1
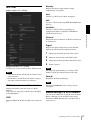
Enable
Select the checkbox to enable the access limit.
SSL Tab
Default policy
Select the basic policy of the limit from Allow and Deny
for the computers specified in the Network address/
Subnet 1 to Network address/Subnet 10 menus below.
Network address/Subnet 1 to Network
address/Subnet 10
Administrating the Camera
Type the network addresses and subnet mask values that
you want to allow or deny access to the camera.
You can specify up to 10 network addresses and subnet
mask values. For a subnet mask, type 8 to 32.
(In the case of IPv6, enter a value between 8 and 128.)
Select Allow or Deny from the drop-down list on the
right for each network address/subnet mask.
Tip
The subnet mask value represents the bit number from
the left of the network address.
For example, the subnet mask value for “255.255.255.0”
is 24.
If you set 192.168.0.0/24 and Allow, you can allow
access from computers having an IP address between
“192.168.0.0” and “192.168.0.255”.
Note
You can access the camera even from a computer having
an IP address whose access right is set to Deny, if you
enter the user name and password set for the
Administrator boxes in the User menu.
OK/Cancel
See “Buttons common to every menu” on page 21.
Configure the SSL or TLS function (called “SSL”
hereafter). The settings allow the camera to
communicate with the client PC by using SSL.
Notes
• The model on sale in China does not support the SSL
function.
• When using the SSL function, always configure the
settings after setting the date and time of the camera.
If the date and time are not correctly set, it may cause
browser connection problems.
42
Setting the Security — Security Menu