1
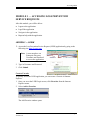
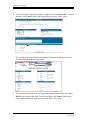
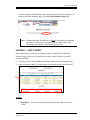
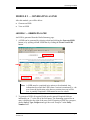
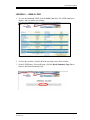
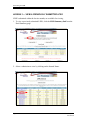
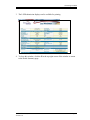
LOSS PREVENTION
SERVICE REQUEST
USER MANUAL
TABLE OF CONTENTS
MODULE 1 — ACCESSING LOSS PREVENTION SERVICE REQUESTS .............. 1
LESSON 1 — LOGIN .............................................................................................. 1
LESSON 2 — LOGOUT .......................................................................................... 3
LESSON 3 — NAVIGATE IN LPSR ........................................................................ 4
LESSON 4 — REQUEST HELP .............................................................................. 4
Module 2 — CREATING A NEW DRAFT ................................................................... 5
LESSON 1 — CREATE A NEW DRAFT ................................................................. 5
LESSON 2 — EDIT A DRAFT ................................................................................. 7
Module 3 — GENERATING A LPSR .......................................................................... 9
LESSON 1 — GENERATE A LPSR ........................................................................ 9
LESSON 2 — VIEW A LPSR................................................................................. 13
LESSON 3 — VIEW A PREVIOUSLY SUBMITTED LPSR ................................... 14
Accessing LPSR
MODULE 1 — ACCESSING LOSS PREVENTION
SERVICE REQUESTS
After this module, you will be able to:
Logon to the application
Logoff the application
Navigate in the application
Request help with the application
LESSON 1 — LOGIN
1. Access the Loss Prevention Service Request (LPSR) application by going to the
following site: http://lp.gaic.com
Note: A user must have an
Enterprise Directory
Username and Password
to access the application.
2. Type in Username and Password.
3. Click Submit.
Create a Favorite
To quickly access the LPSR application, you can create a Favorite in Internet
Explorer.
1. Once you are at the LPSR Login screen, click Favorites from the Internet
Explorer menu.
2. Select Add to Favorites.
The Add Favorite window opens.
© AFG ITServices, 2004
Version 2.0
Page 1
Accessing LPSR
3. Click OK. The website can now be accessed from the Favorites menu.
Create a Shortcut to the Desktop
You can access the website by placing a shortcut on your Desktop.
1. Once you are at the LPSR Login screen, minimize the window, so you can see the
Windows Desktop.
2. Click the
icon in the Address field and drag it to the Desktop.
3. Release the mouse, and the shortcut icon appears on the Desktop. You can now
access the website by double-clicking on the icon.
Page 2
© AFG ITServices, 2004
Version 2.0
Accessing LPSR
LESSON 2 — LOGOUT
1. Click the X in the top, right hand corner of the window or click on the Exit button
to close out the session.
Note: If a user session is inactive for 60 minutes, the session will
automatically terminate and any unsaved information will be lost.
Note: Any information not saved prior to exiting will be lost.
© AFG ITServices, 2004
Version 2.0
Page 3
Accessing LPSR
LESSON 3 — NAVIGATE IN LPSR
Upon successful login, the Draft Summary page displays. If a user has not saved any
drafts previously, the following options will be available:
•
Create New Draft
•
Create New LPSR
Notes: Do not use the Back button to return to previous pages. This action
will cause errors and records may be lost or saved inaccurately.
LESSON 4 — REQUEST HELP
To report problems with the application, or to suggest enhancements, please contact
Nancy Combs at 513-412-4631 or [email protected].
Page 4
© AFG ITServices, 2004
Version 2.0
Creating a New Draft
MODULE 2 — CREATING A NEW DRAFT
After this module, you will be able to:
Create a new draft
Edit a draft
LESSON 1 — CREATE A NEW DRAFT
1. To create a new draft, select Create New Draft on the Draft Summary Page.
The Main Form – New Draft form displays.
Note: Required fields are noted with a {D} to the left of the field name.
Insured Name is the only required field on Drafts.
Note: Coverage is not a required field for drafts. Selecting a coverage will
prompt the application to provide the corresponding coverage form for
the user to make additional entries.
© AFG ITServices, 2004
Version 2.0
Page 5
Creating a New Draft
2. To save the draft or open the selected coverage form, click Save Draft. To cancel
the draft, click Cancel. None of the entries that were made will be saved.
If a coverage was selected, the corresponding coverage form appears. There are
no required fields in the coverage forms.
3. To save the entries made in the coverage form and generate the draft, click Save
Draft at the bottom of the form. To cancel the draft, click Cancel. None of the
entries made in the main form or the coverage form will be saved.
Page 6
© AFG ITServices, 2004
Version 2.0
Creating a New Draft
A status window corresponding to the action requested by the user displays. To
return to the Draft Summary page, click the Draft Summary Page link.
Note: Information saved in draft form will not be forwarded for assigning
until the user selects it to be generated as an LPSR. There is no
limitation to the number of drafts that can be saved.
LESSON 2 — EDIT A DRAFT
Once a draft has been created, it will appear under Saved Drafts on the Draft
Summary page. From here, the draft can be edited, copied, deleted, or used to
generate an LPSR.
1. To select a draft, click the Select radio button to the left of the Insured Name.
2. After selecting the draft, click the button corresponding to the action desired.
Actions
•
Edit Draft – This action will open the draft and allow edits to any of the
fields.
© AFG ITServices, 2004
Version 2.0
Page 7
Creating a New Draft
•
Copy Draft – This action will create a duplicate of the selected draft. The
duplicate draft will appear in the Saved Draft list.
•
Delete Draft – This action will delete the selected draft and remove it from
the Saved Draft list.
•
Generate LSPR – This action will open the draft as an LPSR and require all
the fields to be completed and submitted. The selected draft remains in the
Saved Draft list until the user deletes it.
Page 8
© AFG ITServices, 2004
Version 2.0
Generating an LPSR
MODULE 3 — GENERATING A LPSR
After this module, you will be able to:
Generate an LPSR
View an LPSR
LESSON 1 — GENERATE A LPSR
An LPSR is generated from the Drafts Summary page.
1. A LPSR can be generated by selecting a draft and clicking the Generate LPSR
button, or by opening a blank LPSR form by clicking the Create New LPSR
button.
Note: A LSPR must be completed in its entirety to be submitted. Any
information keyed into the LPSR when a session is terminated (i.e., the
user closes the application or the browser session times out) will be
lost. A partially completed LPSR cannot be saved as a draft.
2. To generate a LPSR, all required fields must be entered. Required fields are
indicated by an “*” to the left of the field name. The formatting required for an
entry is displayed to the right of the entry field. If entering a LPSR for a prospect,
choose Survey Type, Prospect and type the word “Prospect” in the Policy
Number field.
© AFG ITServices, 2004
Version 2.0
Page 9
Generating an LPSR
Note: When selecting a profit center, the profit center can be typed into the
entry field or selected from the drop-down menu. Choosing from the
drop-down menu will populate the entry field with the selected profit
center number. Only the entry contained in the entry field will be used
for processing the LPSR.
3. To select multiple attachments, click on the desired attachments while holding
down the Ctrl key on the keyboard. Selections will be highlighted.
Page 10
© AFG ITServices, 2004
Version 2.0
Generating an LPSR
ATTENTION: You cannot send attachments within the new LPSR. You
must email the attachment to Nancy Combs
([email protected]) when you submit the LPSR. She will
forward it to the representative.
4. To select multiple attachment, click on the desired attachments while holding
down the Ctrl key on the keyboard. Selections will be highlighted.
To designate a Fee Company, select the name of the Fee Company from the Fee
Company drop down box. If the Fee Company is not listed, select Other from the
drop down and then provide the Fee Company Name and Email in the Name and
Email fields.
5. After completing the entries on the main form, click on Continue LPSR. The
coverage form corresponding to the coverage selected on the main form opens.
This form does not contain any required fields.
© AFG ITServices, 2004
Version 2.0
Page 11
Generating an LPSR
6. After completing the entries on the coverage form, click Submit LPSR at the
bottom of the form to submit the LPSR. Once submitted, the LPSR will no longer
be accessible to the user for editing. To make changes to a submitted request,
contact Nancy Combs at 513-412-4631 or [email protected].
Once the submission has been successfully submitted, the LPSR Status –
Successful window displays.
Page 12
© AFG ITServices, 2004
Version 2.0
Generating an LPSR
LESSON 2 — VIEW A LPSR
1. To view the submitted LPSR, click the Print View link. The LSPR submission
displays and is available for printing.
2. To close this window, click the X in the top right corner of the window.
3. On the LPSR Status - Successful page, click the Drafts Summary Page link to
return to the Drafts Summary Page.
© AFG ITServices, 2004
Version 2.0
Page 13
Generating an LPSR
LESSON 3 — VIEW A PREVIOUSLY SUBMITTED LPSR
LPSR’s submitted within the last six months, are available for viewing.
1. To view a previously submitted LPSR, click the LPSR Summary link from the
Draft Summary page.
2. Select a submission to view by clicking on the Insured Name.
Page 14
© AFG ITServices, 2004
Version 2.0
Generating an LPSR
3. The LSPR submission displays and is available for printing.
4. To close this window, click the X in the top right corner of the window to return
to the Drafts Summary page.
© AFG ITServices, 2004
Version 2.0
Page 15