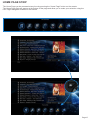
1
User Manual
Based on Firmware V2.0.0
21 November 2011
MED500X2
High Definition Multimedia Player
TM
INDEX
page 1
Index
page 2
Introduction
page 3
General Overview
page 4
Installing a Hard Drive
page 5
Connections
page 6
Connections continued
page 7
TV Output Settings
page 8
Formatting the Hard Drive
page 9
Remote Functionality
page10
Wired Network Connection and Setup
page11
Samba Network Setup
page12
Home Network Samba Server
page13
Wireless Network Setup / Firmware Update / Web Browser
page14
Home Page
page15
Media Library
page16
Media Library Continued
page17
Media Library Metadata Display
page18
Adding Custom Backdrops / Skins
page19
XML Search (Jukebox)
page20
XML Search continued
page21
Media Library Music Player
page22
Cover Art Preview in Media Library
page23
Play Folder / Play from Cover Art / Watched Indicator
page24
Media Scanner
page25
Folder Lock/ System Lock
page26
Favourites Manager
page27
Adding genre artwork to Favourites / Lock/Unlock Favourites
page28
Play Info Search / GOTO / Apha Jump
page29
Screen Calibration / Video Zoom
page30
Subtitles / Custom Fonts
page31
File Manger
page32
File Manager Continued
page33
Picture View Media Library
page34
Plasma Mode / Autoplay / Internet Streams / Web Browser
page35
NFS Setup
page36
Transmission BT Downloader
page37
Setup Menu
Page1
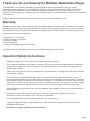
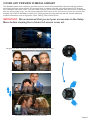
Thank you for purchasing the Mede8er Multimedia Player.
The MED500X2 is the latest generation multimedia player specially developed by Sanji for today’s
demanding media enthusiast. The Mede8er has some very unique features so we suggest you read this
guide and visit the Mede8er forum for additional help and information. The firmware is always “work in
progress” so we suggest you regularly check the Mede8er forum for updated firmware releases and updated
User Manuals.
Please check the Mede8er forum for the latest user guide. www.mede8erforum.com
Warranty
Mede8er products carry a 24 month from date of purchase warranty. In the event of warranty service please
provide proof of purchase. Return your product to the store that it was purchased from or return it directly to
Sanji Electronics (Pty) Ltd 68 Kyalami Boulevard, Kyalami Business Park, Kyalami, Gauteng, South Africa.
Warranty does not cover damage by
a) Lightning or over voltage
b) Water damage or liquid spill
c) Misuse or abuse
d) User tampering
e) Using non Mede8er approved Firmware
Sanji Electronics is not responsible for any loss of data irrespective of the cause.
Important Safety Instructions
·
Read these instructions for all components before using this product.
·
Do not use this apparatus near water or moisture. Do not use this product near a bathtub, washbowl,
kitchen sink, laundry tub, in a wet basement, near a swimming pool, or anywhere else that water or
moisture are present.
·
Clean only with a soft dry cloth and as directed by the manufacturer. Unplug this product from the wall
outlet before cleaning.
·
Do not block any ventilation openings. Install in accordance with the manufacturer instructions. To
ensure reliable operation of the product and to protect it from overheating, put the product in a position
and location that will not interfere with its proper ventilation. For example, do not place the product on
a bed, sofa, or similar surface that may block the ventilation openings. Do not put it in a built-in system,
such as a bookcase or a cabinet that may keep air from flowing through its ventilation openings.
·
Do not install near any heat sources, such as radiators, heat registers, stoves or other apparatus that
produce heat.
·
Protect the power cord from being walked on or pinched, particularly at plugs, convenience
receptacles, and the point where they exit from the apparatus.
·
Only use attachments or accessories specified by the manufacturer.
·
Unplug this apparatus during lightning storms or when unused for long periods of time to prevent
damage to this product.
Refer all servicing to qualified service personnel
Page2
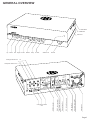
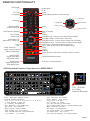
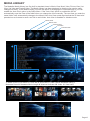
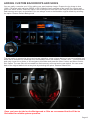
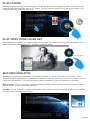
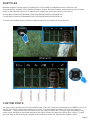
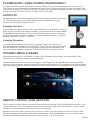
GENERAL OVERVIEW
USB Slave
USB Host
SD Card
Up Down Left Right Enter
Return Stop TV Out
Status Led
On/Off
R
Analogue Audio Out
L
Cooling Fan
PCIe WiFi Antenna
*
USB Host Port
DC - 12Volt 2 Amp input
Optical Audio Out
RJ45 - Lan connector
Coax Digital Audio Out
Component Video
Out
HDMI connector
Composite Video Out
Page3
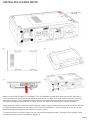
INSTALLING A HARD DRIVE
Lift cover from
this side
a)
b)
c)
d)
Make sure that the DC cable is unplugged. Turn the Mede8er upside down and unscrew the hard drive
cover screws x and y. Lift the hard drive cover and remove it, place it on a flat surface with the mounting
tabs facing upright. Fit a compatible SATA hard drive into place with the label facing upwards and the
connectors facing the side with the air vents. Secure the hard drive with the four screws provided.
Check that the Hard Drive has the correct jumper setting. Connect the hard drive power connector and the
red SATA data connector from the player to the hard drive diagram c. Re fit the hard drive cover into the
Mede8er body and tighten the two securing screws x and y.
To reduce hard drive vibration noise you can use optional Neoprene pads. Just peel of the adhesive side
and stick onto the base as indicated in diagram d.
Page4
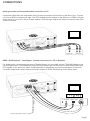
CONNECTIONS
Analogue Audio and Composite Video connection to TV.
Composite Video offers the most basic picture quality connection and should only be used if your TV does
not have a HDMI or Component input. Use RCA analogue audio outputs in the absence of HDMI or Digital
Audio inputs on your TV or Home Theatre system. RCA analogue outputs will output a downmix from mutlichannel to stereo.
VIDEO IN
L R
AUDIO IN
HDMI - RJ45 Network - Coax Digital - Toslink Connection to a TV or Amplifier
For digital audio connection to your Home Theatre System you can either use the TOSLINK Optical or the
Co-Ax Digital output. The MED500X2 supports both Passthrough and Downmix for both Dolby Digital and
DTS signals. If you want your Home Theatre Amplifier to decode the surround sound stream you should
use either Digital Audio output and set the Audio Output to SPDIF Passthrough in the Setup menu.
Coax Digital Optical Digital
HDMI
Connect LAN cable to router or switch
Page5
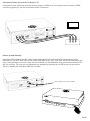
Component Video Connection to Amp or TV
Component Video offers the next best picture quality to HDMI so if your system does not have a HDMI
input we suggest you use the Component Video Connection.
Pr
Pb Y
Power up and Standby
Plug the AC/DC adapter into the mains outlet and plug the DC Jack into the DC IN at the rear of the
MED500X2. DO NOT USE ANY AC/DC ADAPTER AND ONLY USE THE ONE SUPPLIED otherwise you
may cause damage to the unit. Press the On/Off button on the Mede8ers front panel and front facia LED
will turn on Blue. You can put your Mede8er into standby by pressing the On/Off button on the remote.
When in standby the front facia LED will turn Red.
Multi Voltage AC/DC Power Adapter
Page6
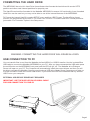
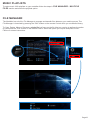
TV OUTPUT SETTINGS
Connect the Mede8er to your TV by one of the connection options as shown on page 6 & 7 and change the
input option on your TV to match the option you selected. If you do not get to see the Mede8er GUI on your
TV you will need to toggle the Mede8er TV output until you get a picture.
TV SYS Toggle Procedure
The Mede8er has three video output options ie Composite Video
(yellow RCA connectors, Component Video (Red - Green- Blue
connectors) and HDMI. Each output option also offers different
screen resolution settings and these will need to be adjusted to
match the type of TV used.
To change the Video Output on the
Mede8er just press the TV SYS
button on the remote and it will
change the Video Output to the
next available output option. If after
pressing the TV SYS button you still
do not get a picture then after a
short pause press the TV SYS
again until you see the Mede8er GUI on
your TV. Keep repeating this procedure until you
see a picture on your TV.
Once you see the Mede8er GUI on your TV then you must enter the Video Setup
mode and adjust the Video settings to match the screen size resolution of your
TV.
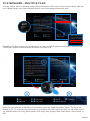
AUDIO SETTINGS
Surround Sound
Select “Don’t Care” if you are using 2 CH stereo. If you are using SPDIF or Co-Axial Digital then
select “AC3". If you are using HDMI Audio to Aamplifier then select “True HD”
HDMI Downmix (2 channel)
Use this setting if you are connecting the Mede8er directly to the HDMI input on your TV. The
sound will be downmixed to 2 channel stereo.
HDMI Passthrough
Use this setting if you are connecting to the HDMI input of a Home Theatre Amplifier. The audio will be
passed through as Bitstream or LPCM and the amplifier will do the multichannel decoding.
HDMI LPCM MULTI CH
Use this setting for content that has a 6 channel AAC soundtrack.
SPDIF Downmix (2 channel)
Use this setting to connect to a Amplifier via Toslink optical cable or Co-Axial Digital RCA cable.
The sound will be downmixed to 2 channel stereo.
SPDIF Passthrough
Use this setting to connect to amplifier via Toslink optical cable or Co-Axial Digital RCA cable.
The sound will be passed through as Bitstream or LPCM and the amplifier will do the
multichannel decoding.
Page7
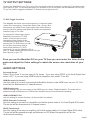
FORMATTING THE HARD DRIVE
The MED500X2 has a built in Hard Drive format feature that formats the hard drive with a main NTFS
partition and other small internal partitions for propriety use.
The Hard Drive should be formatted in the Mede8er MED500X2 to ensure full functionality. A pre formatted
Hard Drive can be used but you may not be able to use all the internal features of the MED500X2.
To Format the internal Hard Drive select SETUP menu and then HDD Format. The Hard Drive format
function can be protected by the built in “Pin Code Lock” function. To enable Hard Drive Format protection
just enable “Pin Protection” option in the Setup menu.
Formatting ...
WARNING: FORMATTING THE HARD DRIVE WILL ERASE ALL DATA
USB CONNECTION TO PC
You can transfer files to and from the Mede8er via fast USB2.0 or USB3.0 transfer. Use the included Blue
USB cable to connect the Mede8er MED500X2 to your PC. After you have connected the USB cable press
the on/off button on the MED500X2 front panel and the LED will go “off’. The Mede8er drive Dialogue
Screen will open on your PC. The Computer will automatically install the correct drivers and then you will
be able to navigate the Mede8er like any normal external USB drive. Note: Some Computers may take up
to a few minutes to install the correct USB drivers. If you cannot connect to the Mede8er than try another
USB Port on your computer.
EXTERNAL USB DEVICE DRIVER NOT REQUIRED
IMPORTANT: USE THE SUPPLIED BLUE USB3.0 CABLE
FOR USB CONNECTION TO YOUR PC
Page8
REMOTE FUNCTIONALITY
DVD Angle
On / Off
TV System
Audio Mute
A-B
Setup
Media Library Shortcut - Devices Page
Volume Up
Numbers
Fast Forward
Fast Rewind
Repeat Shuffle
Volume Up/Down
Fast Forward / Rewind
Play / Pause
Home Page
*Navigation Left
Search Bar - Video File
Menu
Edit
Audio Selection /
Audio Currently Playing
Skip Forward/Back
Web Browser
Toggle Scroll Bars
& Hyperlink select
Web Browser
Toggle Address Bar
Start dBase Scan
Pause / Play
Slow
Volume Down
Next / Previous
Stop
Return
Navigation Up - Volume Up in Video File (not DVD)
Navigation Right - Search Bar - Video File
Navigation Enter - Pause / Play in Video File (not DVD)
Navigation Down - Volume Down in Video File (not DVD)
Info Screen / Movie Sheet (about.jpg) Zoom
View - Change the layout view in Media Library
Goto
Zoom
Subtitle
Setup Functions / Browser Functions / Edit Functions
Favourites Shortcut button
Edit Text - Internet Browser
USB Keyboard Function Keys (based on MEDX2KEY)
TM
Back
Light
Play/
Pause
Return
Enter
Info/
About
ESC: RETURN SPACE: PLAY
ENTER: SELECT(ENTER)
'0': 0 '1': 1 '2': 2 '3': 3 '4': 4 '5': 5 '6': 6 '7': 7 '8': 8 '9': 9
'-': VOL_DOWN '+': VOL_UP
'P' + 'SHIFT' : POWER OFF
'R(r)': REPEAT 'T(t)': SUBTITLE
'I(i)': INFO 'A(a)': AUDIO
'G(g)': GOTO 'H(h)': HOME
'Z(z)': ZOOM '/(?)': Info / About
‘’Ctrl’ : ZOOM YouTube, Internet Browser
',(<)': FRWD '.(>)': FFWD
’Ctrl’ - ZOOM
YouTube,
Internet Browser
'F(f)': Favourite 'E(e)': EDIT
'M(m)': MENU 'S(s)': Setup
'V(v)': View 'L(l)': AB
'\(|)': SLOW '’ (”)': STOP
'/(?)': Info / About '[({)': Back Skip
'](})': Forward Skip 'W(w)': Launch Web Browser
'B(b)': Browser - Devices
'Alt': Mute 'FI': Red button
'F2': Green button 'F3': Yellow button
'F4': Blue button 'F5': TV Sys
'F6': Previous Chapter 'F7': Next Chapter
Page9
WIRED NETWORK CONNECTION AND SETUP
The Mede8er MED500X2 can be connected to your local network by means of a RJ45 CAT5 cable. The
Mede8er is supplied standard with a UPnP facility, Samba Client and NFS that allows connection to your
local area network via a router or switch. You can share media files from your PC and stream media content
to the Mede8er and you can use the Mede8er as a Media Server to stream media content to other
Mede8er’s on your network.
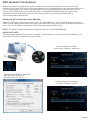
Press the “setup” button on the Mede8er Remote or select “setup” tab on the home page. Select “Network”
option in the setup window and press “OK” to confirm. Network configuration allows for either automatic or
manual IP setup.
Follow the on-screen instructions to complete the network setup.
If you connect to a wired Ethernet network using DHCP, Mede8er automatically detects your network.
Alternately you may have to enter your IP address, subnet mask, router, and DNS addresses manually.
DHCP IP (AUTO)
Choose this option if you want your router to assign a dynamic IP address to Mede8er. This option is easy
to use and recommended for normal users.
FIX IP (MANUAL)
This option allows you to assign a static IP address to Mede8er. This option requires modifying network
settings of the Mede8er and is recommended for advanced users. To set a Static IP for your Mede8er, enter
the information IP Address, Subnet Mast and Gateway and DNS Server Address as relevant to your router
as in the screen below.
DHCP IP Auto
Fixed IP Manual
Page10
SAMBA (Network Setup)
If your PC or NAS has shares setup to specific users then you will need to setup a
shortcut on the X2 to each machine and specify the IP, Username and Password
Setting up Samba shortcuts on the Mede8er
Select ‘Network’ and then select the ‘My_Shortcuts’ icon. Now press the ‘Menu’ button
and select ‘Add New Shortcut’ option. Fill in the fields User Name, Password, IP
Address (Host Machine), and select ‘OK’
NOTE: In order to browse your secure shares you will have to enter
‘My_Shorcuts’ and then select the Shortcut/’s that you have setup.
PUBLIC SHARES
For Public Shares (shares that do not have a Username and Password) just use the name ‘Guest’ for
username and password.
Page11
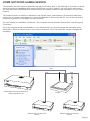
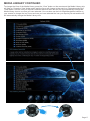
HOME NETWORK SAMBA SERVER
The Mede8er has NAS (Network Attached Storage) functionality built in. And although it is limited in transfer
speed compared to standalone NAS servers it performs very well if speed is not your major requirement.
You can also use the MED500X2 as a Media Server and stream content to other Mede8er’s on your home
network.
The Samba function is enabled or disabled in the System menu under Network. Should the Samba stop
working for any reason we suggest you re-boot the Mede8er ie Disconnect the DC Jack at the rear and re
connect and press the on/off button on the front panel.
You can browse your Mede8er in Windows - My Computer then My Network Places then View Workgroup
Computers.
If you are using more than one Mede8er on your Network then you should change the Hostname in the
Setup Menu. Each X2 should have its own unique Hostname. You must reboot the X2 after changing the
Hostname.
Cat5
Cat5
MED500X2 with internal Hard Drive
acting as Media Server
Mede8er without Hard Drive
Room1
Cat5
Router
Mede8er without Hard Drive
Room 2
Page12
WIRELESS NETWORK SETUP (basic)
The Mede8er MED500X2 is only compatible with the Mede8er Wireless Dongle MED10WFB USB WiFI
Dongle / MED20PCIe PCIe WiFi Kit. (Other brands will not work)
Refer to User Instructions supplied with the Mede8er dongle for detailed wireless connection setup.
Only use model MED10WFB WiFi Dongle as it is supplied together with the USB extension cable base.
WIRELESS NETWORK CONNECTION
Plug the MED10WFB into the USB extension base that
was supplied with your Mede8er. Plug the USB cable
into one of the USB host ports on the side of the
Mede8er. Extend the cable and try to place the base in
a position that is away from any metal object that could
effect the RF signal strength. The best placement for
the dongle will depend on your particular environment. In order to get the best placement you may need to
extend the length with an additional USB extension cable.
Note: The draft N standard prohibits using High Throughput with WEP or WPA2-PSK TKIP as the unicast
cipher, and your data rate will drop to 54 Mbps (802.11g) which is normal. Please try other encryption methods
(WPA-PSK), or choose to configure an unsecured profile.
The operating distance or range of your wireless connection can vary significantly based on the physical
placement of the Router and the WiFi Dongle.
For best results, place your Router:
* Near the center of the area in which your Mede8er will operate,
* In an elevated location such as a high shelf,
* Away from potential sources of interference, such as PCs, microwaves, and cordless phones,
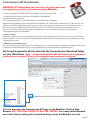
FIRMWARE UPDATE
Download the latest Mede8er Firmware from www.mede8erforum.com. UnZIP or UnRAR or join with HJ Split
and will find one file named install.img. Copy this file to the root directory of a Flash Drive. Plug the flash drive
into the Mede8er.
DO NOT REMOVE POWER DURING THE EMERGENCY RECOVERY PROCEDURE.
Setup Menu Update with Auto Configuration Restore
Open the Setup Menu and select the “Misc” tab. Now select USB upgrade option. After +- 5 sec the screen
will display the current Firmware Version and the New Firmware Version. You will have the option to select
“OK” or “Cancel”. Select “OK” and the Mede8er will reboot within +- 1 second and start the update process will
start in +- 10 seconds. During the update process the front facia Blue LED will flash and you will see the
version of the Firmware and the install progress bar on your TV screen. After the update is complete the
Mede8er will reboot with the new firmware installed.
If the Mede8er does not reboot within 5 seconds
(after pressing the "Enter" button) then press the
"Home" button to initiate
Power Up and hold on/off button
for 15 seconds
Emergency Method (Resets Configuration to
Default)
Disconnect the power jack at the rear of the Mede8er then plug it back in - Now
press the on/off button and hold it pressed for 15 seconds and then release.
After approximately 15 seconds the LED on the Mede8er with flash blue and you will get a progress bar on
your TV display (some TV's will not display this) wait until the Mede8er re boots itself +- 60 sec. Your Mede8er
is now updated.
Page13
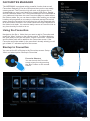
HOME PAGE
The Mede8er Home is the central point where you can launch all the user applications. Press the Right/Left
Navigation buttons on the remote to navigate the Home Page and press “Enter” to launch the selected
page.
FAVOURITES
Create, manage, apply Genre cover art to local and network folder
shortcuts.
MEDIA LIBRARY
In Media Library you can browse all your media content on your Hard
Drive, SD Card, USB Devices and Network and launch the built in File
Manager to manage and transfer your content.
MOVIE DATABASE SEARCH (HDD & USB only)
The Movies Database Search page will display all information about
Video Files and allow you other functionality such as search, most
viewed and recently added.
MUSIC DATABASE SEARCH (HDD & USB only)
The Music Database Search page will display all information about
your Music Files and allow you other functionality such as Search and
filtering options such as sort by -- Albums, Artists, Genres, Year and
access to Playlists.
PICTURES DATABASE SEARCH (HDD & USB only)
The Pictures Database Search will display all information about your
Pictures and Images and allow you other functionality such as Search
and filtering by recently added and recently viewed.
INTERNET MEDIA
The Internet Media page contains all the Internet Media such as Web
Browser, Social Media, YouTUBE, Flicker etc
SETUP
The Setup page is the area where you personalize the setup option for
your needs
Page14
HOME PAGE STRIP
The Home Page can be accessed at any time by pressing the “Home Page” button on the remote.
The Home Page Strip will appear at the bottom of the page and allow you to make your selection using the
Left / Right Navigation buttons on the remote.
Page15
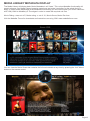
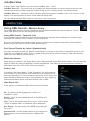
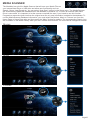
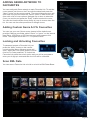
MEDIA LIBRARY
The Mede8er Media Library has five built in standard views ie Movie View, Music View, Picture View, List
View, List View and Preview View. The Media Library has been designed so that the view can be easily
changed on the fly. In the Media Library you have the option of changing the Views Manually or you can
enable the ‘Auto View’ option in the Setup Menu. If the ‘Auto View’ option is enabled the X2 will
automatically save the View of the folder when you change the View manually. The next time you enter the
same folder it will automatically change to the saved View. Auto View mode requires that the X2 has ‘write’
permissions as it needs to save a xml file to each folder. Auto View is disabled in Jukebox mode.
Movie View
Music View
Picture View
List View
Preview View
1
4
2
9
3
5
7
6
8
10
11
1. Media Icons 2. File Name 3. Focus Bar 4. Scroll Bar 5. Folder Path 6. Metadata Rating 7.
Metadata Genre 8. Metadata Movie Length 9. Watched Indicator 10. Index 11. View Icons
Movie View
Music View
List View
Picture View
Preview View
Page16
MEDIA LIBRARY CONTINUED
To change the View of the Media Library press the “View” button on the remote and the Media Library strip
will light up. Press the ‘View’ button again and the focus will change to the next icon. Repeat pressing the
‘View’ button until the icon you require is selected and then wait and the X2 will automatically change the
Media Library view to one one you have selected. You can also use the Left /Right Navigation buttons on
your remote to change the icon focus and one you have selected the icon you require just wait and the X2
will automatically change the Media Library view.
Page17
MEDIA LIBRARY METADATA DISPLAY
The Media Library will display basic Movie Metadata in all ‘Views’. This unique Mede8er functionality will
greatly enhance your Media Library browsing experience and make it real easy for the whole family to
enjoy. In order to take advantage of the advanced functionality you will need to scan your movie collection
with Y2M (YAMJ to Mede8er) or Thumbgen in order to create the required xml files.
Movie Rating - stars out of 5, Movie rating - x out of 10 , Movie Genre, Movie Run time
Visit the Mede8er Forum for downloads and instructions on using Y2M. www.mede8erforum.com
You can view the Movie Sheet that contains the full movie details at any time by pressing the “Info” About
button on the remote control.
Page18
ADDING CUSTOM BACKDROPS AND SKINS
You can easily customise your X2 by adding your own backdrop image. Prepare the jpg image to size
1280 x 720 pixels with max size 500KB. In the X2 Media Library navigate to the image you require and
press the ‘Menu’ button. Select the option ‘Set to Background’ and the x2 will load your new backdrop into
flash memory and use it as its default. You can always revert to the Mede8er original default by selecting
the option ‘Restore Default Background’
The skin option is community driven and we are expecting some unique designs to become available and
these will be available for download from the Mede8er forum and website. To load a skin -- just download it
and unzip /unrar it to a folder. In X2 navigate to this folder and press the ‘Menu’ button and select ‘Add to
Skin Option’ The new Skin will be loaded into flash memory and used as the new default. You can revert
back to the original default skin at any time by selecting the option ‘Restore Default Skin’
Once you have decided on the Background or Skin we recommend that the X2 be be
Re-booted for reliable system operation.
Page19
XML SEARCH (JUKEBOX FUNCTION)
The X2 has a built in XML Search facility that will allow you to sort and arrange your Video Files by pre
defined xml filters. The XML Search can be used with content on the Internal Hard Drive, External USB Hard
Drive, Samba Network and NFS Network.
Library Preparation for XML Search operation
The Media Library must conform to the Mede8er standard with all the relevant movie file information in its
own folder. A typical folder will contain - Video File - Folder.jpg - About.jpg - XML File - Subtitle file. Once you
have arranged your Video Collection into individual folders you can use Y2M (YAMJ To Mede8er) or
Thumbgen to scan the folders to make the requires images and xml files.
Scanning your Library
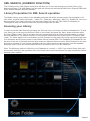
In order to provide XML Search functionality the X2 must scan your library and build a Database file. To scan
your library you must focus on the Root Folder of your library and press the ‘Menu’ button and then select
the ‘Scan Folder’ option. The X2 will start the scan process and Scan all folders and sub folders in order to
build the dBase file. The Search criteria is to only include folders that have a valid Y2M or Thumbgen XML
inside. The folder depth level is not limited in the X2 firmware but the path of the string cannot be longer than
512 characters and the max number of sub folders cannot exceed 4096. The Database file ‘Mede8er.db’ will
be save to the root of the folder that has been scanned. Network shares must be ‘Write Enabled’ for the scan
process to complete. If new content is added to the root folder then the scan operation must be repeated.
Scanning time is quick and it should take about 30 seconds to scan over 300 video files.
Note: The Maximum amount of Movies in one Database is currently +- 1000. If you scan a library with more
movies than 1000 then the operation of the xml Search can become erratic and you may experience that the
Mede8er often crashes.
Page20
JukeBox View
In Setup under ‘Misc Options’ you can select JukeBox View -- on/off
JukeBox View ‘off’ - Favourite Links to a Jukebox will be presented in a normal structure and you can
navigate the scanned Folders and Sub Folders folder as you normally would in the Media Library.
JukeBox View ‘on’ - Favourite Links to Jukebox will be presented in JukeBox View ie 16 Covers in a flat
display. The internal folder structure of the folder will be ignored.
You can add a scanned XML Folder to Favourites in the normal way.
Using XML Search - Media Library
To use the XML Search you must navigate to the root folder that was scanned and open it. You will
see a XML Search icon on the top right of the screen.
Using XML Search - Favourite Link
If the Jukebox was launched from a Favourite link then the contents will be displayed in Jukebox Style
(provided the Jukebox View in enables in the Setup Menu.
If you see the Search Icon top right of the screen you then have Jukebox functionality. Press the Menu
Button and you will have a choice of XML Search option.
Sort Search Results by Latest / Alphabetically
You have the option to have the Search results filtered by ‘Latest’ ie the date you added the movie to your
collection or in Alphabetic order. This is a global setting and will be stored in memory. After selecting this
option you must then do a XML Search.
Watched Indicator
If this option is enabled in the Setup Menu then it will then show on the XML Search Menu. You will have the
option to Mark the Video as Watched / Unmark as Watched. The Video file will automatically marked as
Watched if more than 10% of the Video was watched.
Folder Lock
If enabled in the Setup Menu ( Folder Protection) You will be able to
lock any Movie in the Jukebox. Just select the ‘Lock’ option and the
Movie will be locked. To unlock the Movie just focus on the cover and
press the Menu Button and select ‘Unlock’ then enter your 4 digit pin
code and the Movie will be unlocked. Default code is 0000
Hide Movie Info
If this option is selected the XML Movie Info will be hidden
All - All content will be displayed by ‘Latest’ or in
‘Alphabetic’ order.
Genre - list of all the available Genres in the dBase will
be displayed.
Year - This is the release date of the movie. A list of all the
‘Years’ ie release dates in the dBase will be displayed.
Star Rating - The star rating is the IMDB users rating for
the movie.
Alpha Search - Use the Alpha buttons on the remote. An
Alpha search can be conducted within a dBase XML
Search.
Page21
MEDIA LIBRARY - MUSIC PLAYER
Select any supported music file and the Music Player Screen will launch. If the music file has embedded
information tags and images then these will be displayed on the right hand side in the preview window area.
If you do not want to use embedded mp3 art or you are using .m4a, ape or flac files you can save the Album
Cover as a jpg file named ‘folder.jpg’ to the Music Album Folder and the X2 will use it if it does not find any
embedded art in the music files. Suggested size of the embedded art is 250 x 250pixels.
Currently Playing - Music
Shortcut
The currently playing shortcut will take you back to the
Music Player and display the music that is currently
playing.Press the ‘Audio’ button for the Currently
Playing functionality.
Current Track Time
OFF - Repeat and Shuffle off
Total Track Time
or
Repeat Track - Repeat the current track
Repeat All - Repeat all tracks in the folder. Shuffle off
Shuffle - Shuffle all tracks in the current folder
Page22
COVER ART PREVIEW IN MEDIA LIBRARY
The Mede8er has a built in facility to preview cover art and it will automatically read the folder.jpg and the
about.jpg inside the movie folders. All you need to do in order to use this very useful feature is to arrange
your collection with each video, in its own folder. Place a JPEG picture together with each movie in the folder
and you will be ready to go. You can easily download DVD cover art for your picture or you can use the free
program like YAMJ to Mede8er to make your folder.jpg and about.jpg pictures that will contain additional
content information such as Synopsis, Cover, Rating, Year, Actors etc etc
IMPORTANT: We recommend that you set your screen size in the Setup
Menu before viewing the in folder full screen cover art.
Navigate to a folder. The image will be displayed in the preview window.
To view the preview in full screen press the Info / About button.
Press the Nav Up/Down to browse by cover art
Page23
PLAY FOLDER
Mede8er allows you to play a video file within a folder without the need to open the folder. Just focus on the
required folder and press the ‘Play’ or ‘FF’ button. The first video file found in the folder will be played. The
folder play will only work with video files.
PLAY VIDEO FROM COVER ART
With Mede8er you can play the video directly from the cover art. Zoom the about.jpg by pressing the ‘Info /
About’ button then press ‘Play’ or ‘FF’ or ‘Enter’ to play the video.
Play or Enter
WATCHED INDICATOR
Mede8er is equipped with a watched video indicator feature. To enable this function go to Setup -- Misc -Watched Indicator and switch it on. Mede8er will mark the Video file with a eye icon once more than 10% of a
video has been watched. You can also mark a video as watched or clear the watched icon manually.
Media Library - Focus on the file or folder and press the ‘EDIT’ button on the remote control and you will be
able to add or remove the watched indicator.
JukeBox - Focus on the file or folder and press the ‘Menu’ button on the remote control and you will be able
to add or remove the watched indicator.
Watched Indicator
Page24
MEDIA SCANNER
The Mede8er has a built in Media Scanner that will scan your Media Files on
your internal Hard Drive or USB drive and allow user functionality such as
Search, Genre, Last Played etc. You can select “Auto Scan” options in the Setup menu. The Media Scanner
will automatically update the database when the Mede8er is powered “on” or when an external USB Hard
Drive is connected. It is important to let the scanner complete the scan if you intend to use this function.
Progressive scans take less time than the original scan as only new information is added to the database. To
use the Media Scanner Database information, you must select the Movies, Music or Pictures icon from the
Home Page or Home Page strip and then press the “Menu” button for options. The corresponding Search Icon
will be shown on the Media Library when you are in Media Search Mode. The View can be changed as normal.
Movies
Music
Pictures
Page25
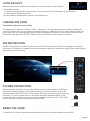
LOCK FACILITY
Mede8er has a built in Lock facility designed to restrict access to certain folders.
Lock facility functions
a. System access areas such as Hard Drive Format screen and File Manager. (Pin Protection)
b. User Folders (Folder Protection)
You can enable or disable these options in the Setup menu
CHANGE PIN CODE
The default 4 digit Pin Code is 0000.
To change the Pin Code go to Setup -- Misc -- Password -- You will be prompted to enter the existing pin
code. For the first time you must enter the default factory pin ie 0000 then the Pin Code change screen will
open. Now enter you new personal 4 digit code by pressing the numbers on your remote. Once you have
entered the code press the “ENTER” button on the remote and the new code will be saved.
PIN PROTECTION
Enable Pin Protection to protect access to the Hard Drive Format area and the File Manager functionality.
Once the Pin Protection is enabled you will be prompted to enter your personal 4 digit pin code when trying to
gain access to these screens.
FOLDER PROTECTION
Folder protection will allow you to protect folders on the Local Hard Drive, USB Drive,
SD Card or Network Shares (write enabled shares). To protect a folder focus on the
folder and press the EDIT button on the remote. Select the Lock icon and the folder will
be locked. To unlock a folder focus on the folder and press the Menu button on the
remote. Select the Unlock icon and you will be prompted to enter your Pin Code. After
the correct code is entered the folder will be Unlocked
Lock Folder
Unlock Folder
RESET PIN CODE
To reset the Pin Code re-install the latest firmware and the Pin Code will default back to 0000
Page26
FAVOURITES MANAGER
The MED500X2 is equipped with a powerful function that we call
Favourites. Basically it is a list of Shortcuts that you the user easily
create yourself. The Favourite Link will work as a shortcut link to
shared folder on your Local Hard Drive, hosted USB Drive, Samba
and NFS Network Share. Our Favourites Manager will consolidate all
your paths and links them into one Favourites page no matter where
the folders reside. So you can have multiple links residing on multiple
locations all presented on one easy to read and manage Favourites
page. Once the Favourite link is launched you will be presented with
all of the folders contents in its normal native structure irrespective of
the folder level depth. You can also easily remove a Favourite Link at
any time should you wish to do so.
Using the Favourites
Navigate to the file or folder that you want to add to Favourites and
press the “Menu” button on the remote control. The Menu dialogue
will open and you will see the option “Add to Favourites”. Select this
and the folder path will be added to the Favourites screen. If the
Favourite cannot be added (in the case that it already exists) you will
get a failed “X” indicator top left of the screen.
Bootup to Favourites
You can set the X2 to Bootup to the Favourites screen. Setup --->
‘Misc’ and select option ‘Bootup to Favourites’
Favourite Shortcut
You can launch the Favourite
screen at any time by pressing
the “Blue” button on the remote
control.
Page27
ADDING GENRE ARTWORK TO
FAVOURITES
You can easily add Genre artwork to each Favourite link. To add the
cover artwork just focus on the Favourite thumbnail and press the
“Menu” button on the remote control. The menu dialogue screen will
open and now you can select the “Genre” option. A new screen will
open with a list of cover options. Navigate up or down to select the
cover you require and press the “Enter” button to select the cover.
You can also use the Alpha Jump facility to jump to covers down the
list. You can use the same procedure to change covers.
Adding Custom Genre Art To Favourites
You can use your own Genre covers instead of the default ones
provided. Make a new folder called “Genre” or “genre” on the internal
Hard Drive, USB Drive or SD Card and copy png images to this
folder. The images should be 117 x 172 pixels in size.
Locking and Unlocking Favourites
To password protect a Favourite link just
press the “Menu” button on the remote
control and the Menu dialogue screen will
open. Select the Lock option and the link will
now be Pin Code protected. To Unlock the
Favourite link select the unlock option and you will be prompted to
enter your 4 digit pin code and then the Link will be unlocked..
Scan XML Data
You can scan a Favourite link to build or re-build a XML Data dBase.
Page28
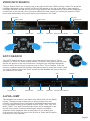
VIDEO INFO SEARCH
The Info Search allows you to easily jump to any part of the video. While viewing a Video File press the
Left/Right Navigation button and the Info Screen will appear on the top of the screen. Now press the
Left/Right Nav and a red bar will move left or right and with the corresponding Time position displayed in
number text on the left side. Once you have reached the time search you require juts press the “Enter”
button and the Mede8er will jump to the time you selected in the Video.
File name
Title info
Audio codec
Current time
Video codec
Search time
Time bar
Chapter info
Total time Search time indicator
Repeat status
GOTO SEARCH
The GOTO Search allows you to easily jump to a specific time point or Title or
Chapter in a Video file. While viewing a Video File press “Goto” button and the Goto
Screen will appear on the top of the screen. Now press the Left/Right Navigation
button to select the function you require such as Time, Title or Chapter. Once the
function is selected press the Up/Down Navigation button to select the numeric value
you require and then press the “Enter” button and the Mede8er will jump to the time
you selected in the Video.
Time
Current time
Search time
Title
Time bar
Total time
Chapter
Search time indicator
ALPHA JUMP
The Mede8er has a easy to use Alpha Jump facility built into the Media
Library. The Alpha Jump enables you to quickly jump to files and
folders in your Media Library. Navigate to the Media Library and press
one of the Alpha buttons on the remote control ie ABC, DEF, GHI, JKL,
MNO, PQRS, TUV, WXYZ and the Alpha letter will be displayed on the
top left of the screen. Press the button again and the next Alpha
character will be displayed. After a short pause of you making your
final selection the focus will jump to the first file or folder with the Alpha
character you have selected.
Page29
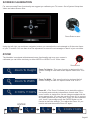
SCREEN CALIBRATION
For more accurate Zoom functionality we suggest you calibrate your TV screen. Go to System Setup then
Video and select Screen Size.
Press Enter to save
Using the left, right, up and down navigation buttons you can adjust the red rectangle to fit the outer frame
of your TV screen. You can then do a fine adjustment to move the red rectangle so that it is just not visible.
ZOOM
The Mede8er is equipped with advanced zoom functionality and once your screen is
calibrated you can zoom intuitively to either WIDTH or HEIGHT or XY of the video.
Zoom in/out
Zoom To Height
Zoom To Width
X:100% Y:100%
ENTER
OFF
W
Zoom To Height - This zoom function is designed for full
screen viewing of ultra wide screen aspect videos on a 16:9
TV.
Zoom To Width - This zoom function is designed for full
screen viewing of older 4:3 aspect videos on a 16:9 TV.
Zoom XY - The Zoom XY allows you to stretch the picture
horizontally and vertically independent of each other. This
zoom function is designed to correct videos encoded with the
wrong aspect ratio. You can also use the Zoom XY to zoom to
any zoom preference you may have. Once you have selected
your X and Y percentage press the ENTER button on the
remote to store the settings. To re-adjust the Zoom XY you
need to exit and then select Zoom XY again.
H
X:100% Y:100%
Page30
SUBTITLES
Mede8er supports various types of subtitle files. If the subtitle is embedded into the video file it will
automatically be available on the Subtitle Dialogue Screen. External Subtitles must be placed into the same
folder as the video file and must be named to be exactly the same name as the video file eg
Cloudy.With.A.Chance.Of.Meatballs.2009.720p.BluRay.HebDub.x264-WiKi.mkv
Cloudy.With.A.Chance.Of.Meatballs.2009.720p.BluRay.HebDub.x264-WiKi.srt
Subtitle Colour
Subtitle Language
Subtitle Time Sync
Subtitle Size
Subtitle Position
Subtitle Select
To access the Subtitle screen press the Subtitle button on the remote during video play.
CUSTOM FONTS
You can easily customize the GUI and Subtitle fonts on the X2. Fonts must be smaller than 500KB in size. For
the GUI font select a fft font and rename it to ‘gui.fft’ - For the Subtitle font select a ttf font and rename it
‘Subtitle.ttf’ - Copy these to the ‘skin’ folder if you are using a custom skin. If not you can copy these to any
folder name. Navigate to this folder and press the ‘Menu’ button and select the ‘Set to Skin’ option. To reset
the fonts back to the default just navigate to this folder and select the ‘Restore Skin Default’ option.
Page31
MUSIC PLAYLISTS
To make music .M3u playlists on your mede8er follow the steps in FILE MANAGER - MULTIPLE
FILES section and select the playlists option.
FILE MANAGER
The Mede8er has a built in File Manager to manage and transfer files between your media sources. The
File Manager is launched by pressing the “Edit” button on the remote Control while you are Media Library.
To Copy, Delete, Move or Rename a single file just focus on the file (that you require to perform the action
on) and press the “Edit” button on the remote control. Select the option you require and press “Enter”.
Follow on-screen instructions.
Page32
FILE MANAGER - MULTIPLE FILES
To Copy, Delete, Move or Rename multiple files just press the “Edit” button on the remote control while you
are in Media Library view. Select “Multiple Select” and a new dialogue screen will open.
Navigate to the files or folders on the left screen “A” that you want to perform the action on and press the
“Play/Pause” button to select and add the files to the File List “B”.
A
A
B
B
Once you have selected all the files you require then press the “Right Navigation” button. The focus will
change to “B”. To continue to the next step you must select the “Edit” button and then you can select one of
the available options ie Copy, Delete, Move, DVD Copy, Save Playlist, Save Photo Album, Save Playlist, or
Edit.
Page33
PICTURES
Press the “View” button on the remote and the Icon strip will light up. Now select the Picture Icon. The page
will re-arrange into a image grid that is optimized for image thumbnail viewing. The X2 supports full Slideshow
functions and you must enable the ‘Slideshow’ option in the Setup Menu. You can now navigate your pictures
as normal and zoom the images to full screen by pressing the “Enter” button on the Remote Control. Once
zoomed to full screen press the “Menu” button on the remote for more options.
Page34
PLASMA MODE / VIDEO SCREEN TRANSPARENCY
The Plasma Mode has been designed for use with Plasma TV’s that are susceptible to still image “burn in”.
The Plasma control will change the transparency level of the GUI screens and will not have any effect on the
screens during Video Play. The Video Screen Transparency controls the transparency level of all video menus
during Video Play. You have a choice of settings Off, Low or High.
AUTOPLAY
Mede8er allows for automated seamless folder play when the Mede8er is switched
on. The autoplay facility is very useful and can turn the Mede8er into a very
effective low cost Digital Signage Solution.
Autoplay Function
The Autoplay files can be stored on SD Card, USB Drive, or Local HDD. 1. Create a
folder in the root of the drive named “Autoplay” (Case Sensitive) 2. Put either Video
OR Audio files into this folder 3. If you require the files to play in order name them
as following 01name - 02name - 03name - 04name - 05name - 06name - 07name 08name - 09name - 10name - 11name up
Autoplay Operation
On power up the Mede8er will look for the “autoplay” folder and if found it will
automatically play the contents of the “autoplay” folder. The contents will be played
with the “Repeat All” as default. If a USB Drive is plugged into the Mede8er it will
auto scan for the “Autoplay” folder and if found it will start the Autoplay function.
INTERNET MEDIA STREAMS
Internet Media consists of YouTubeXL, Picassa, Video Podcasts, Yahoo News, Shoutcast Radio, Flickr,
Yahoo Finance, Facebook, Twitter, and Web Browser.
Internet Media is launched from the Home Page or Home Page strip. The Web Browser and Social Media
requires a USB compatible keyboard /mouse for correct system operation. The contents of the Internet Media
can change depending on legal circumstances at the time and Sanji are not responsible for external changes.
REMOTE CONTROL OVER NETWORK
The X2 supports remote control via another networked device running a DLNA Digital Media Controller. That
includes Windows 7 "Play To". Please consult your own Windows Help Guide for assistance. To play media
hosted on the X2 requires a UPNP Server (still in development).
Remote Control from mobile device such as a iPhone, iPad or any device that has WiFi and a built in Web
Browser. Navigate to Setup Menu and enable Web Remote. Enter the Mede8er IP into your Web Browser
with the correct Port number eg http://xxx.xxx.xxx.xxx:1024 “x” is your actual IP
Page35
NFS (Network File System)
Mede8er by default uses Samba to stream content on a local network and this should be more than
sufficient for all users. NFS can be used when streaming on a local network but you may need take care of
‘Flow Control problems by using a managed switch. If you are streaming from a Windows PC you will
require a NFS client to be running on the host PC. The Mede8er has been tested and verified with
HaneWin but other NFS Servers should work equally as well. You can download HaneWin at
http://www.hanewin.net/nfs-e.htm
Setting up NFS shortcuts on the Mede8er
Select the NFS tab on the Media Library screen. To “Add” “Modify” or “Delete” a NFS shortcut press the
“Menu” button and the Menu screen will open. Select Add NFS Client and a “ADD nfs Dialogue” screen will
open. Fill in the IP Address of the Host PC and the Share Name (Folder Path).
NOTE: The share must be inputted as an “absolute path” ie C/YOURSHARENAME
IMPORTANT NOTE:
You may have to enable “Flow Control” or disable “Jumbo Frames” on your Network Card settings if you
are using NFS with a 1GB switch on your network.
export example of a folder
l:\dvd -public -readonly -name:dvd
Recommended Settings HaneWIN
UDP NFS Server Threads : 32
Max NFS tranfer size : 32768
export example complete drive
e:\ -public -readonly -name:e
Page36
Transmission BT Downloader
WARNING: BT Downloader can use a lot of system resources
we suggest you switch it off while using the Mede8er.
In order to use the Transmission BT downloader you will require as foll
1) Internal hard drive that have been formatted in the Mede8er.
2) Valid Internet Connection
3) PC or Mac with Wired / Wireless Network connection to the Mede8er
Navigate to the Mede8er Setup and select the “Network” tab. Now Select Transmission BT and set it to “on”
Open your PC/Mac web browser and enter the URL as shown on the Transmission on/off setup screen. ie
http://xxx.xxx.xxx.xxx:9091/transmission/web/. The xxx will be the actual IP of your Mede8er on your
network. Once you enter the above into the address bar of your Browser and Enter it will open the
Transmission page on the Mede8er.
a) Add Torrents
Select the “Open” Icon and screen dialogue will open. Now navigate to the torrent file on your PC and then
select “Upload”. The torrent file will be uploaded to the Mede8er and a progress bar will be displayed on the
Transmission screen.
b) Manage Torrent Download
You can right click the download bar for available options. The main setup is located on the bottom left of the
Transmission web page and here you can set options such as Download and Upload speed.
All torrent downloads will be saved to the Transmission Download folder
on your Hard Drive. Note -- compressed downloads will have to be unzipped or
unrared on or via your PC and only complete downloads can be played.
You can also open the Transmisson BT page on the Mede8er’s built in Web
Browser BUT THE FUNCTIONALITY WILL BE LIMITED. You cannot add bittorents
and certain Setup setting will not work and may cause the Mede8er to crash.
Page37
Setup
Setup
Main Page
Menu Language
Text Encoding
Time
DVD Auto-Play
Screen Saver
DLNA-DMR
DLNA Device name
MiniKBD Language
Keyboard Layout
Scan Storage
Resume Play
Format
BD Menu
Restore Default
Auto Detect Encoding
----------------
Audio
Audio
Night Mode
HDMI Output
SPDIF Output
Surround Sound
-----
Picture
Picture
Aspect Ratio
TV System
1080p 24HZ
Plasma Mode
Deep Color
Screen Size
-------
Network
Network
Wired Lan Setup
Wireless Setup
PPPoe Setup
Transmission BT
NAS Mode
UPnP Server
Web Remote
--------
Misc
Misc
Version Info
Network Info
HDD Info
USB Upgrade
Save Config
Restore Config
Pin Protection
Folder Protection
Watched Indicator
Subtitle
Slideshow
HDD Spin down
Boot to Favourites
JukeBox View
Auto View
Password
Menu Language.
Text Encoding for Subtitles.
Set the Time / Time Zone and daylight saving.
Option for USB DVD drive. If enabled the DVD will Auto Play when inserted.
Set the Screen Saver time period and type of Screen Saver.
Plays media from UPNP servers under the control of external devices.
DLNA Device name.
Keyboard Language.
Default US English other option for possible future update.
Default Media Scanner for Hard Drive and USB only.
If enabled the X2 will prompt the user to continue from the last position.
Format internal Hard Drive Option.
Switch the BD Menu option on/off -- Supported BD Profile 1.0
Reset Network and Flash memory settings.
Auto Detect Language - Suggest to leave it off.
Dynamic Range Control limits the dynamics for night viewing.
HDMI Output Audio output settings.
Optical and Co-Ax Digital Audio output settings.
Settings for 7.1 or 5.1 Surround Sound.
Set the Aspect Ratio size of the TV.
Set the Pixel Size Resolution Size of the TV.
24HZ Frame Rate -- Enable this function if your TV supports 1080p 24HZ.
Changes the transparency to prevent screen burn in on Plasma Tv’s.
Colour Depth -- Auto - 12bit - 10bit - off.
Set the TV Screen size accurately for zooming about.jpg.
Network Setup -- DHCP IP (Auto) / Fixed IP (Manual).
Wireless Setup -- DHCP IP (Auto) / Fixed IP (Manual).
PPPoe Setup.
Enable / disable Transmission BT - Requires internal HDD formatted in X2.
Enables X2 to be used as a server to other Network Connected Devices.
If enabled other UPnP enabled devices will be able to stream content from the X2.
If enabled you can control the X2 GUI functions from a Web Browser.
Information about the Firmware Version.
Network connection Information.
Internal Hard Drive Information.
X2 firmware update from USB Flash Drive.
Save your settings to USB Flash Drive before doing a firmware update.
Restore your settings from a Flash Drive after doing a firmware update.
Pine Code Protect the Hard Drive Format Screen
Protect Folders and content by means of a user pin code.
Eye indicator display for watched videos.
Enable or disable Subtitles
Enable or disable Slideshow functionality.
Enable the internal Hard Drive to spin down after the selected period.
If enabled the X2 will boot up the Favourites Desktop.
If enabled will the X2 will present a XML Jukebox that is launched from
Favourites in a traditional Movie Wall View even if the content is in separate or
nested folders.
-- If enabled the X2 will remember the View of the folders you have naviageted.
-- Change Password
---------------
Page38
Mede8er_med500x2_user_rev5.0.6
High Definition Multimedia Player
MED500X2
www.mede8erforum.com
www.mede8er.com www.mede8er.eu
For more information or support please visit
www.mede8er.eu/support/
or call +31(0)10-7142861 during business hours.
Sanji Electronics (Pty) Ltd 68 Kyalami Boulevard, Kyalami Business Park, Kyalami, Gauteng, South Africa.
Tel: 27-11-8750000 Fax: 27-11-4660286 Email [email protected]