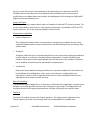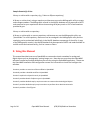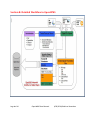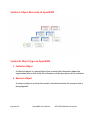
1
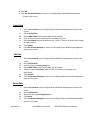
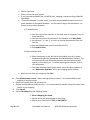
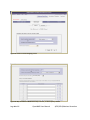
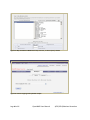
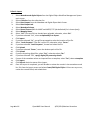
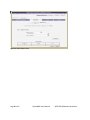
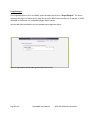
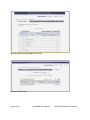
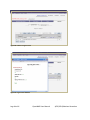
OpenWMS User Manual Workflow Management System for analog and digital objects Version 3.3.0 April 2014 Kalaivani Ananthan The OpenWMS code is free software distributed under the terms of the GNU General Public License v. 3.0 as published by the Free Software Foundation. All terms within the GNU GPL v. 3.0 license apply without reservation. To contact Rutgers University Libraries about OpenWMS, please visit http://rucore.libraries.rutgers.edu/open/projects. Page 2 of 97 OpenWMS User Manual 4/29/2014/Kalaivani Ananthan Table of Contents I. Introduction to OpenWMS ................................................................................................................................ 5 II. Using this Manual .............................................................................................................................................. 7 Section A: Overview of the workflow in OpenWMS .................................................................................................. 8 Section B: Detailed Workflow in OpenWMS.............................................................................................................. 9 Section C: Object Hierarchy in OpenWMS ............................................................................................................... 10 Section D: Object Types in OpenWMS ..................................................................................................................... 10 Section E: Using OpenWMS ..................................................................................................................................... 11 1. Administration ................................................................................................................................................. 11 1.1 User Management 1.2 (Figures 1 to 5)............................................................................................................. 11 Owner/Organization Management 1.3 Collection Management 2. (Figures 6 to 9) ............................................................................. 17 (Figures 10 to 22) ................................................................................................ 20 Metadata and digital objects ........................................................................................................................... 30 2.1 Create metadata manually (Figures 23 to 30) ............................................................................................ 31 2.2 Create Template (Figures 31 to 43)............................................................................................................. 38 3. 2.2.1 Collection level template..................................................................................................................... 39 2.2.2 User level template ............................................................................................................................. 44 2.3 Upload Digital Files (Figures 44 to 60) ........................................................................................................ 49 2.4 Batch load existing metadata and digital files (Figures 58 to 64) .............................................................. 61 Export or Interact with Fedora (Figures 65 to 77) ............................................................................................ 68 3.1 Fedora Users .................................................................................................................................................. 68 3.2 Non-Fedora Users .......................................................................................................................................... 74 Section F: Other Administrative Functions .............................................................................................................. 76 Page 3 of 97 OpenWMS User Manual 4/29/2014/Kalaivani Ananthan 1. Manage controlled vocabularies (Figures 74 to 78) ....................................................................................... 76 2. Define Collection Level Required Elements (Figures 79 to 81) ........................................................................ 81 3. Resource Management (Figures 82 to 84) ....................................................................................................... 83 4. Admin Log ........................................................................................................................................................ 91 5. User Process (Not implemented in this release) ............................................................................................. 92 6. Message Board (Not implemented in this release) ......................................................................................... 92 Page 4 of 97 OpenWMS User Manual 4/29/2014/Kalaivani Ananthan I. Introduction to OpenWMS The OpenWMS is a platform-independent, open source, web-accessible system that can be used as a standalone application or integrated with other repository architectures by a wide range of organizations. It provides a complete metadata creation system for analog and digital materials, with services to ingest objects and metadata into a Fedora repository and to export these objects and metadata, individually and in bulk in METS/XML Wrapper. The OpenWMS features a METS data architecture which can be used in any METS-based or METScompliant environment. It uses MODS as an underlying metadata schema for descriptive MD, NISO/AES standard for technical MD and PREMIS for source MD and rights MD. It outputs an XML wrapper for the METS components as a single object. The data model is primarily an event-based data model, intended to document what happens to a resource at a specific time and place. Preservation and condition events, provenance events, rights events, and descriptive events document what happens to a resource throughout its lifecycle. Details of the events can include associated entities (such as an exhibit curator) and associated objects (such as an exhibit catalog). This is a core application to ingest digital objects into the Institutional Fedora Repository (RUcore) developed at the Rutgers University Libraries. The cataloging module in OpenWMS is based on the Library of Congress version of OpenMIC. Major Features: METS support The OpenWMS features a METS data architecture which can be used in any METS-based or METScompliant environment. It uses MODS as an underlying metadata schema for descriptive metadata, NISO/AES standard for technical metadata and PREMIS for source and rights metadata. It outputs an XML wrapper for the METS components as a single object for export. Event-based data model The OpenWMS data model is primarily an event-based data model, intended to document what happens to a resource at a specific time and place. Preservation and condition events, provenance events, rights events, and descriptive events document what happens to a resource throughout its lifecycle. Details of events can include associated entities (such as an exhibit curator) and associated objects (such as an exhibit catalog). Resource management for analog and digital information formats The bibliographic utility employs the source object, and the entity that is described in the METS source Source MD (source metadata), as the first generation of information controlled by the metadata-creating organization. This is often an analog object a photograph, a slide image of an art Page 5 of 97 OpenWMS User Manual 4/29/2014/Kalaivani Ananthan work, or a print manuscript. Technical details of the digital object are captured in the METS TechMD (technical metadata) area of the Administrative metadata section, and successive modifications to the digital object are tracked in the bibliographic utility through the DigiProvMD (digital provenance metadata) area. Import and Export The bibliographic utility supports batch import of metadata in XML and TXT format at present. This is easily expandable to other formats. It also supports batch export of metadata in METS and TXT format at present. This is also easily expandable to other formats. Customization capabilities Utility Configuration The configuration module allows an organization to configure the metadata schema, set up required metadata element, setup system policies, and file handling policies according to their specific needs. Templates Templates enable the user to increase both efficiency and accuracy when applying metadata to multiple objects in a collection. Templates allow an organization to select mandatory data elements and to automatically supply default values for elements in the metadata. Templates can be modified and proliferated as warranted for a digital project. Vocabularies New values can be added to existing vocabulary lists, and new vocabulary lists themselves can be established in the bibliographic utility. Access to this feature is configurable by the organization in order to limit or expand authorization to control vocabularies based on the organization's local needs and staff resources. Digital File Handling The OpenWMS supports digital files in all formats. It is delivered with Image Magic, an open source software, to create presentation formats from tiff images to jpeg images. The organizations can configure the archival file types and presentation file types according to their specific needs. Fedora IO The Fedora IO module interacts with Fedora repository. The objects can be ingested into the Fedora repository and also can be brought back into the OpenWMS for metadata edits. Page 6 of 97 OpenWMS User Manual 4/29/2014/Kalaivani Ananthan Sample Scenario(s) of Use: Library or archive with a repository (e.g., Fedora or DSpace repository) A library or archive that is using a repository architecture can use the bibliographic utility to create and manage metadata. The bibliographic records in the MySQL database can be exported as METS and converted to your repositories native schema using third-party tools or XSLT transformations provided by you. Library or archive with no repository A library or archive with no current repository architecture can use the bibliographic utility as a "placeholder" for a full repository. Resources can be cataloged in the bibliographic utility and the cataloging can be maintained indefinitely in the MySQL database component of the utility. A copy of the bibliographic records in the MySQL database can be exported as METS and made available to an XML search and retrieval facility, such as Lucene or Zebra. II. Using this Manual This manual describes how to use OpenWMS to create and maintain metadata for analog and digital objects such as photographs, moving images, etc. Note that you must have the OpenWMS software installed and configured before you can start using the OpenWMS application. Please see the OpenWMS installation and configuration manual for instructions to install and configure the software. Section A provides an overview of the workflow in OpenWMS. Section B provides a detailed workflow in OpenWMS. Section C explains the object hierarchy in OpenWMS. Section D provides details of objects types in OpenWMS. Section E provides detailed step-by-step instructions to create and maintain digital objects. Section F provides detailed step-by-step instructions to perform other administrative tasks. Section G provides a list of figures. Page 7 of 97 OpenWMS User Manual 4/29/2014/Kalaivani Ananthan Section A: Overview of the workflow in OpenWMS Page 8 of 97 OpenWMS User Manual 4/29/2014/Kalaivani Ananthan Section B: Detailed Workflow in OpenWMS Page 9 of 97 OpenWMS User Manual 4/29/2014/Kalaivani Ananthan Section C: Object Hierarchy in OpenWMS Section D: Object Types in OpenWMS 1. Collection Object A collection object is a special object that contains the information about the organization/owner that holds the collection and the description of the collection. 2. Resource Object A resource object is an item that contains information about the resource that is being digitized. Page 10 of 97 OpenWMS User Manual 4/29/2014/Kalaivani Ananthan Section E: Using OpenWMS Note 1: Recommended Browsers – Firefox, IE, and Chrome. Note 2: Disable pop-up blocking. Note 3: Enable Cookies. The OpenWMS application may be used to create and maintain metadata for analog and digital materials. It can be used as a standalone system or can be integrated with other repositories. There are three basic steps to create an object in OpenWMS: 1) Administration: Create User, Create Organization, and Create Collection 2) Metadata and Digital Object: Create Resource and upload digital file(s) 3) Export: Ingest into a Fedora repository or export records in XML The OpenWMS uses collection structure to organize the resources. In order to create resources, a collection object must be created. 1. Administration There should be only one organization/owner record for each organization. You may create as many collections as you need for each organization. In order to be able to create organization record, you must have “manage collections” privilege. 1.1 User Management (Figures 1 to 5) It is strongly recommended to create individual user accounts to be able to keep track of the work performed by users. The user information such as user name and email is written in the object XML in the Digital Provenance Metadata section. Each user account is associated with role(s). If a user account is not associated with a role, the user cannot log in. A user with super user privileges will be able to perform all the tasks in the OpenWMS. To create and manage users, the user account must have “manage users” privilege. Create User i. ii. iii. Page 11 of 97 Select User Account from the Digital Object Workflow Management System main screen Select Add from the Registered Users screen. Enter the following user information: OpenWMS User Manual 4/29/2014/Kalaivani Ananthan a) Enter First Name, Last Name, Affiliation, Address (optional), Email, UserID, and password. b) Retype password. iv. Role Assignment section: a. Select “No” to create a regular user account. b. Select Add Collection. Click on the collection you need to add to users account. Then close the window. c. Select the role from the pull down list. d. If you have to assign permissions to more than one collection, repeat steps b and c. e. Click Commit role assignment f. If you want to remove collection from the list, you can click on the radio button in front of the collection name to remove it. v. vi. Click Submit. Click Exit Account Manager to return to the Digital Object Workflow Management System main screen. Edit User i. ii. iii. iv. v. vi. Select User Account from the Digital Object Workflow Management System Main Screen. Select the user from the Registered Users screen. Select Edit. Edit user information. Click Submit. To delete a previously assigned role: a. Select the radio button in front of the collection of the role. b. Click OK to delete. vii. Click Exit Account Manager to return to the Digital Object Workflow Management System main screen Delete User i. Select User Account from the Digital Object Workflow Management System main screen. ii. Select user from the Registered Users screen. iii. Click Delete User. Page 12 of 97 OpenWMS User Manual 4/29/2014/Kalaivani Ananthan iv. Click OK. v. Click Exit Account Manager to return to the Digital Object Workflow Management System main screen. Create Role i. ii. iii. iv. v. vi. vii. Select User Account from the Digital Object Workflow Management System main screen. Select Define Roles. Select WMS Utility from the pull down list for module. Enter role name and role description in the data entry box. Select privilege(s) associated with this role. Refer to Table 1 for details of privileges and permissions. Click Submit. Click Exit Account Manager to return to the Digital Object Workflow Management System main screen. Edit Role i. ii. iii. iv. v. vi. vii. Select User Account from the Digital Object Workflow Management System main screen. Select Define Roles. Select the role from Existing Role(s) list. Select WMS Utility from the pull down list for module. Select or unselect privilege. Refer to Table 1 for details of privileges and permissions. Click Submit. Click Exit Account Manager to return to the Digital Object Workflow Management System main screen. Delete Role i. ii. iii. iv. v. Page 13 of 97 Select User Account from the Digital Object Workflow Management System main screen. Select Define Roles. Select the role from Existing Role(s) list. Click Delete. Click Exit Account Manager to return to the Digital Object Workflow Management System main screen. OpenWMS User Manual 4/29/2014/Kalaivani Ananthan Table 1: User Privileges and Permissions Page 14 of 97 OpenWMS User Manual 4/29/2014/Kalaivani Ananthan Figure 1: Digital Object Workflow Management System main screen Figure 2: Registered Users screen Page 15 of 97 OpenWMS User Manual 4/29/2014/Kalaivani Ananthan Figure 3: Create User screen Figure 4: Assign Role screen Page 16 of 97 OpenWMS User Manual 4/29/2014/Kalaivani Ananthan Figure 5: Define Role(s) screen 1.2 Owner/Organization Management (Figures 6 to 9) Create Owner/Organization: i. ii. iii. iv. v. vi. vii. Page 17 of 97 Select Administration from the Digital Object Workflow Management Main Screen. Select Owner. Select Organization (if the owner is a corporate body) or Person (if the owner is a person). Select Create New Organization or Create New Person. If create New Organization is selected, enter Org ID, Organization Name, address, and contact information. You may use your organization’s Marc Org ID, if you have one. If Create New Person is selected, enter family name, given name and other relevant metadata. Click Save. OpenWMS User Manual 4/29/2014/Kalaivani Ananthan Edit Owner/Organization: i. ii. iii. iv. v. Select Administration from the Digital Object Workflow Management Main Screen. Select Organization (if the owner is a corporate body) or Person (if the owner is a person). Select the Organization or Person you want to edit. Click Edit. Change metadata and click Save. Delete Owner/Organization: Note: Deleting Organization will delete all the collections and resources belong to this organization. i. ii. iii. iv. v. Select Administration from the Digital Object Workflow Management Main Screen. Select Organization (if the owner is a corporate body) or Person (if the owner is a person). Select the Organization or Person to delete. Click Delete. Click OK to confirm deletion. Figure 6: Digital Object Workflow Management main screen Page 18 of 97 OpenWMS User Manual 4/29/2014/Kalaivani Ananthan Figure 7: List of Organization/Owner screen Figure 8: Create/Edit Organization screen Page 19 of 97 OpenWMS User Manual 4/29/2014/Kalaivani Ananthan Figure 9: Create/Edit Owner screen 1.3 Collection Management (Figures 10 to 22) A collection object is a special object that contains information about the owner that holds the collection and the description of the collection. It keeps all the resources that belong to a collection together. The collection structure in OpenWMS is hierarchical and you may create as many collection objects for each owner. Create Parent (Top-level) Collection i. ii. iii. iv. v. vi. Page 20 of 97 Select Administration from the Digital Object Workflow Management System main screen. Select Collection. Select Add New. A message window will appear prompting you to confirm the action. Click OK. Enter metadata for the collection. Enter a collection ID in the identifier field. Do not enter any special characters, period, and “/” in ID value. At Rutgers, collection ID is supplied by the system. Click Save. OpenWMS User Manual 4/29/2014/Kalaivani Ananthan Create Sub-collection i. Select Administration from the Digital Object Workflow Management System main screen. Select Collection. Select the Parent Collection. Select Add New. A message window will appear prompting you to confirm the action. Click OK. Enter metadata for the collection. Enter a collection ID in the identifier field. Do not enter any special characters, period, and “/” in ID value. At Rutgers, collection ID is supplied by the system. Click Save. ii. iii. iv. v. vi. vii. Edit Collection/sub-collection i. Select Administration from the Digital Object Workflow Management System main screen. Select Collection. Select the Collection to edit. Click Edit. Make changes. Click Save. ii. iii. iv. v. vi. Delete Collection/sub-collection Note: Deleting collection will delete all the resources belong to the collection. i. ii. iii. Page 21 of 97 Select Administration from the Digital Object Workflow Management System main screen. Select Collection to delete. Click Delete. OpenWMS User Manual 4/29/2014/Kalaivani Ananthan Figure 10: Digital Object Workflow Management System main screen Figure 11: Create collection screen Page 22 of 97 OpenWMS User Manual 4/29/2014/Kalaivani Ananthan Figure 12: Collection metadata entry form screen View Collection There are three options available to view a collection record: METS, FOXML (Fedora Object XML for Fedora repositories), and TEXT. i. ii. iii. iv. Page 23 of 97 Select Administration from the Digital Object Workflow Management System main screen. Select Collection to view. Select FOXML, METS, or TEXT. Click ‘x’ to close pop-up the window. OpenWMS User Manual 4/29/2014/Kalaivani Ananthan Figure 13: View collection record in METS XML Page 24 of 97 OpenWMS User Manual 4/29/2014/Kalaivani Ananthan Figure 14: View collection record in FOXML Page 25 of 97 OpenWMS User Manual 4/29/2014/Kalaivani Ananthan Figure 15: View collection record in TEXT Page 26 of 97 OpenWMS User Manual 4/29/2014/Kalaivani Ananthan Edit Collection Hierarchy i. ii. iii. iv. v. vi. vii. Select Administration from the Digital Object Workflow Management System main screen. Click Edit Collection Hierarchy button. Click on the radio button in front of the collection name to select collection that you want to move from. Click on the radio button in front of the collection name to select collection that you want to move to. A message window will appear, click OK to move collection to destination collection. A message window will appear prompting you to confirm the action. Click OK to commit change. Click Expand all button to view the change. Note: Only one collection can be changed at a time. Figure 16: Digital Object Workflow Management System main screen Page 27 of 97 OpenWMS User Manual 4/29/2014/Kalaivani Ananthan Figure 17: Edit collection hierarchy screen Figure 18: Edit collection hierarchy screen 2 Page 28 of 97 OpenWMS User Manual 4/29/2014/Kalaivani Ananthan Figure 19: Edit collection hierarchy screen 3 Figure 20: Edit collection hierarchy screen 4 Page 29 of 97 OpenWMS User Manual 4/29/2014/Kalaivani Ananthan Figure 21: Collection administration screen (before editing collection hierarchy) Figure 22: Collection administration screen (after editing collection hierarchy) 2. Metadata and digital objects You must have a collection record created before you can start creating metadata record for resources. There are two ways to create metadata record in OpenWMS. 1) Create metadata manually. 2) Batch load metadata from an existing database. Page 30 of 97 OpenWMS User Manual 4/29/2014/Kalaivani Ananthan 2.1 Create metadata manually (Figures 23 to 30) Tips: 1. In some cases, all or many of the resources in a collection will share the same metadata. Some technical metadata and rights metadata might be identical. The template utility allows collection managers and metadata creators to create generic records that contain default data. When a template is enabled, this default data is added to the metadata record automatically when Create New Record is selected. 2. Templates can be enabled for the entire collection or for a specific resource. To create and to enable a template, refer to section 2.1.1. 3. To enable a template for a specific resource, click on Template at top of the metadata entry screen, select a template, and click Apply. i. Select Metadata and Digital Object from the Digital Object Workflow Management System main screen. ii. Select Collection from the collection list. iii. Click Create New Record from the Metadata and Digital Objects tab. iv. Select the Content Model. v. Enter descriptive, source, technical and rights metadata. For detailed information about the metadata elements, please refer to Metadata Guides found online under OpenWMS project page. vi. Click Save. Edit Metadata i. Select Metadata and digital objects from the Digital Object Workflow Management System main screen. ii. Select Collection from the collection list. iii. Select the record you want to edit and click Edit. iv. Make changes. v. Click Save. Delete Metadata i. ii. iii. iv. Page 31 of 97 Select Metadata and Digital Object from the Digital Object Workflow Management System main screen. Select Collection from the collection list. Select the record you want to delete. Click Delete. OpenWMS User Manual 4/29/2014/Kalaivani Ananthan v. Click OK. Figure 23: Digital Workflow Management System main screen Page 32 of 97 OpenWMS User Manual 4/29/2014/Kalaivani Ananthan Figure 24: Existing metadata records screen Figure 25: Create new record screen Page 33 of 97 OpenWMS User Manual 4/29/2014/Kalaivani Ananthan Figure 26: Descriptive metadata entry form Page 34 of 97 OpenWMS User Manual 4/29/2014/Kalaivani Ananthan Metadata Screen Navigation Help CLEAR ALL VIEW ENTRIES Clear all data values in the record. View metadata in plain text. APPLY TEMPLATE EXIT SAVE Exit without saving data values. Enable collection level template or personal template when creating metadata record. Save all data values and exit. Tab to Toggle between Descriptive MD, Source MD, Technical MD, and Rights MD. NAVIGATOR Enter Descriptive Metadata for multiple items Jump to an element on this page. Use mouse scroll wheel to move up and down the list. Create multiple items metadata within a resource object. Figure 27: Screen navigation help Page 35 of 97 OpenWMS User Manual 4/29/2014/Kalaivani Ananthan View Metadata i. ii. iii. iv. Select Metadata and Digital Object from the Digital Object Workflow Management System main screen. Select Collection from the Organization List. Select the record. Select METS, FOXML or TEXT. Figure 28: View resource metadata in METS Page 36 of 97 OpenWMS User Manual 4/29/2014/Kalaivani Ananthan Figure 29: View resource metadata in FOXML Page 37 of 97 OpenWMS User Manual 4/29/2014/Kalaivani Ananthan Figure 30: View resource metadata in TEXT 2.2 Create Template (Figures 31 to 43) You can create two different templates in the OpenWMS -- collection level and user level. A collection level template can be applied to all resources in the collection. To create a collection level template, the user must have “Configure Cataloging Utility” permission. If the collection level template is set as a default template, it is applied to the metadata record automatically when “Create New Record” is selected. If it is not set as a default template, metadata creators can enable the template at the time the metadata record is created. User level templates are created by metadata creators. A template created at this level is available to the creator of the template only. If a user level template is set as a default template, it is applied to the metadata record automatically when “Create New Record” is selected. If it is not set as a default template, metadata creators can enable the template at the time the metadata record is created. Page 38 of 97 OpenWMS User Manual 4/29/2014/Kalaivani Ananthan 2.2.1 Collection level template Create template i. Select Metadata and digital objects from the Digital Object Workflow Management main screen. Select the collection from the collection list. Select Template. Select Create/Edit template for: Current Collection. Select Create New Template. Select the Content Model. You will get a screen similar to Create New Record screen. You may either create a new template or use an existing collection template record to create a new template. ii. iii. iv. v. vi. vii. a) To create a new template: o Select main for Title Information Type. o Enter Title for the template. o Enter metadata in the metadata elements. o Click Save. o If you want to save this template as a default template, click Set/unset Default button from the Existing Templates screen. b) To create a new template using an existing metadata record: o Select Use Existing Metadata. o Select the metadata base: resource or collection level template or user level template o Select the resource. o Click OK. o Select main for Title Information Type. o Enter Title for the template. o Click Save. o If you want to save this template as a default template, click Set Default button. Edit template: i. ii. Page 39 of 97 Select Metadata and digital objects from the Digital Object Workflow Management main screen. Select the collection from the collection list. OpenWMS User Manual 4/29/2014/Kalaivani Ananthan iii. iv. v. vi. vii. Select Template. Select the template from the Template List. Click Edit Template. Make changes. Click Save. Delete template: i. Select Metadata and digital objects from the Digital Object Workflow Management main screen. ii. Select the collection from the Collection List. iii. Select Template. iv. Select a template from the Template List. v. Click Delete. Figure 31: Digital Workflow Management System screen Page 40 of 97 OpenWMS User Manual 4/29/2014/Kalaivani Ananthan Figure 32: Existing templates screen Figure 33: Create new template screen Page 41 of 97 OpenWMS User Manual 4/29/2014/Kalaivani Ananthan Figure 34: Template metadata entry screen Figure 35: Existing templates screen Page 42 of 97 OpenWMS User Manual 4/29/2014/Kalaivani Ananthan View template i. ii. iii. iv. v. Select Metadata and digital objects from the Digital Object Workflow Management main screen. Select the collection from the collection list. Select Template. Select the template from the Template List. Click METS or TEXT. . Figure 36: View template metadata in METS Page 43 of 97 OpenWMS User Manual 4/29/2014/Kalaivani Ananthan Figure 37: View template metadata in TEXT 2.2.2 User level template Create template i. ii. iii. iv. v. vi. vii. Select Metadata and digital objects from the Digital Object Workflow Management main screen. Select the collection from the Collection List. Select Template. Select Create/Edit template for: Current User. Select Create New Template. Select a Content Model. You will get a screen similar to Create New Record screen. You may either create a new template or use an existing metadata record as a new template. a) To create a new template: o o o o o Page 44 of 97 Select main for Title Information Type. Enter a Title for the template. Enter metadata. Click Save. If you want to save this template as a default template, click Set Default button. OpenWMS User Manual 4/29/2014/Kalaivani Ananthan b) To create a new template using an existing metadata record: (see figure 2.1.1.13) o Select Use Existing Metadata. o Select the metadata base: resource or collection level template or user level template. o Click OK. o Select main for Title Information Type. o Enter a Title for the template. o Click Save. o If you want to save this template as a default template, click Set Default button. Edit template: i. ii. iii. iv. v. vi. vii. viii. Select Metadata and digital objects from the Digital Object Workflow Management main screen. Select the collection from the Collection List. Select Template. Select Create/Edit template for: Current User. Select the template. Click Edit. Make changes. Click Save. Delete template: i. ii. iii. iv. v. vi. vii. Page 45 of 97 Select Metadata and digital objects from the Digital Object Workflow Management main screen. Select the collection from the Collection List. Select Template. Select Current User. Select the template. Click Delete. Click OK. OpenWMS User Manual 4/29/2014/Kalaivani Ananthan Figure 38: Existing template screen Figure 39: Create a new user level template Page 46 of 97 OpenWMS User Manual 4/29/2014/Kalaivani Ananthan Figure 40: User level template metadata entry form Figure 41: Create user level template using existing resource Page 47 of 97 OpenWMS User Manual 4/29/2014/Kalaivani Ananthan View template: i. ii. iii. iv. v. vi. Select Metadata and digital objects from the Digital Object Workflow Management main screen. Select the collection from the Collection List. Select Template. Select Current User or Current Collection. Select the template. Click METS to view in XML or Text to view in plain text. Figure 42: View a user level template in METS Page 48 of 97 OpenWMS User Manual 4/29/2014/Kalaivani Ananthan Figure 43: View a user level template in TEXT 2.3 Upload Digital Files (Figures 44 to 60) This module needs to be configured before proceeding. See the Installation and Configuration Manual for details. The options available to upload digital files are dependent on the file policies. The OpenWMS supports preserving the original master files (high resolution files such as TIFF file) and presentation files (web presentation files such as JPEG file) for user access. The OpenWMS administrator may configure the file policies based on the organization’s needs. i. Select Metadata and digital objects from the Digital Object Workflow Management System main screen. ii. Select Collection from the collection list. iii. If you are uploading digital file(s) to a new record, select Create New Record. Select a content model from the list. Enter Type of Item. Enter Title. Click Digital Files. Go to step (v). iv. If you are uploading digital file(s) to an existing metadata record, select the record and click Upload Digital Files. Page 49 of 97 OpenWMS User Manual 4/29/2014/Kalaivani Ananthan v. Select Instructions for file processing from the Digital File Handler screen: individual files or a directory (or tar/zip file) containing mixed file types. vi. Select Archival File Type. Note: The file upload options available depend on the file policies for each digital object content type. See the configuration manual for more details. vii. Select File Obtaining Method. The OpenWMS is capable of generating generic presentation formats such as JPEG. Note: The options available depend on the file policies. viii. Enter custom label for each datastream ,if you don’t want to display the default datastream labels such as DJVU-1, PDF-1. ix. Select location of files to be uploaded. x. If you have selected Local, follow the steps below: If you are uploading more than one file, click Add more upload fields; Browse and select the file(s). Click Submit. On the File Processing Status pop-up window, check file upload status, then click closing this window. Some uploads may take longer. Click Refresh from the Digital File Handler screen to check the log of file upload. Click on the radio button next to the file to remove the file from the object. Click Clear Log to clear the log. Click Back to Metadata to return to the metadata form. Click Save to save the object. xi. If you have selected Server, follow the steps below: Select How to specify the files to be uploaded and click Continue. If you have selected Manually select individual file names: o If you are uploading more than one file, click Add more upload fields. o Browse the file system and click on the file to upload o Click Submit. If you have selected Provide a list of file names, o Browse the file system and highlight the files to upload o Click Submit. Page 50 of 97 OpenWMS User Manual 4/29/2014/Kalaivani Ananthan If you have selected Specify a range by providing the first and last file name, o o o o o o o Click Browse. Browse the files and select the first page of the digital object. Click Set First File Name. Browse the files and select the last page of the digital object. Click Set Last File Name. Click Close to return to the previous menu. Click Submit to start uploading files. Note: This option works well for a book object or any multi page object but the file names must be in sequential order (IMG0001.tiff, IMG0002.tiff). On the File Processing Status popup window, check file upload status, then click closing this window. Click Refresh to check the log of file upload. Click on the radio button next to the file to remove the file from the object or click on Delete All Files to delete all the files. Click Clear Log to clear the log. Click Back to Metadata to return to the metadata form or click Exit to Record List to return to the Existing Records screen. Click Save to save and exit the object. xi. Click Back to Metadata to return to the metadata form or click Exit to Record List to return to the Existing Records screen. xii. Click Continue. Page 51 of 97 OpenWMS User Manual 4/29/2014/Kalaivani Ananthan Figure 44: Create new record screen Figure 45: Create metadata screen Page 52 of 97 OpenWMS User Manual 4/29/2014/Kalaivani Ananthan Figure 46: Upload file selection screen Page 53 of 97 OpenWMS User Manual 4/29/2014/Kalaivani Ananthan Figure 47: Digital file location selection screen Figure 48: Upload digital file from local PC/server screen Page 54 of 97 OpenWMS User Manual 4/29/2014/Kalaivani Ananthan Figure 49: Digital File upload from server file selection screen Page 55 of 97 OpenWMS User Manual 4/29/2014/Kalaivani Ananthan Figure 50: Provide a list of files names selection screen Figure 51: Select digital files – provide a list of files -- screen Page 56 of 97 OpenWMS User Manual 4/29/2014/Kalaivani Ananthan Figure 52: Select digital files – provide a list of files – screen 2 Figure 53: Upload digital file from server—specify a range of files screen Page 57 of 97 OpenWMS User Manual 4/29/2014/Kalaivani Ananthan Figure 54: Set first file and last file name screen Page 58 of 97 OpenWMS User Manual 4/29/2014/Kalaivani Ananthan Figure 55: Set first file and last file name screen 2 Page 59 of 97 OpenWMS User Manual 4/29/2014/Kalaivani Ananthan Figure 56: Set first file and last file name screen 3 Page 60 of 97 OpenWMS User Manual 4/29/2014/Kalaivani Ananthan Figure 57: Digital file handler status screen 2.4 Batch load existing metadata and digital files (Figures 58 to 64) The OpenWMS provides batch loading capabilities to import metadata records from existing database(s). It has built-in MARCXML and MODS XML mapping tools, developed by Library of Congress, which automatically map metadata into the OpenWMS database. If metadata is in any other format, you need to map your data elements to OpenWMS database using the Mapping Utility using the “in-house” option. Follow the instructions below to batch load metadata from existing database(s). A: Map metadata elements i. Select Metadata and digital objects from the Digital Object Workflow Management System main screen. ii. Select Batch Import. iii. Select Mapping. iv. Select WMS internal schema to map your metadata elements. v. Select Create or Revise Mapping. vi. You may either create a new mapping or edit an existing mapping. vii. To create a new mapping: Page 61 of 97 OpenWMS User Manual 4/29/2014/Kalaivani Ananthan Enter a map name. Select a schema of your records. If you have selected MARC (xml) or MODS (xml), mapping is automatically provided by OpenWMS. If you have selected “in-house (text)”, you must map metadata elements from the inhouse database to OpenWMS database. You also need to export the metadata in .txt format from the native database. a) Provide field list. Enter the name of the elements in the same order as it appears in the inhouse database. If there are more than 10 elements in the database, click More fields. Use edit tools “<<” and “x” to insert or remove data elements from the field list. Enter the field delimiter used in metadata text file. Click Update Fields. b) Map metadata fields. Select the element on the left side of the window from the in-house database and select the appropriate OpenWMS database element. This will automatically map these two elements and these elements will appear in the mapping list. To delete mapping of an element, click on the radio button. If the data elements have multiple values, enter the value separator in the “Multi-value Separator” box in the mapping results window. When you are done with mapping, click Save. viii. Click Upload sample records. Before starting the batch import, it is recommended to view mapping of sample records. ix. Select the mapping from the pull down list. x. Browse and Upload the sample text file. It is recommended to prepare a sample file with a few records to test mapping. xi. Click Submit. xii. Select Check Map from the Mapping Screen. Select a Mapping for review. Sample records will be displayed on the screen. Select a record and click on TEXT or XML (METS). Page 62 of 97 OpenWMS User Manual 4/29/2014/Kalaivani Ananthan Review uploaded records. If you are satisfied with the mapping results, proceed to batch import. xiii. Click Exit to return to the Metadata and Digital Object Main screen. Figure 58: Batch import mapping screen Page 63 of 97 OpenWMS User Manual 4/29/2014/Kalaivani Ananthan Figure 59: Create or Revise mapping screen Figure 60: Map metadata to WMS format step 1 screen, “in-house (text)” schema Page 64 of 97 OpenWMS User Manual 4/29/2014/Kalaivani Ananthan Figure 61: Map metadata to WMS format step 2 screen, “in-house (text)” schema Figure 62: Review mapping with uploaded samples Page 65 of 97 OpenWMS User Manual 4/29/2014/Kalaivani Ananthan B: Batch Import i. ii. iii. iv. v. vi. vii. viii. ix. x. xi. xii. xiii. xiv. xv. xvi. xvii. xviii. xix. xx. xxi. xxii. Select Metadata and digital objects from the Digital Object Workflow Management System main screen. Select Collection from the collection list. Select Batch Import from the Metadata and Digital Object Main Screen. Select Batch Import tab. Select Metadata Schema. Select Record Format (XML for MARC and MODS; TXT (tab-delimited) for in-house (text)). Select Mapping Name. Select “Yes” if the text file has already been uploaded, otherwise, select “No”. If you have selected “Yes”, select an uploaded file to import. Click Import. If you have selected “No”, you will be prompted to select the location of the file. Select “Local Computer” if the file is on the PC; otherwise, select “Server”. If you have selected “Local Computer”, browse and select the file. Click Upload. If you have selected “Server”, enter the absolute path of the file. Click Upload. If you are importing digital files: select “Yes”, otherwise select “No.” If you have selected “Yes”, specify digital file processing details. If some of the metadata values are imported from a template, select “Yes”; select a template. Click Import. Click Refresh check the status of the import. Once the import is completed, you will be able to review the records in the metadata record list. Exit from the import screen and select Create/Edit Digital Object. If there are any errors, review the records failed, and reload them. Page 66 of 97 OpenWMS User Manual 4/29/2014/Kalaivani Ananthan Figure 63: Batch import screen Page 67 of 97 OpenWMS User Manual 4/29/2014/Kalaivani Ananthan Figure 64: Batch import 3 steps screen 3. Export or Interact with Fedora (Figures 65 to 77) 3.1 Fedora Users The OpenWMS interacts with the Fedora repository using the Fedora I/O module. Metadata creators can ingest objects into Fedora individually or in batch mode; Metadata creators can also bring objects from the Fedora repository into WMS forms to perform metadata edits. Please note that the OpenWMS does not allow users to replace digital files once an object is ingested into the Fedora repository. Page 68 of 97 OpenWMS User Manual 4/29/2014/Kalaivani Ananthan Ingesting objects into the Fedora repository i. Select Metadata and digital objects from the Digital Object Workflow Management System main screen. ii. Select Collection from the collection list. iii. Select Fedora IO. iv. Select Ingest to Fedora. v. Select resource(s). vi. Click Ingest. vii. The status of the ingest process is be displayed under “Status.” There are three statuses: OK (Object is ready for ingest), In progress (Object is being ingested), Done (Object is ingested), and Failed (Problem with the ingest process) Editing objects ingested into the Fedora Repository i. Select Metadata and digital objects from the Digital Object Workflow Management System main screen. ii. Select Collection from the collection list. iii. Select Fedora IO. iv. Select Edit Fedora Objects. v. Search for object by Title or Fedora ID. Enter ‘*’ to search everything in the selected collection. vi. Select the resource to edit. vii. Click Edit. viii. Make changes to metadata. ix. Click Save. x. Select the metadata type you have edited. If you have edited in all metadata types, select all of them and add a comment. xi. Click Submit. Viewing objects that are ingested into the Fedora Repository i. ii. iii. iv. v. vi. vii. Select Metadata and digital objects from the Digital Object Workflow Management System main screen. Select Collection from the collection list. Select Fedora IO. Select Edit Fedora Objects. Search for object by Title or Fedora ID. Enter ‘*’ to search everything in the selected collection. Select the resource to view. Click View. Page 69 of 97 OpenWMS User Manual 4/29/2014/Kalaivani Ananthan Purge/Reingest If the ingested object is still in the WMS, select the object and click on “Purge/Reingest”. This action will purge the object in Fedora and re-open the record in WMS. Once the object is re-opened, it will be displayed in the Record List in Metadata/Digital Object section. You can add more metadata or correct metadata and ingest the object. Figure 65: Digital Object Workflow Management System main screen Page 70 of 97 OpenWMS User Manual 4/29/2014/Kalaivani Ananthan Figure 66: Metadata and Digital Object main screen Figure 67: Fedora IO screen Page 71 of 97 OpenWMS User Manual 4/29/2014/Kalaivani Ananthan Figure 68: Fedora IO ingest screen Figure 69: Ingest status window Page 72 of 97 OpenWMS User Manual 4/29/2014/Kalaivani Ananthan Figure 70: Editing objects in Fedora repository main screen Figure 71: Editing object in Fedora repository – metadata screen Page 73 of 97 OpenWMS User Manual 4/29/2014/Kalaivani Ananthan Figure 72: Record viewed in XML screen 3.2 Non-Fedora Users There are two possible scenarios in which you may export records: 1) Organizations using a repository may export the bibliographic records in the OpenWMS database as METS and convert to your repositories native schema using third-party tools or XSLT transformations provided by you. 2) Organizations with no repository may export a copy of the bibliographic records in the OpenWMS database as METS and made available to an XML search and retrieval facility, such as Lucene or Zebra. Follow the instructions below to export records: i. Select Metadata and digital objects from the Digital Object Workflow Management System main screen. Page 74 of 97 OpenWMS User Manual 4/29/2014/Kalaivani Ananthan ii. iii. iv. v. vi. vii. viii. Select Collection from the collection list. Select Export from the Main Cataloging Screen. Select Export Format (METS). Select Export Destination (File). Click one record per file for file option. Select File Name Prefix. Specify record(s) to export. There are three options available. o “All records of this collection” will export every record in the collection in a separate file under the export directory configured by the system administrator. o If “A subset of this collection “is selected, a pop-up box will be prompted to select a range to export. o If “Single record” is selected, a pop-up box will be prompted to select a record to export. ix. x. Click Export. Click Refresh to monitor the progress of export. Figure 73: Export screen Page 75 of 97 OpenWMS User Manual 4/29/2014/Kalaivani Ananthan Section F: Other Administrative Functions A few administrative functionalities in the OpenWMS are available to users with “superuser” privilege or cataloging utility privilege only. They are: 1) Manage controlled vocabularies 2) Define collection level required elements 3) Manageresources 1. Manage controlled vocabularies (Figures 74 to 78) Controlled vocabulary terms can be added while creating metadata record, creating a metadata template or using the configuration module. Using the Controlled Vocabulary module, you may: a) b) Add a new term source (authority) to an element; Add terms to a term source (authority); Add Controlled Vocabularies i. ii. iii. iv. v. Click on the green Navigator from the metadata entry screen. Select Edit CV. Select Item Type. Select Metadata Type. If you are adding terms to source metadata, select Source type; if you are entering technical metadata, select Type of Resource. a) To add a new term source (authority) to an element: o Locate the element name. o Click on Term source. o Enter the term source in the white box. If you are entering multiple terms, separate each term with a semi-colon. o Click Submit. o Click OK. o Click OK if you are done, otherwise, click Cancel. b) To add terms to an authority: o Locate the element name. o Select the Term Source. o Enter terms. If you are entering multiple terms, separate each term with a semi-colon. Page 76 of 97 OpenWMS User Manual 4/29/2014/Kalaivani Ananthan o Click Submit. o Click OK. o Click OK if you are done, otherwise, click Cancel. Edit Controlled Vocabularies i. ii. iii. iv. v. Click on the green Navigator from the metadata entry screen. Select Edit CV. Select Item Type. Select Metadata Type. If you are editing terms in source metadata, select Source type; if you are entering technical metadata, select Type of Resource. a) To edit a term source (authority): o If the term source (authority) has associated terms, follow instructions to add new term source (authority) and the associated terms. o Then delete the terms and the term source (authority). b) To edit terms: o Locate the element name. o Select the Term Source. o Edit terms. If you are editing multiple terms, separate each term with a semi-colon. o Click Submit. o Click OK. o Click OK if you are done, otherwise, click Cancel. Delete Controlled Vocabularies i. ii. iii. iv. v. Click on the green Navigator from the metadata entry screen. Select Edit CV. Select Item Type. Select Metadata Type. If you are deleting terms in source metadata, select source type; if you are entering technical metadata, select Type of Resource. a) Delete a term source (authority) from an element: o If the term source (authority) has associated terms, follow instructions to add new term source (authority) and the associated terms. Page 77 of 97 OpenWMS User Manual 4/29/2014/Kalaivani Ananthan o Then delete the terms and the term source (authority). b) Delete terms from a term source (authority): o o o o o o Locate the element name. Select the term source (authority). Delete terms in the white box. Click Submit. Click OK. Click OK if you are done, otherwise, click Cancel. Figure 74: Navigating Cataloging Utility screen Page 78 of 97 OpenWMS User Manual 4/29/2014/Kalaivani Ananthan Figure 75: Controlled vocabularies screen Figure 76: Controlled vocabularies term source selection screen Page 79 of 97 OpenWMS User Manual 4/29/2014/Kalaivani Ananthan Figure 77: Controlled vocabulary terms screen Figure 78: Controlled vocabularies confirmation screen Page 80 of 97 OpenWMS User Manual 4/29/2014/Kalaivani Ananthan 2. Define Collection Level Required Elements (Figures 79 to 81) The OpenWMS allows users with super user privilege to define required elements at collection level. The elements that are set as required are validated by OpenWMS, and if any elements are missing values, they are flagged with an “M”. i. ii. iii. iv. v. vi. vii. viii. ix. x. xi. xii. xiii. Select Configuration from the Digital Object Workflow Management System main screen. Select Cataloging. Select Required fields. Select item type. Select metadata type. Select Customize collection level required elements. Select or create a customization: the collection(s). Select/Change collection. Select collection. Click on the element(s). Select Yes to set the field and all of its subfields as required field. Click Save. Follow steps i – x to set required elements in other metadata types. To disable required elements: i. ii. iii. Click on the element. Select Yes to remove the element from required element list. Click Save. Page 81 of 97 OpenWMS User Manual 4/29/2014/Kalaivani Ananthan Figure 79: Required elements configuration screen Figure 80: Set required elements Page 82 of 97 OpenWMS User Manual 4/29/2014/Kalaivani Ananthan Figure 81: Remove required elements screen 3. Resource Management (Figures 82 to 84) This module allows users with cataloging utility privilege to: 1) Clean up database or reopen resource for editing or re-ingesting 2) Change affiliation (change collection/ownership) 3) Edit Raw XML 4) Manage collection owner 1) Clean up database or reopen resource for editing or re-ingesting i. Select Administration from the Digital Object Workflow Management System main screen. i. ii. iii. iv. v. Page 83 of 97 Select resource. Select Collection. To delete records from the WMS database: Select resource and click Delete. To re-open a record to edit or re-ingest: Select the resource and click Reopen. Click OK to confirm. OpenWMS User Manual 4/29/2014/Kalaivani Ananthan Figure 82: Resource management screen 2) Change Affiliation The OpenWMS allows users to change the collection owners of the resources. Add collection owner i. ii. iii. iv. v. vi. vii. Select Administration from the Digital Object Workflow Management System main screen. Select resource. Select Collection. Select the resource. Click on Add collection owner. Click OK to confirm. You will be presented with a list of collections in WMS. Select the collection. The resource belongs to two collection owners now. Change collection owner i. ii. Page 84 of 97 Select Administration from the Digital Object Workflow Management System main screen. Select resource. OpenWMS User Manual 4/29/2014/Kalaivani Ananthan iii. iv. v. vi. vii. Select Collection. Select the resource. Click on Change collection owner. Click OK to confirm. You will be presented with a list of collections in WMS. Select the collection. The resource DOES not belong to this collection owner now. Remove collection owner i. ii. iii. iv. v. vi. vii. Select Administration from the Digital Object Workflow Management System main screen. Select resource. Select Collection. Select the resource. Click on Remove collection owner. Click OK to confirm. You will be presented with a list of collections in WMS. Select the collection. The resource collection owner will be removed from the resource. Figure 83: Change affiliation screen Page 85 of 97 OpenWMS User Manual 4/29/2014/Kalaivani Ananthan Figure 84: Change affiliation screen 3) Edit Raw XML i. Select Administration from the Digital Object Workflow Management System main screen. ii. Select resource. iii. Select Edit Raw XML. iv. Enter WMS System ID. v. Click Retrieve. vi. WMS will return the XML for this object in the window below. View the XML and identify the problematic character. vii. Replace the character and click Submit. Page 86 of 97 OpenWMS User Manual 4/29/2014/Kalaivani Ananthan Figure 85: Edit Raw XML screen 4) Owner Management Add new organization i. ii. iii. iv. v. Select Administration from the Digital Object Workflow Management System main screen. Select Owner. Select Create New Organization. Enter organization information. Click Save. Edit organization i. ii. iii. iv. v. vi. Select Administration from the Digital Object Workflow Management System main screen. Select Owner. Select the organization to edit. Click Edit. Make changes. Click Save. Delete organization i. ii. iii. iv. Select Administration from the Digital Object Workflow Management System main screen. Select Owner. Select the organization to delete. Click Delete. Note: If there are resources in an organization, move them to another organization before deleting. Page 87 of 97 OpenWMS User Manual 4/29/2014/Kalaivani Ananthan Figure 86: Organization management screen Figure 87: Personal owner management screen Page 88 of 97 OpenWMS User Manual 4/29/2014/Kalaivani Ananthan Figure 88: Add new organization screen Page 89 of 97 OpenWMS User Manual 4/29/2014/Kalaivani Ananthan Figure 89: Edit Organization screen Figure 90: Add personal owner screen Page 90 of 97 OpenWMS User Manual 4/29/2014/Kalaivani Ananthan Figure 91: Edit personal owner screen 4. Admin Log The OpenWMS logs administration activities in the Admin Log section. Activities such as create collection, edit collection, add/edit controlled vocabulary terms are written to the Admin Log file. Figure 92: Admin Log screen Page 91 of 97 OpenWMS User Manual 4/29/2014/Kalaivani Ananthan 5. User Process (Not implemented in this release) 6. Access Control New This feature allows you to setup temporary access restriction to selected or all WMS modules for all users. Select the WMS module you want to restrict access to, enter starting date/time and ending date/time, and User Message. Then click on Submit. Figure 93: Access Control Page 92 of 97 OpenWMS User Manual 4/29/2014/Kalaivani Ananthan Table of Figures Figure 1: Digital Object Workflow Management System main screen .................................................................... 15 Figure 2: Registered Users screen............................................................................................................................ 15 Figure 3: Create User screen .................................................................................................................................... 16 Figure 4: Assign Role screen .................................................................................................................................... 16 Figure 5: Define Role(s) screen ................................................................................................................................ 17 Figure 6: Digital Object Workflow Management main screen ................................................................................ 18 Figure 7: List of Organization/Owner screen ........................................................................................................... 19 Figure 8: Create/Edit Organization screen............................................................................................................... 19 Figure 9: Create/Edit Owner screen ........................................................................................................................ 20 Figure 10: Digital Object Workflow Management System main screen .................................................................. 22 Figure 11: Create collection screen ......................................................................................................................... 22 Figure 12: Collection metadata entry form screen .................................................................................................. 23 Figure 13: View collection record in METS XML ...................................................................................................... 24 Figure 14: View collection record in FOXML ............................................................................................................ 25 Figure 15: View collection record in TEXT................................................................................................................ 26 Figure 16: Digital Object Workflow Management System main screen .................................................................. 27 Figure 17: Edit collection hierarchy screen .............................................................................................................. 28 Figure 18: Edit collection hierarchy screen 2 ........................................................................................................... 28 Figure 19: Edit collection hierarchy screen 3 ........................................................................................................... 29 Figure 20: Edit collection hierarchy screen 4 ........................................................................................................... 29 Figure 21: Collection administration screen (before editing collection hierarchy) ................................................. 30 Figure 22: Collection administration screen (after editing collection hierarchy) ................................................ 30 Page 93 of 97 OpenWMS User Manual 4/29/2014/Kalaivani Ananthan Figure 23: Digital Workflow Management System main screen ............................................................................. 32 Figure 24: Existing metadata records screen .......................................................................................................... 33 Figure 25: Create new record screen ....................................................................................................................... 33 Figure 26: Descriptive metadata entry form ........................................................................................................... 34 Figure 27: Screen navigation help............................................................................................................................ 35 Figure 28: View resource metadata in METS ........................................................................................................... 36 Figure 29: View resource metadata in FOXML ........................................................................................................ 37 Figure 30: View resource metadata in TEXT ............................................................................................................ 38 Figure 31: Digital Workflow Management System screen ...................................................................................... 40 Figure 32: Existing templates screen ....................................................................................................................... 41 Figure 33: Create new template screen................................................................................................................... 41 Figure 34: Template metadata entry screen ........................................................................................................... 42 Figure 35: Existing templates screen ....................................................................................................................... 42 Figure 36: View template metadata in METS ......................................................................................................... 43 Figure 37: View template metadata in TEXT ........................................................................................................... 44 Figure 38: Existing template screen ......................................................................................................................... 46 Figure 39: Create a new user level template .......................................................................................................... 46 Figure 40: User level template metadata entry form .............................................................................................. 47 Figure 41: Create user level template using existing resource ................................................................................ 47 Figure 42: View a user level template in METS........................................................................................................ 48 Figure 43: View a user level template in TEXT ......................................................................................................... 49 Figure 44: Create new record screen ....................................................................................................................... 52 Figure 45: Create metadata screen.......................................................................................................................... 52 Page 94 of 97 OpenWMS User Manual 4/29/2014/Kalaivani Ananthan Figure 46: Upload file selection screen .................................................................................................................... 53 Figure 47: Digital file location selection screen ....................................................................................................... 54 Figure 48: Upload digital file from local PC/server screen ...................................................................................... 54 Figure 49: Digital File upload from server file selection screen ............................................................................... 55 Figure 50: Provide a list of files names selection screen ....................................................................................... 56 Figure 51: Select digital files – provide a list of files -- screen ................................................................................. 56 Figure 52: Select digital files – provide a list of files – screen 2............................................................................... 57 Figure 53: Upload digital file from server—specify a range of files screen ............................................................. 57 Figure 54: Set first file and last file name screen ..................................................................................................... 58 Figure 55: Set first file and last file name screen 2 .................................................................................................. 59 Figure 56: Set first file and last file name screen 3 .................................................................................................. 60 Figure 57: Digital file handler status screen............................................................................................................. 61 Figure 58: Batch import mapping screen ................................................................................................................. 63 Figure 59: Create or Revise mapping screen ........................................................................................................... 64 Figure 60: Map metadata to WMS format step 1 screen, “in-house (text)” schema .............................................. 64 Figure 61: Map metadata to WMS format step 2 screen, “in-house (text)” schema .............................................. 65 Figure 62: Review mapping with uploaded samples ............................................................................................... 65 Figure 63: Batch import screen ................................................................................................................................ 67 Figure 64: Batch import 3 steps screen ................................................................................................................... 68 Figure 65: Digital Object Workflow Management System main screen .................................................................. 70 Figure 66: Metadata and Digital Object main screen .............................................................................................. 71 Figure 67: Fedora IO screen ..................................................................................................................................... 71 Figure 68: Fedora IO ingest screen .......................................................................................................................... 72 Page 95 of 97 OpenWMS User Manual 4/29/2014/Kalaivani Ananthan Figure 69: Ingest status window .............................................................................................................................. 72 Figure 70: Editing objects in Fedora repository main screen................................................................................. 73 Figure 71: Editing object in Fedora repository – metadata screen ......................................................................... 73 Figure 72: Record viewed in XML screen ................................................................................................................. 74 Figure 73: Export screen .......................................................................................................................................... 75 Figure 74: Navigating Cataloging Utility screen ....................................................................................................... 78 Figure 75: Controlled vocabularies screen............................................................................................................... 79 Figure 76: Controlled vocabularies term source selection screen........................................................................... 79 Figure 77: Controlled vocabulary terms screen ....................................................................................................... 80 Figure 78: Controlled vocabularies confirmation screen ......................................................................................... 80 Figure 79: Required elements configuration screen................................................................................................ 82 Figure 80: Set required elements ............................................................................................................................ 82 Figure 81: Remove required elements screen ......................................................................................................... 83 Figure 82: Resource management screen ............................................................................................................... 84 Figure 83: Change affiliation screen ....................................................................................................................... 85 Figure 84: Change affiliation screen ........................................................................................................................ 86 Figure 85: Edit Raw XML screen ............................................................................................................................... 87 Figure 86: Organization management screen.......................................................................................................... 88 Figure 87: Personal owner management screen ..................................................................................................... 88 Figure 88: Add new organization screen ................................................................................................................. 89 Figure 89: Edit Organization screen ......................................................................................................................... 90 Figure 90: Add personal owner screen .................................................................................................................... 90 Figure 91: Edit personal owner screen .................................................................................................................... 91 Page 96 of 97 OpenWMS User Manual 4/29/2014/Kalaivani Ananthan Figure 92: Admin Log screen .................................................................................................................................... 91 Figure 93: Access Control ......................................................................................................................................... 92 Page 97 of 97 OpenWMS User Manual 4/29/2014/Kalaivani Ananthan