1
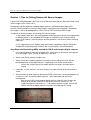
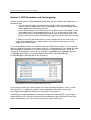
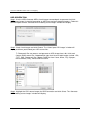
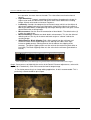
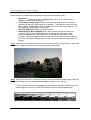
Introduction
High Dynamic Range (HDR) photography is a combination of a specialized image capture
technique and image processing.
Photomatix Pro's HDR imaging processes combine several Low Dynamic Range (LDR)
exposures of a single scene, exposed for the darkest shadows to the brightest highlights. By
capturing multiple images at different exposures, you can use Photomatic pro to achieve detail
throughout the tonal range.
This manual offers step-by-step instructions for using the Photomatix Pro software to create
HDR images, as well as advice on how to make the optimal photographs for exposure blending.
This manual uses the following helpful icons:
Useful information about the program’s capabilities.
Tips and recommendations for using the software.
This manual uses the following style shortcut to explain menu and command navigation:
Top Menu item>Drop-down menu item>>Pop-up window option.
Photomatix Pro User Manual
Table of Contents
Table of Contents
Section 1: Tips for Taking Successful Source Images .................................................... 1
Auto-Exposure Bracketing (AEB) method for DSLR and compact digital cameras .. 1
Manual Exposure Bracketing for DSLR cameras ..................................................... 2
Manual Exposure Bracketing with Compact Digital Cameras .................................. 3
Film SLR photo techniques for creating HDR source images .................................. 3
Section 2: HDR Generation and Tonemapping ............................................................... 4
HDR GENERATION .................................................................................................... 5
TONEMAPPING .......................................................................................................... 7
Tonemapping with Details Enhancer........................................................................ 7
Tonemapping with Tone Compressor .................................................................... 10
Additional Tonemapping Settings........................................................................... 12
Section 3: Exposure Blending via the Combine Menu................................................... 13
Average Method ........................................................................................................ 14
Highlights and Shadows – 2 images.......................................................................... 15
Highlights and Shadows – Auto................................................................................. 16
Highlights & Shadows – Adjust.................................................................................. 17
Highlights & Shadows – Intensive ............................................................................. 19
Section 4: Batch Processing ......................................................................................... 21
Single File Processing ............................................................................................... 26
Photomatix Pro User Manual
Section 1: Tips for Taking Successful Source Images
Section 1: Tips for Taking Successful Source Images
A great final HDR photograph starts with several differently exposed Low Dynamic Range (LDR)
source images of the same scene.
Photographs can be made with compact digital cameras, advanced-feature digital SLR
cameras, or film-based SLR cameras (from images scanned into your computer). Photomatix
can merge 8- and 16-bit photographs in JPEG, PSD or TIFF format into HDR images.
Two pieces of universal advice for creating LDR source images:
1) Still subjects work best. Any moving object will be 'ghosted' and may show up ghosted
in different places in your blended HDR image. An exception to this may be flowing
water, which follows a rhythmic pattern and can produce a soft, dreamy effect with long
exposures.
2) It is suggested to use a tripod to keep your images completely aligned. Photomatix
incorporates Image Alignment functions, but using a tripod is still recommended.
Auto-Exposure Bracketing (AEB) method for DSLR and compact digital cameras
It is recommended to shoot with available light. A flash may try to balance the exposure
of all the images, when a range of exposures is the goal.
Select a low ISO to minimize image noise.
Select Continuous shooting mode on the camera’s drive setting to ensure that the
bracketed photos will be captured with a single depression of the shutter button.
o Consult the camera manual for model-specific instructions on choosing this
setting.
If possible, use the camera’s self-timer setting, or a cable release to minimize camera
shake.
Set the camera to Auto Exposure Bracketing (AEB), which takes several photographs of
a scene in a row: one at the proper exposure, some underexposed, and some
overexposed.
o Most current DSLRs and compact digital cameras allow the user to select the
amount of over/under exposure in one-third or one-half increments. The
suggested exposure increment is +/- 2 for optimal exposure range. Consult the
camera manual for model-specific instructions on choosing this setting.
DSLR LCD window showing AEB icon with +/-2 increments selected.
Photomatix Pro User Manual
Page 1
Section 1: Tips for Taking Successful Source Images
After capturing the bracketed images, check the histogram previews in playback mode to
ensure that you have captured a good range of exposures.
You may also increase the number of source images of the same scene to be
blended in Photomatix Pro by selecting a different Auto Exposure Bracketing Exposure
Value after capturing the first series. For example, if you AutoBracket at +/- 2 and then at
+/- 1, you will have six images, but the two properly exposed images will be identical.
Discard one of the duplicated properly exposed images, and you will have five LDR
source images: -2, -1, 0, +1, +2 for exposure blending.
Manual Exposure Bracketing for DSLR cameras
In scenes with extreme differences between light and dark details, manual exposure bracketing
over a greater exposure value range may provide better source images than Auto Exposure
Bracketing.
Choose a low ISO to minimize noise and make the highest quality source images.
Keep a constant aperture and ISO. Control image exposure by changing the shutter
speed in full-stop increments.
Shoot a series of images starting with your brightest image elements (highlights)
being slightly underexposed (see figure 2.1 below) to the darkest image elements
(shadows) being slightly overexposed (see figure 2.2 below). You may or may not
want or need to use every LDR image in the series for HDR generation and
Tonemapping, but you increase your options with this method. Experiment with
different combinations of the totally bracketed source images in Photomatix Pro to
achieve your desired effect.
Check your DSLR's Histogram preview in playback mode to ensure that you have
captured the entire tonal range of the image.
Self-timer mode, a cable release, and mirror lock-up options, if available, will help
minimize any camera shake, especially for exposures slower than 1/15 second.
Figure 2.1 Histogram depicts the brightest elements (highlights) slightly underexposed.
Photomatix Pro User Manual
Page 2
Section 1: Tips for Taking Successful Source Images
Figure 2.2 Histogram depicts the darkest image elements (shadows) slightly overexposed.
Manual Exposure Bracketing with Compact Digital Cameras
Consult your camera’s user manual to determine if manual exposure is possible. Follow the
steps for Manual Exposure Bracketing with a DSLR.
If your compact camera does not have AEB, you can use the exposure
compensation setting to manually bracket. The series below shows the same
scene captured at -2, 0 and +2.
LCD display
Film SLR photo techniques for creating HDR source images
Follow the advice for shooting with a DSLR, keeping in mind that you will not have the
option of previewing the live histogram to determine your exposure range.
Scan your film or slides, not prints. Photo labs will attempt to make the best print from
each of your source images, and you will not achieve good results scanning these in for
HDR generation.
Turn off your scanner's auto-exposure options, so that you are manually controlling the
exposure.
Choose the Align images option in Photomatix Pro to align your photos prior to HDR
generation.
Photomatix Pro User Manual
Page 3
Section 2: HDR Generation and Tonemapping
Section 2: HDR Generation and Tonemapping
In order to create your final HDR photograph for display, you must follow a two-step process in
Photomatix Pro.
The first step is to merge your Low Dynamic Range (LDR) source images into a
single 32-bit HDR image. Because of the bit depth, a true 32-bit HDR image will not
display properly on conventional monitors.
In the second step, this 32-bit HDR image is then processed, or ‘developed,’ via the
Tonemapping tool. The tonemapping tool sets an 8- or 16-bit value for each 32-bit
pixel, which can then be displayed and printed on conventional LDR monitors and
printers, while preserving the expanded tonal range of the 32-bit HDR source image.
Because the HDR generation process involves multiple files of the same scene, it is
highly recommended to use a logical and consistent naming format for each set of
images that will be merged.
It is recommended to make a new folder for each set of HDR source images. If you choose to
add to the original file names from a digital camera, it is suggested that the first group of images
to be merged be retitled with ‘A’ as the first character of the camera file names, ‘B’ for the
second set of photographs, and so on. For example: A_IMG0001.jpg, A_IMG0002.jpg, and
A_IMG0003.jpg for the first set to be merged to 32-bit HDR, and B_IMG1001.jpg,
B_IMG1002.jpg, B_IMG1003.jpg, for the second set.
In the example above we have both alphabetized and numbered our
descriptive file names for easy reference during processing.
If you choose to retitle your source images with more descriptive filenames, such as ‘castle’,
and ‘mountain’ it is suggested to follow a similar alphabetical convention: castle1.jpg,
castle2.jpg, castle3.jpg and mountain1.tif, mountain2.tif, mountain3.tif.
Following these logical alphabetical naming conventions will help keep LDR source images
organized for the user, and will also work with the alphabetical logic of the Batch Processing
feature of Photomatix Pro. (See section 4 for more on Batch Processing.)
Photomatix Pro User Manual
Page 4
Section 2: HDR Generation and Tonemapping
HDR GENERATION
Step 1: Use the HDR>Generate HDR>>Load Images command path to generate the 32-bit
HDR source image (instead of generating an HDR from previously opened images). Follow this
command path and the “Generate HDR–Loading source images” window will display.
Step 2: Check Load Images and click Browse. The “Select input LDR images” window will
display to follow a path to load your LDR source files.
Photomatix Pro can process and generate an HDR image from 8-bit, 16-bit and
Camera RAW source files. Supported file types for 8-bit and 16-bit images include .JPG,
.TIFF, .PSD. Photomatix Pro supports RAW files from Canon, Nikon, Fuji, Olympus,
Konica-Minolta, Sony, Pentax and Panasonic.
Step 3: Highlight the LDR source images for HDR Generation and click Select. The “Generate
HDR-Loading source images” window will display.
Photomatix Pro User Manual
Page 5
Section 2: HDR Generation and Tonemapping
Step 4: The selected images will appear in the “Generate HDR-Loading source images”
window. Click OK. The “Selecting alignment and curve options” window will appear.
Step 5: Select Assume standard tone curve (recommended) or Attempt to recover tone curve
applied. Check Align source images if necessary. Click OK.
A progress bar will display in the “Generate HDR –Selecting alignment and curve options”
window. Once the HDR is generated, the HDR image and HDR Viewer window will display onscreen.
Step one of the two-step
process is complete.
Until tonemapping
is applied, the 32-bit image
seen on screen will not display
with a full tonal range.
Saving the 32-bit HDR image at this point will enable the user to apply different
Tonemapping settings to the HDR source image without repeatedly following the
“Generate HDR” procedure.
Photomatix Pro User Manual
Page 6
Section 2: HDR Generation and Tonemapping
TONEMAPPING
There are two methods for Tonemapping the HDR image:
Details Enhancer: Utilizes a local operator algorithm.
Tone Compressor: Utilizes a global operator algorithm.
Tonemapping with Details Enhancer
Photomatix defaults to this option when the Tonemapping window is opened. Details Enhancer
utilizes a local operator to ‘develop’ the HDR image.
Step 1: HDR>Tonemapping will launch the active open HDR image into the Tonemapping tool.
If you have followed the “Generate” command path to create a new HDR source image, it will be
the active image. Otherwise, open a saved HDR image via File>Open.
Step 2: Use the eight slider controls to adjust the image. The preview window provides a view of
what the image will look like once it is converted to an 8-bit or 16-bit image that incorporates the
entire expanded tonal range of the HDR source image.
Depending on the HDR file size and your computer’s hardware configuration, it may take
several seconds for the preview window to update and redraw.
Details Enhancer incorporates the following image quality adjustment sliders:
Strength: Controls the strength of contrast enhancements. A value of 100 gives the
maximum increase in both local and global contrast.
Color Saturation: Controls the saturation of the RGB color channels. The greater
Photomatix Pro User Manual
Page 7
Section 2: HDR Generation and Tonemapping
the saturation, the more intense the color. The value affects each color channel
equally.
Light Smoothing: Controls smoothing of light variations throughout the image. A
higher value tends to reduce halos and give a more natural look to the resulting
image. A lower value tends to increase sharpness.
Luminosity: Controls the compression of the tonal range, which has the effects of
adjusting the global luminosity level. Moving the slider to the right has the effect of
boosting shadow details and brightening the image. Moving it to the left gives a more
natural look to the resulting image.
Micro-contrast: Sets the level of accentuation of local details. The default value (2)
is often the optimal one.
Micro-smoothing: Smoothes out local details enhancement. This has the effect of
reducing noise in the sky for instance and tends to give a "cleaner" look to the
resulting image.
White Clipping - Black Clipping: Both sliders control how the minimum and
maximum values of the output image are set. Moving the sliders to the right
increases global contrast. Moving them to the left reduces the clipping at the
extremes. The White Clipping slider sets the value for the maximum (pure white or
level 255). The Black Clipping slider sets the value for the minimum (pure black or
level 0).
In the example above, the HDR image was generated from these five LDR low-bit source images.
Step 3: Once you are satisfied with the results of the Details Enhancer adjustments, select a bit
depth (8-bit is the default). Click OK to create the low-bit output image.
For further processing in an image editing application, 16-bit is recommended. This is
particularly recommended for print output.
Photomatix Pro User Manual
Page 8
Section 2: HDR Generation and Tonemapping
Step 4: Save the resultant file. File>Save. Rename, select save location and file type, if desired.
HDR>Save settings will save the applied tonemapping settings as an .xmp file.
Edit>Undo will undo the tonemapping settings applied to the HDR output image. The
output image will revert to a 32-bit HDR image which can be tonemapped again.
The Tonemapping window offers additional Settings, which are explained after
Tonemapping with Tone Compressor instructions on page 14.
Photomatix Pro User Manual
Page 9
Section 2: HDR Generation and Tonemapping
Tonemapping with Tone Compressor
Step 1: HDR>Tonemapping will launch the active open HDR image into the Tonemapping tool.
If you have followed the Generate command path to create a new HDR source image, it will be
the active image. Otherwise, open a saved HDR image via File>Open.
Step 2: From the Tonemapping window, highlight the Details Enhancer dropdown box and
select Tone Compressor.
The preview window will look very similar to the preview displayed using Details Enhancer,
however the image adjustment slider controls will represent the Tone Compressor functions.
Step 3: Use the eight slider controls to adjust the image. The preview window provides a view of
what the image will look like once it is converted to an 8-bit or 16-bit image that incorporates the
entire expanded tonal range of the HDR source image.
Depending on the HDR file size and your computer’s hardware configuration, it may take
several seconds for the preview window to update and redraw.
Photomatix Pro User Manual
Page 10
Section 2: HDR Generation and Tonemapping
Tone Compressor incorporates the following image quality adjustment sliders:
Brightness: Influences the tone mapping process done on the HDR image in
regards to overall image brightness.
Tonal Range Compression: Controls how the tonal range of the 32-bit image is
compressed into the 0-256 range of 8-bit monitors. The higher the value, the more
both shadows and highlights will be shifted toward the center of the histogram. This
tonemapping method ignores local context.
Contrast Adaptation: Adjusts the HDR contrast.
White Clipping - Black Clipping: Both sliders control how the minimum and
maximum values of the output image are set. Moving the sliders to the right
increases global contrast. Moving them to the left reduces the clipping at the
extremes. The White Clipping slider sets the value for the maximum (pure white or
level 255). The Black Clipping slider sets the value for the minimum (pure black or
level 0).
Step 4: Once you are satisfied with the results of the Tone Compressor adjustments, select a bit
depth (8-bit is default) and click OK to create the low-bit output image.
Step 5: Save the resultant file: File>Save. Rename, select save location and file type, if desired.
HDR>Save settings will save the applied tonemapping settings as an .xmp file.
Edit>Undo will undo the tonemapping settings applied to the HDR output image. The
output image will revert to a 32-bit HDR image which can be tonemapped again.
The HDR image above was generated from these seven LDR source files.
Photomatix Pro User Manual
Page 11
Section 2: HDR Generation and Tonemapping
Additional Tonemapping Settings
In addition to the image adjustment slider controls, the Tonemapping Preview window includes
several other options and settings, which apply to both Details Enhancer and Tone Compressor.
Bit Depth output image: 8-bit is the program’s default. Select 16-bit for 16-bit
output. This can be changed under Photomatix Pro>Preferences>>Tonemapping.
Previous, Load, Default, Save: These four options allow the user to use pre-set
values in both the Details Enhancer and Tone Compressor preview windows.
Previous reverts to the last user settings. Default resets the controls to program
default, Save allows the user to save settings in XMP format (Extensible Metadata
Platform), and Load allows the user to load previously saved settings in XMP format.
Preview: The program default is ON. Click the ON button to turn the preview window
off. Photomatix Pro offers three preview sizes: 512, 768, 1024. Select the radio
button for desired size.
Hovering the cursor over a section of the preview will bring up a 100%
Magnification view of the selected area of the preview. Click the mouse to zoom
in to 100%. Click the mouse again to return to full image preview.
Cancel: Closes the preview window without outputting a LDR image.
OK: Closes the preview window and outputs the 8-bit or 16-bit image.
The Details Enhancer method also offers a 360º image option.
This option needs to be checked when the image processed is an equirectangular image
intended to be viewed as a 360º panorama. Given that Details Enhancer takes into account
local contrast, the 360º seams of an equirectangular image will be assigned different tonal
values, which will result in a visible seam once the resulting image is rendered in a panorama
viewer. Checking this option will correct for this.
This option should only be checked for equirectangular 360º images. Checking it in
other cases may produce less optimal results.
Checking this option increases the amount of memory necessary to process the
image by about 50%. Processing times will also be increased.
The Tonemapping tool can also be used to process a single 16-bit or Camera RAW
image. Open the image, then follow the HDR>Tonemapping command path for
processing.
Photomatix Pro User Manual
Page 12
Section 3: Exposure Blending via the Combine Menu
Section 3: Exposure Blending via the Combine Menu
In addition to true HDR processing, Photomatix Pro also offers several low dynamic range
exposure blending methods.
Each method is explained in this section:
Average Method
Highlights and Shadows – 2 images
Highlights and Shadows – Auto
Highlights & Shadows – Adjust
Highlights & Shadows – Intensive
These blending methods combine 8- and 16-bit source photographs into a single image using
the existing shadow and highlight detail from the multiple source images to make a single final
‘blended’ image with an expanded tonal range.
Highlights & Shadows – Intensive method only supports 8-bit images.
There is no limit to the number of source images you can blend, except when using
Highlights & Shadows – 2 images, which can only blend two photographs.
Each of the Combine menu methods works by blending open images. It is important to
realize this, and to only have one series of photographs open at a time.
You can experiment with exposure blending, however it is mostly automatic. Exposure
blending can also be executed via the Batch Processing function, which is recommended.
Batch Processing is particularly recommended for blending 16-bit source images.
Photomatix Pro User Manual
Page 13
Section 3: Exposure Blending via the Combine Menu
Average Method
Step 1: Open your source images into Photomatix Pro via File>Open command path. (Use Shift
or Command to select and open multiple files at once.)
Step 2: Select Combine>Average. There are no user-inputs for this command. Photomatix Pro
will output a file entitled “Average” which is derived from stacking your source images.
Step 3: File>Save will save your image. Rename, select save location, and file type if desired.
Photomatix Pro User Manual
Page 14
Section 3: Exposure Blending via the Combine Menu
Highlights and Shadows – 2 images
Photomatix Pro will combine two (and only two) images when this command is selected. If more
than two source images are available, Photomatix Pro will select two which will yield the best
results.
Step 1: Open your source images into Photomatix Pro via File>Open command path.
Step 2: Combine>Highlights & Shadows – 2 images
If more than two images are open, the following warning will appear:
Step 2-A: Click Continue. A dialog box will display, informing the user which two source
photographs will be combined.
Step 3: Select Align Images (if necessary) and click OK. Photomatix Pro outputs a blended
photograph entitled “H&S 2 Images”.
Step 4: File>Save will save your image. Rename, select save location, and file type if desired.
You can try different combinations of two source images to make the most pleasing
output image.
Photomatix Pro User Manual
Page 15
Section 3: Exposure Blending via the Combine Menu
Highlights and Shadows – Auto
This method combines all open images into one output image, without offering the user any
adjustment options.
Step 1: Open your source images into Photomatix Pro via File>Open command path. (Use Shift
or Command to select and open multiple files at once.)
Step 2: Select Combine>Highlights & Shadows – Auto. A window will appear stating which
source images will be used.
Step 3: Click OK. Photomatix Pro will output an image titled “H&S Auto”.
Step 4: File>Save will save your image. Rename, select save location, and file type if desired.
If you have many source images, experiment with different numbers and
combinations of source images to obtain your desired results.
Photomatix Pro User Manual
Page 16
Section 3: Exposure Blending via the Combine Menu
Highlights & Shadows – Adjust
This method allows the user to control the blending point and radius of the blended image, and
provides a preview window.
Step 1: Open your source images into Photomatix Pro via File>Open command path. (Use Shift
or Command to select and open multiple files at once.)
Step 2: Select Combine>Highlights & Shadows – Adjust. A preview window will display the
exposure blending of your open source images.
The sliders to the left and below the preview move the image section in the preview
window which is defaulted to a detailed partial view. Click Zoom Out for a full image
preview.
Step 3: Adjust the controls to achieve the desired effect and click OK.
Blending Point: Shift this control to the right to favor overexposure, left for
underexposure.
Radius: A higher radius increases sharpness and blending accuracy, but may produce
halo artifacts.
Photomatix Pro will output an Exposure Blended file titled “H&S Adjust”.
Photomatix Pro User Manual
Page 17
Section 3: Exposure Blending via the Combine Menu
Highlight & Shadows – Adjust: Resulting blended image.
Step 4: File>Save will save your image. Rename, select save location, and file type if desired.
Photomatix Pro User Manual
Page 18
Section 3: Exposure Blending via the Combine Menu
Highlights & Shadows – Intensive
This exposure blending method only works with 8-bit source images.
Step 1: Open your source images into Photomatix Pro via File>Open command path. (Use Shift
or Command to select and open multiple files at once.)
Step 2: Select Combine>Highlights & Shadows – Intensive. A preview window will display.
Step 3: Select either Light or Enhance. If Enhance is chosen, Enhance Colors is an option.
The Enhance method tends to produce a higher dynamic range, but appears to be more
artificial and produce more halos and artifacts than the Light method.
Experiment with both options to obtain your desired results.
Step 4: Select a setting on the Precision slider. The setting defaults to 1.
A higher precision setting increases sharpness and blending accuracy, but may produce halo
artifacts. The higher the precision setting, the longer it will take to process.
Step 5: Check Align Images if necessary.
You must click the Refresh button to update the preview after any adjustments are
made, or when the preview sliders are moved.
Photomatix Pro User Manual
Page 19
Section 3: Exposure Blending via the Combine Menu
Step 6: Click OK to output the combined image. Cancel will close the window without outputting
the previewed image.
Step 7: File>Save will save your image. Rename, select save location, and file type if desired.
Photomatix Pro User Manual
Page 20
Section 4: Batch Processing
Section 4: Batch Processing
The Batch Processing function of Photomatix Pro allows the user to automate many of the
Exposure Blending and HDR/Tonemapping commands. Batch Processing may be used to:
Apply several different exposure blending methods to one set of LDR source images
Apply the same exposure blending settings to several different sets of source LDR
images
Apply both of the above processes at once: applying many different exposure
blending methods to several sets of source LDR images
It is important to note that when processing different sets of LDR source images in a
single folder, each set must contain the same number of source images.
Batch Processing files are selected alphabetically. Ensure that files to be processed
are named in a logical alphabetical manner.
Photomatix Pro can process subfolders with different numbers of source images in
each folder, and can filter by file type.
The following step-by-step instructions apply for all three batch processing functions.
Step 1: Open the Batch Processor via the Automate>Batch Processing command path.
Step 2: Select the processes to be automated. At least one option described below (Options AG) must be selected to run the Batch Processor.
Photomatix Pro User Manual
Page 21
Section 4: Batch Processing
Option A: Generate HDR image
Check Generate HDR image and click the Settings button to open an option window which will
allow input of EV spacing, if no EXIF information is found in the source files. If source images
are RAW, White Balance may be selected. If White Balance is not selected, “as shot” will be
used. Click Preview sample to select the proper white balance. Output Color Space may also be
selected. Click OK to save settings and close window.
Option B: Process with Details Enhancer
Check Process with Details Enhancer and click the
Settings button to open a window which allows
adjustments to the Details Enhancer Tonemapping
settings (described in Section 2) without a preview
window. You may load settings in .XMP format in this
command window.
Batch Processing enables the user to apply
both Details Enhancer and Tone Compressor
tonemapping settings simultaneously.
Photomatix Pro User Manual
Page 22
Section 4: Batch Processing
Option C: Process with Tone Compressor
Check Process with Tone Compressor and click
the Settings button to open a window for making
adjustments to the Tone Compressor
Tonemapping settings (described in Section 2)
without a preview window. You may load settings
in .XMP format in this command window.
Option D: Average
Check Average to combine your source images using the average method.
Option E: Highlights & Shadows – Auto
Check Highlights & Shadows – Auto to combine source images with the exposure blending
method Highlights & Shadows – Auto.
Option F: Highlights and Shadows – Adjust
Check Highlights and Shadows – Adjust and click the Settings button to open a window to
adjust the radius and blending point of the exposure blending method Highlights and Shadows –
Adjust.
Option G: Highlights & Shadows – Intensive
Check Highlights & Shadows – Intensive, and Light and/or Enhanced to run the Highlights &
Shadows – Intensive Exposure Blending methods
Highlights & Shadows – Intensive/Enhanced can only process 8-bit source images.
Selecting Highlights & Shadows – Intensive/Enhanced will prompt a warning window
when you click Run indicating that this option will take a long time to process. Select Yes
to run Highlights & Shadows – Intensive/Enhanced or Cancel to abort this method.
Photomatix Pro User Manual
Page 23
Section 4: Batch Processing
Step 3: Select a number of source images to process at a time: 2-11 or All.
All should only be selected if a single series contains more than 11 source images, or if you are
using the Process Subfolders option. If All is selected, Photomatix will attempt to process all
images in each folder, so it is important that only one series of source images be in each
subfolder.
It is possible to Batch Process multiple series of source images with varying numbers
of source images, if each series is in its own subfolder, and All is selected.
If all source images from multiple series are in a single folder, each series must have
the same number of source images. Images are processed alphabetically, so each
series should be assigned a logical naming method, as described in Section 2. For
example: A_Castle1,jpg, A_Castle2.jpg, A_Castle3.jpg followed by B_Sunrise1.jpg,
B_Sunrise2.jpg, B_Sunrise3.jpg.
Step 4: Check Align Images, if necessary, to correct for slight camera movement between
source photographs.
Step 5: Choose a source folder. Click Choose to route to your source images.
Step 5A: Check Process Subfolders if there are subfolders to be processed.
Use Process Subfolders if you have multiple series of source images which vary in
the number of source images they contain. The Batch Processor can process series with
varying numbers of source images if each series is in its own subfolder and All is
selected.
Step 5B: Select file type from the Filter by File Type dropdown, if necessary. Options are: All,
TIFF, JPEG, PSD, RAW.
This option is useful if a source folder contains RAW+JPEG from a camera, and you
are processing only one file type.
Step 6: Select Destination Folder location. Checking Created under Source Folder will put the
Batch Processing results in subfolders within the source folder. Checking Customized Location
allows you to select a specific (different) location on your computer. Click Choose to select the
location. The resulting folder will be prefixed by ‘PhotomatixResult’.
Photomatix Pro User Manual
Page 24
Section 4: Batch Processing
Step 6A: Select a file type for saving, JPEG or TIFF. If JPEG is selected, select a JPEG Quality,
from 10-100.
Step 6B: Select an HDR file type for saving an HDR: Radiance RGBE or OpenEXR (if
applicable).
Step 6C: Check Remove HDR image after having processed it to save only the Tonemapping
results and not the 32-bit HDR image (if applicable).
Step 6D: Check Use short file names for saving results if desired.
Checking this option results in short file names that do not reference the source
images. For example, if you Select Use Short File Names and run Generate HDR,
Details Enhancer, and Highlights & Shadows – Auto and select Save HDR, the resultant
files will be named 01HDR.hdr, 01Enhancer.jpg, and 01Auto.jpg. Without this option
selected, the file names will be longer, and will reference the source files:
Set01HDR2from_A_PinkHouse3.hdr, Set01Enhancer2from_A_PinkHouse3.jpg, and
Set01Auto2from_A_PinkHouse3.jpg.
Step 7: Click Run to start batch processing. The window below the RUN command will show the
status of each process in real time. When Processing is completed it will state: ***Batch
successfully completed***Results are in /Location/PhotomatixResults of files as selected in Step
6.
Photomatix Pro User Manual
Page 25
Section 4: Batch Processing
Single File Processing
In addition to batch processing multiple source files, Photomatix Pro includes the Single File
Conversion command under Automate>Single File Conversion. Following this command path
will open the Batch Conversion of Single Files Command window. This is useful for applying
one set of Details Enhancer Tonemapping settings to several HDR source images at once. This
command box can also convert single 16-bit or RAW images into 32-bit HDRs in either .hdr or
.exr formats.
Only one conversion method is available at a time. You cannot convert from HIGH to
LOW and LOW to HIGH in a single session.
To Convert HDR source images to Tonemapped LDR output files:
Step 1: Check the Tone Map into box.
Step 2: Select either 8-bit JPEG or 16-bit TIFF for output.
Step 3: Click Settings to adjust the Details Enhancer settings.
Follow from Step 4 on next page for converting from LOW to HIGH Dynamic Range.
Photomatix Pro User Manual
Page 26
Section 4: Batch Processing
To Convert from LOW to HIGH Dynamic Range:
Step 1: Check the Convert into button.
Step 2: Select either Radiance RGBE (.hdr) or OpenEXR (.exr)
Step 3: Click Select Folder to locate the folder you wish to process.
Step 4: Choose an output destination. Check Created Under Source Folder to have the output
files saved to the same location as the source files, or Check Customized Location to select
another location on your computer. In the case of Source Folder the result will be saved in a
sub-folder prefixed by ‘PhotomatixConversion’.
Step 5: Click Run to process the files. The window at the bottom of the command box will
display the progress as the files are processed.
Photomatix Pro User Manual
Page 27