1
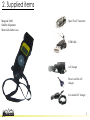
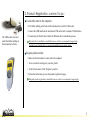
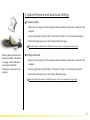
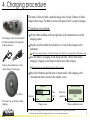
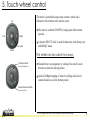
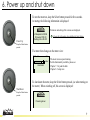
SAM
Satellite Meter
Ver: 0720us
User Manual
Table of contents
Chapter
Page
1. Introduction ............................................................ 2
2. Supplied items ........................................................ 3
3. Getting started
.............................. 4
2. Product registration, connect to PC ............................ 5
3. Download Firmware and Settings ................................ 6
1. Creating a Maxpeak user profile
4. Charging procedure ............................................. 7
5. Touch-wheel control ............................................ 8
6. Power up and shut down .................................... 9
7. Dish installation ....................................................
10
8. Peaking the dish .................................................... 11
9. Setup view .............................................................. 13
10. Battery replacement ............................................. 14
11. Specifications........................................................... 15
12. Warranty .................................................................. 16
1. Introduction
Thank you for purchasing our satellite alignment meter. It should provide
years of trouble free operation.
Please read this guide to familiarize yourself with all features and options
available.
Be careful with satellite dish pointing not to injure others by dropping tools or
hurting yourself by falling down.
Take care of the meter and keep it warm and out of the rain.
Please note in severe cold weather the battery capacity could be greatly
reduced. Store it in warm condition prior to use and keep the battery fully
charged.
2. Supplied items
Maxpeak SAM
Satellite Alignment
Meter with leather case
Spare F to F Connector
USB Cable
A/C charger
Power cord for A/C
charger
Car socket D/C charger
3. Getting started
Before using the instrument, a full charge should be performed (as described in
chapter 4).
Then a few easy tasks have to be done. Create a user profile on our website,
register the instrument to this profile and download firmware and settings to the instrument.
Please make sure your computer is connected to the internet and then follow the steps
listed below:
1. Create a Maxpeak user profile:
Navigate to our website: “www.maxpeak.tv”
• In the top-right corner is a list of flags. If your preferred language is available, click its flag.
Create your Profile.
• In the left side menu, under the maxpeak logotype, click ‘Login’.
• At the login-page, click “Register New Profile” in the left side menu.
• Follow instructions given at the registration page. Help is available from our support pages
The e-mail address entered in the procedure needs to be valid. A confirmation e-mail is sent to this address
and your profile will not be enabled until you reply to it.
2. Product Registration, connect to pc:
Connect the meter to the computer
• Lift rubber molding on left side of the instrument to reveal the USB socket.
• Connect the USB lead from the instruments USB socket to the computer USB interface.
The USB socket is located
under the rubber molding at
the instruments left side.
• If connecting for the first time: follow the Windows driver installation process.
Help with driver installation is available from our website, www.maxpeak.tv/support.php
If windows can’t find the driver it can be downloaded from our support pages.
Register product online
• Make sure the instrument is connected to the computer.
• Go to our website and login to your user profile.
• In the left side menu, Click ‘Register a product’
• Follow the instructions given at the product registrations page.
Help with product registration is available from our website, www.maxpeak.tv/support.php
3. Update firmware and download settings:
Firmware update
• Make sure to be logged in at the maxpeak website and that the instrument is connected to the
computer.
• In the top right menu, click ‘Products’. Then in the left menu, click ‘Firmware Download’.
• Follow the instructions given at the ‘Firmware Download’ page.
Help with firmware download is available from our website, www.maxpeak.tv/support.php
Before updating firmware and
download settings, remember to
be logged in with a Maxpeak
user profile and that the
instrument is connected to the
computer.
Settings download
• Make sure to be logged in at the maxpeak website and that the instrument is connected to the
computer.
• In the top right menu, click ‘Products’. Then in the left menu, click ‘Settings Download’.
• Follow the instructions given at the ‘Settings Download’ page.
Help with settings download is available from our website, www.maxpeak.tv/support.php
4. Charging procedure
The meter is delivered with a nominal charge only. It needs 24 hours of initial
charge before usage. The battery reaches full capacity after a couple of charges.
Charging procedure:
The charging socket is located under
the rubber molding at the right side
of the instrument.
Lift the rubber molding on the top right side of the instrument to reveal the
charging socket.
Plug the cord from either the included car or wall socket chargers to the
instrument.
Please note that warranty is voided if a charger other than the one supplied from Maxpeak is used.
Only use the included car or wall
socket chargers for charging.
Now the battery is charging. A full charge will take 3 hours (after initial
charging). Charging circuit drops to trickle when fully charged.
The meter may get warm during charging. This is normal.
Press Select button to put the meter in meter mode while charging, after
10 minutes the meter returns to the standby screen
CHARGING
Select
Press Select to use the meter while
charging
TRICKLE CHARGE
Time
Left
50%
Charged
01h20m
Charge screen
1h20m
Time since
completed
+00h10m
100%
FULL
Charge completed screen
Some vehicles need ignition turned on in order to provide power to the cigarette lighter socket.
Using the instrument while charging may result in less accurate measurements.
5. Touch-wheel control
The meter is controlled using a touch sensitive wheel and a
distinctive Select button at the wheels center.
Up
Left
Right
Select
Down
The meter is switched ON/OFF by keeping the Select button
pressed.
A shorter SELECT click is used for data entry in the Setup view
and DISEqC menu.
The wheel can be used in two ways:
Clockwise Slide
Quick Step Right/Down
Standard four way navigation, by clicking1 the wheel in each
direction as shown in the top picture.
Quick Left/Right stepping of values by sliding clockwise or
counterclockwise as in the bottom picture.
Counterclockwise Slide
Quick Step Left/Up
A click is triggered on release, when the finger is lifted, not when pressing.
6. Power up and shut down
To turn the meter on, keep the Select button pressed for five seconds.
At startup, the following information is displayed:
Firmware and settings file versions are displayed.
c Maxpeak Ltd 2006
Firmware: FM1.00
Settings file: US.001
Power Up:
Keep the Select button
pressed.
The meter then changes to the meter view:
S
BR DirecTV
S
101w
65dBuV
SEARCHING
Shut Down:
To freeze this information, keep holding the Select button.
The meter is now up and running.
For the functionality available, please see:
Chapter 7 - To peak the dish
Chapter 8 - Setup view.
To shut down the meter, keep the Select button pressed, (as when turning on
the meter). When switching off, this screen is displayed:
Keep the Select button
pressed.
Powering down
7. Dish installation
First find a suitable place to install the dish. It should have a clear line of sight (use
a compass to find azimuth angles (sideways). Make sure there are no overhead
obstructions like trees , buildings etc.
Next, assemble the dish according to the dish manufacturer’s instructions.
Install the LNB.
Obtain the elevation and polarization for the required satellite and location,
usually supplied with the dish or in the receiver software.
Preset the dish elevation (up/down) angle first. There may be a scale on the
back. An inclinometer may be of use if you know the dish elevation offset
angle. Set the feed rotation polarization angle also. There may be a
polarization rotation scale on the LNB feed horn throat. Or in some markets
the dish has screws and a scale on the back to set this. Next use a compass
to roughly set the azimuth. Hook up the SAM meter to the LNB. Switch on the
meter, gently move the dish until the meter changes from searching to found.
Peak the dish for maximum Q. If reception is dual polarity peak the optimum Q
for both polarities.
Follow all Local, State and National grounding requirements.
Be careful with satellite dish pointing not to injure others by
dropping tools or hurting yourself by falling down.
10
8. Peaking the dish
Hook up the lnb via the F to F lead.
Use high quality threaded F connectors for your installation. Low quality connectors will
negatively affect the accuracy of the readings
Do not use push-on F connectors as they are very unreliable, especially when they have
been used a few times.
Connect the other end to the bottom of the meter and power up.
Connect the leads first and then power up the meter.
Connect the F to F lead from the LNB to the F
connector at the bottom of the instrument.
Enter Setup View:
Hold Up.
Select Next Setting:
Clockwise Slide or
Right Click
Select Previous Setting:
Counterclockwise slide or
Left Click.
List of available DISEqC
Commands
Hold Down.
The meter view:
Initially the meter displays signal level and starts to search for a match.
Satellite
RF Level
S
BR DirecTV
S
101w
65dBuV
SEARCHING
Azimuth
Peak Hold indicator
Enable / Disable in Setup View
To choose among settings, click Left / Right or slide the wheel.
Enter Setup view by holding Up.
The menu of available DISEqC commands is shown by holding
Down. In the DISEqC menu, choose command with Up / Down click
or slide the wheel. Send selected command by clicking Select or close
by clicking Select with ‘Exit menu’ selected.
11
When the dish is pointed to the correct satellite, the meter will beep twice and change from searching to FOUND
to indicate identification of correct satellite. A Q1 bar appears that needs to be maximized.
The information available depends on which display mode is selected. The display mode of the Meter view can
be set in the Setup view. An option for S to be displayed in dBuV or dBm and an option to display M2 (MER) or
C3 (SNR) in any of the variants can be found here as well.
Classic
RF Level
S
BR DirecTV
S
Q
Reverse BER /
Quality
101w
65dBuV
75%
RF Level
Reverse BER /
Quality
All
S
BR DirecTV
S
Q
C
65dBuV
75%
9dB
MER Level
FOUND 101w
101w
FOUND 101w
or SNR
Simple
S
BR DirecTV
RF Level
Scientific
101w
Reverse BER /
Quality
Q
65 dBuV
FOUND 101W
RF Level
Pass
Fail, Marginal or Pass
MER Level
S
BR DirecTV
S
Q
C
101w
65dBuV
75%
9dB
A 3.0E-3
or SNR
Pre BER
B 2.3E-5
Post BER
1. Q= Quality / Reverse BER (Bit Error Rate) with FEC compensation. E.g. the highest value will give best signal
2. M= MER (Modulated Error Rate). A digital level of carrier (signal)/ noise but with the phase fault in the transmission
3. C= C/N. Carrier (signal) / noise level
12
9. Setup view
Enter Setup View:
Hold Up for 3 seconds.
The Setup view is where settings and personal preferences are set.
Enter the Setup view by holding Up on the wheel.
SETUP MENU
Exit menu
Backlight:
Sounder:
Auto shutdown:
Meter mode:
Hold finger at the top to enter set up
mode.
On
Off
6 min
Scientific
The following settings and choices are available:
Exit menu:
Slide the wheel or press Left/Right to
navigate the list of options
Press the center of the wheel to make a
selection.
Exit back to Meter view
Display backlight. Turn off when not needed to save
Backlight:
On, Off
Sounder:
on, off
Auto shutdown:
never, 3-15min
Time before meter shuts off to save battery, default=6 min.
Meter mode:
All, Scientific,
Classic, Simple
The meter modes determine the data entities displayed in
RF Level:
SNR/MER:
dBuV, dBm
Select RF Level display.
SNR, MER
Select whether to display SNR or MER value
Peak Hold:
On, Off
Touch sens:
Restore to
default:
Low, Medium,
High
battery time.
Sound feedback while peaking signal.
Beeps faster as signal quality increases.
meter view. (see chapter 7 - Peaking the dish) for details.
A vertical hold line indicating the top value reached.
This applies to all meter bars.
Adjust the touch wheel sensitivity.
Restore the setup view menu values to factory defaults
13
10. Battery replacement
The meter is powered by a replaceable NiMH battery pack.
As with all batteries the pack will deteriorate with time.
Remove the screw located at the upper back side of the instrument.
To ensure good lifetime of the battery pack, make sure to use/discharge and recharge the meter
frequently
When the battery pack needs to be replaced, spare packs can be ordered from an
authorized reseller.
Do not use any other kind of non authorized batteries. A different pack can damage the meter and
make the warranty invalid.
Battery Replacement:
Take away the battery lid and disconnect the current battery pack.
Changing the battery pack is a simple procedure.
Unscrew the screw and take away the battery lid.
Remove the battery and disconnect the plug.
Connect the new battery pack to the plug.
Place the pack as shown in the bottom picture to the left.
Attach the socket of the new battery
to the connector on the instrument.
Put the battery pack in place and put
back the lid and screw.
Initially charge the meter for 24 hours as described in chapter 2 - Charging.
14
11. Specifications
High sensitivity -75dBm
C, Ku, Ka or L band
Replaceable F-connector
75 Ohm imp 30 to 100 dBuV
RF level as dBm or dBuV.Range -90 to -20 dBm 17 dBuV to 87 dBuV Precision+- 3 dB
True MER or SNR displayed in dB Range 3 to 16 dB Precision +- 1dB
Pre and Post BER in numerical value Range preBER 0.001 % to 10 % Precision +- 5 dB
Quality displayed in % (reverse BER)
RF, BER,MER displayed together * Backlite graphics display 128x64 dots
Integrated rechargable NiMH battery 12 V (10 cells) 2250 mA
Charged from wall adaptor or car
Up to 80 sats dividable in sub groups
Upgrade of settings via USB 2.0
Upgrade of firmware via USB 2.0
Language option via USB 2.0
Built in audible sounder
DiSEqC switch commands and 22 K tone
Run time in excess of 4 hours, charge time 3 hours
9.5”Lx3”Wx2.5”H 28 oz.
Charge type: Sophisticated Fast/ trickle charge with auto top off. Using Delta V/ T for long life.
Dedicated LNB driver with auto compensation and current limit of 650 mA
The manufacture reserves the right to change this specification without prior notice.
15
12. Warranty
This product carries a manufacturer’s warranty against faults or manufacturing defects for a period of 12
months from purchase.
Maxpeak reserves the right to replace or repair a faulty meter. The warranty doesn’t cover moisture damage,
misuse, damage caused by dropping the meter or if the meter has been opened.
Declaration of conformity:
We, the manufacturer, Maxpeak Ltd 2nd Floor Compton House 29-33 Church Road Stanmore HA7 4AR ENGLAND declares that SAM (satellite meter) meets the following standards and directives:
Low voltage : 73/23/EEC , 93/68/EEC EMC: 61000-6-1:2001 61000-6-3:2001 and amendment A11:2004
RoHS
P Lagerstedt (Director) Bridgetown 13:th of Feb 2007
Recycle:
Please recycle the carton and packaging.
Do not throw out the NiMH battery, but please recycle instead.
Do not discard the meter at the end of useful life, again recycle.
Check our website for the latest information.
16
Notes
17
[email protected]
US Distrubitor:
Perfect 10 Satellite Distributing
3901 Progress Street
North Little Rock , Arkansas 72114
USA
1-800-205-8620
www.perfect-10.tv
www.maxpeak.tv
18