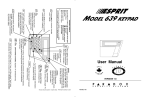
1
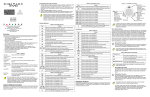
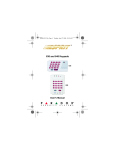
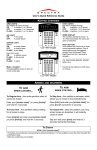
"FAST ARM" key (regular/stay mode) Press this key for 2 seconds and the system arms automatically. There's no need to enter an access code. 10 + CODE Activates manual zone bypassing. You select which zones to leave open when arming the system. BYP When "on", this key indicates that if alarms were generated while the system was armed. Pressing on "MEM" will bring up alarm "events" stored in memory. MEM TRBL Indicates AC power failure. 2ND 5 9 12 AWAY 2 ENTER 8 11 STAY 1 7 4 10 CLEAR MEM BYP 2ND TRBL Made a mistake entering info on the keypad? Just press the [CLEAR] key - it erases any keypad entries and returns the control panel to its previous status. CLEAR Activates programmable output #1 (Let your installer deal with it!!!) 6 3 11 + CODE Paradox Security System Graphic Dept - PRINTED IN CANADA - 951207-727 Activates "STAY" arming. If you want to stay on the premises, but still be protected, "stay" (partial system) arming permits movement in pre-selected, unarmed zones. STAY ENTER Use this key to store keypad entries in memory. 12 + CODE AWAY "AWAY" auto bypass arming. Need to leave in a hurry? This key automatically bypasses any open zones before arming the system. Press this key for 3 seconds to enable keypad buzzer total "muting" (long beep) or disable it (short beep). 9 The red LED illuminates when the system is armed. ARMED Programmable "chime" zones. Pressing for 3 sec any of these keys will activate chime zones (long alternating beeps) or READY de-activate chime zones The green LED must be "on", indicating all zones (short alternating beeps). are closed, before the system can be armed. *(SOFTWARE 3.1 AND OVER) When flashing, it indicates that the exit delay is in progress. 95/12/8 ESPRIT 727 User Manual Version 3.2 S P E C U R R I T Y S D Y S O T E M X S ENDU727 ESPRIT 727 Welcome to the world of ESPRIT technology. Your ESPRIT security system control panel is the first one of its kind designed with total ease of use and simplicity in mind. Weve harnessed the most advanced technology available to create a sophisticated control panel with powerful features that ANYONE can use, without memorizing complex, confusing codes or taking a course in computer programming!! Not only is ESPRIT easy to operate, with many functions accessible by one touch of the keypad, but its also functional and stylish. Were sure that youve already been impressed by its compact design and attractively styled keypads, with their adjustable illumination levels. The protection it provides will also impress you! The dwelling or building that you want to protect can be divided into up to 8 zones, and controlled by up to 5 keypads. All the security operations you need to access will be right at your fingertips. The ESPRIT keypads comprehensive 8 zone keys, 8 function keys and keypad sounder serve to keep you instantly aware of alarm, system and operational status. Motion detectors, smoke and glass break detectors, as well as vibration/shock and door/window contact sensors will all report to the ESPRITs two RISC microprocessor brains, and vital security information will be communicated to you on the uncomplicated keypad display. Look. Everything you need to know about your security system is clearly and simply displayed on the Esprit keypad. Controlling system operations is a question of following a few straightforward instructions. The keypad diagram contained in this booklet provides you with an excellent introduction to the roles of the keypad function keys. 1 ENDU727 ENDU727 Listen. Every time a key is pressed, it illuminates and the keypad beeps (0.5 second tone) to show that the entry has been recognized. When you enter information on the keypad, it will guide you with beep tones that communicate acceptance or rejection of your entries. You should be familiar with these two keypad beep tones: To program the master and all user codes: Press [ENTER] + master code + 1 digit access code number + new 4 or 6 digit code + [ENTER]. Note: If only 2 or 4 digits are entered, digits "00" will be enter automatically in the remaining memory space. CONFIRMATION beep: When an operation (i.e. arming/disarming) is successfully entered on the keypad, or when the system switches to a new status/mode, the sounder produces an intermittent beep tone. END/REJECTION beep: When the system reverts to previous status, or when an operation is incorrectly entered on the keypad, the sounder emits a continuous beep tone. Code priority When deciding who should have access to your security system control panel, please keep in mind that each of the Esprit 727 master and user codes has been assigned a code priority. Code priority determines the level of security access each user will have, and which features and functions they can activate. The Master User Code (priority 2) can arm/disarm the system, activate zone bypassing, and reprogram master and user codes. User Codes #13 (priority 3) can be used to arm/disarm the system, activate "STAY" and "AWAY" arming, and zone bypassing. User Codes #4-6 (priority 4) can arm/disarm the system and User Code #7 (priority 5) is an arm only access code. Master and User Code programming: The Esprit control panel can be programmed to accept up to 7 user codes. Depending on your security requirements, you can choose to use either 4 or 6-digit access codes with your system. 6-digit codes are considered more difficult to crack and are therefore viewed as more secure. If, however, ease of recall is your priority, then 4-digit access codes can be programmed instead. Your installer will program the Esprit to accept 4 or 6 digit codes, and can also program the values for these codes. If you wish to create or change the codes yourself, you may do so by following the steps indicated below. The master code must be used to enter programming mode to program user codes. 2 MASTER CODE: [1] (priority 2) Arm, Disarm, Bypass, Away, Stay,reprogram master and user codes USER CODE #1: [2] (priority 3) Arm, Disarm, Bypass, Away, Stay USER CODE #2: [3] (priority 3) Arm, Disarm, Bypass, Away, Stay USER CODE #3: [4] (priority 3) Arm, Disarm, Bypass, Away, Stay USER CODE #4: [5] (priority 4) Arm, Disarm USER CODE #5: [6] (priority 4) Arm, Disarm USER CODE #6: [7] (priority 4) Arm, Disarm USER CODE #7: [8] (priority 5) Arm ONLY ARM ONLY CODE: This code can only be used to arm the system. No other system features can be accessed, and the system cannot be disarmed using the Arm Only code, unless it is used during the exit delay period. Deleting a user code: Pressing the [2ND] key + [ENTER], while in programming mode at any user code address, will delete that user code. 3 ENDU727 ENDU727 ARMING THE SYSTEM The user-friendly Esprit 727 can be armed in 5 different ways designed to cover a wide variety of security situations. We suggest that you familiarize yourself with all 5 arming procedures so that you can take full advantage of your control panel. #1 (#2 OR #3) on the keypad activates the stay arming command. STAY arming can also be activated by a key switch please refer to section on key switch/push button arming. USER CODE (3) “FAST” arming KEY [10] (1) REGULAR system arming (used for normal, day-to-day system operation) The keypads green "READY" light must be on in order to arm the system. This light will only illuminate if all protected zones are closed. All doors and windows must be closed, and there can be no movement in areas monitored by motion detectors. Once the "READY" light is on, enter your user code. (The installer will program all user codes and code priorities for you.) If you make a mistake entering your code, the keypad sounders END/REJECTION beep will let you know. Just press [CLEAR] and re-enter the code. When you have correctly entered your user code, the red "ARMED" light will come on, and you will hear the keypad CONFIRMATION beep. The "READY" light will flash during the exit delay period. Your installer will program exit delay duration based on the time you require to safely exit the protected area once the system is armed. Important: Please note that when entering user codes, the [10] key represents the digit 0. Fast arming (stay mode). When activated, no "READY" light is required to arm the system. Pressing key [10] for 2 seconds automatically "STAY" arms the system. (See "STAY" arming features described above.) Also, when system is stay armed, pressing key [10] will activate an exit delay and then return the system to STAY ARM status, eliminating the need to disarm and then STAY ARM the system again. (2) “STAY” arming (4) MANUAL BYPASS arming [STAY] + MASTER CODE OR USER CODES #1, #2, #3 (partial system arming) STAY arming allows you to remain in the protected area while partially arming the system. This means that you can stay in and move around your home or commercial building, while certain designated zones are armed and still receive the protection of your security system. You might choose to have entry/exit points like doors or windows protected, or the basement, or perhaps all the zones on the perimeter of your home or establishment. Based on your instructions, your installer programs the control panel to bypass these zones in stay arming mode. These programmed stay zones can only be changed during zone definition programming. (Please remember that fire zone #7 and keypad zone #8 cannot be bypassed.) Entering [STAY] + MASTER CODE or [STAY] + 4 (One touch system arming - no code required) Fast arming (regular mode). When the "READY" light is on, pressing key [10] steadily for 2 seconds will automatically arm the system. No user code is required. This feature can be used to enable specified individuals like service personnel (i.e. cleaners, maintenance) to arm the system when leaving the protected area, without giving them access to any other control panel operations. (FAST ARMING must be activated by your installer during panel option programming.) [BYP] + MASTER CODE OR USER CODES #1, #2, #3 (Arms the system while bypassing defective zones and/or zones you wish to leave open) When you bypass a zone, it is no longer protected by the security system. It will not generate an alarm on the control panel. You may not wish to arm the entire system when, for example, workers are renovating your basement, or you require access to a side door, or for any other reason you need to leave a zone open while arming the system. If a component of your security system is damaged, it can also be bypassed until repairs are made. Manual bypass arming instructs the control panel to ignore zones that you designate open, so that the rest of the system can still be armed. (Based on your instructions, only zones that your installer has programmed bypass-enabled can be bypassed during manual bypass arming, 5 ENDU727 ENDU727 away arming or stay arming. Please note that the fire zone can never be bypassed and zone #8 is always bypass-enabled.) Please note: This feature is not recommended for regular use because leaving zones open can reduce the efficiency of system protection. Press the bypass [BYP] key, followed by your MASTER CODE or USER CODE #1 (#2 OR #3). You are now in bypass mode. The [BYP] and [ENTER] keys will be illuminated. Enter the key numbers corresponding to the zones you wish to leave open (1 - 6, 8). Press twice on a key if you wish to undo a zone selection. If you have entered the correct zone bypass information, press [ENTER]. The [BYP] key light will remain on indicating that zones have been bypassed. If you make an error entering zone numbers, press [CLEAR] and key in zones again. (Pressing the [CLEAR] key once more will exit the bypass mode, without saving any bypass entries in memory.) To cancel zone bypass entries you have just made, press [BYP] + CODE + [CLEAR] + [ENTER]. Zone bypasses are cancelled every time the panel is disarmed. Using the bypass recall feature, you can reinstate the latest zone bypass instructions saved in memory. Press [BYP] while in manual bypass arming mode and the previous bypass status will be reestablished. Even if you are in the process of entering new bypass information on the keypad, one touch of the [BYP] key will override this new information and reinstate the last zone bypass instructions you saved. Panic Alarms If you need to signal a panic situation, pressing keys [1] and [3] simultaneously for 1 second will generate a panic alarm. Panic alarms will be recorded in memory but not displayed on the keypad. Key switch/Push-button Arming Based on your requirements, your installer can replace any keypads with a key switch or a push button that will immediately arm the system. The panel can also be programmed to activate regular or stay arming from the key switch/push-button. This arming method is particularly useful when installed in a master bedroom, making system arming and disarming convenient and accessible. (If you use a push button/key switch to activate stay arming, please keep in mind that if an alarm is generated, or a zone is opened after system arming that has not been defined as a stay zone, the system must be disarmed from a keypad, using an access code.) (5) “AWAY” auto bypass arming [AWAY] + MASTER CODE OR USER CODE #1, #2, #3) (System arming without the need to enter zone bypasses) If you want to arm the system without manually entering zones to be bypassed on the keypad, you can use the Away auto-bypass feature. [AWAY] + MASTER CODE or [AWAY] + USER CODE #1 (#2 OR #3) should be keyed in. The control panel will automatically bypass any open zones after the exit delay terminates and the system will be armed. The ready light does not have to be on, but all open zones must be bypass-enabled. If any zones have been left open, the [BYP] light will illuminate to indicate that zones have automatically been bypassed. (The fire zone cannot be bypassed.) 6 7 ENDU727 ENDU727 DISARMING THE SYSTEM Enter the protected area using the designated entry-exit door. The keypad sounder beeps to remind you to disarm your system. Enter your user code on the keypad before the entry time expires. If you make a mistake while entering this code, press [CLEAR] and reenter it. The "ARMED" light will go off and the sounder will stop. If a fire or 24 hour zone alarm was generated while the system was armed, entering your user code will silence the siren. However, you should then check the zone and eliminate the cause of the alarm, otherwise the zone will remain open and after 30 seconds, the siren will reactivate. If you are unable to pinpoint the reason for the alarm, call your installer immediately. Keypad night illumination Pressing on the [MEM] key for 2 seconds changes it to the keypad illumination key. Subsequently, pressing on this key alters the illumination level from low, medium, to high, and then off. Keep pressing on the [MEM] key until you reach the level you require, then press [ENTER] or [CLEAR] to save the setting in system memory. Trouble Display [TRBL] AC power failure will be communicated to you by the illumination of the keypad [TRBL] indicator. If you are unable to find the cause of AC power loss, contact your installer/alarm company immediately. Alarm Memory [MEM] The memory light [MEM] on your keypad will illuminate if any alarm situations take place while your system is armed. A record of all alarm situations that occur is stored in memory. After disarming the system, pressing once on the [MEM] key brings up the first alarm event, which is displayed on the keypad. (An alarm event consists of zones that generated an alarm or that were open upon alarm.) Up to 15 levels of alarm history can be stored in memory. Each level of memory is retrieved by repeatedly pressing the [MEM] key. If the END/REJECTION beep is heard, this indicates that the last recorded level or the maximum level of alarm history has been reached. When the memory is full, the newest event takes the place of the oldest one in memory. After pressing of the [MEM] key, events will be displayed in order from the most recent to the oldest. To review alarm history again, press [MEM] key. Exiting memory mode is achieved by pressing [CLEAR] or [ENTER], which will be followed by the END/REJ beep. The [MEM] light also goes out. When you arm the control panel again, system memory will not clear and alarm history is saved. Energy-Saver Programming: The ESPRIT 727 can be programmed to reduce energy consumption in the protected area. Just ask your installer about this option, which can automatically lower building temperature and/or turn off lights upon system arming. When the system is disarmed, the panel will return building temperature to its previous level and turn the lights back on. 8 9 ENDU727 WARRANTY Warranty conditions for the Esprit 727 may vary from country to country. Please consult your local dealer for complete warranty information. In all cases, the warranty does not cover malfunctions arising from installer error or failure to follow installation/operation instructions, nor does it apply to damages due to causes beyond the control of Paradox Security Systems, such as lightning, excessive voltage, mechanical shock or water damage. LIABILITY Under no circumstances shall Paradox Security Systems. be held liable for any direct or indirect damages, loss of anticipated profits, loss of time or any other losses incurred by the buyer in connection with the purchase, installation, operation or failure of this product. WARNING This security system should undergo frequent testing. However, despite regular testing, and due to, but not limited to, criminal tampering or electrical disruption, it is possible for this product to fail to perform as expected. 780 Industrial Blvd, St Eustache, Montreal, Quebec, Canada J7R 5V3 Fax: (514) 491-2313 10