1
User Guide
780 Industriel Blvd., Saint-Eustache (Quebec) J7R 5V3 CANADA
www. p a r a d o x . c a
User Guide
780 Industriel Blvd., Saint-Eustache (Quebec) J7R 5V3 CANADA
www. p a r a d o x . c a
Magelan-EU05 - Printed in Canada 09/2005
Magellan is a trademark or registered trademark of Paradox Security Systems Ltd. or its affiliates in Canada, the United States and/or
other countries. All rights reserved. Specifications may change without prior notice. © 2005 Paradox Security Systems Ltd.
Magelan-EU05 - Printed in Canada 09/2005
Magellan is a trademark or registered trademark of Paradox Security Systems Ltd. or its affiliates in Canada, the United States and/or
other countries. All rights reserved. Specifications may change without prior notice. © 2005 Paradox Security Systems Ltd.
Choose from
The Digital Dual-Optic
High-Performance
Outdoor PIR
(40kg/90lb True Pet Immunity)
(MG-PMD85),
Digital Dual-Optic
High-Performance PIR
(40kg/90lb True Pet Immunity)
(MG-PMD75) or,
the Analog Single-Optic PIR
(18kg/40lb Pet Immunity)
(MG-PMD1P)
2-Way Wireless PGM
(MG-2WPGM)
The 2-Way Remote
Control
with Backlit Buttons
(MG-REM2) or,
the Remote Control
with Backlit Buttons
(MG-REM1)
Choose from
The Door Contact
(MG-DCTXP),
Ultra-Small Door Contact
(MG-DCT2) or,
the Long-Range Door Contact
(MG-DCT1)
Smoke Detector
(SD738)
Made by EVERday
(Taiwan)†
† manufactured and available exclusively through
EVERday Technology Co. Ltd.
Choose from
The Digital Dual-Optic
High-Performance
Outdoor PIR
(40kg/90lb True Pet Immunity)
(MG-PMD85),
Digital Dual-Optic
High-Performance PIR
(40kg/90lb True Pet Immunity)
(MG-PMD75) or,
the Analog Single-Optic PIR
(18kg/40lb Pet Immunity)
(MG-PMD1P)
2-Way Wireless PGM
(MG-2WPGM)
Choose from
The Door Contact
(MG-DCTXP),
Ultra-Small Door Contact
(MG-DCT2) or,
the Long-Range Door Contact
(MG-DCT1)
† manufactured and available exclusively through
EVERday Technology Co. Ltd.
Smoke Detector
(SD738)
Made by EVERday
(Taiwan)†
The 2-Way Remote
Control
with Backlit Buttons
(MG-REM2) or,
the Remote Control
with Backlit Buttons
(MG-REM1)
Table of Contents
Overview.................................................... 2
Trouble Display.................................................. 23
Introduction ......................................................... 3
Basic Operation .................................................. 6
Making a Service Call........................................ 24
Arming / Disarming .................................. 9
Demo Mode ....................................................... 24
X10 Automation ................................................. 24
Arming................................................................. 9
Disarming.......................................................... 12
Fire Alarms........................................................ 13
Panic Alarms..................................................... 16
Access System Features by Phone....... 25
Consumer Features................................ 18
Adding a Remote Control to an Existing User ... 28
Access System Features by Phone................... 25
Advanced Features ................................. 27
Programming User Codes ................................. 27
Message Center................................................ 18
FM Radio Feature ............................................. 19
Setting the Language ........................................ 29
Alarm Clock....................................................... 20
Utility Reporting ................................................. 30
Speakerphone................................................... 21
Pager Reporting ................................................ 31
Chime Zones..................................................... 22
Bell Cut-Off Timer .............................................. 32
Keypad Settings................................................ 22
System Test....................................................... 32
Time and Date .................................................. 23
Zone Labels ....................................................... 32
Voice Reporting ................................................. 29
Programmable Outputs (PGMs) ....................... 23
Magellan
1
Chapter 1: Overview
What’s in this chapter:
•
•
Introduction
Basic Operation
This chapter will give you a basic overview of your Magellan system. It will cover Magellan’s light indicators,
keypads and remote controls. This chapter also includes sections explaining how to use this guide as well as
a list of conventions used throughout the manual.
2
User Guide
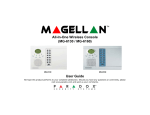
Introduction
Magellan is the first security system to combine security with popular consumer features and a stylish design. Magellan looks different
from anything else in the security industry. Install it anywhere in your home or small business–Magellan blends beautifully with any décor.
Listen to the radio, leave a message or use your system as a telephone, alarm clock or monitoring device.
Magellan consists of wireless detection devices installed at specific entry and exit points, as well as other vulnerable areas, such as
windows. These devices protect the premises and communicate with Magellan’s main console. If you have armed the system and a
device detects a breach, a siren will be activated and your monitoring station will immediately be notified by phone. Choose from wireless
motion detectors with pet immunity, door contacts, and remote controls that automate your most frequently used security functions.
With Magellan you have security and so much more:
•
•
•
•
•
•
•
•
•
•
•
Built-in FM radio (page 19)*
Speakerphone (page 21)*
Family message center (page 18)
Telephone access to system features (page 25)*
Alarm clock (page 20)
Chime zones (page 22)
Voice, Utility and Pager reporting (page 29 to page 31)
One-touch arming (page 11) and panic keys (page 16)
Full, Force, Stay, Instant and Automatic arming (page 9)**
X10 home automation (page 24)*
16 wireless zones, 16 remote controls and 16 users available
* Available with the MG-6060 only.
** Please note that Force arming and Auto-arming are not for use in UL installations.
Overview
3
How to Use this Guide
This manual employs an icon-based instruction format to display the steps required to use Magellan’s features. The icon-based
instructions are designed to be used in conjunction with the on-screen instructions being displayed on the Magellan console. In other
words, as you are following the instructions shown in this guide, you should also be reading what is being displayed on the LCD
screen. All of the icons displayed in this guide are explained in Conventions on page 5.
Example
When setting the Magellan console’s time and date (page 23), the following will be displayed:
A
B
D
C
or
Menu
12Hrs
B- Press the [3] key on the main keypad.
24Hrs
Select the
console’s
time format
A- Press the [MENU] action key (the right action key located under the right
side of the LCD screen).
Enter the
time and
date
C- Select the time format that Magellan will follow; press the [12HRS] action
key (the left action key under the LCD screen) to select the 12-hour
format or the [24HRS] action key (the center action key under the LCD
screen) to select the 24-hour format.
D- Program the desired time (following the time format selected before) and
then the date.
4
User Guide
Conventions
Icon
[DATA]
or
[KEY]
Overview
Definition
Icon
Definition
Reference to another manual or guide.
Enter the System Master code on the main keypad.
Warning or important information.
Enter your User code on the main keypad.
Reminder or suggestion.
Enter a time value (such as when programming
Magellan’s date and time) on the main keypad.
Type required data or press the designated key on
either the main or center keypad.
Enter numerical data for the specified feature on the
main keypad.
Record voice label when prompted or speak into the
Magellan console when using Magellan’s
Speakerphone feature (see page 21).
Press a button on a remote control.
Press the specified action key. See Figure 1 on page
6.
Wait the specified amount of time before performing
another action.
Press the specified key on the main keypad. See
Figure 1 on page 6.
Call Magellan through a standard touch-tone
telephone.
Press the specified function key. See Figure 1 on
page 6.
Press any key on the console.
5
MAGELLAN_EU05.fm Page 6 Tuesday, September 13, 2005 10:19 AM
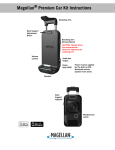
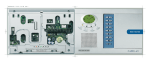
Basic Operation
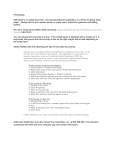
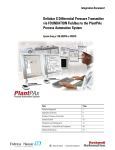
Figure 1: Basic Overview
Light Indicators:
Orange INFORMATION light
ON: There is a trouble in the system, an alarm has just
occurred or a zone has been bypassed.
Flashing: There is a power failure and the Magellan console is
receiving no power.
Center Keypad
(see page 8)
LCD Screen
(see page 7)
Volume Keys
Main Keypad
(see page 8)
Red ARMED light
ON: System is Regular armed.
Slow Flashing: System is Stay armed.
Rapid Flashing: System is in alarm.
Green READY light
ON: All zones closed. System can be armed.
Flashing: System in Exit Delay mode.
Orange MESSAGE light
Flashing: A voice message has been recorded. See Message
Center on page 18.
Function Keys
Message Key
Press once: Play a recorded voice message.
Press & hold: Record message. See page 18.
Radio Tuner / Alarm Clock Key
Press once: Turn ON/OFF radio*. See page 19.
Press & hold: Enable/disable alarm clock. See page 20.
Stay Arming Key
Press once: Enter user code to Stay arm
Press & hold: One-touch Stay arm. See page 10.
Regular Arm Key
Press & hold: One-touch Regular arm. See page 9.
Action Keys
* = MG-6060 only
6
User Guide
LCD Screen
Alarm clock feature enabled (see page 20).
Information symbol. This means:
• There is a trouble in the system
(see page 23).
• There is an alarm in memory
(see page 13).
• Zones or a zone is currently
bypassed (see page 10).
Instructions and/or messages appear in
this line
The function or action associated with
the action key directly underneath the
text appear in this line. Press the
appropriate action key to access the
function.
Remote Controls
Remote Control Default Settings
Your installer can add other functions and/or change the default settings of your remote
controls. To use the functions programmed in your remote control, press and hold the desired
key(s) for at least two seconds. Your remote control has already been programmed with the
following features:
= Force Arm (page 10)
= Disarm (page 12) / Control radio volume
(page 20)
MG-REM1
= Turn FM radio ON/OFF* (page 19)†
= Turn FM radio ON/OFF* (page 19)‡
= Scroll through programmed radio
stations in memory* (page 19)†
= Scroll through programmed radio
stations in memory* (page 19)‡
† = MG-REM1 only
* Available with the MG-6060 only
Overview
= Request feedback from the Magellan
system (see MG-REM2 Reference &
Installation Manual for more information)‡
‡ = MG-REM2 only
MG-REM2
7
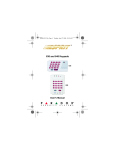
Magellan’s Keypads
Center Keypad
Main Keypad
Use keys [1] to [16] on the center keypad for the following:
Zones 1 to 16*
OFF = Zone closed (ok)
ON = Zone opened
Flashing = The zone has been tampered with
Press once = Listen to zone’s label (e.g.: “Front door”)
* = Press and hold key [16] to listen to the label for zone 16. See
Key [16] below for more information.
Users 1 to 16
When programming a user:
OFF = User not programmed
ON = User programmed
Press once = Listen to user label and program or edit a user
Use this keypad to enter User
codes, required data and/or to
select desired menus.
X10 programming**
This keypad is also used when programming and using
Magellan’s X10 features. Refer to Magellan’s X10 Instruction
Guide which can be downloaded for free from our website at
www.paradox.ca.
Key [16]
Press once = Make a telephone call or answer an incoming call**.
Press again to hang up. See page 21.
Press & hold = Listen to the zone label of zone 16.
Fast flashing = Speakerphone in use**. See page 21.
** Available with the MG-6060 only.
8
User Guide
Chapter 2: Arming / Disarming
This chapter will cover the multiple arming methods that Magellan employs such as Regular arming and Stay arming. This chapter will
also cover disarming the system, what to do during a fire alarm, fire safety tips and panic alarms.
Arming
When your system is armed, it can respond to any breach in the protected zones by generating an alarm and by transmitting a report to
your monitoring station. Though the arming methods explained in this section pertain to arming through Magellan’s keypad, the system
can also be armed using your remote control. See Remote Controls on page 7.
Exit Delay Timer
When you arm your system, it will trigger the Exit Delay Timer to provide you with enough time to exit the protected area before your
system is armed. You can program the Exit Delay Timer from 1 second to 255 seconds (default 45 seconds). Only the System
Master user can program the Exit Delay Timer. To program the Exit Delay Timer:
menu
next
next
System
Master code
ok
ok
Exit Delay from
001 to 255 secs.
next
ok
Press
until
desired
tone
If a Delay zone is opened and then closed while the system is in Exit Delay mode, the Exit Delay timer will be reduced to 10 seconds.
UL installations require a maximum exit delay of 60 seconds.
Regular Arming
This method is used for the everyday arming of your system. All
defined zones in the system must be closed (the green READY light
in ON) to Regular arm the system. To Regular arm your system:
Arming / Disarming
User code
9
Stay Arming
Stay arming will partially arm your system to permit you to remain
in your home by arming the outer zones of your system (e.g. doors
and windows) and ignoring interior zones (e.g. motion detectors).
All defined zones in the system must be closed (the green READY
light is ON) to Stay arm the system. To Stay arm your system:
User code
Instant Arming
This arming method is the same as Stay arming (page 10) except
that the Entry Delay Timer (see page 12) is ignored. Therefore,
any armed zone that is breached will immediately generate an
alarm. To Instant arm your system:
User code
Press &
hold for
3 secs.
Force Arming
Force arming ignores open zones allowing you to arm your system. Once the zone closes, the system will then arm that zone as
well. This feature is useful when a motion detector is protecting the area where your Magellan console is located. During Force
arming, the motion detector will remain unarmed until you exit the area. The system will then arm the motion detector. By default,
your system is programmed with this feature. You can also Force arm your system using your remote control (see page 7).
Please note that Force arming is not permitted in UL installations.
Bypass Programming
You can bypass certain zones when you arm the system. When a
zone is bypassed, it will be ignored the next time you arm the
system. Once the system is disarmed, the system will “unbypass”
the zone. Zones that can be bypassed are defined by your
installer. Fire zones cannot be bypassed. To bypass a zone:
10
menu
next
Press
until
desired
zone
byp
The light
will
turn ON whenever a
zone or multiple
zones are bypassed.
User Guide
One-Touch Arming
If enabled by your installer, you can arm your system with the following arming
methods simply by pressing and holding (for three seconds) the appropriate
function key. You do not have to enter your User code. See Figure 1 on page 6
for the location of the function keys. Table 1 shows what function keys can be
used for one-touch arming.
* To Instant arm your system using one-touch arming, press and hold the
[STAY ARM] key and then during Exit Delay mode, press and hold the [STAY
ARM] key once more.
Table 1: One-touch Arming Keys
Function Key
Arming Method
key
Stay arm (page 10)
key
Instant arm* (page 10)
key
Regular arm (page 9)
Auto-Arming
You can set the time that the system will arm itself automatically. There are two methods of auto-arming:
Timed Auto-Arming
Your installer can set the Timed Auto-arming method to function in either Regular or Stay arming modes. A sixty-second Exit
Delay sequence will begin prior to your system automatically arming itself at the programmed time. To set the Timed Autoarming feature:
menu
ok
Program
time
No Movement Auto-Arming
Your system can be programmed to send a report to your monitoring station and/or arm the system if there is no activity in the
system during a specified period of time. Your installer can set No Movement Auto-arming to function in either Regular or Stay
arming modes. Talk to your installer for more information.
Please note that Auto-arming is not permitted in UL installations
Arming / Disarming
11
Disarming
When your system is disarmed, it deactivates any alarms in progress and it deactivates the zones so an alarm will not be triggered if
zones are breached.
Entry Delay Timer
Your installer will program designated entry points (i.e., the front door) with an Entry Delay timer. This delay gives you time to enter
the armed premises and enter your User code to disarm your system before the alarm is triggered. Up to two Entry Delay Timers can
be programmed in your Magellan console.
Please note that UL installations require a maximum entry delay of 45 seconds.
Programming the Entry Delay Timer
Program the Entry Delay Timer with a value that will give you ample time to disarm your system before the alarm is triggered.
Only the System Master user can program the Entry Delay Timer. To program the timer:
menu
ok
System
Master code
ok
Entry Delay
from 001 to
255 seconds
next
Press
until
desired
tone
ok
ok
Press to
program
Entry
Delay 2
Disarming an Armed System
When an entry point, like the front door, is opened, Magellan will
produce a sound indicating that the system has started the Entry
Delay timer (page 12). If a valid User code is entered before the
Entry Delay timer elapses, your system will disarm and will not
generate an alarm. To disarm an armed system:
12
Enter
designated
entry point
User code
User Guide
Disarming a System in Alarm
To disarm a system in alarm:
In the case of a burglar alarm, leave the premises immediately and call
the police from a safe location (i.e., neighbour’s).
User code
Alarm Memory Display
When an alarm has occurred in your system, the Magellan console will store that alarm in its alarm memory. All zones where alarms
have occurred will be stored in the alarm memory. The system will erase the contents of the alarm memory every time the system is
armed. The Magellan console will indicate that there is an alarm in memory by illuminating the
light and by displaying the
information symbol (see page 7) on the LCD screen. The alarm memory display can be viewed in two ways:
Through the Alarm Memory Menu
menu
prev
next
or
Use the [PREV] or [NEXT] action keys to scroll through available events.
After an alarm has occurred
ok
prev
next
or
Use the [PREV] or [NEXT] action keys to scroll through available events.
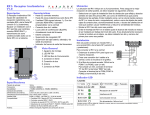
Fire Alarms
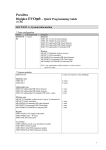
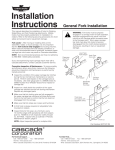
For complete coverage in residential units, smoke detectors should be installed in the following locations:
• In any hallway outside bedroom areas. Additional detectors should be installed for every bedroom area as shown in Figure 2 on page 14.
• On every floor of a multi-floor home or apartment.
• At both ends of a bedroom hallway if the hallway is more than 12m (40ft) long.
• At the bottom of a basement stairwell.
• At the top of the first to second floor stairwell and subsequent stairwells in multi-floored residential units.
Arming / Disarming
13
Figure 2: Single Residence with One or Two Sleeping Areas
Single Residence with One Sleeping Area
Dining Room
Kitchen
Bedroom
Single Residence with Two Sleeping Areas
Bedroom
Kitchen
Kitchen
Bedroom
Bedroom
Bedroom
Bedroom
Family Room
Family Room
Living Room
Living Room
Living Room
Sleeping
area
Bedroom
Bedroom
Bedroom
Bedroom
Bedroom
Sleeping
areas
= Smoke detectors for minimum security.
= Smoke detectors for additional security.
Smoke detectors should be installed as close to the center of the ceiling as possible.
Standard Fire Zones
During a fire alarm, the siren emits an intermittent sound (BEEPBEEP-BEEP) until silenced or reset. If the zone is a Standard Fire
Zone, your system can immediately send an alert to your
monitoring station. To disarm a false alarm:
14
User code
Call your monitoring station
quickly to advise them of the
false alarm.
User Guide
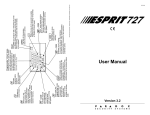
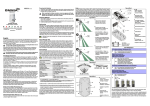
Delayed Fire Zones
If the zone is a Delayed Fire Zone, there is an automatic delay
before your system contacts your monitoring station. Refer to
Figure 3 on page 16 to prevent unnecessary reporting of false
alarms. To clear a fire alarm triggered by accident:
Press any
key within 30
seconds of
alarm
Clear problem
from area (i.e.
smoke around the
smoke detector).
If the problem
remains after
90 seconds,
the alarm will
sound again.
Alert will be
delayed by
another 30
seconds
If you are unable to cancel the false alarm, your system will send
an alert. Call your monitoring station to advise them of the false alarm.
Fire Safety Tips
How should you prepare in case of a fire in your home or business?
•
•
•
•
•
•
•
•
Remind everyone to escape first, and then call for help.
Develop a fire escape plan and designate a meeting place outside.
Practice the escape plan frequently.
Plan two ways to escape from every room, if possible.
Practice feeling the way out with eyes closed.
Instruct everyone never to stand up during a fire. Always crawl under the smoke and keep mouths covered.
Instruct everyone never to return to a burning building for any reason; it may cost them their life.
Check smoke detectors regularly. Working smoke detectors dramatically increase everyone's chance of surviving a fire.
Arming / Disarming
15
Minimizing Home Fire Hazards
Figure 3: Delayed Fire Zone
How can you avoid the three most common causes of fires at home?
•
•
•
Never leave cooking food unattended. It is the leading cause of
fire injuries. Cooking fires often result from unattended cooking
and human error, rather than mechanical failure.
Stay alert when smoking. Careless smoking is the leading cause
of fire deaths. Smoke detectors and smoulder-resistant bedding
and upholstered furniture are significant fire deterrents.
Maintain your heating system. Faulty heating systems are the
second leading cause of residential fires.
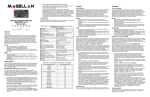
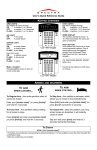
Panic Alarms
Your system can be programmed to send an alarm to your monitoring
station to request help from the police, a medical facility*, the fire
department or anyone you wish when you press a pre-determined
combination of keys on Magellan’s main keypad. To generate a panic
alarm, simultaneously press and hold the key combinations displayed in
Figure 4 on page 17. Your installer can program the alarm to be either
silent or audible.
* Programming your system to send an alarm to your Central Monitoring
Station requesting help from a medical facility is not permitted in UL
installations.
16
User Guide
Figure 4: Panic Alarm Keys
Panic 1
(Non-medical
Emergency Panic)
Panic 2
(Auxiliary Panic)
Panic 3
(Fire Panic)
Arming / Disarming
17
Chapter 3: Consumer Features
This chapter will cover the other features that make Magellan a unique and wireless security system.
Message Center
The Magellan console comes with a message center that allows you to record a voice message that can be played at a later time. This
message center is useful when you need to leave a message for another member of your family or even for yourself.
Recording a Message
Perform the following to record a message:
After recording a message, the
Press
& hold
for 3
secs.
light will begin to flash.
Record
your
message
Playing a Recorded Message
If the
light is flashing, there is a message recorded in the Magellan console. Press the
key to play the message. After the
message is played for the first time, the
light will stop flashing. Although the
light has stopped flashing, the recorded
message is still stored in the Magellan console. The message can be played at any time simply by pressing the
key. To record
another message, please refer to Recording a Message above.
If you wish to record another message, the Magellan console will replace the old message with the new message. Only one message can be
recorded and/or stored at a time.
18
User Guide
FM Radio Feature (MG-6060 only)
The Magellan console incorporates a built-in radio. You can use this radio to listen to your favourite radio stations. You can also save up
to 15 radio stations in memory.
Using the Radio
You can use the main keypad to enter the 4-digit frequency of the
desired radio station or the [UP] action key to advance to the next
available radio station. If no action is performed after a few
seconds, the console will revert to its standby screen. Press the
[FM] action key to return to the radio tuner screen. To use the
radio:
up
or
Go to
desired
station
Saving Radio Stations into Memory
Magellan can store up to 15 radio stations in memory. To store a radio station into memory:
up
mem
or
This appears in the upper right
corner to indicate that the station has been saved in memory.
Press a number key
from [1] to [15] on the
center keypad.
Go to desired station
For example, to assign a radio station to memory location M01, access the radio station, press the [MEM] action key and then press
the [1] key on the center keypad.
Retrieving Radio Stations from Memory
To retrieve a radio station saved in memory:
to
Press the desired key on
the center keypad that
corresponds to the
desired memory location.
Consumer Features
19
Accessing the Radio by Remote Control
By default, your remote control is programmed to manage Magellan’s radio in the following ways:
•
•
•
The
/ button on your remote control turns the radio ON/OFF. Press the button once to turn the radio ON and then press the
button again to turn the radio OFF.
The
/ button on your remote control scrolls through the radio stations saved in memory. Every time you press the button,
Magellan will scroll to the next radio station saved in memory.
The
button on your remote control adjusts the volume of the radio when the radio is already on and the system is disarmed.
The volume of the radio will gradually increase to its highest possible volume and then decrease to its lowest possible volume.
Alarm Clock
Figure 5: Alarm Clock Symbol
You can also use the Magellan console as an alarm clock. At the
programmed time, Magellan will begin to play a selected tone or activate
the radio*. When the alarm clock is enabled, the alarm clock symbol
(Figure 5) will appear in the upper left corner of the LCD screen.
Alarm clock
symbol
* Available with the MG-6060 only.
Setting the Alarm Clock Time
menu
ok
Program
time
next
ok
Press
until desired
tone
Using the Alarm Clock Feature
After programming the alarm clock, the feature will be enabled and Magellan will play the selected tone at the programmed time.
Please note the following:
20
User Guide
•
•
•
•
When the alarm clock activates, press the [snooze] action key or press any button on the Magellan console to enable the
snooze feature. The alarm clock will wait ten minutes before activating again.
Press and hold the
key or press the [off] action key to disable the alarm clock. To enable the alarm clock again, press
and hold the
key. The alarm clock symbol will appear on the LCD screen.
Press the [stop] action key to turn OFF but not disable the alarm clock. The alarm clock will reactivate the following day at the
programmed time.
If you have not activated the snooze or disabled the alarm clock, the alarm clock will stay ON for one hour if AC power is present.
Speakerphone (MG-6060 only)
Magellan comes with a feature that transforms the console into a speakerphone. Simply dial the desired telephone number and talk as
you would on a normal telephone. You can also configure the ring tone and volume for incoming telephone calls. When the console’s
speakerphone is being used, the console will emit a tone and key [16] on the center keypad will flash rapidly (see Magellan’s Keypads on
page 8).
Making a Standard Telephone Call through the Console
Using the center keypad:
To
hang up
Dial
telephone #*
* When using the center keypad
to dial the telephone number:
Keys [1] to [9] = 1 to 9
Key [10] = 0
Key [11] = *
Key [12] = #
Answering an Incoming Call
Using the center keypad:
To
hang up
Consumer Features
21
Setting the Ring Tone and Volume
menu
ok
next
ok
ok
-
+
ok
or
Program
ring tone
Press
until
desired
tone
Chime Zones
Program
ring
volume
Use the – or +
action keys to
increase or
decrease the volume
menu
next
You can program the console to emit a tone whenever designated
zones are opened. These zones are referred to as Chime zones.
ok
next
Press
until
desired
zone
Keypad Settings
ok
Press
until
desired
tone
You can modify the console’s backlight and the LCD screen’s contrast to suit your needs.
Adjusting the Backlight
menu
22
-
Adjusting the LCD Screen’s Contrast
+
ok
menu
-
+
or
or
Use the – or +
action keys to
increase or
decrease the
backlight level
Use the – or +
action keys to
increase or
decrease the
contrast level
ok
User Guide
Time and Date
To set the time and date of your Magellan console:
12hrs
menu
24hrs
or
Select the
console’s
time format
ok
ok
Enter the
time
Enter the
date
Programmable Outputs (PGMs)
The Magellan console includes four programmable outputs (PGMs). When a specific event or condition occurs in the system, the PGM
can be used to activate light switches, open/close a garage door and much more. Talk to your installer about this useful feature.
Programmable Output (PGM) Labels
To modify your PGM labels:
menu
next
Master user
ok
yes
Press until
desired output (PGM)
Trouble Display
If your system experiences any problems, the information symbol will
appear on the LCD screen and the
light will be ON. Use the Trouble
Display to view what troubles your system is experiencing. If an alarm has
occurred in the system, the information screen will first display the alarm
memory. See LCD Screen on page 7. To access the Trouble display:
Consumer Features
Press [yes] to accept the label.
Press [play] to listen to the label.
Press [no] if you wish to re-record
the label.
Record output
(PGM) label
next
Press
to scroll
through
troubles
ok
If any troubles occur, we
strongly recommend that you
contact your installer
immediately to have your
system serviced. To call for
service, refer to Making a
Service Call (MG-6060 only)
23
Making a Service Call (MG-6060
only)
When certain troubles occur, you can call for service using the Magellan
console. The Trouble Display has a feature that can be used to contact
your installer. The telephone number will already be programmed in
your Magellan console by your installer. To make a service call:
next
ok
Press
to scroll
through
troubles
Press
until
Service
Required
screen
call
Demo Mode
Use this mode to preview the Magellan console’s features. After
entering Demo Mode, the Magellan console will begin displaying its
features by flashing its lights, playing tones, etc. To access Demo Mode:
menu
When in Demo mode, the Magellan console’s speaker and siren will also be played. Do not stay in close proximity to the console to
avoid damaging your hearing.
X10 Automation (MG-6060 only)
The Magellan console supports X10 automation. X10 is a communication protocol for remotely controlling electrical devices such as
lamps and appliances. Communication is accomplished through standard household electrical wiring using X10 Transmitters and
receivers. For more information on programming and using X10 with the Magellan console, download and/or refer to the Magellan X10
Operation User Guide from our website at www.paradox.ca.
24
User Guide
Chapter 4: Access System Features by Phone
(MG-6060 only)
This chapter covers Magellan’s remote access feature that transforms any external touch-tone telephone into a keypad. Through the
telephone, you will be able to arm/disarm your system, listen to any messages, activate outputs and more.
Access System Features by Phone
Due to Magellan’s voice-assisted remote features, any touch-tone telephone can be turned into a keypad. Arm/disarm Magellan,
activate/deactivate Magellan’s PGM outputs, record/listen to messages and even turn Magellan into a speakerphone all via your
telephone. Using detailed voice prompts to guide your way, remote access to Magellan is as easy as picking up the telephone.
Please note the following:
• The following instructions pertain to entering commands and/or data through your telephone’s keypad. Therefore, whenever you are
instructed to perform an action and/or enter data, do so on your telephone’s keypad.
• Magellan will automatically hang up if no action is performed after 2 minutes.
• Press the [*] key at any time to exit and have Magellan hang up.
• When Magellan is in speakerphone mode, key [16] on the center keypad will flash rapidly.
Step 1: Call Magellan from any touch-tone telephone
Pick up your telephone and dial the number of the telephone line
that your Magellan console is connected to (usually your home
number). If the telephone line that Magellan is connected to is
shared with an answering service or answering machine, you
have to override the answering service or machine. To override
the answering service or machine:
Step 2: Enter your user code
Call
Magellan,
wait one
or two
rings and
then hang
up
Wait 10
seconds
Call
Magellan
again
Use the same User code that you use with the Magellan console.
Access System Features by Phone (MG-6060 only)
25
Step 3: Select an action
Arm/Disarm:
Pressing the [1] key toggles the system
between armed and disarmed states. If your
system is disarmed, press the [1] key to arm
your Magellan console. If your system is
armed, press the [1] key to disarm your
system.
Speakerphone Mode:
Press the [4] key to convert your Magellan
console into a remote speakerphone. You
can listen in at your home and/or speak to
someone already there. The person you are
talking to can hang up by pressing the [16]
key on the center keypad on the console. You
hang up by pressing the [*] key. Press the [#]
to exit speakerphone mode and to continue
through the menu.
Record a Message:
Press the [2] key to record a message in the
Magellan console’s message center
(page 18). Please note that the message
cannot exceed 20 seconds in length. Press
the [*] key to stop recording at any time.
Listen to message:
Press the [3] key to listen to a message
already in the Magellan console’s message
center (page 18).
Activate/deactivate PGM2:
Press the [6] key to activate or
deactivate the Magellan console’s
PGM output 2 (page 23).
Activate/deactivate PGM1:
Press the [5] key to activate or deactivate the
Magellan console’s PGM output 1 (page 23).
Exit Menu or Hang up:
Press the [*] key to either exit a menu or to
hang up with your Magellan console.
26
User Guide
Chapter 5: Advanced Features
This chapter pertains to features and functions that only the System Master user can access.
This chapter covers User code programming, such as programming new users into the system. This chapter also covers some zone
features as well as instructions on how to customize Magellan to suit your needs.
Programming User Codes
User codes allow access to the system. Magellan supports up to 16 User codes where:
• Every user from 002 to 016 is assigned a User code (user 001 is the System Master).
• Your installer can program User codes to be four or six digits in length.
• Each digit can be any value from 0 to 9.
To create or modify a user:
menu
next
System
Master code
Press
until
desired
user
ok
no/yes
Modify
label?
Enter new
User
Confirm
new User
Yes
Record
label
No
Remote
control?
Yes
No
Another
user
Press
button
System Master Code (default: 1234)
The System Master code will give you access to all of the features available on your system as well as the ability to add, modify, or
delete any users.
Advanced Features
27
It is recommended that you change the default System Master code to a code of your choosing. This will prevent unauthorized users from
accessing and modifying options.
Duress User Code
If enabled by your installer, User code 016 can be programmed as a Duress code. If you are forced to arm or disarm your system,
entering the user code for User 016 will arm or disarm your system and immediately transmit a silent alarm (Duress code) to your
monitoring station.
Deleting a User
When you delete a user, the remote control that is assigned to that user will also be deleted. To delete an existing user:
menu
next
ok
yes
yes
The System Master
user cannot be deleted.
Another
user
Press
until
desired
user
System
Master code
no/yes
Adding a Remote Control to an Existing User
To add a remote control to a user that is already programmed in the Magellan system:
menu
next
System
Master code
28
Press
until
desired
user
ok
next
ok
no/yes
Modify
label?
No
Program
remote?
Yes
Press
button
Another
user
User Guide
Deleting a Remote Control
To delete a remote control that is already programmed in the Magellan system:
menu
next
System
Master code
ok
next
ok
Press
until
desired
user
Setting the Language
yes
Modify
label?
Delete
remote?
No
no/yes
Yes
Another
user
menu
next
By default, Magellan is set to English. To change the language:
Press
until desired
language
System
Master code
Voice Reporting
ok
Use the Magellan console to call you (or someone you choose) on up to two different telephone numbers and play a personalized voice
message (maximum 20 seconds in length) to announce that an alarm has occurred. After receiving the message, press the [#] key on
the telephone twice to acknowledge and end the message. The unit will call eight times (switching between both numbers) or until
someone acknowledges the message. Press the [1] key on the telephone to use the speakerphone feature and to talk through the
Magellan console. To program the Magellan console for voice reporting:
menu
ok
System
Master code
next
Press
until
desired
telephone #
ok
ok
Enter
desired
telephone #
next
Press
until Record
Alrm Mes?
screen
ok
Record
your alarm
message
Example: You programmed Magellan’s Voice Reporting feature to call your cellular phone and play your recorded message, “There is an alarm occurring
at home.” Therefore, whenever an alarm occurs, Magellan will call you on your cellular phone and you will hear “There is an alarm occurring at home”.
Press the [#] key on your cellular phone to acknowledge the message.
Advanced Features
29
Utility Reporting
Customize which events and when these events will be reported to you by using the Utility Reporting menu. Program from one of four
report types to have the Magellan console call you when certain conditions are met. With this feature programmed, Magellan will call up
to two separate telephone numbers and play a personalized pre-recorded voice message. After receiving the message, press the [#] key
on the telephone twice to acknowledge and end the message. Press the [1] key on the telephone to use the speakerphone feature and
to talk through the Magellan console. To program the Utility Reporting feature:
Menu
System
Master code
next
next
Press until
Utility
Reporting
screen
and then
press ok
Press
until
desired
telephone
# and then
press ok
OK
Enter
desired
telephone
# and then
press ok
next
next
Press until
Press until
desired report
Record
type and then Alrm Mes?
press ok.
screen
See Report
Types below
for more info.
OK
Record
your
alarm
message
Report Types
There are four report types that can be used with Utility reporting:
30
•
Disarm with user: Use this report type to program the Magellan console to call you when specific users disarm the system. After
entering the menu, select the desired user(s) that you wish reported. This feature is useful when you wish to know when specific
people disarm the system.
For example, you can program Magellan to call you whenever your children disarm your system thus informing you that they
have arrived home.
•
System troubles: Use this report type to have the Magellan console call you when specific troubles occur. After entering the
menu, select the desired trouble(s) you wish to be notified about. This feature can be used to inform you of a power failure.
•
Non-medical Emergency alarm: Use this report type to have the Magellan console call you when specific users require nonmedical emergency assistance. When the programmed users press the appropriate key on their remote controls (see Remote
User Guide
Controls on page 7), the Magellan console will make a buzzing sound and then call one or both programmed telephone
numbers. After entering the menu, select the desired user(s) that you wish reported. For example, if there is an elderly parent
who lives in your home, you can program Magellan to call you whenever they require assistance. All they have to do is press the
appropriate button on their remote control.
One of the user’s remote control buttons must be programmed with the Non-medical Emergency alarm option in order for the Nonmedical Emergency alarm to function. Talk to your installer about this feature.
•
Zone activation: When a specified zone is breached or opened, the Magellan console will call one or both of the programmed
telephone numbers. After entering this menu, select the desired zones you wish affected. Use this feature to be informed when a
specific zone is breached. For example, if you have a gun closet at home, you can have Magellan call you whenever the gun
closet is opened or breached.
After selecting the
desired report type:
next
Press until
desired
user,
trouble or
zone
yes
no
Example:
or
Press yes if you
wish the selected
user, trouble or zone
reported. Press no if
you don’t.
Zone 1 will be reported
Record message
Press next to scroll to the next available zone
Press no to prevent zone 1 from being reported
Pager Reporting
Transmit personalized numerical messages from the Magellan console to a pager using this communicator format. To program the
Magellan console with this communicator setting:
menu
next
Master code
Advanced Features
next
ok
ok
ok
Enter desired
pager #
ok
ok
Enter desired
numerical message
31
Bell Cut-Off Timer
After an audible alarm, Magellan’s built-in siren will stop upon the disarming of the system or when the Bell Cut-off Timer has elapsed,
whichever comes first. To program the Bell Cut-off Timer:
menu
next
next
next
ok
ok
Enter delay
time in minutes
Master code
For UL installations, the Bell Cut-off Timer must be set to 4 min. minimum. For cUL, the Bell Cut-off Timer must be set to 5 min. minimum.
System Test
This menu will initiate tests for Magellan’s assigned zones, remote controls, reporting feature as well as some of Magellan’s hardware
(lights, speaker and siren). This menu will also display any troubles that the system may be experiencing. Use the [NEXT] action key to
scroll through the available system tests and then press the [OK] action key to access the desired test. Simply follow the on-screen
instructions to perform the test. To access the System Test menu:
next
menu
Master code
ok
When testing the hardware, the speaker and sirens will also be tested. Do
not be in close proximity to the Magellan console when performing the
hardware test to avoid any damage to your hearing.
Press until
desired test
Zone Labels
You can record a custom voice label for one or all of the available zones in your system. By default, each zone has a pre-recorded label
that simply states the zone number. For example, zone 1’s default label is “zone one”. Use this menu feature to apply labels of your
choosing for each available zone. You can use labels such as “Front Door” or “Basement”, etc. To record a zone label:
menu
next
Master user
32
Press until
desired zone
ok
yes
Press [yes] to accept the label. Press
[play] to listen to the label. Press
[no] if you wish to re-record the label.
Record
zone label
User Guide
Index
A
B
E
Accessing system features by phone ....25
Accessing the radio by remote ................20
Action key .....................................................6
Adding a remote control ...........................28
Alarm clock
Backlight ......................................................22
Basic Operation ...........................................6
Bypassing zones .......................................10
Entry delay timer ....................................... 12
Exit delay timer ............................................ 9
Configuring ...........................................20
Disabling ...............................................21
Enabling ................................................21
Snooze ..................................................20
Using .....................................................20
Alarm clock/Radio tuner key ......................6
Alarm memory display ..............................13
Center keypad ......................................... 6, 8
Center, Message .......................................18
Chime zones ..............................................22
Clock, alarm ...............................................20
Contrast .......................................................22
Alarms
Disarming ..............................................13
Fire ........................................................13
Panic .....................................................16
Armed light ....................................................6
Arming methods
Auto-arming ..........................................11
Force arming .........................................10
Instant arming .......................................10
One-touch arming .................................11
Regular arming .......................................9
Stay arming ...........................................10
Auto-arming
No Movement auto-arming ...................11
Timed auto-arming ................................11
Magellan
F
C
Fire alarms
Delayed fire zones ................................ 15
Fire safety tips ...................................... 15
Minimizing home fire hazards ............... 16
Residential installations ........................ 13
Standard fire zones ............................... 14
Fire hazards, minimizing .......................... 16
Fire zones
D
Date and time .............................................23
Delayed fire zones ....................................15
Deleting
Remote Controls ...................................29
Users ....................................................28
Demo mode ................................................24
Disarming ....................................................12
System in alarm ....................................13
Display
Alarm memory ......................................13
Display, Trouble .........................................23
Duress user code ......................................28
Delayed fire zones ................................ 15
Standard fire zone ................................ 14
FM radio feature ........................................ 19
Force arming .............................................. 10
Function keys ............................................... 6
H
Home, Minimizing fire hazards ............... 16
How to use the User Guide ....................... 4
I
Indicators, light ............................................. 6
Information
Light ........................................................ 6
33
Symbol ....................................................7
Instant arming ............................................10
K
Keypad settings .........................................22
Keys
Action keys .............................................6
Alarm clock/Radio Tuner key ..................6
Function keys ..........................................6
Message key ...........................................6
Regular arm key .....................................6
Stay arming key ......................................6
Volume keys ...........................................6
Key ..........................................................6
Light ........................................................6
Message center
Playing a recorded message ................18
Recording a message ...........................18
Minimizing home fire hazards .................16
N
No movement auto-arming ......................11
L
Labels
User ......................................................27
Zone ......................................................32
Language, Setting .....................................29
LCD screen .............................................. 6, 7
Backlight ...............................................22
Contrast ................................................22
Light indicators
Armed light ..............................................6
Information light ......................................6
Message light ..........................................6
Ready light ..............................................6
M
Main keypad ............................................ 6, 8
34
Making a Service Call ...............................24
Master code ................................................27
Memory display, Alarm .............................13
Memory, radio ............................................19
Message
O
One-touch arming ......................................11
Operation, basic ...........................................6
Outputs, programmable ...........................23
P
Pager Reporting .........................................31
Panic alarms
Auxiliary panic .......................................16
Emergency ............................................16
Emergency panic ..................................16
Fire panic ..............................................16
PGMs ...........................................................23
Playing a recorded message ...................18
Programmable outputs .............................23
Programming
Date ......................................................23
Time ......................................................23
User codes ............................................27
R
Radio
Accessing by remote control .................20
Retieving stations from memory ...........19
Saving radio stations into memory ........19
Tuner ....................................................19
Using the radio ......................................19
Ready light ....................................................6
Recording a message ...............................18
Regular arm key ..........................................6
Remote access by phone ........................25
Remote controls ...........................................7
Adding ...................................................28
Deleting .................................................29
Report Types ..............................................30
Reporting
Pager ....................................................31
Utility .....................................................30
Voice .....................................................29
Ring tone .....................................................22
Ring volume ...............................................22
S
Safety, Fire tips ..........................................15
User Guide
Saving radio stations ................................19
Service Call ................................................24
Setting the Language ................................29
Settings, keypad ........................................22
Speakerphone
Utility Reporting .........................................30
Configuring ...........................................22
Using .....................................................21
Standard Fire Zone ...................................14
Stations, radio ............................................19
Stay arming ................................................10
Stay arming key ......................................6
System master code .................................27
Volume key .............................................6
T
Time and date ............................................23
Timers
Entry delay ............................................12
Exit delay ................................................9
Tips, Fire safety .........................................15
Tone, ring ....................................................22
Trouble Display ..........................................23
Tuner, radio ................................................19
V
Voice Reporting .........................................29
Volume ........................................................22
X
X-10 automation ........................................24
Z
Zone
Bypassing .............................................10
Chime ...................................................22
Delayed fire zones ................................15
Labels ...................................................32
Standard Fire zone ...............................14
U
User codes
Adding a remote control ........................28
Deleting .................................................28
Duress ..................................................28
Programming ........................................27
Using the User Guide .................................4
Magellan
35
Warranty
Paradox Security Systems Ltd. ("Seller") warrants its products to be free from manufacturing defects in materials and workmanship for one-year following the date of manufacture. Seller will, within this
period, at its option, repair or replace any product failing to operate correctly without charge to the original purchaser or user. This warranty will not apply to any equipment, or any parts thereof, which have
been repaired by others, improperly installed, improperly used, abused, altered, damaged, subjected to acts of God, or on which any serial numbers have been altered, defaced or removed. Seller will not
be responsible for any dismantling or reinstallation charges.
THERE ARE NO WARRANTIES, EXPRESS OR IMPLIED, BEYOND THE DESCRIPTION HEREIN. THERE IS NO EXPRESS OR IMPLIED WARRANTY OF MERCHANTABILITY OR A WARRANTY OF
FITNESS FOR A PARTICULAR PURPOSE. THIS WARRANTY IS IN LIEU OF ALL OTHER OBLIGATIONS OR LIABILITIES ON THE PART OF SELLER, ITS SUPPLIERS AND/OR AFFILIATES.
Any action for breach of warranty, including but not limited to any implied warranty of merchantability, must be brought within three months following the end of the warranty period. IN NO CASE WILL
SELLER OR ITS AFFILIATES BE LIABLE TO ANYONE FOR ANY CONSEQUENTIAL OR INCIDENTAL DAMAGES FOR BREACH OF THIS OR ANY OTHER WARRANTY, EXPRESS OR IMPLIED,
EVEN IF THE LOSS OR DAMAGE IS CAUSED BY THE SELLER'S OWN NEGLIGENCE OR FAULT.
In case of defect, contact the security professional who installed and maintains your security system. In order to exercise the warranty, the product must be returned to the indicated RMA location by the
security professional, shipping costs prepaid and insured. After repair or replacement, Seller assumes the cost of returning products under warranty. Seller will have no obligation under this warranty, or
otherwise, if the product has been repaired by others, improperly installed, improperly used, abused, altered, damaged, subjected to accident, nuisance, flood, fire or acts of God, or on which any serial
numbers have been altered, defaced or removed. Seller will not be responsible for any dismantling, reassembly or reinstallation charges.
This warranty contains the entire warranty. Any prior agreements or representations, whether oral or written, are either merged herein or are expressly cancelled. Seller neither assumes, nor authorizes any
other person purporting to act on its behalf to modify, to change, or to assume for it, any other warranty or liability concerning its products.
Notwithstanding anything herein, in no event shall Seller or its affiliates be liable for an amount in excess of Seller's original selling price of the product, for any loss or damage, whether direct, indirect,
incidental, consequential or otherwise arising out of any failure of the product. Seller's warranty, as hereinabove set forth, shall not be enlarged, diminished or affected by and no obligation or liability shall
arise from Seller offering to render or rendering technical advice or services in connection with the purchase of goods hereunder.
SELLER STRONGLY RECOMMENDS THAT THE ENTIRE SYSTEM BE COMPLETELY TESTED MONTHLY.
Warning: Despite frequent testing, and due to, but not limited to, any or all of the following: criminal tampering, electrical or communication disruption, or improper use, it is possible for the system to fail to
perform as expected. Seller does not represent that the product/system may not be compromised or circumvented or that the product or system will prevent any personal injury or property loss by burglary,
robbery, fire or otherwise; nor that the product or system will in all cases provide adequate warning or protection. A properly installed and maintained alarm may only reduce risk of burglary, robbery, fire or
otherwise but it is not insurance or a guarantee that these events will not occur. CONSEQUENTLY, SELLER SHALL HAVE NO LIABILITY FOR ANY PERSONAL INJURY, PROPERTY DAMAGE, OR
OTHER LOSS BASED ON A CLAIM THE PRODUCT FAILED TO GIVE WARNING. Therefore, the installer should in turn advise the consumer to take any and all precautions for his or her safety including,
but not limited to, fleeing the premises and calling 911, the police and/or fire department, in order to mitigate the possibilities of harm and/or damage.
Seller is not an insurer of either the property or safety of the user's family or employees, and limits its liability for any loss or damage including incidental or consequential damages to Seller's original selling
price of the product in question, regardless of the cause of such loss and/or damage.
Some locations do not allow limitations on how long an implied warranty lasts or do not allow the exclusion or limitation of incidental or consequential damages, or differentiate in their treatment of limitations
of liabilities for ordinary or gross negligence, therefore the above limitations may be reduced and/or not apply to you. This warranty gives you specific legal rights and you may also have additional rights
depending on the location.
© 2004-2005 Paradox Security Systems Ltd. All rights reserved. Specifications may change without prior notice. One or more of the following US patents may apply: 6215399, 6111256, 5751803, 5721542,
5287111, 5119069, 5077549, 5920259, 5886632. Canadian and international patents may also apply. Magellan is a trademark or registered trademark of Paradox Security Systems Ltd. or its affiliates in
Canada, the United States and/or other countries.
MAGELLAN-EU05
Magelan-EU05 - Printed in Canada 09/2005
Magellan is a trademark or registered trademark of Paradox Security Systems Ltd. or its affiliates in Canada, the United States and/or
other countries. All rights reserved. Specifications may change without prior notice. © 2005 Paradox Security Systems Ltd.
Magelan-EU05 - Printed in Canada 09/2005
Magellan is a trademark or registered trademark of Paradox Security Systems Ltd. or its affiliates in Canada, the United States and/or
other countries. All rights reserved. Specifications may change without prior notice. © 2005 Paradox Security Systems Ltd.
Choose from
The Digital Dual-Optic
High-Performance
Outdoor PIR
(40kg/90lb True Pet Immunity)
(MG-PMD85),
Digital Dual-Optic
High-Performance PIR
(40kg/90lb True Pet Immunity)
(MG-PMD75) or,
the Analog Single-Optic PIR
(18kg/40lb Pet Immunity)
(MG-PMD1P)
2-Way Wireless PGM
(MG-2WPGM)
The 2-Way Remote
Control
with Backlit Buttons
(MG-REM2) or,
the Remote Control
with Backlit Buttons
(MG-REM1)
Choose from
The Door Contact
(MG-DCTXP),
Ultra-Small Door Contact
(MG-DCT2) or,
the Long-Range Door Contact
(MG-DCT1)
Smoke Detector
(SD738)
Made by EVERday
(Taiwan)†
† manufactured and available exclusively through
EVERday Technology Co. Ltd.
Choose from
The Digital Dual-Optic
High-Performance
Outdoor PIR
(40kg/90lb True Pet Immunity)
(MG-PMD85),
Digital Dual-Optic
High-Performance PIR
(40kg/90lb True Pet Immunity)
(MG-PMD75) or,
the Analog Single-Optic PIR
(18kg/40lb Pet Immunity)
(MG-PMD1P)
2-Way Wireless PGM
(MG-2WPGM)
Choose from
The Door Contact
(MG-DCTXP),
Ultra-Small Door Contact
(MG-DCT2) or,
the Long-Range Door Contact
(MG-DCT1)
† manufactured and available exclusively through
EVERday Technology Co. Ltd.
Smoke Detector
(SD738)
Made by EVERday
(Taiwan)†
The 2-Way Remote
Control
with Backlit Buttons
(MG-REM2) or,
the Remote Control
with Backlit Buttons
(MG-REM1)
User Guide
780 Industriel Blvd., Saint-Eustache (Quebec) J7R 5V3 CANADA
www. p a r a d o x . c a
User Guide
780 Industriel Blvd., Saint-Eustache (Quebec) J7R 5V3 CANADA
www. p a r a d o x . c a