1
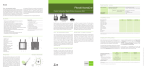
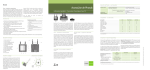
www.phonak.com
029-0061-02/V1.00/2008-02/A+W Printed in Switzerland © Phonak AG All rights reserved
Your hearing care professional
User Guide
!
Contents
Welcome
6
inspiro and accessories
8
important inspiro figures
Operating time and charging
Operating range (FM transmission)
9
9
9
Controls
10
Getting Started
Charging inspiro
Low battery alarms
Wearing inspiro
Attaching the clip to the inspiro
Attaching the lavalier to the inspiro
Wearing iLapel
iLapel wearing position
Wearing iBoom
Switch on inspiro
Activate the key pad lock
Monitoring
12
12
14
15
16
18
19
20
21
24
25
26
Using inspiro
Talking
SoundCheck
28
28
29
3
Contents
4
Muting the microphone
Using the inspiro with an MP3 player,
TV set, GPS, computer or Hifi
Synchronizing receivers
30
Individual inspiro configuration
Setting the alarm time
Setting the preferred date format
Adjusting the settings of the LCD display
Selecting a desktop picture
Selecting your language
34
34
35
36
37
38
Brief description of the menu items
Channels
Receiver options
SoundCheck
Settings
Help
MultiTalker Net
Receiver options
40
40
42
43
43
44
46
47
Multiple talkers in one classroom
The MultiTalker Network
Initiating a MultiTalker Network
Leaving a MultiTalker Network
Practical tips
49
49
50
51
52
31
33
FM receivers
The MLxi
Lock MLxi Push button
Identifying receivers
Other Phonak FM receivers
54
54
56
56
57
Troubleshooting
58
Important notices
62
Service and warranty
64
Declaration of conformity
65
Phonak distributors worldwide
66
5
Welcome
inspiro is an FM transmitter ideally suited to the
needs of teachers and suitable for use in regular
schools as well as special schools.
The outstanding design with its large color display
makes this transmitter unique. Soft keys, an alarm
clock, wearing options to suit different types of
clothing and a wealth of other details reflect Phonaks
passion for user friendliness.
Please read this manual carefully to benefit from all
the features of your inspiro FM transmitter. Ask your
hearing care professional if you have any questions.
inspiro is a quality product developed by the Swiss
company Phonak, the world leader in FM technology,
innovation and reliability. With proper care and
usage, your inspiro will support your hearing and
communication needs for many years.
Phonak – life is on
6
Further resources:
To find out more about inspiro as well as about
Phonak FM in general, we recommend visiting the
following websites:
• www.eschooldesk.com
This is a special website specifically dedicated to
providing support to teachers, but also to parents
and other inspiro users. Short movies available
there present, for instance, the various functions
of the inspiro, while special sections on care and
maintenance and troubleshooting for FM systems
aim to provide assistance in daily life.
• www.phonak.com
This is the Phonak homepage. Go to the Consumer
– Product section and then click on FM systems.
You can find useful information there about inspiro
and FM receivers.
• www.fmelibrary.com
This is an online scientific library about FM
systems. You can find published papers and reports
there about FM systems from all over the world.
The following symbol appears in this user guide:
! Important notes for all users.
7
inspiro and accessories
inspiro is delivered with either the iBoom or the
iLapel microphone, depending on the customer wish.
All the accessories can also be ordered separately.
햲 inspiro
햳 Microphones: iBoom or iLapel
햴 inspiro wearing options:
Belt clip and lavalier cord
햵 Audio cable
햶 Charging unit
햷 Home and travel case
8
Important inspiro figures
Operating time and charging:
• Operating time when the battery is fully charged:
approx. 12 hours
• Charging time for an 80% charge:
approx. 1 hour
• Charging time for a 100% charge:
approx. 2 hours
Operating range (FM transmission):
• Inside a building:
approx. 50 feet (15 meters)
• Outside:
approx. 130–170 feet (40-50 meters)
!
High-powered electronic equipment, large
electronic installations and metallic structures
may impair and significantly reduce the
operating range.
9
Controls
햲
inspiro
햲 On/Off slider
햳 Color LCD
햴 Soft Keys
햵 Keypad lock key
햶 Microphone
mute key
햳
01.10.2008
01:57pm
H33
햴
Jenny Jones
Monitor
햵
Sync
햶
햷 3.5mm audio
input
햸 Mini USB
for charging
햷
10
햸
햹
햹 Button to attach
the belt clip
and the lavalier
햺 Cable wrapper
햺
iLapel microphone
햻 Microphone
openings
(do not cover!)
햽 Wearing clip
햻
햽
햾
햿
iBoom microphone
햾 Adjustable ear loop
햿 Microphone
(do not cover!)
11
Getting Started
Charging inspiro
inspiro contains a re-chargeable built-in state-of-the
art lithium polymer battery with fast-charge capability.
A fully-discharged battery will charge to 80% in one
hour and 100% in 2 hours.
Select an easily accessible
socket outlet and plug
the charging unit into the
socket outlet.
Connect the MiniUSB plug
from the charging unit to
the inspiro.
12
!
Use only the original Phonak charging unit
for insprio.
The segments in the battery symbol flash during
charging. The battery cannot be over-charged.
01.10.2008
01:57pm
H33
If the charging unit is
removed from the inspiro,
the segments in the
battery symbol show the
actual capacity.
Jenny Jones
Monitor
Sync
If the battery is fully
charged, the battery
symbol in the LCD
shows four segments.
13
Getting Started
Low battery alarms
inspiro provides an automatic vibra alarm if the
battery is low.
• Approximately 1 hour before battery is empty:
A vibrating alarm is activated. Check the message
on the LCD and follow the instructions.
• Approximately 15 minutes before battery is
empty:
If inspiro has not been charged after the first
alarm, the second vibrating alarm is automatically
activated before the battery is completely
exhausted. Check the message on the LCD and
follow the instructions. If the battery is not
being charged at that time, inspiro switches off
automatically in 15 minutes.
If the battery is completely exhausted, there will be
no segments in the battery symbol and the battery
symbol in the LCD will change from white to red.
14
Wearing inspiro
inspiro can either
be worn on the belt
by using the clip…
…or around the neck
by using the lavalier
(see page 16)
(see page 18)
15
Getting Started
Attaching the clip to the inspiro:
햲
햳
“click”
Attach the clip to the button on the
backside of the inspiro. Make sure
the clip holds securely on the inspiro.
Fix the clip to the belt
or trousers. Make sure
the clip on the inspiro
holds securely.
16
햳
햲
The clip can also be fixed to the belt or trousers
before the inspiro is attached.
Make sure the clip is secured to the inspiro.
햳
햲
To remove the clip
from the inspiro,
press the button on
the clip and carefully
remove the clip
from the inspiro.
17
Getting Started
Attaching the lavalier to the inspiro:
Attach the lavalier to the button
햲
햳
햴
Adjust the lavalier length
Make sure the microphone
cable is unwound.
18
Wearing iLapel
iLapel is an easy-to-use directional lapel
microphone which provides excellent sound quality.
a) Unwind the iLapel from the inspiro.
b) Fix the iLapel to your
shirt and make sure
the distance between the
microphone and your
mouth is approximately
8 inches (20 cm).
19
Getting Started
iLapel wearing position:
OK!
Wrong!
!
Do not cover the two
microphone openings!
If you are uncertain whether the iLapel is in the
correct position, activate the SoundCheck feature in
inspiro. SoundCheck helps to position the iLapel
correctly.
20
Wearing iBoom
iBoom is an ultra-lightweight boom microphone.
Extremely comfortable to wear, it can be worn on the
left or right ear and adjusts easily to fit all ear and
head sizes.
How to fit the iBoom to the ear:
a) Slightly enlarge the diameter of the ear loop.
햲
햳
21
Getting Started
b) Open the loop carefully
and attach the iBoom
to the left or right ear.
c) Hold the iBoom with
one hand and slightly
pull the black lever
with the other hand to
reduce the diameter
of the ear loop until the
iBoom holds securely.
22
d) Adjust the boom
arm in order to
bring the microphone
as close to the mouth
as possible.
e) Fix the clip on your
clothes as depicted
and make sure the
cable is not stretched
between the clip and
the ear.
!
Do not bend
the boom arm!
23
Getting Started
Switch on inspiro
To switch on, push the slider to the left until the
green mark appears and the LCD is illuminated.
To save power, the backlight of the inspiro LCD is
switched off after a certain time. Press any button
to activate the LCD backlight.
To switch off inspiro, push the slider to the right.
ON
01.10.2008
OFF
01:57pm
H33
Jenny Jones
Monitor
!
24
Sync
The inspiro can also be switched off if
the keypad is locked!
Activate the key pad lock
01.10.2008
It is recommended to
activate the key pad lock
whenever possible.
Monitor
01:57pm
H33
Jenny Jones
Sync
To activate the key pad lock,
go to the highest menu
level as shown above and
press the key showing
the key symbol, then press
OK. A key symbol appears
in the status bar.
01.10.2008
01:57pm
H33
!
If the key pad lock is activated, the six keys
are locked. Please note that the on/off slider
is never locked and can always be used!
To unlock the keys, repeat the above procedure.
25
Getting Started
Monitoring
Monitoring is a simple and easy way to check the
functionality of FM receivers. We recommend
monitoring receivers every day. By pressing the Monitor
soft key, the inspiro reads the information from a
child’s FM receivers (one or two FM receivers).
The procedure is as follows:
• Hold the inspiro close to the child, at a distance
of approximately 20 cm / 8 inches from the receivers.
Ensure that no other receivers are within
synchronisation range.
• Then press the left soft key Monitor at the top Menu
level. The inspiro then begins to search for receivers.
Make sure you are within synchronisation range until
the receivers are shown on the inspiro’s LCD display.
• The result of the Monitoring process will be displayed
on the inspiro’s LCD display. The completion of the
Monitoring process is marked with a beeping sound.
If the beeping sound cannot be heard in the hearing
device, the child’s hearing device is probably not in an
FM program. Contact your Hearing care professional
on matters concerning the right hearing instrument
program for FM.
26
01.10.2008
01:57pm
H33
Jenny Jones
Monitor
Sync
• In order to view detailed Monitoring results, select the
desired receiver on the inspiro LCD display and press
the OK key. For the purpose of this step, you no longer
need to be close to the receiver.
!
Monitoring will only be performed if the receiver
is connected to the hearing device and the receiver
and the hearing instrument are turned on.
!
Monitoring will only work with Phonak Dynamic FM
receivers, like MLxi, ML9i, ML10i, ML11i, MLxi Baha.
If you are not sure that your receivers are Phonak
Dynamic FM receivers, ask your hearing care professional.
27
Using inspiro
Talking
Before you start talking to the children, make sure of
the following:
• the microphone is properly positioned (see page 20)
• the inspiro is turned on (see page 24)
• and the microphone is active, not muted (see page 30)
We also recommend activating the keypad lock.
!
Do not touch the microphone if the inspiro is turned
on. If you need to reposition the microphone, simply
press the microphone mute key to avoid any
amplified noise.
01.10.2008
01:57pm
H33
Jenny Jones
Monitor
28
Sync
SoundCheck
The SoundCheck lets you verify whether the microphone is properly positioned, as well as checking the
noise level in the classroom. The required procedure
is as follows:
• Activate the SoundCheck in the top menu level.
Then follow the instructions shown on the inspiro’s
LCD display.
• Talk continuously until the inspiro stops measuring.
The inspiro will show two results:
• If the level of your voice is good, this will be indicated
with a green bar. If the bar is yellow or red, however,
you may need to reposition the microphone or to
speak more loudly.
• If the noise level in the room is in the red or yellow
zone, discuss with your hearing care professional
whether there are possibilities to improve the acoustics
in the classroom.
29
Using inspiro
Muting the microphone
The inspiro’s microphone can be muted simply by
pressing the microphone key on the device. If you have
forgotten to activate the microphone, inspiro will warn
you with a vibrating alarm after 15 minutes.
01.10.2008
01:57pm
H33
Jenny Jones
Monitor
Sync
• This symbol shows that the microphone
is active:
• This symbol shows that the microphone
has been muted:
30
Using the inspiro with an MP3 player, TV set, GPS,
computer or Hifi
The inspiro can be directly connected to any audio
equipment via the audio input socket on the inspiro.
햳
햲
햴
햲
햳
햴
Plug in to the television’s headphone jack
Plug in to the audio jack AUDIO
Audio cable (standard accessory)
31
Using inspiro
• If the audio cable is plugged in, the audio symbol
appears on the inspiro’s LCD display.
• The microphone can still be activated when the audio
input is connected.
• Some televisions are equipped with a separate audio
output volume control, or a muting function. Please
refer to the television’s operating instructions for
details.
• Certain pieces of audio equipment feature a Scart or
Cinch audio output. Phonak offers an optional adapter
for connecting the audio cable to Scart or Cinch sockets.
Scart adapter
!
32
Cinch adapter
Unwind the microphone cable in order to reach the
maximum operating distance.
Synchronizing receivers
If you change the channel of the inspiro transmitter,
you should always make sure that the channel of the
receivers is synchronized to the new inspiro channel. In
order to synchronize the receivers, the inspiro needs to
be close to the receivers (at a distance of approximately
20 cm / 8 inches).
• Follow the instructions shown on the inspiro, for
example if you change the inspiro channel or if you
activate the Channel Finder.
• In the top screen, you can have direct access to the
synchronization feature by pressing the right soft key
labeled ‘Sync’.
01.10.2008
01:57pm
H33
Jenny Jones
Monitor
Sync
• The Monitoring feature (see page 26) also checks
whether the receivers are on the same channel as
the inspiro.
33
Individual inspiro configuration
Setting the alarm time
The inspiro includes an alarm function. As with mobile
phones, an alarm time can be entered and the alarm
can be either activated or deactivated.
!
The alarm will only be displayed if the inspiro is
switched on!
In order to set an alarm time, proceed as follows:
• Enter the Settings menu and then select Alarm.
• Select Alarm time and then press OK. Using the Up
and Down keys, you can set the first digit of the
alarm time. After pressing OK, the cursor then moves
to the next digit. If the complete time has been
entered, press Save.
• Then select Set Alarm.
• Select On and then press OK.
The alarm time has now been set and the alarm has
been activated. This is confirmed by the presence of the
bell symbol in the top part of the screen.
34
If an alarm sounds, the inspiro will vibrate and a message
will pop up on the screen. Confirm this message using the
OK button.
Setting the preferred date format
A choice of two date formats is available on the inspiro:
DD.MM.YYYY or MM/DD/YYYY
• Enter the Settings menu and then select Date & Time.
• Select Date format and then press OK.
• Select the required date format by using the Up or
Down key. Then press OK.
The preferred date format has now been selected and
the date at the top of the screen is now displayed in
the new format.
The inspiro also offers two time formats:
24-hour clock
12-hour clock (am/pm)
• In order to select the desired time format, scroll
down in the Date & Time menu and then select
Time format. Then proceed in the same manner as
when changing the date format.
35
Individual inspiro configuration
Adjusting the settings of the LCD display
The settings of the inspiro’s LCD display are pre-set.
Should you wish to change the presets, please proceed as
follows:
• Enter the Settings menu and then select Display.
• Select the Backlight menu to increase or decrease
the level of brightness of the backlight of the LCD
display.
• Select Turn off light to set the time when the
inspiro should switch off the backlight in order to
save power.
• Select Turn off display to set the time when the
inspiro should switch off the LCD display to save
power. The recommended setting is never.
You can also check the help in the inspiro menu for further
information.
!
36
Always check the inspiro on/off slider to determine
whether the inspiro is either switched on or off!
If the inspiro is on and the LCD display is off, the
display will be black, whilst if the inspiro is on and
the background light is off, the LCD display will be
dimmed!
If the inspiro is turned on but the LCD display is off or
the backlight is off, press the OK key to activate the
LCD display!
Selecting a desktop picture
The inspiro offers a choice of three desktop pictures.
One of these three pictures is already active in your
inspiro. If you wish to select another of the desktop
pictures, then proceed as follows:
• Enter the Settings menu and then select Desktop
picture.
• The LCD display shows the first desktop picture.
Press the Down key once to see the second picture.
Pressing the Down key again will show the third
desktop picture. Once you have chosen your preferred
picture, press the Save soft key.
37
Individual inspiro configuration
Selecting your language
The inspiro offers a choice of nine different languages.
Should you wish to change the current inspiro language,
then proceed as follows:
• Enter the Settings menu and then select Language.
• You will now see the nine different languages
available listed on the LCD display. The currently
selected language is marked with a black dot.
All of the other languages are marked with a light
grey dot.
• Select the desired language using the Up and Down
keys. Then press OK. An information window will pop
up and then disappear automatically after 2 seconds.
Alternatively, you can press OK to close the window
immediately.
The new language has now been set. All of the menu
items, help texts and information windows will now be
displayed in the selected language.
38
39
Brief description of the menu items
inspiro can be used in the following two
operating modes:
• Standard operating mode
This is the mode for standard use, as well as for use
by all parents and teachers who do not require any
special features.
• Extended operating mode
This is the mode for all users who require access
to special FM features, such as the MultiTalker
Network, etc.
The inspiro’s operating mode can be modified by a
hearing care professional.
Standard operating mode
Channels
• Change channel
Change the inspiro’s transmitting FM channel by
scrolling up or down through the FM channel list.
You can select a new channel using the ‘OK’ key.
FM receivers can be directly synchronized to the
new channel by pressing the right soft key.
40
41
Monitor
Set beep tone
Lock push button
Find channel
Sync receivers
Receiver options
Change channel
Channels
SoundCheck
Desktop picture
Standard operating mode
About inspiro
Audio input
Display
Hotline
www support
Instructions
Help
Date & Time
Alarm
Language
Settings
Short description of the menu items
• Find channel
Finds a new, clean FM channel. All of the channels
available in the inspiro are first checked and
then the inspiro proposes the best channel for use.
Follow the instructions in the inspiro!
• Sync receivers
Changes the FM channel on the receiver to the
current inspiro channel. The receiver must be
within arm’s length. Beeping sounds confirm that
synchronization is complete.
Receiver options
• Monitor
This performs a wireless check on the receivers.
The inspiro should be kept close to the receivers.
The receivers must be connected to a hearing
device and the hearing device must be switched
on. A beeping sound marks the end of the check.
Monitoring works only with Phonak Dynamic FM
receivers.
• Set beep tone
Choose between the different beeping tones
available to indicate when the Dynamic
FM receivers are being synchronized or monitored.
42
• Lock push button
Locks or enables the push button on the universal
MLxi receiver.
SoundCheck
This check determines the volume level of speech
and of background noise. Adjust the position of the
iLapel microphone until you get the best result.
Settings
• Language
Choose the language of the inspiro menu.
• Alarm
Sets the alarm time. The alarm will sound every day
at the set alarm time, but only if the inspiro is
switched on.
• Date & Time
Sets the current date and time and the date format
and time format.
43
Short description of the menu items
• Audio input
To select the special audio input setting for certain
audio devices, such as the iPod nano, go into the
“Audio device” sub-menu. Select “Set microphone
Mute” if you want to mute the iLapel or iBoom
microphone when an audio input signal is detected.
• Display
Set the backlight level, backlight turn-off time and
display turn-off time.
• Desktop picture
Choose your favorite of the three different desktop
pictures available.
Help
• Instructions
Summarizes all the inspiro help texts.
• www support
Displays a website that provides further useful FM
information for teachers and parents.
44
45
Display
Desktop picture
View channels
Change channel
Set FM volume
List of participants
Only in Extended operating mode
Audio input
Identify receivers
Set up network
Lock push button
Set beep tone
About inspiro
Hotline
www support
Instructions
Help
Additional features in
Extended operating mode
Date & Time
Alarm
Sync receivers
Scan for channels
Language
Settings
Stop MultiTalker Net
SoundCheck
Find channel
Monitor
Receiver options
Start MultiTalker Net
MultiTalker Net
Change channel
Channels
Short description of the menu items
• Hotline
Provides the phone number to call in case you have
questions or problems.
• About inspiro
Shows the device’s serial number, the software
version, the hardware version, the DSP setting and
the menu setting (Standard / Extended).
Additional features in Extended operating mode
MultiTalker Net
• MultiTalker Net
If a network has already been set up, you can
choose to start the MultiTalker Network mode. If
you do not start the MultiTalker Network, you
will remain in single teaching mode.
• Stop MultiTalker Net
Stop the MultiTalker Network mode if you want to
return to single teaching mode.
• Set up network
Create a MultiTalker network. The network setting is
automatically stored in the inspiro.
46
• List of participants
In the inspiro managing the network, you can
check the names of other teachers in the MultiTalker
network.
Receiver options
• Scan for channels
Searches for an existing transmission from another
transmitter, e.g. if a speaker is already using an FM
transmitter at a lecture or presentation.
• Identify receivers
Helps to identify a receiver. Relevant receiver
data can be read and displayed in the inspiro LCD,
e.g. the user of the receiver or the serial number.
• View channels
Displays the channels programmed into the receiver.
• Change channel
Change the channel in the receiver without changing
the current inspiro channel. This can be useful if
several working groups need to be created in a class.
47
Short description of the menu items
• Set FM volume
Increase or decrease the volume of the Dynamic FM
receiver.
48
Multiple talkers in one classroom
The MultiTalker Network
The MultiTalker network is an ad hoc network of two or
more inspiro transmitters. It is used in classrooms when
more than one teacher needs to be able to talk to the
children. Up to ten inspiro transmitters can be included
in a network. However, under normal conditions, only
two or three inspiro transmitters are generally used in
a network.
• The MultiTalker Network is only available in the
inspiro’s Extended operating mode.
• The Network operating range, i.e. the distance
between the initiating inspiro and each inspiro joining
the network, is 8 m / 25 feet. If a user should
unintentionally leave the network, an alarm signal
appears on the inspiro to alert the user.
• The initiating inspiro displays a list of the inspiro
transmitters. This makes it possible to check who
is active in the network.
49
Multiple talkers in one classroom
Initiating a MultiTalker Network
Initiating or setting up a MultiTalker Network should be
performed before the lesson begins in the classroom.
The procedure to follow is straightforward and the inspiro
Menu guides you through the necessary steps.
• Make sure that you have all of the inspiro transmitters
you plan to include in the network ready for use
on the table. Ensure that all of the inspiros are
switched off.
• Take the main teacher’s or main speaker’s inspiro
and switch it on. In this inspiro, select MultiTalker
Net and then Set up network. This inspiro is
known as the initiator.
• Read the information on the LCD display and then
press the Start soft key.
• Then switch on all of the other inspiro transmitters.
• A list of the inspiros that have joined the network
should now be displayed on the initiating inspiro. If
all of the inspiros are listed, press the Continue
soft key.
50
You have successfully created the network! The FM
channel of the initiating inspiro also has to be sent to
the inspiros joining the network. All of the inspiros are
now on the same channel and ready for use.
• Begin talking as usual.
• Make sure that only one person is talking at a time.
Leaving a MultiTalker Network
If you are using the initiating inspiro, i.e. the inspiro
which is managing the network, the MultiTalker Network
cannot exist without the presence of your inspiro in
the network. If you decide to end the MultiTalker Network,
the entire network will cease and all of the inspiro
transmitters will activate an alarm.
If you are using an inspiro that just joined a network,
you can always leave the network by selecting Stop
MultiTalker Network. Your inspiro will then be set to
single teaching mode, but all of the other inspiro
transmitters in the MultiTalker Network will remain
in MultiTalker Network mode.
51
Multiple talkers in one classroom
Should you unintentionally leave the MultiTalker Network,
you will be alerted to this by an alarm and informed that
you have left the operating range of the MultiTalker
Network. You can then choose to either return to the
operating range of a maximum of 8m / 25 feet from
the initiating inspiro or to leave the network, at which
point your inspiro will revert to single teaching mode.
Practical tips
• The MultiTalker network setting is stored in the
inspiro transmitters. If the inspiro transmitters have
been switched off in MultiTalker Network mode,
e.g. before lunch, and then switched back on again
after lunch, the MultiTalker Network mode can be
selected by simply pressing a key. In this case, there
is no need to reinitiate the network.
• If you have set up a MultiTalker Network with for
instance four inspiro transmitters and then a fifth
person needs to subsequently join the network,
it is necessary to set up a new network (to initiate
a new MultiTalker Network).
52
• inspiro transmitters joining a network automatically
use the FM channel of the initiating inspiro in the
MultiTalker Network.
• If an inspiro reverts to single teaching mode, it
automatically applies the FM channel used previously.
• If the initiating inspiro alters the FM channel in
MultiTalker Network mode for any reason, the new
channel will automatically be sent to the other
inspiro transmitters in the network and then activated.
53
FM receivers
The MLxi
An FM system consists of a transmitter and FM receivers.
The inspiro is an FM transmitter, while the MLxi is an
FM receiver.
• The MLxi is a universal device and can be used with
Phonak, as well as with nearly all other BTE brands.
54
• In order to connect an MLxi to the hearing device,
you will need an audio shoe (audio boot).
• The Audio shoe is produced by the manufacturer of
the hearing device. The user guide for your hearing
device explains how to attach and remove the audio
shoe from the hearing device.
Consult your hearing care professional if you have any
questions regarding the connecting of the MLxi to the
audio shoe and the hearing device.
55
FM receivers
Lock MLxi push button
The MLxi push button can be either locked or activated.
This action can be performed by either the hearing care
professional or the inspiro user.
• In this mode, the MLxi functions automatically.
• This mode is recommended for all children.
The required procedure is as follows:
• Select Lock push button in the Receiver menu.
• Make sure that the distance between the receivers
and the inspiro is approximately 20 cm / 8 inches.
Then use either the left soft key to Lock the push
button or the right soft key to Activate the push
button.
• Press the MLxi push button to check whether the
setting has successfully been altered.
Identifying receivers
The inspiro is able to identify Dynamic FM receivers,
e.g. an MLxi or ML10i. If it locates an MLxi, the inspiro can
read the identification data and display it on the LCD
display. This also helps in determining to whom the
receiver belongs.
56
This feature is only available in the inspiro’s Extended
operating mode.
The required procedure is as follows:
• Make sure that the receiver is connected to a
hearing device and that both the hearing device
and the receiver are switched on and the FM
program is activated in the hearing instrument.
• Ensure that the distance between the inspiro and
the MLxi or ML10i is approximately 20 cm / 8
inches. Select Receiver options and then Identify
receivers.
• The identification data should now be shown on
the inspiro’s LCD display.
This feature is particularly useful in schools.
Other Phonak FM receivers
The inspiro is compatible with all Phonak FM receivers. If
you have questions concerning a specific receiver, please
consult your hearing care professional or visit:
www.eschooldesk.com
We do not recommend using the inspiro with FM receivers
produced by other manufacturers.
57
Troubleshooting
Problem
The inspiro cannot be switched on.
Poor speech intelligibility.
Speaker’s voice is inaudible even though the inspiro
is turned on.
58
Most probable cause
Solution
The battery is run down.
Charge the inspiro for a
period of at least two
hours.
The microphone has not
been positioned properly.
Move the microphone closer
to the speaker’s mouth.
Activate the SoundCheck
feature.
The microphone mute has
been activated or the
hearing device has not
been set to the right
program.
Check the inspiro’s LCD
display and press the
microphone mute key in
order to activate the
microphone.
Also check whether the
hearing devices are turned
on and set to the right
program.
Activate the Monitoring
function on the inspiro to
check the receivers.
59
Troubleshooting
Problem
Insufficient operating range.
Radio interference.
A second person’s voice can also be heard.
60
Most probable cause
Solution
Microphone cable has not
been unwound.
Unwind the microphone
cable.
External cause:
radio antenna or similar
interfering devices nearby.
Change the FM channel.
Use the ChannelFinder
to locate an unused and
interference-free FM
channel.
Another FM user is using
the same FM channel
nearby.
Change the FM channel.
Use the ChannelFinder
to locate an unused and
interference-free FM
channel.
61
Important notices
Your inspiro transmitter collects and stores internal
technical inspiro data. The data may be read
by a hearing care professional in order to check the
transmitter as well as to support you in being able
to use the inspiro in the ideal manner.
Do not use your inspiro in a place where it is
prohibited to use electronic devices, e.g. on
airplanes or in hospitals. If in doubt, please ask
the person in charge.
Persons with pacemakers or other medical devices
should ALWAYS consult their physician, the
manufacturer of their pacemaker, or other medical
device BEFORE using inspiro. The use of inspiro
with a pacemaker or other medical devices should
ALWAYS be in accordance with the safety
recommendations of the physician responsible for
your pacemaker or the pacemaker manufacturer.
Do not use two or more inspiro transmitters on
the same FM channel, except in the case of inspiros
that are in a MultiTalker Network.
Please note that radio signals might also be picked
up and overheard by other receivers.
62
Before using the inspiro in another country, contact
your hearing care professional to make sure the use
of your radio channels is permitted in that country.
Do not use water or other liquids to clean the
inspiro.
Only use original Phonak accessories.
Only use the original Phonak inspiro charger.
Your inspiro may only be repaired by an authorized
service center.
63
Service and warranty
Phonak provides a manufacturer’s limited warranty
for your inspiro. This covers all manufacturing and
material defects. Problems with inspiro arising from
improper handling or care and repairs made by an
unauthorized party are not covered by the warranty.
Please ask at the point of sale for full details of this
warranty. The salesperson will note the serial number
of your inspiro below. It will be needed in the event
of a warranty repair.
Serial number
inspiro:
Date of purchase:
Serial number FM receivers:
64
Declaration of conformity
Hereby, Phonak Communications AG, declares that
the inspiro is in compliance with the essential
requirements and other relevant provisions of Directive
1999/5/EC. To obtain a copy of the Declaration
of conformity, please contact the local Phonak AG
representative whose address can be taken from
the list of Phonak distributors worldwide.
This device complies with part 15 and part 95 of the
FCC rules and with RSS 210 of Industry Canada.
Operation is subject to the following two conditions:
(1) This device does not cause harmful interference,
and (2) this device must accept any interference received,
including interference that may cause undesired
operation.
!
Warning: Changes or modifications made to
this equipment not expressly approved by Phonak
may void the user’s authority to operate the
equipment.
65
Phonak distributors worldwide
Group companies:
Australia
Austria
Belgium
Brazil
Canada
China
Denmark
France
Germany
Italy
Japan
Jordan
Mexico
Netherlands
New Zealand
Norway
Poland
Russian Federation
66
(detailed information on
www.phonak.com)
Phonak Australasia Pty. Ltd.
Baulkham Hills N. S. W. 2153
Hansaton Akustische Geräte GmbH
5020 Salzburg
Ets Lapperre B.H.A.C. NV
B-1702 Groot-Bijgaarden
Phonak Belgium NV, B-1700 Dilbeek
CAS Produtos Médicos
São Paulo – SP 04363-100
Phonak Canada Limited
Mississauga, Ontario L5W OB3
Phonak (Shanghai) Co. Ltd.,
Shanghai City 200233
Phonak Danmark A/S, Nitivej 10
2000 Frederiksberg
Phonak France SA, 69500 Bron
Phonak GmbH, 70736 Fellbach-Oeffingen
EC Representative
Phonak Italia S.r.l., 20159 Milano
Phonak Japan Co., Ltd., Tokyo 101-0044
Phonak Middle East, 11181 Amman
Phonak Mexicana, S.A. de C.V. 03920
México, D.F.MEXICO
Phonak B.V., 3439 ME Nieuwegein
Phonak New Zealand Ltd., Takapuna
Auckland 9
Phonak AS, 0105 Oslo
Phonak Polska Sp. z o.o., 00-567 Warszawa
Phonak CIS Ltd., Moscow, 115114
Spain
Sweden
Switzerland
United Kingdom
USA
Independent general
distributors:
Manufacturer:
Phonak Ibérica S.A., 03008 Alicante
Phonak AB, 117 43 Stockholm
Phonak AG, Phonak Schweiz, 8712 Stäfa
Phonak UK Limited
Warrington, Cheshire WA1 1PP
Phonak LLC, Warrenville, IL 60555-3927
A complete list of Phonak distributors
is available at Phonak's Internet site:
www.phonak.com. Please visit us or
ask your hearing care professional for
information.
Phonak AG, Laubisrütistrasse 28
CH-8712 Stäfa, Switzerland
67
!
The CE symbol is confirmation by Phonak AG that
this Phonak product meets the requirements
of the R&TTE Directive 1999/5/EC on Radio and
Telecommunication Terminal Equipment.
The alert sign means that potential restrictions on
its use are applicable in one or more European
countries.
This symbol indicates that it is important that the user
refers to associated warnings given in this user guide.
The symbol with the crossed out disposal bin indicates
that this product shall not be treated as household
waste. Please hand over your old or unused product to
the applicable collection point for the recycling of
electrical and electronic equipment or bring your old
product to your hearing care professional for
appropriate disposal. By ensuring this product is
disposed of correctly, you will help prevent potential
negative effects on the environment and human
health.
Operating
conditions
This product has been designed for trouble-free
operation without restrictions when used as intended,
unless otherwise stated in this user guide.
Transportation Temperature should not exceed limits of –20°/60°
and storage Celsius at a relative air humidity of 65% for extended
conditions
periods during transportation and storage.
Air pressure between 500 and 1100 hPa is not
detrimental to this device.
68
!
69
Notes
70
71