Transcript
Quick Reference Guide
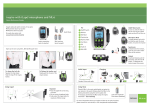
A pupils radio aid system consists of
two parts:
• Transmitter (worn by teacher) and
• Receivers (worn by pupil)
Microphone Directionality
Zoomlink+ has three microphone settings...
!
Superzoom
Narrow beam directionality for, in exceptional
circumstances, pointing at sound source, or
extremely harsh teaching environments.
6 inches
ZoomLink+ transmitter
Audio Shoes
MLxi receiver
Integrated
receiver
Zoom (Recommended)
The recommended directional setting for
everyday teaching scenarios.
On/Off Button
Key
3
1 Twin Microphone Ports
4
2 On/Off & Mic Positions
3 Toggle Button
4 Lavaliere Cord / Antenna
Phonak recommends
that you push the
Middle "Zoom" button
down for 2 seconds to
turn off and on for
normal teaching.
Omni-directional
For using in quiet, group discussion situations
by placing at the opposite end of the table.
Audio Input
5 Clip
6 LCD Display
5
1
LCD Display
7 Channel Select
2
6
ZoomLink+ interface
should be attached to
charge the ZoomLink+
or attach external
devices.
Channel Number
Battery Status
Mic Position
- Superzoom
- Zoom
- Omni (360°)
IF
➔
8 ZoomLink+ Interface Port
Charging
Synchronising
To synchronise a receiver, turn the
ZoomLink+ on within a 50cm range
of the receiver. The receiver should
beep through the hearing aid to
confirm this action.
7
8
ZoomLink+ Interface
A
B
C
A
Audio in
B
Mic in
C
Charging Port
Standard 3.5mm audio cable
Change Channel
ZoomLink+ Compatability
Push button down
with pen to scroll
channels.
Release to stop
and synchronise
any receivers
within range.
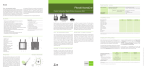
Zoomlink+ is fully compatible with
ALL of Phonak’s FM receivers, past
and present (examples shown).
Simply turn on the transmitter...
and start teaching!
✓
For more information about your ZoomLink+ and how to use other functions
please consult the user manual, or visit www.phonak.com/eschooldesk
OR
✓
Order Ref: ZoomLink+ Quick Ref Guide - Phonak UK
For audio shoe advice visit
www.phonak.com/eschooldesk
Wearing & Adjustment