1
IBM Tealeaf CX
Version 9.0.1
December 4, 2014
Configuration Manual
Note
Before using this information and the product it supports, read the information in “Notices” on page 405.
This edition applies to version 9, release 0, modification 1 of IBM Tealeaf CX and to all subsequent releases and
modifications until otherwise indicated in new editions.
© Copyright IBM Corporation 1999, 2014.
US Government Users Restricted Rights – Use, duplication or disclosure restricted by GSA ADP Schedule Contract
with IBM Corp.
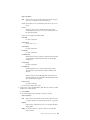
Contents
Tealeaf CX Configuration Manual . . . vii
Chapter 1. Overview of CX Configuration 1
Initial Configuration . . . . .
Configuring Servers and Services
Configuring the CX Pipeline . .
.
.
.
.
.
.
.
.
.
.
.
.
.
.
.
.
.
.
. 1
. 1
. 1
Chapter 2. Configuring Tealeaf
Components . . . . . . . . . . . . . 3
Event Model Backup. . . . . . .
Legend . . . . . . . . . . .
Services . . . . . . . . . . .
Alert Service . . . . . . . .
Canister Manager. . . . . . .
Data Collector . . . . . . . .
Data Service . . . . . . . .
Extract Service . . . . . . . .
Portal GUI . . . . . . . . .
Query Server . . . . . . . .
RSE Service . . . . . . . . .
Session Indexer . . . . . . .
Scheduling Service . . . . . .
Tealeaf Status . . . . . . . .
Tracking Service . . . . . . .
Transport Service . . . . . . .
Servers . . . . . . . . . . .
Canister Server . . . . . . .
cxConnect Server . . . . . . .
cxReveal Server . . . . . . .
Data Service Server . . . . . .
PCA Server . . . . . . . . .
Replay Server . . . . . . . .
Report Server . . . . . . . .
Search Server . . . . . . . .
SQL Server . . . . . . . . .
Tealeaf Management Server . . .
TLI Server . . . . . . . . .
Transport Server . . . . . . .
Visitor Report Server . . . . .
Configuration . . . . . . . .
Tealeaf mail configuration . . .
Shared configuration . . . . .
Tealeaf global configuration . . .
Pipeline Editor . . . . . . .
Privacy Filter . . . . . . . .
Application . . . . . . . . .
RTV . . . . . . . . . . .
RTV Pro . . . . . . . . .
TLBackup and TLRestore . . . .
TLTMaint . . . . . . . . .
Configuring the System Timezone . .
Time Zone Indicator . . . . .
Current Time Zone . . . . . .
Effects of System Time Zone . . .
Configuring the System Time Zone
© Copyright IBM Corp. 1999, 2014
.
.
.
.
.
.
.
.
.
.
.
.
.
.
.
.
.
.
.
.
.
.
.
.
.
.
.
.
.
.
.
.
.
.
.
.
.
.
.
.
.
.
.
.
.
.
.
.
.
.
.
.
.
.
.
.
.
.
.
.
.
.
.
.
.
.
.
.
.
.
.
.
.
.
.
.
.
.
.
.
.
.
.
.
.
.
.
.
.
.
.
.
.
.
.
.
.
.
.
.
.
.
.
.
.
.
.
.
.
.
.
.
.
.
.
.
.
.
.
.
.
.
.
.
.
.
.
.
.
.
.
.
.
.
.
.
.
.
.
.
.
.
.
.
.
.
.
.
.
.
.
.
.
.
.
.
.
.
.
.
.
.
.
.
.
.
.
.
.
.
.
.
.
.
.
.
.
.
.
.
.
.
.
.
. 3
. 3
. 3
. 3
. 3
. 4
. 4
. 4
. 4
. 5
. 5
. 5
. 5
. 6
. 6
. 6
. 7
. 7
. 7
. 7
. 8
. 8
. 8
. 8
. 9
. 9
. 9
. 9
. 10
. 10
. 10
. 10
. 11
. 11
. 11
. 11
. 11
. 11
. 12
. 12
. 12
. 12
. 13
. 13
. 13
. 14
Troubleshooting . . . . . . . . . . . . 15
Configuring the Transport Service . . . . . . . 15
Accessing Transport Service Configuration . . . 15
Transport Overview . . . . . . . . . . 16
Transport Service Configuration . . . . . . 16
Monitoring the Pipeline . . . . . . . . . 16
Transport Service Configuration at the Command
Line . . . . . . . . . . . . . . . . 16
Troubleshooting . . . . . . . . . . . . 16
Configuring the Tracking Service . . . . . . . 17
Editing the Tracking Service configuration using
TMS . . . . . . . . . . . . . . . . 17
Configuring the CX Canister. . . . . . . . . 18
Canister Overview . . . . . . . . . . . 18
Canister Services Tab . . . . . . . . . . 20
Services Controls Tab . . . . . . . . . . 24
Services Perform Tab . . . . . . . . . . 26
Canister Logging Tab . . . . . . . . . . 29
Configuring the Canister Server . . . . . . 31
Troubleshooting . . . . . . . . . . . . 32
Configuring CX Indexing . . . . . . . . . . 33
Indexing Overview . . . . . . . . . . . 33
Index Processing. . . . . . . . . . . . 33
Configuration . . . . . . . . . . . . 35
Addition Settings . . . . . . . . . . . 45
Troubleshooting Session Indexes . . . . . . 45
Index Format and Storage . . . . . . . . 45
Monitoring Indexing . . . . . . . . . . 51
Adding Other Fields for Indexing and Search . . 52
Troubleshooting . . . . . . . . . . . . 57
Configuring the Report Server . . . . . . . . 58
Report Server Time Zone . . . . . . . . . 58
Accessing the Report Server Configuration . . . 58
Portal tab . . . . . . . . . . . . . . 58
Database tab . . . . . . . . . . . . . 60
cxResults DB tab . . . . . . . . . . . 63
Additional Report Server Configuration . . . . 65
Troubleshooting . . . . . . . . . . . . 65
Configuring the Tealeaf Data Service . . . . . . 65
Connections . . . . . . . . . . . . . 65
Installation . . . . . . . . . . . . . 66
Database Configuration . . . . . . . . . 66
Configuring Tealeaf Data Service . . . . . . 66
Starting and Stopping the Service . . . . . . 67
Logging . . . . . . . . . . . . . . 67
Configuring the Replay Server . . . . . . . . 69
Pre-Requisites . . . . . . . . . . . . 70
Installation . . . . . . . . . . . . . 70
Replay Server Configuration. . . . . . . . 70
Creating Additional Replay Servers . . . . . 78
Configuring Replay Rules . . . . . . . . 81
On-Demand Privacy . . . . . . . . . . 81
Replay Server Plugins . . . . . . . . . . 81
Native Replay in BBR . . . . . . . . . . 82
Troubleshooting . . . . . . . . . . . 100
Managing POST Data Matching Plugins . . . . 100
iii
Overview. . . . . . . . . . .
Adding and Removing Plugins . . .
Configuration . . . . . . . . .
Building Custom Plugins . . . . .
Configuring the Search Server . . . . .
Overview. . . . . . . . . . .
Search Configuration . . . . . . .
Authentication . . . . . . . . .
Troubleshooting . . . . . . . .
On-Demand Privacy . . . . . . . .
How On-Demand Privacy Is Applied .
Configuring On-Demand Privacy. . .
Replay Rules for Privacy . . . . .
Debug Mode . . . . . . . . .
Logging and Reporting . . . . . .
Reference. . . . . . . . . . .
Configuring the Alert Service . . . . .
How Alerts Work . . . . . . . .
Installation . . . . . . . . . .
Alert Service Terminology . . . . .
Creating Alerts . . . . . . . . .
Configuration . . . . . . . . .
Canister Statistics . . . . . . . .
Starting/Stopping/Restarting the Service
Configuring the Scheduling Service . . .
Enabling Tealeaf Scheduling Service . .
Configuring Tealeaf Scheduling Service.
Configuring the Extract Service . . . .
Configuration . . . . . . . . .
Reference. . . . . . . . . . .
.
.
.
.
.
.
.
.
.
.
.
.
.
.
.
.
.
.
.
.
.
.
.
.
.
.
.
.
.
.
.
.
.
.
.
.
.
.
.
178
178
178
180
180
181
181
181
181
181
182
182
183
185
185
185
185
186
186
186
187
187
187
188
188
189
189
189
190
190
190
191
191
200
200
200
201
201
202
202
.
.
.
.
.
202
203
203
203
204
.
.
.
.
.
.
205
206
207
208
210
211
.
.
.
.
.
.
.
.
.
.
.
.
.
.
.
.
.
.
.
.
.
.
.
.
.
.
.
.
.
.
.
.
.
.
.
.
.
.
.
.
.
.
.
.
.
.
.
.
.
.
.
.
.
.
.
.
.
.
.
.
Event Model Backup . . . . . . . . .
Tealeaf CX Configuration . . . . . . .
Initial Configuration Steps . . . . . .
Optional Configuration . . . . . . . .
Verifying Your Tealeaf Solution . . . . .
Initial Portal Configuration . . . . . . .
Portal Announcements . . . . . . .
Configure Tealeaf System Time Zone . .
Miscellaneous Settings . . . . . . .
Server Configuration . . . . . . . .
CX User Administration . . . . . . .
Report Configuration . . . . . . . .
Testing Your Configuration . . . . . .
Initial TMS Configuration . . . . . . .
Example Architecture. . . . . . . .
Pre-Requisites . . . . . . . . . .
Initializing TMS . . . . . . . . .
Configuration Management . . . . .
Update Tasks . . . . . . . . . .
Testing Your Configuration . . . . . .
IBM Digital Analytics Integration Solution. .
IBM Digital Analytics integration solution
overview . . . . . . . . . . . .
Configuring IBM Tealeaf for IBM Digital
Analytics integration . . . . . . . .
Data collection for IBM Digital Analytics .
IBM Digital Analytics data examples . .
Initial cxConnect configuration . . . . .
Prerequisites. . . . . . . . . . .
.
.
.
.
.
.
.
.
.
.
.
.
.
.
.
.
.
.
.
.
.
.
.
.
.
.
.
.
.
.
.
.
.
.
.
.
.
.
.
.
.
.
.
. 175
Chapter 4. CX Pipeline Session
Agents . . . . . . . . . . . . . . 213
.
.
.
.
.
.
.
.
.
.
CX Pipeline Configuration . . . .
Capture Modes . . . . . . .
Default Pipelines . . . . . .
How to Configure the Pipeline .
Configuration with Capture Filter
Chapter 3. Initial CX Configuration
iv
IBM Tealeaf CX: Configuration Manual
101
102
103
107
107
107
108
120
132
133
133
134
139
140
141
141
141
141
142
142
143
143
145
145
146
146
146
156
157
158
cxConnect installation . . . . . . . .
Adding cxConnect server . . . . . . .
Adding a configured task . . . . . . .
Other configuration options . . . . . .
Testing your configuration . . . . . . .
References . . . . . . . . . . . .
Initial IBM Tealeaf cxVerify Configuration . . .
Pre-Requisites . . . . . . . . . . .
IBM Tealeaf cxVerify Installation . . . . .
Types of Archiving . . . . . . . . .
Servers . . . . . . . . . . . . .
Archive Tasks . . . . . . . . . . .
Session File Tasks . . . . . . . . . .
Save Task. . . . . . . . . . . . .
Checking Task Status . . . . . . . . .
Test Your Configuration . . . . . . . .
References . . . . . . . . . . . .
Initial cxResults Configuration. . . . . . .
Pre-Requisites . . . . . . . . . . .
Verify Visitor Database . . . . . . . .
Enabling the Visitor Database Extractor Job .
Configure Visitorization . . . . . . . .
cxResults User Administration. . . . . .
Configure Search Templates and Session Lists
Configure cxResults Session Filtering Events .
Other cxResults Settings . . . . . . . .
Visitor Dashboards . . . . . . . . .
References . . . . . . . . . . . .
Testing Your Configuration . . . . . . .
Initial RTV Configuration . . . . . . . .
RTV Installation . . . . . . . . . .
Connect to Tealeaf . . . . . . . . . .
Configuration . . . . . . . . . . .
Testing Your Configuration . . . . . . .
References . . . . . . . . . . . .
Initial CX Mobile configuration . . . . . .
Pre-Requisites . . . . . . . . . . .
Configuring Tealeaf CX Mobile . . . . .
Configure events for CX Mobile . . . . .
Testing your configuration . . . . . . .
Initial configuration for CX Mobile for Mobile
App . . . . . . . . . . . . . .
References . . . . . . . . . . . .
Testing Your Tealeaf Solution . . . . . . .
Methodology . . . . . . . . . . .
Installation . . . . . . . . . . . .
Some Considerations in Generating Your Test
Session . . . . . . . . . . . . .
Generate Session . . . . . . . . . .
Active Session Tests . . . . . . . . .
Completed Session Tests. . . . . . . .
Capturing Additional Test Sessions . . . .
Next Steps . . . . . . . . . . . .
.
.
.
.
.
.
.
.
.
.
.
.
.
.
.
.
.
.
.
.
.
.
.
.
.
.
.
.
.
.
159
159
159
159
159
160
160
160
161
161
161
164
167
167
169
169
170
170
173
174
175
175
176
176
177
177
177
.
.
.
.
.
.
.
.
.
.
.
.
.
.
.
.
.
.
.
.
.
.
.
.
.
214
215
215
216
217
Manual Pipeline Configuration . . . .
Initial Pipeline Configuration . . . . . .
Non-default Listen Ports . . . . . .
Configure Privacy . . . . . . . . .
Health-Based Routing . . . . . . .
Data Drop . . . . . . . . . . .
Testing Your Configuration . . . . . .
Overview of the Capture Pipeline and Session
Agents . . . . . . . . . . . . .
About Session Agents . . . . . . . .
Available Session Agents . . . . . . .
Adding a Session Agent . . . . . . .
Archive Session Agent . . . . . . .
Attribute Indexing Session Agent . . . .
Canister Session Agent . . . . . . .
Cookie Parser Session Agent . . . . .
Data Drop Session Agent . . . . . .
Configuration Settings . . . . . . . .
Custom Drop Rules . . . . . . . . .
Sample Configuration . . . . . . . .
Data Parser Session Agent . . . . . .
Configuring Template Rules . . . . .
Configuration Settings . . . . . . . .
Building Data Parser Rules . . . . . . .
Rule configuration options . . . . . .
Example rules . . . . . . . . . .
Decouple Session Agent . . . . . . .
Extended Decoupler Session Agent . . .
Draining the Short Term Canister. . . . .
Reporting . . . . . . . . . . . .
Logging . . . . . . . . . . . . .
DOM Capture Virtual Hit Session Agent . .
Extended Decoupler Configuration . . . .
Global Settings . . . . . . . . . .
Short Term Canister Thresholds . . . .
DecouplerEx Reporting . . . . . . .
DecouplerEx Disk Settings . . . . . .
Disabling Disk Queuing . . . . . . . .
Extended Privacy Session Agent . . . .
Health-Based Routing (HBR) Session Agent
Configuration Settings . . . . . . . .
Determining HBR Health . . . . . . .
How to Configure HBR . . . . . . . .
Configuring HBR Global Settings. . . .
Configuring HBR Settings for Individual
Canisters . . . . . . . . . . . .
Configuring HBR Child Pipeline Settings .
Sample Configuration . . . . . . .
Main and Child DecoupleEx Configuration
Tweaks . . . . . . . . . . . .
Inflate Session Agent . . . . . . . .
JSON Mobile Parser Session Agent . . .
Uses . . . . . . . . . . . . . .
Overview. . . . . . . . . . . . .
Prerequisites. . . . . . . . . . . .
Install Tealeaf Target page . . . . . .
Request Identifiers. . . . . . . . .
PCA Configuration . . . . . . . .
Mobile Parser Processing Pipeline . . . .
Adding the Session Agent . . . . . . .
Configuration Settings . . . . . . . .
.
.
.
.
.
.
.
.
.
.
.
.
.
.
218
221
221
222
223
223
224
.
.
.
.
.
.
.
.
.
.
.
.
.
.
.
.
.
.
.
.
.
.
.
.
.
.
.
.
.
.
.
.
.
.
.
.
.
.
.
.
.
.
.
.
.
.
.
.
.
.
.
.
.
.
.
.
.
.
.
.
.
.
.
.
.
.
.
.
.
.
.
.
224
224
224
226
227
230
236
238
241
241
243
245
246
246
247
247
247
249
250
252
253
254
254
254
254
255
257
258
259
260
261
263
264
267
267
267
.
.
.
. 268
. 269
. 269
.
.
.
.
.
.
.
.
.
.
.
.
.
.
.
.
.
.
.
.
.
.
.
.
270
271
275
275
275
276
276
276
277
277
279
279
Logging . . . . . . . . . . . . . .
Unhandled exceptions . . . . . . . .
Mobile Name/Value Pairs Reference . . . .
Example Request Data . . . . . . . .
AppEnv section . . . . . . . . . .
MobileEvents section . . . . . . . . .
Managed Code Session Agent . . . . . .
Null Session Agent . . . . . . . . .
Privacy Session Agent . . . . . . . .
Privacy session agent versions. . . . . . .
Support for Mobile App . . . . . . . .
Adding and Configuring the Session Agent . .
Testing Privacy . . . . . . . . . . .
Before You Begin . . . . . . . . . .
Adding the Session Agent . . . . . . .
Enabling the Privacy Session Agent . . . .
Basic Steps . . . . . . . . . . . . .
Accessing the Privacy Editor . . . . . . .
Rules . . . . . . . . . . . . . .
Tests . . . . . . . . . . . . . .
Actions . . . . . . . . . . . . .
Keys . . . . . . . . . . . . . .
Pre-configured Filters. . . . . . . . . .
Blocking Data Filter . . . . . . . . .
Encrypting Data Filter . . . . . . . .
Additional Pre-configured Filters . . . . .
Example Filters . . . . . . . . . . . .
Example - Filtering Employee Session Data .
Example - Text Blocking . . . . . . . .
Example - Enabling Search of Encrypted or
Blocked Fields . . . . . . . . . . .
Example - Existence of a request field means
deleting a request section . . . . . . .
Example - Adding request data for indexing .
Enabling Privacy through TMS . . . . . .
Enabling Privacy through
TealeafCaptureSocket.cfg . . . . . . . .
Logging for Privacy Session Agent . . . .
Applying Privacy . . . . . . . . . . .
Testing Privacy . . . . . . . . . . .
Real-Time Monitoring and Alert (RTA) Session
Agent . . . . . . . . . . . . . . .
Enabling RTA . . . . . . . . . . . .
Configuration Settings . . . . . . . .
Configuring RTA Tests in TMS . . . . . .
Editing the RTA.ini File . . . . . . . .
Rule Limits . . . . . . . . . . . .
Sample RTA Rules . . . . . . . . . .
Example Output . . . . . . . . . . .
Response Tags to Request Session Agent . .
RTA Split Session Agent . . . . . . . .
Session Router Session Agent . . . . . .
Sessioning Session Agent . . . . . . .
Configuration Settings . . . . . . . . .
Alternate Sessioning Fields . . . . . . .
Mobile-Related Session Agents . . . . . .
Socket Session Agent . . . . . . . . .
Statistics Logger Session Agent . . . . .
Tealeaf Reference Session Agent . . . . .
Tealeaf Reference Session Agent - Legacy Mode
Overview. . . . . . . . . . . . .
.
.
.
.
.
.
.
.
.
.
.
.
.
.
.
.
.
.
.
.
.
.
.
.
.
.
.
.
.
280
280
280
280
281
283
287
290
291
292
292
292
292
293
293
293
293
294
294
298
300
308
308
308
309
311
311
311
312
. 313
. 316
. 317
. 317
.
.
.
.
318
320
320
321
.
.
.
.
.
.
.
.
.
.
.
.
.
.
.
.
.
.
321
322
322
322
323
323
323
324
326
328
330
332
333
334
334
335
337
339
357
. 357
Contents
v
Enabling Legacy Mode . . . . . . . . .
Disable use of generics . . . . . . . . .
Tuning the self-pruning cache . . . . . . .
Event log messages at startup . . . . . . .
Detecting browser and O/S type from user
agent information (earliest version) . . . . .
Tealeaf Sessioning Session Agent . . . . . .
Example TLSessioning configuration . . . . .
Configuration Settings . . . . . . . . . .
Examples . . . . . . . . . . . . . . .
Notes . . . . . . . . . . . . . . . .
Session Joining . . . . . . . . . . . . .
Actual TLSessioning Configuration Examples . .
TimeGrades Session Agent . . . . . . . .
Configuration Settings . . . . . . . . . .
TLI Session Agent . . . . . . . . . . .
Prerequisites. . . . . . . . . . . . . .
Setting up TLI Management . . . . . . .
Configuring Pipelines for Static Archives . . . .
Deployment Assumptions . . . . . . . .
Configuration Workflow. . . . . . . . .
TLI processing pipeline . . . . . . . . .
Main processing pipeline . . . . . . . .
Disable DelImages. . . . . . . . . . .
Adding the Session Agent . . . . . . . . .
Configuring the TLI Session Agent . . . . . .
Roll time . . . . . . . . . . . . . .
TLI filenames . . . . . . . . . . . .
Specifying TLI directories . . . . . . . .
Logging . . . . . . . . . . . . . .
Disk space management . . . . . . . . .
URL Decode Session Agent . . . . . . . .
CX Pipeline Utilities . . . . . . . . . . .
TeaLeaf Archive Reader - Run Archived Sessions
vi
IBM Tealeaf CX: Configuration Manual
358
359
359
359
360
360
361
362
363
364
364
365
366
367
368
369
369
369
369
370
370
371
375
376
376
378
378
379
380
381
382
384
384
Starting and Monitoring the Capture Pipeline
across Multiple Servers . . . . . . . . . .
Starting the Capture Pipeline . . . . . . .
Monitoring the Capture Pipeline across Multiple
Servers . . . . . . . . . . . . . .
TeaLeaf Capture Status - Pipeline Monitoring
Utility . . . . . . . . . . . . . . .
Filters . . . . . . . . . . . . . . . .
Connections . . . . . . . . . . . . . .
Transfer Graph . . . . . . . . . . . . .
Transport Service Console . . . . . . . . .
Minimize . . . . . . . . . . . . . . .
Privacy Tester Utility . . . . . . . . . .
Versions . . . . . . . . . . . . . . .
Starting Privacy Tester . . . . . . . . . .
For Privacy Session Agents . . . . . . . .
For Real-Time Monitoring Alert Session Agent
Workflow. . . . . . . . . . . . . . .
Acquiring Sample Data . . . . . . . . . .
Editing Rules . . . . . . . . . . . . .
Running Privacy Tester . . . . . . . . . .
Reviewing Results . . . . . . . . . . . .
Side-by-Side View . . . . . . . . . . .
Unified View . . . . . . . . . . . .
Privacy Logs . . . . . . . . . . . . .
Saving. . . . . . . . . . . . . . . .
385
386
386
386
387
388
389
389
390
390
391
391
391
392
392
394
395
395
397
398
399
401
402
Chapter 5. IBM Tealeaf documentation
and help . . . . . . . . . . . . . 403
Notices . . . . . . . . . . . . . . 405
Trademarks . . . . . . .
Privacy Policy Considerations .
.
.
.
.
.
.
.
.
.
.
.
.
. 407
. 407
Tealeaf CX Configuration Manual
The IBM Tealeaf CX Configuration Manual details how to configure the IBM
Tealeaf CX system after you have completed the installation and on an on-going
basis. Use the links below to access specific topics in the manual.
v This manual should be used after you have completed an installation or an
upgrade. For more information on installation, see "Tealeaf CX Installation
Manual" in the IBM Tealeaf CX Installation Manual.
Note: If you are upgrading an existing Tealeaf solution, please use the Upgrade
Manual. See "Tealeaf CX Release 8 Upgrade Manual" in the IBM Tealeaf CX
Upgrade Manual.
© Copyright IBM Corp. 1999, 2014
vii
viii
IBM Tealeaf CX: Configuration Manual
Chapter 1. Overview of CX Configuration
This document provides topics on how to configure your IBM Tealeaf CX solution
in the following three categories.
Initial Configuration
After you have finished the installation of IBM Tealeaf CX products, you may
review individual topics on how to configure individual Tealeaf products.
v See Chapter 3, “Initial CX Configuration,” on page 159.
Configuring Servers and Services
As part of the initial configuration, the following servers and services are
configured. From time to time, you may need to alter these configurations. See
Chapter 2, “Configuring Tealeaf Components,” on page 3.
These configurations can be managed through the Tealeaf Management System.
See "Tealeaf Management System" in the IBM Tealeaf cxImpact Administration
Manual.
Configuring the CX Pipeline
The IBM Tealeaf CX pipeline enables processing actions to be performed on the
individual requests and responses of each hit that is captured by Tealeaf.
Individual session agents can be added and configured in one or more pipelines,
enabling precise manipulation of captured data.
v See “Overview of the Capture Pipeline and Session Agents” on page 224.
© Copyright IBM Corp. 1999, 2014
1
2
IBM Tealeaf CX: Configuration Manual
Chapter 2. Configuring Tealeaf Components
This section provides information on individual Tealeaf services, servers,
configurations, and standalone applications that are part of the IBM Tealeaf CX
system. You can use the links below to access configuration documentation for the
listed Tealeaf component.
v For more information on the rows in each table, see “Legend.”
v For more information on general configuration of IBM Tealeaf CX including the
initial configuration steps for each Tealeaf product, see Chapter 1, “Overview of
CX Configuration,” on page 1.
Event Model Backup
Before you begin modifying your event definitions, you should perform a backup
of your Tealeaf event model, which can be used to restore event definitions to a
previously known state. See "Event Model Backup and Restore" in the IBM Tealeaf
cxImpact Administration Manual.
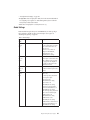
Legend
v Description: description of the component
v Services Panel: Entry in the Windows Services Control Panel, if applicable
v Portal Management: Entry in the "Managing Tealeaf Servers" in the IBM Tealeaf
cxImpact Administration Manual, if applicable
v TMS: Entry in the "Tealeaf Management System" in the IBM Tealeaf cxImpact
Administration Manual, if applicable
v Docs: Links to configuration documentation
Services
Note: Avoid using the Windows Services Control Panel to stop and restart Tealeaf
Services. Use the shortcuts inserted into the Start menu instead.
Alert Service
Description
Manages execution and delivery of event-based alerts
Services Panel
Tealeaf Alert Service
Portal Management
TMS
Alert Service
Docs
“Configuring the Alert Service” on page 141
Canister Manager
Description
This service controls and monitors the canister and Tealeaf Canister Server
processes. Canister Services are restarted by the Canister Manager when an
error condition is detected.
© Copyright IBM Corp. 1999, 2014
3
Services Panel
Tealeaf Canister Manager
Portal Management
TMS
Canister
Docs
Data Collector
Description
Service queries Tealeaf Canisters and aggregates data for storage into the
Tealeaf databases
Services Panel
Tealeaf Data Collector
Portal Management
TMS
Data Collector
Docs
"CX Settings" in the IBM Tealeaf cxImpact Administration Manual
Data Service
Description
Connection manages between Tealeaf services and the databases they
query
Services Panel
Tealeaf Data Service
Portal Management
TMS
Docs
"Configuring the Tealeaf Data Service" in the IBM Tealeaf CX Configuration
Manual
Extract Service
Description
Service used by IBM Tealeaf cxConnect for Data Analysis to extract session
data from Tealeaf databases
Services Panel
Tealeaf Extractor Service
Portal Management
TMS
Extract Service
Docs
“Configuring the Extract Service” on page 156
"cxConnect for Data Analysis Administration Manual" in the IBM Tealeaf
cxConnect for Data Analysis Administration Manual
Portal GUI
Description
Service that stops, starts, and restarts Microsoft IIS, which hosts the Portal
application
Services Panel
4
IBM Tealeaf CX: Configuration Manual
Portal Management
TMS
Portal GUI
Docs
Query Server
Description
Manages communication between the Portal and the Visitor database.
Embedded in the RSE Service.
Services Panel
Portal Management
TMS
Docs
"cxResults Administration Overview" in the IBM Tealeaf cxResults
Administration Manual
RSE Service
Description
Service analyzes session data to create segments
Services Panel
Portal Management
TMS
RSE Extractor Service
Docs
v "RS Extractor Settings" in the IBM Tealeaf cxImpact Administration Manual
v "cxResults Administration Overview" in the IBM Tealeaf cxResults
Administration Manual
Session Indexer
Description
Indexes completed sessions stored in the Canister on the same Processing
Server
Services Panel
Tealeaf Session Indexer
Portal Management
TMS
Session Indexer
Docs
“Configuring CX Indexing” on page 33
Scheduling Service
Description
Manages schedule and execution of Tealeaf jobs including backups,
extractions, and Portal Status reporting
Services Panel
Tealeaf Scheduling Service
Portal Management
TMS
Scheduling Service
Chapter 2. Configuring Tealeaf Components
5
Docs
"Configuring the Scheduling Service" in the IBM Tealeaf CX Configuration
Manual
Tealeaf Status
Description
Status information on configured Tealeaf components and services
Services Panel
Portal Management
TMS
Docs
v "Tealeaf Status Report" in the IBM Tealeaf cxImpact Administration Manual
v "Configuring the Scheduling Service" in the IBM Tealeaf CX Configuration
Manual
Tracking Service
The Tracking Service receives session logging data from the Replay Server and
provides an API to query the logs. Portal queries the tracking service through the
Data Service to obtain the logs.
Description
When enabled, the Tracking Service supports Replay Server logging in BBR
so that logging information displays in the Processing window when
sessions are loaded.
Users with Administrative authorization can expand the Processing
window to get a real-time view of the logs from the rendering engine.
Services Panel
Tealeaf Tracking Service
Portal Management
Replay Server
TMS
Tracking Service
Docs
v Configuration: Configuring the Tracking Service
v Portal Management: "Managing Tealeaf Servers" in the IBM Tealeaf
cxImpact Administration Manual
v Configuring Pipelines: "TMS Pipeline Editor" in the IBM Tealeaf cxImpact
Administration Manual
Transport Service
Description
Receives session data from the PCA Server and initiates and manages
Windows pipeline operations
Services Panel
Tealeaf Transport Service
Portal Management
Transport Server
TMS
Transport Service
Docs
6
IBM Tealeaf CX: Configuration Manual
v Configuration: “Configuring the Transport Service” on page 15
v Portal Management: "Managing Tealeaf Servers" in the IBM Tealeaf
cxImpact Administration Manual
v Configuring Pipelines: "TMS Pipeline Editor" in the IBM Tealeaf cxImpact
Administration Manual
Servers
Canister Server
Description
Capture and storage of active and completed sessions; indexing of
completed sessions for search. Also known as the Processing Server, which
is functionally equivalent to the ctree database.
Services Panel
Tealeaf Canister Server
Portal Management
Canister Server
v When a Canister Server reference is created in the Portal Management, a
reference to the Search Server on the Canister is automatically created,
too.
TMS
Canister Server
Docs
Configuration: “Configuring the CX Canister” on page 18
Portal Management: "Managing Tealeaf Servers" in the IBM Tealeaf cxImpact
Administration Manual
cxConnect Server
Description
Manages extraction of session data for delivery to third-party systems
Services Panel
Portal Management
IBM Tealeaf cxConnect for Data Analysis Server
TMS
IBM Tealeaf cxConnect for Data Analysis Server
Docs
Configuration: "cxConnect Installation" in the IBM Tealeaf cxConnect for Data
Analysis Administration Manual
Portal Management: "Managing Tealeaf Servers" in the IBM Tealeaf cxImpact
Administration Manual
cxReveal Server
Description
Receives session attribute information from the Canister via Event Bus for
insertion into the IBM Tealeaf cxReveal Search database.
Services Panel
Portal Management
IBM Tealeaf cxReveal Database Search Server
TMS
Separate server
Docs
Chapter 2. Configuring Tealeaf Components
7
v Installation: "cxReveal Installation" in the IBM Tealeaf cxReveal
Administration Manual
v Configuration: "Configuring Session Attribute Search" in the IBM Tealeaf
cxReveal Administration Manual
v Portal Management: "Managing Tealeaf Servers" in the IBM Tealeaf
cxImpact Administration Manual
Data Service Server
Description
Manages communications between Tealeaf components and the databases
Services Panel
Tealeaf Data Service
Portal Management
Data Service Server
TMS
Data Service
Docs
Configuration: "Configuring the Tealeaf Data Service" in the IBM Tealeaf CX
Configuration Manual
PCA Server
Description
Portal definition for the machine hosting the IBM Tealeaf CX Passive
Capture Application
Services Panel
Portal Management
Capture Application Server
TMS
PCA Server
Docs
PCA Configuration: "PCA Web Console - Delivery Tab" in the IBM Tealeaf
Passive Capture Application Manual
Portal Management: "Managing Tealeaf Servers" in the IBM Tealeaf cxImpact
Administration Manual
Replay Server
Description
Manages the replay of sessions through the Portal (BBR)
Services Panel
Tealeaf Replay Server
Portal Management
Replay Server
TMS
Replay Server
Docs
Configuration: “Configuring the Replay Server” on page 69
Portal Management: "Managing Tealeaf Servers" in the IBM Tealeaf cxImpact
Administration Manual
Report Server
Description
Manages queries to other servers in the Tealeaf environment
8
IBM Tealeaf CX: Configuration Manual
Services Panel
Portal Management
Report Server
v When a reference to the Report Server is created in the Portal
Management page, a reference to the Search Server instance on the
server is also created.
TMS
Docs
Configuration: “Configuring the Report Server” on page 58
Portal Management: "Managing Tealeaf Servers" in the IBM Tealeaf cxImpact
Administration Manual
Search Server
Description
Manages searches of active and completed session data, among other
functions
Services Panel
Tealeaf Search Server
Portal Management
TMS
Search Server
Docs
“Configuring the Search Server” on page 107
Portal Management: "Managing Tealeaf Servers" in the IBM Tealeaf cxImpact
Administration Manual
SQL Server
Description
Microsoft SQL Server product is required host of Tealeaf databases
Services Panel
MSSQLSERVER
Portal Management
TMS
Docs
"CX Pre-Installation Checklist" in the IBM Tealeaf CX Installation Manual
Tealeaf Management Server
Description
Manages TMS
Services Panel
Tealeaf Management Server
Portal Management
TMS
Tealeaf Management Server
Docs
"TMS WorldView Tab" in the IBM Tealeaf cxImpact Administration Manual
TLI Server
Description
Manages the storage of static content
Chapter 2. Configuring Tealeaf Components
9
Services Panel
Portal Management
TLI Server
TMS
Docs
v Configuration: "Managing Static Archives" in the IBM Tealeaf cxImpact
Administration Manual
v Portal Management: "Managing Tealeaf Servers" in the IBM Tealeaf
cxImpact Administration Manual
v User: "Using Static Archives in RTV" in the IBM Tealeaf RealiTea Viewer
User Manual
Transport Server
Description
Additional instances of the Transport Service can be deployed as
Health-Based Routing (HBR) devices.
Services Panel
TeaLeaf Transport Service
Portal Management
TMS
Transport Service
Docs
v “Configuring the Transport Service” on page 15
v “Health-Based Routing (HBR) Session Agent” on page 263
Visitor Report Server
Description
Server that hosts the Query Server communicating with the Visitor
database
Services Panel
Portal Management
Visitor Report Server
TMS
Docs
Portal Management: "Managing Tealeaf Servers" in the IBM Tealeaf cxImpact
Administration Manual
Configuration
Tealeaf mail configuration
Description
Configure mail server used by Tealeaf
Services Panel
Portal Management
10
TMS
Tealeaf > Tealeaf mail configuration information
Docs
"TMS WorldView Tab" in the IBM Tealeaf cxImpact Administration Manual
IBM Tealeaf CX: Configuration Manual
Shared configuration
Description
Configuration settings shared by multiple servers and services
Services Panel
Portal Management
TMS
Tealeaf > Shared configuration information
Docs
"TMS WorldView Tab" in the IBM Tealeaf cxImpact Administration Manual
Tealeaf global configuration
Description
Global configuration settings
Services Panel
Portal Management
TMS
Tealeaf > Tealeaf global configuration settings
Docs
global: "TMS WorldView Tab" in the IBM Tealeaf cxImpact Administration
Manual
System Timezone: “Configuring the System Timezone” on page 12
Pipeline Editor
Description
Configure Windows pipelines through the TMS Pipeline Editor
Services Panel
Portal Management
TMS
Transport Service > Transport Service configuration
Docs
"TMS Pipeline Editor" in the IBM Tealeaf cxImpact Administration Manual
Privacy Filter
Description
Configure filtering of data in the Windows pipeline.
Services Panel
Portal Management
TMS
Transport Service > Privacy Filter configuration
Docs
“Privacy Session Agent” on page 291
Application
RTV
Description
IBM Tealeaf CX RealiTea Viewer desktop application to search and replay
Tealeaf sessions.
Services Panel
Portal Management
Chapter 2. Configuring Tealeaf Components
11
TMS
IBM Tealeaf CX RealiTea Viewer
Docs
"RealiTea Viewer Overview" in the IBM Tealeaf RealiTea Viewer User Manual
RTV Pro
Description
IBM Tealeaf CX RealiTea Viewer Professional desktop application to search
and replay Tealeaf sessions.
Services Panel
Portal Management
TMS
IBM Tealeaf CX RealiTea Viewer Pro
Docs
"RealiTea Viewer Overview" in the IBM Tealeaf RealiTea Viewer User Manual
TLBackup and TLRestore
Description
Configure and execute scheduled backup and restore Canister operations
Services Panel
Portal Management
TMS
Docs
"TLBackup and TLRestore" in the IBM Tealeaf cxImpact Administration
Manual
TLTMaint
Description
Examines and repairs Canister for data consistency
Services Panel
Portal Management
TMS
Canister > TLTMaint
Docs
Configuring the System Timezone
Tealeaf® requires that a single time zone be defined across all Tealeaf servers in the
system. For some Tealeaf operations such as searching, the time zone may change
the meaning of parameters such as today or yesterday. Among other features, this
system-wide time zone is used as the basis for determining when scheduled
reports are executed and delivered.
Note: Tealeaf supports all Coordinated Universal Time (UTC) formatted time
zones. The use of a time zone that is not defined as standard Coordinated
Universal Time (UTC) time zone is not supported.
v All time zone values for Tealeaf components and applications are calculated
from the system time zone, except for Search Server. All sessions and canister
data are stored using GMT timestamps, so no timezone references are needed
for Search Server. See “Configuring the Search Server” on page 107.
12
IBM Tealeaf CX: Configuration Manual
v Individual users may set their local time zone. A user's time zone primarily
affects searching for data. See "My Settings" in the IBM Tealeaf cxImpact User
Manual.
Note: For time zones that include Daylight Savings Time during the year,
reporting values when the hour jumps forward show a gap of one hour while
values when the hour jumps backward result in double-counts. Tealeaf
administrators can use Portal Announcements to notify users of the time change
and its effects. See "Portal Announcements" in the IBM Tealeaf cxImpact
Administration Manual.
Note: During the installation process, the system time zone should be carefully
considered and selected. After changing the system time zone on an actively
processing Tealeaf system, some data may be lost when the next trimming of the
canisters is performed. The volume of potentially lost data is the number of hours
by which the time zone was shifted.
Time Zone Indicator
Depending on your version of Windows, the Portal may display the time zone
indicator using one of the following acronyms. These indicators are present in the
time zone displayed in the upper-right corner of the Portal and are present in any
saved time zone data.
Note: Functionally, these time zone indicators identify the same zones around the
globe.
Acronym
Description
UTC
Coordinated Universal Time is a more precise time zoning mechanism than
GMT. This method is used in more recent versions of the Windows
operating system.
GMT
Greenwich Mean Time indicates your time zone with respect to the
Greenwich meridian. This method is more prevalent in older versions of
the Windows operating system.
Current Time Zone
User
The time zone for the user currently logged into the Portal is displayed in the
toolbar, relative to the Tealeaf system time zone. For example, GMT-7 is the time
zone seven hours behind Greenwich Mean Time, which corresponds to the U.S.
Pacific time zone.
Global
The global system time zone is specified and available through TMS. See
“Configuring the System Time Zone” on page 14.
Effects of System Time Zone
The configuration of the system time zone has the following behaviors:
1. All reporting data is assigned a timestamp based on the global system time
zone.
v For reporting purposes, a day and its hourly buckets are defined by the
midnight-to-midnight interval in the global system time zone.
Chapter 2. Configuring Tealeaf Components
13
2. Event timestamps are recorded when the event occurred. Events may occur at
the beginning of a session, on individual pages, and at the end of a session.
v This precise timestamping improves the event count calculations, which are
performed on an hourly basis.
v If the session spans two hourly buckets, the events of the session may be
spread across two different intervals.
Note: Since events are recorded at the time they occurred, you may sense
mismatched counts in events if you are searching for a session that ends in a
different hour. For example, if the event fires at 11:55 and the session ends at
12:05, search drilldowns look for sessions in the 11-12 bucket yet won't
discover the specific session, which ended in a different hour. Reporting data
is more accurate, but drilldowns may show discrepancies.
v See "Tealeaf Event Manager" in the IBM Tealeaf Event Manager Manual.
3. All completed sessions are still indexed at GMT. Tealeaf session and index data
are aggregated on a daily basis, based on the GMT day.
v During search operations, Tealeaf Search Server applies a time zone offset so
that returned session data applies to your local time zone.
Configuring the System Time Zone
During installation, the time zone is defined as the current time zone of the install
machine.
v For Tealeaf solutions in which all Tealeaf servers are located in the same time
zone, a configuration change may not be required.
v Since Daylight Savings Time is shifted at 2am, no daily data is lost by shifting
the time one hour forward or backward.
For a multiple-machine implementation that spans multiple time zones, all
machines must roll at the same time. For example, if the processing server is in
New York and another processing server is in Los Angeles, you must decide and
configure a single time zone that both machines recognize. Otherwise, operations
such as searching within a specific time period can produce incorrect results.
Note: All Tealeaf servers must be configured to use the same roll time zone.
Failure to synchronize on the same time system time zone can cause unpredictable
behaviors.
The System time zone can be changed using the Tealeaf Management System
(TMS).
To configure the system time zone:
1. Login to the Portal as an admin user.
2. From the Portal menu, select Tealeaf > TMS.
3. In the Servers view, select the desired server to drill down to components.
4. Select the Tealeaf component to display the configurations.
5. Double-click Tealeaf global configuration settings to open the Config Info
dialog.
6. Click Edit. The Configuration Editor is displayed.
7. Click Roll Time Zone. Select the desired time zone from the list and then click
Apply.
8. Enter a description for the change in the Version Description field, and click
Save to save the changes.
14
IBM Tealeaf CX: Configuration Manual
9. If prompted to add tasks to push the new configuration, select all servers and
click OK.
10. To push the configuration change to the selected server, click Submit.
Troubleshooting
For more information on troubleshooting, see "Troubleshooting - Infrastructure" in
the IBM Tealeaf Troubleshooting Guide.
Configuring the Transport Service
The Transport component is responsible for accepting hits from the Capture Server,
performing a series of pipeline operations, and then delivering the hit to the
Processor component.
v Pipeline operations are managed by a configurable sequence of session agents.
See Chapter 4, “CX Pipeline Session Agents,” on page 213.
v The Processor component can be installed on the same machine as the Transport
component, or it can be installed on a separate machine.
Note: While configuration of this Tealeaf component can be completed at the
command line by editing a file stored on each Tealeaf server, the recommended
approach is to make configuration changes through the Tealeaf Management
System, which allows you to make edits in one place and to apply the
configuration changes to multiple servers. See "Tealeaf Management System" in the
IBM Tealeaf cxImpact Administration Manual.
Accessing Transport Service Configuration
To configure Transport Service:
1. Login to the Tealeaf Portal as an administrator.
2. In the menu, select Tealeaf > TMS.
3. The Tealeaf Management System is displayed. For more information on how to
use TMS, see "Tealeaf Management System" in the IBM Tealeaf cxImpact
Administration Manual.
4. In the View drop-down, select Servers.
5. Click Transport Service. The following nodes are displayed:
v “Transport Service Configuration” on page 16 - Configure the Windows
pipeline through the Pipeline Editor. See “Transport Service Configuration”
on page 16.
v Privacy Filter configuration - Configure the Windows Privacy session agent,
which can be used to remove, mask, or encrypt, or otherwise manipulate
sensitive data that is included in the hit. See “Privacy Session Agent” on
page 291.
– There is also an extended version of this session agent. See “Extended
Privacy Session Agent” on page 261.
v DataParser Search Templates - Configure the search patterns and rules for
the Data Parser. See “Data Parser Session Agent” on page 246.
v RTA configuration - Real-time processing on each captured hit. See
“Real-Time Monitoring and Alert (RTA) Session Agent” on page 321.
Enabling SSL Transport with Passive Capture Application
If needed, you can generate SSL keys and use them to enable encrypted transport
between the IBM Tealeaf CX Passive Capture Application and the Transport
Service.
Chapter 2. Configuring Tealeaf Components
15
Note: SSL transport requires additional processing and may impact overall
throughput.
See "SSL Key Operations" in the IBM Tealeaf Passive Capture Application Manual.
Transport Overview
The installer creates the default pipeline operations. The default pipeline
operations are listed in the order of execution:
DataDrop > DecoupleEx > Inflate > PrivacyEx > TLTRef > SessionRouter >
Canister (or Socket)
v If a Processor component has been installed on this machine, then the pipeline is
terminated with the Canister pipeline agent.
v If the Processor component is installed on a different machine, this pipeline is
terminated with the Socket agent.
This pipeline can be modified to include or exclude other operators. Each available
pipeline operator and its options are described in more detail in the Pipeline
Session Agents chapter. See Chapter 4, “CX Pipeline Session Agents,” on page 213.
Transport Service Configuration
Through the Pipeline Editor in TMS, you can configure the structure and
sequencing of the main and child pipelines in the Transport Service.
1.
2.
3.
4.
In TMS, click the Transport Service node.
Click Transport Service configuration.
In the Config Actions panel, click View/Edit.
The current Transport Service configuration is displayed in the Pipeline Editor.
See "TMS Pipeline Editor" in the IBM Tealeaf cxImpact Administration Manual.
Monitoring the Pipeline
You can monitor the activities in the pipelines you create through the Pipeline
Status tab in TMS. See "TMS Pipeline Status Tab" in the IBM Tealeaf cxImpact
Administration Manual.
Transport Service Configuration at the Command Line
At the command line, Transport configuration is completed in the file
TeaLeafCaptureSocket.cfg:
v You can open this file through the Windows Start menu:
Start > Programs > TeaLeaf Technology > TeaLeaf CX Capture >
Configuration Files > Socket Capture Configuration
v This file is a Windows ini format file, where each section represents a pipeline
operation. For more information on how to configure, you can review the file
itself.
Note: When making a change to the TeaLeafCaptureSocket.cfg file, you must
restart the Tealeaf Transport Service to make the changes take effect. It is
recommended that you make changes through TMS, which maintains version
control.
Troubleshooting
For more information on troubleshooting, see "Troubleshooting - Pipeline" in the
IBM Tealeaf Troubleshooting Guide.
16
IBM Tealeaf CX: Configuration Manual
Configuring the Tracking Service
You can set and modify the configuration for the Tracking Service component by
using TMS.
The Tracking Service component is responsible for tracking Replay Server logging
information and delivering the logging data to Browser Based Replay (BBR).
The Tracking Service must be installed and configured if administrators want
access to real-time page load logging information in BBR.
Note: Although you can configure the Tracking Service component at the
command line by editing a file stored on each Tealeaf server, the recommended
approach is to make configuration changes through the Tealeaf Management
System, which allows you to make edits in one place and to apply the
configuration changes to multiple servers. See the IBM Tealeaf cxImpact
Administration Manual for information about the Tealeaf Management System.
Note: Any changes you make to the Tracking Service require that you restart it, as
well as restarting the Replay Server and the Data Service.
Editing the Tracking Service configuration using TMS
You can access and edit the Tracking Service configuration by using TMS.
To access and edit the Tracking Service configuration using TMS:
1. Login to the Tealeaf Portal as an administrator.
2. From the menu bar, select Tealeaf > TMS.
3. From the World View panel, select Servers from the list of Views.
4. From the list of servers that display, expand the server on which the Tracking
Service is installed.
5. Expand the Tracking Service node and select Tracking Service Configuration.
6. In the Config Actions window, click View/Edit.
7. From the Tracking Service Configuration window, click Enable Tracking to
access the Edit Config Item dialog box.
8. Select Yes from the drop down list to enable the Tracking Service or select No
to disable it.
9. From the Tracking Service Configuration window, click Tracking Service URL
to access the Edit Config Item dialog box.
You can edit the Tracking Service URL to point to a different server.
If you make changes to the Tracking Service configuration, you must restart it.
Also, because the Tacking Service configuration gets applied to the common
registry used by IBM® Tealeaf servers, after you make changes to the Tracking
Service, you must restart the Replay Server and the Data Service. Restarting the
Replay Server and the Data Service enables them to pickup the new registry keys
from the changed configuration.
Chapter 2. Configuring Tealeaf Components
17
Configuring the CX Canister
After installation, you may need to perform additional configuration of the IBM
Tealeaf CX Canister for single server or multi-server installations. Changes to these
settings can be used to deploy the IBM Tealeaf CX Canister and indexing functions
across multiple servers, or you can install multiple Canisters on the same machine
or across multiple machines.
Configuration of the IBM Tealeaf CX Canister is managed through the Tealeaf
Management System, which also manages configurations for other Tealeaf
components. It can be used to view and edit the configuration of IBM Tealeaf CX
Server either on the local computer or on a remote computer. This section describes
how to use TMS to manage IBM Tealeaf CX Canister configurations.
v For more general information about TMS, see "Tealeaf Management System" in
the IBM Tealeaf cxImpact Administration Manual.
Note: The ctsrvr.cfg file in the Tealeaf installation directory contains a
LOCAL_DIRECTORY setting that defines the root directory for the Canisters. The
names of the Canister directory are specified as paths relative to LOCAL_DIRECTORY,
in the Location of Canister section of Canister Configuration. Do not define
LOCAL_DIRECTORY to be the root directory of a volume, such as C:.
To
1.
2.
3.
view or edit canister configuration settings:
Log in to the Portal as an admin user.
From the Portal menu, select Tealeaf > TMS.
In the Servers view, click the next to the desired server to drill down to
components.
4. Click the next to the Canister component to display the configurations.
5. Click Canister configuration to display the Config information.
6. Click View/Edit. The Configuration Editor is displayed.
The following configuration option tabs are available for the canister configuration
by using TMS.
Canister Overview
The Tealeaf Canister consists of two databases designed for the capture, evaluation,
and storage of Tealeaf session data.
v Short Term Canister: This in-memory database is used to store hits forwarded to
the Canister from the Transport Service or Health-Based Routing session agent.
For each session, each hit is added to the STC, associated with the other hits of
the session, and evaluated for events. When the session is closed, it is moved to
the Long-Term Canister.
v Long-Term Canister: When a session is closed, it is written to a disk-based
database called the Long-Term Canister. These disk-stored sessions are then
indexed for search.
Canister Processes
The canister processor consists of a manager process: TlCanMgr.exe. This process
manages four types of worker processors:
v TLEventProc.exe processes evaluate hits for events.
v TLSesnCloser.exe process evaluates expired sessions for session-level events.
v TLSesnArchiver.exe processes prepare and store sessions.
18
IBM Tealeaf CX: Configuration Manual
v TLEventBus.exe processing event placed in the event bus queue.
Note: To stop and restart the Canister Manager, use the Start menu shortcuts
under the IBM Tealeaf CX Portal heading. The Start menu shortcut executes
CanSvcs.exe, which manages the flow of hits into the canister and spooling
operations. Using the Windows Services Control Panel to stop and start the
Canister Manager may cause data loss.
Canister Security
Canister ports
Tealeaf Canisters require two open ports. By default, these ports are the following:
Port
Description
5597
Enables SQL communications between the Portal application and the
Canisters using the Canister native libraries. This port supports Tealeaf
processes such as the Data Collector, Canister Manager, and other session
agents.
Note: This port is secured using the TLUSER or ADMIN account and its
password, which you specify in the Portal Management page. See
"Managing Tealeaf Servers" in the IBM Tealeaf cxImpact Administration
Manual.
19000
Enables communications between the Search Server and the Canister for
queries for session information. There are two types of communications:
v Read-only: Queries for Canister status information from Tealeaf
processes such as Canister status, Governor status, and others. These do
not require authentication.
v Data manipulation: Queries for session data or to execute a command on
the Canister.
Note: To enable authentication for data manipulation operations on the
Canister, NT authentication must be enabled. See "Authentication" in the
IBM Tealeaf cxImpact Administration Manual.
See "CX Pre-Installation Checklist" in the IBM Tealeaf CX Installation Manual.
Session data
On the Canister disk, session data is encrypted using 3DES encryption. See "Tealeaf
Encryption Standards" in the IBM Tealeaf cxImpact Administration Manual.
UNC Paths
Use of UNC paths is supported in configuring Tealeaf Canisters.
Note: For the Processing Server (Canister), you must install locally and then insert
the UNC paths into the Canister configuration after the installation has completed.
Applying Canister Configuration Changes
Since the Canister is a high-performance component integrated into the capture
and processing stream, changes should be applied with care. When applying the
changes to the Canister, select Add Restart Task(s) only when changing the
number of Hit and Session processors:
v Services Controls tab - Hit Processors
v Services Controls tab - Session Processors
Chapter 2. Configuring Tealeaf Components
19
When these settings are changed, a restart of the Transport Service is also required
because the Canister Manager requests the Transport Service to start spooling of
the data stream.
Note: After modifying Canister settings and restarting the Transport Service, hits
may be spooled until the Canister is up and running. In some situations, the
Extended Decoupler session agent does not receive notification that the Canister
has restarted, and hits continue to be spooled even though the Canister is ready to
receive them. In this case, a restart of all Tealeaf services is required.
v Restarting the Transport Service restarts the flow of the data stream. See
“Configuring the Transport Service” on page 15.
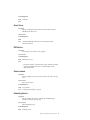
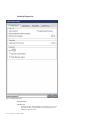
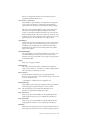
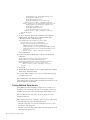
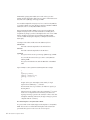
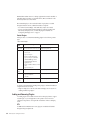
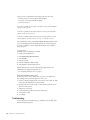
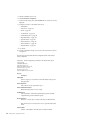
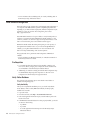
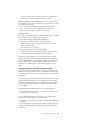
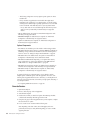
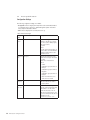
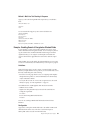
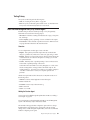
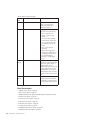
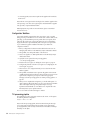
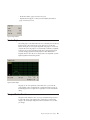
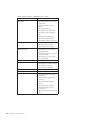
Canister Services Tab
20
IBM Tealeaf CX: Configuration Manual
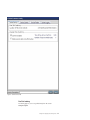
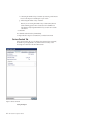
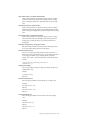
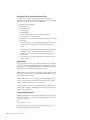
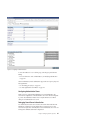
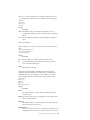
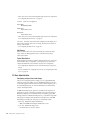
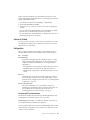
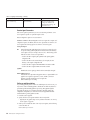
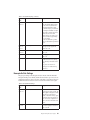
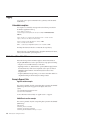
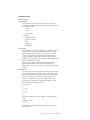
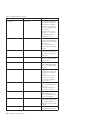
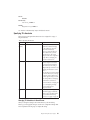
Figure 1. Canister Services Tab
Free-Text Indexing
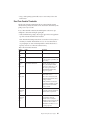
For indexing purposes, sessions are pulled directly from the canister.
Setting Description
Chapter 2. Configuring Tealeaf Components
21
Location of Files to be Indexed
When pulling data from the Canister, Tealeaf Indexing Service uses the
specified directory to store its job files.
Canister Trim (CanTrim)
CanTrim keeps sessions in the Long Term Canister for the number of days
specified and deletes session data older than the number of days specified. For
example, if you have specified seven days for CanTrim, it will keep seven days
worth of sessions and delete any session data older than seven days. CanTrim
deletes both the LSSN*.dat files and LSSN*.idx files. It also sends a message to the
Session Indexer to delete the corresponding dtSearch indexes.
Note: When using CanTrim to remove sessions from the Long Term Archive,
deleted session statistics are still displayed in the Portal's charts and report
summaries.
Setting Description
CanTrim Enabled
Enables trimming of session data.
Time of Day to Run CanTrim
Note: Choose an off-peak time to trim session data from all active
canisters.
Delete session data only after backup
Instructs CanTrim to delete only those day Canisters that have a cleared
archive bit, which are all sessions older than the specified number of days.
If you run Backup before CanTrim, deselect this value so CanTrim can
remove sessions. If you leave this selected without running Backup,
CanTrim never deletes any sessions, and the Long Term Canister continues
to grow in size.
If this option is selected, when CanTrim is executed, you may see the
following errors in the log:
03/25/12 00:40:58|DeleteLSSNDataFile: Skip trimming data file
CANISTER.dbs\LSSN_<date>_<servername>.dat, archive bit is set
These errors indicate that sessions could not be trimmed because they had
not yet been archived. You may need to configure your backup job to
occur before the CanTrim operation is scheduled to execute. See "TLBackup
and TLRestore" in the IBM Tealeaf cxImpact Administration Manual.
Number of Days to Retain Data
The number of days of data in the Long Term Archive should not exceed
your hard disk space.
Note: This setting should be configured in conjunction with Backup, which
backs up Canister, Report, and Index files. For example, if you want to
back up every day, set CanTrim to delete session files every other day.
Configuring the Number of Days to Retain Session Data
For each Canister, session data is stored on the local drive of each Canister in the
location specified by LOCAL_DIRECTORY in the Canister Server configuration. By
default, Tealeaf is configured to retain completed session data in each Canister of
your environment for seven (7) days.
Note: Canister data is stored on the designated disk on the Canister (Processing
Server). It is not stored in a SQL Server database.
22
IBM Tealeaf CX: Configuration Manual
Note: When data has aged beyond the maximum permitted days of retention, the
next Canister trimming operation removes the data from the local drive. Unless the
data has been archived or backed up to another location, it is permanently
removed from access.
If needed, you can change the number of days of data that are retained in each
Canister in your environment. Please use the following steps to verify available
space and change the days retained of Canister data accordingly.
Note: Do not use these steps to change the location of where session data is stored
on each Canister. That process involves several additional steps and should be
completed with Tealeaf assistance. For more information, please contact Tealeaf
http://support.tealeaf.com.
Note: Before you begin, you should back up each Canister whose retention days
you are changing. See "TLBackup and TLRestore" in the IBM Tealeaf cxImpact
Administration Manual.
Accessing Management System:
Access Tealeaf Management System:
1. Tealeaf > TMS. The Tealeaf Management System is displayed.
v See "Tealeaf Management System" in the IBM Tealeaf cxImpact Administration
Manual.
2. Click the WorldView tab.
v See "TMS WorldView Tab" in the IBM Tealeaf cxImpact Administration Manual.
3. Select Servers from View drop-down.
4. Perform the following steps for each Canister in your Tealeaf environment.
Processing Canisters:
1. Click the server hosting one of your Canisters.
2. Click the Canister Server node.
3.
4.
5.
6.
7.
Click Canister Server configuration.
Click View/Edit. The Canister configuration dialog opens.
Expand the Default node.
Look at value for LOCAL_DIRECTORY.
Check the space available on this volume. Before you change the days to
retain, you should verify that you have sufficient space to retain the data if
you are increasing it.
Note: Typically, this volume is the same as where the Canister is located, but
you should verify.
8. If sufficient space is available, you can change the value for Number of Days
to Retain Data. This value defines the number of days that session data is
retained in the Canister. When data is aged longer than this value, data
trimming operations in the Canister remove it permanently.
a.
b.
c.
d.
e.
Click the Canister node, which is a different node in Server view.
Click Canister configuration.
Click View/Edit. The Canister configuration dialog opens.
Click the Canister Services tab.
The setting to change is Number of Days to Retain Data.
Chapter 2. Configuring Tealeaf Components
23
f. If increasing the number of days of retention: try increasing a small amount
first to see the impact on available space in your volume.
g. If decreasing the number of days of retention:
Note: If you are lowering the number of days of data retained, the next
canister trimming operation removes data that is now identified to be
older than the newly designated number of days to retain. Never set this
value below 2.
9. Click Save.
10. Submit the task and run the job immediately.
11. Repeat the above steps for each Canister in your Tealeaf environment.
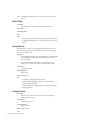
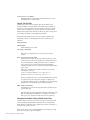
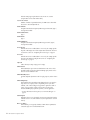
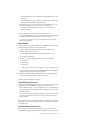
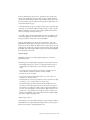
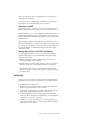
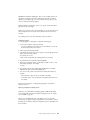
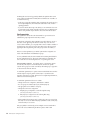
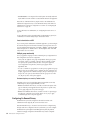
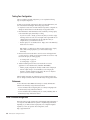
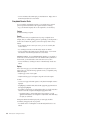
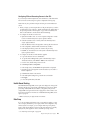
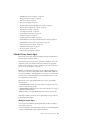
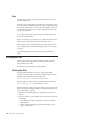
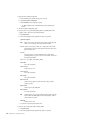
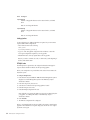
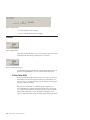
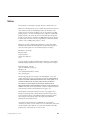
Services Controls Tab
In the Services Controls tab, you can configure how numerical values are treated,
the number of processing threads to use, and the amount of memory on the
Processing Server reserved for the Short Term Canister.
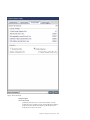
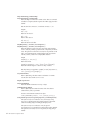
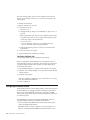
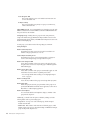
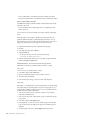
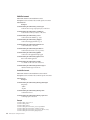
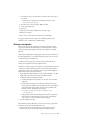
Figure 2. Services Controls Tab
Setting Description
24
IBM Tealeaf CX: Configuration Manual
Max Ctree Bytes
Specifies the amount of memory to allocate to the Tealeaf Canister Server.
The amount of memory is calculated at installation depending on available
physical memory.
Decimal Character for Numbers (deprecated)
For numeric values, you may specify the character to use as the decimal
separator. You can choose between . and , By default, this value is set to .
This setting is ignored if Local number formats is specified.
Local number formats
A comma-separated list of names of local number formats in IETF BCP 47
format, such as en-US or fr-CH, to be used when parsing numeric hit
attributes.
If this setting is not specified, Tealeaf uses a default list of two formats.
The first format uses the setting for Decimal Character for Numbers as a
decimal separator and the alternative as a thousands separator. The second
format uses the reverse.
Note: IBM Tealeaf first tries to parse the numbers in each local format by
requiring that the number be formatted exactly as expected. Tealeaf then
tries to parse the numbers again for each locale in a mode that ignores
missing or misplaced thousands separators. This can have unexpected
results. For example, 123456.78 parses successfully as 12,345,678 in the
fr-FR locale.
Events that extract machine-readable (no thousands separator, . as decimal
separator) numbers (such as from JSON or XML data) should be written as
custom events, parse the hit attribute in JavaScript code, and call setFact()
with the numeric value rather than a string. By doing this, they work
independent of Local number formats.
Parse Numerics as Currency
When set to True, numeric values that are detected in session data are
treated as currency values. These values are rounded to two decimal points
of precision, and the Decimal Character for Numbers is applied.
Processors
Use these controls to configure the processing threads used to evaluate hits and
sessions in the Canister.
Note: For each Canister, there is rarely a need to increase the total count of hit and
session processors above 8. Increasing the number of processors above this soft
limit can have significant impacts on system performance and can cause spooling
and potential data loss.
Setting Description
Hit Processors
Specifies the number of processes to allocate for hit event evaluation in the
Tealeaf Canister Server. If the Decoupler Status is reporting spooling
because of high unevaluated hits, increasing the number of hit processors
alleviates this condition. The default value is 2.
Note: To apply changes to this value, a restart of the Transport Service is
required. See “Configuring the Transport Service” on page 15.
Session Processors
Specifies the number of processes to allocate for session archival in the
Chapter 2. Configuring Tealeaf Components
25
Tealeaf Canister Server. If the Decoupler Status is reporting spooling
because of high sessions waiting for archival, increasing the number of
session processors may this condition if excess I/O throughput is available.
One of the primary functions of the session processor is to compress
sessions for storage, which increases the rate at which sessions are ready
for writing to disk. The default value is 2.
Note: To apply changes to this value, a restart of the Transport Service is
required. See “Configuring the Transport Service” on page 15.
Canister Safety Limits
Tealeaf provides a set of controls to set the maximum size of a session in terms of
hits, bytes, or duration. These controls can be configured through Advanced Mode
in the Event Manager.
v See "Tealeaf EES Tutorial" in the IBM Tealeaf Event Manager Manual.
Services Perform Tab
This tab provides controls for various timeout settings in the canister. You may also
enable the Event Bus through this tab. See "Tealeaf Event Bus" in the IBM Tealeaf
cxConnect for Data Analysis Administration Manual.
26
IBM Tealeaf CX: Configuration Manual
Figure 3. Services Perform Tab
Setting Description
Session Idle Seconds
Specifies that if no hits arrive in a session for the number of seconds
specified, the session is marked as closed, and no further hits are added to
it. If more hits arrive with the same TLT Session ID after the session is
closed, they are saved in a new session.
Chapter 2. Configuring Tealeaf Components
27
Individual session timeouts can also be changed by triggered events. See
"TEM Events Tab" in the IBM Tealeaf Event Manager Manual.
Canister Throttles
The Canister throttles can be used to change how long statistics and data records
are retained in the canister for data collection and other purposes.
Setting Description
Current Image Statistics Size
Specifies the maximum number of records to be kept in the NIMG (Short
Term Canister GUI display statistics) table. Setting this value to 0 disables
this feature and allows unlimited growth. The default value is 10.
Alert records time to live
Number of seconds that current image statistics are retained in the canister.
The default value is 259200 seconds, which is 72 hours.
v If the Alert Service is disabled for a period longer than this setting, alert
data may be lost. See “Configuring the Alert Service” on page 141.
Fact aggregation records time to live
Number of seconds that fact aggregation records are retained in the
canister. The default value is 259200 seconds, which is 72 hours.
v If the Data Collector is disabled for a period longer than this setting,
alert data may be lost. The Data Collector must be enabled and
connected to each active canister. See "CX Settings" in the IBM Tealeaf
cxImpact Administration Manual.
Dimension values records time to live
Number of seconds that dimension values are retained in the canister. The
default value is 259200 seconds, which is 72 hours.
v If the Data Collector is disabled for a period longer than this setting,
dimension value data is lost. The Data Collector must be enabled and
connected to each active canister. See "CX Settings" in the IBM Tealeaf
cxImpact Administration Manual.
Path statistics records time to live
Number of seconds that current image statistics are retained in the canister.
The default value is 259200 seconds, which is 72 hours.
v If the Data Collector is disabled for a period longer than this setting,
alert data may be lost. The Data Collector must be enabled and
connected to each active canister. See "CX Settings" in the IBM Tealeaf
cxImpact Administration Manual.
Event Bus
The Tealeaf Event Bus routes data from the in-memory database to the appropriate
component for processing. For more information on configuring the Event Bus, see
"Tealeaf Event Bus" in the IBM Tealeaf cxConnect for Data Analysis Administration
Manual.
Setting Description
Enable Event Bus
Enables the event bus pipeline for exporting events.
Note: After you enable or disable the Event Bus, please edit the Pipeline
Configuration File value, even if you do not intend to make changes.
28
IBM Tealeaf CX: Configuration Manual
When Apply is then clicked, TMS validates the existence of the file and
enables or removes the Event Bus configuration in the TMS WorldView.
This issue is fixed in a later build.
Include Response
When exporting events, include the page's response file in the event
packet.
Note: Including the response can significantly increase the volume of data
sent to the Event Bus. Do not enable this option unless you are confident
that the destination system can handle the increased volume.
Pipeline Configuration File
Path to the session agent pipeline used to export the events.
Note: The Event Bus should be configured through the Pipeline Editor in
the Tealeaf Management System.
v See "Tealeaf Event Bus" in the IBM Tealeaf cxConnect for Data Analysis
Administration Manual.
v See "TMS Pipeline Editor" in the IBM Tealeaf cxImpact Administration
Manual.
Canister Logging Tab
Chapter 2. Configuring Tealeaf Components
29
Figure 4. Canister Logging Tab
Setting Description
Canister Log Level
Set the log level for the canister:
v Error - Error level includes error messages.
v Warning - Warning level includes warnings and Error level messages.
v Info - Information level includes information messages and Warning
and Error level messages. This setting is the default value.
30
IBM Tealeaf CX: Configuration Manual
v
Debug - Debug level includes all debugging messages and all messages
from the other three levels.
Note: Debug level should be used only to debug specific issues, as the
log files can grow quite larger. As soon as the issue is resolved, you
should set the log level to one of the less verbose settings.
Event Performance Logging
The performance of event evaluation in the canister can be monitored through
logging functions that you enable in this section.
Note: Since events may be firing at a high rate in the canister, you should test the
frequency and sample rates to monitor the size of the generated logs.
Setting Description
Enable Event Performance Logging
Enables or disables event evaluation performance logging, which includes
statistical information on the events that are firing.
Logging Frequency (sec)
Defines the interval at which event performance entries are inserted to the
log. The default value is 3600 seconds (once per hour).
Sample Rate
The percentage of events which are sampled for event performance
logging. The default value is one in ten events. Setting this value to 1
results in gathering performance data on every event evaluation.
Canister Statistics
By default, the Tealeaf Canister server monitors statistical information and
periodically submits statistics hits for capture and storage in the Tealeaf database.
These statistics can be reviewed through the Tealeaf System Statistics dashboard.
See "System Statistics" in the IBM Tealeaf cxImpact Administration Manual.
Configuring the Canister Server
During installation, the Tealeaf Canister Server is configured and enabled
automatically. While you can configure the Canister Server through TMS, you
should not have to make any adjustments after the software is installed and
configured properly.
Note: Unless you are experiencing problems connecting or interacting with your
Short-Term or Long-Term Canisters, you should not need to make changes to the
Canister Server configuration. For more information, please contact
http://support.tealeaf.com.
To configure the Canister Server:
1. Login to the Tealeaf Portal as administrator.
2. To open TMS, select Tealeaf > TMS. See "Tealeaf Management System" in the
IBM Tealeaf cxImpact Administration Manual.
3. Expand the Canister Server node.
4. Click Canister Server configuration.
5. In the Config Actions pane, click View/Edit.
6. The Canister Server configuration is displayed. The following settings are
available
Chapter 2. Configuring Tealeaf Components
31
Advanced Settings
Setting Description
DAT_MEMORY
Reserved memory for system data tables (bytes). The default value is 50MB.
DISK_FULL_LIMIT
When the available disk space drops below this value, it is considered full.
Values are specified as a number of megabytes followed by MB. The default
value is 100MB.
SIGNAL_READY
Full path to the TLTMaint utility.
Default Settings
Setting Description
CHECKPOINT_FLUSH
The default value is 17.
CHECKPOINT_INTERVAL
The frequency in terms of processed megabytes that a checkpoint update is
performed. The default value is 10 MB.
COMMIT_DELAY
The delay in milliseconds between a commit command being initiated and
executed. The default value is 2.
IDX_MEMORY
Reserved memory for canister indexes in bytes. The default value is
200000000 (approximately 200MB).
LOCAL_DIRECTORY
Full path to Canister directory.
Note: Changing the value of the LOCAL_DIRECTORY requires a rebuild of the
canister. See "Troubleshooting - Canister" in the IBM Tealeaf Troubleshooting
Guide.
LOG_SPACE
Space referred on the storage device for log data. The default value is 120
MB.
LOG_TEMPLATE
The ctree log template identifier. The default value is 2.
TRANSACTION_FLUSH
The default value is 500000.
After the changes have been saved, the Canister Server must be restarted for the
changes to take effect. See "Tealeaf Management System" in the IBM Tealeaf
cxImpact Administration Manual.
Troubleshooting
For more information on troubleshooting, see "Troubleshooting - Canister" in the
IBM Tealeaf Troubleshooting Guide.
32
IBM Tealeaf CX: Configuration Manual
Configuring CX Indexing
A session index is a database that stores the locations of meaningful words and
fields in each session. Because an index does not contain all text from each session,
it can hold a large quantity of session information in a single file.
v Noise words such as "but" and "if" are not indexed.
v After a session has been closed by the Short Term Canister, the IBM Tealeaf CX
Server automatically indexes any sessions selected for archiving.
v Index files locate occurrences of data or error codes for which you can configure
derived events, and conduct faster and more effective searches of captured data.
The underlying search engine supports many file types, including binary types
such as .pdf, for indexing and search. When Tealeaf is configured to capture and
process these file types, the search engine indexes the file for search, after which it
can be searched through the Portal or RTV.
v Documents in some formats are converted by the search engine to HTML for
display purposes. The original document is retained as part of the session
record.
Note: The search engine does not generally rely on the file extension to identify
file types. However, you must configure the IBM Tealeaf CX Passive Capture
Application to capture non-standard data types by using the filename extension.
See "PCA Web Console - Pipeline Tab" in the IBM Tealeaf Passive Capture
Application Manual.
v See http://support.dtsearch.com/dts0103.htm.
v See http://support.dtsearch.com/webhelp/dtsearch/supported_file_types.htm.
Indexing Overview
The Session Indexer service converts Long Term Archive session to XML format.
1. It removes HTML tags and invalid XML characters.
2. Indexes are named by day, based on the time of the last hit.
3. The XML files are then converted to session index files and saved in the
Canister\Indexes directory. The XML can then either be kept or deleted. To
save disk space, Tealeaf recommends deleting this XML (the default setting).
The frequency with which the indexer service checks for sessions to index depends
on the Sleep Time setting. See “Operation Times tab” on page 44.
After session index files are created, they can be used by both the Portal and IBM
Tealeaf CX RealiTea Viewer to search sessions stored in the Long Term Canister.
v For more information on searching for sessions in the Portal, see "Searching
Session Data" in the IBM Tealeaf cxImpact User Manual.
v For more information on searching for sessions in RTV, see "RealiTea Viewer Searching Sessions" in the IBM Tealeaf RealiTea Viewer User Manual.
Index Processing
After a session is saved to the Long Term Canister, it gets indexed. During
indexing, the session's hits, Canister events, and Canister summary information are
written in XML format and sent to the indexing engine.
v Settings that control real-time processing of indexes are available through TMS.
See “Configuration” on page 35.
Chapter 2. Configuring Tealeaf Components
33
Multiple Indexing Processes
The IBM Tealeaf CX indexing operation consists of a series of sub-programs that
are single-threaded and executed in a time-based manner. You can modify the
number of processes that run at the same time.
Index Program runs in the background and monitors captured session data for
indexing. It executes the appropriate sub-programs to do the work at the
appropriate times. These sub-programs are as follows:
1. IndexCheck - Checks to make sure indexes are synchronized with the library file
and performs a verify operation that ensures indexes are in good condition.
2. IndexMerge - Merges multiple indexes.
3. IndexMultiProcess - Converts documents in multiple formats to indexes and
saves them in the <TeaLeaf_Install_Directory>\Canister\Indexes directory.
4. IndexDelete - Deletes sessions from the index when requested by other Tealeaf
components.
Note: When Index Program is running, sub-processes such as IndexMerge or
IndexCheck cannot be initiated from the command line. It is best to schedule
execution of these sub-processes through TMS.
Index Program (IndexProgram.exe)
Index Program loops continuously, looking for indexing to be done until a stop is
requested. If it finds indexing to be done, it checks for disk space and then starts
the process.
Index Program retrieves a list of non-indexed sessions. Work files are then
generated, each containing a list of non-indexed sessions to be indexed in a single
batch.
v The number of work files generated is based on the Batch work file parameter
and the number of available processes.
The following types of files are valid for indexing:
v TLA - Captured Tealeaf Archive files
v TLC - Canister Tealeaf Archive files
– TLA and TLC files are not normally generated during the capture process, but
the system can be configured to do so for troubleshooting purposes.
v Filename.ano.yyy - Annotation files
– If the file is filename.ano.xxx, it is indexed using dtSearch's native indexing
for files of type xxx. The work filename is TeaLeafWork_nnn_mmm or
WORKTeaLeafWork_1045006104_00000001
where:
nnn is the UNIX time at the time of creation.
mmm is a counter to ensure uniqueness.
v DOC - Microsoft Word files
v PDF - Portable Document Format (Adobe Reader) files
– Annotation, PDF, and DOC files can be added as attachments to sessions
through IBM Tealeaf CX RealiTea Viewer. For more information on adding
comments and file attachments to indexes, see "RealiTea Viewer (RTV) User
Manual" in the IBM Tealeaf RealiTea Viewer User Manual.
v XML - XML files
The number of files generated is based on the following formula:
(Number of Index Processes) x (Batch work files)
34
IBM Tealeaf CX: Configuration Manual
The maximum number of entries in each file is specified by the Workfile Batch
setting. See “Indexing Options tab” on page 37.
You may specify additional HTTP response content types for indexing. See
“Adding HTTP response content types for indexing” on page 47.
Configuration
UNC Paths Supported
You may enter UNC paths in any configuration field that requires a directory path.
IPv6 Supported
IP addresses are indexed for search in IPv4 or IPv6 format. Depending on your
deployment, the IPv6 versions of the address are inserted into the request, from
which they are indexed for availability in search.
v See "Support for IPv6" in the IBM Tealeaf CX Installation Manual.
Getting Started
Through Tealeaf Management System, you can configure indexing options.
Note: Changes to indexing configuration options are not activated until the
Session Indexer service is restarted through TMS.
To view or edit indexing configuration settings:
1. Login to the Portal as an admin user.
2.
3.
4.
5.
6.
From the Portal menu, select Tealeaf > TMS.
In the Servers view, select the desired server to drill down to components.
Select the Session Indexer component to display the configurations.
Select Index Service configuration.
In the Config Actions panel, click View/Edit.
7. The Indexing configuration tabs are displayed. For more information, see:
v “Scheduling-Diagnostic tab” on page 36
v “Indexing Options tab” on page 37
v “Merge Options tab” on page 41
v “Operation Times tab” on page 44
For more information on TMS in general, see "Tealeaf Management System" in the
IBM Tealeaf cxImpact Administration Manual.
Chapter 2. Configuring Tealeaf Components
35
Scheduling-Diagnostic tab
Figure 5. Scheduling-Diagnostic tab
Setting Description
Index Directory
Specifies the location of the index library (or control) file (ixlib.tll). This
file contains the time at which the indexes were written and a list of all
folders that comprise the index.
36
IBM Tealeaf CX: Configuration Manual
Maximum Number of Work Processes
This setting determines the maximum number of sub-processes used to
complete the work. The default value is 1.
Note: A single index process should be configured at any given time.
Additional index processes should only be configured if the session
indexer consistently falls behind. Adding unnecessary session indexers
may increase disk usage.
Minimum Disk Available
Specifies the minimum amount of space required for indexing to begin
processing. The default is 100 MB.
v If you see Session Indexer NT event log messages reporting almost out
of disk conditions because of a failure during write operations, increase
this value by 25 percent and free up space on the disk containing the
<Tealeaf_install_directory>\Canister\Indexes directory.
Scheduling
Indicates the scheduling priority of the sub-programs of session indexing.
This value determines the priority class for the process.
Note: Do not change this setting unless directed by Tealeaf. For more
information, please consult your Microsoft operating system
documentation.
Level
Specifies the amount of information to include in the log file:
v
v
5 specifies the greatest level of information.
1 specifies the least amount of information.
v
0 disables logging entirely.
Output to Console Window
When enabled, this option outputs log information to the console window
when the Index Program is run from the command line.
Enable dtSearch Logging
When enabled, this option turns on dtSearch error logging.
Indexing Options tab
Chapter 2. Configuring Tealeaf Components
37
Figure 6. Indexing Options tab
Setting Description
Maximum Word Size
Maximum number of characters per word to index. For example, the
default value is 32, which means that any characters in a word after the
first 32 are ignored for indexing purposes.
Note: Changing this value can significantly alter the size of your indexes.
Tealeaf recommends using the default setting. See “Configuring index
sizes” on page 40.
Maximum Index Size
Specifies the maximum size an index can reach before a new index is
created. The recommended value is 250 MB.
v The maximum value for this setting is 2048 MB.
v See “Configuring index sizes” on page 40.
38
IBM Tealeaf CX: Configuration Manual
Delete Source Files when Done
Automatically deletes TLA and TLC files from the FilesToIndex directory
after they are processed. This setting is meaningful only when direct pull
indexing mode is not being used.
Build Temporary XML in Memory
When selected, temporary XML is built in memory, instead of on disk. This
default mode accelerates system performance.
Delete Temporary XML When Done
Automatically deletes temporary XML files when indexing is done. The
default value is true.
v This setting should be selected when Build Temporary XML in Memory is
enabled. It should be disabled only if the XML is required by another
system, such as the BW Extractor.
Modify Temporary XML to Comply with W3C
This option fixes XML to comply with W3C specifications. When converted
to XML, some HTML does not conform to the W3C specification.
v This setting directs the indexer to correct the XML to conform. This
option increases the amount of work the indexer must perform and is
necessary only when the temporary XML is used by another application.
Session Batch
The maximum number of sessions to index per run.
Workfile Batch
Specifies the number of work files to process at once. The default value is
5.
Direct Pull Timeout
Closes the index if the current direct pull index batch has been indexing
continuously for the specified amount of time. The default value is 300
seconds (5 minutes).
v This setting allows search processes to use the index periodically, rather
than tie up the current index exclusively until some other threshold
causes it to be closed.
Minimum Sessions to Start Indexing
Specifies the minimum number of sessions needed to start processing.
Use as session batch for direct pull
If selected, the Session Batch value is used for direct pull communication
with the Canister.
Path for Temp XML File
Specifies the location where XML files are generated and stored as an
intermediate step in the indexing processes, when not using in-memory
indexing.
v This setting is used in conjunction with the Delete Temp XML setting.
Temporary XML files are not deleted in cases where the XML is used as
input to another system.
Hyphenation Style
Specifies how hyphens are treated for indexing purposes. See “Indexing
hyphens” on page 41.
Chapter 2. Configuring Tealeaf Components
39
Additional Content Types to Index
Specify a set of one or more HTTP response content types whose data
should be indexed. See “Adding HTTP response content types for
indexing” on page 47.
Configuring index sizes: Through the Canister configuration, you can modify
limits that affect the maximum permitted size of indexed words and indexed files.
Indexed word limits: By default, Tealeaf imposes a limit of 32 characters on the
lengths of words to be indexed. Any word that is longer than 32 characters is
length is truncated to 32 characters for purposes of indexing. For example, when
the maximum word length is 32 characters, the words
ThisWordIsMyFavoriteWordOfAllTime and
ThisWordIsMyFavoriteWordOfAllTimeNoItsNot are both indexed as
ThisWordIsMyFavoriteWordOfAllTim.
You can change the value of the Maximum Word Size setting to accommodate longer
words if they are commonly in use on your web application. The maximum
accepted word length is 128.
Note: Changing this value can significantly alter the size of your indexes. Tealeaf
recommends using the default setting.
Note: Changes to this setting apply only to indexes that are created after the
change. Typically, those indexes are created the following day.
Note: The underlying search engine imposes a maximum limit of 80 characters on
field names. When the maximum word length is greater than 80 characters, the
underlying search engine limits field names to 80 characters. Field names that are
longer than 80 characters are not included in the index at all. Using these words as
search terms or field names will produce no results.
If you are searching for words longer than the maximum word size:
v You can use the wildcard (*) to search. See "Searching Session Data" in the IBM
Tealeaf cxImpact User Manual.
v You can create a search field that applies an MD5 hash to the value. Users
submit the full text version of the search term, which is converted to the
32-character MD5 hash value and submitted to the search engine for processing.
See "Configuring Search Templates" in the IBM Tealeaf cxImpact Administration
Manual.
Index file sizes: When the Indexer writes index files to storage, they are saved in
separate directories for each day. When the size of the indexing files in a directory
grows above the Maximum Index Size, a new directory is created, and new empty
indexes are written to it. Subsequent indexing operations write to the new
directory.
By default, the size of index directories is limited to 250 MB, which should enable
the indexing of a day's session traffic for a medium-sized customer. This setting
can be changed as needed. The maximum value for this setting is 2048 MB.
Note: The final size of the generated index directory may be larger than the value
set for Maximum Index Size. If you must keep the size of the directory below this
maximum size, set the value of Maximum Index Size to 30% less than the maximum
desired size.
40
IBM Tealeaf CX: Configuration Manual
Indexing hyphens: Tealeaf's search engine indexes blocks of text yet provides
mechanisms for how special characters are treated. Hyphens in session data can be
treated in multiple ways. For example, the term cross-reference might appear in
indexed data as:
crossreference
cross-reference
cross reference
Individual words within the hyphenated phrase are always indexed. In the above
example, cross and reference are indexed in all methods.
You can configure the session indexer to index hyphenated text using any or all of
the above methods. To specify the indexing style for hyphens, set Indexing Hyphen
Style to one of the following values:
Value Description
Ignored
Ignore hyphen (crossreference).
Searchable Text
Treat hyphens as searchable text (cross-reference).
Spaces Treat hyphens as space (cross reference). This is the default value.
All
Index in all of the above styles.
Note: Setting this value to All to index in all styles may bloat index sizes
and produce unexpected results in searches involving longer phrases or
words with multiple hyphens.
You should monitor changes in indexing rates after making this change.
Note: To apply this change to sessions that have already been indexed, you must
re-index those sessions.
Merge Options tab
Chapter 2. Configuring Tealeaf Components
41
Figure 7. Merge Options tab
Setting Description
Save Merged Indexes
Saves merged indexes to the indexes directory. Does not delete the original
indexes after they have been merged into a new merged index. This setting
is useful only for troubleshooting purposes.
Merge Current Day
Merges the current day's indexes if they meet the criteria for being merged.
42
IBM Tealeaf CX: Configuration Manual
v If disabled, merging is attempted only on indexes from days previous to
the current day.
v This setting is disabled by default so that merging does not compete
with the process of creating new indexes for the current day's incoming
data.
Maximum Merge Size
Specifies the maximum size (in MB) of a merged index.
Maximum Merge Count
Specifies the maximum number of indexes to merge into a new merged
index.
Merge Until all Possible Merging is Complete
Repeats the merge process until every index that is below the Maximum
Merge Size and Maximum Merge Count has been merged.
Chapter 2. Configuring Tealeaf Components
43
Operation Times tab
Figure 8. Operation Times tab
Setting Description
Enable Indexing
Master setting to enable or disable indexing of Tealeaf data.
Enable Index Check
Determines whether Index Check should run.
Enable Index Check at Startup
Determines whether IndexCheck should run at startup.
Enable Index Merge
Determines whether Index Merging should run.
44
IBM Tealeaf CX: Configuration Manual
Enable Command File Processing
Determines whether command files should run.
Sleep Time when No Work
Specifies the amount of time in seconds that indexing should sleep when
there are no non-indexed sessions or XEQ files to process. The default
value is 10000 milliseconds (10 seconds).
Interval Between Index Check
Specifies the amount of time in minutes to wait between runs of the Index
Check process.
Merge Times
Specifies the time in 24-hour format to run IndexMerge to merge index
files that meet the criteria specified on the Merge Options tab. You can add
multiple merge times throughout the 24-hour day.
v Merge times are based off of the local time zone, instead of the Tealeaf
system time zone.
Addition Settings
System group
In TMS, system group options for indexing in general are available under the
Tealeaf component node. See "TMS WorldView Tab" in the IBM Tealeaf cxImpact
Administration Manual.
Troubleshooting Session Indexes
See "Troubleshooting - Indexer" in the IBM Tealeaf Troubleshooting Guide.
Index Format and Storage
Indexes consist of an index library file (IXILB.ILB) and a corresponding group of
index files (*.IX).
v The ILB file is used only if dtSearch Desktop is enabled. Index libraries are
essentially lists that keep track of the names and locations of each index.
v The IXLIB.TLL file contains the same information as the library file, in addition
to information used exclusively by IBM Tealeaf CX.
Format of Index Control File (IXLIB.TLL)
The following table provides a description of each tag that comprises the
IXLIB.TLL file, a Tealeaf-specific file used by the IBM Tealeaf CX RealiTea Viewer
for searching. It may be necessary to check this file for troubleshooting purposes.
Tag
Description
<Day>
A text version of the date
<Julian>
A pseudo-julian date: (year - 2000) * 1000) + DayOfTheYear
<FirstUse>
UNIX time of the last time of the first session in the index
<LastUse>
UNIX time of the last time of the last session in the index
<IndexName>
The name of the index
Chapter 2. Configuring Tealeaf Components
45
<IndexPath>
Relative path of the index
<Valid>
Is this index valid? False under certain situations, primarily merging, while
indexes are being created.
<InUse>
Is the index in use?
<FirstSession>
Canister session identifier of the first session in the index
<LastSession>
Canister session identifier of the last session in the index
<CheckRequired>
Should a verification be run on this index? This option is set only when
the -F flag is given to IndexCheck, or if something went wrong during
normal operation.
<IndexSize>
dtSearch determination of the size of the index
<DocCount>
dtSearch internal value of the document count for this index
<CheckCount>
Is the TLPIS.ix file current for this index?
Index directories
An index directory is a sub-directory below the TeaLeaf\Canister\Indexes
directory. Index directories are named with the time and date of index creation in
the following format: YYYYMMDDxxx
where:
xxx is three sequential uppercase letters. For example, an index created on
December 12, 2004 may be stored in a directory named 20041212AAA.
An index file may represent several sessions, a single session, or a partial session
depending on the limits specified for your indexing options. The number of
created indexes depends on the individual index size limit specified in the
Indexing Options dialog box. For example, if the individual index size is limited to
50 MB, a new index directory is created after the files in the current index
directory reach this limit.
After an index is created, it is added to the library file and listed by directory
name.
Indexed Content Types
The following content types, also called Internet media types and MIME types, are
indexed by default:
Note: These configured content types apply to HTTP responses only. HTTP
requests are indexed based on individual sections. See “Request File” on page 48.
v text/html
v text/plain
v text/xml
v application/xhtml+xml
v application/rdf+xml
46
IBM Tealeaf CX: Configuration Manual
v application/vnd.mozilla.xul+xml
v application/xml
Adding HTTP response content types for indexing:
As needed, additional content types can be added to the list of content types that
are automatically indexed by Tealeaf.
Note: Depending on the content type, the IBM Tealeaf CX Passive Capture
Application may need to be configured to capture it. See "PCA Web Console Pipeline Tab" in the IBM Tealeaf Passive Capture Application Manual.
The following are some of the notable types that may be added:
v text/json
v text/x-json
v application/json
v application/x-json
Note: Adding content types can cause the size of indexes to grow, depending on
the volume of data of the added content type.
Note: Do not add binary content types for indexing. These types cannot be
indexed, and attempting to index them adds no benefit and impacts indexing
performance.
To add new content types, please complete the following instructions.
1. Login to the Portal as a Tealeaf administrator.
2. Select Tealeaf > TMS.
3.
4.
5.
6.
Click the Session Indexer node.
Select Index Service configuration.
Click View/Edit.
Click the Indexing Options tab.
7. Select Additional Content Types to Index.
8. Specify the new content types as a comma-separated list.
Note: Do not include spaces.
Note: No data validation is performed on the entries.
9. Click Save.
10. Configure a job to push the changes to all Tealeaf servers. See "PCA Web
Console - Pipeline Tab" in the IBM Tealeaf Passive Capture Application Manual.
Character indexing: Some rules by which the index performs indexing of specific
characters can be applied through the alphabet.dat file. Additional special rules
may be apply to specific data structures. See "Character Indexing" in the IBM
Tealeaf cxImpact Administration Manual.
Indexed Items
STS File: The STS file contains data that applies to the entire session, including
the session attributes.
[CanisterSummary] Section
The following variables in the Canister Summary section are indexed.
Chapter 2. Configuring Tealeaf Components
47
v
v
v
v
v
TltStsBrowser
TltStsCanisterID
TltStsCloseSessionEvent
TltStsDomain
TltStsEnumValueId
v
v
v
v
v
v
v
TltStsEventText
TltStsEventUniqueId
TltStsEventUniqueIdHour
TltStsFirstPage
TltStsFirstUse
TltStsIPaddr
TltStsLastUse
v
v
v
v
v
v
TltStsLastPage
TltStsLoginID
TltStsNumHits
TltStsRandomSel
TltStsSesnDuration
TltStsSesnID
v TltStsSesnIdx
v TltStsTLTVID
v TltStsTrafficType
v
v
v
v
TltStsTxtPages
TltStsUniqueIdAndEnumValueId
TltStsUserDef
TltStsUserID
v TltStsCustomVar0 - TltStsCustomVar63
v TltStsEventUniqueId fields are recorded in the STS file in the order of
occurrence. An event is only listed once in the STS file but may be listed
multiple times in the request buffers of individual hits.
For more information on these terms, see "RealiTea Viewer - Session Attributes" in
the IBM Tealeaf RealiTea Viewer User Manual.
Request File: [AppData] Section
Everything is indexed in this section.
If you wish to index something in the request, insert it as a name/value pair in
this section.
[Env] Section
Only the following fields are indexed:
v http_referer
v http_remote_addr
v local_addr
v referer
v remote_addr
v remote_host
v StatusCode
48
IBM Tealeaf CX: Configuration Manual
v URL
This section may be populated from HTTP request/response headers, PCA data
insertion, and Windows pipeline actions. See "RealiTea Viewer - Request View" in
the IBM Tealeaf RealiTea Viewer User Manual.
[Timestamp]The following fields are indexed:
v NT_Grade
v RT_Grade
v WS_Grade
[URLField] Section
Everything is indexed in this section.
Session Attributes
In addition to searching the response data described above, Free Text searches look
for and find any of these fields in a request.
cookies
Cookies are not automatically added to the indexes. Sites that employ cookies may
have multiple cookies containing long unreadable strings of encoded data on
personalization information, often unique to every hit. Indexing these generally
leads to extremely large indexes.
If there is a specific cookie that should be indexed/searchable, you can add it to
the [IndexFields] RTA rule that copies the cookie and its value into the [appdata]
section of a request, which will make it be indexed and searchable.
Any Other Sections: Nothing else is indexed in the request files.
Response File: The HTTP header is not indexed in standard indexing.
REQ Section: For standard indexing, the following sections are indexed:
v [urlfield]
v [appdata]
v [TimeBlock] - time of the hit. See “TimeBlock section.”
v [TLFID_] section. See “Fact section” on page 50.
If there is an entry of TLMergeId in the [appdata] section, then put the
<TLMergeId> entry at the end of the XML.
See "RealiTea Viewer - Request View" in the IBM Tealeaf RealiTea Viewer User
Manual.
TimeBlock section: Into each request is automatically inserted the [TimeBlock]
section, which contains timing information related to the hit. This data is
automatically indexed.
Below is an example [TimeBlock] section:
[TimeBlock]
WEEK=24
MONTH=6
QUARTER=2
YEAR=2010
Chapter 2. Configuring Tealeaf Components
49
HOUR_OF_DAY=13
DAY_OF_WEEK=4
DAY_OF_MONTH=10
DAY_OF_YEAR=161
For more information on the definitions of each request variable, see "RealiTea
Viewer - Request View" in the IBM Tealeaf RealiTea Viewer User Manual.
Fact section: In standard indexing, each recorded fact is indexed, if it has been
configured to be searchable through the Tealeaf Event Manager.
Note: Facts are flagged for indexing through the Tealeaf Event Manager. When the
Searchable flag is set, the following name/value pair is inserted into the request:
Searchable=True
If the above value is False, the fact is not indexed.
If this flag is true, the following elements of the fact are indexed:
v TLFID
v TLFactValue
v TLDimHash*
Example fact definition:
[TLFID_78]
Searchable=True
TLFID=78
TLFactValue=1
TLDimHash1=926515C2EE3C2BAB9D2C675E0FD8B487
TLDimHash2=C815C31FCFF0FD2640B310579BD35BCC
TLDimHash3=8CD892B7B97EF9489AE4479D3F4EF0FC
TLDimHash4=04C3451BC46213B3EAD4DCBFBF9E3389
TLDim1=/store/defaultpage
TLDim2=www.straussandplesser.com
TLDim3=store
TLDim4=63.194.158.210
In the above example, under standard indexing, the first two items and the last
form items are not indexed.
For more information on enabling the indexing of specific facts, see "TEM Events
Tab" in the IBM Tealeaf Event Manager Manual.
RSP Section: HTTP headers are removed for Standard Indexing.
See "RealiTea Viewer - Response View" in the IBM Tealeaf RealiTea Viewer User
Manual.
TimeGrades:
v <WS_Grade>
v <NT_Grade>
v <RT_Grade>
The following TimeGrades fields are in the XML for every hit:
ExcellentWS </WS_Grade>
ExcellentNT </NT_Grade>
ExcellentRT </RT_Grade>
Note: Other options besides ExcellentWS, etc. are Normal<nn>, HighNormal<nn>,
or High<nn>, where <nn> represents WS, NT, or RT, depending on the measure.
In captured data, you can search for time grades.
50
IBM Tealeaf CX: Configuration Manual
v See "Searching Session Data" in the IBM Tealeaf cxImpact User Manual.
v For more information on configuring time grades, see "PCA Web Console Pipeline Tab" in the IBM Tealeaf Passive Capture Application Manual.
JSON Messages: Messages submitted in JSON format from the Tealeaf client
frameworks are automatically indexed as Request/RequestBody pairs.
Note: The Tealeaf client frameworks enable the capture of client-side user interface
events from web, mobile web, iOS, and Android applications.
For more information:
v See "UI Capture j2 Guide" in the IBM Tealeaf UI Capture for j2 Guide.
v See "Tealeaf Android Logging Framework Reference Guide" in the IBM Tealeaf
Android Logging Framework Reference Guide.
v See "Tealeaf iOS Logging Framework Reference Guide" in the IBM Tealeaf iOS
Logging Framework Reference Guide.
For more information on JSON message indexing, see "Integrating Client
Framework Data into Tealeaf" in the IBM Tealeaf Client Framework Data Integration
Guide.
Monitoring Indexing
You can use the following mechanisms to monitor indexing.
System Status - Canister report
Through the Portal, you can monitor the status of canisters. In the Portal menu,
select Tealeaf > System Status > Canister. From the IBM Tealeaf CX drop-down,
select the specific Canister you wish to monitor. Click Refresh if necessary. See
"System Status" in the IBM Tealeaf cxImpact Administration Manual.
System Status - Storage report
Through the Portal, you can monitor the indexing of sessions over the number of
days that sessions are retained in each server. In the Portal menu, select Tealeaf >
System Status > Storage. The base report provides overall storage requirements for
each Canister or archive.
From the Storage Server drop-down, select the specific Processing Server you wish
to monitor. Click Refresh if necessary. In the displayed report, you can compare
the values in the LSSN Sessions column to the value in the Index Sessions column
for each day to determine if indexing is falling behind.
See "System Status" in the IBM Tealeaf cxImpact Administration Manual.
Tealeaf Status report
The Tealeaf Status report contains a wealth of information on IBM Tealeaf CX
system health and status. Specific to indexing, you can search a generated Tealeaf
Status report for the "Canister Overview" section and "Canister Status" section for
individual servers.
If the Session Indexer falls behind a threshold set for the number of un-indexed
sessions, the Tealeaf Status report includes the following message:
Sessions Waiting to be Indexed has broken its threshold.
To generate an immediate Tealeaf Status report through the Portal:
Chapter 2. Configuring Tealeaf Components
51
1. Login to the Portal as an administrator.
2. In the Portal menu, select Tealeaf > Portal Management.
3. In the Portal Management page, click the Logs pane in the left-navigation
panel.
4. Click the View Tealeaf Status link.
5. A Tealeaf Status report is generated and displayed.
v See "Tealeaf Status Report" in the IBM Tealeaf cxImpact Administration Manual.
Indexing Logs
In the Logs directory inside the Tealeaf install directory, the following log files
contain useful information about indexing services:
File
Description
history.ix
Main session indexer log.
TLTIndexMultiProcess*.log
Log messages generated by the spawning process for indexing.
TLTIndexCheck*.log
Log messages generated by the IndexCheck sub-program.
TLTIndexMerge*.log
Log messages generated by the IndexMerge sub-program.
TLTIndexService*.log
Log messages for the Tealeaf Indexing Service.
v In the above filenames, the * value is a date stamp and the process identifier.
Adding Other Fields for Indexing and Search
By default, Tealeaf indexes various request data so that Tealeaf components and
users can search for sessions using a range of criteria. The set of available fields is
defined for the most common case. Any application-specific fields or data added
using optional Tealeaf components is not automatically available for search.
The following section provides a set of potential methods for making any request
variable available for indexing and searching. By default, most Tealeaf solutions do
not index response data.
Methods and Tradeoffs
General approach: To make data available for indexing, it must be located in or
moved to a section of the request where data is indexed.
Note: The IndexMultiProcess does not support specifying individual fields or
sections of the request for indexing. All additional data that is to be indexed must
be inserted into the [appdata] section of the request.
The purpose of indexing, however, is to make the data available for search. It is
possible to also make request or response data available for search by creating
events that capture and store the values as event data.
In the sections below, the different approaches are described, and examples are
provided for making the data available for each approach.
52
IBM Tealeaf CX: Configuration Manual
Methods for making indexing available for search: Use the following methods to
make request or response data available for indexing. You can also use these
methods to move response data.
Table 1. Methods for making indexing available for search
Method
Description
Pros
Cons
Move request data to
[appdata]
Using the Privacy session
agent, you can move any
request variable into the
[appdata] section of the
request. All fields in this
section are automatically
indexed.
v Privacy session agent
should already be
deployed.
v Data is not available for
reporting.
See “Using Privacy to
Insert Request or Response
Data for Indexing” on page
54.
v Indexed data is available
in a consistent space
v Indexes are stored in
individual Canisters and
are periodically trimmed
when the session is no
longer available.
Reporting data is
typically retained for a
longer period of time in
a SQL database.
v Privacy session agent can
be resource-intensive,
particularly if regular
expressions are used or if
the field occurs
frequently in session
data.
v A limited number of
rules can be created for
Privacy session agent.
v With two copies of the
data in the request, it is
possible for discrepancies
to be created between the
request variable names
and their values.
v Each additional field
added to indexing grows
the size of the indexes
Chapter 2. Configuring Tealeaf Components
53
Table 1. Methods for making indexing available for search (continued)
Method
Description
Pros
Create an event to capture
the request data
Through the Event
v Event data is available
Manager, you can create an
for search and for
event to capture and store
reporting.
the request data. From the
v Event data is stored in
Portal, you can then search
the session itself;
for sessions using the event
indexing data is stored
or values for the event.
separately.
v Events can be configured
to be checked on every
hit when they only need
to be checked on the first
or last hit, for example,
which impacts Canister
performance.
See “Creating Events to
Enable Searching for
Session Data” on page 56.
v If regular expression is
used to define an event,
event evaluation can be
impacted by a poorly
constructed regular
expression.
v By default, event data is
stored in the SQL
database for 365 days.
v Event data is more
widely accessible in the
Portal. For example, you
can locate sessions that
contain events based on
the icon associated with
the event.
Cons
v Adding a new event
increases the storage
required for every
session in which the
event occurs. Depending
on how frequently the
event is triggered and
the number of
dimensions associated
with the event, the
storage increase can be
significant.
v Events are also stored in
the Reporting database
and, if IBM Tealeaf
cxResults is licensed, the
Visitors database.
Using Privacy to Insert Request or Response Data for Indexing
The Privacy session agent can be used to move request or response variables and
values into the [appdata] section of the request, where it is automatically made
available for indexing.
Note: Adding new fields for indexing increases the size of the indexes, particularly
if the fields occur frequently in the session data. Additionally, depending on
privacy rules are created, the new processing can impede throughput in the
Windows pipeline. Tealeaf recommends creating a single Privacy rule to move one
field of data and checking the change in the size of the indexes before adding more
rules.
Note: Adding new fields for indexing is not required to enable users to search for
the data. To search for request variable and value combinations, users may enter
the following in the All Text field:
RequestVariable contains RequestVariableValue
where
v RequestVariable = the name of the request variable
v RequestVariableValue = the value of the request variable
54
IBM Tealeaf CX: Configuration Manual
While the above method works, it is expensive in terms of Search Server
processing. Tealeaf recommends moving the data for indexing for searching for
common request variables.
Example: The Tealeaf IBM Tealeaf CX UI Capture for AJAX solution captures
items that may not generate transactions with the web server, such as user
interface events and other properties, from the visitor's browser and submits them
to Tealeaf for capture. Using Tealeaf IBM Tealeaf CX UI Capture for AJAX, you can
capture a rich repository of data about visitors to your web application.
For more information on IBM Tealeaf CX UI Capture for AJAX, see "UI Capture
FAQ" in the IBM Tealeaf UI Capture for AJAX FAQ.
When IBM Tealeaf CX UI Capture for AJAX is deployed, some Tealeaf performance
reports are populated with data captured from the visitor's browser. These reports
are available through the Tealeaf Portal. For more information on performance
reporting, see "Analyzing Performance" in the IBM Tealeaf Reporting Guide.
However, these reports are generated from internal events in the Canister. For
maintaining performance, the Canister does not maintain events to reflect all of the
possible data captured from the client. For example, exceptions detected in the user
interface are detected by IBM Tealeaf CX UI Capture for AJAX and submitted to
Tealeaf, but they are not available in the provided reports.
This information could be very valuable for assisting customers with problems
with your web application and then providing that information to developers to
resolve. If you were able to capture this information and store it in such a way that
it is indexed for search, CSRs at your enterprise could search for these sessions,
drill into them to locate the customer issues, and then provide the sessions to
developers for further resolution.
Tealeaf automatically provides this information in the [env] section of the request.
In that section, IBM Tealeaf CX UI Capture for AJAX inserts the following request
variable containing an identifier for the number of client user interface exceptions:
HTTP_X_TEALEAF_PAGE_CUI_EXCEPTIONS=2
See "UI Capture for AJAX Sample Client Event Message" in the IBM Tealeaf UI
Capture for AJAX Guide.
Configuring privacy: By default, Tealeaf does not index this field, so you can use
the Privacy session agent to move this field into the [appdata] section of the
request.
Note: The following example is created using the raw configuration for the
privacy filter. If you are creating multiple rules to move content to the [appdata]
section of the request, you can copy and paste finished versions of the rule to
create new, similar rules.
v If you prefer to use the TMS interface to create privacy rules, you can review a
similar example for configuring IBM Tealeaf cxResults visitorization. See
"cxResults Installation" in the IBM Tealeaf cxResults Administration Manual.
See “Privacy Session Agent” on page 291.
See “Extended Privacy Session Agent” on page 261.
To configure privacy indexing:
Chapter 2. Configuring Tealeaf Components
55
1.
2.
3.
4.
5.
Verify that Privacy is enabled.
Open the privacy configuration.
Create a privacy action and rule.
Test the privacy action and rule.
Create any additional rules and actions.
Creating Events to Enable Searching for Session Data
The other method of making additional request data available is to capture the
values for the request variable into event objects.
v When request data is captured in events, you can search for the data through the
Portal. See "Events" in the IBM Tealeaf cxImpact User Manual.
v Additionally, the data is available for reports created through the Report Builder.
See "Tealeaf Report Builder" in the IBM Tealeaf Reporting Guide.
In the steps below is presented a general approach for how to capture request data
into event objects for search and reporting purposes.
1. Identify the request data to capture:
v In our example above, we are searching for data that fits the following
pattern:
HTTP_X_TEALEAF_PAGE_CUI_EXCEPTIONS=2
v The value to the right of the equals sign is the one to capture and can change
with each hit.
2. Create the hit attribute: Through the Event Manager, you must create the hit
attribute to look for and capture, if present, this data on each hit. Key
properties:
v Define the hit attribute to check the request.
v Start Tag:
\r\nHTTP_X_TEALEAF_PAGE_CUI_EXCEPTIONS=
v End Tag:
\r\n
v Verify that it is not a case-sensitive search.
v See "TEM Hit Attributes Tab" in the IBM Tealeaf Event Manager Manual.
3. Create the dimension: You can also create a dimension sourced from the hit
attribute to capture the contextual information. Key properties:
a. Populated By: Select the hit attribute that you created.
b. Populate With: Select the First Value on Page/Hit.
c. Values to Record: Select Whitelist + Observed Values.
Note: When observed values are allowed to be recorded, data is
immediately collected and available. However, every instance of the
dimension is recorded without limit to the number of instances. Wherever
possible, dimensions that record observed values should be converted to
whitelist only dimensions.
v See "Data Management for Dimensions" in the IBM Tealeaf Event Manager
Manual.
v See "Whitelists and Blacklists" in the IBM Tealeaf Event Manager Manual.
4. Save the dimension.
5. Commit the changes to the server.
56
IBM Tealeaf CX: Configuration Manual
6. Create the event: Through the Event Manager, you can create the event to be
triggered off of the hit attribute. The event records the value of the hit attribute.
Key properties:
Evaluate: Every Hit
Track: Every Occurrence
Value Type: Numeric
Condition step:
– Select the hit attribute you just created. If you did not specify a label for
it, it is under the Default label.
– Set the condition to be Hit Attribute Found and Is true, since this value
is not inserted when there are not exceptions.
v Value step:
– For the item to record, select the hit attribute you created, which means
that the numeric value of the hit attribute is recorded as the numeric
value for the event.
v Report Groups step:
– If you wish to have the event associated with any contextual information,
you can associate report groups containing the contextual dimensions in
this step. It is not a required step.
v More Options step:
– Until you are satisfied with the results of the event, you may not want to
include in IBM Tealeaf cxResults (if licensed) or send to other components
or event objects.
a. Save the event and hit attribute.
v
v
v
v
b. Commit the changes to the server.
v See "TEM Events Tab" in the IBM Tealeaf Event Manager Manual.
7. Test the event: To test the event, you can send sample sessions, which include
the data, to the Event Tester. See "Event Tester" in the IBM Tealeaf Event Manager
Manual.
8. Allow event counts to accumulate: If the event and hit attribute are properly
firing in the Event Tester, you must let sufficient time to pass for occurrences of
the event to be detected in the Canister and stored in the reporting data.
a. While you are waiting, you can search for the event through the Portal.
v You should be able to search for active sessions that include the event as
soon as it is detected in the Canister.
v See "Events" in the IBM Tealeaf cxImpact User Manual.
b. After sufficient time has passed, you can create a report using the event.
v If you created the dimension, you can use it in reports, too.
v See "Tealeaf Report Builder" in the IBM Tealeaf Reporting Guide.
For more information on using the Event Manager, see "Tealeaf Event Manager" in
the IBM Tealeaf Event Manager Manual.
Troubleshooting
For more information on troubleshooting, see "Troubleshooting - Indexer" in the
IBM Tealeaf Troubleshooting Guide.
Chapter 2. Configuring Tealeaf Components
57
Configuring the Report Server
The Report Server consists of the Portal Web Application, the databases, and the
Data Service. To configure the report server, you can use Tealeaf Management
System (TMS).
v For more information on TMS in general, see "Tealeaf Management System" in
the IBM Tealeaf cxImpact Administration Manual.
Report Server Time Zone
The time zone for the Windows machine hosting the Tealeaf Report Server must be
configured to match the Tealeaf system time zone. This requirement may be
loosened in a subsequent release.
v See “Configuring the System Timezone” on page 12.
Accessing the Report Server Configuration
Note: Changes to the Report Server configuration require an IISReset, which forces
all users from the Tealeaf Portal. Please perform these configuration changes
accordingly.
To view or edit Report Server configuration settings:
1. Log in to the Portal as an admin user.
2. From the Portal menu, select Tealeaf > TMS.
3.
4.
5.
6.
In the Servers view, select the desired server to drill down to components.
Select the Tealeaf component to display the configurations.
Select Shared configuration information to display the Config Info dialog.
Click View/Edit. The Configuration Editor is displayed.
Note: After you make changes to the Report Server configuration, the
following steps are required:
a. Push the configuration to all servers through TMS.
b. Restart the Tealeaf Data Service. See "Configuring the Tealeaf Data Service"
in the IBM Tealeaf CX Configuration Manual.
c. Perform an IISreset of the Tealeaf Portal.
Portal tab
The following information is accessible via the Portal tab.
58
IBM Tealeaf CX: Configuration Manual
Figure 9. Portal tab
Setting Description
Portal Session Timeout
Specifies the amount of time in minutes a Portal user can remain inactive
before automatically logging off.
Date Format
Controls the input/output format for the dates in the Portal.
Chapter 2. Configuring Tealeaf Components
59
Authentication Method
Select one of the following values: 3DES (default), RC2, MD5, or NT.
v 3DES authentication is the default method for all new installs of IBM
Tealeaf cxImpact.
v NT Authentication enables the Portal to use a Windows digest-style
authentication model for user logins. See “Portal NT Authentication” on
page 65.
Search Server Timeout
Specifies the timeout setting for Search Server. Default value is 300 seconds
(5 minutes).
Allow Mixed Mode Login
Mixed Mode Login allows Portal users to choose whether to authenticate
via the Tealeaf database or via the Windows NT domain method. When
Authentication Method is set to NT, this setting toggles display of the
"Login using database authentication" link on the login page in the Portal.
To remove the link, enable this option.
Database tab
The following information is required when connecting to the database, which is
automatically configured during installation of Tealeaf.
Note: These values should not be altered unless you make specific changes to the
database connection parameters (host name with an instance and port number).
60
IBM Tealeaf CX: Configuration Manual
Figure 10. Database tab
Setting Description
Report Database Server
Defines the name of the database host. If the databases are on a named
instance, the following format should be used: <server name>\<instance
name>.
System Database
Defines the name of the Report Database. Default value is TL_SYSTEM.
Chapter 2. Configuring Tealeaf Components
61
cxImpact Reports Database
Defines the name of the Report Database. Default value is TL_REPORTS.
Session Segment Database
Defines the name of the Result Set Extractor Database. Default value is
TL_RSEXTRACTOR.
System Statistics Database
Defines the name of the System Statistics Database. Default value is
TL_STATISTICS.
Admin User Name
Defines name of user for databases with alter privileges. Default value is
TLADMIN. See “Changing Database Passwords.”
Portal User Name
Defines name of user for database with read/write privileges. Default
value is TLUSER. See “Changing Database Passwords.”
Report Database Server Port
Specifies the port used to communicate with the SQL Server database.
Default value is 1433.
Note: If you are using a port other than the default (1433), that port
number must be inserted when you connect to the Tealeaf databases using
the Tealeaf Database Manager. See "Tealeaf Database Manager Reference"
in the IBM Tealeaf Databases Guide.
Log Level
Determines the logging level from 1 (lowest) to 9 (highest).
Note: Log Level is also used by the Portal to determine the level of
logging to display in an error. Level 9 displays all details in the Portal and
should only be used for debugging purposes.
Processing Interval
Determines the idle period between data collection runs. If this number is
set to 0, the Data Service runs once and stops. The default is 300 seconds
or (5 minutes), which is the lowest recommended setting.
Connection Timeout
Determines the maximum time in seconds for the MSSQL server to
respond. The default value is 300 seconds (5 minutes).
Changing Database Passwords
Note: Changing database passwords in the Portal changes only the passwords
used by the Portal to connect to the database; it does not change the passwords in
SQL Server. Please change passwords using the following steps.
1. Login to the Report Server.
2. Stop all services except for the Tealeaf Management System, which is required
to complete this set of steps.
3. In SQL Server, change the passwords for the Tealeaf administrator and user
accounts.
v By default, these account IDs are TLADMIN and TLUSER.
v Retain the passwords for later use.
v For more information on making this change in SQL Server, please see the
documentation that came with the product.
62
IBM Tealeaf CX: Configuration Manual
4. Run the Tealeaf Database Manager. Connect using an account with database
administrator permissions.
5. In the Tealeaf Database Manager menu, select Info/Config > Report Server
Configuration.
6. Change the passwords as desired.
7. Click OK. Passwords are changed.
8. To exit the Tealeaf Database Manager, click Exit.
9. Relaunch the Tealeaf Database Mananger. Connect using Tealeaf
authentication.
10. If the passwords that you entered are correct, then you should be able to login
to the Tealeaf Database Manager.
11. Click Exit.
12. Restart all Tealeaf services on the Report Server.
cxResults DB tab
In the IBM Tealeaf cxResults tab, you can configure the names of the server and
databases in use for IBM Tealeaf cxResults.
Note: This tab does not appear if you have not licensed and installed IBM Tealeaf
cxResults. IBM Tealeaf cxResults is a separately licensable product of the IBM
Tealeaf CX platform. IBM Tealeaf cxResults is no longer available as a newly
licensed product as of Release 8.7. Customers that licensed IBM Tealeaf cxResults
in Release 8.6 and earlier may continue to use and receive support for the product
in Release 8.7 and later. For more information, please contact Tealeaf Customer
Support .
Chapter 2. Configuring Tealeaf Components
63
Figure 11. IBM Tealeaf cxResults DB tab
Setting Description
Visitor Database Server
Defines the name of the database host for the Visitor report and staging
databases. If the databases are on a named instance, the following format
should be used: <server name>\<instance name>.
Visitor Database Port
The port used to communicate with the visitor databases.
64
IBM Tealeaf CX: Configuration Manual
Path for Visitor Database files
On the hosting server, the full path to where the visitor database files are
stored.
Visitor Report Database
The name of the Visitor report database.
Visitor Staging Database
The name of the Visitor staging database.
Additional Report Server Configuration
You can perform the additional configuration tasks for the Report Server outside of
TMS.
Configuring SNMP Traps
See “Configuring the Alert Service” on page 141.
Portal NT Authentication
Portal NT authentication mode enables the Portal to authenticate users based on
their Windows NT domain identities. To use this feature, Portal user accounts must
be configured to be associated with NT domains and usernames. When a user is
logged on to an NT domain associated with a Portal user identity and requests the
Portal login page, that user is recognized as an NT domain user and can log in to
the Portal using NT domain credentials. The Portal user account associated with
their NT credentials then determines what Portal features and data (e.g., charts)
can be accessed by the user. For more information on Tealeaf authentication
methods, see "Authentication" in the IBM Tealeaf cxImpact Administration Manual.
Troubleshooting
For more information on troubleshooting, see "Troubleshooting - Reporting" in the
IBM Tealeaf Troubleshooting Guide.
Configuring the Tealeaf Data Service
The Tealeaf Data Service manages connections between Tealeaf components and
services and the databases they are querying. This service allows database
connectivity to be managed as a Windows-based service for security, reliability, and
control.
v As of Release 8.0, the Reporting Service is an integrated component of the
Tealeaf Data Service.
To acquire data, Tealeaf servers and services send queries through the Tealeaf Data
Service, which then issues queries to the appropriate databases, canisters, or both.
v Search Server does not communicate directly with the database.
v Any non-Portal Server issuing a command that requires the Tealeaf Data Service
is redirected to the Search Server associated with the Portal Server. This instance
of Search Server queries the Tealeaf Data Service and returns the data.
Connections
The Tealeaf Data Service replaces some of the functionality managed by the Search
Server, which utilizes SQL authentication for direct access to the Tealeaf databases.
In some environments, this authentication method is problematic.
Currently, the Tealeaf Data Service manages the following connections:
Chapter 2. Configuring Tealeaf Components
65
1. Tealeaf user data: Tealeaf user information is made available to Tealeaf
components through the Tealeaf data service.
v See "CX User Administration" in the IBM Tealeaf cxImpact Administration
Manual.
v See "cxView User Administration" in the IBM Tealeaf cxImpact Administration
Manual.
2.
3.
4.
5.
6.
7.
v See "cxReveal User Administration" in the IBM Tealeaf cxReveal Administration
Manual.
Tealeaf Status: The Tealeaf Status report uses Tealeaf Data Service to retrieve
statistical information about the Tealeaf servers and databases. See "Tealeaf
Status Report" in the IBM Tealeaf cxImpact Administration Manual.
Portal Control Settings: Configuration settings internal to the Portal are stored
in the TL_SYSTEM database and are retrieved at startup for use.
Tealeaf Canister Server Definitions: The Portal uses the service to acquire the
definitions for all Canister servers in the environment. See "Managing Tealeaf
Servers" in the IBM Tealeaf cxImpact Administration Manual.
RTV Search & Replay Audit Logs: The IBM Tealeaf CX RealiTea Viewer uses
the service to commit audit logs to the Portal's database which can be seen in
the User Activity Reports. See "Monitoring User Activity" in the IBM Tealeaf
cxImpact Administration Manual.
NT/Active Directory User Lists: When NT/AD authentication is enabled for
Tealeaf, the Portal retrieves the list of configured NT/AD groups from the Data
Service. The Data Service collects them at a scheduled interval from Search
Servers in the Tealeaf system.
Portal Reports: Wherever possible, the Portal relies on the Tealeaf data service
as the data source during report generation. In particular, the data service
provides inputs to the following reports:
v Tealeaf system status reports. See "System Status" in the IBM Tealeaf cxImpact
Administration Manual.
v Active status and events reports and the Alert Monitor. See "Monitoring
Current® Tealeaf Activities" in the IBM Tealeaf cxImpact User Manual.
v The Reporting Service is one component of the Tealeaf Data Service.
8. Event and Dimension Definitions: Events, dimensions, session attributes, and
other run-time data definitions are managed through Search Server, which
queries the Data Service to interact with the database tables.
v See "Tealeaf Event Manager" in the IBM Tealeaf Event Manager Manual.
Installation
During the installation process, the Tealeaf Data Service is installed on the same
server where the Tealeaf Data Collector is installed. The Tealeaf Data Service uses
the same registry settings to self-configure and connect to the Tealeaf databases.
Database Configuration
For more information on how to configure Tealeaf databases, including
re-installation as needed, see "Database Administration" in the IBM Tealeaf Databases
Guide.
Configuring Tealeaf Data Service
Through Search Server, Tealeaf servers and services communicate with the Data
Service and the Report Server by extension.
66
IBM Tealeaf CX: Configuration Manual
On each Tealeaf server specified in TMS, the Search Server configuration must be
supplied with a method for connecting to the Tealeaf Data Service, depending on
the server type:
1. Portal Server: The machine hosting the Portal Server must be provided a valid
entry for TeaLeaf Data Service.
v In most configurations, the service is installed on the Report Server, which is
typically installed on the Portal Server machine. In these configurations, this
value is localhost:23000.
v If the Portal Server and the Report Server are split onto separate machines or
if the service is installed in a non-standard server, then the value must be
specified to point to the hostname and port number of the hosting server:
<Server_hosting_Tealeaf_Data_Service>:23000
2. All other servers: All other Tealeaf servers require a valid entry for the Portal
Server in their Search Server configurations.
v These Tealeaf servers communicate through the Portal Server, which knows
how to contact the Tealeaf Data Service based on the configuration in the
previous step.
v In Search Server configuration for non-Portal Server machines, the value for
TeaLeaf Data Service should be left blank.
v For more information on configuring Search Server, see "Configuring the Search
Server" in the IBM Tealeaf CX Configuration Manual.
v For more information on using TMS, see "TMS WorldView Tab" in the IBM
Tealeaf cxImpact Administration Manual.
Starting and Stopping the Service
You can start, stop, and restart the Tealeaf Data Service through TMS.
Note: Since the Tealeaf Data Service provides critical data to Search Server, it must
be started before Search Server and stopped after it.
1. Log in to the Tealeaf Portal as an administrator.
2. From the Portal menu, select Tealeaf > TMS.
3. Click the WorldView tab.
4. Select Servers view.
5. Click the Data Service node.
6. The available commands are displayed in the Component Actions panel. See
"TMS WorldView Tab" in the IBM Tealeaf cxImpact Administration Manual.
Logging
This section describes how to manage and use the Data Service log files through
IBM Tealeaf Portal.
Accessing Logs
Tealeaf administrators may access the Data Service log files through the Tealeaf
Portal.
1.
2.
3.
4.
5.
6.
From the Portal menu, select Tealeaf > Portal Management.
Click the Tealeaf Servers link in the left navigation pane.
Click the Manage Servers link.
The right side of the screen is populated with the configured Tealeaf servers.
Select the Report Server.
In the toolbar above the server configuration panel, click the Tealeaf Logs icon.
Chapter 2. Configuring Tealeaf Components
67
7. From the Filter By drop-down, select Data Service.
8. The Data Service logs currently stored on the Report Server are listed.
v See "Managing Tealeaf Servers" in the IBM Tealeaf cxImpact Administration
Manual.
You may also access the database entries for the Data Service through the Logs
section in the Portal Management page. See "Portal Logs" in the IBM Tealeaf
cxImpact Administration Manual.
Log File Location
Tealeaf Data Service generates log messages in the following log file:
<Tealeaf_install_directory>\Logs\TLDataService.log
The log file is rolled daily at midnight. Log files from previous days include a
YYYYMMDD indicator in the filename.
Changing the Log Level
By default, the Log Level for the Tealeaf Data Service is set to 1, which means that
the log file contains only the following types of status messages:
v Startup
v Shut-down
v Verification of connection to all databases
If needed to resolve specific issues with the Tealeaf Data Service, you can change
the logging level to a value between 1 and 9. If Log Level 9 is enabled via TMS,
the Data Service log file contains individual request information and additional
trace/debug statements to assist in resolving issues.
The Tealeaf Data Service shares the same logging controls as other services
managed through the Report Server. To change the logging level for it and other
Report Server functions, set the Log Level value on the Database tab in the Report
Server configuration in TMS.
v See "Configuring the Report Server" in the IBM Tealeaf CX Configuration Manual.
Per-Minute Data Service Stats
In addition to core logging functions, the Data Service writes statistical information
on its current state to .CSV files in the Logs directory. These files provide
performance information on the Data Service CPU usage, threads, handles,
requests, and more.
Files are in the following location:
<Tealeaf_install_directory>\Logs\TLDataService-Stats_YYYYMMDD.log
This file is updated every minute and is rolled every day. The file contains the
following tab-delimited fields.
Field
Description
LogTime
Timestamp for when the entry was written to the file
DsUptime
Current uptime for the Data Service in minutes
ReqsSinceStart
Requests since the Data Service was last restarted
68
IBM Tealeaf CX: Configuration Manual
ReqsInLastMinute
Requests to the Data Service in the last minute
AvgReqsPerMinute
Average requests to the Data Service per minute since last restart
CPU
CPU usage by the Data Service at the time the entry was written
Handles
Number of handles in use by the Data Service
Threads
Number of threads in use by the Data Service
WorkingSet
The current amount of physical memory allocated for the Data Service
PeakWorkingSet
The maximum amount of physical memory used by the Data Service since
last restart
PrivateMemory
The current amount of paged memory allocated by the Data Service
PagedMemory
The current amount of paged memory allocated by the Data Service
PeakPagedMemory
The maximum amount of memory in the virtual memory paging file used
by the Data Service since last restart
NonpagedSystemMemory
The current amount of nonpaged system memory allocated for the Data
Service
PagedSystemMemory
The current amount of pageable system memory allocated for the Data
Service
VirtualMemory
The current amount of the virtual memory allocated for the Data Service
PeakVirtualMemory
The maximum amount of virtual memory used by the Data Service since
last restart
AvailWorkerThreads
The number of worker threads currently available to the Data Service
AvailCpThread
The number of available asynchronous I/O threads available to the Data
Service
Configuring the Replay Server
The Replay Server manages the replay of sessions to Browser Based Replay clients.
Whenever a BBR user queries for a session to replay, the query is passed through
Search Server to retrieve the session, which is delivered to the user's browser
through Replay Server.
Chapter 2. Configuring Tealeaf Components
69
Pre-Requisites
Note: In order to effectively replay the complete session, the Replay Server must
have access to the static content, including images, Javascripts, and stylesheets, that
are referenced in the session. Static content may be referenced from the origin
server or a TLI Server. Tealeaf recommends deploying a TLI Server for static
archive management. For more information on TLI servers, see "Managing Static
Archives" in the IBM Tealeaf cxImpact Administration Manual.
There may be some limitations in the replay experience due to differences in how
session content is rendered for display in specific devices.
v See "Search and Replay for Mobile Web" in the IBM Tealeaf CX Mobile User
Manual.
Installation
During initial installation, one Replay Server is installed as part of the IBM Tealeaf
cxImpact installation. This server is initially designated as the master Replay
Server.
As needed, additional Replay Servers may be installed and configured.
v See “Creating Additional Replay Servers” on page 78.
Portal Reference
During installation, a reference to the initial master Replay Server is added to the
Portal Management page, which enables BBR users to request and receive sessions
from the Replay Server through the Portal application. See "Managing Tealeaf
Servers" in the IBM Tealeaf cxImpact Administration Manual.
Replay Server Configuration
You can view or edit the Replay Server configuration from the Portal.
Accessing the Replay Server Configuration
To view or edit Replay Server configuration settings:
1. Log in to the Portal as an admin user.
2.
3.
4.
5.
6.
From the Portal menu, select Tealeaf > TMS.
From the View drop-down, select Servers.
In the Servers view, select the desired server to drill down to components.
Click the Replay Server node.
Select Replay Server configuration.
7. In the Config Actions panel, click View/Edit. The Configuration Editor is
displayed.
Note: After you make changes to the Replay Server configuration, the
following steps are required:
v Push the configuration to all servers through TMS.
v Restart the Replay Server.
70
IBM Tealeaf CX: Configuration Manual
Replay Server Settings
Through TMS, the following configuration items are available.
Setting Description
Auth Master Server
Identifies the server that manages authentication. In environments where
the Replay Server is on the same server as the Portal application, this value
is localhost.
Cache Timeout
Time (in minutes) that static resources are kept in the cache. If not accessed
again before the timeout expires, items are deleted from the cache.
Chrome Instances
Specifies the number of renderer instances using the Chrome/WebKit
browser to spawn on the Replay Server.
Note: This renderer is only needed if your web application supports the
Chrome browser or mobile web browser sessions.
v This definition is available in the raw configuration only.
Days to Keep Logs
Number of days to retain Replay Server log data. The default value is 30
days.
DisablerendererImageLoading
When set to 1, DisableRendererImageLoading stops an image from
loading during replay rendering to improve performance. If this setting is
enabled, the FakeImagesOnRender setting is disabled.
EnableDomCapture
Set to 1 to enable DOM Capture, or set to 0 disable DOM Capture.
The default setting is 1 (enable DOM capture).
Enabling DOM Capture allows the Replay Server to parse DOM capture
data and then use it to show Replay.
Chapter 2. Configuring Tealeaf Components
71
When you enable DOM capture, any UI Events that do not contain DOM
capture data are hidden, though these UI events are still available to make
Step Events in Request data.
For information about using DOM capture for Replay, see the IBM Tealeaf
cxImpact User Manual.
EnableNativeReplay
Set to 1 to enable Native Replay, or set to 0 disable Native Replay.
The default setting is 1 (enable Native Replay).
Enabling Native Replay allows the Replay Server replay sessions from
mobile device users.
For information about using Native Replay, see the IBM Tealeaf cxImpact
User Manual.
Enable TLI Server
When set to 1, the Replay Server is configured to look for static content on
the specified TLI Server and to store TLI data on the Replay Server in a
cache (TLI Cache Path) . See “Configuring TLI Server Usage” on page 75.
Exec UI Events Now
When enabled, UI events in the session are rendered while the hit is
rendered. This configuration may assist if pages rendered in BBR appear to
display UI events on the page after which the event occurred.
v By default, this setting is False. When set to False, they are rendered
after the hit has been rendered.
Fake Images On Render
When set to 1, the Replay Server generates stub 1x1 pixel images to be
used for all image requests, instead of retrieving real images from the
origin site. By default, this option is disabled, but it can be enabled if
image load time is significant.
v This definition is available in the raw configuration only.
v When enabled, stubs are generated for all requested images, even if they
are archived in a TLI server. For more information on TLI archives, see
"Managing Static Archives" in the IBM Tealeaf cxImpact Administration
Manual.
Note: When enabled, this option can cause problems with pages where
images styles are dynamically modified by JavaScript. These situations
are not common.
IEEmulation
Specifies the Internet Explorer emulation mode used by
BBRIERenderer.exe.
By default, BBRIERenderer.exe uses the Emulation Mode of the minimum
version of Internet Explorer supported by Tealeaf.
If you want BBRIERenderer.exe to render using a different version of
Internet Explorer, set the IEEmulation property to the Emulation Mode
associated with the version of Internet Explorer that you want to use.
BBRIERenderer.exe renders the IE sessions using the mode specified.
For information about emulation modes for the different versions of
Internet Explorer, consult the Microsoft Developer Network article about
Browser Emulation.
72
IBM Tealeaf CX: Configuration Manual
Note: If you change the IE emulation mode, all renderers need to be
restarted by restarting the Replay Server.
Insert Missing or Cached Pages
When enabled, this option attempts to insert pages that are missing in the
session or that were cached by a content delivery network (CDN) by
retrieving them from the origin server. By default, this setting is disabled.
Note: This option should be enabled in isolation to rectify simple issues
with replay of missing data. Enabling this setting may result in false
positives, in which query parameters in the URLs for UI events cannot be
matched with pages stored in the session. In these cases, this option causes
the Replay Server to reach for the page from the origin server; for UI event
pages, the page does not exist, which may cause replay problems.
InsertBackPages
Browsers cache previously visited pages and do not issue a request back to
original server when user goes back to those pages. This option allows to
synthetically insert viewable pages into navigation list when UISDK is
instrumented on the website. UI events will be attached to the synthetic
pages for smooth replay.
InsertUIEventBackPages
This option attempts to inserts missing back buttons pages from UI events.
InsertUIEventBackPages uses the Performance Init UI event and its
WindowHref value. It goes through the session looking for miss pages based
on the WindowHrefURL.
Logging
When set to Yes, logging is enabled.
MaxRenderPerSesn
This option is the maximum number of renderers that are dedicated to
render a session selected out of available pool of renderers. Other renderers
will not be touched to render the given session.
Mozilla Instances
Specifies the number of renderer instances using the Mozilla Gecko
browser to spawn on the replay server. The default setting is 4. You should
not have to change this value.
v This definition is available in the raw configuration only.
On-demand Rendering
When enabled, only the current page and the page following are rendered
until another page is requested. This improves session load time.
Port
This value defines the server port through which Replay Server
interactions are performed. The default value is 38000.
Proxy Auth Password
When a proxy server is between BBR users and the public Internet, this
setting specifies the password to use for authentication with the proxy.
Proxy Auth Username
When a proxy server is between BBR users and the public Internet, this
setting specifies the username to use for authentication with the proxy.
RenderDelay
Render delay is the amount of time (in seconds) that the renderer will wait
after the page is loaded (and UI events are run) before taking the snapshot.
Chapter 2. Configuring Tealeaf Components
73
After the initial page snapshot the UI events are run one at a time
(snapshot after each one after renderer delay.
Session Idle Timeout
Number of minutes of permitted inactivity for a BBR session after which
the session is automatically timed out.
ShowClientEvents
Navigation list includes UI Capture JSON message's Client State (Type 1)
message when enabled.
ShowPerformanceEvents
Type 7
ShowInfoEvents
Type 2
ShowReplayGUIEvents
Navigation list includes UI Capture JSON message's Control (Type 4)
message when enabled.
TLI Cache Path
When the TLI server is enabled (Enable TLI Server), this setting specifies
the path on the Replay Server where objects retrieved from the TLI server
are stored in a cache. See “Configuring TLI Server Usage” on page 75.
TLI Server
When the TLI server is enabled (Enable TLI Server), this setting specifies
the name of the machine hosting the TLI server. See “Configuring TLI
Server Usage” on page 75.
Temp Path
Path to directory to temp storage space for replay.
UIEventCoalesce
When enabled, this option removes redundant UI events such as click a
text field from the session that is delivered during replay. Events such as
these do not offer additional value.
UIEventDeleteDuplicates
To delete duplicate adjacent UI events for replay purposes, set this value to
1.
UIEventSubTypeSkip1
This list displays the potential UI Event SubTypes that you can specify to
skip (value=1) or to replay (value=0). Depending on how your site is
rendered, some of these sub-types may generate a significant volume of
events or may not replay correctly, so these options can be used to
fine-tune the BBR replay experience specific to your web application.
v For more information on these options, see “UI Event Sub-Types” on
page 76.
UseBackingStore
When this value is set to 1, the Replay Server stores request data from the
rendered session in a local file. When set to 0, the request data is stored in
memory.
White List Enable
When enabled, you may specify whitelists of URLs that are permitted to
contact the origin server for the defined domain.
74
IBM Tealeaf CX: Configuration Manual
v These whitelists are specified as regex patterns in the Portal
Management page. See "Managing Tealeaf Servers" in the IBM Tealeaf
cxImpact Administration Manual.
Configuring Proxy Access for Replay Server
When a session is opened in Browser Based Replay, static content such as images
and stylesheets is requested from the Replay Server. If the Replay Server does not
have the content stored locally in a cache, then it requests the content from the
origin server.
If a proxy server is in place between Tealeaf and the origin server, you must
configure access for Replay Server to the origin server through the proxy.
v See "Troubleshooting - BBR" in the IBM Tealeaf Troubleshooting Guide.
Configuring TLI Server Usage
Note: If you have deployed a TLI Server in your environment, each Replay Server
that you deploy must be configured to reference the TLI Server for static objects.
This configuration must be applied to each Replay Server in your environment. See
"Managing Static Archives" in the IBM Tealeaf cxImpact Administration Manual.
Configuring Access to the Origin Server
Static content is not stored with the session data. When references to static content
are detected in the session data, the Replay Server performs requests to the origin
server based on one of the following modes.
Note: If a TLI Server has been deployed in your environment, Replay Server
always checks first with its local static object cache and then the TLI Server for
static content before contacting the origin server.
v See “Configuring TLI Server Usage.”
If those checks fail to return static content or if a TLI Server is not deployed, the
following modes apply.
Blacklist mode
By default, the Replay Server operates in blacklist mode, in which it makes
requests to the origin server for any static content. If the Replay Server is unable to
satisfy the request through local resources, such as a cache or a TLI Server, then
the request is made back to the origin server.
v In Blacklist mode, White List mode is disabled, and white list rules are ignored.
Note: If Replay Server is operating in Blacklist mode and you wish to prevent
contact with the origin server, you can specify a BlockUrl rule in your replay
profile, which prevents the Replay Server from contacting the origin server for the
specified URLs. Note that blocked pages cannot be displayed during replay. See
"RealiTea Viewer - Profile Options" in the IBM Tealeaf RealiTea Viewer User Manual.
Whitelist mode
In Whitelist mode, Replay Server is prevented from contact the origin server by
default. In many environments, contacting the origin server from the replay client
is either forbidden or undesirable.
v For more information on reasons to avoid contacting the origin server, see
"Managing Static Archives" in the IBM Tealeaf cxImpact Administration Manual.
Chapter 2. Configuring Tealeaf Components
75
You must specify white list rules that identify the URL patterns that are permitted
to contact the origin server. For each rule that you configure, one or more URLs
are defined to be permitted to contact the origin server for static content for the
specified domain.
For example, you can create regular expression patterns to identify the file
extensions of content that the Replay Server is permitted to retrieve from the origin
server. All URLs that match the regular expression pattern are permitted to contact
the origin server.
Whitelist mode must be enabled on each Replay Server in your environment.
v See “Enabling whitelist rules for multiple Replay Servers” on page 80.
After you have enabled whitelist mode, you must configure white list rules. See
"Managing Tealeaf Servers" in the IBM Tealeaf cxImpact Administration Manual.
UI Event Sub-Types
The following UI event subtypes can be enabled or disabled for replay in BBR.
When disabled, these events are hidden during replay; the data remains in the
session for eventing and other purposes.
These settings apply only to the rendering of sessions in BBR. If your
implementation of UI Capture has been configured to not capture a sub-type, the
data is not present in the session, and changing the corresponding setting here has
no impact.
v See "UI Capture j2 Guide" in the IBM Tealeaf UI Capture for j2 Guide.
v See "UI Capture for AJAX Guide" in the IBM Tealeaf UI Capture for AJAX Guide.
Note: Enabling some of these UI events may significantly increase the number of
UI events rendered in a session, which can impact performance and usability in
BBR. Be cautious when making changes.
Table 2. UI Event Sub-Types
76
Sub-Type
Description
Default
blur
Focus has been removed from the
element.
0
focusin
Element has received focus.
1
focusout
Focus has been moved off of element. 1
mousedown
A click of the mouse button has been
recorded on the element.
1
mouseup
A clicked mouse button has been
released on the element.
1
mousewheel
The mouse wheel has been scrolled
over the element.
0
scroll
The element has been scrolled.
1
unchanged
The element has received focus, lost
it, and remains unchanged.
0
attention
The element has received attention.
0
resize
The element has been resized.
0
load
The element has been loaded on the
page.
0
IBM Tealeaf CX: Configuration Manual
Table 2. UI Event Sub-Types (continued)
Sub-Type
Description
Default
unload
The element has been unloaded from
the page.
0
mouseout
The mouse has moved out of the
element.
0
Updating the Replay Server Profile for DWR POST Data Matching
If you have upgraded to Release 8.4 or later and your site is using the DWR
library for Javascript/Java interactions, you must update the profile stored on the
Replay Server to use the appropriate POST data matching plugin when DWR
requests are detected in session data during replay. POST data matching plug-ins
are used to match requests of specified content type to their corresponding
responses in session data. POST data matching plug-ins enhance the probability of
properly matching each request to its corresponding response. See “Managing
POST Data Matching Plugins” on page 100.
DWR POSTs must be passed through the pre-existing FormData plug-in for proper
matching. To configure, you must include a reference to the type of hit in the
plug-in FormData configuration on the Replay Server. Please complete the
following steps.
1. Login to the server hosting the Replay Server.
2. Navigate to the following directory:
<Tealeaf_install_directory>\System
3. Edit the ReplayServerProfile.xml file.
4. Locate the following configuration. It may be at the top of the file:
<Plugins>
<ReplayHitMatchPlugin name="AMF" version="8.4.0.8436" interfaceVersion="1"
errorCode="0" errorMessage="">
<HitType contentType="application/x-amf" handlesQueryString="false"
wantResponseData="false" haveCustomOptionsDialog="false"
haveCustomIgnoreParamDialog="false"
haveCustomResponseDisplay="false"
haveCustomPostDataDisplay="false" affinity="0.5">
<URLFilter pattern="" reqVar="" reqVarValue=""/></HitType>
</ReplayHitMatchPlugin>
<ReplayHitMatchPlugin name="FormData" version="8.4.0.8436"
interfaceVersion="1" errorCode="0" errorMessage="">
<HitType contentType="application/x-www-form-urlencoded"
handlesQueryString="true" wantResponseData="false"
haveCustomOptionsDialog="false"
haveCustomIgnoreParamDialog="false"
haveCustomResponseDisplay="false"
haveCustomPostDataDisplay="false" affinity="0.5">
<URLFilter pattern="" reqVar="" reqVarValue=""/></HitType>
</ReplayHitMatchPlugin>
<ReplayHitMatchPlugin name="JSON" version="8.4.0.8436"
interfaceVersion="1" errorCode="0" errorMessage="">
<HitType contentType="application/json" handlesQueryString="false"
wantResponseData="false" haveCustomOptionsDialog="false"
haveCustomIgnoreParamDialog="false"
haveCustomResponseDisplay="false"
haveCustomPostDataDisplay="false" affinity="0.5">
<URLFilter pattern="" reqVar="" reqVarValue=""/></HitType>
</ReplayHitMatchPlugin>
<ReplayHitMatchPlugin name="XML" version="8.4.0.8436"
interfaceVersion="1" errorCode="0" errorMessage="">
<HitType contentType="text/xml" handlesQueryString="false"
Chapter 2. Configuring Tealeaf Components
77
wantResponseData="false" haveCustomOptionsDialog="false"
haveCustomIgnoreParamDialog="false"
haveCustomResponseDisplay="false"
haveCustomPostDataDisplay="false" affinity="0.5">
<URLFilter pattern="" reqVar="" reqVarValue=""/></HitType>
<HitType contentType="application/msbin1" handlesQueryString="false"
wantResponseData="false" haveCustomOptionsDialog="false"
haveCustomIgnoreParamDialog="false"
haveCustomResponseDisplay="false"
haveCustomPostDataDisplay="false" affinity="0.5">
<URLFilter pattern="" reqVar="" reqVarValue=""/></HitType>
</ReplayHitMatchPlugin>
</Plugins>
5. The above configuration represents the configuration for the POST Data
Matching plugins on the Replay Server. Locate the FormData plugin
configuration. It should look like the following:
<ReplayHitMatchPlugin name="FormData" version="8.4.0.8436"
interfaceVersion="1" errorCode="0" errorMessage="">
<HitType contentType="application/x-www-form-urlencoded"
handlesQueryString="true" wantResponseData="false"
haveCustomOptionsDialog="false" haveCustomIgnoreParamDialog="false"
haveCustomResponseDisplay="false" haveCustomPostDataDisplay="false"
affinity="0.5">
<URLFilter pattern="" reqVar="" reqVarValue=""/></HitType>
</ReplayHitMatchPlugin>
6. Just before the </ReplayHitMatchPlugin> closing tag, insert the following
configuration:
<HitType contentType="text/plain" handlesQueryString="false"
wantResponseData="false" haveCustomOptionsDialog="false"
haveCustomIgnoreParamDialog="false" haveCustomResponseDisplay="false"
haveCustomPostDataDisplay="false" affinity="0.5" enabled="1">
<URLFilter pattern="" reqVar="" reqVarValue="" enabled="1"/>
</HitType>
7. Save the file.
8. Through TMS, restart the Replay Server. See "TMS WorldView Tab" in the IBM
Tealeaf cxImpact Administration Manual.
9. If you have additional Replay Servers in your environment, this change must
be applied to those servers.
Note: Individual users of the IBM Tealeaf CX RealiTea Viewer must apply a
similar change to their local replay profiles. See "RealiTea Viewer Overview" in the
IBM Tealeaf RealiTea Viewer User Manual.
Creating Additional Replay Servers
During IBM Tealeaf cxImpact installation, one Replay Server is created for you.
This Replay Server is designated as the master server. Depending on the load on
the Replay Server, you may need to install and deploy additional Replay Servers.
Note: Your Tealeaf solution must contain one and only Replay Server that is
designated as the master.
When a Replay Server receives a command to open a session, one of the following
occurs, depending on the status of the master Replay Server:
v The Replay Server checks to see if it is the master Replay Server. If so, it uses
the local copy of the replay profile.
v The Replay Server knows that another machine is the master Replay Server and
retrieves the master profile from it.
78
IBM Tealeaf CX: Configuration Manual
– If the master Replay Server is unavailable, the requesting Replay Server uses
its local copy.
– If the master Replay Server is available, the retrieved profile is stored locally,
in case it becomes unavailable at some future point.
v The Replay Server can't discover which server is the master Replay Server. In
this case, the requesting server uses its local copy of the profile.
– At startup, the requesting Replay Server logs an error message in the
Windows event log.
Note: One Replay Server must be designated as the master server.
v If you have multiple Replay Servers and deactivate the master server, the Portal
automatically designates another Replay Server as the new master.
v If you have only one Replay Server, you cannot deactivate it, since it is the
master server by default.
Basic Workflow
Assuming that you have already installed at least one IBM Tealeaf CX Server, the
following basic steps outline how to add a Replay Server.
1. Acquire (if needed) and install new hardware to host the Replay Server.
2. Install a Portal-only on the new server.
a. In the IBM Tealeaf cxImpact Installer, select the Portal-only option.
b. Complete the installation.
3. In CanSvcs.cfg, set all non-Replay Server services to manually restart:
a. Search Server
b. Data Collector
c. Data Service
Note: The only services to retain are TMS, Search Server and Replay Server.
4. All non-Replay Server services must be configured to Manual start through the
Windows Services control panel on the host machine.
5. Add the server through the Portal Management page. See "Managing Tealeaf
Servers" in the IBM Tealeaf cxImpact Administration Manual.
For details, please read the following sections.
Assessing Replay Server Load
In an environment with multiple Replay Servers, sessions are managed and served
to BBR users in a round-robin fashion among the active Replay Servers.
v When a BBR user requests a session for replay, the session is served by the next
Replay Server based on current load, and the serving Replay Server is moved to
the bottom of the list.
v Every twenty seconds, the load list is rebuilt based on the current load of each
server. The server that most recently served a session is always placed at the
bottom of the list.
Note: In general, if you are experiencing sluggishness during replay or slowness in
the loading of a new session, you may be able to improve performance by adding
a new Replay Server.
Installing Additional Replay Servers
Before you create a reference to additional Replay Servers in the Portal, please
verify that the following components have been installed on the designated server.
Chapter 2. Configuring Tealeaf Components
79
These components are available in the IBM Tealeaf cxImpact installer, using the
Report Server and Portal Web Application component.
v See "CX Installation and Setup" in the IBM Tealeaf CX Installation Manual.
Disable Interactive Services Detection
For the WebKit/Chrome renderer to function properly, the Interactive Services
Detection service on the server hosting Replay Server must be disabled.
Note: When you add a new Replay Server, the Interactive Services Detection
service must be disabled to prevent conflicts with the WebKit/Chrome renderer.
v If you enable the Replay Server on a server already hosting Tealeaf software,
you may need to manually disable this service. See "CX Pre-Installation
Checklist" in the IBM Tealeaf CX Installation Manual.
v If you are installing the Replay Server using the Installer, it automatically
disables the service.
Replay Server must run as Local System
The Replay Server must be configured to run as the Local System user on the
server.
v See "Post-Upgrade Cleanup" in the IBM Tealeaf CX Upgrade Manual.
Configuring Replay Servers Instances
After the software has been installed on the designated server, you must add a
reference to the new Replay Server through the Portal Management page. For each
Replay Server, you must create a reference for it in the Portal.
Note:
v One Replay Server must exist in the Portal.
v One Replay Server must be designated as the master server.
v Each Replay Server must be configured to use the TLI Server, if deployed. See
“Configuring TLI Server Usage” on page 75.
Enabling whitelist rules for multiple Replay Servers:
Through the Portal Management page, you can configure whitelist rules. When
these rules are defined, all matching URLs are allowed to contact the origin server
for content, which allows you to prevent other URLs from contacting the server
and triggering server-side actions based on replay contact.
Note: Whitelist rules must be enabled and configured on each Replay Server in
your environment.
To configure whitelist rules for multiple Replay Servers, please complete the
following steps.
1. On the master Replay Server, configure your replay whitelist rules.
v See "Managing Tealeaf Servers" in the IBM Tealeaf cxImpact Administration
Manual.
2. Test these rules to verify that they are functioning properly.
3. If you have not done so already, in the Portal Management page, define the
slave Replay Servers.
4. Through TMS, enable whitelist rules on the slave servers.
80
IBM Tealeaf CX: Configuration Manual
a. In the Portal menu, select Tealeaf > TMS. The Tealeaf Management System
is displayed. See "Tealeaf Management System" in the IBM Tealeaf cxImpact
Administration Manual.
b. In TMS, click the WorldView tab.
c. From the View drop-down, select Servers.
d. For each server hosting a Replay Server instance:
1) Select the server.
2) Click the Replay Server node.
3) Click Replay Server configuration.
4) Click View/Edit.
5) Click the Whitelist Enable option.
6) Set this value to 1.
7) Click Apply.
8) Click Save.
9) Click Add to Current Job.
e. Repeat the above steps for each Replay Server in the environment.
f. When all Replay Servers have been updated, click the Jobs tab in TMS.
g. Select the job and click Submit.
h. All Replay Servers are now enabled to use whitelists.
5. Test replay on the slave servers to verify that the white list rules are being
applied.
See "Managing Tealeaf Servers" in the IBM Tealeaf cxImpact Administration Manual.
Configuring Replay Rules
The Replay Server supports the creation of a custom set of replay rules to apply to
BBR sessions. These rules are managed by the master Replay Server, which
publishes them on request to the other slave Replay Servers. See "BBR Replay
Rules" in the IBM Tealeaf cxImpact User Manual.
If you are deploying white lists in an environment with multiple Replay Servers,
additional configuration is required. See “Enabling whitelist rules for multiple
Replay Servers” on page 80.
On-Demand Privacy
Optionally, you can configure privacy rules to apply to replay through the Replay
Server. This feature enables the blocking or masking of sensitive data from replay
while maintaining the data as part of the session record.
v See “On-Demand Privacy” on page 133.
Replay Server Plugins
To manage the matching of requests to responses in a session, Tealeaf provides a
set of plugins for the Replay Server, which can be used to match post data to the
appropriate response during replay. These plugins manage the matching for
specific content-types.
v See “Managing POST Data Matching Plugins” on page 100.
Chapter 2. Configuring Tealeaf Components
81
Native Replay in BBR
Replaying sessions from mobile devices requires Tealeaf to convert JSON data to
HTML.
Tealeaf uses a set of templates to convert JSON to HTML.
The following sections describe:
v The JSON input, including an illustration of the structure of a JSON message
v The Tealeaf templates, including a description of the Tealeaf template (TLT)
directory
v The template language
v The template library functions
v How Tealeaf uses the templates to convert JSON data to HTML
v The template parser tool
v Tealeaf template customization
JSON data and Tealeaf templates
Tealeaf templates process JSON data that is generated by the mobile device and
convert that data into HTML. The template expressions can reference JSON.
Templates accept two sources of input from JSON data. These inputs are:
v Environment input
Environment input is the static (unchanging) information that is contained in the
JSON header.
Examples of Environment input include:
osType
osVersion
msgVersion
j2hVersion
clientEnvironment
Environment input is accessed with the dollar sign ($), for example,
[$valueName].
v Context input
Context input is the single type 10 JSON message being processed.
The context input is used by the templates to render data and contains layout
and control information.
Context input is accessed without the dollar sign ($), for example, [valueName].
82
IBM Tealeaf CX: Configuration Manual
Figure 12. JSON message example
Replay server templates
IBM Tealeaf ships with ReplayServer templates.
These templates are installed to the ReplayServer\TLT directory when you install
IBM Tealeaf.
C:\Program Files (86)\IBM Tealeaf CX\ReplayServer\TLT
\android (folder)
\ios (folder)
\readme.txt (file)
\type10.html (file)
Figure 13. Directory path to the Replay Server templates
The directory path (ReplayServer\TLT) and the type10.html file are the only things
in the template system that are hardcoded.
Chapter 2. Configuring Tealeaf Components
83
In IBM Tealeaf, replaying Native Mobile sessions relies on the type10.html
template and other template files called from type10.html to render mobile session
data (in the form of JSON Type 10 messages) to HTML.
You can edit the template files in ReplayServer/TLT to control how the JSON data
is converted to HTML. Type10.html delegates to templates in the iOS or Android
subdirectories and is root of all JSON-to-HTML conversions.
Note: Customizing the JSON-to-HTML conversion process by modifying the
templates in ReplayServer/TLT has certain drawbacks. You will likely have to
re-implement any changes you make to the templates when a new version of IBM
Tealeaf is installed. For information about customizing the JSON-to-HTML
conversion without modifying these templates, see Template customization for
Native replay.
A description of the folders and files in the TLT subdirectory follows:
android folder
This folder contains the template files for the Android device.
iOS folder
This folder contains the template files for the iOS device.
type10.html
The type10.html file converts type10 messages (JSON message) to HTML.
You can modify the contents of the type10.html to control JSON data
rendering in BBR.
The type10.html file branches into either the iOS folder or the android
folder.
Figure 14. Example of code in type10.html for determining which folder to delegate
{{
if(
eq([$"osType"],"Android"),
template([], "android\\root.tlt"),
template([], "ios\\root.tlt")
)
}}
In Figure 14, the Type10.html template consists entirely of a single
expression that is delimited by {{ }} characters.
The environment value osType is tested to see whether it is equal (eq) to
the string Android.
If this test passes, the complete context value, represented as [], is passed
into the root.tlt template in the android directory. Since the root of a
single Type 10 message is passed as the context, this is what is sent to that
sub template. Alternately, if the test fails, the Type 10 message is passed to
a template under the ios directory.
How Tealeaf templates convert JSON data to HTML:
In a process similar to ASP and JSP, Replay uses the templates to convert JSON to
HTML. The conversion is not hardcoded. The templates are the customization
point and the file type10.html is the root of the conversion process.
84
IBM Tealeaf CX: Configuration Manual
The templates are located in ReplayServer/TLT and consist of fixed or static text
and inline expressions, into which Replay can substitute other values.
Note: For information about the Tealeaf Template (TLT) directory structure, see
Replay server templates.
The processing sequence for converting JSON data to HTML is as follows:
1. The entire type10 JSON message is passed to the Type10.html template.
Type10.html is the root of the conversion process.
2. The Type10.html template reads the type10 JSON message to determine if it is
coming from an Android or iOS device.
v If Type10.html determines that the message is from an Android device, it
passes the entire type10 JSON message into the android\\root.tlt.
v If Type10.html determines that the message is from an iOS device, it passes
the entire type10 JSON message into the iOS\\root.tlt.
The iOS\\root.tlt and android\\root.tlt are templates in-and-of-themselves
that can emit some HTML and can also pass all or part of the JSON message
into other templates.
The following diagram illustrates how Replay uses templates to convert JSON to
HTML.
Note: Template expressions are delimited with leading {{ and trailing }} set of
braces.
Chapter 2. Configuring Tealeaf Components
85
Figure 15. Converting JSON to HTML
In Figure 15, the HTML <label> </label> is fixed text. {{ and }} delimit the
expression. The expression itself is ["currState"]["text"].
As an example, the result of rendering this template might be:
<label>Tealeaf</label>
A template might contain any amount of fixed text and any number of delimited
expressions. JSON data from the logging framework post is rendered by the
templates to produce HTML.
How Replay renders JSON data as HTML in BBR
Replay interprets the JSON data in a session that was posted to TealeafTarget by
the mobile logging framework.
The JSON data posted by the logging framework includes a series of messages that
describe events that occurred within the mobile application. Each message has a
numeric type that indicates what type of information that message contains. For
information about the JSON structure, see Replay server templates.
Replay relies on several parts of the JSON post.
v Header information that describes the mobile application and device.
v Type 10 messages that describe the platform native controls on the screen at a
moment in time.
v Type 4 messages that describe changes in the state of controls on the screen.
86
IBM Tealeaf CX: Configuration Manual
In Browser Based Replay, web sessions are organized into Pages and UI events,
with UI events nested under their pages. When you replay a mobile application
session, Browser Based Replay reuses this same paradigm with Type 10 messages
that are presented as pages and with Type 4 messages that are represented as UI
events nested under those pages.
To make the JSON data in Type 10 and Type 4 messages easy to understand, Type
10 messages are converted into HTML, and Type 4 messages are drawn onto that
HTML. To enable this, each control is given a unique identifier that remains the
same across both Type 10 and Type 4 messages.
For example, a Type 10 message might indicate the presence of a Textbox control
on the mobile application screen with a certain value, and a subsequent Type 4
message may indicate a change in the value of that Textbox.
In Browser Based Reply, the Type 10 message is represented as a page in the
Navigation List, and the replay of that page is the result of the conversion from
the Type 10 message into HTML. The Type 4 message is represented as a UI event
under that page, and the replay of that UI event shows the Type 10 page but with
the Textbox value updated and the Textbox appearing with the green highlighting
that is characteristic of UI events.
Template language:
IBM Tealeaf mobile app session replay template language uses a functional
programming model.
The mobile app session replay template language has the following chracteristics.
v Each template language macro consists of a single expression that consists of
nested function calls, which results in a Json value that is rendered as the
output.
v No existing values can be modified; only the creation of modified copies is
allowed. Therefore, parameters of functions cannot be modified.
v Functions can have no side-effects.
v Every function or jpath navigation either returns a json value or throws an
exception as its only result or effect.
v Parameters that are not used are guaranteed to never be evaluated. For example,
in default(), if() or foreach() functions (or any place else).
v The template language provides exception-based error handling where any
errors that occur when processing an expression will generate an exception. If
the exception is recoverable, (for example, a jpath navigation element that does
not exist), it may be handled by a default() function. Other exceptions such as
parsing errors or json parameters of the wrong type passed to a function will
generate "non-defaultable" ( fatal) exceptions that cannot be caught by default()
but which is caught by the Replay Server.
Template language constructs:
The mobile app session replay template language is composed of three constructs;
inline JSON literal values, Jpath style JSON navigation that is enclosed in square
brackets, and composition of predefined function calls.
Chapter 2. Configuring Tealeaf Components
87
Inline JSON literal values
Inline JSON literal values are quoted strings; integers; doubles floats and real; the
constants true, false, and null; and arrays and objects that are all converted to
JSON values.
JSON uses [ value, value, value ] to specify arrays, but if that is used for
inlining JSON arrays, it would create a parser ambiguity with jpath navigation, so
inlined array value constants must be specified with parenthesis instead as (
value, value, value ). The output contains JSON square brackets [] if an array is
output.
String constants are JSON strings and must not include any " (quotation), \
(backslash), or control characters (for example, newline, form-feed, tab) in the
strings. The JSON string escape sequences are provided except for \uxxxx (hex
unicode code point).
\"
\\
\/
\b
\f
\n
\r
\t
quote
backslash
forward slash (optional / may be used without escapting)
backspace
form-feed
newline
carriage return
horizontal tab
Example
{{ "JSON text string \n" }}
{{ 5 }}
{{ 5.6 }}
{{ 5.6e10 }}
{{ true }}
{{ false }}
{{ null }}
{{ ( 6, 8.2, "value", true, false, null ) }} outputs as [6,8.2,"value",true,
false,null]
{{ {"a" : 3, "b" : true, "c" : (5, 2, 3), "d" : { "e" : 2, "f" : 3}} }}
outputs as: {"a":3,"b":true,"c":[5,2,3),"d":{"e":2,"f":3}}
Jpath style JSON navigation enclosed in square brackets
This construct has the following variants.
[] (empty brackets) indicate the root of the JSON tree that is passed when starting
the template. In most cases, the root context is the default and [] is optional.
["value-name"] indicates a value with the specified name within a JSON object.
[3] indicates the fourth value of a JSON array (0 based index).
[@"iter-name"] indicates the name of a limited-scope iterator or variable. These are
used with foreach(), let(), and filter() function calls.
[$"env-var-name"] indicates an environment variable value. These values are made
available through the template engine, but the values are determined and provided
by the program that starts the template engine. Expected usage of these values is
for version information of various aspects of the system or other data that is not
contained within the root JSON value. Determination of which environment
88
IBM Tealeaf CX: Configuration Manual
variables are present should be based on the value of the [$"j2hVersion"] variable
because J2H is responsible for setting these values.
Current environment values that are provided by the ReplayServer and J2H are:
v [$"osType"] is either Android or iOS.
v [$"osVersion"] is version of the Android or iOS operating system.
v [$"msgVersion"] is the version of the JSON message that is used for the type-10
message and [$"clientEnvironment].
v [$"j2hVersion"] is the version of j2h.dll that started the template engine. This
value is primarily used to determine what other environment variables should
be present.
v [$"clientEnvironment"] is the "clientEnvironment" object from the header of
the JSON message that also included the type-10 message that is passed as the
primary value. Use the [$"msgVersion"] value to determine what values should
be present in this value.
Example
{{ ["layout"]["controls"][0]["tltype"] }}
is equivalent to:
{{ []["layout"]["controls"][0]["tltype"] }}
Note: Frequently, the JSON navigation is the only thing inside {{...}}. In that
case, the contents of that JSON value are substituted for the expression.
Composition of predefined function calls
Note: User-defined functions are not supported.
Note: Values/sub-expressions that are never used are never executed. For example,
the else portion of an if() expression where the predicate condition evaluates to
true.
All functions return a JSON value or throw an exception, and take only
expressions that resolve to JSON values as arguments.
Some exceptions can be caught and handled by the default() function. Examples
of these exceptions are json-navigation array range or missing object values. Other
exceptions cannot be intercepted by default() and are fatal. Examples of these
exceptions are parsing errors or json-navigation through invalid JSON value types.
These exceptions always cause a failure for that template and any template
parents/ancestors that instantiated it. These exceptions are caught by the Replay
Server, which logs the appropriate information and generates html that indicates
the error.
Predicate values are evaluated as true if a bool value is true; an int or uint value is
not zero; or a string, object, or array value is not empty.
Template library functions:
Mobile app session replay templates have various functions you can use to
customize your session replay.
Chapter 2. Configuring Tealeaf Components
89
Version functions
getTemplateLanguageVersion()
Returns a version string that indicates the version of the template
language.
The current version is 1.0.0.0.
See also the versionXX() comparison predicate functions.
getTemplateLibraryVersion()
Returns a version string that indicates the version of the template library.
The current version is 1.1.0.0.
See also the versionXX() comparison predicate functions.
Predicate functions
These functions return a Boolean true/false value.
JSON type id functions:
isNull(jsonValue)
isBool(jsonValue)
isInt(jsonValue)
isUInt(jsonValue)
isIntegral(jsonValue)
isDouble(jsonValue)
isNumeric(jsonValue)
isString(jsonValue)
isArray(jsonValue)
isObject(jsonValue)
These JSON type id functions return true only if the value's type is the
type at the name of the function end.
isIntegral() and isNumeric() are compound tests that return if the type is
of the multiple types.
isEmpty(jsonArrayValue)
Returns true if the array is empty or false if it is not.
eq(jsonValue1, jsonValue2)
Compares two JSON values for equality. jsonValue1 and jsonValue2
might be any JSON type.
fileExists("filename")
Returns True if the given file name file exists and False if the given file
name does not exist.
Can be used along with readRawFile(), readJsonFile(), and template().
Note: The "filename" might include a path, but that path name specified
must begin with the directory that contains the templates and the file must
be contained in that directory or a subdirectory.
lt(jsonValue1, jsonValue2)
le(jsonValue1, jsonValue2)
gt(jsonValue1, jsonValue2)
ge(jsonValue1, jsonValue2)
Compares ordinal relationship of two values. jsonValue1 and jsonValue2
must either both be numeric types, or must both be strings.
90
IBM Tealeaf CX: Configuration Manual
Returns true if the ordinal relationship between jsonValue1 and jsonValue2
match the named condition and false if they do not.
String comparison is strictly lexical and sorted by ascii / UTF-8 numerical
values.
exists(jsonObject, "valueName1" [, "valueName2" [, "valueName3" ] ] )
This predicate function indicates whether the named values exist in a JSON
object.
Returns false if either the jsonObject is not an object, any of the named
values (except for the last) are not objects, or if any of the "value-name"
arguments are not present in the object indicated by the parameter that
precedes it.
A single call can be used to verify existence up to three levels deep with
the variants that take multiple "valueName" parameters. In that case, the
objects are searched in sequence so that if "valueName1" refers to an object
in jsonObject, the object referred to by "valueName1" is then checked for
the existence of a value named "valueName2". If that value is an object that
object is then checked for the presence of a value, that is named
"valueName3" if "valueName3" was also specified.
Example
if( exists( [], "layout"), template( [] ["layout"],"layout.tlt"))
if( exists( [], "layout", "coordinates", "x" ), concat("\n<!-- X is : ",
["layout"]["coordinates"]["x""], "-->\n") )
valueInArray(jsonValue, jsonArray)
Returns true if at least one value in the jsonArray returns true when
compared with jsonValue for equality.
Example
if( valueInArray( [][tlType], ("button", "canvas", "label", "grid")
), ("exists", "does not exist") valueInArray( (3, 5, 7),
( (1,
2, 3), (4, 5, 6), (3, 5, 7)) )
Returns true.
versionEQ(jsonVersionString, jsonVersionString)
versionNE(jsonVersionString, jsonVersionString)
versionLT(jsonVersionString, jsonVersionString)
versionGT(jsonVersionString, jsonVersionString)
versionLE(jsonVersionString, jsonVersionString)
versionGE(jsonVersionString, jsonVersionString)
Compares two version strings made up of 1 or more integers that are
separated by . or ,, for example, of the form ##.##.## or ##,##,##. This
function returns true of false depending on the condition reflected by the
function name and the string values.
See also the getTemplateLanguageVersion() and
getTemplateLibraryVersion() functions.
Note: If two version strings contain a different number of integers, only
the integers that they have in common are compared. For example, 5 can
be thought of as 5.*.*.*.*. 5.6 and 5 are equal. If this behavior is
undesired, then adding extra ".0"(s) onto the potentially shorter version
string (or both) guarantees strict ordering (For example, "5.6" and "5.0.0.0"
are "not equal").
Example
Chapter 2. Configuring Tealeaf Components
91
versionEQ("5.6" , "5.6.3")
Returns true.
versionNE("5.6" , "5.6.3")
Returns false.
versionLE("5.6" , "5.6.3")
Returns true.
versionGT("5.6" , "5.6.3")
Returns false.
versionLT("5.6" , "5.6.3")
Return false.
Although mathematical logic would say 5.6<5.6.3 is true, the semantics of
the version comparison logic says that only the number of shared digits are
compared. Therefore, the comparison is really 5.6<5.6, which is false.
versionGE("5.6" , "5.6.3")
Returns true.
Although mathematical logic would say 5.6>= 5.6.3 is false, the semantics
of the version comparison logic says that only the number of shared digits
are compared. Therefore, the comparison is really 5.6>=5.6, which is true.
Boolean logic functions
and(predicate-expression, predicate-expression)
Returns true if both predicate-expressions evaluate to true and returns
false if either predicate-expression evaluates to false.
Note: The left predicate is evaluated first and if that expression evaluates
to false, the right predicate expression is not evaluated and false is
returned.
or(predicate-expression, predicate-expression)
Returns true if either predicate-expression evaluates to true and false if
both expressions evaluate to false.
Note: The left predicate is evaluated first and if that expression evaluates
to true, the right predicate expression is not evaluated and true is
returned.
xor(predicate-expression, predicate-expression)
Returns true if one of the predicate-expressions evaluates to true and
the other to false. Otherwise, it returns false.
Note: This function is equivalent to not(equals(predicate-expression,
predicate-expression) ).
not(predicate-expression)
Returns true if the predicate-expression evaluates to false and returns
false if the expression evaluates to true.
Math functions
add(jsonNumericValue, jsonNumericValue)
If both numeric parameters are integer, this function performs an integer
addition and returns the integer result. If either parameter is floating point,
a floating point addition is performed and the result is floating point.
92
IBM Tealeaf CX: Configuration Manual
sub(jsonNumericValue, jsonNumericSubtractedValue)
If both numeric parameters are integer, this function performs an integer
subtraction and returns the integer result. If either parameter is floating
point, a floating point subtraction is performed and the result is floating
point.
mult(jsonNumericValue, jsonNumericValue)
If both numeric parameters are integer, this function performs an integer
multiplication and returns the integer result. If either parameter is floating
point, a floating point multiplication is performed and the result is floating
point.
div(jsonNumericValue, jsonNumericDiviserValue)
If both numeric parameters are integer, this function performs an integer
division (truncated) and returns the integer result. If either parameter is
floating point, a floating point division is performed and the result is
floating point.
remainder(jsonIntegerValue, jsonIntegerDivisorValue)
Returns the integer remainder of the first parameter divided by (modulo)
the second parameter. Both parameters must be integers.
numericToFloat(jsonNumeric)
Converts any numeric type (integer, unsigned, real/float, Boolean) to a
JSON real/float value. The expected use is to convert an integer parameter
to a floating point number so that a subsequent math operation (for
example, div()) returns a fractional result instead of truncating the result.
Example
roundFloatToInt( div( ["anIntValue"], numericToFloat(
["anIntDivisor"] ) ) )
stringToFloat(jsonString)
Parses a jsong string that contain a floating point number and returns it as
a JSON numeric value.
Example
stringToFloat("5.3")
Returns 5.3.
truncateFloatToInt(jsonFloat)
Takes a floating point JSON value and truncates it to an integer value.
Examples
truncateFloatToInt( 5.8 )
Returns 5.
truncateFloatToInt( -5.8 )
Returns -5.
roundFloatToInt(jsonFloat)
Takes a floating point JSON value and rounds it to the nearest integer
value.
Examples
roundFloatToInt( 5.8 )
Returns 6.
roundFloatToInt( -5.8 )
Returns -6.
Chapter 2. Configuring Tealeaf Components
93
min(jsonNumericExpr, jsonNumericExpr)
max(jsonNumericExpr, jsonNumericExpr)
Returns the larger or smaller of two numeric values. Values are converted
to doubles for comparison, but the original value with its type preserved is
returned.
Note: Boolean false converts to 0 / 0.0 and true converts to 1 / 1.0.
Examples
min( 5, 5.5)
Returns an int value of 5.
max( 5, 5.5)
Returns a float value 5.5.
min( false, 3)
Returns the boolean value false.
arrayMin(jsonArray [ , "iter-name", accessorExpression ] )
arrayMax(jsonArray [ , "iter-name", accessorExpression ] )
Returns the smallest or largest value in an array. If the single argument
version is used, the jsonArray is presumed to be a simple array of numeric
values. The optional iter-name and accessorExpression parameters can be
used to access elements that are contained deeper in the array structure
when the jsonArray contains more complex JSON structures.
Example
arrayMin( (5, 7, true, 4.3 ) )
Returns boolean true.
arrayMax( arrayOfControls, "iter", [@"iter"]["ctrl"]["height"])
Return the maximum height of a control in an array of controls.
Note: This function is equivalent to arrayMax( foreach( arrayOfControls,
"iter", [@"iter"]["ctrl"]["height"]) ).
str( jsonNumericValue )
Returns a JSON string value that contains a serialization of a numeric
value. Boolean values serialize to true or false.
Template logic functions
size(jsonArrayOrObject)
Returns the number of elements in an array or object.
getMemberNames(jsonObject)
Returns a JSON array that contains the names of the values that are
contained in the jsonObject parameter.
To iterate over the elements contained in an object
foreach( getMemberNames(jsonObject) , "iter", jsonObject[ [@"iter"] ] )
assert( predicate-expression, message-string-expression [, assertPassExpression] )
If the predicate-expression evaluates to false, the message-stringexpression is evaluated and an unrecoverable exception is thrown that
contains the resulting string for handling by the Replay Server.
If the predicate-expression evaluates to true, the optional
assertPassExpression is evaluated if it is present and its result is returned.
If the optional assertPassExpression is not specified, an empty string is
returned.
94
IBM Tealeaf CX: Configuration Manual
Note: The expected usage of the two argument version of the assert()
function is the sole function call within a stand-alone expression, whereas
the three argument version of assert() is for use in the context of a more
complex expression.
{{
assert(versionLT([$"templateLangVersion"], "2"),
concat("these templates only tested on version 1.x of
template language; template language version is : " ,
[$"templateLangVersion"] ) )
}}
{{ if(equals([$"osType"],
"Android), "osType is Android",
assert (equals([$"osType"],"iOS"), concat("invalid value for
osType", [$"osType"]) ,
"osType is iOS")
)
}}
arrayConcat( arrayOfStringValues [, separatorStringValue] )
Each value that is contained in the arrayOfStringValues parameter is
concatenated into a new string value. If the optional separatorStringValue
parameter is specified, that value is inserted between each value of the
array in the rendered output.
concat( value1, value2 [, value3 [, value4 ] ] )
2 - 4 string values may be specified that will be concatenated into a single
string. If more than four string values need to be concatenated, then nested
calls of concat() can be used.
template(jsonSubTree/Object, "template filename" [,defaultStringValue] )
Loads, processes and renders the result of a template instantiation into a
Json string object. If the defaultStringValue is specified, it will be
evaluated and returned only in the case that the "template filename" does
not exist, but not for any other errors (e.g. a parsing error).
Note: The "template filename" can include a path, but that path must be
specified starting with the directory containing the templates and the file
must be contained in that directory or in a subdirectory.
Note: The 3 argument variant was added with template library version
1.1.0
default(expression, expression-on-error)
Allows error/exception handling for certain (recoverable)
errors/exceptions. If an expression has a recoverable error,
expression-on-error is evaluated, and its result is used instead.
Note: Use of default() should be avoided, when possible. It catches all
defaultable errors whether the error is the one that was expected and hides
problems in the templates, and makes debugging of the templates much
more difficult. Use if(..., )when feasible to test for the condition that
would be expected to cause an error and provide the default behavior
there instead of with default().
If a condition triggers the default() frequently, performance might be
impacted compared to testing for the condition in advance.
if(predicate-expression, then-expression, else-expression)
The JSON value returned by the if() function is either the result of the
then-expression or the else-expression, depending on the value that is
Chapter 2. Configuring Tealeaf Components
95
returned by the predicate expression. The predicate expression evaluates to
true if a boolean value is true, an integer or unsigned integer that is not
equal to 0, or a string or array is not empty.
Analogous to the C/C++ ternary operator:
predicate ? true-value : false-value;
let("variable-name", expression-to-assign, expression-usingvariable(...[@"variable-name"]...) )
This function is a limited, scoped assignment of a value to a temporary
variable that is valid only for the evaluation of the expression that is the
third parameter to the let() statement. The result of the
expression-using-variable becomes the returned value from let(). The
"variable-name" is the plain-text of the name within expression-usingvariable. That value is then accessed with [@"variable-name"].
Example
let("hexClr", htmlColor(["color"]),
default(some-expression-using([@"hexClr"]), concat("problem rendering
with ", [@"hexClr"]))
)
Note: Typically the expression-using-variable that is the third parameter
to a let() call is moderately complex.
foreach(json-array, "iter-name", expression( ...[@"iter-name"]... ) )
This function iterates over the json-array parameter and assigns each
element of the array to the iterator-name one at a time and evaluates
expression with that context. The JSON value that results from each
evaluation of the array is assigned to the corresponding element of a result
array. For example, an input array with 11 elements produces a result array
with exactly 11 elements. If any of the evaluations result in an unhandled
exception, all results are discarded and the result is the exception.
filter(json-array, "iter-name", predicate_expression(...[@"iter-name"]...) )
This function iterates over an array much like foreach() except that the
expression is a predicate-expression where the result indicates whether the
corresponding element of the json-array parameter should be copied to
the result array. For example, if an input array has 11 elements, the
resulting array has 0 - 11 elements, depending on the predicate expression.
If any of the evaluations results in an unhandled exception, the result-array
is discarded and the result is the exception. The predicate_expression
evaluates to true if a Boolean value is true, an integer or unsigned integer
is not equal to 0, or a string or array is not empty.
readJsonFile("json filename" [, defaultJsonValue] )
Returns a JSON value parsed from a file containing a single JSON value,
which might be JSON primitive value (e.g. string, integer, float, true,
false or null) or a more complex value composed with JSON objects or
arrays (but must still be a single value).
If the optional defaultJsonValue parameter is specified, it is evaluated and
its value returned only if the "json filename" specified does not exist.
Note: The "jason filename" can include a path, but the path name that is
specified must begin with the directory that contains the templates and the
file must be contained in that directory or in a subdirectory.
readRawFile("filename" [, defaultStringValue] )
Loads the specified file and returns the contents as a JSON string.
96
IBM Tealeaf CX: Configuration Manual
If the optional defaultStringValue parameter is specified, it is evaluated
and a value is returned only if filename does not exist.
Note: The "filename" can include a path, but that path must be specified
starting with the directory containing the templates and the file must be
contained in that directory or in a subdirectory.
readJsonFile("json filename" [, defaultJsonValue] )
Returns a JSON value parsed from a file containing a single JSON value
(which can be a JSON primitive value (e.g. string, integer, float, true,
false, or null) or a more complex value composed with JSON objects
and/or arrays (but must still be a single value). If the optional
defaultJsonValue parameter is specified, it is evaluated and its value
returned only if the specified json filename does not exist.
Note: The "json filename" can include a path, but that path must be
specified starting with the directory containing the templates and the file
must be contained in that directory or in a subdirectory.
HTML generation functions
htmlColor( jsonIntValue )
Returns a JSON string that contains a hex representation of the integer
parameter that is suitable for specifying a color in HTML. The
jsonIntValue must be between 0 and 0x00FFFFFF (decimal 16777215).
htmlEscape( jsonStringValue)
Provides html escaping to avoid accidental or malicious injection of text
that might interfere with the html context where the text is inserted.
htmlAttr( attrValue, attrName [, attrUnits] )
Returns a JSON string that contains a generated html attribute declaration.
Any double quotation marks characters (") that are included in any of the
attrValue, attrName, or attrUnits values are escaped (replaced) with
" note that only double-quote characters are escaped (& is not
escaped) so that you do not have to worry about accidentally double
escaping if an already escaped string is passed in.
Example
htmlAttr( 5, "id" )
returns: id="5"
cssDecl( attrValue, attrName [, attrUnits] )
Returns a JSON string that contains a generated css declaration.
cssDecl( 100, "height","px" )
returns height:100px;
Template Parser Test tool
The Template Parser Test tool is provided to help develop and test templates.
The usage of this tool is as follows.
templateParserTest.exe
templateFileName [paramJsonFilename [envJsonFilename] ]
Used with a single argument, the name of a template file is expected. In this usage,
the template that is provided is parsed and tested for validity. Only the template
expressions inside {{ }} are checked. The static text is not checked. With this
Chapter 2. Configuring Tealeaf Components
97
usage, only the templateFileName that is passed on the command line is validated.
Any other template files that may be invoked from within that template file are
not validated.
Used with two arguments, the second parameter is a JSON file that represents the
context input. In this usage, the JSON context input is rendered through the
template to produce a result, and no environment inputs are available to the
template. For replay templates, the result is presumably HTML or a subset thereof.
This input can be a JSON object or a JSON array.
Used with three arguments, the third parameter is a JSON file that represents the
environment input. In this usage, the JSON context input is rendered in the same
manner as with two arguments and the environment inputs are available. This
input must be a JSON object where each environment variable is represented as a
JSON name-value pair.
When you use templateParserTest.exe, use caution when you use templates that
reference sub templates. Sub template paths are relative to the execution directory
of templateParserTest.exe, not relative to the templateFileName provided as
input. For example, the expected usage is to copy the templateParserTest.exe
utility into the directory containing the root template of the templates being tested.
Template customization for Native replay
You can customize Replay Server templates.
You can either:
v Modify the Replay Server templates that are shipped with IBM Tealeaf
v Create custom templates
Modifying the replay server templates that are shipped with IBM
Tealeaf
IBM Tealeaf ships with Replay Server templates. These templates are placed in the
ReplayServer\TLT directory when you install IBM Tealeaf. You can modify these
templates to customize mobile device session replay.
Note: Editing the templates in ReplayServer\TLT as a way of customizing how
JSON data is converted to HTML, has certain drawbacks. You will likely need to
re-implement any changes you make to the templates when a new version of IBM
Tealeaf is installed.
Consult IBM Tealeaf Professional Services if you are considering modifying the
templates that are shipped with IBM Tealeaf. IBM Tealeaf Professional Services
personnel have the expertise and tools for modifying Replay Server templates.
Creating your own templates to customize mobile device session
replay
You can create custom templates for use with mobile device session replay.
Custom templates are useful if you make changes to the out-of-the-box mobile
controls in iOS or Android that result in a subclass of that control that has a
different visual appearance. In such a scenario, the replay of that control might not
show your customization. By using a custom template, you can make the replay
match your customization.
98
IBM Tealeaf CX: Configuration Manual
By creating your own templates, you can avoid having to re-implement template
changes whenever a new version of IBM Tealeaf is installed.
To create custom templates:
1. Create a folder named custom under either the ReplayServer\TLT\iOS or
ReplayServer\TLT\Android subdirectories.
The templates shipped with IBM Tealeaf will look in the custom folder and use
the contents if present.
2. There are four customization points you can utilize by placing content into the
custom folder.
Each customization point is a file that you can place in the custom folder.
The four files are:
nativeTypeRemap.json
The nativeTypeRemap.json file is expected to contain a JSON object,
where each key in the object is the name of a native iOS or Android
type of control, and each corresponding value is the name of a template
file that will handle the rendering of that native type.
For example, assume that an iOS application developer has subclassed
the UITableViewCell control to create EnhancedTableViewCell that
utilizes custom drawing commands. In the logging framework (SDK),
this might be displayed as follows:
Notice that the tlType is still the default tableCell, and by default, the
rendering of this control is handled by the control_tableCell.tlt
template. But also notice that the native type property shows
EnhancedTableViewCell, which is the name of the subclass. You can use
this name as a key in the nativeTypeRemap.json file and create a
Chapter 2. Configuring Tealeaf Components
99
template that customizes how the control type is rendered. For
example:
Figure 16. Example of using custom templates - nativeTypeRemap.json
{
"EnhancedTableViewCell ": "control_EnhancedTableViewCell.tlt",
"ColorfulLabel": "control_ColorfulLabel.tlt"
}
In Figure 16, the templates look for a file
control_EnhancedTableViewCell.tlt (also under the custom directory)
and use that template instead of the default control_tableCell.tlt
template to enable a customized rendering of EnhancedTableViewCell
controls.
headAdditions1.tlt
If provided, the contents of the headAdditions1.tlt template is inserted
in the <HTML> head element (after the CSS <link> elements, but before
the in-line CSS).
Use this template to include any additional CSS file that are required to
handle your customization.
headAdditions2.tlt
If provided, the contents of this template is inserted at the very end of
the <HTML> head element.
This provides an opportunity to insert any scripts or to override any
CSS inline in the HTML document.
bodyAttrs.tlt
If provided, this template specifies attributes to be added to the HTML
<body> element.
You might use this template, for example, to add a style attribute and
set a background-image to the reply of your application.
Troubleshooting
For more information on troubleshooting, see "Troubleshooting - Replay Server" in
the IBM Tealeaf Troubleshooting Guide.
Managing POST Data Matching Plugins
Session data captured by Tealeaf is composed of the requests submitted by the
visitor's browser to a web application and the responses served by the web server.
These messages are usually in the form of HTTP GET requests or HTTP POST
requests to the server and the response returned to the requestor. Historically, the
request data in the POST requests has been in name=value pairs and is
URL-encoded; the POST data resembles a URL query string.
v This type of data is also referred to as form data and is by far the most common
mechanism for submitting HTML forms.
With the emergence of rich internet applications, requests and responses have
become more complicated, using a wider range of optional technologies. In
addition to the form data, rich internet applications are now using hierarchical
forms of data, such as XML and JSON, and even binary forms to communicate
between client and server.
100
IBM Tealeaf CX: Configuration Manual
v RIAs can also make use of plugin platforms. Such applications have the option
to use proprietary data formats offered by the respective plugin vendors.
These data forms can be captured by the IBM Tealeaf CX Passive Capture
Application and forwarded into the Tealeaf system. During replay, the IBM Tealeaf
CX RealiTea Viewer and Browser-Based Replay clients need to know how to
manage these data forms. In particular, for a given request happening at replay
time, the captured request/response pair with which to associate the request may
not be immediately identifiable.
For example, some requests may include a timestamp or a client-generated GUID
parameter. The timestamp (or GUID) that is stored in a Tealeaf session corresponds
to the time when the session was captured. During replay, a different timestamp
(or GUID) corresponding to the time of the replay is generated as part of the
request, which results in a replay request that does not exactly match any captured
request.
Depending on the data format in use, this variable parameter could also be in the
form of a name/value pair, such as timestamp=14325453, or an XML node, such as
the following:
<timestamp>14325453</timestamp>
JSON properties may also be used:
{"timestamp": 14325453}
Ignoring a specific subset of variables in order to get the best matching request
requires detailed knowledge about the underlying data format in which the
content is represented.
Through the POST Data Matching Plugin framework, the RTV and BBR clients can
access a set of plugins that help to identify the appropriate response with which to
match the request. Using the content type indicated in the request, the replay client
can locate the appropriate plugin to use to match requests of these content types to
their responses in the session.
As the area of rich internet applications continues to expand, new plugin types can
be developed and deployed to your Tealeaf environment, enabling Tealeaf replay
to keep pace with emerging technologies.
v Additionally, users can configure priorities for applying the plugins, so that
hybrid technologies can be managed by a suite of plugins. See “Plugin Affinity”
on page 104.
This section provides overview information for how to manage plugins for RTV
and BBR, which utilizes the plugins maintained on the Replay Server.
Note: For custom or hybrid formats, it is possible to build plugins for use in your
Tealeaf environment. See “Building Custom Plugins” on page 107.
Overview
Supported Replay Clients
POST Data Matching plugins can be deployed without modification to RTV and
BBR on Release 8.3 or later.
Note: Versions of RTV or BBR prior to Release 8.3 do not recognize plugins.
Chapter 2. Configuring Tealeaf Components
101
IBM TealeafCX RealiTea Viewer is a desktop application that must be installed on
individual Windows desktops. See "RealiTea Viewer (RTV) User Manual" in the
IBM Tealeaf RealiTea Viewer User Manual.
Browser-Based Replay is a browser-based method of replay that is accessible
through the Tealeaf Portal. No additional installation is required.
v See "CX Browser Based Replay" in the IBM Tealeaf cxImpact User Manual.
v Sessions served through Browser-Based Replay are managed, rendered, and
delivered by the Replay Server, on which the plugins are installed. See
“Configuring the Replay Server” on page 69.
Default Plugins
Tealeaf provides a set of POST Data Matching plugins for the following content
types.
Table 3. Default Plugins
Plugin
Name
Supported Content Types
DLL
Form Data
application/x-www-form-urlencoded
TLReplayPluginForm.dll
JSON
v text/json
TLReplayPluginJSON.dll
v text/x-json
v application/json
Note: For JSON transactions,
application/json is the IANA
standard MIME type and is
recommended by Tealeaf for
application use.
Note: Available in Release 8.4 and
later.
v application/x-json
formdata/
jsonp
text/html
TLReplayPluginJSONP.dll
XML
v application/msbin1
TLReplayPluginXML.dll
v text/xml
Google Web text/x-gwt-rpc
Toolkit
TLReplayPluginGWT.dll
To perform accurate POST data matching during replay, no additional installation
is required for the above formats.
v Plugins are deployed as .DLL files to the RTV and Replay Server locations. See
“Adding and Removing Plugins.”
Adding and Removing Plugins
As needed, plugins can be added and removed from the replay clients to support
accurate replay of your web applications. This operation can be viewed as a
configuration step and does not require full re-installation of RTV or the Replay
Server.
RTV
For IBM Tealeaf CX RealiTea Viewer users, plug-ins are enabled and disabled
through the Plug-ins Options tab.
102
IBM Tealeaf CX: Configuration Manual
Note: Plug-ins must be provided to individual RTV users for deploying and
enabling through the application.
For more information on managing plug-ins through RTV, see "RealiTea Viewer Plug-ins Options" in the IBM Tealeaf RealiTea Viewer User Manual.
Replay Server and BBR
When the Replay Server is started, a discovery is performed on the Tealeaf install
directory on the Replay Server for the plug-ins, which are stored as DLL files.
During the render phase for a session, the Replay Server utilizes these DLL files to
perform POST data matching of responses to requests before delivering the session
data to the BBR client. The POST data matching plug-in framework is transparent
for BBR end users.
Note: New plug-ins in BBR must be installed in the root Tealeaf directory of the
Replay Server. To disable them, you simply remove them from the directory. If you
do not have access to the Replay Server, these items can be inserted using the Put
File option through TMS. See "TMS Advanced Tab" in the IBM Tealeaf cxImpact
Administration Manual.
Updating Replay Profiles for DWR POST Data Matching
If you have upgraded to Release 8.4 or later, you must manually configure the
FormData matching plug-in to recognize DWR POSTs and to apply the proper
plug-in to match the content.
v BBR: This configuration is applied through the Replay Server Profile. See
“Configuring the Replay Server” on page 69.
v RTV: Individual users of RTV must apply this change to their local profiles. See
"RealiTea Viewer Overview" in the IBM Tealeaf RealiTea Viewer User Manual.
Note: This configuration information is not shared between RTV and BBR
(Replay Server) profiles, so changes must be applied on each Replay Server and
each instance of RTV.
Configuration
Note: For purposes of configuration, Tealeaf recommends using the IBM Tealeaf
CX RealiTea Viewer client to perform configuration and to test plugin operations.
To install IBM TealeafCX RealiTea Viewer:
1. Install RTV on your local Windows system. See "RealiTea Viewer (RTV) User
Manual" in the IBM Tealeaf RealiTea Viewer User Manual.
2. Verify that the appropriate plugins are available in RTV. See "RealiTea Viewer Plugins Options" in the IBM Tealeaf RealiTea Viewer User Manual.
3. Configure the IBM Tealeaf CX Passive Capture Application to capture the
content types that are managed by the installed plugins. See “Configuring PCA
to Capture New Content Types” on page 104.
4. Verify that you can search for and retrieve sessions that use the plugins you
wish to test. See "RealiTea Viewer - Session Search and Subsearch" in the IBM
Tealeaf RealiTea Viewer User Manual.
Chapter 2. Configuring Tealeaf Components
103
Configuring PCA to Capture New Content Types
By default, the PCA captures content types used by most standard web
applications. For rich internet applications, the PCA typically must be configured
to allow the content types in use for your web application.
1. In RTV, select Tools > Options?.
2. Click the Plugins tab.
3. For each listed plugin:
a. Select the plugin.
b. Click Properties.
c. Copy the entire string. Paste it into a text file for safekeeping.
d. Repeat the above for each listed plugin.
4. Verify that the PCA is capturing each of the content types that you have listed
in the text file.
a. If the content type is not currently being captured, it must be inserted into
the appropriate capture type list in the Pipeline tab of the PCA Web
Console.
Note: When you enable a new capture type, the PCA begins immediately
capturing the content. Depending on the volume of content, the new
capture stream can affect performance and processing throughout the
Tealeaf system.
b. See "PCA Web Console - Pipeline Tab" in the IBM Tealeaf Passive Capture
Application Manual.
Plugin Affinity
Through the Plugins tab in RTV, you can define the affinity value of each plugin.
Since it is possible to deploy multiple POST data matching plugins for a single
content type, you can configure the affinity value for each plugin to indicate the
priority and, hence, the order in which the plugins are used.
Multiple plugins might be used when one plugin is required to handle a specific
URL or area of the site, with the other plugin being the default plugin for the
content type elsewhere on the site.
Affinity values range from 0.0 to 1.0. Plugins with a greater affinity value are
used for evaluating the same content type first. See "RealiTea Viewer - Plugins
Options" in the IBM Tealeaf RealiTea Viewer User Manual.
When the Replay Rules are deployed to the Replay Server, the affinity values
defined in RTV are applied to the BBR plugins. See “Deploying configuration to
Replay Server” on page 105.
Verifying Plugin Operations
Location of content type: In hits captured by Tealeaf, the content type value is
inserted into the [env] section of the request. In the example below, the content
type is set to text/xml:
[env]
HTTP_CONTENT_TYPE=text/xml
When this value matches the value inserted for the plugin content type, the
associated plugin is used for matching purposes.
104
IBM Tealeaf CX: Configuration Manual
Searching for sessions by content type: After you have enabled capture of the
appropriate content types and waited a sufficient period of time for Tealeaf to
capture sessions using this type, you can perform the following steps to locate a
session in which the content type appears.
The basic method for locating these sessions is to specify a search using URLs to
pages that use this content type.
Note: If you are unaware of the appropriate URL to use, you should contact your
web development team. You may also contact Tealeaf Professional Services for
assistance.
See "Searching Session Data" in the IBM Tealeaf cxImpact User Manual.
Verifying the plugin:
To verify the plugin is working, please complete the following steps.
1. Load a session using the content type into RTV.
v You can load from the Portal session list. See "Search Results - Session List"
in the IBM Tealeaf cxImpact User Manual.
2. In the toolbar, click the Request button.
3. Step through the requests of the session until you locate the appropriate entry
in the [env] section of the request:
HTTP_CONTENT_TYPE=text/xml
where text/xml is replaced by the content type that you are testing.
4. From the RTV menu, select View > Page Load Details....
5. In the Page Load Details column, scan the Method column. Look for a value
that includes parentheses. For example:
Post(244)
6. Page objects such as the above indicate that the POST data was matched.
Right-click the object and select the PostData option.
7. You can review the contents of the sub-menu to identify the data that was
matched.
v If the sub-menu is empty, no data was matched for the POST.
v See "RealiTea Viewer - Page Load Details" in the IBM Tealeaf RealiTea Viewer
User Manual.
Note: For more information on verifying the plugin, please contact Tealeaf
Professional Services.
Deploying configuration to Replay Server:
Note: Before you enable POST Data Matching plugins to BBR through Replay
Server, the plugin DLL files must be installed on the Replay Server. See “Replay
Server and BBR” on page 103.
After you have installed the DLL files on the Replay Server, you can use the
following steps to apply the plugin configuration from your installation of RTV to
the Replay Server, which provides these configuration options to each BBR user in
the environment.
Chapter 2. Configuring Tealeaf Components
105
Note: The following steps deploy all replay rules in your RTV configuration to the
Replay Server. You should create a copy of your replay rules file and modify it to
remove any personal replay rules that you want deployed before deploying the
copy to Replay Server.
1. From the RTV menu, select Tools > Options....
2. Click the Profiles tab.
3. To modify your profile rules for plugins, click Edit Raw Profile....
4. At the top of the file are the listed plugins currently installed in RTV:
<Plugins>
<ReplayHitMatchPlugin name="AMF" version="8.3.0.8326" interfaceVersion="1"
errorCode="0" errorMessage="">
<HitType contentType="application/x-amf" handlesQueryString="false"
wantResponseData="false" haveCustomOptionsDialog="false"
haveCustomIgnoreParamDialog="false"
haveCustomResponseDisplay="false"
haveCustomPostDataDisplay="false" affinity="0.5">
<URLFilter pattern="" reqVar="" reqVarValue=""/></HitType>
</ReplayHitMatchPlugin>
<ReplayHitMatchPlugin name="FormData" version="8.3.0.8326"
interfaceVersion="1" errorCode="0" errorMessage="">
<HitType contentType="application/x-www-form-urlencoded"
handlesQueryString="true" wantResponseData="false"
haveCustomOptionsDialog="false"
haveCustomIgnoreParamDialog="false"
haveCustomResponseDisplay="false"
haveCustomPostDataDisplay="false" affinity="0.5">
<URLFilter pattern="" reqVar="" reqVarValue=""/></HitType>
</ReplayHitMatchPlugin>
<ReplayHitMatchPlugin name="FormDataCustom" version="8.3.0.8326"
interfaceVersion="1" errorCode="0" errorMessage="">
<HitType contentType="application/x-www-form-urlencoded"
handlesQueryString="true" wantResponseData="true"
haveCustomOptionsDialog="false"
haveCustomIgnoreParamDialog="false"
haveCustomResponseDisplay="false"
haveCustomPostDataDisplay="false" affinity="0.4">
<URLFilter pattern="http://stuff.com/page1.asp" reqVar=""
reqVarValue=""/></HitType>
</ReplayHitMatchPlugin>
<ReplayHitMatchPlugin name="XML" version="8.3.0.8326" interfaceVersion="1"
errorCode="0" errorMessage="">
<HitType contentType="text/xml" handlesQueryString="false"
wantResponseData="false" haveCustomOptionsDialog="false"
haveCustomIgnoreParamDialog="false"
haveCustomResponseDisplay="false"
haveCustomPostDataDisplay="false" affinity="0.5">
<URLFilter pattern="" reqVar="" reqVarValue=""/></HitType>
<HitType contentType="application/msbin1" handlesQueryString="false"
wantResponseData="false" haveCustomOptionsDialog="false"
haveCustomIgnoreParamDialog="false"
haveCustomResponseDisplay="false"
haveCustomPostDataDisplay="false" affinity="0.5">
<URLFilter pattern="" reqVar="" reqVarValue=""/></HitType>
</ReplayHitMatchPlugin>
</Plugins>
5. Make any modifications as necessary.
6. To save your changes, click Save Changes & Exit.
7. Enter the master Replay Server in the Default Profile textbox.
8. Click Upload Settings to Server.
9. Your replay profile has been applied to the Replay Server.
106
IBM Tealeaf CX: Configuration Manual
Building Custom Plugins
Plugins can be designed to:
1. perform decoding tasks of binary responses during replay (Base64)
2. perform data matching for the specified format (XML, JSON)
3. both (AMF, binary XML, JSONP)
POST data matching is a unique requirement for replay and isn?t needed in other
areas of the Tealeaf product suite. The matching itself can range in complexity
from simple to one involving complex rules, heuristics and response adaptation.
Note: Building POST Data Matching plugins requires a Professional Services
engagement. For more information, please contact Tealeaf Professional Services.
Configuring the Search Server
Search Server implements several low-level functions used by the Tealeaf system to
retrieve session data and to monitor the systems that maintain it. This section
provides overview information on Search Server and instructions for configuring
individual settings for Search Server.
Overview
Search Server Functions
The following functions are supported:
v Retrieve Canister status - Displays an XML version of Short Term Canister data
points that can tell you the state of the current Short Term Canister.
v Retrieve a replayable list of all active sessions - Retrieves a list of all active
sessions in the Short Term Canister with a link that enables them to be replayed.
If IBM Tealeaf CX RealiTea Viewer is installed on the same machine, it can load
all active sessions. For more information on RTV, see "RealiTea Viewer (RTV)
User Manual" in the IBM Tealeaf RealiTea Viewer User Manual.
v Perform session search - Enables searching of the Short and Long Term
Canisters. You can select the Canister to search, which allows you to search
active or completed sessions or both types.
v Retrieve Canister Events - Enables retrieval of all configured Canister events
from the machine on which Search Server is running.
v Rebuild indexes - If index files are corrupted, you can rebuild indexes using the
check and fix command. This command pulls TLC files from the Canister and
converts them to indexes.
v Drain the Short Term Canister of sessions - Search Server provides access to
governor operations so you can drain the Canister, start spooling data, and
more.
v Retrieve event definitions - The Search Server that is also the Event Master
server can retrieve the event definitions from the database.
v Distribution searches - The Search Server hosted on the Portal Server distributes
searches executed through the Portal interface to Search Servers located on other
machines to retrieve sessions.
Search Server issues URL commands and returns sessions in XML format.
Chapter 2. Configuring Tealeaf Components
107
Search Server Hosts
Tealeaf Search Server can be co-located on the systems hosting the following
Tealeaf components, or it can be hosted on a standalone server. Depending on the
server where it is installed, its primary function may vary.
Tealeaf Component
Primary function of Search Server
Portal Server
The Search Server instance on the Portal is typically defined as the Event
Master, which means that it is the designated server to retrieve event
definitions from the database. These event definitions are cached on the
server for retrieval as needed.
v The Portal's Search Server is also responsible for federating search
queries to the Canisters where the requested sessions are located.
Note: In a multi-server environment, the Portal Server does not contain
Canister indexes. Some Search Server functions and settings do not
apply.
Canister Server
The Search Server on an individual Canister is responsible for executing
the searches submitted to it from other servers and returning the session
information in XML format to the requestor.
IBM Tealeaf cxConnect for Data Analysis Server
The Search Server on a IBM Tealeaf cxConnect for Data Analysis Server
manages the search queries executed as part of IBM Tealeaf cxConnect for
Data Analysis tasks to retrieve sessions for extraction and saving into one
of the supported formats.
IBM Tealeaf cxVerify Server
The Search Server on a IBM Tealeaf cxVerify Server manages the search
queries executed as part of IBM Tealeaf cxVerify tasks to retrieve sessions
for extraction and export.
Report Server
In some deployments, the Search Server that aggregates search results for
Portal users is located on the Report Server to offload processing from the
Portal Server. This deployment is not common.
Search Configuration
Using the Tealeaf Management System in the Portal, you can configure Search
Server to suit your needs. For more information on using TMS, see "Tealeaf
Management System" in the IBM Tealeaf cxImpact Administration Manual.
To configure Search Server:
Note: Changes to the Search Server configuration require an IISReset, which forces
all users from the Tealeaf Portal. Please perform these configuration changes
accordingly.
1. Log into the Portal as an administrator.
2.
3.
4.
5.
6.
108
From the Portal menu, select Tealeaf > TMS.
Click the WorldView tab.
For the desired server, drill-down to the Search Server component.
Select Search Server configuration.
Click View.
IBM Tealeaf CX: Configuration Manual
7. In the Config Info dialog, click Edit to start Search Configuration.
v To edit any individual setting, click the setting name. In the dialog, edit the
value and click OK.
v To change any group of settings, click Modify.
Figure 17. Search Configuration
Saving Search Server Configurations
Note: Do not push Search Server configurations to other Search Servers without
considering all of the settings. Some Search Server settings, such as role definitions
and TLI server locations, should not be applied across all servers.
Note: After you make changes to the Search Server configuration, the following
steps are required:
v Push the configuration to any servers through TMS.
v Restart the Tealeaf Data Service. See "Configuring the Tealeaf Data Service" in
the IBM Tealeaf CX Configuration Manual.
v Perform an IISreset of the Tealeaf Portal.
Basic Settings
Click any of the following options in this group to modify the value.
Setting Description
Search Server Port
Specifies the IP port for Search Server to use to query the Canister. The
default value is 19000.
Logging
Enable or disable logging. Search Server log files are saved to TeaLeaf\Logs
on the machine on which the Search Server is installed.
Days to Keep Logs
Defines the number of days to retain Search Server log files.
Chapter 2. Configuring Tealeaf Components
109
Close Idle Canister Connection After
Specifies the number of minutes for Search Server to remain idle before
closing its connection to the Canister. If the number of connections to the
Canister exceeds 16, then the Canister disallows other components from
connecting; it can be beneficial to have Search Server release its connection
if no near-term future usage appears likely.
TeaLeaf Data Service
Hostname and port number for Search Server to connect to the Tealeaf
Data Service. By default, this value is localhost:23000.
v Tealeaf Data Service manages connections between Tealeaf components
and the databases they use. See "Configuring the Tealeaf Data Service" in
the IBM Tealeaf CX Configuration Manual.
Temp Path
The fully qualified path on the Search Server machine where temporary
files are to be stored.
Note: This path must be a fully qualified path value.
Result Set Path
The path on the Search Server machine where returned search results are
stored.
Note: This path must be a fully qualified path value.
Authentication Settings
These settings allow you to set authentication properties that enable you to restrict
access to Search Server and thus Tealeaf data.
v For more information on configuring authentication, see “Modifying
authentication” on page 112.
– For more information on authentication through NT, see “NT Authentication”
on page 120.
– For more information on authentication through the Portal, see “Portal
Authentication” on page 126.
v For more information on the authorization refresh intervals, see “Modifying
authorization refresh interval” on page 113.
v For more information on creating and modifying Portal privacy keys, see
“Generating privacy keys” on page 116.
Through the Authentication panel, you can modify authentication mechanisms and
the privacy keys that secure them.
Setting Description
Type
The type of authentication method. See “Modifying authentication” on
page 112.
Domains
The authentication domains in use. This field is populated by domains that
you select. See “Domain local groups” on page 111.
Auth Master
The master server used for authentication.
Domain Local Groups
When enabled, local domain groups are used for authentication. By
default, this value is false. See “Domain local groups” on page 111.
110
IBM Tealeaf CX: Configuration Manual
Auth Refresh Interval
The interval at which domain authorization is checked. See “Modifying
authorization refresh interval” on page 113.
Privacy Keys
Click to create, edit, and delete the privacy keys in use by the Privacy
Filter in the PCA and Search Server. See “Generating privacy keys” on
page 116.
Domain local groups: When using NT authentication, Search Server can use
domain local groups, instead of global domain groups. Domain local groups are
groups local to the authentication master. You may deploy this option if access to
the NT domain and its groups is not possible. This method enables you to deploy
NT authentication without having access to the global domain groups.
v Search Server can use domain local groups.
v For more information from Microsoft on domain local groups, see
http://support.microsoft.com/kb/884417.
Authentication master configuration:
On the authentication master, you must perform some server-side configuration.
By convention, the authentication master is the same server where the Portal web
application is installed. Please perform the following steps.
1. Login to the server that is identified as the Authentication Master in Search
Server.
2. Open the Computer Management console:
Start > Administrative Tools > Computer Management
3. Select the following from the Computer Management console:
Computer Management > System Tools > Local Users and Groups > Groups
4. Right-click Groups and select New Group. Provide the group a meaningful
name. For example: TLusers.
5. Add users to the domain group.
Note: Users must be added by domain. For example, users in the tealeaf
domain must be added as tealeaf\username.
6. Add users and groups until all Tealeaf users have been added to the local
domain.
v You should create at least two groups, one for users and one for
administrators.
7. In Tealeaf Search Server configuration, click Modify... beneath Domain Local
Groups.
8. Enter the local machine name in the Domains textbox. Do not use localhost.
9. Click the Domain Local Groups checkbox.
10. You can now add users to user groups and admin groups.
11. Click Add to User Groups....
12. Search Server configuration lists the groups defined on the local machine,
instead of the domain server.
Note: Users that are added to the listed groups must be part of the local
domain. They cannot be user accounts for the local machine.
13. Repeat the above steps for admin groups.
14. Complete the rest of the configuration for NT authentication.
v See “NT Authentication” on page 120.
Chapter 2. Configuring Tealeaf Components
111
Modifying authentication:
To modify Search Server authentication:
1. To configure authentication, click Modify... in the Authentication area of the
main Search Configuration dialog.
2. The following options are available for modification:
Figure 18. Search Configuration options
Setting the Authentication Type allows you to specify the type of
authentication to use; for example, “NT Authentication” on page 120 or “Portal
Authentication” on page 126, or to disable authentication None.
User and Admin Groups: You can define the authentication server from which to
retrieve user and administrator groups used by Search Server.
Setting Description
Domain By specifying an NT authentication domain, Search Server automatically
locates the domain controller on the network. This menu is populated
automatically. After you specify the domain, you can add groups to the
Admin or User categories.
v To add a new domain, select Enter domain... from the drop-down.
Domain Local Groups
When enabled, local domain groups are used for authentication. By
default, this value is false.
112
IBM Tealeaf CX: Configuration Manual
Add To User Groups
Groups assigned to the user category have restricted access to IBM Tealeaf
CX RealiTea Viewer and Search Server. In the data segmentation section,
you can specify a search phrase that is ANDed to every search request the
Search Server makes. Groups are listed in the format domain\group.
Add to Admin Groups
Groups assigned to the Admin category have unlimited access to IBM
Tealeaf CX RealiTea Viewer and Search Server commands and features.
Admin members can access indexes, set up shared IBM Tealeaf CX
RealiTea Viewer profiles, and perform Search Server commands.
Remove Group
Removes a selected group from the user or admin list.
List Group
Lists all usernames belonging to a group on the NT domain.
Edit Privacy Key
Edit the privacy key for the selected user. See “Generating privacy keys”
on page 116.
Data Segmentation Search Filters: These filters restrict access to Tealeaf data by user
group. Data segmentation is performed by ANDing a specific event onto every
request made through the Search Server by a member of the user group.
v When a user or admin group is added using the Add To commands, the group
name is displayed in this window along with the events that define the sessions
that the group may access.
v See “Data Segmentation” on page 128.
Setting Description
Add Events to Group
Specifies the events that will be ANDed to the search request of the users.
One way to create a data-restricted event is to fire an event on a particular
URL. For example, you can segment data by firing an event on
www.usa.mycompany.com and on www.uk.mycompany.com. These two events
could be used to define two data segmentation groups.
Remove Event from Group
Removes the selected event from the group.
Events Visible in Portal
A list of the currently configured events that can be made visible in the
Portal to users in each group.
Change Group Filter Operator
When you have more than one event configured for a given group, use
this command to either AND the events together or OR them together.
Change Event Filter Operator
When you have more than one event filter configured for a given group,
use this command to either AND the filters together or OR them together.
Modifying authorization refresh interval: This setting controls how often a main,
slave, or Archive Search Server asks the domain server for the list of users
belonging to any groups set up for NT Authorization. To change the refresh
interval, click Modify next to Auth Refresh Interval in the Tealeaf Search Config
dialog.
Chapter 2. Configuring Tealeaf Components
113
Figure 19. Authentication Refresh Interval options
Setting Description
Update every n minutes
Perform an authorization refresh update at the specified interval. Default
value is 5 minutes.
Refresh from Master at service startup
Update only on startup or until the Master responds successfully. Retries
are attempted every n minutes, as defined in the above setting.
Disable Authorization refresh from Master
Never update authorization.
Configuring on-demand privacy: Privacy rules can be applied to sessions
requested through Search Server by the IBM Tealeaf CX RealiTea Viewer
application or the Replay Server, on behalf of Browser Based Replay users. These
rules are applied based upon the group membership of the requesting user.
v For more information on configuring on-demand privacy, see “On-Demand
Privacy” on page 133.
More Settings
These settings allow you to specify the Search Server alias and other properties.
Setting Description
Search Server Alias
This setting is used when your enterprise is unable to access the server
unless its name is further qualified with a domain name. For example, the
server's name is server1 but it can be seen on the network only as
server1.mydomain.com.
Note: If your enterprise's network does not recognize short server names,
then you must populate this field with the long server name, or searches
that use this Search Server may not return results.
Archive Server
This setting tells a Search Server where its Archives are located. When this
value is set and you connect to indexes from IBM Tealeaf CX RealiTea
Viewer, it automatically finds the Archived indexes, instead of requiring
manual configuration. It is not necessary to add port 19100 to this setting;
IBM Tealeaf CX RealiTea Viewer adds it when it looks for the Archives.
v This setting needs to be configured only if you have licensed and
installed IBM Tealeaf cxVerify. See "cxVerify Administration Manual" in
the IBM Tealeaf cxVerify Administration Manual.
114
IBM Tealeaf CX: Configuration Manual
Archive Server Port
The port through which Search Server communicates with the Archive
Server defined above.
v This value is inserted into the .xml for the segment, when it is moved
from the Processing Server to the Archive Server. At a later point, Tealeaf
components that use this .xml, such as RTV, use this value to know
where to acquire the data.
v This setting needs to be configured only if you have licensed and
installed IBM Tealeaf cxVerify. See "cxVerify Administration Manual" in
the IBM Tealeaf cxVerify Administration Manual.
Maximum number of open LSSN files allowed
This value defines the maximum number of canister files that are allowed
to be open at one time. The default value is 1.
Note: Do not configure this setting to a value other than 1 without
contacting Tealeaf Customer Support.
Event Server Settings
Setting Description
Portal Server
On each Processing Server, this setting is used by a number of Tealeaf
components, including RTV, to contact the Portal?s Search Server.
v If needed, the Portal Server setting can be specified as an IP address,
hostname, or alias.
Note: Whether you are specifying the Portal Server with an IP address
or an alias, you should use consistent references in RTV, the Portal
Management page in the Portal, and the Search Server configuration for
each Processing Server.
– For more information on configuring the Portal Server in the Portal
Management page, see "Managing Tealeaf Servers" in the IBM Tealeaf
cxImpact Administration Manual.
– For more information on configuring access in RTV, see "RealiTea
Viewer - Advanced Options Tabs" in the IBM Tealeaf RealiTea Viewer
User Manual.
Note: If the Portal Server and Reporting Server are installed on separate
machines, in the Search Server configuration the Portal Server field
should be set to the name of the Reporting Server for all Canisters. On
the Portal Server and Reporting Server themselves, leave this field blank.
Alert Server
Specifies the server that hosts the Tealeaf Alert Service.
v If this value is not specified, then the Portal Server location is used.
Privacy Keys
Privacy keys are used for encryption and decryption by the Privacy Filter, which is
available in the IBM Tealeaf CX Passive Capture Application and in the Windows
pipeline as a session agent.
v For more information on PCA privacy, see "PCA Web Console - Rules Tab" in the
IBM Tealeaf Passive Capture Application Manual.
v For more information on pipeline privacy, see “Extended Privacy Session Agent”
on page 261.
Chapter 2. Configuring Tealeaf Components
115
v For more information on pipeline rules creation, see “Privacy Session Agent” on
page 291.
v For a general overview of how Tealeaf manages privacy, see "Managing Data
Privacy in Tealeaf CX" in the IBM Tealeaf CX Installation Manual.
These keys are managed by Search Server and are automatically retrieved during
session replay as needed for decryption.
Generating privacy keys:
Privacy keys can be generated through the Search Server configuration in TMS.
Note: Any encryption key used by the PCA to encrypt and by Search Server to
decrypt must be defined in Search Server configuration and provided to the PCA.
For more information on defining these keys, see "PCA Web Console - Rules Tab"
in the IBM Tealeaf Passive Capture Application Manual.
1. Log into the Portal as an administrator.
2. From the Portal menu, select Tealeaf > TMS.
3. Click the WorldView tab.
4.
5.
6.
7.
For the desired server, drill-down to the Search Server component.
Select Search Server configuration.
Click View.
In the Config Info dialog, click Edit to start Search Configuration. The
following dialog is displayed:
Figure 20. Search Configuration in TMS
8. Click the first Modify button in the Authentication section. The following
dialog is presented:
116
IBM Tealeaf CX: Configuration Manual
Figure 21. Authentication configuration showing Portal Authentication options
Note: You must have either NT Authentication or Portal Authentication
enabled to get to the privacy key options.
9. If you don't see groups listed under User Groups, you can add them.
10. After you have one or more user groups listed, you can assign privacy keys.
Creating Privacy Keys:
To create/assign Privacy Keys:
Note: Only one privacy key can be assigned to a group. If multiple privacy keys
are required, you must create a group for each key and assign users to the groups
as needed.
1. Select a group in the User Groups listbox and click Edit Privacy Key. The
following dialog is displayed:
Chapter 2. Configuring Tealeaf Components
117
Figure 22. Privacy key configuration
2. Select the desired cipher from the dropdown. Click Add New Key to create a
new key.
3. To assign it to the group, select the new key from the dropdown at the top of
the dialog.
4. If you need to use a key ID and key value in the Privacy session agent
configuration file, then copy them from the Privacy Key dialog at this time. You
can use standard Windows keyboard shortcuts to copy the values from the
fields and then paste them into Privacy.cfg.
v For example, the above key ID and value should be pasted into the [Keys]
section in the following format: Key00001=<key_value>.
5. When finished with the Privacy Key dialog, click OK. For the user group, you
should now see Yes in the Privacy session agent Key Assigned? column.
6. Repeat this process for all groups for which data is encrypted.
7. When you are finished assigning privacy keys to groups, click OK to commit
the changes.
Adding or deleting privacy keys (independent of authentication settings):
To create or delete privacy keys, click Modify next to the Privacy Keys setting in
the Tealeaf Search Config dialog.
118
IBM Tealeaf CX: Configuration Manual
Figure 23. Privacy Keys dialog
The list of available privacy keys is displayed in the Privacy Keys dialog. You can
create new privacy keys in this dialog without having to set up groups in the
Authentication dialog first.
v To create a new privacy key, select the cipher to use from the drop-down. Then,
click Add Key. A privacy key is generated and displayed.
v To remove a created privacy key, select the key and click Delete Key. The key is
removed.
To manually create a privacy key, click Enter Key.
Figure 24. Entering Privacy Keys
To manually create a privacy key:
1. From the Cipher drop-down, select the method of encryption to use for the key.
2. Enter the unique privacy key identifier in the space provided.
3. Enter the privacy key value. To generate a unique ID, click Generate New Key
Value.
4. To save the entered privacy key, click OK.
Chapter 2. Configuring Tealeaf Components
119
Note: When manually creating a privacy key it is important to use a valid value
for the key. This value is an encrypted and encoded key value, along with key
information and key name. Unless you are copying an existing key value from an
external source you should use Generate New Key Value to create a valid key
value. If you change the key name after generating the key value, then you must
generate a new key value, since the name is stored as part of it.
Authentication
Search Server authentication lets you define a list of users that have administrative
or general user privileges to perform operations such as searching and retrieving
session data, editing events, or modifying system settings.
When authentication is configured for Search Server, visitor requests automatically
present the Windows domain and username of the currently logged-in account.
The login information is checked to determine the following:
v Whether the user exists on the domain specified
v Whether the user actually belongs to the group specified and has restricted
access based on the group. This group defines the types of tasks the user can
perform in the client. For example, a user who is a member of the Tealeaf user's
group may be able to search and not to configure events.
If the user belongs to none of the groups, access is completely denied.
NT Authentication
IBM Tealeaf CX is capable of using NT domain information to authenticate users
and restrict access to specific functionality based on user identity. The two
components of IBM Tealeaf CX that can be configured to use NT authentication are
the Portal and the Search Server service.
Note: Active Directory user login names should not included any accented
characters.
Note: It is highly recommended that both of these components be configured to
use NT authentication together. If the Search Server's NT authentication is enabled,
then the Portal should have its NT authentication feature enabled as well, or Portal
users cannot search for or retrieve session data.
NT authentication relies on querying a Windows NT domain controller to
determine existence of users and their NT user group memberships.
Note: It is recommended that two NT groups be specifically created on the
domain controller for use as Tealeaf User and Tealeaf Administrator groups,
although it is possible to use existing NT groups for these purposes.
v For more background information, see "Authentication" in the IBM Tealeaf
cxImpact Administration Manual.
v For more information on configuring NT authentication for Search Server, see
“Configuring NT Authentication for Search Server” on page 121.
v For more information on configuring NT authentication for the Portal, see
“Configuring NT Authentication for the Portal” on page 122.
Configuring Active Directory:
To enable NT authentication use by Tealeaf, please verify and complete the
following configuration steps in Active Directory.
120
IBM Tealeaf CX: Configuration Manual
1. In Active Directory, create two global security groups, one each for users and
administrators. For example:
a. TLuser - user group
b. TLadmin - admin group
2. Assign Tealeaf users to these groups.
3. Tealeaf administrators must be permitted to create events in Tealeaf. Access is
provided by enabling access to the Tealeaf Event Manager through the Portal
menu.
v See "CX User Administration" in the IBM Tealeaf cxImpact Administration
Manual.
v Search Server can be configured to use a Tealeaf event-based method for data
segmentation. See Configuring the Search Server.
4. Verify that the Tealeaf Portal Server has permissions to query Active Directory
for group information. For more information, please refer to your Active
Directory documentation.
5. A service account must be created or used to run the Search Server service. You
must create a new account within Active Directory if the local computer
account does not have these rights or if multiple domains are involved.
6. Test accounts from both user groups by logging in to the Tealeaf Portal and
executing a search.
Search Server NT authentication: Search Server authentication lets you define a
list of users who have general or administrative privileges to perform operations
such as searching for and retrieving session data, editing events, or modifying
shared IBM Tealeaf CX RealiTea Viewer settings profiles.
When configured, clients of Search Server authenticate the currently logged in user
before allowing access to Search Server's functions. The login information is
checked to determine if the user belongs to the NT group specified and to restrict
access based on the applicable group. For example, a user who is a member of the
Search Server Users group only can search but cannot configure events.
If the user belongs to none of the groups defined in the Search Server
authentication settings, access is denied to that user.
v In the case of the IBM Tealeaf CX RealiTea Viewer, a denied user cannot search
for sessions or edit events.
v In the case of the Portal, a denied user cannot perform searches.
Configuring NT Authentication for Search Server:
To configure:
1. Verify that the Admin and User groups you want to use for the Search Server
exist on the NT domain controller that you are using for authentication.
2. Edit the Search Server configuration using TMS in the Portal. To do this, select
TMS from the Tealeaf menu. Make sure the WorldView tab is selected. Drill
down to the Search Server component for the desired server, select "Search
Server configuration" and then click on the View button. Then click Edit on the
Config Info dialog to edit the configuration.
3. In the Authentication area of the Search Config window, click Modify....
4. In the Authentication dialog, do the following:
a. For Authentication Type, select the NT Authentication radio button.
b. Select the NT domain to use from the Domains drop-down menu.
Chapter 2. Configuring Tealeaf Components
121
v To enter another domain, select Enter Domain?. In the dialog box, enter
the domain identifier.
Note: To specify a child domain, you may need to try both of the
following forms:
– child.domain.com
– child
c. Click Add to User Groups.... Users who are members of the groups in the
User Groups list may use Search Server features such as searching, getting
session information, and retrieving sessions. Users who belong to only this
group may not configure Canister events.
1) The resulting Add Group dialog lists the groups defined on the domain
controller for the chosen domain.
2) Choose a group from the list and click List Group.... A list of members
of that group is displayed.
3) Click OK to add the group to the list of Search Server user groups.
Repeat this step if needed.
d. Click Add to Admin Groups.... Only users who belong to this group may
configure Canister events and upload shared Viewer profiles.
1) The resulting Add Group dialog lists the groups defined on the domain
controller for the chosen domain.
2) Choose a group from the list and click List Group.... A list of members
of the group is displayed.
3) Click OK to add the group to the list of Search Server user groups.
Repeat this step if needed.
e. Click OK to close the Authentication dialog.
5. Enter a description for the change to the configuration in the Version
Description field at the bottom of the window and click Save to save the
changes.
6. When prompted whether to add tasks to push the new version, click the Yes
button. Also answer Yes when asked if you want to add restart tasks.
7. Enter a description in the Current Job pane, then click on the Submit button to
submit the job to push the changed configuration and restart the Search Server.
8. Test the authentication by opening the IBM Tealeaf CX RealiTea Viewer and
perform a search.
a. If you are not a member of one of Search Server's User groups, you are
denied access to searching.
Note: If Search Server NT authentication is enabled and the Search Server
service is running as a user that is not registered on the NT domain
specified in SearchConfig (e.g., a member of one of the machine's local user
groups), the service fails to start (it may return error code 110). Running the
Search Server service under the Local System account is acceptable.
Configuring NT Authentication for the Portal:
To configure:
To enable this feature, you must turn on NT authentication for the Report database
and modify IIS settings for the Portal virtual directory. See “Configuring the Report
Server” on page 58.
122
IBM Tealeaf CX: Configuration Manual
To use NT authentication in the Portal, the machine on which the Portal is running
must be a member of an NT domain. It should be in the same domain as the NT
domain controller, or a trust relationship must be established between the domain
controller's domain and the Portal server's domain.
Note: By default, the Portal creates an "internal" account for every valid NT user
in the valid groups. See “Portal User Creation under NT Authentication.”
Enabling Portal NT Authentication:
1. Login to the Tealeaf Portal as an administrator.
2. Through the menu, select Tealeaf > TMS. See "Tealeaf Management System" in
the IBM Tealeaf cxImpact Administration Manual.
Open the Search Server node.
Click Search Server configuration.
In the Config Actions panel, click View/Edit.
The Search Server configuration is displayed.
Under Domain Local Groups, click Modify....
In the Authentication dialog, select NT Authentication in the Authentication
Type section.
9. For more information on configuring NT authentication, see “Modifying
authentication” on page 112.
3.
4.
5.
6.
7.
8.
Disabling Portal NT Authentication:
To disable anonymous access in IIS virtual directory settings:
1. Open the Internet Information Services Manager from the Windows Start menu:
Start > Control Panel > Administrative Tools > IIS Manager
2. Expand the machine node and right-click the Portal virtual directory under the
website where it was installed (usually the Default Web Site). Select Properties.
3. Click the Directory Security tab, and then click Edit under Authentication and
access control.
4. Deselect the Anonymous access checkbox and select the Integrated Windows
authentication checkbox.
5. Close the dialog.
6. To restart the IIS Admin service, right-click the computer node in IIS Manager
and selecting Restart IIS... from the menu. Anonymous login to the Portal is
prohibited. Users must be logged in to the NT domain, and be using Internet
Explorer to connect to the Portal, in order to be recognized.
Portal User Creation under NT Authentication: Depending on your
configuration settings, the Portal can automatically create Portal user accounts for
NT users when they first visit the Portal home page.
v Alternatively, you can create these accounts by mapping them manually. See
“Manually mapping Portal users to NT users” on page 125.
Automated Portal user creation under NT authentication:
If desired, you can configure the Portal to automatically create Portal user accounts
for NT users that arrive to the Portal login page. You can assign the Portal account
to one product (IBM Tealeaf cxImpact, IBM Tealeaf cxView, or IBM Tealeaf
cxReveal) and any groups within that product.
v Any other product assignments must be completed after the user is created.
Chapter 2. Configuring Tealeaf Components
123
Note: If you wish to auto-create users across multiple products, you might
notify IBM Tealeaf cxImpact users to login Monday and IBM Tealeaf cxView
users to login on Wednesday, making the necessary configuration changes
between days.
1. After you have enabled NT authentication through Search Server, you must
configure some settings in each of the product settings groups.
v For more information on Search Server configuration, see “Enabling Portal
NT Authentication” on page 123.
2. From the Portal menu, select Tealeaf > Portal Management.
3. General User Creation Settings:
a. Click IBM Tealeaf CX Settings > Users.
b. Configure the following settings to the listed values. For descriptive
information on these settings, see "CX Settings" in the IBM Tealeaf cxImpact
Administration Manual.
Setting Value
Automatic NT User Login
Enabled
Automatic User Creation
Enabled
Automatic User Creation Settings Prompt
optional
Automatic User Creation Type
Set this value to the Tealeaf product to which you would initially
like to assign users. Portal users are IBM Tealeaf cxImpact users.
Note: For the product to which you are assigning newly created
users, you must enable Automatic User Creation.
c. Password Security: The following settings pertain to password length,
security, and duration. If you have not done so already, please consult with
your IT staff to determine requirements.
v Minimum Password Length
v Previous Password History (Count)
v Previous Password History (Days)
v Require Strong Passwords
v Newly created users must create a new password that meets these
guidelines. For descriptive information on these settings, see "CX
Settings" in the IBM Tealeaf cxImpact Administration Manual.
d. Click Save.
4. IBM Tealeaf cxImpact User Settings: If you chose Portal for Automatic User
Creation Type, please complete the following configuration for new users
automatically created by the Portal.
a. In the same set of settings, configure the following settings to meet your
requirements. For descriptive information on these settings, see "CX
Settings" in the IBM Tealeaf cxImpact Administration Manual.
v New User Default Group
v New User Default Page
v New User Default Time Zone
v New User Group Default Language
124
IBM Tealeaf CX: Configuration Manual
b. Click Save.
5. IBM Tealeaf cxReveal User Settings: If you chose cxReveal for Automatic User
Creation Type, please complete the following configuration for new users
automatically created by the Portal.
a. In the Portal Management page, click IBM Tealeaf cxReveal > Users.
b. Configure the following settings to meet your requirements. For descriptive
information on these settings, see "cxReveal Settings" in the IBM Tealeaf
cxReveal Administration Manual.
v Automatic User Creation must be enabled.
v New User Default Page
v New User Default Time Zone
v User Default Group
c. You should review the Password-related settings as well.
d. Click Save.
6. IBM Tealeaf cxView User Settings: If you chose Portal for Automatic User
Creation Type, please complete the following configuration for new users
automatically created by the Portal.
a. In the Portal Management page, click IBM Tealeaf cxView > Users.
b. Configure the following settings to meet your requirements. For descriptive
information on these settings, see "cxView Settings" in the IBM Tealeaf
cxImpact Administration Manual.
v Automatic User Creation must be enabled.
v Automatic User Creation Settings Prompt
v New User Default Page
v New User Default Time Zone
v User Default Group
c. You should review the Password-related settings as well.
d. Click Save.
Manually mapping Portal users to NT users:
To map a Portal user to an NT user:
1. Log in to the Portal Web application as a Portal administrative user.
2. Click Tealeaf > Portal Management.
3. Click the user administration link for the type of user you wish to create:
v IBM Tealeaf cxImpact: CX User Administration
v IBM Tealeaf cxView: cxView User Administration
v IBM Tealeaf cxReveal: cxReveal User Administration
4. Click Users. Click New in the toolbar.
5. Enter the Portal username if creating a new user. Enter the NT domain and NT
username (exactly as typed by the user when logging into the NT domain) to
which this Portal user maps.
6. Specify other user properties.
Note: Only one Portal user account should be associated with each NT
domain/user combination.
7. Click Save.
8. When the user whose account you just modified requests the Portal login page,
their NT username is posted to the login page, and the user can access the
Portal by clicking Login.
Chapter 2. Configuring Tealeaf Components
125
v See "CX User Administration" in the IBM Tealeaf cxImpact Administration
Manual.
v See "cxView User Administration" in the IBM Tealeaf cxImpact Administration
Manual.
v See "cxReveal User Administration" in the IBM Tealeaf cxReveal Administration
Manual.
HTTPS/SSL and NT Authentication:
If you are using NT Authentication and also turn on HTTPS/SSL on the Portal (in
IIS's settings), you may not see the expected NT-authenticated login page for the
Portal until the Portal machine is added to Internet Explorer's Trusted Intranet
Zone.
Note: If you encounter the Portal error The Tealeaf ASP Utility Object
(TLAspUtil) could not be loaded, and you have been recently added to the Tealeaf
Users Active Directory group, then perform this procedure.
1. Go to Start > Run.
2. Type cmd in the Open: field.
3. Enter the following command:
gpudate /force
4. Reboot the user's machine (It is important to reboot and not simply logoff.).
Portal Authentication
The Search Server can be configured to authenticate user access through the Tealeaf
Portal's authentication mechanisms. Configuring portal authentication is similar to
how you can configure NT authentication for Search Server with the following
differences:
Note: Portal authentication extracts user and group information from the Portal
database tables. You cannot make changes to users and groups through Search
Server configuration. For more information on making changes to Portal users and
groups, see "cxImpact Administration Manual" in the IBM Tealeaf cxImpact
Administration Manual.
Note: Portal authentication can be enabled only on a server that contains the
Portal user database. All other servers that host Search Server must point to the
Portal authenticating server as their authentication master.
By default, Search Server assumes that the following Portal user groups have
administration privileges:
v admin group
v
event admin
For more background information, see "Authentication" in the IBM Tealeaf cxImpact
Administration Manual.
126
IBM Tealeaf CX: Configuration Manual
Figure 25. Configuring Portal Authentication
To view the members of a user or admin group, select the group and click List
Group.
v For more information on the available buttons, see “Modifying authentication”
on page 112.
Like NT authentication, Portal authentication supports the use of privacy keys and
data segmentation.
v See “Generating privacy keys” on page 116.
v See “Data Segmentation Search Filters” on page 113.
Configuring Authentication Slaves
Note: If you have configured NT authentication or Portal authentication, the
Search Server configurations of all authentication slave servers must be configured
to point to the authentication master. Please verify the Authentication Master
setting on each authentication slave server.
Debugging Search Server Authentication
For authorization, the Search Server uses the same user ID that issued the Event
Maintenance command to read and update the slave Search Servers. If a slave
Search Server rejects those commands, then it can be inferred that slave servers are
running with a different authorization configuration.
Chapter 2. Configuring Tealeaf Components
127
Examining the Search Server logs generally identifies the problem. When Search
Server restarts with authorization enabled, the list of defined users accessible to it
are inserted into the log.
v Search Server is typically restarted at 1AM. At restart time, the Search Server log
also lists OperatingParams, which indicate the authorization mode and other
operating parameters.
v If you know the time that saving events failed, you can examine the slave server
log at that time for the /NTYP command from Search Server to identify the user
name it's using and then compare that ID to the user list from the last restart.
Data Segmentation
Data segmentation restricts the search data returned for a given user based on
authentication group using Tealeaf events that you create.
Events that are configured for data segmentation are used to filter live sessions so
that active sessions appearing in the Portal are visible only to users who have
access to them. In addition, you can specify which events are visible to members of
specified groups; users cannot see sessions from other groups, and active events
appearing in the Portal pertaining to the other groups' sessions are hidden, too.
Note: To use data segmentation, your Tealeaf system must be configured to use
Portal or NT authentication and authentication groups.
For every submitted search, the term is ANDed with a restricting term defined for
the user's authentication group. The second search term that is appended to the
user's search term is an event configured to fire on a specific type of session.
Data segmentation example 1: For example, suppose your enterprise supports
two web sites, www.example1.com and www.example2.com. There are separate
customer service groups to monitor each website, and neither group is supposed to
see the session data from the other site.
To enable data segmentation, two separate events must be defined. One event fires
when the request or response pertains to www.example1.com, while the other
responds to www.example2.com data. The first event is assigned unique identifier 17,
and the second received unique ID 18.
To enable data segmentation of these two websites:
v Through Search Server configuration, authentication is enabled.
v Two user groups are created: Example1group and Example2group.
v The appropriate users are added to each group.
v Through the Search Server configuration:
1. Example1group is configured to use the following filter string:
(canisterappevent/uniqueid contains 17)
2. Example2group is configured to use the following filter string:
(canisterappevent/uniqueid contains 18)
v When members of the Example1group do searches, they cannot see sessions from
www.example2.com sessions. When Example2group members execute searches, they
cannot www.example1.com sessions.
Each group added in Search Config can have multiple events associated with it.
These events can be combined using the Boolean operators AND or OR.
128
IBM Tealeaf CX: Configuration Manual
v For users belonging to multiple groups, individual filters are OR'ed together
before being joined with the requested search. For the above example, for each
search term executed by a member of both groups, the following filter is applied
to the term:
((canisterappevent/uniqueid contains 18) or
(canisterappevent/uniqueid contains 17))
Data segmentation example 2: Another example: suppose you have configured
the following three groups with events in Search Config:
Group Events
TeaLeaf\users
event 1
TeaLeaf\eng
(Items AND'ed together)
event 2
event 3
TeaLeaf\qa
(Items OR'ed
event
event
event
together)
4
5
6
v A user who is a member of TeaLeaf\users searching for the word session
generates the search query:
(canisterAppEvent contains 1) and (session)
v A user who is a member of TeaLeaf\eng searching for the word session
generates the search query:
(canisterAppEvent contains (2 and 3)) and (session)
v A user who is a member of both TeaLeaf\eng and TeaLeaf\qa searching for the
word session generates the search query:
(canisterAppEvent contains (2 and 3) or (4 or 5 or 6)) and (session)
Data segmentation pre-requisites: Before you begin configuring event-based data
segmentation, please verify that the following conditions are met:
v Users must be added to the appropriate groups.
v You must have Portal or NT authentication enabled on every machine where
Search Server is running.
v You must have an admin user group assigned in order to configure
authentication.
v You must point each server to the authentication master server to populate the
same groups to each server in the environment. Having different groups on
different servers causes varying results.
v You must have the Portal also configured for NT authentication.
v Proper data segmentation depends on a correctly configured event.
v You must set the value of Canister Server under “More Settings” on page 114 to
the appropriate value, if you have all of the following conditions in your Tealeaf
environment:
– Data segmentation with Portal or NT authentication
– The Portal Server is the authentication master
Chapter 2. Configuring Tealeaf Components
129
Configuring data segmentation: Data segmentation works in conjunction with
the other components on the IBM Tealeaf CX system. For example, you should also
set up profiles in IBM Tealeaf CX RealiTea Viewer to fully enable all the security
features of these client programs.
1. Set up the events that will perform the Data Segmentation:
To properly set up data segmentation, you must create event definitions that
effectively divide the data into the buckets that you want to isolate from other
groups. Suppose your company has two competing subdivisions, such as
www.myaudio.com and www.myvideo.com, and you don't want either division to see
each other's data. You can configure event-based data segmentation using
hostname events to segment the data.
1. Open the Tealeaf Event Manager. From the Portal menu, select Configure >
Event Manager.
v See "Tealeaf Event Manager" in the IBM Tealeaf Event Manager Manual.
2. Click the Hit Attributes tab. See "TEM Hit Attributes Tab" in the IBM Tealeaf
Event Manager Manual.
3. Create a new hit attribute.
a. Enter the hostname in the Start Tag field. For example: www.myaudio.com.
b. Do not specify an End Tag. This configuration means that the hit attribute
searches for the explicit Start Tag.
c. Set the other properties as desired.
Note: When configuring your event for data segmentation, avoid using a
NOT operator. The underlying search engine must retrieve all possible values
for the event and then apply the NOT to generate proper results, which can
significantly impact overall Portal performance.
4. Create a new event. See "TEM Events Tab" in the IBM Tealeaf Event Manager
Manual.
a. Set Evaluate to First Hit of Session.
b. For the Track value, select First per Session.
c. For the Value Type, select Text.
d. Set Searchable & Reportable to true.
e. Click the Condition step. For the condition of the event, select the hit
attribute you just created.
f. Click the Value step. Click Select Item to Record.... Select the hit attribute
you created.
g. Do not configure any other attributes.
h. Click Save Draft.
5. Commit changes for both new objects.
After the changes have been committed, sessions from either website can be
segmented based on the hostname events.
2. Enable Authentication:
1. Login to the Tealeaf Portal.
2.
3.
4.
5.
130
In the Portal menu, select Tealeaf > TMS.
In Servers view, open the Search Server node.
Click Search Server configuration. Then, click View/Edit.
The Search Server configuration window opens.
IBM Tealeaf CX: Configuration Manual
6. In the Authentication area, click Modify.
7. The Authentication dialog controls which groups have user access and
administration access to the Search Server and consequently the Canister.
8. To enable NT authentication, click the NT Authentication button. Additional
options are displayed.
9. From the Domain drop-down, select the domain name for your network. The
Search Server automatically derives the domain controller on which the
groups are located from the domain name.
10. To add the User Groups to the list, click Add to User Groups.
Note: User groups are limited to see only the data specified by the Admin
group and cannot use the Search Server interface to interact with the IBM
Tealeaf CX Server.
11. The Add Group dialog displays all the groups available on the network. To
show all users belonging to a particular group, click List Group. Select a
group and click Add.
12. To add the Admin Groups, click Add to Admin Groups.
Note: Groups with administrative access can edit event definitions and see all
the data on the IBM Tealeaf CX system.
13. Configure Authentication.
Note: You must select at least one admin group when using Authentication.
See "Authentication" in the IBM Tealeaf cxImpact Administration Manual.
14. Add the user groups and admin groups. You must assign an admin group to
administer the event definitions and perform other administrative tasks, like
setting up profiles in RTV.
3. Add Events to the Authentication Groups:
To complete the configuration of data segmentation, you must add the events to
the authentication groups. This step filters the data according to the group that
examines the data. The Short Term Canister and Long Term archive are filtered.
For example, when a member of the audio group views sessions in either the
Portal or the IBM Tealeaf CX RealiTea Viewer, only the sessions from
www.audio.com are displayed.
Data segmentation is entirely event-based. Each group added in Search Server
Configuration can have multiple events, which can be combined using the Boolean
operators AND or OR. Users who are members of multiple groups have each set of
group events combined by OR.
1. In the Authentication dialog, select the Group Name in the Data Segmentation
Search Filters section.
2. Click Add Events to Group and select an event in the Event Selection dialog.
You can add multiple events to the same group list.
v By default, the events are ANDed together, which means that AND is used
as the operator when filtering sessions. When a session contains all of the
events, it is viewable by that particular group.
Data segmentation by event is essentially an event-based session search. The search
query is appended to every Search Server request made from either the Report
Server or Portal Web application.
Following are some additional examples of event filtering.
Chapter 2. Configuring Tealeaf Components
131
Suppose you have configured the following three groups in Search Config:
v tealeaf\usersevent 1tealeaf\eng (Items AND'ed together)
v event 2event 3tealeaf\qa (Items OR'ed together)
v event 4event 5event 6
A user who's a member of tealeaf\users searches for session: (canisterAppEvent
contains 1) and (session)
A user who's a member of tealeaf\eng searches for session: (canisterAppEvent
contains (2 and 3)) and (session)
A user who's a member of both tealeaf\eng and tealeaf\qa searches for session:
(canisterAppEvent contains (2 and 3) or (4 or 5 or 6)) and (session)
In the Authentication window, click Events Visible in the Portal. Check the events
you want to be displayed in the Portal Web application for the selected group. If
no events are selected, no events are displayed in the Portal when a member of
that group logs on.
4. Configure Portal:
Verify that Portal NT Authentication is enabled.
1. In TMS, select the Tealeaf node.
2.
3.
4.
5.
Click
Click
Click
Click
Shared Configuration information.
View/Edit.
the Portal tab.
the Authentication Method setting.
6. Verify that NT is selected in the drop-down.
What the individual user sees in the Portal will largely depend on how the
Administrator has configured that particular user.
v See “Configuring the Report Server” on page 58.
Using data segmentation to hide sessions:
In some cases, you may need to hide specific sessions from some Tealeaf users.
This section provides a generalized approach for how to do it.
1. Create an event that is triggered in all sessions that you wish to hide. See "TEM
Events Tab" in the IBM Tealeaf Event Manager Manual.
2. Through Search Server, create a group to contain all Tealeaf users who are not
allowed to see the sessions.
3.
4.
5.
6.
Add the users to the group.
In event segmentation, add the created event to this group.
Set its operator as NOT.
Save changes.
Troubleshooting
For more information on troubleshooting, see "Troubleshooting - Searching" in the
IBM Tealeaf Troubleshooting Guide.
132
IBM Tealeaf CX: Configuration Manual
On-Demand Privacy
When the IBM Tealeaf CX RealiTea Viewer standalone application or the Replay
Server, which acts on behalf of Browser Based Replay users, request a session or a
set of sessions for replay on the client application, Search Server queries the
canisters to retrieve the sessions. Optionally, Search Server can be configured to
open up the retrieved sessions and apply a pre-defined set of privacy rules to the
sessions, based upon group membership of the requesting user.
In some cases, you may wish to capture data to the Tealeaf Canisters for long-term
storage and search availability but do not wish to expose these data elements to
users through replay.
v This set of privacy rules can different from the privacy rules applied through the
PCA or the Windows pipeline.
v Privacy rules can be developed and applied for each user group to which you
are applying on-demand privacy.
This section describes how on-demand privacy is configured and applied.
How On-Demand Privacy Is Applied
When RTV or BBR queries search server for a session to replay, Search Server
examines the user groups to which the requesting user belongs. If a set of replay
rules has been assigned to one of the user's groups, Search Server opens the data
for the requested session and applies the set of replay rules to the session. Then,
the session is delivered to the requesting application for replay to the user.
Note: On-Demand privacy rules are applied to Tealeaf Canisters only. On-Demand
Privacy cannot be applied to HBR machines.
Note: On-Demand privacy rules are applied through user groups and cannot be
applied selectively to individual users.
On-demand privacy enables you to apply privacy rules based upon a user's group
membership. You may configure and apply separate sets of privacy rules for each
user group. Through Search Server configuration, you may assign privacy rules to
all users through a global configuration file and privacy rules to individual user
groups based on separate configuration files.
Example Use
Fields that have been encrypted using privacy rules in the IBM Tealeaf CX Passive
Capture Application or Windows pipelines cannot be decrypted in the Portal.
v These encrypted fields can be decrypted only during replay.
As an option, you can leave the configured fields in unencrypted state in the
session data and then define On-Demand Privacy rules specifically to be applied
during session replay, permitting the display of the unencrypted data in the Portal,
as needed.
Authentication Required
On-Demand privacy works in conjunction with the enabled and configured
method of authentication. Tealeaf supports two primary methods of authentication:
v Portal authentication - User requests of the Tealeaf system are authorized by the
Tealeaf Portal application.
Chapter 2. Configuring Tealeaf Components
133
v NT authentication - User requests of the Tealeaf system are initially authorized
by the Windows domain controller associated with the Tealeaf Portal application.
Note: The use of On-Demand Privacy requires Portal or NT authentication be
enabled and configured. You may not use On-Demand Privacy if the method of
authentication in Search Server configuration is set to None. See “Configuring the
Search Server” on page 107.
For more information on authentication, see “Configuring the Search Server” on
page 107.
For more information on the supported methods of authentication in general, see
"Authentication" in the IBM Tealeaf cxImpact Administration Manual.
Portal authentication and RTV
If you are using Portal authentication and the RTV application, you must configure
the username and password of the Tealeaf user that is querying Search Server for
sessions inside RTV. In the RTV menu, select Tools > Options... and click the IBM
Tealeaf cxImpact tab. See "RealiTea Viewer - Advanced Options Tabs" in the IBM
Tealeaf RealiTea Viewer User Manual.
Multiple group membership
Privacy is applied to all groups for which on-demand privacy configurations have
been configured in Search Server configuration.
v Privacy rules are applied to user groups in alphabetical order by group name.
For example, if User 1 is a member of Group A and Group B, both of which
have privacy rules specified for them, the rules of Group A are applied to
session replay before Group B's rules, since that group appears first in
alphabetical order.
v If a user is a member of a group that does not have privacy applied and a group
that does have privacy applied, privacy is applied to the user's replay data. For
example, suppose User 2 is a member of Group C, Group D and Group E, and
Group D has a set of privacy rules while the other two groups do not. In this
case, the privacy rules of Group D are applied.
On-demand privacy on events by Tealeaf version
Depending on the version of Tealeaf that captured and stored the session data,
on-demand privacy may be applied differently on events:
v Release 8.0 or later: In these releases, event data is stored in the request of the
page on which they were triggered. Based on the presence of a specific event,
you may apply replay rules to any data on the page.
v Release 7.2 or earlier: In these releases, event data is stored on a separate page
from the page on which the event occurred. There is no easy way to apply
event-based replay rules to the parent page data.
Configuring On-Demand Privacy
On-Demand Privacy must be configured on the Tealeaf server that is the
authentication master. Typically, this server is the Portal Server.
Note: On-Demand Privacy is a feature of Search Server and is configured using
through Search Server configuration. However, at this time, you cannot configure
On-Demand Privacy through the Tealeaf Management System, the preferred
method of managing configuration. On-Demand Privacy must be configured
134
IBM Tealeaf CX: Configuration Manual
through the SearchConfig.exe tool in the Tealeaf install directory of the
authentication master server. Screenshots and descriptions below refer to this tool.
v Each Canister that is not the Authentication Master must be configured
separately to point to the Authentication Master server. See “Configuring
authentication slave Canisters” on page 137.
Uploading Privacy Configuration Files
Before you begin, you may wish to upload one or more privacy configuration files
to the authentication master server. On-demand privacy uses the same
configuration file format as other forms of Tealeaf privacy. You should copy at least
one Privacy.cfg file to the following directory on the authentication master server:
Tealeaf_install_directory\System
The Search Server configuration tool examines this directory to look for available
privacy configuration files. Any .cfg file that is properly formatted for privacy
configuration is available for use in on-demand privacy.
Note: You may wish to copy a global privacy file, which applies the most general
privacy to the directory. Then, you can use that file to create other files containing
privacy rules specific to individual user groups.
Release 8.0 and later only: If you do not have direct access to this server, you may
use the Put File command in the TMS Advanced tab to place the configuration files
in the Tealeaf install directory. See "TMS Advanced Tab" in the IBM Tealeaf cxImpact
Administration Manual.
On-Demand Privacy in Search Server Configuration
1. After you have uploaded the appropriate configuration files, to begin
on-demand privacy configuration, double-click the following executable:
<Tealeaf_install_directory>\SearchConfig.exe
2. The external SearchConfig utility is displayed.
3. Under Domain Local Groups, click Modify....
4. Under Authentication Type, verify that NT Authentication or Portal
Authentication is enabled. See “Authentication Required” on page 133.
5. The Authentication window is displayed:
Chapter 2. Configuring Tealeaf Components
135
Figure 26. Authentication
6. For the selected type of authentication, the available user groups are displayed:
Field
Description
User Groups
The available user groups for the selected method of authentication
Privacy Filter Key
The privacy filter key applied to the user group. This setting does not
apply to On-Demand Privacy. See “Configuring the Search Server” on
page 107.
Replay Privacy Encryption
The privacy configuration file that is applied to members of this group
when they request session data for replay.
Configuring the privacy file to use for a group:
136
IBM Tealeaf CX: Configuration Manual
To apply a configuration file for a specific user group, please complete the
following steps.
1. In the Authentication window, select the group to which to apply a
configuration file.
2. Click Privacy Encryption....
3. The Privacy Encryption Config File dialog is displayed.
Figure 27. On-Demand Privacy - Select Config File
4. The list of available configuration files is displayed.
v The list of files is populated based on a scan of the
Tealeaf_install_directory\System directory. See “Uploading Privacy
Configuration Files” on page 135.
v If the server is also a Processing Server, the Privacy.cfg file used for the
Windows pipeline is not available. It is stored in the parent directory to the
System directory.
v To review and edit a privacy file, select it and click Open in Notepad.... You
can edit the file and save it back to the server.
v To open the System directory to look for files, click Open System Directory....
v To apply a privacy file to the selected user group, select the file and click
OK.
v To choose to not apply privacy to the selected user group, click None and
click OK. No privacy is applied to the group.
v To cancel changes, click Cancel.
5. Repeat the above steps for other user groups, as needed.
Configuring authentication slave Canisters:
For Canisters that are not the Portal or NT Authentication master server, you must
configure the Search Server for those Canisters to point to the authentication
master server. This configuration can be performed through the Tealeaf
Management System.
Chapter 2. Configuring Tealeaf Components
137
Note: This configuration applies only if you have multiple Canisters in your
environment.
Note: When a new Canister is deployed, configuring the authentication master
server should be performed as part of the initial configuration. Please verify the
following steps.
1. Login to the Portal as an administrator.
2. From the Portal menu, select Tealeaf > TMS.
3. Click the WorldView tab. See "TMS WorldView Tab" in the IBM Tealeaf
cxImpact Administration Manual.
4. Select a server that is not the authentication master.
5. Click the Search Server node.
6. Select Search Server configuration.
7. In the Config Actions panel, click View/Edit.
8. The Search Server configuration is displayed.
9. Under Domain Local groups, click Modify....
10. For the Auth Master Server setting, please verify that it is pointing the
authentication master server, which is typically the Portal Server. Modify the
setting, if needed.
11.
12.
13.
14.
15.
16.
17.
18.
19.
20.
Note: For the server hosting the Search Server that is the authentication
master, this setting must be blank. The setting on the authentication master is
verified in a later step.
Click OK.
Click Save.
When prompted, push this change to all servers and submit the job
immediately.
Now, in the WorldView tab, select the server that is the authentication master.
Click the Search Server node.
Select Search Server configuration.
In the Config Actions panel, click View/Edit.
The Search Server configuration is displayed.
Under Domain Local groups, click Modify....
For the Auth Master Server setting, this value must be blank.
Note: For the Canister hosting the Search Server that is the authentication
server, this setting must be blank.
21. Click OK.
22. Click Save.
23. When prompted, do not push the change to other servers.
All Canisters should now be properly configured to point to the authentication
master server. See “Configuring the Search Server” on page 107. For more
information on TMS, see "Tealeaf Management System" in the IBM Tealeaf cxImpact
Administration Manual.
Updating slaves: At the specified authorization refresh interval, the slave servers
of the authentication master copy the privacy configuration files to their local
servers. By default, this updating occurs every five minutes.
v See “Configuring the Search Server” on page 107.
138
IBM Tealeaf CX: Configuration Manual
Replay Rules for Privacy
You may configure privacy rules for replay exactly as you would configure them in
the PCA or the Windows pipeline. The exceptions and special features that apply
to On-Demand Privacy only are listed below.
v For more information on developing privacy rules in general, see “Privacy
Session Agent” on page 291.
Using RTV Privacy Tester for On-Demand Privacy Rules
Development
To assist in the development of on-demand privacy rules, you may use the IBM
Tealeaf CX RealiTea Viewer, which includes an embedded privacy tester that can
be applied to sessions loaded from local disk or requested from Search Server.
Iteration cycles are very rapid:
v Edit the privacy rules configuration file locally in a text editor. Save your
changes.
v Load the sessions in RTV.
v Open the Privacy Tester.
v Load the privacy rules configuration file.
v Privacy is applied to the selected sessions.
v Repeat the above steps until you are satisfied with the results.
See "RealiTea Viewer - Privacy Tester" in the IBM Tealeaf RealiTea Viewer User
Manual for more information.
Use Blocking
Tealeaf privacy supports two methods of hiding data from users: encrypting or
blocking. Encryption is useful if you wish to hide data from some users and
expose it to others. However, since On-Demand Privacy can be selectively applied
at the group level, there is no meaningful use for encrypting replay data.
Encryption is also more expensive in terms of processing time.
Note: To hide data from users through On-Demand Privacy, use blocking rules
instead of encryption rules.
Special On-Demand Privacy Functions
The following sections describe special privacy functions or keywords that have
been implemented for On-Demand Privacy only.
TL_USER_GROUPS ReqField value: In On-Demand Privacy, you may define tests to
evaluate the user groups to which the requesting user belongs.
In your privacy tests, you may use the following name/value pair to specify a test
of the user groups to which the user requesting sessions for replay belongs:
ReqField=TL_USER_GROUPS
Example
In the following example, the rule ([Rule9]) is defined to block the response based
on the following tests:
v [SixPageTest] - The URL of the requested page contains the value six.
v [NotInSuperUserGroup] - The user is not a member of the group SuperUser.
Chapter 2. Configuring Tealeaf Components
139
Note that the definition for [Rule9] includes the test operator (TestOp) of AND,
which means that both of the above tests must evaluate to true in order for the
specified actions (BlockRsp, ReqSetBlockedRsp) to be executed.
[Rule9]
Enabled=true
TestOp=AND
Tests=NotInSuperUserGroup, SixPageTest
Actions=BlockRsp, ReqSetBlockedRsp
[SixPageTest]
ReqField=URL
ReqOp=CONTAINS
ReqVal=six
[NotInSuperUserGroup]
ReqField=TL_USER_GROUPS
ReqOp=CONTAINS
ReqVal=SuperUser
CaseSensitive=False
Not=True
[BlockRsp]
Action=Block
Section=response
Field=body
[ReqSetBlockedRsp]
Action=ReqSet
ReqSetSection=env
ReqSetField=RspAltText
ReplaceString=<html>Response has been blocked for replay.</html>
TL_USER_NAME ReqField value: In your tests, you may also use the TL_USER_NAME
value in the required field to apply replay rules to specific Tealeaf users.
In the example below, a test is defined to see if the requesting user name is
johndoe. Note the case-insensitive configuration.
[isJohnDoe]
ReqField=TL_USER_NAME
ReqVal=johndoe
ReqOp=CONTAINS
CaseSensitive=False
Debug Mode
For privacy in the Windows pipeline, you can configure the Privacy or Extended
Privacy session agent in TealeafCaptureSocket.cfg to generate log messages to
assist in debugging your privacy rules.
On-demand privacy does not utilize this configuration file. To enable these
debugging messages for your on-demand privacy rules, you may add the
following section to the top of each configuration file used for on-demand privacy:
[Config]
LogLevel=debug
Note: Debug level may generate many log messages. It should be disabled as soon
as you have resolved the issue.
To disable debug logging, set LogLevel to any value other than Debug. Or you may
remove the above section from the .cfg file.
140
IBM Tealeaf CX: Configuration Manual
Logging and Reporting
When Replay Server delivers sessions, On-Demand Privacy is automatically
applied, and the replay is logged in the usual manner. You can track replays
through the Tealeaf Portal. See "Monitoring User Activity" in the IBM Tealeaf
cxImpact Administration Manual.
Reference
v "Managing Data Privacy in Tealeaf CX" in the IBM Tealeaf CX Installation Manual
– “Privacy Session Agent” on page 291
– “Extended Privacy Session Agent” on page 261
– “Privacy Tester Utility” on page 390
v On-Demand Privacy
– "RealiTea Viewer - Privacy Tester" in the IBM Tealeaf RealiTea Viewer User
Manual
– “Configuring the Search Server” on page 107
Configuring the Alert Service
The Tealeaf Alert Service provides real-time alerting on Tealeaf events and Top
Movers. Each alert can be configured to send email messages depending on
threshold values defined for the event or Top Mover.
Tealeaf data is analyzed every minute, which allows the alerting engine to quickly
inform users of issues that require attention. The Alert Service has the following
features:
v Integrated into the event evaluation process on the Processing Server
v Aligned with the hourly or daily gathering of Top Mover data
v One-minute granularity in threshold calculations
v Summarizes alert information across multiple processing servers
v Each alert has independent configuration options: thresholds, warning, alert and
black-out periods, and messaging options.
How Alerts Work
Event data inserted into the database includes a count of events that fired, the
number of new sessions, and the number of new pages added on a per-minute
basis.
Each minute, the Alert Service polls the database to identify the list of events that
have fired in the last minutes or Top Movers that have been calculated.
v Events and Top Movers are compared the set of defined and active alerts to
determine if any thresholds have been exceeded. If so, the corresponding alerts
are fired.
v The timing of alerts is based upon the system clock of the IBM Tealeaf CX
Passive Capture Application server.
Note: Sessions that are being spooled by the Tealeaf Canister at the time of alert
evaluation may not be included in threshold calculations.
v For events whose trigger is End of Session or whose reporting is set to Report
last occurrence, the event time associated with the event is in the past because
Chapter 2. Configuring Tealeaf Components
141
of the need to wait for the session timeout. These events are timed to the
evaluation time of the NALT table so that their counts are included in thresholds
calculations.
v Each minute, two special records are updated with counts for new sessions and
new pages, even if no new ones are added. These records serve as the heartbeat
for the Alert Service. The hit time for the heartbeat record is taken to be the
delivery time of the record.
Note: Since the Alert Service polls all Canisters on one-minute intervals,
performance can be significantly impacted by network latency or other disruptions.
Installation
The Portal assumes the machine configured to be the Report Server in the Portal is
where the Alert Service is running. The Alert Service needs to be running on that
machine.
Alert Service Terminology
Understanding how the Alert Service works requires understanding a few key
concepts.
Term
Definition
Intervals
Alerting intervals can be configured to the minute. The smallest unit of
time for accumulating event counts is one minute.
v All intervals are contiguous regardless of event activity.
Rolling window of time
Each alert has a configurable window of time in which event counts
accumulate. The window does not have a defined start time such as the
beginning of the hour or every half hour. The start time of the window
equals the current time minus the alert interval size. This window can be
smaller if an alert has happened any time during the alert interval.
v The size of the window is controlled by the Alert Interval setting for
each event. The counts from each new minute are added to the
window's accumulated count, and the count of the oldest minute is
dropped off if it is outside the alert interval settings.
Thresholds
These values define when a warning or alert message is created. If the
count surpasses one of these values and the alert is not in a reset interval,
then a message is created.
v Alert thresholds take priority over warning thresholds.
v Negative thresholds are evaluated as "less than or equal to" the value
rather than "greater than or equal to". A simple way to remember this
concept is to think of small numbers as being alertable values. One
example is inactivity on an event ("We had only 3 orders in the past 30
minutes").
Reset Intervals
Reset Intervals allow the Alert Service to suppress warnings and alerts for
a configurable amount of time before it starts sending messages again. This
feature prohibits repeating warning/alert messages (every minute) while
an event is in a warning or alert status. The Alert reset interval for these
alerts resets the event counter and the interval start time at the end of the
reset period.
142
IBM Tealeaf CX: Configuration Manual
v Reset intervals do not apply to Top Mover alerts and Top Mover report
alerts.
Creating Alerts
You can create alerts and the objects to trigger them through the Portal. See
"Tealeaf Event Manager" in the IBM Tealeaf Event Manager Manual.
v See "TEM Alerts Tab" in the IBM Tealeaf Event Manager Manual.
v See "TEM Events Tab" in the IBM Tealeaf Event Manager Manual.
v See "TEM Top Movers Tab" in the IBM Tealeaf Event Manager Manual.
Configuration
You can configure the Alert Service through TMS.
To configure:
1.
2.
3.
4.
5.
Login to the Tealeaf Portal as an administrator.
In the Portal menu, select Tealeaf > TMS.
In the Servers view, click Alert Service.
Click Alert Service configuration.
In the Config Actions panel, click View/Edit.
The following settings are available for editing. See "Tealeaf Management System"
in the IBM Tealeaf cxImpact Administration Manual.
Setting
Description
Canister Attempts
The number of times the service attempts to connect to a processing server
for data collection at one minute intervals when the service is started. The
service continues attempting to establish connection with any missing
canisters at 10 minute intervals forever.
Email From Address
The email sending address for all email alert messages. Addresses can be
in the following forms:
John Smith<[email protected]>
"John Smith"<[email protected]>
<[email protected]>
[email protected]
Note: Some email servers will not accept a From: email address with
invalid formatting. Please be sure to configure a valid email address.
Event Refresh Interval
The interval at which the service attempts to refresh the event/alert
definitions. The default value is 10 minutes; it should not be lower than 10
minutes.
Logfile Verbosity
This setting contols the content of the TLAlertSrv_YYYYMMDD.log file
maintained in the Logs directory. By default, the logging level is set to 2
and should be kept at this level unless an issue required investigation.
v For gathering debugging data across multiple days, set this value to 4.
v For gathering debugging data across hours within a day, you may set
this value to 9.
Chapter 2. Configuring Tealeaf Components
143
Note: After you have resolved any issue, you should reset the logging
level to 2.
Maximum Length of Email Subject Line
Defines the maximum number of characters that can be used in the Subject
line of the generated alert email. The maximum value for this setting is
255.
Message Attempts
The number of times the service attempts to send a single message
Minutes to Inhibit Alerts
If needed, you can apply an emergency shut-down of alert processing for
the specified number of minutes. When the shut-down period expires, the
Alert Service resumes operations automatically.
See “Shutting down alert generation.”
Per Minute SQL Updates
When Enabled, the Alert Service can selectively insert informational records
into a database to track Canister Status. These records are inserted every
minute and might impact performance in installations with large numbers
of Canister Servers.
Portal URL
The Web address for the Portal. In email alert messages, this address
provides user access to the alert details through the Portal.
Record XML Data
When enabled, this setting writes XML data that is read by the Alert
Service. In the Tealeaf\Portal directory, the following XML files are
written: EventsReadbyAlertService.xml, ReportsReadbyAlertService.xml
and TopMoversReadbyAlertService.xml.
Note: By default, this setting is disabled. This XML data is useful only for
debugging purposes when working with Tealeaf Customer Support.
SNMP Monitors
A comma-separated list of SNMP servers that receive SNMP trap messages
Service Log File
Alert Service logs errors and debugging information to a file each day. The
default value, TLAlertSrv.log yields files of the form
TLAlertSrv_YYYYMMDD.log. This field allows user individualization of
the base log file name.
Shutting down alert generation
If needed, you can force a temporary shut-down of the Alert Service, which
prevents the generation of new alerts. When a non-zero value is entered for the
Minutes to Inhibit Alerts setting and the configuration is saved and applied, the
Alert Service prevents the generation of any new alerts for the specified number of
minutes, regardless of how individual alerts are defined.
This feature may be helpful in debugging alerts that are firing too frequently due
to improper specification of the source event or other mis-configuration in the alert
definition.
When the specified period has expired, Alert Service resumes operating normally.
Note: When this value is changed through TMS, the value is applied to the
corresponding registry setting, from which Alert Service reads and applies to its
144
IBM Tealeaf CX: Configuration Manual
behavior. When the shut-down period has expired, Alert Service resets the registry
setting to 0, which enables it to resume normal operations, but the setting in TMS
is not reset automatically.
If you reload the Alert Service configuration through TMS, it recognizes that there
is a difference between the registry setting (0) and the value stored in TMS (20). To
resynchronize the values, you should either manually reset the value in TMS or
reload the configuration from the local system when prompted.
Configuring SNMP Traps
Tealeaf supports the ability to send SNMP traps to SNMP listeners.
Note: Tealeaf does not provide a Management Information Base (MIB) file for
monitoring alerts.
To
1.
2.
3.
4.
enable:
In the Alert Service configuration in TMS, click SNMP Monitors.
Enter a comma-separated list of servers to send SNMP traps.
Click Save.
Configure a TMS task to update the configuration of all affected servers.
To monitor SNMP Traps:
Tealeaf does not provide an MIB file with which to monitor SNMP traps. However,
Tealeaf does send a simple text SNMP trap, and you can configure your external
application to monitor Tealeaf events using the following information.
The SNMP trap OID structure can be used to determine which alert fired. The
Tealeaf company ID is 9147. An alert trap has the following OID:
1.3.6.1.4.1.9147.0.1.<Event ID>
The message in the alert is in the following format:
ALERT DETAILS: <Alert Title>
You can create a filter based on the OID to allow the external receiver to monitor
specific events.
Canister Statistics
As part of its operations, the Alert Service retrieves and inserts Canister statistics
for all Canisters identified in the Portal into the TL_STATISTICS database.
v The writing of statistics is enabled via the Per Minute SQL Updates parameter.
See “Configuration” on page 143.
v Some of these statistics appear in the Canister Status reports. See "System Status"
in the IBM Tealeaf cxImpact Administration Manual.
Starting/Stopping/Restarting the Service
You can start, stop, and restart the Alert Service through TMS.
To configure:
1.
2.
3.
4.
Login to the Tealeaf Portal as an administrator.
In the Portal menu, select Tealeaf > TMS.
In the Servers view, click Alert Service.
In the Component Actions pane, you can click the Start, Stop, or Restart
buttons.
Chapter 2. Configuring Tealeaf Components
145
Configuring the Scheduling Service
The Tealeaf Scheduling Service can be used to schedule repeated Tealeaf-specific
jobs, which include TLI archiving, backups, and extractions. During installation,
the Tealeaf Scheduling Service is configured to automatically start up, yet some
default jobs are disabled.
Note: The Tealeaf Scheduling Service should not be used for scheduling and
executing Tealeaf-related jobs other than those specified in this section.
Enabling Tealeaf Scheduling Service
By default, the Tealeaf Scheduling Service is automatically started and enabled
during initialization of the Tealeaf server.
v To enable or disable the service, use the Windows Service Control Panel to start
or stop the Tealeaf Scheduling Service.
Configuring Tealeaf Scheduling Service
The service is configuring using an .XML file stored in the following location:
<Tealeaf_install_directory>\Tools\TlSchedulersvccfg.xml
The default configuration file included during installation contains the specification
for jobs of three different types. By default, all are disabled.
Note: Before you begin editing the above file, you may want to save the original
as a backup.
Default Configuration
The following .XML is the default configuration provided during the installation
process. For more information on each type of job configuration:
v “Configuring TLBackup Jobs” on page 148
v “Visitor Database Extractor” on page 149
v “Configuring TLI Jobs” on page 149
v “Configuring Tealeaf Status Jobs” on page 150
<JobDefinitions>
<!-Available repeat commands:
RepeatEvery5Cmd
- runs every 5 minutes
RepeatEvery10Cmd
- runs every 10 minutes
RepeatEvery15Cmd
- runs every 15 minutes
RepeatEvery30Cmd
- runs every 30 minutes
RepeatEvery60Cmd
- runs every 60 minutes
RepeatDailyCmd
- runs every day at a set time.
-->
<!-- Run TealeafStatus every 15 minutes -->
<Job Enable="False" Name="TealeafStatus" RunType="RepeatEvery15Cmd"
DailyStartTime="" CmdString="tools\TealeafStatus.exe" />
<!-- Run Cycle Services at 00:30 AM every day -->
<Job Enable="True" Name="Cycle" RunType="RepeatDailyCmd"
DailyStartTime="00:30" CmdString="tools\TLBackup.exe -C" />
<!-- Run Extractor for Visitor DB every 15 minutes -->
<Job Enable="False" Name="VisitorDBExtract" RunType="RepeatEvery15Cmd"
DailyStartTime="" CmdString="Reporting\TLExtractorVDB.exe" />
<!-- Run TLManageTLI to trim any TLI files old than 31 days, runs at 02:30 AM
every day -->
146
IBM Tealeaf CX: Configuration Manual
<Job Enable="False" Name="TLI_Trim" RunType="RepeatDailyCmd"
DailyStartTime="02:30" CmdString="tools\TLManageTLI.exe -server servername
-trim -days 31" />
<!-- Run TLManageTLI to merge previous days TLI file, runs at 02:30 AM every
day -->
<Job Enable="False" Name="TLI_Merge" RunType="RepeatDailyCmd"
DailyStartTime="02:30" CmdString="tools\TLManageTLI.exe -server servername
-merge" />
</JobDefinitions>
Job properties: For each job definition, the following properties must be specified:
Property
Description
Enable To enable the job, set this value to true.
Name
The name of the job must be unique within the set of job definitions.
RunType
Defines the frequency at which the job is executed. See “Types of runs.”
DailyStartTime
If the job is configured to run once per day, this value defines the start
time for the job in hh:mm format. For example, a 00:30 job runs at 12:30am.
CmdString
This value is the command that is executed at the command line by the
scheduling service at the scheduled time.
Note: Path names are relative to the Tealeaf install directory. You cannot
use environment variables in the path names.
Types of runs: At the top of the file is listed the commands for configuring the
frequency of job execution.
Note: Avoid changing the job frequency for the default job configurations.
Changing the frequency of these jobs may affect the behavior and performance of
the Tealeaf system.
Note: Do not schedule jobs to run more frequently than every fifteen minutes
unless directed by Tealeaf.
Command
Description
RepeatEvery5Cmd
Runs every 5 minutes.
RepeatEvery10Cmd
Runs every 10 minutes.
RepeatEvery15Cmd
Runs every 15 minutes.
RepeatEvery30Cmd
Runs every 30 minutes.
RepeatEvery60Cmd
Runs every 60 minutes.
Chapter 2. Configuring Tealeaf Components
147
RepeatDailyCmd
Runs every day at a set time.
This service cannot be used for scheduling non-repeating jobs. To schedule a
one-off job, set the repeat command to RepeatDailyCmd and disable the job after it
successfully executes.
v Only one scheduled job can run at a time. If execution of a scheduled job
overlaps the start time of another job, the second job is executed after
completion of the first job.
Configuring TLBackup Jobs
The TLBackup job can execute the Tealeaf Backup utility, which can perform any of
the following jobs:
v Partial backup
v Full backup
v Cycle all Tealeaf Services
Note: By default, the nightly Cycle Services job is enabled and configured to
execute at 12:30am. Tealeaf recommends that the default Cycle Services job be
enabled and executed once per day.
Additional configuration options are available through the configuration file for
TLBackup. Restoring from backup requires a separate utility. See "TLBackup and
TLRestore" in the IBM Tealeaf cxImpact Administration Manual.
To enable the TLBackup job:
The job for the default Scheduling Service (Name="Cycle") is configured to execute
a CycleServices job to restart all Tealeaf services at 12:30am. Please complete the
following steps to verify this configuration.
1. Open the TlSchedulersvccfg.xml file.
2. For the Name="Cycle" job:
a. Set Enable to true.
b. Changing the RunType setting is not recommended. See “Types of runs” on
page 147.
c. If RunType="RepeatDailyCmd", then you must configure the start time. Times
are specified on the 24-hour clock. For example, the following job executes
at 12:30 am according to the Tealeaf timezone.
DailyStartTime="00:30"
v For more information on timezones, see "Configuring the System
Timezone" in the IBM Tealeaf CX Configuration Manual.
d. Verify that the CmdString points to TLBackup.exe inside the Tealeaf install
directory.
v The default job includes the -C parameters, which cycles all Tealeaf
services. For more information on parameters for other job types, see
"TLBackup and TLRestore" in the IBM Tealeaf cxImpact Administration
Manual.
3. Save the file. A restart is not required.
4. At the appointed time, the scheduled job is executed.
See "TLBackup and TLRestore" in the IBM Tealeaf cxImpact Administration Manual.
148
IBM Tealeaf CX: Configuration Manual
Visitor Database Extractor
The Visitor database extractor job is used for extracting session data from the
Long-Term Canisters and inserting them in the proper format into the IBM Tealeaf
cxResults staging database.
Note: If you have licensed IBM Tealeaf cxResults, this job must be enabled after all
software has been installed and database connectivity has been established. IBM
Tealeaf cxResults is not operable until this job is enabled and functioning.
To enable the VDBExtractor job:
1. Open the TlSchedulersvccfg.xml file.
2. For the Name="VisitorDBExtract" job:
a. Set Enable to true.
b. Do not modify any of the other settings.
3. Save the file. A restart is not required.
4. At the appointed time, the scheduled job is executed.
Configuring TLI Jobs
Through the Scheduling Service, you can configure and enable jobs to trim and
merge TLI files stored on the designated TLI server.
A TLI file contains static content objects that have been captured by Tealeaf and
stored in daily archives for replay and long-term storage purposes. See "Managing
Static Archives" in the IBM Tealeaf cxImpact Administration Manual.
Note: Before you configure TLI jobs, you must designate and enable one Tealeaf
server to be the TLI server. See "Managing Static Archives" in the IBM Tealeaf
cxImpact Administration Manual.
You can verify the proper capture of static content in archives through RTV. See
"Using Static Archives in RTV" in the IBM Tealeaf RealiTea Viewer User Manual.
Note: To back up TLI files before trim and merge operations, add the switch
-backup to the CmdString in the job specification. Prior to executing the specified
job, the affected TLI files are backed up to the backup directory in the server.
Configuring TLI trim jobs:
You may configure jobs to trim content from the TLI server when it is aged more
than a specified number of days.
v TLI trim operations trim daily .TLI files from the live and backup directory.
v Content is removed based on the modified timestamp of each .TLI file on the
server.
v You may review the .TLI files currently stored on the TLI server, including their
last modification date. See "Managing Tealeaf Servers" in the IBM Tealeaf cxImpact
Administration Manual.
Note: You should configure the Trim job to run on a daily basis.
Note: Tealeaf supports one TLI server in the environment. Multiple TLI servers are
not currently supported. For more information on creating a TLI server, see
"Managing Tealeaf Servers" in the IBM Tealeaf cxImpact Administration Manual.
To enable the TLI trim job:
Chapter 2. Configuring Tealeaf Components
149
1. Open the TlSchedulersvccfg.xml file.
2. For the Name="TLI_Trim" job:
a. Set Enable to true.
Note: Depending on available storage, you may wish to change the number
of days of TLI data retained on the server. In the CmdString value, set the
-days parameter to be the number of days of TLI files retained. Tealeaf
recommends using the default settings until you have confidence in the
volume of static content stored on a daily basis.
b. Replace the servername value with the host name of the TLI server in your
environment.
3. Save the file. A restart is not required.
4. At the appointed time, the scheduled job is executed.
Configuring TLI merge jobs:
Through the Portal, you can manage the merging of daily .TLI files into the
monthly file, which can then be extracted for permanent storage. When executed
on a daily basis, TLI Merge jobs roll the content from the previous day's .TLI file
into the monthly file and optionally move the source file to the TLI backup
directory. In this manner, static content is aggregated for delivery to the permanent
data warehouse.
v As part of the merge operation, the Portal attempts to match static objects from
the daily file with other instances of the object in the monthly file by using a
unique composed of the URL for the object and a checksum. If a match is found,
a simple reference to the object already written into the monthly file is created,
instead of adding a second instance of an identical object.
v You may review the .TLI files currently stored on the TLI server, including their
last modification date. See "Managing Tealeaf Servers" in the IBM Tealeaf cxImpact
Administration Manual.
Any merge operation also rolls the monthly TLI file when it is executed after the
beginning of the new month.
Note: You should configure the Merge job to run on a daily basis.
Note: After a monthly .TLI file has been closed, the file remains on the server. It is
the customer's responsibility to manage monthly .TLI static archives.
To enable the TLI merge job:
1. Open the TlSchedulersvccfg.xml file.
2. For the Name="TLI_Merge" job:
a. Set Enable to true.
b. The DailyStartTime value should be set to the same time as the time
configured for the Trim job.
c. Replace the servername value with the host name of the TLI server in your
environment.
3. Save the file. A restart is not required.
4. At the appointed time, the scheduled job is executed.
Configuring Tealeaf Status Jobs
Enabling jobs:
150
IBM Tealeaf CX: Configuration Manual
The Tealeaf Status job generates the Tealeaf Status report at specified intervals for
delivery through email. This job gathers data from servers in the Tealeaf
environment on their current operating conditions and captured data.
v Ad-hoc versions of the Tealeaf Status report can be generated through the Portal
for display in a browser window. See "Portal Logs" in the IBM Tealeaf cxImpact
Administration Manual.
v The Tealeaf Status report supersedes the deprecated Portal Status report. See
"Tealeaf Status Report" in the IBM Tealeaf cxImpact Administration Manual.
To enable the Tealeaf Status job:
1. Login to the Tealeaf Portal as an administrator.
2. From the Portal menu, select Tealeaf > TMS. The Tealeaf Management System
is displayed.
3.
4.
5.
6.
v See "Tealeaf Management System" in the IBM Tealeaf cxImpact Administration
Manual.
Click the WorldView tab. See "TMS WorldView Tab" in the IBM Tealeaf
cxImpact Administration Manual.
From the View drop-down, select Servers.
Click the Scheduling Service node.
Click Scheduling Service configuration.
7. From the Config Actions panel, click View/Edit. The TlSchedulersvccfg.xml
file is displayed.
8. For the Name="TealeafStatus" job:
a. Set Enable to true.
b. Changing the RunType setting is not recommended. See “Types of runs” on
page 147.
c. TealeafStatus should be configured to run every fifteen minutes. Set
RunType="RepeatEvery15Cmd".
d. Verify that the CmdString points to TealeafStatus.exe, relative to the
Tealeaf install directory. This value should be:
Tools\TealeafStatus.exe
9. Save the file.
10. Push the configuration changes to all servers in the environment. A restart is
not required.
11. At the appointed time, the scheduled job is executed.
v See "Tealeaf Status Report" in the IBM Tealeaf cxImpact Administration Manual.
Configuring the Tealeaf Status report:
You can configure the Tealeaf Status report to display INFO, WARNING and ERROR
messages based on values that you specify in the configuration.
Please complete the following steps to configure your Tealeaf Status report.
1. Login to the Tealeaf Portal as an administrator.
2. From the Portal menu, select Tealeaf > TMS. The Tealeaf Management System
is displayed.
v See "Tealeaf Management System" in the IBM Tealeaf cxImpact Administration
Manual.
3. Click the WorldView tab. See "TMS WorldView Tab" in the IBM Tealeaf
cxImpact Administration Manual.
4. From the View drop-down, select Servers.
Chapter 2. Configuring Tealeaf Components
151
5. Click the Scheduling Service node.
6. Click Tealeaf Status configuration.
7. From the Config Actions panel, click View/Edit. The TealeafStatus.ini file is
displayed.
8. Configure each section of the Tealeaf Status report:
v “TealeafStatus”
v “DataService” on page 153
v “Email” on page 153
v
v
v
v
v
v
v
“PcaThresholds” on page 153
“CanisterThresholds” on page 154
“ReportThresholds” on page 154
“IgnoreEventList” on page 154
“NoErrorEventList” on page 155
“NoErrorEventList” on page 155
“RepeatEventList” on page 155
9. Save the file.
10. Push the configuration changes to all servers in the environment. A restart is
not required.
The following sections describe individual configuration blocks in the Tealeaf
Status configuration.
TealeafStatus: General configuration parameters for the Tealeaf Status report.
[TealeafStatus]
CompanyName=myCompany
GeneralReportTime=07:00
MinutesToBetweenErrorReport=180
BlackOutPeriod=00:15,00:45
WriteReportToFile=True
ReportFileName=TealeafStatus.html
Property
Description
CompanyName
Name of company or environment for which the Tealeaf Status report is
being generated.
GeneralReportTime
Time in 24 hour clock to generate the report.
MinutesToBetweenErrorReport
Minutes between generation of error reports
BlackOutPeriod
Start and end time of the blackout period. Blackout period should be
configured during system maintenance period.
WriteReportToFile
When set to True, the report is written to the ReportFileName filename.
Note: WriteReportToFile must be set to False to generate Tealeaf Status
emails.
ReportFileName
Filename of the HTML to which the report is written, if enabled.
152
IBM Tealeaf CX: Configuration Manual
DataService: Connection information for connecting to the Tealeaf Data Service.
v See "Configuring the Tealeaf Data Service" in the IBM Tealeaf CX Configuration
Manual.
[DataService]
server=sierra
port=23000
Property
Description
server The identifier for the server that hosts the Tealeaf Data Service. See
"Configuring the Tealeaf Data Service" in the IBM Tealeaf CX Configuration
Manual.
port
The port number through which to communicate with the Tealeaf Data
Service
Email: Email parameters.
Note: WriteReportToFile must be set to False to generate Tealeaf Status emails.
[Email]
[email protected]
[email protected]
Subject=Tealeaf Status
Property
Description
From
The email address from which the Tealeaf Status report is sent
To
A comma-separated list of email addresses of recipients of the email
version of the Tealeaf Status report.
Subject
The Subject line of the email
PcaThresholds: Defines thresholds for the IBM Tealeaf CX Passive Capture
Application. When these thresholds are exceeded, an error is indicated in the
Tealeaf Status report. For more information on these statistics, see "PCA Web
Console - Statistics Tab" in the IBM Tealeaf Passive Capture Application Manual.
[PcaThresholds]
MaxIdle=120
MaxCpu=75
MaxRestart=0
MaxCacheSSLMisses=10000
Property
Description
MaxIdle
The maximum idle time in seconds, after which Tealeaf Status reports a
non-response PCA
MaxCpu The maximum CPU use rate as a percentage, above which Tealeaf Status
reports an overburdened PCA
MaxRestart
The maximum number of restarts since the last Tealeaf Status report, above
which Tealeaf Status reports the count
MaxCacheSSLMisses
When an SSL session record comes in for decryption, it is checked to see if
decryption cipher info for that session is in the cache. If not, it is counted
Chapter 2. Configuring Tealeaf Components
153
as a cache miss. These misses can happen if Passive Capture was restarted
and began capturing in-progress SSL sessions or it has exceeded the
default 10,000 concurrent SSL session cache entries and the LRU entries
were deleted.
CanisterThresholds: Thresholds for the Tealeaf Canister or Canisters in the system.
For more information on these statistics, see "System Status" in the IBM Tealeaf
cxImpact Administration Manual.
[CanisterThresholds]
CanisterDiskPctFree=5
WaitToBeEval=20000
WaitToBeLongTermed=20000
UnEvaluatedHits=10000
UnIndexedSessions=20000
MaxLssnDisplayCount=7
Property
Description
CanisterDiskPctFree
Minimum disk space as a percentage, below which Tealeaf Status reports
as an error.
WaitToBeEval
Maximum number of sessions waiting to be evaluated, above which
Tealeaf Status reports as an error.
WaitToBeLongTermed
Maximum number of sessions waiting to be closed and moved to the Long
Term Canister on disk, above which Tealeaf Status reports as an error.
UnEvaluatedHits
Maximum number of hits that have not yet been evaluated, above which
Tealeaf Status reports as an error.
UnIndexedSessions
Maximum number of sessions that have not been indexed, above which
Tealeaf Status reports as an error.
MaxLssnDisplayCount
Maximum number of updated LSSN records to be displayed. There is no
upper limit to this setting.
ReportThresholds: These thresholds pertain to the report database activities.
[ReportThresholds]
ReportInvalidIndexDelay=86400
DefaultMaxInvalidIndexPaths=12
Property
Description
ReportInvalidIndexDelay
The maximum number of seconds to wait for an invalid index to be
corrected, after which it is reported as an error
DefaultMaxInvalidIndexPaths
The maximum number of invalid index paths, above which Tealeaf Status
reports as an error.
IgnoreEventList: In this section, you can configure events from the Application
Event Log to ignore for inclusion in the Tealeaf Status report.
154
IBM Tealeaf CX: Configuration Manual
Event_<n>=[EventSource],[Category],[EventID],[MessageType]
Event_1=TeaLeaf Report Service,TeaLeafAlert,ALL,ALL
Event_2=TeaLeaf Event Reporter,ALL,10241,ALL
Event_3=TeaLeaf Session Indexer,ALL,9833,INFO
Property
Description
Property
test
<n>
a number, each one must be unique
[EventSource]
Name of the event source
[Category]
Event category or ALL
[EventID]
Number of the event id or ALL
[MessageType]
The type of event to report: ALL, ERROR, WARN, and INFO
NoErrorEventList: Application Event Log events can be specified in this section if
you do not want them to generate an error in the Tealeaf Status report.
[NoErrorEventList]
Event_1=TeaLeaf Report Service,TeaLeafRS,200,ERROR
Event_2=TeaLeaf Report Service,TeaLeafRS,201,ERROR
Event_3=TeaLeaf Session Indexer,ALL,9845,ERROR
Event_4=TeaLeaf Session Indexer,ALL,9745,ERROR
Event_5=TeaLeaf Session Indexer,ALL,9753,ERROR
For more information on the format, see “IgnoreEventList” on page 154.
RepeatEventList: In this section, you can list Application Event Log events that
should only be listed once. Configuring this section for events that are likely to
repeat many times can greatly reduce the size and clutter of your Tealeaf Status
reports.
[RepeatEventList]
Event_1=TeaLeaf Alert Service,TeaLeafAS,200,INFO
Event_2=TeaLeaf Alert Service,TeaLeafAS,201,INFO
Event_3=TeaLeaf Session Indexer,Check,12553,INFO
Event_4=TeaLeaf Session Indexer,Control Prog,9834,INFO
Event_5=TeaLeaf Pipeline,All,16,WARN
For more information on the format, see “IgnoreEventList” on page 154.
Configuring Portal Status Jobs
Note: DEPRECATED FEATURE:
The Portal Status Report has been superseded by the "Tealeaf Status Report" in the
IBM Tealeaf cxImpact Administration Manual, which requires no additional
configuration. For legacy customers, the following configuration documentation is
retained. In a future release, it may be removed. If you are using Portal Status, it is
recommended that you migrate to using the "Tealeaf Status Report" in the IBM
Tealeaf cxImpact Administration Manual. For more information, see “Configuring
Tealeaf Status Jobs” on page 150.
Chapter 2. Configuring Tealeaf Components
155
The Portal Status job gathers a useful set of data and delivers it to the Tealeaf
Portal for review. Through Portal Status, you can monitor critical aspects of the
Tealeaf platform.
To enable the Portal Status job:
1. Open the TlSchedulersvccfg.xml file.
2. For the Name="Status" job:
a. Set Enable to true.
b. Changing the RunType setting is not recommended. See “Types of runs” on
page 147.
c. If RunType="RepeatDailyCmd", then you must configure the start time. Times
are specified on the 24-hour clock. For example, the following job executes
at 11:30 pm according to the Tealeaf timezone.
DailyStartTime="23:30"
v For more information on timezones, see "Configuring the System
Timezone" in the IBM Tealeaf CX Configuration Manual.
d. Verify that the CmdString points to PortalStatus.exe inside the Tealeaf
install directory.
3. Save the file. A restart is not required.
4. At the appointed time, the scheduled job is executed.
Configuring Additional Jobs
You may specify additional jobs by completing the following steps.
Note: You should specify only the minimum set of jobs required to meet your
needs. Depending on the type of job and the volume of data processed, these jobs
may impact system performance. Where possible, you should configure jobs to
execute during off-peak hours.
1. Copy the XML specification for a job that is similar to the job you're creating.
2. Change the value of the Name attribute to a new name that is unique within the
available job names.
3. Specify the other properties.
Note: The job should be configured to execute at a time that does not overlap
with other scheduled and enabled jobs.
4. Save the configuration.
Configuring the Extract Service
The Tealeaf Extract Service is used by Tealeaf products to extract session data from
the Tealeaf databases for packaging and delivery to third-party systems. Tealeaf
Extract Service is used by IBM Tealeaf cxConnect for Data Analysis and IBM
Tealeaf cxVerify during normal operations and must be enabled and operational for
use with those products.
Note: IBM Tealeaf cxConnect for Data Analysis and IBM Tealeaf cxVerify are
separately licensable components of the IBM Tealeaf CX platform.
v For more information about IBM Tealeaf cxConnect for Data Analysis, please
contact your IBM Tealeaf representative.
v IBM Tealeaf cxVerify is no longer available as a newly licensed product as of
Release 8.7. Customers that licensed IBM Tealeaf cxVerify in Release 8.6 and
156
IBM Tealeaf CX: Configuration Manual
earlier may continue to use and receive support for the product in Release 8.7
and later. For more information, please contact Tealeaf Customer Support .
When a IBM Tealeaf cxConnect for Data Analysis or IBM Tealeaf cxVerify task is
executed, the query to retrieve the specified sessions is prepared and delivered to
the Tealeaf Extract Service, which is responsible for executing the query and
returning the sessions to the calling program.
Configuration
You can configure the Extract Service through TMS.
To configure:
1.
2.
3.
4.
5.
6.
Login to the Tealeaf Portal as an administrator.
In the Portal menu, select Tealeaf > TMS.
In the Servers view, click Extract Service.
Click Tealeaf Extractor Service configuration.
In the Config Actions panel, click View/Edit.
The following settings are available for editing. See "Tealeaf Management
System" in the IBM Tealeaf cxImpact Administration Manual.
Setting
Description
ConcurrentJobs
The maximum number of IBM Tealeaf cxConnect for Data Analysis and
IBM Tealeaf cxVerify jobs that are permitted to run concurrently.
v The default value is 1.
DBThreads
The number of database threads used by the Tealeaf Extract Service to
retrieve sessions.
v The default value is 10.
DeferTime
The number of minutes that the job is delayed before it is run again when
session search indexes are not available. Jobs may be run up to the
MaxRetries number of attempts.
v The default value is 60.
DispReschdJobs
When set to 1, rescheduled IBM Tealeaf cxConnect for Data Analysis and
IBM Tealeaf cxVerify are displayed in the Tealeaf Portal.
v The default value is 0.
DisplayDays
The number of days to display a scheduled IBM Tealeaf cxConnect for
Data Analysis or IBM Tealeaf cxVerify scheduled job in the Tealeaf Portal.
v The default value is 7.
Enable-TransactionLog
When set to True, this option enables transaction logging for the Extractor
Service, which allows IBM Tealeaf cxConnect for Data Analysis to resume a
job where it left off, if the job fails for some reason.
ExtendedJobLog
When set to 1, the Tealeaf Extract Service writes an extended log file for
each job, which is useful for debugging purposes.
Chapter 2. Configuring Tealeaf Components
157
v The default value is 1.
ExtractorMode
Installation parameter. Please do not change.
v The default value is 1.
ExtractorServicePath
The path to the TLExtractService.exe file. By default, this service
executable is located in the following directory:
<Tealeaf_install_directory\DataExtractor
LogLevel
The log level for the Tealeaf Extract Service (1-5).
Note: Log level 5 is for debugging purposes only.
v The default value is 1.
MaxErrors
The maximum number of permitted errors before a job is failed.
v The default value is 5.
MaxRetention
The maximum number of days that a IBM Tealeaf cxConnect for Data
Analysis or IBM Tealeaf cxVerify job is persisted.
v The default value is 5.
MaxRetries
When a IBM Tealeaf cxConnect for Data Analysis or IBM Tealeaf cxVerify
job fails, this setting specifies the maximum number of attempts that the
Tealeaf Extract Service makes to execute the job before failing the job.
v The default value is 2.
PassdueDays
The maximum number of days that a pass due job is allowed to be
retrieved, before it is failed.
SSThreads
The number of Search Server threads used by Tealeaf Extract Service.
v The default value is 10.
Reference
IBM Tealeaf cxConnect for Data Analysis: See "cxConnect Configuring Tasks" in
the IBM Tealeaf cxConnect for Data Analysis Administration Manual.
IBM Tealeaf cxVerify: See "cxVerify Configuring Tasks" in the IBM Tealeaf cxVerify
Administration Manual.
158
IBM Tealeaf CX: Configuration Manual
Chapter 3. Initial CX Configuration
After you have successfully installed the PCA and Windows software, you can use
the following steps as a means of performing the initial configuration of your IBM
Tealeaf CX solution. There is no required order of completing these configuration
tasks. However, for best results, it is recommended that you complete the
following steps in the listed order.
Additional optional configuration steps are listed below.
Event Model Backup
Before you begin making modifications to your event object definitions, you may
want to perform a backup, which can be used to restore your event model to its
previous state. See "Event Model Backup and Restore" in the IBM Tealeaf cxImpact
Administration Manual.
Tealeaf CX Configuration
Note: Before completing these steps, all required Linux and Windows software
must be installed on all servers in the Tealeaf environment. See "CX Installation" in
the IBM Tealeaf CX Installation Manual.
Note: This sequence of steps provides a framework for configuring the IBM
Tealeaf CX solution. These steps should be reconciled with and adjusted based on
the specifics of your Tealeaf solution. If you have questions, please contact
http://support.tealeaf.com.
Initial Configuration Steps
1. "Initial PCA Configuration" in the IBM Tealeaf Passive Capture Application Manual
2. “Initial TMS Configuration” on page 169
3. “Initial Portal Configuration” on page 160 The configuration steps include IBM
TealeafcxView configuration. For more information on IBM TealeafcxView, see
"cxView User Manual" in the IBM Tealeaf cxView User Manual.
4. “Initial Pipeline Configuration” on page 221
Note: For enterprise security reasons, it may be important to immediately
implement privacy rules. Please complete the steps on this page for any
implementation.
Optional Configuration
Initial Configuration of Optional Components: The following pages describe the
configuration of several separately licensable components of the IBM Tealeaf CX
solution. please contact your IBM Tealeaf representative.
1. "Initial RTV Configuration" in the IBM Tealeaf CX Configuration Manual
v RTV is installed through a separate installer from IBM Tealeaf cxImpact. See
"RealiTea Viewer Overview" in the IBM Tealeaf RealiTea Viewer User Manual
2. "Initial cxResults Configuration" in the IBM Tealeaf cxResults Administration
Manual
© Copyright IBM Corp. 1999, 2014
159
3. "Initial cxReveal Configuration" in the IBM Tealeaf cxReveal Administration
Manual
4. "Initial CX Mobile Configuration" in the IBM Tealeaf CX Configuration Manual
5. "Initial cxConnect Configuration" in the IBM Tealeaf CX Configuration Manual
v IBM Tealeaf cxConnect for Data Analysis is installed through a separate
installer from IBM Tealeaf cxImpact. See "cxConnect Installation" in the IBM
Tealeaf cxConnect for Data Analysis Administration Manual.
6. "Initial cxVerify Configuration" in the IBM Tealeaf CX Configuration Manual
v IBM Tealeaf cxVerify is installed through a separate installer from IBM
Tealeaf cxImpact. See "cxVerify Installation" in the IBM Tealeaf cxVerify
Administration Manual.
Verifying Your Tealeaf Solution
After you have completed installation and initial configuration of each component
in your Tealeaf solution, you should verify operations of all major components.
v See "Testing Your Tealeaf Solution" in the IBM Tealeaf CX Configuration Manual.
Initial Portal Configuration
Note: This section provides a framework for performing the initial configuration of
one component of the IBM Tealeaf CX system in a simplified deployment model.
Depending on your Tealeaf solution's deployment, additional configuration may be
required. If you have any questions about configuration, contact
http://support.tealeaf.com.
After you log in to the Portal for the first time, perform the tasks that are listed in
this section to complete the basic configuration of the IBM Tealeaf cxImpact
product.
Portal Announcements
With each installation or upgrade, it is recommended that you create a Portal
Announcement for display to users as to the current stage of the machine, its state,
and whether there are any current issues that might impact Tealeaf users. The
following are example messages:
v Stage: Proof of Concept
Stage: Proof of Concept
State: Functional
Notes:
This system is intended to demonstrate Tealeaf capabilities only. This system
should not be used for any functions other than demonstrating system
functionality.
For more information, contact your Tealeaf administrator. From the Portal
menu, select Help > Contact Tealeaf Administrator.
v Stage: Development
Stage: Development
State: Functional
Notes:
This system is under construction. Users may experience problems using the
system.
For more information, contact your Tealeaf administrator. From the Portal
menu, select Help > Contact Tealeaf Administrator.
v Stage: Staging
160
IBM Tealeaf CX: Configuration Manual
Stage: Staging
State: Functional
Notes:
This system is currently being tested for production release. Please report
any problems.
For more information, contact your Tealeaf administrator. From the Portal
menu, select Help > Contact Tealeaf Administrator.
v Stage: Production
Note: For most production environments, a Portal Announcement is
unnecessary. If you create one following the pattern above, it should expire
within a few days of launching the production environment.
For more information on configuring and enabling Portal Announcements, see
"Portal Announcements" in the IBM Tealeaf cxImpact Administration Manual.
Configure Tealeaf System Time Zone
In the Tealeaf system time zone is used by all Tealeaf servers to synchronize a
variety of tasks. During the installation process, this system-wide setting must be
defined and applied to each server in the environment.
v See “Configuring the System Timezone” on page 12.
Miscellaneous Settings
In the Miscellaneous settings panel, you can define a variety of settings, including
the contact information for the Tealeaf administrator. See "CX Settings" in the IBM
Tealeaf cxImpact Administration Manual.
Server Configuration
Authentication
At this time, you can configure the method of authentication used by the Tealeaf
Portal and other services. Search Server must be made aware of the mode of
authentication. See “Configuring the Search Server” on page 107.
For general information on authentication methods, see "Authentication" in the
IBM Tealeaf cxImpact Administration Manual.
Configure Machine Reference Values
During the installation process, reference values for the machines hosting Tealeaf
servers and services are inserted into the database for use by the Portal. The
sections below describe the recommended values depending on your deployment
scenario.
General Notes:
v For Search Server, all machines on which Search Server is installed must have
their Portal Server setting pointing to the machine on which the Portal is
installed. This setting must be blank on the Portal machine itself. When the Data
Service is running on the Report machine, however, all Search Servers should
point their Portal server at the Report machine.
Deployment - All-in-One: Portal Management Page:
Server Name
Recommended Value
Chapter 3. Initial CX Configuration
161
Report Server
current machine name (not localhost)
Data Service
current machine name (not localhost)
v These values can be reviewed and changed through the Portal Management
page. See "Managing Tealeaf Servers" in the IBM Tealeaf cxImpact Administration
Manual.
Search Server Configuration:
Server Name
Recommended Value
Portal Server
leave blank
Data Service
current machine name (not localhost)
These values can be reviewed and changed through Search Server configuration.
See “Configuring the Search Server” on page 107.
Deployment - Multi-Server: In a typical multi-system deployment, the Windows
servers are configured as follows:
v 1 Portal and Report Machine
v 1 or more Processing Server Machines (Canister(s))
Portal and Report Machine: Portal Management Page:
Server Name
Recommended Value
Report Server
current machine name (not localhost)
Data Service
current machine name (not localhost)
These values can be reviewed and changed through the Portal Management page.
See "Managing Tealeaf Servers" in the IBM Tealeaf cxImpact Administration Manual.
Search Server Configuration:
Note: If the Portal Server and Reporting Server are installed on separate machines,
in the Search Server configuration the Portal Server field should be set to the name
of the Reporting Server for all Canisters. On the Portal Server and Reporting
Server themselves, leave this field blank.
Server Name
Recommended Value
Portal Server
leave blank
Data Service
current machine name (not localhost)
Alert Server
If this value is not specified, then the Portal Server location is used.
162
IBM Tealeaf CX: Configuration Manual
These values can be reviewed and changed through Search Server configuration.
See “Configuring the Search Server” on page 107.
Canister(s): Search Server Configuration:
Server Name
Recommended Value
Portal Server
Portal Machine name
Data Service
Portal Machine name
v These values can be reviewed and changed through Search Server configuration.
See “Configuring the Search Server” on page 107.
Deployment - Multi-Server with Portal and Report Server on Different
Machines: In most deployments, the Portal application and the Report Server are
installed on the same machine. However, during initial installation, you can choose
to install these two components on different machines.
v If the Report Server is installed on a separate machine, then the setting for
Search Server Alias must point to the Report Machine, especially for the Portal
machine.
Portal Machine: Portal Management Page:
Server Name
Recommended Value
Report Server
Report Machine name
Data Service
Report Machine name
These values can be reviewed and changed through the Portal Management page.
See "Managing Tealeaf Servers" in the IBM Tealeaf cxImpact Administration Manual.
Search Server Configuration:
Server Name
Recommended Value
Portal Server
leave blank
Data Service
Report Machine name
v These values can be reviewed and changed through Search Server configuration.
See “Configuring the Search Server” on page 107.
Report Machine: Search Server Configuration:
Server Name
Recommended Value
Portal Server
leave blank
Data Service
current machine name (not localhost)
Chapter 3. Initial CX Configuration
163
v These values can be reviewed and changed through Search Server configuration.
See “Configuring the Search Server” on page 107.
Canister(s): Search Server Configuration:
Server Name
Recommended Value
Portal Server
Report Machine name
Data Service
Report Machine name
v These values can be reviewed and changed through Search Server configuration.
See “Configuring the Search Server” on page 107.
Alert Service: The Portal assumes the machine configured to be the Report Server
in the Portal is where the Alert Service is running. The Alert Service needs to be
running on that machine.
v See “Configuring the Alert Service” on page 141.
Add Servers
If there are other Tealeaf servers in the environment, the Portal must be made
aware of them. See "Managing Tealeaf Servers" in the IBM Tealeaf cxImpact
Administration Manual.
Tealeaf Data Service
The Tealeaf Data Service brokers connections between Tealeaf servers and services
and the databases they use. Depending on your deployment, you may need to
configure the Tealeaf Data Service references in Search Server configuration.
v See "Configuring the Tealeaf Data Service" in the IBM Tealeaf CX Configuration
Manual.
v For more information on configuring Search Server, see “Configuring the Search
Server” on page 107.
CX User Administration
Configuring cxImpact Users and Groups
After you have configured application settings, you can configure IBM Tealeaf
cxImpact user and group settings. To review the IBM TealeafcxImpact users who
are currently logged in, click the Current Users link in the left navigation pane of
the Portal Management page. See "CX User Administration" in the IBM Tealeaf
cxImpact Administration Manual.
For IBM Tealeaf cxImpact users, permissions are defined as the superset of all
permissions for groups of which they are members. The group level settings for
IBM Tealeaf cxImpact users are inherited from the user's primary group. When
defining permissions for IBM TealeafcxImpact users, you should first assign them
at the group level and then make adjustments for individual users. When IBM
TealeafcxImpact is installed, two user groups are automatically created:
v Admin Group - IBM Tealeaf cxImpact administrators.
– ADMIN - default IBM Tealeaf cxImpact administrator account.
v Portal User - IBM Tealeaf cxImpact users.
– No default Portal user account is created.
164
IBM Tealeaf CX: Configuration Manual
Configuring ADMIN account: The ADMIN account is the master account for the
Tealeaf Portal. Before you configure other accounts in the system, you should
configure this account.
v To configure the ADMIN account, click the IBM Tealeaf CX User Administration
link in the left navigation panel. Click Users. Then, select ADMIN. The account
settings are displayed. Review the following items:
Setting Description
Username
By default, this account username is set to ADMIN.
Note: Renaming this account is not permitted.
NT Username
If you are using NT authentication, enter the NT domain username for
this account.
– For more information on NT Authentication, see "Authentication" in
the IBM Tealeaf cxImpact Administration Manual.
NT Domain
If you are using NT authentication, enter the NT domain for this
account.
– For more information on NT Authentication, see "Authentication" in
the IBM Tealeaf cxImpact Administration Manual.
Email
Enter a valid email address for the Tealeaf administrator who manages
IBM Tealeaf cxImpact.
Time Zone (used in Search)
Select the administrator's preferred time zone. When viewing session
data, the date and time information is converted to the configure time
zone.
This setting defaults to the Primary Group Default. The administrator
can then make adjustments to this setting by selecting from the time
zones.
System Locale
Select the preferred system locale setting to configure the Tealeaf Portal
to use the regional locale settings for the administrator user. The system
locale setting defines how currency, numeric values, date, and time are
formatted and displayed.
This setting defaults to the Primary Group Default at the user level. The
administrator can then make adjustments to this setting by selecting
from the available system locales.
Date Format
Select the format, such as mm/dd/yyyy, from the drop-down list.
At the user level, the administrator's date format defaults to the Primary
Group Default that would be the Admin Group's date format. At the
group level, the Admin Group's date format defaults to the date format
of the system locale that admin group selects. However, the
administrator user can change date format from Primary Group Default
to Use system locale (default) to apply the selected System Locale
settings to the date format. You can also select a specific date format
from the list of available formats.
Chapter 3. Initial CX Configuration
165
Portal Navigation Menu
This account should have access to all Tealeaf Portal menu items. You
can leave the default value.
Primary User Group
This account should have its primary user group set to Admin Group,
which is the default value.
Change ADMIN password: It is recommended that you change the password on the
ADMIN account at this time. Select the ADMIN account and click Password. Enter the
new password twice and click Save.
Configuring Groups: Initially, these two groups have the same permissions,
except for the default start page. IBM Tealeaf cxImpact Admin users start on the
Portal Management page by default, while IBM Tealeaf cxImpact Users start on the
default search template page.
For each group, you should review the following settings at a minimum:
Setting Description
Default Password Expiration
The number of days that a password is allowed to be used before all
members of the group must choose a new one.
Password Expiration Warning Period
The number of days prior to password expiration that a user begins to
receive Portal warning messages to change it before it expires.
Default Portal Navigation Menu
If set to Disable, members of this group cannot see the top-level Portal
navigation menu and can access only Portal pages available through their
defined default page.
Default Log User Out If Idle
If set to Enable, members of this group are automatically logged out of the
Portal if their accounts are idle for a specified period of time.
v You can change the idle timeout setting. See “Configuring the Report
Server” on page 58.
Default Lock Replay Mode
If set to Disable, members of this group cannot change their Replay Mode.
Default Replay Mode
Defines the replay mode for the group. If members of this group are not
provided the IBM Tealeaf CX RealiTea Viewer application, set this value to
BBR, which is a web-based replay application.
Default Search Template
You can select the default search template to display to members of this
group from the drop-down.
Additionally, you should review the options available by selecting each of the
following buttons at the top of the settings pane:
v Assign Users - To assign a user to the selected group, click the Assigned
checkbox and click Save.
v Menu Profile - Make selections in the menu tree to define the pages to which
members of this group can access. The default settings for IBM Tealeaf cxImpact
groups should provide adequate access.
166
IBM Tealeaf CX: Configuration Manual
Note: By default, the IBM Tealeaf cxImpact Admin group has additional menu
permissions to see monitoring reports, such as Activity Reports and Active
Status, which may be used to verify system status and to diagnose problems
reported by user group members.
v Administration Profile - You can select the areas of the Portal Management
page to which the group members have access.
Note: The group must have the Portal Management page in its menu profile.
Access to these areas should be reserved for administrator groups.
v Search Profile - The Search Profile defines the options available to the members
of this group on the Search page, as well as the specific search templates that
they can access.
v Browser Replay Profile - For groups with access to Browser-Based Replay, this
profile controls the actions and permissions available to group members when
using BBR.
After you have configured group-level settings, you can make adjustments to
individual user accounts. To see the user settings, click the Users link in the left
navigation pane under IBM Tealeaf CX User Administration.
v See "CX User Administration" in the IBM Tealeaf cxImpact Administration Manual.
Report Configuration
You can also define and configure reports for use in the system.
v For more information on configuring reports, see "Report Configuration" in the
IBM Tealeaf cxImpact Administration Manual.
v Scorecards are used to report in graphical or tabular format useful metrics on
data captured by Tealeaf. For more information on configuring scorecards, see
"Configuring Scorecards" in the IBM Tealeaf cxView User Manual.
v Dashboards can be used to arrange multiple reporting components into a single
page. For more information on configuring dashboards, see "Configuring
Dashboards" in the IBM Tealeaf cxView User Manual.
v Tealeaf Status report delivers status information on the components of the
Tealeaf system. For more information on configuring the Tealeaf Status report,
see "Tealeaf Status Report" in the IBM Tealeaf cxImpact Administration Manual.
v Search and List Templates can be configured to enable specific search fields for
specified groups. For more information on configuring search templates, see
"Configuring Search Templates" in the IBM Tealeaf cxImpact Administration
Manual.
Note: If the number of days to retain hourly event reporting data is changed, the
reports might not display current data until the system normalizes.
Testing Your Configuration
After you have completed your initial configuration, you can perform the
following steps to verify the configuration. A more complete set of tests can be
executed after all Tealeaf components have been configured. See "Testing Your
Tealeaf Solution" in the IBM Tealeaf CX Configuration Manual.
1. Test a IBM Tealeaf cxImpact User Account: After you have configured user
and group settings, you should create a sample user for each group and test
menu access, its default search template, and replay features.
a. Check an account that is a basic Portal user.
Chapter 3. Initial CX Configuration
167
b. Try to search for session data. See "Searching Session Data" in the IBM
Tealeaf cxImpact User Manual.
v If you cannot complete a search, there may be issues with your
authentication configuration. See "Authentication" in the IBM Tealeaf
cxImpact Administration Manual.
c. For more information on replay through the Portal, see "CX Browser Based
Replay" in the IBM Tealeaf cxImpact User Manual.
2. Login under ADMIN: You should verify that the ADMIN account is properly
configured.
a. Log in using this account and check to see that all menu items are available.
b. If you have configured Portal announcements, select Help > Portal
Announcements.
c. If you have configured the Tealeaf administrator, select Help > Contact
Tealeaf Administrator.
3. Run Portal Tests:
a. From the Portal menu, select Help > About IBM Tealeaf CX Portal.
b. In the Portal Performance Tests panel, click the Execute All link.
c. When the tests are completed, a Success message or a time value should be
displayed in the Results column. These messages indicate that the Portal is
operational and able to communicate with its required component
frameworks and the Tealeaf database.
4. Generate Tealeaf Status Report: The Tealeaf Status report can be configured to
provide useful status information from Tealeaf databases, servers, and
components, including the IBM Tealeaf CX Passive Capture Application.
Through the Portal, you can generate one of these reports.
a. To execute the Tealeaf Status, select Help > Portal Management.
b. In the Portal Management page, click the Logs section in the left navigation
panel.
c. Under the Logs heading, click the View Tealeaf Status link.
d. The Tealeaf Status report is generated in the Portal.
e. Review the generated report for error or warning conditions.
5. Review Logs:
a. In the Portal Management page under the Logs heading, you can bundle
the Tealeaf logs together into a .ZIP file for external review. Click the
Tealeaf Logs and Configuration Files link. Save the file locally.
b. Review each of the zipped log files for Error entries.
6. Verify Tealeaf Servers:
a. In the Portal menu, select Tealeaf > Portal Management.
b. Under Tealeaf Servers, click the Manage Servers link.
c. Review the list of available servers. For each server, use the buttons in the
toolbar to complete the following:
1) Ping the server.
2) Review the Windows Event Log.
3) Review the Tealeaf Logs.
d. You should display inactive servers to verify that none of the listed ones
should be active.
When all Tealeaf components are configured, you should complete an end-to-end
test. See "Testing Your Tealeaf Solution" in the IBM Tealeaf CX Configuration Manual.
168
IBM Tealeaf CX: Configuration Manual
Initial TMS Configuration
Note: This section provides a framework for performing the initial configuration of
one component of the IBM Tealeaf CX system in a simplified deployment model.
Depending on your Tealeaf solution's deployment, extra configuration may be
required. If you have any questions about configuration, contact
http://support.tealeaf.com.
The Tealeaf Management System provides a single, central point from which you
can manage all Tealeaf servers, components, and their configurations. Through
TMS, you define properties for individual Tealeaf components and then schedule
and execute jobs to push those configuration changes to all dependent servers.
v See "Tealeaf Management System" in the IBM Tealeaf cxImpact Administration
Manual.
Through TMS, you can define, configure, and monitor the Windows pipelines that
process hit data forwarded from the IBM Tealeaf CX Passive Capture Application
to your Processing Servers for reporting purposes.
v For more information about defining and configuring Windows pipelines, see
"TMS Pipeline Editor" in the IBM Tealeaf cxImpact Administration Manual.
v For more information about monitoring Windows pipelines, see "TMS Pipeline
Status Tab" in the IBM Tealeaf cxImpact Administration Manual.
TMS also provides the means of managing your Tealeaf database, including
backup and import, as well as exporting XML configuration reports on the
contents of TMS.
v See "TMS Advanced Tab" in the IBM Tealeaf cxImpact Administration Manual.
This section provides a sequence of tasks to perform the initial configuration of the
Tealeaf Management System. Read the sections in the listed order to complete the
necessary steps to get TMS up and running.
Example Architecture
This section assumes the following deployment for your Tealeaf solution.
Depending on your Tealeaf deployment, additional configuration may be required.
v 1 PCA Server - The IBM Tealeaf CX Passive Capture Application manages the
capture of requests and responses forwarded from your web application and
assembles them into meaningful session data for use by the rest of the Tealeaf
system.
Note: Before you complete the TMS configuration, you should have already
installed and configured at least one instance of the IBM Tealeaf CX Passive
Capture Application on a separate Linux server. See "Initial PCA Configuration"
in the IBM Tealeaf Passive Capture Application Manual.
v 1 HBR Server - Health-Based Routing (HBR) managing load balancing and
failover in Tealeaf environments that include multiple canister servers. For
purposes of this initial configuration, it is assumed that HBR has been deployed
in your Windows pipeline and properly configured. For more information on
HBR, see “Health-Based Routing (HBR) Session Agent” on page 263.
v 2 Canister Servers - These Canister Servers (or Processing Servers) perform the
essential processing of hits received to them and writes them to disk for
indexing and ultimately search.
Chapter 3. Initial CX Configuration
169
v 1 Reporting Server - The Reporting Server consists of the Portal Web Interface,
the Data Server, and the IBM Tealeaf CX databases.
Note: TMS is typically installed and hosted on the Reporting Server.
Pre-Requisites
1. It is assumed that all Tealeaf software has been installed on Windows and
Linux servers. Before you begin, please complete all software installation first.
See "CX Installation" in the IBM Tealeaf CX Installation Manual.
2. Additionally, you should have already performed the initial configuration steps
for the IBM Tealeaf CX product components. See Chapter 1, “Overview of CX
Configuration,” on page 1.
TMS Pre-Requisites
Before you begin configuring TMS, you should complete the following steps:
1. Get latest build of TMS for your Tealeaf version.
v Tealeaf software can be downloaded. For more information on downloading
Tealeaf software, see Tealeaf CX Downloads.
2. Assign the TMS master server.
Note: In almost all deployments, the TMS master server should be Portal
Server, unless there is a compelling reason to assign it to another server.
Initializing TMS
Configuration files such as TealeafCaptureSocket.cfg are available within the
Tealeaf install directory. If changes are made outside of TMS, you may be
prompted of these external changes when you try to edit the associated
configuration inside TMS.
Note: Avoid editing Windows configuration files directly.
First Startup
When TMS is started for the first time, the following steps are performed.
1. TMS master server:
a. TMS Datastore is created.
b. Data dictionary is loaded from TMSManifest.dll.
c. TMS performs a discovery of components & configurations on the TMS
master server.
d. TMS master server starts listening for requests.
2. All TMS slave servers:
a. TMS slave servers attempt to contact the TMS master.
b. If the connection attempt fails:
1) The connection is retried every 10 seconds.
2) An error is logged every 5 minutes until the connection is successful.
c. TMS Datastore is created.
d. Slave server requests data from the TMS master server.
e. TMS performs a discovery of components & configurations on the TMS
slave server. Newly discovered items are forwarded to the TMS master for
updating.
f. Slave server begins listening for requests.
170
IBM Tealeaf CX: Configuration Manual
Subsequent Startups
After the first time TMS is started, subsequent starts or restarts of TMS result in
the following steps:
1. TMS master server:
a. TMS master server checks TMSManifest.dll for data dictionary updates.
b. TMS performs a discovery of components & configurations on the TMS
master server.
c. TMS master server starts listening for requests.
2. All TMS slave servers:
a. TMS slave servers attempt to contact the TMS master.
b. If the connection attempt fails:
1) The connection is retried every 10 seconds.
2) An error is logged every 5 minutes until the connection is successful.
c. TMS Datastore is created.
d. Slave server requests data from the TMS master server.
e. TMS performs a discovery of components & configurations on the TMS
slave server. Newly discovered items are forwarded to the TMS master for
updating.
f. Slave server begins listening for requests.
TMS Settings
When the Portal becomes available, you should login to the Portal and configure
the TMS Master server.
v See “Initial Portal Configuration” on page 160.
1. Login to the Tealeaf Portal as an administrator.
2. In the Portal menu, select Tealeaf > TMS.
3. In the Server view, click the Tealeaf Management Server node.
4. Click Tealeaf Management Server configuration.
5. In the Config Actions pane, click View/Edit.
6. The Tealeaf Management Server configuration is displayed:
Table 4. TMS Settings
Field
Description
Required Value
Days to Keep Notifications
Number of days to retain notification Retain default value for now
messages.
Log Level
The log level for writing messages to
the TMS log.
Retain default value for now
Master Port
Port number for the TMS master
server to use. For more information
ports used by Tealeaf, see "CX
Pre-Installation Checklist" in the IBM
Tealeaf CX Installation Manual.
Default setting is 20000. Change this
value only if required.
Chapter 3. Initial CX Configuration
171
Table 4. TMS Settings (continued)
Field
Description
Required Value
Master Server
Enter the name of the server that is
the TMS master.
Note: When specifying the TMS
master server on TMS slave servers,
use the DNS-resolvable machine
name, which can be acquired by
running the hostname command from
the Windows command line.
Specify the machine name. If the
TMS Master is installed on the Portal
Server, use localhost.
Note: Unless there is a strong reason
to do otherwise, the Portal Server
should always be the TMS master.
Using a different server as TMS
master may require additional
configuration and extra processing.
Note: It is recommended that you
install on the TMS Server first and
launch the TMS server. If it is on the
Portal Server, it is not required that
you start the Portal. You can install
and start other servers first; these
servers poll for the TMS master
server until it comes online.
For more information on these settings, see "TMS Administration" in the IBM
Tealeaf cxImpact Administration Manual.
Defining Event Master
Through TMS, you can specify the Tealeaf server that is the event master server for
event slave servers. The event master server maintains the copy of record for
Tealeaf event definitions, changes to which are published to the event slave
servers.
v The Event master is specified through the Search Server configuration. See
“Configuring the Search Server” on page 107.
1. Login to the Tealeaf Portal as an administrator.
2. In the Portal menu, select Tealeaf > TMS.
3. In the WorldView, select Servers from the drop-down.
4. For each listed server that is not the event master server:
a. In the Server view, click the Search Server node.
b. Click Search Server configuration.
c. In the Config Actions pane, click View/Edit.
d. The Search Server configuration is displayed.
e. Click the Event Master Server item.
f. Enter the machine name for the event master server.
g. Click Apply.
h. Click Save.
5. Repeat the above configuration steps for each event slave server in the Tealeaf
environment.
v See “Configuring the Search Server” on page 107.
Adding New Servers
When a new server is added to the Tealeaf system, it automatically registers itself
with the TMS Master and uploads its configuration data.
172
IBM Tealeaf CX: Configuration Manual
Configuration Management
You can now configure TMS to manage your Tealeaf configurations across all
Tealeaf components in your environment.
Using Keywords
You can assign keywords to specific configurations and then filter the WorldView
display to show only those items that share the same keyword. For example, you
could assign the keyword SearchServer for the Search Server configuration across
all Tealeaf servers. See "TMS WorldView Tab" in the IBM Tealeaf cxImpact
Administration Manual.
Sharing Configurations
Through TMS, you can specify TMS items on different servers to share the same
configuration.
1. In TMS WorldView, select the item to share a configuration.
2. In the Config Actions pane, click Assign (share).
3. In the dialog, select the items to share the same configuration.
4. Click Assign.
5. The next time a push configuration job is executed, all servers are updated with
the latest shared configuration from the TMS master. See "TMS WorldView Tab"
in the IBM Tealeaf cxImpact Administration Manual.
Scheduling Jobs
Through the TMS Jobs tab, you can schedule the execution of jobs whose actions
you specify. These jobs can be push or assign a configuration, stop or start or
restart a component, and more. See "TMS Jobs Tab" in the IBM Tealeaf cxImpact
Administration Manual.
Pushing Configurations: After you have specified all of the components that are
to share configurations, you can configure a job to push configurations to
dependent servers and components.
Managing Revisions
In the TMS WorldView tab, you can manage revisions to configurations for each
displayed configuration.
To access an earlier configuration version:
1. In the TMS WorldView tab, select the configuration that has an earlier version
you wish to review.
2. In the Config Info panel, select the desired version from the Versions
drop-down.
3. Click View/Edit.
4. The older version of the configuration is displayed.
Note: If you save the configuration, it is saved as a new version for the
selected server. You must specify a Push Configuration job to make the saved
version active on the server(s).
For more information on revisions, see "TMS WorldView Tab" in the IBM Tealeaf
cxImpact Administration Manual.
Chapter 3. Initial CX Configuration
173
Update Tasks
Depending on your Tealeaf solution, you may be required to complete some or all
of the following tasks on a regular basis through TMS.
Editing Privacy through TMS
Tealeaf privacy enables the removal or masking of sensitive customer data that is
part of the web transaction stream. For more information on how Tealeaf manages
privacy, see "Managing Data Privacy in Tealeaf CX" in the IBM Tealeaf CX
Installation Manual.
In general, it is recommended that you apply privacy rules through the IBM
Tealeaf CX Passive Capture Application. However, depending on the volume of
web traffic, you may need to move some privacy filtering into the Windows
pipeline.
For more information on PCA privacy, see "PCA Web Console - Rules Tab" in the
IBM Tealeaf Passive Capture Application Manual.
As your web application changes over time, you may need to update the privacy
rules that are applied to session data passing through the Windows pipeline. The
following steps provide a general approach to managing privacy updates through
TMS.
Note: Privacy rules should be developed on production data. Instead, you should
use the standalone Privacy tester utility to iterate on your privacy rules before you
use TMS to deploy them into the production data stream. See “Privacy Tester
Utility” on page 390.
When you are ready to deploy privacy rules modifications to the production
transaction stream, please complete the following steps:
1. In the TMS WorldView tab, select the Transport Service node.
2. If you have not yet added the Privacy or Privacy session agent to your
pipeline, you can do so now. See "TMS Pipeline Editor" in the IBM Tealeaf
cxImpact Administration Manual.
3. To edit privacy rules for an existing session, agent, under the Transport Service
node, click Privacy Filter configuration.
4. In the Config Actions pane, click View/Edit.
5. The Privacy Filter configuration dialog is displayed in which you can create or
edit the rules, tests, and actions to apply to transactional data being passed
through the privacy filter in the Windows pipeline. For documentation on
privacy rules, see “Privacy Session Agent” on page 291 and “Extended Privacy
Session Agent” on page 261.
6. To save changes, click Save.
7. Define a Push Configuration job to assign the configuration changes to any
other Processing Servers in the Tealeaf environment. See "TMS Jobs Tab" in the
IBM Tealeaf cxImpact Administration Manual.
Updating License Key
As you upgrade or license new Tealeaf components, you may be required to enter
a new license key. The following steps can be used to change the license key
through TMS without having to login to the Portal server.
1. In TMS WorldView, click the Tealeaf node.
2. Click Shared Configuration information.
174
IBM Tealeaf CX: Configuration Manual
3. In the Config Actions pane, click View/Edit.
4. The Report Server configuration is displayed. Click the Portal tab.
v See “Configuring the Report Server” on page 58.
5. Click the Portal License Key entry.
6. Enter the new license key provided to you by Tealeaf http://
support.tealeaf.com.
7. To save the new license key, click Save.
8. In the TMS Job tab, configure a new job with the following actions:
a. A Push Configuration job to assign the configuration to the machine hosting
the Portal Server
b. A Restart Component job to restart the Portal Server after the assignment
has been executed. This job performs an IIS Restart on the server.
v See "TMS Jobs Tab" in the IBM Tealeaf cxImpact Administration Manual.
Testing Your Configuration
When all Tealeaf components are configured, you should complete an end-to-end
test. See "Testing Your Tealeaf Solution" in the IBM Tealeaf CX Configuration Manual.
IBM Digital Analytics Integration Solution
IBM Tealeaf supports integration with IBM Digital Analytics. By integrating IBM
Tealeaf and IBM Digital Analytics you enable access to Tealeaf session data and
session replays from reports that are generated by IBM Digital Analytics.
IBM Digital Analytics removes barriers for going from analytics to action so
marketers can increase revenues by targeting prospective customers with relevant
content across digital channels. IBM Digital Analytics helps marketers increase
visitor acquisition and retention rates, improve multichannel strategy formation
and implementation, and optimize budget allocation and marketing mix, including
email marketing, mobile marketing, display advertising, and social media
marketing. For more information about IBM Digital Analytics, visit
http://www.ibm.com/software.
IBM Digital Analytics integration solution overview
The segment file integration method is used to automate the creation of a Tealeaf
session segment that corresponds to a segment defined in IBM Digital Analytics.
The integration is accomplished by supplying a data file that contains a list of
values that identify unique customer sessions to the configured Tealeaf Segment
Builder. For more information about the segment builder, see "Segment Builder
Service" in the IBM Tealeaf cxConnect for Web Analytics Administration Manual.
For the IBM Digital Analytics integration solution, IBM Digital Analytics provides
a data file which is read by Tealeaf. Tealeaf uses this data to format and return
session information back to IBM Digital Analytics. The integration enables you to
create session reports in Tealeaf and then push the data to IBM Digital Analytics.
Once the data is pushed to IBM Digital Analytics, the user can generate reports in
IBM Digital Analytics that provide links to Tealeaf session data and replays.
Chapter 3. Initial CX Configuration
175
Configuring IBM Tealeaf for IBM Digital Analytics integration
Note: Before you configure IBM Tealeaf for integration with IBM Digital Analytics,
create a shared folder on an FTP server. Both applications use the folder to read
and write data that is shared between the applications.
To enable IBM Digital Analytics integration in IBM Tealeaf:
1. Create a user account and a shared folder on an FTP Server where IBM Tealeaf
and IBM Digital Analytics can read and write data files.
2. Configure the IBM Tealeaf CX Settings for integration with IBM Digital
Analytics. by navigating to the Tealeaf Portal, then clicking CX Settings >
Integration. For more information on configuring the integration settings, see
"CX Settings" and "Integration" in the IBM Tealeaf cxImpact Administration
Manual.
a. Open the Tealeaf Portal.
b. Click CX Settings > Integration.
Note: Click Save each time you enter a value for a setting. If you do not
click Save, the value will be lost when you click another setting.
c. Edit each of the IBM Digital Analytics settings by clicking on the setting;
then, enter the value for the setting and click Save.
Note: The values for the FTP settings use the same user account settings
that were created in step 1.
Additional configuration is required in IBM Digital Analytics. For more
information on configuring IBM Digital Analytics to integrate with IBM Tealeaf, see
the documentation that comes with IBM Digital Analytics.
After you have configured IBM Tealeaf for IBM Digital Analytics integration, you
can export session searches to IBM Digital Analytics. For more information on
creating and exporting session searches, see "cxReveal - Searching for Sessions" and
"Exporting Search Results" in the IBM Tealeaf cxReveal User Manual.
Data collection for IBM Digital Analytics
Tealeaf creates a data file that holds the session information and metadata for the
segment. This file is saved to the FTP server that was defined when the integration
settings for IBM Digital Analytics. For more information on configuring the
integration settings for IBM Digital Analytics , see “Configuring IBM Tealeaf for
IBM Digital Analytics integration.”
The data file contains the following data that can be read by IBM Digital Analytics:
v The name of the segment.
v The email address that is used for notification when the session IDs for the
Tealeaf segment are sent to the FTP server and are available for use in IBM
Digital Analytics.
v ID of each Tealeaf customer session.
v The first and last time stamps of each session.
For an example of the Tealeaf data file that is exported for IBM Digital Analytics,
see “ IBM Digital Analytics data examples” on page 177.
176
IBM Tealeaf CX: Configuration Manual
IBM Digital Analytics data examples
Segment File example
The following is an example of the data that Tealeaf exports for IBM Digital
Analytics.
TL_SESSION_ID,TL_START_TS,TL_END_TS
43F23716C901C5AAD4D31521503DBE10,1363756101,1363756766
5DD66F4484F4FABD751F8B9416259797,1363760019,1363760443
261FE68588637CDA80BEA928EC865BD1,1363756600,1363756916
F895E4DD56AB0AA0AF7C95DAD85C14CC,1363758338,1363758338
42699EC62F5A27D7D96211BC70476377,1363757469,1363757469
4FB3E23822EEE2CFC2FE4D6D27A52C67,1363759653,1363759888
AA7786F92731D854477D6E3BA45C7E58,1363760287,1363760699
21B6D808ABCDDF94E46C4A6FE55A2801,1363756869,1363757280
Initial cxConnect configuration
It is necessary to perform configurations of your IBM Tealeaf CX deployment.
Depending on your Tealeaf solution deployment, more configuration might be
necessary.
Note: This section provides a framework for performing the initial configuration of
one component of the IBM Tealeaf CX system in a simplified deployment model.
Depending on your Tealeaf solution's deployment, more configuration may be
required. If you have questions about configuration, contact http://
support.tealeaf.com.
Tealeaf IBM Tealeaf cxConnect for Data Analysis provides you with the ability to
analyze and report on data that is captured by Tealeaf-captured data within
various third-party solutions, including custom reporting tools and databases,
warehouses, business intelligence environments, and web analytics products.
Additionally, IBM Tealeaf cxConnect for Data Analysis enables the creation of a
persistent store of session data from your web applications.
Note: IBM Tealeaf cxConnect for Data Analysis is a separately licensable
component of the IBM Tealeaf CX system. please contact your IBM Tealeaf
representative.
This page describes how to perform the initial configuration of IBM Tealeaf
cxConnect for Data Analysis.
v For more information about IBM Tealeaf cxConnect for Data Analysis, see
"cxConnect for Data Analysis Administration Manual" in the IBM Tealeaf
cxConnect for Data Analysis Administration Manual.
Prerequisites
Certain prerequisites are required to perform the initial configuration of IBM
Tealeaf cxConnect.
v It is assumed that all Tealeaf software was installed on Windows and Linux
servers. Before you begin, complete all software installation first. See "CX
Installation" in the IBM Tealeaf CX Installation Manual.
v Additionally, you should already perform the initial configuration steps for the
IBM Tealeaf cxImpact product components. See "Overview of CX Configuration"
in the IBM Tealeaf CX Configuration Manual.
Chapter 3. Initial CX Configuration
177
cxConnect installation
Before you begin, IBM Tealeaf cxConnect for Data Analysis must be installed
through the separate installation program. See "cxConnect Installation" in the IBM
Tealeaf cxConnect for Data Analysis Administration Manual.
Adding cxConnect server
IBM Tealeaf cxConnect for Data Analysis requires its own Tealeaf server to manage
extraction and data output.
1. Log in to the Tealeaf Portal as an administrator.
2. From the Portal menu, select Tealeaf > Portal Management.
3. The Portal Management page appears.
4. In the left navigation pane, click Tealeaf Servers.
5. Click the Manage Servers link. The list of currently available Tealeaf servers is
displayed.
6. If a IBM Tealeaf cxConnect for Data Analysis server does not exist, click New.
Select CxConnect Server from the drop-down menu. If a IBM Tealeaf
cxConnect for Data Analysis server exists, select it and click Edit.
7. Edit the IBM Tealeaf cxConnect for Data Analysis Server properties.
a. Click the Active check box.
b. Enter the display name for the server. The default value cxConnect Server
is recommended.
c. From the drop-down, select the server that is hosting the IBM Tealeaf
cxConnect for Data Analysis Server.
d. Enter the port number to use. The default value for IBM Tealeaf cxConnect
for Data Analysis is 19000.
e. Click Save.
8. The server is added to the list. See "Managing Tealeaf Servers" in the IBM
Tealeaf cxImpact Administration Manual.
Adding a configured task
Now that the IBM Tealeaf cxConnect for Data Analysis software was installed and
the IBM Tealeaf cxConnect for Data Analysis server was configured, you can create
your first IBM Tealeaf cxConnect for Data Analysis task.
v For more information about configuring IBM Tealeaf cxConnect for Data
Analysis tasks, see "cxConnect Configuring Tasks" in the IBM Tealeaf cxConnect
for Data Analysis Administration Manual.
The steps below outline how to create a simple IBM Tealeaf cxConnect for Data
Analysis Data Files task. The Data Files method of export extracts selected Tealeaf
sessions into a flat-file text format. These sessions can then be inserted into your
enterprise system of choice.
Note: The Data Files method of export is the recommended Tealeaf integration
method.
1. Log in to the Tealeaf Portal as an administrator.
2. From the Portal menu, select Tealeaf > IBM Tealeaf cxConnect for Data
Analysis.
3. The IBM Tealeaf cxConnect for Data Analysis page is displayed. The list of
scheduled tasks is displayed.
4. In the left navigation pane, click Configured Tasks.
178
IBM Tealeaf CX: Configuration Manual
5. Then, click the + sign.
6. The following sections describe the properties in each tab of the configured task
that must be populated.
General tab
You can review session data by selecting a time period between Extract From and
Extract To values to define a time period of session data that you would like to
review.
1.
2.
3.
4.
Click the General tab.
Enter a value for the task Name. For example, test_task.
For Scheduling, click Run Now.
For the Extract parameters, enter a time period when you know that session
data was generated.
v For testing purposes, limit yourself to a one-hour period. Do not overlap
dates for this test.
v To specify a date, click in one of the date fields. Use the calendar tool to
select a date.
v To specify a time value, click in one of the time fields. Use the arrow keys or
enter the value from the keyboard. To set the time value, click Set.
v Verify that your Extract From and Extract To values define a one-hour period
that occurs some time in the past when session data is likely to be captured.
5. Select the Active check box.
CX Servers tab
1. Click the IBM Tealeaf CX Servers tab.
2. Click the check box next to the server from which you want to extract sessions.
v If multiple servers are listed, select only a single server.
Data Set tab
For this test, skip the Data Set tab.
Data Filters tab
For this test, skip the Data Filters tab.
Destination tab
1. Click the Destination tab.
2. Select the Data Files option. The following options appear.
a. Select the Active check box.
b. If needed, specify the Exported Data Directory value. This directory should
be accessible to you on the IBM Tealeaf cxConnect for Data Analysis Server.
c. For this test, set the Number of Concurrent Exports to 1.
Notification tab
1. Click the Notification tab.
2. Click To.
3. Enter your email address in the space provided.
Save task
After you completed the above steps in each IBM Tealeaf cxConnect for Data
Analysis tab, click Save. The task is saved.
Chapter 3. Initial CX Configuration
179
Checking task status
Since the task was specified to run immediately, IBM Tealeaf cxConnect for Data
Analysis begins processing it as soon as possible. You can complete the following
steps to verify task status.
Note: Since you configured the task to notify your email address, you can wait for
the email to be delivered to you. However, if there is a configuration issue with the
mail settings, use IBM Tealeaf cxConnect for Data Analysis to monitor job status
this time.
1. In the IBM Tealeaf cxConnect for Data Analysis left navigation pane, click
Scheduled Tasks.
2. The job is displayed in the list of scheduled tasks. Look for the friendly Name
you specified in the General tab in the list.
3. In the Information column, you can monitor the progress of the task
completion.
v To refresh the display that includes the Information column, click Refresh.
v When the Information column field value concludes with Processed, IBM
Tealeaf cxConnect for Data Analysis completed the task.
4. The notification email arrives shortly. It contains the extraction log for the task,
which can be useful in resolving issues.
Verify output in destination directory
After the task was processed, you can verify that the output files were generated in
the destination directory on the IBM Tealeaf cxConnect for Data Analysis server.
In the specified output directory, files similar to the following should be generated:
BulkAppData.20090925_120000_20090925_115959.test_task_30_1253917972.9480_1.dat
BulkAttrb.20090925_120000_20090925_115959.test_task_30_1253917972.9480_1.dat
BulkEvent.20090925_120000_20090925_115959.test_task_30_1253917972.9480_1.dat
BulkHit.20090925_100000_20090925_105959.test-spo_40_1253918431.9528_1.dat
BulkSesn.20090925_120000_20090925_115959.test_task_30_1253917972.9480_1.dat
BulkUrlField.20090925_120000_20090925_115959.test_task_30_1253917972.9480_1.dat
For more information about the schema of these files, see "cxConnect Configuring
Tasks" in the IBM Tealeaf cxConnect for Data Analysis Administration Manual.
Integration with enterprise databases
These files are ready for integration with the destination enterprise database.
Tealeaf provides a set of sample scripts that can be modified to complete this
integration step. See "cxConnect Configuring Tasks" in the IBM Tealeaf cxConnect for
Data Analysis Administration Manual.
Other configuration options
In addition to the Data Files method of output, IBM Tealeaf cxConnect for Data
Analysis provides the following output options:
v Log files - Extract sessions into W3C-compliant log files. See "cxConnect
Configuring Tasks" in the IBM Tealeaf cxConnect for Data Analysis Administration
Manual.
Testing your configuration
After you completed your initial configuration, you can perform the following
steps to verify the configuration.
180
IBM Tealeaf CX: Configuration Manual
If you completed the initial test configuration in the preceding steps, you can
verify IBM Tealeaf cxConnect for Data Analysis operations by examining the
results in the output directory, if you did not do so already.
v See “Verify output in destination directory” on page 180.
When all Tealeaf components are configured, complete an end-to-end test. See
"Testing Your Tealeaf Solution" in the IBM Tealeaf CX Configuration Manual.
References
For more information about IBM Tealeaf cxConnect for Data Analysis, see
"cxConnect for Data Analysis Administration Manual" in the IBM Tealeaf cxConnect
for Data Analysis Administration Manual.
v For more information about configuring tasks, see "cxConnect Configuring
Tasks" in the IBM Tealeaf cxConnect for Data Analysis Administration Manual.
v For more information about scheduling tasks, see "cxConnect Scheduling Tasks"
in the IBM Tealeaf cxConnect for Data Analysis Administration Manual.
For another example integration that uses the Data Files method, see "cxConnect
Configuring Tasks" in the IBM Tealeaf cxConnect for Data Analysis Administration
Manual.
Initial IBM Tealeaf cxVerify Configuration
Note: Following is a framework for configuring one component of the IBM Tealeaf
CX system in a simplified deployment model. Depending on your deployment,
more configuration might be required. If you have any questions about
configuration, contact http://support.tealeaf.com.
IBM Tealeaf cxVerify generates an accurate record of each visitor's interactions with
your website. At scheduled intervals, IBM Tealeaf cxVerify stores captured session
data in a persistent datastore from which you can later retrieve and replay it.
Note: IBM Tealeaf cxVerify is a separately licensable component of the IBM Tealeaf
CX system. IBM Tealeaf cxVerify is no longer available as a newly licensed product
as of Release 8.7. Customers that licensed IBM Tealeaf cxVerify in Release 8.6 and
earlier can continue to use and receive support for the product in Release 8.7 and
later. For more information, contact Tealeaf Customer Support .
Pre-Requisites
Before you begin, install all IBM Tealeaf software on Windows or Linux servers.
For more information, see the IBM Tealeaf CX Installation Manual.
In addition, you must first complete the initial configuration steps for IBM Tealeaf
cxImpact. For more information, see the IBM Tealeaf CX Configuration Manual.
IBM Tealeaf cxVerify Installation
Before you begin, you must install IBM Tealeaf cxVerify.
Types of Archiving
IBM Tealeaf cxVerify supports one type of archiving.
Session File Task: To export session data to a PDF, configure a Session File Task to
deliver the session data files to a IBM Tealeaf cxVerify server. For each exported
Chapter 3. Initial CX Configuration
181
session, a PDF file is generated and can optionally include logging information and
a link to replay the session. See “Session File Tasks” on page 183.
Servers
Add a IBM Tealeaf cxVerify Server
The IBM Tealeaf Portal requires a reference to communicate with the IBM Tealeaf
cxVerify server. You must create this reference through the Portal Management
Page.
Add the Selective Archive Server
Selective Archiving requires its own IBM Tealeafserver, which you create through
the Portal Management page. The Selective Archive server is used to archive
sessions that are extracted from the Canister.
Archive Tasks
If you are exporting IBM Tealeaf sessions that you still want to access through
search and replay, you can configure an Archive task. Archive tasks deliver a
user-configurable set of sessions to a selective archive at regularly scheduled times.
Create the New Selective Archive
On the server where you intend to store your sessions, you must create a new
Selective Archive.
Adding a Configured Task
Now that the IBM Tealeaf cxVerify server is configured, you can create your first
IBM Tealeaf cxVerify task. The following steps show how to create a simple IBM
Tealeaf cxVerify Session File task.
1. Log in to the IBM Tealeaf Portal as an administrator.
2. From the Portal menu, select Tealeaf > IBM Tealeaf cxVerify.
The IBM Tealeaf cxVerify page opens and displays the list of scheduled tasks.
3. In the left navigation pane, click Configured Tasks.
4. Click the + sign.
The following sections describe the properties in each tab of the configured task
that must be populated.
Editing the General Tab
1. Click the General tab.
2. Enter a value for the task Name.
For example, enter test_task.
3. For Scheduling, click Run Now.
4. For the Extract parameters, enter a time period when you know that session
data was generated.
v For testing purposes, limit yourself to a one-hour period. Do not overlap
dates for this test.
v To specify a date, click in one of the date fields. Use the calendar tool to
select a date.
v To specify a time value, click in one of the time fields. Use the arrow keys or
enter the value from the keyboard. To set the time value, click Set.
v Verify that Extract From and Extract To values define a one-hour period
that occurred some time in the past when session data was likely captured.
182
IBM Tealeaf CX: Configuration Manual
5. Check the Active check box.
Editing the CX Servers Tab
1. Click the IBM Tealeaf CX Servers tab.
2. Click the check box next to the server from which to extract sessions.
If multiple servers are listed, select only a single server.
Data Set Tab
For this test, skip the Data Set tab.
Editing the Destination Tab
1. Click the Destination tab.
2. Select the Selective Archive option.
Select one of the options available.
v The Active check box.
v The Selective Archive to which you are exporting the sessions.
Editing the Notification Tab
1. Click the Notification tab.
2. Click To.
3. Enter your email address in the space provided.
Next Steps
You can now save the task.
Session File Tasks
If you are delivering individual PDF files for each extracted session, complete the
following configuration steps to set up a Session File task.
Adding an cxVerify IBM Tealeaf Server
Session File Export requires a IBM Tealeaf cxVerify Server to manage extraction
and data output.
1. Log in to the IBM Tealeaf Portal as an administrator.
2. From the Portal menu, select Tealeaf > Portal Management.
The Portal Management page opens.
3. In the left navigation pane, click Tealeaf Servers.
4. Click the Manage Servers link. The list of currently available servers is
displayed.
The list of currently available servers is displayed.
5. If an IBM Tealeaf cxVerify server does not exist, click New and select IBM
Tealeaf cxVerify Server from the menu.
v If a IBM Tealeaf cxVerify server exists, select it and click Edit.
6. Edit the IBM Tealeaf cxVerify Server properties.
a. Click the Active check box.
b. Enter the Display Name for the server.
The default value is cxVerify Server.
c. From the list, select the server that is hosting the IBM Tealeaf cxVerify
Server.
d. Enter the port number to use.
The default value is 19000.
Chapter 3. Initial CX Configuration
183
e. Click Save.
The server is added to the list.
Editing the General Tab
Click the General tab.
Enter a value for the task Name. For example, test_task.
For Scheduling, click Run Now.
For the Extract parameters, enter a time period when you know that session
data was generated.
v For testing purposes, limit yourself to a one-hour period. Do not overlap
dates for this test.
v To specify a date, click in one of the date fields and use the calendar tool to
select a date.
v To specify a time value, click in one of the time fields. Use the arrow keys or
enter the value from the keyboard. To set the time value, click Set.
v Verify that your Extract From and Extract To values define a one-hour
period that occurred when session data was likely captured.
5. Select the Active check box.
1.
2.
3.
4.
Editing the IBM Tealeaf CX Servers Tab
1. Click the IBM Tealeaf CX Servers tab.
2. Click the check box next to the server from which you want to extract sessions.
v If multiple servers are listed, select only a single server.
Editing the Data Set Tab
For this test, skip the Data Set tab.
Editing the Destination Tab
1. Click the Destination tab.
2. Click the Session Files link.
v You can select the Session Files with Images option. However, output in this
format might take considerably longer.
a. Select the Active check box.
b. Specify the directory on the IBM Tealeaf cxVerify Server where output PDF
files are to be written.
Ensure that you have access to that directory.
Digital Signature Tab
For this test, skip the Data Signature tab.
PDF Page Fields Tab
For this test, skip the PDF Page Fields tab. The default values are ok.
Notification Tab
1. Click the Notification tab.
2. Click the To button.
3. Enter your email address in the space provided.
184
IBM Tealeaf CX: Configuration Manual
Save Task
After you have completed the above steps in each IBM Tealeaf cxVerify tab, click
Save. The task is saved.
Checking Task Status
Because the task was specified to run immediately, IBM Tealeaf cxVerify begins
processing it as soon as possible. Complete the following steps to verify task
status.
Note: Because you configured the task to send status to your email address, you
can wait for the email to be delivered to you. However, if there is a configuration
issue with the mail settings, use IBM Tealeaf cxVerify to monitor job status.
1. In the IBM Tealeaf cxVerify left navigation pane, click Scheduled Tasks.
The job is displayed in the list of scheduled tasks. In the Information column,
you can monitor the progress of the task completion.
When the task is complete, the Information column field value concludes with
Processed.
2. To refresh the display, click Refresh.
The notification email arrives shortly. It contains the extraction log for the task,
which can be useful in resolving issues.
Test Your Configuration
After you complete your initial configuration, you can take the following steps to
verify the configuration.
Through the sections below, you can check that IBM Tealeaf cxVerify outputted the
sessions in the correct location.
A complete set of tests can be run after all IBM Tealeaf components are configured.
For more information, see the IBM Tealeaf CX Configuration Manual.
Verifying Archive Task
1. Replay one of the saved sessions.
For more information, see the IBM Tealeaf RealiTea Viewer User Manual.
2. Search the archive.
Verifying Session File Task
1. Go to the output directory on the IBM Tealeaf cxVerify Server.
The number of PDF files should match the number of sessions that are listed in
the Information column of the Scheduled Tasks page as were processed for
your task.
2. To verify output, open a sample of the PDF files.
When all IBM Tealeaf components are configured, complete an end-to-end test. For
more information, see the IBM Tealeaf CX Configuration Manual.
References
For more information about IBM Tealeaf cxVerify, see "cxVerify Administration
Manual" in the IBM Tealeaf cxVerify Administration Manual.
v For more information about configuring tasks, see "cxVerify Configuring Tasks"
in the IBM Tealeaf cxVerify Administration Manual.
Chapter 3. Initial CX Configuration
185
v For more information about scheduling tasks, see "cxVerify Scheduling Tasks" in
the IBM Tealeaf cxVerify Administration Manual.
Initial cxResults Configuration
Note: This section provides a framework for performing the initial configuration of
one component of the IBM TealeafCX system in a simplified deployment model.
Depending on your Tealeaf solution's deployment, additional configuration may be
required. If you have any questions about configuration, please contact
http://support.tealeaf.com.
Note: IBM Tealeaf cxResults is no longer available as a newly licensed product as
of Release 8.7. Customers that licensed IBM Tealeaf cxResults in Release 8.6 and
earlier may continue to use and receive support for the product in Release 8.7 and
later. For more information, please contact Tealeaf Customer Support .
IBM Tealeaf cxResults enables the tracking and reporting on a rich repository of
data captured from individual visitors to your web site. Through IBM Tealeaf
cxResults, you can gather detailed information on visitor characteristics and
behavior for deeper understanding of the customer experience.
This page describes how to perform the initial configuration of IBM Tealeaf
cxResults.
v For more information on IBM Tealeaf cxResults, see "cxResults User Manual" in
the IBM Tealeaf cxResults User Manual.
Pre-Requisites
1. It is assumed that all Tealeaf software has been installed on Windows and
Linux servers. Before you begin, please complete all software installation first.
See "CX Installation" in the IBM Tealeaf CX Installation Manual.
2. Additionally, you should have already performed the initial configuration steps
for the IBM Tealeaf cxImpact product components. See "Overview of CX
Configuration" in the IBM Tealeaf CX Configuration Manual.
Verify Visitor Database
This section provides verification steps to ensure that the visitor database is
installed and configured properly.
Verify Availability
After you have completed the installation process, you should verify that the
Visitor database, which is used by IBM Tealeaf cxResults, has been properly
installed and is accessible.
1. Login to the Portal.
2. From the Portal menu, select Help > About IBM Tealeaf CX Portal.
3. In the Portal Application Information report, locate the Database panel on the
left side of the screen.
4. If the IBM Tealeaf cxResults databases have been properly installed, you should
see entries for the following:
v TL_VISREPORT
v TL_VISSTAGE
v See "Portal Application Information Report" in the IBM Tealeaf cxImpact
Administration Manual.
186
IBM Tealeaf CX: Configuration Manual
Verify Server Settings
In the Portal Management page, you can verify the settings for connecting the
Visitor server.
1. Login to the Tealeaf Portal as an administrator.
2. From the menu, select Tealeaf > Portal Management.
3. Click the Manage Servers link.
4. In the displayed list of servers, click the Visitor Report Server.
5. Verify that the server's hostname and port number are appropriate for
connection.
6. To test the connection, click the Ping Server icon in the toolbar.
7. You can also verify other settings pertaining to the Visitor Server. See "cxResults
Settings" in the IBM Tealeaf cxImpact Administration Manual.
Data retention settings: For more information on configuring the database data
retention settings, see "Data Aggregation and Retention" in the IBM Tealeaf cxImpact
Administration Manual.
cxImpact settings:
In the IBM Tealeaf cxImpact settings are some parameters that affect IBM Tealeaf
cxResults.
1. Login to the Tealeaf Portal as an administrator.
2. From the menu, select Tealeaf > Portal Management.
3. In the left navigation panel, select IBM Tealeaf CX Settings.
a. Please review all settings with Visitor in the name.
v See "CX Settings" in the IBM Tealeaf cxImpact Administration Manual section.
v See "CX Settings" in the IBM Tealeaf cxImpact Administration Manual section.
a. Please review all settings with Session Segment in the name.
v See "CX Settings" in the IBM Tealeaf cxImpact Administration Manual section.
Enabling the Visitor Database Extractor Job
Through the Tealeaf Scheduling Service, you must enable the Visitor Database
Extractor job, which scans each active Canister for sessions to add to the Visitor
database at regularly scheduled intervals.
Note: Until this job is configured, enabled, and successfully executed, no data is
available for Visitor search.
v See "Configuring the Scheduling Service" in the IBM Tealeaf CX Configuration
Manual.
Configure Visitorization
In order to identify individual visitors, you must define the field in the session
data that indicates a unique visitor identifier. Then, this field must be inserted into
the proper location in the request so that it may be defined in the Portal as the
visitor identifier.
v See "Configuring Visitorization" in the IBM Tealeaf cxResults Administration
Manual.
cxResults User Administration
See "Managing Users and Groups for cxResults" in the IBM Tealeaf cxResults
Administration Manual.
Chapter 3. Initial CX Configuration
187
Configure Search Templates and Session Lists
For optimal search performance, you may need to design specific search templates
to be made available to users. A search template defines the fields for which a user
with access to the template can access. Designing a search template enables you to
provide only the necessary search fields while removing from access unnecessary
or sensitive fields.
When a search is executed, the results are displayed in the search results page,
which uses a session list template to define which fields to display. A session list
template can assist users in finding the most relevant information.
Search Field for Visitor ID
When the TLT_VID field has been populated with the visitor identifier and inserted
into the [appdata] section of the request, you may configure a search field that can
be used to search for these visitor identifiers in your search templates.
When you configure a search template for Visitor search, you must add a new
search field whose keyword is set to TLTVID. This keyword automatically searches
the appropriate field in the request data for matches to the input string that Tealeaf
users provide through the Portal.
v For more information on configuring search templates and session list templates,
see "Configuring Search Templates" in the IBM Tealeaf cxImpact Administration
Manual.
v For more information on selecting the search template for users who can
perform visitor searches, see "Managing Users and Groups for cxResults" in the
IBM Tealeaf cxResults Administration Manual.
Test Search
After you have performed the above configuration steps, you should be able to
search for visitors. Use the visitor search template to find visitor identifiers for
sessions that you know have been completed.
v See "Searching for Visitors" in the IBM Tealeaf cxResults User Manual.
Configure cxResults Session Filtering Events
By default, Tealeaf provides and enables two events to filter out sessions from IBM
Tealeaf cxResults. For storage optimization, these events perform the following
actions by default.
Event Name
Default Behavior
cxResults - Include Sessions
All sessions with a hit count greater than 1 are included in IBM Tealeaf
cxResults.
cxResults - Exclude Sessions
All sessions identified as bot traffic by Tealeaf are excluded from IBM
Tealeaf cxResults.
See "cxResults Session and Event Filtering" in the IBM Tealeaf cxResults
Administration Manual.
Next steps
Now that the visitor identifier has been configured for your system, you must
configure the search templates for visitors, so that individual visitor data can be
found. See “Configure Search Templates and Session Lists.”
188
IBM Tealeaf CX: Configuration Manual
Other cxResults Settings
As part of your initial configuration, you should review the settings defined for
IBM Tealeaf cxResults.
1. Login to the Tealeaf Portal as an administrator.
2. In the Portal menu, select Tealeaf > Portal Management.
3. In the left navigation bar, click the IBM Tealeaf cxResults Settings link.
4. You should review the specific settings listed below for the following
categories.
v For more information on Search settings, see “Visitor Extract.”
v For more information on Users settings, see “Visitor Server.”
Visitor Extract
During initial configuration, please review the following configuration items:
Setting Description
Populate Event TextFound column in Visitor Extract
Note: If this value is set to Disabled, event values are not available for
search in the Visitor database. Unless there are storage space constraints,
Tealeaf recommends verifying that this setting is Enabled.
Reporting Visitor Data - Days to Retain
The number of days of data to retain in the Visitor database is set to 30 by
default.
Note: This setting directly impacts the size of your Visitors database.
v See "cxResults Settings" in the IBM Tealeaf cxImpact Administration Manual.
Visitor Server
No settings require review at this time.
v For more information on these settings, see "cxResults Settings" in the IBM
Tealeaf cxImpact Administration Manual.
Visitor Dashboards
Tealeaf provides a set of dashboards for use with visitor data. These visitor
dashboards can provide meaningful insight into aggregated visitor behavior.
Steps:
To access these reports:
1. In the Tealeaf Portal, select Analyze > Segments > Analyze Visitor Segments.
2. Select a segment to analyze.
3. Click the Report Gallery link at the bottom of the left navigation pane.
v See "Analyzing Visitor Segments" in the IBM Tealeaf cxResults User Manual.
v At this time, no additional configuration should be required to see visitor
dashboards. For more information on configuration, see "Configuring Visitor
Dashboards" in the IBM Tealeaf cxResults User Manual.
References
For more information on IBM Tealeaf cxResults, see "cxResults User Manual" in the
IBM Tealeaf cxResults User Manual.
Chapter 3. Initial CX Configuration
189
Testing Your Configuration
After you have completed your initial configuration, you can perform the
following steps to verify the configuration.
For IBM Tealeaf cxResults, the key configuration to monitor is the creation, capture,
and tracking of a unique visitor identifier across sessions. The steps below describe
how to monitor visitor identifiers and the other configuration elements of IBM
Tealeaf cxResults.
v A more complete set of tests can be executed after all Tealeaf components have
been configured. See "Testing Your Tealeaf Solution" in the IBM Tealeaf CX
Configuration Manual.
1. Database: You should have already verified that the IBM Tealeaf cxResults
Visitor database is installed and available. See “Verify Availability” on page 186.
2. IBM Tealeaf cxResults User Accounts: Login as a IBM Tealeaf cxResults user
and verify that the account has access to all required menu items. See
“cxResults User Administration” on page 187.
3. Test Search: If you have not done so already, you should verify that the user
account can search for visitor identifiers using the default IBM Tealeaf cxResults
search template. See "Searching for Visitors" in the IBM Tealeaf cxResults User
Manual.
4. Review unique visitor identifiers: When you analyze visitor segments, the
generated list indicates individual visitors who have access your web
application. You should review values greater than 1 in the Matches column to
check to see that the visitor identifier is used to reference the same visitor. See
"Analyzing Visitor Segments" in the IBM Tealeaf cxResults User Manual.
5. Visitor Dashboards: Visitor dashboards should contain data. See "Analyzing
Visitor Segments" in the IBM Tealeaf cxResults User Manual.
When all Tealeaf components are configured, you should complete an end-to-end
test. See "Testing Your Tealeaf Solution" in the IBM Tealeaf CX Configuration Manual.
Initial RTV Configuration
Note: This information provides a framework for completing the initial
configuration of one component of the IBM Tealeaf CX system in a simplified
deployment model. Depending on your Tealeaf solution's deployment, additional
configuration can be required.
The IBM Tealeaf CX RealiTea Viewer allows Tealeaf users to search for and replay
Tealeaf sessions on their local desktop systems. The standalone RTV application
connects through the available network to the IBM Tealeaf CX platform to search
for active or completed sessions and then displays them as they were originally
experienced in a customized web browser.
This page describes how to complete the initial configuration of RTV.
v For more information about RTV, see "RealiTea Viewer (RTV) User Manual" in
the IBM Tealeaf RealiTea Viewer User Manual.
RTV Installation
The IBM Tealeaf CX RealiTea Viewer is a standalone Windows application that
must be installed on the desktop system of each Tealeaf user. Before you configure
RTV, you must verify that the software is installed on your system.
190
IBM Tealeaf CX: Configuration Manual
Note: For Tealeaf Event Manager users, the installed major and minor version
number of the IBM Tealeaf CX RealiTea Viewer on your desktop must match those
numbers of IBM Tealeaf cxImpact.
1. From the Windows Start menu, select Settings... > Control Panel.
2. Double-click Add or Remove Programs.
3. In the list, if you see an entry for Tealeaf RealiTea Viewer, the application is
installed.
v For more information about RTV minimum system requirements, see "RealiTea
Viewer Overview" in the IBM Tealeaf RealiTea Viewer User Manual.
v For more information about RTV installation, see "RealiTea Viewer Overview" in
the IBM Tealeaf RealiTea Viewer User Manual.
Connect to Tealeaf
If you have not done so already, you must connect your installed version of RTV
to the IBM Tealeaf cxImpact server. See "RealiTea Viewer Overview" in the IBM
Tealeaf RealiTea Viewer User Manual.
Configuration
Before you begin configuring and using RTV, you must determine the roles of
individual Tealeaf users. RTV roles can be broken into the following categories.
Role
Description
RTV Administrator
Responsible for managing replay rules and global profiles. Can overlap
with the Tealeaf application administrator. For more information about
configuration tasks for RTV administrators, see “Configuring RTV for
Administrators.”
v RTV administrators can be required to configure replay rules to achieve
high-fidelity replay of the monitored web application in RTV. See
"RealiTea Viewer - Replay Rules" in the IBM Tealeaf RealiTea Viewer User
Manual.
RTV User
Individual Tealeaf user who must use the RTV application to search for
session data, replay selected sessions, and act on their findings. For more
information about configuration tasks for RTV users, see “Configuring RTV
for RTV Users” on page 194.
RTV User Who Edits Events
Tealeaf user or administrator who is responsible for creating and
maintaining the event definitions that are used in the Tealeaf system. For
more information about configuration tasks for these users, see
“Configuring RTV for Users Who Edit Events” on page 195.
Configuring RTV for Administrators
This information describes the configuration steps that RTV administrators must
complete before they enable Tealeaf users to access session data.
Configuring RTV user accounts: Any Tealeaf user with basic Portal access can
also use the IBM Tealeaf CX RealiTea Viewer application.
Accounts assigned to RTV users cannot have their Default Replay Mode set to BBR
at either the group or individual user level. It must be set to either RTV or Prompt
on Replay. For more information:
Chapter 3. Initial CX Configuration
191
v "CX User Administration" in the IBM Tealeaf cxImpact Administration Manual
v "cxReveal User Administration" in the IBM Tealeaf cxReveal Administration Manual
Create or acquire default user profile:
After IBM Tealeaf cxImpact is initially installed, a default profile must be created
and stored on the server.
v For more information about creating replay rules, see “Configuring the User
Profile” on page 196.
You can search for sessions and complete a basic replay of them by acquiring the
profile.
Note: The quality of session replay is dependent upon the nature of the web
application. Websites that employ sophisticated display technologies or rely on
client user interaction events can require significant customization of the common
replay profile and replay rules. Those steps are covered in later sections.
To acquire the default RTV user profile, complete the following steps.
1. Run RTV.
2. In the RTV menu, select Tools > Options....
3. Click the Profiles tab.
v At the top of the panel, you must see the following message:
You are using the default built-in profile.
4. Under the Default Profile, enter the server from which to acquire the default
profile. Click Check for Updates Now.
Test RTV Connection: This information describes the steps that RTV
administrators must take to test whether the RTV connection is working.
Testing search:
You can now test to see whether search is working.
1. In the RTV toolbar, click the Search button.
2. Specify a search that must return a non-zero number of sessions.
3. To run the search, click Search....
4. In the Search Progress dialog, you must see search results displayed.
Testing replay:
Note: Replay is a complicated process and can require tuning of your RTV settings
and possibly changes to the web application to get it to work properly. Now, you
can test the basic capability of replaying sessions. You can see problems that must
be addressed before production deployment.
1. After you have run the search, you must see a number of sessions that are
listed in the Search Results tab.
2. Select a session that contains a high number of pages, as indicated in the Page
Count column.
3. In the RTV toolbar, click the Replay button.
4. In the Replay tab, you must see a non-zero number of pages in the Viewable
Pages list. In the pane to the right, the first page in the Viewable Pages list is
displayed.
5. To test the replay of this session, click theReplay button in the toolbar.
192
IBM Tealeaf CX: Configuration Manual
6. If your installation of RTV is working properly, the session begins to replay as
the user initially experienced it.
Save session:
If your session is a representative example of a typical user experience with your
web application, you can choose to save it locally to help your subsequent
configuration tasks.
1. When the session is open in RTV, from the menu select File > Save....
2. Save it to a directory on your local workstation that is outside of the RTV
installation directory.
Other Options tabs:
This information describes the other profile options that are available for RTV
administrators.
Testing profile changes: Before you save your profile to the server, you can save a
local copy and to test your local copy against sessions that are saved in .TLS files.
Copying host profile for other hosts:
If you have multiple hosts of your web application, you can rapidly create host
profiles by copying the host profile that you create and modifying the destination
profile as needed.
To copy the profile:
1. In the RTV menu, select Tools > Options....
2. Click the Profiles tab.
3. Click Edit Raw Profile.... The raw XML of the profile is displayed.
4.
5.
6.
7.
Click in the profile text. Press CTRL + A to select all of it.
Paste the text into a text editor.
To retain a backup, save the text file.
Search the text file for the following string:
<HostProfile
8. Verify that the value of the name attribute corresponds to the host that you
configured.
9. Select the text that starts at the preceding string down till:
</HostProfile>
10. Copy the text and paste the copy just after the preceding string.
11. Modify the name attribute in the first line of the copied text to match the host
name for which you are applying the copied host profile.
12. Save the text file under a new name.
13. Press CTRL + A to select the entire profile.
14.
15.
16.
17.
18.
Paste the text back into RTV.
Click Save Changes & Exit.
Click Edit Profile....
The new host profile node must be displayed.
Modify the profile rules for the new host as needed.
Saving your profile to the server:
After you are satisfied with your user profile and rules for all hosts, you can post
it to the common server for other Tealeaf users.
1. In RTV, select Tools > Options....
Chapter 3. Initial CX Configuration
193
2. Click the Profiles tab.
3. If you have not done so already, save a copy of your profile locally. Copy the
contents of the raw profile into a text editor and save it to a local directory.
4. In the Default Profile text box, verify that the Server and port number
correspond to the server that hosts the Portal application.
5. To see whether the server profile is updated since you last synced, click Check
for Updates.
v If other Tealeaf users can edit the server profile, you must select the Check
for Updates at Startup.
6. If there are updates to the server profile, you must reconcile them with your
saved local copy.
7. To upload the user profile that is currently stored in RTV, click Upload Settings
to Server.
v To apply specific settings to the BBR profile, click Sync to BBR.... Select the
settings to apply to the BBR profile, and click Commit....
8. In theOptions window, click OK.
Distribute connection information to RTV users: After you upload your setting
changes to the server profile, you can distribute connection information to Tealeaf
users.
Configuring RTV for RTV Users
This information describes the steps that RTV users must take to acquire their user
profile.
Auto-configuring RTV from the Tealeaf master server:
After the RTV administrator configures the user profile, RTV users can enter the
connection information to the master Replay Server and acquire the user profile.
1. Start RTV.
2. In the RTV menu, select Tools > AutoConfig from TeaLeaf Master....
3. In the list of available IBM Tealeaf cxImpact systems, select the top node of the
master server with which you want to sync.
v Below each master server node, you can review the different servers and port
numbers relevant to RTV that are part of the IBM Tealeaf cxImpact
deployment.
v If the master server is not listed, enter the simple host name in the IBM
Tealeaf cxImpact Server textbox and click Add. If RTV is able to connect to
the server, it is added to the list.
4. To sync with a listed server, click the server name in the server tree.
a. To use the shared profile that is stored on the server, click the Used Shared
Profile check box.
Note: If no shared profile is available on the server, your local profile is
unchanged.
b. To configure your local installation of RTV to work with the selected IBM
Tealeaf cxImpact server, click Configure RealiTeaViewer to use this system.
Note: It is recommended that you configure RTV to auto-configure by using
servers of the same version as the RTV installation. For example, if you are
using Release 7.2 RTV, you must connect only to Release 7.2 IBM Tealeaf
cxImpact servers.
194
IBM Tealeaf CX: Configuration Manual
v To remove a server from your list of available servers, select the server node
in the list and click Remove.
5. After you complete the auto-configuration, click Exit.
v See "RealiTea Viewer Overview" in the IBM Tealeaf RealiTea Viewer User
Manual.
Updating your local profile:
If your RTV administrator is periodically updating the common profile, you must
configure RTV to check for updates at startup.
1. In the RTV menu, select Tools > Options....
2. Click the Profiles tab.
3. Under the Default Profile, enter the server from which to acquire the default
profile.
4. Select the Check for Updates at Startup check box.
5. Click Check for Updates Now.
6. To save changes, click OK.
v To restore your user profile to the default one provided by Tealeaf, click
Restore Default Profile.
Configuring RTV for Users Who Edit Events
The Tealeaf Event Manager enables users with the appropriate permissions to
create, edit, and delete Tealeaf events and related data. This information describes
the configuration steps in RTV for users who must access TEM.
v See "Tealeaf Event Manager" in the IBM Tealeaf Event Manager Manual.
1. If you have not done so already, you must complete the configuration steps for
RTV users. See “Configuring RTV for RTV Users” on page 194.
2. In the RTV menu, select Tools > Options....
3. Click the IBM Tealeaf cxImpact tab.
a. If Portal authentication is enabled, RTV must be provided with the Portal
user name and password with which to connect to the Portal Server. Enter
the user name and password to use to connect to the server.
v See "RealiTea Viewer - Advanced Options Tabs" in the IBM Tealeaf RealiTea
Viewer User Manual.
4. To save your configuration changes, click OK.
5. Users of the Event Manager must be part of the Event Admin group in IBM
Tealeaf cxImpact.
v See "CX User Administration" in the IBM Tealeaf cxImpact Administration
Manual.
v See "Event Administration" in the IBM Tealeaf Event Manager Manual.
6. To test the connection, in the RTV menu, select Edit > Event Editor....
7. The Events tab of the Tealeaf Event Manager opens, displaying all event
definitions on the server.
v See "Tealeaf Event Manager" in the IBM Tealeaf Event Manager Manual.
Acquiring the Mobile License
If you have licensed the IBM Tealeaf CX Mobile module, RTV must be supplied
with the license key to enable mobile-specific replay features. This configuration is
also completed through the IBM Tealeaf cxImpact Options tab.
v See "RealiTea Viewer - Advanced Options Tabs" in the IBM Tealeaf RealiTea Viewer
User Manual.
Chapter 3. Initial CX Configuration
195
Configuring the User Profile
After basic connectivity is established, RTV administrators can configure the user
profile to contain hints on how to display content during replay. Using replay
rules, you can provide instructions to RTV for how to handle specific pages or
other aspects of the web application during replay.
This information describes how to configure the RTV user profile. The user profile
is stored as an XML file inside your local RTV installation directory.
Note: It is recommended that you begin by modifying the user profile through the
RTV GUI, instead of editing the raw XML.
The local RTV profile can be optionally synchronized with a common user profile
stored on the server.
v This common user profile can be optionally synchronized with the user profile
used by Browser-Based Replay. See "RealiTea Viewer - Profile Options" in the
IBM Tealeaf RealiTea Viewer User Manual.
Editing the RTV profile:
1. In the RTV menu, select Tools > Options....
2. Click the Profiles tab.
3. Click Edit Profile....
4. The nodes of the RTV profile are displayed. Specific nodes to modify are
described in the following sections.
v For more information about user profiles, see "RealiTea Viewer - Profile
Options" in the IBM Tealeaf RealiTea Viewer User Manual.
Backing up RTV profile: See "RealiTea Viewer - Profile Options" in the IBM
Tealeaf RealiTea Viewer User Manual.
Host-port remapping:
If needed, you can remap the hosts and ports that are detected in the transaction
stream to another host:port number gateway. If it is not practical or desirable for
replay to make requests to the live production server, you can change all references
to the live server in replay data to point to the other server or to a null server.
Note: In a user profile, you can have no more than one host-port remapping.
1. In the Edit Profile dialog, double-click the Remap Host node.
2. Click Add Hostname. Enter your web application's host name in the following
form:
www.<host_name>.<ext>
3. Click OK.
4. To enable remapping, select one of the following remap options:
v Remap host to - Enter the host to which you want to remap the source host
name, using the same format.
v Remap host to NULL server - If you do not have a remap server to use and
do not want requests that are made to the source web server, this option
effectively cancels any requests that are embedded in the replay data.
Note: If this option is enabled, some content does not display properly
during replay.
196
IBM Tealeaf CX: Configuration Manual
5. If you want, you can remap port numbers from the source web application's
traffic to new port numbers on the remap server. Click Add Port. Enter the
From and To remap ports, and click OK.
v You can enter multiple port numbers to remap.
6. From the Protocol drop-down, you can select the protocol to use when you
connect to the remap server. The Auto automatically detects the appropriate
protocol to use.
7. To save your remap settings, click OK.
Ignore URLs:
Some URLs for your web application are not viewable pages, which can result in
display issues in RTV. To avoid these pages, you can configure RTV to ignore URL
patterns, including query parameters.
1. In the Edit Profile dialog, double-click the IgnoreURL node.
2. Enter the path information for the URLs to ignore. The path /app/.asp?
instructs RTV to ignore any .asp file containing query parameters in the app
tree of the source host.
v The wildcards * and ? are accepted.
v When you specify URLs to ignore, start simple and specific. You can
download a session and save it locally as a .TLS file and then to iterate on
your ignore URL rules.
3. To save the IgnoreURL rule into your profile, click OK.
4. To create the IgnoreURL rule, in the Edit Profile dialog click New.... From the
drop-down, select Add IgnoreUrl....
v For more information about configuring your profile, see "RealiTea Viewer Profile Options" in the IBM Tealeaf RealiTea Viewer User Manual.
Popup URLs:
If needed, you can configure RTV to recognize URLs that must be displayed in a
popup window. When you browse to URLs that match the PopupURL pattern in
the NavList, RTV displays them in a popup window.
v In Browser-Based Replay, popup URLs are displayed in the NavList yet are
displayed as regular pages during replay.
1. In the Edit Profile dialog, double-click the PopupURL node.
2. Enter the path information for the URLs to treat as popups. Path configuration
for popup URLs follows the same requirements as specifying Ignore URLs. See
“Ignore URLs.”
3. To save the PopupURL rule into your profile, click OK.
v For more information about configuring your profile, see "RealiTea Viewer Profile Options" in the IBM Tealeaf RealiTea Viewer User Manual.
Response modifications:
You can modify the response of replay data by performing pattern-based
replacement of text. For example, response modifications can be used to prevent
the unwanted execution of JavaScripts referenced or included in the response.
1. In the Edit Profile dialog, double-click the ResponseMod node.
2. For the specified host name, you can select whether the response modification
is to be applied to all responses or to those matching a regular expression
pattern.
v Regular expressions are a powerful mechanism for specifying pattern
matching. See "Regular Expressions in the RealiTea Viewer" in the IBM Tealeaf
RealiTea Viewer User Manual.
Chapter 3. Initial CX Configuration
197
3. In the Pattern text box, you can specify by using a regular expression the text
for which to search the response.
4. In the Replacement text box, specify the text to replace the matched pattern.
5. Select whether to replace only the first occurrence (First) in the response or all
occurrences (All).
6. To save your response modification rule, click OK.
7. After you specify your response modification rule, you must test it against
sample data. See “Testing response modifications.”
Testing response modifications:
After you specify your response modification rule, you must test it against sample
data.
1. Load a session that you can use to test the rule.
2. Click theResponse View button in the toolbar.
3. Select some example text in the response to use for testing.
4. Right-click the selected text and select Test Response Modify Rules....
5. TheTest Modify Rules window opens.
6. To test the selected text against the Response Modify rules for the page, click
Test.
7. To edit the Response Modify rules, click Edit Rules....
v For more information about configuring your profile, see "RealiTea Viewer Profile Options" in the IBM Tealeaf RealiTea Viewer User Manual.
Configuring dynamic response modifications: If your web application includes
data that is delivered from a third party, that content must be associated with a
specific request. You can use dynamic response modification rules to modify
response patterns that are based on the detection of Tealeaf events in the
transaction stream.
v See "RealiTea Viewer - Creating Events" in the IBM Tealeaf RealiTea Viewer User
Manual.
External file modifications:
If your web application references external files such as JavaScripts, you can
configure a set of file modifications so that undesirable actions are not taken within
the RTV web browser during replay. Typically, this feature is used to disable script
execution.
1. In the Edit Profile dialog, double-click the ExternalFileMod node.
2. For the specified host name, enter the regular expression pattern for the file
names to modify.
v Regular expressions are a powerful mechanism for specifying pattern
matching. See "Regular Expressions in the RealiTea Viewer" in the IBM Tealeaf
RealiTea Viewer User Manual.
3. In the Pattern text box, you can specify using a regular expression the text for
which to search.
4. In the Replacement text box, specify the text to replace the matched pattern.
5. Select whether to replace only the first occurrence (First) or all occurrences
(All).
6. After you specify your external file modification rule, you must test it against
sample data. See “Testing response modifications.”
7. To save your external file modification rule, click OK.
198
IBM Tealeaf CX: Configuration Manual
v For more information about configuring your profile, see "RealiTea Viewer Profile Options" in the IBM Tealeaf RealiTea Viewer User Manual.
Configuring dynamic external file modifications: You can use dynamic external
file modification rules to modify external file data based on the detection of Tealeaf
events in the transaction stream.
v You can configure these modifications by using the same interface as the one
used to configure dynamic response modifications. See "RealiTea Viewer Creating Events" in the IBM Tealeaf RealiTea Viewer User Manual.
Creating frame rules:
If your web application uses framesets to organize the display page, you can create
frame rules to deliver URLs to named frames in the frameset.
1. In the Edit Profile dialog, double-click the FrameRule node.
2. Enter the name of the frame to which to map the URL pattern.
3. In the Matching URL textbox, enter the URL pattern for the source page or
pages to map into the frame.
v The wildcards * and ? are accepted.
4. To apply the frame rule to your user profile, click OK.
v For more information about configuring your profile, see "RealiTea Viewer Profile Options" in the IBM Tealeaf RealiTea Viewer User Manual.
Note: For dynamically loaded frames, you can create rules from the Viewable
Pages list to manage frame placement. Right-click the page in the Viewable Pages
list and select Replay Rules... > Place this page in a frame... and select the frame.
The rule is then created to always place the page into the selected frame. See
"RealiTea Viewer - Viewable Pages List" in the IBM Tealeaf RealiTea Viewer User
Manual.
Configuring replay for client-side user interface actions
The emergence of rich internet application technologies has greatly increased the
utilization of client-side user interface events in web applications. These UI events
may not be transmitted to the host server by default, which prevents Tealeaf from
tracking them.
As an optional part of the IBM Tealeaf CX platform, the Tealeaf IBM Tealeaf CX UI
Capture for AJAX can be deployed in your web application to provide detailed
monitoring of client-side user interface events. The IBM Tealeaf CX UI Capture for
AJAX can require additional development, configuration, and integration with
your web application.
Note: IBM Tealeaf CX UI Capture for AJAX is only available to legacy users.
v For more information about UI Capture, see "UI Capture for Ajax Guide" in the
IBM Tealeaf UI Capture for Ajax Guide.
If you are unable to deploy UI Capture at this time, you can configure RTV to
complete some limited monitoring of client-side UI events.
v See "Monitoring Client UI Events through RTV" in the IBM Tealeaf RealiTea Viewer
User Manual.
v If your web application uses Ajax technologies, additional configuration can be
required. See "RealiTea Viewer - Ajax Replay" in the IBM Tealeaf RealiTea Viewer
User Manual.
Chapter 3. Initial CX Configuration
199
Testing Your Configuration
After you complete your initial configuration, you can complete the following
steps to verify the configuration.
For RTV, you must test the configuration for basic users, RTV administrators, and
users of the Tealeaf Event Manager. The following steps are listed.
v A complete set of tests can be run after all Tealeaf components is configured. See
"Testing Your Tealeaf Solution" in the IBM Tealeaf CX Configuration Manual.
1. RTV Administrators: RTV administrators must test that they can change replay
rules and that basic replay functionality is working.
v If you have not done so already, you must verify that you can make a replay
rule change and save it to the server. You might create an IgnoreURL rule for
a URL that will never be displayed in the web application. After you
complete this test, you should remove the rule.
v Test basic replay now. See "RealiTea Viewer - Replay View" in the IBM Tealeaf
RealiTea Viewer User Manual.
Note: Replay is a complex process that can require regular review of replay
rules to make it work properly. Now, you want to test basic replay
functionality.
2. RTV Users: RTV users must be able to search for sessions and replay them. If
you have not done so already, you must test a basic RTV user account to verify
that search and replay are working properly.
v See “Testing search” on page 192.
v See “Testing replay” on page 192.
3. Tealeaf Event Manager Users: These users must be able to access the
application now. From the RTV menu, select Edit > Event Editor....
v If RTV is properly configured, the currently available events are displayed.
v Perform a simple change to an event definition, such as changing the
description, and then commit the change back to the server to verify that
your user account can modify event definitions.
When all Tealeaf components are configured, you must complete an end-to-end
test. See "Testing Your Tealeaf Solution" in the IBM Tealeaf CX Configuration Manual.
References
For more information about IBM Tealeaf cxVerify, see "cxVerify Administration
Manual" in the IBM Tealeaf cxVerify Administration Manual.
v For more information about configuring tasks, see "cxVerify Configuring Tasks"
in the IBM Tealeaf cxVerify Administration Manual.
v For more information about scheduling tasks, see "cxVerify Scheduling Tasks" in
the IBM Tealeaf cxVerify Administration Manual.
Initial CX Mobile configuration
Note: This section provides a framework for performing the initial configuration of
one component of the IBM Tealeaf CX system in a simplified deployment model.
Depending on your Tealeaf solution's deployment, more configuration might be
required. If you have any questions about configuration, contact
http://support.tealeaf.com.
200
IBM Tealeaf CX: Configuration Manual
The IBM Tealeaf CX Mobile module extends the user agent detection, analysis, and
reporting capabilities of IBM Tealeaf cxImpact to track user agents for mobile
devices. Through IBM Tealeaf CX Mobile, you can identify and track the
experiences of your customers connecting to your web application by mobile
devices.
Note: The IBM Tealeaf CX Mobile module is a separately licensed module of the
IBM Tealeaf CX platform. please contact your IBM Tealeaf representative.
v For more information about enabling, see "Overview of CX Mobile" in the IBM
Tealeaf CX Mobile User Manual.
v For more information about data acquired from mobile devices, see "Overview
of CX Mobile" in the IBM Tealeaf CX Mobile User Manual.
This page describes how to perform the initial configuration of IBM Tealeaf CX
Mobile for Mobile Web, which manages the capture of user interface events and
system properties from mobile devices that interact with your web application
through a self-identified mobile browser.
Note: IBM Tealeaf CX Mobile for Mobile App enables the capture of user interface
events and application properties from mobile native applications. It requires a
separate installation, deployment, and configuration. See “Initial configuration for
CX Mobile for Mobile App” on page 202.
Pre-Requisites
Before you begin, install all IBM Tealeaf software on Windows or Linux servers.
For more information, see the IBM Tealeaf CX Installation Manual.
In addition, you must first complete the initial configuration steps for IBM Tealeaf
cxImpact. For more information, see the IBM Tealeaf CX Configuration Manual.
UI Capture for Replay
Note: For RTV users, the IBM Tealeaf CX Mobile license must be deployed to the
application from one of the hosting Tealeaf servers to enable proper replay of
Mobile Web sessions. See "Search and Replay for Mobile Web" in the IBM Tealeaf
CX Mobile User Manual.
RTV
Note: To replay Mobile Web sessions in Release 8.1 or later, you must install or
upgrade to IBM Tealeaf CX UI Capture for AJAX to build 2011.03.15.1 or later.
v See "UI Capture FAQ" in the IBM Tealeaf UI Capture for Ajax FAQ.
v See "UI Capture for Ajax Guide" in the IBM Tealeaf UI Capture for Ajax Guide.
v Replay of sessions that are captured from native applications has a different set
of requirements. See "Search and Replay for Mobile App" in the IBM Tealeaf CX
Mobile User Manual.
Configuring Tealeaf CX Mobile
IBM Tealeaf CX Mobile for Mobile Web relies on the WURFL standard for
detecting mobile user agents. This .csv file must be downloaded, converted into a
usable form for Tealeaf, and then made available to the IBM Tealeaf CX platform.
This standard must be updated regularly. See "Configuring Tealeaf for Mobile
Visitors" in the IBM Tealeaf CX Mobile Administration Manual.
Chapter 3. Initial CX Configuration
201
Configure events for CX Mobile
The Mobile Traffic Dashboard that is imported in the previous step includes events
to detect mobile visitors and other meaningful information that is related to their
experience. These events test for the presence of specific name-value pairs in the
[ExtendedUserAgent] section of the request.
The [ExtendedUserAgent] section is added to the request by enabling extended
user agent parsing.
v For more information about enabling this feature, see "Tealeaf Reference Session
Agent" in the IBM Tealeaf CX Configuration Manual.
For more information about the events for mobile visitors that become available
through extended user agent parsing, see "Events for Mobile Visitors" in the IBM
Tealeaf CX Mobile User Manual.
Testing your configuration
For IBM Tealeaf CX Mobile, you must verify that the Mobile Dashboard was
properly imported and that mobile events are appearing in reports. Testing the CX
Mobile is part of end-to-end testing of your Tealeaf components.
You might need to wait a few minutes after you enable user agent detection and
import the mobile dashboard before mobile events are being triggered by session
data. If you experience difficulties while you are searching for events or viewing
the Mobile Dashboard, wait a few minutes and try again.
When all Tealeaf components are configured, complete an end-to-end test. See
"Testing Your Tealeaf Solution" in the IBM Tealeaf CX Configuration Manual.
1. Search for events. Through the Portal or RTV, run a search for any of the
mobile events that are imported with the dashboard.
2. Review the Mobile Dashboard. If you installed the Mobile Traffic dashboard:
a. In the Dashboard menu, select the Mobile dashboard.
b. Review the content in the dashboard to verify that it is being populated
with data.
3. Review other Tealeaf reports. Check the other mobile visitor reports in Tealeaf
to verify that they are being populated with data.
Initial configuration for CX Mobile for Mobile App
To capture data from mobile native applications, you must deploy one or more of
the following Logging Frameworks with your application. When deployed and
configured, the following Logging Frameworks capture user interface events and
application properties from native applications that are developed for the listed
mobile operating systems.
Note: Use of the Tealeaf Logging Frameworks for mobile native applications
requires the Tealeaf CX Mobile license for Mobile App. For more information,
contact your Tealeaf representative.
Note: Licensees must use code that is provided by Tealeaf in their apps. For more
information on downloading Tealeaf software, see Tealeaf CX Downloads.
Logging Framework
Description
202
IBM Tealeaf CX: Configuration Manual
Android Logging Framework
Logging Framework for Android-based applications. See "Tealeaf Android
Logging Framework Reference Guide" in the IBM Tealeaf Android Logging
Framework Reference Guide.
iOS Logging Framework
Logging Framework for iOS-based applications. See "Tealeaf iOS Logging
Framework Reference Guide" in the IBM Tealeaf iOS Logging Framework
Reference Guide.
References
v For more information about IBM Tealeaf CX Mobile in general, see "TLTopic Mobile" in the IBM Tealeaf Topics.
v For more information about using IBM Tealeaf CX Mobile, see "Tealeaf CX
Mobile User Manual" in the IBM Tealeaf CX Mobile User Manual.
v For more information about configuring IBM Tealeaf CX Mobile, see "Tealeaf CX
Mobile Administration Manual" in the IBM Tealeaf CX Mobile Administration
Manual.
v For more information about IBM Tealeaf CX UI Capture for AJAX, see "UI
Capture FAQ" in the IBM Tealeaf UI Capture for Ajax FAQ.
Testing Your Tealeaf Solution
After you complete installation and the initial configuration tasks for each licensed
Tealeaf product and module, verify the operations of your Tealeaf solution. This
section provides a simple procedure for testing end-to-end operations of the
Tealeaf solution, with modifications based on optional components that you may
have installed.
Methodology
This testing procedure requires the generation of a test session on the web
application and the capture of the session through Tealeaf and locally through the
Tealeaf Client-Side Capture utility.
As you browse through the session, you can test, search, replay, and report
capabilities for active sessions and then perform similar tests when the session
completes.
v In an active session, hits are currently being added to the session stored in the
in-memory Short Term Canister, or the session is not yet closed or timed out.
v A completed session is a closed session that moved from the Short Term
Canister to the Long Term Canister for indexing and storage. Sessions that
archived out of the LTC are also considered to be completed sessions.
The methodology tests the following fundamental features of the Tealeaf solution
by locating your captured session data in various parts of the capture, processing,
and reporting areas of the Tealeaf solution.
Features
v Capture: Session capture by the IBM Tealeaf CX Passive Capture Application.
v Search: Search for the session data as an active or completed session.
v Replay: Replay of the session through Browser-Based Replay and the IBM
Tealeaf CX RealiTea Viewer as an active and completed session
v Reporting: Display of data in the Portal as an active or completed session
Chapter 3. Initial CX Configuration
203
v Data Export: Export of captured and processed data
Temporary Configuration Changes
The previous steps mirror the generalized flow of data through the solution, which
is outlined below.
v All items below apply to completed sessions. Items also marked (active) apply
to active sessions, too.
General Data Flow of Session Data throughIBM TealeafCX
v Active session begins.
– (active) Session is available for replay in Portal and RTV.
v Session is completed.
v Session is moved from Short Term Canister to Long Term Canister.
v Session is indexed for search in LTC.
– (completed) Session becomes available for search by using completed search
templates in the Portal and RTV.
v Session data is aggregated for reporting purposes.
– (completed) Session data populates Portal reports.
v Session data is trimmed from the Long Term Canister and, optionally, archived.
For testing purposes, you may want to shorten the intervals for some of the steps
to hasten the testing process. These intervals can be configured by modifying the
following configuration options.
Note: Do not make these changes on a production server. These changes should
only be applied in a testing environment and should be reverted when the testing
is complete.
v Session is indexed for search in LTC: For more information about configuring
indexing, see "Configuring CX Indexing" in the IBM Tealeaf CX Configuration
Manual.
1. The control program for indexing (indexprogram) checks for sessions that
need indexing that is based on the Sleep Time When No Work setting.
2. When sessions are detected that need indexing, the indexing process begins.
Indexes are not committed to disk, which enables searching until the Direct
Pull Timeout setting expires or the index size exceeds the Maximum Index
Size threshold.
v Session data is aggregated for reporting purposes: By default, the Data Collector
polls the Long Term Canister for data to aggregate every five minutes.
1. If necessary, you can restart the Tealeaf Data Collector Service through the
Windows Services Control Panel to immediately perform a data collection.
However, you must be certain that the data to be collected is already
generated for this step to work.
Installation
Before you begin, install the following components, if you did not do so already.
v Client-Side Capture: The Tealeaf Client-Side Capture is a plug-in for Fiddler that
enables the capture of your IE navigation experience to your local desktop. The
session that you explore on the monitored web application is captured locally as
a control to test the results of capture, processing, and replay through Tealeaf's
replay features.
204
IBM Tealeaf CX: Configuration Manual
– For more information about installing Client-Side Capture, see "Using
Client-Side Capture for Fiddler" in the IBM Tealeaf Client-Side Capture Manual.
v IBM Tealeaf CX RealiTea Viewer: The RTV application can be installed on the
desktop systems of Tealeaf users to enable the search and replay of session data.
Additionally, through RTV, users with the appropriate permissions can edit
event definitions that are applied to the Tealeaf capture stream.
– If RTV is used by Tealeaf users in your enterprise, you should test its
capabilities as part of the testing process. For more information about
installing RTV, see "RealiTea Viewer Overview" in the IBM Tealeaf RealiTea
Viewer User Manual.
Some Considerations in Generating Your Test Session
Before you capture your test session, you should consider the following items,
which may affect the pages that you attempt to capture:
v Session Identifier: You should decide how you are going to explore the web
application in a way that permits you to uniquely identify the session through
search and replay. When you test the captured session, you must be able to
uniquely identify it.
– If no unique identifier is available, you may be able to identify the session by
timestamps.
– If you licensed and deployed IBM Tealeaf cxResults, you can use the visitor
identifier that you configured for the product. See "Initial cxResults
Configuration" in the IBM Tealeaf cxResults Administration Manual.
v Tracking Event: You should design your session so that you trigger at least one
known event that you configured for the web application. Later, you can use this
event as a key for digging through Tealeaf report data to locate the completed
session.
v Scorecard: For testing report features, you should trigger an event that registers
in a KPI or Process Scorecard.
– For more information about KPI scorecards, see "Using Scorecards" in the IBM
Tealeaf cxView User Manual.
– For more information about Process scorecards, see "Using Scorecards" in the
IBM Tealeaf cxView User Manual.
v PCA: Before capture, you may want to open the Summary tab of the PCA Web
Console, where you may be able to monitor the traffic if there is little other
activity on the web application.
– If you have enabled data filter rules, configured traffic to ignore, or other
tuning parameters, you may want to design your capture session so that you
test these settings. For example, if you know of specific host traffic that is
configured to be ignored, you should design your session to generate session
data from that host, which is forwarded to the PCA and then ignored. See
"PCA Web Console - Interface Tab" in the IBM Tealeaf Passive Capture
Application Manual.
– If the PCA is capturing some SSL traffic, you should design your session to
explore secured areas of the web application. See "PCA Web Console Interface Tab" in the IBM Tealeaf Passive Capture Application Manual.
– The PCA supports data sessioning, multiple capture modes, inclusion and
exclusion of specific file extensions, and other features. You should be able to
design your capture to identify that the captured and processed data properly
reflects capture mode, file extension settings, and any data sessioning
configuration that is managed through the PCA. See "PCA Web Console Pipeline Tab" in the IBM Tealeaf Passive Capture Application Manual.
Chapter 3. Initial CX Configuration
205
– The following configuration areas may require separate captures in order to
test them well.
– Privacy rules that are applied at the PCA should be thoroughly tested.
Depending on the complexity of your configured rules, you should consider
reviewing each of them through a separately captured session. See "PCA Web
Console - Rules Tab" in the IBM Tealeaf Passive Capture Application Manual.
- Privacy Tester rules can also be tested through the external Privacy Tester
utility. See "Privacy Tester Utility" in the IBM Tealeaf CX Configuration
Manual.
v TMS: No additional tests are required. See "Initial TMS Configuration" in the
IBM Tealeaf CX Configuration Manual.
v IBM Tealeaf cxImpact: No additional tests are required. See "Initial Portal
Configuration" in the IBM Tealeaf CX Configuration Manual.
v Pipeline: No additional tests are required. See "Initial Portal Configuration" in
the IBM Tealeaf CX Configuration Manual.
Optional Components
v RTV: RTV tests are included as part of the workflow in this testing procedure.
v IBM Tealeaf cxResults: The key criteria for configuring IBM Tealeaf cxResults are
establishing a unique, multi-session identifier for each visitor and being able to
search for visitors. See “Testing for Unique cxResults Identifier” on page 210.
v IBM Tealeaf cxReveal: No additional tests are required. See "Initial cxReveal
Configuration" in the IBM Tealeaf cxReveal Administration Manual.
v IBM Tealeaf CX Mobile Module: Optionally, you can perform these tests by
using a mobile device to verify proper configuration of the IBM Tealeaf CX
Mobile module. See “Testing for Mobile Visitors” on page 210.
v IBM Tealeaf cxConnect for Data Analysis: No additional tests are required. See
"Initial cxConnect Configuration" in the IBM Tealeaf CX Configuration Manual.
v IBM Tealeaf cxVerify: No additional tests are required. See "Initial cxVerify
Configuration" in the IBM Tealeaf CX Configuration Manual.
To capture all of the above configuration items, you may decide to perform
multiple captures of different aspects of the web application. Since some of the
following tests are applied while the session is still active, you should perform all
of the tests on the page for the first session before you begin capture and testing of
any subsequent sessions.
v See “Capturing Additional Test Sessions” on page 210.
Generate Session
1. Open Internet Explorer.
2. Browse to the home page of the web application.
3. Start Client-Side Capture.
4. Note the time at which you started local capture. This timestamp should be
correlated to the timestamps that later appear in the Portal.
5. Navigate to the pages in the web application that you must capture to complete
the tests of the above systems.
6. Do not close the session. Continue with the following tests.
Note: Depending on the data volume, network throughput, and server
performance, there may be a delay between beginning your session and hits
appearing in Tealeaf.
206
IBM Tealeaf CX: Configuration Manual
Active Session Tests
The following tests can be applied to the active session you are currently
capturing.
Capture
If you are in a production environment with general web traffic, you may not be
able to test for the capture process only. It may not be easy to detect the hit data
for your specific active session through the PCA Web Console or the Windows
pipeline, which receives the PCA data.
However, if you are in a test environment with no other traffic, you may be able to
verify capture by monitoring the following sections in the Summary Tab of the
PCA Web Console:
v Current Per Seconds Stats section indicates the transfer rates of each PCA
process through the pipeline.
v Peers section indicates delivery of PCA data to the destination Processing Server
and its Windows pipeline.
v See "PCA Web Console - Summary Tab" in the IBM Tealeaf Passive Capture
Application Manual.
Reporting
Through the Portal, you can review all active sessions. From the Portal menu,
select Active > Sessions. The session list displays all active sessions. If you are able
to locate the session that you are currently creating, then you verified that the
Windows pipeline is working properly.
v In the Portal session list, you can click the Info icon to review session
information for verification purposes. See "Searching Session Data" in the IBM
Tealeaf cxImpact User Manual.
In the Session List, click the Pages List icon to display a list of pages in the
session. You can drill into individual pages to review captured data. This area is
useful for reviewing Windows pipeline operations, such as privacy, Tealeaf
reference values, and more.
v You can also replay the active session from this screen.
v See "Searching Session Data" in the IBM Tealeaf cxImpact User Manual.
Search
To search for active sessions through the Portal, select Search > Active Sessions.
See "Searching Session Data" in the IBM Tealeaf cxImpact User Manual.
v If you triggered a known event in your session, you can search by that event for
sessions.
v To search for active sessions in RTV, click the Search Active Sessions check box
in the Search Builder tab. For more information about RTV search, see "RealiTea
Viewer - Session Search and Subsearch" in the IBM Tealeaf RealiTea Viewer User
Manual.
Replay
If you find the active session in the Portal, you can click the Camera icon in the
Session List to replay the session.
v Depending on your configuration, you may be able to use the method to replay
in the Portal, RTV, or both. See "CX Browser Based Replay" in the IBM Tealeaf
cxImpact User Manual.
Chapter 3. Initial CX Configuration
207
v For more information about RTV replay, see "RealiTea Viewer - Replay View" in
the IBM Tealeaf RealiTea Viewer User Manual.
Completed Session Tests
If you successfully completed the tests, then you can end the session at which
point it is queued for transferred to the Long Term Canister for indexing.
v Stop your Client-Side Capture, and save the capture file to a local directory.
Capture
No additional testing is required.
Search
If you are able to find your completed session by using a completed session
template, then you verified indexing operations. Specifically, you should perform a
search for known data in the [appdata] section of the request, which is always
indexed.
v If you triggered a known event in your session, you can also search by that
event for sessions.
v See "Searching Session Data" in the IBM Tealeaf cxImpact User Manual.
v For more information about RTV search, see "RealiTea Viewer - Session Search
and Subsearch" in the IBM Tealeaf RealiTea Viewer User Manual.
Searching for Visitors: If you enabled IBM Tealeaf cxResults, you can perform a
search for the session that is based on the visitor identifier. When you drill down
into the results, you should be able to retrieve the same session as above.
v For more information, "Searching for Visitors" in the IBM Tealeaf cxResults User
Manual.
Replay
In the Session List page, you can click the Camera icon to replay the session. For
replay in this case, verify the following against the version you captured by using
Client-Side Capture:
v Verify the page counts of each capture.
v Verify that the last page of each capture corresponds to the other capture.
For RTV:
v Look at several pages in the RTV capture to verify that all meaningful content is
displayed.
v If highlighting is enabled in RTV, check that the appropriate page elements have
been properly highlighted.
v If UI Capture is deployed in your web application, then you should verify that a
selection of UI events is captured and displayed appropriate in RTV.
– UI Capture requires a separate deployment of JavaScript into your web
application infrastructure. See "UI Capture for AJAX Guide" in the IBM Tealeaf
UI Capture for AJAX Guide.
Discrepancies between the Tealeaf replay and your CSC replay should be
reconciled by using replay rules in your profile.
v See "RealiTea Viewer - Profile Options" in the IBM Tealeaf RealiTea Viewer User
Manual.
208
IBM Tealeaf CX: Configuration Manual
Reporting
Event reporting:
If the events for your captured session tabulated for reporting purposes, complete
the following steps.
In the Portal menu, select Analyze > Report Builder.
Click Add Event.
Select the event that you triggered in your captured session. Click Select.
Verify that the Focus Date is configured for today or the date when you created
the session.
5. Click Refresh if necessary.
6. In the displayed chart, find the hour during which the session was made. If
you cannot find the appropriate link, click the Total link at the bottom of the
display.
1.
2.
3.
4.
7. The list of relevant sessions is displayed. Find your session in the displayed
list.
8. If you are able to complete the test, then you verified that event data from your
session is available for reporting.
v See "Tealeaf Report Builder" in the IBM Tealeaf Reporting Guide.
Aggregated data reporting:
Identify if the aggregated data from captured session is tabulated for reporting
purposes, complete the following steps.
1. In the Portal menu, select Analyze > Scorecards. The Scorecards screen is
displayed.
2. Verify that the Focus Date is configured for today or the date when you
created the session.
3. For Focus Period, select Day.
4. Click Change. Select a scorecard that includes events that are triggered during
your captured session. Click Select.
5. Click Refresh if necessary.
6. In the displayed scorecard, click a link that displays a count of sessions for the
event that was triggered during your capture.
7. An event chart for the selected event is displayed.
8. In the displayed chart, find the hour during which the session was made. If
you cannot find the appropriate link, click the Total link at the bottom of the
display.
9. The list of relevant sessions is displayed. Find your session in the displayed
list.
10. If you are able to complete the test, then you verified that your session data is
being aggregated for reporting.
v See "Using Scorecards" in the IBM Tealeaf cxView User Manual.
Data Export
You can test the data export features of the Tealeaf system by completing the
following procedures.
Export Chart
1. From the Portal menu, select Analyze > Report Builder.
2. Select an event, reporting period, and server options so that you can see data
display on-screen.
Chapter 3. Initial CX Configuration
209
3. Use the buttons in the upper-right corner to test export to Microsoft Excel and
PDF.
v See "Tealeaf Report Builder" in the IBM Tealeaf Reporting Guide.
4. Verify the data in the exported chart against the displayed version.
Export Scorecard
1. From the Portal menu, select Analyze > Scorecards.
2. Select a scorecard and reporting period that contains data.
3. Use the buttons in the upper-right corner to test export to Microsoft Excel and
PDF.
v See "Using Scorecards" in the IBM Tealeaf cxView User Manual.
4. Verify the data in the exported scorecard against the displayed version.
Export Dashboard
1. From the Portal menu, select a dashboard from the Dashboards menu.
2. Verify that the dashboard contains meaningful data.
3. In the upper-right corner, click Options.
4. Email the dashboard to yourself.
5. A PDF version of the dashboard is attached to the email. Verify the data in the
exported dashboard against the displayed version.
Capturing Additional Test Sessions
You may want to create sessions to test the following situations:
Testing for Mobile Visitors
If you enabled the IBM Tealeaf CX Mobile module, you can perform the tests by
using a mobile device to verify that Tealeaf is properly configured to capture
mobile user activities.
Testing for Unique cxResults Identifier
If you licensed and enabled IBM Tealeaf cxResults, generate and close a second
session to verify that you generated a visitor identifier in the session list that
matches two sessions. See "Analyzing Visitor Segments" in the IBM Tealeaf cxResults
User Manual.
Alerts
If you enabled the alert service, complete the following procedure to test alerts.
v For more information about enabling the alert service, see "Configuring the Alert
Service" in the IBM Tealeaf CX Configuration Manual.
This procedure defines an alert that is triggered when the number of active
sessions is greater than 1. After you define the alert and commit your changes,
when you begin exploring the web application, you should receive an alert email.
v Alerts are generated through the Event Manager in the Tealeaf Portal. See
"Tealeaf Event Manager" in the IBM Tealeaf Event Manager Manual.
v For more information about configuring alerts, see "TEM Alerts Tab" in the IBM
Tealeaf Event Manager Manual.
1. Log in to the Portal as an administrator.
2. In the Portal menu, select Configure > Event Manager.
3. In the Tealeaf Event Manager, click the Alerts tab.
4. Click New Canister Alert.
210
IBM Tealeaf CX: Configuration Manual
5.
6.
7.
8.
9.
Click the Active check box.
For Alert Type, select Count.
Click Select Event. Select the Active Sessions event.
For Alert Function, select Positive.
Click the Alert Threshold Only check box.
10. In the Threshold text field, enter a value of 1.
11. For Interval, enter a value of 100.
12. For Reset, enter a value of 100.
Note: This alert should fire only one time. After you verified the test, modify
the alert properties or delete the alert.
13. Clear the Enable Warnings check box.
14. In the Notification panel, select the email check box and clear all other check
box.
15. Enter your email address in the space provided.
16. In the Blackout panel, verify that the Enable Alert Blackout check box is not
selected.
17. Click Save Draft.
18. The Alert should be displayed in red in the Alerts tab.
19. To commit the changes to the server, click Commit Changes.
20. Open a browser window to explore the application that is monitored by
Tealeaf.
21. Open a second browser to explore the application. You should now have two
active sessions, which exceed the alert threshold.
22. A copy of the alert should be emailed to you.
23. Remember to delete the alert after you received and reviewed it.
v See "TEM Alerts Tab" in the IBM Tealeaf Event Manager Manual.
Next Steps
If all of the tests complete successfully, your Tealeaf solution is operational.
Remember to switch any temporary configuration settings back to their previous
values. See “Temporary Configuration Changes” on page 204.
Chapter 3. Initial CX Configuration
211
212
IBM Tealeaf CX: Configuration Manual
Chapter 4. CX Pipeline Session Agents
Tealeaf session agents can be deployed in the data capture process to filter the
data that is retained by the Tealeaf system. You can define session agents to
discard uninteresting or repetitive data, expand compressed data, filter out private
or sensitive data, and more.
This section describes how to enable configure session agents for the pipeline and
to monitor the pipeline's health with a set of utilities.
v “CX Pipeline Configuration” on page 214
v “Overview of the Capture Pipeline and Session Agents” on page 224
– “Adding a Session Agent” on page 226
– “Archive Session Agent” on page 227
– "Attribute Indexing Session Agent" in the IBM Tealeaf CX Configuration Manual
– “Canister Session Agent” on page 236
– “Cookie Parser Session Agent” on page 238
– “Data Drop Session Agent” on page 241
– “Data Parser Session Agent” on page 246
– “Decouple Session Agent” on page 250
–
–
–
–
–
“DOM Capture Virtual Hit Session Agent” on page 254
“Extended Decoupler Session Agent” on page 252
“Extended Privacy Session Agent” on page 261
“Health-Based Routing (HBR) Session Agent” on page 263
“Inflate Session Agent” on page 271
–
–
–
–
–
“JSON Mobile Parser Session Agent” on page 275
“Managed Code Session Agent” on page 287
“Null Session Agent” on page 290
“Privacy Session Agent” on page 291
“Real-Time Monitoring and Alert (RTA) Session Agent” on page 321
– “Response Tags to Request Session Agent” on page 326
– “RTA Split Session Agent” on page 328
– “Sessioning Session Agent” on page 332
– “Session Router Session Agent” on page 330
–
–
–
–
–
–
“Socket Session Agent” on page 335
“Statistics Logger Session Agent” on page 337
"Tealeaf Reference Session Agent" in the IBM Tealeaf CX Configuration Manual
“Tealeaf Reference Session Agent - Legacy Mode” on page 357
“Tealeaf Sessioning Session Agent” on page 360
“TimeGrades Session Agent” on page 366
– “TLI Session Agent” on page 368
– “URL Decode Session Agent” on page 382
v “CX Pipeline Utilities” on page 384
– “TeaLeaf Archive Reader - Run Archived Sessions” on page 384
– “Privacy Tester Utility” on page 390
© Copyright IBM Corp. 1999, 2014
213
– “TeaLeaf Capture Status - Pipeline Monitoring Utility” on page 386
– "TMS Pipeline Status Tab" in the IBM Tealeaf cxImpact Administration Manual
CX Pipeline Configuration
The IBM Tealeaf CX Pipeline is composed of a series of modules that you enable
and configure to perform a specific set of operations on captured data. Each
module, called a session agent, performs a specific manipulation on the captured
data and forwards it to the next session agent. At the end of a IBM Tealeaf CX
pipeline, a terminal agent performs final pipeline disposition of the session data,
which may include forwarding to a Short Term Canister (canister in the diagram
below), to an archive, to another port on the server for processing by a different
pipeline, or to the NULL session agent, which discards the data.
Figure 28. Example of IBM Tealeaf CX Pipeline
After traffic has been captured by the IBM Tealeaf CX Passive Capture Application,
it is forwarded to the Processing Server, where captured data is passed into the
pipeline. Data is passed from one session agent to the next one in the pipeline,
with each agent performing one or more manipulations on the data. The output of
session agent #1 is the input of session agent #2.
Note: The DOM Capture Virtual Hit session agent shown in Figure 28 is needed
only if you are going to perform DOM capture. Additionally, if you decide to
perform DOM capture, the DOM Capture Virtual Hit session agent must be
configured after the Inflate session agent and before the Privacy session agent.
Tealeaf session agents in the pipeline can modify the data with no effects on the
visitor.
In the diagram below, you can see how multiple instances of the IBM Tealeaf CX
Passive Capture Application can feed the same pipeline. Since each instance of the
IBM Tealeaf CX Passive Capture Application can be configured with individual
delivery options, the downstream destination of each PCA instance can be the
same pipeline on the same server. See "Passive Capture Configuration via Web
Console" in the IBM Tealeaf Passive Capture Application Manual.
214
IBM Tealeaf CX: Configuration Manual
Figure 29. Multiple IBM Tealeaf CX Passive Capture Application Instances Feeding the Same Pipeline
This section covers the basics for configuring the IBM Tealeaf CX pipeline.
Capture Modes
Tealeaf Technology provides the following modes of capture:
v Business Mode Captures HTML data. Does not capture binary data such as GIF,
JPEG, and PDF file formats.
v BusinessIT Mode Captures the same information as Business capture mode and
in addition captures request files for all data, including the requests for binary
data. BusinessIT mode does not capture the binary files themselves.
The above modes are configured in the IBM Tealeaf CX Passive Capture
Application. See "Passive Capture Configuration via Web Console" in the IBM
Tealeaf Passive Capture Application Manual.
Default Pipelines
Depending on the role of the server on which you are installing the pipeline, the
following pipelines are the default configurations for the deployment. In the
sections below, the required session agents are listed in the order of appearance in
the pipeline.
Note: All of the listed session agents are required. You may add session agents to
the pipeline.
Processing Server without HBR
For a Processing Server (Canister) without a Health-Based Routing (HBR) server in
front of it, the following pipeline is the default pipeline.
Chapter 4. CX Pipeline Session Agents
215
Configuring the Transport Service
v
v
v
v
“Data Drop Session Agent” on page 241
“Extended Decoupler Session Agent” on page 252
“Inflate Session Agent” on page 271
“Privacy Session Agent” on page 291
v "Tealeaf Reference Session Agent" in the IBM Tealeaf CX Configuration Manual
v “Canister Session Agent” on page 236
Processing Server with HBR
For a Processing Server with an HBR server in front of it, the following pipeline is
the default pipeline. When HBR is enabled, the HBR Server contains most of the
processing session agents. For more information about HBR, see “HBR Server” and
“Health-Based Routing (HBR) Session Agent” on page 263. For more information
about Privacy
Attention: In multi-pipeline environments, do not enable the extended privacy
session agent (PrivacyEx) for child pipelines that have HBR enabled. If HBR and
PrivacyEx are enabled for a child pipeline, the service can run out of memory and
cause the service to restart unexpectedly. For more information about PrivacyEx,
see “Extended Privacy Session Agent” on page 261.
Configuring the Transport Service
v “Data Drop Session Agent” on page 241
v “Extended Decoupler Session Agent” on page 252
v “Session Router Session Agent” on page 330
v “Canister Session Agent” on page 236
HBR Server
For the Health-Based Routing (HBR) Server in your environment, the following
pipeline is the default configuration.
v For more information on HBR, see “Health-Based Routing (HBR) Session Agent”
on page 263.
Configuring the Transport Service
v “Data Drop Session Agent” on page 241
v “Extended Decoupler Session Agent” on page 252
v “Inflate Session Agent” on page 271
v “Privacy Session Agent” on page 291
v "Tealeaf Reference Session Agent" in the IBM Tealeaf CX Configuration Manual
v “Health-Based Routing (HBR) Session Agent” on page 263
How to Configure the Pipeline
In most environments, the Tealeaf installer automatically preconfigures the pipeline
based upon the components selected for installation. For example, if the Processing
component was selected, the installer adds the Canister session agent to the
pipeline. So, in most cases, no additional configuration of the pipeline session
agents is required.
You can set up individual pipelines for each port to which the IBM TealeafCX
Passive Capture Application is forwarding captured data. Pipelines can also be
arranged in parent-child relationships.If needed, you can configure main and child
216
IBM Tealeaf CX: Configuration Manual
pipelines through the Pipeline Editor, which is available through TMS. The
Pipeline Editor is a graphical interface available to Tealeaf administrators through
TMS in the Tealeaf Portal. You can drag and drop items to build your pipelines for
processing captured Tealeaf data. For more information on TMS and the Pipeline
Editor, see "Tealeaf Management System" in the IBM Tealeaf cxImpact Administration
Manual.
Note: Depending on the Tealeaf products that you have licensed, some session
agent functionality may not be available.
Attention: In multi-pipeline environments, do not enable the extended privacy
session agent (PrivacyEx) for child pipelines that have HBR enabled. If HBR and
PrivacyEx are enabled for a child pipeline, the service can run out of memory and
cause the service to restart unexpectedly. For more information about PrivacyEx,
see “Extended Privacy Session Agent” on page 261.
Note: Pipeline configuration can also be performed by editing a configuration file.
In future releases, this option may not be available, so it is recommended that you
use the Pipeline Editor to configure pipelines. For more information on manual
configuration, see “Manual Pipeline Configuration” on page 218.
Configuration with Capture Filter
Capture Filter configuration
As a proof-of-concept method, you can configure a capture filter to perform
capture services through Microsoft IIS. This capture method enables rapid
deployment of the Tealeaf system without having to implement a dedicated IBM
Tealeaf CX Passive Capture Application server. However, there are performance
implications in capturing through IIS.
Capture settings are controlled by the capture filter configuration file. Each
supported platform has its own capture configuration file. This chapter discusses
how to modify the capture configuration file to control the resulting captured data.
Capture Source or Service
Configuration File Name
Microsoft IIS
TeaLeafIIS.cfg
Tealeaf Client-Side Capture
Configured using the Tealeaf toolbar that you can install in Microsoft
Internet Explorer. The Client-Side Capture software is provided with the
Tealeaf distribution.
Tealeaf Transport Service
TeaLeafCaptureSocket.cfg
Tealeaf Cookie Scheme
Tealeaf Web capture filter uses three types of cookies to determine the content that
belongs to a session, as well as where each session starts and stops. The cookie
format consists of a 32-byte GUID (Globally Unique ID). The following three
cookies are used:
v TLTSID (Session) is a temporary cookie, active only for the length of a browser
session, used to group hits into a session. The end user can decide whether or
not to allow this cookie.
v TLTHID (Hit) Assigned at the server, a hit cookie is used to identify a hit within
a session. This temporary cookie is useful for server side processing of the hit.
Chapter 4. CX Pipeline Session Agents
217
For example, if the hit is processed by an application server or a server handling
instrumentation with the event API, the TLTHID is used by this server to
identify the hit. The end user has no control over whether or not to allow the
TLTHID.
v TLTUID (User) is a persistent cookie with a long expiration used to determine
the user that generated the session. The end user has control over whether or
not to allow this cookie. This cookie is available only for applications running
under Internet Information Services (IIS).
The Tealeaf Web capture filter issues these cookies and should be installed on
the Web server. The cookies are visible to the downstream application server.
Monitoring Socket Capture Status
Through TMS, you can monitor statistical information on the socket capture
process for each pipeline in your environment. From the Pipeline Status tab, you
can see the active connections, byte transfer rates, and page views as currently
sampled in the pipeline data. You can also review how the data is passed through
each session agent in the pipeline. See "TMS Pipeline Status Tab" in the IBM Tealeaf
cxImpact Administration Manual.
Manual Pipeline Configuration
Through a single configuration file, you can define one or more pipelines to
manipulate captured data. In the Tealeaf install directory, the
TeaLeafCaptureSocket.cfg file contains the configurations of each session agent
available in your Tealeaf solution.
Building a Pipeline in the Configuration File
You can set up individual pipelines for each port to which the IBM Tealeaf CX
Passive Capture Application is forwarding captured data.
1. In a text editor, open TeaLeafCaptureSocket.cfg.
2. In the [Globals] section, you can specify the port number to receive standard
or SSL traffic. In the following example, standard traffic (Port) is captured on
port 1966 and forwarded to the DataDrop session agent. SSL traffic (SSLPort) is
captured on port 1967 and forwarded to the DecoupleSSL session agent:
Port=1966:DataDrop
#SSLPort=1967:DecoupleSSL
#* For more information on configuring the IBM Tealeaf CX Passive Capture
Application to send traffic to a specific port, see "Configuration" in the IBM
Tealeaf Passive Capture Application Manual.
3. Note that the SSL pipeline is commented out (#), which means that it is current
disabled. To enable a pipeline, remove the #.
4. Configure the [firewall] section. See “Configuring firewall settings” on page
219.
5. For the standard traffic port pipeline, the DataDrop session agent initiates the
pipeline. Search the file for the following string: [DataDrop].
6. In the Data Drop session agent, configure all session agent settings, including
the following configuration item:
DownStreamConfigSection=DecoupleEx
#* The settings for individual session agents are described elsewhere. For a list
of available session agents, see “Overview of the Capture Pipeline and Session
Agents” on page 224.
218
IBM Tealeaf CX: Configuration Manual
7. The DownStreamConfigSection property indicates the next session agent to
which to pass the data outputted from DataDrop. If you search the file for the
following string: [DecoupleEx], you will see another DownStreamConfigSection
property, which points to the next session agent, and so on.
8. In this manner, you can build your pipeline until you reach one of the terminal
pipeline session agents:
a. [Canister] session agent forwards the session data to a Tealeaf Short Term
Canister. See “Canister Session Agent” on page 236.
b. [Archive] session agent writes the session data to a Tealeaf Archive File
(TLA) on the server's hard drive. See “Archive Session Agent” on page 227.
c. [Null] session agent discards the data. For debugging purposes.
d. You can also point the end of a pipeline to the start of the next one. See
“Setting up multiple pipelines” on page 220.
Configuring firewall settings: By default, the TealeafCaptureSocket process
accepts connections from a remote machine, assuming it follows the Tealeaf
Transport Service Protocol. The Firewall section of TealeafCaptureSocket.cfg can
be used to restrict which remote capture devices are permitted to communicate
with the IBM Tealeaf CX server. This section contains addresses of remote hosts
allowed to send data to the Tealeaf Transport Service.
When a connection is first accepted, the sending addresses are verified against the
set of addresses specified in the RemoteHosts setting. Any address not in the list is
tracked, disconnected, and logged at the next ReportingInterval when logging is
enabled.
The firewall settings:
v Display Name values are displayed in TMS, which is the recommended method
for configuring session agents. See "Tealeaf Management System" in the IBM
Tealeaf cxImpact Administration Manual.
v Name values are displayed in TealeafCaptureSocket.cfg.
Table 5. Configuring firewall settings
Display Name
Name
Description
Remote Hosts
RemoteHosts
A comma-separated list of IP
addresses or DSN-resolvable host
names. You can also specify a range
of addresses, separated by a hyphen.
Any address falling within the
specified range is permitted to
connect. In the following example, an
IP address, a DSN address, and a
range of addresses are specified for
acceptance:RemoteHosts=1.2.3.4,
freebird2, 1.2.3.10-1.2.3.12
Reporting Interval
ReportingInterval
This setting defines the amount of
time in seconds to wait between
reporting on rejected connections.
Configuring a valid reporting interval
prevents inundating the log with
reports of rejected connections when
a server is attempting to reconnect
multiple times. The default value is
900 seconds (15 minutes).
Chapter 4. CX Pipeline Session Agents
219
Table 5. Configuring firewall settings (continued)
Display Name
Name
Description
Report to Event Log
ReportToEventLog
When set to true, the rejection
reporting is also written to the
Tealeaf application event log. The
default value is false.
Session Agent Parameters
Each session agent has parameters you can set to customize performance. Some
session agents are specific to a particular capture source.
Note: Configuration options are not case-sensitive.
Parameters common to all session agents: Each session agent has a unique set of
configuration options. In addition, there are some options that are common to all
session agents. The following options are common to all session agents:
Setting Description
DLL
Name of the Dynamic Link Library (DLL) for the session agent. If you do
not provide a fully qualified path, the DLL must be in the same directory
as the capture source (for example, TeaLeafIIS.dll). The following search
methods are used to locate session agent DLLs:
v search for the DLL using the path specified in the capture pipeline
configuration file
v search for the DLL in the current directory (for example, the same
directory as the capture configuration file
v search for the DLL using the TEALEAFPATH environment variable
v search for the DLL using the PATH environment variable
TypeName
Identifies the session agent type. This should not normally be changed.
DownStreamConfigSection
Indicates the next component in the pipeline. This is a required field for all
pipeline session agents except Archive, Socket, and Null, which can
terminate a pipeline and therefore do not require the
DownStreamConfigSection setting.
Setting up multiple pipelines
If your web application passes content over standard protocols and over SSL, you
may wish to create a dedicated pipeline to handle the SSL traffic first, before it is
passed through the standard pipeline for processing. This pipeline might be
responsible for the removal of sensitive information. When the pipeline has
completed its manipulations, it can then forward to the pipeline that handles
standard traffic for general pipeline activities.
1. Create the SSLPort pipeline.
2. Specify all of the session agents needed for the SSL-only traffic.
v Typically, the SSL pipeline strips out any sensitive information. See “Privacy
Session Agent” on page 291.
3. When you have created the chain of SSL-only session agents, set the following
value in the final one:
DownStreamConfigSection=Socket
220
IBM Tealeaf CX: Configuration Manual
4. In the [Socket] section, specify the following properties to point to the start of
the standard pipeline. If you are using a port that is not 1966, insert that value
in the location below:
Server=localhost
Port=1966
UseSSL=False
5. Create the second pipeline for port 1966 in standard fashion.
6. When you have created both pipelines, SSL traffic is passed through the SSL
pipeline first, which then forwards it to the port=1966 pipeline for standard
processing.
Initial Pipeline Configuration
Note: This section provides a framework for performing the initial configuration of
one component of the IBM TealeafCX system in a simplified deployment model.
Depending on your Tealeaf solution's deployment, additional configuration may be
required. If you have any questions about configuration, please contact
http://support.tealeaf.com.
After the PCA and Windows server software has been installed, in most
configurations, the Windows Pipeline requires little configuration in order to be
operational.
Non-default Listen Ports
If you have configured the PCA to deliver to HBR or the Processing Server over a
port that is not 1966, you must configure the recipient to listen on the appropriate
port number. Pipeline listening ports are defined through the Pipeline Editor in the
Tealeaf Management System. See "TMS Pipeline Editor" in the IBM Tealeaf cxImpact
Administration Manual.
1. Before you begin, you should determine if you need to use SSL to transmit
between the PCA and the Windows pipeline. See “Configuring PCA and
Processing Servers to Use SSL” on page 223 below.
2. Login to the Tealeaf Portal as an administrator.
3. To open the "Tealeaf Management System" in the IBM Tealeaf cxImpact
Administration Manual, select Tealeaf > TMS from the Portal menu.
4. In Servers view, click the Transport Service node.
5. Click Transport Service configuration.
6. In the Config actions, click View/Edit. The Pipeline Editor is displayed.
7. Select the top node of the pipeline. Its name should be Pipeline:1966 in a
default configuration.
8. Click Edit at the bottom of the window.
9. In the Edit Pipeline Settings dialog:
a. Enter the port number on which the Processing Server should listen for
this pipeline.
b. If using SSL between the PCA and the Processing Server, select the Use
SSL checkbox.
10. Click Apply.
11. To close the Pipeline Editor, click Save.
Chapter 4. CX Pipeline Session Agents
221
Configure Privacy
Note: Before you enable capture, you may need to configure privacy rules to
prevent the unwanted capture of sensitive information, such as customer credit
card numbers. If capture is enabled without appropriate privacy rules, unfiltered
customer data may be forwarded to the Windows pipeline and stored in the
Tealeaf databases, where it can be searched by any Tealeaf user with the
appropriate permissions.
Tealeaf privacy enables the manipulation, masking, or removal of sensitive
information in the request or response traffic. Based upon privacy rules that you
configure, this data can be hidden in the traffic that is stored in the Tealeaf
database. For more information on privacy, see "Managing Data Privacy in Tealeaf
CX" in the IBM Tealeaf CX Installation Manual.
During the initial configuration, privacy rules and actions are typically defined at
the earliest point in the capture and processing of session data, which occurs at the
PCA. By blocking all private data through the PCA, you can be assured that no
sensitive information is ever available in the system.
v For more information on managing privacy in the PCA, see "PCA Web Console Rules Tab" in the IBM Tealeaf Passive Capture Application Manual.
v For more initial configuration steps for PCA-based privacy, see "Initial PCA
Configuration" in the IBM Tealeaf Passive Capture Application Manual.
Depending on the volume and type of privacy rules enacted at the PCA and the
overall volume of traffic, the PCA server may be unable to keep up with all
captured hits and may be forced to drop hits. In these instances, to relieve the
processing burden on the PCA, you may choose to move some of the privacy rules
processing to the Windows pipeline, which is managed on a different server from
the PCA.
v Other issues may cause hits to be dropped at the PCA. For more information,
please contact http://support.tealeaf.com.
v The PCA server and each Processing Server can be configured to transmit
encrypted data, if that additional layer of security is needed. See “Configuring
PCA and Processing Servers to Use SSL” on page 223.
In the Windows pipeline, privacy is managed by including the Privacy or
Extended Privacy session agents in your pipeline configuration. Through either of
these two session agents, you can define the same privacy rules and actions that
are available in the PCA.
Attention: In multi-pipeline environments, do not enable the extended privacy
session agent (PrivacyEx) for child pipelines that have HBR enabled. If HBR and
PrivacyEx are enabled for a child pipeline, the service can run out of memory and
cause the service to restart unexpectedly. For more information about PrivacyEx,
see “Extended Privacy Session Agent” on page 261.
v Extended Privacy session agent is the recommended session agent. See
“Extended Privacy Session Agent” on page 261.
v For more information on privacy rules and actions, see “Privacy Session Agent”
on page 291.
v Privacy is configured through the Pipeline Editor available in TMS. See "TMS
Pipeline Editor" in the IBM Tealeaf cxImpact Administration Manual.
222
IBM Tealeaf CX: Configuration Manual
Configuring PCA and Processing Servers to Use SSL
If your security environment requires the secure transmission of data between the
PCA server and each Processing Server, please complete the following steps.
Note: There may be a performance impact with using SSL to transmit between
servers.
1. Before you begin, you must acquire the text of the private key that you wish to
use between the servers. The key is .PEM file and placed in the Tealeaf folder of
the processing machines. The PCA queries a copy of the web certificate and
then use that certificate to encode the data before transmitting.
2. To configure SSL transmission on the PCA:
a. Open the PCA Web Console. See "Passive Capture Configuration via Web
Console" in the IBM Tealeaf Passive Capture Application Manual.
b. Click the "PCA Web Console - Delivery Tab" in the IBM Tealeaf Passive
Capture Application Manual.
c. Click the edit button next to the target that is receiving data from the PCA.
d. In the configuration, click the Enable Secure Delivery checkbox.
e. In the displayed window, paste in the content of the private key.
f. Click OK. See "PCA Web Console - Delivery Tab" in the IBM Tealeaf Passive
Capture Application Manual.
3. To configure SSL transmission in the Windows pipeline:
a. Login to the Tealeaf Portal as an administrator.
b. To open the "Tealeaf Management System" in the IBM Tealeaf cxImpact
Administration Manual, select Tealeaf > TMS from the Portal menu.
c. In Servers view, click the Transport Service node.
d. Click Transport Service configuration.
e. In the Config actions, click View/Edit. The Pipeline Editor is displayed.
f. Select the top node of the pipeline. Its name should be Pipeline:1966 in a
default configuration.
g. Click Edit at the bottom of the window.
h. In the Edit Pipeline Settings dialog, select the Use SSL checkbox.
i. Click Apply.
j. To close the Pipeline Editor, click Save.
Health-Based Routing
The Health-Based Routing (HBR) session agent can be deployed to manage load
balancing and failover in environments with multiple Processing Servers. Before
processing is enabled, HBR must be added to your pipelines, and you must
configure HBR to recognize and forward an appropriate volume of data to each
Processing Server in the environment. See “Health-Based Routing (HBR) Session
Agent” on page 263.
v HBR is not necessary in single canister environments.
Data Drop
If you are encountering performance issues in your Windows pipeline, you may
choose to deploy the Data Drop session agent, which can be configured to drop
unnecessary data. For example, you can configure Data Drop to drop binary
images, which are data-intensive and may not be useful. Data Drop is typically
deployed early in the pipeline in order to streamline processing of data.
v See “Data Drop Session Agent” on page 241.
Chapter 4. CX Pipeline Session Agents
223
Testing Your Configuration
After you have completed your initial configuration, you can perform the
following steps to verify the configuration.
When you have completed the configuration of a basic pipeline, TMS provides the
mechanism for reviewing the pipeline processing. Use the steps below to verify
pipeline operations.
Note: A more complete set of tests can be executed after all Tealeaf components
have been configured. See "Testing Your Tealeaf Solution" in the IBM Tealeaf CX
Configuration Manual.
1. Login to the Tealeaf Portal as an administrator.
2. From the Portal menu, select Tealeaf > TMS.
3. Click the Pipeline Status tab.
4. From the Pipelines textbox, select the pipeline that you just configured if
multiple pipelines are available.
5. In the upper-right panel, you can review the session agents currently
configured in the pipeline. Verify that hits are being passed between session
agents for delivery. See "TMS Pipeline Status Tab" in the IBM Tealeaf cxImpact
Administration Manual.
6. If the pipeline is delivering the hits to a Tealeaf Canister, you can search the
Canister for active sessions. Those active sessions should have hits being added
to them. You may find it useful to open a session of your own on the web
application being monitored by Tealeaf. As you navigate around the web
application, you may be able to track your activities as an active session. See
"Searching Session Data" in the IBM Tealeaf cxImpact User Manual.
When all Tealeaf components are configured, you should complete an end-to-end
test. See "Testing Your Tealeaf Solution" in the IBM Tealeaf CX Configuration Manual.
Overview of the Capture Pipeline and Session Agents
The Capture Pipeline consists of a series of modules called session agents. Each
session agent controls part of the capture process.
Depending on the type of pipeline, the set of useful session agents may vary:
v The Transport Service pipeline can use all of the session agents below.
v The IIS Capture filter pipeline should normally be limited to Decouple and
Socket session agents.
About Session Agents
Session agents can be added and configured through the TMS Pipeline Editor. See
“Adding a Session Agent” on page 226.
Available Session Agents
Table 6. Available Session Agents
Agent Name
Agent Token
“Archive Session Agent” on page 227 [Archive]
224
IBM Tealeaf CX: Configuration Manual
Description
Saves captured data to disk as TLA
files.
Table 6. Available Session Agents (continued)
Agent Name
Agent Token
Description
"Attribute Indexing Session Agent" in [AttrIndexer]
the IBM Tealeaf CX Configuration
Manual
Captures session attribute
information and inserts into IBM
Tealeaf cxReveal database.
“Canister Session Agent” on page 236 [Canister]
Sends session data to the Short Term
Canister.
“Cookie Parser Session Agent” on
page 238
[CookieParser]
Enable ease of searching by parsing
cookies.
“Data Drop Session Agent” on page
241
[DataDrop]
Removes hits from specific binary
requests which are of no interest.
“Data Parser Session Agent” on page
246
[DataParser]
Scrapes the REQ or RSP buffer for a
value, then sets it into a user chosen
name/value pair in the REQ
[appdata] section. The found value
can be operated upon by a regex and
can be MD5 encoded.
“Decouple Session Agent” on page
250
[Decouple]
Decouples the Capture Pipeline from
the main thread of the server and
queues hits in memory only.
“DOM Capture Virtual Hit Session
Agent” on page 254
[DomCaptureVHit]
Moves the captured DOM data from
the UI hit into a newly created
virtual hit, with the captured DOM
as its response.
Note: The DOM Capture Virtual Hit
session agent is needed only if you
are going to perform DOM capture.
Additionally, if you decide to
perform DOM capture, the DOM
Capture Virtual Hit session agent
must be configured after the Inflate
session agent and before the Privacy
session agent.
“Extended Decoupler Session Agent”
on page 252
[DecoupleEx]
Handles sustained increases in traffic
volume by regulating the volume of
hits entering the Canister to prevent
it from becoming overloaded.
“Extended Privacy Session Agent” on [PrivacyEx]
page 261
Extended [Privacy] session agent
with checksum and MD5 hashing
features.
“Health-Based Routing (HBR) Session [HBR]
Agent” on page 263
Dynamic router of traffic based on
the health of processing servers.
“Inflate Session Agent” on page 271
[Inflate]
Expands data in the Capture Pipeline
which has been compressed with
GZIP for HTTP transfer.
“JSON Mobile Parser Session Agent”
on page 275
various
Enables capture of events from native
applications on mobile devices using
Tealeaf Logging Frameworks.
Messages submitted via JSON.
“Managed Code Session Agent” on
page 287
various
Allows custom functionality written
in C# or VB.NET.
“Null Session Agent” on page 290
[Null]
Terminates the pipeline and performs
no action on the data.
Chapter 4. CX Pipeline Session Agents
225
Table 6. Available Session Agents (continued)
Agent Name
Agent Token
Description
“Privacy Session Agent” on page 291
[Privacy]
Provides rule-based blocking or
encryption for sensitive data.
“Real-Time Monitoring and Alert
(RTA) Session Agent” on page 321
[RTA]
Identifies errors in the captured data
and takes one or more of the
following actions: writes an event to
the Windows Event Log, generates a
TeaLeaf Application Event in the
recorded request file, deletes the hit,
or sends email.
“Response Tags to Request Session
Agent” on page 326
[RSPTags2REQ]
Search response buffer for tags to
add to the [appdata] section of the
request.
“RTA Split Session Agent” on page
328
[RTASplit]
Used to route traffic to child
pipelines.
“Sessioning Session Agent” on page
332
[Sessioning]
Uses an MD5 hash or a specified
request field to generate the session
ID.
“Session Router Session Agent” on
page 330
[SessionRouter]
Designed for cases of simple session
routing or sampling.
“Socket Session Agent” on page 335
[Socket]
Transfers captured data to another
machine through a TCP/IP network.
“Statistics Logger Session Agent” on
page 337
[StatsLogger]
Manages the assembly and insertion
of hit statistics into the Statistics
database.
"Tealeaf Reference Session Agent" in
the IBM Tealeaf CX Configuration
Manual
[TLTRef]
Normalizes some hit information,
such as URL, server, host, and
application.
“Tealeaf Sessioning Session Agent”
on page 360
[TLSessioning]
Sessionizes in the pipeline for the
non-simple cases.
“TimeGrades Session Agent” on page [TimeGrades]
366
Assigns a grade to a hit in the
following three areas:
Page Generation time, RoundTrip
time, and Network time.
“TLI Session Agent” on page 368
[TLI]
Captures static content and inserts
into TLI files stored on the TLI
Server.
“URL Decode Session Agent” on
page 382
[URLDecode]
Converts characters in the URL
request that are represented in
hexadecimal data to ASCII characters.
Adding a Session Agent
Session agents can be added, configured, and removed from your pipelines
through the Pipeline Editor in TMS. This graphical interface enables rapid
development, deployment, and testing of pipelines and individual session agents
while eliminating potential configuration errors.
v For a summary of each session agent, see “Overview of the Capture Pipeline
and Session Agents” on page 224.
v For more information on specific session agents, please use the links below.
1. Login to the Tealeaf Portal as an administrator.
226
IBM Tealeaf CX: Configuration Manual
2.
3.
4.
5.
6.
Select Tealeaf > TMS.
Click the Transport Service node.
Click Transport Service configuration.
In the Actions panel, click View/Edit.
The Pipeline Editor is displayed.
v To add a session agent to your pipeline, drag it from the Available Session
Agents panel and drop it on the top of the pipeline. The session agent is
added.
– You can drag and drop it within the list of session agents in the pipeline
to reposition.
– When you add or move a session agent, the configuration changes to
connect the session agents within a pipeline are handled for you.
v To edit a session agent in the pipeline, select it.
– To edit the selected instance of the agent, click Edit.
– To rename the selected agent, click Rename. Enter a new name and press
ENTER.
v To remove a session agent from a pipeline, drag it from the pipeline to one
of the right-hand panels. If you wish to save the session agent, drop it in the
Saved Session Agents panel.
Archive Session Agent
The Archive session agent saves captured data to disk. The resulting files are
named as follows:
TLT_MachineName_ID_GMT_YYYYMMDD_StartTime_EndTime.ext
Note: The Archive session agent is a terminating session agent, so the
-DownStreamConfigSection option is not required.
Adding the Session Agent
Session agents can be added through the Pipeline Editor in TMS. See “Adding a
Session Agent” on page 226. For more information on the Pipeline Editor and TMS,
see "Tealeaf Management System" in the IBM Tealeaf cxImpact Administration
Manual.
The remainder of this page describes configuration options and how to change
them through the TealeafCaptureSocket.cfg file stored on the server. These
settings are also available through the Pipeline Editor, which is the recommended
method for configuring session agents.
Settings
Setting Description
MachineName
The name of the server capturing the data
ID
Identifies the type of captured data. YYYYMMDD is the date on which the
capture took place within the archive file.
StartTime and EndTime
Represents in Greenwich Standard Mean Time the first and last pages in
the captured data contained in the archive file. EndTime includes
milliseconds.
Chapter 4. CX Pipeline Session Agents
227
ext
The user-specified file extension.
Configuration Settings
The following configuration settings are available:
v Display Name values are displayed in TMS, which is the recommended method
for configuring session agents. See "Tealeaf Management System" in the IBM
Tealeaf cxImpact Administration Manual.
v Name values are displayed in TealeafCaptureSocket.cfg.
Table 7. Archive Session Agent
Display
Name
Name
Description
Archive
Prefix
FileID
Sets the ID that appears in the TLA
filename so that the type of capture
for a file is easier to identify. Specify
this value as follows:
FileID=id
where
id is the capture type description you
want to add to your archive filename.
Examples of FileID names are Web
and BusinessEvent.
Max Archive MaxLogSize
Size
Specifies the maximum size of the
archive TLA file in bytes. The default
is 32 MB.
Valid values can be entered as
follows:
v number
v numberKB to specify the number of
Kilobytes
v numberMB to specify the number of
Megabytes
v numberGB to specify the number of
Gigabytes
Note: The minimum size of an
archive TLA file is 10 MB.
228
Archive
Directory
LogDirectory
Specifies the directory in which data
files are stored. Files are stored in
C:\temp by default.
Archive
Roll Time
RollTime
This comma-delimited list specifies
the times in 24-hour Greenwich Mean
Time (GMT) to close the current
archive file and create a new one.
The following example creates a new
log file at 1:00 AM, 4:30 AM, and 5:00
PM GMT every day:
RollTime=01:00, 04:30, 17:00
IBM Tealeaf CX: Configuration Manual
Table 7. Archive Session Agent (continued)
Display
Name
Name
Description
Disk Quota
Scan
Interval
QuotaScanTime
Specifies the time interval in seconds
when the disk quota check should
occur. Valid values range from 20 to
3600 (twenty seconds to sixty
minutes).
For example, you might set
QuotaScan Time as follows:
QuotaScanTime=60
The minimum QuotaScanTime is 20.
Disk % Free QuotaPctFree
Specifies the percent free threshold
for the directory specified using the
QuotaDir option. If the amount of
free space falls below this threshold,
the Capture Filter disables itself to
avoid consuming too much disk
space.
v On Microsoft Windows NT 4.0, the
directory disk space is the same as
overall disk space.
v On Microsoft Windows 2000 or
higher, you can establish directory
quotas.
Tealeaf Session Agents
v “Adding a Session Agent” on page 226
v Archive Session Agent
v
v
v
v
v
v
"Attribute Indexing Session Agent" in the IBM Tealeaf CX Configuration Manual
“Canister Session Agent” on page 236
“Cookie Parser Session Agent” on page 238
“Data Drop Session Agent” on page 241
“Data Parser Session Agent” on page 246
“Decouple Session Agent” on page 250
v
v
v
v
v
v
v
“Extended Decoupler Session Agent” on page 252
“Extended Privacy Session Agent” on page 261
“Health-Based Routing (HBR) Session Agent” on page 263
“Inflate Session Agent” on page 271
“JSON Mobile Parser Session Agent” on page 275
“Managed Code Session Agent” on page 287
“Null Session Agent” on page 290
v “Privacy Session Agent” on page 291
v “Real-Time Monitoring and Alert (RTA) Session Agent” on page 321
v
v
v
v
v
“Response Tags to Request Session Agent” on page 326
“RTA Split Session Agent” on page 328
“Sessioning Session Agent” on page 332
“Session Router Session Agent” on page 330
“Socket Session Agent” on page 335
Chapter 4. CX Pipeline Session Agents
229
v
v
v
v
v
“Statistics Logger Session Agent” on page 337
"Tealeaf Reference Session Agent" in the IBM Tealeaf CX Configuration Manual
“Tealeaf Reference Session Agent - Legacy Mode” on page 357
“Tealeaf Sessioning Session Agent” on page 360
“TimeGrades Session Agent” on page 366
v “TLI Session Agent” on page 368
v “URL Decode Session Agent” on page 382
Attribute Indexing Session Agent
The Attribute Indexing session agent can be deployed to retrieve session attribute
information from Tealeaf event data and to insert that content into the IBM Tealeaf
cxReveal database (TL_SEARCH).
v This session agent is deployed in a Windows pipeline that receives event data
through the Tealeaf Event Bus enabled and configured on each Processing Server
in the environment.
Note: The Tealeaf Event Bus is a component of cxConnect for Data Analysis, a
separately licensable component of the Tealeaf CX platform. please contact your
IBM Tealeaf representative.
Available through IBM Tealeaf cxReveal, the IBM Tealeaf cxReveal database enables
Tealeaf users to quickly locate Tealeaf sessions in any state of capture and
processing by searching for session attributes. Session attributes may be specified
as soon as the first hit is evaluated in the Windows pipeline. For example, the
value for the login identifier is typically set to populate the SessionAttribute00
attribute as soon as the visitor logs into the web application. When the first session
attribute is detected by the session agent, a new record for the session is inserted
into the IBM Tealeaf cxReveal database.
Note: The cxReveal database is a component of cxReveal, a separately licensable
component of the Tealeaf CX platform. please contact your IBM Tealeaf
representative.
This database record can be immediately queried and retrieved through Portal
search by IBM Tealeaf cxReveal users, which enables them to quickly locate visitor
sessions as needed.
Since these visitor records are stored in a single SQL Server database, search and
retrieval of visitor information is very fast.
Note: The deployment of multiple IBM Tealeaf cxReveal servers is supported for
higher volume web applications.
Pre-Requisites
Note: This section describes how to configure the IBM Tealeaf cxReveal server and
pipeline for capture of session attributes. To enable the end-to-end solution for
session attribute capture, search, and replay, additional configuration is required in
the Portal. Before you begin, you should review the other configuration steps.
1. IBM Tealeaf cxImpact: The attribute indexing session agent is available
through IBM Tealeaf cxImpact.
230
IBM Tealeaf CX: Configuration Manual
2. IBM Tealeaf cxConnect for Data Analysis: The capture of session attribute
information from each Canister requires the use of the Tealeaf Event Bus to
send events to the designated pipeline for capture.
3. IBM Tealeaf cxReveal: The IBM Tealeaf cxReveal database is a component of
IBM Tealeaf cxReveal, a separately licensable product of the IBM Tealeaf CX
system.
v IBM Tealeaf cxReveal requires a separate installation on each IBM Tealeaf
cxReveal server.
v Enabling session attribute search requires additional configuration.
Note: The Attribute Indexing session agent should not be deployed in a Windows
pipeline where other processing occurs. This session agent requires a dedicated
Windows pipeline and a separate IBM Tealeaf cxReveal server.
Installing cxReveal: Before you begin, the Tealeaf Transport Service and the IBM
Tealeaf cxReveal database must be installed on each IBM Tealeaf cxReveal server.
The IBM Tealeaf cxReveal database may be installed separately on the same system
using the Tealeaf Database Manager.
Configuration Workflow
The basic architecture for attribute indexing pipelines is to split content from one
of your existing Windows pipelines and to send the content to a Windows pipeline
on the IBM Tealeaf cxReveal Server for insertion of session attribute information
into the IBM Tealeaf cxReveal database.
1. If you have not done so already, you must install the Processing Server and
IBM Tealeaf cxReveal database on each dedicated IBM Tealeaf cxReveal Server.
Multiple deployment models are supported for the IBM TealeafcxReveal
database.
2. As part of the install process, a default pipeline is created. It contains the
minimum session agents to capture and insert session attribute information into
the database, including the Attribute Indexing session agent.
3. Configure the parameters of the Attribute Indexing session agent. See
“Configuring Attribute Indexing Session Agent” on page 233.
4. In the main Windows pipelines that are sending hits through the Event Bus to
the Processing Server managing attribute indexing, enable the Event Bus and
configure the Event Bus.
5. After the Event Bus has been enabled and tested locally, the Event Bus pipeline
must be configured to send Tealeaf events to the destination system.
6. Repeat the Event Bus configuration for each Processing Server to send events to
the IBM Tealeaf cxReveal Servers.
7. After you have completed the configuration steps, you may test capture as
soon as data has arrived at the pipeline.
Attribute Indexing processing pipeline:
In the following sections, you can review the minimum pipeline configuration
required to enable capture of session attributes. These are minimum requirements.
The pipeline required for your Tealeaf environment may vary.
Note: The IBM Tealeaf cxReveal Installer configures the following default pipeline
for use. If this pipeline meets your needs, additional configuration may not be
required. You may wish to review the available parameters for the session agent.
Chapter 4. CX Pipeline Session Agents
231
The pipeline that is used to capture session attributes and insert them into the IBM
Tealeaf cxReveal database requires the following minimum configuration:
DataDrop > DecoupleEx > SessionRouter > AttrIndexer > Null
Tealeaf recommends using the DecoupleEx pipeline session agent. DecoupleEx
enables spooling of hits into the pipeline during overloaded conditions, such as
when a broad search is being executed. When the DecoupleEx session agent is
deployed, statistical information on the pipeline performance can be surfaced in
the Portal.
Avoid using Decouple in the IBM TealeafcxReveal Search pipeline.
Note: The Attribute Indexing session agent must be configured so that its
downstream session agent is the Null session agent.
Note: In almost all environments, Tealeaf Privacy rules are not necessary for this
pipeline, as the terminating session agent is the Null session agent. If privacy is
required to meet your security requirements, you may insert the Privacy session
agent or Extended Privacy session agent after the Decouple session agent in the
above pipeline.
Adding the Session Agent: Session agents can be added through the Pipeline
Editor in TMS.
Configuring the Event Bus
The Tealeaf Event Bus enables the delivery of Tealeaf events to other systems or
pipelines for offline analysis or use.
Note: The Tealeaf Event Bus is a component of cxConnect for Data Analysis, a
separately licensable component of the Tealeaf CX platform. please contact your
IBM Tealeaf representative.
Before you deploy the session agent, you should complete the following
configuration tasks on each Processing Server in the environment sending event
data for capture by the session agent:
1. Enable the Event Bus.
Note: When enabling the Event Bus, do not include the response data. Since
the Attribute Indexing session agent collects session-level information only,
including individual response data consumes unnecessary bandwidth to
transfer to the IBM Tealeaf cxReveal server.
2. Enable the Event Bus pipeline local to the Processing Server hosting it.
3. Configure the Event Bus pipeline.
4. Test the Event Bus pipeline by writing event data to a Tealeaf archive.
These steps are documented in the Event Bus documentation.
Minimum Event Bus Pipeline:
After the Event Bus has been enabled, configured, and tested on each Processing
Server submitting event data for capture, you can configure the Event Bus
pipelines to forward data to the machine dedicated to capturing session attribute
data.
1. From the Portal menu, select Tealeaf > TMS.
2. Click the WorldView tab.
232
IBM Tealeaf CX: Configuration Manual
3. From the Server drop-down, select one of the Processing Servers sending data
to the session attribute machine.
4. Click the Canister node.
5. Click Event Bus configuration. In the Config Actions pane, click View/Edit.
6. The Event Bus pipeline is displayed in the Pipeline Editor.
7. During testing, you may have deployed one of the following session agents as
the last one in the pipeline (the terminal session agent).
8. When you are ready to send data to the session attribute capture machine,
replace the terminal session agent with the Socket session agent.
9. Drag and drop the terminal session agent in the pipeline to the Available
Session Agents pane.
10. Drag and drop the Socket session agent from the Available Session Agents
pane to be the last session agent in the pipeline.
11. The pipeline should look something like the following:
Decouple > <other_agents> > Socket
where:
<other_agents> - may be zero or more session agents, depending on your
Event Bus requirements.
12. Configure the Socket session agent.
13. Save your changes.
14. Push the changes to other servers.
15. Repeat these configuration changes to each Event Bus on the Processing
Servers in your environment.
Configuring the Socket Session Agent:
This session agent terminates all Event Bus pipelines that send event data for
further processing by another pipeline.
The following settings need to be configured for the Event Bus pipeline for each
Processing Server delivering events.
Setting Description
Port
Set this value to the port used by the pipeline that is capturing attribute
information on the IBM Tealeaf cxReveal server.
Server Set this value to the hostname of the IBM Tealeaf cxReveal server.
Configuring Attribute Indexing Session Agent
After you have configured the pipeline to capture session attribute information,
you must configure the Attribute Indexing session agent in the pipeline.
This session agent scans content for user-defined session attributes. When new
attribute values or changes to attribute values are detected, the session agent uses
the available session information to attempt to locate the session record in the IBM
Tealeaf cxReveal database.
v If there is no match with an existing record, a new session record is inserted into
the database.
Settings: When the Windows pipeline is installed, the session agent configuration
items are specified for you.
Chapter 4. CX Pipeline Session Agents
233
Note: Do not change values for the available configuration settings other than the
settings listed below.
Setting Description
LogLevel
Set the log level for the session agent.
RolloverHour
Define the hour when a new database table is created to store the captured
session attributes for the day.
MasterPipeline
One pipeline must be configured as the master pipeline for maintenance
purposes. If you are using only one pipeline to capture session attributes,
set this value to true.
Logging:
The Attribute Indexing session agent can be configured to generate logging
information.
To enable logging:
1. In the Attribute Indexing session agent, you must configure the LogLevel value
to one of the following values:
v status
v info
v warn
v error (default)
v debug
Note: Use the debug level only for troubleshooting specific issues. When the
issue has been resolved, reset to a lower level.
2. Save changes.
Log files are written to the main Tealeaf log directory.
The following log is written from the session agent.
<Tealeaf_install_directory>\Logs\
TLSessionAgentAttrIndex_PipelineId_YYYYMMDD.log
where:
v PipelineId - identifies the port number for the pipeline. Typically, this value is
1966 or 1967.
v YYYYDDMM - date stamp
This log receives status information from the session agent once per minute.
<Tealeaf_install_directory>\Logs\
RevealStatus_YYYYMMDD.log
where:
v YYYYDDMM - date stamp
Log fields:
The following fields are displayed in the RevealStatus log file, which are updated
once per minute.
234
IBM Tealeaf CX: Configuration Manual
v Log files are updated from the master pipeline only on each IBM Tealeaf
cxReveal server.
Field(s)
Description
RevealStatus
Current status of the connection to the IBM Tealeaf cxReveal database (up
or down)
RevealDownReason
If status is down, this field indicates the reason.
SessionsUpdated
Number of Tealeaf sessions that were updated in the past minute with new
or changed session attributes.
HitsSkippedAttributesUnchanged
Number of hits that were skipped in the past minute because there were
no new or updated session attributes.
SearchAttribute1 SearchAttribute5
The session attributes that are currently configured to be searchable.
v IBM Tealeaf cxReveal supports up to five searchable session attributes.
The attributes available for IBM Tealeaf cxReveal search are defined
through the Event Manager.
TrackedAttribute1 TrackedAttribute32
The session attributes that are currently configured to be tracked.
v IBM Tealeaf cxReveal supports tracking in the database of up to 32
session attributes. The attributes available for IBM Tealeaf cxReveal
tracking are defined through the Event Manager.
Downloading logs:
Log files may be downloaded through the Portal Management page.
1. In the Portal menu, select Tealeaf > Portal Management.
2. Click the Manage Servers link.
3. Select the server hosting the Attribute Indexing session agent and IBM Tealeaf
cxReveal capture pipeline.
4. Click the Tealeaf Logs icon in the toolbar.
5. In the Filter By drop-down, select SA Session Attribute. Click Refresh.
6. Click the link of the log file you wish to download. Log filenames should be in
the following format:
TLSessionAgentAttrIndex_YYYYMMDD.log
Testing Capture of Attributes
This section describes how to test the capturing of session attributes.
Check the Pipeline:
Through TMS, you can verify that the pipeline is operating in the Pipeline Status
tab.
1. From the Portal menu, select Tealeaf > TMS.
2. Click the Pipeline Status tab.
3. From the Server menu, select the server where the session attributes are
evaluated.
Chapter 4. CX Pipeline Session Agents
235
4. Verify that the proper pipeline is selected in the Pipelines panel.
5. In the upper-right pane, you can review the character and hit counts passed
through each session agent.
Non-zero values indicate that the pipeline is capturing content.
Verify Search: The best way to test capture of session attributes is to perform a
search through the Portal using the IBM Tealeaf cxReveal template for Active
sessions.
Note: To enable search, additional configuration is required. See "Configuring
Session Attribute Search" in the IBM Tealeaf cxReveal Administration Manual.
v If sessions are returned, then the session agent is capturing session attributes
and creating valid records in the IBM Tealeaf cxReveal database.
v See "cxReveal - Searching Sessions by Session Attribute" in the IBM Tealeaf
cxReveal User Manual.
Tealeaf Session Agents
v Attribute Indexing Session Agent
v Canister Session Agent
v Cookie Parser Session Agent
v Data Drop Session Agent
v
v
v
v
Data Parser Session Agent
Decouple Session Agent
Extended Decoupler Session Agent
Extended Privacy Session Agent
v
v
v
v
v
Health-Based Routing (HBR) Session Agent
Inflate Session Agent
JSON Mobile Parser Session Agent
Managed Code Session Agent
Null Session Agent
v Privacy Session Agent
v Real-Time Monitoring and Alert (RTA) Session Agent
v
v
v
v
v
v
Response Tags to Request Session Agent
RTA Split Session Agent
Sessioning Session Agent
Session Router Session Agent
Socket Session Agent
Statistics Logger Session Agent
v
v
v
v
v
Tealeaf Reference Session Agent
Tealeaf Sessioning Session Agent
TimeGrades Session Agent
TLI Session Agent
URL Decode Session Agent
Canister Session Agent
This session agent is the interface to the Tealeaf datastore. Captured data is
compressed, sessionized and inserted into the datastore.
236
IBM Tealeaf CX: Configuration Manual
Note: For some deployments of the Processing Server, this session agent is
included in the default pipeline and is required. See “CX Pipeline Configuration”
on page 214.
Adding the Session Agent
Session agents can be added through the Pipeline Editor in TMS. See “Adding a
Session Agent” on page 226.
For more information on the Pipeline Editor and TMS, see "Tealeaf Management
System" in the IBM Tealeaf cxImpact Administration Manual.
The remainder of this page describes configuration options and how to change
them through the TealeafCaptureSocket.cfg file stored on the server. These
settings are also available through the Pipeline Editor, which is the recommended
method for configuring session agents.
SA Global Settings
The following settings are available for this session agent.
Setting Description
TypeName
This option should be set to Canister.
DLL
Specifies the name of the canister session agent: SessionAgentCanister.dll.
You must specify the full path if the .DLL is not in the same directory as
the capture filter.
CanisterPath
Name of the database into which the captured data is stored. CanisterPath
should be set to CANISTER.dbs as follows: CanisterPath=CANISTER.dbs.
CanisterSrvr
Name of the canister server. CanisterSrvr should be set to FAIRCOMS as
follows: CanisterPath= FAIRCOMS.
Canister Safety Limits
Tealeaf provides a set of controls to set the maximum size of a session in terms of
hits, bytes, or duration. These controls can be configured through Advanced Mode
in the Event Manager.
v See "Tealeaf EES Tutorial" in the IBM Tealeaf Event Manager Manual.
Compression Settings
v Display Name values are displayed in TMS, which is the recommended method
for configuring session agents. See "Tealeaf Management System" in the IBM
Tealeaf cxImpact Administration Manual.
v Name values are displayed in TealeafCaptureSocket.cfg.
Chapter 4. CX Pipeline Session Agents
237
Table 8. Canister Session Agent
Display
Name
Name
Compression CompressionType
Type
Description
Controls how the captured data is
compressed:
v 0 - no compression is performed.
v 1 - compress only the response file.
v 2 - compress both the request and
response files.
The default setting is 2.
Tealeaf Session Agents
v “Adding a Session Agent” on page 226
v “Archive Session Agent” on page 227
v "Attribute Indexing Session Agent" in the IBM Tealeaf CX Configuration Manual
v Canister Session Agent
v “Cookie Parser Session Agent”
v “Data Drop Session Agent” on page 241
v
v
v
v
v
“Data Parser Session Agent” on page 246
“Decouple Session Agent” on page 250
“Extended Decoupler Session Agent” on page 252
“Extended Privacy Session Agent” on page 261
“Health-Based Routing (HBR) Session Agent” on page 263
v “Inflate Session Agent” on page 271
v “JSON Mobile Parser Session Agent” on page 275
v
v
v
v
v
v
“Managed Code Session Agent” on page 287
“Null Session Agent” on page 290
“Privacy Session Agent” on page 291
“Real-Time Monitoring and Alert (RTA) Session Agent” on page 321
“Response Tags to Request Session Agent” on page 326
“RTA Split Session Agent” on page 328
v “Sessioning Session Agent” on page 332
v “Session Router Session Agent” on page 330
v
v
v
v
v
“Socket Session Agent” on page 335
“Statistics Logger Session Agent” on page 337
"Tealeaf Reference Session Agent" in the IBM Tealeaf CX Configuration Manual
“Tealeaf Reference Session Agent - Legacy Mode” on page 357
“Tealeaf Sessioning Session Agent” on page 360
v “TimeGrades Session Agent” on page 366
v “TLI Session Agent” on page 368
v “URL Decode Session Agent” on page 382
Cookie Parser Session Agent
To enable easy searching, the CookieParser session agent parses cookies appearing
after the HTTP_COOKIE value in the request into name-value pairs. Cookie data is
placed at the bottom of the request in a section entitled [cookies]
238
IBM Tealeaf CX: Configuration Manual
The following is an example:
[cookies]
TLTSID=CF37A9C511D67E7F03003785F87C9647z0
TLTHID=CF37A9C511D67E7F03003785F87C9647
TLTUID=CC50ED7C11D67E1C90003B95BC7A8A27
SITESERVER=ID=3c576155747d32c21e27fa781a689ac7
TLT_NumCookies=4
TLT_CookiesBytes=165
Adding the Session Agent
Session agents can be added through the Pipeline Editor in TMS. See “Adding a
Session Agent” on page 226.
v For more information on the Pipeline Editor, see "TMS Pipeline Editor" in the
IBM Tealeaf cxImpact Administration Manual.
Configuration Settings
The following configuration settings are available:
v Display Name values are displayed in TMS, which is the recommended method
for configuring session agents. See "Tealeaf Management System" in the IBM
Tealeaf cxImpact Administration Manual.
v Name values are displayed in TealeafCaptureSocket.cfg.
Table 9. Cookie Parser Session Agent
Display
Name
Name
Description
Cookie
Delimiter
CookieDelimiter
Delimiter used in Cookies header.
The default value is ;.
Extract
Extract
Allows for the extraction of
sub-values from a cookie value. The
default value is YES.
Fragment
Delimiter
FragmentDelimiter
Used in conjunction with the Extract
option, this setting specifies cookie
fragment delimiter. The default value
is `.
URL Decode
URLDecode
Specifies if the cookie value should
be URL-decoded. The default value is
YES.
The remainder of this page describes configuration options and how to change
them through the TealeafCaptureSocket.cfg file stored on the server. These
settings are also available through the Pipeline Editor, which is the recommended
method for configuring session agents.
Cookie Delimiter
The Cookie Parser allows users to denote their own cookie delimiter, which allows
a wider range of cookie formats to be processed.
v If no delimiter is provided, then the semicolon ( ; ) character is used.
v If you use more than one character, the cookie parser uses only the first char in
the string as the delimiter.
v “Avoid Using Ampersand as a Delimiter” on page 240
Chapter 4. CX Pipeline Session Agents
239
v To denote your own delimiter, add the following to the CookieParser section of
the configuration file:
CookieDelimiter=<somechar>
Avoid Using Ampersand as a Delimiter
Avoid using the ampersand (&) character as a delimiter. This character is
commonly used to denote fragments within a parent cookie, such as the following:
HTTP_COOKIE=TLTUID=567683546&id=1234&page=0; TLTRUID=234567;
Which would typically result in the following:
TLT_NumCookies=2
TLT_CookiesBytes=48
TLT_NumCookieFragments=2
TLT_CookieFragmentBytes=15
However, using ampersand (&) as the delimiter generates the following:
TLT_NumCookies=3
TLT_CookiesBytes=48
TLT_NumCookieFragments=0
TLT_CookieFragmentBytes=0
Note the incorrect figures above.
Tealeaf Session Agents
v “Adding a Session Agent” on page 226
v “Archive Session Agent” on page 227
v "Attribute Indexing Session Agent" in the IBM Tealeaf CX Configuration Manual
v “Canister Session Agent” on page 236
v Cookie Parser Session Agent
v “Data Drop Session Agent” on page 241
v
v
v
v
v
v
“Data Parser Session Agent” on page 246
“Decouple Session Agent” on page 250
“Extended Decoupler Session Agent” on page 252
“Extended Privacy Session Agent” on page 261
“Health-Based Routing (HBR) Session Agent” on page 263
“Inflate Session Agent” on page 271
v
v
v
v
v
v
v
“JSON Mobile Parser Session Agent” on page 275
“Managed Code Session Agent” on page 287
“Null Session Agent” on page 290
“Privacy Session Agent” on page 291
“Real-Time Monitoring and Alert (RTA) Session Agent” on page 321
“Response Tags to Request Session Agent” on page 326
“RTA Split Session Agent” on page 328
v “Sessioning Session Agent” on page 332
v “Session Router Session Agent” on page 330
v
v
v
v
240
“Socket Session Agent” on page 335
“Statistics Logger Session Agent” on page 337
"Tealeaf Reference Session Agent" in the IBM Tealeaf CX Configuration Manual
“Tealeaf Reference Session Agent - Legacy Mode” on page 357
IBM Tealeaf CX: Configuration Manual
v
v
v
v
“Tealeaf Sessioning Session Agent” on page 360
“TimeGrades Session Agent” on page 366
“TLI Session Agent” on page 368
“URL Decode Session Agent” on page 382
Data Drop Session Agent
This session agent deletes unwanted data. DataDrop typically sits between CSS
and the Extended Decoupler session agent, so data is deleted before it passes
through the Decoupler. This positioning significantly reduces the size of spool files.
Note: For some deployments of the Processing Server, this session agent is
included in the default pipeline and is required. See “CX Pipeline Configuration”
on page 214.
Overview
Below is a rough description of the DataDrop decision tree for deciding whether to
keep a hit, in the order of evaluation. If a hit passes one test, the next test in the
sequence is evaluated:
v If the hit is a round-trip hit, drop it only if the KeepRoundTripHits option is
false.
v If DelImages is set to YES and the hit is an uninteresting binary hit, then drop it.
v If the hit is from the IBM Tealeaf CX RealiTea Viewer, then drop the hit if the
KeepRealiTeaViewerHits option is false.
v If one of the custom drop rules matches the hit, then drop the hit.
v Keep the hit and pass it on to the next session agent.
Adding the Session Agent
Session agents can be added through the Pipeline Editor in TMS. See “Adding a
Session Agent” on page 226. For more information on the Pipeline Editor and TMS,
see "Tealeaf Management System" in the IBM Tealeaf cxImpact Administration
Manual.
The remainder of this page describes configuration options and how to change
them through the TealeafCaptureSocket.cfg file stored on the server. These
settings are also available through the Pipeline Editor, which is the recommended
method for configuring session agents.
Configuration Settings
v Display Name values are displayed in TMS, which is the recommended method
for configuring session agents. See "Tealeaf Management System" in the IBM
Tealeaf cxImpact Administration Manual.
v Name values are displayed in TealeafCaptureSocket.cfg.
Table 10. Configuration Settings
Display Name
Name
Description
DelImages
DelImages
Enable DelImages actions, such as
deleting images or other binary hits.
The default value is YES.
v See “DelImages” on page 242.
Chapter 4. CX Pipeline Session Agents
241
Table 10. Configuration Settings (continued)
Display Name
Name
Description
Keep RealiTea Viewer Hits
KeepRealiTeaViewerHits
Retain hits generated by the session
viewer. The default value is NO.
v See “KeepRealiTeaViewerHits.”
Keep RoundTrip Hits
KeepRoundTripHits
Retain hits used to estimate
round-trip times. The default value is
YES.
v See “KeepRoundTripHits.”
Log Statistics
LogStatistics
Enable logging of statistics. The
default value is NO.
v See “LogStatistics” on page 243.
Statistics Logging Interval
LogStatisticsInterval
Time in seconds between statistics
logging. The default value is 3600
seconds (one hour).
v See “LogStatisticsInterval” on page
243.
DataDrop Rule
Drop
See “Custom Drop Rules” on page
243.
DelImages
By default, the DelImages option enables the DataDrop session agent to remove
uninteresting binary hits. Set DelImages to YES to drop these kinds of hits.
Typically, an uninteresting hit references a common binary or configuration file
that does not contain information of interest to Tealeaf. An uninteresting hit has
the following properties:
v Capture type: 3
v Status code: 200-299 or 304
v URL field does not have a suffix specified by the KeepSuffixes setting.
Note: Beginning in PCA Build 3502, this functionality can be enabled in the PCA
pipeline, which limits the volume of data that is processed and transmitted to the
Processing Servers. See "PCA Web Console - Pipeline Tab" in the IBM Tealeaf Passive
Capture Application Manual.
KeepRealiTeaViewerHits
Set KeepRealiTeaViewerHits to YES if you want to keep hits from RealiTeaViewer.
A hit from RealiTeaViewer is one where the HTTP_USER_AGENT field is set to
RealiTeaViewer or TealeafFileGetter.
v By default, KeepRealiTeaViewerHits is set to NO.
KeepRoundTripHits
Set KeepRoundTripHits to YES if you want to keep round-trip hits for processing
by RoundTrip.Action.tcl.
A round-trip hit is defined when the TealeafRoundTrip field is set to YES.
v By default, KeepRoundTripHits is set to YES.
242
IBM Tealeaf CX: Configuration Manual
LogStatistics
Set LogStatistics to YES if you want statistics on dropped hits written to a
tab-delimited file.
The statistics file is prefixed with SADataDropStats and is written to the same
directory as the session-agent log.
v By default, LogStatistics is set to NO.
LogStatisticsInterval
Set LogStatisticsInterval to the number of seconds to wait before writing statistical
information to the session agent's statistics file.
v By default, LogStatisticsInterval is 86400, which corresponds to the number of
seconds in one day.
Custom Drop Rules
The following sections document the various configuration options specific to
SessionAgent DataDrop. These options should be placed in the capture source's
configuration file.
In addition to the pre-configured drop rules, you can define up to 100 custom rules
that select hits to drop.
To define a rule, add a Drop rule to the configuration section, as in the following
example:
Drop1=reqfield url contains /company/\
The DataDrop session agent loads rules Drop1 through Drop100 and evaluates them
in that order.
You can specify the following types of rules.
v REQFIELD rules match the values of fields in the request buffer. See “REQFIELD
rules.”
v REQSECTION rules test for the existence of text in a specified section of the request
buffer. See “REQSECTION rules” on page 244.
v REQUEST and RESPONSE rules test for the existence of text in the request or
response buffers, respectively. See “REQUEST and RESPONSE rules” on page
245.
REQFIELD rules
These rules are in the following format:
REQFIELD NAME OPERATOR TEXT MODIFIER
Where:
v NAME is the case-sensitive name of the field variable you want to examine.
v OPERATOR is one of the following operators:
CONTAINS EQ GE GT LE LT NE PARTOF
Operator
Description
CONTAINS
field value contains TEXT value. e.g. URL value contains .asp.
Chapter 4. CX Pipeline Session Agents
243
EQ
field value equals TEXT value
GE
(numeric fields only) field value is greater than or equal to TEXT value
GT
(numeric fields only) field value is greater than TEXT value
LE
(numeric fields only) field value is less than or equal to TEXT value
LT
(numeric fields only) field value is less than TEXT value
NE
(numeric fields only) field value is not equal to TEXT value
PARTOF field value is one entry in the list of TEXT values. Values must be
semicolon-separated. For example, the state abbreviation CA is a subset of
the list CA;OR;WA;HI;AK.
Note: Matches are entire string matches. Partial matches are not
supported.
See “Example PARTOF Configuration” on page 245.
You can negate the above operators with NOT. For example:
NOT CONTAINS
NOT GE
v TEXT is the text you want to use with the operator.
v MODIFIER is an optional keyword that tells the operators to ignore or match the
case of the field value and text. For example:
REQFIELD remote_host EQ server1 IGNORECASE
REQFIELD remote_host EQ ExactServer MATCHCASE
– If you do not specify MODIFIER, then the operators ignore the case of the
letters in the value and text.
To include spaces in the name or text, surround the name or text with quotation
marks. For example:
reqfield "name with spaces" contains "text with spaces"
If both the field value and the text can be evaluated as numbers, then the
following operators perform numeric tests:
EQ GE GT LE LT NE
Otherwise, both the value and text are treated as text.
REQSECTION rules
These rules have the following format:
REQSECTION NAME CONTAINS TEXT MODIFIER
where:
v NAME Name of the section you want to search.
v TEXT is the text for which you are looking.
– This value may also be a delimited list.
v MODIFIER The same optional keyword as in REQFIELD.
You can negate the CONTAINS operator with NOT. For example:
REQSECTION env NOT CONTAINS 10.20.40.50
244
IBM Tealeaf CX: Configuration Manual
REQUEST and RESPONSE rules
These rules have the following forms:
REQUEST CONTAINS TEXT MODIFIER
RESPONSE CONTAINS TEXT MODIFIER
where:
v TEXT is the text for which you are looking.
– This value may also be a delimited list.
v MODIFIER is the same optional keyword as in REQFIELD.
You can negate the CONTAINS operator with NOT. For example:
RESPONSE NOT CONTAINS "something went wrong"
Sample Configuration
Full Configuration
The following configuration sample is taken from the TealeafCaptureSocket.cfg
file on the Processing Server.
Note: TMS is the preferred method for configuring Windows pipelines. See
"Tealeaf Management System" in the IBM Tealeaf cxImpact Administration Manual.
[DataDrop]
...
DelImages=YES
KeepRealiTeaViewerHits=YES
KeepRoundTripHits=YES
LogStatistics=NO
LogStatisticsInterval=3600
Drop1=reqfield URL contains /company/
Drop2=reqfield HTTP_USER_AGENT contains bot
Drop3=reqfield URL contains /coMPany/ IGNORECASE
Drop4=reqsection env contains CaptureType=2
Drop5=response contains "cache-control: private"
Example PARTOF Configuration
In the example below, the drop rule has been specified to drop the hit if the
request field (reqfield) called PCA_NAME contains one of the listed values: ceres, io,
or pluto.
Drop6=reqfield PCA_NAME partof ceres;io;pluto
This request field is contained in the [env] section of the request and is assigned
by the IBM Tealeaf CX Passive Capture Application that captured the hit. This
example configuration might be useful if you have one or more development
instances of the IBM Tealeaf CX Passive Capture Application, whose data you do
not wish to capture and process through the Windows pipeline.
Tealeaf Session Agents
v
v
v
v
v
“Adding a Session Agent” on page 226
“Archive Session Agent” on page 227
"Attribute Indexing Session Agent" in the IBM Tealeaf CX Configuration Manual
“Canister Session Agent” on page 236
“Cookie Parser Session Agent” on page 238
Chapter 4. CX Pipeline Session Agents
245
v
v
v
v
v
Data Drop Session Agent
“Data Parser Session Agent”
“Decouple Session Agent” on page 250
“Extended Decoupler Session Agent” on page 252
“Extended Privacy Session Agent” on page 261
v
v
v
v
v
v
v
“Health-Based Routing (HBR) Session Agent” on page 263
“Inflate Session Agent” on page 271
“JSON Mobile Parser Session Agent” on page 275
“Managed Code Session Agent” on page 287
“Null Session Agent” on page 290
“Privacy Session Agent” on page 291
“Real-Time Monitoring and Alert (RTA) Session Agent” on page 321
v
v
v
v
v
v
“Response Tags to Request Session Agent” on page 326
“RTA Split Session Agent” on page 328
“Sessioning Session Agent” on page 332
“Session Router Session Agent” on page 330
“Socket Session Agent” on page 335
“Statistics Logger Session Agent” on page 337
v "Tealeaf Reference Session Agent" in the IBM Tealeaf CX Configuration Manual
v “Tealeaf Reference Session Agent - Legacy Mode” on page 357
v “Tealeaf Sessioning Session Agent” on page 360
v “TimeGrades Session Agent” on page 366
v “TLI Session Agent” on page 368
v “URL Decode Session Agent” on page 382
Data Parser Session Agent
The Data Parser session agent is a general-purpose "search and grab" pipeline
agent that scrapes either the REQ or RSP buffers of a hit for user-defined patterns.
These patterns can then be manipulated.
Like the Privacy session agent, rules can be created for the Data Parser session
agent to allow name/value pairs to be appended to sections in the REQ buffer.
When values are found in either the request or the response, the following types of
operations can be applied to the found value:
v A regular expression
v An MD5 hash
v Found values can be concatenated or listed with a delimiter
Adding the Session Agent
Session agents can be added through the Pipeline Editor in TMS. See “Adding a
Session Agent” on page 226. For more information on the Pipeline Editor and TMS,
see "Tealeaf Management System" in the IBM Tealeaf cxImpact Administration
Manual.
Configuring Template Rules
After the session agent has been added to a pipeline through the Pipeline Editor,
you can configure the Data Parser search templates through TMS. To edit:
246
IBM Tealeaf CX: Configuration Manual
1.
2.
3.
4.
5.
In TMS, select the WorldView tab.
Select Servers view.
Open the Transport Service node.
Click DataParser Search Templates.
In the Config Actions pane, click View/Edit.
6. The search templates are displayed. See “Building Data Parser Rules.”
Configuration Settings
When the Data Parser session agent is added to the pipeline, the following session
agent settings can be modified to significantly affect its performance and behavior.
v Display Name values are displayed in TMS, which is the recommended method
for configuring session agents. See "Tealeaf Management System" in the IBM
Tealeaf cxImpact Administration Manual.
v Name values are displayed in TealeafCaptureSocket.cfg.
Table 11. Configuration Settings
Display Name
Name
Description
Max Tag Length
MaxTagLength
This setting represents the number of
characters collected after the pattern
is matched if no end tag or regular
expression is provided. Minimizing
this value is important for optimizing
speed. The default value is 1024
characters.
Config File
ConfigFile
This path identifies the file
containing rules to apply to the Data
Parser. If this path is not found, the
session agent does not load.
Storage Name
StorageName
This user-defined section name in the
request buffer indicates where
created name/value pairs are
inserted. If it is not specified, the
created values are automatically
inserted into the [appdata] section,
which is created if none exists.
Inserting data into the [appdata]
section allows indexing of the new
values.
Building Data Parser Rules
For the Data Parser session agent, you can create rules in the
DataParserSearchTemplates.cfg file, or whatever file is specified in the ConfigFile
property for the Data Parser configuration.
v You can edit this file through the Transport Service node in TMS. See
“Configuring Template Rules” on page 246.
Rule configuration options
There are several possible permutations to DataParser rules:
Setting Description
Chapter 4. CX Pipeline Session Agents
247
Action For all rules in DataParser, the Action must be set to Search. This setting
avoids confusion with other types of actions allowed by other session
agents.
SearchType
The search type can have one of two values: Single Pass or XML.
v Single Pass uses normal text searching methods to collect strings from
the buffer.
v XML uses a separate XSL transform to do all data manipulation. XSL
transforms are powerful but very slow to execute. XSL usage is not
recommended in high-traffic environments.
DisplayName
This setting is the name used in the name/value pair, if the pattern is
found.
SearchString
This setting is the pattern for which you wish to search in the buffer.
StartPattern can also be used.
Regular expression
Denotes the regular expression used, if the SearchString pattern is found.
v regular expression= and regex= are recognized in rules configuration.
v Look-behind expressions of un-fixed length are not supported.
If you need to use an expression like (?<=start).*end, then you must
denote the number of chars you want to capture explicitly. Example:
(?<=start).
{1,200}
end
Note: If a regular expression is supplied and does not match the text
found after the SearchString is found, no name/value pair appears in
the REQ buffer.
SearchURL
The URL on which to fire for this action.
v If no SearchURL is specified, the action fires on all hits.
EndTag Denotes an end tag character sequence that terminates the collection of
characters. You can use an end tag and a regular expression to collect and
then clean up a character string. EndPattern can also be used.
MD5
Set this value to True to apply MD5 to the final value, after the regular
expressions and end tags are applied.
Note: Only the value is MD5-encoded. The DisplayName is not.
Section
This setting denotes whether to search the REQ or RSP buffer. Only two
case-sensitive values are accepted: Response or Request. If no value is
provided, the RSP buffer is used by default.
DelimMatches
When set to True, Data Parser puts all the matches found under the
Display Name delimited by comma by default. You can provide a different
delimiter in the Delimiter setting.
Delimiter
The user-defined delimiter used when DelimMatches is set to True. If it is
not specified, the delimiter is set to comma.
248
IBM Tealeaf CX: Configuration Manual
Note: If multiple search patterns are found from the same rule, the
DataParser numbers them and puts them in the REQ buffer in the order
they are found. For example, if multiple Title searches returned results,
the output looks like the following:
Title=firstfind
Title2=secondfind
Title3=thirdfind
RegGroup
Optionally, you can specify the output and format of the regular expression
matching based on groups in the regular expression. For example, if the
regular expression is (tom)(/sis)(/s.)(*), then specifying
RegGroup={g1}={g2} returns the value tom= is. In this case, the second
equals sign (=) is a literal and is passed through to the output.
Values are returned in the order they are found in the buffer.
Example rules
Get Title rule
The following example rule for Data Parser Session Agent uses a single-pass search
on the RSP buffer for the <title>stuff</title> tag of an HTML document. If
found, it then applies a regular expression to acquire the content inside the tags
and to apply the value to the Title parameter in the request buffer:
[Title]
Action=Search
SearchType=SinglePass
DisplayName=Title
SearchString=<title>
Regular expression=<title.*</title>
Get Tealeaf User ID rule
This rule uses a single-pass search on the request buffer to find TLTUID=. If it is
found, the name/value pair consists of TLTUID_MD5= and everything to the next
carriage return. An MD5 hash is applied to the value.
[TLTUID]
Action=Search
SearchType=SinglePass
DisplayName=TLTUID_MD5
SearchString=TLTUID=
EndTag=\r
MD5=True
Section=Request
Apply XSL to Request buffer rule
This rule applies the ClientEventXSL.xsl transform file to transform the REQ
buffer. Note the DisplayName parameter is set to none. While DisplayName
parameter is a required part of a well-formed rule, the XSL denotes the name of
the name/value pair, and this parameter is not used.
[ClientXSL]
Action=Search
SearchType=XML
DisplayName=None
SearchString=ClientEventXSL.xsl
Section=Request
Chapter 4. CX Pipeline Session Agents
249
Tealeaf Session Agents
v
v
v
v
“Adding a Session Agent” on page 226
“Archive Session Agent” on page 227
"Attribute Indexing Session Agent" in the IBM Tealeaf CX Configuration Manual
“Canister Session Agent” on page 236
v
v
v
v
v
v
v
“Cookie Parser Session Agent” on page 238
“Data Drop Session Agent” on page 241
Data Parser Session Agent
“Decouple Session Agent”
“Extended Decoupler Session Agent” on page 252
“Extended Privacy Session Agent” on page 261
“Health-Based Routing (HBR) Session Agent” on page 263
v “Inflate Session Agent” on page 271
v “JSON Mobile Parser Session Agent” on page 275
v
v
v
v
v
“Managed Code Session Agent” on page 287
“Null Session Agent” on page 290
“Privacy Session Agent” on page 291
“Real-Time Monitoring and Alert (RTA) Session Agent” on page 321
“Response Tags to Request Session Agent” on page 326
v “RTA Split Session Agent” on page 328
v “Sessioning Session Agent” on page 332
v “Session Router Session Agent” on page 330
v
v
v
v
“Socket Session Agent” on page 335
“Statistics Logger Session Agent” on page 337
"Tealeaf Reference Session Agent" in the IBM Tealeaf CX Configuration Manual
“Tealeaf Reference Session Agent - Legacy Mode” on page 357
v “Tealeaf Sessioning Session Agent” on page 360
v “TimeGrades Session Agent” on page 366
v “TLI Session Agent” on page 368
v “URL Decode Session Agent” on page 382
Decouple Session Agent
The Decouple session agent decouples the capture pipeline from the socket
receiving component and the remainder of the pipeline and throttles traffic spikes
using an in-memory queue. For example, if there was a burst of traffic that exceeds
the capacity of the remaining pipeline agents, the Decouple session agent queues
this burst on the in-memory queue so that no hits are lost.
Unlike Extended Decouple, this session agent operates in-memory only and cannot
spool hits to disk when volume is high. Consequently, this session agent is much
simpler to configure. There is only one configuration option, the size of the
in-memory queue.
Note: If the number of hits in memory exceeds the maximum queue size,
subsequent hits are dropped and lost. This session agent is not intended for any
extended queuing periods. It can be used only to smooth bursts of traffic lasting a
minute or two.
250
IBM Tealeaf CX: Configuration Manual
Note: Extended Decouple includes additional features and configuration options
that are not available in Decouple session agent. For any envisioned extended
queuing that lasts longer than two minutes, you should consider deploying the
Extended Decouple session agent. See “Extended Decoupler Session Agent” on
page 252.
Adding the Session Agent
Session agents can be added through the Pipeline Editor in TMS. See “Adding a
Session Agent” on page 226. For more information on the Pipeline Editor and TMS,
see "Tealeaf Management System" in the IBM Tealeaf cxImpact Administration
Manual.
The remainder of this page describes configuration options and how to change
them through the TealeafCaptureSocket.cfg file stored on the server. These
settings are also available through the Pipeline Editor, which is the recommended
method for configuring session agents.
Settings
v Display Name values are displayed in TMS, which is the recommended method
for configuring session agents. See "Tealeaf Management System" in the IBM
Tealeaf cxImpact Administration Manual.
v Name values are displayed in TealeafCaptureSocket.cfg.
Table 12. Decouple Session Agent
Display
Name
Name
Description
Max Queue
Size
MaxQueueSize
Specifies the maximum number of
hits the memory queue can hold.
Increasing the memory queue size
increases competition for memory
resources. The default value is 2500.
Mobile-Related Session Agents
This session agent can be used as part of capturing and processing JSON messages
submitted from one of the Tealeaf client frameworks and splitting these messages
into separate hits in the Windows pipeline. This method is the legacy method.
These client framework versions were introduced in Release 8.4 and have been
superseded by the step-based method of messaging, beginning in Release 8.5. For
more information on these client frameworks, including implementation steps,
please use the links below:
Tealeaf Session Agents
v
v
v
v
v
v
“Adding a Session Agent” on page 226
“Archive Session Agent” on page 227
"Attribute Indexing Session Agent" in the IBM Tealeaf CX Configuration Manual
“Canister Session Agent” on page 236
“Cookie Parser Session Agent” on page 238
“Data Drop Session Agent” on page 241
v “Data Parser Session Agent” on page 246
v Decouple Session Agent
Chapter 4. CX Pipeline Session Agents
251
v
v
v
v
v
“Extended Decoupler Session Agent”
“Extended Privacy Session Agent” on page 261
“Health-Based Routing (HBR) Session Agent” on page 263
“Inflate Session Agent” on page 271
“JSON Mobile Parser Session Agent” on page 275
v
v
v
v
v
v
v
“Managed Code Session Agent” on page 287
“Null Session Agent” on page 290
“Privacy Session Agent” on page 291
“Real-Time Monitoring and Alert (RTA) Session Agent” on page 321
“Response Tags to Request Session Agent” on page 326
“RTA Split Session Agent” on page 328
“Sessioning Session Agent” on page 332
v
v
v
v
v
v
“Session Router Session Agent” on page 330
“Socket Session Agent” on page 335
“Statistics Logger Session Agent” on page 337
"Tealeaf Reference Session Agent" in the IBM Tealeaf CX Configuration Manual
“Tealeaf Reference Session Agent - Legacy Mode” on page 357
“Tealeaf Sessioning Session Agent” on page 360
v “TimeGrades Session Agent” on page 366
v “TLI Session Agent” on page 368
v “URL Decode Session Agent” on page 382
Extended Decoupler Session Agent
The Extended Decoupler session agent in the Capture Socket Service pipeline
manages sustained increases in traffic volume. For websites with sustained
increases in traffic volume in the first part of the day or at the end of each month,
this session agent is crucial.
Hit volume entering the Short Term Canister is regulated to prevent the STC from
becoming overloaded. By queuing data in this manner, IBM Tealeaf CX greatly
reduces the loss of data at any point in the pipeline.
Note: For some deployments of the Processing Server, this session agent is
included in the default pipeline and is required. See “CX Pipeline Configuration”
on page 214.
Adding the Session Agent
Session agents can be added through the Pipeline Editor in TMS. See “Adding a
Session Agent” on page 226.
v For more information on the Pipeline Editor and TMS, see "Tealeaf Management
System" in the IBM Tealeaf cxImpact Administration Manual.
The remainder of this page describes configuration options and how to change
them through the TealeafCaptureSocket.cfg file stored on the server. These
settings are also available through the Pipeline Editor, which is the recommended
method for configuring session agents.
252
IBM Tealeaf CX: Configuration Manual
Extended Decoupler Process
The Extended Decoupler monitors the Short Term Canister's vital statistics and
compares them to the predefined thresholds for the session agent. When a
threshold has been exceeded, Extended Decoupler begins to store hits in a queue.
Hits are first queued in memory. When the memory queue reaches its capacity, hits
are then queued to disk.
Since the Short Term Canister is an in-memory database, it can sustain volumes
above capacity for only 10 to 50 minutes. Beyond this range, the Canister begins
paging to disk for extra memory. Paging forces a decrease in the rate at which the
Short Term Canister accepts hits, until its capacity is restored.
Draining the Short Term Canister
Draining the Short Term Canister refers to when one or more of the thresholds
used to monitor STC health is exceeded, and the Extended Decoupler begins the
queuing process to let the Canister process the existing session data.
For example, if the maximum number of unevaluated hits reaches a threshold, the
Extended Decoupler begins queuing hits, which allows the Short Term Canister to
drain its store of unevaluated hits: aggregating hits into sessions, sending
interesting hits to the Long Term Archive, and deleting non-interesting session
data.
The Extended Decoupler monitors the following thresholds to determine whether
the Canister needs to drain:
v ctree cache usage level
v processing unevaluated hits
v processing sessions waiting to be archived
v processing sessions waiting to be indexed.
The Extended Decoupler keeps track of the hit arrival rate and the hit departure
rate as hits pass through the capture socket pipeline into the Canister. If the
Canister is healthy, hits pass through without being queued. The health of the
Canister is determined by examining the following conditions in the Short Term
Canister:
v Number of unevaluated hits versus evaluated hits
v Number of sessions waiting for long term archive
v Number of sessions waiting to be indexed
v Maximum percentage of Faircom Cache used
Each of the above values is configurable. The size of the values depends greatly on
the size of the computer on which the IBM Tealeaf CX Server is installed. These
values are given equal priority.
v If one value is over the threshold, Extended Decoupler stops sending hits to the
Canister and begins queuing hits until the minimum threshold value is reached.
For example, when the Short Term Canister size is greater than 1 GB, queuing
may begin, and hits are queued until the STC size is less than 500 MB.
After the system has regained healthy status, the Extended Decoupler sends
queued data into the Canister at an outflow rate specified in the session agent
configuration settings. The outflow rate acts as a governor on data flow so hits
don't immediately overflow the Canister.
Chapter 4. CX Pipeline Session Agents
253
Reporting
After Extended Decoupler has gone through the queuing cycle and released hits
back into the Canister, hourly reporting is skewed because the Canister looks at the
time stamps of when data arrives in the Canister and not when it was originally
captured. However, daily reports tallying total hits is not affected by the hourly
skewing.
Logging
The Extended Decoupler creates a log file in tab-separated format, which can be
imported into other applications such as Excel.
The log file also logs CPU usage on the Canister machine for current, last 10
minutes, and last hour metrics.
DOM Capture Virtual Hit Session Agent
Moves the captured DOM data from the UI hit into a newly created virtual hit,
with the captured DOM as its response.
After the virtual hit is created, the original DOM capture data is removed from the
JSON and replaced with an empty string.
Note: The DOM Capture Virtual Hit session agent is needed only if you are going
to perform DOM capture.
Adding the Session Agent
Session agents can be added through the Pipeline Editor in TMS. See “Adding a
Session Agent” on page 226. For more information on the Pipeline Editor and TMS,
see "Tealeaf Management System" in the IBM Tealeaf cxImpact Administration
Manual.
If you are planning to use DOM capture, it must be configured after the Inflate
session agent and before the Privacy session agent in TealeafCaptureSocket.cfg.
For example:
[Inflate]
TypeName=Inflate
DLL=SessionAgentInflate.dll
UnReqCancelled=True
MaxInflateSize=1536KB
DownStreamConfigSection=DomCaptureVHit
[DomCaptureVHit]
TypeName=DomCaptureVHit
DLL=SessionAgentDomCaptureVHit.dll
DownStreamConfigSection=PrivacyEx
Extended Decoupler Configuration
The Extended Decoupler configuration options are grouped into the following
categories:
v “Global Settings” on page 255
v “Short Term Canister Thresholds” on page 257
v “DecouplerEx Reporting” on page 258
254
IBM Tealeaf CX: Configuration Manual
v “DecouplerEx Disk Settings” on page 259
v Display Name values are displayed in TMS, which is the recommended method
for configuring session agents. See "Tealeaf Management System" in the IBM
Tealeaf cxImpact Administration Manual.
v Name values are displayed in TealeafCaptureSocket.cfg.
Global Settings
Note: Extended Decoupler always runs in EXTENDED mode, in which spooling is
always enabled. To disable spooling, use the Decoupler session agent. See
“Disabling Disk Queuing” on page 260.
Table 13. Global Settings
Display
Name
Name
Description
Control
Outflow
Rate
ControlMaxOutRate
Turns on the parameter that controls
the rate at which hits flow from the
queue to the Canister. Values are
either ON or OFF.
When set to ON, you must also
configure the MaxOutMode,
MaxOutHitsPerSec, and
MaxOutBytesPerSec settings.
Max Outflow MaxOutHitsPerSec
Hits Per
Second
Specifies the rate at which hits flow
from the queue to the Canister. This
value is defined as hits per second.
The appropriate value depends on
the hardware configuration of the
IBM Tealeaf CX Server.
Max Outflow MaxOutBytesPerSec
Bytes Per
Second
Specifies the rate in bytes per second
that hits flow from the queue to the
Canister.
Outflow
Control
Mode
OutflowControlMode
Specifies the mode to meter queue
outflow rates.
The following settings measure hit
flow rate queue output:
v Hits meter to the
MaxOutHitsPerSec setting.
v Bytes meter to the
MaxOutBytesPerSec setting.
v Both meter to the threshold of
either the MaxOutHitsPerSec or
MaxOutBytesPerSec setting.
The following settings measure hit
flow rate at the Canister input:
v CANHITS meter to the
MaxOutHitsPerSec setting.
v CANBYTES meter to the
MaxOutBytesPerSec setting.
v CANBOTH meter to the threshold of
either the MaxOutHitsPerSec or
MaxOutBytesPerSec setting.
Chapter 4. CX Pipeline Session Agents
255
Table 13. Global Settings (continued)
Display
Name
Name
Description
Persistence Persistence
Specifies if there are spooled files and
the Extended Decoupler is stopped.
After a restart, this setting enables the
Extended Decoupler to continue
processing the spooled files created
during a previous queue of files.
Spool At
Startup
The equivalent of issuing a StartQ
command from Search Server on
startup.
SpoolAtStartup
Calculating and Configuring the Outflow Rate
To properly throttle the session agent, you must configure the appropriate data
outflow to avoid some of the following problems:
v Canister unable to process hits to meet the incoming rate
v Running out of memory address space in the Short Term Canister
v ctree memory limit configured to close to the maximum address space
v Spooling
Use the steps below to configure the outflow rate.
1. Before you configure the session agent, you must acquire the maximum
available memory in the Short Term Canister. This value is displayed as the Max
Ctree Bytes setting in the Services Controls tab of the Canister configuration in
TMS.
v Write this value down for later use.
v See “Configuring the CX Canister” on page 18.
2. In the Short Term Canister Thresholds section of the Extended Decouple session
agent configuration, review the value for Canister Max % Memory Used.Write
this value down.
3. In the Globals section of the Extended Decouple session agent configuration, set
ControlMaxOutRate to ON. When set to ON, basic throttling of hits to the canisters
is enabled.
4. Configure the Outflow Control Mode setting, which manages how the session
agent manages the maximum outflow rate. Set this figure to Bytes, which pegs
the outflow rate to the Max Outflow Bytes Per Second setting.
5. Set Max Outflow Hits Per Second to 1000.
6. Set Max Outflow Bytes Per Second to the following formula:
Max Ctree Bytes * Canister Max % Memory Used +
(Max Outflow Hits Per Second *60)
v For Canister Max % Memory Used, convert the value to a decimal. For
example, a figure of 85% is inserted into the formula as 0.85.
v If this value is greater than Max Ctree Bytes value, then set the value to Max
Ctree Bytes - 1.
Note: Do not attempt to set the outflow rate to a value greater than the maximum
available bytes in any destination Short Term Canister.
v For 32-bit systems, Tealeaf does not support the use of the /3GB operating
system switch.
256
IBM Tealeaf CX: Configuration Manual
v Using a 64-bit operating system enables access to more memory for the Short
Term Canister.
Short Term Canister Thresholds
The following Short Term Canister thresholds are compared with the Canister
statistics that are polled by the Statistics service and stored in shared memory. This
polling occurs every 30 seconds.
If any of these thresholds is breached, the TealeafCapture Socket service stops
sending hits to the Canister and begins queuing hits.
v If the CanCheckEventLog setting is ON, messages appear in the event application
log when a Canister threshold has been exceeded.
Note: These threshold settings must take into account the size of the systems on
which they are installed. Thresholds that are set too low cause the Canister to
stop accepting hits too often and interrupt traffic flow. Thresholds that are too
high may cause data to overflow the Canister's memory.
Table 14. Short Term Canister Thresholds
Display
Name
Name
Description
Canister
Check
Cancheck
Enables checking of the Canister.
Canister
Logging
CanCheckLog
Outputs Canister statistics to a log
file whose location is specified by the
LogDir setting
Canister
CanCheckMaxCtreeMemUsedPct
Max %
Memory Used
Maximum allowed percentage of
memory allocated by the Tealeaf
Canister Server. When set to 0, the
cache value is ignored, and the
CanCheckMinCtreeMemUsedPct
setting is also ignored.
Canister
CanCheckMinCtreeMemUsedPct
Min %
Memory Used
Specifies the minimum percentage of
FairCom Cache in use.
v This value is checked only if the
CanCheckMaxCtreeMemUsedPct
setting is enabled.
v If the maximum value has been
exceeded, the Extended Decoupler
queues hits until the minimum
value is reached.
CanCheckMaxUnevalHits
Max
Unevaluated
Canister
Hits
If the number of un-evaluated hits in
the Canister exceeds this number, the
Canister health is compromised.
Min
CanCheckMinUnevalHits
Unevaluated
Canister
Hits
Specifies the minimum number of
unevaluated hits. When the
maximum value is reached, the
Extended Decoupler queues hits until
the minimum value is reached. If
CanCheckMaxUnevalHits is set to 0,
this setting is ignored.
Chapter 4. CX Pipeline Session Agents
257
Table 14. Short Term Canister Thresholds (continued)
Display
Name
Name
Description
Max
CanCheckMaxSesnWaitForLtc
Sessions
Waiting for
LTC
If the number of sessions waiting to
be archived exceeds this value, the
Canister health is compromised.
Min
CanCheckMinSesnWaitForLtc
Sessions
Waiting For
LTC
Specifies the minimum threshold of
sessions waiting to be archived.
When the maximum threshold has
been exceeded, Extended Decoupler
queues until the minimum number
has been reached.
Max
CanCheckMaxSesnWaitForIdx
Sessions
Waiting For
IDX
If the number of sessions waiting to
be indexed exceeds the specified
number, the Canister health is
compromised.
CanCheckMinSesnWaitForIdx
Min
Sessions
Waiting for
IDX
Specifies the minimum threshold of
sessions waiting to be indexed. When
the maximum threshold has been
exceeded, Extended Decoupler
queues until the minimum number
has been reached.
Drain STC
on Error
When a maximum threshold is
surpassed, the Extended Decoupler
signals to the Canister to close all
sessions and drain the Canister
without waiting for the session
timeout. The default value is OFF.
CanCheckDrainSTCOnError
DecouplerEx Reporting
DecouplerEx has several settings that determine the output for and enable
DecouplerEx statistics.
Table 15. DecouplerEx Reporting
258
Display
Name
Name
Description
Log
Directory
LogDir
Specifies the Log directory. If the Log,
StatsMeter, or CanCheckLog setting is
enabled, logging occurs in this
directory. The default value is the
global Tealeaf log directory.
IBM Tealeaf CX: Configuration Manual
Table 15. DecouplerEx Reporting (continued)
Display
Name
Name
Description
Report
Statistics
StatsMeter
Enables or disables the statistics
meter. The statistics meter monitors
the rate of hits or bytes that enter
and exit the Extended Decoupler.
The number of bytes per second that
are entering the Extended Decoupler
can be used to calculate the amount
of data sent to the Short Term
Canister. Reports are output in text
format to the directory specified by
the LogDir setting.
You can also define the log format.
.CSV is recommended for spreadsheet
import.
Write Stat
Report To
Log File
StatsMeterLogToFile
Specifies whether to output statistics
meter reports to the log file. The
default value is ON.
Generate
Stats Hits
StatsMeterHits
Controls statistics hits. The default
value is OFF.
Log
Log
Turns logging on or off. The default
value is ON.
Log Level
LogLevel
Specifies the Log level of detail.
Possible values are: Error, Warning,
Info, and Debug. The default value is
Debug.
v Log levels are inclusive. For
example, Info includes Warning
and Error.
DecouplerEx Disk Settings
This group of settings control the queue size, the amount of time the Extended
Decoupler should spool to the disk, and the amount of data to spool. You can also
configure the amount of space to leave free on the disk as a percentage. The quota
mechanism used here is the same as the one used for the Archive session agent.
Table 16. DecouplerEx Disk Settings
Display
Name
Name
Description
Max Memory
Queue Size
MaxQueueSize
Specifies the maximum number of
hits the memory queue can hold. The
memory queue is designed to handle
brief spikes in hit flow. Hits are
queued on disk when memory queue
is exhausted. Increasing the memory
queue size increases competition for
memory resources. The default value
is 5000.
Spool File
Roll Size
SpoolRollSizeMB
Specifies the maximum size of each
spool file in megabytes. The default
value is 500 MB.
Chapter 4. CX Pipeline Session Agents
259
Table 16. DecouplerEx Disk Settings (continued)
Display
Name
Name
Description
Spool
Directory
SpoolDir
Specifies the directory location in
which to write the spool file. The
default value is the Spool
subdirectory in the install directory.
Spool Write SpoolChunkSizeMB
Chunk Size
The size of chunks to write when
spooling data, in megabytes.
Disk % Free DiskQuotaPctFree
Specifies the percent free threshold
for the directory specified in the
QuotaDir option. If the amount of
free space falls below this threshold,
the Capture Filter disables itself to
avoid consuming too much disk
space.
v On Microsoft Windows NT 4.0
systems, the directory disk space is
the same as overall disk space.
v On Microsoft Windows 2000 or
higher, you can establish directory
quotas. The default value is 2
percent.
Disabling Disk Queuing
A lightweight predecessor to the Extended Decoupler session agent, the Decoupler
session agent uses an in-memory queue for queuing up hits for processing and
does not queue any hits to disk. If the in-memory queue is filled, hits are dropped.
Extended Decoupler session agent is configured to always queue sessions to disk if
the in-memory queue is filled.
The configuration settings for Decoupler session agent is a subset of those in
Extended Decoupler session agent. You can add the session agent through the
Pipeline Editor and adjust the size of the in-memory queue (Max Queue Size).
See "Tealeaf Management System" in the IBM Tealeaf cxImpact Administration
Manual.
Tealeaf Session Agents
v “Adding a Session Agent” on page 226
v “Archive Session Agent” on page 227
v "Attribute Indexing Session Agent" in the IBM Tealeaf CX Configuration Manual
v “Canister Session Agent” on page 236
v
v
v
v
v
“Cookie Parser Session Agent” on page 238
“Data Drop Session Agent” on page 241
“Data Parser Session Agent” on page 246
“Decouple Session Agent” on page 250
Extended Decoupler Session Agent
v “Extended Privacy Session Agent” on page 261
v “Health-Based Routing (HBR) Session Agent” on page 263
v “Inflate Session Agent” on page 271
260
IBM Tealeaf CX: Configuration Manual
v
v
v
v
v
“JSON Mobile Parser Session Agent” on page 275
“Managed Code Session Agent” on page 287
“Null Session Agent” on page 290
“Privacy Session Agent” on page 291
“Real-Time Monitoring and Alert (RTA) Session Agent” on page 321
v
v
v
v
v
v
v
“Response Tags to Request Session Agent” on page 326
“RTA Split Session Agent” on page 328
“Sessioning Session Agent” on page 332
“Session Router Session Agent” on page 330
“Socket Session Agent” on page 335
“Statistics Logger Session Agent” on page 337
"Tealeaf Reference Session Agent" in the IBM Tealeaf CX Configuration Manual
v
v
v
v
v
“Tealeaf Reference Session Agent - Legacy Mode” on page 357
“Tealeaf Sessioning Session Agent” on page 360
“TimeGrades Session Agent” on page 366
“TLI Session Agent” on page 368
“URL Decode Session Agent” on page 382
Extended Privacy Session Agent
The PrivacyEx session agent enables the encryption, blocking, and replacement of
text in the request and response buffers.
Like its predecessor, Privacy, this session agent utilizes a flexible set of rules and
configuration options to ensure that sensitive data is treated in an appropriate
manner. For more information on how to configure the rules, actions, and tests in
use, see “Privacy Session Agent” on page 291.
Attention: In multi-pipeline environments, do not enable the extended privacy
session agent (PrivacyEx) for child pipelines that have HBR enabled. If HBR and
PrivacyEx are enabled for a child pipeline, the service can run out of memory and
cause the service to restart unexpectedly. For more information about PrivacyEx,
see “Extended Privacy Session Agent.”
The PrivacyEx session agent extends the older Privacy session agent with the
following features:
v Faster buffer search: PrivacyEx can search a request or a response once for all
terms for which it is trying to filter.
v Internationalization support: PrivacyEx can be used to filter data in a variety of
international encoding schemes.
v MD5: If needed, you can apply MD5 hashing to the output of a privacy rule.
Note: Where possible, use PrivacyEx session agent instead of Privacy, which may
be deprecated in future releases.
Adding the Session Agent
Session agents can be added through the Pipeline Editor in TMS. See “Adding a
Session Agent” on page 226.
v For more information on the Pipeline Editor and TMS, see "Tealeaf Management
System" in the IBM Tealeaf cxImpact Administration Manual.
Chapter 4. CX Pipeline Session Agents
261
The remainder of this page describes configuration options and how to change
them through the TealeafCaptureSocket.cfg file stored on the server. These
settings are also available through the Pipeline Editor, which is the recommended
method for configuring session agents.
Settings
The following configuration settings are available for the session agent:
v Display Name values are displayed in TMS, which is the recommended method
for configuring session agents. See "Tealeaf Management System" in the IBM
Tealeaf cxImpact Administration Manual.
v Name values are displayed in TealeafCaptureSocket.cfg.
Table 17. Extended Privacy Session Agent
Display
Name
Name
Description
Config File ConfigFile
The name of the file containing the
rules and actions in use by PrivacyEx
session agent. Default value is
Privacy.cfg, which is used by the
Privacy session agent, too.
Show Rules
in Event
Log
LogRules
When set to true, PrivacyEx session
agent lists the rules and actions in
use in the Tealeaf application event
log.
Log Level
LogLevel
When enabled and defined, the log
level setting defines the logging level
of messages inserted into the request
in the [privacylog] section. The
following log levels are accepted:
v Error - reports Errors only
v Warning - reports Errors and
Warnings
v Info - reports Errors, Warnings,
and Info messages
v Trace - reports above messages,
plus additional information for
tracing
v Debug - reports maximum
information
Note: The Debug logging level
should only be enabled when you
are debugging issues with rules
and actions. The additional data
inserted into the request may cause
a significant increase in data
volume and decrease in
performance. Additionally,
unencrypted original data values
may be logged at Debug level.
When you have finished
debugging, remember to reset the
logging level.
262
IBM Tealeaf CX: Configuration Manual
Tealeaf Session Agents
v
v
v
v
“Adding a Session Agent” on page 226
“Archive Session Agent” on page 227
"Attribute Indexing Session Agent" in the IBM Tealeaf CX Configuration Manual
“Canister Session Agent” on page 236
v
v
v
v
v
v
v
“Cookie Parser Session Agent” on page 238
“Data Drop Session Agent” on page 241
“Data Parser Session Agent” on page 246
“Decouple Session Agent” on page 250
“Extended Decoupler Session Agent” on page 252
Extended Privacy Session Agent
“Health-Based Routing (HBR) Session Agent”
v “Inflate Session Agent” on page 271
v “JSON Mobile Parser Session Agent” on page 275
v
v
v
v
v
“Managed Code Session Agent” on page 287
“Null Session Agent” on page 290
“Privacy Session Agent” on page 291
“Real-Time Monitoring and Alert (RTA) Session Agent” on page 321
“Response Tags to Request Session Agent” on page 326
v “RTA Split Session Agent” on page 328
v “Sessioning Session Agent” on page 332
v “Session Router Session Agent” on page 330
v
v
v
v
“Socket Session Agent” on page 335
“Statistics Logger Session Agent” on page 337
"Tealeaf Reference Session Agent" in the IBM Tealeaf CX Configuration Manual
“Tealeaf Reference Session Agent - Legacy Mode” on page 357
v “Tealeaf Sessioning Session Agent” on page 360
v “TimeGrades Session Agent” on page 366
v “TLI Session Agent” on page 368
v “URL Decode Session Agent” on page 382
Health-Based Routing (HBR) Session Agent
Health-Based Routing (HBR) is a pipeline agent that monitors the health of the
downstream canisters and can dynamically route sessions to those canisters based
upon their health. HBR requires a minimum of 2 processing servers (HBR does not
make sense for a single processing server) and can monitor up to a maximum of 20
processing servers.
Note: For some deployments of the Processing Server, this session agent is
included in the default pipeline and is required. See “CX Pipeline Configuration”
on page 214.
HBR determines the processing server health by communicating with the
processing server SearchServer and gets the Governor/Canister status (i.e.,
http://processingserver:19000/GovernorStatusEx); Processing server health is
determined if the processing server is spooling, if it is not spooling HBR assumes
that it can continue to take traffic for existing sessions and new sessions. If HBR
determines that the processing server is spooling, then it will continue to send
Chapter 4. CX Pipeline Session Agents
263
traffic for existing sessions (HBR tries to maintain session fidelity per canister) but
will not start any new sessions for that processing server till it has recovered from
its spool condition.
This section describes how to add and configure the Health-Based Routing session
agent.
Note: If you selected to install HBR during through the Tealeaf installer, HBR is
automatically configured for you. This section is useful if you are adding HBR or
modifying an existing HBR after installation is complete.
Prerequisites
Note: A local instance of Search Server must be started before HBR is initialized.
HBR uses Search Server to perform a Governor Status assessment on the local
machine. Both services are available through the Canister Services utility
(CanSvcs.exe), which should be used to start and stop these services.
Adding the Session Agent
Session agents can be added through the Pipeline Editor in TMS. See “Adding a
Session Agent” on page 226.
v For more information on the Pipeline Editor and TMS, see "Tealeaf Management
System" in the IBM Tealeaf cxImpact Administration Manual.
The remainder of this page describes configuration options and how to change
them through the TealeafCaptureSocket.cfg file stored on the server. These
settings are also available through the Pipeline Editor, which is the recommended
method for configuring session agents.
Configuration Settings
The following configuration settings are available for HBR.
Table 18. Configuration Settings
Display Name
Name
Description
Maximum Amount of Sessions
MaxSessions
Indicates the maximum number of
concurrent sessions that HBR needs
to monitor. HBR maintains a session
table to track the canister for that
session, this indicates how big to
make the session table (sessions
kept/removed per LRU
methodology).
Global Default Hits Per Second Per DefaultPerSecMax
Canister
The global number of hits/sec per
canister (for 5 canisters and with the
default of 200, HBR will throttle
traffic to 1000 hits/sec). This global
value can be overridden per canister
with the CanisterPerSecMaxX
directive.
HBR Rules PreProcess TCL Script
Path to the HBR rules Pre-Process
TCL Script.
264
PreProcScript
IBM Tealeaf CX: Configuration Manual
Table 18. Configuration Settings (continued)
Display Name
Name
Description
Health Routing Method
RoutingMethod
Indicates how HBR should route
traffic. HBR can route traffic in two
ways, 1) "equal" indicating that it
should equally balance traffic among
the target processing machines, 2)
"biased" indicating it should as much
traffic as possible to the first canister
and should it become unhealthy then
fallover to the second canister and so
forth.
StartUpRouting
StartUpRouting
The fallback routing method should
HBR somehow be unable determine
routing. This is a highly unlikely
event, but an instance where it could
occur is if TeaLeafCaptureSocket.cfg
in the [DecoupleEx] section was not
configured with
"SpoolAtStartUp=True", so that at
service startup traffic would hit the
HBR session agent before it had a
chance to poll the target canisters for
their health.
Script Trace
ScriptTrace
Script tracing enables tracking of
session agent activities, which is
useful for debugging.
Large Session Deletion Time Period LargeSessionTimePeriodSecs
in Seconds
Sets the amount of time in seconds
wherein a certain number of hits are
recorded. Ex.
LargeSessionTimePeriodSecs=10, the
time period being measured in this
example is 10 seconds.
Large Session Deletion Hits Within LargeSessionTimePeriodHits
Time Period
Determines the number of hits that
occur within a certain number of
seconds. Ex.
LargeSessionTimePeriodHits=500, the
number of hits retained in a
10-second time period is 500. Once
500 hits have been reached, HBR will
delete any remaining hits for that
session.
Large Session Deletion Required
Field
A way to exempt a session from
deletion. For example, when using
LargeSessionReqField=URL, then a
specific string within the URL will
determine which session is exempt
from deletion.
LargeSessionReqField
Chapter 4. CX Pipeline Session Agents
265
Table 18. Configuration Settings (continued)
Display Name
Name
Description
Large Session Deletion Required
Value
LargeSessionReqValue
The specific value within a field that
will exempt a session from deletion.
If any hit in a session meets these
two criteria, LargeSessionReqField
and LargeSessionReqValue, and if a
particular field (in this case, the URL)
contains a specific string, then the
session is exempt from deletion
regardless of whether it met the
LargeSessionTimePeriodSecs and
LargeSessionTimePeriodHits values.
Take for example,
LargeSessionReqValue=ReO. If the
URL contains ReO (case insensitive),
then that session is exempt from
deletion.
Per Processing Server
For each processing server:
Table 19. Configuration Settings
Display Name
Name
Description
Canister Name
CanisterName
Machine name (or IP address) of the
processing server to monitor.
SearchServer Port
CanisterSSPort
Port number for the SearchServer on
the target Canister machine (default
is 19000).
Canister Pipeline ID
CanisterPipeID
Associated with HBR are the child
pipelines (the PipelineConfig*
parameter) and this ties the canister
to the child pipeline (this number is
the * in PipelineConfig* parameter).
CanisterAppName
CanisterAppName
Specifies the AppName parameter of
the associated HBR_Pipeline*.cfg
(each AppName must be unique).
HBR uses this value when parsing
the GovernorStsEx to find the correct
entry.
Canister Down Times
CanisterOffline
Scheduled Canister down times.
"Daily at 2300 for 10 minutes
winddown 20 minutes" indicates that
at 10:40PM no new sessions (existing
sessions only), 11:00PM no traffic
whatsoever, resume all traffic at
11:10PM". An optional format would
be "Tuesday at 2300 for 10 minutes
winddown 20 minutes" indicating
that it would be offline every
Tuesday at this time.
266
IBM Tealeaf CX: Configuration Manual
Table 19. Configuration Settings (continued)
Display Name
Name
Description
HBR Initialization Time Out value
InitTimeOut
Specifies the amount of time (in
seconds) that HBR will spend during
initialization. Initialization can be
time consuming in cases where there
is a large amount of spool files.
Determining HBR Health
HBR works through Search Server, which provides the DecoupleEx status of local
and remote machines.
Canister Health is determined primarily by whether the canister is up/down as
reported by the GovernorStatus command through Search Server. If the average
time on queue value is more than 30 minutes, the canister is considered in an
unhealthy state. See "System Status" in the IBM Tealeaf cxImpact Administration
Manual.
How to Configure HBR
This section outlines a generalized approach to setting up HBR to work with
multiple canisters in your Tealeaf environment. For every target canister, there is a
1-to-1 correlation between the CanisterN entries in the [HBR] section of
TeaLeafCaptureSocket.cfg and the HBR child pipeline. So, configuring HBR
requires the following:
v Editing the [HBR] section of TeaLeafCaptureSocket.cfg
v Editing the HBR child pipelines configurations (HBR_PipelineN.cfg)
v Additional tweaking of TeaLeafCaptureSocket.cfg and the HBR_PipelineN.cfg,
such as making adjustments to [DecoupleEx] settings.
Configuring HBR Global Settings
In the [HBR] section of TeaLeafCaptureSocket.cfg, please review the following
settings.
v See “Configuration Settings” on page 264.
Setting Description
MaxSessions
This value defines the number of rows in HBR's session table, which is the
maximum number of sessions that HBR manages. When a new session
arrives to HBR, the oldest one is removed. The default value is 100,000.
Note: HBR Requires sessionized data.
DefaultPerSecMax
Maximum hits/sec per target canister. The default value is 300.
RoutingMethod
Defines the method of routing sessions to each canister:
v Equal - each canister receives the same number of sessions. The default
value is Equal.
Chapter 4. CX Pipeline Session Agents
267
v Biased - All traffic is delivered to the first canister until it can handle no
more, at which the excess traffic is routed to the second canister until it
can handle no more.
StartUpRouting
Routing information in the absence of Canister status.
LocalSSPort
Port number for local SearchServer. The default is the value stored in the
local registry.
InitTimeOut
Time in seconds that HBR waits for initialization, which is complete after
DecoupleEx is initialized. The default value is 1800 seconds (30 minutes).
HBRAppName
AppName from .cfg file in which the [HBR] section resides, which enables
HBR to be in a child pipeline. The default value is TeaLeafCSS_1966.
Configuring HBR Settings for Individual Canisters
In the following settings, X indicates the index number for the canister. See “Per
Processing Server” on page 266.
Setting Description
CanisterNameX
Name or IP address of the target canister.
CanisterPipeIDX
ID of the associated HBR_PipelineX.cfg so that HBR knows the child
pipeline associated with the canister.
CanisterAppNameX
AppName value from the HBR_PipelineX.cfg file, so that HBR knows the
Governor Status entry from the GovernorStatusEx command.
CanisterSSPortX
The search server port number for the target canister. The default value is
19000.
CanisterPerSecMaxX
Maximum hits/sec for the target canister, which overrides the default
global setting and enables the deployment of canisters with different
capacities. The default value is the global default value.
CanisterSSLogX
Whether HBR requests should be logged to the Search Server log. The
default value is False.
Canister Down Times
HBR needs to be apprised of scheduled canister down times. For each canister, you
can specify the daily or weekly times when HBR should wind down usage before
stopping the flow of hits to the canister, so that maintenance tasks can be
performed on it.
The following configurations describe multiple scheduled downtimes for the same
canister. Individual downtimes begin with the same identifier (CanisterOffline=1)
and may be appended with a unique extension (a, b) to specify multiple
downtimes.
268
IBM Tealeaf CX: Configuration Manual
Example configurations:
CanisterOffline1=Daily at 2300 for 10 minutes winddown 20 minutes
v Every day at 10:40 PM, stop the flow of new hits to this canister. At 11:00 PM,
stop the canister for 10 minutes.
CanisterOffline1a=Tuesday at 0200 for 10 minutes winddown 20 minutes
v Every Tuesday at 1:40 AM, stop the flow of new hits to this canister. At 2:00 AM,
stop the canister for 10 minutes.
CanisterOffline1b=Friday at 0500 for 10 minutes winddown 20 minutes
v Every Friday at 4:40 AM, stop the flow of new hits to this canister. At 5:00 AM,
stop the canister for 10 minutes.
Disabling HBR-Canister Connections
You can disable HBR connections to individual Canisters through the HBR
configuration files. However, for nonscheduled downtime, making these changes
without interrupting data capture and processing may be challenging. You can use
the following method instead.
Note: If you need to stop routing of hits to a Canister that is managed by HBR,
you can stop the Search Server service on the target machine. When HBR is
attempting to send hits to a server, it first queries Search Server. If Search Server is
inactive, it does not send hits and begins rerouting hits to another Canister. Wait
another 60 seconds to verify that HBR is no longer routing traffic to the Canister.
You can monitor traffic flow through the HBR report. See "System Status" in the
IBM Tealeaf cxImpact Administration Manual.
Configuring HBR Child Pipeline Settings
For each destination canister, you must configure a separate child pipeline.
Note: There must be a 1-to-1 correspondence between a child pipeline and a
destination Canister.
PipelineConfig1=HBR_Pipeline1.cfg
PipelineConfig2=HBR_Pipeline2.cfg
PipelineConfig3=HBR_Pipeline3.cfg
PipelineConfig4=HBR_Pipeline4.cfg
....
PipelineConfigN=HBR_PipelineN.cfg
Sample Configuration
[HBR]
....
MaxSessions=200000
DefaultPerSecMax=220
StartUpRouting=1:1-20; 2:21-40; 3:41-60; 4:61-80; 5:81-100
RoutingMethod=Equal
HBRAppName=TeaLeafCSS_1966
CanisterName1=utltea01
CanisterPipeID1=1
CanisterAppName1=TeaLeafHBR1
CanisterSSLog1=OFF
#CanisterOffline1=Daily at 0100 for 30 minutes winddown 15 minutes
CanisterName2=utltea02
CanisterPipeID2=2
CanisterAppName2=TeaLeafHBR2
CanisterSSLog2=OFF
#CanisterOffline2=Daily at 0100 for 30 minutes winddown 15 minutes
CanisterName3=utltea03
Chapter 4. CX Pipeline Session Agents
269
CanisterPipeID3=3
....
PipelineConfig1=HBR_Pipeline1.cfg
PipelineConfig2=HBR_Pipeline2.cfg
PipelineConfig3=HBR_Pipeline3.cfg
PipelineConfig4=HBR_Pipeline4.cfg
PipelineConfig5=HBR_Pipeline5.cfg
PipelineConfig6=HBR_Pipeline6.cfg
PipelineConfig7=HBR_Pipeline7.cfg
Main and Child DecoupleEx Configuration Tweaks
The following settings should be reviewed in the [DecoupleEx] section of the
TealeafCaptureSocket.cfg file.
Note: Verify that each DecoupleEx spool folder is unique. Do not allow Multiple
DecoupleEx instances sharing the same spool folder.
See “Extended Decoupler Session Agent” on page 252.
Setting Description
SpoolAtStartup=True
HBR needs approximately 15 seconds to poll the target canisters for their
health. If they are healthy, HBR stops any queuing and begins sending hits.
Note: This value must be set to true.
MaxOutMode=HITS
This value defines the metric by which HBR determines throughput for
individual canisters. Set this value to HITS.
MaxOutHitsPerSec=10000
This value defines the maximum number of hits of throughput for
individual canisters. The entered value should account for all child
pipelines, each of which feeds a canister. Set this value to a high number
initially, or regulation of hit distribution is out of HBR's control.
Tealeaf Session Agents
v “Adding a Session Agent” on page 226
v “Archive Session Agent” on page 227
v
v
v
v
v
"Attribute Indexing Session Agent" in the IBM Tealeaf CX Configuration Manual
“Canister Session Agent” on page 236
“Cookie Parser Session Agent” on page 238
“Data Drop Session Agent” on page 241
“Data Parser Session Agent” on page 246
v “Decouple Session Agent” on page 250
v “Extended Decoupler Session Agent” on page 252
v
v
v
v
v
v
v
“Extended Privacy Session Agent” on page 261
Health-Based Routing (HBR) Session Agent
“Inflate Session Agent” on page 271
“JSON Mobile Parser Session Agent” on page 275
“Managed Code Session Agent” on page 287
“Null Session Agent” on page 290
“Privacy Session Agent” on page 291
v “Real-Time Monitoring and Alert (RTA) Session Agent” on page 321
270
IBM Tealeaf CX: Configuration Manual
v
v
v
v
v
“Response Tags to Request Session Agent” on page 326
“RTA Split Session Agent” on page 328
“Sessioning Session Agent” on page 332
“Session Router Session Agent” on page 330
“Socket Session Agent” on page 335
v
v
v
v
v
v
v
“Statistics Logger Session Agent” on page 337
"Tealeaf Reference Session Agent" in the IBM Tealeaf CX Configuration Manual
“Tealeaf Reference Session Agent - Legacy Mode” on page 357
“Tealeaf Sessioning Session Agent” on page 360
“TimeGrades Session Agent” on page 366
“TLI Session Agent” on page 368
“URL Decode Session Agent” on page 382
Inflate Session Agent
The Inflate session agent performs multiple pipeline functions, including the
expansion of data compressed by a Web server for HTTP transfer. By default, this
session agent is always configured as part of every pipeline.
Note: For some deployments of the Processing Server, this session agent is
included in the default pipeline and is required. See “CX Pipeline Configuration”
on page 214.
Note: If you are capturing IP addresses in IPv6 format, to enable indexing and
searching for these addresses, you must do one of the following:
v Upgrade to PCA Build 3501 or later
v Deploy the Inflate session agent in each Windows processing pipeline.
Note: This session agent should appear before any session agent that may examine
the data in the HTTP Response, including Privacy, DataParser, and RTA.
Overview
Since this session agent is typically present and placed before any of the processing
session agents, Inflate session agent has been augmented with additional
functionality for performance and pipeline simplicity. It can also perform the
following functions:
v Unreqcancelled - This functionality can be used to identify false positives in
which a request appears to have been cancelled by the visitor. Typically, this
functionality can be managed by the Passive Capture Device, but it can be a
burden on the CPU. When enabled through the Inflate session agent, this
options allows for the offloading of this functionality, as the Inflate session agent
is already working with the Response buffer.
v Internationalization - To manage localization issues, the Passive Capture Device
can insert some buffer variables into the request related to internationalization. If
these variables are not present, the Inflate session agent adds them. This feature
requires no configuration. See "Internationalization Support" in the IBM Tealeaf
CX Installation Manual.
v Deflate - Optionally, the Inflate session agent can be configured to deflate
(compress) the HTTP response data, which is useful in pipelines that are
configured to forward captured hits across the network to other servers.
Chapter 4. CX Pipeline Session Agents
271
– The Inflate session agent replaces the Compress session agent, which has been
deprecated.
v IPv6 Request Data - To support the indexing and searching for IPv6 addresses,
the Inflate session agent inserts some request variables for IP addresses in
IPv6-compatible format. See “IPv6 Request Data” on page 274.
Note: This session agent must be used if compressed data is processed by session
agents other than the terminating session agents (Archive, Socket, or Null) or by
the Tealeaf Session Index Program.
Adding the Session Agent
Session agents can be added through the Pipeline Editor in TMS. See “Adding a
Session Agent” on page 226.
v For more information on the Pipeline Editor and TMS, see "Tealeaf Management
System" in the IBM Tealeaf cxImpact Administration Manual.
The remainder of this page describes configuration options and how to change
them through the TealeafCaptureSocket.cfg file stored on the server. These
settings are also available through the Pipeline Editor, which is the recommended
method for configuring session agents.
Configuration Settings
The following settings are available for the Inflate session agent.
v Display Name values are displayed in TMS, which is the recommended method
for configuring session agents. See "Tealeaf Management System" in the IBM
Tealeaf cxImpact Administration Manual.
v Name values are displayed in TealeafCaptureSocket.cfg.
Table 20. Inflate Session Agent
Display Name
Name
Description
Replace Response On Error
ReplaceResponseOnError
When set to True, an error
encountered while decompressing a
response that has a Content-Encoding
of gzip or deflate causes the
response body to be replaced with
valid HTML containing a descriptive
error message.
v The default value is True.
v When set to False, the original
response is retained when an error
occurs during decompression.
Note: When this value is set to
False and the decompression
operation fails, the following
message is inserted into the
request:
InflateFailed=True.
272
IBM Tealeaf CX: Configuration Manual
Table 20. Inflate Session Agent (continued)
Display Name
Name
Description
UnReqCancelled
UnReqCancelled
Request Cancelled hits occur when
the IBM Tealeaf CX Passive Capture
Application server cannot complete
the capture.
Typical reasons for a hit being
Request Cancelled is if the PCA
server did not receive a web server
response for the browser request or if
the size of the web server response
did not match the size specification
in the response header. In some
cases, a mismatch in the response
size does not indicate an incomplete
response. For example, an HTML
response contained a trailing </html>
tag or a proper XML close tag may
still be a complete response.
When this setting is set to True (the
default value), ReqCancelled hits
examine the response for a proper
closing tag. If one is found, the
session agent changes the
ReqCancelled value to False.
Max Inflate Size
MaxInflateSize
This setting specifies the maximum
response size to which this session
agent inflates a deflated or
compressed response. This setting is
a pipeline safety limit to prevent
inflation of very large responses. The
default value is 1536 KB.
Default Encoding
DefaultEncoding
When Mode is set to deflate, this value
indicates the default encoding
scheme to apply to the decompressed
text. The default value is iso-8859-1.
Compression Level
CompressionLevel
When Mode is set to deflate, this value
indicates the level of compression to
use when compressing. Compression
levels range from 1 (least) to 9
(most). The default value is 5.
Mode
Mode
This setting defines the operating
mode of the session agent.
v Inflate - Inflate session agent
decompresses HTTP response data.
v Deflate - Inflate session agent
compresses HTTP response data.
If neither value is explicitly
specified, the session agent
operates in Inflate mode.
Chapter 4. CX Pipeline Session Agents
273
IPv6 Request Data
Beginning in Build 3501, the IBM Tealeaf CX Passive Capture Application supports
the capture of IP addresses in IPv4 and IPv6 format. Depending on the detected
format, IP addresses are written into an IPv6-compatible format into the following
request variables:
v IPV6_REMOTE_ADDR
v IPV6_LOCAL_ADDR
If these variables are not present in the request, the Inflate session agent
automatically inserts them.
These request variables are then indexed for search purposes, enabling the
searching for IPv4 or IPv6 addresses through a single search field.
v For more information on these request variables, see "Support for IPv6" in the
IBM Tealeaf CX Installation Manual.
v For more information on end-to-end support for IPv6 in Tealeaf, see "Support for
IPv6" in the IBM Tealeaf CX Installation Manual.
Tealeaf Session Agents
v “Adding a Session Agent” on page 226
v “Archive Session Agent” on page 227
v
v
v
v
v
"Attribute Indexing Session Agent" in the IBM Tealeaf CX Configuration Manual
“Canister Session Agent” on page 236
“Cookie Parser Session Agent” on page 238
“Data Drop Session Agent” on page 241
“Data Parser Session Agent” on page 246
v “Decouple Session Agent” on page 250
v “Extended Decoupler Session Agent” on page 252
v
v
v
v
v
v
“Extended Privacy Session Agent” on page 261
“Health-Based Routing (HBR) Session Agent” on page 263
Inflate Session Agent
“JSON Mobile Parser Session Agent” on page 275
“Managed Code Session Agent” on page 287
“Null Session Agent” on page 290
v “Privacy Session Agent” on page 291
v “Real-Time Monitoring and Alert (RTA) Session Agent” on page 321
v
v
v
v
v
“Response Tags to Request Session Agent” on page 326
“RTA Split Session Agent” on page 328
“Sessioning Session Agent” on page 332
“Session Router Session Agent” on page 330
“Socket Session Agent” on page 335
v “Statistics Logger Session Agent” on page 337
v "Tealeaf Reference Session Agent" in the IBM Tealeaf CX Configuration Manual
v
v
v
v
274
“Tealeaf Reference Session Agent - Legacy Mode” on page 357
“Tealeaf Sessioning Session Agent” on page 360
“TimeGrades Session Agent” on page 366
“TLI Session Agent” on page 368
IBM Tealeaf CX: Configuration Manual
v “URL Decode Session Agent” on page 382
JSON Mobile Parser Session Agent
Note: In Release 8.5, Tealeaf introduced step-based eventing, in which all
client-based frameworks submit event information in a consistent JSON format. As
a result, this session agent is no longer used with the latest version of the
client-side capture frameworks.
v For Release 8.7, an upgrade of any Tealeaf client frameworks in use may be
required.
v For more information on the new implementation of capture from logging
frameworks, see "Step-Based Eventing" in the IBM Tealeaf Event Manager Manual.
The JSON Mobile Parser session agent parses plain-text JSON messages, which are
generated by the Tealeaf iOS or Android Mobile Logging Frameworks. When the
data is decoded, the session agent parses it for environment and event data, which
are added as name/value pairs on the resulting hits.
v The parser does not evaluate mobile web hits, which may be captured by one of
the supported client frameworks.
Note: The Tealeaf iOS and Android Mobile Logging Frameworks are a component
of the IBM Tealeaf CX Mobile license for Mobile App. please contact your IBM
Tealeaf representative.
Note: This session agent supports data from iOS and Android devices only.
Uses
This session agent is used by the client frameworks to generate hit data in sessions
based on submitted JSON messages, which is the legacy method. These versions
were introduced in Release 8.4 and have been superseded by the step-based
method of messaging.
Note: This session agent applies only to the legacy, hit-splitting method of
managing JSON messages from the client frameworks. If you have implemented
step-based eventing, introduced in Release 8.5, then this session is not needed in
your implementation.
Overview
The Tealeaf iOS/Android Mobile Logging Frameworks capture environment and
event data from iOS-based or Android-based mobile applications and submits
them to the Tealeaf servers for capture and processing. When the PCA has been
properly configured to process these hits, they are forwarded to the Windows
pipeline for decoding and analysis, the bulk of which is performed by this session
agent.
As each hit is received by the session agent, it is scanned for name/value pairs
that identify it as containing data from one of the supported Logging Frameworks.
v Any hits that do not contain the appropriate values are passed to the next
session agent without changes.
v When the session agent encounters an error during processing of a hit, such as
being caused by invalid logging data, the session agent produces a dump file,
and the Windows pipeline restarts.
Chapter 4. CX Pipeline Session Agents
275
v For more information on the required name/value pairs, see “Request
Identifiers.”
For hits that contain data submitted from a framework, the hit is parsed as
described in the following steps.
v JSON messages are split into multiple Tealeaf hits to make mobile native
application data accessible for eventing. The majority of the request data is
cloned from the original hit.
v Each hit may contain only unique JSON message types.
– A new hit is created if a message type is repeated.
Note: Hits may also split per session. Tealeaf Logging Frameworks can send
data from multiple sessions in a single message.
v The data is parsed into a C++ object representing the JSON message.
– If this step fails, an error is logged. The session agent produces a dump file,
and the Windows pipeline restarts.
v These additional sections are added to the request: AppEnv and MobileEvents,
containing environment and event data, respectively.
v After each Tealeaf hit is created, it is passed to the next session agent in the
pipeline for downstream processing.
v These steps are repeated for subsequent hits passing through the session agent.
Each packet submitted from the Logging Frameworks may be broken up within
the Tealeaf system into multiple hits composed of different views or screens from
the mobile native application.
v Tealeaf recommends using the DecoupleEx session agent after this one to throttle
delivery of hits to subsequent session agents and pipelines. See “Mobile Parser
Processing Pipeline” on page 277.
Note: It may be difficult to predict how much data is generated based upon the
capture of a mobile application using the Mobile Logging Frameworks. Tealeaf
recommends extensive load testing in a development environment prior to
deployment in production.
Prerequisites
Install Tealeaf Target page
The mobile application that is being monitored must be configured to submit
requests to a Tealeaf Target page, which acknowledges receipt of the submission to
enable capture and forwarding of client-side events to Tealeaf. See "UI Capture for
AJAX Installation and Implementation" in the IBM Tealeaf UI Capture for AJAX
Guide.
Note: IBM Tealeaf CX UI Capture for AJAX is only available to legacy users. New
users must use IBM Tealeaf CX UI Capture j2.
Request Identifiers
Hits that are generated and submitted by the Mobile Logging Frameworks must
have the following name/value pairs in the request:
HTTP_CONTENT_TYPE=<AnyContentTypeEndingwith>/json
HTTP_X_TEALEAF =DEVICE
X-Tealeaf-JSON-Version=N.N.N.N
276
IBM Tealeaf CX: Configuration Manual
where:
v DEVICE is set to Android or iOS
v NNNN is the JSON schema version
As each hit is received for processing, the session agent searches for the
HTTP_CONTENT_TYPE value.
v If the type is not ending with json, the hit is passed downstream unchanged.
v The device string from HTTP_X_TEALEAF=DEVICE is parsed and checked if DEVICE
matches Android or iOS. If not, the hit is passed downstream unchanged.
PCA Configuration
The PCA must be configured to capture the data type submitted from the Mobile
Logging Frameworks. In the Pipeline tab of the PCA Web Console, you must
specify the following:
v Any mobile pages submitted for capture should not appear in the Excluded File
Extensions list.
v The TealeafTarget page must be enabled for capture.
v Any special extensions related to your mobile application need to be included in
the Included File Extensions list.
v The following JSON POST types must be enabled for capture. These content
types must be verified or inserted in the Capture All Post Types configuration.
– text/json
– text/x-json
– application/json
– application/x-json
– See "PCA Web Console - Pipeline Tab" in the IBM Tealeaf Passive Capture
Application Manual.
Mobile Parser Processing Pipeline
The JSON Mobile Parser session agent can be deployed in any Tealeaf pipeline,
including child pipelines. Please observe the following considerations:
Note: This session agent should be deployed before any Privacy session agent in
the pipeline.
v See “Privacy Session Agent” on page 291.
v See “Extended Privacy Session Agent” on page 261.
Note: To sessionize hits from the mobile application, you must insert the
Sessioning session agent after this one, so that it can use the extracted SessionID
identifier from the MobileEnv section as the sessioning key. See “Sessioning Session
Agent” on page 332.
Pipelines are configured in the Pipeline Editor in the Tealeaf Management System.
v See "TMS Pipeline Editor" in the IBM Tealeaf cxImpact Administration Manual.
v See "Tealeaf Management System" in the IBM Tealeaf cxImpact Administration
Manual.
Chapter 4. CX Pipeline Session Agents
277
Mobile-Related Session Agents
The following session agents apply to the effective capture of application data
submitted from the Logging Frameworks deployed to mobile devices.
Table 21. Mobile Parser Processing Pipeline
Suggested
Order
Session Agent
Required for Framework
Description
1
JSON Mobile Parser
Y
Captures JSON-based events
submitted by the deployed
Tealeaf Logging Framework. For
more information, see JSON
Mobile Parser Session Agent.
2
Structured Data Mobile Parser
N
Captures customer data
submitted in JSON posts by the
mobile application.
This session agent is needed in
your mobile data pipeline only if
you are capturing customer data
from the mobile native
application.
3
Decoupler
N
The JSON Mobile Parser session
agent may generate multiple hits
for each hit passing through the
pipeline. To manage the sudden
increase in traffic downstream,
you may should consider
inserting the Decoupler session
agent downstream of the Mobile
Parser. For more information, see
“Decouple Session Agent” on
page 250.
4
Privacy
N
After the JSON session agents,
you should deploy the Privacy
session agent, so that you can
remove sensitive data that has
been exposed in clear-text JSON
messages by the parser. For more
information, see “Privacy Session
Agent” on page 291.
5
Sessioning
N
Generates the sessionization key
for sessions originating from the
mobile application using the
Logging Framework. For more
information, see “Sessioning
Session Agent” on page 332.
This session agent must be
placed after the JSON Mobile
Parser session agent in the
pipeline, as it uses the AppEnv
key SessionID for sessionization.
Note: If it is present, remove the Mobile Parser session agent, as it has been
deprecated and replaced by the JSON version.
278
IBM Tealeaf CX: Configuration Manual
Adding the Session Agent
Session agents can be added through the Pipeline Editor in TMS. See “Adding a
Session Agent” on page 226. For more information on the Pipeline Editor and TMS,
see "Tealeaf Management System" in the IBM Tealeaf cxImpact Administration
Manual.
The remainder of this page describes configuration options and how to change
them through the TealeafCaptureSocket.cfg file stored on the server. These
settings are also available through the Pipeline Editor, which is the recommended
method for configuring session agents.
Configuration Settings
[MobileJsonParser]
TypeName=MobileJsonParser
DLL=SessionAgentMobileJsonParser.dll
DownStreamConfigSection=TLTRef
LogLevel=Debug
EnableLogFile=true
LogKeepDays=30
OutputStats=true
StatsReportingInterval=60
Table 22. Configuration Settings
Display Name
Name
Description
Log Level
LogLevel
The Log level for the session agent
can be one of the following numeric
values.
v 0 - Errors only
v 1 - Warnings
v 2 - Info
v 3 - Performance
v 4 - Parsing debugging
v 5 - Function tracing
Commenting out the setting
disables logging. See “Logging” on
page 280.
Enable Log File
EnableLogFile
When set to true, a log file for the
session agent is written to the Logs
directory. See “Logging” on page 280.
Log Keep Days
LogKeepDays
Set the number of days of logging
files to retain. The default value is 30.
Output Stats
OutputStats
When set to true, statistical
information is generated from the
session agent at the interval defined
below.
Stats Reporting Interval
StatsReportingInterval
The interval in minutes at which
statistics are generated and reported
by the session agent. The default is
60 (one hour).
Chapter 4. CX Pipeline Session Agents
279
Logging
A log for this session agent is maintained in the Logs directory inside the Tealeaf
install directory.
Unhandled exceptions
If an exception is not handled, a message similar to the following is recorded in
the Windows Application Event Log.
Process dump file written to:
C:\Tealeaf\Logs\TeaLeafCaptureSocket.exe-(vX.X.X.XXXX)-YYYYMMDD-NNNNNN-NNNNNNNNNN.dmp
Please send this file along with the information below to Tealeaf customer
support, and delete the dump file when finished.
Exception <exception name and number> at address 0xADDR!
<source file name and line number>
Module: c:\tealeaf\SessionAgentMobileJsonParser.dll BaseAddr: 0xADDR
The dump file referenced in the above is written into the Logs directory.
Note: In the event of an unhandled exception, the pipeline terminates and restarts,
and any hits in the middle of processing are lost.
Mobile Name/Value Pairs Reference
Note: The following reference information applies to Tealeaf solutions that are
using the JSON Mobile Parser session agent and are not using step-based eventing.
v This parser is not available for Release 8.3. and earlier.
v Beginning in Release 8.5, Tealeaf introduces a generic JSON messaging format in
the client frameworks, which does not require this session agent. See "Tealeaf
JSON Object Schema Reference" in the IBM Tealeaf Client Framework Data
Integration Guide.
v Using the JSON-based message format, you can create events within Tealeaf. See
"Step-Based Eventing" in the IBM Tealeaf Event Manager Manual.
Example Request Data
AppEnv section example
This section is generated only if the corresponding data is present in the submitted
JSON message. This section may appear in each request of the session.
[AppEnv]
SessionID=9fb657a4a241d140d1e8c5c551c13752
SessionStartTime=1324065248277
For more information on these fields, see “AppEnv section” on page 281.
MobileEvents section example
This section is generated only if the corresponding data is present in the submitted
JSON message.
[MobileEvents]
CustomEvent_TimeOffset=60099007
CustomEvent_ScreenViewOffset=60099007
CustomEvent_CustomEventName=AlertDialog is Pressed
280
IBM Tealeaf CX: Configuration Manual
CustomEvent_CustomEventData=AlertDialog Button Pressed: OK
Control_TimeOffset=60101427
Control_ScreenViewOffset=60105000
Control_Id=-1
Control_Target.Type=LinearLayout
Control_Target.SubType=ViewGroup
Control_Location.x=0
Control_Location.y=118
Control_Location.width=480
Control_Location.height=117
Control_Event.Type=Click
Control_Event.SubType=
For more information on these fields, see “MobileEvents section” on page 283.
RequestBody
For replay purposes, the first hit of each session contains the [RequestBody]
section, which is the JSON data.
AppEnv section
The [AppEnv] section of the request contains information about the mobile
application and the device on which it's running.
Name/Value Pair
Description
SessionID=x
x is the model of the device in use (e.g. iPhone)
SessionStartTime=n
n is the starting time for the session in microseconds since January 1, 1970
GMT
ClientEnvironment Message
Description: Contains device-specific information. Appears at specific intervals in a
session.
ClientEnvironment
If available, the Environment name/value pairs are appended to [AppEnv] section.
v This data is repeated in any hits that are split and generated by the session
agent.
Description: Contains base client environment data consistent across all devices.
Name Prefix: ClientEnvironment
Name/Value Pair
Description
ClientEnvironment_OSVersion=x
x is the Device Operating System Version.
ClientEnvironment_Width=n
n is the width of the screen.
ClientEnvironment_Height=n
n is the height of the screen.
Chapter 4. CX Pipeline Session Agents
281
MobileEnvironment
Name Prefix: ClientEnvironment.MobileEnvironment
Description: Contains information about mobile specific environment.
Name/Value Pair
Description
ClientEnvironment_MobileEnvironment_TotalStorage=n
n is the amount of storage capacity (in bytes) on the device.
ClientEnvironment_MobileEnvironment_TotalMemory=n
n is the amount of memory (in bytes) on the device.
ClientEnvironment_MobileEnvironment_Locale=x
x is the current locale identifier (e.g. en_US).
ClientEnvironment_MobileEnvironment_Language=x
x is the current language identifier (e.g. en).
ClientEnvironment_MobileEnvironment_Manufacturer=x
x is the manufacturer of the device.
ClientEnvironment_MobileEnvironment_DeviceModel=x
x is the model of the device in use (e.g. iPhone).
ClientEnvironment_MobileEnvironment_AppName=x
x is the name of the application being logged.
ClientEnvironment_MobileEnvironment_AppVersion=n.n
Version of the mobile application
ClientEnvironment_MobileEnvironment_UserID=x
x is a hashed user ID for the user of the device.
ClientEnvironment_MobileEnvironment_OrientationType=x
x default orientation type for the device.
Android Environment
Name Prefix: ClientEnvironment.MobileEnvironment.Android
Description: Contains information about Android-specific environment.
Name/Value Pair
Description
ClientEnvironment_MobileEnvironment_Android_KeyBoardType=x
String Values:
v QWERTY
v NO_KEYS
ClientEnvironment_MobileEnvironment_Android_Brand=x
x is the Brand of device
ClientEnvironment_MobileEnvironment_Android_FingerPrint=x
x is the finger print of the device
Example
ClientEnvironment_OSVersion=2.3.4
ClientEnvironment_Width=0
ClientEnvironment_Height=0
ClientEnvironment_MobileEnvironment_TotalStorage=89245748
ClientEnvironment_MobileEnvironment_TotalMemory=3151234
ClientEnvironment_MobileEnvironment_Locale=English (United States)
ClientEnvironment_MobileEnvironment_Language=English
282
IBM Tealeaf CX: Configuration Manual
ClientEnvironment_MobileEnvironment_Manufacturer=motorola
ClientEnvironment_MobileEnvironment_DeviceModel=MB860
ClientEnvironment_MobileEnvironment_AppName=
ClientEnvironment_MobileEnvironment_AppVersion=1.0
ClientEnvironment_MobileEnvironment_UserID=fpgh48
ClientEnvironment_MobileEnvironment_OrientationType=PORTRAIT
ClientEnvironment_MobileEnvironment_Android_Brand=MOTO
ClientEnvironment_MobileEnvironment_Android_FingerPrint=
MOTO/olyatt/olympus:2.3.4/4.5.91/110625:user/release-keys
ClientEnvironment_MobileEnvironment_Android_KeyBoardType=1
MobileEvents section
MobileEvents Name/Value Pair Naming Conventions
The entries in the [MobileEvents] section of the request are named after the
message type on which they are reporting. Each name/value pair represents a data
member from a JSON object, so the name is constructed to represent the hierarchy,
but in a form that is usable for Tealeaf processing.
Every event has at least one entry:
Name/Value Pair
Description
<messageType>.TimeOffset=n
n is the timestamp offset for the event
<messageType>.ScreenViewOffset=n
n is the timestamp offset for the event since the context was loaded
The following is a list of the expected name/value pairs for each message type. If a
value is not populated by the client message, it is not displayed.
Control Message
Description: Contains User Interaction specific information.
Name Prefix: Control_Target
Description: Contains information about target UI element specific to the user
action.
Name/Value Pair
Description
Control_TimeOffset=n
n is the timestamp offset for the event
Control_ScreenViewOffset=n
n is the timestamp offset for the event since the context was loaded
Control_Target_Type=x
x is the type of UI control
Control_Target_SubType=x
x is the sub type of UI control if any
Control_Target_Id=x
x is the unique Id of the control
Control_Target_DwellTime=n
n is the time user spent on that UI control
Chapter 4. CX Pipeline Session Agents
283
Control_Target_CurrentState=x
x is the current state of UI control if any (Example: Current text in a text
box)
Control_Target_PreviousState=x
x is the previous state of UI control if any (Example: Initial text in a text
box before the event occurred)
Name Prefix: Control_Target_Position
Description: Contains information about target UI element's position relative to the
screen.
Name/Value Pair
Description
Control_Target_Position_x=n
n is x coordinate of UI control
Control_Target_Position_y=n
n is the y coordinate UI control if any
Control_Target_Position_width=n
n is the width of UI control
Control_Target_Position_height=n
n is the height of UI control if any
Example
Control_TimeOffset=60101427
Control_TimeOffset=60101427
Control_Target_Type=LinearLayout
Control_Target_SubType=ViewGroup
Control_Target_Id=0
Control_Target_DwellTime=3245
Control_Target_CurrentState=
Control_Target_PreviousState=
Control_Target_Position.x=0
Control_Target_Position.y=118
Control_Target_Position.width=100
Control_Target_Position.height=75
Control_Event_Type=Click
Control_Event_SubType=
ScreenView Message
Description: Contains the ScreenViewView visible to the visitor.
Name Prefix: ScreenView
Description: Contains information about current ScreenView's Load or Unload
operations.
Name/Value Pair
Description
ScreenView_TimeOffset=n
n is the timestamp offset for the event
ScreenView_ScreenViewOffset=n
n is the timestamp offset for the event since the context was loaded
ScreenView_LogicalPageName=x
x is the name of the context
284
IBM Tealeaf CX: Configuration Manual
ScreenView_Type=x
x is either LOAD or UNLOAD.
ScreenView_RenderTime=n
n is the time taken in milliseconds to render the context upon LOAD.
ScreenView_Referrer=x
x is the reference to the previous context that initiated the current context.
Example
ScreenView_TimeOffset=225
ScreenView_ScreenViewOffset=0
ScreenView_LogicalPageName=Tab2
ScreenView_Type=LOAD
ScreenView_RenderTime=22
ScreenView_Referrer=Tab1
Custom Event Message
Name Prefix: CustomEvent
Description: Contains custom event name and event data.
Name/Value Pair
Description
CustomEvent_CustomEventName=x
x is the name of custom event
CustomEvent_CustomEventData=x
x is the custom data from the event
Example
CustomEvent_TimeOffset=60099007
CustomEvent_ScreenViewOffset=0
CustomEvent_CustomEventName=AlertDialog
CustomEvent_CustomEventData= AlertDialog Button Pressed: OK
Client State Message
Name Prefix: ClientState.MobileState
Description: Contains mobile device state data which changes over time.
Name/Value Pair
Description
ClientState_MobileState_IPAddress=x
x is the name of custom event
v This value is 0.0.0.0 if the device is connected to a wireless WAN.
ClientState_MobileState_Battery=n
n is the battery level of the device
ClientState_MobileState_FreeMemory=n
n is the free memory available in Bytes
ClientState_MobileState_FreeStorage=n
n is the free storage available in Bytes
ClientState_MobileState_Orientation=n
n = 0, 90, 180,-180,-90
ClientState_MobileState_Carrier=x
x is the name of carrier to which the device is connected
Chapter 4. CX Pipeline Session Agents
285
ClientState_MobileState_NetworkReachability=x
x is the type of network the to which the device is connected. Examples:
ReachableViaWIFI, 3G, Edge
ClientState_MobileState_KeyboardState=x
x is Keyboard State HIDDEN_TRUE or HIDDEN_FALSE
Example
ClientState_TimeOffset=0
ClientState_ScreenViewOffset=0
ClientState_MobileState_IPAddress=92.68.34.114
ClientState_MobileState_freeMemory=228896768
ClientState_MobileState_FreeStorage=2147483647
ClientState_MobileState_Orientation=0
ClientState_MobileState_Carrier=Verizon
ClientState_MobileState_NetworkReachability=ReachableViaWiFi
Exception Message
Name Prefix: ClientException
Description: Exception logs are shown as follows.
Name/Value Pair
Description
ClientException_Name=x
x is the name of exception
ClientException_Description=x
x is the description of the exception
ClientException_Description_Exists=True
Description may have a carriage return. This can be used as a End Tag
sentinel when making a hit attribute.
ClientException_StackTrace=x
x is the stack trace left by the exception handler.
ClientException_StackTrace_Exists=True
Stack trace may have carriage return. This can be used as End Tag sentinel
when making a hit attribute.
Example
ClientException_Name=CrashTest
ClientException_Description=-[TProtoMonitoringLevelViewController crashme]:
unrecognized selector sent to instance 0x6656060
ClientException_Description_Exists=True
ClientException_StackTrace=-[TProtoMonitoringLevelViewController crashme]:
ClientException_StackTrace_Exists=True
Tealeaf Session Agents
v
v
v
v
v
“Adding a Session Agent” on page 226
“Archive Session Agent” on page 227
"Attribute Indexing Session Agent" in the IBM Tealeaf CX Configuration Manual
“Canister Session Agent” on page 236
“Cookie Parser Session Agent” on page 238
v “Data Drop Session Agent” on page 241
v “Data Parser Session Agent” on page 246
v “Decouple Session Agent” on page 250
286
IBM Tealeaf CX: Configuration Manual
v
v
v
v
v
“Extended Decoupler Session Agent” on page 252
“Extended Privacy Session Agent” on page 261
“Health-Based Routing (HBR) Session Agent” on page 263
“Inflate Session Agent” on page 271
JSON Mobile Parser Session Agent
v
v
v
v
v
v
v
“Managed Code Session Agent”
“Null Session Agent” on page 290
“Privacy Session Agent” on page 291
“Real-Time Monitoring and Alert (RTA) Session Agent” on page 321
“Response Tags to Request Session Agent” on page 326
“RTA Split Session Agent” on page 328
“Sessioning Session Agent” on page 332
v
v
v
v
v
v
“Session Router Session Agent” on page 330
“Socket Session Agent” on page 335
“Statistics Logger Session Agent” on page 337
"Tealeaf Reference Session Agent" in the IBM Tealeaf CX Configuration Manual
“Tealeaf Reference Session Agent - Legacy Mode” on page 357
“Tealeaf Sessioning Session Agent” on page 360
v “TimeGrades Session Agent” on page 366
v “TLI Session Agent” on page 368
v “URL Decode Session Agent” on page 382
Managed Code Session Agent
The Managed Code session agent (SessionAgentCLR) is a development framework
that enables custom functionality to be built on top of the pipeline using an
object-oriented development language, such as C# or VB.NET. For example,
Managed Code can be used to conduct external data lookups, develop custom data
filters and transformations, or invoke external actions.
Managed Code allows access to the following external resources:
v Microsoft .NET class library
v COM objects
v External DLLs
Note: SessionAgentCLR requires version 1.1 or higher of Microsoft's .NET
Framework. MS Visual Studio.NET 2003 or later is recommended for writing
and debugging.
SessionAgentCLR uses the following procedure:
v Loads an instance of the Common Language Runtime.
v Compares source file(s) to the assembly .DLL. May be compiled if .DLL is
missing or source is newer.
v Loads user assembly. Init method is called. The user code can do any needed
global initialization here.
v Calls the ProcessHit method for each hit. The user code can modify or drop hit,
or add new hit(s).
v Calls the Heartbeat method on each maintenance scan. Time-specific code can
execute at this time.
Chapter 4. CX Pipeline Session Agents
287
v Calls the Cleanup method on pipeline teardown. The user code can perform
global cleanup at this time.
Adding the Session Agent
Session agents can be added through the Pipeline Editor in TMS. See “Adding a
Session Agent” on page 226.
v For more information on the Pipeline Editor and TMS, see "Tealeaf Management
System" in the IBM Tealeaf cxImpact Administration Manual.
The remainder of this page describes configuration options and how to change
them through the TealeafCaptureSocket.cfg file stored on the server. These
settings are also available through the Pipeline Editor, which is the recommended
method for configuring session agents.
Configuration Settings_c
The following configuration options are available:
v Display Name values are displayed in TMS, which is the recommended method
for configuring session agents. See "Tealeaf Management System" in the IBM
Tealeaf cxImpact Administration Manual.
v Name values are displayed in TealeafCaptureSocket.cfg.
Table 23. Managed Code Session Agent
288
Display
Name
Name
Description
Assembly
DLL
AssemblyDLL
The name of the .DLL containing the
session agent assembly (compiled
session agent). This setting is also
used to specify the output .DLL name
if the CompileIfNeeded is set to True.
Assembly
Name
AssemblyName
Specifies the name of the assembly.
Typically, it is the same value as
AssemblyDLL, without the .DLL.
Class Name
ClassName
The name of the class that
implements the IHitHandler interface
for the session agent.
Compile If
Needed
CompileIfNeeded
When set to True, the timestamps for
all specified source files are compared
with the timestamp for the assembly
.DLL. If any source files have been
modified or if the assembly .DLL
doesn't yet exist, then the assembly
for the session agent is compiled.
This option should be set to False if
the source file is not available on the
server running this session agent.
Debug
Debug
Specifies whether to build the session
agent assembly in debug mode, if
CompileIfNeeded=True.
IBM Tealeaf CX: Configuration Manual
Table 23. Managed Code Session Agent (continued)
Display
Name
Name
Description
Assembly
Base Path
AssemblyBase
This setting is used to specify the
directory, relative to the Tealeaf
install directory, to use as the base
directory for searching for assembly
DLLs that are not in the Global
Access Cache (GAC).
Log File
LogFile
Specifies the name and optional path,
relative to the Tealeaf install
directory, of a log file for the
managed code session agent. Any
trace methods called in the session
agent code write to the specified log
file, if appropriate for specified
LogLevel.
Log Level
LogLevel
The level of verbosity used when
writing to the log file. Possible values
are error, warn, info, debug or off.
The default value is warn.
Include
Response
IncludeResponse
Specifies whether to pass the
response to the hit handler in the
session agent. If the response is not
examined or modified by the session
agent, then this value should be set
to False to improve performance.
Example Configuration
[Managed]
TypeName=Managed
DLL=SessionAgentCLR.dll
SourceFile=managed\source\testhandler.cs
AssemblyDLL=TestHandler.dll
AssemblyName=TestHandler
ClassName=TestHandler.TestClass
References=System.Data.dll, System.XML.dll
CompileIfNeeded=True
Debug=True
AssemblyBase=managed
HitObjectDLL=Tealeaf.Pipeline.dll
LogFile=managed\saclr.log
LogLevel=warn
DownStreamConfigSection=Null
# Add any additional config options here. They will be available to your code
# via the Tealeaf object.
Tealeaf Session Agents
v “Adding a Session Agent” on page 226
v
v
v
v
v
v
v
“Archive Session Agent” on page 227
"Attribute Indexing Session Agent" in the IBM Tealeaf CX Configuration Manual
“Canister Session Agent” on page 236
“Cookie Parser Session Agent” on page 238
“Data Drop Session Agent” on page 241
“Data Parser Session Agent” on page 246
“Decouple Session Agent” on page 250
Chapter 4. CX Pipeline Session Agents
289
v
v
v
v
v
“Extended Decoupler Session Agent” on page 252
“Extended Privacy Session Agent” on page 261
“Health-Based Routing (HBR) Session Agent” on page 263
“Inflate Session Agent” on page 271
“JSON Mobile Parser Session Agent” on page 275
v
v
v
v
v
v
v
Managed Code Session Agent
“Null Session Agent”
“Privacy Session Agent” on page 291
“Real-Time Monitoring and Alert (RTA) Session Agent” on page 321
“Response Tags to Request Session Agent” on page 326
“RTA Split Session Agent” on page 328
“Sessioning Session Agent” on page 332
v
v
v
v
v
v
“Session Router Session Agent” on page 330
“Socket Session Agent” on page 335
“Statistics Logger Session Agent” on page 337
"Tealeaf Reference Session Agent" in the IBM Tealeaf CX Configuration Manual
“Tealeaf Reference Session Agent - Legacy Mode” on page 357
“Tealeaf Sessioning Session Agent” on page 360
v “TimeGrades Session Agent” on page 366
v “TLI Session Agent” on page 368
v “URL Decode Session Agent” on page 382
Null Session Agent
The Null session agent terminates the capture pipeline if no action on the data is
necessary. This session agent is useful if there is no further need for the data.
Note: The Null session agent is a terminating session agent, so the
-DownStreamConfigSection option is not required.
Adding the Session Agent
Session agents can be added through the Pipeline Editor in TMS. See “Adding a
Session Agent” on page 226.
For more information on the Pipeline Editor and TMS, see "Tealeaf Management
System" in the IBM Tealeaf cxImpact Administration Manual.
The remainder of this page describes configuration options and how to change
them through the TealeafCaptureSocket.cfg file stored on the server. These
settings are also available through the Pipeline Editor, which is the recommended
method for configuring session agents.
Tealeaf Session Agents
v “Adding a Session Agent” on page 226
v “Archive Session Agent” on page 227
v "Attribute Indexing Session Agent" in the IBM Tealeaf CX Configuration Manual
v “Canister Session Agent” on page 236
v “Cookie Parser Session Agent” on page 238
v “Data Drop Session Agent” on page 241
290
IBM Tealeaf CX: Configuration Manual
v
v
v
v
v
“Data Parser Session Agent” on page 246
“Decouple Session Agent” on page 250
“Extended Decoupler Session Agent” on page 252
“Extended Privacy Session Agent” on page 261
“Health-Based Routing (HBR) Session Agent” on page 263
v
v
v
v
v
v
v
“Inflate Session Agent” on page 271
“JSON Mobile Parser Session Agent” on page 275
“Managed Code Session Agent” on page 287
Null Session Agent
“Privacy Session Agent”
“Real-Time Monitoring and Alert (RTA) Session Agent” on page 321
“Response Tags to Request Session Agent” on page 326
v
v
v
v
v
v
“RTA Split Session Agent” on page 328
“Sessioning Session Agent” on page 332
“Session Router Session Agent” on page 330
“Socket Session Agent” on page 335
“Statistics Logger Session Agent” on page 337
"Tealeaf Reference Session Agent" in the IBM Tealeaf CX Configuration Manual
v “Tealeaf Reference Session Agent - Legacy Mode” on page 357
v “Tealeaf Sessioning Session Agent” on page 360
v “TimeGrades Session Agent” on page 366
v “TLI Session Agent” on page 368
v “URL Decode Session Agent” on page 382
Privacy Session Agent
The Privacy session agent provides a rule-based means of blocking, encrypting or
replacing sensitive data in captured Web requests and responses. The Privacy
session agent can be deployed on the IBM Tealeaf CX server, a IBM Tealeaf CX
Passive Capture Application server, or individual Web servers.
Note: For some deployments of the Processing Server, this session agent is
included in the default pipeline and is required. See “CX Pipeline Configuration”
on page 214.
The Privacy session agent can block, encrypt, or replace sensitive data, drop hits
(or just response data from hits), as well as add, modify, or remove name/value
pairs in the request.
v Blocked Data: Blocked data is permanently replaced with a specified strike
character, which is repeated to match the length of the blocked data.
– The default strike character is X.
Note: This replacement is a non-reversible operation. Tealeaf recommends
only blocking sensitive data that never needs to be retrieved in the future.
v Encryption: Encryption is performed using a privacy key, which is assigned to a
specific NT group. Each privacy action can specify a key or group for
encryption. After the data is encrypted, the original data is blocked using a
different strike character to indicate that it has been encrypted. The encrypted
data is saved in the [Privacy] section in the request.
– The default strike character for encryption is @.
Chapter 4. CX Pipeline Session Agents
291
– You can assign privacy keys using TMS.
– When a session with data encrypted by Privacy session agent is replayed, the
IBM Tealeaf CX RealiTea Viewer or Browser Based Replay retrieves the
privacy keys for groups to which the current user belongs and decrypts only
those data items encrypted with the authorized keys.
Note: Fields that have been encrypted using privacy rules in the IBM Tealeaf
CX Passive Capture Application or Windows pipelines cannot be decrypted in
the Portal.
- These encrypted fields can be decrypted only during replay.
- As an alternative, you can leave the configured fields in unencrypted state
in the session data and then define privacy rules specifically to be applied
during session replay, permitting the display of the unencrypted data in the
Portal, as needed. See “On-Demand Privacy” on page 133.
v Replace Data: When data is replaced, a pre-configured replacement string is
inserted, or the data is removed, if no replacement string is specified. This
operation is non-reversible.
v Edit name/value pairs: You can also use the Privacy session agent to add,
modify or remove name/value pairs (a field name and its value) in the request.
This feature provides powerful options for manipulating the metadata used to
process hits.
Privacy session agent versions
Tealeaf currently supports two Privacy session agent session agents: [Privacy] and
[PrivacyEx]. The latter extends the functionality of the former.
Note: [Privacy] is an earlier version with a reduced feature set. When you enable
Privacy session agent in your pipeline, you should use [PrivacyEx].
The remainder of this section covers the [Privacy], including the Privacy Editor,
the TMS utility through which you configure your privacy rules.
v See “Accessing the Privacy Editor” on page 294.
Support for Mobile App
Note: Use of the Privacy or Extended Privacy session agent to block or mask
step-based JSON data submitted for capture from a Tealeaf client framework is not
supported in this release. To enable privacy, you must use the privacy solution
provided by the client framework. See "Data Privacy in Tealeaf Client Frameworks"
in the IBM Tealeaf Client Framework Data Integration Guide.
Adding and Configuring the Session Agent
Testing Privacy
Before you apply your privacy rules into the pipeline, you can test them using the
Tealeaf Privacy Tester utility. This utility should be a standard part of your privacy
workflow. See “Privacy Tester Utility” on page 390.
Testing Privacy in RTV
The IBM Tealeaf CX RealiTea Viewer includes an integrated Privacy Tester.
292
IBM Tealeaf CX: Configuration Manual
Note: When using data from RTV for testing your privacy rules, additional
configuration in RTV may be required. See "RealiTea Viewer - Privacy Tester" in
the IBM Tealeaf RealiTea Viewer User Manual.
Before You Begin
Before you enable the Privacy session agent, you should define its tests, rules, and
actions through the Transport Service\Privacy session agent configuration
node in TMS. See “Accessing the Privacy Editor” on page 294.
Adding the Session Agent
Session agents can be added through the Pipeline Editor. See “Adding a Session
Agent” on page 226.
Enabling the Privacy Session Agent
After you have developed and tested the rules, tests, and actions in your Privacy
session agent, you can enable it through the Transport Service\Transport Service
configuration node. See “Accessing the Privacy Editor” on page 294.
v After you have configured your Privacy session agent, it appears in the Pipeline
Status tab of TMS. See "TMS Pipeline Status Tab" in the IBM Tealeaf cxImpact
Administration Manual.
v You may need to schedule or execute an update to push the Privacy session
agent configuration to TMS slave servers. See "TMS Jobs Tab" in the IBM Tealeaf
cxImpact Administration Manual.
v For more information on the Pipeline Editor, see "TMS Pipeline Editor" in the
IBM Tealeaf cxImpact Administration Manual.
The remainder of this page describes configuration options and how to change
them through the TealeafCaptureSocket.cfg file stored on the server. These
settings are also available through the Pipeline Editor, which is the recommended
method for configuring session agents.
Basic Steps
The following steps provide a basic outline of how to enable the Privacy session
agent to your pipeline configuration. Each of the following steps references a
section for additional detail.
1. To enable encryption, edit the Search Server\Search Server configuration
using TMS to define privacy keys for groups that have access to encrypted
data. See “Configuring the Search Server” on page 107.
2. Create rules and actions in the Transport Service\Privacy session agent
configuration in TMS to perform the blocking and encryption actions desired.
See “Accessing the Privacy Editor” on page 294.
3. Add the Privacy session agent configuration section ([Privacy]) to the pipeline
configuration. See “Enabling Privacy through TMS” on page 317.
4. Specify this session agent as the DownStreamConfigSection for one of the
session agents currently in the pipeline.
5. Change the DownStreamConfigSection value for the [Privacy] section to
reference the session agent to which the previous session agent was originally
pointing.
6. Verify that the Privacy session agent configuration file (Privacy.cfg) is properly
configured before restarting the pipeline.
Chapter 4. CX Pipeline Session Agents
293
7. Restart the pipeline. Typically, restarting require a restart of the appropriate
service, such as the Tealeaf Transport Service. See "Tealeaf Management System"
in the IBM Tealeaf cxImpact Administration Manual.
8. When the restart is complete, check the application event log for errors.
v Any errors in the Privacy session agent configuration are logged as errors in
the application event log.
v In most cases where errors have occurred, the pipeline still successfully loads
and processes hits, but any rules or actions with an invalid configuration are
ignored.
Accessing the Privacy Editor
Through the Privacy Editor in TMS, you can configure the Privacy filter, which
applies a set of user-defined rules, tests, and actions to the pipeline traffic through
the Privacy or Extended Privacy session agent. For more information on TMS, see
"Tealeaf Management System" in the IBM Tealeaf cxImpact Administration Manual.
To access the Privacy Editor:
1. Login to the Portal as a Tealeaf administrator.
2.
3.
4.
5.
6.
From the Portal menu, select Tealeaf > TMS.
Drill-down on the Transport Service node for the server you wish to configure.
Click Privacy Filter configuration.
In the Config Actions panel, click View/Edit.
The Privacy Editor is displayed, showing the current set of privacy rules.
The Privacy Editor is divided into four sections:
v “Rules” are used to determined which hits to select for data blocking, encryption
or other Privacy action.
v “Tests” on page 298 are comparisons used to determine whether an associated
action should be taken upon evaluation.
v “Actions” on page 300 indicate the data in the hit to process and how to process
it.
v “Keys” on page 308 determine the privacy keys to utilize for encryption
processes.
The data in the Privacy Editor is available in Privacy.cfg.
Rules
Privacy rules are the mechanism by which hits are selected for data blocking or
encryption. The Privacy session agent interprets each rule against the hit data and
filters out content based on the rule specification. Rules are mechanisms for
grouping actions to fire based on the same condition. See “Actions” on page 300.
Note: When creating privacy rules that modify content on UpdatePanel pages, the
byte count for the unmodified page must be maintained in the modified page after
the modification has been applied. Otherwise, these pages do not replay correctly.
This limitation also applies to replay rules. See "RealiTea Viewer - Replay Rules" in
the IBM Tealeaf RealiTea Viewer User Manual.
294
IBM Tealeaf CX: Configuration Manual
Rule naming conventions
In the Rules configuration panel, each rule is defined in its own section. Rule
sections are named starting with [Rule1]. The next rule is [Rule2], which is
followed by [Rule3], and so on.
v Rules must be named with the Rule + Number format shown above or the
Privacy session agent does recognize them.
v Rules are evaluated in numeric order, not in the order listed in the file. For
example, if [Rule2] is listed before [Rule1], [Rule1] is still evaluated first.
v A maximum of 256 rules are supported by the Privacy session agent.
Rule tests
Each rule can have one or more tests, which are evaluated to determine whether to
process the actions associated with the rule.
v For a single condition to evaluate, you can define an embedded test in the
[Tests] section using the ReqField, ReqOp and ReqVal configuration options.
See “Tests” on page 298.
v To create multiple tests or to share a test among several rules, you can create
named tests and specify them in the order to be evaluated by using the Tests
configuration option.
v For examples of rule formats including tests and actions, consult the
Privacy.cfg file in the Tealeaf install directory.
Note: To perform any blocking or encryption, there must be at least one defined
rule. You can create a rule to process all hits by omitting the Tests configuration
option and any embedded test configuration options. See “Tests” on page 298.
Manipulating rules
v To add a rule, click Add Rule. See “Configuring rules” on page 296.
v To edit a rule, click Edit next to the listed rule. See “Configuring rules” on page
296.
v To change the order of rules listed in the Privacy session agent configuration,
click the up and down arrows.
v To delete a rule, click Delete next to the listed rule.
Chapter 4. CX Pipeline Session Agents
295
Configuring rules
Figure 30. Configuring rules
The configuration options for rules are as follows:
Option Description
Name
Enter a name for the rule. Rule names must be in the form of Rule +
Sequential Number. See “Rule naming conventions” on page 295.
ReqField
This option specifies the name of a field, the name portion of a
name/value pair, in the request file. The value of this field is used for
comparison. You may also apply one of following special field names:
296
IBM Tealeaf CX: Configuration Manual
TL_URLEXT - The file extension portion of the URL
TL_URLTAIL - The tail of the URL, which includes the last / in the URL
and everything following it
v TL_VIRTUALDIR - The virtual directory portion of the URL
v
v
ReqOp
ReqOp defines the comparison operation performed by this rule between
ReqField and ReqVal. The valid values for this option are the following:
v = - True if the field value equals ReqVal. String comparison is
case-insensitive
v != - True if the field value does not equal ReqVal. String comparison is
case-insensitive
v > - True if the field value is greater than ReqVal
v < - True if the field value is less than ReqVal
v contains - True if ReqVal is contained in the field value
v partof - True if the field value is part of (contained in) ReqVal
partoflist - True if the field value matches one of the values in ReqVal.
– The list of values in ReqVal can be delimited by semicolons or other
delimiter specified by the ListDelimiter property.
v exists - True if the request field exists. The ReqVal portion of the rule is
not required.
– For an example rule using the exists operator, see “Example Existence of a request field means deleting a request section” on page
316.
v null - True if the request field exists yet has no value. The ReqVal
portion of the rule is not required.
v
v
notnull - True if the request field exists yet has a value. No validation
is performed on the value. The ReqVal portion of the rule is not
required.
ReqVal
ReqVal specifies the value with which to compare the value of the field
specified by ReqField. This value can either be a literal value or a field
name.
v If a field name is specified, then the value of the field is used for the
comparison.
v To use a field name, you must specify ReqVal Is a Field=true for the
rule.
TestOp
Logical operator to use when multiple tests are specified. Possible values
are AND and OR. When TestOp=AND, all tests must return true for the actions
to be processed. If TestOp=OR the actions are processed if any of the tests
return true. If no value is specified, AND is applied as the default value.
Note: You may apply only one test operator to a single rule. If you require
combinations of AND and OR operators, they must be broken out into
multiple rules.
List Delimiter
The character used to separate list items in ReqVal when using the
PARTOFLIST ReqOp. The default is a semicolon ( ; ).
Chapter 4. CX Pipeline Session Agents
297
Case Sensitive
true or false value indicating whether the searches for field names should
be case-sensitive. Default is false. Setting this to true accelerates searches.
ReqVal Is a Field
true or false indicating whether ReqVal contains a field name.
Not
true or false value - if true then the result of the test evaluation is
inverted (logical NOT). See “Notes on NOT operator.”
Stop Processing
true or false value indicating whether to stop processing further rules if
this rule evaluates to true.
Enabled
true or false Value which specifies whether or not this rule is active.
Actions
One or more action names which correspond to the names of action
sections to process if this rule returns true.
v To add an action, select the action from the drop-down. Then, click Add.
v To remove an action from the list, select it and click Remove Selected.
v See “Actions” on page 300.
Tests
One or more test names which correspond to the names of test sections.
The specified tests are evaluated to determine whether the action(s) are
executed for the rule. If no test is specified, then the actions are executed
for every hit.
v To add a test, select the test from the drop-down. Then, click Add.
v To remove a test from the list, select it and click Remove Selected.
v See “Tests.”
Notes on NOT operator
Tests using the Not operator return true, when the field is not found for all
operators except the exists operator.
Note: If you are performing a not operator on a comparison test, you should first
check to see if the field exists before performing the comparison.
Tests
Privacy tests are comparison conditions that are evaluated to determine whether to
execute the actions for associated with a test.
v The name of a test must be unique among all section names.
v Each test can be used by any number of rules.
Manipulating tests
v To add a test, click Add Test. See “Configuring tests” on page 299.
v To edit a test, click Edit next to the listed test. See “Configuring tests” on page
299.
v To delete a test, click Delete next to the listed test.
– Some tests cannot be deleted.
298
IBM Tealeaf CX: Configuration Manual
Configuring tests
Figure 31. Configuring tests
The configuration options for Tests are the following:
Option Description
Name
Enter a name for the test. This name must be unique among all tests.
ReqField
This option specifies the name of a field, the name portion of a
name/value pair, in the request file. The value of this field is used for
comparison. You may also apply one of following special field names:
v TL_URLEXT - The file extension portion of the URL
TL_URLTAIL - The tail of the URL, which includes the last / in the URL
and everything following it
v TL_VIRTUALDIR - The virtual directory portion of the URL
v
v To enter another field name, select ...(enter in field to right). Enter
the name of the field in the provided textbox.
Note: Privacy test conditions cannot reference request fields that begin
with TL_. Fields that utilize these names are considered specific to
Tealeaf.
ReqOp
ReqOp defines the comparison operation performed by this rule between
ReqField and ReqVal. The valid values for this option are the following:
v = - True if the field value equals ReqVal. String comparison is
case-insensitive
!= - True if the field value does not equal ReqVal. String comparison is
case-insensitive
v > - True if the field value is greater than ReqVal
v
Chapter 4. CX Pipeline Session Agents
299
< - True if the field value is less than ReqVal
contains - True if ReqVal is contained in the field value
partof - True if the field value is part of (contained in) ReqVal
partoflist - True if the field value matches one of the values in ReqVal.
– The list of values in ReqVal can be delimited by semicolons or other
delimiter specified by the ListDelimiter property.
v exists - True if the request field exists.
v
v
v
v
Note: For the exists operator, you must enter a ReqVal, although this
value is ignored.
ReqVal
ReqVal specifies the value with which to compare the value of the field
specified by ReqField. This value can either be a literal value or a field
name.
v If a field name is specified, then the value of the field is used for the
comparison.
v To use a field name, you must specify ReqVal is a Field=true for the
rule.
ReqVal is a Field
If this option is set to true, then the value specified by ReqVal is
interpreted as a field name. The default value is false.
List Delimiter
The character used to separate list items in ReqVal when using the
partoflist ReqOp. The default value is a semicolon ( ; ).
Case Sensitive
Boolean value indicating whether the searches for field names should be
case-sensitive. Default value is false. Setting this to true accelerates
searches for this data.
Actions
Privacy actions identify the data to process and define the type of processing to
perform on it.
v Each action is defined in its own section. An action's name must be unique
among all section names.
v Each action can be used by any number of rules.
Buffered actions
When privacy actions are executed, the resulting changes are buffered. [Rule1] is
tested first, and if it evaluates to true, its action is buffered for later execution.
[Rule2], [Rule3], and all subsequent rules are tested, and their actions are buffered
in the order of evaluation as necessary. Each subsequent action is taken on the data
before it has been changed; it does not apply changes to data made by previous
actions.
There is one exception:
Note: For ReqSet, ReqAppend, and ReqDelete actions, which make changes to the
request data, the Privacy session agent examines buffered changes made by
previous ReqSet, ReqAppend, and ReqDelete actions, as well as the existing data. For
example, if two consecutive actions set a value for the request variable Foo in the
300
IBM Tealeaf CX: Configuration Manual
[appdata] section of the request, the second action overrides the first. However,
these actions cannot see any changes made by previous block or encrypt actions.
Manipulating actions
v To add an action, click Add Action. See “Configuring actions.”
v To edit an action, click Edit next to the listed action. See “Configuring actions.”
v To delete an action, click Delete next to the listed action.
– Some actions cannot be deleted.
Configuring actions
Figure 32. Configuring actions
The configuration options for actions are the following.
Chapter 4. CX Pipeline Session Agents
301
Name/Action section
Option Description
Name
Enter a name for the action. This name must be unique among all action.
Action
Identifies the action to be performed. The available actions are available:
v Block - Blocks the matched data using the specified strike character.
v Encrypt - Encrypts the matched data and masks it with the specified
strike character.
v Replace - Replaces the matched data with a specified text string.
v DropHit - Drops the current hit. No further action is taken.
v DropResponse - Drops the response from the current hit.
v ReqSet - Sets or replaces the value for the specified name/value pair in
the request. Creates the name/value pair if it doesn't exist. Also creates
the specified section if it doesn't exist.
– Actions of this type are buffered. See “Buffered actions” on page 300.
v ReqAppend - Appends to the value of the specified name/value pair in
the request. Creates the name/value pair if it doesn't exist. Also creates
the specified section if it doesn't exist.
– Actions of this type are buffered. See “Buffered actions” on page 300.
v
ReqDelete - Removes the specified name/value pair completely from
the request. This does not remove the section, even if it is empty.
– Actions of this type are buffered. See “Buffered actions” on page 300.
Encryption Key
When Action is set to Encrypt, the Encryption Key option is used to
specify the key ID of the privacy key to use for encryption. This ID should
correspond to the key ID for the group whose members should be able to
decrypt the data when replaying the session.
Note: To specify the encryption key, either Key or Group may be used, but
not both.
v See “Configuring the Search Server” on page 107.
Group
When Action is set to Encrypt, the Group option is used to specify the
group name whose privacy key is used for encryption and whose members
should be able to decrypt the data when replaying the session. The
specified group must already have a privacy key using TMS and must be
specified in the format domain\groupname. For example, a group named
admin in the Windows domain operations is specified as follows:
Group=operations\admin
Note: To specify the encryption key, either Key or Group may be used, but
not both.
Destination section
Option Description
Section
The Section option is used to identify the name of the section containing
the data to process. It can be one of the section names in the request file
(e.g., [env]) or one of the following reserved names:
302
IBM Tealeaf CX: Configuration Manual
response - Specifies that the response should be searched for the
specified data.
v urlfield - Performs the action for the specified Value Name(s) (or all if
Value Name is omitted) for values in the urlfield section,
QUERY_STRING, query string in RawRequest (if present), query string
in HTTP_REFERER and the Referer request header, and request body in
RawRequest (if present). The name of the urlfield field(s) to process
should be specified using Value Name.
v cookie - Performs the action for the specified Value Name(s) (or all if
Value Name is omitted) for values in the cookie section, HTTP_COOKIE
and HTTP_SET_COOKIE name/value pairs, Set-Cookies headers in the
ResponseHeader section (if present), Set-Cookie headers in the response,
and the Cookie header in the RawRequest section (if present). The name
of the cookie(s) to process should be specified using Value Name.
v
Note: If a Section is not specified in an action, then the entire request
buffer is used.
Note: When editing a Section value in raw mode through TMS, do not
use double-quotes (") in the Section name.
Ignore Special
This Boolean value indicates whether to ignore special handling when
urlfield or cookie is specified for the Section (see above).
v When true, Start Pattern can be used in the [urlfield] and [cookie]
sections.
v The default value is false.
Field
The Field option is used to optionally specify one or more
comma-separated field names. If both Field and Value Name are omitted,
then the entire section (specified by the Section parameter) is blocked or
encrypted.
Note: When blocking or encrypting an [xmlN] section of the request, you
cannot use Field and Value Name combinations to specify the data, due to
the different formatting in these sections. You must use Start Pattern and
Start Pattern RE to specify the content to block or encrypt.
The value of Field can either be a field name (name portion of a
name/value pair) or one of the following reserved names:
v
body:
– If Section=response, then the body of the response is processed, not
including response headers.
– If Section=RawRequest and the RawRequest section is present, then
the request body is processed, if it is present.
v To include a specific header in the response, enter the name of the
header for the Field value.
Note: To apply privacy to response header fields, omit the colon from
the field name. For example, use x-mydatafield, instead of
x-mydatafield:.
v Leave Field value empty to include the entire header section.
Value Name
Value Name is used to optionally specify one or more value names.
Chapter 4. CX Pipeline Session Agents
303
v If Section=urlfield, then this option specifies the urlfield names to be
processed.
v If Section=cookie, then this option is used to specify the cookie(s) to
process.
Note: When blocking or encrypting an [xmlN] section of the request,
you cannot use Field and Value Name combinations to specify the data,
due to the different formatting in these sections. You must use Start
Pattern and Start Pattern RE to specify the content to block or encrypt.
v Else, Value Name specifies the name portion of a name/value pair
within the value of a request field or response header (if
Section=response).
Invert Action
true or false value indicating whether to invert the action. When enabled,
this option performs the action on all Fields or Value Names except the
ones specified.
v If Value Name is specified, then all except the name(s) specified in Value
Name are processed.
v If Value Name is not specified then the name(s) specified for Field is/are
excepted from the action.
Note: This can only be used with Block, Encrypt and Replace actions.
Start Pattern may not be used with an invert action.
Pattern Expression section
Option Description
Start Pattern
Start Pattern is used for text matching within regions of data, such as the
response body, an XML block in the request, or a long value for a
name/value pair. The data (specified by Section, Field and Value Name) is
searched for the string specified by Start Pattern. If Start Pattern is used,
then you must also specify either End Pattern or Length, unless you set
Inclusive to true. When Inclusive=true, then the Start Pattern and
optional End Pattern are blocked/encrypted as well. This option is useful
for blocking or encrypting a constant data string. If Inclusive=false, then
the Start Pattern is not processed.
End Pattern
The End Pattern option specifies the string pattern which signals the end
of the data matched by a Start Pattern. All data from Start Pattern to End
Pattern is processed, if Inclusive=true. If Inclusive=false, the pattern
strings are not included.
Regular Expression?
If the Start Pattern or End Pattern value represents a regular expression,
set this value to true.
Inclusive
The Inclusive option identifies whether to block or encrypt the Start
Pattern and End Pattern (if used), along with any data processed as part of
a Start Pattern search. The default value is false.
Repeat Count
For actions with a Start Pattern, this option specifies how many instances
of data matching the pattern to process.
304
IBM Tealeaf CX: Configuration Manual
Replacement section
Option Description
Strike Character
Strike Character is used to replace the original data that is blocked or
encrypted with an alphanumeric character. The following values cannot be
used as Strike Character:
v . - (period)
v , - (comma)
v / - (forward slash)
v (backslash)
v [ - (left square bracket)
v
v
v
v
]
|
’
"
-
(right square bracket)
(pipe)
(single quote)
(double quote)
Strike Length
Strike Length is used to specify the length in bytes of the matched data to
strike. This option is the number of Strike Character characters used to
replace the original data (if Action=Block or Action=Encrypt). If Strike
Length is longer than the original data length, then additional strike
characters are added. If Strike Length is shorter than the original data
length, then Strike Length characters are replaced with the Strike Character
and the remaining data is removed.
If Strike Length is a negative number, then the number of characters
represented by the absolute value of Strike Length is retained. For
example, to leave the last four characters of a value untouched, set Strike
Length=-4.
Blocking Mask
An optional regular expression that specifies which characters in the found
data are replaced with the strike character. All characters within a group,
as defined by parentheses, in the regular expression are replaced with the
strike character. Characters that match part of the pattern outside of a
group are not replaced. This option does not apply to Replace actions.
For example, the following mask would block the numbers in a Social
Security Number, leaving the dashes visible:
BlockingMask=([0-9]
{3}
)-(--[0-9]{2}
-)-([0-9]
{4})
The following example leaves the first 4 digits of a credit card number
visible:
BlockingMask=[0-9]{4}
([0-9]\*)
Blocking Mask is used in lieu of Strike Length. You may use one or the
other, but not both.
Chapter 4. CX Pipeline Session Agents
305
Note: Be careful when using Blocking Mask. If the data does not match the
regular expression specified for Blocking Mask then the data is not blocked
or encrypted.
Replace String
The string used to replace the original data when Action=Replace.
Matching Options section
Option Description
Case Sensitive
true or false value indicating whether the searches for should be
case-sensitive. Default is false. Setting this to true accelerates searches.
Length (bytes)
Used in lieu of an End Pattern, the Length option specifies the length of
the data (in bytes) to process following a matched Start Pattern. If
Inclusive=true, then the length of the Start Pattern is not taken into
account, even though it is also processed.
Request Operations section
Option Description
ReqSet Section
This option is used to specify the section for the name/value pair for a
ReqSet, ReqAppend or ReqDelete action. ReqSet Section is required for
these three actions.
ReqSet Field
ReqSet Field specifies the name of a name/value pair for a ReqSet,
ReqAppend or ReqDelete action. ReqSet Field is required for these three
actions.
ReqSet Result
When the start pattern is a regular expression, this option is used to
produce a formatted value for a ReqSet or ReqAppend action. The Start
Pattern expression should contain one or more "groups", defined by
parentheses within the regular expression. ReqSet Result is a string
containing literal text and placeholders for the data captured by the start
pattern. For example:
Start Pattern=name="(.*?)" value="(.*?)"
ReqSet Result=Field
{g1}
value:
{g2}
Results in a value like the following:
Field-Foo-value: Bob
The first placeholder (g1) is replaced with the value from the first group in
the regular expression. g2 gets the second value, and so on. The result
string is then used as the value for the ReqSet or ReqAppend action.
MD5
306
The MD5 true/false setting denotes whether the resulting data captured by
the rule should be MD5 encoded.
IBM Tealeaf CX: Configuration Manual
Note: The MD5 option can be applied only if the Extended Privacy session
agent is used. For more information, see “Extended Privacy Session Agent”
on page 261.
v The default value is false.
Checksum
The Checksum true/false setting denotes whether the resulting data
captured by the rule should have an Adler32 checksum applied to it. This
checksum handles several cases not traditionally handled by checksums
such as multiple errors that sum to 0 or rearranging of characters in the
sequence.
The Checksum value is useful for comparing sensitive data where the user
wants a low possibility of reverse lookup to obtain the original value. A
good application of the Checksum value is to allow comparison of multiple
attempts at entering a password. If the user mis-types the password from
hit to hit, the Checksum will allow this case to be recorded without the
password being revealed. In simply blocking the password data, you
would not be able to compare subsequent hits to reveal the multiple
attempts at entering the password.
v The default value is false.
Note:
v For ReqSet and ReqAppend, the value to set or append can be specified a couple
different ways:
1. You can use a literal string by setting Replace String to the desired text.
2. You can pull data from the request or response using Section, Field, Value
Name, Start Pattern or End Pattern or both.
v When using Start Pattern with one of these actions, the Repeat Count is always
set to 1, which means that the first match is always used.
v Ignore Special is always true for these actions when Section is specified. There is
no special handling for the urlfield or cookie sections with these actions.
v To clear the value for a field (name/value pair) without removing the entire
field, set Replace String to an empty value:
Replace String=
v All carriage-returns and linefeeds in the value string are replaced with \r and
\n, respectively.
v Privacy changes are queued and applied after all actions are complete, which
means that actions normally see the original data. ReqSet, ReqAppend and
ReqDelete keep track of field additions, changes and deletions, so multiple
changes to a single field can be done safely. For example, you can add a field
and then concatenate additional data to the value. Changes made to field values
are best done using ReqSet and ReqAppend.
– Since the Replace action can affect any arbitrary piece of data in the request
or response, it is not included in this change tracking.
v When using Field or Value Name with ReqSet or ReqAppend, you should
specify only a single field or value name. If there are multiple names, the value
for the last found item is used.
v For a ReqSet or ReqAppend, you should avoid specifying only a section to
retrieve the value, which results in the value from the last field (name/value
pair) in the section used for the ReqSet or ReqAppend.
Chapter 4. CX Pipeline Session Agents
307
Keys
The optional [Keys] section may be used to explicitly define privacy keys along
with their encrypted value.
Note: This option is normally used only when the Privacy session agent is running
on a machine other than the IBM Tealeaf CX server where the defined privacy keys
are not directly accessible. In this case, the key IDs and encrypted key values must
be copied from TMS to the Privacy session agent configuration file, which is then
copied to the target machine.
You can add keys to the [Keys] section by clicking on the Add Key button in the
Privacy Filter configuration editor.
Note: Do not rename a privacy key after you have created it. The encrypted value
contains a reference to the name and cannot be modified after creation.
The key name and value should be obtained from keys generated by the Search
Server configuration editor in the Tealeaf Management System. See “Privacy Keys”
on page 115.
See "Tealeaf Management System" in the IBM Tealeaf cxImpact Administration
Manual.
Pre-configured Filters
Tealeaf provides a number of pre-configured data privacy filters in the default
Privacy configuration. Through TMS, you can enable, edit, and test the rules,
actions, and tests for these filters.
The following sections document two pre-configured filters.
Blocking Data Filter
By default, Tealeaf includes rules and actions to recognize specific HTML
comments in the response data and to block the data between them. Data may be
bracketed by the web application in the following manner:
Your Social Security No. is <!--TLTIHB-->123-12-1234<!--TLTIHE-->
When this data filter is enabled, the data is rendered in Tealeaf as the following:
Your Social Security No. is <!--TLTIHB-->XXXXXXXXXXX<!--TLTIHE-->
Note: Tealeaf provides a utility for testing privacy filters. You may wish to use this
utility for developing and testing this filter prior to deploying it through TMS. See
“Privacy Tester Utility” on page 390.
1. Open the Privacy filter through TMS. See “Accessing the Privacy Editor” on
page 294.
2. In the Privacy Editor, you must enable the action TextBlockTags. Find the entry
and click Edit.
a. In the Action, the Start Pattern and End Pattern values should match the
HTML tags above.
b. If there is whitespace between the tags that must be factored, you must
apply a regular expression:
308
IBM Tealeaf CX: Configuration Manual
Note: Use of a regular expression in a privacy rule is an expensive
operation. They should be avoided wherever possible. Instead, try to
remove the whitespace between the tags.
1) Enter the following expression in the Start Pattern text-box and click the
Regular Expression? checkbox:
<!--[ \t\r\n]*TLTIHB[ \t\r\n]*-->
2) Enter the following expression in the End Pattern text-box and click the
Regular Expression? checkbox:
<!--[ \t\r\n]*TLTIHE[ \t\r\n]*-->
c. By default, the replacement character for each character between the tags is
X. To use a different character, enter a value in the Strike Character textbox.
d. Review the other listed values.
e. Click OK.
3. Now, you must configure Rule 1 to execute this action.
a. Under the Rules section, find Rule 1. Click Edit.
b. Verify that the Enabled checkbox is selected.
c. From the Actions drop-down, select TextBlockTags. Then, click Add.
d. The TextBlockTags action has been added to the rule.
e. Review the other listed values.
f. Click OK.
4. For this filter, there are no Tests to configure.
5. Click Save. The TextBlockTags action has been enabled for Rule 1.
6. Create a TMS task to assign this configuration to all servers immediately. See
"TMS Jobs Tab" in the IBM Tealeaf cxImpact Administration Manual.
For more information on how to build web applications to utilize this filter and
multiple levels of data security, see "Building Web Applications with Tealeaf in
Mind" in the IBM Tealeaf CX Installation Manual.
Encrypting Data Filter
Similar to the previous section, Tealeaf can be configured to recognize specific
HTML comments in the response data and to encrypt the data between them. Data
may be bracketed by the web application in the following manner:
Your Social Security No. is <!--TLTENB-->123-12-1234<!--TLTENE-->
When this data filter is enabled, the data is rendered in Tealeaf as the following for
Tealeaf users who do not have the appropriate permissions:
Your Social Security No. is <!--TLTENB-->@@@@@@@@@@<!--TLTENE-->
Tealeaf users with the appropriate user group permissions can see the data.
Note: Tealeaf provides a utility for testing privacy filters. You may wish to use this
utility for developing and testing this filter prior to deploying it through TMS. See
“Privacy Tester Utility” on page 390.
To create an encrypting filter for a specific set of users, please complete the
detailed steps listed below.
Before you begin
If you have not done so already, create the user group that contains the users who
can see the data.
Chapter 4. CX Pipeline Session Agents
309
1. Add the Tealeaf users to the group.
2. Generate a privacy key and assign it to that group. See “Generating privacy
keys” on page 116.
3. Copy this value to the keyboard for later use.
In TMS
Note: Before you complete these steps, you should check to see if this Action has
already been included in your Tealeaf system. Depending on your current build
and whether you have upgraded it from a previous version, this Action may
already be available for you. You may be required to assign the privacy key for the
action. See “In Privacy.cfg” on page 311.
1. Open the Privacy filter through TMS. See “Accessing the Privacy Editor” on
page 294.
2. In the Privacy Editor, you must create the action. In the Actions section, click
Add Action.
a. Provide a name for the action, such as TextEncryptTags.
b. From the Action drop-down, select Encrypt. Additional options may appear.
c. For the Key value, paste in the value that you created for the privacy key
above.
d. In the Group textbox, enter the name of the group that can see the data.
e. From the Section drop-down, select response.
f. The Start Pattern and End Pattern values should match the HTML tags
below.
v Set the Start Pattern: <!--TLTENB-->.
v Set the End Pattern: <!--TLTENE-->.
g. If there is whitespace between the tags that must be factored, you must
apply a regular expression:
Note: Use of a regular expression in a privacy rule is an expensive
operation. They should be avoided wherever possible. Instead, try to
remove the whitespace between the tags.
1) Enter the following expression in the Start Pattern textbox and click the
Regular Expression? checkbox:
<!--[ \t\r\n]*TLTENB[ \t\r\n]*-->
2) Enter the following expression in the End Pattern textbox and click the
Regular Expression? checkbox:
<!--[ \t\r\n]*TLTENE[ \t\r\n]*-->
h. By default, the replacement character for each character between the tags is
X. Typically, this character is reserved for blocking actions. Set this value to
@ in the Strike Character textbox.
i. Review the other listed values.
j. Click OK.
3. Now, you must configure Rule 1 to execute this action.
a.
b.
c.
d.
e.
f.
310
Under the Rules section, find Rule 1. Click Edit.
Verify that the Enabled checkbox is selected.
From the Actions drop-down, select TextEncryptTags. Then, click Add.
The TextEncryptTags action has been added to the rule.
Review the other listed values.
Click OK.
IBM Tealeaf CX: Configuration Manual
4. For this filter, there are no Tests to configure.
5. Click Save. The TextEncryptTags action has been enabled for Rule 1.
6. Create a TMS task to assign this configuration to all servers immediately. See
"TMS Jobs Tab" in the IBM Tealeaf cxImpact Administration Manual.
In Privacy.cfg
In the Privacy.cfg configuration file, the action looks like the following:
[TextEncryptTags]
Action=Encrypt
Key=DemoKey01
Section=response
Field=body
StartPattern=<!--TLTEHB-->
EndPattern=<!--TLTEHE-->
In the above configuration, the value DemoKey01 must be replaced with the privacy
key used to decrypt the hidden data. See “Generating privacy keys” on page 116.
For more information on how to build web applications to utilize this filter and
multiple levels of data security, see "Building Web Applications with Tealeaf in
Mind" in the IBM Tealeaf CX Installation Manual.
Additional Pre-configured Filters
Additional filters have been provided in the Tealeaf Privacy.cfg configuration file.
v See “Accessing the Privacy Editor” on page 294.
Example Filters
The following section provides examples for how to use Privacy session agent to
block or remove text.
Example - Filtering Employee Session Data
If your employees are regularly using your enterprise website, you may find it
useful to filter out their session data from reporting while still capturing the
information.
In the following solution, internal employee visitors are connecting to the company
website from the same IP address (aaa.bbb.ccc.ddd). Through Privacy.cfg
configuration, Tealeaf can universally identify the requesting application
(TLT_APPLICATION_NAME) for employees with the value Employee.
Note: This solution must be deployed in the Tealeaf pipeline before the Tealeaf
Reference session agent is applied.
In Privacy.cfg, make the following changes:
[Rule1]
ReqField=REMOTE_ADDR
ReqOp=EQ
ReqVal=aaa.bbb.ccc.ddd
Actions=Employee
[Employee]
Action=ReqSet
ReqSet Section=appdata
ReqSet Field=TLT_APPLICATION_NAME
Replace String=Employee
Chapter 4. CX Pipeline Session Agents
311
After you have completed the above configuration, be sure to enable the Employee
value:
System\Reference_Application.txt A xx employee
To filter employee sessions:
v Employee sessions can then be easily filtered by Tealeaf users as needed based
on TLT_APPLICATION_NAME=Employee.
v To find employee sessions, use Tealeaf search builder. In the
TLT_APPLICATION_NAME value, enter Employee.
v All existing reports can be filtered for employee session data by using the
Application Filter in charts.
Note: The Windows Privacy.cfg file contains many examples of filtering
operations.
Example - Text Blocking
Text blocking can be used to sanitize sensitive data such as credit card numbers or
passwords from captured data that was used in earlier versions of IBM Tealeaf CX.
In addition to the extended functionality, the Privacy session agent provides
default rules and actions that emulate the behavior of the old Text Blocking session
agent.
Note: By default, the PCA is configured to sanitize all user input data from form
fields for security purposes. If needed, you can disable this setting through the
PCA Web Console and manage data privacy for fields on an individual field basis.
This sanitization is managed through the TextBlockURLFields action configured by
default in Rule 1. See "PCA Web Console - Rules Tab" in the IBM Tealeaf Passive
Capture Application Manual.
Note: Tealeaf customers are responsible for determining which information to
sanitize, identifying the fields and locations of the information, implementing
Privacy session agent rules and actions (and optional metadata tags), and
maintaining these settings over time.
v The following sections describe how to block specific data fields in the request
and response. By default, Tealeaf provides filtering rules and actions to block
text in the response, which can be modified and enabled to meet your web
application requirements. See “Blocking Data Filter” on page 308.
Method 1: Request File Changes
To sanitize sensitive data in URL fields you can use the
TextBlockURLFields_WhiteList action in the provided Privacy session agent
configuration file (Privacy.cfg). By default, this action is run as part of Rule1.
To identify the fields to block, specify the field names in the Value Name option in
the TextBlockURLFields_WhiteList action.
Method 2: Response File Changes
All sensitive field names (e.g., primaryApplicant_SocialSecurityNumber) must be
added to the TextBlockURLFields_WhiteList action (or similar Privacy session
agent action) in order to block users from viewing this information in the
Request/Response view of the IBM Tealeaf CX RealiTea Viewer.
312
IBM Tealeaf CX: Configuration Manual
Method 3: Multi-Line Text Blocking in Response
Suppose you have the following HTML in the response that you would like to
block:
<b>Account Number: </b>
7777777777
</td>
You can create the following privacy action section to block this text:
[BlockAccountNumber]
Action=Replace
Section=response
Field=body
StartPattern=<b>Account Number:
EndPattern=</td>
Inclusive=True
ReplaceString=<b>Account Number: XXXXXXXX </b> </td>
Example - Enabling Search of Encrypted or Blocked Fields
In some situations, you may wish to enable a restricted set of users to search
sensitive data that has been encrypted or blocked. You can create privacy filters to
copy the sensitive data to an MD5-hashed field and then encrypt or block the
original field. Then, you can configure a search template to include the new
version of the field and to apply MD5 to the search term to return the original
value.
Note: The MD5 option can be applied only if the Extended Privacy session agent
is used. For more information, see “Extended Privacy Session Agent” on page 261.
Limitations
Note: The following steps do provide a means of accessing blocked or sensitive
data that you might otherwise wish to protect. If you are concerned about access to
this newly created field, please do the following:
v Review the users and groups that have access to configuring search templates
through their menu profiles. See "CX User Administration" in the IBM Tealeaf
cxImpact Administration Manual.
v You may be able to create one or more events to segment access to the search
field by user groups. See “Data Segmentation” on page 128.
Search fields that have an MD5 applied to them must be exact matches.
v Wildcards are not available.
v Hyphens and other punctuation may be removed in the search field. For
example, the original data:
4217-5689-12
becomes the following MD5-hashed field value:
4217568912
Users who are searching an MD5-hashed field must be informed of these
limitations.
Configuration
Suppose that a contact phone number field needs to be enabled via MD5 search
and blocked from common access. This value is stored in the request as
CONTACT_PHONE. Values are stored in XXX-XXX-XXXX format.
Chapter 4. CX Pipeline Session Agents
313
1. Open the Privacy Filter through TMS.
a. In the WorldView tab, click the Transport Service node.
b. Click Privacy Filter configuration.
c. Click View/Edit in the Config Actions panel.
v See "TMS WorldView Tab" in the IBM Tealeaf cxImpact Administration
Manual.
2. The Privacy Filter configuration opens.
3. Create an action to copy the field CONTACT_PHONE to CON_PHONE_HASH in the
[appdata] section, where it is automatically indexed.
a. Click Add Action.
b. The following fields must be specified. The others are optional:
Option Description
Name
Enter a name for the action. This name must be unique among all
action. For our example, call it CopyContactPhoneToHash.
Action Set this value to ReqSet, which sets or replaces the value for the
specified name/value pair in the request. Creates the name/value
pair if it doesn't exist.
Section
The Section option is used to identify the name of the section
containing the data to process. You can leave it blank, which scans
the entire request buffer.
Field
For our example, enter CONTACT_PHONE.
Value Name
Leave this value blank.
Invert Action
Set this value to false.
Start Pattern
Leave this value blank.
End Pattern
Leave this value blank.
ReqSet Section
Set this value to appdata to place the name/value pair in the
[appdata] section.
ReqSet Field
Set this value to CON_PHONE_HASH.
ReqSet Result
Leave this value blank.
MD5
Set this value to true to apply an MD5 hash to the field. Later, the
search field has the MD5 applied to the entered string to retrieve
values from the new field.
Checksum
Set this value to false.
c. Save the new CopyContactPhoneToHash action.
4. Create an action to block the data in CONTACT_PHONE.
a. Click Add Action.
b. The following fields must be specified. The others are optional:
314
IBM Tealeaf CX: Configuration Manual
Option Description
Name
Enter a name for the action. This name must be unique among all
action. For our example, call it BlockContactPhone.
Action This example uses Block, which blocks data. You may also choose
Encrypt.
Section
The Section option is used to identify the name of the section
containing the data to process. You can leave it blank, which scans
the entire request buffer.
Field
For our example, enter CONTACT_PHONE.
Value Name
Leave this value blank.
Invert Action
Set this value to false.
Start Pattern
Leave this value blank.
End Pattern
Leave this value blank.
Strike Character
Strike Character is used to replace the original data that is blocked
or encrypted with an alphanumeric character. For this blocking
example, use X.
Strike Length
Leave this value blank.
Blocking Mask
The Blocking Mask value is a regular expression that specifies
which characters in the found data are replaced with the strike
character.
Note: Be careful when using Blocking Mask. If the data does not
match the regular expression specified for Blocking Mask then the
data is not blocked or encrypted.
Replace String
Leave this value blank.
c. Save the new BlockContactPhone action.
5. Create a rule to look for the field CONTACT_PHONE. This rule evaluates each hit to
determine if it contains the field.
a. Click Add Rule.
b. The following fields must be specified. The others are optional:
Option Description
Name
Enter a name for the rule. Rule names must be in the form of Rule
+ Sequential Number. See “Rule naming conventions” on page 295.
ReqField
Enter the name of the field to look for. In our example, this field is
CONTACT_PHONE.
ReqOp
For this rule, select exists, which evaluates to true if the field
exists in the data.
Chapter 4. CX Pipeline Session Agents
315
Stop Processing
Set this value to false to continue processing further rules when
this rule evaluates to true.
Enabled
Set this value to true.
Actions
Select the actions you previous created. You must select them so
that they appear in the following order: 1) CopyContactPhoneToHash,
2) BlockContactPhone
Note: The copy action must be executed before the block or
encrypting action.
Tests For this example, no test is required.
c. To save the rule, click OK.
6. Click Save to save your changes.
7. Configure a task to push the changes to all servers.
8. You can configure a search template to include the field CON_PHONE_HASH.
v The field should be included in a completed search template.
v The field must be configured to have MD5 hashing enabled.
v Users of the search template must be informed that they should not insert
dashes - in their search strings of this field. An example value might be
4154958000.
v See "Configuring Search Templates" in the IBM Tealeaf cxImpact Administration
Manual.
9. You can optionally create a session list template to include this new field value
in the displayed output. See "Session List Templates" in the IBM Tealeaf cxImpact
Administration Manual.
Note: Values do not become available for search using a completed search
template until a completed session containing the CON_PHONE_HASH has been
captured and indexed.
Example - Existence of a request field means deleting a
request section
Suppose the request data for your web application contains a credit card field
(CREDIT_CARD_NO), whose value you wish to block. Additionally, you want to block
the fieldname itself for extra security, and requests that include the field also
include a section called [CustInfo] that you want to remove.
You can manage these tasks by doing the following rules configuration.
1. Create an action to delete the request variable:
v Name: Del_CREDIT_CARD_NO
v Action: ReqDelete
v Section: Leave blank
v Field: CREDIT_CARD_NO
2. Create an action to delete the [CustInfo] section:
v Name: Del_CustInfo
v Action: ReqDelete
v Section: CustInfo
316
IBM Tealeaf CX: Configuration Manual
v Field: Leave blank
3. Create a rule with the following values:
v ReqField: CREDIT_CARD_NO
v ReqOp: exists
v Enabled: true
v Actions:
– Del_CREDIT_CARD_NO
– Del_CustInfo
Example - Adding request data for indexing
To enable improved search performance, Tealeaf scans completed sessions for a
predefined set of data that is typically of use in locating sessions. The Portal and
RTV then use these indexes to quickly locate sessions based on search criteria that
you enter. For many customers, this dataset is sufficient to enable effective search
for sessions of interest.
Indexes are not used for searching active sessions. In some cases, you may decide
that some session data that is not available for search by default should be
accessible, for example:
v You have created pipeline rules that insert application-specific data into the
request.
v You have deployed IBM Tealeaf CX UI Capture for AJAX, which enables the
capture of user interface events from the visitor's browser.
In the above circumstances, the data may not be automatically indexed for
search. Using one of the provided methods, you can make this data available for
search through indexed data or event values. Using privacy rules, you can move
data from anywhere in the response or the request into the [appdata] section of
the request, where it is automatically indexed for search.
Note: Adding index data is considered a Tealeaf administrator task. Adding
data to be indexed for search increases the size of the indexes stored in the
Processing Server. Depending on the volume of increased data that is marked for
indexing, indexes can grow considerably and may impact available disk space
and performance of the Processing Server. Before you begin adding data, you
should review your goals with IT staff.
v See “Adding Other Fields for Indexing and Search” on page 52.
Enabling Privacy through TMS
You can enable the Privacy session agent through TMS.
To enable Privacy session agent:
1. Access TMS through the Portal. See “Adding and Configuring the Session
Agent” on page 292.
2. Drill-down on the Transport Service node for the server you wish to configure.
3. Click Transport Service configuration.
4. Click View.
5. To edit the displayed version, click Edit.
6. The window displays all pipelines and their session agents currently available
in your Tealeaf system.
Chapter 4. CX Pipeline Session Agents
317
7. Pipelines are defined by name and port in the [Globals] section. For more
information on creating new pipelines, see “Building a Pipeline in the
Configuration File” on page 218.
Note: The Privacy session agent should be after the Decouple session agent (and
Inflate session agent if responses are compressed) in the pipeline, but before most
other session agents.
Enabling Privacy through TealeafCaptureSocket.cfg
A session agent, such as the Privacy session agent, is enabled by creating a pointer
in this file to its configuration in the configuration section for the session agent
that occurs directly upstream of it.
1. To integrate the Privacy session agent session agent, you must edit the
DownStreamConfigSection property of the session agent's configuration just
before it in the pipeline.
2. For example, if the upstream session agent is [DecoupleEx], then in that session
agent's configuration, you must set the following property:
DownStreamConfigSection=PrivacyEx.
Figure 33. Enabling Privacy through TMS
318
IBM Tealeaf CX: Configuration Manual
3. In the [Privacy] section, you can modify the properties to reflect the session
agent. Items with a pound sign (#) in front of them are disabled.
Figure 34. Enabling Privacy
4. Set the global configuration settings. The following table lists the configuration
settings for the session agent:
Note:
v Display Name values are displayed in TMS, which is the recommended
method for configuring session agents. See "Tealeaf Management System" in
the IBM Tealeaf cxImpact Administration Manual.
v Name values are displayed in TealeafCaptureSocket.cfg.
Table 24. Enabling Privacy through TealeafCaptureSocket.cfg
Display
Name
Description
DLL
DLL
The .DLL file used by the session
agent. Do not change this value.
Chapter 4. CX Pipeline Session Agents
319
Table 24. Enabling Privacy through TealeafCaptureSocket.cfg (continued)
Display
Name
Config File ConfigFile
Description
File containing the privacy rules,
actions, and tests. The default value
for ConfigFile is Privacy.cfg, which
is the default template file that is
installed in the Tealeaf install
directory.\ This file contains multiple
example rules and detailed
documentation on implementation.
For additional information, please
review this file through TMS.
Note: Before you enable the Privacy
session agent, you should configure
and test the rules and action of your
session agent. See “Accessing the
Privacy Editor” on page 294.
Show Rules
in Event
Log
LogRules
When set to true, this option enables
the writing of rules and their actions
into the hit. See “Logging for Privacy
Session Agent.”
Log Level
LogLevel
When LogRules is enabled, this value
defines the logging level. See
“Logging for Privacy Session Agent.”
5. In the Version Description field, enter a description of the changes in this
version. For example, Enabled Privacy session agent.
Note: If the Transport Service is on a server other than the TMS master server,
you must push the configuration changes to the Transport Service server. See
"TMS Jobs Tab" in the IBM Tealeaf cxImpact Administration Manual.
6. Click Save to save your changes.
Privacy session agent has been enabled in the configured pipeline.
Logging for Privacy Session Agent
When logging is enabled, log messages are written into the [privacylog] section of
the request. Through RTV or Browser Based Replay, you can review hit data to
evaluate how the Privacy session agent rules are being processed.
Note: Privacy session agent logging is used mostly for debugging purposes. To
enable debugging in Privacy session agent, set the following property values in the
[PrivacyEx] section:
v LogRules - true
v LogLevel - DEBUG
Additional documentation is available in the notes inside the [PrivacyEx] section.
See the preceding screenshot.
Applying Privacy
Privacy rules may be applied in multiple areas of the Tealeaf system. See
"Managing Data Privacy in Tealeaf CX" in the IBM Tealeaf CX Installation Manual.
320
IBM Tealeaf CX: Configuration Manual
Testing Privacy
Privacy rules can be developed in the following areas:
v TMS: See “Accessing the Privacy Editor” on page 294.
v RTV: Privacy rules can be tested against selected sessions. See "RealiTea Viewer Privacy Tester" in the IBM Tealeaf RealiTea Viewer User Manual.
Real-Time Monitoring and Alert (RTA) Session Agent
Real-Time Alerts provides true real-time processing on every hit captured by
Tealeaf. RTA can be used for the following purposes:
v Hit Deletion - Delete hits containing unwanted data such as ping or "keep-alive"
hits, and images.
v Session sampling - Specify a percentage of sessions to delete from the capture.
v Event Detection - Detect and alert on specified events such as HTTP errors and
Long Page Generation times before hits enter the Canister.
Overview
You can configure RTA to run three types of tests on the data:
v REQTest - Tests against any field in the request. This test searches the URL
string for a specified value, which can be a status code, query string, or similar.
v RSPSrch - Performs a text search of the response. This test searches the text that
is returned from the server based on the request. For example, you can search
for a partial transaction.
v SessPCT - Randomly selects a specified percentage of sessions. This test can be
used to delete a specified percentage of the sessions.
SessPCT knows the total number of sessions by taking bytes 4 - 7 of the session
ID and converting them to an integer, which is then modulo'd by 101. The
resulting number is 0 - 100. A full session contains an even number of integers 0
- 100. When a valid modulo is received, it is compared against the rule
parameter.
After the test is performed and all of the test rules are met, RTA can take one of
the following actions:
v APPEvent - Generate a Tealeaf Application Event in the request
v Delete - Delete the hit
v EventLOG - Create an entry in the NT Event Log
v Email - Send email
v SetVar - Set a variable
Adding the Session Agent
Session agents can be added through the Pipeline Editor in TMS. See “Adding a
Session Agent” on page 226.
For more information on the Pipeline Editor and TMS, see "Tealeaf Management
System" in the IBM Tealeaf cxImpact Administration Manual.
The remainder of this page describes configuration options and how to change
them through the TealeafCaptureSocket.cfg file stored on the server. These
settings are also available through the Pipeline Editor, which is the recommended
method for configuring session agents.
Chapter 4. CX Pipeline Session Agents
321
Enabling RTA
You can enable the Real-Time session agent by adding it to your Windows pipeline
through TMS.
To enable RTA:
1. Login to the Tealeaf Portal as an administrator.
2. In the Portal menu, select Tealeaf > TMS.
3.
4.
5.
6.
In Servers view, click the Transport Service node.
Click Transport Service configuration.
Click View/Edit.
The Pipeline Editor is displayed. See "TMS Pipeline Editor" in the IBM Tealeaf
cxImpact Administration Manual.
7. From the Available Session Agents panel, drag and drop RTA into your
pipeline.
8. The Edit Session Agent dialog appears. See “Configuration Settings.”
9. Edit the properties. Click OK.
10. To save your changes in the Pipeline Editor, click Save.
Configuration Settings
The following configuration settings are available for this session agent:
v Display Name values are displayed in TMS, which is the recommended method
for configuring session agents. See "Tealeaf Management System" in the IBM
Tealeaf cxImpact Administration Manual.
v Name values are displayed in TealeafCaptureSocket.cfg.
Table 25. Configuration Settings
Display Name
Name
Description
Script Trace
ScriptTrace
Specifies whether or not to enable
script debugging functionality. Set
this option as follows:
ScriptTrace=OFF or ScriptTrace=ON
Configuring RTA Tests in TMS
The tests and rules of the Real-Time Alerting session agent can be configured
through the Tealeaf Management System in the Tealeaf Portal.
To configure RTA:
1. Login to the Tealeaf Portal as an administrator.
2. In the Portal menu, select Tealeaf > TMS.
3. In Servers view, click the Transport Service node.
4. Click RTA configuration.
5. Click View/Edit.
6. The RTA .ini configuration file is displayed. For more information on TMS, see
"Tealeaf Management System" in the IBM Tealeaf cxImpact Administration Manual.
322
IBM Tealeaf CX: Configuration Manual
Editing the RTA.ini File
The RTA.ini file is where rules for RTA are configured. Complete instructions for
how to configure RTA are in the RTA.ini file, accessible through TMS.
The RTA.ini file contains seven sample rules that can be used as templates.
v The rules are implemented in loose XML format with start and end tags.
v There is no limit on the number of tests a rule may have.
v Rules are processed in the order specified by the NUM= parameter and not in the
order in which they appear in the file.
v Rules can use operators such as Greater Than, Equal To, Not Equal to, etc. The
STOPRULES parameter stops processing of rules.
Rule Limits
An individual instance of the RTA session agent cannot contain more than 150
rules. The RTA.ini can contain no more than 150 rules.
v Additionally, the NUM= parameter cannot use a value greater than 150.
v The workaround is to deploy a second instance of RTA in the same pipeline
using a different .ini file.
Sample RTA Rules
Reduce Session Count rule
This rule reduces the session count by approximately 10 percent.
Note: The STOPRULES directive stops further processing of rules if the rule is true.
<RULE NUM="1" STATUS="DISABLED" DESCRIPTION="Delete 10% of Sessions"
STOPRULES="YES">
<GROUP TYPE="SessPCT" PERCENT="10" >
</GROUP>
<GROUP TYPE="DELETE" >
</GROUP>
</RULE>
HTTP 400 Errors or Greater rule
This rule tests for HTTP errors 400 or greater, except 404 errors, which can
frequently occur due to user typos.
The action is to create an entry in the NT Event Log:
<RULE NUM="5" STATUS="DISABLED" DESCRIPTION="HTTP Errors">
<GROUP TYPE="REQTest" REQF="StatusCode" REQOP="GT" REQVAL="399" >
</GROUP>
<GROUP TYPE="REQTest" REQF="StatusCode" REQOP="NE" REQVAL="404" >
</GROUP>
<GROUP TYPE="EventLog" TYPE="WARNING" PRIORITY="Normal"
CATEGORY="3xx - 4xx HTTP Errors">
</GROUP>
</RULE>
Long Page Generation Time rule
This rule tests for Page Generation time greater than 60 seconds:
<RULE NUM="6" STATUS="DISABLED" DESCRIPTION="Page Response Time > 300 Secs">
<GROUP TYPE="REQTest" REQF="TL_ResponseTime" REQOP="GT" REQVAL="300" >
</GROUP>
Chapter 4. CX Pipeline Session Agents
323
<GROUP TYPE="EventLog" TYPE="ERROR" PRIORITY="Severe"
CATEGORY="Page Generation Error">
</GROUP>
</RULE>
HTTP 500 errors or Greater rule
This rule tests for HTTP errors 500 or greater, which are internal server errors. In
addition to creating an ERROR type event log entry, it also creates an APPEvent.
v The NOT operator is used in this rule.
<RULE NUM="8" STATUS="DISABLED" DESCRIPTION="HTTP 500 Errors">
<GROUP TYPE="REQTest" NOT="YES" REQF="StatusCode" REQOP="LT" REQVAL="500" >
</GROUP>
<GROUP TYPE="APPEvent" TYPE="ERROR" PRIORITY="High"
CATEGORY="HTTP 500 Errors">
</GROUP>
</RULE>
Search Response Buffer rule
This example searches the response buffer for the string Partial Transaction, only
for server non-cached pages (HTTP Status Code 302).
<RULE NUM="9" STATUS="DISABLED" DESCRIPTION="Partial Transaction" >
<GROUP TYPE="REQTest" REQF="StatusCode" REQOP="NE" REQVAL="302" >
</GROUP>
<GROUP TYPE="RSPSrch" SRCHSTR="Partial Transaction" SRCHCASE="YES"
REGEXPR="NO" >
</GROUP>
<GROUP TYPE="Email" To="[email protected],[email protected]" From="[email protected]"
Subject="Partial Server Transaction" Hostname="Mailhost" Port="25">
</GROUP>
<GROUP TYPE="EventLog" TYPE="WARNING" PRIORITY="Low"
CATEGORY="Partial Transaction">
</GROUP>
</RULE>
Search Request Buffer rule
This example searches the REQ buffer for the string APPEVENT TYPE=&qout, as found
in an APPEvent.
v The ReqTest does only name/value operations.
<RULE NUM="10" STATUS="DISABLED" DESCRIPTION="Partial Transaction" >
<GROUP TYPE="RSPSrch" SRCHSTR="APPEVENT TYPE=&qout" SRCHCASE="YES"
REGEXPR="NO" SRCHREQ="YES" >
</GROUP>
<GROUP TYPE="EventLog" TYPE="WARNING" PRIORITY="Low"
CATEGORY="APPEvent Found">
</GROUP>
</RULE>
Example Output
The following is an example of an Event Log entry generated by the RTA Event
Log option:
Tealeaf Real Time Alert
__________________________
Page/URL - /postinfo.html
Type - APP HTTP
Sts Code - 200
Sesn ID - B77674C64D1B68945A0A058A28EE5021
324
IBM Tealeaf CX: Configuration Manual
Hit ID - 20010614155628_168A
Error Summary - Priority: Ultra-High - Category: HTTP - Description: ASP error
Rsp Time - 0 seconds RequestTime: 2001-06-14T15:56:28.168Z ResponseTime:
2001-06-14T15:56:28.268Z Miscellaneous Server: localhost - Page Size: 2542
Bytes - Referring URL:
The following is an example of the XML output generated by the RTA AppEvent
option:
[xml1]
<APPEVENT TYPE="SessionAgent" EVENT="ERROR"
SESSIONID="5A7CB3DF4CABFF43E5478DB111466B50" HITID="20010615202144_561A">
<GROUP TYPE="ERROR"> <VAR NAME="CATEGORY" VALUE="Test of Ctype1"/>
<VAR NAME="STATUS_CODE" VALUE="200"/>
<VAR NAME="DESCRIPTION" VALUE="Any Page Response Time >10 Secs"/>
</GROUP>
</APPEVENT>
Tealeaf Session Agents
v “Adding a Session Agent” on page 226
v “Archive Session Agent” on page 227
v "Attribute Indexing Session Agent" in the IBM Tealeaf CX Configuration Manual
v “Canister Session Agent” on page 236
v “Cookie Parser Session Agent” on page 238
v “Data Drop Session Agent” on page 241
v
v
v
v
v
“Data Parser Session Agent” on page 246
“Decouple Session Agent” on page 250
“Extended Decoupler Session Agent” on page 252
“Extended Privacy Session Agent” on page 261
“Health-Based Routing (HBR) Session Agent” on page 263
v
v
v
v
v
v
v
“Inflate Session Agent” on page 271
“JSON Mobile Parser Session Agent” on page 275
“Managed Code Session Agent” on page 287
“Null Session Agent” on page 290
“Privacy Session Agent” on page 291
Real-Time Monitoring and Alert (RTA) Session Agent
“Response Tags to Request Session Agent” on page 326
v “RTA Split Session Agent” on page 328
v “Sessioning Session Agent” on page 332
v
v
v
v
v
“Session Router Session Agent” on page 330
“Socket Session Agent” on page 335
“Statistics Logger Session Agent” on page 337
"Tealeaf Reference Session Agent" in the IBM Tealeaf CX Configuration Manual
“Tealeaf Reference Session Agent - Legacy Mode” on page 357
v “Tealeaf Sessioning Session Agent” on page 360
v “TimeGrades Session Agent” on page 366
v “TLI Session Agent” on page 368
v “URL Decode Session Agent” on page 382
Chapter 4. CX Pipeline Session Agents
325
Response Tags to Request Session Agent
RSPTags2REQ scrapes the RSP buffer for name/value pairs and puts them into the
REQ [appdata] section so that they are indexed and searchable. It is primarily
intended for sites and products that already employ page tagging and use those
tags.
v For more information, see http://www.coremetrics.com.
Adding the Session Agent
Session agents can be added through the Pipeline Editor in TMS. See “Adding a
Session Agent” on page 226.
v For more information on the Pipeline Editor and TMS, see "Tealeaf Management
System" in the IBM Tealeaf cxImpact Administration Manual.
The remainder of this page describes configuration options and how to change
them through the TealeafCaptureSocket.cfg file stored on the server. These
settings are also available through the Pipeline Editor, which is the recommended
method for configuring session agents.
Configuration Settings
The following configuration settings are available for RSPTags2REQ:
v Display Name values are displayed in TMS, which is the recommended method
for configuring session agents. See "Tealeaf Management System" in the IBM
Tealeaf cxImpact Administration Manual.
v Name values are displayed in TealeafCaptureSocket.cfg.
Table 26. Response Tags to Request Session Agent
326
Display
Name
Name
Description
Response
Buffer
Start
Pattern
RSPStartPatt
Search Start of the RSP buffer, which
is used to limit the searching of the
RSP buffer.
Response
Buffer End
Pattern
RSPEndPatt
Search End of the RSP buffer.
Response
Name/Value
Pair
Delimiter
RSPNameValueDelimiter
Defines the delimiter between the
name/value pairs.
RSP Var
Delimiter
RSPVarDelimiter
Name/value delimiter. Default value
is =.
RSP Tags To RSPTags
Search For
Semicolon-delimited list of variables
to search. If the pipe symbol (|) is
present, the left side is the RSP buffer
variable name and the right side is
the name for the REQ [appdata]
section. If no pipe symbol is present,
then the same name is used.
Script
Trace
When ON, script tracing is enabled,
which is useful for debugging. The
default value is OFF.
ScriptTrace
IBM Tealeaf CX: Configuration Manual
Example Configuration
In the following example, assume the RSP buffer is page tagged in the following
manner:
...
<!-- PageTagging Start -->
<!-- Page Tagging Comments-->
<script language="JavaScript" type="text/javascript">
<!-var TL_Name="Tea Pots";
var TL_Category="Clay";
var TL_Type="Dual";
var TL_var1="";
var TL_var2="Teal";
var TL_var3="6 cup set";
var TL_var4="";
var TL_var5="Burn Pad";
*/-->
</script>
...
The following is a sample configuration, based on the above where Name, var2,
var3 and var4 are to be extracted:
RSPStartPatt=<!-- PageTaggingStart
RSPEndPatt=*/-->
RSPVarDelimiter==
RSPTags=TL_Name|Item;TL_var2|Color;TL_var3|Version;TL_var5|Accessory
This configuration would result in the REQ [appdata] section looking like the
following:
[appdata]
Item=Tea Pots
Color=Teal
Version=6 cup set
Accessory=Burn Pad
Tealeaf Session Agents
v
v
v
v
“Adding a Session Agent” on page 226
“Archive Session Agent” on page 227
"Attribute Indexing Session Agent" in the IBM Tealeaf CX Configuration Manual
“Canister Session Agent” on page 236
v “Cookie Parser Session Agent” on page 238
v “Data Drop Session Agent” on page 241
v
v
v
v
v
“Data Parser Session Agent” on page 246
“Decouple Session Agent” on page 250
“Extended Decoupler Session Agent” on page 252
“Extended Privacy Session Agent” on page 261
“Health-Based Routing (HBR) Session Agent” on page 263
v “Inflate Session Agent” on page 271
v “JSON Mobile Parser Session Agent” on page 275
v
v
v
v
v
“Managed Code Session Agent” on page 287
“Null Session Agent” on page 290
“Privacy Session Agent” on page 291
“Real-Time Monitoring and Alert (RTA) Session Agent” on page 321
Response Tags to Request Session Agent
Chapter 4. CX Pipeline Session Agents
327
v
v
v
v
v
“RTA Split Session Agent”
“Sessioning Session Agent” on page 332
“Session Router Session Agent” on page 330
“Socket Session Agent” on page 335
“Statistics Logger Session Agent” on page 337
v
v
v
v
v
v
"Tealeaf Reference Session Agent" in the IBM Tealeaf CX Configuration Manual
“Tealeaf Reference Session Agent - Legacy Mode” on page 357
“Tealeaf Sessioning Session Agent” on page 360
“TimeGrades Session Agent” on page 366
“TLI Session Agent” on page 368
“URL Decode Session Agent” on page 382
RTA Split Session Agent
Along with Session Router, RTASplit can be used to route traffic to child pipelines.
RTASplit can use rich RTA conditions to determine routing. Routing can be based
on the contents of one or more REQ values. For example, you can route based on
URL. If the URL includes tealeaf, then route to childpipe1. Else, route to
childpipe2.
v The Session Router session agent is used for cases of session routing by
percentages. See “Session Router Session Agent” on page 330.
Adding the Session Agent
Session agents can be added through the Pipeline Editor in TMS. See “Adding a
Session Agent” on page 226.
v For more information on the Pipeline Editor and TMS, see "Tealeaf Management
System" in the IBM Tealeaf cxImpact Administration Manual.
The remainder of this page describes configuration options and how to change
them through the TealeafCaptureSocket.cfg file stored on the server. These
settings are also available through the Pipeline Editor, which is the recommended
method for configuring session agents.
Configuration Settings
The following configuration settings are available for this session agent:
v Display Name values are displayed in TMS, which is the recommended method
for configuring session agents. See "Tealeaf Management System" in the IBM
Tealeaf cxImpact Administration Manual.
v Name values are displayed in TealeafCaptureSocket.cfg.
Table 27. RTA Split Session Agent
328
Display
Name
Name
Description
Script
Trace
ScriptTrace
When set to ON, script tracing is
enabled, which is useful for
debugging. The default value is OFF.
IBM Tealeaf CX: Configuration Manual
Table 27. RTA Split Session Agent (continued)
Display
Name
Name
Description
The filename of the configuration file
for the session agent. By default, the
filename is RTASplit.ini.
Config File RTAIni
v Additional configuration
documentation is provided in the
.ini file.
Configuration Example
The RTA Split session agent is used to divert static content out of a Windows
processing pipeline to the TLI server and pipeline for insertion into a static archive.
A static archive is a library of static content captured on a daily basis for purposes
of long-terms storage for replay and auditing.
v For more information on configuring RTA Split for use with static archives, see
“TLI Session Agent” on page 368.
v For more information on static archives, see "Managing Static Archives" in the
IBM Tealeaf cxImpact Administration Manual.
Tealeaf Session Agents
v “Adding a Session Agent” on page 226
v “Archive Session Agent” on page 227
v
v
v
v
v
"Attribute Indexing Session Agent" in the IBM Tealeaf CX Configuration Manual
“Canister Session Agent” on page 236
“Cookie Parser Session Agent” on page 238
“Data Drop Session Agent” on page 241
“Data Parser Session Agent” on page 246
v “Decouple Session Agent” on page 250
v “Extended Decoupler Session Agent” on page 252
v
v
v
v
v
v
v
“Extended Privacy Session Agent” on page 261
“Health-Based Routing (HBR) Session Agent” on page 263
“Inflate Session Agent” on page 271
“JSON Mobile Parser Session Agent” on page 275
“Managed Code Session Agent” on page 287
“Null Session Agent” on page 290
“Privacy Session Agent” on page 291
v
v
v
v
v
“Real-Time Monitoring and Alert (RTA) Session Agent” on page 321
“Response Tags to Request Session Agent” on page 326
RTA Split Session Agent
“Sessioning Session Agent” on page 332
“Session Router Session Agent” on page 330
v “Socket Session Agent” on page 335
v “Statistics Logger Session Agent” on page 337
v "Tealeaf Reference Session Agent" in the IBM Tealeaf CX Configuration Manual
v “Tealeaf Reference Session Agent - Legacy Mode” on page 357
v “Tealeaf Sessioning Session Agent” on page 360
Chapter 4. CX Pipeline Session Agents
329
v “TimeGrades Session Agent” on page 366
v “TLI Session Agent” on page 368
v “URL Decode Session Agent” on page 382
Session Router Session Agent
The Session Router session agent is used for routing traffic, which is necessary in a
multi-processor or multi-canister environment, where the Transport Service must
route traffic to one or more processing servers.
Routing is always done on a session percentage basis. For example, in a system
with a Transport component and three Processor components to receive data, the
Session Router agent can be configured to send each processing component a third
of the traffic.
Note: For some deployments of the Processing Server, this session agent is
included in the default pipeline and is required. See “CX Pipeline Configuration”
on page 214.
Note: Since this agent routes traffic at the session level, the data must be properly
sessionized beforehand.
Note: If traffic is segregated using a method other than percentages, then the
RTASplit session agent is required.
Adding the Session Agent
Session agents can be added through the Pipeline Editor in TMS. See “Adding a
Session Agent” on page 226.
v For more information on the Pipeline Editor and TMS, see "Tealeaf Management
System" in the IBM Tealeaf cxImpact Administration Manual.
The remainder of this page describes configuration options and how to change
them through the TealeafCaptureSocket.cfg file stored on the server. These
settings are also available through the Pipeline Editor, which is the recommended
method for configuring session agents.
Configuration Settings
The following configuration settings are available for this session agent:
v Display Name values are displayed in TMS, which is the recommended method
for configuring session agents. See "Tealeaf Management System" in the IBM
Tealeaf cxImpact Administration Manual.
v Name values are displayed in TealeafCaptureSocket.cfg.
Table 28. Session Router Session Agent
Display
Name
330
Name
Description
Init Script InitScript
TCL script that initializes this session
agent. The default value is
PipelineSplitterCFG.tcl.
Keep TEMP
Config
When set to true, temporary pipeline
configuration files are retained, which
is useful for debugging. The default
value is false.
KeepTEMPConfig
IBM Tealeaf CX: Configuration Manual
Table 28. Session Router Session Agent (continued)
Display
Name
Name
Description
Pipeline
(0)
PipelineEx0
This setting contains the default
pipeline configuration, which sends
hits to next session agent in the
current pipeline. This default
configuration is the following:
Traffic SessPct=0-100
Pipeline
(1)
PipelineEx1
This setting can be used for routing
statistics hits to the appropriate
pipeline. The default setting is the
following:
Traffic Stats || Decouple || Null
Sample Configuration
Sample SessionRouter section from TealeafCaptureSocket.cfg:
[SessionRouter]
TypeName=SessionRouter
DLL=SessionAgentPipelineSplitter.dll
DownStreamConfigSection=Null
InitScript=PipelineSplitterCFG.tcl
KeepTEMPConfig=False
PipelineEx0=Traffic SessPct=0-100
PipelineEx1=Traffic Stats || Decouple || Socket TeaBag0:1966
PipelineEx2=Traffic SessPct=0-50 || Decouple ||
Socket TeaBag1:1966
PipelineEx3=Traffic SessPct=51-100 || Decouple ||
Socket TeaBag2:1966 UseSSL=true
The above example has a main pipeline (PipelineEx0) and three child pipelines,
one of which is the Traffic Status pipeline and the other two receiving 50% of the
traffic.
Pipe 0 (PipelineEx0) is the main pipeline, as specified in
TealeafCaptureSocket.cfg. Normally, SessionRouter terminates the main pipeline,
as in the above example where the DownStreamConfigSection points to Null.
All the other pipelines are considered to be child pipelines to
SessionAgentSessionRouter.
v The stats pipeline is for statistics hits, which are routed to the Reporting Server.
v The two session traffic pipelines route the two halves of the traffic to the two
processing servers.
v The Session Router session agent supports the creation of up to 64 child
pipelines.
Tealeaf Session Agents
v
v
v
v
“Adding a Session Agent” on page 226
“Archive Session Agent” on page 227
"Attribute Indexing Session Agent" in the IBM Tealeaf CX Configuration Manual
“Canister Session Agent” on page 236
v “Cookie Parser Session Agent” on page 238
v “Data Drop Session Agent” on page 241
Chapter 4. CX Pipeline Session Agents
331
v
v
v
v
v
“Data Parser Session Agent” on page 246
“Decouple Session Agent” on page 250
“Extended Decoupler Session Agent” on page 252
“Extended Privacy Session Agent” on page 261
“Health-Based Routing (HBR) Session Agent” on page 263
v
v
v
v
v
v
v
“Inflate Session Agent” on page 271
“JSON Mobile Parser Session Agent” on page 275
“Managed Code Session Agent” on page 287
“Null Session Agent” on page 290
“Privacy Session Agent” on page 291
“Real-Time Monitoring and Alert (RTA) Session Agent” on page 321
“Response Tags to Request Session Agent” on page 326
v
v
v
v
v
v
“RTA Split Session Agent” on page 328
“Sessioning Session Agent”
Session Router Session Agent
“Socket Session Agent” on page 335
“Statistics Logger Session Agent” on page 337
"Tealeaf Reference Session Agent" in the IBM Tealeaf CX Configuration Manual
v “Tealeaf Reference Session Agent - Legacy Mode” on page 357
v “Tealeaf Sessioning Session Agent” on page 360
v “TimeGrades Session Agent” on page 366
v “TLI Session Agent” on page 368
v “URL Decode Session Agent” on page 382
Sessioning Session Agent
The Sessioning session agent uses a single REQ buffer field and applies the MD5
hashing algorithm. MD5 takes a single field of arbitrary size and creates a 32-byte
hex-ASCII string, similar to the 32-byte REQ buffer TLTSID value.
Adding the Session Agent
Session agents can be added through the Pipeline Editor in TMS. See “Adding a
Session Agent” on page 226.
For more information on the Pipeline Editor and TMS, see "Tealeaf Management
System" in the IBM Tealeaf cxImpact Administration Manual.
The remainder of this page describes configuration options and how to change
them through the TealeafCaptureSocket.cfg file stored on the server. These
settings are also available through the Pipeline Editor, which is the recommended
method for configuring session agents.
MD5 Hashing Method
Configuration for MD5 consists of the following parameters:
Note: MD5 hash is limited to only one sessioning parameter.
v PrimarySessMD5=True (optional)
v PrimarySessField=JSESSIOND (required)
332
IBM Tealeaf CX: Configuration Manual
v PrimarySessFieldMaskOFF=0 35 (optional)
v PrimaryCaseInsensitive=true (optional)
Configuration Settings
The following configuration settings are available for this session agent:
v Display Name values are displayed in TMS, which is the recommended method
for configuring session agents. See "Tealeaf Management System" in the IBM
Tealeaf cxImpact Administration Manual.
v Name values are displayed in TealeafCaptureSocket.cfg.
Table 29. Configuration Settings
Display Name
Name
Description
Sessioning Field
PrimarySessField
Specifies the primary REQ field to
sessionize. This value can be any
field in the REQ buffer, [urlfield]
name/value pair, or REMOTE_ADDR in
the [env] section.
v You can specify multiple primary
session fields. See “Alternate
Sessioning Fields” on page 334.
Note: If this field is a HTTP
Cookie parameter, verify that this
script is configured after
CookieParser.
Field Offsets
PrimarySessFieldMaskOff
Allows for specifying the SessField to
be some "substring" of the REQ field.
This is a simple specification of the
character start and end offsets.
Normally these are integer values,
but the use of the meta-parameter
end is also allowed. Offsets are
0-based values. The following are
some examples:
PrimarySessFieldMaskOff=0 end
(entire string)
PrimarySessFieldMaskOff=0 19 (first
20 characters)
PrimarySessFieldMaskOff=14 end-4
(15th character to 4th from the end)
PrimarySessFieldMaskOff=end-9
end-2 (9th from the end to 2nd from
the end)
Section
PrimarySessFieldSection
Optional field that indicates which
section of the REQ buffer the
PrimarySessField is found. By
default, the entire request is searched
for the field specified by
PrimarySessField.
Chapter 4. CX Pipeline Session Agents
333
Table 29. Configuration Settings (continued)
Display Name
Name
Description
Case Insensitive
PrimaryCaseInsensitive
When set to true, the sessioning
parameter may have mixed-case
values.
v Where possible, this option should
be avoided, as case-insensitive
matching is more costly than
case-sensitive matching.
v This setting applies only to the
parameter name and not the
parameter value.
Alternate Sessioning Fields
This capability allows multiple field names to be specified for PrimarySessField as
a comma-delimited list. Each field name may optionally be prefixed with a section
name (e.g., cookies:sessionid).
The following is an example:
PrimarySessField=SESSIONID,SESSIONID2,cookies:OTHER_SESSIONID
Note:
v If PrimarySessFieldSection is specified, then it applies to all fields that don't
have an explicit section name.
v The PrimarySessFieldMaskOff and PrimaryCaseInsensitive values apply to all
sessioning fields.
v SASessioning looks for the sessioning field(s) in the order listed.
Mobile-Related Session Agents
This session agent can be used as part of capturing and processing JSON messages
submitted from one of the Tealeaf client frameworks and splitting these messages
into separate hits in the Windows pipeline. This method is the legacy method.
These client framework versions were introduced in Release 8.4 and have been
superseded by the step-based method of messaging, beginning in Release 8.5.
Tealeaf Session Agents
334
v
v
v
v
v
v
“Adding a Session Agent” on page 226
“Archive Session Agent” on page 227
"Attribute Indexing Session Agent" in the IBM Tealeaf CX Configuration Manual
“Canister Session Agent” on page 236
“Cookie Parser Session Agent” on page 238
“Data Drop Session Agent” on page 241
v
v
v
v
v
v
“Data Parser Session Agent” on page 246
“Decouple Session Agent” on page 250
“Extended Decoupler Session Agent” on page 252
“Extended Privacy Session Agent” on page 261
“Health-Based Routing (HBR) Session Agent” on page 263
“Inflate Session Agent” on page 271
IBM Tealeaf CX: Configuration Manual
v
v
v
v
v
“JSON Mobile Parser Session Agent” on page 275
“Managed Code Session Agent” on page 287
“Null Session Agent” on page 290
“Privacy Session Agent” on page 291
“Real-Time Monitoring and Alert (RTA) Session Agent” on page 321
v
v
v
v
v
v
v
“Response Tags to Request Session Agent” on page 326
“RTA Split Session Agent” on page 328
Sessioning Session Agent
“Session Router Session Agent” on page 330
“Socket Session Agent”
“Statistics Logger Session Agent” on page 337
"Tealeaf Reference Session Agent" in the IBM Tealeaf CX Configuration Manual
v
v
v
v
v
“Tealeaf Reference Session Agent - Legacy Mode” on page 357
“Tealeaf Sessioning Session Agent” on page 360
“TimeGrades Session Agent” on page 366
“TLI Session Agent” on page 368
“URL Decode Session Agent” on page 382
Socket Session Agent
The Socket session agent transfers captured data to another computer through a
TCP/IP network, such as a server inside a firewall.
Note: When enabled, the Socket session agent is the end of the pipeline, so the
-DownStreamConfigSection option is not required.
Adding the Session Agent
Session agents can be added through the Pipeline Editor in TMS. See “Adding a
Session Agent” on page 226.
v For more information on the Pipeline Editor and TMS, see "Tealeaf Management
System" in the IBM Tealeaf cxImpact Administration Manual.
The remainder of this page describes configuration options and how to change
them through the TealeafCaptureSocket.cfg file stored on the server. These
settings are also available through the Pipeline Editor, which is the recommended
method for configuring session agents.
Configuration Settings
The following configuration settings are available for this session agent:
v Display Name values are displayed in TMS, which is the recommended method
for configuring session agents. See "Tealeaf Management System" in the IBM
Tealeaf cxImpact Administration Manual.
v Name values are displayed in TealeafCaptureSocket.cfg.
Chapter 4. CX Pipeline Session Agents
335
Table 30. Socket Session Agent
Display
Name
Name
Description
Server
Server
Specifies the name or numeric IP
address of the remote machine to
which the captured data is sent.
Port
Port
Specifies the network IP port number
to be used for the data transfer.
Use SSL
UseSSL
Specifies whether an SSL connection
should be used to transfer capture
data to the server.
Note: The specified port on the
server must be configured for SSL to
use this option.
Tealeaf Session Agents
v “Adding a Session Agent” on page 226
v “Archive Session Agent” on page 227
v "Attribute Indexing Session Agent" in the IBM Tealeaf CX Configuration Manual
v “Canister Session Agent” on page 236
v “Cookie Parser Session Agent” on page 238
v “Data Drop Session Agent” on page 241
v
v
v
v
v
“Data Parser Session Agent” on page 246
“Decouple Session Agent” on page 250
“Extended Decoupler Session Agent” on page 252
“Extended Privacy Session Agent” on page 261
“Health-Based Routing (HBR) Session Agent” on page 263
v
v
v
v
v
v
v
v
“Inflate Session Agent” on page 271
“JSON Mobile Parser Session Agent” on page 275
“Managed Code Session Agent” on page 287
“Null Session Agent” on page 290
“Privacy Session Agent” on page 291
“Real-Time Monitoring and Alert (RTA) Session Agent” on page 321
“Response Tags to Request Session Agent” on page 326
“RTA Split Session Agent” on page 328
v “Sessioning Session Agent” on page 332
v “Session Router Session Agent” on page 330
v
v
v
v
v
Socket Session Agent
“Statistics Logger Session Agent” on page 337
"Tealeaf Reference Session Agent" in the IBM Tealeaf CX Configuration Manual
“Tealeaf Reference Session Agent - Legacy Mode” on page 357
“Tealeaf Sessioning Session Agent” on page 360
v “TimeGrades Session Agent” on page 366
v “TLI Session Agent” on page 368
v “URL Decode Session Agent” on page 382
336
IBM Tealeaf CX: Configuration Manual
Statistics Logger Session Agent
The Stats Logger session agent is a terminating pipeline session agent that can be
used to forward statistical information about Tealeaf components for logging in the
STATISTICS database.
Tealeaf components like the IBM Tealeaf CX Passive Capture Application and the
DecoupleEx session agent can insert hits into the pipeline, which contain statistical
information about the component's operations. When the Stats Logger session
agent is enabled, these statistics hits are assembled for insertion into the
STATISTICS database.
Note: The Statistics Logger session agent uses the TLUSER account to connect to the
TL_STATISTICS database. This database user account must have read/write
privileges on the database. See "SQL Server Administration" in the IBM Tealeaf
Databases Guide.
The results of these assembled statistics logs can be reviewed in charts and reports
through the Tealeaf Portal.
v To see component statistics, select Tealeaf > System Statistics in the Tealeaf
Portal. Select the Tealeaf components. Select date, time, components, and the
report to generate. See "System Statistics" in the IBM Tealeaf cxImpact
Administration Manual.
Adding the Session Agent
Session agents can be added through the Pipeline Editor in TMS. See “Adding a
Session Agent” on page 226.
For more information on the Pipeline Editor and TMS, see "Tealeaf Management
System" in the IBM Tealeaf cxImpact Administration Manual.
The remainder of this page describes configuration options and how to change
them through the TealeafCaptureSocket.cfg file stored on the server. These
settings are also available through the Pipeline Editor, which is the recommended
method for configuring session agents.
Configuration Settings
Note: During installation, the Tealeaf installer prompts you for server information
and whether to enable Stats Logger. If you enabled it during installation, you
should not have to change any settings. It is recommended that you accept the
default values.
The following configuration settings are available for the session agent:
v Display Name values are displayed in TMS, which is the recommended method
for configuring session agents. See "Tealeaf Management System" in the IBM
Tealeaf cxImpact Administration Manual.
v Name values are displayed in TealeafCaptureSocket.cfg.
Chapter 4. CX Pipeline Session Agents
337
Table 31. Statistics Logger Session Agent
Display
Name
Name
Description
Log File
LogFile
The log file for the session agent,
relative to the Tealeaf install
directory. The default value is
managed\StatsDebug.log.
Log Level
LogLevel
The logging level for log messages.
Accepted values are the following:
v Error - reports Errors only
v Warning - reports Errors and
Warnings
v Info - reports Errors, Warnings,
and Info messages (default value)
v Trace - reports above messages,
plus additional information for
tracing
v Debug - reports maximum
information
Note: The Debug logging level
should only be enabled when you
are debugging issues. When you
have finished debugging,
remember to reset the logging
level.
Pass
Through
PassThrough
When set to YES, the statistics logging
application is not the final destination
for hits in the pipeline. Instead of
dropping statistics hits, the
DownStreamConfigSection can be used
to define additional session agents,
including Canister session agent or
other destinations, where non-visitor
hit data is stored. The default value is
NO.
SQL Retry
Interval
SQLRetryTimeMins
The time interval to try to restore a
lost SQL connection. The minimum
accepted time is 1 minute, and there
is no upper limit. The default value is
5.
Tealeaf Session Agents
v
v
v
v
v
v
v
“Adding a Session Agent” on page 226
“Archive Session Agent” on page 227
"Attribute Indexing Session Agent" in the IBM Tealeaf CX Configuration Manual
“Canister Session Agent” on page 236
“Cookie Parser Session Agent” on page 238
“Data Drop Session Agent” on page 241
“Data Parser Session Agent” on page 246
v “Decouple Session Agent” on page 250
v “Extended Decoupler Session Agent” on page 252
v “Extended Privacy Session Agent” on page 261
338
IBM Tealeaf CX: Configuration Manual
v
v
v
v
v
“Health-Based Routing (HBR) Session Agent” on page 263
“Inflate Session Agent” on page 271
“JSON Mobile Parser Session Agent” on page 275
“Managed Code Session Agent” on page 287
“Null Session Agent” on page 290
v
v
v
v
v
v
v
“Privacy Session Agent” on page 291
“Real-Time Monitoring and Alert (RTA) Session Agent” on page 321
“Response Tags to Request Session Agent” on page 326
“RTA Split Session Agent” on page 328
“Sessioning Session Agent” on page 332
“Session Router Session Agent” on page 330
“Socket Session Agent” on page 335
v
v
v
v
v
v
Statistics Logger Session Agent
"Tealeaf Reference Session Agent" in the IBM Tealeaf CX Configuration Manual
“Tealeaf Reference Session Agent - Legacy Mode” on page 357
“Tealeaf Sessioning Session Agent” on page 360
“TimeGrades Session Agent” on page 366
“TLI Session Agent” on page 368
v “URL Decode Session Agent” on page 382
Tealeaf Reference Session Agent
The Tealeaf Reference session agent is deployed in the Windows pipeline to detect
specific dimensional data and capture it for use by Tealeaf.
The Reference session agent can be used for these activities:
v User-agent detection - The Tealeaf Reference session agent can detect the type of
user agent, browser, and operating system in use by your visitors. For more
information, “Extended User Agent Parsing” on page 343.
v Referrer parsing and prepending - The Tealeaf Reference session agent can be
configured to normalize referrer values into name-value pairs for easier analysis
and can prepend these values with a configured string to eliminate potential
conflicts with other URL values. See “Referrer Parsing” on page 342.
v Client-side capture references - The Tealeaf UI Capture capability can be
deployed to capture client-side events and other data, including reference values.
These values are detected by the Tealeaf Reference session agent. See
“Client-Side Capture References” on page 340.
For some deployments of the Processing Server, this session agent is included in
the default pipeline and is required. See "CX Pipeline Configuration" in the IBM
Tealeaf CX Configuration Manual.
Tutorial
For more information about how user agent information is used within Tealeaf,
including steps to configure event objects to track user agent information, see "E2E
Scenario - Tracking User Agent Information".
"E2E Scenario - Tracking User Agent Information in Tealeaf" is in the IBM Tealeaf
cxImpact User Manual.
Chapter 4. CX Pipeline Session Agents
339
Add the session agent
Session agents can be added through the Pipeline Editor in TMS. This session
agent is added to the default pipeline on each Canister. The session agent must be
present in any pipeline that processes session hits.
See "Adding a Session Agent" in the IBM Tealeaf CX Configuration Manual.
For more information about the Pipeline Editor and TMS, see "Tealeaf Management
System" in the IBM Tealeaf cxImpact Administration Manual.
The configuration options are changed with the TealeafCaptureSocket.cfg file that
is stored on the server. These settings are also available through the Pipeline
Editor, which is the recommended method for configuring session agents.
Client-Side Capture References:
Tealeaf Reference session agent adds TLT_CUI_URL and TLT_CUI_APPLICATION_NAME
values to the request buffer to track the URLs and application names from which
events captured from the client user interface are generated.
These values are generated when the IBM TealeafCX UI Capture for AJAX is
licensed and deployed in your environment to capture user interface events
occurring in the visitor's browser. For more information, please contact your IBM
Tealeaf representative. For more information on IBM TealeafCX UI Capture for
AJAX, see "UI Capture FAQ" in the IBM Tealeaf UI Capture for AJAX FAQ.
These values are generated like normal reference values, but they might not match
the values in the normal members. The normal members represent the parent page
from which the AJAX client-side events were started. Since the child event might
post to any page, its value might not match the parent page.
v TLT_CUI_URL is rendered as the normalized value for the client-side URL.
v If the session agent is configured for overloading the application field,
TLT_CUI_APPLICATION_NAME might be used in a different way. See “Overloading
and UI Capture” on page 352.
Tealeaf Reference session agent also adds TLT_CUI_URL_ID and
TLT_CUI_APPLICATION_NAME_ID values to the request buffer, which allows coupling
of data from AJAX requests and the parent pages from which they are started.
They follow the same scheme as the regular TLT IDs. All of their information
comes from the same reference files, and they can be manipulated and augmented
in the same way.
Path reference values
The hardest dimension to make meaningful is the Path dimension, which contains
URL information. Dynamic content generation technologies can serve differing
page content in response to requests for a path. Thus, URLs might differ only in
their query string, POST data, or other HTTP request content.
Determine path values:
The value of the Path reference dimension can be set by the Tealeaf Reference
session agent or by any pipeline agent before it. The session agent provides the
following three methods for setting this variable: Simple, Mapping, and
Programming.
340
IBM Tealeaf CX: Configuration Manual
The path is defined as all characters in the URL from the first / after the host
identifier through the character that precedes the first ?, if it is present. The
following elements are not part of the path:
v Protocol identifier: http://
v Host: (for example, www.tealeaf.com)
v Port (for example, :80)
Simple
In the Simple case, the file name extension and HTTP status code checks done by
Tealeaf Reference session agent are sufficient to limit or determine the virtual path
values. This case implies the following conditions:
v The URL does not contain distinct session or hit identifiers. It does not carry any
state information.
v Paths end with file name extensions
v The website software is homogeneous across all servers. Default page names (for
example, index.html or default.asp) for URLs that end with / are identical for
all web servers.
Mapping
The mapping technique can be used for the following cases:
v The path for multiple pages can be the same (for example, /page.cgi or
/ISAPI.dll), but one or two query strings or other request variables can
distinguish pages from one another.
– For example, a code can be embedded in the query string to distinguish
pages for the web application's own purposes, as in the catid value 700 in
/page.asp?catid=700 signifies the Product View page).
– The session agent's "default page" algorithm for virtual directories (for
example, URL=/ or URL=/somedir/) use the mapping configuration file to set
the TLT_URL value.
– The mapping file has an initial entry that is created during the installation
process. For example:
# TLT_URL URL ReqVar1 ReqVar2
/default.asp /
This example configuration assigns TLT_URL=/default.asp in the [appdata]
section when / is the value of the URL variable in the Tealeaf request.
v Virtual directory start patterns determine validity of paths. All paths that
conform to a specified start pattern are included, such as all paths that begin
with /server/ or /support/customers/).
This method is more open-ended than the first mapping method and allows more
junk path values to be accepted.
Programming
Programming, in the form of RTA rules or a custom pipeline agent, using TCL or
Managed Code session agents, is required for cases that cannot be handled by the
Simple or Mapping techniques. For example, if the URL value contains any type of
application state or tracking information that should be stripped out to produce a
good value for TLT_URL, the TLT_URL value must be set through a custom pipeline
agent upstream of Tealeaf Reference session agent.
Chapter 4. CX Pipeline Session Agents
341
As performed by DoubleClick or Coremetrics® for example, page tagging cannot be
handled natively by the session agent as a source for the value of TLT_URL. You
must create a custom pipeline agent and apply it before the session agent.
Order of precedence of Path processing methods
The URL processing precedence is as follows:
v URLReferenceRules
v URLReferenceVirtualDir
v NormalizeURLExt and NormalizeURLStatusCode
If URLReferenceRulesMode is set to STOP, then method 3 is not used to validate
the URL, and Tealeaf Reference session agent performs strict interpretation of the
URL.
v If the mode is CONT, then a combination of rules and status code and file name
extension tests can be used.
An example of combining methods 1 and 3 would be for a site with multiple
possible virtual directory names, most likely because the web servers are a
heterogeneous mixture of IIS and Java™ Platform, Enterprise Edition. Use step 1 to
determine the default file name for virtual directories. For all other types of URLs,
use the normal extension/status code rules.
Example:
#TLT_URL URL ReqVar1 ReqVar2
/default.asp / IISSESSIONID
/page.jhtml / JSESSIONID
High-volume dimensions:
Path values are used to populate the URL dimension that is provided by Tealeaf.
Depending on how this dimension is configured, your database can grow without
limit.
Data management of dimensions is especially important for dimensions that
capture a high volume of values, such as URL. Implementation of specific
instructions for managing URL and other high-volume dimensions can help to
prevent runaway database growth.
v See "Managing URL and Other High-Volume Dimensions" in the IBM Tealeaf
Event Manager Manual.
More reference parsing options
The Tealeaf Reference session agent can parse the HTTP_REFERER value in the REQ
buffer into a more accessible set of name-value pairs. The Tealeaf Reference session
agent manages the detection and population of user agent information that is
extracted from the request buffer.
Referrer Parsing:
The Tealeaf Reference session agent can parse the HTTP_REFERER value in the REQ
buffer into a more accessible set of name-value pairs.
Consider the following example name-value pair:
HTTP_REFERER=[http://www.yourdomain.com/parent/first_child/second_child/
page.html?id=1234&req=25&page_id=2]
342
IBM Tealeaf CX: Configuration Manual
The [referrer] section in the REQ buffer looks like this:
[referrer]
REFERRER_DOMAIN=yourdomain.com
REFERRER_FILEPATH=/parent/first_child/second_child/page.html
req=25
page_id=2
id=1234
This configuration allows Tealeaf to generate events on and collect data for values
within certain referring URLs of your choosing.
v First Hit: The referrer parsed from the first hit of a session is used as input for
the session attribute that tracks referrer values. This value is the referrer for the
session.
v Each Hit: Tealeaf Reference session agent also detects the referrer value for each
hit in the session.
To enable referrer parsing in Tealeaf Reference session agent, set
ReferrerParsing=True in the session agent configuration through TMS.
If ReferrerParsing is not enabled, the pattern Referrer Domain provided by Tealeaf
does not capture any data.
Referrer prepending:
To eliminate potential conflicts between referrers and URL fields, you can prepend
values in the referrer section.
For example, add this configuration property to the Tealeaf Reference Session
Agent configuration:
ReferrerPrepend=MY_PREPEND_
To prepend referrers, Referrer Parsing must be enabled (ReferrerParsing=True).
When referring prepending is enabled, the sample output in the [Referrer] section
of the request:
[Referrer]
MY_PREPEND_REFERRER_DOMAIN=somewhere.somplace.com
MY_PREPEND_REFERRER_FILEPATH=/testytime/testytime2/file.dll
Extended User Agent Parsing:
The Tealeaf Reference session agent manages the detection and population of user
agent information that is extracted from the request buffer. When a user submits a
request to the web application, information about the visitor's browser, operating
system, and type of application (mobile, desktop, BOT) is included in the request.
The information in the request is compared to a set of publicly maintained
standards and overrides that you define to determine if the submitted user agent
information matches known user agents.
v Initially, the Tealeaf Reference session agent examines a self-pruning cache that it
maintains in memory for faster access to the mostly commonly detected values.
See “Tune the self-pruning cache” on page 347.
v If no match is found, the session agent examines other file-based resources for
matches. See “Order of evaluation for extended user agent parsing” on page 344.
Chapter 4. CX Pipeline Session Agents
343
Note: By default, user agent parsing is enabled for new installs and upgrades.
Legacy Mode must be enabled separately. See “Legacy Mode for user agent
parsing” on page 351.
Example output:
This example shows the output for a name-value pair in a request.
Suppose this user agent name-value pair is detected in the request:
HTTP_USER_AGENT=Mozilla/5.0 (Windows; U; Windows NT 5.1; en-US; rv:1.9.2.13)
Gecko/20101203 Firefox/3.6.13 ( .NET CLR 3.5.30729)
When the user agent is detected, the session agent performs lookups to return the
values that are associated with this user agent from the public standards. These
values are inserted as name-value pairs in the request:
[ExtendedUserAgent]
TLT_BROWSER=Firefox
TLT_BROWSER_VERSION=Firefox3.6
TLT_BROWSER_PLATFORM=Win XP
TLT_TRAFFIC_TYPE=BROWSER
TLT_BROWSER_JAVASCRIPT=true
TLT_BROWSER_COOKIES=true
If TLT_TRAFFIC_TYPE=MOBILE, then these fields can be inserted and populated for
the mobile user agent:
TLT_SCREEN_HEIGHT
TLT_SCREEN_WIDTH
TLT_COLOR_DEPTH
TLT_PICTURE_SUPPORT
TLT_VIDEO_SUPPORT
TLT_STREAMING_SUPPORT
Additionally, if user agent logging is enabled, these entries can appear in the
[UALog] section that is inserted into the request:
[UALog]
Retrieve From Cache took 9.029e-005 seconds
Checking TLT_USER_CAP
Selected class User Agent Parsing::Firefox User Agent Matcher
User Agent Parsing::Wurfl Data Manager::Apply Exact Match
m_user Agent Map.find took 0.000342962 seconds
User Agent Parsing::Wurfl Data Manager::Apply Exact Match
took 0.000636579 seconds
User Agent Parsing::Browscap Data Manager::Apply Exact Match
m_exact Search Map.find took 0.000381108 seconds
Regex match: Mozilla/5\.0\s+\(Windows;\s+.*;\s+Windows\s+NT\
s+5\.1;\s+.*;\s+rv:1\.9\.2.*\)
\s+Gecko/.*\s+Firefox/3\.6.*
m_regex Search Map lookup took 0.00878997 seconds
User Agent Parsing::Browscap Data Manager::Apply Exact Match
took 0.00971492 seconds
User Agent Parsing::Filter::Get Data Node took 0.0113107 seconds
GJK_Browscap_Version GJK_Browscap_Version
4566 Thu, 28 Oct 2010 19:52:36 -0000
Order of evaluation for extended user agent parsing:
When the Tealeaf Reference session agent detects a value in the HTTP_USER_AGENT
request variable, the value is evaluated through a several step process.
The value evaluation steps are:
344
IBM Tealeaf CX: Configuration Manual
Table 32. Order of evaluation for extended user agent parsing
Order of
Evaluation
File name
Description
1
special non-valid values
If the HTTP_USER_AGENT contains blank
or white space values, special values
are inserted into the appropriate
attributes. See “Blank user agent
values” on page 346.
2
in-memory cache
Check for the value is made to the
in-memory cache maintained by the
session agent. See “Tune the
self-pruning cache” on page 347.
3
UserCap.csv
User-defined values that override any
values in the public standards
(WURFL.csv and BrowsCap.csv) are
specified in this file, which is checked
before the public standards.
v UserCap.csv may be used to insert
values that are not present in the
public standards.
v These matches are identified using
the UAMatchers DLLs. See
“UAMatchers” on page 349.
4
WURFL.csv
Public standard for mobile devices.
This file must be downloaded and
converted from its native XML for
use by the session agent.
v During conversion, you may
optionally include the use of
generic values in your converted
WURFL file. See “Use of generics”
on page 347.
v These matches are identified using
the UAMatchers DLLs. See
“UAMatchers” on page 349.
v See "User Agent Tools" in the IBM
Tealeaf cxImpact Administration
Manual.
5
mobile native application
For mobile native applications
monitored by Tealeaf, user agent
information is automatically
submitted by the Tealeaf client
framework that is monitoring the
application. This information is used
to populate the standard extended
user agent parsing properties. See
“Extended user agent parsing for
mobile native applications” on page
350.
Chapter 4. CX Pipeline Session Agents
345
Table 32. Order of evaluation for extended user agent parsing (continued)
Order of
Evaluation
File name
Description
6
BrowsCap.csv
Public standard for fixed and bot
user agents. This file must be
converted from its native format for
use by the session agent.
v Generics are automatically
included in the converted version
of BrowsCap.csv. See “Use of
generics” on page 347.
v See "User Agent Tools" in the IBM
Tealeaf cxImpact Administration
Manual.
7
UserSupplement.csv
If no match is found in any of the
above files, the session agent checks
the UserSupplement.csv, which can
be used to add user agents that are
not currently listed in the public
standard and are appearing in your
capture stream.
Blank user agent values
If the value of HTTP_USER_AGENT is a value that cannot be detected, then these
values are inserted into the relevant attributes:
Table 33. BrowserType hit attribute:
Detected Value
Attribute
Inserted Value
""
BrowserType
UserAgentBlank
whitespace
BrowserType
UserAgentBlank
HTTP_USER_AGENT not BrowserType
found in request
UserAgentNotFound
Table 34. TrafficType hit attribute:
Detected Value
Attribute
Inserted Value
""
TrafficType
UserAgentHeaderIsBlank
whitespace
TrafficType
UserAgentBlank
HTTP_USER_AGENT not TrafficType
found in request
NoUserAgentHeaderFound
To search for TrafficType values:
v Active sessions: Search the Text in Request for TLT_TRAFFIC_TYPE=<Inserted
Value>.
v Completed sessions:
– Create an event to record the value of the Traffic Type hit attribute. See
"TEM Events Tab" in the IBM Tealeaf Event Manager Manual.
– Create a privacy rule to move the TLT_TRAFFIC_TYPE request variable and
value to the [appdata] section. See "Privacy Session Agent" in the IBM Tealeaf
CX Configuration Manual.
346
IBM Tealeaf CX: Configuration Manual
For more information about search, see "Searching Session Data" in the IBM Tealeaf
cxImpact User Manual.
Tune the self-pruning cache:
Depending on the traffic volume and the variety of traffic to your website, you
might need to tweak the settings for the self-pruning cache. Finding an appropriate
setting for these two parameters is paramount for optimum performance of your
pipeline when you are using extended user agent parsing.
Pruning interval
You can define the interval at which the self-pruning cache is updated to reflect the
most recently detected user agents. The PruningInterval setting is the number of
seconds between updates.
v Adjust the setting after extended user agent parsing is in operation.
By changing the PruningInterval value of the cache, you are affecting how likely
it is that a user agent is removed from the cache due to inactivity. When this value
is large, a user agent can be in the cache for a long time before it is removed.
When it is small, the user agent must be seen frequently, or it is more likely to be
removed.
Maximum cache size
The MaxCacheSize setting is the maximum number of entries in the cache.
v Adjust the setting after extended user agent parsing is in operation.
For websites with a core set of user agents, the cache performs well with a
relatively small MaxCacheSize setting. Set this value to 2000. This value size
effectively means that up to 2000 different user agents are stored for quick lookup.
v If you begin to see spooling due to the user agent cache, increasing the
MaxCacheSize value decreases the likelihood that an incoming user agent string
is not already cached. Increasing this number also use more memory, as more
data must be stored.
Use of generics:
The public standards that are used for extended user agent parsing can contain
generic values for user agents.
For example, if a user agent string of iPhone 10 is detected in the capture stream
and there is no exact match in the public standard, a generic user agent string
(iPhone) can be inserted, if the public standard contains a generic entry.
v BrowsCap.csv - For fixed user agents, use of generics is automatically enabled
and cannot be configured.
v WURFL.csv - For mobile user agents, use of generics is enabled by default when
the public standard is converted for use in Tealeaf. See "User Agent Tools" in the
IBM Tealeaf cxImpact Administration Manual.
Enabling generics is useful for capturing in some form new versions of user agents
that are not yet in the public standards. When the public standards are updated,
the entries for these user agents match on the public standard without
configuration changes. See “Order of evaluation for extended user agent parsing”
on page 344.
Chapter 4. CX Pipeline Session Agents
347
Specifying paths to skip:
Optionally, you can configure extended user agent parsing to treat specified URLs
that are triggered by specific user agents to be marked as a different traffic type.
Complete this task to specify the paths to skip.
For example, suppose that for the user agent Jakarta, a visit to any page other
than /MyXMLService.aspx indicates that the user agent is a search engine while
visits to /MyXMLService.aspx indicate that the user agent is not a robot. By defining
this path to be skipped during normal user agent parsing, you can specify the
appropriate traffic type value for the non-robot exception
(TrafficType=XMLServiceConsumer).
1. Log in to the Tealeaf Portal as an administrator.
2. From the Portal menu, select Tealeaf > TMS. The Tealeaf Management System
is displayed. See "Tealeaf Management System" in the IBM Tealeaf cxImpact
Administration Manual.
3. Click the WorldView tab.
4. From the Servers drop-down, select the server hosting the capture pipeline
where the Tealeaf Reference session agent is deployed.
5. Click the Transport Service node.
6. Select Transport Service configuration.
7. In the Config Actions tab, click View/Edit (Raw).
8. The raw version of the TealeafCaptureSocket.cfg file is displayed. You can
choose to copy and paste this content into your favorite text editor for editing.
9. In the file, locate the [TLTRef] section.
10. Look for the following configuration settings in the [TLTRef] section. If they
are not present, insert them.
PathsToSkip=^MyPath*$;^YourPath*$
TrafficTypeForSkippedPaths=XMLService
BrowserForSkippedPaths=XMLServiceConsumer
where
Setting Description
PathsToSkip
Enter a list of paths, delimited by semi-colons (;). You can enter
regular expressions. For example, you can enter a value of ^MyPath*$
to match all paths that contain the substring MyPath. For more
information about regular expressions, see “Regular expressions in
extended user agent parsing” on page 349.
TrafficTypeForSkippedPaths
For paths that match a value that is specified in PathsToSkip, this
setting identifies the value to insert into the Traffic Type object. See
"Configuring User Agent Events" in the IBM Tealeaf cxImpact
Administration Manual.
BrowserForSkippedPaths
For paths that match a value that is specified in PathsToSkip, this
setting identifies the value to insert into the Browser Type object. See
"Configuring User Agent Events" in the IBM Tealeaf cxImpact
Administration Manual.
11. To save your changes, click Save.
12. To push the change to other Canisters in your environment, click Add Tasks
and Submit.
348
IBM Tealeaf CX: Configuration Manual
Regular expressions in extended user agent parsing:
You can use regular expressions in the values you define in user agent parsing
configuration.
This table lists exceptions to the standard implementation of regular expressions:
Character
How Used
*
Wildcard
?
Wildcard
.
String literal. Appears frequently in user
agent definitions.
(
String literal. Appears frequently in user
agent definitions.
)
String literal. Appears frequently in user
agent definitions.
Space character
Treated as white space.
Because of these exceptions and some other differences, the implementation of
regular expressions for this session agent and the IBM Tealeaf CX RealiTea Viewer
are not the same. See "Regular Expressions in the RealiTea Viewer" in the IBM
Tealeaf RealiTea Viewer User Manual.
This table shows some examples and how they match values in user agent parsing.
RegEx pattern
Matches
^IP$
IP
SHIP
SHIPS
S.P
SP
SIP
SIT UP
S?P
SIP
SAP
SOP
S*P
SIP
SAP
STOP
UAMatchers:
Matching between detected values and the available set of user agent values is
managed by plug-in. For each major type of user agent, Tealeaf provides a separate
.dll that performs the matching analysis. UAMatchers plug-ins are provided by
Tealeaf. Customers cannot create their own plug-ins now.
When user agent data is not available in the public standard definition files, a UA
Matcher can augment the user agent information that is recorded in the session
with additional information. The additional information includes browser version
or browser platform, that are read directly from the user agent string that is
provided in the original request.
v Currently, the Browscap standard does not distinguish between the WinXP 64-bit
platform and the Windows Server 2003 64-bit platform, as user agent strings
Chapter 4. CX Pipeline Session Agents
349
from both platforms self-identify as Windows NT 5.2. By default, Browscap
identifies this user agent string as a WindowsXP 64-bit machine.
UAMatchers are stored in this directory:
<Tealeaf_install_directory>\System\UAMatchers
Do not move, rename, or otherwise modify these files.
Extended user agent parsing for mobile native applications: Individual mobile
applications typically send a unique user agent string that is not known to any
public repository, or they may not send a user agent at all. As a result, user agent
detection for mobile native applications cannot rely on WURFL, Browscap, or other
public standard.
To enable tracking of user agent-related information, the Tealeaf client frameworks
for mobile native applications submitthis header information:
Table 35. Mobile native applications header information
Logging Framework
Example Submitted Header
Android Logging Framework
HTTP_X_TEALEAF=device (Android) Lib/0.0.10
iOS Logging Framework
HTTP_X_TEALEAF=device (iOS) Lib/8.5.4.1
The header is also used by the IBM Tealeaf CX UI Capture for AJAX solution.
However, user agent detection for IBM Tealeaf CX UI Capture for AJAX is sourced
from the client being used in the session. See “Client-Side Capture References” on
page 340.
When the Tealeaf Reference session agent detects the HTTP_X_TEALEAF header and
either the (android) or (ios) value, it performs these tasks:
v Tealeaf Reference session agent overwrites the request variable for traffic type:
TLT_TRAFFIC_TYPE=MOBILE_APP
– This value is eventually surfaced as the value MOBILE_APP in the Traffic Type
dimension. See "TEM Dimensions Tab" in the IBM Tealeaf Event Manager
Manual.
v Tealeaf Reference session agent overwrites the request variable for browser
platform:
– Android:
TLT_BROWSER_PLATFORM=Android
– iOS:
TLT_BROWSER_PLATFORM=iOS
v Tealeaf Reference session agent looks for the HTTP_X_TEALEAF_PROPERTY header,
which is submitted from the client frameworks with extended user agent
information. For example:
HTTP_X_TEALEAF_PROPERTY=TLT_BROWSER=StraussAndPlesser Native;
TLT_BROWSER_VERSION=8.5; TLT_BROWSER_PLATFORM=Android;
TLT_BRAND=Asus; TLT_MODEL=Asus Eee Pad Transformer TF101;
TLT_SCREEN_HEIGHT=800; TLT_SCREEN_WIDTH=1280;
TLT_COLOR_DEPTH=65536
v These values are used to populate the [ExtendedUserAgent] section. For
example:
[ExtendedUserAgent]
TLT_BROWSER=StraussAndPlesser Native
TLT_BROWSER_VERSION=8.5
350
IBM Tealeaf CX: Configuration Manual
TLT_BROWSER_PLATFORM=Android
TLT_BRAND=Asus
TLT_MODEL=Asus Eee Pad Transformer TF101
TLT_SCREEN_HEIGHT=800
TLT_SCREEN_WIDTH=1280
TLT_COLOR_DEPTH=65536
These [ExtendedUserAgent] fields are not populated with data from the mobile
native applications, as the fields are applicable to browsers only:
TLT_BROWSER_JAVASCRIPT
TLT_BROWSER_COOKIES
TLT_PICTURE_SUPPORT
TLT_VIDEO_SUPPORT
TLT_STREAMING_SUPPORT
Some of the above variables may be inserted with false values if the request itself
includes a user agent. After these fields were inserted into the
[ExtendedUserAgent] section, the fields and properties of HTTP_X_TEALEAF_PROPERTY
are applied.
Legacy Mode for user agent parsing:
In Release 7.2.12.729x, Tealeaf introduced a new implementation of user agent
parsing that provides much more accurate matching of user agents that are
detected in the capture stream. If you want, you can enable the previous
implementation of user agent parsing as a Legacy Mode.
Tealeaf strongly recommends that you use the most recent implementation of user
agent parsing. Legacy Mode user agent parsing is provided for customers who
upgrade from versions that supported the previous implementation of user agent
parsing yet cannot switch to the new implementation now. In a future release,
Legacy Mode user agent parsing is likely to be deprecated.
For more information on Legacy Mode, see "Tealeaf Reference Session Agent Legacy Mode" in the IBM Tealeaf CX Configuration Manual.
Overloading application reference field:
As of Release 8.0, the ability to capture the type of user agent is better handled by
creating a dimension that is populated by a pattern that detects the value directly
from the request. You disable this feature if it was enabled and design a dimension
to capture the content. In a future release, this capability is likely to be deprecated.
See "TEM Dimensions Tab" in the IBM Tealeaf Event Manager Manual.
Optionally, you can configure the Tealeaf Reference session agent to replace the
default contents that are inserted in the TLT_APPLICATION_NAME field of the
[appdata] section of the request.
When the OverloadAppRef option is set to True, then the value of
TLT_APPLICATION_NAME is overridden with the value for the traffic type that is
extracted from the user agent cache. Possible values are as follows:
v BOT
v MOBILE
v BROWSER
v MOBILE_BOT
Chapter 4. CX Pipeline Session Agents
351
v UNKNOWN
When the Application reference field is overloaded, the only identifiers visible to
the Canister are any associated with the traffic type values.
1. Optional: If you are configuring with the TealeafCaptureSocket.cfg file, in the
[TLTRef] of TealeafCaptureSocket.cfg, set OverloadAppRef=true.
2. If you are configuring through TMS:
a. Add the session agent to your pipeline through the Pipeline Editor. See
"TMS Pipeline Editor" in the IBM Tealeaf cxImpact Administration Manual.
b. Select the TLTRef session agent icon in the Pipeline Editor and select Edit.
c. Select Add Config Items.
d. Select the Overload Application Reference Field check box.
e. Select OK twice.
f. Select Save.
g. Configure a task to update all servers immediately.
Overloading and UI Capture:
If UI Capture is deployed when the Application reference field is overloaded, then
the value of TLT_APPLICATION_NAME extracted from user agent information is also
written to the TLT_CUI_APPLICATION_NAME value, which is inserted by the session
agent when the HTTP_X_TEALEAF_PAGE_URL is detected in the request.
HTTP_X_TEALEAF_PAGE_URL is inserted by UI Capture. See "UI Capture FAQ" in the
IBM Tealeaf UI Capture for Ajax FAQ.
By default, this value contains the URL path of the parent page. For more
information about configuring this header, see "UI Capture for Ajax Reference" in
the IBM Tealeaf UI Capture for Ajax Guide.
In the table below, you can review the mapping of destination request variables
and how they are populated by data when overloading is disabled and enabled.
Table 36. Overloading and UI Capture
Destination
Standard Request Source
Request Variable
Overloaded Request Source
TLT_CUI_
APPLICATION_
NAME
HTTP_X_TEALEAF_PAGE_URL header
If overloaded: TLT_TRAFFIC_TYPE
TLT_
APPLICATION_
NAME
[env]/URL
If overloaded: TLT_TRAFFIC_TYPE
Both application variables in the request contain the traffic type information that is
extracted for the detected user agent.
The value for TLT_CUI_URL is set by the session agent and is not affected by
overloading the application field. See “Client-Side Capture References” on page
340.
Configuration settings
Several configuration settings are available for the Tealeaf Reference session agent.
352
IBM Tealeaf CX: Configuration Manual
Display Name values are displayed in TMS, which is the recommended method for
configuring session agents. See "Tealeaf Management System" in the IBM Tealeaf
cxImpact Administration Manual.
Name values are displayed in TealeafCaptureSocket.cfg.
This table lists and describes the configuration settings:
Table 37. Configuration Settings
Display Name
Name
Description
Advanced User Agent Parsing
AdvancedUAParsing
When set to True, the Tealeaf
Reference session agent uses the
self-pruning cache to speed up
lookups of user agent information.
This cache contains the most recently
seen user agents. The default value is
True.
See "Configuring User Agent
Detection" in the IBM Tealeaf cxImpact
Administration Manual.
Allow Empty Extensions
AllowEmptyExtension
When True, URLs that do not contain
an extension are permitted to be
normalized. The default value is
True.
Days to Keep Stats
StatsKeepDays
The number of days to retain
statistics on the Tealeaf Reference
session agent in rolling log files. The
default value is 30.
Log Reference Statistics
OutputReferenceStats
When set to True, statistics on the
Tealeaf Reference session agent
operations are generated each hour
for reporting through the Statistics
Logger session agent. The default
value is True.
Maximum Cache Size
MaxCacheSize
The maximum number of entries in
the cache. The default value is 2000.
Note: If Advanced User Agent
Parsing is enabled, this value must
be specified.
Normalize App Name
NormalizeAppName
When set to True, the value of
TLT_APPLICATION_NAME is set to the
virtual directory defined as the value
between the first two slashes of the
URL. The default value is True.
Normalize Host
NormalizeHost
When set to True, extra data
manipulation is performed to
normalize host values before they are
saved as reference IDs. The default
value is True.
Normalize Server
NormalizeServer
When set to True, TLT_SERVER is set to
the value of LOCAL_ADDR. The default
value is True.
Chapter 4. CX Pipeline Session Agents
353
Table 37. Configuration Settings (continued)
Display Name
Name
Description
Normalize URL
NormalizeURL
Only URLs with the extension and
status codes that are listed under
NormalizeURLExt are considered.
v If the URL ends in a slash, the
default root is appended, and the
URL is decoded.
v If the URL contains one of the
characters (/, :, ;, ?), the URL is
truncated at that character.
v The default value is True.
Pruning Interval
PruningInterval
The interval in minutes when the
user agent cache is updated with the
most recently seen user agents. The
default value is 10.
Note: If Advanced User Agent
Parsing is enabled, this value must
be specified.
Reference Statistics Min Hits
OutputReferenceStatsMin
Minimum number of hits during a
statistic log interval to qualify the
reference statistics for logging. The
default value is 1.
Reference Update Interval
UpdateInterval
Interval in seconds at which the
references files are updated or read.
The default value is 60.
Referrer Parsing
ReferrerParsing
When set to True, referrer values are
parsed and normalized. The default
value is True. See “Referrer Parsing”
on page 342.
Statistics Reporting Interval
StatsReportingInterval
The interval in minutes at which the
session agent reports statistics. The
following values are accepted: 5, 10,
15, 30, or 60.
Note: This interval is relative to the
start of the hour. For example, a
value of 30 generates statistics at
12:00, 12:30, and so on.
Status Codes
NormalizeURLStatusCode
The list of qualifying URL status
codes that can be normalized. The
default value is
0;200;302;304;400;402;403;404;
410;500;501;502;503;504;505.
URL Default Document
NormalizeURLRootDefault
If the URL indicates that the resource
is a directory, then this value is
inserted as the default file name. The
default value is DEFAULTPAGE.
URL Extensions
NormalizeURLExt
The semi-colon delimited list of URLs
to be normalized. The default value
is ACTION;ASMX;ASP;ASPX;CSS;DO;
HTM;HTML;GIF;ICO;JPG;JS;JSP;JHTML;
PDF;PHP;SWF.
URL Reference Rules
URLReferenceRules
Whether URL reference rules are
enabled. The default value is true.
354
IBM Tealeaf CX: Configuration Manual
Table 37. Configuration Settings (continued)
Display Name
Name
Description
URL Reference Rules File
URLReferenceRulesFile
The path and file name of the URL
reference rules. The default value is
.\system\Reference_Path_Rules.txt.
v Relative paths are relative to the
directory that contains the DLL in
use.
URL Reference Rules Mode
URLReferenceRulesMode
The mode for URL reference rules.
The default value is cont.
v stop - URL processing ends after
the rule set or virtual directory
fails to match. Processing always
stops after a matched rule set or
virtual directory.
v cont - URL processing continues
even if a failure condition is met.
Use Full Virtual Dir
UseFullVirtualDir
If set to True, matches are made for
the entire virtual directory string,
even if it includes a slash (for
example, myapp\subdir). If set to
False, matches are determined by the
URLReferenceVirtualDir setting in
use. The default value is False.
v See “Reference virtual directories”
on page 356.
URL Virtual Dirs
URLReferenceVirtualDir
A list of URL virtual directories,
which are separated by commas and
without spaces. The default value is
servlets. Example:
servlets;cgi-bin
v Other options are available. See
“Reference virtual directories” on
page 356.
User Agent Files Directory
UAFilesDir
This directory contains all required
user agent parsing files:
v BrowsCap.csv for desktop user
agent detection
v WURFL.csv for mobile user agents
v UserCap.csv for any user-defined
user agent detection strings
Note:
– If Advanced User Agent Parsing
is enabled, this value must be
specified.
– This value is a full path to the
directory. Do not use a relative
path.
– You can specify this path as a
UNC path.
v See "Configuring User Agent
Detection" in the IBM Tealeaf
cxImpact Administration Manual.
Chapter 4. CX Pipeline Session Agents
355
This table lists and describes more configuration items:
Table 38. More Configuration Items:
Display
Name
Name
Description
Log URL
Statistics
OutputURLStats
This debugging tool can be used to
output URL statistics. The default
value is False.
Overload
OverloadAppRef
Application
Reference
Field
When set to True, the value of
TLT_APPLICATION_NAME in the request
buffer is overridden by the value for
the type of browser that is extracted
from the user agent cache. See
“Overloading application reference
field” on page 351.
Reference virtual directories:
You can specify all or specific parts of the URL to use as the virtual directory.
To use the entire URL, set UseFullVirtualDir to True.
To use part of the URL, set UseFullVirtualDir to True. You can determine the part
of the URL to use as the virtual directory by setting one of the following
parameters to True.
Suppose that this URL is encountered:
/dir/sub-dir/sub-sub-dir/page.html
v If URLReferenceVirtualDir=true, then the virtual directory is:
dir
v If URLReferenceVirtualDir2=true, then the virtual directory is:
sub-dir
v If URLReferenceVirtualDir3=true, then the virtual directory is:
sub-sub-dir
Any setting for URLReferenceVirtualDir4 and above is ignored.
Tealeaf reference session agent in multi-canister environments
The session agent should be deployed in a consistent location in each Windows
pipeline of each Canister that is processing hits. In a multi-canister environment,
all canisters can communicate independently with the database to retrieve
reference values.
Tealeaf session agents
v
v
v
v
v
v
v
"Adding a Session Agent" in the IBM Tealeaf CX Configuration Manual
"Archive Session Agent" in the IBM Tealeaf CX Configuration Manual
"Attribute Indexing Session Agent" in the IBM Tealeaf CX Configuration Manual
"Canister Session Agent" in the IBM Tealeaf CX Configuration Manual
"Cookie Parser Session Agent" in the IBM Tealeaf CX Configuration Manual
"Data Drop Session Agent" in the IBM Tealeaf CX Configuration Manual
"Data Parser Session Agent" in the IBM Tealeaf CX Configuration Manual
v "Decouple Session Agent" in the IBM Tealeaf CX Configuration Manual
356
IBM Tealeaf CX: Configuration Manual
v "Extended Decoupler Session Agent" in the IBM Tealeaf CX Configuration Manual
v "Extended Privacy Session Agent" in the IBM Tealeaf CX Configuration Manual
v "Health-Based Routing (HBR) Session Agent" in the IBM Tealeaf CX Configuration
Manual
v "Inflate Session Agent" in the IBM Tealeaf CX Configuration Manual
v "JSON Mobile Parser Session Agent" in the IBM Tealeaf CX Configuration Manual
v "Managed Code Session Agent" in the IBM Tealeaf CX Configuration Manual
v "Null Session Agent" in the IBM Tealeaf CX Configuration Manual
v "Privacy Session Agent" in the IBM Tealeaf CX Configuration Manual
v "Real-Time Monitoring and Alert (RTA) Session Agent" in the IBM Tealeaf CX
Configuration Manual
v "Response Tags to Request Session Agent" in the IBM Tealeaf CX Configuration
Manual
v "RTA Split Session Agent" in the IBM Tealeaf CX Configuration Manual
v "Sessioning Session Agent" in the IBM Tealeaf CX Configuration Manual
v "Session Router Session Agent" in the IBM Tealeaf CX Configuration Manual
v
v
v
v
v
"Socket Session Agent" in the IBM Tealeaf CX Configuration Manual
"Statistics Logger Session Agent" in the IBM Tealeaf CX Configuration Manual
Tealeaf Reference Session Agent
"Tealeaf Sessioning Session Agent" in the IBM Tealeaf CX Configuration Manual
"TimeGrades Session Agent" in the IBM Tealeaf CX Configuration Manual
v "TLI Session Agent" in the IBM Tealeaf CX Configuration Manual
v "URL Decode Session Agent" in the IBM Tealeaf CX Configuration Manual
Tealeaf Reference Session Agent - Legacy Mode
Note: This section describes a legacy mode for user agent parsing. For Release 8.1,
Tealeaf utilizes a superior implementation for tracking fixed, mobile, and bot user
agents. Tealeaf strongly recommends using the new method of user agent parsing.
See "Tealeaf Reference Session Agent" in the IBM Tealeaf CX Configuration Manual.
The Tealeaf Reference session agent manages the detection and population of user
agent information extracted from the request buffer. When a user submits a request
to the web application, information about the visitor's browser, operating system,
and type of application (mobile, desktop, BOT) is included in the request.
Note: By default, user agent parsing is enabled for new installs and upgrades.
Legacy Mode must be enabled separately. See “Enabling Legacy Mode” on page
358.
Overview
Legacy Mode enables the capabilities of the initial implementation of extended
user agent parsing.
Note: With respect to Tealeaf users, the difference between the two implementation
methods is seamless. However, the newer method provides superior matching
capabilities, logging improvements, and better support for data anomalies.
Legacy Mode features include:
Chapter 4. CX Pipeline Session Agents
357
v Use of a self-pruning cache for quick access to the most frequently detected user
agents. This cache is also used in the new implementation. See "Tealeaf
Reference Session Agent" in the IBM Tealeaf CX Configuration Manual.
v Configuration files in use:
– BrowsCap.csv - Public standard for fixed and bot user agents.
– UserCap.csv - User-defined configuration file of user agents not available in
UserCap.csv.
– WURFL.csv - If the IBM Tealeaf CX Mobile module is licensed, the WURFL
standard must be downloaded and converted to CSV format, which contains
the public WURFL standard for use by Tealeaf in identifying mobile user
agents.
- See "Maintaining the CX System" in the IBM Tealeaf CX Installation Manual.
v Log messages sent to the Windows Event Log.
Enabling Legacy Mode
To enable Legacy Mode user agent parsing, please complete the following steps.
Note: If you have been using the standard version of user agent parsing and have
added values into the UserSupplement.csv file, those values must be inserted into
UserCap.csv. UserSupplement.csv is not used in Legacy Mode.
1. Login to the Tealeaf Portal as an administrator.
2. From the Portal menu, select Tealeaf > TMS. The Tealeaf Management System
is displayed. See "Tealeaf Management System" in the IBM Tealeaf cxImpact
Administration Manual.
3. Click the WorldView tab.
4. From the Servers drop-down, select the server hosting the capture pipeline
where the Tealeaf Reference session agent is deployed.
5.
6.
7.
8.
Click the Transport Service node.
Select Transport Service configuration.
In the Config Actions panel, click View/Edit (Raw).
The raw version of the TealeafCaptureSocket.cfg file is displayed. You may
choose to copy and paste this content into your favorite text editor for editing.
9. In the file, locate the [TLTRef] section.
10. Verify that the setting for AdvancedUAParsing is True. This setting enables basic
user agent parsing. It should be set to True for all new installs or upgrades to
Release 8.1 or later. If it is not, set this value to True.
11. Search the [TLTRef] section for UAParsing=.
If it is not found, insert the following line in the section:
UAParsing=old
If it is found, verify that it is set to the above value (old). This setting enables
Legacy Mode.
Note: This setting is not available by default and must be inserted in the
configuration manually.
12. Configure the other settings for the user agent. See "Tealeaf Reference Session
Agent" in the IBM Tealeaf CX Configuration Manual.
13. To save your changes, click Save.
14. To push the change to other Canisters in your environment, click Add Tasks
and Submit.
358
IBM Tealeaf CX: Configuration Manual
15. Legacy Mode for user agent parsing is enabled. To disable, set UAParsing to
any other value, comment out the line, or remove it from the configuration.
Disable use of generics
When Legacy Mode is enabled, use of user agent generics is not supported. See
"Tealeaf Reference Session Agent" in the IBM Tealeaf CX Configuration Manual.
Generics are a substitution mechanism used when updates to BrowsCap.csv and
WURFL.csv are converted for use in Tealeaf. During this conversion process, the use
of generics is disabled by checkbox. See "User Agent Tools" in the IBM Tealeaf
cxImpact Administration Manual.
Tuning the self-pruning cache
Depending on the traffic volume and the variety of traffic to your website, you
may need to tweak the settings for the self-pruning cache. Finding an appropriate
setting for these two parameters is paramount for optimum performance of your
pipeline when using extended user agent parsing.
Legacy Mode utilizes the same cache as the current implementation.
v See "Tealeaf Reference Session Agent" in the IBM Tealeaf CX Configuration Manual.
Event log messages at startup
Several errors can occur during startup of the extended user agent module. Most
of the errors pertain to missing files or files in the wrong format. While the errors
are meant to be self-explanatory, you can avoid causing issues with user agent
cache files by observing the following rules.
Rules for editing configuration files
1. Do not edit the files BrowsCap.csv and WURFL.csv by hand in an editor. These
files are meant to be in the format created by their owners and should not be
altered. The user agent cache verifies the file format and headers prior to
loading the files and does not load files that have been altered.
Note: These files should be updated on a regular basis from released versions
of the publicly available standard. See "Maintaining the CX System" in the IBM
Tealeaf CX Installation Manual.
2. When editing the UserCap.csv file, observe the format of the file. Configuring
this file is an advanced user function and should only be done by savvy users.
The format is defined in the first line of the file and consists of a list of
columns. The number of columns and their default values are also available in
the file. These must match exactly or loading of the file will fail. For more
information on editing, see "User Agent Tools" in the IBM Tealeaf cxImpact
Administration Manual.
3. Editing the UserCap.csv file in Excel may cause the quote characters to be
removed from each value on a particular line. In this case, the file fails to load.
Always save a backup of the file before editing, so you can revert if a
formatting error occurs.
Chapter 4. CX Pipeline Session Agents
359
Detecting browser and O/S type from user agent information
(earliest version)
Note: The information below is only used when advanced user agent parsing is
disabled. The information below pertains to an earlier version of user agent
tracking and is superseded by the AdvancedUAParsing setting.
It may be useful to detect and report the types of browser and operating system in
use by your visitors. To collect this data, the Tealeaf Reference session agent allows
user-chosen name/value pairs denoting a regular expression, to be used against
the HTTP_USER_AGENT REQ buffer member.
For example, in the configuration file, you can enter the following section:
#User Agent Parsing (add new members as desired)
UA_Replace=True
IE_All=MSIE\s\d\.\d
Opera_MajMin=Opera/\d\.\d\d
#Operating System Parsing (add new members as desired)
OS_Replace=True
Windows_XP=Windows\sNT\s5\.1
If UA_Replace is set to True, then the regular expression on each name/value pair is
applied to the user agent string. If a match is found, the value for the name on the
left side is inserted into the [appdata] section as below:
[appdata]
TLT_BROWSER=Opera_MajMin
TLT_OS=Windows_XP
In this manner, you can group OS and Browser types in any way. For example,
you can make all possible regular expression matches for Microsoft Internet
Explorer be represented as IE_ALL, or you could split them by major and minor
version numbers to get finer granularity, as in the following example:
UA_Replace=True
IE_6=MSIE\s6\.\d
IE_7=MSIE\s7\.\d
For reference, the TealeafCaptureSocket-base.cfg file contains several common
regular expressions.
Tealeaf Sessioning Session Agent
Sessionization can be applied in the Tealeaf pipeline via the TLSessioning session
agent. Tealeaf sessionization relies on user data in the REQ buffer to successfully
perform its function.
v The Tealeaf session identifier can be specified as something other than an HTTP
Cookie, such as a QUERY_STRING parameter.
v TLSessioning supports sessionization involving tables and table lookups.
Note: When configuring the TLSessioning section in CSS.cfg, place the section
after the [CookieParser] section. Otherwise, the session agent does not see the
cookie as a REQ name/value pair.
Adding the Session Agent
Session agents can be added through the Pipeline Editor in TMS. See “Adding a
Session Agent” on page 226.
360
IBM Tealeaf CX: Configuration Manual
For more information on the Pipeline Editor and TMS, see "Tealeaf Management
System" in the IBM Tealeaf cxImpact Administration Manual.
The remainder of this page describes configuration options and how to change
them through the TealeafCaptureSocket.cfg file stored on the server. These
settings are also available through the Pipeline Editor, which is the recommended
method for configuring session agents.
How Tealeaf Sessioning Works
The strength and vulnerability of Tealeaf sessionizing are the hash tables associated
with the session tables. SessionIDs are stored in buckets where the SessionID hash
determines the bucket in which the SessionID resides. The goal of hashing keys is
to distribute SessionIDs equally across the hash buckets. Therefore, it is important
that the hash function work well with the specified SessionIDs so that the resulting
bucket usage is relatively uniform. A hash function that does not work well can
effectively turn into a sequential list.
Note: Hashes vary between Tealeaf environments. What worked well for one
website may not work well elsewhere. Determining the appropriate hash typically
involves capturing data to determine the best hash value.
Underlying storage provides 65,536 buckets for storing SessionIDs. For a site that
creates a new session every second, 86,400 SessionIDs would be stored per day.
With a well-distributing hash, on average there would be one or two SessionIDs
per bucket. To find any random SessionID, a user extracts the hash from the
SessionID, looks in the associated bucket, and performs no more than two lookups
before finding the SessionID. If the hash value is not equally distributed, search
times become longer, and in the capture pipeline, speed is of the essence.
Typically, sessionization requires storing 10,000 or more SessionIDs into tables. The
rate at which these storage and search operations occur directly impacts the rate of
sessionization.
Serially searching through the SessionID pool is very slow. Using hash keys, the
database hash determines in which bucket a particular SessionID resides. For
example, the standard TLTSID is a 32-byte hex-ASCII value. Bytes 5 through 8 of
this string is a fairly random number, making it a good hash key for GUIDs
because SessionIDs are equally distributed into buckets specified by this substring.
The RTA SessPCT operator uses these 4 bytes to perform its function.
No hash performs equally well on all possible data sets. The default hash function
may perform poorly with a particular set of keys. The TLSessioning configuration
variable allows for specifying varying hash keys.
Example TLSessioning configuration
Below is an example of the TLSessioning section in the CSS.cfg file:
[TLSessioning]
TypeName=TLSessioning
DLL=SessionAgentRulesEngine.dll
DownStreamConfigSection=<NEXT CONFIG SECTION>
ScriptTrace=OFF
ResponseType=All
EnvironmentScript=EngineEnvironment.tcl
PreProcScript=TLSessioning.PreProc.tcl
ActionScript=TLSessioning.Action.tcl
Chapter 4. CX Pipeline Session Agents
361
MaxSessions=5000
PrimarySessField=SITESERVER=ID
PrimaryLooseStrict=Strict
PrimaryMaxFieldLen=36
The following settings are optional:
REQFilterTCL=true
PrimarySessFieldMaskOff / PrimarySessFieldMaskTCL
PrimaryHashKeyOff/PrimaryHashKeyTCL
PrimaryAssociateSetCookie=true
PrimaryCaseInsensitive=true
SecondarySessField =JSESSIONID
SecondaryLooseStrict=Strict
SecondaryMaxFieldLen=156
TertiarySessField=USER_ID
TertiaryLooseStrict=Strict
TertiaryMaxFieldLen=36
Configuration Settings
The following configuration settings are available for this session agent:
v Display Name values are displayed in TMS, which is the recommended method
for configuring session agents. See "Tealeaf Management System" in the IBM
Tealeaf cxImpact Administration Manual.
v Name values are displayed in TealeafCaptureSocket.cfg.
Table 39. Configuration Settings
Display Name
Name
Description
Max Sessions
MaxSessions
Specifies the maximum number of
concurrent sessions. The default
value is 10000.
PrimarySessField
PrimarySessField
Primary Sessioning Field. The default
value is JSESSIONID.
PrimaryMaxFieldLen
PrimaryMaxFieldLen
Maximum size of
PrimarySessioningField in
characters.
PrimaryCaseInsensitve
PrimaryCaseInsensitve
When set to true,
PrimarySessioningField is
case-insensitive. The default value is
false.
PrimarySessFieldMaskOFF
PrimarySessFieldMaskOFF
This field may be used for specifying
field offsets for PrimarySessField.
Offsets are 0-based.
PrimaryAssociateSetCookie
PrimaryAssociateSetCookie
For situations in which the sessioning
parameter is a cookie value and may
get updated, this option instructs the
script to search for the next
occurrence of the sessioning
parameter. If one is found, that value
is associated with the TLTSID.
SecondarySessField
SecondarySessField
Secondary Sessioning Field. The
default value is JSESSIONID.
SecondaryMaxFieldLen
SecondaryMaxFieldLen
Maximum size of
SecondarySessioningField in
characters.
362
IBM Tealeaf CX: Configuration Manual
Table 39. Configuration Settings (continued)
Display Name
Name
Description
SecondarySessFieldMaskOFF
SecondarySessFieldMaskOFF
This field may be used for specifying
field offsets for SecondarySessField.
Offsets are 0-based.
SecondaryAssociateSetCookie
SecondaryAssociateSetCookie
For use when
SecondarySessioningField is a cookie
and changes within the session, via a
set-cookie directive.
SecondaryCaseInsensitve
SecondaryCaseInsensitve
When set to true,
SecondarySessioningField is
case-insensitive. The default value is
false.
TertiarySessField
TertiarySessField
Tertiary Sessioning Field. The default
value is JSESSIONID.
TertiaryMaxFieldLen
TertiaryMaxFieldLen
Maximum size of
TertiarySessioningField in
characters.
TertiarySessFieldMaskOFF
TertiarySessFieldMaskOFF
This field may be used for specifying
field offsets for TertiarySessField.
Offsets are 0-based.
TertiaryAssociateSetCookie
TertiaryAssociateSetCookie
For use when
TertiarySessioningField is a cookie
and changes within the session, via a
set-cookie directive.
TertiaryCaseInsensitve
TertiaryCaseInsensitve
When set to true,
TertiarySessioningField is
case-insensitive. The default value is
false.
ScriptTrace
ScriptTrace
When enabled, script tracing is
applied to the session agent actions,
which is helpful for debugging.
Note: ScriptTrace should not be
enabled in production environments.
Examples
The following checks the CaptureSource parameter and only takes those captured
via the PCAv2:
REQFilterTCL=string equal "TealeafPassiveCapture2" [REQBufVal "CaptureSource"]
The following is identical to above except that string comparison is
case-insensitive:
REQFilterTCL=string equal -nocase "TealeafPassiveCapture2"
[REQBufVal "CaptureSource"]
The following tests if the string "test" is contained anywhere in the HTTP_HOST
value:
REQFilterTCL=string first "test" [REQBufVal "HTTP_HOST"]
Note the string first operation is always case-sensitive, so there is no -nocase
parameter.
Chapter 4. CX Pipeline Session Agents
363
The following is identical to above except test is case-insensitive:
REQFilterTCL=regexp -nocase -- "test" [REQBufVal "HTTP_HOST"]
The following tests if the LOCAL_ADDR parameter contains any of these IP
addresses: 10.10.10.10, 10.10.10.14, or 10.10.10.18"
REQFilterTCL=regexp -- "10.10.10.(10|14|18)" [REQBufVal "LOCAL_ADDR"]
Notes
v Do not change the ctc-conf.xml file to remove TLTSID as the cookie to session,
even when it is not. If sessionizing on a non-TLTSID value, Passive Capture
creates a 32-byte GUID as the TLTSID value, which turns all hits into 1-hit
sessions.
– TLSessioning assumes that the TLTSID contents are a 32-byte GUID (new
sessions assume the TLTSID of the first hit), so keep this value as a 32-byte
GUID. If the TLTSID cookie is valid because the Tealeaf cookie injector is in
use, then this TLSessioning is not necessary, although there is harm in using it
as long as TLTSID is specified as the PrimarySessField.
v Any Session Sampling such as performed by the RTA session agent must be
after the TLSessioning Script, or there is downstream session infidelity.
Session Joining
TLSessioning can be used for basic Session Joining. Session Joining is defined as
the joining of fragments into a single fragment. For example, the hits below
represent two different physical sessions, as determined by TLTSID:
Hit
Hit
Hit
Hit
Hit
Hit
Hit
1:
2:
3:
4:
5:
6:
7:
TLTSID
TLTSID
TLTSID
TLTSID
TLTSID
TLTSID
TLTSID
=
=
=
=
=
=
=
C70C0F4F451ED57190F8D5A059A1D071
C70C0F4F451ED57190F8D5A059A1D071
C70C0F4F451ED57190F8D5A059A1D071
C70C0F4F451ED57190F8D5A059A1D071
649B0BDA4BC15E0B141AD99791282A13
649B0BDA4BC15E0B141AD99791282A13
649B0BDA4BC15E0B141AD99791282A13
User-Key
User-Key
User-Key
User-Key
=
=
=
=
20E8AB8F-531D
20E8AB8F-531D
20E8AB8F-531D
20E8AB8F-531D
To combine these fragments into a single session, hits 5-7 should have the same
TLTSID as hits 1-4. The configuration is as follows:
PrimarySessField=TLTSID
PrimaryLooseStrict=Strict
PrimaryMaxFieldLen=36
SecondarySessField=User-Key
SecondaryLooseStrict=Strict
SecondaryMaxFieldLen=20
When Hit3 is processed, TLSessioning notes the presence of User-Key and
associates the SessionID (in this case, C70C0F4F451ED57190F8D5A059A1D071) with it.
When Hit5 arrives, the TLTSID changes, indicating the start of a new session.
While this TLTSID is appearing for the first time, TLSessioning already associates
the User-Key value to an existing TLTSID, so the first identifier
(C70C0F4F451ED57190F8D5A059A1D071) replaces the new TLTSID.
v This User-Key value is also associated with the new TLTSID. When Hit7 is
processed without a User-Key value, TLSessioning can continue to associate the
correct TLTSID with this hit.
364
IBM Tealeaf CX: Configuration Manual
Actual TLSessioning Configuration Examples
Example 1
This simple example shows sessioning on one REQ buffer field USERID, which can
be a maximum of 32 bytes long.
Since there is no REQFilterTCL parameter, all hits are subject to sessioning. From
analysis of the USERID field, the USERID was determined to be in GUID format,
so the default hash key (bytes 5 through 8) of USERID is used.
[TLSessioning]
TypeName=TLSessioning
DLL=SessionAgentRulesEngine.dll
DownStreamConfigSection=Null
ScriptTrace=OFF
ResponseType=All
EnvironmentScript=EngineEnvironment.tcl
ActionScript=TLSessioning.Action.tcl
PreProcScript=TLSessioning.PreProc.tcl
MaxSessions=10000
PrimarySessField=USERID
PrimaryLooseStrict=Strict
PrimaryMaxFieldLen=32
Example 2
Example 2 is a slight elaboration on example 1, using JSESSIONIDs. Only hits
where TealeafPassiveCapture2 is the CaptureSource are used.
Examination of some JSESSIONID examples reveals the following:
JSESSIONID=0000NMkvrBPJZ_CDI6uwIGn2mc5:-1
JSESSIONID=0000Fnvv6ZSGhoYwYYGnhO0o9uP:-1
JSESSIONID=0000RxQRv-FOyXbf_HqSo8sgE9t:-1
JSESSIONID=0000h9fQp-aVTadt7TAw4IksSXP:-1
JSESSIONID=0000BvLWMKVi8qNs8G6OC12tF8V:-1
JSESSIONID=0000b3N00Y8Af0Miv54CkeijtTL:-1
Bytes 5 through 27 are the sessioning field, and bytes 5 through 9 are the hash key.
The appropriate configuration is the following:
[TLSessioning]
TypeName=TLSessioning
DLL=SessionAgentRulesEngine.dll
DownStreamConfigSection=Null
ScriptTrace=OFF
ResponseType=All
EnvironmentScript=EngineEnvironment.tcl
ActionScript=TLSessioning.Action.tcl
PreProcScript=TLSessioning.PreProc.tcl
MaxSessions=10000
REQFilterTCL=string equal "TealeafPassiveCapture2" \
[REQBufVal "CaptureSource"]
PrimarySessField=JSESSIONID
PrimaryLooseStrict=Strict
PrimaryMaxFieldLen=32
PrimarySessFieldMaskOFF=4 26
PrimaryHashKeyOFF=4 8
Chapter 4. CX Pipeline Session Agents
365
Tealeaf Session Agents
v
v
v
v
“Adding a Session Agent” on page 226
“Archive Session Agent” on page 227
"Attribute Indexing Session Agent" in the IBM Tealeaf CX Configuration Manual
“Canister Session Agent” on page 236
v
v
v
v
v
v
v
“Cookie Parser Session Agent” on page 238
“Data Drop Session Agent” on page 241
“Data Parser Session Agent” on page 246
“Decouple Session Agent” on page 250
“Extended Decoupler Session Agent” on page 252
“Extended Privacy Session Agent” on page 261
“Health-Based Routing (HBR) Session Agent” on page 263
v “Inflate Session Agent” on page 271
v “JSON Mobile Parser Session Agent” on page 275
v
v
v
v
v
“Managed Code Session Agent” on page 287
“Null Session Agent” on page 290
“Privacy Session Agent” on page 291
“Real-Time Monitoring and Alert (RTA) Session Agent” on page 321
“Response Tags to Request Session Agent” on page 326
v “RTA Split Session Agent” on page 328
v “Sessioning Session Agent” on page 332
v “Session Router Session Agent” on page 330
v
v
v
v
“Socket Session Agent” on page 335
“Statistics Logger Session Agent” on page 337
"Tealeaf Reference Session Agent" in the IBM Tealeaf CX Configuration Manual
“Tealeaf Reference Session Agent - Legacy Mode” on page 357
v Tealeaf Sessioning Session Agent
v “TimeGrades Session Agent”
v “TLI Session Agent” on page 368
v “URL Decode Session Agent” on page 382
TimeGrades Session Agent
The TimeGrades session agent assigns a grade to a hit in the following three areas:
v Web Server generation time: How long it takes the Web server to serve up the
page.
v Network time: Measures network speed based on how much time a packet
spent on the network. This information is available only from a Passive Capture
host machine.
v Round Trip time: How long it takes an arbitrary packet to travel from the client
to the Web server. This information is available only from a Passive Capture host
machine.
Based on these three criteria, TimeGrades assigns the hit a grade of Excellent,
Normal, HighNormal, or High. These values are paired with numbers assigned to
them in the TimeGrades TCL script.
366
IBM Tealeaf CX: Configuration Manual
Adding the Session Agent_g
Session agents can be added through the Pipeline Editor in TMS. See “Adding a
Session Agent” on page 226.
For more information on the Pipeline Editor and TMS, see "Tealeaf Management
System" in the IBM Tealeaf cxImpact Administration Manual.
The remainder of this page describes configuration options and how to change
them through the TealeafCaptureSocket.cfg file stored on the server. These
settings are also available through the Pipeline Editor, which is the recommended
method for configuring session agents.
Configuration Settings
The following settings are available for this session agent.
v Display Name values are displayed in TMS, which is the recommended method
for configuring session agents. See "Tealeaf Management System" in the IBM
Tealeaf cxImpact Administration Manual.
v Name values are displayed in TealeafCaptureSocket.cfg.
In each case, the entry is a specified set of values. See “Assigning Grades.”
Table 40. Configuration Settings
Display Name
Name
Description
Web Server Time Breaks
WSGenBreaks
List of web server page generation
time grade breaks
(<value>:<description>) separated
by commas.
Network Transit Breaks
NetworkTransitBreaks
List of network transit time grade
breaks (<value>:<description>)
separated by commas.
RoundTrip Breaks
RoundTripBreaks
List of round trip time grade breaks
(<value>:<description>) separated
by commas.
Assigning Grades
The following is a sample input string for WSGenBreaks:
.20:ExcellentWS,1.0:NormalWS,2.0:HighNormalWS,4:HighWS
The following is a sample input string for NetworkTransitBreaks:
.5:ExcellentNT,1:NormalNT,2.1:HighNormalNT,5:HighNT
The following is a sample input string for RoundTripBreaks:
.5:ExcellentRT,1.0:NormalRT,2.25:HighNormalRT,3.5:HighRT
How Grades Are Applied
TimeGrades adds these scores to the hits, based on the raw values it receives. Any
number above the highest defined value (e.g., 5) is automatically assigned a grade
of HighNormal. This grade can be configured to have a different label by adding the
Chapter 4. CX Pipeline Session Agents
367
desired description in the set LastNTDesc, set LastRTDesc, and set LastWSDesc
sections of the TCL script. If a new name is added, it will appear as High <New
Name>.
For example:
set LastWSDesc [GetValue $ConfigSection "LastWSDescription=Extra"]
results in the following as the highest grade: High Extra
Tealeaf Session Agents
v
v
v
v
“Adding a Session Agent” on page 226
“Archive Session Agent” on page 227
"Attribute Indexing Session Agent" in the IBM Tealeaf CX Configuration Manual
“Canister Session Agent” on page 236
v
v
v
v
v
v
v
“Cookie Parser Session Agent” on page 238
“Data Drop Session Agent” on page 241
“Data Parser Session Agent” on page 246
“Decouple Session Agent” on page 250
“Extended Decoupler Session Agent” on page 252
“Extended Privacy Session Agent” on page 261
“Health-Based Routing (HBR) Session Agent” on page 263
v “Inflate Session Agent” on page 271
v “JSON Mobile Parser Session Agent” on page 275
v
v
v
v
v
“Managed Code Session Agent” on page 287
“Null Session Agent” on page 290
“Privacy Session Agent” on page 291
“Real-Time Monitoring and Alert (RTA) Session Agent” on page 321
“Response Tags to Request Session Agent” on page 326
v “RTA Split Session Agent” on page 328
v “Sessioning Session Agent” on page 332
v
v
v
v
v
“Session Router Session Agent” on page 330
“Socket Session Agent” on page 335
“Statistics Logger Session Agent” on page 337
"Tealeaf Reference Session Agent" in the IBM Tealeaf CX Configuration Manual
“Tealeaf Reference Session Agent - Legacy Mode” on page 357
v “Tealeaf Sessioning Session Agent” on page 360
v TimeGrades Session Agent
v “TLI Session Agent”
v “URL Decode Session Agent” on page 382
TLI Session Agent
The TLI session agent can be deployed to generate TLI files in real-time based on
the session data passed through a Windows pipeline and captured for storage. A
TLI file is a database of static content such as images, JavaScripts, and stylesheets
that can be referenced during replay, instead of going to the origin server. This
archive of static content improves replay performance without the potential
connectivity issues or distortion of performance statistics on the production web
application.
368
IBM Tealeaf CX: Configuration Manual
Note: The TLI session agent is used to add content to static archives (TLI files).
For more information on Tealeaf static archives, see "Managing Static Archives" in
the IBM Tealeaf cxImpact Administration Manual.
Replay using TLI files is supported through the IBM Tealeaf CX RealiTea Viewer
and Browser-Based Replay.
v See "Using Static Archives in RTV" in the IBM Tealeaf RealiTea Viewer User
Manual.
v For BBR users, replay of static content is transparent.
This section provides configuration steps on the details of deploying the TLI
session agent, configuring the TLI pipeline, and splitting static content from the
main processing pipeline for the TLI server.
v For more information on the other configuration steps required to set up TLI
servers, see "Managing Static Archives" in the IBM Tealeaf cxImpact Administration
Manual.
Prerequisites
Note: Depending on the volume of static content in your web application and
daily traffic, enabling the capture of static content can significantly increase the
volume of data that is captured, processed, and stored by Tealeaf. For more
information, contact Tealeaf Professional Services.
Setting up TLI Management
Deployment of this session agent and capture of static content requires end-to-end
configuration of Tealeaf. Before you begin, you should familiarize yourself with the
requirements and perform the configuration of the session agent and its pipeline
within the context of the overall steps. See "Managing Static Archives" in the IBM
Tealeaf cxImpact Administration Manual.
Configuring Pipelines for Static Archives
The basic architecture for TLI processing pipelines is to split content from one of
your existing Windows pipelines and to send the content to a Windows pipeline
dedicated to inserting static content into .TLI files.
v See “Deployment Assumptions.”
Static archiving requires changes to the following pipelines:
v “Main processing pipeline” on page 371 - In your main Windows processing
pipeline, you must insert the RTA session agent to forward static content to the
TLI server.
– See “Main processing pipeline” on page 371.
v “TLI processing pipeline” on page 370 - On the TLI server, you must configure a
pipeline to capture the static content and store it in the appropriate TLI file.
– See “Main processing pipeline” on page 371.
Deployment Assumptions
The configuration instructions listed below assume that:
v The TLI pipeline is installed on a separate machine dedicated to capturing static
content and storing it in TLIs. This TLI server has no other pipelines on it.
Chapter 4. CX Pipeline Session Agents
369
v In a Canister pipeline, static content is split from the pipeline and forwarded to
the TLI server.
Note: The TLI session agent should not be deployed in a Windows pipeline where
other processing occurs. This session agent requires a dedicated Windows pipeline
and, if possible, a separate dedicated machine.
Other deployments are possible. For more information, please contact Tealeaf
Professional Services.
Configuration Workflow
Static content should be separated from other session data as early as possible
during processing on the Windows servers. Since the static content volumes can be
quite large, you should minimize processing it with other session agents, which
will not be able to take action on this mostly binary data. It is recommended to
deploy the RTA session agent immediately after a Decouple session agent at the
top of each Windows pipeline. Additional information is provided in the
configuration workflow.
1. Before you begin, Tealeaf software must be installed on the TLI server. See
"Managing Static Archives" in the IBM Tealeaf cxImpact Administration Manual.
2. Through TMS, access the Pipeline Editor on the TLI server.
3. Create a new pipeline. See "TMS Pipeline Editor" in the IBM Tealeaf cxImpact
Administration Manual.
4. Specify the session agents of the TLI processing pipeline.
v See “TLI processing pipeline.”
5. Insert the TLI session agent. See “Adding the Session Agent” on page 376.
6. Configure the parameters of the TLI session agent. See “Configuring the TLI
Session Agent” on page 376.
7. The TLI server is now configured and ready to receive data from the main
Windows pipeline.
8. Through TMS, insert the RTA session agent into the pipeline on the Canister
or HBR machine that will forward static content to the TLI server. This session
agent must be configured to pass response content of the appropriate
mimetypes to the TLI processing pipeline. See “Main processing pipeline” on
page 371.
9. When you have completed the configuration, you should enable capture of a
single content type through the PCA to test. You can use this test to determine
static content capture and storage and potential impacts on storage
requirements and bandwidth. See "PCA Web Console - Pipeline Tab" in the
IBM Tealeaf Passive Capture Application Manual.
10. You can continue to enable content types as needed.
TLI processing pipeline
The pipeline that is used to insert static content into the current .TLI file requires
the following minimum configuration:
Decouple > Inflate > TLI > Null
Note: For the TLI processing pipeline, Tealeaf recommends using the Decouple
session agent, instead of DecoupleEx. The DecoupleEx session agent includes
spooling capabilities, which can delay insertion into the TLI database and disrupt
timestamps on the objects.
370
IBM Tealeaf CX: Configuration Manual
v Outside of the TLI environment, TLI recommends the DecoupleEx session agent
for pipelines that process session hits.
Note: The TLI session agent must be configured so that its downstream session
agent is the Null session agent. See “Adding the Session Agent” on page 376.
Note: In almost all environments, the Privacy session agent is not necessary for the
TLI pipeline. Since most static content is binary or script files, it is unlikely that
any static content requires security measures. As a general guideline, if an object
requires privacy to be applied to it, it probably does not belong in a static archive.
Main processing pipeline
Deploy RTASplit
Below, you can review the minimum main content processing pipeline as a list of
session agents. Specifically, the RTASplit session agent needs to be inserted and
configured to direct the static content to the TLI processing pipeline.
Decouple > RTASplit > (other session agents, including Privacy) > Null
Note: The RTASplit session agent should be deployed as early as possible in the
pipeline, so that downstream session agents do not need to process static content
unnecessarily. Tealeaf recommends deploying it immediately after Decouple. This
deployment may impact spool file sizes.
RTASplit can be deployed through the Pipeline Editor in TMS. When the session
agent is added through TMS:
v The RTASplit session agent in the pipeline needs to be configured. See
“Configure RTASplit.”
v An RTASplit configuration file reference is added beneath the Transport Service
node on the server where it has been deployed. This ini file is used to defined
the rules applied to RTASplit. See “RTASplit rules” on page 372
See "TMS Pipeline Editor" in the IBM Tealeaf cxImpact Administration Manual.
Configure RTASplit
When the RTASplit session agent has been deployed in the main processing
pipeline, you can use the following example configuration as the basis for
modifying the session agent's behavior.
v Key elements of the configuration are described below the sample.
[RTASplit]
TypeName=RTASplit
DLL=SessionAgentPipelineSplitter.dll
DownStreamConfigSection=<NEXT CONFIG SECTION>
ScriptTrace=OFF
RTAIni=RTASplit.ini
ResponseType=All
EnvironmentScript=EngineEnvironment.tcl
PreProcScript=RTA.PreProc.tcl
ActionScript=RTA.Action.tcl
# TLI pipeline
PipelineConfig1=HitRouter_Pipeline1.cfg
# Null pipeline
PipelineConfig2=HitRouter_Pipeline2.cfg
The following are key elements in the configuration that you may wish to modify.
Note: Tealeaf recommends that you leave the other configurations unmodified,
unless explicitly directed to do otherwise by Tealeaf.
Chapter 4. CX Pipeline Session Agents
371
Field
Description
PipelineConfig1
Filename of the pipeline that receives the content of Rule 2, as defined
below.
Note: Do not change this filename.
PipelineConfig2
Filename of the pipeline that receives the content of Rule 1, as defined
below.
Note: Do not change this filename.
Adding pipelines
For TLI configuration, no additional pipelines are required. If your environment
requires additional RTA configurations:
v Add a reference similar to the following:
# Null pipeline
PipelineConfig3=HitRouter_Pipeline3.cfg
v Copy one of the other pipeline configuration files and edit it to contain the
session agent configuration required for your new pipeline.
v Edit the RTA rules to send any required data to the new pipeline.
Note: If you need to comment out a rule, in a hash mark (#) at the beginning of
the line, which disables them.
RTASplit rules
The RTASplit session agent needs to be configured to detect the mimetypes for
responses that should be forwarded to the TLI processing pipeline.
Below, some example rules are provided that can be used to direct content to the
destination system.
To configure RTASplit rules:
1. In the Tealeaf Portal, select Tealeaf > TMS. The Tealeaf Management System is
displayed. See "Tealeaf Management System" in the IBM Tealeaf cxImpact
Administration Manual.
2. In the View drop-down, select Servers.
3. Select the server where the main processing pipeline is located.
4. Click the Transport Service node.
5. Click the RTASplit configuration file node.
Note: If this file is not present, the RTA session agent has not been deployed in
your pipeline. See "TMS Pipeline Editor" in the IBM Tealeaf cxImpact
Administration Manual.
6. Click View/Edit.
7. The RTA rules configuration file is displayed.
Below, a set of RTAsplit rules have been provided to divert static content from the
pipeline in which the RTA session agent is deployed to the TLI server for capture
by the TLI session agent.
372
IBM Tealeaf CX: Configuration Manual
#---------------------------------------------------------------------------# The below rules searches the ResponseType for a match and routes the current
# hit to Pipe0 or Pipe1.
# This is an example is intended to be used with a TLI session agent
# configured in Pipe1.
#
<RULE NUM="1" STATUS="ENABLED" DESCRIPTION="ResponseType to Pipe 2"
Stoprules="YES" >
<GROUP TYPE="REQTest" REQF="ResponseType" REQOP="EQ" REQVAL="unknown">
</GROUP>
<GROUP TYPE="REQTest" REQF="StatusCode" REQOP="EQ" REQVAL="304">
</GROUP>
<GROUP TYPE="REQTest" REQF="URL" REQOP="REGEXPR"
REQVAL="(\.js|\.gif|\.jpg)">
</GROUP>
<GROUP TYPE="SetPipeID" PipeID="2" Type="SET">
</GROUP>
</Rule>
<RULE NUM="2" STATUS="ENABLED" DESCRIPTION="ResponseType to Pipe 1"
Stoprules="YES" >
<GROUP TYPE="REQTest" REQF="ResponseType" REQOP="REGEXPR"
REQVAL="(image|x-javascript|css)">
</GROUP>
<GROUP TYPE="SetPipeID" PipeID="1" Type="SET">
</GROUP>
</Rule>
#----------------------------------------------------------------------------
Rule
Description
RULE 1
This set of rules sends non-static content to Pipeline 2 (See
HitRouter_PipeLine2_TLI_sample.cfg below), based on the following
groupings:
v All content with unknown response type
v All content that contains a Status Code 304 message. This code indicates
that the content has not been changed since the last time it was
requested, which means that it has been cached in the browser and
already processed for capture as a new content item.
v All content that does not have a .js, .gif, or .jpg extension
v See “Pipeline 2” on page 375.
RULE 2
This set of rules sends static content to Pipeline 1 (See
HitRouter_PipeLine1_TLI_sample.cfg below), based on the regular
expression that matches the response type to types image, x-javascript or
css.
Note: Depending on the content types in your web application, this list
may need to be expanded. Additional content types should be enabled for
capture through the Pipeline tab of the PCA Web Console. See "PCA Web
Console - Pipeline Tab" in the IBM Tealeaf Passive Capture Application
Manual.
v See “Pipeline 1” on page 374.
RTASplit Pipeline configuration
Below, you can see example configurations for pipelines that are specific to the
RTASplit session agent. When data is passed through the RTASplit session agent,
the rules above dictate the pipelines to which the data is passed. Based on the
Chapter 4. CX Pipeline Session Agents
373
following configurations, the data is processed and, when configuring RTA for
static content management, forwarded to the TLI server through Pipeline 1.
Note: When used in the TLI pipeline, the RTA session agent is an advanced
session agent and should only be deployed in consultation with Tealeaf
Professional Services.
Pipeline 1
This pipeline receives the static content from the RTA session agent, as defined in
Rule 2 above.
[StatusMaster]
DLL=StatusMaster.dll
AppName=TeaLeafHR1
[Globals]
DownStreamConfigSection=Decouple
# Child pipelines should have a Decouple session agent, the Decoupler
# allows for sending hits down multiple pipelines to be a parallel operation.
# Otherwise data sent down multiple pipelines would become a serial
# operation, and any delay (eg, socket having to reconnect) will impact the
# speed/performance of possible other child pipelines.
#
[Decouple]
TypeName=Decouple
DLL=SessionAgentDecouple.dll
MaxQueueSize=2500
DownStreamConfigSection=Inflate
[Inflate]
TypeName=Inflate
DLL=SessionAgentInflate.dll
UnReqCancelled=True
MaxInflateSize=512KB
DownStreamConfigSection=RTA
#DownStreamConfigSection=TLI
# Inflate or Deflate Stuff
#Mode=Deflate
Mode=Inflate
# use only when querystring needs to be modified.
[RTA]
TypeName=RTA
DLL=SessionAgentRulesEngine.dll
DownStreamConfigSection=TLI
RTAIni=TLI_RTA.ini
ScriptTrace=ON
ResponseType=All
EnvironmentScript=EngineEnvironment.tcl
PreProcScript=RTA.PreProc.tcl
ActionScript=RTA.Action.tcl
[TLI]
TypeName=TLI
DLL=SessionAgentTLI.dll
MaxImageSize=1MB
DownStreamConfigSection=Null
MimeTypes=image/jpeg,image/gif,application/x-javascript
#-- Leave it commented out for <installbasedir>\System\TLI
#TliDirectory=C:\Tealeaf\System\TLI
374
IBM Tealeaf CX: Configuration Manual
Log=OFF
LogLevel=INFO
#-- Leave it commented out for <installbasedir>\logs
#LogDir=C:\TeaLeaf\Logs
# Disk Quota Controls (identical to SessionAgentArchive)
#
DiskQuotaDLL=DiskQuota.dll
DiskQuotaPctFree=10
DiskQuotaScanTimeSeconds=20
[Null]
TypeName=Null
DLL=SessionAgentNull.dll
Pipeline 2
Based on the rules above, this child pipeline manages the non-static content. As
such, content passes through the Decouple session agent, which manages the
throttling of content in the pipelines so that processing can occur in parallel. The
pipeline is immediately terminated with the Null session agent, after which it is
passed back to the parent pipeline, entering the session agent defined to receive
content after the RTA session agent.
[StatusMaster]
DLL=StatusMaster.dll
AppName=TeaLeafHR2
[Globals]
DownStreamConfigSection=Decouple
# Child pipelines should have a Decouple session agent, the Decoupler
# allows for sending hits down multiple pipelines to be a parallel operation.
# Otherwise data sent down multiple pipelines would become a serial
# operation, and any delay (eg, socket having to reconnect) will impact
# the speed/performance of possible other child pipelines.
#
[Decouple]
TypeName=Decouple
DLL=SessionAgentDecouple.dll
MaxQueueSize=2500
DownStreamConfigSection=Null
[Null]
TypeName=Null
DLL=SessionAgentNull.dll
Disable DelImages
If you have deployed the Data Drop session agent in your TLI pipeline or any
pipeline that feeds the TLI pipeline, please verify that the DelImages feature has
been disabled. Enabled by default, this feature deletes static content, including
images, stylesheets, and Javascripts, from hits passing through the pipeline. For the
static archive to properly capture this content, it must remain in the hit until the
TLI session agent can see it.
Note: Beginning in PCA Build 3502, this functionality can be enabled in the PCA
pipeline. If you have installed PCA Build 3502 or later, please verify that this
feature is disabled in the Pipeline Tab. See "Delete Images on PCA Side" in the IBM
Tealeaf Passive Capture Application Manual.
Chapter 4. CX Pipeline Session Agents
375
See “Data Drop Session Agent” on page 241.
Adding the Session Agent
Note: Do not enable the capture of static content on the PCA until you have
completed the configuration of the TLI session agent.
To add the session agent, you can use the TMS pipeline editor to create the
pipeline and specify most of its session agent:
Decouple > Inflate > TLI > Null
All of the above session agents can be added through the Pipeline Editor in the
Tealeaf Management System.
Please complete the following steps to insert the TLI session agent into your
capture pipeline on the TLI server.
Note: These steps assume that you have already created the pipeline with all
session agents except for the TLI session agent and saved the configuration to the
server.
v For more information on creating the pipeline, see "Adding Pipelines" in the
IBM Tealeaf cxImpact Administration Manual.
v For more information on adding a session agent, see "Adding Session Agents" in
the IBM Tealeaf cxImpact Administration Manual.
v For more information on where you perform these configuration changes
through the Portal, see "TMS Pipeline Editor" in the IBM Tealeaf cxImpact
Administration Manual.
1. Insert the TLI session agent in your pipeline.
2.
3.
4.
5.
Place the session agent immediately after the Inflate session agent.
Edit the session agent.
Configure the settings as needed. See “Configuring the TLI Session Agent.”
In the TLI configuration settings, verify that the following setting is specified:
DownStreamConfigSection=Null
6. The above setting identifies that the next session agent after the TLI session
agent is the Null session agent, which is the proper configuration.
7. Save the configuration. You have now specified the pipeline.
8. The next step is to configure the other settings for the session agent. You can
leave the file open to complete the next section. See “Configuring the TLI
Session Agent.”
Configuring the TLI Session Agent
After you have configured the TLI pipeline to capture static content, you must
configure the TLI session agent in the pipeline.
This session agent scans content based on a configured list of mime types. When
matching mime types are detected, the session agent computes a unique identifier
for the object using a computed checksum of the content and the URL for where
the content originated. This identifier is compared to identifiers for objects already
stored in the active .TLI file. If there is no match with an existing identifier, the
static object is inserted into the static archive.
376
IBM Tealeaf CX: Configuration Manual
Note: Static content served by a content deliver network such as Akamai is
downloaded to the visitor browser and is thus available for capture by the TLI
session agent.
By default, the TLI session agent is configured to capture the following mime
types:
v image/jpeg
v image/gif
v application/x-javascript
Note: If the PCA has not yet been configured to capture the desired mime types,
they never appear in the Windows pipeline and are not captured at this time.
Enabling capture of these mimetypes through the PCA is the last step in
configuration, after which static content is flowing through the system and data
volume may rise significantly.
Below is a sample configuration for the TLI session agent as it appears in the
TealeafCaptureSocket.cfg file.
Note: Where possible, you should use the Tealeaf Management System to perform
your configuration changes. The information below is provided, as it contains
additional documentation.
#----------------------------------------------------------------------------# Tealeaf Image Content File
#
# MimeTypes
- Mimetype(s) to add to TLI file.
# MaxImageSize
- Max size of individual content added to TLI file.
# TLIDirectory
- Directory where TLI files are written.
#
# Logging Controls
#
Log
-- either ON/OFF
#
LogLevel
-- either ERROR/WARNING/INFO/DEBUG
#
LogDir
-- log directory. Default "<Tealeaf Install Directory>\Logs"
[TLI]
TypeName=TLI
DLL=SessionAgentTLI.dll
MaxImageSize=1MB
DownStreamConfigSection=Null
MimeTypes=image/jpeg,image/gif,application/x-javascript
#-- Leave it commented out for <installbasedir>\System\TLI
#TliDirectory=C:\Tealeaf\System\TLI
Log=ON
LogLevel=INFO
#-- Leave it commented out for <installbasedir>\logs
#LogDir=C:\TeaLeaf\Logs
# Disk Quota Controls (identical to SessionAgentArchive)
#
DiskQuotaDLL=DiskQuota.dll
DiskQuotaPctFree=20
DiskQuotaScanTimeSeconds=20
Setting Description
DLL
Set this value to SessionAgentTLI.dll.
MaxImageSize
The maximum permitted size for image files. By default, this value is set to
1 MB.
Chapter 4. CX Pipeline Session Agents
377
DownStreamConfigSection
This setting specifies the next session agent in the pipeline to which the
output of this one is passed.
Note: For the TLI session agent, this value must be set to Null. Do not
pass static content to other session agents after it has been inserted or
rejected by the TLI session agent.
MimeTypes
Defines the mimetypes that are captured into the static archive. By default
the following mimetypes are captured into static archives:
image/jpeg,image/gif,application/x-javascript
Note: These mimetypes must be configured to be captured by the IBM
Tealeaf CX Passive Capture Application, which drops static content by
default. See "PCA Web Console - Pipeline Tab" in the IBM Tealeaf Passive
Capture Application Manual.
Note: If the TLI server detects a content type that is not in this list, the
content type is automatically dropped from further processing.
Log
To enable logging, set this value to ON. See “Logging” on page 380.
LogLevel
Set the logging level for the TLI session agent.
Note: The only logging levels currently supported are INFO/DEBUG. See
“Logging” on page 380.
DiskQuotaDLL
Specifies the .DLL that handles disk management monitoring of the TLI
directory. This value should be set to DiskQuota.dll. See “Disk space
management” on page 381.
DiskQuotaPctFree
Configures the lowest permitted percentage of free disk space. See “Disk
space management” on page 381.
DiskQuotaScanTimeSeconds
Interval in seconds when the disk manager scans the TLI directory for free
space. See “Disk space management” on page 381.
Roll time
The TLI session agent is automatically configured to roll the day's static archive at
12:01 AM. When the archive is rolled, the current static archive is closed, and a
new .TLI file is created, and static content is added to it. Through the Scheduling
Service, you can configure merge jobs to merge the daily TLI content into the
monthly archive. See "Configuring TLI Jobs" in the IBM Tealeaf CX Configuration
Manual.
The TLI session agent can be deployed through the TMS Pipeline Editor.
Additional configured is required. See "TMS Pipeline Editor" in the IBM Tealeaf
cxImpact Administration Manual.
TLI filenames
.TLI files are stored in the TLI directories using the following naming patterns.
378
IBM Tealeaf CX: Configuration Manual
TLI file
Filename
Current Daily
StaticFiles_YYYYMMDD.tli
Monthly
MergeStaticFiles_YYYYMMDD.tli
See "TLI Files" in the IBM Tealeaf cxImpact Administration Manual.
Specifying TLI directories
The TLI session agent requires three directories to be configured for storage of
TLI-generated data:
Table 41. Specifying TLI directories
Directory
Setting
Description
TLI
Directory
TLIDirectory
The directory where daily TLIs are
created and stored before merging
into the monthly TLIs, which are
stored in the same directory
Note: If you change this directory
from its default value, you must
apply the change to the TLIPath
setting in Search Server configuration
through TMS. See “Changing TLI
directories in Search Server.”
TLI Backup
TLIBackupPath
The directory where daily TLIs that
have been merged are stored after
they have been removed from the
main TLI directory. This setting is
configured through Search Server. See
“Changing TLI directories in Search
Server.”
Note: This directory cannot be within
the main TLI directory. If you change
this directory from its default value,
you must apply the change to Search
Server through TMS. See “Changing
TLI directories in Search Server.”
For more information on merging TLI
files, see "Configuring TLI merge
jobs" in the IBM Tealeaf CX
Configuration Manual
Logs
LogDir
The directory where TLI log files are
stored when logging is enabled. By
default, logging is disabled, and this
directory is the main Tealeaf log
directory. See “Logging” on page 380.
Changing TLI directories in Search Server
When you change the setting for the main TLI directory or the TLI backup
directory, you must apply the change to Search Server configuration through TMS.
Please complete the following steps to complete the change.
Chapter 4. CX Pipeline Session Agents
379
1. After you have applied the change to the TLI session agent, save the
configuration. See "TMS Pipeline Editor" in the IBM Tealeaf cxImpact
Administration Manual.
2. If you are not currently in the Tealeaf Management System, from the Portal
menu, select Tealeaf > TMS. See "Tealeaf Management System" in the IBM
Tealeaf cxImpact Administration Manual.
3. Click the WorldView tab.
4. From the View drop-down, select Servers.
5. Select the server where the TLI processing pipeline is located.
Note: These updates need to be applied only to the Search Server hosted by
the TLI server.
6. Open the Search Server node.
7. Click Search Server configuration.
8. In the Config Actions pane, click View/Edit (Raw).
9. The raw configuration for Search Server is displayed. Click the Default node.
10. Specify the local file path for either or both of the following settings to match
the value(s) you've specified for the TLI session agent:
Search Server Setting
Description
TLIPath
Main TLI directory setting. It should match the value for TliDirectory
in the TLI session agent
TLIBackupPath
Setting for the TLI backup directory on the TLI server. It should match
the value specified for TliBackupDir in the TLI session agent.
Note: This directory cannot be within the main TLI directory. It may
be a separate directory on the same storage device, which is
recommended. If you create this directory on the same storage volume
as the main directory and enable monitoring of the disk space, this
backup directory is effectively monitored for free space. The directory
is not monitored if it's on another storage device. See “Disk space
management” on page 381.
11. Save the configuration changes.
Changing TLI directories in Replay Server
Each instance of the Replay Server in your environment must be aware of the
location of the TLI server and appropriate path values. This configuration must be
applied to each Replay Server instance through TMS.
v See “Configuring the Replay Server” on page 69.
Logging
The TLI session agent can be configured to generate logging information.
Note: Debug log level generates information, warning, and error log messages,
which may result in sizeable files. For this reason, logging is set to INFO by default.
To enable logging:
v In the TLI session agent, you must configure the following settings:
380
IBM Tealeaf CX: Configuration Manual
1. Configure the LogDir to the local directory where TLI session agent logs are
to be stored.
– If this value is not specified, the main Tealeaf log directory is used:
<Tealeaf_install_directory>\Logs
2. Raise the LogLevel value from INFO to DEBUG, if needed.
3. Set the Log parameter to ON.
v Save changes.
v Debug log level messaging is enabled for the TLI session agent.
v Debug issues as needed.
v When you have resolved the issue, reset the log value from DEBUG.
If logging is enabled, the session agent writes a detailed log file that can be
searched for errors. Search the file for the ERROR string.
Disk space management
The TLI session agent can be configured to monitor the available space on the
storage device where the TLI main directory is located and generate a Windows
event log alert when the percentage of free disk space drops below a specified
threshold.
Note: TLI disk management monitoring applies only to the TLI main directory. If
the TLI backup directory is on a different storage device, these tools do not track
or alert free disk space in that directory.
To enable monitoring of disk space on the storage device where TLI files are
written, please complete the following configuration steps.
Note: Before you begin using TLI session agent, you should determine the amount
of disk space on the designated storage device and assess the potential impact of
capturing static content. See "Assess Impact on Data Storage and Throughput" in
the IBM Tealeaf cxImpact Administration Manual.
1. In the TMS Pipeline Editor, edit the TLI session agent configuration. See "TMS
Pipeline Editor" in the IBM Tealeaf cxImpact Administration Manual.
2. Configure the following configuration settings:
a. Set the DiskQuotaDLL value to DiskQuota.dll. No other value is currently
supported.
b. Set the minimum percentage of free disk space permitted on the storage
device. When the available free disk space drops below this percentage, hits
are dropped by the capture pipeline, and a message is generated in the
Windows event log. The message is the following:
Session Agent TLI: Disk quota check failed. Disk quota too low.
Start dropping hits.
c. Set the DiskQuotaScanTimeSeconds setting to the interval in seconds when
the disk manager scans the TLI directory for free space. By default, this
value is set to 20 seconds. It should not require changing.
3. Save the configuration changes.
If the minimum percentage threshold is crossed, an error message is generated in
the Windows Event Log for the designated TLI server.
v You may monitor the Event Log for the TLI server through the Portal. See
"Windows Event Log" in the IBM Tealeaf cxImpact Administration Manual.
Chapter 4. CX Pipeline Session Agents
381
These disk management controls are identical to those used by the Archive session
agent. See “Archive Session Agent” on page 227.
Tealeaf Session Agents
v
v
v
v
“Adding a Session Agent” on page 226
“Archive Session Agent” on page 227
"Attribute Indexing Session Agent" in the IBM Tealeaf CX Configuration Manual
“Canister Session Agent” on page 236
v
v
v
v
v
v
v
“Cookie Parser Session Agent” on page 238
“Data Drop Session Agent” on page 241
“Data Parser Session Agent” on page 246
“Decouple Session Agent” on page 250
“Extended Decoupler Session Agent” on page 252
“Extended Privacy Session Agent” on page 261
“Health-Based Routing (HBR) Session Agent” on page 263
v “Inflate Session Agent” on page 271
v “JSON Mobile Parser Session Agent” on page 275
v
v
v
v
v
“Managed Code Session Agent” on page 287
“Null Session Agent” on page 290
“Privacy Session Agent” on page 291
“Real-Time Monitoring and Alert (RTA) Session Agent” on page 321
“Response Tags to Request Session Agent” on page 326
v “RTA Split Session Agent” on page 328
v “Sessioning Session Agent” on page 332
v “Session Router Session Agent” on page 330
v
v
v
v
“Socket Session Agent” on page 335
“Statistics Logger Session Agent” on page 337
"Tealeaf Reference Session Agent" in the IBM Tealeaf CX Configuration Manual
“Tealeaf Reference Session Agent - Legacy Mode” on page 357
v “Tealeaf Sessioning Session Agent” on page 360
v “TimeGrades Session Agent” on page 366
v TLI Session Agent
v “URL Decode Session Agent”
URL Decode Session Agent
The URL Decode session agent is used to normalize characters in the [urlfield]
section of the request buffer.
HTTP protocol does not allow for the native representation of some characters,
such as colon, semicolon, space, and ampersand. Any extended characters (those
with the high bit set) and any multi-byte characters are url-encoded.
v Url-encoded characters are represented as the hexadecimal value of the character
preceded by the percent character (%).
v The space character is an exception to the above method. The space character is
represented by the plus sign (+).
v For example the string Now’s the time is url-encoded as Now%27s+the+time.
382
IBM Tealeaf CX: Configuration Manual
Adding the Session Agent
Session agents can be added through the Pipeline Editor in TMS. See “Adding a
Session Agent” on page 226. For more information on the Pipeline Editor and TMS,
see "Tealeaf Management System" in the IBM Tealeaf cxImpact Administration
Manual.
Configuration Settings
The following configuration settings are available for this session agent:
v Display Name values are displayed in TMS, which is the recommended method
for configuring session agents. See "Tealeaf Management System" in the IBM
Tealeaf cxImpact Administration Manual.
v Name values are displayed in TealeafCaptureSocket.cfg.
Table 42. URL Decode Session Agent
Display Name
Name
Description
ExcludeType1
ExcludeType1
When specified, the entered
CaptureSources/CaptureTypes are
excluded from the URL Decode
operation.
ExcludeType2
ExcludeType2
When specified, the entered
CaptureSources/CaptureTypes are
excluded from the URL Decode
operation.
Exclude Vars
ExcludeVars
When specified, the listed variables
in the [urlfield] section are
excluded from the URL Decode
operation.
Tealeaf Session Agents
v “Adding a Session Agent” on page 226
v “Archive Session Agent” on page 227
v "Attribute Indexing Session Agent" in the IBM Tealeaf CX Configuration Manual
v “Canister Session Agent” on page 236
v “Cookie Parser Session Agent” on page 238
v
v
v
v
v
v
v
“Data Drop Session Agent” on page 241
“Data Parser Session Agent” on page 246
“Decouple Session Agent” on page 250
“Extended Decoupler Session Agent” on page 252
“Extended Privacy Session Agent” on page 261
“Health-Based Routing (HBR) Session Agent” on page 263
“Inflate Session Agent” on page 271
v
v
v
v
v
v
v
“JSON Mobile Parser Session Agent” on page 275
“Managed Code Session Agent” on page 287
“Null Session Agent” on page 290
“Privacy Session Agent” on page 291
“Real-Time Monitoring and Alert (RTA) Session Agent” on page 321
“Response Tags to Request Session Agent” on page 326
“RTA Split Session Agent” on page 328
Chapter 4. CX Pipeline Session Agents
383
v
v
v
v
v
“Sessioning Session Agent” on page 332
“Session Router Session Agent” on page 330
“Socket Session Agent” on page 335
“Statistics Logger Session Agent” on page 337
"Tealeaf Reference Session Agent" in the IBM Tealeaf CX Configuration Manual
v
v
v
v
v
“Tealeaf Reference Session Agent - Legacy Mode” on page 357
“Tealeaf Sessioning Session Agent” on page 360
“TimeGrades Session Agent” on page 366
“TLI Session Agent” on page 368
URL Decode Session Agent
CX Pipeline Utilities
To assist in the development, monitoring, and maintenance of your Tealeaf
pipelines, several tools are included in your Tealeaf solution. Use the links below
to access documentation on these utilities.
Pipeline Utility
Description
"TMS Pipeline Editor" in the IBM Tealeaf cxImpact Administration Manual
You define and configure your Tealeaf processing pipelines through the
Pipeline Editor in TMS. See "TMS Pipeline Editor" in the IBM Tealeaf
cxImpact Administration Manual.
“TeaLeaf Archive Reader - Run Archived Sessions”
Reads Tealeaf archive files and sends them through configured pipelines
for re-processing.
“TeaLeaf Capture Status - Pipeline Monitoring Utility” on page 386
Monitors status of Tealeaf capture pipelines.
Note: This utility is now available through the Tealeaf Portal, as well. See
"TMS Pipeline Status Tab" in the IBM Tealeaf cxImpact Administration
Manual.
“Privacy Tester Utility” on page 390
Test privacy rules, actions, and tests prior to deploying to the live capture
stream.
v See “Privacy Tester Utility” on page 390.
TeaLeaf Archive Reader - Run Archived Sessions
The Archive Reader reads Tealeaf Archive (.TLA) files and sends the data through
pipeline session agents, allowing for further processing of the data. The operations
performed are typically those not performed during real-time data capture, either
for convenience or performance reasons (such as applying a sophisticated Rules
Engine script to the data that may have a negative impact on capture
performance).
Before you begin, you should start the pipeline through which you are sending the
.TLA file.
v See “Starting and Monitoring the Capture Pipeline across Multiple Servers” on
page 385.
384
IBM Tealeaf CX: Configuration Manual
A configuration file is associated with the Tealeaf Archive Reader. The
configuration file is similar to the capture configuration files.
To use the Tealeaf Archive Reader:
1. Launch the following executable:
<Tealeaf_install_directory>\TealeafArchiverReader.exe
2. The Tealeaf Archive Reader is displayed:
3. In the Configuration File textbox, the path to the TeaLeafArchiveReader.cfg is
displayed.
v To select a different file, click Browse... and navigate to the file location.
4. To select a .TLA file, click Add....
v To examine the headers, requests, and responses of the selected file, click
Examine.
v To generate a summary of the selected file, click Summarize.
v To remove a .TLA file from the server, select it and click Delete.
5. Options:
v Open for Every File option can be used when the Capture Pipeline is set to
terminate with the Archive session agent and new .TLA files are created in
the process. If this option is selected, each .TLA file in the list is processed
individually. If this option is not selected, the multiple files are processed as
one .TLA file.
v Sequence Hits option is used to process session hits in chronological order.
6. To begin processing the file, click Start.
Starting and Monitoring the Capture Pipeline across Multiple Servers
Start the receiving server before starting the Capture Pipeline. The receiving server
is controlled by a Windows NT Service in the Control Panel. After the receiving
server is started, the sending servers can be started.
The following procedures provide instructions for installing the service in the
Control Panel and starting the server.
Chapter 4. CX Pipeline Session Agents
385
Starting the Capture Pipeline
Start the Capture Pipeline using the Tealeaf Transport Service in the Windows
Control Panel's services applet. Verify the pipeline started by using the Event
Viewer to look for errors from the Tealeaf application.
To
1.
2.
3.
4.
start the Capture Pipeline across multiple servers:
From the Start menu, click Settings > Control Panel.
In the Control Panel, double-click Services.
Select the TeaLeaf Transport Service.
Click Start.
5. Click Close to close the Services window.
To check the Event Viewer:
6. Go to Start > Programs > Administrative Tools > Event Viewer.
7. In the Event Viewer tree, select Application Log.
8. Review the Source column.
9. Verify that there are no error messages from the Tealeaf Transport Service.
Monitoring the Capture Pipeline across Multiple Servers
You can monitor Tealeaf server activity through the Tealeaf Capture Status utility
or through the Tealeaf Management System.
v See “TeaLeaf Capture Status - Pipeline Monitoring Utility.”
v For more information on TMS, see "Tealeaf Management System" in the IBM
Tealeaf cxImpact Administration Manual.
TeaLeaf Capture Status - Pipeline Monitoring Utility
Through the Tealeaf Transport Status utility, you can monitor all Tealeaf capture
and processing pipelines, including the processing by each agent in the pipeline,
for all Tealeaf servers in your environment.
Note: The Tealeaf pipeline can also be monitored through TMS. In future releases,
the separate utility may be deprecated. For more information on TMS, see See
"TMS Pipeline Status Tab" in the IBM Tealeaf cxImpact Administration Manual.
The Tealeaf Transport Status utility is accessible through the following location in
the Windows Start menu:
386
IBM Tealeaf CX: Configuration Manual
Filters
The filter list box shows the different session agents (in pipeline order) for each
filter that is currently running on the system. After the name of the session agent
there are statistics on everything from flow rate to whether a session agent is
queuing data. When you click on each filter the active list of agents and their data
will reflect which filter you are currently viewing. This will also change the filter
statistics (next to the filter list) to reflect the start time and date and the name of
the filter.
The filter list box is top level master control for monitoring the pipeline with the
utility. Make sure you have selected the appropriate filter when monitoring stats
for a particular pipeline.
Figure 35. Filters List Box
Chapter 4. CX Pipeline Session Agents
387
Connections
The connections list shows active connections, their throughput, protocol, and the
name of the machine they are on. All current connections are permanently
displayed and cannot be added, removed or selected. The slot# is the memory
address in Tealeaf's shared memory that the connection occupies.
Figure 36. Connections List Box
Below the connections list box, there are statistics that reflect the overall state of all
the connections on the list.
v
v
v
Active: The number of active connections at any given time.
Max: The maximum number of connections allowed.
Total: The total number of connections seen since the application was launched.
Figure 37. Connection Statistics
Next to the connection stats box, there is a box entitled "Bytes". This box shows the
total throughput of all connections.
v
v
Total: The total number of bytes that have gone through all the connections.
Per Sec: The number of bytes per second that are going through all the
connections.
Figure 38. Statistics on Bytes
Below the connections stats box, there is a set of stats regarding pages transferred.
v Total: The total number of pages seen since the launch of the utility.
388
IBM Tealeaf CX: Configuration Manual
v
v
Per Sec: The number of pages seen in the last second.
Avg. Size: The through put over the last second divided by the number of
pages seen in the last second.
Figure 39. Page Statistics
Transfer Graph
The transfer graph is at the bottom left hand corner of the utility. It shows the total
transfer in bytes of all connections each second. There are also several radio
buttons allowing the user to change the magnitude of the graph for various levels
of transfer. The reason the graph does not automatically re-calibrate for magnitude
is that some sites can have large deltas in traffic. This would result in the graph
constantly changing magnitude as traffic jumped from KB to MB and back
frequently. This also allows the user to watch just the lowest magnitude or just the
highest magnitude moments during transfer.
Figure 40. Transfer Graph
The graph also has a fine granularity control which allows you to divide the
values plotted by orders of magnitude. This is useful when traffic is maxing out
the KB setting, but does not register fine enough deltas to be seen under the MB
setting.
Transport Service Console
The Capture Status utility also allows you to stop and start the Transport Service
to easily make changes to the pipeline. This is useful when you need to make
changes to the SessionAgent configuration and must restart the service to reflect
your changes.
Chapter 4. CX Pipeline Session Agents
389
Figure 41. Transport Service
v To stop the Transport service, click Stop.
v To start or restart the Transport service, click Start.
Minimize
Figure 42. Minimized utility
Lastly, when minimized the utility now goes to the system tray. This allows it to be
used much like the Task Manager and recalled at your convenience.
Figure 43. Tealeaf System Tray menu
To re-instate the utility, simply double click or right click on the Tealeaf icon in the
system tray and select Restore. You can also close the utility from this menu.
Privacy Tester Utility
The Privacy Tester utility enables Tealeaf developers to create privacy rules and to
test their behavior in the Tealeaf pipeline without having to submit hit data to it.
In Privacy Tester, you can define and edit privacy rules and then test them against
data that you paste into the utility.
Note: The Privacy Tester utility is accessible through the configurations for
Privacy, Extended Privacy, and Real-Time Monitoring Alert session agents. These
session agents must be included in your Windows pipeline in order to enable the
editing of rules configuration. For more information on adding these session
agents, see "TMS Pipeline Editor" in the IBM Tealeaf cxImpact Administration Manual.
390
IBM Tealeaf CX: Configuration Manual
Versions
Privacy Tester can be used to test the rules used by the following Tealeaf session
agents, which are defined in the configuration files listed below:
Table 43. Versions
Session
Agent
Configuration File
Session Agent Documentation
Privacy
Privacy.cfg
“Privacy Session Agent” on page 291
PrivacyEx
Privacy.cfg
“Extended Privacy Session Agent” on
page 261
RTA
RTA.ini
“Real-Time Monitoring and Alert
(RTA) Session Agent” on page 321
Note: Before you begin editing, you should save a backup version of the file. See
“Saving” on page 402.
Starting Privacy Tester
For Privacy Session Agents
For the Privacy and Extended Privacy session agents, please complete the
following steps to run the privacy tester:
1. Login to the Tealeaf Portal as an administrator.
2. To open the Tealeaf Management System, select Tealeaf > TMS from the
Portal menu.
3. If you have not done so already, you must add the Privacy or Extended
Privacy session agent through the Pipeline Editor in TMS. See "TMS Pipeline
Editor" in the IBM Tealeaf cxImpact Administration Manual.
4. In TMS, select Servers from the View drop-down.
5. Open the following node:
Transport Service > Privacy Filter
6. Click View/Edit.
7. The Privacy Filter configuration is displayed. See “Privacy Session Agent” on
page 291.
8. Through the Privacy Filter configuration, you can test the privacy rule
definitions for either of the versions of privacy rules supported by Tealeaf:
a. To test Privacy session agent rules, click Test (Privacy).
v The Privacy session agent provides a base set of privacy rules. It has
been superseded by the Extended Privacy session agent. See “Privacy
Session Agent” on page 291.
b. To test Extended Privacy session agent rules, click Test (PrivacyEx).
v The Extended Privacy session agent provides all of the privacy rules of
Privacy session agent, as well as faster search and internationalization
support. See “Extended Privacy Session Agent” on page 261.
Note: The Privacy session agent has been superseded by the Extended
Privacy session agent. Whenever possible, use PrivacyEx. See “Extended
Privacy Session Agent” on page 261.
9. The Privacy Tester opens.
Chapter 4. CX Pipeline Session Agents
391
Note: If a configuration is shared, you may select the server on which to run
the tester. Configurations that are not shared are tested on the server that
owns the configuration.
10. The utility has the same functions for either version of the Privacy Tester.
For Real-Time Monitoring Alert Session Agent
For the RTA session agent, please complete the following steps to run the Privacy
Tester for RTA:
1. Login to the Tealeaf Portal as an administrator.
2. To open the Tealeaf Management System, select Tealeaf > TMS from the
Portal menu.
3. If you have not done so already, you must add the RTA session agent through
the Pipeline Editor in TMS. See "TMS Pipeline Editor" in the IBM Tealeaf
cxImpact Administration Manual.
4. In TMS, select Servers from the View menu.
5. Open the following node:
Transport Service > RTA configuration
6. Click View/Edit.
7. The RTA configuration is displayed. See “Real-Time Monitoring and Alert
(RTA) Session Agent” on page 321.
8. To test the RTA configuration rules, click Test(RTA).
9. The Privacy Tester opens.
Note: If a configuration is shared, you may select the server on which to run
the tester. Configurations that are not shared are tested on the server that
owns the configuration.
10. The utility has the same functions for either version of the Privacy Tester.
Workflow
392
IBM Tealeaf CX: Configuration Manual
Figure 44. Privacy Tester
When the Privacy Tester is started, the Request tab and the Response tab are
pre-populated with a sample request and a sample response.
v You can copy and paste other data to test into either tab. See “Acquiring Sample
Data” on page 394.
When it is run, Privacy Tester creates a Tealeaf .tla file containing the initial
request and response. This file is pushed to the ArchiveReader, which then applies
the Privacy rules and outputs the modified .tla file for the Privacy Tester to
display.
Chapter 4. CX Pipeline Session Agents
393
Privacy Tester Workflow:
Here's the suggested workflow.
1. By default, Privacy Tester populates the Request and the Response tab with
sample data. However, to test specific rules, you may need to configure your
own sample data. You may copy and paste any sample data into the Request
and Response tabs. If desired, acquire sample data. See “Acquiring Sample
Data.”
2. Make changes to your privacy rules in the appropriate editor in TMS. See
“Editing Rules” on page 395.
3. From the editor, open the Privacy Tester. See “Starting Privacy Tester” on page
391.
4. You can use standard copy and paste commands to populate these tabs with
real hit data.
Note: Privacy Tester does not save the contents of the Response and Request
tabs. You may want to save your sample data to a text file outside of the utility.
5. To include privacy logging information, select the Include Privacy Log
checkbox. This option is not available in Privacy Tester for RTA. See “Privacy
Logs” on page 401.
6. Run the Privacy Tester. See “Running Privacy Tester” on page 395.
7. Review the results in the output tabs. See “Reviewing Results” on page 397.
8. Iterate on the above steps until you are satisfied with the results.
9. If the rule changes are working, you may save the edited configuration file
through TMS. See “Saving” on page 402.
Acquiring Sample Data
While Privacy Tester does pre-populate the Request and Response tabs with data
when it is launched, you should provide sample data that specifically tests the
rules you are creating. If the sample data does not contain data that is identified
and evaluated by your rules, the output results may show no changes for rules
that would make changes to detected data.
Note: It is important to gather sample data that will be specifically exercised by
the rules in development. You should review the request and response data in
detail to verify that it meets your testing criteria.
You can acquire sample request and response data from sessions available through
Browser-Based Replay or through RTV.
Note: If you are pasting an entire response buffer from RTV, please make sure that
the HTTP: line is the first line in the response. RTV inserts extra lines for proper
operation, but they may cause problems for the Privacy Tester utility.
v The standalone IBM Tealeaf CX RealiTea Viewer application enables replay
functionality and provides views for request and response data from the
Windows desktop.
– See "RealiTea Viewer - Request View" in the IBM Tealeaf RealiTea Viewer User
Manual.
– See "RealiTea Viewer - Response View" in the IBM Tealeaf RealiTea Viewer User
Manual.
v Browser-Based Replay enables the replay of Tealeaf sessions through the Portal.
Through BBR, you can replay sessions and review request and response data.
See "CX Browser Based Replay" in the IBM Tealeaf cxImpact User Manual.
394
IBM Tealeaf CX: Configuration Manual
If you are testing a response that is an XML document, it does not contain a
header. Privacy Tester attempts to interpret this data as an HTML document;
without a properly defined header, it is invalid HTML, and Privacy Tester fails.
To
1.
2.
3.
4.
5.
test an XML response:
In RTV, select View > Show HTTP Headers.
To view the full response, click the RSP button.
Copy the entire XML text, including the headers.
Paste the entire text into the response tab of the Privacy Tester.
Test the data against your defined set of rules.
Editing Rules
You edit rules and launch the Privacy Tester through the appropriate configuration
in TMS.
Note: The configuration does not appear in TMS until you have added it to your
pipeline through the Pipeline Editor. See "TMS Pipeline Editor" in the IBM Tealeaf
cxImpact Administration Manual.
For more information on editing rules:
v “Privacy Session Agent” on page 291
v “Extended Privacy Session Agent” on page 261
v “Real-Time Monitoring and Alert (RTA) Session Agent” on page 321
After you edit the rules, you can open the Privacy Tester from the configuration
and test the rules immediately.
Note: You do not have to save the file to test the privacy rules through the utility.
See “Starting Privacy Tester” on page 391.
Running Privacy Tester
Chapter 4. CX Pipeline Session Agents
395
Figure 45. Executing Privacy Tester
1. If you have not done so already, you should paste in sample request and
response data and edit your rules.
v See “Acquiring Sample Data” on page 394.
v See “Editing Rules” on page 395.
2. To include privacy logging information, select the Include Privacy Log
checkbox. This option is not available in Privacy Tester for RTA. See “Privacy
Logs” on page 401.
3. To run the selected privacy rules against the text in the Request and Response
tabs, click Run.
396
IBM Tealeaf CX: Configuration Manual
v During execution, logging information is displayed in the Status pane.
4. When the test has completed, you can review the output. See “Reviewing
Results” below.
Reviewing Results
After the test has completed, click the Request Out or Response Out tab to see the
output results.
Figure 46. Request Out tab
Chapter 4. CX Pipeline Session Agents
397
After running Privacy Tester, you can compare the differences in the request and
response samples between the input sample data and the output results.
v To compare the input and output requests, click Diff Request.
v To compare the input and output responses, click Diff Response.
When the differences are displayed, you can review results side-by-side or as a
single merged piece of text.
v Unified View - In Unified view, you can review the changes between input and
output of the request or response in a single pane. See “Unified View” on page
399.
v Side-by-Side View - In Side-by-Side view, you can review the changes between
input and output in separate panels. See “Side-by-Side View.”
Side-by-Side View
In Side-by-Side view, the input request or response text is listed on the left side
and the output on the right side with line numbers displayed to help to match up
changes.
v You can copy data from either pane. Select the data and press CTRL+C.
In the image below, items that have been removed appear in gray, while
replacement text in the output appears in blue on the right side.
Figure 47. Side by Side View
398
IBM Tealeaf CX: Configuration Manual
Side-by-side view differences
Change
Identifier
Added lines
pre-test version: gray background
post-test version: blue background
Deleted lines
pre-test version: red background
post-test version: gray background
Updated lines
pre-test version: red background
post-test version: blue blackground
Unified View
In Unified view, you can review differences between the input response or request
and the output in the same panel.
v To copy data, select the data and press CTRL+C.
In the image below, items that have been removed by the rules appear in red,
while replacement text in the output appears in blue.
Chapter 4. CX Pipeline Session Agents
399
Figure 48. Unified View
Unified view differences
Change
Identifier
Added lines
blue text
Deleted lines
red text
Updated lines
old line: red text
new line: blue text
400
IBM Tealeaf CX: Configuration Manual
Privacy Logs
During execution, logging information generated by the session agent is displayed
in the Status pane. Optionally, you can choose to include the privacy logging
information generated by the session agent at the bottom of the generated output.
v To include privacy logging information, select the Include Privacy Log checkbox.
Note: Including the Privacy Log is not available in the RTA version of Privacy
Tester.
In the output, the log information is displayed under the [privacylog] section of
the output, as in the image below:
Chapter 4. CX Pipeline Session Agents
401
Figure 49. Privacy Log in Request Output
Note: All errors in the privacy configuration are logged to the Windows
Application Event Log. See the Windows Application Event Log to verify that the
Privacy Tester has not reported any errors.
Saving
If you are satisfied with the results of your privacy tests, you can save the
configuration that you have edited through TMS. See "TMS WorldView Tab" in the
IBM Tealeaf cxImpact Administration Manual.
402
IBM Tealeaf CX: Configuration Manual
Chapter 5. IBM Tealeaf documentation and help
IBM Tealeaf provides documentation and help for users, developers, and
administrators.
Viewing product documentation
All IBM Tealeaf product documentation is available at the following website:
https://tealeaf.support.ibmcloud.com/
Use the information in the following table to view the product documentation for
IBM Tealeaf:
Table 44. Getting help
To view...
Do this...
Product documentation
On the IBM Tealeaf portal, go to ? > Product
Documentation.
Help for a page on the IBM Tealeaf Portal
On the IBM Tealeaf portal, go to ? > Help
for This Page.
Help for IBM Tealeaf CX PCA
On the IBM Tealeaf CX PCA web interface,
select Guide to access the IBM Tealeaf CX
PCA Manual.
Available documents for IBM Tealeaf products
Use the following table to view a list of available documents for all IBM Tealeaf
products:
Table 45. Available documentation for IBM Tealeaf products
IBM Tealeaf products
Available documents
IBM Tealeaf CX
v IBM Tealeaf Customer Experience Overview
Guide
v IBM Tealeaf CX Client Framework Data
Integration Guide
v IBM Tealeaf CX Configuration Manual
v IBM Tealeaf CX Cookie Injector Manual
v IBM Tealeaf CX Databases Guide
v IBM Tealeaf CX Event Manager Manual
v IBM Tealeaf CX Glossary
v IBM Tealeaf CX Installation Manual
v IBM Tealeaf CX PCA Manual
v IBM Tealeaf CX PCA Release Notes
© Copyright IBM Corp. 1999, 2014
403
Table 45. Available documentation for IBM Tealeaf products (continued)
IBM Tealeaf products
Available documents
IBM Tealeaf CX
v IBM Tealeaf CX RealiTea Viewer Client Side
Capture Manual
v IBM Tealeaf CX RealiTea Viewer User
Manual
v IBM Tealeaf CX Release Notes
v IBM Tealeaf CX Release Upgrade Manual
v IBM Tealeaf CX Support Troubleshooting
FAQ
v IBM Tealeaf CX Troubleshooting Guide
v IBM Tealeaf CX UI Capture j2 Guide
v IBM Tealeaf CX UI Capture j2 Release Notes
IBM Tealeaf cxImpact
v IBM Tealeaf cxImpact Administration Manual
v IBM Tealeaf cxImpact User Manual
v IBM Tealeaf cxImpact Reporting Guide
IBM Tealeaf cxConnect
v IBM Tealeaf cxConnect for Data Analysis
Administration Manual
v IBM Tealeaf cxConnect for Voice of Customer
Administration Manual
v IBM Tealeaf cxConnect for Web Analytics
Administration Manual
IBM Tealeaf cxOverstat
IBM Tealeaf cxOverstat User Manual
IBM Tealeaf cxReveal
v IBM Tealeaf cxReveal Administration Manual
v IBM Tealeaf cxReveal API Guide
v IBM Tealeaf cxReveal User Manual
IBM Tealeaf cxVerify
IBM Tealeaf cxVerify Administration Manual
IBM Tealeaf cxView
IBM Tealeaf cxView User Manual
IBM Tealeaf CX Mobile
v IBM Tealeaf CX Mobile Android Logging
Framework Guide
v IBM Tealeaf Android Logging Framework
Release Notes
v IBM Tealeaf CX Mobile Administration
Manual
v IBM Tealeaf CX Mobile User Manual
v IBM Tealeaf CX Mobile iOS Logging
Framework Guide
v IBM Tealeaf iOS Logging Framework Release
Notes
404
IBM Tealeaf CX: Configuration Manual
Notices
This information was developed for products and services offered in the U.S.A.
IBM may not offer the products, services, or features discussed in this document in
other countries. Consult your local IBM representative for information on the
products and services currently available in your area. Any reference to an IBM
product, program, or service is not intended to state or imply that only that IBM
product, program, or service may be used. Any functionally equivalent product,
program, or service that does not infringe any IBM intellectual property right may
be used instead. However, it is the user's responsibility to evaluate and verify the
operation of any non-IBM product, program, or service.
IBM may have patents or pending patent applications covering subject matter
described in this document. The furnishing of this document does not grant you
any license to these patents. You can send license inquiries, in writing, to:
IBM Director of Licensing
IBM Corporation
North Castle Drive
Armonk, NY 10504-1785
U.S.A.
For license inquiries regarding double-byte (DBCS) information, contact the IBM
Intellectual Property Department in your country or send inquiries, in writing, to:
Intellectual Property Licensing
Legal and Intellectual Property Law
IBM Japan, Ltd.
19-21, Nihonbashi-Hakozakicho, Chuo-ku
Tokyo 103-8510, Japan
The following paragraph does not apply to the United Kingdom or any other
country where such provisions are inconsistent with local law: INTERNATIONAL
BUSINESS MACHINES CORPORATION PROVIDES THIS PUBLICATION "AS IS"
WITHOUT WARRANTY OF ANY KIND, EITHER EXPRESS OR IMPLIED,
INCLUDING, BUT NOT LIMITED TO, THE IMPLIED WARRANTIES OF
NON-INFRINGEMENT, MERCHANTABILITY OR FITNESS FOR A PARTICULAR
PURPOSE. Some states do not allow disclaimer of express or implied warranties in
certain transactions, therefore, this statement may not apply to you.
This information could include technical inaccuracies or typographical errors.
Changes are periodically made to the information herein; these changes will be
incorporated in new editions of the publication. IBM may make improvements
and/or changes in the product(s) and/or the program(s) described in this
publication at any time without notice.
Any references in this information to non-IBM Web sites are provided for
convenience only and do not in any manner serve as an endorsement of those Web
sites. The materials at those Web sites are not part of the materials for this IBM
product and use of those Web sites is at your own risk.
© Copyright IBM Corp. 1999, 2014
405
IBM may use or distribute any of the information you supply in any way it
believes appropriate without incurring any obligation to you.
Licensees of this program who wish to have information about it for the purpose
of enabling: (i) the exchange of information between independently created
programs and other programs (including this one) and (ii) the mutual use of the
information which has been exchanged, should contact:
IBM Bay Area Lab
1001 E Hillsdale Boulevard
Foster City, California 94404
U.S.A.
Such information may be available, subject to appropriate terms and conditions,
including in some cases, payment of a fee.
The licensed program described in this document and all licensed material
available for it are provided by IBM under terms of the IBM Customer Agreement,
IBM International Program License Agreement or any equivalent agreement
between us.
Any performance data contained herein was determined in a controlled
environment. Therefore, the results obtained in other operating environments may
vary significantly. Some measurements may have been made on development-level
systems and there is no guarantee that these measurements will be the same on
generally available systems. Furthermore, some measurements may have been
estimated through extrapolation. Actual results may vary. Users of this document
should verify the applicable data for their specific environment.
Information concerning non-IBM products was obtained from the suppliers of
those products, their published announcements or other publicly available sources.
IBM has not tested those products and cannot confirm the accuracy of
performance, compatibility or any other claims related to non-IBM products.
Questions on the capabilities of non-IBM products should be addressed to the
suppliers of those products.
All statements regarding IBM's future direction or intent are subject to change or
withdrawal without notice, and represent goals and objectives only.
This information contains examples of data and reports used in daily business
operations. To illustrate them as completely as possible, the examples include the
names of individuals, companies, brands, and products. All of these names are
fictitious and any similarity to the names and addresses used by an actual business
enterprise is entirely coincidental.
COPYRIGHT LICENSE:
This information contains sample application programs in source language, which
illustrate programming techniques on various operating platforms. You may copy,
modify, and distribute these sample programs in any form without payment to
IBM, for the purposes of developing, using, marketing or distributing application
programs conforming to the application programming interface for the operating
platform for which the sample programs are written. These examples have not
been thoroughly tested under all conditions. IBM, therefore, cannot guarantee or
imply reliability, serviceability, or function of these programs. The sample
406
IBM Tealeaf CX: Configuration Manual
programs are provided "AS IS", without warranty of any kind. IBM shall not be
liable for any damages arising out of your use of the sample programs.
Trademarks
IBM, the IBM logo, and ibm.com® are trademarks or registered trademarks of
International Business Machines Corp., registered in many jurisdictions worldwide.
Other product and service names might be trademarks of IBM or other companies.
A current list of IBM trademarks is available on the Web at “Copyright and
trademark information” at www.ibm.com/legal/copytrade.shtml.
Privacy Policy Considerations
IBM Software products, including software as a service solutions, ("Software
Offerings") may use cookies or other technologies to collect product usage
information, to help improve the end user experience, to tailor interactions with
the end user or for other purposes. A cookie is a piece of data that a web site can
send to your browser, which may then be stored on your computer as a tag that
identifies your computer. In many cases, no personal information is collected by
these cookies. If a Software Offering you are using enables you to collect personal
information through cookies and similar technologies, we inform you about the
specifics below.
Depending upon the configurations deployed, this Software Offering may use
session and persistent cookies that collect each user's user name, and other
personal information for purposes of session management, enhanced user usability,
or other usage tracking or functional purposes. These cookies can be disabled, but
disabling them will also eliminate the functionality they enable.
Various jurisdictions regulate the collection of personal information through
cookies and similar technologies. If the configurations deployed for this Software
Offering provide you as customer the ability to collect personal information from
end users via cookies and other technologies, you should seek your own legal
advice about any laws applicable to such data collection, including any
requirements for providing notice and consent where appropriate.
IBM requires that Clients (1) provide a clear and conspicuous link to Customer's
website terms of use (e.g. privacy policy) which includes a link to IBM's and
Client's data collection and use practices, (2) notify that cookies and clear gifs/web
beacons are being placed on the visitor's computer by IBM on the Client's behalf
along with an explanation of the purpose of such technology, and (3) to the extent
required by law, obtain consent from website visitors prior to the placement of
cookies and clear gifs/web beacons placed by Client or IBM on Client's behalf on
website visitor's devices
For more information about the use of various technologies, including cookies, for
these purposes, See IBM's Online Privacy Statement at: http://www.ibm.com/
privacy/details/us/en section entitled "Cookies, Web Beacons and Other
Technologies."
Notices
407
408
IBM Tealeaf CX: Configuration Manual
Printed in USA