1
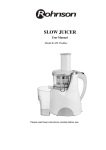
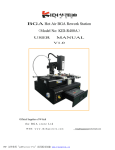
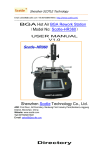
Smart Juicer Instructions Smart Juicer Stainless Table of Contents Safety Precautions....................................................................... 3 Exploded View.............................................................................. 5 What is a Smart Juicer?............................................................... 6 How to Assemble......................................................................... 7 Operating Instructions . ............................................................... 9 Cleaning & Maintenance.............................................................. 10 Troubleshooting............................................................................ 11 Notes ........................................................................................... 12 Five Year Limited Warranty........................................................... 13 2 Safety Precautions: When using electrical appliances, basic safety precautions should always be followed including the following: 1. Please read the instructions carefully before operating. 2. This appliance is intended for household use only. 3. Do not use the appliance other than intended or specified purposes. 4. Make sure the voltage mark on the appliance corresponds to the voltage in your home before plugging in the power cord in order to avoid damage to the appliance. 5. To protect against electrical shock, do not place cord, plug, or base unit in water or other liquids. Do not operate machine with wet hands or place on a wet surface while operating. Do not let the cord hang over the edge of the table or counter or touch hot surfaces. 6. If the supply cord is damaged, it must be replaced by the manufacturer, its service agent or similarly qualifiedly persons in order to avoid a hazard. 7. Unplug from outlet when not in use. 8. It is prohibited to plug or unplug with wet hand to avoid electric shock. 9. To disconnect, remove plug from the electric outlet. 10. This appliance is not intended for use by persons (including children) with reduced physical, sensory or mental capabilities, or lack of experience and knowledge, unless they have been given supervision or instruction concerning the use of the appliance by a person responsible for their safety. 11. Children should be supervised to ensure that they do not play with the appliance. 12. Check the strainer every time you want to use the appliance. If you detect any cracks or damage, do not use the appliance and contact Customer Care at 1-855-85-RONCO. 13. Always securely clamp in place all parts before the motor is turned on. Do not unfasten while appliance is in operation. 14. Avoid contacting moving parts. Make sure the motor stops completely before disassembling. 15. Do not place the appliance on or near a hot gas or electric burner or in a heated oven. 16. Do not leave the Smart Juicer unattended while turned on. 3 17. Do not disassemble the base. 18. Do not put any foreign materials in the machine. 19. Do not use for more than 30 minutes continuously. 20. It is prohibited to let the machine operate in an idle state. Idling time can’t exceed 2 minutes or it will damage the spiral blade. 21. During operation, please feed the food material slowly to avoid clogging rotations. If clogging happens, please stop working immediately. Reverse it for a while then open the lid to take out the food. Then resume if it is unclogged. 22. Please use the special pressing stick to feed food into the feeder opening. 23. Before use, please cut food into small pieces and take out core or it will cause clogging. 24. It is prohibited to insert too big or too hard food materials otherwise they might cause a blockage. If blockage occurs, immediately press the reverse button and hold for 3-5 seconds. If that does not clear the blockage, clean the unit out. Unplug the power cord for 10 seconds and replug. 25. Do not use too hard food materials. Cereals should be carefully immersed and soaked in water before it can be fed into the feeder opening. This can avoid damage to the machine. 26. When using, if you notice any abnormal sounds, smells, overheating, smoke, etc., immediately turn off the power and apply to the service center for maintenance and repair. This can avoid electric shock, electricity leakage and fire hazard. 27. It is prohibited to scrub and wash the machine body on water-filled platform or pour water to wash the inside of the machine to avoid fire, electric shock or damage to machine body, etc. 28. When making carrot juice, please pay attention to the size of the carrots. The size should be no more than 3.15” in length, no more than 0.59” in width, and no more than 0.59” in height. Interval feeding time should be no less than 5 seconds. SPECIFICATIONS Rated Voltage: AC120V Rated Power: 150W Rated Frequency: 60HZ Speed: 80 RPM 4 Exploded View 5 What is a Smart Juicer? The Ronco® Smart Juicer is a juice extractor that uses the patented Low Speed Technology System (LSTS). It is considered a low speed, masticating juicer because it operates at only 80-90 RPM and uses a mere 150 watts of energy instead of 1,000-24,000 RPM and up to 1,500 watts of energy like a typical centrifugal or “high-speed” juicer. This juicer might operate at a lower RPM, but the Smart Juicer actually juices faster than a typical juicer and expels much drier pulp with a much higher yield. The method of extraction is masticating and pressing, using the screw-like auger like a mortar and pestle. The action crushes and presses the food, releasing its deep-seeded nutrients and enzymes. It also breaks up more of the phytonutrients, resulting in a richer colored juice that retains more vitamins and minerals. The slow RPM ensures that it does not disturb the cellular structure of fruits and vegetables, eliminating oxidation and separation. Thus, it preserves the precious enzymes and nutrients that are close to its natural form. 6 How to Assemble The Smart Juicer is virtually assembled straight out of the box. We suggest taking it apart and wash the removable parts in warm water with a biodegradable, non-abrasive liquid detergent before the first use. Rinse thoroughly with water and allow to air-dry. This will eliminate any traces of dust or residue from manufacturing or shipping. Never submerge the Smart Juicer motor base in water or any other liquid. Parts for top assembly: BOWL 1 ROTATING BASKET STRAINER AUGER FOOD CHUTE 2 1. Place the bowl on the base so that 2. Assemble the strainer and the its gray arrow lines up with the orange rotating basket and place black arrow on the base. Make sure into the bowl. Make sure the red bowl rests flush against the base. dots are aligned. 3 4 3. Place the auger in the center of the 4. Place the food chute onto the bowl. bowl. Press firmly into place. When Make sure the gray dot on the food chute and the red dot on the bowl in place, the auger will sit flush with align. the top of the strainer. 7 TOP VIEW TOP VIEW 5. Place the food lid with food shoot on top of the bowl with the arrow and tab as shown above. 6. To close, rotate the lid to the left and align the triangles. It is now locked and ready to use. Rotate to right to open. As Shown below, the food chute must point too “CLOSE” on the base in order for the machine to operate. WARNING: Make sure all parts are secure and in place before operation. Do not operate without food. Note: Under the bowl, there is an orange silicon plug that prevents juice from exiting through the pulp ejector. When using the Smart Juicer, make sure the silicon plug is firmly in place. You may slide the plug out when cleaning. 8 Operating Instructions 1. Once all parts are secure and in place, connect the power cord to an approved power source/outlet. 2. Place the pulp container under the pulp ejector and a juice receptacle or glass under the spout for juice before turning the Smart Juicer on. Juice and pulp will begin ejecting immediately. 3. The Smart Juicer has 3 settings: ON - this starts the motor for juicing. OFF - This stops the operation. REV - This moves the auger in the opposite direction for unclogging or unblocking. 4. Before placing food in the juicer, please make sure all foods are thoroughly washed and cleaned. Cut all foods into the appropriate size to easily fit into the food chute. Please remove any hard seeds before juicing. 5. For the most part, when placing food into the Smart Juicer, the auger will pull in the food and start juicing immediately. However, you may need to use the included pusher with some foods. NEVER INSERT YOUR FINGERS INTO THE FOOD CHUTE TO MOVE THE FOOD ALONG. ALWAYS USE THE FOOD PUSHER. 6. The bowl has a non-drip cap that you can use to keep juice from dripping out when switching juice glasses or receptacles. 7. The Smart Juicer has a unique simple flushing process when switching between different flavors of juices and fruits. When you are ready, simply pour water through the food chute. This will rinse out most of the residue and you are ready to continue juicing with a different food. MAKE SURE YOU HAVE A LARGE ENOUGH RECEPTACLE READY TO CATCH THE WATER WHEN FLUSHING. NOTE: This is not an alternative to a complete cleaning of each disassembled part. 9 Cleaning and Maintenance 1. Switch off the machine and disconnect from power source. 2. Turn the food chute counter-clockwise direction to unlock. 3. Twist the bowl counter-clockwise to the unlock position and lift out the entire section. 4. Disassemble the top assembly in the following order: a. Food Chute b. Auger c. Strainer d. Rotating Basket e. Bowl FOOD CHUTE AUGER STRAINER ROTATING BASKET BOWL 5. Using the included cleaning brush, thoroughly clean each of the disassembled parts using warm, soapy water. Do not use abrasive cloths or liquids. We recommend that you hand-wash attachments. 6. Do not rinse the Smart Juicer base. 7. Dry all attachments before reusing. Do not soak attachments for an extended period of time. Helpful Tips: Due to the powerful staining properties of the carotenoids that are found in many vegetables especially carrots, we suggest the following cleaning procedures: 1. 2. 3. 4. 5. 6. 10 Biodegradable soap in enough warm water to cover parts. 1 part warm water to 1 part cider vinegar. 1/2 small box baking soda in enough warm water to cover parts. 1/4 cup bleach in sink full of warm water. Never use strong household cleaners, ammonia or abrasives. Bleach helps remove stubborn stains caused by some fruits and vegetables. Clean parts immediately to avoid using bleach. Troubleshooting Problem If machine does not operate If machine jams or stops operating Solution 1. Check power cord and power source. 2. Check that all parts are assembled correctly. 1. Check that the food chute is clear and not blocked. 2. Hard seeds should be removed before juicing. 3. Turn machine OFF and switch to REVERSE for 3 seconds. 4. Disassemble top assembly and clear pulp. 5. Unplug the power cord, remove big food and clean it. Then connect the power again and resume juicing. NOTE: Do not throw away the appliance with the normal household waste at the end of its life. Hand it in at an office collection point for recycling. By doing this you help preserve the environment. 11 Notes 12 Five Year Limited Warranty Ronco Holdings, Inc. warrants to the original owner of this product that it is free from defects in material and workmanship for a period of five years from date of purchase to be provided on the Owner Registration Card to be completed and returned to Ronco Holdings, Inc. within thirty (30) days from the original purchase date. The manufacturer’s obligation shall be limited to repairing or replacing any part of the product which is defective. Such warranty shall not apply to defects resulting from tamper, cosmetic damage, acts of God, accidental breakage, abuse, negligence, neglect or misuse. If you must return the product for reasons of malfunction within the five year warranty period, the following action and steps are required: • The machine must be clean and packaged securely to protect from damage or breakage in shipment. • Call and obtain a RETURN AUTHORIZATION NUMBER. Then ship prepaid to Ronco Holdings, Inc. by the most convenient method. Please be sure to enclose $25.00 to cover return shipping, handling and insurance. Ronco Holdings, Inc. will repair or replace your Smart Juicer and return it to you prepaid. • All Smart Juicer parts are replaceable without having to send back the damaged item with one exception- the Smart Juicer base where the unit motor is housed. The base is replaceable by another for $45.00 for the base and $25.00 for shipping and handling. All other parts are replaceable at the nominal part value plus a basic shipping and handling dependent on number of parts required. Contact customer care for specific quotes when needed. Even if not required, the rights in this warranty are granted to you. This warranty gives you specific legal rights, and you may also have other rights which vary from state to state. Return of owner registration card is not a condition precedent to warranty coverage. Ronco Holdings, Inc. will not be liable for misuse or any special, incidental, or consequential damage, resulting from possession, use or loss of use of this product either directly or indirectly. No returns will be accepted without prior authorization. TO RECEIVE A RETURN AUTHORIZATION NUMBER call customer care 1-855-85-RONCO or e-mail [email protected]. Ronco Holdings, Inc. 15505 Long Vista Dr., Ste 250 Austin, TX 78728 1-855-85-RONCO (76626) www.Ronco.com 13 Ronco Holdings, Inc. 15505 Long Vista Dr., Ste 250 Austin, TX 78728 1-855-85-RONCO (76626) www.Ronco.com Visit our YouTube channel to learn more about using the Smart Juicer. www.youtube.com/RoncoProducts Customer Care: 1-855-85-RONCO (76626) [email protected] http://support.ronco.com HOUSEHOLD USE ONLY. DO NOT IMMERSE IN WATER. WARNING: TO PREVENT ELECTRIC SHOCK, UNPLUG BEFORE CLEANING. 240V 50Hz 150W Max Copyright © 2013 by Ronco Holdings, Inc. All Rights Reserved. U.S. and foreign patents pending. JU1001SSGEN 12.12