1
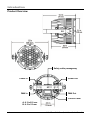
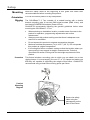
Quick Start Guide
Table of Contents
Table of Contents
1. Before you Begin .......................................................................................1
What is included ....................................................................................................... 1
About this Guide....................................................................................................... 1
Unpacking ................................................................................................................ 1
Text Conventions ..................................................................................................... 1
Icons........................................................................................................................ 1
Safety Notes ............................................................................................................ 2
Expected LED Lifespan ............................................................................................ 2
2. Introduction ................................................................................................3
Fixture at a Glance ................................................................................................... 3
Features .................................................................................................................. 3
Product Overview ..................................................................................................... 4
3. Setup...........................................................................................................5
AC Power................................................................................................................. 5
Lens Assembly ......................................................................................................... 5
Mounting .................................................................................................................. 6
DMX Linking............................................................................................................. 7
ID Addressing........................................................................................................... 7
4. Operation ....................................................................................................8
Control Panel Description ......................................................................................... 8
Control Options ........................................................................................................ 8
Basic Programs ........................................................................................................ 8
Menu Options........................................................................................................... 9
DMX Values ........................................................................................................... 10
5. Technical Information .............................................................................. 13
General Maintenance ............................................................................................. 13
Repairs .................................................................................................................. 13
Returns Procedure ................................................................................................. 13
Claims ................................................................................................................... 13
Contact Us ............................................................................................................. 13
Technical Specifications ......................................................................................... 14
COLORado™ 2 Tour Quick Start Guide Rev. 02
Before you Begin
1. Before you Begin
What is
included
·
·
·
·
·
One COLORado™ 2 Tour
One power input cord with Edison plug
One barn doors frame
Warranty Card
Quick Start Guide
About this
Guide
This COLORado™ 2 Tour Quick Start Guide is a condensed version of the
COLORado™ 2 Tour user manual, which users can download from the
CHAUVET® Web site (www.chauvetlighting.com).
Unpacking
Immediately upon receiving a fixture, carefully unpack the carton. Check the
contents to ensure that all parts are present, and have been received in
good condition. If you have detected a problem, refer to the Claims section
in the Technical Information chapter of the COLORado™ 2 Tour user
manual for complete instructions on how to make a claim.
Text
Conventions
Convention
Meaning
1~512
A range of values
50/60
A set of mutually exclusive values in the text
Claims
A fixture function, a new term, or a section or
chapter
<SET>
A key to be pressed on the fixture’s control panel
Settings
A menu option
MENU > Settings A sequence of menu options to be followed
[1~10]
A range of menu values
Yes/No
A set of mutually exclusive menu options
ON
Icons
A value to be entered or selected
Icons
Meaning
This icon indicates critical installation, configuration or
operation information. Failure to comply with this information
may render the fixture partially or completely inoperative,
damage third-party equipment, or cause harm to the user.
This icon indicates important installation or configuration
information. Failure to comply with this information may
prevent the fixture from functioning correctly.
This icon indicates useful, although non-critical information.
The term “DMX” used throughout this document refers to the USITT
DMX512-A transmission protocol.
COLORado™ 2 Tour Quick Start Guide Rev. 02
1
Before you Begin
Safety
Notes
Please read the following notes carefully because they include important
safety information about the installation, usage and maintenance of this
product.
The COLORado™ 2 Tour has no user serviceable parts inside it. Any
reference to servicing this fixture you may find within this guide or the
downloaded user manual will only apply to properly CHAUVET®
certified technicians. Do not open the housing or attempt any repairs
unless you are one of them.
Please refer to all applicable local codes and regulations for proper
installation of the COLORado™ 2 Tour.
Keep this guide and the user manual for future consultation. If you sell
the COLORado™ 2 Tour to another user, make sure that they also
receive these documents.
Personal
Safety
·
·
·
Mounting
and Rigging
·
·
·
Power and
Wiring
·
·
·
Operation
·
·
Avoid direct eye exposure to the light source while the fixture is on.
Always disconnect the COLORado™ 2 Tour from its power source
before servicing.
The COLORado™ 2 Tour’s housing may be hot when operating.
This product is for indoor use only! To prevent risk of fire or shock, do
not expose this product to rain or moisture.
Make sure there are no flammable materials close to this product while
operating.
When hanging this fixture, always secure it to a fastening device using
a safety chain (not provided).
Never connect the COLORado™ 2 Tour to a dimmer pack.
Make sure this product’s housing or cable are not cracked, crimped or
damaged.
Never disconnect this product by pulling or tugging on the power cable.
Maximum ambient temperature (Ta) is 104° F (40° C). Do not operate
the fixture at a higher temperature.
In case of a serious operating problem, stop using this product
immediately!
In the unlikely event that your COLORado™ 2 Tour may require
service, please contact CHAUVET® Technical Support.
Expected
LED
Lifespan
2
LEDs gradually decline in brightness over time, mostly because of heat.
Packaged in clusters, LEDs exhibit higher operating temperatures than in
ideal or singular optimum conditions. For this reason, using all color LEDs
at their fullest intensity significantly reduces the LEDs’ lifespan. Under
normal conditions, this lifespan can be of 40,000 to 50,000 hours. If
extending this lifespan expectancy is vital, lower the operational
temperature by improving ventilation and reducing the external temperature,
as well as limiting the overall projection intensity.
COLORado™ 2 Tour Quick Start Guide Rev. 02
Introduction
2. Introduction
Fixture at
a Glance
Use on Dimmer
Outdoor Use
Sound Activated
DMX
Master/Slave
Features
·
·
x
x
x
P
P
Auto Programs
100~240 VAC, 50/60 Hz
Auto-ranging Power Supply
Replaceable Fuse
User Serviceable
Duty Cycle
·
·
·
·
3, 4, 5, 6 or 11-channel DMX LED wash light (with ID addressing)
Operating modes (personalities)
3-channel: RGB control
3-channel: HSV control (hue, saturation and value)
4-channel: RGBW control
4-channel: RGB, dimmer
5-channel: RGBW, dimmer
6-channel: RGBW, dimmer, strobe
11-channel: RGBW, ID, dimmer, strobe, macro, auto/custom,
dimmer speed, auto speed
RGBW color mixing with or without DMX controller
Color temperature presets (3,200~10,000 K)
Recall custom programs via DMX
Recall custom programs via DMX
Additional
Features
·
·
·
·
·
·
High-power, 2~3 W (750~1,000 mA) LEDs
Additional power output: max 5 units @ 120 V
Adjustable barn doors to direct output (includes gel frame)
LED display with lock-out feature
NEUTRIK® powerCON connectors
3-pin DMX input and output connectors
Options
·
·
Top hat (C2TOP)
Optical systems: 15° (installed), 30° (CLENS3048)
COLORado™ 2 Tour Quick Start Guide Rev. 02
P
P
x
x
x
3
Introduction
Product Overview
Safety cable passageway
Power In
DMX In
Power Out
DMX Out
Control Panel
A: 0.3 in/8.5 mm
B: 0.5 in/13 mm
4
COLORado™ 2 Tour Quick Start Guide Rev. 02
Setup
3. Setup
AC Power
The COLORado™ 2 has an auto-ranging power supply that can work with
an input voltage range of 100~240 VAC, 50/60 Hz.
Make sure that you are connecting this product to the proper voltage, as per
the specifications in this guide, the product’s user manual or on the
product’s sticker.
Always connect the COLORado™ 2 Tour to a protected circuit with an
appropriate electrical ground to avoid the risk of electrocution or fire.
To determine the power requirements for the COLORado™ 2 Tour see the
sticker affixed to the product. Alternatively, you may refer to the Technical
Specifications chart in the Technical Information chapter of this guide.
The listed current rating indicates the maximum current draw during normal
operation. Please refer to the Sizing the Circuit Breakers section in the
Appendix chapter of the COLORado™ 2 Tour user manual.
Never connect the COLORado™ 2 Tour to a rheostat (variable resistor)
or dimmer circuit, even if the rheostat or dimmer channel serves only
as a 0 to 100% switch.
Power
Linking
The COLORado™ 2 Tour supports power linking for up to five other
COLORado™ 2 Tour fixtures. Each COLORado™ 2 Tour has NEUTRIK®
powerCON connectors for Power In and Power Out. Although the fixture
comes with a power input cord, it comes with no power linking cord.
AC Plug
Depending on the market and the application, the COLORado™ 2 Tour
may require an AC plug other than the Edison type. Use the table below to
install a different AC plug for the COLORado™ 2 Tour.
Connection
Wire (US)
Wire (Europe)
Screw Color
AC Live
Black
Brown
Yellow/Brass
AC Neutral
White
Blue
Silver
AC Ground
Green/Yellow
Green/Yellow
Green
Fuse
Replacement
The COLORado™ 2 Tour fixture has no external fuse for the user to
change. However, it does have an internal fuse that only an authorized
CHAUVET® technician should change.
Lens
Assembly
The COLORado™ 2 Tour comes with the 15° lens assembly pre-installed
from the factory. However, there is an optional lens kits (CLENS3048)
available as an accessory, which will alter the beam and field angle of the
fixture to 30º.
To learn how to change or replace the LED lens assembly, download the
COLORado™ 2 Tour User Manual and refer to the Lens Assembly
Installation/Replacement section in the Setup chapter.
COLORado™ 2 Tour Quick Start Guide Rev. 02
5
Setup
Mounting
Orientation
Rigging
Read the safety notes at the beginning of this guide and follow their
recommendations before mounting this product.
You can mount this product in any safe position.
The COLORado™ 2 Tour consists of a sealed housing with a double
bracket mounting yoke. It has two DMX signal sockets (DMX In/out), and
two Neutrik POWERCON sockets (Power In/Out).
CHAUVET® recommends following the general guidelines below when
mounting the COLORado™ 2 Tour
·
·
·
·
·
Procedure
When selecting an installation location, consider ease of access to the
product for operation, programming adjustments and routine
maintenance.
Always mount this product making sure that there is adequate room
around it for ventilation.
Do not expose this product to extreme temperature changes.
Maximum ambient temperature (Ta) is 104° F (40° C). Do not operate
this product at a higher temperature.
If mounting this fixture overhead, make sure that the location where you
are mounting it can support its weight. Please see the Technical
Specifications section of this guide for the weight requirement of this
product.
This fixture includes a mounting yoke to which you can attach one or two
rigging clamps. You must supply your own “C” or “O” clamps and make sure
that they are capable of supporting the weight of this fixture. CHAUVET®
recommends using at least two mounting points per fixture.
Product
Mounting
Diagram
Secure the safety
cable using the
passageway on the
back of the fixture.
6
COLORado™ 2 Tour Quick Start Guide Rev. 02
Setup
DMX Linking
The COLORado™ 2 Tour can work with a DMX controller when linked
using a regular DMX serial connection.
If you are not familiar with the DMX standard, please download the
COLORado™ 2 Tour user manual and refer to the DMX Primer and DMX
Connectivity sections in the Appendix chapter.
DMX
Connection
The COLORado™ 2 Tour uses a regular DMX data connection for its DMX
modes (also known as “personalities”), TOUR, ARC 1, AR1 + D, ARC 2,
AR2 + D, AR2 + S, and HSV. Download the COLORado™ 2 Tour user
manual and refer to the Setup chapter to learn how to connect this fixture
for DMX operation. In addition, refer to its Operation Instructions chapter to
learn in detail how to configure this fixture for DMX operation.
Master/Slave
Connection
The COLORado™ 2 Tour uses the DMX data connection for its
Master/Slave mode. Download the COLORado™ 2 Tour user manual a and
refer to the Setup chapter to learn how to connect this fixture for
Master/Slave operation, and the Operation Instructions chapter to learn in
detail how to configure this fixture for Master/Slave operation.
ID
Addressing
The COLORado™ 2 Tour uses the ID Addressing feature to increase the
number of addressable fixtures in the same DMX universe. Download the
COLORado™ 2 Tour user manual and refer to the Operation Instructions
chapter to learn in detail how to configure the COLORado™ 2 Tour fixture
when using ID Addressing.
COLORado™ 2 Tour Quick Start Guide Rev. 02
7
Operation
4. Operation
Control
Panel
Description
BUTTON
<MENU>
<ENTER>
<UP>
<DOWN>
Control
Options
FUNCTION
Exits from the current menu or function
Enables the currently displayed menu or sets the currently
selected value into the current function
Navigates upwards through the menu list and increases
the numeric value when in a function
Navigates downwards through the menu list and
decreases the numeric value when in a function
You can set the COLORado™ 2 Tour start address in the 001~512 DMX
range. This allows for the control of up to 56 fixtures in the 11-channel
TOUR personality. In addition, the ID address system allows you to assign
up to 66 fixtures within the same DMX address, thus multiplying the number
of fixtures you can control within a single universe. You can access the
fixture’s ID address system from channel 11 when in the TOUR personality.
To remain within a one-second execution time, program no more than
10 fixtures on ID addressing per DMX channel.
Basic
Programs
DMX
Personality
DMX Control
Without ID
Addressing
Carry out all the programming procedures indicated below from the control
panel. Refer to the Menu Options on page 9 to learn how the menu options
relate to each other. Download the COLORado™ 2 Tour User manual for
more programming instructions.
1) Go to MENU > PERS and select any DMX personality.
2) Make sure to rearrange the DMX addresses of all fixtures in the current
DMX universe to avoid address overlapping.
1)
2)
3)
4)
Select the DMX personality as explained in DMX Personality.
Go to MENU > RUN and select DMX.
Go to MENU > DMX and select a starting DMX address (001~512).
Go to MENU > SET > ID and select OFF.
Make sure to disable ID Addressing on all fixtures and to set DMX
channel 11 to 0 when in the TOUR personality.
8
DMX Control
With ID
Addressing
1) Repeat steps 1 to 3 from DMX Control Without ID Addressing.
2) Go to MENU > SET > ID and select ON.
3) Go to MENU > ID and select an ID address (1~66)
Master/Slave
On the Master unit:
1) Go to MENU > RUN and select DMX.
2) Go to MENU > AUTO and select any Auto program.
On each of the Slave units:
1) Go to MENU > RUN and select SLAVE.
COLORado™ 2 Tour Quick Start Guide Rev. 02
Operation
Menu Options
MAIN LEVEL 2ND LEVEL
STAT
AUTO
Red
Green
Blue
White
Strob
AT 1~10
3RD LEVEL
4TH LEVEL
INSTRUCTIONS
000~255
N/A
Combine Red, Green, Blue and White to
generate a custom color (0~100%)
N/A
N/A
Run
DMX/Slave N/A
N/A
DMX
D 001~512 N/A
TOUR
Arc.1
Ar1.d
Arc 2
N/A
Ar2.d
Ar2.s
HSV
ID 1~66
N/A
N/A
PERS
ID
EDIT
PR 1~10
PR 1~10
UPLD
REST
ID
RGBW
SET
POW
Dim
CAL1
WT 1~11
CAL2
RGB
KEY
On/Off
SC 1~30
N/A
N/A
Red
Green
Blue
White
Strobe
Time
Fade
Select the strobing frequency (0~20 Hz)
Choose from 10 automatic programs
Choose from 10 customizable programs
(Use Edit to customize them)
DMX: Works with a DMX controller
Slave: Works with a Master or a COLOR-CON
Set the DMX starting address
11-channel RGBW + D
3-channel RGB
4-channel RGB + D
4-channel RGBW
5-channel RGBW + D
6-channel RGBW + D + Strobe
3-channel: Hue, Saturation, and Value
Assign the ID address (1~66) to a fixture
0~255
Select the values (0~255) to generate a
new color
Password
Password
On/Off
0~20 Select the strobing frequency (0~20 Hz)
0~255 Select the scene duration
0~255 Select the fading time
Upload the custom programs to another fixture.
Perform a factory reset
Enable or disable ID Addressing
Yes/No
Enable or disable RGB to White
Normal/
High
Off
Dim1
Dim2
Dim3
Dim4
Red
Green
Blue
White
Red
Green
Blue
N/A
N/A
Determines the power draw.
Linear dimmer speed
Special dimmer speed
Dim1 is the fastest dimming curve
Dim4 is the slowest dimming curve
000~255
000~255
N/A
COLORado™ 2 Tour Quick Start Guide Rev. 02
Edit the color temperature of the 11 pre-set white
levels
Set the maximum level of each color (RGB) to
determine the resulting white balance when
DMX RGB = 255, 255, 255.
Enable or disable the password lockout function
Password: <UP> <DOWN><UP><DOWN>
9
Operation
DMX Values
TOUR
Channel
Value
Percent/Setting
Function
1
000 ó 255 0 ó 100%
Dimmer
2
000 ó 255 0 ó 100% (Step Time if CUS 01~10 active)
Red
3
000 ó 255 0 ó 100% (Fade Time if CUS 01~10 active)
Green
4
000 ó 255 0 ó 100%
Blue
5
000 ó 255 0 ó 100%
White
6
000 ó 005
006 ó 020
021 ó 030
031 ó 050
051 ó 070
071 ó 090
091 ó 110
111 ó 130
131 ó 150
151 ó 170
171 ó 190
191 ó 200
201 ó 205
206 ó 210
211 ó 215
216 ó 220
221 ó 225
226 ó 230
231 ó 235
236 ó 240
241 ó 245
246 ó 250
251 ó 255
7
000 ó 010 No function
011 ó 255 0~20 Hz
8
000 ó
021 ó
031 ó
041 ó
051 ó
061 ó
071 ó
081 ó
091 ó
101 ó
111 ó
121 ó
020
030
040
050
060
070
080
090
100
110
120
130
No function
High Power (only when in NORMAL power mode)
No Function
Red 100% / Green Up / Blue 0%
Red Down / Green 100% / Blue 0%
Red 0% / Green 100% / Blue Up
Red 0% / Green Down ‘ Blue 100%
Red Up / Green 0% / Blue 100%
Red 100% / Green 0% / Blue Down
Red 100% / Green Up / Blue Up
Red Down / Green Down / Blue 100%
Color Macro + White
Red 100% / Green 100% / Blue 100% / White 100%
Balance
White 1: 3,200 K
White 2: 3,400 K
White 3: 4,200 K
White 4: 4,900 K
White 5: 5,600 K
White 6: 5,900 K
White 7: 6,500 K
White 8: 7,200 K
White 9: 8,000 K
White 10: 8,500 K
White 11: 10,000 K
Strobe
No function
Auto 1
Auto 2
Auto 3
Auto 4
Auto 5
Auto 6
Auto 7
Auto 8
Auto 9
Auto 10
Custom 1
Programs
(Continues next page)
10
COLORado™ 2 Tour Quick Start Guide Rev. 02
Operation
TOUR (Cont)
Channel
Value
8
(Cont)
131 ó 140
141 ó 150
151 ó 160
161 ó 170
171 ó 180
181 ó 190
191 ó 200
201 ó 210
211 ó 220
221 ó 255
Percent/Setting
Function
Custom 2
Custom 3
Custom 4
Custom 5
Custom 6
Custom 7
Custom 8
Custom 9
Custom 10
No function
Programs (Cont.)
9
000 ó 255 0~100% (Only works if AUTO 01~10 is playing)
Auto Speed Adjust
10
000 ó
010 ó
030 ó
070 ó
130 ó
190 ó
Dimmer Speed
Value
Setting
Value
11
000 ó 009
010 ó 019
020 ó 029
030 ó 039
040 ó 049
050 ó 059
060 ó 069
070 ó 079
080 ó 089
090 ó 099
100 ó 109
110 ó 119
120 ó 129
130 ó 139
140 ó 149
150 ó 159
160 ó 169
170 ó 179
180 ó 189
190 ó 199
200 ó 209
210
211
All IDs
ID 1
ID 2
ID 3
ID 4
ID 5
ID 6
ID 7
ID 8
ID 9
ID 10
ID 11
ID 12
ID 13
ID 14
ID 15
ID 16
ID 17
ID 18
ID 19
ID 20
ID 21
ID 22
212
213
214
215
216
217
218
219
220
221
222
223
224
225
226
227
228
229
230
231
232
233
234
009
029
069
129
189
255
Preset dimmer speed from display menu
Linear dimmer
Nonlinear dimming curve 1 (fastest)
Nonlinear dimming curve 2
Nonlinear dimming curve 3
Nonlinear dimming curve 4 (slowest)
Setting
ID 23
ID 24
ID 25
ID 26
ID 27
ID 28
ID 29
ID 30
ID 31
ID 32
ID 33
ID 34
ID 35
ID 36
ID 37
ID 38
ID 39
ID 40
ID 41
ID 42
ID 43
ID 44
ID 45
COLORado™ 2 Tour Quick Start Guide Rev. 02
Value
235
236
237
238
239
240
241
242
243
244
245
246
247
248
249
250
251
252
253
254
255
Setting
ID 46
ID 47
ID 48
ID 49
ID 50
ID 51
ID 52
ID 53
ID 54
ID 55
ID 56
ID 57
ID 58
ID 59
ID 60
ID 61
ID 62
ID 63
ID 64
ID 65
ID 66
ID Addressing
11
Operation
DMX Values (Cont.)
ARC1
Channel Value
1
2
3
AR1 + D
Channel Value
1
2
3
4
ARC2
000 ó
000 ó
000 ó
000 ó
255
255
255
255
000 ó
000 ó
000 ó
000 ó
000 ó
255
255
255
255
255
Channel Value
1
2
3
4
5
6
HSV
255
255
255
255
Channel Value
1
2
3
4
5
AR2 + S
000 ó
000 ó
000 ó
000 ó
Channel Value
1
2
3
4
AR2 + D
Percent/Setting
000 ó 255 0 ó 100%
000 ó 255 0 ó 100%
000 ó 255 0 ó 100%
000 ó
000 ó
000 ó
000 ó
000 ó
000 ó
Channel Value
1
2
3
255
255
255
255
255
255
Function
Red
Green
Blue
Percent/Setting
Function
0ó
0ó
0ó
0ó
100%
100%
100%
100%
Dimmer
Red
Green
Blue
Percent/Setting
Function
0ó
0ó
0ó
0ó
Red
Green
Blue
White
100%
100%
100%
100%
Percent/Setting
Function
0ó
0ó
0ó
0ó
0ó
100%
100%
100%
100%
100%
Dimmer
Red
Green
Blue
White
Percent/Setting
Function
0ó
0ó
0ó
0ó
0ó
0ó
100%
100%
100%
100%
100%
100%
Dimmer
Red
Green
Blue
White
Strobe
Percent/Setting
Function
000 ó 255 0 ó 100%
000 ó 255 0 ó 100%
000 ó 255 0 ó 100%
Hue
Saturation
Value
In HSV mode, Hue refers to the visible light, such as red, yellow, and
cyan, etc. Saturation is the dominance of hue in the color; when
saturation is at 100%, the color is at its purest. Value is the color’s
brightness; when value is at 100%, the color is at its brightest.
12
COLORado™ 2 Tour Quick Start Guide Rev. 02
Technical Information
5. Technical Information
General
Maintenance
Download the COLORado™ 2 Tour user manual and refer to its Technical
Information chapter for a description on how to troubleshoot and maintain
this fixture
Always dry the external optics and glass surfaces carefully after
cleaning them.
Never spin a fan using compressed air.
Repairs
Download the COLORado™ 2 Tour user manual and refer to its Technical
Information chapter for a description on how to troubleshoot this fixture
If you need help troubleshooting your fixture, contact CHAUVET®
Technical Support.
Returns
Procedure
Download the COLORado™ 2 Tour user manual and refer to its Technical
Information chapter for a description on how to return this fixture to
CHAUVET®.
Claims
Download the COLORado™ 2 Tour user manual and refer to its Technical
Information chapter for a description on how to make a claim regarding this
fixture if you received it damaged during shipping. For other claims (missing
parts, fixture not working, etc., contact CHAUVET® Technical Support.
Contact Us
World Wide
General Information
CHAUVET®
th
5200 NW 108 Avenue
Sunrise, FL. 33351
Voice: (954) 929-1115
Fax: (954).929-5560
Toll free: (800) 762-1084
Technical Support
Voice: (954) 929-1115 (Press 4)
Fax: (954) 929-5560 (Attention: Service)
World Wide Web
www.chauvetlighting.com
COLORado™ 2 Tour Quick Start Guide Rev. 02
13
Technical Information
Technical Specifications
Weight & Dimensions
Length ..........................................................................................10.8 in (276 mm)
Width ...............................................................................................12 in (305 mm)
Height .............................................................................................9.0 in (230 mm)
Weight .............................................................................................. 20 lbs (9.1 kg)
Power
Auto-ranging .........................................................................100~240 V, 50/60 Hz
Fuse (internal) ........................................................................................ 2 A, 250 V
Power Consumption ............................................ 179.4 W (1.43 A) max @ 120 V
Power Consumption ............................................ 178.9 W (0.78 A) max @ 230 V
Inrush Current ................................................... 0.75 A @ 120 V, 0.81 A @ 230 V
Power Factor............................................................ 1.00 @ 120 V, 0.99 @ 230 V
Power Linking .................................5 units max @ 120 V, 10 units max @ 230 V
Light Source
Type .................................................................................... 3 W, 50,000 hrs LEDs
Configuration...............................................................................................48 units
Red ............................................................. 12 units, 750 mA
Green .......................................................12 units, 1,000 mA
Blue ..........................................................12 units, 1,000 mA
White ........................................................12 units, 1,000 mA
Refresh rate ................................................................................................. 400 Hz
Photo Optic
Luminance @ 2 m (with included 15° degree lenses) .......................... 16,300 lux
Beam Angle @ 2 m (with included 15° degree lenses).................................... 10°
Field Angle @ 2 m (with included 15° degree lenses) ..................................... 23°
Thermal
Cooling ...................................................................................... Natural convection
Maximum ambient temperature ...................................................... 104° F (40° C)
Control & Programming
Data input ..............................................................Locking 3-pin XLR male socket
Data output ....................................................... Locking 3-pin XLR female socket
Data pin configuration............................................ Pin 1 shield, pin 2 (-), pin 3 (+)
Protocols .................................................................................... USITT DMX512-A
DMX Channels .................................................................................... 3, 4, 5, 6, 11
Ordering Information
COLORado™ 2 Tour ............................................................. COLORADO2TOUR
Warranty Information
Warranty............................................................................. 2-year limited warranty
© Copyright 2009 CHAUVET®
All rights reserved
Printed in the P. R. C.
14
COLORado™ 2 Tour Quick Start Guide Rev. 02