1
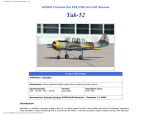
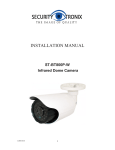
A-EFIS USER'S MANUAL Thank you for purchasing A-EFIS. This manual provides important information for a cautionary and safe operation of A-EFIS. Please spend some time before using it to get familiar with its operation. While we tried hard to make the operation as simple and intuitive as possible, it is important that you know how to use it before you make the first flight. IMPORTANT DISCLAIMER A-EFIS IS NOT A CERTIFIED DEVICE FOR SAFE OPERATION ON A FLYING AIRCRAFT. WILL NOT REPLACE ANY OTHER CERTIFIED FLYING INSTRUMENT. YOU USE THIS DEVICE SOLELY AT YOUR OWN RISK. THIS SOFTWARE IS ONLY FOR PRIVATE, NON-COMMERCIAL USE AND COMES WITHOUT ANY WARRANTY. SYSTEM OVERVIEW A-EFIS is based on Android devices. For correct operation the device must be equipped with the following sensors: 3axis gyroscope 3axis accelerometer magnetic compass GPS After the installation a window pops up which informs you about the sensors included in your device. If critical sensors are not included the screen of the device loose its transparency. The same happens if during the flight a sensor stops functioning e.g. GPS. In this case you know that you cannot trust the AHRS indication. No android device so far is equipped with air pressure sensor and thus in the software-only version, there is no indication of IAS or TAS. You can have only Ground Speed. Some devices have a barometric sensor. In this case altitude, vario and all functionalities about altitude are fully operating. If there is no such sensor in your device, altitude and vario are based on GPS data. The selection of which altitude operation to use is automatic. In case of barometric sensor presence, altitude, vario etc. are based on this sensor. You can see also the GPS altitude in the landscape position of your device. INSTALLATION PROCEDURE Software installation First you must download or copy the A-EFIS.apk to your android device. Run the application and let the installation finish. A button like the one in the picture on the left will appear in your applications screen. If you like you can drag and drop a copy in the main screen of your device. If you downloaded the free version of the software, just press the button and the application will start running. In the welcome screen you will see the restrictions and limitations of this version. If you purchased the full and unlimited version, please send by email to [email protected] your Google account email or use the form in contact www.talosavionics.com and we will email you back the key to unlock your device. The first time you press the start button, a popup window will appear asking you to enter the unlocking code. Enter the code and your device will be unlocked and fully operating. You can find your Google account email if you press settings-accounts-Google. Device installation There are two main operating modes of your device, portrait and landscape. See below the pictures and explanation of all features. You cannot change the mode in flight and while the device is operating. You must do this selection before flight or if you want to do it during the flight you must close the application rotate the device and start again the application. In either modes it is important the position of the device. You must mount the device as close as possible to vertical position and parallel to the airplane’s axis. If there is some degrees of offset from the correct position, it will be automatically corrected with the calibration procedure. But if the offset is very big, operation mainly during steep turns won’t be correct. It is though very important that after installation you select from settings the AHRS CALIBRATION button. If after the flight you unmount the device it is very important that next time you use it you mount it in exactly the same position or you can use the same calibration procedure as above. It is a good practice, every time you mount the device or start a flight after some time, to repeat the calibration procedure. ATTENTION: During calibration procedure the engine must be off and the aircraft on the ground and in the same attitude as in straight and leveled flight. Your device must be mounted on a solid and non vibrating holder. Some suction holders are not suitable for this application, because they vibrate very much when in turbulence. If you use the device in a tail dragger or an aircraft which has different attitude on the ground and in the air, please read below “Tail dragger installation” OPERATION A-EFIS has 4 main screens: 1. Portrait A 2. Portrait B 3.Landscape A 4.Landscape B In the previous page you can see the explanation of each part of the interface. We tried hard to make the interface as easy and user-friendly as possible. We tried to reduce menus and selections with separate windows to the minimum necessary. In order to change the units you just tap on the relative black window. To change the speed units just tap on the lower left window. Every time you tap, units change in this order: 1 KMH, 2 MPH, 3 KNOTS. If you want to change altitude units, just tap the lower right window. 1 tap is in meters, 2 tap feet. If you tap in the middle of the green altitude and vario bar you select vario units feet/min or m/s. To the side of the speed and altitude window in the above example it is written in grey GPS. This is the source of the relative information. In this case the speed is from the GPS, ground speed and altitude from GPS. If your device includes the barometric sensor, then the altitude is based on this sensor and GPS disappears. If you purchased the external pressure sensors box, also speed is IAS and TAS. Please note that to simplify operation, there is no default units selection screen. The last units selected are the default for any new operation. The same applies also to turn coordinator. st nd st rd nd SCREEN SELECTION To change screen during operation tap with one finger in the middle of the screen for more than 2 secs. Please note that you can select only the 2 screens in portrait mode or in landscape mode. To change mode, you must close and restart the application in the new mode. TURN COORDINATOR You can switch on or off turn coordinator during the flight by fast tapping with one finger in the middle of the screen. SETTINGS Please tap settings at the right top of your screen to open the settings window. AHRS CALIBRATION Tapping AHRS CALIBRATION, you enable calibration of the ahrs. You have to install your device in its final flight position and then press this button while the aircraft doesn't move. Installation data are saved in your device and every time you install it in the same position, you have correct altitude indication. If for any reason you change position, you must repeat this simple procedure. If for any reason you need to calibrate the device during the flight, try to fly leveled and straight with less possible vibrations from the engine and press again AHRS CALIBRATION or you can use the procedure described in “TAIL DRAGGER INSTALLATION”. ATTENTION: During the calibration in flight the procedure is much slower than on the ground and you should maintain the leveled flight for at least 1min. COMPASS The strip of numbers at the top of the artificial horizon is the magnetic indication (compass). For correct operation you must install the android device away from any metallic object or sources of strong electromagnetic field. You need to proceed to the correct compass calibration following the instructions below. During the flight you can change the indication of the strip from true track (red color) to magnetic heading (white) by fast tapping in the small window in the middle of the strip. COMPASS CALIBRATION It is very important that you make a good calibration of the compass as close as possible to the location you are going to install the device in the cockpit. Calibration is a process where all other parasitic magnetic fields are canceled, except the earth's magnetic field, in order to have correct compass indication. Start moving slowly in all directions the device and at the end press COMPASS CALIBRATION. If the data collected during the rotation are not enough, you get a message that there are not enough data for compass calibration. In this case, please repeat the procedure. Also you can repeat the same procedure after some flights. The device doesn't delete old useful data and after some flights new data are collected that improve calibration. SPEED INFO Pressing this button you get a new window where you can set Stall, Cruise, Vmax speeds and also the units you use for this setting. These units don't change the speed unit selection on the interface. They are only the units that you use to setup the colors and audio warnings for the speed. PRESSURE INFO If your device doesn't have pressure sensor or you don't have the external pressure sensors, this button do nothing. Your altitude is based on GPS data and you can't have any other information. If your device has pressure sensor (barometric sensor) with this button you open a new window, where you can set the QNH or the altitude to get the pressure. After you set the pressure, press “compute altitude“ to get the altitude. If you select Units a new window pops up where you can select pressure units between Millibars or Inches-Hg. If your device doesn’t have any native barometric sensor you can use the GPS to get current altitude, by taping Use GPS ENABLE SOUNDS With this button you enable sound warnings for low speed, stall and hi speed. Warnings are based on the date you set in SPEED INFO. COURSE INDICATOR In landscape mode, on the right side of the screen or in the bottom of the screen in portrait mode, you can see the HIS rose. The outer circle shows the angle from the set waypoint, while the green arrow shows the actual GPS course. To set new waypoints tap SETTINGS and then tap GPS DATA. A new window, where you can enter waypoint coordinates in Latitude and Longitude, pops up. If you press Add Coordinates you can enter as many sets of coordinates as you want. Pressing Show Coords you can see all coordinates you entered and edit them. During the flight you can select among the sets of coordinates you added by sliding with one finger on the coordinate’s indication on the HSI window. If you tap Units a new window pops up where you can select the desired coordinate’s format. You can select between Decimal, DMS and DMM. In the middle of the rose you can see one green arrow and a series of orange dots. The green arrow indicates the angle of your course from the desired. A part of this arrow is broken and moves on the left or the right of the arrow. This measures the distance of your course from the straight line connecting the 2 waypoints one. Each dot of the orange line is 2 miles out of course. The small triangle points to the nose of the aircraft, while the legend below it, shows the set course. By short taping on the HSI rose, you can switch the indication from true track (red color) to magnetic heading (yellow). EXTERNAL DEVICES If you select “EXTERNAL DEVICE” a new window pops up with 2 buttons. You can select to connect to the external pressure box AEOLUS via WiFi or to an external GPS via Bluetooth. To connect to an external GPS, first you need to turn the external gps on then turn on Bluetooth in your android device and pair the external gps following the manufacturer's instructions. Then run a-efis, tap settings and tap external devices. If you tap connect to NMEA device, a-efis reads data from the external gps and not the internal anymore. It is good practice to turn off the internal gps of the android device before you connect to the external. TAIL DRAGGER INSTALLATION If you install your device in a tail dragger or you want to change the initial calibration you can do it in the following way: Press the middle of the screen for about 2-3 seconds with 2 fingers. Four arrows appear as in the picture below Each time you press one arrow, the attitude, pitch or roll changes by 1 degree. If you know the angle of your tail dragger on the ground, first you calibrate A-EFIS following the procedure described above and then you move the horizon’s line up to the correct flight attitude. You can follow the same procedure if the attitude of the airplane is not the same on the ground and in the air. You can also correct the attitude during the flight. To dismiss this screen just press again in the middle of the screen for 2-3 secs with 2 fingers.