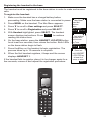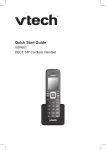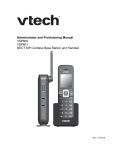
1
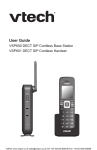
User Guide
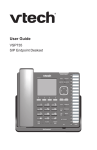
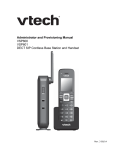
VSP600 DECT SIP Cordless Base Station
VSP601 DECT SIP Cordless Handset
VSP600
2
Congratulations
on your purchase of this VTech product. Before using this product, please read
Important Safety Information on page 4 of this manual. Please thoroughly
read this user’s manual for all the feature operations and troubleshooting
information necessary to install and operate your product. You can also visit our
website at businessphones.vtech.com or call 1 (888) 370-2006.
Please note the serial number of your product, which can be found on the bottom
of the base station. Save your sales receipt and original packaging in case it is
necessary to return your telephone for warranty service.
3
Important Safety Information
This symbol is to alert you to important operating or servicing
instructions that may appear on the product or in this user’s manual.
Always follow basic safety precautions when using this product to
reduce the risk of injury, fire, or electric shock.
Important safety instructions
When using your telephone equipment, basic safety precautions should always
be followed to reduce the risk of fire, electric shock and injury, including the
following:
1. This product should be installed by a qualified technician.
2. This product should only be connected to the host equipment and never
directly to the network such as Public Switch Telephone Network (PSTN) or
Plain Old Telephone Services (POTS).
3. Read and understand all instructions.
4. Follow all warnings and instructions marked on the product.
5. Unplug this product from the wall outlet before cleaning. Do not use liquid or
aerosol cleaners. Use a damp cloth for cleaning.
6. Do not use this product near water such as near a bath tub, wash bowl,
kitchen sink, laundry tub or swimming pool, or in a wet basement or shower.
7. Do not place this product on an unstable table, shelf, stand or other unstable
surfaces.
8. Slots and openings in the back or bottom of the base station and handset are
provided for ventilation. To protect them from overheating, these openings
must not be blocked by placing the product on a soft surface such as a bed,
sofa or rug. This product should never be placed near or over a radiator or
heat register. This product should not be placed in any area where proper
ventilation is not provided.
9. This product should be operated only from the type of power source indicated
on the marking label. If you are not sure of the type of power supplied at the
premises, consult your dealer or local power company.
10. Do not allow anything to rest on the power cord. Do not install this product
where the cord may be walked on.
11. Never push objects of any kind into this product through the slots in the base
station or handset because they may touch dangerous voltage points or
create a short circuit. Never spill liquid of any kind on the product.
4
12. To reduce the risk of electric shock, do not disassemble this product, but take
it to an authorized service facility. Opening or removing parts of the base
station or handset other than specified access doors may expose you to
dangerous voltages or other risks. Incorrect reassembling can cause electric
shock when the product is subsequently used.
13. Do not overload wall outlets and extension cords.
14. Unplug this product from the wall outlet and refer servicing to an authorized
service facility under the following conditions:
A. When the power supply cord or plug is damaged or frayed.
B. If liquid has been spilled onto the product.
C. If the product has been exposed to rain or water.
D.
If the product does not operate normally by following the operating
instructions. Adjust only those controls that are covered by the
operation instructions. Improper adjustment of other controls may
result in damage and often requires extensive work by an authorized
technician to restore the product to normal operation.
E. If the product has been dropped and the telephone base and/or
handset has been damaged.
F. If the product exhibits a distinct change in performance.
15. Avoid using a telephone (other than cordless) during an electrical storm.
There is a remote risk of electric shock from lightning.
16. Do not use the telephone to report a gas leak in the vicinity of the leak. Under
certain circumstances, a spark may be created when the adapter is plugged
into the power outlet, or when the handset is replaced in its cradle. This is a
common event associated with the closing of any electrical circuit. The user
should not plug the phone into a power outlet, and should not put a charged
handset into the cradle, if the phone is located in an environment containing
concentrations of flammable or flame-supporting gases, unless there is
adequate ventilation. A spark in such an environment could create a fire or
explosion. Such environments might include: medical use of oxygen without
adequate ventilation; industrial gases (cleaning solvents; gasoline vapors;
etc.); a leak of natural gas; etc.
17. Only put the handset of your telephone next to your ear when it is in normal
talk mode.
18. The power adapters are intended to be correctly oriented in a vertical or floor
mount position. The prongs are not designed to hold the plug in place if it is
plugged into a ceiling, under-the-table or cabinet outlet.
5
19. Use only the power cord indicated in this manual.
20. In wall mounting position, make sure to mount the telephone base on the wall
by aligning the eyelets with the mounting studs of the wall plate. Then slide
the telephone base down on both mounting studs until it locks into place.
Refer to the full installation instructions in “Handset Installation” on page
16 in this User Guide.
21. CAUTION: Keep small metallic objects such as pins and staples away from
the handset receiver.
SAVE THESE INSTRUCTIONS
6
Compliance
FCC part 15
This device complies with Part 15 of the FCC rules. Operation is subject to the
following two conditions: (1) This device may not cause harmful interference, and
(2) this device must accept any interference received, including interference that
may cause undesired operation.
This equipment has been tested and found to comply with the limits for a
Class A digital device, pursuant to Part 15 of the FCC Rules. These limits are
designed to provide reasonable protection against harmful interference when the
equipment is operated in a commercial environment. This equipment generates,
uses, and can radiate radio frequency energy and, if not installed and used in
accordance with the instruction manual, may cause harmful interference to radio
communications. Operation of this equipment in a residential area is likely to
cause harmful interference in which case the user will be required to correct the
interference at the user’s expense.
Privacy of communications may not be ensured when using this phone.
Warning: Changes or modifications to this equipment not expressly approved by
the party responsible for compliance could void the user’s authority to operate
the equipment.
Caution: To maintain the compliance with the FCC’s RF exposure guideline,
place the base unit at least 20 cm from nearby persons.
For body-worn operation, this handset has been tested and meets the FCC RF
exposure guidelines when used with the accessories supplied or designated for
this product. Use of other accessories may not ensure compliance with FCC RF
exposure guidelines.
This Class A digital apparatus complies with Canadian requirements:
CAN ICES-3 (A)/NMB-3(A).
Cet appareil numérique de la classe A est conforme à la norme CAN ICES-3 (A)/
NMB-3(A) du Canada.
This device complies with Industry Canada license-exempt RSS standard(s).
Industry Canada
Operation is subject to the following two conditions: (1) this device may not cause
harmful interference, and (2) this device must accept any interference received,
including interference that may cause undesired operation of the device.
Privacy of communications may not be ensured when using this telephone.
The term ‘’IC:‘’ before the certification/registration number only signifies that the
Industry Canada technical specifications were met.
This product meets the applicable Industry Canada technical specifications.
7
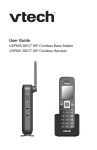
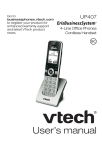
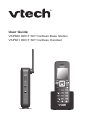
User Guide
VSP600 DECT SIP Cordless Base Station
VSP601 DECT SIP Cordless Handset
Table of Contents
Important Safety Information
Setting up a conference call������������� 28
Listening to messages���������������������� 29
4
Using the Directory��������������������������� 30
Important safety instructions�������������� 4
Introduction
Using the Call History����������������������� 32
10
Using Speed Dial������������������������������ 33
About this guide�������������������������������� 10
Configuring the Handset
Product overview������������������������������ 10
Quick Reference Guide
Setting do not disturb����������������������� 34
11
Setting call forwarding���������������������� 34
Base station external features���������� 11
Blocking anonymous calls���������������� 35
Cordless handset external features�� 12
Dialing anonymously������������������������ 35
Dial pad and audio controls�������������� 12
Base Station Installation
13
Handset Installation
16
Answering calls automatically���������� 35
Setting missed-call alerts����������������� 36
Setting call waiting���������������������������� 36
Installing the charger������������������������ 16
Viewing handset status��������������������� 36
Battery installation and charging������ 17
Setting the language������������������������ 37
Wall mounting the charger���������������� 19
Setting the date and time����������������� 37
Adding a corded headset����������������� 20
Setting the handset name���������������� 37
Registering the handset to the base� 21
Setting the screen brightness����������� 37
Deregistering the handset���������������� 22
Locating the Handset
23
Screen icons
23
Using the Handset
24
34
Setting the ringer tone and volume�� 38
Turning low battery tone on or off����� 38
Turning link lost tone on or off���������� 38
Turning key tones on or off��������������� 38
Idle screen���������������������������������������� 24
Making calls�������������������������������������� 24
Registering or deregistering your
handset��������������������������������������������� 39
Answering calls�������������������������������� 25
Updating the handset software��������� 39
Putting a call on hold������������������������ 26
WebUI
Switching between two calls������������� 26
Using the WebUI������������������������������ 40
Transferring a call����������������������������� 27
System Status���������������������������������� 42
8
40
Handset Status��������������������������������� 43
Technical Specifications
51
Call Settings������������������������������������� 43
Special characters
51
User Preferences����������������������������� 45
Entering special characters�������������� 51
Base Directory���������������������������������� 46
Maintenance
Blacklist�������������������������������������������� 48
Taking care of your telephone���������� 52
Security�������������������������������������������� 49
GPL License Information
Troubleshooting
GPL code requests��������������������������� 53
50
General issues��������������������������������� 50
9
52
53
Introduction
About this guide
This user guide provides information about the external features of the base
station and handset, installation and handset configuration instructions, and
detailed instructions for using the handset. Please read this user’s manual before
using your handset.
Please refer to the VSP600/VSP601 Administrator and Provisioning Manual for
complete configuration instructions. You can download the guide from
businessphones.vtech.com.
For customer service or product information, visit our website at
businessphones.vtech.com or call 1 (888) 370-2006.
Product overview
The VTech VSP600 base station and VSP601 cordless handset is a full-featured
SIP endpoint business phone system designed to work with popular hosted IP
PBX services and on-premise SIP PBXs. Once you have ordered and configured
your PBX service, the handset enables you to make and receive calls as you
would with any other business phone. Up to six cordless handsets can be
registered to the base station. Each handset provides calling features such as
hold, transfer, conferencing, and speakerphone.
The VSP601 cordless handset features include:
•
Orbitlink Wireless Technology™
•
Backlit Liquid Crystal Display
•
Speakerphone, Hold and Mute
•
Up to 6 SIP lines/accounts
•
Up to 4 concurrent calls across all handsets
•
3-way conferencing
•
Corded headset support
•
200-entry local directory
10
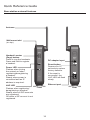
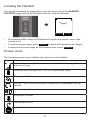
Quick Reference Guide
Base station external features
Antenna
Wall mount slot
(on top)
Handset Locator
(Page) button
Press to ring the handsets.
Press and hold to register
a handset.
Power LED
Flashes when joining
the network or when
registering/deregistering
a handset.
Steady when power is
connected and an IP
address is acquired.
VoIP LED
Flashes when registering/
deregistering a handset.
Steady when all SIP accounts
are registered.
Off when a SIP account is not
registered.
Use only
Supplied
Adapter
DC adapter input
Reset button
Depress for 15
seconds to restore
factory defaults.
If the reset is
successful, the
VoIP LED will flash
slowly.
VSP600
RESET
Ethernet port
Front
Rear
11
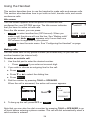
Quick Reference Guide
Cordless handset external features
Message light
Flashes when a line
has a new voice
message.
HEADSET JACK
2.5 mm jack for connecting
a corded headset.
SOFT KEYS
Perform the actions
indicated by the onscreen labels.
VOL p DIR
While in menus, press p
to scroll up the menu.
Press to display the
Directory.
TRANSFER
Press to start
transferring a call.
CONF
Press to start a
conference call.
TALK
Press to start
making a call.
VOL q CID
While in menus, press q
to scroll down the menu.
Press to display the Call
history.
On back:
HOLD
Press to put a call on hold.
SPEAKER
BELT CLIP
Dial pad and audio controls
MENU/SELECT
Press to display the main
menu.
Press to select a menu item.
OFF/CANCEL
Press to end a call.
Press to cancel an operation
and leave a menu.
INT
Press to start making
an intercom call.
HANDSET LOCK
Press and hold to lock
handset keys and
prevent accidental key
presses.
DIAL PAD
SPEAKER
Press to use
the handset
speakerphone.
MUTE/DELETE
During a call, press to
prevent your voice from
being heard.
While entering numbers
or letters, press to delete
previous character.
REDIAL/PAUSE
Press to redial a number
or enter a pause when
programming a phone number.
12
Base Station Installation
This section assumes that your network infrastructure is established and that
your IP PBX phone service has been ordered and configured for your location.
For more information about IP PBX configuration, see the VSP600/VSP601
Administrator and Provisioning Manual, available at
businessphones.vtech.com.
You can power the base station using the supplied power adapter or using Power
over Ethernet (PoE) from your network. (The base station requires PoE Class 2.)
If you are not using PoE, install the base station near a power outlet not controlled
by a wall switch. The base station can be placed on a flat surface or mounted on a
wall in a vertical or horizontal orientation.
Avoid placing the base station too close to:
•
Communication devices such as television sets, DVD players, or other
cordless telephones
•
Excessive heat sources
•
Noise sources such as a window with traffic outside, motors, microwave
ovens, refrigerators, or fluorescent lighting
•
Excessive dust sources such as a workshop or garage
•
Excessive moisture
•
Extremely low temperature
•
Mechanical vibration or shock such as on top of a washing machine or work
bench
13
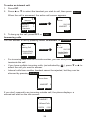
To install the base station:
1. Plug one end of the Ethernet cable into the Ethernet port on the rear of the
base station (marked by
), and plug the other end of the cable into your
network router or switch.
2. If the base station is not using power from a PoE-capable network router or
switch:
a. Connect the supplied power adapter to the base station power jack.
a. Plug the power adapter into an electrical outlet that is not controlled by a
wall switch.
Use only
Supplied
Adapter
RESET
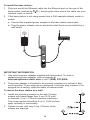
IMPORTANT INFORMATION
1. Use only the power adapter supplied with this product. To order a
replacement power adapter, visit our website at
businessphones.vtech.com or call 1 (888) 370-2006.
2. The power adapter is intended to be correctly oriented in a vertical or floor
mount position. The prongs are not designed to hold the plug in place if it is
plugged into a ceiling, under-the-table or cabinet outlet.
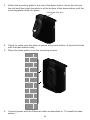
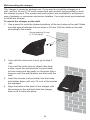
To mount the base station on a wall:
1. Install two mounting screws on the wall. Choose
screws with heads larger than 5 mm (3/16 inch)
in diameter (1 cm / 7/16 inch diameter maximum).
The screw centers should be 5 cm (1 15/16 inches)
apart vertically or horizontally.
2. Tighten screws until only 3 mm (1/8 inch) of the
screws are exposed.
14
3. Attach the mounting plate to the top of the base station. Insert the tab into
the slot and then push the plate in at the bottom of the base station until the
mounting plate clicks into place.
Insert tab into slot.
4. Check to make sure the plate is secure at top and bottom. It should be flush
with the base station body.
5. Place the base station over the mounting screws.
6. Connect power and the Ethernet cable as described in “To install the base
station.”
15
Handset Installation
This section assumes that your network infrastructure is established and that
your IP PBX phone service has been ordered and configured for your location.
For more information about IP PBX configuration, see the VSP600/VSP601
Administrator and Provisioning Manual, available at
businessphones.vtech.com.
Handset installation involves both the handset and the handset charger. The
charger is powered using the supplied power adapter. The charger can be placed
on a flat surface or mounted on a wall.
Avoid placing the handset and charger too close to:
•
Communication devices such as television sets, DVD players, or other
cordless telephones
•
Excessive heat sources
•
Noise sources such as a window with traffic outside, motors, microwave
ovens, refrigerators, or fluorescent lighting
•
Excessive dust sources such as a workshop or garage
•
Excessive moisture
•
Extremely low temperature
•
Mechanical vibration or shock such as on top of a washing machine or work
bench
Installing the charger
Install the charger as shown below.
Plug the power adapter into an electrical outlet not controlled by a wall switch.
16
IMPORTANT INFORMATION
1. Use only the power adapter supplied with this product. To order a
replacement power adapter, visit our website at
businessphones.vtech.com or call 1 (888) 370-2006.
2. The power adapter is intended to be correctly oriented in a vertical or floor
mount position. The prongs are not designed to hold the plug in place if it is
plugged into a ceiling, under-the-table or cabinet outlet.
Battery installation and charging
Install the battery as shown on the following page. Once you have installed
the battery, the screen indicates the battery status (see the table below). If
necessary, place the handset in the charger to charge the battery. For best
performance, keep the handset in the charger when not in use. The battery is
fully charged after 11 hours of continuous charging.
If the screen is blank, you need to charge the handset without interruption for
at least 30 minutes to give the handset enough charge to use the telephone for
a short time. When the battery is low, the handset shows Low battery and a
flashing .
Battery indicators
Battery Status
The screen is blank or
shows Place in charger
and flashes.
The battery has no
or little charge. The
handset cannot be used.
Charge without
interruption (at least 30
minutes).
The screen shows Low
battery and flashes.
Battery has enough
charge to be used for a
short time.
Charge without
interruption (at least 30
minutes).
Full battery icon ( )
appears. The screen
shows HANDSETx (x
represents the handset
ID number 1 to 6).
Battery is charged.
To keep the battery
charged, place it in the
charger when not in use.
17
Action
To install the handset battery:
1. Plug the battery connector securely into the socket inside the handset battery
compartment. Insert the supplied battery with the label THIS SIDE UP facing
up as indicated.
2. Align the cover flat against the battery compartment, then slide it upwards
until it clicks into place.
3. Charge the handset by placing it face forward in the charger. The battery icon
indicates the charge status as the battery charges.
Very low battery charging
less than 30 minutes.
Charging 30 to 80 minutes.
Charging 80 minutes
to 7 hours.
Charging more than 7 hours.
Fully charged at 11 hours.
IMPORTANT INFORMATION
•
Use only the supplied rechargeable battery or replacement battery
(model BT164392). To order a replacement battery, visit our website at
businessphones.vtech.com or call 1 (888) 370-2006.
•
If you do not use the handset for a long time, disconnect and remove the
battery to prevent possible leakage.
18
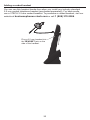
Wall mounting the charger
The charger is ready for tabletop use. If you want to mount the charger on a
wall, use two 10 mm (7/16 inch) screws and wall anchors (not provided) to hold
the charger in place. The screws and wall anchors are available for purchase in
many hardware or consumer electronics retailers. You might need a professional
to install the charger.
To mount the charger on the wall:
1. Use a pencil to mark the desired positions of the two holes on the wall. Make
sure the space between the two holes is 30 mm. Drill two holes in the wall
according to the marks.
Screw spacing 30 mm
(1 3/16 inches)
2. If you drill the holes into a stud, go to step 3.
-ORIf you drill the holes into an object other than
a stud, insert the wall anchors (not provided)
into the holes and tap gently on the ends with a
hammer until the wall anchors are flush with the
wall.
3. Insert the screws (not provided) into the holes
and tighten them until only 1/4 inch of the screws
are exposed.
4. Align the holes at the back of the charger with
the screws on the wall and slide the charger
down until it locks into place.
19
Adding a corded headset
You can use this handset hands-free when you install any industry-standard
2.5 mm corded telephone headset (purchased separately). For best results,
use a VTECH 2.5 mm corded headset. To purchase a corded headset, visit our
website at businessphones.vtech.com or call 1 (888) 370-2006.
Plug a 2.5 mm headset into
the HEADSET jack on the
side of the handset.
20
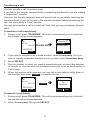
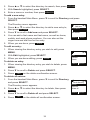
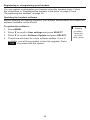
Registering the handset to the base
The handset must be registered to the base station in order to make and receive
calls.
To register the handset:
1. Make sure the handset has a charged battery before
proceeding. Make sure the base station is connected to power.
2. Press MENU on the handset. The Main Menu appears.
3. Press q to scroll to User settings and press SELECT.
4. Press q to scroll to Registration and press SELECT.
5. With Handset highlighted, press SELECT. The handset
screen displays instructions. Press NEXT to continue
reading the instructions.
6. On the base station, press the HANDSET LOCATOR button
for at least four seconds, then release the button. Both LEDs
on the base station begin to flash.
7. Press the # key on the handset to begin registration. The
process takes up to 10 seconds to complete.
8. When the first handset registers, it beeps and the screen
displays HANDSET 1.
If the handset fails to register, place it in the charger again for a
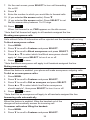
few seconds, remove it and repeat the registration procedure.
HANDSET
1
11:26PM 01/01
LINE
MENU
21
0DLQ0HQX
6SHHGGLDO
)HDWXUHV
6WDWXV
8VHUVHWWLQJV
%$&. (17(5
8VHUVHWWLQJV
/RZEDWWWRQH
/LQNORVWWRQH
.H\7RQH
5HJLVWUDWLRQ
%$&. (17(5
3UHVVDQG
KROG+$1'6(7
/2&$725NH\
DWEDVHIRU
VHFVRUHQWHU
1(;7
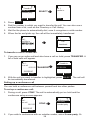
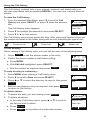
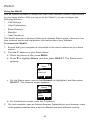
Deregistering the handset
Before using the handset with a different base station, you must deregister the
handset from the base station to which it is currently registered.
To deregister the handset:
1. Press MENU on the handset. The Main Menu appears.
2. Press q to scroll to User settings and press SELECT.
3. Press q to scroll to Registration and press SELECT.
4. Press q to highlight Deregistration and press SELECT.
The handset screen displays a list of registered handsets.
5. Highlight the name of the handset you want to deregister, and
then press SELECT .
6. On the base station, press the HANDSET LOCATOR button
for at least four seconds, then release the button. Both LEDs
on the base station begin to flash.
7. On the handset, enter the System PIN and then press
SELECT to begin deregistration.
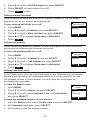
Registration
Handset
Deregistration
BACK
SELECT
Deregistration
HANDSET
HANDSET
HANDSET
HANDSET
BACK
SELECT
The deregistration process takes up to 10 seconds to complete. When the
handset deregisters, it beeps and the screen displays Unregistered.
Note: The handset enters an energy-saving charging mode after being
deregistered. All cordless telephone functions except handset-battery charging
are disabled. Energy-saving charging mode is deactivated after the handset
registers to the base station.
22
1
2
3
4
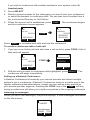
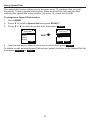
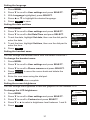
Locating the Handset
You can find handsets by paging them from the base. Press the HANDSET
LOCATOR (page) button on the base station to ring all handsets:
â
3DJLQJ
6,/(1&(
6723
•
All handsets within range of the base will ring for one minute, even if the
volume is off.
•
To end the locator page, press STOP or place the handset in its charger.
•
To silence the locator page on one handset only, press SILENCE .
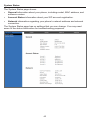
Screen icons
The following screen icons indicate your phone’s current status:
Icon
Status
Indicates signal strength, from one bar (weak) to four bars (strong). Flashes
when out of range.
Indicates battery strength from 1/3 to 3/3. Flashes when empty.
The ringer is off.
VSP600
Headset—audio is coming through a headset after the HEADSET key was
pressed.
Speakerphone—the speakerphone is active.
Microphone is muted.
Call Forward All is on.
Do Not Disturb is on.
23
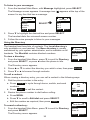
Using the Handset
This section describes how to use the handset to make calls and answer calls.
This section also describes how to put calls on hold, transfer calls, and create
conference calls.
Idle screen
The Idle screen appears after the phone is connected and
configured for your SIP PBX service. The Idle screen indicates
that you have no active or held calls.
HANDSET
1
From the Idle screen, you can press:
•
•
LINE to select another line (SIP Account). When you
make a call, the phone will use this line. See “Making calls”
on page 24. Note: LINE appears only if more than one
SIP account is registered to your phone.
11:26PM 01/01
LINE
MENU
MENU to view the main menu. See “Configuring the Handset” on page
34.
Making calls
You can make calls to any phone number (an outside call), or you can call
another handset (an internal call).
To make an outside call:
1. Use the dial pad to enter the desired number.
•
Press BACKSP if you enter an incorrect digit.
2. If you wish to choose an outgoing line for the call:
a. Press
LINE
.
a. Press q or p to select the dialing line.
a. Press SELECT .
3. Dial the number by pressing TALK or SPEAKER.
When the call is answered, the active call screen appears.
/LQH
TALK
%$&.63
â
(1'
/,1(
4. To hang up the call, press OFF or
/LQH
2QDFDOO
END
.
Note that you can also live dial a number by pressing TALK or SPEAKER to go
off hook before entering a phone number. The call will dial automatically when a
valid number is entered.
24
To make an internal call:
1. Press INT.
2. Press p or q to select the handset you wish to call, then press SELECT .
When the call is answered, the active call screen appears.
,QWHUFRP
+$1'6(7
+$1'6(7
+$1'6(7
$OOKDQGVHWV
%$&.
,QWHUFRP
SELECT
â
+$1'6(7 (1'
6(/(&7
3. To hang up the call, press OFF or
.
END
Answering calls
You can answer a call by pressing TALK, SPEAKER, or ANSWER :
/LQH
,QFRPLQJ&DOO
ANSWER
$QJHOD0DUWLQ
$16:(5
â
5(-(&7
/LQH
2QDFDOO
$QJHOD0DUWLQ
(1'
•
For incoming calls from an outside number, you can also press REJECT to
terminate the call.
•
If you have multiple incoming calls, (as indicated by
select the call you want to answer.
•
Internal calls from another handset cannot be rejected, but they can be
silenced by pressing SILENCE :
), press q or p to
,QWHUFRPIURP
+$1'6(7
$16:(5 6,/(1&(
If you don’t respond to an incoming outside call, the phone displays a
missed-call alert on the idle screen:
+$1'6(7 0LVVHG&DOOV
30 /,1(
0(18
25
Putting a call on hold
You can put an outside call on hold by pressing HOLD. The handset also puts
calls on hold automatically when you answer another call, transfer a call, or
create a conference. Note that you cannot put an internal call on hold.
/LQH
2QDFDOO
HOLD
â
/LQH
2QKROG
(1'
5(680(
From the On Hold screen, you can press RESUME to take the call off hold.
If another party puts you on hold, you may see the message Held by far end.
This message depends on compatibility between phones and PBX types, and
may not always appear. You can press END to end the call.
/LQH
+HOGE\IDUHQG
(1'
To make a new call while on hold:
1. When you have a call on hold, press the MENU key.
2. With New call highlighted, press ENTER .
0HQX
1HZFDOO
'LUHFWRU\
&DOOKLVWRU\
%$&.
/LQH
ENTER
â
(1'
(17(5
3. Enter the number you wish to dial.
Switching between two calls
If you are managing two calls, switch between them by pressing NEXT :
/LQH
2QDFDOO
NEXT
1(;7
(1'
â
/LQH
2QKROG
0DUN/HH
1(;7
26
5(680(
Transferring a call
You can transfer a call to another party.
If you talk to the transfer recipient before completing the transfer, you are making
a “supervised” transfer.
However, the transfer recipient does not have to talk to you before receiving the
transferred call. If you do not talk to the transfer recipient before transferring the
call, you are making a “blind” transfer.
You can also transfer a call to a held call. Note that you cannot transfer internal
calls.
To transfer a call (supervised):
1. During a call, press TRANSFER. The call is automatically put on hold and
the transfer setup screen appears.
/LQH
2QDFDOO
TRANSFER
â
(1'
7UDQVIHUWR
$QHZSDUW\
$KDQGVHWSDUW\
&$1&(/ 6(/(&7
2. If you wish to transfer to an outside number, select A new party. Or if you
wish to transfer to another handset in your system, select A handset party.
3. Press SELECT.
4. Dial the number to which you want to transfer the call, or select the handset
to transfer to. You can also use a number from a list, such as the Directory or
Call History.
5. When the second caller answers, you can talk to the caller to notify them of
the transfer, then press TRANS. to transfer the call.
/LQH
2QDFDOO
TRANS.
â
75$16 (1'
/LQH
2QDFDOO
&DOO
WUDQVIHUUHG
75$16 (1'
To transfer a call (blind):
1. During a call, press TRANSFER. The call is automatically put on hold and
the transfer setup screen appears.
2. Select A new party, then press SELECT.
27
7UDQVIHUWR
$QHZSDUW\
$KDQGVHWSDUW\
SELECT
â
&$1&(/ 6(/(&7
/LQH
7UDQVIHUWR
%/,1'
3. Press BLIND .
4. Dial the number to which you want to transfer the call. You can also use a
number from a list, such as the Directory or Call History.
5. Wait for the phone to automatically dial, once it recognizes a valid number.
6. When the far end picks up, the call will be immediately transferred.
/LQH
%OLQG;IHUWR
(1'
/LQH
%OLQG;IHUWR
&DOO
WUDQVIHUUHG
â
(1'
',$/
To transfer a call to a held call:
1. If you are on an active call and also have a call on hold, press TRANSFER. A
list of held calls will appear.
/LQH
2QDFDOO
7UDQVIHUWR
TRANSFER
â
1(;7
(1'
&$1&(/ 6(/(&7
2. With the call you want to transfer to highlighted, press SELECT . The call will
be immediately transferred.
Setting up a conference call
You can hold a conference call between yourself and two other parties.
To set up a conference call:
1. During a call, press CONF. The call is automatically put on hold and the
conference setup screen appears.
/LQH
2QDFDOO
(1'
CONF.
â
&RQIHUHQFHZLWK
$QHZSDUW\
$KDQGVHWSDUW\
&$1&(/ 6(/(&7
2. If you wish to conference with an outside number, select A new party. Or
28
if you wish to conference with another handset in your system, select A
handset party.
3. Press SELECT.
4. Dial the second number for the other party you want to join your conference,
or select the handset to conference with. You can also use a number from a
list, such as the Directory or Call History.
5. When the second call is established, press CONF. . The conference begins
and the conference screen appears.
/LQH
2QDFDOO
CONF.
â
&21)
(1'
Press
END
/LQH
&RQIHUHQFH
(1'
to terminate both calls and end the conference.
To create a conference with a held call:
1. If you are on an Active call and also have a call on hold, press CONF. A list of
held calls will appear.
/LQH
2QDFDOO
&RQIHUHQFHZLWK
CONF.
â
1(;7
(1'
&$1&(/ 6(/(&7
2. With the call you want to conference with highlighted, press SELECT . The
conference will begin immediately.
Setting up a Network Conference:
A Network Conference is hosted by your service provider and allows multiple
parties to join a conference. A Network Conference works in a similar way to the
regular conference described above, except you can add as many parties as
your service provider supports. Pressing the CONF. key or the Add soft key
during a conference will allow you to add more parties to the ongoing conference.
Listening to messages
When you have new messages, the phone displays a new-messages notification
on the idle screen:
+$1'6(7 1HZ0HVVDJHV
30 /,1(
0(18
29
To listen to your messages:
1. From the handset Main Menu, with Message highlighted, press SELECT.
The Message screen appears. A message icon ( ) appears at the top of the
screen for any line that has a message.
0DLQ0HQX
0HVVDJH
'LUHFWRU\
&DOOKLVWRU\
,QWHUFRP
%$&. (17(5
SELECT
â
0HVVDJH
/LQH
/LQH
/LQH
/LQH
%$&. 6(/(&7
2. Press q to highlight the desired line and press SELECT.
The handset dials the voicemail access number.
3. Follow the voice prompts to listen to your messages.
Using the Directory
The handset has three lists of contacts. The Local directory is
only available on your handset. The Base directory is usually
maintained by your system administrator, and is available on all
handsets. The Blacklist contains blocked numbers.
To view a directory:
1. From the handset Main Menu, press q to scroll to Directory
and press SELECT, or press p when the phone is idle.
'LUHFWRU\
/RFDOGLUHFWRU\
%DVHGLUHFWRU\
%ODFNOLVW
237,21 5(9,(:
The Directory menu appears.
2. Press p or q to select the directory you wish to view, then press REVIEW .
3. Press q or p to browse through contacts.
To call a contact:
When viewing a directory entry, you can call a contact in the following ways.
1. Dial the phone number in the entry:
a. Press TYPE to cycle through home, mobile, and work
numbers.
b. Press
DIAL
to call the contact.
2. Revise the phone number to dial before calling:
:RUN
$P\
/HH
7<3(
a. Press MENU.
',$/
b. Press q to scroll to Edit dial and press SELECT.
c. Edit the number as required, then press
DIAL
.
To search a directory:
1. From the handset Main Menu, press q to scroll to Directory
and press SELECT.
The Directory menu appears.
30
/RFDOGLUHFWRU\
6HDUFK
$GGQHZ
'HOHWHDOO
%$&.
6(/(&7
2. Press p or q to select the directory to search, then press OPTION .
3. With Search highlighted, press SELECT.
4. Enter a name or number, then press SEARCH .
To add a new entry:
1. From the handset Main Menu, press q to scroll to Directory and press
SELECT.
The Directory menu appears.
$EF
2. Press p or q to select the directory to add a new entry to,
then press OPTION .
$GGQHZ
)LUVW1DPH
3. Press q to scroll to Add new and press SELECT.
/DVW1DPH
4. You can add a first name and last name, as well as home,
mobile, and work phone numbers. You can also set the
ringer tone and dial line for the entry.
%$&.
6$9(
5. When you are done, press SAVE .
To edit an entry:
1. When viewing the directory entry you wish to edit, press
MENU.
2. With Edit highlighted, press SELECT.
3. When you are done editing, press SAVE .
To delete an entry:
1. When viewing the directory entry you wish to delete, press
MENU.
(GLW
(GLWGLDO
'HOHWH
%$&.
6(/(&7
2. Press q to scroll to Delete and press SELECT.
3. Press
YES
on the delete confirmation screen.
To delete all entries:
1. From the handset Main Menu, press q to scroll to Directory
and press SELECT.
The Directory menu appears.
2. Press p or q to select the directory to delete, then press
OPTION .
3. Press q to scroll to Delete all and press SELECT.
4. Press
YES
on the delete all confirmation screen.
31
/RFDOGLUHFWRU\
6HDUFK
$GGQHZ
'HOHWHDOO
%$&.
6(/(&7
Using the Call History
The Call History contains lists of your missed, received, and dialed calls (you
can also view dialed calls by pressing REDIAL). You can view, call and store list
entries.
To view the Call History:
1. From the handset Main Menu, press q to scroll to Call
History and press SELECT, or press q when the phone is
idle.
The Call History menu appears.
2. Press q to highlight the desired list and press SELECT.
3. Press q or p to view entries.
&DOOKLVWRU\
0LVVHG&DOOV
5HFHLYHG&DOOV
'LDOHG&DOOV
'(/$// 5(9,(:
The Call History entry screen shows the time, date, name and number of the call,
the number of entries in the folder, along with an icon indicating the type of call.
Received call
Dialed call
Missed call
To call an entry:
When viewing a Call History entry, you can call the entry in the following ways.
1. Press
DIAL
to call the phone number in the entry.
2. Revise the phone number to dial before calling:
a. Press MENU.
b. With Edit dial highlighted, press SELECT.
c. Edit the number as required, then press
DIAL
.
30
'(/(7(
',$/
To save an entry to a directory:
1. Press MENU when viewing a Call History entry.
2. Press q to scroll to Save and press SELECT.
3. Press p or q to select the directory to save to, then press
ENTER .
4. Edit the new directory entry as required, then press SAVE
to return to Call History.
(GLWGLDO
6DYH
%$&.
6(/(&7
To delete entries:
1. To delete the entry you are viewing, press DELETE .
a. In the main Call History menu, press p or q to scroll to
the list you wish to delete.
&DOOKLVWRU\
0LVVHG&DOOV
5HFHLYHG&DOOV
'LDOHG&DOOV
b. Press DEL ALL .
'(/$// 5(9,(:
2. To delete all entries:
c. Press
YES
on the delete all confirmation screen.
32
Using Speed Dial
The speed dial feature allows you to program up to 10 numbers that you dial
frequently. To dial a speed dial number, press and hold the dial pad key that
matches the speed dial entry number (for entry 10, press and hold 0).
To program a Speed Dial number:
1. Press MENU.
2. Press q to scroll to Speed dial and press SELECT.
3. Press q or p to select an empty slot, then press
ADD
.
$EF
6SHHGGLDO
(PSW\
(PSW\
(PSW\
(PSW\
$''
ADD
â
(GLW(QWU\
1DPH
1XPEHU
%$&.
6$9(
4. Use the dial pad to enter a name and number, then press SAVE .
To delete or edit existing Speed Dial entries, select the entry in the Speed Dial list
then press DELETE or EDIT .
33
Configuring the Handset
You can configure the phone using one of two methods:
1. The Features and User settings menus on the phone.
2. The WebUI, which you access using your Internet browser.
This section describes settings you can change using your
handset. For information about settings you can change on the
WebUI, see “WebUI” on page 40.
The system administrator can configure additional settings,
including Network settings, Provisioning, and the PIN code
by using the Admin settings menu. For more information
about this menu, see the VSP600/VSP601 Administrator and
Provisioning Manual, available at
businessphones.vtech.com.
Setting do not disturb
)HDWXUHV
'1'
&DOOIRUZDUG
%ORFNDQRQ\PRXV
'LDODVDQRQ\PV
%$&. (17(5
8VHUVHWWLQJV
/DQJXDJH
6HW'DWH7LPH
3KRQHUHQDPH
&RQWUDVW
%$&. (17(5
When Do Not Disturb (DND) is on for a line, calls to that line will be rejected.
To turn DND on or off:
1. Press MENU.
2. Press q to scroll to Features and press SELECT.
3. With DND highlighted, press SELECT.
4. Press p or q to select which line DND should apply to*,
then press SELECT to turn it on or off.
5. Press
SET
'1'
/LQH
2II
/LQH
2Q
%$&.
6(7
to save.
* Note that DND will apply to all handsets assigned the line.
Setting call forwarding
Calls can be forwarded to another phone number always, only when busy, or
after a set number of rings.
To set call forward:
1. Press MENU.
2. Press q to scroll to Features and press SELECT.
3. Press q to scroll to Call forward and press SELECT.
4. Press p or q to select which line Call forward should apply to*, then press
SELECT.
5. Press q to highlight the desired option:
•
Always
•
Busy
•
No answer
6. Press SELECT.
/LQH
$OZD\V
%XV\
1RDQVZHU
34
%$&.
(17(5
7. On the next screen, press SELECT to turn call forwarding
On or Off.
8. Press q.
9. Enter the number to which you would like to forward calls.
10. (If you selected No answer earlier) Press q.
11. (If you selected No answer earlier) Press SELECT to set
the No answer delay between 1 to 10 rings.
12. Press
SET
$OZD\V
$OZD\V
2Q
3KRQHQXPEHU
%$&.
6(7
.
When Call forward is on, FWD appears on the idle screen.
* Note that Call forward will apply to all handsets assigned the line.
Blocking anonymous calls
Calls without Caller ID information will be rejected and the handset will not ring.
To block anonymous callers:
1. Press MENU.
2. Press q to scroll to Features and press SELECT.
3. Press q to scroll to Block anonymous and press SELECT.
4. Press p or q to select which line Block anonymous should
apply to*, then press SELECT to turn it on or off.
5. Press
SET
%ORFNDQRQ\PRXV
/LQH
2II
/LQH
2Q
%$&.
6(7
to save.
* Note that Block anonymous will apply to all handsets assigned the line.
Dialing anonymously
When this feature is enabled, your phone will make anonymous outgoing calls.
To dial as an anonymous caller:
1. Press MENU.
2. Press q to scroll to Features and press SELECT.
3. Press q to scroll to Dial as anonyms and press SELECT.
4. Press p or q to select which line Dial as anonymous
should apply to*, then press SELECT to turn it on or off.
5. Press
SET
'LDODVDQRQ\PV
/LQH
2Q
/LQH
2II
%$&.
6(7
to save.
* Note that Dial as anonymous will apply to all handsets assigned the line.
Answering calls automatically
When this feature is enabled, lifting the handset out of the
charger will automatically answer an incoming call.
To answer calls when lifting the handset:
1. Press MENU.
2. Press q to scroll to Features and press SELECT.
35
/LIW+6DQVZHU
/LIW+6DQVZHU
2II
%$&.
6(7
3. Press q to scroll to Lift HS answer and press SELECT.
4. Press SELECT to select either On or Off.
5. Press
SET
to save.
Setting missed-call alerts
When missed-call alerts are enabled, an alert will display on the idle screen
whenever you do not answer an incoming call.
To turn missed-call alerts on or off:
1. Press MENU.
2. Press q to scroll to Features and press SELECT.
3. Press q to scroll to Miss call alert and press SELECT.
4. Press p or q to highlight Show alert or Hide alert.
5. Press
SET
0LVVFDOODOHUW
6KRZDOHUW
+LGHDOHUW
%$&.
6(7
.
Setting call waiting
When call-waiting alerts are enabled, an alert will display on-screen whenever
you receive an incoming call during an active call.
To turn call-waiting alerts on or off:
1. Press MENU.
2. Press q to scroll to Features and press SELECT.
&DOOZDLWLQJ
6KRZDOHUW
+LGHDOHUW
3. Press q to scroll to Call waiting and press SELECT.
4. Press p or q to highlight Show alert or Hide alert.
5. Press
SET
%$&.
6(7
.
Viewing handset status
In the Status menu, you can view information on the LAN network your phone
system is connected to, the registration status of your SIP accounts, or view
the software version of your handset. You may need this information for
troubleshooting purposes.
To view the Status menu:
1. Press MENU.
2. Press q to scroll to Status and press SELECT.
3. Press q to scroll to either Network, Line, or Product Info,
and press SELECT.
To view the software version of your phone:
6WDWXV
1HWZRUN
/LQH
3URGXFW,QIR
%$&.
1. From the Status menu, select Product Info and press SELECT.
2. With Handset highlighted, press SELECT.
3. Scroll down to view the software version.
36
(17(5
Setting the language
1. Press MENU.
2. Press q to scroll to User settings and press SELECT.
3. With Language highlighted, press SELECT.
4. Press p or q to highlight the desired language.
5. Press
SET
to save.
/DQJXDJH
(QJOLVK
)UDQoDLV
(VSDxRO
%$&.
6(7
Setting the date and time
1. Press MENU.
2. Press q to scroll to User settings and press SELECT.
3. Press q to scroll to Set Date/Time and press SELECT.
4. To set the date, highlight Set date, then use the dial pad to
enter the date.
5. To set the time, highlight Set time, then use the dial pad to
enter the time.
6. Press
SET
6HW'DWH7LPH
)RUPDW
00''<<<<
6HWGDWH
%$&.
6(7
.
Setting the handset name
You can change the handset name from the default HANDSET.
To change the handset name:
$EF
1. Press MENU.
2. Press q to scroll to User settings and press SELECT.
3. Press q to scroll to Phone rename and press SELECT.
4. Press BACKSP to move the cursor back and delete the
previous name.
3KRQHUHQDPH
(GLW1DPH
+$1'6(7
%$&.63
6(7
5. Enter the new name using the dial pad.
6. Press
SET
when complete.
Setting the screen brightness
You can change the brightness of text and graphics on the handset LCD.
To change the LCD brightness:
1. Press MENU.
2. Press q to scroll to User settings and press SELECT.
3. Press q to scroll to Contrast and press SELECT.
4. Press q or p to select a brightness level between 1 and 8.
5. Press
SET
.
37
&RQWUDVW
/HYHO
/HYHO
/HYHO
/HYHO
%$&.
6(7
Setting the ringer tone and volume
1. Press MENU.
2. Press q to scroll to User settings and press SELECT.
3. Press q to scroll to Ringers and press SELECT.
4. To change the ringer volume:
a. Highlight Ringer Volume and press SELECT.
b. Press q or p to change the volume level as desired.
c. Press
SET
5LQJHUV
5LQJHU9ROXPH
5LQJHU7RQH
%$&.
(17(5
to save.
5. To change the ringer tone:
5LQJHU9ROXPH
a. Highlight Ringer Tone and press SELECT.
b. Press q or p to select a line, then press ENTER .
c. Press q or p to select a ringer tone.
d. Press
SET
%$&.
6(7
to save.
Turning low battery tone on or off
1. Press MENU.
2. Press q to scroll to User settings and press SELECT.
3. Press q to scroll to Low batt tone and press SELECT.
4. Press SELECT to turn the low battery tone on or off.
5. Press
SET
to save.
/RZEDWWWRQH
/RZEDWWWRQH
2II
%$&.
Turning link lost tone on or off
6(7
1. Press MENU.
2. Press q to scroll to User settings and press SELECT.
3. Press q to scroll to Link lost tone and press SELECT.
4. Press SELECT to turn the link lost tone on or off.
5. Press
SET
to save.
/LQNORVWWRQH
/LQNORVWWRQH
2II
%$&.
Turning key tones on or off
6(7
1. Press MENU.
2. Press q to scroll to User settings and press SELECT.
3. Press q to scroll to Key Tone and press SELECT.
4. Press SELECT to turn key tones on or off.
5. Press
SET
.H\7RQH
.H\7RQH
2II
to save.
%$&.
38
6(7
Registering or deregistering your handset
You can register or deregister your handset using the handset menu. Follow
the instructions in “Registering the handset to the base” on page 21 and
“Deregistering the handset” on page 22.
Updating the handset software
Before updating the handset software, your system administrator must make the
software available via the WebUI.
To update the software:
1. Press MENU.
2. Press q to scroll to User settings and press SELECT.
3. Press q to scroll to Software Update and press SELECT.
4. The phone will check for a new software update. If one is
available, you will be prompted to start the upgrade. Press
YES to proceed with the update.
39
&KHFNLQJ
IRUXSGDWH«
3OHDVHGRQ¶W
WXUQRIIWKH
%DVH¶VSRZHU
WebUI
Using the WebUI
Use an Internet browser to access the Web User Interface (WebUI) that resides
on your base station. After you log on to the WebUI, you can configure the
following features:
•
Call Settings
•
User Preferences
•
Base Directory
•
Blacklist
•
User Password
The WebUI also has a System Status and Handset Status page, where you can
view network status and registration information about your handset.
To access the WebUI:
1. Ensure that your computer is connected to the same network as your base
station.
2. Find the IP address of your base station:
a. When the phone is idle, press MENU.
b. Press q to highlight Status, and then press SELECT. The Status menu
appears:
6WDWXV
1HWZRUN
/LQH
3URGXFW,QIR
%$&.
(17(5
c. On the Status menu, ensure that Network is highlighted, and then press
SELECT. The Network screen appears:
1HWZRUN
,3$GGUHVV
'+&3
(QDEOHG
%$&.
2.
d. On the Network screen, note the IP Address.
3. On your computer, open an Internet browser. Depending on your browser, some
of the pages presented here may look different and have different controls.
40
4. Type the phone IP address in the browser address bar and press ENTER on
your computer keyboard:
A Login window appears.
5.Under User Name, enter user.
6.Under Password, enter user, or your own password, if you have created
one. You can create or change a password after you log on.
7.Click Log In / OK. The WebUI appears.
Click topics from the navigation bar at the top of the page, and then click the
desired setting on the left side of the WebUI to see the page for that setting. You
view and change settings in two different types of fields: drop-down lists and
entry fields into which you type information. For your security, the WebUI times
out after 10 minutes, so if it is idle for that time, you must log on again.
The remaining procedures in this section assume that you have already logged
on to the WebUI.
41
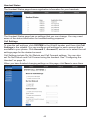
System Status
The System Status page shows:
•
General information about your phone, including model, MAC address, and
software version.
•
Account Status information about your SIP account registration.
•
Network information regarding your phone’s network address and network
connection.
The System Status page has no settings that you can change. You may need
some of the status information for troubleshooting purposes.
42
Handset Status
The Handset Status page shows registration information for your handsets.
The Handset Status page has no settings that you can change. You may need
some of the status information for troubleshooting purposes.
Call Settings
To view the call settings, click SYSTEM in the WebUI header, and then click Call
Settings in the sidebar. You can configure call settings for each account that is
available to your phone. Click Account 1, Account 2, and so on to select the call
settings page for the desired account.
Call Settings include Do Not Disturb and Call Forward settings. You can also
set Do Not Disturb and Call Forward using the handset. See “Configuring the
Handset” on page 34.
When you have finished changing settings on this page, click Save to save them.
43
General Call Settings
Setting
Description
Anonymous Call Reject
Select to block incoming calls that have no caller ID.
Enable Anonymous Call
Select to make outgoing calls that remove your own caller
ID information.
Do Not Disturb Settings
Setting
Description
Enable DND
Turns Do Not Disturb on or off.
Incoming Calls
Selects whether the phone displays incoming call
information while Do Not Disturb is on.
Call Forward Settings
Setting
Description
Enable Call Forward
Always
Select to enable call forwarding for all calls on that account.
Target Number
Enter a number to which all calls will be forwarded.
Enable Call Forward
Busy
Select to enable call forwarding for calls when you are on
another call on that account.
Target Number
Enter a number to which calls will be forwarded when the
line is busy.
Enable Call Forward No
Answer
Select to enable call forwarding for unanswered calls on that
account.
Target Number
Enter a number to which unanswered calls will be forwarded.
Delay
Select the number of rings before
unanswered calls are forwarded.
44
Range: 1 to 10 rings
Default: 6 rings
User Preferences
On the User Preferences page, you can configure the WebUI language.
After changing the setting on this page, click Save to save.
General User Settings
Setting
Description
Range
Default
WebUI
Language
Sets the language that
appears on the WebUI.
Any language supported
by your phone. For
example, English,
French, Spanish, etc.
English
45
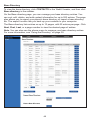
Base Directory
To view the base directory, click CONTACTS in the WebUI header, and then click
Base directory in the sidebar.
On the Base directory page, you can manage your base directory entries. You
can sort, edit, delete, and add contact information for up to 200 entries. The page
also allows you to export your phone’s base directory or import a base directory
file. The export function lets you back up your contacts to your computer.
The Base directory lists entries on up to 10 pages, with 20 entries per page. Click
Next, First, Last, or a page number to view the desired page of entries.
Note: You can also use the phone menu to manage your base directory entries.
For more information, see “Using the Directory” on page 30.
46
Base directory
Click
To...
Sort the list by last name.
Edit information for an entry.
View the last page of entries.
View the next page of entries.
Delete selected entries from the directory. Click Select All to select
every entry on the page you are viewing.
Add a new directory entry.
Delete all Directory entries
To add a new directory entry:
1. Click Add New Entry.
The Create Base directory Entry page appears.
2. Enter the required information. At minimum, a first and last name are
required.
Setting
Description
Range
Default
First Name
Enter the appropriate names in these
fields.
n/a
n/a
Ringer Tone
Sets a unique ringer tone for calls from
this directory entry.
Auto,
Tone 1–10
Auto
Account
Sets the account used when you dial this Default
directory entry.
Account,
Account 1–
Account 6
Default
Account
Home Number
Enter the appropriate numbers in these
fields.
n/a
Last Name
Work Number
Mobile Number
3. Click Save.
47
n/a
To edit a directory entry:
1. Click Edit for the entry you want to edit.
The Edit Base directory Entry page appears.
2. Edit or add the desired information.
3. Click Save.
Import Base directory
You can import an existing base directory file. Importing a directory file replaces
all your previous base directory entries. After importing a directory file, you can
add, edit, or delete entries as desired.
Note: Directory files are .xml files containing contacts and contact information.
For more information about creating or editing a directory file, consult your
system administrator.
To import a base directory file:
1. Click Choose File.
2. In the Choose File to Upload window, navigate to the directory file.
3. Click the file, and then click Open.
4. On the WebUI, click Import.
Export Base directory
You can export the directory and save it as an .xml file on your computer.
To export the base directory:
1. Click Export.
2. At your browser’s prompt, save the file to the desired location on your
computer.
Blacklist
To view the Blacklist, click CONTACTS in the WebUI header, and then click
Blacklist in the sidebar.
The Blacklist directory is identical to the Base directory, except that you cannot
configure an incoming ringer tone.
48
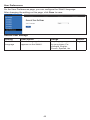
Security
On the Security page, you can change your User Password.
After changing your password, click Save.
49
Troubleshooting
If you have difficulty with your handset, please try the suggestions below. For
customer service, visit our website at businessphones.vtech.com or call
1 (888) 370-2006.
General issues
Handset does not work at all (LCD is black)
•
Confirm the battery is installed and charged correctly.
•
Place the handset into it’s charger. Ensure the charger is securely plugged
into an outlet not controlled by a wall switch.
•
If the battery is completely depleted, it can take up to 10 minutes to charge
the battery before the low battery icon displays on screen.
My caller ID isn’t working.
•
Caller ID is a subscription service. Your telephone service provider may
require subscription to this service for this feature to work.
•
The caller must be calling from an area that supports caller ID.
•
Both your telephone service provider and your caller’s service provider must
use caller ID compatible equipment.
Handset registration is not working
•
Place the handset in the charger for a few seconds, remove it and repeat the
registration procedure.
•
Ensure the handset is within range of the base station.
Cannot make external calls
•
Check if your SIP account is registered (Press MENU g Status g Line and
select a line. Check that the status reads Registered).
•
You might be out of range of the base station. Try moving closer. If you
see an idle screen with no alerts, then your handset is successfully
communicating with the base station.
Handset does not receive incoming calls
•
Ensure that Do Not Disturb and Call Forward All are turned off.
•
Check if your SIP account is registered (Press MENU g Status g Line and
select a line. Check that the status reads Registered).
•
You might be out of range of the base station. Try moving closer.
Cannot locate handset using base station
•
The handset may not be registered.
•
If the handset battery is dead or the handset is out of range, the locator tone
will not sound.
50
Poor audio quality. Speech is cutting out.
•
You may be close to being out of range of the base station. Try moving
closer.
•
Other electronic products can cause interference with your handset. Try
installing the base station far away from devices such as TVs, microwaves,
or other cordless devices, including other handsets.
•
If the problem persists, contact your system administrator.
Technical Specifications
RF frequency band
1921.536–1928.448 MHz
Channels
5
Operating temperature
32–122 °F (0–50 °C)
Power requirements
Base: 5.0 Vdc @ 800 mA
Handset charger: 6.0 Vdc @ 300 mA
Handset: 2.4 V 550/750 mAh, Ni-MH battery pack
Power over Ethernet
IEEE 802.3at supported, class 2
Ethernet network port
10/100 Mbps RJ-45 port
Special characters
Entering special characters
When entering text using the dial pad, the following special characters are
available. Press the 1, 0, or pound sign (#) keys to enter special characters.
Key
Characters
1
~^`%!&-_+=|
0
0:;,?.@*
#
()[]{}<>/\#
Press star ( ) to switch between uppercase and lowercase/European characters.
51
Maintenance
Taking care of your telephone
•
Your base station and cordless handset contain sophisticated electronic
parts, so you must treat them with care.
•
Avoid rough treatment.
•
Place the handset down gently.
•
Save the original packing materials to protect your products if you ever need
to ship them.
Avoid water
•
You can damage your cordless telephone if it gets wet. Do not use the
handset in the rain, or handle it with wet hands. Do not install the base
station and handset near a sink, bathtub or shower.
Electrical storms
•
Electrical storms can sometimes cause power surges harmful to electronic
equipment. For your own safety, take caution when using electric appliances
during storms.
Cleaning your telephone
•
Your products have a durable plastic casing that should retain its luster for
many years. Clean it only with a soft cloth slightly dampened with water or a
mild soap.
•
Do not use excess water or cleaning solvents of any kind.
Remember that electrical appliances can cause serious injury if used when you
are wet or standing in water. If the telephone base should fall into water, DO NOT
RETRIEVE IT UNTIL YOU UNPLUG THE POWER CORD FROM THE WALL,
then pull the unit out by the unplugged cord.
Deregistering the handset
Before using the handset with a different base station, you must deregister the
handset from the base station to which it is currently registered.
52
GPL License Information
GPL code requests
Portions of the software associated with this product are open source, and fall
within the scope of the GNU General Public License (GPL). Accordingly, those
portions of code are available to the public, consistent with the requirements
of the GPL, in either source code format or object code format, depending
upon the nature of the code at issue. If you would like to exercise your right to
receive the available code, please send a cashier’s check, payable to VTech
Communications, Inc., in the amount of $15.00 (U.S.$) to:
VTech Communications, Inc.,
9590 SW Gemini Drive, Suite 120
Beaverton OR 97008
ATTN: Information Technology Group—VSP600 GPL code request
along with a written request for the available code. If your request does not
fully comply with the foregoing requirements, VTech reserves the right to reject
your request. Further, by requesting and receiving the available code, you
release VTech, its affiliates, and its and their officers, directors, employees,
and representatives (“VTech Parties”) from any liability or responsibility
relating to such code, and you acknowledge that the VTech Parties make no
representations with respect to the origin, accuracy, usability, or usefulness of
such code, and the VTech Parties have no responsibility to you whatsoever
concerning the code, including without limitation any responsibility to provide
explanation, support, upgrade, or any communication whatsoever. Your review or
use of the available code is at your sole risk and responsibility.
VTECH COMMUNICATIONS LTD.
A member of THE VTECH GROUP OF COMPANIES.
Distributed in the U.S.A. by VTech Communications Inc., Beaverton, Oregon 97008.
VTech is a registered trademark of VTech Holdings Limited.
Copyright © 2014 for VTECH COMMUNICATIONS LTD. All rights reserved.
Printed in China. Version 4, 09/14
53