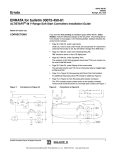
1
Altivar™ Plus for Compressor Applications
User’s Manual
125–900 hp
Instruction Bulletin
NHA65138
08/2015
Retain for future use.
™
Hazard Categories and Special
Symbols
Read these instructions carefully and look at the equipment to become
familiar with the device before trying to install, operate, service, or maintain
it. The following special messages may appear throughout this bulletin or on
the equipment to warn of hazards or to call attention to information that
clarifies or simplifies a procedure.
The addition of either symbol to a “Danger” or “Warning” safety label
indicates that an electrical hazard exists which will result in personal injury if
the instructions are not followed.
This is the safety alert symbol. It is used to alert you to personal injury
hazards. Obey all safety messages that follow this symbol to avoid possible
injury or death.
DANGER
DANGER indicates a hazardous situation which, if not avoided, will result
in death or serious injury.
WARNING
WARNING indicates a hazardous situation which, if not avoided, can
result in death or serious injury.
CAUTION
CAUTION indicates a hazardous situation which, if not avoided, can
result in minor or moderate injury.
NOTICE
NOTICE is used to address practices not related to physical injury. The
safety alert symbol is not used with this signal word.
NOTE: Provides additional information to clarify or simplify a procedure.
Please Note
Electrical equipment should be installed, operated, serviced, and maintained
only by qualified personnel. No responsibility is assumed by Schneider
Electric for any consequences arising out of the use of this material.
NHA65138
08/2015
Altivar™ Plus for Compressor Applications
Table of Contents
Hazard Categories and Special Symbols ................................................... 2
SECTION 1:
PRECAUTIONS AND TERMINOLOGY ............................................................................................................... 5
Installation and Maintenance Precautions .............................................. 5
Operation Precautions .............................................................................. 6
Terminology ............................................................................................... 7
SECTION 2:
INTRODUCTION AND TECHNICAL CHARACTERISTICS ................................................................................ 9
Introduction ................................................................................................ 9
Supplied Documentation........................................................................... 9
Related Documentation........................................................................... 10
Technical Specifications ......................................................................... 11
Standard Features ................................................................................... 12
Factory Modifications.............................................................................. 13
Power Options .......................................................................................... 13
Additional Options ..................................................................................... 13
SECTION 3:
HANDLING, INSTALLATION, AND COMMISSIONING .................................................................................... 15
Receiving and Handling .......................................................................... 15
Storage...................................................................................................... 16
Mechanical Installation............................................................................ 16
Unpacking the Altivar Plus Enclosed Drives ............................................. 16
Handling the Enclosed Drive ..................................................................... 17
Floor-Mounting the Enclosed Drive ........................................................... 19
Total Dissipated Watts Loss ..................................................................... 20
Mounting Dimensions and
Typical Mounting Locations ...................................................................... 21
Clearance Requirements .......................................................................... 27
Door Interlock Opening Procedure ........................................................... 27
Electrical Installation ............................................................................... 28
General Wiring Practices .......................................................................... 28
Input Power .............................................................................................. 28
Branch Circuit Connections ................................................................... 29
Input Wiring .............................................................................................. 29
Grounding................................................................................................. 29
Connection to Ungrounded or High-Resistance Grounded Systems ........ 30
Wiring and Electromagnetic Compatibility ................................................ 31
Output Wiring ........................................................................................... 32
Output Cable ............................................................................................. 32
DC Bus Voltage Measurement Procedure .............................................. 34
Wire Routing And Interconnection......................................................... 35
Wire Class ................................................................................................. 35
Noise Class ............................................................................................... 35
Voltage Class ............................................................................................ 36
Wiring Methods ......................................................................................... 36
Typical Component Locations ................................................................... 38
© 2015 Schneider Electric All Rights Reserved
3
Altivar™ Plus for Compressor Applications
Table of Contents
NHA65138
08/2015
Power Wiring ............................................................................................. 38
Control Wiring ........................................................................................... 42
Initial Startup ............................................................................................ 43
Start-Up Procedure ................................................................................... 44
Step 1: Checking the Enclosure Components and Connections .............. 45
Step 2: Adjusting Motor Overload Protection ............................................ 45
Step 3: Testing Motor Rotation ................................................................. 45
Step 4: Testing Motor Rotation in Bypass Mode ....................................... 46
Step 5: Checking the Graphic Terminal Settings ...................................... 47
Step 6: Setting the Softstart Bypass Parameters ...................................... 48
Start-Up Checklist .................................................................................... 49
Customer Readiness Acknowledgment .................................................... 50
SECTION 4:
CIRCUIT DESCRIPTIONS AND OPTIONS ........................................................................................................ 51
Terminal Command Versus Keypad Command Operation .................. 51
Graphic Display Terminal Operation ...................................................... 51
Trip Reset.................................................................................................. 51
Control Circuit Sequencing and Operation ........................................... 52
Start Relay ................................................................................................ 52
Shunt Trip of Main Disconnect .................................................................. 52
SECTION 5:
MAINTENANCE AND SUPPORT
.................................................................................................................... 53
Qualified Personnel ................................................................................. 53
Diagnostic Codes ..................................................................................... 53
External Signs of Damage ....................................................................... 54
Preventive Maintenance .......................................................................... 54
Inspection .................................................................................................. 55
Field Replacement of Drives ................................................................... 55
Removing the Drive Assembly .................................................................. 56
Replacing the Drive .................................................................................... 57
Technical Support .................................................................................... 58
APPENDIX A: RENEWABLE PARTS
.................................................................................................................... 59
460 V Enclosed Drives .............................................................................. 59
575 V Enclosed Drives .............................................................................. 62
4
© 2015 Schneider Electric All Rights Reserved
NHA65138
08/2015
Altivar™ Plus for Compressor Applications
Section 1—Precautions and Terminology
Section 1—Precautions and Terminology
Installation and Maintenance
Precautions
DANGER
HAZARD OF ELECTRIC SHOCK, EXPLOSION, OR ARC FLASH
• Read and understand this manual before installing or operating the
enclosed drive. Installation, adjustment, repair, and maintenance must
be performed by qualified personnel.
• The user is responsible for compliance with all international and national
electrical code requirements with respect to grounding of all equipment.
• Many parts of this enclosed drive, including the printed circuit boards,
operate at the line voltage. DO NOT TOUCH. Use only electricallyinsulated tools.
• DO NOT touch unshielded components or terminal strip screw
connections with voltage present.
• DO NOT short across terminals PA/+ and PC/- or across the DC bus
capacitors.
• Before servicing the enclosed drive:
— Disconnect the power, including the external control power that may
be present. The circuit breaker or disconnecting switch does not
always open all circuits.
— Lock the circuit breaker or disconnecting switch in the opened
position.
— Place a “DO NOT TURN ON” label on the circuit breaker or
disconnect switch of the enclosed drive.
— Wait 15 minutes to allow the DC bus capacitors to discharge. Then
follow the “DC Bus Voltage Measurement Procedure” on page 34 to
verify that the DC voltage is less than 42 V. The enclosed drive LED
is not an indicator of the absence of DC bus voltage.
• Install and close all covers before applying power or starting and
stopping the enclosed drive.
Failure to follow these instructions will result in death or serious
injury.
WARNING
DAMAGED ENCLOSED DRIVE
• Do not install or operate any enclosed drive that appears damaged.
• If you find shipping damage, notify the carrier and your Schneider
Electric sales representative.
Failure to follow these instructions can result in death, serious
injury, or equipment damage.
© 2015 Schneider Electric All Rights Reserved
5
Altivar™ Plus for Compressor Applications
Section 1—Precautions and Terminology
NHA65138
08/2015
CAUTION
RISK OF BURNS AND ROTATING FAN BLADES
• Make sure that the device is sufficiently cooled and that the permitted
ambient conditions are maintained.
• Do not touch components inside the enclosure. Heat sinks, chokes, and
transformers remain hot after removing power.
• Before opening the enclosure, ensure that the fans are not running.
After switching off the voltage supply, the device fans may continue
running for some time.
Failure to follow these instructions can result in injury or equipment
damage.
Operation Precautions
DANGER
HAZARD OF ELECTRIC SHOCK, EXPLOSION, OR ARC FLASH
Before working on this equipment, turn off all power supplying it and
perform the “DC Bus Voltage Measurement Procedure” on page 34.
Failure to follow these instructions will result in death or serious
injury.
DANGER
UNQUALIFIED PERSONNEL
• This equipment must be installed and serviced only by qualified
personnel.
• Qualified personnel performing diagnostics or troubleshooting that
requires electrical conductors to be energized must comply with:
— NFPA 70 E® – Standard for Electrical Safety Requirements for
Employee Workplaces®
— CSA Z462 – Workplace Electrical Safety
— OSHA Standards – 29 CFR Part 1910 Subpart S Electrical
— NOM-029-STPS – Maintenance of Electrical Installation in the
Workplace, Safety Conditions
— Other national and local electrical codes that may apply
Failure to follow these instructions will result in death or serious
injury.
6
© 2015 Schneider Electric All Rights Reserved
NHA65138
08/2015
Altivar™ Plus for Compressor Applications
Section 1—Precautions and Terminology
DANGER
HAZARD OF ELECTRIC SHOCK, EXPLOSION, OR ARC FLASH
• Properly ground the enclosed drive before applying power.
• Close and secure the enclosure doors before applying power.
• Certain adjustments and test procedures require that power be applied
to this enclosed drive. Extreme caution must be exercised as hazardous
voltages exist. The enclosure door must be closed and secured while
turning on power or starting and stopping this enclosed drive.
Failure to follow these instructions will result in death or serious
injury.
CAUTION
INCOMPATIBLE LINE VOLTAGE
Before powering up and configuring the enclosed drive, ensure that the
line voltage is compatible with the supply voltage shown on the enclosed
drive nameplate. The enclosed drive may be damaged if the line voltage
is not compatible.
Failure to follow these instructions can result in injury and/or
equipment damage.
Terminology
© 2015 Schneider Electric All Rights Reserved
The following terminology is used throughout this instruction bulletin to
distinguish between the 08/2015Altivar Plus enclosed drives and the Altivar
61/71 components.
•
Enclosed drive refers to the combination of the drive, enclosure, and
the power and control circuits that constitute the Altivar Plus enclosed
drive.
•
Drive, as used in this manual, refers to the controller portion of the
adjustable speed drive as per the NEC.
7
Altivar™ Plus for Compressor Applications
Section 1—Precautions and Terminology
8
NHA65138
08/2015
© 2015 Schneider Electric All Rights Reserved
NHA65138
08/2015
Altivar™ Plus for Compressor Applications
Section 2—Introduction and Technical Characteristics
Section 2—Introduction and Technical Characteristics
Introduction
Schneider Electric’s Altivar™ Plus enclosed drives feature the Altivar 61
and Altivar 71 adjustable frequency drives, providing a robust, packaged,
adjustable speed solution for commercial, industrial, and municipal
applications.
This instruction bulletin covers receiving, installation, start-up, configuration,
operation, and troubleshooting of Altivar Plus enclosed drives.
Supplied Documentation
The Altivar Plus enclosed drives include factory-supplied user drawings and
are identified by a factory order number. The factory order number for the
enclosed drive appears on the nameplate (see Figure 1 on page 15). This
same number appears as part of the number sequence in the title block of
the factory-supplied user drawings. The drawing set includes:
•
•
•
An enclosure outline drawing
Electrical schematic drawings
A component layout drawing
To replace documents, contact your local Schneider Electric field office.
© 2015 Schneider Electric All Rights Reserved
9
Altivar™ Plus for Compressor Applications
Section 2—Introduction and Technical Characteristics
Related Documentation
NHA65138
08/2015
For further information, refer to the latest revision of the instruction bulletins
listed in Table 1. These documents ship with the drive when the
corresponding option is selected and are available from the Technical
Library at www.schneider-electric.com.
Table 1:
Instruction Bulletins
Bulletin No.
1755849 (HD) or 1760655
Installation Manual, 75–100 hp, 230 V and 125–700 hp, 460 V
1755855 (HD) or 1760649 (ND)
Programming Manual
1755861 (HD) or 1760661 (ND)
Communication Parameters
30072-200-50
Handling, Installation, Operation, and Maintenance of
Electrical Control Equipment
S1B86974
ATV61 Quick Start Guide
S1B86982
ATV71 Quick Start Guide
1760649
ATV61 Programming Manual
1755855
ATV71 Programming Manual
1760661
ATV61 Communication Parameters Manual
1755861
ATV71 Communication Parameters Manual
1755863
ATV71 Integrated Modbus™ Manual
1755867
ATV71 Uni-Telway™ Manual
1755875
ATV71 Modbus with Uni-Telway Manual
1765273
ATV61 LonWorks™ Card manual
1765274
ATV61 BACnet™ Manual
1755877
ATV61/71 DeviceNet™ Manual
AAV33578
ATV61 Metasys™ N2 Manual
BBV10543
ATV61 Apogee™ FLN P1 Manual
1755871
ATV61/71 Interbus™ Manual
1755873
ATV61/71 Profibus™ DP manual
AAV52935
ATV61/71 Profibus DPv1 Manual
1757062
ATV61/71 Controller Inside Manual
1755865
ATV61/71 CANopen™ Manual
AAV68822
ATV61/71 Ethernet-IP Manual
1755879
ATV61/71 Ethernet - Modbus TCP-IP Manual
AAV69931
ATV61/71 Modbus TCP/IP Manual - Daisy Chain EtherNet
Card Manual
HRB10064
ATV61/71 Modbus TCP Manual VW3A3320
HRB10065
ATV61/71 Ethernet IP Manual VW3A3320
1494409
ATS48 User manual
VVDED302023
ATS48 Modbus Protocol User's Manual
1
10
Title
(ND)1
ND: Normal duty; HD: Heavy duty.
© 2015 Schneider Electric All Rights Reserved
NHA65138
08/2015
Altivar™ Plus for Compressor Applications
Section 2—Introduction and Technical Characteristics
Technical Specifications
Table 2:
Electrical Specifications
Input mains voltage
480 Vac ±10%, 600 Vac ±10% (other voltages on request)
Short circuit current rating (AC symmetrical)
100 kA symmetrical short circuit current rating up to 500hp, No Bypass
65 kA symmetrical short circuit current rating up to 700 hp with Bypass
Control voltage
24 Vdc (regulated, supplied by drive); 115 Vac +10%/-15% (control power transformer included)
Displacement power factor
98% through speed range (in AFC operation mode)
Input frequency
50/60 Hz ± 5%
Output voltage
Three-phase output; maximum voltage equal to input voltage
Galvanic isolation
Galvanic isolation between power and control (inputs, outputs, and power supplies)
Output frequency range of drive
0.1 to 500 Hz (factory setting of 60 Hz)
Torque overload
Normal Duty: 110% of nominal motor torque for 60 s; Heavy Duty: 150% of nominal motor torque for 60 s
Current (transient)
Normal Duty: 110% of drive rated current for 60 s; Heavy Duty: 150% of drive rated current for 60 s
Switching frequency
Selectable from 0.5 to 8 kHz. Factory setting: 2.5 kHz
The drive reduces the switching frequency automatically in the event of excessive heat sink temperature.
Table 3:
Environmental Specifications
Storage temperature
-13 to +158 °F (-25 to +70 °C).
Operating temperature
+14 to +104 °F (-10 to 40 °C). For 125 hp and higher (460 V) operating between 40 and 50 °C, derate the current
3.3% per °C above 40 °C.
Humidity
95% with no condensation or dripping water, conforming to IEC 60068-2-78.
3,300 ft (1000 m), without derating and:
•
Altitude
•
•
All 460 V equipment, derate the current by 1% for each additional 330 ft (100 m) up to 9,842 ft. (3000 m)
maximum
All 575 V equipment, derate the current by 1% for each additional 330 ft (100 m) up to 6,560 ft. (2000 m)
maximum
When an integral softstart bypass (D08) is selected, derate the current by 2.2% for each additional 330 ft
(100 m) up to 6,560 ft. (2000 m) maximum
Enclosure
UL Type 12: Dust-tight (ventilated)
Pollution degree
Pollution degree 2 or 3 per NEMA ICS-1 Annex A and IEC 60664-1
Operational test vibration
Conforming to IEC 60721-3-3-3M3 amplitude; 1.5 mm peak to peak from 3 to 13 Hz; 1 g from 13 to 200 Hz
Transit test to shock
Conforming to National Safe Transit Association and International Safe Transit Association test for packages.
Operational shock
15 g, 11 ms
Codes and standards
UL/cUL Listed per UL 508A;
IEEE519 Compliant (harmonic input filter required);
Conforms to applicable NEMA ICS, NFPA, and IEC standards;
Manufactured under ISO 9001 standards.
Table 4:
Operation and Control
AI1: 0 to +10 V, Impedance = 30 kΩ. Can be used for speed potentiometer, 1–10 kΩ.
AI2: Factory setting: 4 to 20 mA. Impedance = 242 Ω (reassignable, X–Y range with graphic display terminal).
Speed reference
Frequency resolution in analog reference
0.1 for 100 Hz (11 bits)
Speed regulation
V/f control: equal to the motor's rated slip.
SFVC: 10% of the motor's rate slip from 20% to 100% of nominal motor torque.
Efficiency
95% (or greater) at full load typical
Reference sample time
2 ms ±0.5 ms
Acceleration and deceleration ramps
Drive: 0.1 to 999.9 s (definition in 0.1 s increments); Softstarter: 1 to 60 s (definition in 1 s increments)
Graphic display terminal
Self diagnostics with trip indication messages in three languages; also refer to the Programming Manual(s)
available online at www.schneider-electric.com.
Table 5:
Protection
System protection
•
•
•
Motor protection
Class 10 electronic overload protection (drive)
Class 10 or 20 bypass overload protection (with bypass)
Motor phase loss protection
© 2015 Schneider Electric All Rights Reserved
Thermal protection of drive, input passive filter, and starter
Phase loss of AC mains
Fuse protected
11
Altivar™ Plus for Compressor Applications
Section 2—Introduction and Technical Characteristics
Standard Features
NHA65138
08/2015
Altivar Plus enclosed drives include:
•
•
•
•
•
Pre-engineered, ready-to-use solutions in highly efficient designs
UL Type 12 enclosures
Large swiveling control panel for customization of drive controls
Rail-mounted drive for easy maintenance
Altivar Plus enclosed drive with Altivar 71
— 125–700 hp, 460 Vac
— 125–700 hp, 575 Vac
•
Altivar Plus enclosed drive with Altivar 61
— 125–900 hp, 460 Vac
— 125–800 hp, 575 Vac
List of standard features:
12
•
•
•
•
•
•
•
•
•
•
•
•
•
•
•
UL/cUL Listed per UL508A
•
•
•
3 kVA control power transformer
100 kA short circuit rating (460 V) without bypass
Overcurrent protection device
Disconnect handle with lock/out tag-out provisions
Non bypass
3% line reactor
0–10 Vdc or 4–20 mA speed reference input
0–10 Vdc or 4–20 mA programmable output
Door mounted graphic display terminal
Auto-Start relay (120 Vac control)
Permanent wire markers
4 in. Plinth
Accommodations for remote shunt tripping of main disconnects
Accommodations for remote tripping of drive and softstarter
Accommodations for supplying 120 Vac to the motor winding heater (up
to 500 VA)
Door mounted reset pushbutton
Cooling fan adjustable off-delay timing
© 2015 Schneider Electric All Rights Reserved
NHA65138
08/2015
Factory Modifications
Altivar™ Plus for Compressor Applications
Section 2—Introduction and Technical Characteristics
Refer to Table 6 for the list of parts included with each factory modification.
NOTE: Legend plate part numbers beginning with 65170 are not available
as a separately-ordered part. Contact your local field sales office.
Power Options
Additional Options
Table 6:
Parts List for Bypass Circuit Selector Switches
Part
Part No.
Description
AFC-Off-Bypass Selector
Switch
65170-166-43
Engraved legend plate “AFC-Off-Bypass”
ZBZ32
Legend plate holder
Pushbutton Enclosure
XAPA1110
—
•
•
•
•
•
•
•
•
•
5% Line Reactor
Surge Suppressor
DV/DT Filter
Harmonic Filter
Softstart Bypass
Full Voltage Bypass
Line Contactor
Top Entry Cubicle
8 in. Plinth
For other options contact your local field sales office.
© 2015 Schneider Electric All Rights Reserved
13
Altivar™ Plus for Compressor Applications
Section 2—Introduction and Technical Characteristics
14
NHA65138
08/2015
© 2015 Schneider Electric All Rights Reserved
NHA65138
08/2015
Altivar™ Plus for Compressor Applications
Section 3—Handling, Installation, and Commissioning
Section 3—Handling, Installation, and Commissioning
Receiving and Handling
Inspect the enclosed drive before storing or installing it. Upon receipt:
•
Remove the enclosed drive from its packaging and visually inspect the
exterior for shipping damage.
•
Ensure that the part number on the nameplate matches the part number
on the packing slip and purchase order. See Figure 1 for a nameplate
example.
•
If you find shipping damage, notify the carrier and your Schneider
Electric sales representative.
Figure 1:
Nameplate Example
ATV71EXC5C16N4E7UWA09A10
WD–32771777
32771777–001–001
12
460
3
302
60
100
© 2015 Schneider Electric All Rights Reserved
460
15
Altivar™ Plus for Compressor Applications
Section 3—Handling, Installation, and Commissioning
Storage
NHA65138
08/2015
Store the enclosed drive in its original packaging until it reaches its final
installation site. This helps protect the equipment and helps prevent
damage to its exterior.
•
Storage temperature: –25 °C to +70 °C (–13 °F to +158 °F)
NOTICE
• If the enclosed drive is not switched on for a long period, the
performance of its electrolytic capacitors will be reduced.
• If it is stopped for a prolonged period, turn the enclosed drive on every
two years for at least 5 hours to restore the performance of the
capacitors, then check its operation. Do not connect the enclosed drive
directly to the line voltage. Increase the voltage gradually using an
adjustable AC source.
Failure to follow these instructions can result in equipment damage.
Mechanical Installation
Unpacking the Altivar Plus
Enclosed Drives
Altivar Plus enclosed drives are shipped standing up and may have a high
center of gravity, which can cause them to tilt and fall. Fork trucks provide a
convenient method of moving floor-mounted equipment.
WARNING
UNSTABLE LOAD
• Use extreme care when moving heavy equipment.
• Verify that the moving equipment is rated to handle the weight.
• When removing equipment from a shipping pallet, carefully balance and
secure it using a safety strap.
Failure to follow these instructions can result in death, serious
injury, or equipment damage.
Before installation:
1. Open the drive door by moving the main disconnect handle to the OFF
position.
2. Visually verify that all internal mounting and terminal connection
hardware is properly seated, securely fastened, and undamaged.
3. Visually verify that the control board and any communication boards on
the drive are properly seated, securely fastened, and undamaged. Verify
that the internal plugs and wiring connections are tight. Inspect all
connections for damage.
4. Verify that all relays and fuses are installed and fully seated.
5. Close and secure the enclosed drive door.
16
© 2015 Schneider Electric All Rights Reserved
NHA65138
08/2015
Altivar™ Plus for Compressor Applications
Section 3—Handling, Installation, and Commissioning
Handling the Enclosed Drive
WARNING
HANDLING AND LIFTING HAZARDS
• Keep the area below any equipment being lifted clear of all personnel
and property.
• Lifting the enclosed drive requires the use of a lifting apparatus. Use the
lifting method shown in Figures 2 and 3 on page 18.
• Before lifting the enclosed drive:
— Inspect the lifting plates, holes, slots, and eyebolts for any damage.
— Keep the lifting force vertical.
— Limit the sling angle to less than 60°.
Failure to follow these instructions can result in death, serious
injury, or equipment damage.
Handle the enclosed drive carefully to avoid damage to the internal
components, frame, or exterior. When handling the enclosed drive, balance
it carefully to keep it from tipping. The enclosed drive is equipped with
eyelets or lifting rails to facilitate handling with a hoist. It also has a provision
for a crane hook that can be removed after final placement.
When handling the enclosed drive:
© 2015 Schneider Electric All Rights Reserved
•
Always work with another person. The weight, size, and shape of the
enclosed drive is such that two people are required to handle it.
•
•
•
Wear gloves.
Use a hoist or a crane.
Place the enclosed drive in an upright position.
17
Altivar™ Plus for Compressor Applications
Section 3—Handling, Installation, and Commissioning
NHA65138
08/2015
Figure 2:
Lifting with a Hoist (Frame B)
60º
Max
Figure 3:
Lifting with a Hoist (Frame C)
Remove the lifting bars
upon installation.
18
60º
Max
© 2015 Schneider Electric All Rights Reserved
NHA65138
08/2015
Altivar™ Plus for Compressor Applications
Section 3—Handling, Installation, and Commissioning
WARNING
IMPROPER MOUNTING
Before removing the lifting mechanism:
• Ensure that all mounting hardware is of a sufficient size and type for the
enclosed drive weight.
• Secure and tighten all mounting hardware.
Failure to follow these instructions can result in death, serious
injury, or equipment damage.
Floor-Mounting the Enclosed
Drive
WARNING
INCREASED RISK OF TOPPLING
Secure the enclosed drive to the floor with mounting hardware at the final
position.
Failure to follow these instructions can result in death, serious
injury, or equipment damage.
•
Mount the enclosed drive on a flat, solid surface capable of supporting
its weight.
•
Mount the enclosed drive in a location that provides air access into the
lower front of the enclosed drive.
•
•
Do not mount the enclosed drive on hot surfaces or in direct sunlight.
•
If drilling for conduit entry, take care to prevent metal chips from falling
on parts and electronic printed wiring boards.
•
•
See Figures 5–10 on pages 21–26 for mounting dimensions.
•
Check the enclosure for damage that might reduce electrical clearances.
Secure all four corners of the enclosed drive with hardware of a
sufficient size and type for its weight.
When cleaning the interior and exterior of the enclosed drive, use a
vacuum. Do not use compressed air, as it may blow contaminants into
other parts of the enclosed drive.
Figure 4:
Mounting Hole Location for Floor Mount
Securing the enclosed
drive to the floor from
the inside
Securing the enclosed
drive to the floor from
the outside
© 2015 Schneider Electric All Rights Reserved
19
Altivar™ Plus for Compressor Applications
Section 3—Handling, Installation, and Commissioning
Total Dissipated Watts Loss
Table 7:
NHA65138
08/2015
The total dissipated watts loss in Tables 7 and 8 is provided for sizing the
environment HVAC cooling requirements based upon worst-case operating
conditions for Type 12 enclosures.
Maximum Total Dissipated Watts Loss, 460 V1
Heavy Duty (Altivar 71)
Total
Total
Dissipated Dissipated
kW
hp Watts Loss Watts Loss
(Code)
5% Line
3% Line
Reactor
Reactor
Controller
Catalog No.
ATV•EXC5•N4E7UW
Table 8:
Normal Duty (Altivar 61)
Total
Dissipated
kW
hp
Watts Loss
(Code)
Passive
Harmonic filter
125
2707
2727
3549
D90
125
2369
2389
3211
C11
150
3075
3135
4119
C11
150
2863
2923
3907
C13
200
3521
3661
4755
C13
200
3509
3649
4743
C16
250
4199
4410
5405
C16
250
4423
4634
5629
C20
300
5361
5766
6912
C22
350
5997
6282
7669
C25
400
6393
6653
8060
C25
400
6899
7159
8566
C28
450
7388
7653
9388
C31
500
8435
8614
10426
C31
500
8022
8201
10013
C40
600
10396
10894
12419
C40
600
10089
10587
12112
C50
700
12977
13559
15268
C50
700
12267
12849
14558
C63
900
16178
16926
19457
Maximum Total Dissipated Watts Loss, 575 V1
Controller
Catalog No.
ATV•EXC5•Y6E7UW
20
Total
Dissipated
Watts Loss
Passive
Harmonic filter
D90
Heavy Duty (Altivar 71)
1
Total
Total
Dissipated Dissipated
Watts Loss Watts Loss
5% Line
3% Line
Reactor
Reactor
kW
hp
(Code)
Normal Duty (Altivar 61)
Total
Dissipated
Watts Loss
3% Line Reactor
Total
Dissipated
Watts Loss
5% Line Reactor
kW
(Code)
hp
Total
Dissipated
Watts Loss
3% Line Reactor
Total
Dissipated
Watts Loss
5% Line Reactor
C11
125
2631
2751
C11
125
2636
2756
C13
150
3042
3194
C13
150
3054
3206
C16
175
3663
3787
C16
175
3679
3803
C20
200
4397
4521
C20
200
4423
4547
C25
250
5586
5670
C25
250
5603
5687
C31
350
6817
6882
C31
350
6832
6897
C40
450
8119
8167
C40
450
8074
8122
C50
550
10412
10644
C50
550
10457
10689
C63
700
12919
13049
C63
700
12952
13082
—
—
—
—
C80
800
15959
16239
To convert to BTU/hr, multiply Watts Loss by 3.41.
© 2015 Schneider Electric All Rights Reserved
NHA65138
08/2015
Altivar™ Plus for Compressor Applications
Section 3—Handling, Installation, and Commissioning
Mounting Dimensions and
Typical Mounting Locations
Figure 5:
Frame Size A Enclosure:
125–250 hp Normal Duty and 125–200 hp Heavy Duty @ 460 V, 125–200 hp Normal Duty and 125–175 hp
Heavy Duty @ 575 V, Circuit Breaker for 460 V, Fusible Disconnect for 575 V
DIMENSIONS: mm
[in.]
APPROXIMATE WEIGHT: 850–1100 lb.
© 2015 Schneider Electric All Rights Reserved
21
Altivar™ Plus for Compressor Applications
Section 3—Handling, Installation, and Commissioning
Figure 6:
NHA65138
08/2015
Frame Size A Enclosure with SS Bypass
DIMENSIONS: mm
[in.]
APPROXIMATE WEIGHT: 1100–1400 lb.
22
© 2015 Schneider Electric All Rights Reserved
NHA65138
08/2015
Altivar™ Plus for Compressor Applications
Section 3—Handling, Installation, and Commissioning
Figure 7:
Frame Size B Enclosure: 350–500 hp Normal Duty and 250–450 hp Heavy Duty @ 460 V, 250–450 hp Normal
Duty and 200–350 hp Heavy Duty @ 575 V, Fusible Disconnect for 460 V and 575 V
DIMENSIONS: mm
[in.]
APPROXIMATE WEIGHT: 1200–1700 lb.
© 2015 Schneider Electric All Rights Reserved
23
Altivar™ Plus for Compressor Applications
Section 3—Handling, Installation, and Commissioning
Figure 8:
NHA65138
08/2015
Frame Size B Enclosure with SS Bypass
APPROXIMATE WEIGHT: 1750–2500 lb.
24
© 2015 Schneider Electric All Rights Reserved
NHA65138
08/2015
Altivar™ Plus for Compressor Applications
Section 3—Handling, Installation, and Commissioning
Figure 9:
Frame Size C Enclosure: 600–900 hp Normal Duty and 500–700 hp Heavy Duty @ 460 V, 550–800 hp Normal
Duty and 450–700 hp Heavy Duty @ 575 V, Circuit Breaker for 460 V and 575 V
DIMENSIONS: mm
[in.]
APPROXIMATE WEIGHT: 2500–3000 lb.
© 2015 Schneider Electric All Rights Reserved
25
Altivar™ Plus for Compressor Applications
Section 3—Handling, Installation, and Commissioning
Figure 10:
NHA65138
08/2015
Frame Size C Enclosure with SS Bypass
APPROXIMATE WEIGHT: 3500–4050 lb.
26
© 2015 Schneider Electric All Rights Reserved
NHA65138
08/2015
Clearance Requirements
Door Interlock Opening Procedure
Altivar™ Plus for Compressor Applications
Section 3—Handling, Installation, and Commissioning
Observe the following spacing requirements when mounting the Altivar Plus
enclosed drive:
•
•
Mount each enclosed drive so that the door can be opened at least 90°.
•
Provide a minimum of 3 ft (914 mm) of free space above the enclosed
drive.
•
Provide a minimum of 0.5 in. (13 mm) of space between the back of the
enclosed drive and the wall. For damp locations, allow a minimum of
6 in. (152 mm).
Provide a minimum of 3 ft (914 mm) of free space in front of the
enclosed drive.
To open doors on equipment with multiple doors, follow these steps
(see Figure 11 for lettered callouts):
1. Use the key provided to open door 1 (A) containing the main disconnect.
2. Slide the black handle inside of section 1 (B) to the left. This allows the
door of section 2 to open.
3. Use the key provided to open door 2 (C).
Figure 11:
Door Interlock Opening Procedure
B
C
A
To close the door interlock, perform the steps in the reverse order.
© 2015 Schneider Electric All Rights Reserved
27
Altivar™ Plus for Compressor Applications
Section 3—Handling, Installation, and Commissioning
NHA65138
08/2015
Electrical Installation
DANGER
HAZARD OF ELECTRIC SHOCK, EXPLOSION, OR ARC FLASH
• Turn off all power (main and remote) before installing the equipment.
• Read and understand the precautions in “Installation and Maintenance
Precautions” beginning on page 5 before performing the procedures in
this section.
Failure to follow these instructions will result in death or serious
injury.
General Wiring Practices
Before wiring, perform the DC Bus Voltage Measurement Procedure on
page 34. Good wiring practice requires the separation of control circuit
wiring from all power wiring. Power wiring to the motor must have the
maximum possible separation from all other power wiring, whether from the
same drive or other drives. Do not run power and control wiring or
multiple power conductors in the same conduit. This separation reduces
the possibility of coupling electrical transients from power circuits into
control circuits or from motor power wiring into other power circuits.
CAUTION
IMPROPER WIRING
Follow the wiring practices described in this document in addition to those
already required by national and local electrical codes.
Failure to follow these instructions can result in injury or equipment
damage.
Follow these practices when wiring the drive:
Input Power
28
•
Use metallic conduit for all drive wiring. Do not run control and power
wiring in the same conduit.
•
Separate metallic conduits carrying power wiring or low-level control
wiring by at least 3 inches (76 mm).
•
Separate existing, non-metallic conduits or cable trays used to carry
power wiring from metallic conduit carrying low-level control wiring by at
least 12 inches (305 mm).
•
Whenever power and control wiring cross, the metallic conduits and
non-metallic conduits or trays must cross at right angles.
•
Equip all inductive circuits near the drive (relays, contactors, solenoid
valves) with noise suppressors, or connect them to a separate circuit.
The Altivar Plus enclosed drive operates from a three-phase supply
connected to the main disconnect switch. Connect only voltage falling within
the voltage and frequency range specified on the equipment nameplate.
Do not connect the equipment to a circuit for which the perspective shortcircuit current rating exceeds the marked short circuit rating located on the
equipment nameplate. The equipment nameplate is located on the inside of
the main enclosure door.
© 2015 Schneider Electric All Rights Reserved
NHA65138
08/2015
Branch Circuit Connections
Altivar™ Plus for Compressor Applications
Section 3—Handling, Installation, and Commissioning
Size all branch circuit components and equipment such as feeder cables,
disconnect devices, and protective devices according to national and local
electrical codes based on the full-load panel input current or motor full load
current (whichever is greater). The full-load panel input current is printed on
the nameplate. Connect input power conductors L1, L2, and L3 to the
bottom of the main disconnect switch (1DS1 or 1CB1).
WARNING
IMPROPER OVERCURRENT COORDINATION
• Properly coordinate all protective devices.
• Do not connect the drive to a power feeder whose short circuit capacity
exceeds the short-circuit current rating listed on the equipment
nameplate.
Failure to follow these instructions can result in death, serious
injury, or equipment damage.
CAUTION
EQUIPMENT DAMAGE FROM IMPROPER WIRING
• Do not connect input power leads to the output terminals (T1, T2, T3 or
U, V, W). This damages the drive and voids the warranty.
• Check the power connections before energizing the drive.
Failure to follow these instructions can result in injury or equipment
damage.
Input Wiring
Size the ampacity of the input power conductors according to national and
local electrical codes based on:
A. Drive input current when the enclosed drive has no bypass.
B. Drive input current or motor full load current (whichever is greater) when
the enclosed drive has a bypass circuit.
Refer to the markings located on the inside of the main enclosure door for
lug data and torque requirements.
Grounding
© 2015 Schneider Electric All Rights Reserved
Ground the Altivar Plus enclosed drive according to national and local
electrical codes. To ground the equipment:
•
Connect a copper wire from the ground bar terminal to the power system
ground.
•
Verify that the resistance to ground is 1 Ω or less. Improper grounding
causes intermittent and unreliable operation.
•
Do not remove any internal ground wires or connections.
29
Altivar™ Plus for Compressor Applications
Section 3—Handling, Installation, and Commissioning
NHA65138
08/2015
DANGER
HAZARD OF ELECTRIC SHOCK, EXPLOSION, OR ARC FLASH
• Read and understand the precautions in “Installation and Maintenance
Precautions” beginning on page 5 before performing the procedures in
this section.
• Do not use metallic conduit as a ground conductor.
Failure to follow these instructions will result in death or serious
injury.
•
Ground multiple drives as shown in Figure 12. Use one grounding
conductor per device. Do not loop ground conductors or install them in
series.
Figure 12:
Grounding Multiple Drives
YES
Connection to Ungrounded or
High-Resistance Grounded
Systems
30
NO
Drive
Drive
Drive
Drive
Drive
Drive
Drive
Drive
Drive
Altivar 61 and 71 drives feature built-in radio frequency interference (RFI)
filters with grounded capacitors. When using the drive on an ungrounded,
resistance grounded, or delta connected system, isolate the RFI filters from
ground to help prevent reduction of their operating life. Refer to the
Altivar 61 Installation Manuals, 1755849 (Heavy Duty) or 1760655 (Normal
Duty), for information on disconnecting the filter ground. The installation
manuals are available online at www.schneider-electric.com.
© 2015 Schneider Electric All Rights Reserved
NHA65138
08/2015
Altivar™ Plus for Compressor Applications
Section 3—Handling, Installation, and Commissioning
Wiring and Electromagnetic
Compatibility
WARNING
LOSS OF CONTROL
• The designer of any control scheme must consider the potential failure
modes of control paths and, for certain critical control functions, provide
a means to achieve a safe state during and after a path failure.
Examples of critical control functions are emergency stop and over
travel stop.
• Separate or redundant control paths must be provided for critical control
functions.
• System control paths may include communication links. Consideration
must be given to the implications of anticipated transmission delays or
failures of the link1.
• Each implementation of a Altivar Plus enclosed drive must be
individually and thoroughly tested for proper operation before being
placed into service.
Failure to follow these instructions can result in death, serious
injury, or equipment damage.
1
For additional information, refer to NEMA ICS 1.1 (latest edition), “Safety Guidelines for the
Application, Installation, and Maintenance of Solid State Control” and to NEMA ICS 7.1 (latest
edition), “Safety Standards for Construction and Guide for Selection, Installation and Operation
of Adjustable-Speed Drive Systems.”
The high frequency equipotential ground connection between the enclosed
drive, motor, and cable shielding does not eliminate the need to connect the
ground (PE) conductors (green-yellow) to the appropriate terminals on each
unit. To help accomplish this, follow these guidelines:
•
To avoid communication interference, grounds between the enclosed
drive, motor, and cable shields must have high frequency equipotentiality.
•
When using shielded cable for the motor, use a 4-conductor cable so
that one wire will be the ground connection between the motor and the
enclosed drive. The size of the ground conductor must be selected in
compliance with local and national codes. The shield can then be
grounded at both ends. Metal ducting or conduit can be used for part or
all of the shielding length, provided there is no break in continuity.
•
When using shielded cable for control signals, if the cable is connecting
equipment that is close together and the grounds are bonded together,
then both ends of the shield can be grounded. If the cable is connected
to equipment that may have a different ground potential, then ground the
shield at one end only to prevent large currents from flowing in the
shield. The shield on the ungrounded end may be tied to ground with a
capacitor (for example: 10 nF, 100 V or higher) in order to provide a path
for the higher frequency noise.
•
Ensure maximum separation between the power supply cable (line
supply) and the motor cable and also ensure maximum separation
between the control cables and any power cables.
Connecting the motor ground wire directly to the drive chassis is the
preferred grounding method. This method reduces the amount of high
frequency noise generated by the drive PWM that may be coupled into
communication or control wiring. The drive has two or more marked
terminals for making grounding connections.
© 2015 Schneider Electric All Rights Reserved
31
Altivar™ Plus for Compressor Applications
Section 3—Handling, Installation, and Commissioning
Output Wiring
NHA65138
08/2015
Size the ampacity of motor power conductors according to the motor full
load current following national and local electrical codes.
Connect motor conductors to the lugs provided (T1, T2, and T3) and
connect the motor ground to the ground bar provided. See Figure 14 on
page 38 for terminal locations. Refer to the markings located on the inside
of the main enclosure door, on or next to the device, for lug data and torque
requirements.
The drive is sensitive to the amount of capacitance (either phase-to-phase
or phase-to-ground) present on the output power conductors. If excessive
capacitance is present, the drive may trip on overcurrent.
Output Cable
Follow the guidelines below when selecting output cable:
•
Cable type: the cable selected must have a low capacitance phase-tophase and phase-to-ground. Do not use mineral-impregnated cable
because it has a very high capacitance. Immersion of cables in water
increases capacitance.
•
Cable length: the longer the cable, the greater the capacitance. Cable
lengths greater than 150 ft (50 m) may cause ground faults. For
installation where cable capacitances may be a problem, a reactor or
motor protection filter can be installed between the drive and the motor.
The following guidelines address maximum cable length for typical
drive/motor applications:
These limits are based on the maximum recommended peak voltage that
can be allowed at the motor terminals, which is due to the reflected wave
phenomenon. This increase in voltage is primarily determined by the degree
of impedance mismatch between the power conductor and the motor in
combination of the dV/dt of the specific semiconductors used in the inverter
section of the drive feeding the motor, both of which vary depending on the
horsepower.
Many variables affect the performance of the drive, motor, and cables in
long-lead applications. Motor protection filters can provide substantial
benefits for:
•
•
•
AC drives rated 460 V or higher
Existing general-purpose motors subject to retrofit with an AC drive
Shielded cables
Motors compliant with NEMA MG-1 Part 31 are recommended but not
required. Consult the motor manufacturer or vendor literature for specific
limitations governing the application.
•
Proximity to other output cables: because of high frequency switching
and increased capacitance, the drive may trip under some conditions.
•
Do not use lightning arrestors or power factor correction
capacitors on the output of the drive.
For proper drive short circuit protection, certain values of inductance may be
required in the output power wiring. Inductance can be supplied by the
power wiring or auxiliary inductors.
32
© 2015 Schneider Electric All Rights Reserved
NHA65138
08/2015
Altivar™ Plus for Compressor Applications
Section 3—Handling, Installation, and Commissioning
CAUTION
INSUFFICIENT OUTPUT INDUCTANCE
Provide at least 500 mm (20 in.) of cable at the drive output (U/T1, V/T2,
W/T3) to help protect the drive output when short circuits occur.
Failure to follow these instructions can result in injury or equipment
damage.
Table 9:
Maximum Cable Length for Standard Duty Motors
Approximate length of motor cables, ft (m)1
Type of Cable
20 in.–164
164–328
(508 mm–50) (50–100)
328–492
(100–150)
492–656
(150–200)
Shielded
Software Function2
3% Load Reactor (Choke)
Unshielded
Software Function2
656–984
(200–300)
3% Load Reactor (Choke)
984–1312
(300–400)
1312–1968
(400–600)
Motor Protection Filter
1968–3280
(600–1000)
Consult
Schneider
Electric
Motor Protection Filter
1
The cable length varies depending on the combination of variable speed drive/load reactor or line filter. For an application with several motors connected in
parallel, the cable length must include all cabling.
2
The software function limits the overvoltage at the motor terminals to twice the DC bus voltage. For any application with dynamic braking, the DC bus voltage rises to
more than the supply voltage multiplied by square-root 2. The electrical characteristics of the motor must be checked before using this function.
© 2015 Schneider Electric All Rights Reserved
33
Altivar™ Plus for Compressor Applications
Section 3—Handling, Installation, and Commissioning
NHA65138
08/2015
DC Bus Voltage Measurement
Procedure
DANGER
HAZARD OF ELECTRIC SHOCK, EXPLOSION, OR ARC FLASH
• Read and understand the DC Bus Voltage Measurement Procedure
before performing the procedure.
• Measurement of bus capacitor voltage must be performed by qualified
personnel.
• Apply appropriate personal protective equipment (PPE) and follow safe
electrical work practices. See NFPA 70E®, CSA Z462, NOM-029STPS, and other applicable regulations defining safe electrical work
practices.
• DO NOT short across terminals PA/+ and PC/- or across the DC bus
capacitors.
• DO NOT touch unshielded components or terminal strip screw
connections with voltage present.
• Use only electrically insulated tools.
• Before servicing the drive:
— Disconnect all power including external control power that may be
present.
— Always use a properly rated voltage sensing device to confirm
power is off.
— Place a “DO NOT TURN ON” label on all power disconnects.
— Lock all power disconnects in the open position.
— WAIT 15 MINUTES to allow the DC bus capacitors to discharge.
Then follow the DC Bus Voltage Measurement Procedure below to
verify that the DC voltage is less than 42 V. The drive LED is not an
indicator of the absence of DC bus voltage.
• Replace all devices, doors, and covers before turning on power to this
equipment or starting and stopping the drive.
Failure to follow these instructions will result in death or serious
injury.
The DC bus voltage level is determined by monitoring the PA/+ and PC/terminals. The location of these terminals varies by drive model number.
Read the model number of the drive from the nameplate, and identify the
corresponding PA/+ and PC/- terminals.
To measure the DC bus capacitor voltage:
1. Remove all power from the Altivar Plus enclosed drive. Use a properly
rated voltage sensing device to confirm power is off. Also, be sure to
remove all external control power that may be present such as on the
control board and the option board terminals.
2. Open the disconnect between the input line and the enclosed drive.
Lock the disconnect in the open position and install a “Do Not Turn On”
sign. Open the main disconnect located on the front of the enclosed
drive.
3. Wait 15 minutes for the DC bus capacitors to discharge.
4. Open the main door of the enclosed drive.
5. Open the inner control panel door, use care to ensure that no control
wires are pinched or pulled when opening this door.
34
© 2015 Schneider Electric All Rights Reserved
NHA65138
08/2015
Altivar™ Plus for Compressor Applications
Section 3—Handling, Installation, and Commissioning
6. Set a properly rated voltmeter to the 1000 Vdc scale. Measure the
voltage between the PA/+ and PC/- terminals. The physical location of
these terminals varies by the drive model number, which is listed on the
drive nameplate. Removal of the front cover of the drive may be
necessary to access these terminals. Refer to the drive installation
manual referenced in Table 1 on page 10 for information on removal and
replacement of this cover.
7. Verify that the DC bus voltage has discharged below 42 V before
servicing the drive. If the DC bus capacitors will not discharge below
42 V, contact your local Schneider Electric representative. Do not
operate the drive.
8. After servicing the drive, replace all covers and close and secure all
doors.
Wire Routing And
Interconnection
Wire Class
The Wire Class describes the compatibility of the field wiring terminal with
the conductor material and insulation system. When used in conjunction
with the required conductor current rating and drive ambient temperature
rating, the Wire Class forms the basis for selecting a conductor size that
limits the temperature on the conductor insulation at the field wiring terminal
to acceptable limits. Although it is permissible to use conductors with
operating temperatures exceeding those given by the Wire Class, conductor
size must fall within the Wire Class limits.
Noise Class
The Noise Class categorizes the electromagnetic properties of the voltages
and currents present. The Noise Class comprises the six categories shown
below.
Quiet Wiring 1 (QW1)
High-susceptibility analog and digital control signals. Signals falling under
the classification of QW1 include digital communication/network circuits,
and drive analog I/O and analog process signals.
Quiet Wiring 2 (QW2)
Medium-susceptibility analog and digital control signals. Signals falling
under the classification of QW2 include 24 Vdc and 24 Vac control circuits.
Standard Wiring 1 (SW1)
Low-susceptibility control or power circuits rated less than 600 Vac
(250 Vdc) and less than 15 A (voltage and current spectra are generally
contained within 0.05–9 kHz). Signals falling under the classification of SW1
include 120 Vac control circuits.
Standard Wiring 2 (SW2)
Power circuits rated greater than 15 A (voltage and current spectra are
generally contained with 0.05–9 kHz). Signals falling under the classification
of SW2 include line power to drives.
Standard Wiring 3 (SW3)
Reserved.
Pulse Wiring 1 (PW1)
Control or power circuits whose voltage or current spectra significantly
exceed 9 kHz. Signals falling under the classification of PW1 include motor
and dynamic braking circuits fed from PWM (pulse width modulation) drives.
© 2015 Schneider Electric All Rights Reserved
35
Altivar™ Plus for Compressor Applications
Section 3—Handling, Installation, and Commissioning
Voltage Class
NHA65138
08/2015
The Voltage Class categorizes the voltages present into recognized
conductor insulation categories (30, 150, 300, and 600 V) for selection of
the conductor voltage rating and physical segregation
Figure 13:
Wire Routing EMI Class Groups
Wiring Methods
DANGER
HAZARD OF ELECTRIC SHOCK, EXPLOSION, OR ARC FLASH
• Route and secure all conductors to prevent damage to insulation when
installing them under or near sharp edges.
• When possible, use jacketed conductors.
Failure to follow these instructions will result in death or serious
injury.
Based on the Noise Class and Voltage Class of the conductors, apply the
wiring methods in Table 10 (page 37) to the drive system.
36
© 2015 Schneider Electric All Rights Reserved
NHA65138
08/2015
Table 10:
Altivar™ Plus for Compressor Applications
Section 3—Handling, Installation, and Commissioning
Wire Routing and Interconnection
Wiring Methods and Considerations
Noise Class of Conductors
QW1
QW2
SW1
SW2
PW1
Conductor Grouping in Wireways/Conduits
1. All conductors of 1 or 3 phase AC power circuits must be bundled to minimize stray magnetic fields.
X
X
X
2. All conductors of a DC power circuit must be bundled to minimize stray magnetic fields.
X
X
X
X
X
3. When paralleled conductors must be run in separate wireways or conduit, bundle conductors into
groups that minimize stray magnetic fields.
4. Maintain conductor runs as short and direct as practical.
X
X
X
X
X
Separation of Circuits
1. DO NOT run different Noise Class conductors in the same conduit.
X
X
X
X
X
2. DO NOT run different Voltage Class conductors in the same conduit unless all conductors are
insulated for the maximum Voltage Class present.
X
X
X
X
X
3. All PW conductor groups must be individually segregated using metallic conduit.
X
4. Segregate all conductors by Noise Class. Use the following circuit separation when conductors can
run parallel for more than 12 in. (305 mm)
•
Metallic conduit: 3 in. (76 mm) between QW and SW/PW
•
Metallic tray: 3 in. (76 mm) between SW and PW
•
Metallic tray: 6 in. (152 mm) between QW and SW/PW
•
Against continuous metal surface: 3 in. (76 mm) between SW and PW
•
X
X
X
X
X
X
X
X
X
X
X
X
X
X
X
X
Against continuous metal surface: 6 in. (152 mm) between QW and SW/PW
X
X
X
X
X
•
Metallic conduit housing QW: 12 in. (305 mm) to non-metallic conduit SW/PW
X
X
X
X
X
•
Non-metallic conduit: 3 in. (76 mm) between SW and PW
X
X
X
•
Non-metallic conduit: 24 in. (610 mm) between QW and SW/PW
X
X
X
X
X
5. If QW and SW1 wiring must cross SW2 or PW1 wiring, the bundles must cross at right angles.
X
X
X
X
X
Common Mode Noise Issues
1. Provide adjacent signal returns using twisted pair cable.
X
X
2. Galvanically isolate signal and associated signal return path when possible.
X
X
Shielding
1. Use metallic conduit for all power and control circuits external to the drive enclosure.
X
X
X
X
X
2. Shields should be continuous and equipped with a drain wire.
X
X
X
3. DO NOT group different Noise Class conductors within the same shield.
X
X
X
X
X
4. Minimize non-shielded portion of conductor at the ends of shielded cable.
X
X
X
X
X
X
X
X
5. When shielding AC or DC power conductors, group conductors to minimize magnetic field in shield.
Grounding
1. Ground shields only at the drive end.
X
X
X
X
X
2. Use separate ground wire for each shield ground.
X
X
X
X
X
3. Provide a ground wire with all conductor groups whether in tray or conduit.
X
X
X
4. When multiple grounds must be made to a shielded power cable, the shield must have the same
short-circuit current rating as the ground conductor in the power cable.
X
X
X
X
X
X
X
X
X
5. Terminate all power grounds and power shield grounds to the enclosed drive grounding point or bar.
6. Terminate all signal shield grounds to the terminals provided.
7. Always supply a separate equipment-grounding conductor with the enclosed drive power feed.
DO NOT depend on metallic conduit for ground connection.
© 2015 Schneider Electric All Rights Reserved
X
X
37
Altivar™ Plus for Compressor Applications
Section 3—Handling, Installation, and Commissioning
Typical Component Locations
Figure 14:
NHA65138
08/2015
Figure 14 illustrates the typical components of the Altivar Plus enclosed
drive.
Typical Component Locations
Outlet Ventilation
Fan
Control Power
Transformer
ATV61/71
Variable
Speed Drive
Graphic
Keypad
Enclosure
Door
Handle
Main
Disconnect
Handle
Main
Disconnect
Switch
(L1, L2, L3)
Inlet
Ventilation
Fan
User
Dedicated
Control
Terminals
Power
Distribution
Block
(T1, T2, T3)
Line Reactor
DV/DT
Filter
(optional)
Enclosure
Ground
Power Wiring
DANGER
HAZARD OF ELECTRIC SHOCK, EXPLOSION, OR ARC FLASH
• Apply appropriate personal protective equipment (PPE) and follow safe
electrical work practices. See NFPA 70E®, CSA Z462, NOM-029STPS, and other applicable regulations defining safe electrical work
practices.
• Some terminals have voltage on them when the disconnect is open.
• Turn off all power supplying this equipment before working on or inside
equipment.
• Always use a properly rated voltage sensing device to confirm that
power is off.
• Replace covers before turning on power to equipment.
• Read and understand the precautions in “Installation and Maintenance
Precautions” beginning on page 5 before performing the procedures in
this section.
Failure to follow these instructions will result in death or serious
injury.
38
© 2015 Schneider Electric All Rights Reserved
NHA65138
08/2015
Altivar™ Plus for Compressor Applications
Section 3—Handling, Installation, and Commissioning
CAUTION
IMPROPER WIRING
• Do not connect input power leads to the drive output terminals (T1, T2,
T3 or U, V, W). This damages the drive and voids the warranty.
• Check the power connections before energizing the drive.
Failure to follow these instructions can result in injury or equipment
damage.
CAUTION
HEAT AND FIRE DAMAGE
Follow the torque requirements specified on the Altivar Plus enclosed
drive nameplate.
Failure to follow these instructions can result in injury or equipment
damage.
Power Terminal Connections
Table 11:
Power Terminal Characteristics1
Terminal
GND (Ground)
Ground bar and/or ground lugs
L1, L2, L3
3-phase input power (bottom of disconnect)
T1, T2, T3
Output connections to motor (power distribution block or output contactor)
1
Input Connections
For terminal locations, refer to Figure 14 on page 38.
Table 12:
Frame Size
Input Connections, Without SS Bypass, Standard Duty
hp
Max Wire Size
AWG
mm2
Terminal Torque
lb-in
N•m
A
125–154, 460 V
350
185
225
26
A
175–263, 460 V
2–500
2–240
442.5
50
B
284–437, 460 V
3–500
3–240
442.5
50
B
450–687, 460 V
4–500
4–240
442.5
50
C
700–800, 460 V
4–500
4–240
442.5
50
C
900, 460 V
8–750
8–400
552
62
A
125–154, 575 V
350
185
225
26
A
175–235, 575 V
2–500
2–240
442.5
50
B
250–482, 575 V
2–500
2–240
442.5
50
C
500–600, 575 V
3–500
3–240
442.5
50
C
643–800, 575 V
4–500
4–240
442.5
50
Table 13:
Frame Size
© 2015 Schneider Electric All Rights Reserved
Function
Input Connections, Without SS Bypass, Heavy Duty
hp
Max Wire Size
AWG
mm2
Terminal Torque
lb-in
N•m
A
125–154, 460 V
350
185
225
26
A
175–206, 460 V
2–500
2–240
442.5
50
39
Altivar™ Plus for Compressor Applications
Section 3—Handling, Installation, and Commissioning
NHA65138
08/2015
Table 13:
Frame Size
Max Wire Size
AWG
mm2
Terminal Torque
lb-in
N•m
235–500, 460 V
3–500
3–240
442.5
50
C
529–700, 460 V
4–500
4–240
442.5
50
A
125–200, 575 V
350
185
225
26
B
206–407, 575 V
2–500
2–240
442.5
50
C
437–600, 575 V
3–500
3–240
442.5
50
C
643–700, 575 V
4–500
4–240
442.5
50
Frame
Size
Input Connections, With SS Bypass, Standard Duty
hp
Max Wire Size
Terminal Torque
AWG
mm2
lb-in
N•m
A
125–263, 460 V
2–500
2–240
442.5
50
B
284–437, 460 V
3–500
3–240
442.5
50
B
450–529, 460 V
4–500
4–240
442.5
50
C
570–800, 460 V
4–500
4–240
442.5
50
C
900, 460 V
8–750
8–400
552
62
A
125–235, 575 V
2–500
2–240
442.5
50
B
250–335, 575 V
2–500
2–240
442.5
50
B
350–482, 575 V
3–500
3–240
442.5
50
C
500–529, 575 V
3–500
3–240
442.5
50
C
570–800, 575 V
4–500
4–240
442.5
50
Table 15:
Frame
Size
Input Connections, With SS Bypass, Heavy Duty
hp
Max Wire Size
Terminal Torque
AWG
mm2
lb-in
N•m
A
125 - 206, 460 V
2–500
2–240
442.5
50
B
235–437, 460 V
3–500
3–240
442.5
50
B
450–500, 460 V
4–500
4–240
442.5
50
C
529–700, 460 V
4–500
4–240
442.5
50
A
125–200, 575 V
2–500
2–240
442.5
50
B
206–284, 575 V
2–500
2–240
442.5
50
B
300–407, 575 V
3–500
3–240
442.5
50
C
437–700, 575 V
3–500
3–240
442.5
50
Table 16:
Frame
Size
40
hp
B
Table 14:
Output Connections
Input Connections, Without SS Bypass, Heavy Duty
(continued)
Output Connections, Without SS Bypass, Standard Duty
hp
Max Wire Size
Terminal Torque
AWG
mm2
lb-in
N•m
56.5
A
125–263, 460 V
600
304
500
B
284–687, 460 V
2–500
2–253
375
42.4
C
700–900, 460 V
5–750
5–400
376
42.4
A
125–235, 575 V
600
304
500
56.5
B
250–482, 575 V
2–500
2–253
375
42.4
C
570–800, 575 V
5–750
5–400
376
42.4
© 2015 Schneider Electric All Rights Reserved
NHA65138
08/2015
Altivar™ Plus for Compressor Applications
Section 3—Handling, Installation, and Commissioning
Table 17:
Frame
Size
hp
Max Wire Size
AWG
mm2
Terminal Torque
lb-in
N•m
56.5
A
125–206, 460 V
600
304
500
B
235–500, 460 V
2–500
2–253
375
42.4
C
529–700, 460 V
5–750
5–400
376
42.4
A
125–200, 575 V
600
304
500
56.5
B
206–407, 575 V
2–500
2–253
375
42.4
C
437–700, 575 V
5–750
5–400
376
42.4
Table 18:
Frame
Size
Output Connections, With SS Bypass, Standard Duty
hp
Max Wire Size
Terminal Torque
AWG
mm2
lb-in
N•m
31
A
125–263, 460 V
300
152
275
B
284–335, 460 V
500
253
500
56.5
B
350–368, 460 V
2–600
2–304
500
56.5
B
400–529, 460 V
3–600
3–304
500
56.5
C
570–800, 460 V
3–600
3–304
500
56.5
C
900, 460 V
4–750
4–380
500
56.5
A
125–235, 575V
300
152
275
31
B
250–335, 575 V
300
152
275
31
B
350–368, 575 V
500
253
500
56.5
B
400–482, 575 V
2–600
2–304
500
56.5
C
500–529, 575 V
2–600
2–304
500
56.5
C
570–800, 575 V
3–600
3–304
500
56.5
Table 19:
Frame
Size
© 2015 Schneider Electric All Rights Reserved
Output Connections, Without SS Bypass, Heavy Duty
Output Connections, With SS Bypass, Heavy Duty
hp
Max Wire Size
Terminal Torque
AWG
mm2
A
125–206, 460 V
300
152
275
31
B
235–284, 460 V
500
253
500
56.5
B
300–350, 460 V
2–600
2–304
500
56.5
B
368–500, 460 V
3–600
3–304
500
56.5
C
529–700, 460 V
3–600
3–304
500
56.5
A
125–200, 575 V
300
152
275
31
B
206–284, 575V
300
152
275
31
B
300–350, 575 V
500
253
500
56.5
B
368–407, 575 V
2–600
2–304
500
56.5
C
437–450, 575 V
2–600
2–304
500
56.5
C
482–700, 575V
3–600
3–304
500
56.5
lb-in
N•m
41
Altivar™ Plus for Compressor Applications
Section 3—Handling, Installation, and Commissioning
Control Wiring
NHA65138
08/2015
Table 20:
Terminal Block Characteristics, 120 Vac Control
Terminal
Functions
Characteristics
TB1-1 to TB1-28
Main Disconnect Remote Shunt Trip
Command
—
TB1-16A to TB1-2
120VAC Supply for Motor Winding
Heater
500VA Max Heater
TB1-1 to TB1-18
Compressor/Blowers Start Command
—
TB1-1 to TB1-8
Oil Pump Start Command
—
TB1-1A to TB1-25
Remote Thermistor Trip Signal
Remove Factory Jumper to
Enable Interlock
TB1-5 to TB1-19
Oil Pump Run Status Indication
Closed when Oil Pump is running
TB1-5 to TB1-20
Drive Run Status Indication
Closed when Drive is running
TB2-40
(+) External 4-20 mA Speed
Reference
—
TB2-41
(-) External 4-20 mA Speed Reference —
TB2-42
(+) 4-20 mA Current Feedback
—
TB2-43
(-) 4-20 mA Current Feedback
—
TB2-44
(+) 4-20 mA Frequency Feedback
—
TB2-45
(-) 4-20 mA Frequency Feedback
—
TB2-SH
Analog Signal Shield Connections
—
Table 21:
Terminal Block Characteristics, 120 Vac Control,
Additional Contacts for Softstart Bypass
Terminal
Functions
Characteristics
TB1-1 to TB1-6
Compressor Enable Interlock
Remove Factory Jumper to Enable
Interlock
TB1-6 to TB1-7
Softstart Bypass Output Enable
—
TB1-6 to TB1-10
VFD Output Enable
—
TB1-11 to TB1-12
VFD Mode Indication
—
Connect the control wiring to the upper portion of the pull-apart terminal
block located on the controls panel.
•
The control terminals are rated 300 V, 20 A. Maximum wire size for the
control terminals:
— 12 AWG (2.5 mm2), 1 wire
— 16 AWG (1.5 mm2), 2 wire
Minimum tightening torque: 4.5 lb-in (0.5 N•m)
42
© 2015 Schneider Electric All Rights Reserved
NHA65138
08/2015
Altivar™ Plus for Compressor Applications
Section 3—Handling, Installation, and Commissioning
Initial Startup
DANGER
HAZARD OF ELECTRIC SHOCK, EXPLOSION, OR ARC FLASH
Read and understand the precautions in “Installation and Maintenance
Precautions” beginning on page 5 before performing the procedures in
this section.
Failure to follow these instructions will result in death or serious
injury.
DANGER
HAZARD OF ELECTRIC SHOCK, EXPLOSION, OR ARC FLASH
• Apply appropriate personal protective equipment (PPE) and follow safe
electrical work practices. See NFPA 70E®, CSA Z462, NOM-029STPS, and other applicable regulations defining safe electrical work
practices.
• This equipment must only be installed and serviced by qualified
electrical personnel.
• Turn off all power supplying this equipment before working on or inside
equipment.
• Always use a properly rated voltage sensing device to confirm power is off.
• Replace all devices, doors, and covers before turning on power to this
equipment.
Failure to follow these instructions will result in death or serious
injury.
DANGER
UNQUALIFIED PERSONNEL
• This equipment must be installed and serviced only by qualified
personnel.
• Qualified personnel performing diagnostics or troubleshooting that
requires electrical conductors to be energized must comply with:
— NFPA 70 E® – Standard for Electrical Safety Requirements for
Employee Workplaces®
— CSA Z462 – Workplace Electrical Safety
— OSHA Standards – 29 CFR Part 1910 Subpart S Electrical
— NOM-029-STPS – Maintenance of Electrical Installation in the
Workplace, Safety Conditions
— Other national and local electrical codes that may apply
Failure to follow these instructions will result in death or serious
injury.
The Altivar Plus enclosed drive has been configured for the installed options
and tested at the factory. Depending on the application conditions and
requirements, minor adjustments to complete the field installation may be
required, based on the application requirements. This initial start-up
procedure should be followed step by step.
© 2015 Schneider Electric All Rights Reserved
43
Altivar™ Plus for Compressor Applications
Section 3—Handling, Installation, and Commissioning
NHA65138
08/2015
Use the door-mounted or remote-mounted graphic display terminal, or the
optional SoMove™ software to perform the initial start-up procedure.
DANGER
HAZARD OF ELECTRIC SHOCK, EXPLOSION, OR ARC FLASH
• Properly ground the enclosed drive panel before applying power.
• Close and secure the enclosure door before applying power.
• Certain adjustments and test procedures require that power be applied
to this enclosed drive. Exercise extreme caution as hazardous voltages
exist. The enclosure door must be closed and secured while turning on
power or starting and stopping this enclosed drive. Always follow
practices and procedures from NFPA 70E®, CSA Z462, NOM-029STPS, and other applicable regulations defining safe electrical work
practices.
Failure to follow these instructions will result in death or serious
injury.
WARNING
UNINTENDED CONFIGURATION CHANGES
• Changing the macro configurations or installing a new option card
reconfigures the drive to factory settings.
• The drive configuration must be reinstalled.
Failure to follow these instructions can result in death or serious
injury.
After replacing the drive or installing any plug-in option card, you must set
the programming parameters as listed in the documentation that
accompanies the enclosed drive.
In addition, after you install any plug-in option card for the first time, the
previously saved parameters downloaded from the keypad or PC software
will not be correct as they do not include the additional parameters available
with the card. You must set the option card parameters as listed in the
documentation.
Start-Up Procedure
44
❏
Step 1: Check the enclosure components and connections (see the
procedure on page 45).
❏
Step 2: Adjust motor overload protection for the full load current of the
motor (see the procedure on page 45).
❏
Step 3: Test motor rotation (see the procedure on page 45).
❏
Step 4: If your enclosed drive has a bypass, test the motor rotation in
Bypass mode (see the procedure on page 46).
❏
Step 5: Check the graphic display terminal high speed, low speed,
acceleration, and deceleration settings (see the procedure on page 47).
❏
Step 6: Set the softstart bypass parameters (see the procedure on
page 48).
© 2015 Schneider Electric All Rights Reserved
NHA65138
08/2015
Step 1: Checking the Enclosure
Components and Connections
Altivar™ Plus for Compressor Applications
Section 3—Handling, Installation, and Commissioning
With all incoming power removed, make the following equipment checks:
A. Verify that all equipment disconnects are open.
B. Move the circuit breaker and handle assembly to the Off position. Open
the enclosure doors.
C. Check the wiring of the input power ground and motor ground. Consult
the control circuit electrical schematics provided with the equipment to
make all checks.
D. Ensure that the motor conductors are wired to terminals T1, T2, and T3
of the distribution block or output contactor (if softstart bypass option).
E. Using a voltmeter set at the 1000 Vac scale, verify that the incoming line
voltage at the line side of the disconnecting means is within ±10% of the
input voltage rating on the enclosed drive nameplate.
Step 2: Adjusting Motor Overload
Protection
CAUTION
OVERHEATED MOTOR
• This drive does not provide direct thermal protection for the motor.
• Use of a thermal sensor in the motor may be required for protection at
all speeds or load conditions.
• Consult the motor manufacturer for the thermal capability of the motor
when it is operated above the desired speed range.
Failure to follow these instructions can result in injury or equipment
damage.
To adjust motor overload protection, refer to the Programming Manual supplied
with the drive or online at www.schneider-electric.com.
Step 3: Testing Motor Rotation
WARNING
HAZARDOUS MOVING PARTS
Before starting the enclosed drive, ensure that personnel are clear of the
motor and its connected load and that the motor and load are ready to run.
Failure to follow these instructions can result in death or serious
injury.
NOTE: The settings listed in this procedure are suitable for most
applications. If your application requires different operating characteristics,
refer to the Programming Manual supplied with the drive for more
information.
A. Verify that all disconnects are open, move the circuit breaker and handle
to the off position, and open the enclosure doors.
B. Set the AFC-Off-Bypass selector switch (if used) to AFC.
C. Close the enclosure doors, reapply power, and close any previously
opened motor disconnects.
© 2015 Schneider Electric All Rights Reserved
45
Altivar™ Plus for Compressor Applications
Section 3—Handling, Installation, and Commissioning
NHA65138
08/2015
D. Apply a start command to the compressor and a small speed reference
signal to check the direction of motor rotation.
— If correct, proceed to “Step 4: Testing Motor Rotation in Bypass
Mode” on page 46.
— If incorrect, stop the drive. Remove all power! Correct the motor
rotation.
Correcting Motor Rotation
DANGER
HAZARD OF ELECTRIC SHOCK, EXPLOSION, OR ARC FLASH
Read and understand the precautions in “Installation and Maintenance
Precautions” beginning on page 5 before performing the procedures in
this section.
Failure to follow these instructions will result in death or serious
injury.
To correct the direction of motor rotation:
A. Reverse any two motor leads located on the device terminals marked
T1, T2, or T3.
B. Close and secure the enclosure door, then reapply power and restart the
enclosed drive.
C. Reapply the start command to the compressor and apply a small speed
reference signal to check the direction of motor rotation.
— If correct, this completes the drive mode motor rotation check.
— If incorrect, repeat Steps A through C until correct.
Step 4: Testing Motor Rotation in
Bypass Mode
A. Verify that all disconnects are open, move the circuit breaker and handle to
the Off position, and open the enclosure doors.
B. Set the AFC-Off-Bypass selector switch (if used) to Bypass.
C. Close the enclosure doors, reapply power, and close any opened motor
disconnects.
D. Momentarily apply a start command to the compressor to check the
direction of motor rotation, then immediately turn off the start command.
— If the direction of motor rotation is correct, proceed to “Step 5:
Checking the Graphic Display Settings” on page 47.
— If incorrect, stop the drive. Remove all power! Correct the motor
rotation.
Correcting Motor Rotation in Bypass
Mode
DANGER
HAZARD OF ELECTRIC SHOCK, EXPLOSION, OR ARC FLASH
Read and understand the precautions in “Installation and Maintenance
Precautions” beginning on page 5 before performing the procedures in
this section.
Failure to follow these instructions will result in death or serious
injury.
46
© 2015 Schneider Electric All Rights Reserved
NHA65138
08/2015
Altivar™ Plus for Compressor Applications
Section 3—Handling, Installation, and Commissioning
To correct the direction of motor rotation:
A. Reverse any two incoming leads to the drive input marked L1, L2,
or L3.
B. Close the enclosure doors, reapply power, and restart the enclosed
drive.
C. Momentarily apply a start command to the compressor to check the
direction of motor rotation, then immediately turn off the start command.
— If correct, this completes the motor rotation check in Bypass mode.
— If incorrect, repeat Steps A through C until correct.
Step 5: Checking the Graphic
Terminal Settings
A. Enter the motor nameplate parameters.
a. Press ESC on the graphic display terminal until the Main menu is
displayed and the Drive menu is highlighted. Press the keypad knob
(ENT) twice. The Simply Start menu will be displayed.
b. Rotate the keypad knob clockwise until motor power is highlighted.
Press ENT.
c. Enter the correct value for motor power per the motor nameplate.
Press ENT.
d. Enter the remainder of the motor nameplate parameters: motor
voltage, motor current, motor frequency, and motor speed.
e. Rotate the keypad knob clockwise until motor thermal current is
highlighted. Press ENT.
f.
Set the motor thermal current to the rated current indicated on the
motor nameplate. Press ENT.
The motor parameters have now been entered.
B. Check the High Speed (HSP) setting (maximum motor speed setting).
a. Press ESC on the graphic display terminal until Main Menu is
displayed and Drive Menu is highlighted. Press the keypad knob
(ENT) twice. The Simply Start menu is displayed.
b. Rotate the keypad knob clockwise until High Speed is highlighted.
Press ENT.
c. Rotate the keypad knob until the display indicates the maximum
output frequency required for the application (factory default is
60 Hz). Press ENT.
The drive HSP setting is now complete.
C. Check the Low Speed (LSP) setting (minimum motor speed setting).
a. Continuing from Step A above, rotate the keypad knob
counter-clockwise until Low Speed is highlighted. Press ENT.
b. Rotate the keypad knob until the display indicates the minimum
output frequency required for the application (preset value is 3 Hz;
factory default is 0 Hz). Press ENT.
The drive LSP setting is now complete. To return to the monitor
screen, press ESC three times.
© 2015 Schneider Electric All Rights Reserved
47
Altivar™ Plus for Compressor Applications
Section 3—Handling, Installation, and Commissioning
NHA65138
08/2015
D. The application may require changing the setting of Acceleration (ACC)
and Deceleration (dEC) times. To change the setting:
a. Press ESC on the graphic display terminal until Main Menu is
displayed and Drive Menu is highlighted. Press the keypad knob
(ENT) twice. The Simply Start menu is displayed.
b. Rotate the keypad knob clockwise until Acceleration is highlighted.
Press ENT.
c. Rotate the keypad knob until the display indicates the acceleration
time required for the application. Press ENT.
d. Rotate the keypad knob clockwise until Deceleration is highlighted.
Press ENT.
e. Rotate the keypad knob until the display indicates the deceleration
time required for the application. Press ENT.
The drive acceleration and deceleration time settings are now
complete. To return to the monitor screen, press ESC three times.
Step 6: Setting the Softstart
Bypass Parameters
A. Enter the motor nameplate parameters.
a. Press ENT on the graphic terminal twice to enter the Settings menu.
b. Press ENT to select nominal motor current (In).
c. Press the up or down arrows to adjust the value to match the
nominal motor current indicated on the motor nameplate.
d. Press ENT to store the value.
B. If required, change the setting of acceleration (ACC) time:
a. Press the down arrow twice until the keypad displays ACC. Press ENT.
b. Press the up or down arrows to adjust acceleration to the appropriate
value for the application and press ENT to store the value.
Drive Factory Settings
WARNING
UNINTENDED EQUIPMENT OPERATION
• The enclosed drive has been factory-programmed. Alteration of factory
programming may create incompatibilities with the supplied enclosed
drive configuration.
• Read and understand the Programming Manual on the CD supplied
with the drive, as well as the programming information found in the
applicable control circuit elementary diagrams provided with each
enclosed drive.
• If the drive or the main control board of the drive is replaced, or if any
option cards are field installed, the drive must be re-programmed
according to the programming instructions found in the applicable
control circuit elementary diagrams provided with each enclosed drive.
Failure to follow these instructions will result in death or serious
injury.
If the ATV61H or ATV71H drive has been replaced or reset to the factory
settings, you may need to adjust some parameter values. The drive factory
configuration is shown on documentation accompanying the Altivar Plus
enclosed drive. Refer to the Altivar 61 programming manual (1760649) or the
ATS48 Softstarter instruction bulletin (S1A37491) for other settings and
options. The manuals are available online at www.schneider-electric.com.
48
© 2015 Schneider Electric All Rights Reserved
NHA65138
08/2015
Altivar™ Plus for Compressor Applications
Section 3—Handling, Installation, and Commissioning
Start-Up Checklist
Table 22:
This is an initial start-up checklist for customer use. Schneider Electric
recommends that you store this information with the drive.
Drive Start-Up Checklist
Yes
No
N/A
Equipment Location
1. Are the drives mounted in their permanent locations?
2. Is the work area around the drives accessible?
3. Does the work facility have safety provisions such as first aid and fire extinguishers?
Power Connections (Line Side)
1. Are the properly sized incoming power connections installed, completely terminated, and properly tightened?
2. Are the incoming power leads in the standard (A-B-C) rotation pattern?
3. Have proper grounding practices been followed, in accordance with national and local electrical codes?
Motor Connections (Load Side)
1. Are suitable motors installed for each drive?
2. Are the motor leads completely terminated and properly tightened to the output of each drive?
3. If a bypass application is part of the installation, are the contactors mounted, wired, and properly tightened?
4. Is each AFC output power cable in an independent conduit with respect to other AFC output cables?
5. Can the motor be run at full speed in Bypass mode?
Motor Load Device
1. Is the proper load device installed and ready?
2. Is the desired motor rotation known?
3. Is the load properly coupled to the motor shaft?
4. At time of start-up, can the application provide maximum motor loading?
Control Circuit Wiring
1. Is all local and remote control wiring properly identified, securely terminated, and properly tightened?
2. Are the low-level analog signals separated from control and power wiring?
3. Is shielded cable used for all analog signals, and is the shield wire grounded at the AFC end only?
4. Is control wiring separated from the power wiring?
Other User Interfaces
1. Are all required remote commissioning terminals and interconnect cables operational and available?
2. Are serial communication links ready for AFC?
3. Are accurate control and power wiring diagrams available at the start-up location?
4. Are specific drive settings known for each drive (for example, Min/Max Speed and ACC/DEC Time)?
Availability of Equipment
1. Will the equipment be available to be energized and de-energized on the date of start-up?
2. Will the process/load be available?
Authorized Personnel
1. Will the person(s) responsible for the entire process be available to verify final operation?
2. Will all necessary union trade personnel be ready and available if they need to be present when Schneider Electric personnel
are working on the equipment?
Special Requirements: Please list any specific concerns/comments
For enclosed drives with bypass, are the bypass fuses installed?
For bypass drives with NEMA contactors, are the overload elements installed and properly selected according to the motor
nameplate information?
© 2015 Schneider Electric All Rights Reserved
49
Altivar™ Plus for Compressor Applications
Section 3—Handling, Installation, and Commissioning
Customer Readiness
Acknowledgment
NHA65138
08/2015
I/We have verified that all checklist questions have been answered. All
questions with a Yes response indicate a ready state for the start-up to be
efficient and successful. An explanation for any question with a No
response is listed in the Special Requirements section above.
CUSTOMER NAME: ____________________________________________________________________________________
COMPANY NAME:
____________________________________________________________________________________
PHONE: (_______) __________________________________________
FAX: (_______) ____________________________
SIGNATURE:________________________________________________ DATE: ___________________________________
50
© 2015 Schneider Electric All Rights Reserved
NHA65138
08/2015
Altivar™ Plus for Compressor Applications
Section 4—Circuit Descriptions and Options
Section 4—Circuit Descriptions and Options
Terminal Command Versus
Keypad Command Operation
For factory and/or user-supplied pilot devices and controls to be recognized,
the Altivar Plus enclosed drive is factory-configured to operate from the
terminal strip. Changing settings in Menu 1.6 COMMAND disables certain
drive logic inputs. Factory and user-provided control devices are ignored.
For this reason, do not operate the enclosed drive with Menu 1.6 settings
different from those shown in the ATV61 or ATV71 Factory Configuration
tables.
Before re-programming inputs, outputs, torque types, or control types:
•
Consult the factory configuration listing on the applicable control circuit
diagram provided separately.
•
•
Refer to the Programming Manual supplied with the drive.
Refer to the instruction bulletin for the selected option, as specified in
Table 1 on page 10.
WARNING
UNINTENDED EQUIPMENT OPERATION
• The enclosed drive has been factory-programmed. Alteration of factory
programming may create incompatibilities with the supplied enclosed
drive configuration.
• Read and understand the Programming Manual on the CD supplied
with the drive, as well as the programming information found in the
applicable control circuit elementary diagrams provided with each
enclosed drive.
• If the drive or the main control board of the drive is replaced, or if any
option cards are field installed, the drive must be re-programmed
according to the programming instructions found in the applicable
control circuit elementary diagrams provided with each enclosed drive.
Failure to follow these instructions can result in death or serious
injury.
NOTE: The factory program can be saved in the graphic display terminal.
Refer to the Programming Manual for information on saving and retrieving
factory settings.1
Graphic Display Terminal
Operation
Trip Reset
The graphic display terminal is for programming and display. The
FWD/REV, Run, and Stop/Reset buttons are not for primary operation of the
enclosed drive. Use the operators located on the front of the enclosed drive
door to command the AFC and Bypass modes of operation.
When a communication option is selected, the drive trip reset feature is
removed. If Start/Stop commands are not sent over the communication
system network, you may choose to activate the trip reset function by
assigning trip reset to LI4.
1
© 2015 Schneider Electric All Rights Reserved
User documentation for Altivar 61 and Altivar 71 drives is available electronically from the
Technical Library at www.schneider-electric.com.
51
Altivar™ Plus for Compressor Applications
Section 4—Circuit Descriptions and Options
Control Circuit Sequencing
and Operation
NHA65138
08/2015
The following descriptions do not represent all possible combinations of
standard control options. Order engineered (OE) options are available for
other possible combinations.
Start Relay
The Start relay energizes if all internal and external safety interlocks are
closed and the external controlling device initiates a start command.
Remote device start command is initiated via remote contact closure. Upon
Start relay energization the VFD or the softstart controller (if installed and
selected as the mode of operation) begins compressor run operation.
Shunt Trip of Main Disconnect
The main disconnect device contains a shunt trip mechanism that allows
remote tripping of the disconnect via remote contact closure. Remote
contact closure by an external control device will energize the shunt trip
mechanism causing the main disconnect to open and enter a trip free state.
52
© 2015 Schneider Electric All Rights Reserved
NHA65138
08/2015
Altivar™ Plus for Compressor Applications
Section 5—Maintenance and Support
Section 5—Maintenance and Support
DANGER
DANGER
HAZARD OF ELECTRIC SHOCK,
EXPLOSION, OR ARC FLASH
HAZARD OF ELECTRIC SHOCK
• Read and understand this bulletin in its entirety before installing or
operating Altivar Plus enclosed drives. Installation, adjustment, repair,
and maintenance of the drives must be performed by qualified
personnel.
• Apply appropriate personal protective
equipment (PPE) and follow safe electrical
work practices. See NFPA 70E®, CSA Z462,
NOM-029-STPS, and other applicable
regulations defining safe electrical work
practices.
• User is responsible for conforming to all applicable code requirements
with respect to grounding all equipment.
• Many parts in this drive, including printed wiring boards, operate at line
voltage. DO NOT TOUCH. Use only electrically insulated tools.
• This equipment must only be installed and
serviced by qualified electrical personnel.
• DO NOT short across DC bus capacitors or touch unshielded
components or terminal strip screw connections with voltage present.
• Turn off all power supplying this equipment
before working on or inside equipment.
• Before servicing the drive:
• Always use a properly rated voltage sensing
device to confirm power is off.
— Disconnect all power including external control power that may be
present before servicing the drive.
• Replace all devices, doors, and covers
before turning on power to this equipment.
— Place a “DO NOT TURN ON” label on the drive disconnect.
— Lock the disconnect in open position.
Failure to follow these instructions will
result in death or serious injury.
— WAIT 15 MINUTES for the DC bus capacitors to discharge. Then
follow the “DC Bus Voltage Measurement Procedure” on page 34 to
verify that the DC voltage is less than 45 V. The drive LEDs are not
accurate indicators of the absence of DC bus voltage.
• Install and close all covers before applying power or starting and
stopping the drive.
Failure to follow these instructions will result in death or serious
injury.
Qualified Personnel
For the protection of personnel and equipment, a qualified person must
perform the procedures detailed in this section. A qualified person is one
who has skills and knowledge related to the construction and operation of
this electrical equipment and the installation, and has received safety
training to recognize and avoid the hazards involved.
Refer to the most current release of NFPA 70E®, CSA Z462,
NOM-029-STPS and other applicable regulations defining safe electrical work
practices for safety training requirements. In addition, the person must be:
Diagnostic Codes
© 2015 Schneider Electric All Rights Reserved
•
Able to read, interpret, and follow the instructions and precautions in this
instruction bulletin and the other documentation referenced.
•
Able to use the required tools listed in this instruction bulletin in a safe
and correct manner
A number of diagnostic and status codes are included on the drive. The
graphic display terminal provides visual indication of enclosed drive
operation and protective circuit functions and indicator lights to assist in
maintenance and troubleshooting. If the enclosed drive trips while
operating, the codes must be viewed before power is removed because
removing power resets the trip code.
53
Altivar™ Plus for Compressor Applications
Section 5—Maintenance and Support
NHA65138
08/2015
External Signs of Damage
The following are examples of external signs of damage:
•
•
Cracked, charred, or damaged covers or enclosure parts
•
Oil or electrolyte on the bottom of the drive which might have leaked
from the capacitors inside
•
•
•
•
Excessive surface temperatures of enclosures and conduits
Damage to the graphic display terminal, such as scratches, punctures,
burn marks, chemical burns, or moisture in the screen
Damage to power or control conductors
Unusual noise or odors from any of the equipment
Abnormal temperature, humidity, or vibration
If any of the above signs are found while the equipment is powered up,
immediately inform operating personnel and assess the risk of leaving the
drive system powered up. Before removing power from the equipment,
always consult with the operating personnel responsible for the machinery
and process.
If troubleshooting indicates that component replacement is necessary, refer
to “Field Replacement of Drives” on page 55.
Preventive Maintenance
Table 23:
Recommended Maintenance Intervals
Interval (years)
Inspection1
1
2
3
4
5
6
7
8
9
10
11
13
14
15
16
17
18
19
20
√
√
√
√
Load side terminals and torque
√
√
√
√
√
Plug-in connections
√
√
√
√
√
√
Relay contacts
√
√
√
Circuit boards
√
√
√
Insulation damage
√
√
Fiber optic cables
Oxidation, corrosion, dust
√
√
√
√
√
√
Power supply LEDs
√
√
√
√
√
√
√
√
√
√
√
√
√
√
√
√
√
√
√
√
√
√
√
√
√
√
√
√
√
√
√
√
Gasket
√
√
√
DC-link capacitors
√
√
√
Circuit breaker inspection
√
√
√
√
√
Spare part inspection
√
√
√
√
√
Air filter2
√
Heat sinks (dust and debris)
Change
√
√
√
1
2
√
√
√
3
4
√
√
√
5
6
√
√
√
7
8
√
√
√
9
10
√
√
√
11
12
√
√
√
13
14
√
√
√
15
16
√
√
√
17
18
√
√
19
20
Fan(s) for control electronics
√
√
√
√
Fan(s) for power electronics
√
√
√
√
√
Enclosure fan(s)
√
√
√
√
√
√
√
√
√
DC-link capacitors
Service
√
√
Enclosure filters
1
2
3
4
5
6
7
8
√
9
10
11
12
13
14
15
16
17
18
19
20
Capacitor reforming
√
√
√
√
Thermography
√
√
√
√
√
Current symmetry
√
√
√
√
√
Check of parameter setting
√
√
√
√
√
1
All service must be done with the enclosed drive in a non-energized state.
2
Clean fan filters once every six months.
54
12
Line side terminals and torque
√
© 2015 Schneider Electric All Rights Reserved
NHA65138
08/2015
Inspection
Altivar™ Plus for Compressor Applications
Section 5—Maintenance and Support
Periodic inspection of equipment is recommended to maintain the functionality
of equipment of the course of its lifetime.
•
Inspect the interior fans and exterior fans of the enclosed drive for
blockage and impeded rotation. To prevent overheating and to allow
proper air flow, maintain the clearances.
•
•
Clean the fan filters at least once every six months.
•
Clean the interior and exterior of the enclosed drive with a vacuum. Do
not use compressed air; it may distribute foreign contaminants to other
surfaces.
•
•
Check the enclosure for damage that might reduce electrical clearances.
Examine the interior and exterior of the enclosed drive for moisture, oil,
or other foreign material. Eliminate all foreign material and clean the
enclosed drive.
Examine the finish of the enclosure. Touch up the paint if necessary.
Replace any badly oxidized, corroded or damaged enclosure parts.
Field Replacement of Drives
DANGER
HAZARD OF ELECTRIC SHOCK, EXPLOSION, OR ARC FLASH
• Read and understand this manual before installing or operating the
enclosed drive. Installation, adjustment, repair, and maintenance must
be performed by qualified personnel.
• The user is responsible for compliance with all international and national
electrical code requirements with respect to grounding of all equipment.
• Many parts of this enclosed drive, including the printed circuit boards,
operate at the line voltage. DO NOT TOUCH. Use only electricallyinsulated tools.
• DO NOT touch unshielded components or terminal strip screw
connections with voltage present.
• DO NOT short across terminals PA/+ and PC/- or across the DC bus
capacitors.
• Before servicing the enclosed drive:
— Disconnect the power, including the external control power that may
be present. The circuit breaker or disconnecting switch does not
always open all circuits.
— Lock the circuit breaker or disconnecting switch in the opened
position.
— Place a “DO NOT TURN ON” label on the circuit breaker or
disconnect switch of the enclosed drive.
— Wait 15 minutes to allow the DC bus capacitors to discharge. Then
follow the “DC Bus Voltage Measurement Procedure” on page 34 to
verify that the DC voltage is less than 42 V. The enclosed drive LED
is not an indicator of the absence of DC bus voltage.
• Install and close all covers before applying power or starting and
stopping the enclosed drive.
Failure to follow these instructions will result in death or serious
injury.
© 2015 Schneider Electric All Rights Reserved
55
Altivar™ Plus for Compressor Applications
Section 5—Maintenance and Support
NHA65138
08/2015
Removing the Drive Assembly
WARNING
HANDLING AND LIFTING HAZARD
Keep the area below any equipment being lifted clear of all personnel and
property.
Failure to follow these instructions can result in death, serious
injury, or equipment damage.
CAUTION
ELECTROSTATIC DISCHARGE
Do not subject this equipment to electrostatic discharge. The enclosed
drive contains electronic components that are very susceptible to damage
from electrostatic discharge.
Failure to follow these instructions can result in injury or equipment
damage.
1. Remove the two nuts on the top of the drive using a 17 mm socket.
2. Remove the nuts on the bottom of the drive using a 17 mm socket.
3. Pulling on the bracket located at the bottom front of the drive, slide the
drive forward until it is stopped by the M6 retaining bolt located on the
right-hand side. See Figure 15.
4. Using a spreader bar, attach the lifting device to the back holes on the
top mounting bracket of the drive and then remove the drive retaining
bolt using a 13 mm socket. Ensure that the lifting device remains tight
throughout the removal.
5. Slowly slide the drive the remainder of the way out, preventing the drive
from swinging or swaying.
6. Place the drive on its back in order to remove the bottom bracket on the
drive and perform any required maintenance.
Figure 15:
Drive Assembly Removal
M6 drive
retaining
bolt
56
© 2015 Schneider Electric All Rights Reserved
NHA65138
08/2015
Bottom Bracket Removal
Altivar™ Plus for Compressor Applications
Section 5—Maintenance and Support
1. Remove the two bolts at the rear of the bracket using a 17 mm socket.
2. Remove two screws on the side of the bracket (one on the right and one
on the left) using a size 2 Phillips driver.
3. Remove the bracket and perform any maintenance required.
Replacing the Drive
Attaching the Bottom Bracket
1. Place bracket on the bottom of the drive.
2. Install two screws on the side of the bracket (one on the right and one on
the left) using a size 2 Phillips driver. Install two bolts on the rear of the
drive using a 17 mm socket.
Installing the Drive
1. Attach a lifting device (including a spreader bar) to the back holes on the
top mounting bracket of the drive. Ensure that the lifting device remains
tight throughout the installation process.
2. Using the lifting device, lift the drive until it is at the correct level for
installation.
3. Align the bottom bracket with the rails in the enclosure and slide it into
place until it is possible to insert the M6 bolt.
4. Using a 10 mm socket, install the M6 bolt into the enclosed drive frame
in the location shown in Figure 15 (see Removing the Drive Assembly,
Step 3). Torque the bolt to 93.6 lb-in (10.6 N•m).
5. Remove the lifting device and push the drive the rest of the way into the
enclosure.
6. Fasten the two nuts on the top of the drive using a 17 mm socket.
Torque the nuts to 459 lb-in (51.9 N•m).
7. Fasten the nuts on the bottom of the drive using a 17 mm socket. Torque
the nuts to 459 lb-in (51.9 N•m).
8. Install all power conductors, ground conductor, and control wiring to the
drive terminal blocks. Install all other removed equipment. Tighten the
hardware to the torque values given in Table 25.
9. Check all wiring connections for correct terminations and check isolation
ground.
10. Using a size 2 Phillips driver, secure the drive cover with 7–9 screws.
The number of screws varies depending on the enclosed drive size.
11. Close and latch the control panel.
12. Close the main door to the equipment and secure the handle.
13. Observe the lockout/tagout procedures as identified in OSHA Standard
29 CFR, Subpart J for energizing the enclosed drive.
14. Apply power to the enclosed drive by turning the disconnect switch in a
clockwise direction.
15. The enclosed drive is now ready for operation.
© 2015 Schneider Electric All Rights Reserved
57
Altivar™ Plus for Compressor Applications
Section 5—Maintenance and Support
NHA65138
08/2015
Table 24:
Drive Weights
hp
Normal Duty
Weight
lb (kg)
Heavy Duty
460 V
575 V
460 V
575 V
125
—
125
—
132 (60)
150
—
150
—
163 (74)
200
—
—
—
176 (80)
—
125–200
—
125–175
242 (110)
250
—
200
—
255 (116)
300–350
—
250
—
358 (163)
—
250–450
—
200–350
418 (190)
400–500
—
300–450
—
455 (207)
600
—
500
—
704 (320)
700
—
600
—
726 (330)
—
550–800
—
450–700
880 (400)
900
—
700
—
957 (435)
Table 25:
VFD Power Terminal Torque
hp
Normal Duty
Heavy Duty
Torque
lb-in (N•m)
460 V
575 V
460 V
575 V
125–250
125–200
125–200
125–175
212 (24)
300–900
250–800
250–700
200–700
360 (41)
NOTE: Control wire terminal torque is 5.3 lb-in (0.6 N•m).
Technical Support
For quotation assistance, selection, and commercial questions, please
contact your local Schneider Electric Sales Representative.
The Drives Product Support Group (DPSG) provides field sales, distributors,
OEMs, contractors, and end users with AC drive and soft starter technical
assistance. Support includes equipment selection, programming,
communications, and other troubleshooting assistance. The support group
may be contacted as follows:
•
Phone (toll free): 1-888-778-2733 Monday–Friday 8 a.m. to 8 p.m. ET
(after-hours emergency support is available)
•
•
Fax: 919-217-6508
E-mail: [email protected]
Contact the DPSG for all product-related technical support questions. If the
reported problem cannot be resolved, the support engineer will direct you to
the functional group that can best provide problem resolution. Each problem
inquiry is assigned a case number, which is critical for tracking the history of
the problem, for dispatching services, and for warranty evaluations.
58
© 2015 Schneider Electric All Rights Reserved
NHA65138
08/2015
Altivar™ Plus for Compressor Applications
Appendix A—Renewable Parts
Appendix A—Renewable Parts
460 V Enclosed Drives
Table 26:
Renewable Parts, 460 V, Standard Duty
Description
Qty
Frame Size A
Drive
1
ATV61HD90N4D (125–154 hp) 1
Qty
Frame Size B
Qty
Frame Size C
ATV61HC22N4D (284–368 hp)
1
ATV61HC40N4D (570–700 hp)
Drive
1
ATV61HC11N4D (175 hp)
1
ATV61HC25N4D (400–437 hp)
1
ATV61HC50N4D (800 hp)
Drive
1
ATV61HC13N4D (200–206 hp) 1
ATV61HC31N4D (450–529 hp)
1
ATV61HC63N4D (900 hp)
Drive
1
ATV61HC16N4D (235–263 hp) —
—
—
—
ATS48 Softstarter
1
ATS48C21Y (125–154 hp)
1
ATS48C41Y (284–335 hp)
1
ATS48C79Y (570–687 hp)
ATS48 Softstarter
1
ATS48C25Y (175–206 hp)
1
ATS48C48Y (350–368 hp)
1
ATS48M10Y (700–800 hp)
ATS48 Softstarter
1
ATS48C32Y (235–263 hp)
1
ATS48C59Y (400–437 hp)
1
ATS48M12Y (900 hp)
ATS48 Softstarter
—
—
1
ATS48C66Y (450–529 hp)
—
—
Graphic Display Terminal
1
VW3A1101
1
VW3A1101
1
VW3A1101
Softstart Graphic Display
Terminal
1
VW3G48101
1
VW3G48101
1
VW3G48101
Power Fuses (No SS Bypass)
—
—
3
25423-35000 (284–368 hp)
3
A070URD32KI0900 (570–687 hp)
Power Fuses (No SS Bypass)
—
—
3
25423-36000 (400–437 hp)
6
25423-16000 (700–800 hp)
Power Fuses (No SS Bypass)
—
—
3
25423-16000 (450–529 hp)
6
A070URD32KI0800 (900 hp)
Power Fuses (With SS Bypass)
3
25423–13000 (125–154 hp)
3
25423-35000 (284–368 hp)
3
A070URD32KI0900 (570–687 hp)
Power Fuses (With SS Bypass)
—
—
3
25423-36000 (400–437 hp)
6
25423-16000 (700–800 hp)
Power Fuses (With SS Bypass)
—
—
3
25423-16000 (450–529 hp)
6
A070URD32KI0800 (900 hp)
Power Fuses (With SS Bypass)
—
—
—
—
3
KRP-C-1600SP (900 hp)
Primary Control Fuses
2
25430–21000
2
25430-21000
2
25430-21000
Secondary Control Fuses
1
25430-23000
1
25430-23000
1
25430-23000
Pilot Light, Red
2
XB5AVG4
2
XB5AVG4
2
XB5AVG4
Pilot Light, Yellow
4
XB5AVG5
4
XB5AVG5
5
XB5AVG5
Pilot Light, Green
2
XB5AVG3
2
XB5AVG3
2
XB5AVG3
Pilot Light, White
1
XB5AVG1
1
XB5AVG1
1
XB5AVG1
I/O Extension2
1
VW3A3202
1
VW3A3202
1
VW3A3202
LONWORKS2
1
VW3A3312
1
VW3A3312
1
VW3A3312
Modbus2
1
VW3A3303
1
VW3A3303
1
VW3A3303
Metasys N22
1
VW3A3318
1
VW3A3318
1
VW3A3318
Ethernet IP2
1
VW3A3316
1
VW3A3316
1
VW3A3316
Modbus TCP/IP2
1
VW3A3310D
1
VW3A3310D
1
VW3A3310D
DeviceNet2
1
VW3A3309
1
VW3A3309
1
VW3A3309
Profibus2
1
VW3A3307
1
VW3A3307
1
VW3A3307
Apogee P12
1
VW3A3314
1
VW3A3314
1
VW3A3314
BACnet2
1
VW3A3319
1
VW3A3319
1
VW3A3319
Interbus2
1
VW3A3304
1
VW3A3304
1
VW3A3304
Stirring Fan Assembly
1
26016-00006
1
26016-00006
1
26016-00006
Door Fan
1
11677154055
1
11677154055
1
11677154055
18611600037
Door Fan Filter
1
18611600037
1
18611600037
1
Roof Fan (Pack of 5)
1
11681152055
1
11681152055
1
11681152055
Roof Fan Filter (Pack of 20)
1
18611600039
1
18611600039
1
18611600039
AC Coil for LC1F185
1
LX1FG095
—
—
—
—
AC Coil for LC1F265
2
LX1FH1272
—
—
—
—
AC Coil for LC1F330
2
LX1FH1272
—
—
—
—
AC Coil for LC1F400
—
—
3
LX1FJ110
—
—
© 2015 Schneider Electric, All Rights Reserved
59
Altivar™ Plus for Compressor Applications
Appendix A—Renewable Parts
Table 26:
NHA65138
08/2015
Renewable Parts, 460 V, Standard Duty (continued)
Description
Qty
Frame Size A
Qty
Frame Size B
Qty
Frame Size C
AC Coil for LC1F500
—
—
2
LX1FK110
—
—
AC Coil for LC1F630
—
—
3
LX1FL110
—
—
AC Coil for LC1F780
—
—
—
—
3
LX1FX110
DC Coil for LC1F800
—
—
—
—
3
LX4F8FW
Rectifier for LC1F800 coil
—
—
—
—
3
DR5TE4U
Replacement Contacts for
LC1F185
1
LA5FG431
—
—
—
—
Replacement Contacts for
LC1F265
2
LA5FH431
—
—
—
—
Replacement Contacts for
LC1F330
2
LA5F400803
—
—
—
—
Replacement Contacts for
LC1F400
—
—
3
LA5F400803
—
—
Replacement Contacts for
LC1F500
—
—
2
LA5F500803
—
—
Replacement Contacts for
LC1F630
—
—
3
LA5F630803
—
—
Replacement Contacts for
LC1F780
—
—
—
—
9
LA5F780801
Replacement Contacts for
LC1F800
—
—
—
—
3
LA5F800803
Arc Chamber for LC1F185
1
LA5F18550
—
—
—
—
Arc Chamber for LC1F265
2
LA5F26550
—
—
—
—
Arc Chamber for LC1F330
2
LA5F33050
—
—
—
—
Arc Chamber for LC1F400
—
—
3
LA5F40050
—
—
Arc Chamber for LC1F500
—
—
2
LA5F50050
—
—
Arc Chamber for LC1F630
—
—
3
LA5F63050
—
—
Arc Chamber for LC1F780
—
—
—
—
9
LA5F780150
Arc Chamber for LC1F800
—
—
—
—
3
LA5F80050
Qty
Table 27:
Renewable Parts, 460 V, Heavy Duty
Description
Qty
Frame Size A
Frame Size B
Qty
Frame Size C
Drive
1
ATV71HD90N4D (125–154 hp) 1
ATV71HC16N4D (235–284 hp)
1
ATV71HC31N4D (529 hp)
Drive
1
ATV71HC11N4D (175 hp)
1
ATV71HC20N4D (300–350 hp)
1
ATV71HC40N4D (570–700 hp)
Drive
1
ATV71HC13N4D (200–206 hp) 1
ATV71HC25N4D (368–437 hp)
1
—
Drive
1
—
1
ATV71HC28N4D (450–500 hp)
—
—
ATS48 Softstarter
1
ATS48C21Y (125–150 hp)
1
ATS48C41Y (235–284 hp)
1
ATS48C66Y (529 hp)
ATS48 Softstarter
1
ATS48C25Y (154–175 hp)
1
ATS48C48Y (300–350 hp)
1
ATS48C79Y (570 hp)
ATS48 Softstarter
1
ATS48C32Y (200–206 hp)
1
ATS48C59Y (368–437 hp)
1
ATS48M10Y (600–700 hp)
ATS48 Softstarter
—
—
1
ATS48C66Y (450–500 hp)
—
—
Softstart Graphic Display
Terminal
1
VW3G48101
1
VW3G48101
1
VW3G48101
Power Fuses (No SS Bypass)
—
—
3
25423-34000 (235–284 hp)
3
A070URD32KI0800 (529 hp)
Power Fuses (No SS Bypass)
—
—
3
25423-35000 (300–350 hp)
6
25423-15000 (570–700 hp)
Power Fuses (No SS Bypass)
—
—
3
25423-36000 (368–500 hp)
6
—
A070URD32KI0800 (529 hp)
Power Fuses (With SS Bypass)
3
25423-13000 (125–154 hp)
3
25423-34000 (235–284 hp)
3
Power Fuses (With SS Bypass)
—
—
3
25423-35000 (300–350 hp)
6
25423-15000 (570–700 hp)
Power Fuses (With SS Bypass)
—
—
3
25423-36000 (368–500 hp)
6
—
Primary Control Fuses
2
25430-21000
2
25430-21000
2
25430-21000
Secondary Control Fuses
1
25430-23000
1
25430-23000
1
25430-23000
Pilot Light, Red
2
XB5AVG4
2
XB5AVG4
2
XB5AVG4
Pilot Light, Yellow
4
XB5AVG5
4
XB5AVG5
5
XB5AVG5
Pilot Light, Green
2
XB5AVG3
2
XB5AVG3
2
XB5AVG3
60
© 2015 Schneider Electric, All Rights Reserved
NHA65138
08/2015
Table 27:
Altivar™ Plus for Compressor Applications
Appendix A—Renewable Parts
Renewable Parts, 460 V, Heavy Duty (continued)
Description
Qty
Frame Size A
Qty
Frame Size B
Qty
Pilot Light, White
1
XB5AVG1
1
XB5AVG1
1
XB5AVG1
AC Coil for LC1F185
1
LX1FG095
—
—
—
—
AC Coil for LC1F265
2
LX1FH1272
—
—
—
—
AC Coil for LC1F330
2
LX1FH1272
—
—
—
—
AC Coil for LC1F400
—
—
3
LX1FJ110
—
—
AC Coil for LC1F500
—
—
1
LX1FK110
—
—
AC Coil for LC1F630
—
—
1
LX1FL110
—
—
DC Coil for LC1F800
—
—
—
—
1
LX4F8FW
Rectifier for LC1F800 coil
—
—
—
—
1
DR5TE4U
Replacement Contacts for
LC1F185
1
LA5FG431
—
—
—
—
Replacement Contacts for
LC1F265
2
LA5FH431
—
—
—
—
Replacement Contacts for
LC1F330
2
LA5F400803
—
—
—
—
Replacement Contacts for
LC1F400
—
—
3
LA5F400803
—
—
Replacement Contacts for
LC1F500
—
—
2
LA5F500803
—
—
Replacement Contacts for
LC1F630
—
—
3
LA5F630803
3
LA5F630803
Replacement Contacts for
LC1F800
—
—
—
—
3
LA5F800803
Arc Chamber for LC1F185
1
LA5F18550
—
—
—
—
Arc Chamber for LC1F265
2
LA5F26550
—
—
—
—
Arc Chamber for LC1F330
2
LA5F33050
—
—
—
—
Arc Chamber for LC1F400
—
—
3
LA5F40050
—
—
Arc Chamber for LC1F500
—
—
2
LA5F50050
—
—
Arc Chamber for LC1F630
—
—
3
LA5F63050
3
LA5F63050
Arc Chamber for LC1F800
—
—
—
—
3
LA5F80050
© 2015 Schneider Electric, All Rights Reserved
Frame Size C
61
Altivar™ Plus for Compressor Applications
Appendix A—Renewable Parts
NHA65138
08/2015
575 V Enclosed Drives
Table 28:
Renewable Parts, 575 V, Standard Duty
Description
Qty
Frame Size A
Qty
Frame Size B
Qty
Frame Size C
Drive
1
ATV61HC11YT (125–134hp)
1
ATV61HC25YT (250–335 hp)
1
ATV61HC50YT (500–600 hp)
Drive
1
ATV61HC13YT (150 -154 hp)
1
ATV61HC31YT (350–407 hp)
1
ATV61HC63YT (643–700 hp)
Drive
1
ATV61HC16YT (175–206 hp)
1
ATV61HC40YT (437–482 hp)
1
ATV61HC80YT (800 hp)
Drive
1
ATV61HC20YT (235 hp)
—
—
—
—
ATS48 Softstarter
1
ATS48C21Y (125–206 hp)
1
ATS48C25Y (250–263 hp)
1
ATS48C48Y (500–529 hp)
ATS48 Softstarter
1
ATS48C25Y (235 hp)
1
ATS48C32Y (284–335 hp)
1
ATS48C66Y (570–700 hp)
ATS48 Softstarter
—
—
1
ATS48C41Y (350–368 hp)
1
ATS48M10Y (800 hp)
ATS48 Softstarter
—
—
1
ATS48C48Y (400–482 hp)
—
—
Softstart Graphic Display
Terminal
1
VW3G48101
1
VW3G48101
1
VW3G48101
Power Fuses
3
25423-11500 (125–134 hp)
3
25423-14000 (250–335 hp)
6
25423-14000 (500–600 hp)
Power Fuses
3
25423-12000 (150–154 hp)
3
25423-15000 (350–407 hp)
6
25423-15000 (643–700 hp)
Power Fuses
3
25423-12500 (175–206 hp)
3
25423-16000 (437–482 hp)
6
25423-16000 (800 hp)
Power Fuses
3
25423-13000 (235 hp)
—
—
—
—
Additional Power Fuses for SS
Bypass
—
—
3
25423-35000 (350–368 hp)
3
25423-36000 (500–529 hp)
Additional Power Fuses for SS
Bypass
—
—
3
25423-36000 (400–482 hp)
—
—
Primary Control Fuses
2
25430-20700
2
25430-20700
2
25430-20700
Secondary Control Fuses
1
25430-23000
1
25430-23000
1
25430-23000
Pilot Light, Red
2
XB5AVG4
2
XB5AVG4
2
XB5AVG4
Pilot Light, Yellow
4
XB5AVG5
4
XB5AVG5
5
XB5AVG5
Pilot Light, Green
2
XB5AVG3
2
XB5AVG3
2
XB5AVG3
Pilot Light, White
1
XB5AVG1
1
XB5AVG1
1
XB5AVG1
AC Coil for LC1F185
1
LX1FG095
—
—
—
—
AC Coil for LC1F265
2
LX1FH1272
2
LX1FH1272
—
—
AC Coil for LC1F330
—
—
3
LX1FH1272
—
—
AC Coil for LC1F400
—
—
2
LX1FJ110
—
—
AC Coil for LC1F500
—
—
3
LX1FK110
3
LX1FK110
AC Coil for LC1F630
—
—
3
LX1FL110
3
LX1FL110
DC Coil for LC1F800
—
—
—
—
3
LX4F8FW
Rectifier for LC1F800 coil
—
—
—
—
3
DR5TE4U
Replacement Contacts for
LC1F185
1
LA5FG431
—
—
—
—
Replacement Contacts for
LC1F265
2
LA5FH431
2
LA5FH431
—
—
Replacement Contacts for
LC1F330
—
—
3
LA5F400803
—
—
Replacement Contacts for
LC1F400
—
—
2
LA5F400803
—
—
Replacement Contacts for
LC1F500
—
—
3
LA5F500803
3
LA5F500803
Replacement Contacts for
LC1F630
—
—
3
LA5F630803
3
LA5F630803
Replacement Contacts for
LC1F800
—
—
—
—
3
LA5F800803
Arc Chamber for LC1F185
1
LA5F18550
—
—
—
—
Arc Chamber for LC1F265
2
LA5F26550
2
LA5F26550
—
—
Arc Chamber for LC1F330
—
—
3
LA5F33050
—
—
Arc Chamber for LC1F400
—
—
2
LA5F40050
—
—
Arc Chamber for LC1F500
—
—
3
LA5F50050
3
LA5F50050
Arc Chamber for LC1F630
—
—
3
LA5F63050
3
LA5F63050
Arc Chamber for LC1F800
—
—
—
—
3
LA5F80050
62
© 2015 Schneider Electric, All Rights Reserved
NHA65138
08/2015
Table 29:
Altivar™ Plus for Compressor Applications
Appendix A—Renewable Parts
Renewable Parts, 575 V, Heavy Duty
Description
Qty
Frame Size A
Qty
Frame Size B
Qty Frame Size C
Drive
1
ATV71HC11YT (125–134hp)
1
ATV71HC20YT (206–235 hp)
1
Drive
1
ATV71HC13YT (150 -154 hp)
1
ATV71HC25YT (250 -335 hp)
1
ATV71HC50YT (482–600 hp)
Drive
1
ATV71HC16YT (175–200 hp)
1
ATV71HC31YT (350–407 hp)
1
ATV71HC63YT (643–700 hp)
ATS48 Softstarter
1
ATS48C21Y (125–175 hp)
1
ATS48C25Y (206–235 hp)
1
ATS48C48Y (437–450 hp)
ATS48 Softstarter
1
ATS48C25Y (200 hp)
1
ATS48C32Y (250–284 hp)
1
ATS48C66Y (482–643 hp)
ATS48 Softstarter
—
—
1
ATS48C41Y (300–350 hp)
1
ATS48M10Y (687–700 hp)
ATS48 Softstarter
—
—
ATV71HC40YT (437–450 hp)
—
1
ATS48C48Y (368–407 hp)
—
Softstart Graphic Display Terminal 1
VW3G48101
1
VW3G48101
1
VW3G48101
Power Fuses
25423-12000 (125–154 hp)
3
25423-13000 (206–235 hp)
6
25423-13000 (437–450 hp)
3
Power Fuses
3
25423-12500 (175–200 hp)
3
25423-14000 (250–335 hp)
6
25423-14000 (482–600 hp)
Power Fuses
—
—
3
25423-15000 (350–407 hp)
6
25423-15000 (643–700 hp)
Additional Power Fuses for SS
Bypass
—
—
3
25423-35000 (350 hp)
3
25423-36000 (437–450 hp)
Additional Power Fuses for SS
Bypass
—
—
3
25423-36000 (368–407 hp)
—
—
Pilot Light, White
1
XB5AVG1
1
XB5AVG1
1
XB5AVG1
AC Coil for LC1F185
1
LX1FG095
1
LX1FG095
—
—
AC Coil for LC1F265
2
LX1FH1272
2
LX1FH1272
—
—
AC Coil for LC1F330
—
—
3
LX1FH1272
—
—
AC Coil for LC1F400
—
—
2
LX1FJ110
—
—
AC Coil for LC1F500
—
—
3
LX1FK110
3
LX1FK110
AC Coil for LC1F630
—
—
—
—
3
LX1FL110
DC Coil for LC1F800
—
—
—
—
3
LX4F8FW
Rectifier for LC1F800 coil
—
—
—
—
3
DR5TE4U
Replacement Contacts for
LC1F185
1
LA5FG431
1
LA5FG431
—
—
Replacement Contacts for
LC1F265
2
LA5FH431
2
LA5FH431
—
—
Replacement Contacts for
LC1F330
—
—
3
LA5F400803
—
—
Replacement Contacts for
LC1F400
—
—
2
LA5F400803
—
—
Replacement Contacts for
LC1F500
—
—
3
LA5F500803
3
LA5F500803
Replacement Contacts for
LC1F630
—
—
3
LA5F630803
3
LA5F630803
Replacement Contacts for
LC1F800
—
—
—
—
3
LA5F800803
Arc Chamber for LC1F185
1
LA5F18550
1
LA5F18550
—
—
Arc Chamber for LC1F265
2
LA5F26550
2
LA5F26550
—
—
Arc Chamber for LC1F330
—
—
3
LA5F33050
—
—
Arc Chamber for LC1F400
—
—
2
LA5F40050
—
—
Arc Chamber for LC1F500
—
—
3
LA5F50050
3
LA5F50050
Arc Chamber for LC1F630
—
—
3
LA5F63050
3
LA5F63050
Arc Chamber for LC1F800
—
—
—
—
3
LA5F80050
© 2015 Schneider Electric, All Rights Reserved
63
Altivar™ Plus for Compressor Applications
Appendix A—Renewable Parts
64
NHA65138
08/2015
© 2015 Schneider Electric, All Rights Reserved
Altivar™ Plus for Compressor Applications
Instruction Bulletin
Electrical equipment should be installed, operated, serviced, and maintained only by qualified
personnel. No responsibility is assumed by Schneider Electric for any consequences arising out of
the use of this material.
Schneider Electric USA, Inc.
800 Federal Street
Andover, MA 01810 USA
1-888-778-2733
www.schneider-electric.us
© 2015 Schneider Electric All Rights Reserved
Altivar™, Modbus™, SoMove™, Square D™, and Schneider Electric™ are trademarks owned by
Schneider Electric Industries SAS or its affiliated companies. All other trademarks are the property
of their respective owners.
NHA65138 08/2015