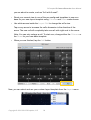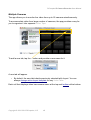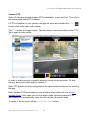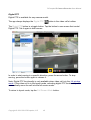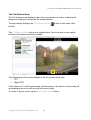
1
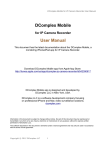
DComplex IP Camera Recorder User Manual
DComplex IP Camera Recorder
User Manual
This document has the latest documentation about
the DComplex IP Camera Recorder.
Download IP Camera Recorder from
https://dcomplex.com/store/
IP Camera Recorder is designed and developed by
DComplex, LLC in New York, USA.
DComplex, LLC is a software development company focusing
on professional iPhone and Mac video surveillance solutions.
dcomplex.com
Information in this document is subject to change without notice. No part of this document may be reproduced or
transmitted in any form or by any means, electronic or mechanical, for any purpose, without the express written
permission of DComplex, LLC.
The software described in this document is furnished under a license agreement and may only be used in accordance
with the terms of that agreement.
Copyright © 2012-2013 DComplex, LLC
1
DComplex IP Camera Recorder User Manual
Table of Contents
How to Prepare an IP Camera.............................................................................................................. 4
Validating Access to Your IP Camera.............................................................................................. 4
Protecting Your IP Camera.............................................................................................................. 4
Configuring IP Camera Recorder......................................................................................................... 5
The First Launch.............................................................................................................................. 6
Recorder........................................................................................................................................... 7
Connecting to a Remote Recorder.............................................................................................. 7
Connection Settings................................................................................................................ 7
Configuring a Recorder............................................................................................................... 9
Connection Settings.............................................................................................................. 11
Storage Locations................................................................................................................. 13
Video Recording and Sleep Mode in Mac OSX...................................................................14
Disconnecting from a Recorder................................................................................................ 15
Camera........................................................................................................................................... 16
Adding a Camera...................................................................................................................... 16
Using Auto-Detection........................................................................................................... 17
Using Its Address .................................................................................................................17
Configuration........................................................................................................................18
List of Cameras.................................................................................................................... 18
Editing a Camera....................................................................................................................... 20
Configuring a Camera............................................................................................................... 21
Connection Settings.............................................................................................................. 21
Video Quality....................................................................................................................... 22
Video Recording................................................................................................................... 22
Video Analytics.................................................................................................................... 22
Removing a Camera.................................................................................................................. 24
Events.............................................................................................................................................25
Managing the Events List......................................................................................................... 25
Schedules....................................................................................................................................... 26
List of Schedules....................................................................................................................... 26
Built-in Schedules..................................................................................................................... 27
Custom Schedules..................................................................................................................... 28
Users.............................................................................................................................................. 30
List of Users.............................................................................................................................. 30
Password Change...................................................................................................................... 30
License Keys.................................................................................................................................. 32
Trial Mode................................................................................................................................. 32
List of License Keys................................................................................................................. 32
Buying a License Key............................................................................................................... 33
Activation.................................................................................................................................. 34
Monitoring Live Video....................................................................................................................... 36
Live Video...................................................................................................................................... 36
Preferences..................................................................................................................................... 37
Layout Templates........................................................................................................................... 38
Multiple Cameras........................................................................................................................... 40
Toolbar........................................................................................................................................... 41
Copyright © 2012-2013 DComplex, LLC
2
DComplex IP Camera Recorder User Manual
Camera PTZ.............................................................................................................................. 42
Digital PTZ............................................................................................................................... 43
The Full Window Mode............................................................................................................ 44
Saving a Snapshot..................................................................................................................... 45
Scrubbing Live Video............................................................................................................... 46
Closing a Video Cell................................................................................................................. 47
Video Search....................................................................................................................................... 48
Launching Video Search Window................................................................................................. 48
Functionality Overview................................................................................................................. 49
Time Line.................................................................................................................................. 50
Events List.................................................................................................................................51
Playing Recorded Video............................................................................................................ 52
Other IP Camera Recorder Features................................................................................................... 53
E-mailing Technical Support......................................................................................................... 53
Copyright © 2012-2013 DComplex, LLC
3
DComplex IP Camera Recorder User Manual
How to Prepare an IP Camera
Validating Access to Your IP Camera
Once you have an IP Camera setup on your network and running, verify that you
can connect to it from your Mac.
For this, on your Mac,
•
Open the Safari app and
•
Enter the address of your IP Camera.
You should get the web page of the camera.
The camera's web page might need to install plug-ins for your browser to function
properly in Safari. However, you do not need to install those in order for IP Camera
Recorder to work. If you see the camera home page in Safari, this is sufficient for
the IP Camera Recorder to access the camera.
If you do not see the camera home page in Safari, please see the instructions that
came with the camera to make sure that the camera is configured properly and the
address of the camera is spelled correctly.
If the Safari app on your Mac cannot connect to your IP Camera, then the IP
Camera Recorder will not work with it as well. Ask your network administrator
to allow access to the IP Camera from your Mac.
Protecting Your IP Camera
In the default configuration, camera username and password will be sent to the
camera in clear text.
We recommend to activate the Secure Sockets Layer (SSL, aka TLS, aka HTTPS)
on the camera to protect the network traffic. Each camera has a different procedure
for it. Please see the camera manual.
Copyright © 2012-2013 DComplex, LLC
4
DComplex IP Camera Recorder User Manual
Configuring IP Camera Recorder
DComplex IP Camera Recorder app (“the app” for short) was designed to allow
easy configuration of DComplex IP Camera Recorders and easy access to theirs
video. You can monitor all your local and remote recorders from one app.
Copyright © 2012-2013 DComplex, LLC
5
DComplex IP Camera Recorder User Manual
The First Launch
When you launch the app the first time, it will automatically search for DComplex IP
Camera Recorders on your network.
The app will automatically detect and add your recorder into the Cameras list.
It will prompt you to add cameras next.
Before you start adding cameras,
•
Change your recorder's default password .
By default, your IP Camera Recorder comes with a default user name and
password (User Name: admin, Password: admin). It is recommended that
you change the password immediately. This way, no one can connect to it but
you. You can easily change the password or add a new user using the app.
Make sure you update it in the app's recorder's connection settings as well.
•
Verify the storage locations selection
IP Camera Recorder scans your Mac for all available storage locations. By
default, after a camera has been added, your recorder starts recording video
from it automatically. It is recommended to verify the storage locations
selection before adding any cameras to the recorder.
Copyright © 2012-2013 DComplex, LLC
6
DComplex IP Camera Recorder User Manual
Recorder
Connecting to a Remote Recorder
The app allows you to connect to, configure and monitor an unlimited number of IP
Camera Recorders.
You need to know Address of the remote DComplex IP Camera Recorder. Typically,
you would use a computer IP Address here. However, if your computer has another
address format, such as DNS (like: dcomplexhq.dyndns.org), or local address (like:
mac.local.) - it would work as well.
Note: If you are running the app locally (with DComplex IP Camera Recorder
currently installed and running on your Mac), then the app will automatically add
your recorder into the Cameras list for you. The Address field of your local recorder
will show localhost value.
Invoke the Connect to an IP Camera Recorder command from the Cameras menu
on the top of your computer screen.
Connection Settings
You will see the list of parameters to access the recorder.
Setup the recorder's connection parameters as needed, tap the Next button.
Copyright © 2012-2013 DComplex, LLC
7
DComplex IP Camera Recorder User Manual
Note: Only authorized users can connect to the recorder. Use the default User
Name: admin, and Password: admin to connect to the recorder the first time.
The app will attempt to connect to the IP Camera Recorder to synchronize any preconfigured configuration, including any existing cameras, storages, schedules and
users.
Then, the app will automatically open the recorder's configuration window. For a
new recorder the Cameras list will be empty. All other tabs will have default
configuration.
You can continue configuring your IP Camera Recorder using the app's
configuration window. When you are finished, tap the Close button.
The recorder is added to the app's Cameras list now.
Copyright © 2012-2013 DComplex, LLC
8
DComplex IP Camera Recorder User Manual
Configuring a Recorder
The app allows you to modify your recorder's settings such as adding/removing
cameras and users, selecting storage locations, and customizing schedules.
Access the recorder configuration by,
•
Selecting the recorder you want to modify, and
•
Tapping the Edit
button on the top-left corner of the app.
The recorder configuration window looks like the following:
It has the following tabs:
•
Connection: Contains connection parameters to the actual IP Camera
Recorder. They are required in order the app to successfully connect to your
recorder.
•
Cameras: Lists all cameras configured on the IP Camera Recorder. It allows
you to add, modify and remove cameras on the recorder.
•
Storages: Lists all possible storage locations. It allows you to select storage
locations on your IP Camera Recorder for video recording.
Copyright © 2012-2013 DComplex, LLC
9
DComplex IP Camera Recorder User Manual
•
Schedules: Lists all built-in and custom video recording schedules. It allows
you to add, modify and remove schedules on your IP Camera Recorder to
control video recording.
•
Users: Lists all authorized users with access rights. It allows you to add,
modify and remove users on your IP Camera Recorder.
•
License Keys: Lists all purchased camera license keys.
Copyright © 2012-2013 DComplex, LLC
10
DComplex IP Camera Recorder User Manual
Connection Settings
The app can successfully connect to any DComplex IP Camera Recorder only if its
connection settings are valid.
If you installed your recorder with default settings, you might only need to enter
Address of your remote recorder in order for the app to add the recorder and be
able to connect to it.
Changing of your IP Camera Recorder's port number or user/password, or
switching to a more secure protocol, will cause the app to loose the recorder's
connection. Video streams from any cameras from that recorder will stop. It is
important to update the app recorder's connection settings accordingly.
The Connection tab stores required IP Camera Recorder's connection parameters.
The app uses them to successfully connect to the recorder.
To update the recorder's connection settings,
•
Tap the Edit
button, and
•
Select the Connection tab.
The app's window will look like the following:
It has the following fields:
•
Name: Enter any name that helps you to identify the recorder, such as
“Office”, “Home”, “Mom's House”.
•
Address: Address of your IP Camera Recorder. It is OK to use IP Address or
a name, such as mac.local. or dcomplexhq.dyndns.org. Do NOT enter http://
nor port number into the address field.
Note: If you are running the app locally (with DComplex IP Camera Recorder
currently installed and running on your Mac), then the app will automatically
Copyright © 2012-2013 DComplex, LLC
11
DComplex IP Camera Recorder User Manual
add your recorder into the Cameras list for you. The Address field of your
local recorder will show localhost value.
•
Port: The IP Camera Recorder uses an Embedded Web Server. By default, it
is set to Port: 9001.
•
Protocol: By default, the IP Camera Recorder uses HTTP protocol. It is
possible to use more secure HTTPS protocol using the Apache Web Server
that came with your Mac. Contact us for details.
•
User Name and Password: By default, your IP Camera Recorder comes with
a default user name and password (User Name: admin, Password: admin). It
is recommended that you change the password immediately. This way no
one can connect to it but you. You can easily change the password or add a
new user using the app. Make sure you update it in the app recorder's
connection settings as well.
Copyright © 2012-2013 DComplex, LLC
12
DComplex IP Camera Recorder User Manual
Storage Locations
IP Camera Recorder scans your Mac for all available storage locations. By default,
after a camera has been added, your recorder starts recording video from it
automatically. It is recommended to verify the storage locations selection before
adding any cameras to the recorder.
Your IP Camera Recorder monitors your hard drives for free space. You can always
see the current video storage locations on your IP Camera Recorder and it's status.
•
Select the recorder,
•
Tap the Edit
•
Select the Storages tab.
button, and
The app will display all storage locations available on your Mac.
IP Camera Recorder records video to the selected locations.
IP Camera Recorder does not limit the number of days to store the recorded video.
The video will be stored for up to as many days as the specified storage locations
permit.
If your location is 90% full with system files or your other files, IP Camera Recorder
will not record video to it.
If there is not enough space in the selected locations, the oldest video recorded by
the IP Camera Recorder will be deleted automatically to free up space for newest
video.
Copyright © 2012-2013 DComplex, LLC
13
DComplex IP Camera Recorder User Manual
Video Recording and Sleep Mode in Mac OSX
When your computer goes to sleep, the IP Camera Recorder will STOP video
recording. That means that your scheduled recording will NOT work as well.
To learn more about what happens when your Mac goes to sleep read About
Energy Saver sleep and idle modes in Mac OS X article.
Here is how to disable sleep mode on your Mac.
•
Open the Finder app and select Applications item
•
From it launch System Preferences app
•
Select Energy Saver under Hardware section
•
You will see two sliders
•
If you set the Computer Sleep slider to Never - the computer will always stay
on.
•
You could keep Display Sleep to some small value, like 5 minutes to save
energy.
Copyright © 2012-2013 DComplex, LLC
14
DComplex IP Camera Recorder User Manual
Disconnecting from a Recorder
The app can easily be disconnected from any IP Camera Recorder.
Note: You cannot permanently uninstall a recorder using the app from your Mac.
Invoke the Remove command by
•
Selecting the recorder you want to disconnect from, and
•
Tapping the Remove
button on the top-left corner of the app.
The app will ask you to confirm.
The app will disconnect from the recorder and remove it from the Cameras list.
Any video cell displaying video from any camera from the disconnected recorder
will be closed.
Copyright © 2012-2013 DComplex, LLC
15
DComplex IP Camera Recorder User Manual
Camera
Adding a Camera
The Recorder can detect many camera models on your network. If your camera is
detected, you do not even need to know the address of your camera. Otherwise,
you must know the Address of the camera and the camera Model, before you can
add the camera to your IP Camera Recorder.
Note: Typically you would use camera IP Address here. However, if your camera
has less popular address format, such as DNS (like: mycam.dyndns.org), or local
address (like: axis-a3.local.) - it would work as well.
Select the recorder you want to add cameras to.
Invoke the Add Camera functionality by
•
Tapping the Add button
•
Selecting the Add Cameras command.
on the top-left corner of the app, and
The app will scan your network for any available devices.
Copyright © 2012-2013 DComplex, LLC
16
DComplex IP Camera Recorder User Manual
Using Auto-Detection
The app can automatically discover IP Cameras near you. To see all auto detected
devices, open the Name list-box:
To add the camera, select it from the Name list, and tap the button below it:
Using Its Address
You may choose to add your camera manually by tapping the button below:
Then, select the camera type, such Axis, Sony or ONVIF, tap the Next button.
Copyright © 2012-2013 DComplex, LLC
17
DComplex IP Camera Recorder User Manual
Configuration
The app will open the camera's configuration window. Setup the camera's
parameters as needed, tap the Next button.
The app will send the camera parameters to the selected DComplex IP Camera
Recorder. The camera will be added to your recorder.
The recorder will attempt to connect to the camera to see what functionality is
available. For example: whether the camera allows Pan Tilt and Zoom controls.
List of Cameras
The camera will be added to the Cameras tab's list.
It is set up with default configuration. You can adjust your camera's settings anytime
by using the camera's configuration window.
The camera will be added under your IP Camera Recorder into Cameras list.
Notice that now the recorder has ▶ symbol before it in the Cameras list control.
All your cameras from the recorder are listed under it. Tap ▶ symbol to see all the
cameras from that recorder.
Copyright © 2012-2013 DComplex, LLC
18
DComplex IP Camera Recorder User Manual
Notice that ▶ symbol changed to ▼ symbol. Tap ▼ symbol to hide all the cameras
from that recorder.
At this point, you also can add camera to your video layout to be able to see live
video from it.
Copyright © 2012-2013 DComplex, LLC
19
DComplex IP Camera Recorder User Manual
Editing a Camera
The app allows you to modify your camera's settings on your IP Camera Recorder.
Invoke the Edit Camera functionality by
•
Selecting the camera, and
•
Tapping the Edit
button.
The app will open the camera's configuration window. Setup the camera's
parameters as needed, tap the Save button.
The app will send camera's new settings to the recorder.
Copyright © 2012-2013 DComplex, LLC
20
DComplex IP Camera Recorder User Manual
Configuring a Camera
The app allows you to modify camera's settings on your IP Camera Recorder
anytime by using the following camera's configuration window.
It has the following fields:
Connection Settings
•
Name: Enter any name that helps you to identify the camera, such as “Front
Entrance”.
•
Address: Address of the camera. It is OK to use IP Address or a name, such
as axis-a3.local. or me.dyndns.org. Do NOT enter http:// nor port number into
the address field.
•
Port: Most cameras are configured to operate on port 80. If you changed it
through the camera's Web page, update the port number here.
•
Protocol: Most cameras operate using HTTP protocol, which is not secure. If
you configured the camera to operate on HTTPS protocol through the
camera's Web page, select it from the list here.
•
User Name and Password: If the camera allows access only to specific
users, enter the credentials of the user.
Copyright © 2012-2013 DComplex, LLC
21
DComplex IP Camera Recorder User Manual
Video Quality
•
Quality: quality parameter of the video stream.
•
Frames Per Second: Select frame rate for live video. The IP Camera
Recorder will pull video and show live video from the camera at this rate.
Video Recording
•
Continuous Recording Schedule: The app allows you to configure your IP
Camera Recorder to record video from a camera automatically using a
schedule.
By default, after a camera has been added, your IP Camera Recorder
automatically starts recording video from it using one of the built-in schedules
(Always).
You can always switch to any other built-in schedules or create you own
ones.
Note: When your computer goes to sleep, video recording will NOT work. You
must disable Mac sleep mode to be able to continue record video.
An IP Camera Recorder can record video from up to 20 cameras at the same
time. You will need a valid license key for each camera.
•
Keep Recorded Video (Days): Allows you to specify how long you want to
keep the recorded video from the camera.
•
Record Continuously: Select frame rate for continuous recording.
The number of images per second to record when no Motion events happen.
•
Record During Events: Select frame rate for recording during events.
If Motion Detection is activated then this is the rate your recorder will record
video with during event times.
If Motion Detection is not activated then this rate will be ignored.
Video Analytics
•
Detect Motion: IP Camera Recorder can continuously analyze video stream
from configured cameras to detect motion.
By default, after a camera has been added, your recorder automatically starts
Copyright © 2012-2013 DComplex, LLC
22
DComplex IP Camera Recorder User Manual
analyzing the video stream.
Once motion is detected, the app will display the event in its Events list.
IP Camera Recorder records the video that triggered the event at a special
rate (see Record During Events).
You can always search recorded video for events from a camera by using the
app's Video Search functionality.
•
Motion Detection Threshold: Configure the Threshold value for the Motion
Detection event to have the event triggered only when the amount of motion
exceeds the value.
Take some time to play with video analytic events to understand how they
can be used in your environment. When used correctly, the events can save
you a lot of time during video search.
Copyright © 2012-2013 DComplex, LLC
23
DComplex IP Camera Recorder User Manual
Removing a Camera
You can permanently remove a camera from your DComplex IP Camera Recorder.
•
Select the camera you want to remove,
•
Tap the Remove
•
Confirm
button, and
The camera will be permanently removed from the recorder and the app's
Cameras list. All video cells from the camera will be closed.
Copyright © 2012-2013 DComplex, LLC
24
DComplex IP Camera Recorder User Manual
Events
Managing the Events List
The app allows you to monitor Motion Detection events from your IP Camera
Recorder for any configured camera. By default, after a camera is added, your
recorder automatically starts analyzing video stream for motion. Once motion is
detected, the app will display the event in its Events list.
To see the Events list, activate the Show Events item from the Window menu.
Once motion is detected, the app will display the event in the Events list in red.
In addition, the app will display red
borders around the camera's video cell.
After the event is restored, the app will display the event name in black and show
the total duration of the event.
Note: The number of items in the Events list is limited. However, you can still find all
events from the camera in the Video Search window.
To help you see which portion of the image caused the event, the event's thumbnail
image will have a red rectangle highlighting the region of the event.
You can always search recorded video for events from a camera by using Video
Search functionality.
Copyright © 2012-2013 DComplex, LLC
25
DComplex IP Camera Recorder User Manual
Schedules
IP Camera Recorder allows you to record video from a camera automatically using
a schedule.
List of Schedules
By default, after a camera is added, your IP Camera Recorder automatically starts
recording video from it using one of the built-in schedules (Always).
You can switch video recording mode to any other built-in schedules using the
Continuous Recording Schedule setting on your camera or create you own
schedules.
To see all available schedules on a recorder or create your own,
•
Select the recorder,
•
Tap the Edit
•
Select the Schedules tab.
button, and
The app will display all schedules available on your IP Camera Recorder as a
list.
Notice that all your cameras are listed next to the schedule they use.
Copyright © 2012-2013 DComplex, LLC
26
DComplex IP Camera Recorder User Manual
Built-in Schedules
There are 5 built-in schedules available to you: “Always”, “Never”, “MondayFriday, 8am-6pm”, “Monday-Friday” and “Saturday and Sunday”.
Notice, all built-in schedules are listed using bold font for easy spotting.
You cannot Edit or Remove any built-in schedules.
You can only View them. For that, select a built-in schedule from the list and tap the
View button.
The Schedule configuration window will look something like the following:
Copyright © 2012-2013 DComplex, LLC
27
DComplex IP Camera Recorder User Manual
Custom Schedules
You can easily create you own schedules. For that, tap the Add button.
Use your mouse to select time (in green) for continuous recording for each day of
the week.
You can reset the schedule to one of the built-in templates (Always, Never,
Business Hours, Weekdays or Weekend) by using the Reset to combo-box to make
a base for your customized schedule.
Enter a new name for your schedule to help you identify it easily.
After you are finished, tap the Add button. You can see your new customized
schedule in the list now.
You can easily Edit or Remove your schedules.
Copyright © 2012-2013 DComplex, LLC
28
DComplex IP Camera Recorder User Manual
Now you can switch any camera from your IP Camera Recorder to the new
customized schedule.
•
Select the Cameras tab.
•
Select a camera from the list,
•
Tap the Edit button, and
•
Update Continuos Recording Schedule field with your new customized
schedule value.
Note: When your computer goes to sleep, video recording will NOT work. You must
disable Mac sleep mode to be able to continue record video.
Copyright © 2012-2013 DComplex, LLC
29
DComplex IP Camera Recorder User Manual
Users
IP Camera Recorder allows you to add new users, and change their passwords for
extra protection.
By default, your IP Camera Recorder comes with one pre-configured user ( User
Name: admin, Password: admin).
Note: All Users have Administrative Rights to the recorder with unlimited access.
List of Users
To see all available users,
•
Select the recorder,
•
Tap the Edit
•
Select the Users tab,
button,
The app will display all users available as a list.
Password Change
By default, your IP Camera Recorder comes with a default user name and
password (User Name: admin, Password: admin). It is recommended that you
change the default password immediately. This way, no one can connect to the
recorder but you.
To change password for any existing user,
•
Select the user's name from the list of all available users,
Copyright © 2012-2013 DComplex, LLC
30
DComplex IP Camera Recorder User Manual
•
Tap the Edit button,
•
Change the password.
The app will connect to the selected recorder and update its users
information. Now, your IP Camera Recorder can only be accessed with the
new password.
Note: At this time, if the app uses the user information you have modified to
connect to the recorder, it will loose the recorder's connection due to the
invalid password. Video steams from any cameras from the updated recorder
will stop.
To update the app's connection settings to the recorder,
•
Select the Connection tab,
•
Update the Password field accordingly, and
•
Confirm.
The app will try to re-connect to the recorder using new password now.
Copyright © 2012-2013 DComplex, LLC
31
DComplex IP Camera Recorder User Manual
License Keys
DComplex IP Camera Recorder software is available for download free of charge.
However, IP Camera Recorder requires a valid Video Channel License Key for
every IP Camera before it can stream and/or record video from it.
Trial Mode
The Trial mode allows you to control two IP Cameras for FREE for 30 days. Notice
the reminder about trial on your recorder's Cameras tab.
List of License Keys
The app allows you to buy, activate and manage license keys for all your IP
Cameras.
You can see all purchased license keys for any selected recorder.
•
Select the recorder,
•
Tap the Edit
•
Select the License Keys tab from the Edit window.
button, and
Copyright © 2012-2013 DComplex, LLC
32
DComplex IP Camera Recorder User Manual
Buying a License Key
To purchase a new video channel license key, tap the Buy License Keys button.
You will be automatically forwarded to the DComplex Store's Login page.
•
Login.
•
Select the Buy License Key tab.
•
Tap the Buy Now button and follow the on screen instructions.
You can always see your purchase history and find all your license keys under the
My Account tab.
Your must activate the license key inside the app.
Copyright © 2012-2013 DComplex, LLC
33
DComplex IP Camera Recorder User Manual
Activation
To activate a video channel,
•
Tap the Add button,
•
Enter your license key:
•
Tap the Add button and confirm.
You can see your new in the License Keys list now.
•
Select your new license key from the list,
•
Tap the Activate button.
Copyright © 2012-2013 DComplex, LLC
34
DComplex IP Camera Recorder User Manual
The app will attempt to connect to the DComplex IP Camera Recorder to set
new license key. It may take a few minutes especially if you are activating
camera on a remote recorder.
•
Tap the Close button to close the Information Message box.
You can see your new license key as being Activated in the License Keys list
now.
You can add more IP Cameras to your recorder now.
Copyright © 2012-2013 DComplex, LLC
35
DComplex IP Camera Recorder User Manual
Monitoring Live Video
Monitoring live video will take the lion's share of the app use. Please review these
tips to get familiar will all relevant features. You might find something that will make
your experience with the product much better.
Live Video
To watch live video from a camera
•
Tap on the ▶ button in the middle of the camera video icon
Note: If there is no empty cells in your current layout, the camera will replace
one of the displayed cameras.
Note: Each empty cell displays its order number.
•
or
Drag the camera from the Cameras list into the desired cell.
You should see the video from the camera now.
Copyright © 2012-2013 DComplex, LLC
36
DComplex IP Camera Recorder User Manual
Preferences
Video from each camera fills all of the cell's space. If the video from a camera is too
wide or too high for the cell, it is automatically cropped to maximally fit in to the cell.
To change cropping,
•
Access the Preferences menu item from the DComplex IP Camera Recorder
menu on the top of the computer screen
•
Change your preferences
•
Tap the Close button.
All video windows will switch to the new mode of cropping.
In addition, the screen controls preferences for displaying camera names and
current time on the video.
Copyright © 2012-2013 DComplex, LLC
37
DComplex IP Camera Recorder User Manual
Layout Templates
The app comes with multiple layout templates. It can display video in 1x2 grid, 2x2
grid, 3x3 grid, 4x4 grid. It also allows you to create your own custom layout
template.
To change active layout template, use the Layout menu.
To create a custom layout template,
•
Tap the Layout menu and
•
Select Add ... menu item
•
A new Add Layout configuration window will open
•
Enter a name in the Name field that helps you to identify the layout template
Copyright © 2012-2013 DComplex, LLC
38
DComplex IP Camera Recorder User Manual
you are about to create, such as “2x2 with 9 small”.
•
Reset your current view to one of the pre-configured templates to use as a
base for your new layout template using Columns and Rows combo-boxes.
•
Use white arrows inside the Layout Grid to change the cell's size.
Tap on any arrow to increase the cell's dimension in the direction of the
arrow. The new cell will completely take over all cells right next to the arrow.
Note: You can only enlarge a cell. To start over, change either the Columns or
the Rows for your new base template.
•
When you are finished, tap the Add button.
Now, you can select and use your custom layout template from the Layout menu.
Copyright © 2012-2013 DComplex, LLC
39
DComplex IP Camera Recorder User Manual
Multiple Cameras
The app allows you to monitor live video from up to 25 cameras simultaneously.
To accommodate video from large number of cameras, the app provides a way for
you to organize it into separate Video Taps.
To add a new tab, tap the + button and provide a new name for it.
A new tab will appear.
•
By default, the new tab inherits previously selected tab's layout. You can
always change active layout template for any Video Tabs.
Each cell that displays video has camera name at the top and toolbar at the bottom.
Copyright © 2012-2013 DComplex, LLC
40
DComplex IP Camera Recorder User Manual
Toolbar
Each video cell has toolbar for managing video.
To display video toolbar, simply move the mouse into the video cell.
The toolbar automatically appear/disappears every time you move the mouse
on/away from the video cell.
The toolbar has following buttons in order of their appearance:
•
Camera PTZ: for controlling Pan, Tilt or Zoom on camera models that support
PTZ functionality.
•
Digital PTZ: for controlling digital PTZ.
•
Full Window Mode: for displaying video from one camera with max
dimensions.
•
Save Image: for capturing snapshots from a camera.
•
Time Line: for quick review of recent video activities from a camera.
•
Close: for removing a camera from a video cell.
Copyright © 2012-2013 DComplex, LLC
41
DComplex IP Camera Recorder User Manual
Camera PTZ
Some IP Cameras models support PTZ functionality: a user can Pan, Tilt or Zoom
the camera and control PTZ presets.
If PTZ is available for your camera, the app will show an activated the PTZ
button in the main video cell's toolbar.
The PTZ button is a toggle button. Tap the button to see arrows that control PTZ.
Tab it again to hide arrows.
In order to start moving in a specific direction, press the arrow button. To stop
moving, press the button again to release it.
Note: PTZ presets must be configured on the camera before they can be used by
the app.
Note: Camera PTZ functionality is only available when video cell is in the full
window mode. If the video cell is in the layout mode, activating camera PTZ
functionality will automatically move the cell into the full screen mode.
To return to layout mode, tab the Full Screen Mode button.
Copyright © 2012-2013 DComplex, LLC
42
DComplex IP Camera Recorder User Manual
Digital PTZ
Digital PTZ is available for any camera model.
The app always displays the Digital PTZ
button in the video cell's toolbar.
The Digital PTZ button is a toggle button. Tap the button to see arrows that control
Digital PTZ. Tab it again to hide arrows.
In order to start moving in a specific direction, press the arrow button. To stop
moving, press the button again to release it.
Note: Digital PTZ functionality is only available when video cell is in the full window
mode. If the video cell is in the layout mode, activating digital PTZ functionality will
automatically move the cell into the full screen mode.
To return to layout mode, tap the Full Screen Mode button.
Copyright © 2012-2013 DComplex, LLC
43
DComplex IP Camera Recorder User Manual
The Full Window Mode
The full window mode displays video from one camera at a time, centering the
image and making it as large as the window allows.
The app always displays the Full Window Mode
toolbar.
button in the video cell's
The Full Window Mode button is a toggle button. Tap the button to see switch
between full window and layout modes.
The following functions are available in the full screen mode only.
• PTZ
• Digital PTZ
If the video cell is in the layout mode, activating any of the above functionality will
automatically move the cell into the full screen mode.
To return to layout mode, tap the Full Screen Mode button.
Copyright © 2012-2013 DComplex, LLC
44
DComplex IP Camera Recorder User Manual
Saving a Snapshot
The app allows to save an image from any camera.
The app always displays the Save Image
button in the video cell's toolbar.
Tap it to capture the snapshot from the camera. The captured image will be opened
in the Preview app, where you could edit the image, or email it and etc.
The app automatically manages all exported images. Notice that now the camera
has ▶ symbol before it in the Cameras list control.
Tap it to see the Snapshots from the camera.
All your images will be stored in the Snapshots section under the corresponding
camera.
You can open image any time by tapping on the ▶ button in the middle of the
snapshot icon. The image will be opened by the Preview app.
You can remove any snapshot by selecting it and tapping the Remove
on the top-left corner of the app.
Copyright © 2012-2013 DComplex, LLC
45
button
DComplex IP Camera Recorder User Manual
Scrubbing Live Video
The app automatically buffers video for up to 10 minutes for all displayed cameras.
Scrubbing live video functionality allows you to access and instantly replay that
video from any camera.
The app always displays the Time Line
button in the video cell's toolbar.
The Time Line button is a toggle button. Tap the button to see recently displayed
video.
Scrub the images with the mouse to find the desired time.
Note: Every time you are in the Time Line mode, the camera's video cell is NOT
displaying live video.
When you are ready to switch to live video, tap the Time Line button again.
Copyright © 2012-2013 DComplex, LLC
46
DComplex IP Camera Recorder User Manual
Closing a Video Cell
You can easily stop displaying a camera from any video cell.
The app always displays the Close
button in the video cell's toolbar.
Note: Tapping the Close button will only STOP displaying video from the camera. It
will NOT remove the camera from the app or IP Camera Recorder.
Copyright © 2012-2013 DComplex, LLC
47
DComplex IP Camera Recorder User Manual
Video Search
The IP Camera Recorder app provides Video Search functionality to search
recorded video from any configured camera.
Launching Video Search Window
You can launch Video Search window to see recorded video for any camera that
has video recording and/or video analytics activated.
Once you have configured video recording on a camera, you can search recorded
video for events from the camera. For this,
•
Select the camera from the Cameras list, and
•
Tap the Search
button in the top-left corner of the app screen.
The app will open the Video Search window.
If, in addition to video recording, you have configured video analytics you can also
launch and view video from any event in the Events list. For this, select the event
from the Events list and
•
Tap on the ▶ button in the middle of the event video icon,
The app will open the Video Search window.
Copyright © 2012-2013 DComplex, LLC
48
DComplex IP Camera Recorder User Manual
Functionality Overview
Video Search window contains the following elements
•
Toolbar: for navigating the Time Line and video
•
Time Line: for graphical display of recorded video and events
•
Video Cell: for playing recorded video
•
Events List: for showing any events detected from the camera
Copyright © 2012-2013 DComplex, LLC
49
DComplex IP Camera Recorder User Manual
Time Line
Video Search window allows you to pick time from the Time Line control by tapping
anywhere on it.
The Time Line can show video allocation time line in two different time intervals
•
One Hour interval
The toolbar will display
time per line.
•
button. The Time Line control will show 1 hour
One Day interval
The toolbar will display
time per line.
button. The Time Line control will show 1 day
Use the buttons above to switch between different time interval modes.
Video is graphically marked on the Time Line using green for continuous recorded
video and red for events.
You can scroll the Time Line all the way down to the first available video.
Once you have selected the time from the time line, video cell will start video
playback from that time automatically.
You can navigate between to the closest events next to the selected time by using
button below.
Copyright © 2012-2013 DComplex, LLC
50
DComplex IP Camera Recorder User Manual
Events List
Video Search window allows you to search through all events from the camera,
and/or export any event or any video clip.
Event list has all events generated from the camera for the time selected in the
Time Line control. You can see the selection as blue rectangle.
Tapping on any other lines will switch the selection. Every time you do it, the Event
list will be refilled with updated events from the selected time frame.
Simply selecting an event from the Events list will automatically
•
Mark the event position on the time line
•
Start video playback from the event in the video cell control. The video
playback will play for the duration of the event and then stop automatically.
and
Video Search window allows instant export of any selected event.
The window always displays
button in its toolbar.
Tap it to open the configuration window below.
The event will be opened by the QuickTime Player app. It allows you to play back
the movie, email it and etc.
Copyright © 2012-2013 DComplex, LLC
51
DComplex IP Camera Recorder User Manual
Playing Recorded Video
Video Search window allows you to search through all video from the camera.
Once you have selected the time from the Time Line control, it start video playback
from that time automatically.
You have the following controls in the toolbar to help you search recorded video.
Video Search window allows to save an image of recorded video from the camera.
The window always displays the Snapshot
button in its toolbar.
Tap it to capture the snapshot of the recorded video. The captured image will be
opened by the Preview app.
Copyright © 2012-2013 DComplex, LLC
52
DComplex IP Camera Recorder User Manual
Other IP Camera Recorder Features
E-mailing Technical Support
If you need help with the IP Camera Recorder app, you can use the menu to send
an email directly to Technical Support.
This is especially useful when the app generates error messages. The most recent
error messages will automatically be included in the email for more efficient
troubleshooting.
If you have any questions or comments about the IP Camera Recorder, please
send email to [email protected]
Copyright © 2012-2013 DComplex, LLC
53