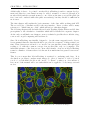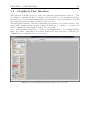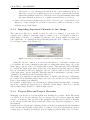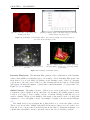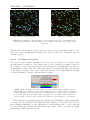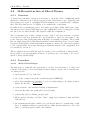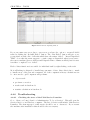
1
MotionTracking Manual
MotionTracking by
Yannis Kalaidzidis, Alexander Kalaidzidis,
Giovanni Marsico, Mikhail Chernykh,
Hernan Morales-Navarrete, Piotr Klukowski
1997-2014
Manual by
Yury Bodrov ([email protected])
2010-2013
Zerial Lab, MPI-CBG
Last Update: November 7, 2014
Contents
1 Introduction
1.1 Introduction . . . . . . . . . . . . . . . . . . . . . .
1.2 Installation and Set-Up . . . . . . . . . . . . . . . .
1.2.1 Download and Installation . . . . . . . . . .
1.2.2 Program Setup and Database Connection . .
1.2.3 Updates . . . . . . . . . . . . . . . . . . . .
1.3 Graphical User Interface . . . . . . . . . . . . . . .
1.3.1 The Load and Save Buttons . . . . . . . . .
1.3.2 Search Parameters . . . . . . . . . . . . . .
1.3.3 Scale and Zoom . . . . . . . . . . . . . . . .
1.3.4 Frame Information . . . . . . . . . . . . . .
1.3.5 Navigation . . . . . . . . . . . . . . . . . . .
1.3.6 View Setup . . . . . . . . . . . . . . . . . .
1.3.7 Illumination and Chromatic Shift Correction
1.3.8 Statistic and Filters . . . . . . . . . . . . . .
1.3.9 Measurements . . . . . . . . . . . . . . . . .
1.3.10 Additional Tools . . . . . . . . . . . . . . .
1.3.11 Channel Activation . . . . . . . . . . . . . .
1.3.12 Image Window . . . . . . . . . . . . . . . .
1.3.13 View Options . . . . . . . . . . . . . . . . .
1.3.14 Status Bar . . . . . . . . . . . . . . . . . . .
1.3.15 Full Frame Name . . . . . . . . . . . . . . .
1.3.16 Brightness Control . . . . . . . . . . . . . .
.
.
.
.
.
.
.
.
.
.
.
.
.
.
.
.
.
.
.
.
.
.
.
.
.
.
.
.
.
.
.
.
.
.
.
.
.
.
.
.
.
.
.
.
.
.
.
.
.
.
.
.
.
.
.
.
.
.
.
.
.
.
.
.
.
.
.
.
.
.
.
.
.
.
.
.
.
.
.
.
.
.
.
.
.
.
.
.
.
.
.
.
.
.
.
.
.
.
.
.
.
.
.
.
.
.
.
.
.
.
.
.
.
.
.
.
.
.
.
.
.
.
.
.
.
.
.
.
.
.
.
.
.
.
.
.
.
.
.
.
.
.
.
.
.
.
.
.
.
.
.
.
.
.
.
.
.
.
.
.
.
.
.
.
.
.
.
.
.
.
.
.
.
.
.
.
.
.
.
.
.
.
.
.
.
.
.
.
.
.
.
.
.
.
.
.
.
.
.
.
.
.
.
.
.
.
.
.
.
.
.
.
.
.
.
.
.
.
.
.
.
.
.
.
.
.
.
.
.
.
.
.
.
.
.
.
.
.
.
.
.
.
.
.
.
.
.
.
.
.
.
.
.
.
.
.
.
.
.
.
.
.
.
.
.
.
.
.
.
.
.
.
.
.
.
.
.
.
.
.
.
.
.
.
.
.
4
4
6
6
7
8
10
11
11
12
13
13
14
15
15
17
17
18
18
18
19
19
20
2 Processing
2.1 Import of Data and Project Management . . . . . .
2.1.1 Basic Import . . . . . . . . . . . . . . . . .
2.1.2 Importing Separated Channels to One Image
2.1.3 Project Files and Project Structure . . . . .
2.1.4 List of Commonly Used Import Functions .
2.1.5 Setting Channel Names . . . . . . . . . . . .
2.2 Image Processing and Correction . . . . . . . . . .
2.2.1 Manual Measurements . . . . . . . . . . . .
2.2.2 Correcting Systematic Errors . . . . . . . .
2.2.3 Frame Operations . . . . . . . . . . . . . . .
2.3 Object Search . . . . . . . . . . . . . . . . . . . . .
2.3.1 Properties of Objects . . . . . . . . . . . . .
2.3.2 Basic Procedure . . . . . . . . . . . . . . . .
.
.
.
.
.
.
.
.
.
.
.
.
.
.
.
.
.
.
.
.
.
.
.
.
.
.
.
.
.
.
.
.
.
.
.
.
.
.
.
.
.
.
.
.
.
.
.
.
.
.
.
.
.
.
.
.
.
.
.
.
.
.
.
.
.
.
.
.
.
.
.
.
.
.
.
.
.
.
.
.
.
.
.
.
.
.
.
.
.
.
.
.
.
.
.
.
.
.
.
.
.
.
.
.
.
.
.
.
.
.
.
.
.
.
.
.
.
.
.
.
.
.
.
.
.
.
.
.
.
.
.
.
.
.
.
.
.
.
.
.
.
.
.
.
.
.
.
.
.
.
.
.
.
.
.
.
.
.
.
.
.
.
.
.
.
.
.
.
.
21
21
21
22
22
23
25
26
26
29
32
33
33
34
1
CONTENTS
.
.
.
.
.
.
.
.
.
.
.
.
.
.
.
.
.
.
.
.
.
.
.
.
.
.
.
.
.
.
.
.
.
.
.
.
.
.
.
.
.
.
.
.
.
.
.
.
.
.
.
.
.
.
.
.
.
.
.
.
.
.
.
.
.
.
.
.
.
.
.
.
.
.
.
.
.
.
.
.
.
.
.
.
.
.
.
.
.
.
.
.
.
.
.
.
.
.
.
.
.
.
.
.
.
.
.
.
.
.
.
.
.
.
.
.
.
.
.
.
.
.
.
.
.
.
.
.
.
.
.
.
.
.
.
.
.
.
.
.
.
.
.
.
.
.
.
.
.
.
.
.
.
.
.
.
.
.
.
.
.
.
.
.
.
.
.
.
.
.
.
.
.
.
.
.
.
.
.
.
.
.
.
.
.
.
.
.
.
.
.
.
.
.
.
.
.
.
.
.
.
.
.
.
.
.
.
.
.
.
.
.
.
.
.
.
.
.
.
.
.
.
.
.
.
.
.
.
.
.
.
.
.
.
.
.
.
.
.
.
.
.
.
.
.
.
.
.
.
.
.
.
.
.
.
.
.
.
.
.
.
.
.
.
.
.
.
.
.
.
.
.
.
.
.
.
.
.
.
.
.
.
.
.
.
.
.
.
.
.
.
.
.
.
.
.
.
.
.
.
.
.
.
.
.
.
.
.
.
.
.
.
.
.
.
.
.
.
.
.
.
.
.
.
.
.
.
.
.
.
.
.
.
.
.
.
.
.
.
.
34
39
39
40
40
40
43
43
44
45
45
46
46
47
48
48
50
3 Data Analysis and Statistics
3.1 Calculate Statistics with MotionTraching
3.2 Statistic Calculation Tools . . . . . . . .
3.2.1 Statistic Menu . . . . . . . . . . .
3.2.2 Batch Statistic Window . . . . .
3.2.3 Graph Window . . . . . . . . . .
3.3 Data Analysis . . . . . . . . . . . . . . .
3.4 Statistic Characteristics and Parameters
3.4.1 Common Statistical Parameters .
3.4.2 Object Characteristics . . . . . .
3.4.3 Track Characteristics . . . . . . .
3.4.4 Quality Control Parameters . . .
3.4.5 Shape Analysis . . . . . . . . . .
3.4.6 Other Statistical Parameters . . .
3.4.7 Example Statistic List . . . . . .
.
.
.
.
.
.
.
.
.
.
.
.
.
.
.
.
.
.
.
.
.
.
.
.
.
.
.
.
.
.
.
.
.
.
.
.
.
.
.
.
.
.
.
.
.
.
.
.
.
.
.
.
.
.
.
.
.
.
.
.
.
.
.
.
.
.
.
.
.
.
.
.
.
.
.
.
.
.
.
.
.
.
.
.
.
.
.
.
.
.
.
.
.
.
.
.
.
.
.
.
.
.
.
.
.
.
.
.
.
.
.
.
.
.
.
.
.
.
.
.
.
.
.
.
.
.
.
.
.
.
.
.
.
.
.
.
.
.
.
.
.
.
.
.
.
.
.
.
.
.
.
.
.
.
.
.
.
.
.
.
.
.
.
.
.
.
.
.
.
.
.
.
.
.
.
.
.
.
.
.
.
.
.
.
.
.
.
.
.
.
.
.
.
.
.
.
.
.
.
.
.
.
.
.
.
.
.
.
.
.
.
.
.
.
.
.
.
.
.
.
.
.
.
.
.
.
.
.
.
.
.
.
.
.
.
.
.
.
.
.
.
.
.
.
.
.
.
.
.
.
.
.
.
.
.
.
.
.
.
.
.
.
.
.
.
.
52
52
53
53
56
62
66
66
66
66
66
66
67
67
67
4 Tools
4.1 3d Analysis . . . . . . . . . . . . . . . . . . . . . .
4.1.1 Introduction to 3d analysis . . . . . . . . . .
4.1.2 First Steps . . . . . . . . . . . . . . . . . . .
4.1.3 Functions and Scripts . . . . . . . . . . . . .
4.1.4 Common procedures and order of operations
4.1.5 List of Functions . . . . . . . . . . . . . . .
4.1.6 Stack Statistics . . . . . . . . . . . . . . . .
4.2 3d Reconstruction of Sliced Tissues . . . . . . . . .
4.2.1 Overview . . . . . . . . . . . . . . . . . . .
4.2.2 Procedure . . . . . . . . . . . . . . . . . . .
4.3 ROI - Regions Of Interest . . . . . . . . . . . . . .
4.3.1 Basic ROIs . . . . . . . . . . . . . . . . . .
4.3.2 3D ROI . . . . . . . . . . . . . . . . . . . .
4.4 Grid Computing with MotionTracking . . . . . . .
.
.
.
.
.
.
.
.
.
.
.
.
.
.
.
.
.
.
.
.
.
.
.
.
.
.
.
.
.
.
.
.
.
.
.
.
.
.
.
.
.
.
.
.
.
.
.
.
.
.
.
.
.
.
.
.
.
.
.
.
.
.
.
.
.
.
.
.
.
.
.
.
.
.
.
.
.
.
.
.
.
.
.
.
.
.
.
.
.
.
.
.
.
.
.
.
.
.
.
.
.
.
.
.
.
.
.
.
.
.
.
.
.
.
.
.
.
.
.
.
.
.
.
.
.
.
.
.
.
.
.
.
.
.
.
.
.
.
.
.
.
.
.
.
.
.
.
.
.
.
.
.
.
.
.
.
.
.
.
.
.
.
.
.
.
.
.
.
.
.
.
.
.
.
.
.
.
.
.
.
.
.
68
68
68
69
69
71
73
76
78
78
78
83
83
84
85
2.4
2.5
2.3.3 Object Search Parameters
2.3.4 Searching For Objects . .
2.3.5 Other Options . . . . . . .
2.3.6 Nuclei, Cells, Worms . . .
2.3.7 Multicolor Objects . . . .
2.3.8 Some Examples . . . . . .
Track Search . . . . . . . . . . .
2.4.1 Options of Track Search .
2.4.2 Relative Weights . . . . .
2.4.3 Track Break Thresholds .
2.4.4 Other Parameters . . . . .
2.4.5 Track Search Procedure .
2.4.6 Other Options . . . . . . .
2.4.7 Track Properties . . . . .
Statistic Filters and Masks . . . .
2.5.1 Statistic Filters . . . . . .
2.5.2 Masking . . . . . . . . . .
2
.
.
.
.
.
.
.
.
.
.
.
.
.
.
.
.
.
.
.
.
.
.
.
.
.
.
.
.
.
.
.
.
.
.
.
.
.
.
.
.
.
.
.
.
.
.
.
.
.
.
.
CONTENTS
4.5
3
4.4.1 Introduction to Grid Computing . . . . . . . . . . .
4.4.2 Configuring a Remote Machine for Grid Computing
4.4.3 Configuring MotionTracking for Grid Computing .
4.4.4 Connection to a PC-Farm over SSH and psftp . . .
4.4.5 Using the Application Server . . . . . . . . . . . . .
4.4.6 Troubleshooting . . . . . . . . . . . . . . . . . . . .
Export . . . . . . . . . . . . . . . . . . . . . . . . . . . . .
.
.
.
.
.
.
.
.
.
.
.
.
.
.
.
.
.
.
.
.
.
.
.
.
.
.
.
.
.
.
.
.
.
.
.
.
.
.
.
.
.
.
.
.
.
.
.
.
.
.
.
.
.
.
.
.
.
.
.
.
.
.
.
85
86
87
89
90
91
93
A Common Problems and Troubleshooting
94
A.1 Troubleshooting . . . . . . . . . . . . . . . . . . . . . . . . . . . . . . . . . 94
B A Quick Help to the Standard Procedure
B.1 Introduction . . . . . . . . . . . . . . . . .
B.2 Import . . . . . . . . . . . . . . . . . . . .
B.3 Correction . . . . . . . . . . . . . . . . . .
B.4 Object Search . . . . . . . . . . . . . . . .
B.5 Tracking . . . . . . . . . . . . . . . . . . .
B.6 Masking and Statistical Filters . . . . . . .
B.7 Statistic . . . . . . . . . . . . . . . . . . .
.
.
.
.
.
.
.
.
.
.
.
.
.
.
.
.
.
.
.
.
.
.
.
.
.
.
.
.
.
.
.
.
.
.
.
.
.
.
.
.
.
.
.
.
.
.
.
.
.
.
.
.
.
.
.
.
.
.
.
.
.
.
.
.
.
.
.
.
.
.
.
.
.
.
.
.
.
.
.
.
.
.
.
.
.
.
.
.
.
.
.
.
.
.
.
.
.
.
.
.
.
.
.
.
.
.
.
.
.
.
.
.
.
.
.
.
.
.
.
.
.
.
.
.
.
.
96
96
96
96
98
98
99
100
Chapter 1
Introduction
1.1
Introduction
Figure 1.1: Intensity surface of an object.
This document is intended as a short guide to the MotionTracking (short: MT) software, not as a full user manual. Therefore it will rather give a brief overview over the
main functions than go into full depth of the program. Since many of the functions from
different sections interact with each other it is hard to sort them. The decision fell to
sort them by category, which should improve the usability of this guide for later reference. The disadvantage is, of course, that when you use the program for most standard
procedures you will need to jump between the chapters, so for better comprehension it
is recommended to briefly look through the complete guide before actually trying to calculate a specific project. Due to the massive size of the statistic tools and amount of
options there, the statistics are described in a separate manual. You can access it from
the “Batch Statistic” window in the “Help” submenu.
Note: If you just need a quick start to do the standard procedure to the point where
you get calculated objects (and tracks if necessary) on vesicles of common size and behavior, jump to Appendix B.1 of this manual on page 96 and follow the instructions there.
4
CHAPTER 1. INTRODUCTION
5
Additionally, it has to be pointed out that MotionTracking is under constant development and therefore some functions may be added, renamed or removed (though it is
mostly added) and the screenshots may be out of date at the time you read the guide (in
fact, some were outdated while this guide was written), but they should be sufficient in
most cases.
The first chapter will explain the basic structure of the data while working with MT.
The second topic of discussion will be the user interface. Later on there will be many
references to “which button to click” which will refer to this first chapter.
The following chapters will deal with Object Search, Tracking, Masks, Filters and all other
prerequisites to the calculation of statistics which will be handled in a separate chapter.
At the end you will find some chapters on more technical topics like the troubleshooting,
some words on grid computing and batch mode.
Since MotionTracking was initially designed to (as the name suggests) track objects,
it was assumed that the data that should be processed is a sequence of images taken over
time. Thus, datasets are referred to as “movies” in some interface items, although it has
nothing to do with the common concept of movie files (like .avi) on a computer. The
individual pictures of the data set are often called frames. A movie in MotionTracking
terms is a number of frames where it is known how much time has passed between two
frames.
This does not mean that MotionTracking is restricted to analyzing such data. It is
absolutely no problem to analyze static images (so “photos” instead of “videos”), but if
you do so you shouldn’t let the words “movie” or “frame” confuse you. As a matter of
fact, most of the manual will cover tasks which can be applied to both, image sets and
movies.
Figure 1.2: Automatically detected nuclei and cell contours in 2D images.
CHAPTER 1. INTRODUCTION
1.2
Installation and Set-Up
1.2.1
Download and Installation
6
The current major release of MotionTracking can be found at http://motiontracking.mpicbg.de/get/ in the MotionTracking Installer section. You will be redirected to a site with
a setup x xx 00.exe which can be downloaded by clicking on it.
Figure 1.3: MotionTracking website with download link
To install MotionTracking, execute the downloaded setup.exe. A setup wizard will guide
you through the installation.
After accepting the license agreement you will be asked what components you wish to
install - you only need the 64 bit version if you run a 64 bit operating system and you
can leave it out safely otherwise.
If you do not know if you are using 32 or 64 bit you can check by right-clicking on
“Computer” in the “Start Menu” and selecting “Properties”. There you have to look up
“System Type” in the “System” section.
Finally you can choose the installation directory where all the data will be placed.
The rest of the installation will be completed automatically.
If you installed both 32 bit and 64 bit versions you can use both versions at any time,
but the 64 bit is recommended due to possible high memory demand during complex
calculations.
During the first installation the components ExploreDir32 (and possibly ExploreDir64)
CHAPTER 1. INTRODUCTION
7
as well as “Microsoft VS 2008 Redistributable Package” will be installed automatically.
They are important for file selection dialogues and need to be installed.
1.2.2
Program Setup and Database Connection
On the first start of the program you will be asked if you want to connect to a remote
database. The database is used to organize project information and a remote one can be
used across multiple computers. To connect to a remote database you have to provide the
connection information like the network address of the database and the login information. If you select not to connect to a remote database you will be connected to a local
database on you machine located in you bin32 directory called MT DB.mdb. A working
connection to either a remote or a local database is necessary to ensure that the program
is working properly.
Figure 1.4: Remote database connection window
In the case that a connection to the remote database is selected but the connection fails
you will be automatically connected to the local database. If you connected to local
database first you can later connect to a remote one via “File→Database→Connect to
Database”
The database you are connected to is named in the header of MotionTracking just
after the name and the version. Example: “MotionTracking 8.18.61 (x64) Database:
C:/Motiontracking/bin32/MT DB”. If you are actively using a local database you may
want to back up the file from time to time. During re-installation of MT you will also be
asked if you want to keep the old database.
Figure 1.5: MotionTracking header with version number and database info
After the database connection you will most likely be asked if you want to update MotionTracking, because the setup.exe is only created for major releases and not for every
new minor update. After updating, MotionTracking will be ready to use.
CHAPTER 1. INTRODUCTION
1.2.3
8
Updates
MotionTracking looks for updates automatically when the program is launched. If new
updates are available you will be asked if you want to install them or not. If you decide
not to install them the automatic update function will be disabled. You can check for
updates manually by clicking Help → Update in the main window menu.
Another option is to download an update package from
http://motiontracking.mpi-cbg.de/get/. By selecting your current version you will get an
download link for a .zip package with all the updated binary files that you need to update
to the newest version. To install the update you have to unpack this package in your
MotionTracking installation directory and overwrite all older files when asked to do so.
This package can also be copied to a different machine as long as the other machine has
the same initial older version of MotionTracking.
Note that you must close all running MotionTracking applications and all related processes
in the Windows Task Manager → Processes like plbrok.exe, mtupdater.exe, rserver.exe,
rdaemon.exe.
This is very useful for users with issues with the automatic update function or computers
without direct internet access.
Figure 1.6: mtupdater.exe with opened settings window
The automatic updating process is handled by “mtupdater.exe” stand-alone updater component which is called via “Help → Update”. From there you can update MotionTracking
without having to run MotionTracking itself. You can change the connection settings by
clicking on “Settings...” and modify the connection to the update-server which is useful
to fix problems with automatic updates.
The default values are “Update Server: motiontracking.mpi-cbg.de” and “Port: 80”. Furthermore the correct installation path should be specified in the “bin32/64 folder” field.
CHAPTER 1. INTRODUCTION
9
If automatic updates don’t work with these settings the most likely cause is that your
connection is blocked by a firewall, please open Port 80 on motiontracking.mpi-cbg.de in
the firewall settings.
MotionTracking is in constant development and has important updates and bugfixes at
irregular time intervals, therefore it is highly recommended to install all available updates
as soon as possible.
CHAPTER 1. INTRODUCTION
1.3
10
Graphical User Interface
This subsection should provide a basic idea what the main interface items do. The
procedures to actually use these to analyse your data will be covered in their respective
subsections. For better understanding there is a screenshot of MotionTracking as you will
face it when it starts and after you have loaded a project.
The individual elements of the MotionTracking user interface are described below. The
menu itself contains a huge amount of functions which are too many to cover here and
will be explained in other chapters as they become useful.
A lot of the interface items refer to objects or tracks which have to be calculated during
image processing. Until this is done these items won’t have any effect. Still they are
explained here to maintain some sort of order.
Figure 1.7: MotionTracking main window without any loaded data.
CHAPTER 1. INTRODUCTION
11
Figure 1.8: MotionTracking main window after a project was loaded.
1.3.1
The Load and Save Buttons
Figure 1.9: Load and Save Buttons
The left, blue one is called “Load Project” and the right, green one is “Save Project”.
While the functions should be obvious it is important to know that both affect all related
files like object search parameters. Thus, any change (except the statistics) will be controlled over these buttons. MotionTracking saves all related files under the same name
with different extensions.
Example: If you load a project a.mtj MT will load a.srp, a.stp and so on from the
same directory in the background. If you decide to save it as b.mtj it will create b.srp,
b.stp and so on in the directory of b.mtj.
1.3.2
Search Parameters
These Buttons will open the “object usage list”, “object search parameters” and “track
search parameters” (from left to right). Their functions are covered in Chapter 4: Object
Search and Chapter 6: Tracking.
CHAPTER 1. INTRODUCTION
12
Figure 1.10: Search Parameters
1.3.3
Scale and Zoom
Figure 1.11: Scale and Zoom
To produce meaningful results with MotionTracking you must set up the proper scale.
The Scale (micrometers/pixel) allows you to set up the correlation between pixels of the
image and the physical size of the objects that are displayed in the picture. Obviously
this is extremely important if you want to measure size, area or elongation.
The Time (seconds/frame) is important if your data is a stream of images taken over
time (called movie for MT purposes). The time/frame rate is necessary to understand
the time steps between two images and measure speed or any rates of change.
These values are very important. Please take care to ensure they are accurate.
The Scale is specified in micrometers (um) per pixel (pix). In most laboratories, the Scale
is measured directly by imaging a micrometer grid with your camera, objective lens, magnification settings, etc. This allows you to measure the size of your pixels in micrometers.
The Time is specified in seconds per frame. The Rate was determined when the movie
was first taken at the microscope. For example, if you set the microscope to capture one
image every five seconds, the Time (sec/frm) is 5. If you set the microscope to capture
one image every five minutes, the Time (sec/frm) is 300. The Time is not related to the
exposure time of the camera, which could be identical in the two examples above (e.g., a
0.1 sec exposure time).
The Project field will display the name of the project as soon as one is loaded.
The “Zoom” Dropdown menu gives you the choice between “Original Size”, which will
scale the picture to 1.00 (100%) and “Fit to Window” which will scale the picture in a
way that you will see the whole picture without having to move around with the scroll
bars. As soon as you decide to zoom manually by dragging a box on the picture with
your right mouse button it will change to “Zoom” automatically. At all times, the number
below will show you the scaling factor. Once you zoomed manually you can use the arrow
facing left to zoom back. The arrow facing right will undo the actions of the left arrow
and therefore zoom in to your previously selected area. MT remembers several steps in
every direction so you can jump between zoomed areas. Obviously you have to load a
picture before trying this out.
CHAPTER 1. INTRODUCTION
1.3.4
13
Frame Information
Figure 1.12: Frame Information
Here you will find some general information about the currently displayed picture.
The top row shows the total Number of Frames in the Project.
The second provides information on the number of Objects found. Until you have done
that it will be empty. The Numbers will be shown in the order they appear in the “object
usage list” (see Fig. 1.10 Search Parameters). If you decide not to calculate any object
type which is specified in the “object usage list” it can lead to confusion because it will not
show as a blank in this row. Example: you activated Channel 1, 2, 3 and 4but calculated
objects only on channel 1, 3 and 4, leaving channel 2 untouched and get “Numb.Obj:
7/42/1234” it will mean that there are 7 found objects on the first, 42 on the third and
1234 on the 4th in this single active frame.
The last row shows the current Frame Number and helps you to navigate through the set
of pictures. You can enter any number there and MT will jump to that picture. The time
given in the brackets is a result of the current frame number and the time scale. (See
Chapter 4.5 Export on page 93).
1.3.5
Navigation
MotionTracking allows you to play your movies, scan through to specific frames, and
control the playback rate. These features are stored in the “Navigation” panel. With the
Figure 1.13: Navigation
Movie Controls, you can play, pause, and fast-forward your movie. The buttons are similar to controls on a CD player, DVD player, or digital media player such as QuickTime.
The slider above the buttons allows you to manually scan through your movie.
The Playback control (ms/frame) sets the playback rate for the movie. To show your
data in real time, the playback rate should correspond to the frame rate used for image
CHAPTER 1. INTRODUCTION
14
acquisition. However, the Playback rate can be set to any value, allowing you to accelerate or slow down the Playback of your movie.
Note: the fastest possible playback rate is limited by the capabilities of your computer.
The Loop option tells the program to loop your movie continuously. The movie will
continue to loop until the option is unselected or the stop button is pressed.
An important feature is the Frame Subset selection. The frames selected by the From
Frame and To Frame boxes are the frames that Motion Tracking uses for all computation.
In other words, the Object Search, Track Search, and Statistics calculations will apply
only to frames within the selected subset.
Frame Subset selection is very useful in the following circumstances:
∙ Selecting a single frame for testing of the Object Search procedure.
∙ Selecting a subset of frames for testing of the Track Search procedure.
∙ Looking at statistics for only a portion of the movie.
When a subset of the movie is selected, this is the only portion of the movie which
plays. Therefore, the Frame Subset allows you to watch and loop only a portion of your
movie.
Show selected Subset will restrict the frames that can be accessed in the movie control menu to the ones in the subset.
Auto Load Objects, on by default, is used to decide whether you want to load objects
that were calculated previously when switching frames. Disable to speed up the movie,
but remember that the objects will disappear (including the number of object shown in
the interface).
1.3.6
View Setup
Figure 1.14: View Setup
These controls are used to specify what exactly MT should show you on the picture.
The 3 Buttons allow you to select if the picture view is separated in 2 or 4 fields which
get their own 1.21 “View Options” and 1.25 “Brightness Control” bars which you can use
to display the same picture in different colours and/or activate different channels to get
a better view of the data.
CHAPTER 1. INTRODUCTION
15
You can activate the scale bar to get an idea of the size and print the time that has
passed since the movie started. Both will be kept if the picture is exported. (See Chapter
4.5 “Export”).
When playing a movie with tracks the Track Trail allows you to specify how many frames
the track path will be shown. A high number allows you to see more of the way the
tracked object has travelled but may lead to confusion when there are a lot of objects
close by.
The Checkboxes are one of the main tools to work with when viewing pictures. Note: All
of these options will only affect the view, but never have any effect on the calculations.
“Show Corrected” is used to (not) view the illumination and chromatic shift correction,
but not the per Frame Correction. See Chapter 2.2: Image Processing.
The others are quite self-explanatory and toggle the views of different things which will
be discussed later. Use these as you see fit to get a better view of the picture.
Additionally you should read the subsections 1.21 “View Options” and 1.25 “Brightness
Control” for further manipulation of the display.
1.3.7
Illumination and Chromatic Shift Correction
Figure 1.15: Illumination and Chromatic Shift Correction
The illumination and chromatic shift correction are covered in Chapter 2.2 “Image
Processing” on page 26.
By clicking on either button a dialog will pop up which asks you to load a file with
the appropriate extension (.ilm and .chs respectively). If done, the red cross will turn into
a green checkmark (as seen in Fig. 1.8 Overview with loaded project). If clicked again
when the green checkmark is active the correction will be unselected and the red cross
will appear again, giving you the option to load a different correction file.
The per frame correction is calculated in the object search menu and is, as the name
suggests, individual for each frame. Therefore it cannot be loaded and is only shown
for reference whether active or not. The checkbox has the same function as the “Show
Corrected” in Fig. 1.14 “View Setup”, but applies only for “Per Frame Correction” while
the “Show Corrected” uses the illumination and chromatic shift correction.
1.3.8
Statistic and Filters
This tool is used to control which objects or tracks will be included in statistic computations. This topic will be discussed in Chapter 3 on Statistics. The dropdown menu at
CHAPTER 1. INTRODUCTION
16
Figure 1.16: Statistic and Filters
the top allows you to decide which channel to use when calculating statistics individually
and not in batch mode. The Checkboxes allow you to decide whether you want to use
the object or track filters. These filters must be carefully set up in the object statistic
parameters window which can be accessed with the upper one of the two buttons at the
left of this box.
The lower button is used to specify the parameters of statistic distributions.
CHAPTER 1. INTRODUCTION
1.3.9
17
Measurements
Figure 1.17: Measurements
This box is used to activate simple user-controlled measurements on the picture. They
will be covered in Chapter 2 on Image Processing.
1.3.10
Additional Tools
Figure 1.18: Additional Tools
These buttons open a lot of different tools. The top 3 open the Graph, Bar Graph
and 3D graphs menus which you can use to visualize statistical data. They are followed
by Time Course and Scatter Plot which are also valuable tools for data analysis. The last
two items in the list are the text editor which is a sort if minimalistic notepad and the
calculator.
The “inverse Image” inverts the colours channel by channel, so the bright spots become
dark and vice versa. It may be necessary to adjust the result with “15. Brightness Control”.
The “Reverse Byte Order” is not important (at least for now). Leave it as it is by
default: unchecked.
CHAPTER 1. INTRODUCTION
1.3.11
18
Channel Activation
Figure 1.19: Channel Activation
Unselecting any colour channel will stop MT from calculating or showing the channel
or anything that depends on it, though no information will be deleted.
1.3.12
Image Window
Figure 1.20: Image Window
This is the place where the picture will appear as soon as a project is loaded, if
something besides “None” is selected in the first dropdown menu in Fig. 1.21 View
Options.
If this doesn’t happen there may be various reasons, but most frequently it happens
because the database is not properly connected or something went wrong during import.
1.3.13
View Options
Figure 1.21: View Options
This is the main tool of view control. The light bulb on the left toggles whether “15.
Brightness Control” is displayed. The three dropdown menus give you the following options:
∙ None, Raw, Synthetic and Background: “Raw” is the default option and displays
the image as it came from the data source. “Background” will only show the background, which is calculated my MT. “Synthetic” is the signal, basically the difference
between “Raw” and “Background”. “None” will show no picture at all.
∙ Greyscale, Colour, Channel 1, Channel 2, ...: Are pretty much self explanatory.
CHAPTER 1. INTRODUCTION
19
The “Sequence” one is not relevant at the moment.
That leaves us the “Options” button. When pressed, the window shown in Fig. 1.22
“Options Button Dialog” will appear.
Figure 1.22: Options Button Dialog
“Show Objects” and “Show Tracks” will open a dialogue where you can select or
unselect by double-clicking which objects or tracks (channel wise) should be displayed. In
the “Show Object Window” you additionally have the option to select “Object Contours”
to be shown (if nothing happens, check if the “Show Obj. Contours” in Fig. 1.14 “View
Setup” is disabled) . The contours are very helpful to understand whether the objects
were calculated successfully. Unfortunately it is currently not possible to display contours
without the object dot. Especially small objects may be obscured by the object dot. If
this is the case, switching “Show Objects” on and off several times might help (remember
the respective checkbox “Hide Objects” mentioned in Fig. 1.14 “View Setup”.
1.3.14
Status Bar
Figure 1.23: Status Bar
This bar shows general information. On the left you see the position of the cursor as x
and y coordinates in micrometers and in pixels with the coordinate origin being the lower
left corner of the picture. The middle block shows the intensity for each channel at the
position of the cursor. The right box displays the resolution of the picture in pixels and
the number of channels as the third number (in this case it is a 1376 pix wide and 1040
pix high picture with 4 channels).
1.3.15
Full Frame Name
This box just shows the full name of the Frame for further reference if necessary.
CHAPTER 1. INTRODUCTION
20
Figure 1.24: Full Frame Name
1.3.16
Brightness Control
This window is the last one which controls the view of the picture. It will be activated when clicking on the light bulb in “13.
View Options”.
The tool allows you to switch any channel on and
off, but in contrary to Fig.
1.19 “Channel Activation” it will only affect the view, not the calculations.
By clicking on the coloured boxes with the channel name a
dialog will appear asking you to choose the colour for this
channel. Using this, you could make channel 1 which is labelled EGF in this case to be blue instead of red and so
on. It is good to use bright colours to ensure good visibility.
The “Auto” checkboxes let the program decide how the image
should be displayed in terms of brightness. Generally speaking,
it should be a reasonable view. If you are interested in the dimmer objects, you can activate SQR which improves visibility in
some cases.
If this is not sufficient, deactivate the Auto-Checkbox
and drag the arrowheads on the line.
The top arrowhead is at the intensity where the colour will be displayed in maximum brightness and the bottom one where
it will be black.
The numbers directly above and below show the numerical value of the arrowhead position.
The other 2 numbers set the range in which the arrowheads
can be moved. The max value is between the On and
Auto and the min value is at the very bottom of this window.
Figure 1.25: Brightness
Control
Chapter 2
Processing
2.1
Import of Data and Project Management
MotionTracking is capable of reading image and movie data from a variety of formats.
By movie data, we mean any sequence of images taken over time. The movie data could
include a series of images taken as part of a high-throughput screen (for example, multiple
images per well in a 96 well plate), or it could be a conventional time lapse recording of
living cells.
MotionTracking will convert your images into the “MTF” Motion Tracking Format used
by the software. It will create a numbered sequence of .mtf files, one image per frame of
your movie. This allows the software to process each frame of the movie independently.
2.1.1
Basic Import
Importing your movie into MotionTracking is simple. Follow the procedure below:
1. Determine the image format used by your image acquisition software. Common
examples include Metamorph Stacks (.stk files), multi-image TIFF files (.tif), and
Leica color plane files.
2. Look in the “File → Import → Import Images” menu. If your image format is found
in this sub-menu, use the respective function. it will provide a mostly automated
way to import all data and is generally the easiest way to import data. The complete
list of supported formats is found in subsection 2.1.4 on page 23. Additionally you
can load the corresponding Metadata via “File → Import → Import Metadata”.
3. If your data format is not found in the Import menu, then you will need to convert the format used by your image acquisition software into a format usable by
MotionTracking.
(a) Check if your image acquisition software can be reconfigured to acquire images
in an easily importable format for future movies.
(b) Using a software program such as ImageJ, convert your images into a numbered
sequence of images (for example, TIFF images).
(c) Use “File → Import → Load Sequence of Images” or “Load Sequence of Images
from Directory” and select your numbered sequence of TIFF files. However,
if your images are spread over many folders, use “File → Import → Merge
21
CHAPTER 2. PROCESSING
22
Directories” to copy all images in subfolders into a new destination directory.
After the copy process is finished a new project will be generated from all the
files in the destination directory. This step can be repeated multiple times with
the same destination directory to combine as many folders as you need.
4. Once your movie has been imported, use “File → Save Project” or the Save Project
Button to create a unique Project File for the movie, which you will use to work
with the movie in the future.
2.1.2
Importing Separated Channels to One Image
The basic procedure above should be used for each color channel of your data. For
example, it is common to take time lapse recordings of one color channel, as well as a
single image of another color channel for reference. If you have multicolour data, you
can combine the color channels in MotionTracking using the “File → Import → Combine
Color Planes” feature. (See Figure 2.1)
Figure 2.1: Dialog for the import of separated color channels into one image.
Using the “Browse” button, you can select the directory or file that contains each
color channel. If you are combining a time lapse recording with a static image, choose the
Static Image option for the color channel that is static. This will cause MotionTracking
to combine the single static image with each of the images in the time lapse recording.
Choose a Destination Directory using the “Browse” button. After you have selected all
of the appropriate options, click OK. This will cause MotionTracking to generate a series
of multicolour .mtf files in the Destination Directory.
The multicolour .mtf files are the final files that you should open and use for all further
procedures. MotionTracking will prompt you to save a Project file (see below), which will
refer to these multicolour .mtf files.
For example, a single image of a cell nucleus is combined with a fast time-lapse or streaming movie of nuclear proteins in motion. Click the “Static Image” check box to specify
when a single image should be combined with a movie.
2.1.3
Project Files and Project Structure
Managing your movies is done through Motion Tracking Project files. In the File menu,
you will see Load Project and Save Project. Saving a Project creates a single file which
refers to your image data, as well as the parameter settings used by Motion Tracking
in the Object Search and Track Search procedures (see respective Chapters for more
information).
Usually there is a big amount of pictures and projects and a certain scheme has established
itself over the time. Usually a single plate of a run of a biological experiment is saved as
a single project. As there are many projects belonging together it turns out to be best to
CHAPTER 2. PROCESSING
23
create a folder for the experiment, put the image data in subfolders of it and create the
project files into the main folder of the experiment. Thus you separate the project and
parameter files from the data and have all the projects together in one directory. The
result should look something like the picture below.
When you want to load a project, simply press “Load Project” either as button or from
“File → Load Project” and select the project file you need. Everything else is done
automatically in the background.
Figure 2.2: An example of a reasonable file structure.
Each file stores some information about specific parameters used for calculations.
∙ the subfolder named “example project images” contains the raw image data in the
format .mtf.
∙ .chs is the file that contains the information about chromatic shift correction.
∙ .ilm is the file that contains the information about illumination correction.
∙ .mtj is the project file itself. Technically it is a text file that can be opened with
any text editor and contains a list of all the parameter files and all the images that
belong to that project.
∙ .roi is the file that contains Regions Of Interest.
∙ .srp is the file that contains the object search parameters.
∙ .stp is the file that contains the statistic filters and masking parameters.
∙ .trp is the file that contains the track search parameters.
The most important one is the .mtj project file which is generally used to load and save
all processing and calculations. Usually there is no direct interaction between the user
and the other files, because all of them are handled automatically by MT.
2.1.4
List of Commonly Used Import Functions
The basic functions are “Load Sequence of Images” and it’s variations “from Number
Interval”, “Directory”, “TextFile”. In that case you simply specify which images to load
and select the format they are in from the list in the selection dialogue.
Most of the import functions of specific file formats are fairly automated so they should
be usable without further explanation.
CHAPTER 2. PROCESSING
24
Import AVI: The AVI movie format is a Microsoft format. Often, AVI is the
format of choice for the export and publication of compressed movies. For example,
collaborators may send you AVI files of their movies for analysis. Use the Import
AVI command to read these files.
AndorIQ imports AndorIQ images via .txt files.
DAX directly imports .dax files.
DeltaVision directly imports .dv files.
Leica directly imports .lif files and can be used to handle Leica Color Planes.
MetaExpress handles MetaExpress Color Planes.
Metamorph Metamorph, from Universal Imaging, is a popular software program
for control of microscopes and image acquisition. The default format used by Metamorph is the Stack file (.stk file).
Import Multiframe TIFF: Multiframe TIFFs are single image files that contain
many TIFF images. This format is used by some image acquisition software packages. When importing a generic multiframe TIFF, Motion Tracking views every
frame of the TIFF as the same color channel. If your multiframe TIFF is an interlaced sequence of two or more channels, see the Combine Color Planes feature
below. Note that some specific TIFFs like AndorIQ’ ones can be imported directly
through the respective import option.
Nikon directly imports .nd2 files.
Olympus directly imports .oif and .oib files.
Opera unpacks .flex files into single images in .mtf format that can be imported
into MT with “Merge Directories” (see below).
Zeiss directly imports .czi or .lsm as well as multiple .lsm via .lsm databases.
Additionally the “Convert to MTF format” will convert selected files into the .MTF
format, but this is done automatically when you choose any of the import options. The
last important option is the “Merge Directories” one which allows the user to merge images located in multiple folders into one and creates a project file form all images in the
destination directory after the copy process is finished. This is very useful if you have
multiple runs/measurements which you want to analyse together.
If the project is already created you also have the option to import metadata like channel
names, laser frequencies and much more from specific files provided by the microscope
software like Zeiss LSM Databases with the various functions in “Import Metadata”.
CHAPTER 2. PROCESSING
2.1.5
25
Setting Channel Names
For better overview you should set up channel names after creating your project. Go
to “Options → Set Channel Names” to do this. After that, all Interface items where
“Channel X” was show before will be changed to show the respective names. While not
that important during image processing, it is extremely helpful to do this before statistic calculation or exporting any data to have presentable results instead of meaningless
“Channel X” strings.
The “Batch Statistic Window” also has a similar option in the menu.
CHAPTER 2. PROCESSING
2.2
26
Image Processing and Correction
This section will cover several important aspects of MotionTracking. The first is “Manual
Measurements” which explains how to do simple measurements and calculations on single
frames. These are not used for statistics but are very useful to get a first idea of the
properties of your data.
The second part is far more important. As we know, any pictures taken by a microscope are victim to two major systematic errors: the uneven illumination caused by the
light source and the chromatic shift between different channels caused by the fact that
physical properties of light vary with different wave lengths. MotionTracking is capable
of correcting these errors as described in section 2.2.2.1.
2.2.1
Manual Measurements
The Measurement tools allow you to measure the intensity of your images, select subregions for analysis, and measure the length and size of objects. To use a specific tool
select it from the measurement tools area in the interface (shown in Figure 2.3).
Figure 2.3: Measurement Tools area of the interface.
Intensity Curve The Intensity curve is a “line scan” across your image. Select “Intensity Curve”, and then draw a line on your image by clicking on the start location of
the line, dragging your mouse to the end location of the line, and releasing the mouse
button. A graph will appear showing the intensity values of your image across that line.
See Figure 2.4 for an example.
Intensity Surface The Intensity Surface is a 3D view of the intensities in your image.
Select “Intensity Surface”, and then draw a box on your image by clicking on the starting
corner of the box, dragging your mouse to the end corner of the box, and releasing the
mouse button. A 3D surface will appear, showing the intensity values at each pixel within
the box. See Figure 2.5 for an example.
CHAPTER 2. PROCESSING
(a) The yellow line on the image was
drawn by the user.
27
(b) The resulting graph of intensity values (y, arbitrary
units) versus position (x, 𝜇𝑚).
Figure 2.4: Example of an Intensity Curve. Note that the bright object in the image is
detectable in the intensity profile.
(a) The yellow box on the image was drawn by
the user.
(b) The resulting surface of intensity values (z,
arbitrary units) over the x-y box (in um) drawn
on the image.
Figure 2.5: Example of Intensity Surface.
Intensity Histogram The Intensity Histogram provides a distribution of the intensity
values found within a rectangular region of your image. Select “Intensity Histogram” and
then draw a box on your image by clicking on the starting corner of the box, dragging
your mouse to the end corner of the box, and releasing the mouse button. A histogram
will appear, showing the number of pixels that contain intensities of a given value. See
Figure 2.6 for an example.
Spline Contour The spline contour tool allows you to select a sub-region of your image
for analysis. Select “Spline Contour” and click on your image. By clicking again at a new
location, you begin to draw a spline contour. Continue clicking around the area you
want to examine. When you are finished, click again on the start location or double-click
anywhere to “close” the spline contour. An example of a spline contour is shown in Figure
2.7.
The small yellow boxes represent the points clicked on to create the spline contour.
These boxes are movable. Simply click and hold the mouse button over one of the boxes.
Drag the box to a new position, and release the mouse button. Using this technique, you
can fine-tune the spline contour to precisely enclose the area you want to analyze.
CHAPTER 2. PROCESSING
(a) The yellow box on the image was
drawn by the user.
28
(b) The resulting histogram of intensity values (x,
arbitrary units) and the number of pixels with these
values (y).
Figure 2.6: Example of an Intensity Histogram
Figure 2.7: Example of a spline contour. The small yellow boxes are the points clicked on to
create the contour line, shown also in yellow.
Distance The distance measure is a simple tool for measuring the length of a line drawn
by the user. Select “Distance”, and then draw a line on your image by clicking on the start
location of the line, dragging your mouse to the end location of the line, and releasing
the mouse button. The distance measured appears in the upper-left corner of the image,
measured in micrometers (𝜇𝑚).
Intensity Time Course The intensity time course tool allows you to measure the
change in intensity in an area over time. Select “Intensity Time Course”, and then draw
a box on your image by clicking on the starting corner of the box, dragging your mouse
to the end corner of the box, and releasing the mouse button. An x-y graph will appear,
showing the intensity in the box as a function of time. An example is shown in Figure
2.8.
Kymogram This function will produce a 2D picture. On the x-axis you will see the
intensity along the line you specified when selecting this function and the y-axis is the
time. It is useful to check the intensity development along a line in time. To leave this
view select “Sequence” in the “13. View Option”.
Integral The integral tool works similarly to the “Intensity Time Course” but instead
of a graph with the intensity over time function you will get an editor window with up to
CHAPTER 2. PROCESSING
(a) The program calculates the
cumulative intensity of every pixel in
the area of interest (shown in yellow).
29
(b) This generates a graph of cumulative intensity (y,
arbitrary units) drawn against time (x, seconds).
Figure 2.8: Example of an intensity time course.
4 lines, each showing a number which is the integrated intensity of the respective channel.
None Selecting “None” will remove all drawn lines, boxes or splines and deactivate the
left click on the picture.
2.2.2
Correcting Systematic Errors
Most image data gathered during experiments is compromised by systematic errors. The
two most common examples are the uneven illumination and the shift between the color
channels because they are acquired with different lasers which have different refraction
angles. While some microscopes like Opera provide their own correction software which
might be sufficient, others don’t. MotionTracking is capable of calculating such error
correction in three different ways.
2.2.2.1
Illumination and Chromatic Shift Correction Files
The first method, using correction files, is based on control measurements which are handled as a separated MT project. These control measurements are used to calculate a
specific correction profile that in turn can be applied on the actual experiment data as
long as the control measurements were done in equal conditions.
To correct the uneven illumination you have to create a project which consists only
of images of empty wells filled only with dye dillution and with the laser(s) turned on
and some where they are turned off. Once done, go to “Processing → Uneven Illumination/Chromatic Shift → Calculate Noneven Illumination”. After MT is done with
calculating the checkmark mentioned in section 1.15 turns green and a Dialog will popup,
asking you to save the illumination correction as an .ilm file which can be loaded into
other projects. A 3D Graph will appear showing you the mathematical representation of
the correction. You can check if the correction makes sense by clicking on the checkbox
called “Show Corrected” - the picture where the laser was on and should look evenly
illuminated now (Figure 2.9).
CHAPTER 2. PROCESSING
(a) Original image of a dye dilution.
30
(b) Automatically corrected image.
Figure 2.9: Example of nonlinear intensity correction of an empty well, only filled with a dye
dillution illuminated by the laser.
The procedure to correct chromatic shift is a little more complicated but quite similar.
To calculate it in an automatic fashion it is necessary to image “beads”, objects of small
size that are flourescent in all laser frequencies. After loading pictures showing only beads
as a separate project, you need to segment the objects first. This is covered in the next
Chapter. Once calculated, the chromatic shift calculation can be started by selecting
“Processing → Uneven Illumination/Chromatic Shift → Calculate Chromatic Shift”. An
dialogue will appear, the default selection shown in 2.10 should work in most cases. If
not, try using integral intensity as weight.
Additionally you can set up an initial manual guess by selecting yes in the according
dropdown menu. You will be asked to enter the initial guess x and y coordinates for each
channel other than the base channel. These coordinates will be used to shift the respective
channels relative to the first one before starting the calculation which can speed up the
calculation massively if you have a high density of beads.
Again, you will be asked to save a file once the shift is calculated, ending with .chs
this time. Check the correction by enabling “Show Corrected”, all the beads should be
moved in such a way that all channels lay over each other.
Figure 2.10: Chromatic Shift Calculation Dialog with the typically used funtions enabled. If
these fail, first try to select a different base channel or use manual initial guess instead of
automatic to give the algorithm a nudge in the right direction.
The result should look something like Figure 2.11b.
CHAPTER 2. PROCESSING
(a) Uncorrected image of beads.
31
(b) Corrected image.
Figure 2.11: Example of chromatic shift correction applied (now beads on all channels are at
the same position) after nonlinear intensity correction (notice that there are no dark corners
anymore).
This should be the method of choice but if you don’t get any reasonable results or don’t
have any control measurements which can be used you have two additional, but less
accurate options.
2.2.2.2
Per Frame Correction
The second method requires calculated objects in a project. If there are enough objects
in each channel (>1000 is good) it makes sense to try to calculate per frame correction.
To do this go to the object search window and activate the chromatic shift correction for
all channels by double click. The important features are marked in Figure 2.12, the rest
of the window belongs to the object search and is therefore not important here though
you need calculated objects to perform this procedure.
Figure 2.12: Per Frame Correction turned on for all 3 channels using weighting, tilt and
nonlinear shift. It is calculated for each of the Channels 2 and 3 seperately relative to Channel 1
(“Base Channel”) for all cases where the two channels that are compared have at least 1000
objects each. The “Keep Per Frame Shift” only applies if you recalculate frames that already
have per frame correction: if it is checked, the per frame correction will not be recalculated.
If the result is not an improvement, try disabling the Weighting by Integral Intensity
or change the base Channel. The higher the min. number of object the better. If you
have a channel with nuclei or some other kind of objects which are far too few you should
not select them and calculate the shift between the others. Then, you can try to adjust
it manually, which is discussed below.
CHAPTER 2. PROCESSING
2.2.2.3
32
Manual Correction
The third, and last, method is manual correction. It can be accessed through “Processing
→ Uneven Illumination/Chromatic Shift → Manual Correction”. The appearing window
(Figure 2.13) allows you to select the channel and the operation to perform (either “shift”
or “rotate”).
Figure 2.13: Manual Correction Dialog.
Select either “shift” or “rotate” and the channel you want to move, then drag it with
the mouse. If it gets worse, use reset to return to the unmodified state, if the result is
good use OK to close the window and save the result. Note that this function should be
the last resort and not used if the other two methods are available.
2.2.3
Frame Operations
The “Edit”-Menu entry of MT allows you to perform a number of operations on single
or multiple frames. While the functions like remove Frame from project are quite selfexplanatory, there is one important thing to point out.
When working with MotionTracking there always is the image data itself. Every frame is
saved as a .mtf somewhere on the drive. Then it is linked to from a project and becomes a
part of the project. After that you can select it into your active list (all frames are active
as default) in the “Navigation” area (See Fig. 1.13). Now you can remove a frame on all
3 stages: deactivate it via movie control or just by “Edit → remove frame from active
list”, remove the link to the image data by “Edit → Remove Frame from project”, but
keep the .mtf file and in the end, delete the image data itself by “Edit → Delete Frame”.
It is advised not to delete any image data until the project is completely finished.
CHAPTER 2. PROCESSING
2.3
33
Object Search
The core of MotionTracking is finding the position of objects in your images, such as
intracellular vesicles, single fluorescent molecules, or cellular structures like nuclei or mitochondria. Once found, the software assigns an x-y position and quantifies the intensity
profiles of your objects.
Knowing the x-y positions and intensities of your biological objects is the first step to
answering many important questions, such as: How fast do my objects move? How often
are they co-localized with other objects I am looking at? What is their distribution of
size and shape? This chapter describes the procedure for localizing objects with MT.
What happens is straight-forward: MT searches the image for objects, using information
that you provide about the expected size and shape of the biological object at hand. The
results of this search for objects are the basis of everything afterward.
The input to MotionTracking for the Object Search is in the form of Object Search
Parameters. It is important to provide the software with carefully chosen parameters.
The next section describes these parameters in detail and guides you through choosing
values that will result in a successful search. Some examples are provided in section 2.3.8
of this chapter.
Generally speaking you should calculate objects on all available channels. Additionally
you will need to calculate the separated Nuclei and Cell object categories if the statistics
you are interested are using things like “Cell Based” or “Distance to Nucleus”. To do the
latter one it is highly advised to have a separate channel showing Nuclei and Cells where
you calculate vesicles normally and later use these to calculate the Nuclei and Cell object
out of that, though it is possible to do without if necessary.
All found objects are represented as dots on the screen surrounded by an object contour which isn’t visible by default, but can be turned on. Right click on an Object and
select “Get Object Info” to get all the information on this particular object.
Check the examples in section 2.3.8 to get an idea of the common parameters for different cases.
2.3.1
Properties of Objects
MotionTracking stores the following properties of your objects: Object Size, Object Area,
Integral Intensity, Peak Intensity, and Mean Intensity. Each object is basically a group
of pixels. The number of pixels combined with the given scale will lead to “Object Size”
and “Area”. On the other hand, each pixel has its own brightness - called Intensity.
The Intensity based parameters of an Object are calculated from the pixels it contains as
described below. Note: all intensity values are given in arbitrary units (a.u.), which are
determined by your camera and microscope set up.
∙ Object Area (𝜇𝑚2 ): Object Area is defined as the area of the image covered by your
object. It is calculated from the base functions used in the Object Search procedure.
∙ Object Size/Radius (𝜇𝑚): Object Size/Radius is different from Object Size in the
following way: first, MotionTracking converts the Object Area into a circle of the
CHAPTER 2. PROCESSING
34
same
√︀ area. The Size/Radius is the radius of this circle. In other words, Radius =
(Area)/𝜋.
∙ Integral Intensity (a.u.): Integral Intensity (often written Integral) is the sum of
the intensity of all pixels of the object. It is literally the integral of the function
describing your object.
∙ Peak Intensity (a.u.): The maximum intensity value for any of the pixels of the
object.
∙ Mean Intensity (a.u.): The Mean Intensity is defined as the Integral Intensity divided
by the Object Area. This is the average intensity per pixel of the object.
2.3.2
Basic Procedure
The Object Search procedure is computationally-intense, and it can take several hours
to process an entire movie (e.g. 300 frames of 512 x 512 pixels each). Therefore, it is
recommended first to test the Object Search procedure using one or more frames only.
After verifying the search results for these test frames, the program can be set to work
on the entire data set.
1. Select a representative frame from your movie.
2. Find Objects in this frame only using an initial set of Object Search Parameters.
3. Visually inspect the search results: are they satisfactory?
4. Tune the Object Search Parameters accordingly. Use the Rebuild Objects command
to find objects with the new parameter set. Repeat until the search is successful.
5. Verify the Object Search Parameters in additional movie frames (optional).
2.3.3
Object Search Parameters
The options for the Object Search procedure are located in the Object Search menu under
Object Search Parameters. The dialog box that opens lets you adjust for your images,
save parameter settings, and load settings from a file (see Figure 2.14).
MotionTracking can find objects in any of the four color channels used in your images.
By selecting the appropriate Channel at the top of the Object Search Parameters window,
you can specify the parameters to be used for that particular channel. Each Channel is
independent, and the parameters should be chosen individually for each.
The parameters are divided into three categories: Basic Parameters, Noise Model Parameters, and Advanced Parameters. Each set is contained in a labelled box. The Basic
Parameters and Noise Parameters must be set by each user to match the data at hand.
The values for Advanced Parameters are pre-set for standard image types, but can be
easily changed. Below, each parameter is described in detail, with a guide to selection of
an appropriate value.
The right click menu on a channel in the left part of the window gives you access to
the copy and paste parameters options which can save a lot of time if you have several
channels with the same search parameters.
CHAPTER 2. PROCESSING
35
Figure 2.14: Object Search Parameters Window.
2.3.3.1
Basic Parameters
∙ Background Window Size (𝜇𝑚): Before the Object Search, MotionTracking subtracts the background intensity from your images, using a local measure of the
background fluorescence. The Background Window size is used by MotionTracking
during this procedure. The software passes another box over your image, known as
the background window, and it measures the background signal in this box. With
this parameter, the user defines the size of this box. The default value is 4.8𝜇𝑚
which can safely be used for small cargo vesicles. It is recommended that the Background Window Size be optimized for each movie. For example, a good value for
the Nuclei Channel is about 50 𝜇𝑚. Generally speaking the Background Window
Size should be bigger than the object you are looking for, but still in the same order
of magnitude. The quality of the background subtraction can be visually verified
by checking the “Show Preprocessed” checkbox in the main window. When this
checkbox is turned on, you will see a background-subtracted. Adjust this parameter
to obtain the best results, whereby the background subtraction does not cause a
loss of objects and produces an even intensity across the image.
∙ Resolution Limit (um): The resolution limit is defined by your microscope setup.
Specifically, the resolution limit is a function of the numerical aperture of the objective (NA) and the wavelength of emitted light (𝜆). The equation is: 𝑟 = 0.61·𝜆/NA.
For imaging single molecules, the resolution limit is the Rayleigh diffraction limit of
0.2 um. For larger objects imaged with lower NA objectives, the resolution limit is
increased. Consult a microscope text for information on determining this limit for
your microscope.
∙ Minimum Object Area: The minimum object area describes the smallest possible
object that the program should find. The units are 𝜇𝑚2 . The default value is
set to 0.07 𝜇𝑚2 , which is approximately the size of a diffraction-limited spot in a
conventional microscope with a 100X objective. This parameter should be increased
for finding very large objects.
∙ Threshold Scale: The threshold scale is a critical parameter. It deals with the
requisite brightness of your object. More specifically, it specifies how bright your
CHAPTER 2. PROCESSING
36
object must be relative to the background: the signal-to-noise ratio. The Threshold
Scale sets the signal-to-noise ratio required for an object to be “found”. The default
value is 1, which corresponds to a signal value outside of 4 times the standard
deviation (SD) of the background noise.
𝐼𝑚𝑎𝑥 ≤ 𝑇 ℎ𝑟𝑒𝑠ℎ𝑜𝑙𝑑𝑆𝑐𝑎𝑙𝑒 × 𝑆𝐷(𝑛𝑜𝑖𝑠𝑒). where 𝐼𝑚𝑎𝑥 is the peak intensity of your
object. Where SD(noise) is the standard deviation of the background noise.
∙ Object Combination Coefficient: During Object Search, the program often finds two
or more objects very close to one another. In many cases, it is best to combine these
objects into a single object for tracking. Higher values for the Object Combination
Coeff. make MotionTracking more likely to combine the objects. The value ranges
from 0 to 1, with 0 telling the program never to combine objects, 1 to combine as
often as possible. Figure 2.15 demonstrates the schemata for the calculation. The
coefficient gives the relation between the intensity of a and b. Two objects will be
combined if the ration a/b < Object Combination Coefficient.
∙ Cut-off Intensity Threshold: This parameter can be used to define the lowest intensity acceptable, in order to cut off objects below this threshold. The default value
is set to 0, which gives the greatest number of objects (all found are included). If
you wish to exclude dim objects, selecting only bright ones, then set this value to
be greater than the peak intensity of your dim objects.
∙ Clip Border (pix): If the Clip Border button is active, the program will crop you
image. In some cases, your images will contain a coloured border, or the intensity
of your objects will be exceptionally dim at the edges of the image. In these cases,
it is advised to clip the border of the image prior to Object Search. By entering
a value in the Clip Border box, MotionTracking will remove this number of pixels
from the outer edges of your images. The unit of this parameter is pixels to cut out,
measured from the outside edge of the image.
∙ Binning: Binning refers to the grouping together of pixels, in the same way as a
microscope camera can bin pixels during image acquisition. For example, a binning
value of 2 means that MotionTracking will combine the values of a 2 x 2 square of
pixels. The binned values are used in the Object Search. The default value is 1.
Binning is advantageous when searching for very large objects, such as cell nuclei.
In these cases, computation time is substantially improved.
∙ Single Molecule: TODO
Figure 2.15: Illustration of the object combination coefficient.
CHAPTER 2. PROCESSING
2.3.3.2
37
Noise Model Parameters
∙ Poisson Noise: Choose this option for fluorescence image data, such as confocal,
TIRF, or epifluorescence data. This option specifies that the noise in your image
data is Poisson-distributed. This assumption is true for fluorescence microscopy,
but it is not true for transmitted light, phase contrast, or differential interference
contrast microscopy. For more information on Poisson-distributed noise, consult a
microscopy text and/or a statistics text. If Poisson Noise is applicable, the following
options are available:
∙ Movie: Choose Movie if the image frames are connected in time and the same objects
are being imaged over time. For example, choose Movie for many time-lapse image
sets and also for streaming image data. When Movie is selected, the program uses
data from up to 30 frames when calculating the noise in your data. If you choose
Movie, the option Equal Conditions is disabled.
∙ Equal Conditions: Choose Equal Conditions if your image data is not connected in
time. In this case, the program will calculate the noise for each frame individually.
∙ Central Part of Image: By selecting this option, the program will calculate the noise
in the central part of the image only. The central area has a size of 250 times 350
pixels. The default value is off.
∙ Spline: The default value is off. Choose this option if the microscope software
performed pre-processing on your images.
∙ Tune Start Point: The default value is on. This option calculates the start and end
point of the linear fit area of the Poisson noise fit.
2.3.3.3
Advanced Parameters
∙ Smoothing of the images: Three different models for smoothing are distributable:
– Convolve with Gaussian: Usage of a 2D-Gaussian for smoothing. The input
parameter is 𝜎 (infection point of the Gauss distribution) in terms of um.
– Median Smooth: Calculated a median value from a surrounding of a 3x3 matrix.
– Quadratic Approximation: This option uses a 2D quadratic approximation for
the calculation of the new intensity value at each point.
∙ Update After Combine: This feature is only included in MotionTracking Versions
8.12.01 and newer. It is on by default but can be turned off to approx. double the
speed of the Object Search at the cost of the object contour accuracy. If you are
calculating small vesicles the contour is usually not important and this feature can
safely be turned off, but if you are calculating nuclei or equivalent it is better to
leave this on.
∙ Fit algorithm: the user selects the finding algorithm. The program provides four
algorithms. All algorithms are Multi Variable Optimization Procedures.
CHAPTER 2. PROCESSING
38
∙ Minimum Fitting Window Size (pix): The software passes a box over your image,
known as the fitting window, and it looks for objects in this box. The Minimum
Fitting Window Size (pix) specifies the smallest size for this box in pixels. Therefore,
it relates to the smallest acceptable size of an object. One recommendation is to
measure the length or diameter of the object you hope to find, and set the Minimum
Fitting Window Size to this length x150%. The default value is 8 pixels.
– DFP: Davidon-Fletcher-Powell algorithm is the fastest, but least accurate
– BFGS: Braydon-Fletcher-Goldfarb-Shanno algorithm.
– Powell: Powell algorithm.
– YK: Yannis Kalaidzidis algorithm is the slowest, yet most accurate.
∙ Use Elliptical Base Functions: With this option selected, the program searches for
ellipse-shaped objects. With this option turned off, the program assumes circular
objects. If your objects are indeed circular, it is best to turn off the Ellipse option.
Using Ellipse increases accuracy, but it slows down the Object Search procedure.
∙ Use Sharpness fit: The Sharpness option contains additional calculations. For each
object, an individual base function will be calculated. The calculation time increases
for object finding in the case this option is activated.
∙ Use Fine Fit: This option concerns the calculation of the number of base functions.
The user can choose between two states. In the off state, MotionTracking calculates
the number of base functions by a heuristic procedure. In the on state, MotionTracking always uses the greatest number of base functions possible. The on state
yields a fine fit of the data, but substantially increases calculation time.
∙ Accuracy: This parameter defines the accuracy of the chi-squared minimization
procedures used by MotionTracking when fitting your objects to a function. The
default value is 1e-5. Decreasing the value (e.g., to 1e-6) will cause the program
to perform a greater number of iterative calculations. This will produce a more
accurate Object Search, at the cost of greater computation time.
∙ Fit Negative Image: By default, this feature is turned off. The radio button Fit
Negative Image must be active only in the case that the images where saved on a
microscope in opposed intensity colour mode. This means that low intensities are
displayed in white and high intensities in black (i.e., black objects against a white
background).
∙ Subtract Background: The default value is on. This option allows the user to remove
the background subtraction performed by MotionTracking.
∙ Calculation Timeout (sec): This feature is relevant for network calculations and
calculations on computers with multiple processors. It sets the amount of time the
program should wait before terminating a calculation, due to the assumption of a
network error or processor problem.
After any parameter is changed, the Apply button is active and highlighted red. Click
Apply to save your changes. Only saved changes will be used in the Object Search
procedure.
CHAPTER 2. PROCESSING
2.3.4
39
Searching For Objects
Once the Object Search Parameters have been specified, start the Object Search using
the following commands from the Object Search menu:
∙ Find Objects: Find all possible objects in each frame of the active image sequence.
∙ Find Objects inside Spline Contour: Spline Contours are areas of the active image
that the use draws using the Spline Contour measurement tools. Selecting this option will find objects only in this selected area, and for one frame only. Find Objects
inside Spline Contour is useful for fine-tuning your Object Search Parameters. If no
Spline Contour is found in the selected frame, the calculations will be done on the
whole frame instead.
∙ Find Objects in Batch Mode: This option is useful for analyzing multiple movies
for which the same set of Object Search Parameters apply. In Batch Mode, the user
specifies a list of projects.
During the search process, a progress bar is visible. The search procedure is separated
in two processes: object detection and object combination. Figure 2.16 below shows the
progress bar for the two processes.
Figure 2.16: Progress bars. The top one shows the total progress and the bottom one the one
of the current operation.
2.3.5
Other Options
The following options are available under the Object Search menu:
∙ Show Intermediate Image During Object Search: With this option, the user can
observe the program in action, directly watching MotionTracking find objects in
your images.
∙ Split Complex Objects: A complex object is an object composed of more than
one base function. These base functions are combined in the initial Object Search
depending on the value of the Object Combination Coefficient. After the Object
Search procedure is finished, you can force MotionTracking to split these complex
objects into their individual components.
∙ Fuse Complex Objects: This command is the opposite of the Split Complex Objects command. After the Object Search procedure is completed, you can force
MotionTracking to combine complex objects together.
CHAPTER 2. PROCESSING
40
∙ Fuse Complex Objects (on Base of Master Channel): This command is similar to the
Fuse Complex Object command, but it takes additional input in the form of intensity
in another color channel. In other words, this command will tell MotionTracking to
fuse objects only if they overlap with intensity in another color channel.
∙ Recalculate Area and Intensity Integral. This command tells MotionTracking to
recalculate the area and intensity integral of the Objects in the active sequence of
images.
∙ Clear Objects: delete the Objects from the active sequence of images.
2.3.6
Nuclei, Cells, Worms
A few words should be said concerning the “Cells”, “Nuclei” and “Worms” object types.
These don’t have any color channels bound to them. Additionally they mustn’t be confused with color channels which show nuclei or cells. Color channels are just intensity
channels and the program does not know what is supposed to be shown there. The Nuclei, Cells and Worms are artificial “channels” so that you can identify your objects in a
better way. Thus they must be constructed on the basis of the real channels 1 to 4. The
figures 4.5, 6 and 8 show you the typical setup if you have a nuclei/cell channel like DAPI.
The examples 2.20b and 2.20a show you simple parameters which should work in most
cases. Note that they assume that the nuclei/cell channel is number 4. If in your case it
is not, simply change all the references from channel 4 to channel 1, 2 or 3 as you need.
2.3.7
Multicolor Objects
The main idea behind multicolor objects is to combine co-localized objects on several different channels into one to make further processing easier. To include Multicolor objects
into your calculation, go to “object usage list” and “right-click → add multicolor objects”. You have to add several Multicolor Object channels if you want to look at several
different combinations of channels and co-localization parameters. Then you can choose
the parameters in the object search window. You will find a window similar to Figure
4.8 there where you can select up to 4 channels which should be taken into account and
the numerical co-localization parameter. You can also select the “NOT” checkboxes if
you want to find objects which are non-co-localized to the selected channel. To calculate
Multicolor Objects you must calculate the objects on the color channels first, but this
can be done in the same run (the objects are calculated in the order of appearance in the
list). A good default value for co-localization is 0.35.
2.3.8
Some Examples
In most cases you can use similar parameters (except for threshold and obj. combination
coefficient) for most of the calculations as long as the expected size of the vesicles stays in
the same order of magnitude. Therefore the following figures will provide some examples
how to calculate small vesicles like Cargo, big ones like Nuclei on a color channel and
finally how to use a Nuclei color channel to calculate the separate Nuclei and Cell objects.
CHAPTER 2. PROCESSING
41
Figure 2.17: Example parameters for small vesicles.
Figure 2.18: Example parameters for big vesicles (Nuclei).
(a) Too few...
(b) About right...
(c) Too many...
Figure 2.19: Examples of different cases of found objects.
CHAPTER 2. PROCESSING
(a) Nuclei
42
(b) Cells
Figure 2.20: Sample parameters for Nuclei and Cells. Note that most parameters are grayed
out, e.g. disabled.
Figure 2.21: Example of a reasonable result. The yellow countours are segmented Nuclei and
Cells. Note the highly accurate nuclei contours due to the “active contour” algorithm.
CHAPTER 2. PROCESSING
2.4
43
Track Search
Once MotionTracking has successfully localized every object in the movie, the objects in
consecutive frames can be linked into trajectories, or tracks. A track is the location of
an object over time. Tracks have properties such as speed, direction, maximum displacement, and so on. The Track Search procedure can be started only after Object Search is
completed because it links already calculated objects together.
The Track Search procedure is the 2nd core function of MotionTracking. It allows the
user to ask many important questions, such as: how fast do my objects move? How far
do they travel? Do they all move with the same speed, or are some fast and some slow?
In order to build a track, the program asks this simple question: for each object: in the
next frame, which object is most likely to be the same object we are looking at now? The
user provides input to help the program answer this question. For example, perhaps the
most likely object is the object of the same size? Perhaps the most likely object is the
object that moved in the same direction?
As with Object Search, the program requires input from the user, in the form of Track
Search Parameters. It is important to provide the software with carefully chosen parameters. The next section describes these parameters in detail and guides you through
choosing values that will result in a successful search.
Obviously sometimes it makes no sense to calculate tracks because either you are not
interested in these or your project doesn’t show the same objects during a time-span
(conventional sense of a movie) but rather static images of a certain time. This can be
the case in fixed cell measurements where you take pictures of different wells on a plate
and focus on the differences between them rather than the movement inside of them. If
this is the case you can simply ignore this section and all references to tracks.
2.4.1
Options of Track Search
The options for the Track Search procedure are located in the Track Search menu under
Track Search Parameters. The dialog box that opens lets you adjust for your images, save
parameters settings, and load settings from a file (see figure 2.22).
Figure 2.22: Track Search Parameters window.
CHAPTER 2. PROCESSING
2.4.2
44
Relative Weights
Using the Relative Weights, the user tells MotionTracking what to consider important
when building tracks. Is it important that the objects always move in the same direction?
Is it important that the object maintain the same size? The program uses six relative
weights when deciding which objects belong in tracks. Increasing the value of each weight
will cause MotionTracking to consider this parameter to be of greater importance.
∙ Direction (0 random - 1 straight line): A high value means that the objects are
most likely to move (a) in the same direction or (b) along the same line. For
example, consider the movement of stars in a telescopethey always move in the
same direction, and the user would set a high value. As a counter example, consider
a random diffusion processthere is no correlation in direction, and the user should
set the value to zero.
∙ Position (0 high movement or dense field - 1 nearly stationary or sparse field): The
higher the value the more the algorithm weights the predicted position and restricts
itself to tracking objects which are close to it. The predicted position is determined
based on continuation in the same direction and/or a stop in movement. This is
useful when the objects are stationary or slow moving so that the position is easy
to predict, or when the objects are sparse in the field of view, making the closest
object likely to be correct. In contrast, this value should be set to zero if the objects
move a significant distance and/or the objects are part of a flow in a dense field of
objects.
∙ Speed (0 unpredictable movement speed - 1 constant speed) : A high value means
that the program should construct tracks that maintain a constant speed. This
is useful for cases where a constant speed is expected, and you should set a high
value. It is not useful when speed fluctuations (such as stops-and-starts) are to be
expected, and you should set a lower value.
∙ Intensity (0 unpredictable
means the program should
mean intensity value. Use
the bright and dim objects
fluorescence - 1 constant fluorescence): A high value
construct tracks from objects that maintain a constant
this value when there are bright and dim objects, and
should never be linked into the same track.
∙ Area (0 fast size changes - 1 constant size): A high value means the program should
construct tracks from objects that maintain a constant size. If bleaching is a problem, the tracked object might retain its size, while losing intensity. In this case,
Area would be more useful than Intensity.
∙ Integral (0 unpredictable fluorescence - 1 constant fluorescence): A high value means
the program should construct tracks from objects that maintain a constant integral
Intensity value. This is useful if the objects undergo deformations and changes in
size, without significant bleaching. In these circumstances, the Integral Intensity
value stays constant while the Area and Intensity values will change.
∙ Unidirectional (active (default) or inactive): Active means that the objects must
move in the same direction along a line in 100% of all cases. This differs from the
Direction option in that the Direction weight can be superseded by other weights.
Checking the box for Unidirectional essentially sets the Direction weight to an extremely high value.
CHAPTER 2. PROCESSING
45
The Relative Weights can take any positive values from 0 to 1. One important consideration are the relative values. For example, values of Direction: 1 and Area: 0.1 place
a strong preference to Direction over Area. It is also important to use zero (0) where
appropriate. Negative values are not permitted.
2.4.3
Track Break Thresholds
The Track Break Thresholds tell the program how much variation in object properties it
can tolerate when building a track. For example, how much is the intensity of an object
allowed to change before it can no longer be considered the same object? The default
values for each parameter are 0.3 or 0.4. This means, for example, if the starting intensity
of an object was 1000 auxiliary units, it cannot drop below 400 or rise above 2500; if
so, the track will break. Increasing the value creates more leniency, decreasing the value
makes the software more strict.
∙ Integral Score Threshold: threshold for the intensity integral of the object.
∙ Area Score Threshold: threshold for the object Area
∙ Intensity Score Threshold: threshold for the object peak Intensity.
∙ Total Score Threshold: The Total Score Threshold deals with cases where many
factors are varied (Area and Intensity and Integral), but none of the individual
variances is sufficient to cause the track to break. In other words, the total change
in the object is too great, because everything about that object has changed. The
Total Score Threshold is therefore a critical parameter, and changing this value can
significantly impact the outcome of the Track Search.
2.4.4
Other Parameters
The remaining parameters are divided into three groups. The first group affects how the
program performs computations:
1. Search Depth: This parameter specifies how many frames the program considers at
one time when performing calculations. The default value is 4. The value can be
changed to 3 or to 5. A value of 5 results in much slower calculations, but with
perhaps more accurate results. A value of 3 speeds up the calculations, and this is
appropriate with very dense fields of objects.
2. Min. Track Len. (frames): The minimum track length is set in number of frames.
This value is independent of the Search Depth and is used to exclude short tracks.
3. Max. Speed (um/sec): This parameter is very important! It defines how far objects
are allowed to move. In other words, it draws a circle around each object, and it
tells the program that the next object must fall within that circle. Increasing the
Max. Speed will allow the object to traverse greater distances between frames and
still be considered in the track.
The second group considers the properties of the objects themselves, and what objects
are allowed into the track building procedure:
CHAPTER 2. PROCESSING
46
1. Min. Area (𝜇𝑚2 ): The minimum area that an object can have to be considered as
a candidate for a track start in micrometres squared.
2. Min. Intens.: The minimal intensity that an object can have to be considered as a
candidate for a track start.
3. Intensity/Speed threshold: Very dim objects have the highest potential to be falsepositive results of the Object Searchthey are not true objects. Therefore, it is wise
to prevent the program from connecting very dim objects into tracks, especially if
the dim object is far away for the original. The Intensity/Speed Threshold prevents
MotionTracking for doing this. For an object with intensity below this threshold,
the maximum allowed speed will be set to 0.5 of the max. speed specified in 3 above.
By pressing the “Automatic Params” button, the program will calculate an initial
value for the second group of parameters. MotionTracking does this by looking at the
distribution of object properties, and choosing parameter values so as to include ∼ 66%
of all objects in the initial search. Setting these values to zero will allow every object to
be included. The third group considers whether objects are allowed to disappear for one
or more frames and then reappear. This often occurs if the tracked object is temporarily
out of focus.
1. Interpolation: Selecting this checkbox will allow objects to disappear for one or
more frames.
2. Max. Insertion Number: This specifies the maximum number of frames that an
object can disappear. This number should be kept low, to prevent mistaken linking
of separate trajectories.
In the case of an object that disappears, the program will insert an interpolated value for
the position, intensity, size, and integral of the object. These interpolated values are not
included in any statistical analysis and they are for visualization purposes only.
2.4.5
Track Search Procedure
The track finding procedure will be started under the menu Track Search / Find Tracks.
The program also has the capability to restrict tracks to those that co-localize with other
colors (either by intensity or by raw intensity) if you select “Find Tracks Restricted by
Intensity in Other Channel”.
This feature is relevant for multicolour images. It could be used, for example, to find
only tracks located in the nucleus, if the nucleus were stained by a different color than
the tracked objects. Selecting this option brings up a pop-up box that allows the user to
set the intensity threshold in the other channel.
2.4.6
Other Options
The other options for manipulating tracks are as follows.
∙ Show Intermediate Image During Object Search: With this option, the user can
observe the program in action, directly watching MotionTracking find objects in
your images.
CHAPTER 2. PROCESSING
47
∙ Check Track Integrity: This option performs a security check on your tracks, to
make sure they are in a consistent format
∙ Smooth Tracks: The smoothing feature does just that: it smoothes out the jagged
transitions of a track, converting the track from a saw-tooth-like trajectory into a
smooth curve. This is useful for displaying the tracks.
∙ Delete Non-moving Tracks: This procedure deletes any tracks which do not move
a specified distance. This is useful if you wish to analyze only long-distance tracks
and exclude stationary tracks. Selecting this option will bring up a dialog box that
asks you to specify the minimum travelling distance in micrometers. The program
will then delete any tracks which do not move beyond that threshold.
∙ Delete Zero-length Tracks: This procedure deletes tracks which do not persist for
a minimum number of frames. This is useful if you wish to analyze only long-lived
tracks and exclude short-lived tracks. Selecting this option will bring up a dialog
box that asks you to specify the minimum number of frames. The program will
then delete any tracks which do not persist for this length of time.
∙ Mark Filtered Tracks: This feature marks all tracks within the Track Filter. See
the chapters on Statistics and Track Marking for more information.
∙ Mark All Tracks: This feature marks all tracks.
∙ Unmark All Tracks: This feature removes all track marks.
2.4.7
Track Properties
After the Track Search procedure, MotionTracking stores the following properties of your
tracks: Track Duration, Track Displacement, Track Speed, and Processive Movement.
∙ Track Duration (sec): The track persists for a defined number of frames, and the
number of frames multiplied by the frame rate gives the Track Duration in seconds.
∙ Track Displacement (um): The distance travelled by an Object in micrometers
during its whole Track duration.
∙ Track Speed (um/s): Speed is defined as distance travelled divided by time. While
this is a simple equation, MotionTracking is capable of handling more complicated
trajectories than those with a constant speed. Specifically, the program will calculate
the speed for finite segments of the track, which allows the user to take into account
changes in the speed as the track continues (see Statistic Options below for more
details).
∙ Processive Movement: This measures the amount of time that the object spends
moving in the same direction with the same speed.
CHAPTER 2. PROCESSING
2.5
48
Statistic Filters and Masks
After calculating Objects MT offers several ways to fine-tune the results without having
to recalculate everything. Masks and statistic Filters are the most important and will be
covered here. The menu for both is accessed from the box described in 1.16 by pressing
the upper button (as seen in Figure 2.23).
Figure 2.23: Box in the main user interface. The Object Filters and Track Filters can be
applied separately.
2.5.1
Statistic Filters
A very powerful feature of MotionTracking is that it allows you to select only objects
and tracks that fall within criteria you define. This is done through the Statistic Filters
window: For example, you can examine only objects above a certain size, say the largest
10%. Then, once can ask questions such as: what is the Track Duration for the largest
10%? Is it longer or shorter than objects in the other 90% of cases?
After clicking the button described above the following window shown in Figure 2.24
will appear.
Figure 2.24: Statistic Filter window.
CHAPTER 2. PROCESSING
49
The four filter parameters are:
∙ Object Intensity (Mean Intensity of the object in arbitrary units)
∙ Object Radius in 𝜇𝑚
∙ Object Integral Intensity (Total Intensity of the object in arbitrary units)
∙ Object Elongation (Ratio between longest and shortes cross-section of the objects,
circular objects therefore have low elongation values.)
All of them can be calculated for either the full image (default when nothing is selected)
or “per Cell”. Another option is to restrict the objects to certain areas of the image via
“Statistic Inside Contour”. These elaborate restrictions to specific areas of the image are
handled with Regions Of Interest (ROI) and described in Section 4.3.
The “Spatial Center Type” should be set to “Nuclei” in static images (provided nuclei were imaged) or to “Flow Centers” if you have movies with flow and calculate Flow
Centers or set them manually. If neither Nuclei or Flow Centers are present then this
setting doesn’t matter.
For example, by specifying the Object Intensity for Statistic, you can select objects within
a given range of Intensity values. After clicking Apply, this filter will be used for all statistic calculations. These numbers are all absolute numbers, so if you need relative filters
(like cutting 20% of the smallest objects off) you need to calculate a distribution of the
chosen parameter on the unfiltered objects and then calculate the absolute value corresponding to the relative one from the graph. This topic is discussed more thoroughly in
Chapter 3 on statistics.
Don’t forget that you can use this to remove objects which clearly are noise. For example it is impossible for an object that represents a nucleus to be smaller than a certain
size (like 3𝜇𝑚2 ), so use these values accordingly.
The Statistic Filters can be applied separately to the objects in different colour channels.
Additionally, using the drop-down box: “Statistic for:” allows you to apply the Object
Statistic Filter to:
(a) All Objects
(b) Non-Tracked Objects
(c) Tracked Objects.
To access Track Statistic Filter Options you can use the 3 buttons on the bottom of
the window just left of the “Apply” button.
If you want to apply similar statistic filters to several projects you can load and save
the parameters you have put into the boxes (including the mask) with the load and save
parameters buttons in the lower left corner of the image. Some sub-windows have such
buttons as well, but those will only apply to their respective parameters while these big
ones load and save the whole parameter sets.
These Statistic Filters allow the user to ask complex questions about the objects in their
biological movies. For example, what is the size distribution of objects included in Tracks?
CHAPTER 2. PROCESSING
50
Does this differ for the size distribution of non-tracked objects? And so forth.
The filters can be actively applied to the view window by selecting “Options → Show
Objects for Statistics”. (See 1.21 View Options), but are of course always applied to the
statistic calculation as long as the “ Object (Track) Filter” checkboxes are marked.
2.5.2
Masking
Now that we can filter our objects we move on the subject of Masks.
Masks are used to cut areas of the images based on their intensity. If for example you
are only interested in objects that are inside cells, make a mask on the base of the cell
channel and everything outside the cells will be removed if the parameters are good.
(a) Summary of the mask parameters.
(b) Adding a new condition.
Figure 2.25: The left image shows an overview of the mask parameters and the right one is the
dialog used to add additional conditions to the mask that will be combined using logical
operators.
All listed masks are connected by the logical operation specified in the brackets behind
“Mask Expression” which can be changed to achieve different results. To add a new image
mask, right click on the “Mask Expression” text and select “Add → Image Mask”. A
window shown in Figure 2.25a will appear.
There you can choose the channel that you want to base the mask on. The parameters have
to be chosen for each project individually as they may vary a lot. Choose a representative
frame from the project and adjust the parameters until you find the result satisfactory.
∙ The Threshold parameter is the most important one: it is the numerical intensity
value above which the pixel will be kept.
∙ Blurring by how much the edges of the mask should be blurred. This is used to
prevent a grainy mask. Usualle the default parameter of 1𝜇𝑚 is a solid choice.
∙ Deflation is the number of pixels the borders of the mask are inflated and then
deflated (and vice versa) after the inital mask is calculated. The idea behind this is
that if the deflation closes a hole in the mask it will not be reinflated (and vice versa
with small masked areas outside). Thus high deflation numbers will close bigger
holes. (See example in Figure 2.26)
CHAPTER 2. PROCESSING
51
Mask Type 2 and 3 have different algorithms and may work better with unevenly
illuminated pictures. Confirm by clicking “OK”. Now the newly created Image Mask will
appear in the List below the “Mask Expression”-text. In most cases it is best to set up a
mask for the Nuclei Channel (if present) and fine-tune it by adding Image Masks on the
other channels.
The choice of the logical operator mentioned above decides how the separate image masks
are connected. Let’s assume you have 2 image masks, one on Channel 1 and one on
Channel 2, both with a Threshold value of 50. Now every pixel which has an intensity
of at least 50 on any of the two channels will be kept. If they are connected by “AND”
only pixels which match both criteria (thus over 50 on both channels at the same time)
will be kept. You should go with “OR” unless it does not work.
To test the mask on the current frame click “Test”. You can toggle whether the mask
should be displayed by selecting “Show Mask” in box discussed in “Chapter 1: View
Setup”.
It must be pointed out that the absolute intensities vary from frame to frame so it is
important to check the mask on several frames. These frames should be spread across the
whole project (like frame 0, 9 and 19 from a project with 20 frames) to check whether the
overall intensity shifted during the experiment and the mask becomes inappropriate.
(a) Mask off.
(b) Mask on.
Figure 2.26: Both images display the same frame, on the left the mask is deactivated, on the
right it is active. Note the small particles outside of the cell that were not properly filtered by the
mask because they are too bright. This can be fixed by increasing the Deflation parameter of the
mask.
Note: The “masked area” parameter is a number describing how much relative area
is covered by the mask (therefore not cut-out).
Chapter 3
Data Analysis and Statistics
3.1
Calculate Statistics with MotionTraching
This Chapter is dedicated to the most insightful part of MotionTracking: the statistic
calculations.
While object and track search are important to produce data it is useless without proper
analysis. This is where the massive statistical tools come into play. There is a great
variety of them and this guide will rather show how to access them than explain their
mathematical conception.
MotionTracking offers a variety of tools that can be used to do this analysis. These
are described in Section 3.2.
Objects (or Tracks) that were calculated in the previous stages have a very large number
of possible properties which can be of interest for different experiments. These can be
roughly grouped into
∙ Basic properties of the data, for example Number of Objects in a image (see Section
3.4.1).
∙ Fundamental properties ob Objects (Section 3.4.2) and Tracks (3.4.3), for example
Mean Object Intensity or Total Track Length
∙ Quality Control Parameters used to evaluate the quality of the experiment, for
example In Focus Score (Section 3.4.4)
∙ Specialized Parameters used in specific applications (Sections 3.4.5 and 3.4.6)
52
CHAPTER 3. DATA ANALYSIS AND STATISTICS
3.2
53
Statistic Calculation Tools
The fastest and simplest way to calculate statistics for a given set of images (one MotionTrakcing project) is to use the “Statistics” (3.2.1) menu found in the MotionTracking
Main Window. It is best used to quickly calculate a small number of interesting metrics,
for example to estimate if the mean intensity is high enough over the whole project to
confirm proper staining. In a most of the cases though the number of statistics of interest
is high and it becomes impractical to calculate them one buy one and save each result
seperately. Therefore the “Batch Statistic Window” (3.2.2) is used frequently to calculate and store multiple statistics simultaneously. This “Batch Statistic Window” is the
fundamental quantitative multi-parametric image analysis (QMPIA) tool.
3.2.1
Statistic Menu
3.2.1.1
Distributions and Dependencies
Object Characteristic Distributions and Dependencies are the simplest statistics that can
be calculated and are the main use for the “Statistic Menu”. The results will be plotted
immediately in a graph window (See section 3.2.3). Detailed descriptions of the most
common characteristics can be found in sections 3.4.2 and 3.4.3.
Figure 3.1: Statistic Menu with Distributions dialog highlighted.
The most important items of this menu are the Object (or Track) Characteristic
Distribution (Figure 3.2) and Dependency (Fig 3.3). Both open a separate window which
allows you to select many different Object Characteristics like intensity or size. The Track
Characteristics work exactly like the object ones except offering you parameters like track
duration or speed instead of object size and so on.
The characteristics itself are listed on the left side and are used to change the characteristics of the selected item in the list on the right.
In both dialogs you can add elements and operators with the right click menu as seen in
the right part of Figure 3.3. To add multiple object characteristics use the button found
in the “Add” submenu, as clicking on the left will just change the current one. When
adding a new item you will be asked which characteristic you want to add directly.
As you might imagine, this tool can be used to construct any mathematical formula containing the Object Characteristics and numbers.
CHAPTER 3. DATA ANALYSIS AND STATISTICS
54
Figure 3.2: Object Characteristic Distribution Dialog. In this (not particulary meaniningful)
example the “Characteristic” to be calculated is the difference between maximum and mean
intensity which is weighted by the integral intensity. This will be calculated for all objects on
Channel 1 (red) in the project (.mtj file). Note that it is possible to use custom binning for the
resulting distribution in the bottom of this window.
You will notice several places to select weighting functions. It will open an almost identical dialog to that of Figure 3.2 where you can select the parameter you want the original
characteristic to be weighted by. This allows you to take certain objects as more important than others.
For example a size distribution weighted by mean intensity will take brighter object into
account stronger than dimmer ones and thus reduce the impact of the noise.
The weighting can, of course, be done in different ways: Mean, Mode, Median and Sum.
Sometimes it makes sense to calculate a important parameter with all available weighting
and without any weighting at all to compare the results. Mean is the most default setting,
though.
The results will be plotted in an appropriate graph (see section 3.2.3)
Both windows (3.2 and 3.3) allow to save (and load) the setup so that it can be used
on a different project. The buttons are in the menu bar at the top.
Important Note: To select a different channel you have to do it in the box shown
in Figure 1.16.
3.2.1.2
Time Course Analysis
MotionTracking can measure how certain statistics change over the course of a movie. For
example, how does the number of objects change with time? Does the number increase or
decrease? Or again, how does the Mean Intensity of my objects change with time? These
CHAPTER 3. DATA ANALYSIS AND STATISTICS
55
Figure 3.3: Object Characteristic Dependency Dialog showing an example. In this case the
unweighted Dependency between the ratio of mean intensity to size and the elongation of objects
is set up to be analysed for all objects on channel 1 (red). The mean of the distribution will be
displayed as the numerical result as selected in the box on the bottom left of the window.
types of analysis are accessed through the “Statistics → Time Course” submenu shown
below:
∙ Number of Objects Course: reports the number of objects found in each frame by
Object Search versus the time of the movie.
∙ Number of Tracks Course: reports the number of tracks present in each frame as
found by Track Search versus the time of the movie.
∙ Integral of Object Characteristic Course: reports the sum of the Object Characteristic Integral for all objects in the frame versus the time of the movie. The
Characteristic you are interested in can be chosen from a dialog similar to figure
3.2.
∙ Mean Object Characteristic Course: reports the sum of the Mean Object Characteristic for all objects in the frame versus the time of the movie. Characteristic
choice as above.
∙ Track Characteristic Course: reports the sum of the Object Characteristic Integral
for all objects in the frame versus the time of the movie. Characteristic choice as
above.
∙ Total Intensity Course: reports the sum of the intensity values of every pixel versus
the time of the movie. Note: these values will be very large numbers (imagine an
average intensity of 250 a.u. on a pixel for a 1000 × 1000 pix image) for larger
images. This statistic is also useful in characterizing photo-bleaching.
CHAPTER 3. DATA ANALYSIS AND STATISTICS
56
∙ Background Intensity Course: reports the sum of the background fluorescence in
each frame versus the time of the movie. Note: the sum of the background fluorescence will be a very large number for larger images. This statistic is useful in
characterizing the photo-bleaching of the background fluorescence.
∙ Mask Area Course: If a mask has been applied to the images, this feature calculates
the relative area of the mask with respect to the area of the image as a whole. The
relative area is plotted versus the time of the movie.
∙ Object Characteristic Distribution Course: reports the change of a Object Characteristic Distribution over time.
Additionally, there are 5 more Time Courses based on dependencies between different
Object Characteristics or Intensity in particular, which can be very handy for certain
tasks but are too specialised to be explained here in detail.
3.2.1.3
Analysis of individual Tracks
MotionTracking allows you to examine the properties of individual tracks as well. Position
the mouse cursor over the track of interest. Right-click to bring up a context-sensitive
menu. Select the appropriate statistic.
Figure 3.4: Overview of Statistics for Individual Tracks.
The various options in the Track Time Course menu will produce the value (e.g., the
Intensity) of the track versus the time of the track. In the case of object properties such
as Intensity, Radius, and Area, the program measures the objects associated with the
track in each frame.
3.2.2
Batch Statistic Window
From “Statistics → Batch Statistics → Open Batch Statistic Window” you can access
the “Image Set Analysis” window where a row in the table will be created for each frame
in the picture (if you have a project loaded). The file-name column will be filled with
the path and filename of each picture. From here on you can save the table as an .srl file
which works independently from the project files once created. It will copy the statistic
CHAPTER 3. DATA ANALYSIS AND STATISTICS
57
filters and requires masks and objects (and tracks if applicable) to be already calculated
and present.
Figure 3.5: Overview of an empty Batch Statistic Window. Each line represents one frame of
the project. The first column shows the path to the file on the hard drive, the second column is
added by default and will contain some sort of description of the conditions later on.
The first option, “Open Batch Statistic Window” will do just that: open an “Image Set
Analysis” window where a row in the table will be created for each frame in the picture.
The file-name column will have the corresponding full file name of the image data for
each frame in the order they are in the project. From there on you have to add additional
columns depending on what you want to calculate. This Image Set Analysis has three
core menu items: Image Set Analysis (Figure 3.8), Process Data (3.9) and Automatic
Enumeration (3.6).
3.2.2.1
Automatic Enumeration
Figure 3.6: Overview of the automatic enumeration menu. It is used to assign meaningful
identifiers like the experimental conditions to each image in an (semi-)automatic fashion.
Enumeration is essential for MotionTracking to handle the data set properly. This
means that the “Sequence Value” column will be filled out according to some rules. Although any statistics can be calculated without it, no processing can be done and no data
can be plotted unless all rows of the table are enumerated.
MotionTracking has different pre-defined fields to handle certain time of information that
CHAPTER 3. DATA ANALYSIS AND STATISTICS
58
is used to describe the conditions of each of the images in the table (Gene, siRNA, concentration etc.).
There are multiple ways to enumerate the data:
∙ Manual Enumeration is the easiest solution for small numbers of lines. Just
double-click on each well in the Sequence Value column and fill in the condition of
the data. To avoid confusion it is best to keep the description short to one character
sequence.
Although it is technically possible to manually enter a sequence that will math
the MotionTracking format for the Gene Name, siRNA etc. fields it can be quite
confusing.
∙ Random or Sequential Enumeration will introduce arbitrary values. Both can
come in handy if you just want to plot the data quickly, but can’t be used to process
data properly.
∙ Automatic Enumeration for OPERA can be used if the barcode of the images
can be parsed into their exact location. An enumeration file that maps position and
condition can then be applied to identify all images of the table at once. See Figure
3.7 for the necessary layout of such enumeration files.
In addition it’s possible to extract certain information like plate number, date or run
number directly from the barcode via “Opera File Name Run/Plate/Measurement”.
Figure 3.7: Layout of an enumeration file. It can be crated with Excel or similar, but must be
saved as a .csv.
3.2.2.2
Image Set Analysis
The first one, “Image Set Analysis” is used to add parameters which will then be calculated
when the “Execute” button is used. Which parameters to use depends on your experiment in particular, but almost certainly you will be interested in the object characteristics
of “size” and “mean -”, “total -” and “integral intensity”. Typical track characteristics
are “speed” and “duration”. Of course MT has many more to offer and you can create
any combination or ratio between the characteristics as described in via the dependencies
menu. See section 3.4 for a list of available statistics.
If you have calculated a part of the table and click execute you will be asked if you
want to recalculate all data (which will erase all previous data) or not (in which case only
CHAPTER 3. DATA ANALYSIS AND STATISTICS
59
the lines with at least one empty cell will be calculated). You can select a specific number
of lines before clicking the Execute button, in which case you will be asked if you want to
narrow your calculation on the selected rows. Additionally there is a way to (re-)calculate
single columns, rows or wells out of the list as well: “right click → calculate → calculate
column/row/well”. To clear all data from the rows use “right click → clear rows”.
The Object and Track Characteristic (Dependency) menu items work exactly as described
in section 3.2.1. Additionally to the possibilities that they give you there are some quite
useful features mostly based on Distances. Remember that all Cell or Nucleous related
options require nuclei and cells to be calculated during Object Search.
Additionally to all statistics that you want to use it is advised to include the following
quality control parameters to filter out empty, overfilled and out-of-focus images:
∙ Number of Objects on the Nuclei-Channel
∙ Masked Area
∙ any of the parameters specified under “Image Quality Controls”
To filter the results, sort the statistic table by one of the quality control parameters
(left click on the column header and select “Sort”). Then select all rows falling into your
category as you would normally select multiple files in windows, and “right click → delete”
them. This delete will only affect the current .srl file and will never touch any project or
image files.
Typical thresholds for bad pictures are the following numbers:
∙ any with less than 5 (too empty) or more than 65 (too full) Nuclei
∙ less than 5% masked area (too empty again)
∙ about 10% of the images with the least contrast (out-of-focus score), although this
strongly depends on the quality of your imaging. You should take a look on the
low-on-contrast pictures before deleting them by selecting them and using “Right
Click → Go To Image/ Activate Image Set”
After you have selected the parameters you need you can get an overview of the whole
parameter set by using “Change Column Set Parameters” from Figure 3.8.
This list of parameters can be saved as a “Statistic Template” and loaded (applied)
to other .srl files in the future via “File → Statistic List Template → Load/Save Statistic
List”.
As you might have noticed, the table can grow very big if you want to know many things
about the pictures. Besides, every cell of this statistic contains the whole distribution of
this parameter with all necessary information labelled as “additional data”. Thus, the
size of a .srl table can easily grow to 100 Mbyte or more. If you don’t need the whole
distributions and are satisfied with the Mean, which is displayed as a number in the cell,
select “No Additional Data” and the file size will be considerably smaller. You can view
the “Additional Data” at any time by selecting it from the context menu of any cell. To
get the additional data back you have to recalculate the respective cells, rows or columns.
CHAPTER 3. DATA ANALYSIS AND STATISTICS
60
Figure 3.8: Overview of the image set analysis. It is used to add statistics to be calculated.
3.2.2.3
Process Data
This menu is used to manipulate the whole data set. Remember that most of them won’t
work unless the data is properly enumerated (see section 3.2.2.1) It’s most important
functions are:
∙ Combine Images of Equal Condition: combines the data from all lines which
have the same values in the selected fields of the enumeration (for example combine
all images with the same Gene and siRNA).
∙ Normalize: allows you to normalize the complete data set by either Total Set or
a Control condition. In addition there are some options to shift the base value and
scale the data sets.
∙ Remove: offers various functions to remove certain frames from the result file. For
example outliers or those with bad values (Empty lines, NaN, etc.)
The common procedure is to enumerate the data, calculate everything and then process
the data by combining all images of equal conditions and then normalize them by the
control group (Mock, Untreated, etc/).
CHAPTER 3. DATA ANALYSIS AND STATISTICS
61
Figure 3.9: Overview of the processing menu. It is used to process the table as a whole after
calculation.
3.2.2.4
Plotting Data from Batch Statistic Window
There are multiple ways to plot a certain data set in MotionTracking. Note that the data
set needs to be enumerated, so that none of the “Sequence Value” cells is empty, or the
plots will not be created.
∙ Profile (Curve/Bar Graph): Plots the profile(s) of the selected line(s) by displaying the value of each cell on the y-axis and the parameters on the x-axis. Note
that it is helpful to normalize the data beforehand to get reasonable profiles as
different parameters can be on different orders of magnitude to be compared in a
non-normalized fashion.
∙ Create Curve/Bar Graph: Plots the values of the selected column for all lines.
This is useful to compare a specific parameter across all conditions.
∙ Get Additional Data: Plots the distribution underlying the selected cell. Note
that some parameters are just values (for example Number of Objects on Channel
1) but others have a distribution (Mean Intensity of Objects on Channel 1) and the
mean value is the one that is displayed in the table.
∙ (Cumulative) Parameter Distribution: Plots the distribution of the mean value
of the selected parameter of all rows (conditions).
3.2.2.5
Handling multiple projects or result files
Batch Statistic of Multiple Projects: After selecting the project files, an “Image Set
Analysis” window will open with the lines representing whole projects instead of simple
frames.
This is useful if you have grouped your images in projects in such a way, that you can
CHAPTER 3. DATA ANALYSIS AND STATISTICS
62
Figure 3.10: Overview of the available ways to handle multiple projects and result files.
compare complete projects instead of single frames (for example a movie of one condition
vs. a second movie of a different condition).
Create .srl files of Multiple Projects with Common Template: creates a .srl file
for each project in the list and uses the selected template for the other columns so that
you don’t have to do this manually.
Batch Statistic of Multiple Result (.srl) Files: is a little bit different. Instead of
using projects like the other two, it uses already existing result files. After choosing all
the .srl files you want it goes through them and executes each one. In the end it works in
the same way as any batch operation like “batch find objects” or “batch find tracks”.
Apply Statistic Template to multiple SRL files: loads all of the selected result
files and applied the selected template to them. Useful if you create a bunch of .srl files at
some point and want to apply a new template to them (Warning: overwrites old template
and deletes all calculated statistics).
3.2.3
Graph Window
The “Graph” window is used to both visualize data and do simple or complex manipulations of the resulting curve (for example averaging multiple curves). In MotionTracking
graphs are the coordinate systems and curves are the plotted datasets. You can add
as many graphs or curves as you want and move the curves freely between the graphs.
In Addition to the main “Graph” Window there are “BarGraph”, “3d Graph”, “Time
Course” and “Scatter Plot” Windows that have essentially the same functionality and
user iterface, but handle different types of data.
Let’s start with the simple stuff: you can find all scale-related options in the “Scale”
menu in the menu bar. You may use “Find Scale” to let the program figure out the
optimal scale by itself, but sometimes, for example if you want a logarithmic scale, you
have to set it up manually. Select “Set Scale” in this case. You will see a window similar to
Figure 3.12. Using x/y min and max will let you set up the minimal and maximal values
CHAPTER 3. DATA ANALYSIS AND STATISTICS
63
Figure 3.11: Plot of the distribution and the cumulative distribution of the mean intensity of
the same objects. To switch to the calculation of cumulative distributions you need to select it in
the “disribution build parameters” which can be accesses via the button right above the
illumination correction interface entry.
of the view range. The Checkbox behind these values allows you to set up a logarithmic
scale for the respective axis. Remember that once you select log scale you can’t set the
minimal (or maximal if working with negative values) to 0. (Because of 𝑙𝑜𝑔(0) = −∞).
The “Enable Sweeps” option allows you to display an split in the x-axis with the values
specified below.
Figure 3.12: Scale setup dialog.
The “Graph” Submenu allows you to label your axis, create a legend and turn on a
second y-axis on the right side of the graph. The “Marker” submenu is related and allows
to modify shape and size of the curve points (markers) and thickness of the axis.
To add text, arrows or similar try the “Text” submenu. The text-fields you can add
there behave just like normal text fields in any image editing program and can be moved
around or manipulated. If you don’t like the colors of the plot, go to “Color” and select
the appropriate option.
If you want to know the exact values, select “Cursor On” in the Submenu bar to
get a line on where your cursor currently is located. A separate window with the exact
coordinates where all curves cross this line will be displayed.
CHAPTER 3. DATA ANALYSIS AND STATISTICS
64
Figure 3.13: Plot of the distribution of the mean intensity of objects as well as an integrated
(or summed up since it’s discrete) version of the same plot. Note that the bottom graph has been
labelled and resized for demonstation purposes.
It is possible to save graphs and curves either together (Save Window ) or just the curves
(Save Curve (Set)) for later use through the file menu. This will use a MotionTrackingspecific file format (.gwd) so the calculations can be continued properly when the graph
is loaded again.
The whole plot can be exported as an image in various formats (Save Image As). The
data sets (curves) can be exported as a .csv file for further analysis with Excel or similar
programs (Export Curve as CSV/Excel ).
The last and most complex submenu is “Curves”. It contains all the mathematical
options available in the graph menu. Most of them have a lot of sub-options and parameters so a full explanation would be too long. At this point you should know what
you want to calculate so that you can look for the functions you need. Usually the name
is self-explainatory. Still, some important ones will be discussed in the “Data Analysis”
Chapter (see 3.3).
CHAPTER 3. DATA ANALYSIS AND STATISTICS
Figure 3.14: Curves submenu.
65
CHAPTER 3. DATA ANALYSIS AND STATISTICS
3.3
66
Data Analysis
TODO
3.4
Statistic Characteristics and Parameters
The following sections will provide a brief overview of the most important available statistics for calculations. Note that some of them only exist in the Batch Statistic Window.
3.4.1
Common Statistical Parameters
∙
3.4.2
Object Characteristics
∙ Size
∙ Area
∙ Elongation
∙ Contrast
∙ Mean Intensity
∙ Maximum Intensity
∙ Integral Intensity
∙ Position Accuracy
∙ Speed (Plus-End, Minus-End)
∙ Distance to Center
∙ Volume (of Nucleous)
∙ Number of Neighbours
∙ Apical/Basal/Lateral Area
∙ Density
3.4.3
Track Characteristics
∙
3.4.4
Quality Control Parameters
nothing complicated
CHAPTER 3. DATA ANALYSIS AND STATISTICS
3.4.5
Shape Analysis
buggy
3.4.6
Other Statistical Parameters
rare
3.4.7
Example Statistic List
67
Chapter 4
Tools
4.1
4.1.1
3d Analysis
Introduction to 3d analysis
MotionTracking provides a large variety of tools to work with stacks of images that can be
interpreted as 3d images. This document is intended to provide some basic explanation
how to process such stacks and calculate objects and structures in 3d. Since MotionTracking is under constant development and functions are added and optimized frequently, some
information maym be out of date. It is assumed that the reader has a basic understanding
of MotionTracking and the 2d functionality. Refer to the MotionTracking manual for an
introduction to MotionTracking itself.
The processing itself can be done on any machine, but the 3d view requires a up-to-date
graphic card with proper drivers installed (see Requirements for 3d).
4.1.1.1
Requirements for 3d
First it is recommended to update your display driver.
MotionTracking uses NVidia CUDA technology that needs to be installed first (https:
//developer.nvidia.com/cuda-downloads). Follow the installation instructions provided by NVidia and install all available CUDA components.
As of 2014, support for AMD/ATI graphic cards is neither implemented nor planned.
Please note that 3d calculations require a lot of resources, mainly a stong GPU and
lots of RAM. The specific demands depend on your data sets.
4.1.1.2
File Structure of 3d Images
The file structure is slightly different than in 2D image sequences or movies. The whole
stack of images is handled as a single image with multiple layers with the same X, Y
coordinates but different Z values. Instead of saving each layer as single .mtf image files
as it is the case with movies all the raw image data is saved as one single .MTST file.
As before, the images can have up to 4 different color channels. A major difference is
that most of the processing is done directly on the color channels of the stack rather than
it’s objects. To provide some space for processing there are up to 8 artificial, temporary
channels called prc1 to prc8 where the partly processed data can be stored. The first 4
68
CHAPTER 4. TOOLS
69
prc channels are called processed stack 1 and the other 4 processed stack 2. In general
they are not saved but they can be saved, loaded or exported by accessing “File → ZStack
→ Save (or Load or Export) → Processed Stack 1 (or 2)” manually if necessary.
In general the processing leads to the calculation of objects such as triangulation meshes,
central lines and so on which are handled as objects similar to the treatment of vesicles
in 2D. Therefore it is very important to save the objects manually by clicking “File →
Objects → Save Objects in Current Frame”.
4.1.2
First Steps
4.1.2.1
Import, Load and Save Stacks
MotionTracking provides a direct import function for Zeiss microscope data. Stacks acquired in another way need to be imported manually.
∙ Zeiss .LSM stack (“File → Import → Import Images → Zeiss → Import Zeiss
LSM”)
This will convert the data directly to .mtst stacks. Select all .lsm files you want to
import adn the directory where the .mtst files will be saved. You can either import
them all into one project or each stack in its own. When prompted, combine planes
as Z-Stack.
∙ Zeiss .CZI stack (“File → Import → Import Images → Zeiss → Import Zeiss
CZI”)
Same procedure as with .lsm files. TODO check bug
∙ Build Z-Stacks from series of 2D images: (“File → Import → Load Sequence
of Images (from Directory)”)
After selecting the images you will be prompted if you want to import them as
a Z-Stack. If so, an additional window will apear and ask what the Z distance
between images is and how many images compose one single stack. If the number
of images selected is larger than the number of images per stack it is assumed that
the selection is a sequence of stacks (with the same number of images per stack.).
The stacks will be saved as “stack XXX.mtst”.
4.1.2.2
3d View
The stack of images can be visualized in 3d. This has no practical purpose from the
calculations point of view, but it is very useful to visualize the actual data. To access
the 3d view select either the checkbox labelled “3D” above the image. The first time you
access the 3D view after loading the project you will be asked which channels you want
to transfer to 3D view. After that it won’t recalculate the 3D even if the data changed
due to processing. To update the 3D view got to “Processing → Process ZStack →
Transfer Stack to 3D”. This transfer is necessary because the visualization requires some
calculation time. Therefore it would be counter-productive to recalculate everything if it
is not desired by the user.
4.1.3
Functions and Scripts
The processing of the stack is usually a sequence of operations. For example one might
start with Smoothing the data, then continue with Segmentation, Triangulation to get
CHAPTER 4. TOOLS
70
a mesh and finally finding central lines (See Fig. 4.1). Each operation can be started
alone by selecting “Processing → Process ZStack → Operation over Stack”. On the other
hand, since most operations are a part of a sequence, it is much more convenient to use
scripts. Scripts basically list all selected operations in order of execution. They can be
loaded and saved to process multiple projects in the same way. To access scripts select
“Processing → Process ZStack → Stack Operation Script”. It will always load the last
script used. Scripts can be executed from the beginning by selecting “Start” or from the
selected entry by “Start from Selected Step”.
To create a script simply click “Add” and add an operation. A new line will appear
in the script list in the format “[A -> B] OPERATION (PARAMETERS)”:
∙ “A” is the source channel, from which the data is taken. Make sure than each step
is using the respective output channel of the previous one.
∙ “B” is the destination channel where the processed data is stored. Since it would be
unwise to overwrite the original data MotionTracking provides 6 virtual channels to
store intermediate results called “Prc1-6”. It is advised to use the “Prc” channels
for all operations and only copy to final result in to the real color channel in the end
to preserve the original data. In addition it is useful to use a different prc channel
after each time-consuming operation like segmentation to save time on recalculation
if something unexpected happens.
∙ “OPERATION” is the name of the applied operation.
∙ “PARAMETERS” is a list of all parameter values of the operation. They are shown
in the same order as they appear in the dialog when selecting the operation.
The order of operations can be modified by selecting an operation and clicking “Move
Up” or “Move Down”. “Clear” clears the scripts and removes all operations. To modify
the parameters of an operation click “Edit” or double-click on an operation.
Figure 4.1: Example of a script. It processes the channel with the CD13 marker which is
named “CD13”. In the end the triangle mesh and the central lines of that mesh are copied back
into the color channel as objects.
CHAPTER 4. TOOLS
4.1.4
71
Common procedures and order of operations
Typically a procedure to find objects has the following concept:
1. Smoothing of original data - optional, but recommended.
2. Segmentation
3. Triangulation
4. Smoothing and/or fine-tuning of triangulation mesh - optional, but recommended.
5. calculation of central lines
6. copy mesh and central lines as objects back into original color channel
Important Note: Triangulation can only be applied on Segmented channels
The following examples are working procedures for different types of objects
Figure 4.2: Script for a channel with a tube like structure
Figure 4.3: Script to find nuclei. After calculation they are copied back to the image (“Main
Frame”) as objects that can be used to calculate statistics.
CHAPTER 4. TOOLS
72
The inflation/deflation process in the nuclei script (Fig. 4.3) is supposed to close the
inner holes of the nuclei mesh because the nuclei calculation requires filled objects, not
surfaces.
It should be obvious that some operations can be only executed after others, for example
smooth thriangle mesh is possible only after the triangle mesh is calculated.
CHAPTER 4. TOOLS
4.1.5
73
List of Functions
∙ Segmentation - creates a mask on each layer to seperate objects. Parameters
need to be fine tuned for each channel and the result of the segmentation has to be
verified manually. Typical parameters for tube-like structures are ...
∙ Triangulation - calculates the triangle mesh. Parameters specify how man pixels
in each dimension should be taken into account. Typical values are 2, 2.
∙ Central Lines - calculates the central lines of the triangle mesh. Estimated tube
radius should be as accurate as possible to ensure proper behaviour on branching
points.
∙ Find Nuclei - calculated nuclei on basis of a triangle mesh.
∙ Classify Nuclei - TODO
∙ Find Cells - calculates cells on basis of nuclei, triangle meshes and a unprocessed
color channel with data related to cell boundaries. A higher Intensity Gradient
means that the intensity of the channel repels the cell boundaries stronger. A lower
value for accuracy means more precise boundaries. It can be defines which meshes
are impassable for the cell contours. EXPAND
∙ Process Central Lines - TODO
∙ Resample Active Mesh - recalculates the triangle mesh based on a new sample
of control points.
∙ Resample Cells - recalculates the triangle mesh of cells.
∙ Tune Active Mesh - performs a fine tuning of the triangle mesh by reprocessing
the surface.
∙ Tune Cells - TODO
∙ Apply ROI Mask (Bool) - apply either the normal or the inverse mask based on
Regions of Interest (ROI). See ROI in MotionTracking manual. Parameters: direct
or inverted mask.
∙ Apply Segmented Mask (Int, Bool) - apply the mask calculated by segmentation
on a channel to a different channel. Parameters: channel number that provides the
mask, direct or inverted mask.
∙ Binning (Int) - compresses the image by the specified factor in each dimension (X,
Y, Z). Useful to reduce the amount of memory and calculation time required.
∙ UnBinning - reverse of Binning (see above).
∙ Median Smooth - smooths the original image data (intensity values) of one channel.
CHAPTER 4. TOOLS
74
∙ Blur (number) - blurs the image with a Gaussian smooth with the size specified in
the parameter (in micrometers).
∙ Smooth Cells - smooths the surface of the Cell objects.
∙ Smooth Nuclei - smooths the surface of the Nuclei objects.
∙ Smooth Triangle Mesh - smooths the triangle mesh N times with a weight W.
∙ Tangential Smooth Triangle Mesh
∙ Diffusion - diffuses a channel with the given formula.
∙ Laplasian - applies the Laplace operator (divergence of the gradient) on a channel.
∙ SQRT LUT
∙ Shift - shifts a channel relative to all other channels by dx, dy, dz.
∙ Correct Dark Frames - operation is used to correct frames with missing information by interpolating information from the neighbouring frames. The threshold
value is the relative intensity of one frame to it’s two neighbouring frames.
∙ Deconvolution - Reverse operation of convolution - optical distortions can be
modelled as such and therefore this can be used to correct distortions.
∙ Deflation - decreases the size of a filled mesh in every direction by X pixels.
∙ Deflation by Trace of Inflation - CHECK decreases and then increases the size
of a filled mesh in every direction by X pixels.
∙ Deflation 2D by Trace of Inflation 3D - CHECK decreases and then increases
the size of a filled mesh in every direction by X pixels.
∙ Inflation - increases the size of a filled mesh in every direction by X pixels and fills
the new pixels with the value Y.
∙ Inflation by trace of Deflation - increases the size of a filled mesh in every
direction by X pixels and fills the new pixels with values taken from the selected
channel and then decreases it by X pixels again.
∙ Arithmetics - performs basic arithmetic operations (+ − */) either between two
channels or on one channel.
∙ Sum Channels
∙ Copy ... operations used to copy objects from one channel to another.
– Copy Cells
– Copy Central Lines
CHAPTER 4. TOOLS
75
– Copy Channel Data
– Copy Nuclei
– Copy Triangle Mesh
∙ Fill ...
– Fill Cells - Check
– Fill Central Lines - Check
– Fill Nuclei - if Nuclei type objects have holes inside this operation fill them.
– Fill Triangle Mesh - fills the mesh so that it becomes an object rather than
a surface. Parameter: Binning (similar to Binning operation, see above).
∙ Remove ... operations used to remove objects.
– Remove Central Lines
– Remove Small Nuclei
– Remove Small Triangles in Cells
– Remove Small Triangles in Mesh
– Remove Small Triangles in Nuclei
– Remove Triangulation
∙ Delete Small Objects - deletes all objects that are made of less than a certain
number of voxels. A voxel is the equivalent of a pixel in 3D.
∙ Free Channel Memory - removes everything from the selected prc channel and
frees up the memory. Very useful for machines with low memory.
∙ Split ... operations used to split objects or rough parts of triangulation meshes.
– Split Nuclei
– Split Large Triangles in Cells
– Split Large Triangles in Mesh
– Split Large Triangles in Nuclei
CHAPTER 4. TOOLS
4.1.6
76
Stack Statistics
All functions for the calculation of statistics on 3d stacks can be found at “Statistic→Statistics
ZStack” and are divided into the three categories “Central Line Statistic”, “Object Statistic” and “Cross Object Statistic”. Some functions are still experimental and may not work
properly.
4.1.6.1
Central Line Statistic
These statistics are calculated from central line networks that were computed during
Z-Stack processing.
∙ Radius Distribution - Radius distribution along the network.
∙ Branches Analysis - Several parameters for branch analysis: 1) branch length, 2)
branch Euclidean distance; 3) branch straightness; 4) branch shape coefficient 1; 5)
branch shape coefficient 2; 6) branch estimated surface area; 7) branch estimated
inner volume. Some parameters require pre-calculation of radius distribution; the
procedure modifies the graph by removing all the slab points.
∙ Branches Number Neighbour Objects
∙ Junctions Number Neighbour Objects
∙ 2-Graphs Distance Distribution - Distance Distribution of the closest distance
between each node point in one tree (i.e., canalicula) and the points in another
tree (i.e., sinusoids), considering only points in a certain user-defined radius (speed
reasons).
∙ 2-Junctions Rotation Angles - Rotation angle between two adjacent branching
points, between 0∘ (parallel) and 180 (anti-parallel).
∙ Junction Spatial Analysis - Spatial Density of junction nodes, useful for zonation
analysis; the visualization part is missing.
∙ Junction Cardinality - Cardinality of branching points.
∙ Planarity Angles - Planar projection of branches at junction nodes and angle
distribution analysis.
∙ Branches Orientation
∙ Angle Distribution - Angle distribution between all couples of branches emanating
from a junction.
∙ Absolute Angles Distribution - Distribution of absolute angles with the axes x,
y, z of the image stack between of all branches emanating from a junction.
∙ Distance of Close Parallel Branches
∙ Distance of Parallel Branches 2 Networks
∙ Total Length
CHAPTER 4. TOOLS
77
∙ Loop Analysis
– Loop Analysis (single) - Identification of single (minimal) loops and calculation of several parameters for describing features of single loops: “number of nodes”, “branch length mean”, “branch length variance”, “node cardinality mean”, “node cardinality variance”, “loop radius mean”, “loop radius variance”, “loop circularity (circumference/total length)”, “irregularity
(max rad/min rad)”, “planarity (br len pl / br len)”, “planarity (average plane
dist)”, “polygon area”, “eccentricity plane-1 (0/1)”, “eccentricity plane-2 (0/2)”,
“eccentricity z (0-1 / 2)”, “normal x-angle”, “normal y-angle”, “normal zangle”.
– Loop Analysis (couples) - Identification of couples of adjacent loops and calculation of several parameters for describing features of loops couplets: “couplets angles”. Other parameters missing.
– Analyse Features - General procedure for the spatial distribution of any
network statistics and color-coded visual representation of the spatial variation
of some parameters. Very useful for zonation analysis at a glance.
– Polygon Edges Analysis
4.1.6.2
Object Statistic
These statistics are calculated on the basis of previously calculated nuclei and cells.
∙ Number Of Neighbours - Distribution of number of neighbours for cells and
nuclei. A neighbour is an object which surface is closer to the object surface than a
user defined threshold.
∙ Nuclei Volume Distribution - Distribution of nuclei volume in one stack.
∙ Nuclei Surface Distribution - Distribution of nuclei surface in one stack.
4.1.6.3
Cross Object Statistic
These statistics requite both calculated nuclei/cells and central line networks.
∙ Cells per Network Junction - Distribution of number of cells sharing a single
network junction (neighbouring cells are the one closer than a user-defined threshold).
∙ Cells per Network Branch - Distribution of number of cells sharing a single
network branch (neighbouring cells are the one closer than a user-defined threshold
to any point of the entire branch).
CHAPTER 4. TOOLS
4.2
4.2.1
78
3d Reconstruction of Sliced Tissues
Overview
To image large amounts of tissue it is necessary to cut it into slices of sufficiently small
thickness so that they can be imaged properly with optical microscopes. Typically each
slide is imaged as a grid of overlapping Z-Stacks which need to be stitched into a full slice
first. The slices then need to be aligned to reconstruct the overall tissue.
In addition the overall imaging can be done with low resolution (LR), while areas of specific interest can be imaged with higher resolution (HR) that need to be mapped correctly
into the lower resolution stacks - this requires additional computation.
The reconstruction procedure contains 10 steps. Due to the large amount of calculations involved, each step generates it’s own result files so that you can return to any
point of the procedure at any time without having to recalculate everything. Those result
files are either .mtst (MotionTracking Stack) that contain full image data or .csv (Comma
Seperated Values) that contain transformation matrices. surfaces etc. that can be applied
to the original stacks. Most steps will suggest default file names for the output files. It is
reccomended to use those.
The reconstruction is accessible through “Processing → Process Z-Stack → Merge Stacks”.
It is possible to set up sequential execution of operations via “Processing → Process ZStack → Merge Stacks Script”.
4.2.2
Procedure
4.2.2.1
Stitch Grid of Images
The first step is to stitch the various z-stacks of one slice. It is necessary to do this for all
z-stacks of the tissue, both low and high resolution images. At the end you should have
one .mtst per slice.
1. enter grid size (X, Y) of the slice.
2. choose the overlap between the z-stacks (in pixels (CHECK)).
3. select the resampling rate (default 1, 1 for low resolution images. For high resolution
resolution
).
images use the ratio of High
Low resolution
4. at the moment, only standard blending is implemented.
5. select the file where the result will be saved (.mtst).
6. generate the grid by clicking “prepare grid”.
7. fill the grid by selecting “load list of files”. Supported formats are .mtst and Zeiss
.lsm and .czi.
8. the calculations take quite a while to process and are therefore organized into a task
list to do multiple stitches in a queue with no additional user interaction. Use “add
task” to add the prepared task to the task list.
CHAPTER 4. TOOLS
79
9. Repeat the above steps to add further tasks to the list.
10. When all tasks are in the list, start the calculations via “OK”.
(b) High-Resolution Positioning
(a) Stitch Grid of Images.
4.2.2.2
High-Resolution Positioning
The second step is to position the high resolution slices in the tissue. Select the high
resolution .mtst and that you want to position and the low resolution slice .mtst it should
be located in. Both files were the result of step one. Make sure that the sinusoids channel
info for both images is correct so that the algorithm knows what channels to match.
The “refinement pyramid” is used to downsample large datasets to reduce memory requirements. For average machines the default values are (0.25, 0.25) for the first level and
(0.128, 0.128) for the third. On high end machines you could use (1,1) and (0.25, 0.25) to
slighly improve the accuracy of the result at the cost of more computational resources. It
is not advised to go below 0.128 because otherwise small objects may produce artifacts.
This step will generate transformation matrices (.csv) for the HR slices that will be stored
with the same filename and path as the HR slices.
CHAPTER 4. TOOLS
4.2.2.3
80
Generate High-Resolution-Channel
This step produces a visualization of HR slices inside the LR slice. Select the LR slice that
includes the HR slices. Then, add all relevant HR slices. The program will automatically
ask for the corresponding transformation matrices.
Finally, select the output file name. It will be the a .mtst with one channel that shows
the HR position in the LR stack (CHECK). Note that this will only be a visualisation of
the position, not the full data set.
(a) Generate High-Resolution-Channel
4.2.2.4
(b) Merge Files
Detect Surface
This is the most error prone step. The algorithm will try to calculate the surfaces of
the input .mtst slice and return two .csv files containing the upper and lower surface
respectively. It is recommended to use the provided default file names for the surfaces.
The algorithm has three parameters:
∙ Smoothness (Bending): Number, Default 1 ; gives a measure for how fast the surface
can bend. Low values mean (CHECK)
∙ Thickness: 0-1, Default 0.5 ; Determines the allowed variability of the slice thickness.
Low value: no variability, high value: lots of it.
∙ Likelihood (Measurement Error): 0-1, Default 0.5 ; Determines how close the surface
must stick to the masured signal. Low values: close to signal, High values: close to
theoretical estimate.
4.2.2.5
Vessels Segmentation
This step segments vessels. It only requires one parameter, Threshold (Default: 0.35) (CHECK).
As before, when selecting a file it will automatically try to load the other files by looking
for the default file names. It will create a new .mtst as a result file which will only include
the segmented vessels as a channel.
CHAPTER 4. TOOLS
(a) Vessels Segmentation
4.2.2.6
81
(b) Detect Surface
Merge Files
Up to this point, all steps produce additional files. To view them all at once it is useful
to combine all the .mtst of one specific slice (the slice itself, HR position, segemented
vessels) so far into one big .mtst. Note that MotionTracking only supports up to 6
channels, therefore it will depend on the number of channels in your original set if all
channels will fit in one .mtst file.
4.2.2.7
Flatten Slice
This procedure uses the upper and lower boundaries and flattens the slice for better
alignment. Although optional, it is highly recommended to do this step because most of
the times the cutting process produces slices of uneven thickness.
(a) Flatten Slice.
(b) Align Serial Slices.
4.2.2.8
Align Serial Slices
This step will calculate the alignment of serial slices (in Z-direction). Use the “Add”
button to add all slices of the series. Make sure that they are shown in the correct order.
If default names were used, then the surfaces will be loaded automatically. If some of
the slices were imaged in a different orientation you can use the “Flip” checkboxes to
correct the orientation. If the “Flatten Slice” step was skipped the last checkbox has to
be disabled.
It is required to provide the blood vessel segmemntation channel(s) (Multiple channels
separated by comma, e.g. “4, 5, 6”). The calculation scale will downsample the data to
save computational resources (default 0.25).
The procedure will output two .csv files per slice in the selected output directory.
CHAPTER 4. TOOLS
4.2.2.9
82
Build
If you want to make a final stack containing all the slices, you can build it with this
function. Note that usually the amount of data will be huge, therefore it is necessary to
downsample the output to fit your hardware capabilities (mostly RAM). At the moment,
only slices with the naming scheme “a N b.mtst” can be loaded (where a and b can be
any characters, but N must be the number indicating the slice position).
The procedure will automatically ask for the two transofrmation matrices generated in
the previous step and the upper and lower surface .csv files.
(a) Build.
4.2.2.10
(b) Split Vessels.
Split Vessels
Finally it is possible to extract specific vessels using Regions of Interest (.roi files).
The output will be a .mtst with one channel that only contains the selected vessels. It
is recommended to annotate each vessel type at once and then repeat the step for each
vessel type.
To annotate a vessel put any small ROI somewhere inside the vessel. The algorithm will
then expand it to fit the edges automatically.
CHAPTER 4. TOOLS
4.3
83
ROI - Regions Of Interest
Regions of Interest (ROI) are a valuable tool when you want to analyse specific parts of
images rather than the whole image. An example of this is an image with two cells that
you want to compare to each other - it’s possible to mark one as ROI number one and
the other as ROI number two and calculate separate statistics for each.
4.3.1
Basic ROIs
When a project is loaded, you can right click on the picture window (Figure 1.20) and
access ROI in the right-click-menu.
Now, choose the type of the geometrical figure you want (Circle, Rectangle, Spline and
so on) and create a new ROI by holing down the Ctrl and Alt buttons while using
the left mouse button ro drwa the shape. To move a figure, hold down Ctrl and Alt
while clicking inside it and drag the figure over the screen. To alter size and shape
CRTL+ALT+click on the small rectangles on the contour of the figure. To set up a
spline, simply CRTL+ALT+click on several spots of the image and double-click to confirm, then the calculated contour will appear.
Figure 4.9: ROI menu window whith two example ROIs next to it.
When a ROI is created it appears in the ROI window list. Its name can be changed by
double clicking on it in the list or through the right click menu in the same list. Several
different ROIs can be applied on a certain frame.
You can apply the ROI on selected frames from the movie or to all fames. To apply
to all frames right click on the ROI in the ROI window and select Interpolate to first or
Interpolate to last respectively.
In order to work with statistic parameters only within the ROI you should tick the
function Statistic Inside Contour, which can be found in the Object Statistic parameters (filter) (Figure 2.24).
To calculate statistic within the ROI proceed as follows:
CHAPTER 4. TOOLS
84
Open “Statistic → Batch Statistic → Open Batch Statistic Window” and then “Process
data → Split images by ROI”. This will split you images to separately calculated subpictures defined by the ROI, so than now you can compare statistics of different regions
of the same frames.
Important Note: As of MotionTracking Version 8.18, ROI are a very new feature and
it is not possible to use the ROI for calculating batch statistic yet. Thus, ROI can only
work with one project at a time. This may change in a newer version.
4.3.2
3D ROI
The procedure to create 3D ROI is based on 2D ROI given by the user on specific layers
and interpolation of ROIs for all other layers between those.
1. To work with 3D ROI the “3D Mode” checkbox must be activated
2. Create a new ROI the same way you would create a 2D ROI
3. select that ROI in the list.
4. select “Next Contour”
5. go to another layer of the image stack
6. draw another ROI
7. optionally add more ROIs on more layers.
8. click finish to interpolate a ROI for each layer between the chosen ones.
CHAPTER 4. TOOLS
4.4
4.4.1
85
Grid Computing with MotionTracking
Introduction to Grid Computing
We live in an era of very large data sets, whether from high-throughput screens or movies
taken at very high frame rates. In either case, researchers can easily generate thousands
of images in a single day. Performing the Object Search routine on thousands of images
is often more than one computer can handle. In order to handle very large data sets,
MotionTracking is equipped to perform grid computing, whereby the program distributes
the images to a networked cluster of computers. The same technique can be used to take
advantage of dual-core and quad-core computers, by distributing separate image files to
each of the processors for analysis. By distributing the computational tasks, the time
required to process very large data sets is substantially reduced. The calculations can be
done on remote PCs running windows, large super-computers/PC-Farms with Linux or
other cores of the MotionTracking workstation itself. The generalized term for these in
MotionTracking is “Application Server”.
CHAPTER 4. TOOLS
4.4.2
86
Configuring a Remote Machine for Grid Computing
In order for a computer to function in a computational cluster, it is necessary to install
the Pluk development environment on the computer. Although it is not necessary to
install MotionTracking iself, only the Pluk environment, Pluk is included in the current
MotionTracking installation and it is recommended use it because of it’s better installation
wizard.
4.4.2.1
Installing Pluk
Download the latest MotionTracking installer from motiontracking.mpi-cbg.de and execute the downloaded setup file. Follow the instructions in the wizard. It is recommended
to use the default C:/MotionTracking installation directory.
4.4.2.2
Creating a Pluk Account
First, make sure your MotionTracking installation directory contains a dat subdirectory,
if not, create it.
Execute placclst.exe that can be found in the bin64 directory (if you only use 32 bit then
use the bin directory). The account list is shared across both 32 and 64 bit versions so
you don’t need to repeat the procedure for 32 bit.
Create a new “Pluk account” under which you execute your remote calculations. The
user name and password that you select here will be used later, when you configure
Motion Tracking to connect to the remote computer. The Pluk Account List should appear as shown in Figure 4.10. After creating a new account, you must restart the Pluk
Services Launcher, as described above, by either restarting the computer or by stopping
and restarting the “Pluk Services Launcher” in “Services” of the Windows Task Manager.
This procedure will enable you to calculate on one single core of the machine, but most
likely you will want to use multiple cores. If the initial username is “username” you need
to simply add another user with the name “username1” for the second core, then “username2” for the third and so on. Note that they all have to have the same password. See
Figure 4.10 for an example.
Figure 4.10: Creating a Pluk Account. In order to create an account, enter the user name (e.g.,
rink), enter and confirm a password, and select “Allow Remote Execution”. Pressing the Enter
button will cause the new account to appear in the Account List. In this example the machine is
set up to execute calculations on 8 cores.
CHAPTER 4. TOOLS
87
Warning: if the account list dissapears if you close and reopen placclist.exe you need
to create a folder “dat” in your MotionTracking installation directory.
(e.g. C:/MotionTracking/dat)
4.4.2.3
Launching Pluk Services: plbrok and rdaemon
It is necessary to have both plbrok.exe and rdaemon.exe services running on the application
server to calculate tasks. The most elegant way is to create a Windows batch file that will
start both services for you. Just create a new file with the extension .bat in the bin or bin64
folder inside you MotionTracking installation directory, for example “start rdaemon.bat”
and put the following two lines in it:
start plbrok.exe /hide
start rdaemon.exe /hide
Now double click on that file to start both sevices at once. If you want the machine to
be available for remote calculations at all times, put a shortcut to this file in the startup
directory of the start menu.
4.4.3
Configuring MotionTracking for Grid Computing
Now that the remote computer is set up properly, we are ready to configure Motion
Tracking on your machine to connect to the remote computer and distribute computational tasks.
First of all, Start Motion Tracking.
4.4.3.1
Adding a remote computer to the list of available servers
Go to “Options → Grid Computing”. This command brings up a dialog box that lists the
servers available for grid computing. This dialog box appears in Figure 4.11. Right-click
in the white space of the Server List, select Add in order to add a new server.
Figure 4.11: Server List for Motion Tracking. The grid computing option is turned on by
checking the “Use Application Server” box. In this example we have two PC farms, deimos and
emilia, connected by SSH and two remote machines, jochen1 and 5, connected by TCP/IP.
Right-click in the white region of the Server list, select Add. This will create a new
line in the list of servers, where you can add the IP address of the new computer. The IP
CHAPTER 4. TOOLS
88
address can be either the name of the remote computer on the local area network (LAN)
(e.g., remote-computer-12) or the IP address of the computer (e.g., 10.24.217.121).
The “#CPUs” is the number of tasks you want to send to the remote machine for simultaneous calculation. It is advised not to enter a number greater than the number of
cores you have set up on the remote machine because the queuing over TCP/IP is not
that good. You can use any number if you use SSH on PC Farms because they have their
own queueing systems. Select TCP/IP in the last column for remote machines and SSH
for PC Farms (more on those later).
The Login and Password should be filled in with the same login and password given
to the remote computer, above. You may use a different login and password for each
server added to the list.
4.4.3.2
Verifying the Library List
Click on Library List. This will open the dialog box. The following three libraries should
be present: math.dll, cmath.dll, and imageframe.dll. Make sure that all three libraries
are checked with a green check-mark. Click Update Libraries to confirm.
4.4.3.3
Activating Application Server
When the “Use Application Server” button is selected, Motion tracking will distribute
the computational tasks to the servers in the Server List. Each server in the list has an
Active or Inactive status, shown by a green check-mark or a red X. By toggling the status
of the different servers in the Server List, you can distribute the computation to only a
subset of the available servers.
4.4.3.4
Checking Servers
After this is done you can click on “Check Servers”. If one of the active servers is not
working it will deactivate it. Double-Check your data in this case, make sure the remote
computer is running and check if the firewall settings allow the communication.
4.4.3.5
Configuration of a multi-core Motion Tracking Workstation
Most computers nowadays have multiple cores. The MotionTracking program itself uses
only one core, but it can send computational tasks to all cores of the workstation.
If the computer running Motion Tracking (not a remote computer, but the computer with
the full program) has a multi-core processor, it can be set up in a similar way to remote
machines. First of all you need to create a pluk account on your own machine as described
previously in section 4.4.2.2. Then you need to open the Server List by going to “Options
→ Grid Computing”. Add a new server with the IP address: 127.0.0.1. This IP address
is used by every computer to address itself. Change the #CPUs column to the number
of cores on your machine that you want to use simultaneously. No login or password
are necessary for configuration of a computer with IP address: 127.0.0.1. Selecting Use
Application Server will now cause Motion Tracking to send one image to each core of the
multi-core computer for processing.
CHAPTER 4. TOOLS
4.4.4
89
Connection to a PC-Farm over SSH and psftp
First of all you must consult the administration of the PC-Farm for login information and
the authorization files (id rsa.ppk from step 7) and help with SSH if necessary.
It is also assumed that MotionTracking is installed on PC-Farm since this is a complicated process. As of now, MT is only installed on the PC-Farms Atlas and Emilia of
the “center for information services and high performance computing” (ZIH) in Dresden.
You will need to install several third party programs to get the system up and running
on your local workstation. When you see strings like “...∖OpenSSH∖bin” it means that
you have to type the full path to you OpenSSH install directory instead of the “...”.
1. Download Cygwin from cygwin.com
2. Install it to “C:∖Program Files∖OpenSSH”. This is non-optional. If you use a nonEnglish windows and Program Files doesn’t exist, create it.
3. The installation is a bit tricky. Proceed until you get to the window shown above.
Meanwhile you will be asked where you want to download the packages and other
stuff, most of which is self explanatory. Select http on inf.tu-dresden.de as download
server if in doubt.
When you reach the window where you have to select the packages that will be installed search for ssh and select the OpenSSH package by checking the right checkbox
in the Bin column. You don’t need to select the Source Checkbox. Hit next when
done and proceed. It will ask you if you want to install automatically selected
additional packages that OpenSSH needs to run which you must do. Finish the
installation.
4. Download psftp and putty (http://www.chiark.greenend.org.uk/ sgtatham/putty/).
(Encryption is legal in Germany btw.)
5. Copy psftp.exe to “...∖OpenSSH∖bin” folder. Make sure that you install the Pagent
and Puttygen components as well.
6. Run ssh session from terminal. To do that open the terminal (run cmd) and type
“ssh [email protected]” with the correct information for the pc farm that
you want to connect to.
7. Exit ssh session by either closing the terminal or typing “exit” or “logout” (depends
on the machine you are logged on)
8. Optional: Download and install WinSCP (http://winscp.net/eng/download.php)
for an easy way to do get the next few steps done. If you think that you can do
that with psftp and the command line, you can do that of course but it is way more
convenient to do it with WinSCP.
9. Copy “id rsa.ppk” from your pc-farm node to “...∖OpenSSH∖home∖ [your windows
username] ṡsh” and to “...∖OpenSSH∖bin”. To do that use WinSCP and login onto
your PC-Farm with it.
CHAPTER 4. TOOLS
90
10. Test connection (Open Terminal (run cmd),
C:∖...∖OpenSSH∖bin∖ssh farm [email protected] ). If it asks for a password,
something is wrong. Most likely it is the permissions of the files that were copied
into the .ssh directory, because windows resets them while copying. Therefore you
need to use the cygwin terminal that was installed in one of the earlier steps and
type:
cd .ssh
chmod 600 *
cd ..
chmod 700 .ssh
11. Test psftp connection by using the following command from the terminal:
“...∖OpenSSH∖bin∖psft.exe -i ...∖OpenSSH∖bin∖id rsa.ppk”. This should go through
without any password requests as well.
12. Note that on a x64 system you must copy the Cygwin installation from“C:∖Program
Files∖OpenSSH” to “C:∖Program Files (x86)∖OpenSSH”, otherwise the 32bit version will not work.
Once done, add the Farm to the server list the same way you would do with a remote
computer.
Warning: SSH must go through without any password requests. Use proper SSH authentification files. psftp should connect without any further requests as well if called
with an additional flag as seen in the example below. You can check both by trying both
out from the windows command line:
ssh [email protected]
psftp [email protected] -i ..\OpenSSH\bin\id_rsa.ppk
4.4.5
Using the Application Server
After the remote computer and the Motion Tracking workstation have been configured
for Grid Computing, and you have selected the Use Application Server option, simply
start any calculation procedure which supports Grid Computing you normally would.
For example, select “Object → Object → Find Objects” and select the “Use Gird Computing”. Starting the Object Search procedure with the Application Server active will
bring up a dialog window shown in Fig. 4.12:
Click the Start button to begin the computation. The window will specify the specific
server to which each image has been sent, the total processing time, the number of objects found in each image, etc. You can stop the computation by pressing the Stop button.
If you want to change servers during running calculation, hit the stop button, click on
“list servers”, select the servers you like or change any options. When done, simply start
again. Any dispatched tasks will be resent if the server that they were sent on was either
deactivated or its options changed.
CHAPTER 4. TOOLS
91
Figure 4.12: Grid Computing window
If you encounter any errors due to any reason you have the option to resent all failed
tasks by clicking the “Rebuild Failed” button. The “List Failed” button will give you a
popup window with a list of all tasks which have the status “failed”. “Reset Dispatched
Tasks” does what the name suggests - a task counts as dispatched when it was sent to
the remote machine (Server Address and Dispatch Time columns are filled) but it’s state
is neither “completed” nor “failed”.
Each of these functions is accessible for individual task by right-clicking on the task.
MotionTracking is designed to handle huge amounts of data. Since this is far too much
to handle most of the personal computers, all of the computation-heavy calculations can
be out-sourced to grid computers and pc-farms.
∙ object search
∙ per frame correction
∙ track search in batch mode
∙ statistic calculation in batch mode
4.4.6
Troubleshooting
4.4.6.1
Checking the state of the Pluk Service Launcher
Go to “Start → Control Panel → Administrative Tools → Services”. This will open the
Services list for your Windows computer. The list of Services will include Pluk Services
Launcher. The start-up type for this service should be set to Automatic. If you restart
the machine after installation this should be the case anyway.
CHAPTER 4. TOOLS
4.4.6.2
92
Verifying that the Pluk Services are active
Go to “Start → Programs → Pluk → Pluk Services List”. This will bring up a list of
the services that Pluk uses in the operating system. There are two services required for
grid computing: plbrok and rdaemon. Check that both of these services are visible in
the Pluk Services List. If one of the services is missing, go to file menu: “Service→Add”.
The “Add Service” command will create a new line in the Services list, into which you
can enter the information shown in 4.13. After adding any missing services, go to the file
menu: “File→Save” to save the newly added Services.
Figure 4.13: Pluk Services List. The dialog box above shows the services as they should appear
for Grid Computing. If either of the two services are missing, they can be added as described
above.
Select Auto-start for both services. After adding the two services, it is necessary
to activate them on your machine. This can be done by (a) restarting the computer,
or (b) restarting the Pluk Services Launcher. To restart the Pluk Services Launcher,
go to “Start→Control Panel→Administrative Tools→Services”. Select the Pluk Services
Launcher, and stop the service (right-click to bring up a context menu, or press the Stop
button on the top menu bar), then restart the service (again, right-click or use the Start
button to the top menu bar).
Once the Pluk Services Launcher has been restarted, you can verify that the two processes are operating in memory by looking at the Processes list for your machine. To
bring up the list of active processes, press Ctrl-Alt-Delete. This opens the Windows Task
Manager. The Task Manager has a tab called Processes, which lists all of the active
processes currently running in memory. In order for grid computing to function on a
computer in a computational cluster, the following services must be running: plbrok.exe,
plukserv.exe, rdaemon.exe, and rserver.exe. Please verify that all four services appear in
the Windows Task Manager before proceeding.
Important Note: if the remote computer is separated from your Motion Tracking workstation by a firewall, it is required that the Pluk processes are able to communicate through
the firewall. Contact your network administrator and grant firewall access to the processes: plbrok.exe and rserver.exe. Without firewall access, the grid computing features
will not function.
CHAPTER 4. TOOLS
4.5
93
Export
After getting your statistical data and analysing it you will most likely want to present
it. Therefore there are tools to export most parts of the data as images, movies, graphs
or tables so that they can be opened by other programs or included in a presentation.
These possibilities will be discussed here. You can access the export submenu as seen in
Figure 4.14 from “File → Export”.
Figure 4.14: Export menu
∙ Save (Pre-)Processed Image: This Option allows you to export the current
frame either raw or processed with all the alterations that you have made. The
processed is greyed out when there is no difference to the raw image.
∙ Export Bitmap (with Splitted Colors): This will export the currently displayed picture into a common image format. Available formats are bitmap (.bmp),
Graphics Interchange Format (.gif) and Tagged Image File Format (.tiff). Selecting
“Splitted Colors” will allow you to have separate images for each channel.
∙ Export AVI (with Splitted Colors): This will export the whole set of frames
as a movie with the .avi format. Selecting “Splitted Colors” will allow you to have
separate movies for each channel. Note that the exported movie will look exactly
like it is displayed in MotionTracking at the moment of export.
∙ Export Objects/Tracks: This function exports all basic data ( (X,Y) coordinates,
size, intensity etc.) about objects or tracks as a .csv file. These .csv files can be
opened with LibreOffice Calc, Microsoft Excel or other programs for further analysis.
∙ Copy Project Files to New Directory: A MT project has multiple accessory
files where information like object search parameters is stored. If you want to move
or backup the project at some point you can either move all project files by hand
or use this option. The image data will be left where it is since no manipulation is
done directly on the .mtf files.
∙ Export Mtf to TIFF: MT is using .mtf files to save raw image data. These
files can’t be processed by most image manipulation programs, so you can export
the current frame as .tif(f) which can be opened with almost any image processing
program.
∙ Export 3D Stack to TIFFs: MT is using .mtst files to save stacks of images.
These files can’t be processed by most image manipulation programs, so you can
export the whole stack as a series of .tiff files which can be opened with almost any
image processing program.
Appendix A
Common Problems and
Troubleshooting
A.1
Troubleshooting
Sometimes things don’t work out as they should. While MotionTracking is not entirely
bug-free in any version, most problems are caused by poor choice of parameters or overlooking one of the many checkboxes. This section will cover some of the more popular
errors. (If you know some other popular mistakes feel free to send them to [email protected].)
Check the respective Chapter in this manual if you need further help on that topic.
∙ “Calculate Chromatic Shift” on beads doesn’t do anything or produces
bad results: Check if the Objects in the beads files are calculated. If not, calculate
them. Make sure that you get roughly equal numbers of objects on each channel.
If everything seems fine so far, but still doesn’t work, deactivate the Object Filter.
∙ I have calculated the objects but when I load my project there aren’t
there: Make sure the “Autoload Objects” Checkbox in the Movie Control interface
is turned ON. If this is the case, check if there are .vsc files in the directory where
the image data of the project is - if they aren’t there something went wrong during
object calculation and the information was not saved. If they are there, they are
probably empty and have to be recalculated.
∙ The Track Search does not work: the most common problem in this case is
a frame with no objects (or multiple of them). Simply recalculate Objects and
UNMARK the Rebuild option to calculate the frames with 0 objects. If you are
using Grid Computing the list of tasks will show which images are affected.
∙ I try to calculate a statistic of an object characteristic, but nothing happens: same as “Track Search doesn’t work”
∙ I have calculated Tracks and/or Objects in Batch Mode but I get empty
cells, errors and/or zeros in the statistic calculations: It is most likely that
the statistic filter or the mask which are too restrictive and cut all the objects.
Check the mask manually and look if there are any objects left if you select the
“Show Objects for Statistic” option.
94
APPENDIX A. COMMON PROBLEMS AND TROUBLESHOOTING
95
∙ Object Characteristic calculation takes a very long time: Most likely due to
not calculated masks. Uncheck “use masking” which will speed up the calculation
massively, but obviously include the whole image rather than the masked parts of
it.
Appendix B
A Quick Help to the Standard
Procedure
B.1
Introduction
The following steps should give you a quick help to get objects (and tracks if necessary)
out of data.
If you experience any problems with any step or if the function you need is not covered
here, read the respective chapter in the manual to get a better understanding. It is advised
to set up Grid Computing before but since this is rather complicated we assume that you
either use a machine where it is already set up (like a workstation in a lab already using
MotionTracking) or wait until the calculation is done locally on your own machine.
If you can’t find any of the mentioned buttons check the first Chapter on the user interface.
B.2
Import
In this quick guide we have to assume that you already have a project file and the import was done already because the procedure depends on your image source and can’t be
summarized in two sentences. If this is not the case, read the chapter “Import of Data
and Project Management” in the manual.
B.3
Correction
Additionally we assume the presence of two projects used to correct the image:
∙ empty images with the microscope’s laser turned on and off
∙ images with “beads” which reflect the whole spectrum and can be used to correct
the shift between images taken with different laser frequencies
These are also covered in the “Import” chapter in the manual.
If you have several projects with different corresponding beads and laser screens, make
sure all of them are imported correctly, because it makes no sense to use a wrong correction file.
96
APPENDIX B. A QUICK HELP TO THE STANDARD PROCEDURE
97
These project files contain the images we need to correct the systematic errors produced
by the microscopes.
1. Open the project showing nothing but the laser turned on and off. Go to “Processing
→ Uneven Illumination/Chromatic Shift → Calculate Noneven Illumination”. An
Save Dialog will appear, save the .ilm file.
2. Open the project with the beads. Apply the illumination correction calculated in
the previous step by clicking on the “Illum. Correction” button in the lower left
part of the user interface and selecting the “.ilm” file in the appearing dialog.
3. Use the parameters shown in Figure B.1 to calculate objects by selecting “Objects
→ Object Search Parameters” to set up the parameters and then “Objects → Find
Objects” (Grid Computing advised). Save the “.chs” file when asked.
4. When those steps are done, open any of the projects with real image data and click
on the “Illum. Correction” and “Chs. Shift Corr.” buttons in the lower left part of
the interface. Select the “.ilm” and “.chs” you created respectively in the steps 1
and 2.
Figure B.1: Typical object search parameters to find beads. Note that the Threshold Scale and
the Object Combination Coefficient may vary significantly.
You can view the corrected image by selecting the “Show Corrected” Checkbox in the
left part of the interface, which you should do to find out if everything went right. If
not, either the beads and laser screens are not relevant for the set of frames or the object
calculation in the beads project went wrong. If the latter is the case read the chapter on
“Object Search” and recalculate, but generally the parameters in the example work fine.
APPENDIX B. A QUICK HELP TO THE STANDARD PROCEDURE
B.4
98
Object Search
Now you have to calculate the vesicles. For the channels showing cargo vesicles like those
typically marked by EGF or LDL and others of comparable size you can use the parameters shown in Figure B.2, for Nuclei those in Figure B.3. You must to adjust the
“Threshold Scale” parameter to you individual project. To do this simply play around
with it until the result is reasonable. If several objects are merged together or you see
several objects where only one is present in the picture you must alter the “Object Combination Coefficient”. You will have to experiment around with the values a bit at this
point, there is no way around it.
It is highly advised to use the “Objects → Find Objects in Spline Contour” to calculate the selected frame individually to check if the object parameters fit before calculating
the whole image frame set with “Object → Find Objects”. Check Figure B.4 for reference.
Note: Remember to set up the parameters for each channel.
In the following Figure B.2 and Figure B.3 the right side (where the fields labeled with
“Parameters” are) is the important one.
Figure B.2: Parameters for small vesicles.
B.5
Tracking
If you have a living cell movie or something comparable where you are interested in the
information about the movement of vesicles proceed as described below. Ignore this section if you have pictures of a fixed cell or similar.
1. Set up track search parameters: Open “Tracks → Track Search Parameters”. Use
the default parameters (shown in Figure B.5) and click “Automatic Params” to
generate automatic values for Min. Intensity, Min. Area, Critical Intensity and
Total Score Threshold.
2. Calculate Tracks: Select “Tracks → Find Tracks” and wait until done. It’s advised
APPENDIX B. A QUICK HELP TO THE STANDARD PROCEDURE
99
Figure B.3: Parameters for large vesicles.
Figure B.4: Different results from left to right: too few objects, reasonable result, too many
objects
to do this locally for single projects because the calculation time is usually less than
the data transfer time.
3. Once done, save everything.
Now the data mining process is done. Everything else is based on this data.
B.6
Masking and Statistical Filters
Certainly there are some restrictions to the data found so far. Some objects are bound
by some characteristics, for example there is a minimal size of a nucleus. You can enter
these restrictions when you open “Statistic → Object Statistic Filter Parameters”.
Example: If Channel 2 is your nuclei channel, you can put a minimal “object radius
(um)” of 3.
Additionally you can access the mask from the same window where you enter the filter
parameters. You can use the mask to cut off parts of the picture based on the intensity on
any channel. To learn how to set up the mask read the “Masking” chapter of the manual.
APPENDIX B. A QUICK HELP TO THE STANDARD PROCEDURE
100
Figure B.5: Track Search Parameters
B.7
Statistic
Since this part is very complex and very important you should read the chapter on “Statistics” in the manual. Still, one simple example will be covered here to give you the feel
how to use the Batch Statistic Window.
While a project with calculated Objects (and Tracks) is open:
1. Open “Statistic → Batch Statistic → Open Batch Statistic Window”. You will see
a table with two columns. Ignore the second one for now. In the first column you
will see file names of your image data. For each image in the project there will be
a individual row.
2. Go to “Image Set Analysis → Object Characteristic”. Select Size and click ok in
the appearing dialog. An additional column will appear which is labelled “Mean:
Size (Channel 1)” or similar.
3. Now click execute. For each image (= row) you will get a number in the column,
which is the result of the respective statistic - mean object size in this case.
4. Simply add the columns you need in a similar fashion to get the statistics you are
looking for. A description on some of the object characteristics can be found in the
“Statistics” Chapter in the manual.
5. You can fill out the second column, the Sequence Value, at any point. This can
happen either manually or automatically. The information provided in this column
is essential for many statistic or data processing operations like “Oligo Correlation”
and it is used to label any results.
To Edit a single cell simply double click on it, to edit multiple select them and “Right
Click → Set Name”. MotionTracking uses the format “Gene Symbol; OligoID/RNAi”
providing two slots to save information separated by a semicolon.
Technically you can enter any data in these two slots if it suits you better, but
remember that the user interface will still assume that the first entry is means Gene
and the second Oligo when it comes to the mentioned statistics.