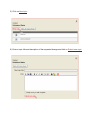
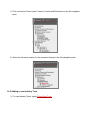
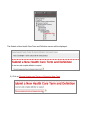
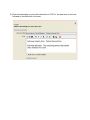
1
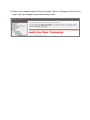
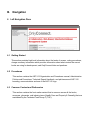
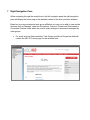
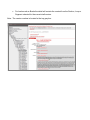
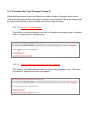
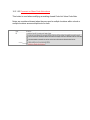
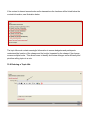
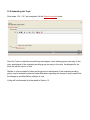
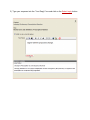
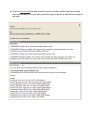
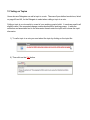
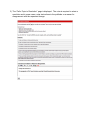
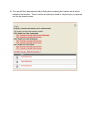
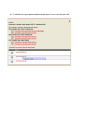
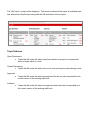
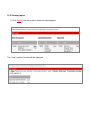
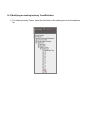
OnlyConnect
User Manual
®
1 Table of Contents
A. Introduction............................................................................................................................................4
2
Gaining Access to OnlyConnect ..............................................................................................................5
3
Role Based Access ...................................................................................................................................6
3.1
Read-Only ........................................................................................................................................6
3.2
Participant .......................................................................................................................................6
3.3
Delegate...........................................................................................................................................6
3.4
Annotator ........................................................................................................................................6
4
Logging In ................................................................................................................................................7
5
Home Page ..............................................................................................................................................8
B.
Navigation ............................................................................................................................................10
6
Left Navigation Pane .............................................................................................................................10
6.1
Getting Started ..............................................................................................................................10
6.2
Procedures.....................................................................................................................................10
6.3
Common Content and Dictionaries ...............................................................................................10
6.4
Committee Charters ......................................................................................................................11
6.5
Subcommittees..............................................................................................................................11
7
Right Navigation Pane...........................................................................................................................12
7.1
8
Finding and navigating inside a book ............................................................................................14
Finding a previous draft of a book ........................................................................................................18
C. Notifications ............................................................................................................................................19
9
Setting up Notifications ........................................................................................................................19
9.1
Book Notifications .........................................................................................................................19
9.2
Topic Notifications.........................................................................................................................20
D. Topics ....................................................................................................................................................22
10
Entering Topics ..................................................................................................................................22
10.1 Overview........................................................................................................................................22
10.2 Purpose and Business Information Topic Changes (Chapter 1) ....................................................22
10.3 Transaction Set Topic Changes (Chapter 2) ..................................................................................23
10.4 Example Changes (Chapter 3) .......................................................................................................33
10.5 Topic Dialog Box ............................................................................................................................33
10.6 Entering a Topic title .....................................................................................................................34
10.6.1
Change Request Reference ....................................................................................................35
10.6.2
Book References ....................................................................................................................35
10.6.3
Location References ...............................................................................................................35
10.6.4
Change Description ................................................................................................................35
10.7 Entering the Topic Description (Post) ...........................................................................................36
10.8 Submitting the Topic .....................................................................................................................37
11
Replying to Topics .............................................................................................................................38
12
Voting on Topics ................................................................................................................................41
13
Searching for Topics ..........................................................................................................................45
13.1 My Topics.......................................................................................................................................48
13.2 Viewing topics ...............................................................................................................................50
E. Reports .....................................................................................................................................................52
14
Selecting a Report to view ................................................................................................................52
14.1 01 – Topics – 006020 TR3s ............................................................................................................53
14.2 02 – Topics Requiring Action .........................................................................................................53
F. Appendices ..............................................................................................................................................54
15
Appendix A. External Code Sets ........................................................................................................54
15.1 Adding or Deleting an External Code Set ......................................................................................54
16
Appendix B Nomenclature ................................................................................................................57
16.1 Commenting on ASC X12 Nomenclature ......................................................................................57
17
Appendix C. EDI Control Directory ....................................................................................................60
17.1 Commenting on the EDI Control Directory ...................................................................................60
18
Appendix D. Change Summary..........................................................................................................61
19
Appendix E. Industry Names .............................................................................................................61
19.1 Commenting on Industry Names ..................................................................................................61
19.2 Adding a new Industry Term .........................................................................................................62
19.3 Modifying an existing Industry Term/Definition ...........................................................................67
A.
Introduction
OnlyConnect is an application that was created by Washington Publishing Company (WPC) to
support the development and maintenance of work products within ASC X12N. This user
manual is meant to assist ASC X12 work group members with using the OnlyConnect
application for the maintenance of Technical Reports Type 2 and 3 residing in the Common
Database.
The Common Database (CDB) was created to enforce consistency across work products. Items
in the CDB appear in books, such as Implementation Guides, Dictionaries, and Foundation
documents. Items may be shared across books and groups. OnlyConnect is the application
layer used to make changes to the CDB.
This user manual does not contain detail instructions on changes to other documents housed in
OnlyConnect but maintained by the Data Interchange Standards Association (DISA),
Washington Publishing Company, (WPC), the Technical Task Group C (TGC), the
Communications/Controls Subcommittee (X12C) or the Supply Change Subcommittee (X12M).
2 Gaining Access to OnlyConnect
1) Go to www.wpc-edi.com/onlyconnect.
2) Click on “Click here to:” login, register or retrieve password.
3) Complete the registration boxes.
4) Once your request is verified you will be granted read-only access to OnlyConnect for the
primary work group selected, unless otherwise instructed by the primary work group cochairs.
For questions or issues with registration or login, email [email protected].
3 Role Based Access
3.1
Read-Only
This level of access allows users to view topics that exist, but they cannot create or reply
to topics.
3.2
Participant
This level of access allows users to create new topics, view and post replies to existing
topics, but does not allow the ability to call a topic.
3.3
Delegate
This level of access allows users to create new topics, view and post replies to existing
topics and call topics to a vote. This level of access is usually assigned to
implementation guide authors and work group co-chairs.
3.4
Annotator
This level of access allows users to create new topics, view and post replies to existing
topics, call topics to a vote and place annotations on elements throughout the
implementation guides. A delegate may also be an annotator.
4 Logging In
1) Once you have received the email notifying that your registration is complete, you are
ready to log in to OnlyConnect.
2) Go to www.wpc-edi.com/onlyconnect.
3) Click on “Click here to:” login, register or retrieve password
4) Enter the email address and password you used to register and click the login button.
Note: The Save Login? check box is not enabled at this time.
5 Home Page
1) Once you log in you will see the OnlyConnect home page.
2) Options:
•
Change Requests – access is restricted to members of the Change Management
Work Group and allows a user to view and update requests for change.
•
Reports – allows a user to run reports on open and closed topics, user access, etc.
Section E – Reports, provides more detail about reports.
•
Voting – access is restricted to delegate users and allows a user to view uncalled and
unresolved voting items and “My Voting Items” which are topics that require a vote.
•
My Topics – allows you to view topics that you created in OnlyConnect by status.
Section D – Topics, provides more detail about My Topics.
•
Notifications – allows a user to set up email notifications when changes are requested
to books the user can access. Section C – Notifications, provides more detail about
Notifications.
•
Topic Search – allows a user to search by topic number.
•
Logout – used to logout of OnlyConnect.
3) Once a user navigates away from the home page “Options” will appear at the top of the
page in the right navigation pane when viewing a book.
B.
Navigation
6 Left Navigation Pane
6.1 Getting Started
This section provides high level information about the levels of access, voting procedures,
change summary information which provides information about what version the current
books are using for development, and OnlyConnect hints and practices.
6.2 Procedures
This section contains the ASC X12 Organization and Procedures manual, Administrative
Policies and Procedures, Technical Report Handbook, and policies around ASC X12
branding, communications and use of the ASC X12 logo.
6.3 Common Content and Dictionaries
This section contains the front matter content that is common across all the books,
acronyms, glossaries, and industry terms (Health Care and Property & Casualty) that are
maintained by the Technical Task Group C (TGC).
6.4 Committee Charters
This section contains the charters for the Marketing and Business Task Group (MBTG)
and the Code Maintenance Committee.
6.5 Subcommittees
This section contains the documents/books maintained by the ASC X12 Subcommittees.
The following subsections exist under Subcommittees
• Task Groups
• Work Groups
• Books
7 Right Navigation Pane
When navigating through the nested tree in the left navigation pane the right navigation
pane will display the home page or the detailed content of the level you have selected.
Based on your user access and work group affiliation you may not be able to view certain
sections such as “Manage” under the Procedures, Common Content and Dictionaries or
Committee Charters levels which are used to make changes to documents managed by
other groups.
•
For levels such as Subcommittees, Task Groups and Work Groups the detail will
contain the ASC X12 home page for the selected level.
•
For levels such as Books the detail will contain the content from the Section, Loop or
Segment selected for the current draft version.
Note: The version number is located in the top gray box.
7.1 Finding and navigating inside a book
1) Click on Subcommittees on the left navigation pane.
2) Click on the Subcommittee where you participate, for example Insurance (X12N).
3) Click on the Task Group where you participate, for example the Health Care Task Group
(Task Group 2).
4) Click on the Work Group where you participate, for example the Health Care Claim Work
Group (Work Group 2).
5) Once you click on the Work Group you will be presented with the current books in
development within that Work Group.
You may also see Change Reference Documents. This section exists when significant
changes are required to a section or a full replacement is made to a section within the
book.
6) Once you click on the book you want to view you will be presented with the contents in a
nested tree format.
Note: The default view for a book is the current draft version.
7) To view the transaction set click on item 2. Transaction Set. This will open the next level
of the tree.
•
To view all Loops/Segments of the transaction set you must open up all levels of the
nested tree.
•
There is no “expand all” option available to view the entire transaction set at once.
8 Finding a previous draft of a book
1) Click on the transaction set you want to view. If you are already in the current draft of the
book, click on Change Draft in the gray box at the top of the right navigation pane.
2) A list of previous drafts will display in red which include the version, draft number and the
date the draft was created. To view, click on any one of the drafts.
3) The previous draft information will display in the gray box at the top of the right navigation
pane.
4) To navigate back to the current draft click on Change Draft and select the first draft from
the list.
C. Notifications
9 Setting up Notifications
9.1 Book Notifications
This option allows a user to be notified of changes to books they have access to view.
1) Click on the Notifications link on the OnlyConnect home page.
2) The next page displays a listing of books that the logged in user has access to view.
Checking boxes and saving causes OnlyConnect to send an email to the user any time
there is activity within the selected books.
9.2
Topic Notifications
This option allows participant, delegate and annotator users to set up notifications for individual
topics they have created. When someone replies or calls the vote for a topic they have entered
they will receive an email notification.
To enable this feature the user must click on the Notify me by e-mail of replies check box when
entering a topic.
This feature is also available after the topic has been submitted. It will appear in the upper left
hand side of the topic once it is opened.
D.
Topics
10 Entering Topics
10.1 Overview
Creating a Topic is the vehicle for generating a change to a book. Topics can be entered
for most of the content that resides in a book. Information that cannot be changed using a
topic is content that resides in the ASC X12 standards for transaction sets. See DM Work
Request Instructions for changes to ASC X12 standards.
Section 10.2 – 10.8 are the procedures for entering topics. These procedures must
be used to promote consistency in documentation, easy identification of the change
location, and accurate instructions to the publisher.
10.2 Purpose and Business Information Topic Changes (Chapter 1)
Chapter 1 includes content maintained by TGC (referred to as Common Content) which
is constant across all books. It also includes content maintained by the working group
responsible for the book.
Common Content exists in several sections of the book, such as all Chapter 1 Section
headings, and some sub-section content that is constant across all books. Any
requested changes to these sections must be approved by TGC.
Content specific to a book exists in Sections 1.4 Business Usage, 1.5 Business
Terminology, 1.7 Related Transactions and any sections below Section 1.9 HIPAA Role
in Implementation Guides. Section 1.9 will not exist in a book if that book has not been
adopted under HIPAA.
Requests for change to common content should be submitted to TGC. A Request for
change specific to a book (referred to as front matter) is entered by the working group
responsible for the book.
The buttons that appear in Chapter 1 can vary depending on the content housed within
the section. For the purposes of this documentation, the buttons have not been
documented since they vary so greatly between sections and between books.
10.3 Transaction Set Topic Changes (Chapter 2)
When modifying existing Loops and Segments or adding Loops or Segments within a book,
utilizing the appropriate button for the type of change is very important. Below are change types
by location and the buttons that should be used for each type of change.
10.3.1.1 Comment on this Segment
This button is used when adding a new Note or Example to an existing Loop or Segment
when no existing Note or Example exists.
10.3.1.2 Create a New Loop Using this Loop as a Template
This button is used when adding a new Loop to an existing transaction set. This button
only exists on Segments that are Loop Headers.
10.3.1.3 Create a New Segment Using this Segment as a Template
This button is used when adding a new Segment to an existing transaction set. This
button only exists on individual Segments that are not Loop Headers.
10.3.1.4 Comment on Unique Segment Name above
This button is used when modifying an existing Unique Segment Name.
10.3.1.5 Comment on Shared Segment Name above
This button is used when modifying an existing Shared Segment Name.
Segment Names are considered shared when they are used in multiple locations within a
book or multiple locations across multiple books or both.
10.3.1.6 Comment on Segment Repeat above
This button is used when modifying an existing Segment Repeat.
10.3.1.7 Comment on Segment Usage above
This button is used when modifying an existing Segment Usage.
10.3.1.8 Comment on Unique Situational Rule above
This button is used when modifying an existing Unique Segment or Element Situational
Rule.
10.3.1.9 Comment on Shared Situational Rule above
This button is used when modifying an existing Shared Segment or Element Situational
Rule.
Rules are considered shared when they are used in multiple locations within a book or
multiple locations across multiple books or both.
10.3.1.10 Comment on TR3 Notes below
This button is used when adding a new Note to an existing Loop or Segment when other
Notes exist.
10.3.1.11 Comment on Unique TR3 Note above
This button is used when modifying an existing unique TR3 Note.
10.3.1.12 Comment on Shared TR3 Note above
This button is used when modifying an existing shared TR3 Note.
Notes are considered shared when they are used in multiple locations within a book or
multiple locations across multiple books or both.
10.3.1.13 Comment on Unique Example above
This button is used when modifying an existing unique Example.
10.3.1.14 Comment on Shared Example above
This button is used when modifying an existing shared Example.
Examples are considered shared when they are used in multiple locations within a book
or multiple locations across multiple books or both.
10.3.1.15 Comment on Element Notes below
This button is used when adding a new Element Note.
10.3.1.16 Comment on Requirement above
This button is used when modifying an existing Element requirement.
10.3.1.17 Comment on Composite Notes below
This button is used when adding a new Element Note to an existing Composite Data
Element (i.e. C024) or sub-component Element (i.e. 1362).
10.3.1.18 Comment on Shared Composite Note above
This button is used when modifying an existing shared Composite Data Element (i.e.
C024) or sub-component Element (i.e. 1362) Note.
Notes are considered shared when they are used in multiple locations within a book or
multiple locations across multiple books or both.
10.3.1.19 Comment on Unique Component Notes above
This button is used when modifying an existing unique Composite Data Element (i.e.
C024) or sub-component Element (i.e. 1362) Note.
10.3.1.20 Comment on Shared Component Situational Rule above
This button is used when modifying a shared situational rule for an existing Composite
Data Element (i.e. C024) or sub-component Data Element (i.e. 1362).
Rules are considered shared when they are used in multiple locations within a book or
multiple locations across multiple books or both.
10.3.1.21 Comment on Codes below
This button is used when adding a Code Note to an existing Code List Value.
10.3.1.22 Comment on Unique Code Note above
This button is used when modifying an existing Unique Code List Value Code Note.
10.3.1.23 Comment on Share Code Note above
This button is used when modifying an existing shared Code List Value Code Note.
Notes are considered shared when they are used in multiple locations within a book or
multiple locations across multiple books or both.
10.4 Example Changes (Chapter 3)
Chapter 3 includes examples of the transaction set represented in a book based on specific
business scenarios. The number of examples in each book varies based on business need.
The buttons that appear in Chapter 3 can vary depending on the content housed within the
section. For the purposes of this documentation, the buttons have not been documented since
they vary so greatly between sections and between books.
10.5 Topic Dialog Box
Once you click on a button you will presented with a dialog box that provides information
about the content and data entry options.
•
Context – describes the type of data content, such as Element, Element Note,
Component Note, Code Note, etc.
•
Annotate – this button is used to provide a purpose or business rationale for the
use of the data content. This is meant to be used as a historical record of its use
and any subsequent changes made to the element due to changes in business
need. Annotations provide institutional memory to authors, but they do not appear
in published books.
•
New Topic – this button is used to add a new topic.
•
Mark All Topics Read – this button will mark any open topic under this data
content as read. This button is not typically used when entering topics but may be
used for long discussion threads.
If the content is shared across books and/or transactions the locations will be listed below the
context information, see illustration below.
The topic title must contain meaningful information to ensure delegates and participants
understand the location of the change and the book(s) impacted by the change if the change
crosses multiple books. This allows users to identify and review changes more efficiently and
prioritize calling topics to a vote.
10.6 Entering a Topic title
10.6.1
•
Change Request Reference
Each topic must begin with a change request reference in the title. The format is
“CR” (space) followed by the change request number.
10.6.2
Book References
•
Each topic must begin with a book reference in the title. The format is XNNN
which is the last four characters of the book number. For example: X259 for the
6020 version of the 837P.
•
If multiple books are impacted within the same transaction set, it is appropriate to
use the transaction set number prefaced by the word “All”. For example: All 837s.
•
If multiple books are involved across transaction sets but the requested change
only impacts one of the books where the information is shared, the user must
enter the word “Only” after the book references in the title.
10.6.3
Location References
•
The book number must be followed by the location of the requested change.
•
The format is transaction set order, for a requested change to Chapter 2.
Transaction Set. For example: Loop 2010AA/NM109.
•
The format is Section number and Section or Sub-Section Title, for a requested
change to Chapter 1. Purpose and Business Information - (a.k.a. Front Matter) or
Chapter 3. Examples.
•
The title must include a meaningful reference to the location of the change in that
section. For example: Section 1.4.5.1 Claim Level - 2) Claim Payment Amounts
– Paragraph 2.
10.6.4
•
Change Description
The location must be followed by a brief description of the change. For example:
Change Situational Rule, Add new Code to Code List, etc.
10.7 Entering the Topic Description (Post)
The description or post for the topic must include the details of the requested change including
the “before” and “after” language when appropriate, along with the business rationale of the
change.
10.8 Submitting the Topic
Once steps 10.6 – 10.7 are completed, hit the Submit new topic button.
Once the Topic is submitted several things can happen; other working groups can reply to the
topic; participants of the originating working group can reply to the topic, the delegate for the
book can call the topic to a vote.
Replies to a topic created by other working groups or participants of the originating working
group, may be entered to promote further discussion regarding the change or may request that
the change be modified before calling to a vote.
Voting will be discussed in further detail in Section 12.
11 Replying to Topics
1) To reply to a new topic you must first select the topic by clicking on the topic title. New
topics are prefaced by an exclamation point icon to the left of the topic.
2) The next step is to click the Reply button.
3) Type your response into the “Your Reply:” box and click on the Submit reply button.
4) Once the Submit reply has been clicked a new post will be recorded under the existing
topic with the name of the user who entered the reply along with a date and time stamp of
the reply.
12 Voting on Topics
Users who are Delegates can call a topic to a vote. There are 9 pre-defined resolutions, listed
on page 45 and 46, for the Delegate to select when calling a topic to a vote.
Calling a topic to a vote results in a cast of your working group’s ballot. It sends an email to all
eligible voters if the requested change crosses books and/or working groups. It adds the
resolution and associated text to the discussion thread under the topic and it closes the topic/
discussion.
1) To call a topic to a vote you must select the topic by clicking on the topic title.
2) Then click on the Call button.
3) The “Call a Topic to Resolution” page is displayed. The voter is required to select a
resolution and in some cases, enter instructions to the publisher or a reason for
disagreement with the requested change.
Resolutions
1) Agree, will change in a future published version.
•
This resolution indicates that the requested change will be made in a future
version of the book.
2) Agree, will change in the next published version. Add details of the exact changes.
•
This resolution indicates that the requested change will be made in the current
working version of the book. The details provided here become directions to the
publisher. They must be unambiguous instructions.
3) Disagree, no change will be made. Add details on why the IGDG disagrees.
•
This resolution indicates that the requested change will not be made. The
Implementation Guide Development Group (IGDG) or working group must enter
the rationale for disagreeing with the requested change.
4) Disagree, the functionality is already provided.
•
This resolution indicates that the functionality in the requested change already
exists within the current working version of the book.
5) Undecided, will consider this request for a future draft.
•
This resolution indicates that the IGDG will consider making the requested change
after further analysis; however it will not be made in the current working version of
the book. There is no guarantee it will be incorporated into a future version of the
book based on the outcome of further analysis and discussion.
6) This is part of the standard content and cannot be changed by the developers of this
implementation guide. Your comment will be submitted for consideration in the next
version of the standard implementation guide content. No change will be made in this
version of the implementation guide standard content.
•
This resolution means that the requested change requires data maintenance to the
underlying ASC X12 Standard. That data maintenance must be completed before
the requested change can be incorporated into a version of the book.
7) Supportive comment, no request for change.
•
This resolution is used when a user enters a topic in support of existing data
content.
8) This is not the appropriate forum for guidance on implementations. Consider submitting
your question to the RFI portal for clarification.
•
This resolution indicates that the requested change is really a request for
interpretation of an existing implementation guide and the appropriate place to
request that interpretation is the RFI portal at
http://www.x12.org/x12org/subcommittees/x12rfi.cfm.
9) There is not enough information included in your comment for us to make a determination
of action. Please submit a detailed business case explaining the business need for future
consideration.
•
This resolution indicates that the requested change is too vague for the IGDG or
working group to move forward with the request. The user should submit a
request for change with the necessary business rationale to the ASC X12 TR3
Change Request process at http://www.x12.org/TR3ChangeRequest/.
13 Searching for Topics
1) To search for a topic by topic number go to the top of the right navigation pane and click
on the Topic Search link.
2) Enter the topic number and either tab to the Go button and hit enter, or click on the Go
button.
3) The next screen will display the topic title, the location of the topic and the book(s) where
the topic is located. Click on the View link to view the details of the topic.
4) The user will then be presented with a dialog box containing the location and all topics
related to that location. There could be several topics listed or only the topic you entered
into the top search screen.
5) To identify the topic desired when multiple exist, hover over the topic title.
13.1 My Topics
To search or review topics you have entered click on the “My Topics” link at the top of the right
navigation pane or from the home page.
Right Navigation Pane
Home Page
The “My Topics” screen will be displayed. This screen contains all the topics an individual user
has entered into OnlyConnect along with the title and status of those topics
Topic Statuses
Open Discussions
• Topics that fall under this status have been started, are open for comment but
have not been called to a vote.
Closed Discussions
• Topics that fall under this status are out for vote and may be vetoed during a vote.
Approved
•
Topics that fall under this status are approved but are not yet incorporated in the
current version of the working draft book.
•
Topics that fall under this status are approved and have been incorporated in to
the current version of the working draft book.
Archived
13.2 Viewing topics
1) Click View to see the locations where the topic appears.
The “View Locations” screen will be displayed.
2) Find the book you want to review and click View again to get to one of the location of the
topic.
3) Click on the topic title to get to the details of the topic.
Depending on the status column you choose the information returned will vary. The “My Topics”
screen can be used as a means for tracking open topics, a reference tool to identify when
changes have been incorporated into a draft, and for historical reference on changes made.
Some OnlyConnect reports also provide this type of status by book, which will display all topics
regardless of the user, see Chapter E for more information on reports. The “My Topics” screen
under your user login will only display topics created by you.
E. Reports
14 Selecting a Report to view
Several reports exist for the current draft of the books, common content, dictionaries, and public
review comments. New reports are created as needed by the working groups/IGDG.
1) Select the Reports link at the top of the right navigation pane or from the OnlyConnect
home page.
Right Navigation Pane
Home Page
2) The Select Report screen will be displayed.
14.1 01 – Topics – 006020 TR3s
This report allows a user to view topics by book number and status. This report has been
replaced by Report 11.
14.2 02 – Topics Requiring Action
This report allows a user to view topics that require action by the working group/IGDG.
F. Appendices
15 Appendix A. External Code Sets
Appendix A is maintained by X12N TGC and houses all external code sets used throughout the
book with the code source, information on where the codes are available and the abstract of
what the codes represent. External code sets can be added to a book only after the proper data
maintenance has been done to add the code set to the ASC X12 standard under the data
element for which it will be used.
15.1 Adding or Deleting an External Code Set
1) Click on Appendix A in the left navigation pane.
2) In the right navigation pane select Add or Delete Codes.
3) Click OK to navigate to the source document under common content.
4) Click on Comment on Head above.
5) Click on New Topic.
6) Enter the number and name of external code source in the topic title and the business
reason for the request to add or remove the code set. Then click on Submit New Topic.
16 Appendix B Nomenclature
Appendix B is maintained by X12N TGC and contains two sub sections that outline the
interchange control structure, delimiters, data element length exceptions to the X12 standard for
the book, exceptions to decimal usage, and an explanation of object descriptors in the X12
standard.
16.1 Commenting on ASC X12 Nomenclature
1) Click on Appendix B in the left navigation pane.
2) In the right navigation pane select Comment on Appendix B Nomenclature.
3) Click OK to navigate to the source document under common content.
4) Click on the button for the section where the change is being requested. For example,
B.1.1.2 Delimiters.
5) Click on New topic.
6) Enter a topic title and description of the requested change and click on Submit new topic.
17 Appendix C. EDI Control Directory
Appendix C is maintained by X12N TGC and contains the data element and name of the EDI
Control Segments, ISA/IEA and GS/GE.
17.1 Commenting on the EDI Control Directory
1) Click Appendix C in the left navigation pane.
2) In the right navigation pane select Comment on Appendix C. EDI Control Directory.
3) Click OK to navigate to the source document under common content.
4) Once the source document is displayed the user can comment on the heading,
subheading, bulleted list as well as request that a new section be added.
18 Appendix D. Change Summary
In OnlyConnect Appendix D is a placeholder for the actual change summary that will be created
once a book is published. The content of the change summary only appears in the published
book created by WPC.
19 Appendix E. Industry Names
Appendix E is maintained by X12N TGC and contains the industry names and definitions for all
data elements in the book that have been assigned an industry name
19.1 Commenting on Industry Names
1) Click on Industry Terms under Common Content and Dictionaries in the left navigation
pane
2) Select the insurance section for the requested change in the left navigation pane.
19.2 Adding a new Industry Term
1) For new Industry Terms, select Submit New Term
The Submit a New Health Care Term and Definition screen will be displayed.
2) Click on Review Unapproved Terms or Request a New Term.
3) Click on New Topic.
4) Enter the new industry term in the topic title prefaced by “New Industry Term/Definition”.
For example, New Industry Term/Definition: Patient Amount Due
5) Enter the description or post with instructions to TGC for the new term on line one,
followed by the definition on line two.
6) Then click the Submit new topic button.
Note: Users must create a new topic for each term/definition request. This is required to
avoid situations where one term is approved to be added and another is not approved.
19.3 Modifying an existing Industry Term/Definition
1) For existing Industry Terms, select the first letter of the existing term from the selection
list.
The right navigation pane will display all terms that start with the alphabetic character selected.
To view what books contain this industry name click on the + next to “Used In”.
All books where the term is used will display.
2) Click on Comment on Term or Definition above.
3) The topic dialog box will be displayed. Click on New Topic.
4) Enter the topic title prefaced by “Change existing term/definition:”. For example, “Change
existing industry definition: Medical Record Number.”
5) Enter a description or post with instructions to TGC with the new term/definition.
6) Click the Submit new topic button.