1
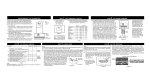
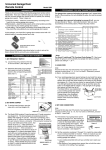
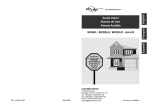
Thank you for your purchase of the Skylink garage door 1. Open the front cover and 2. To Program Your
Keypad
slide open the battery
remote control, Model 88. There are 3 different things you
-Open the cover
compartment. Remove
need to setup in order to use this universal garage door
on the back.
the battery isolator (the
remote control to operate your existing garage door opener.
plastic strip between the
These 3 things are:
two batteries), then re1) Frequency switch – select the correct frequency accordplace the battery cover.
CLOSE
ing to the brand of your existing garage door opener.
2) Brand jumper – place the brand jumper at the correct
position according to the brand of your existing garage
door opener.
3) Code setting – Set the DIP switches on the Model 88
so that they match the code setting of your existing
garage door opener.
OPEN
battery Isolator
Please follow the detail instructions below in order to setup the Skylink Model 88 to work with your existing opener.
SET FREQUENCY SWITCH
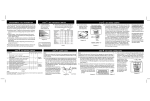
SET BRAND JUMPER
PROGRAMMING THE TRANSMITTER
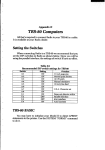
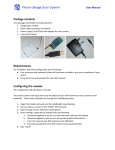
3. Set brand jumper by moving
the red plastic tab to the correct
jumper (see diagram and chart
below).Slide an opened paper
clip, into the top of the red plastic tab, then lift and reposition.
Brand of your opener Use Jumper Number
Linear ®
1
M-O-M ®
1
Stanley ®
2
Multi-Code ®
2
Chamberlain®
3
Lift-Master ®
3
Sears ®
3
®
Wayne Dalton
2 or 3
®
Master Mechanic
3
Genie ® (9 positions)
4
Genie ® (12 positions)
5
Master Craft ®
5
Martec ®
6
Pulsar/Allister/Allstar ®
7
Skylink®
8
4. Set frequency switch located above the
ABCD to the corresponding letter:
Frequency
Switch
USA
CANADA
Set switch
Set switch
to position Frequency to position Frequency
Brand of your opener
Stanley ®
DIP Switch Location
1
2
3
4
5
6
7
8
A or B 300/310
1976-1997
A or B 300/310
Multi-Code ® 1976-1997
300
A
Martec/Teckey ® 1992-2001
A or B 300/310
Skylink ® 1993-2001
310
B
Linear ® 1975-1997
310
B
M-O-M ® 1983-1997
Master Craft ® 1985-1997
318
C
Pulsar/Allister/Allstar ®1985-2001
390
D
Chamberlain® 1983-1997
390
D
Lift-Master ® 1983-1997
390
D
Sears ® 1983-1997
A or D 300/390
Wayne Dalton ® 1983-1997
390
D
Master Mechanic® 1983-1997
®
390
D
Genie (9 positions)1983-1997
390
D
Genie® (12 positions)1983-1997
Unknown**
Unknown**
** Works with Skylink’s Universal Receiver UR-100
310
A
310
A
310
A
310
A
310
A
B or D 315/390
318
C
B or D 315/390
B or D 315/390
B or D 315/390
B or D 315/390
B or D 315/390
B or D 315/390
B or D 315/390
Unknown**
Brand Jumper
SET DIP SWITCHES
5. Opener Has DIP Switches:
- Use a pen to set the DIP switches to match the code of your existing
transmitter or receiver. If your opener is a Chamberlain®, Lift-Master® ,
Sears® , Wayne Dalton® or Master Mechanic® and does not have any
DIP switches, go to point #6.
Each dip switch of this keypad has 3 positions (" + ", " 0 ", " - "). If the switches
of your existing receiver (Stanley ®, Genie®, Multi-Code®, Linear®, Moore-OMatic® , Martec®, Skylink®) have only two positions, set the switches of the
model 88 to " + " for ON, and " - " for OFF or OPEN. (Do not use " 0 " center
position.) If the switches of your existing
DIP Switch
Location
transmitter (Chamberlain® , Sears® ,
Lift-Master® ,Wayne Dalton® , Pulsar®
or Master Mechanic® ) have 3 positions,
set the dip switches of the model 88 to
match their corresponding positions.
6. If your existing transmitter has fewer DIP
switches than this transmitter, match
only the first corresponding DIP switches.
Leave the remaining DIP switches at
“ 0 ”, or the center position. If your garage
door opener is a Stanley® or Multi-Code®,
the unused DIP switches may need to
be set to either the “ + ” or the “ - ” position. If the transmitter is still not working,
try reversing the set Dip switches,
(example, if the #1 DIP switch is set to
“ + ”, change it to “ - ” and continue
reversing the remaining DIP switches.
Also try the unused DIP switches in
the “ + ”, “ 0 ” or “ - ” positions.)
If your Stanley ® / Multi-Code ® receiver has fewer than 10
switches and you have a 2 button transmitter then the button
that operates the receiver will determine whether you use
Channel 1 or Channel 2. If the number 10 Dip switch of your
existing transmitter is set in the OPEN or OFF position, you
have Channel 1, set the number
10 DIP switch in the model #88 to
“ - ” position. If the number 10 Dip
switch of your transmitter is set
in the CLOSED or ON position,
you have Channel 2, set the number 10 DIP switch in the model
#88 to “ + ” position.
If your Sears®, Chamberlain® or Lift-Master®
transmitter has three
buttons (two small, one
large) then the button
that operates the receiver
will determine how to set
the number 1 DIP switch
of the Skylink transmitter.
If the large button is used
to operate the unit, set
the #1 DIP switch to “ - ”
position; if the middle
button is used set the #1
DIP switch to the center
SET DIP SWITCHES
position; if the button at the end is used, set the #1 DIP switch to " + " position. Set the
other DIP switches (DIP switch #2 onward) to match the setting of your existing transmitter.
Note - ‘LEARN CODE’ Some transmitters/receivers do not have DIP switches, this means
they can “learn” new code settings. Just set the DIP switches on our transmitter to any code
combination. Press the learn button, (located on the back of the garage door receiver
located in the ceiling of the garage), for 2 seconds then release, so that the light beside
the learn button goes on. While the light is on, enter the 4 digit pin number, (currently set
at 0000), then press the # key. If the light beside the learn button flashes, the operator has
now learned and will recognize the keypads code.
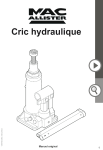
If your Pulsar ® /Allister ® /Allstar ® #ADX9921 has 2
position Dip switches, refer to the chart below. If any
of the Dip switches in your Pulsar ® /Allister ® /Allstar ®
transmitter/receiver are set to the “OFF” position, set
the switches in the model 88 to the “0” position. If Dip
switches 1-4 on the Pulsar ® /Allister ® /Allstar ® are
set to the “ON” position, set the switches in the model
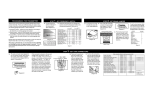
Examples of how to set Model 88
Existing Transmitter
Model 88
Diagram A
88 to the “+” position. If the Dip switches 5-9 on the Pulsar ®
/Allister ® /Allstar ® are set to the “ON” position, set the
switches in the model 88 to the “-” position. (see Diagram
A and B)
DIP switch setting to match with Pulsar/Allister/Allstar transmitter.
PULSAR / ALLISTER / ALLSTAR
DIP switch position setting
1
ON / OFF
2
ON / OFF
3
ON / OFF
4
ON / OFF
5
ON / OFF
6
ON / OFF
7
ON / OFF
8
ON / OFF
9
ON / OFF
MODEL 88
DIP switch position setting
1
+ OR 0
2
+ OR 0
3
+ OR 0
4
+ OR 0
5
- OR 0
6
- OR 0
7
- OR 0
8
- OR 0
9
- OR 0
Diagram B
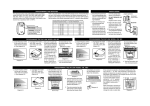
SET DIP SWITCHES
DIP switch setting to match your opener
Linear (1975-1997)
M-O-M (1983-1997)
Stanley (1976-1997)
Multi-Code (1982-1997)
Chamberlain (1983-1997)
Lift-Master (1983-1997)
Sears (1983-1997)
Wayne Dalton (1983-1997)
Master Mechanic (1983-1997)
Genie (9 positions) (1983-1997)
Genie (12 positions) (1983-1997)
Master Craft (1985-1997)
Martec/Teckey (1992-2001)
Pulsar/Allister/Allstar (1985-2001)
Skylink (1993-2001)
Diagram C
+ OR + OR + OR + OR +, 0 (center),
+, 0 (center),
+, 0 (center),
+, 0 (center),
+, 0 (center),
+ OR + OR + OR + OR +, 0 (center),
+, 0 (center),
11 & 12 set to ‘+’ or ‘-’
11 & 12 set to ‘+’ or ‘-’
OR
OR
OR
OR
OR
-
7. If your existing opener does not have any switches, then it can
“learn” the keypads code. First open the battery compartment,
remove the battery isolator (the plastic strip between the two
batteries), replace the battery cover. Press the learn button on
the garage door opener (unit with motor located in the ceiling
of the garage) for approximately two seconds, so that the light
beside the learn button goes on. While the light is on, enter the
4 digit pin number, (currently set at 0000), then press the ‘SEND’
key. If the light beside the learn button flashes, the operator has
now learned and will recognize the keypads code.
11 & 12 set to ‘+’
OR OR -
Garage Door
Opener (GDO)
1-5 set ‘+’ or ‘0’
6-8 set ‘0’ or ‘-’
9-12 must set to‘0’
If your Skylink Universal Remote Control does not activate your Garage Door Opener (GDO), the reason
may be that your GDO age or manufacturer is not listed on the compatibility chart.
The solution is the Skylink UR-100 Universal Receiver, or the 838 “The Code Scrambler”, (convert any
GDO to a Total Security System !) For more information, call (800) 304-1187
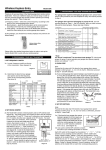
INSTALLATION
‘Learn’ Button
KEY PAD OPERATION
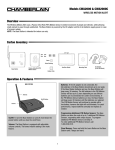
8. Installation
-Position the keypad
on the garage door
frame.
-Lift up the cover and
insert screw above
the keypad in the slot
provided (a).
-Remove the battery
cover and insert the
second screw in the
lower slot (b).
-Replace the battery
cover and insert
screw (c).
9. Key Pad Operation
NOTE: The backlight comes on and a beep is
emited when any key is pressed. The backlight
of the key pad may not be visible when it is too
bright outside. When any key is pressed, the
next key must be pressed within 5 seconds or
the backlight turns off and the sequence is
canceled. You must begin again.
(a)
(c)
WARRANTY
If, within one year from date
of purchase, this product
should become defective
(except battery), due to
faulty workmanship or
materials, it will be repaired
or replaced, without charge.
Proof of purchase is
required.
Position 1 to 8
Position 1 to 8
Position 1 to 10
Position 1 to 10
Position 1 to 9
Position 1 to 9
Position 1 to 9
Position 1 to 9
Position 1 to 9
Position 1 to 9
Position 1 to 12
Position 1 to 12
Position 1 to 10
Position 1 to 9
Position 1 to 8
If the keypad does not emit a beep when pressed,
wait a few seconds and press the key again. If
you hear a beep, the keypad has accepted that
key.
(b)
BATTERY
Two 3 volt Lithium type
(CR2032) batteries (included).
+
Battery
Compartment
It is time to change the batteries when the backlight no
longer appears.
WARNING
If the battery is completely
drained or if it is disconnected
longer than 1 week, the PIN
you have set WILL revert to
the factory preset of 0000. To
preserve your PIN and reduce
the chance of someone using
PIN#0000 for unauthorized
entry, be sure to check and
replace the battery regularly.
When replacing the battery,
check your PIN and reset it if
needed.
- To change your PIN:
[Enter the current PIN,
(currently set at 0 0 0 0),
press , enter new 4 digit
*
PIN, press , enternew
*
PIN again, press ].
*
For example, if you are
changing the PIN number
from 0000 to 1234, enter
the following sequence,
0000, * ,1234, * ,1234, * .
WARNING
If this transmitter triggers
other garage doors in
your neighborhood,
change all your transmitters and receiver to a
new code setting.
- Operation
Press [ PIN ] , [SEND]
To open or close garage
door, press your four
digit PIN and the [SEND]
key. If confirmed, the
model 86 will emit three
beeps.
DO NOT let children use
the garage door transmitter without adult
supervision. Children
can injure themselves or
others by the garage
door.
If confirmed, the backlit
LED flashes and the unit
emits a long beep.
FCC
The Universal Garage Door
Remote Control is approved
by the FCC and it complies
with Part 15 of the FCC
Rules. Its operation is
subject to the following two
conditions :
1. This device may not
cause harmful interference.
2. This device must accept
any interference that
may cause undesired
operation.
WARNING:
Changes or modifications
to this unit not expressly
approved by the party responsible of compliance
could void the user’s
authority to operate the
equipment.
®
Skylink will not be held
liable or responsible for
any misuse or application
of this product other than
for its intended use.
SKYLINK
TECHNOLOGIES INC.
2213 Dunwin Drive,
Mississauga, Ontario,
L5L 1X1, CANADA
(905)608-9223
(905)608-8744 FAX
Customer Service : (800)304-1187
http://www.skylinkhome.com
P/N. 101A069-006 Rev.6
Patent no. 5680134
Patents Pending
©1995 SKYLINK TECHNOLOGIES INC.
® are registered trademarks of their respective corporations
If your Pulsar ® /Allister ® /
Allstar ® transmitter or
receiver has fewer than 9
switches and the existing
transmitter has 2 buttons
(see diagram C), then the
button that operates the
receiver will determine how
to set the number 9 DIP
switch of the model 88. If
the left button is used to
operate the receiver, set the
#9 DIP switch to ‘+’ position; if the right button is
used, set the #9 DIP switch
to ‘0’ position.
WIRELESS
KEYLESS ENTRY
USER'S INSTRUCTIONS
(Model 88)