1
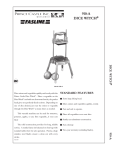
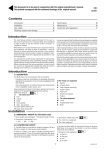
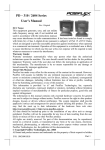
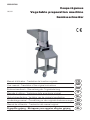
0595J01D00
Coupe-légumes
09/2011
Vegetable preparation machine
Gemüseschneider
Manuel d’utilisation - Traduction de la notice originale
User manual - Translation of the original instructions
FR
GB
Gebruikshandleiding - Vertaling van de originele handleiding
DE
IT
NL
Användningsmanual - Översättning av den originala bruksanvisningen
SE
Manual de utilización - Traducción del manual original
ES
Εγχειρίδιο χρήσης - Μετάφραση των αρχικών οδηγιών χρήσης
EL
Bedienerhandbuch - Übersetzung der Originalanleitung
Manuale di utilizzo - Traduzione delle avvertenze originali
04/2007
TR200 FR 04 07
A
A
A
F
TENSION
E
TR200 FR 02 00
TR200 FR 02 00
Refer to the numbered drawings
which correspond to the paragraph numbers in the instructions
GB
09/2011
Contents
Introduction
Installation
Use and safety
Cleaning, hygiene and storage
Fault finding
Maintenance
Conformity with regulations
1
1
2
4
4
5
6
Introduction
The User Manual contains useful information for the user on
how to work correctly and in complete safety, and is designed
to make it easier to use the machine (called «machine» or
«appliance» below).
What follows is in no case intended to be a long list of warnings
and constraints, but rather a series of instructions meant to
improve the service provided by the machine in every respect,
and particularly to avoid a series of injuries or damage to equipment that might result from inappropriate procedures for use
and management.
It is essential that all the people responsible for transporting,
installing, commissioning, using, maintaining, repairing or dismantling the machine should consult this manual and read it carefully
before proceeding with the various operations, in order to avoid
any incorrect or inappropriate handling that might be result in
damage to the machine or put people’s safety at risk.
It is just as important that the Manual should always be available
to the operator and it should be kept carefully where the machine
is used ready for easy and immediate consultation in case of any
doubt, or in any case, whenever the need arises.
If after reading the Manual, there are still any doubts concerning
how to use the machine, please do not hesitate to contact the
Manufacturer or approved After Sales Service provider, who
is constantly available to ensure quick and careful service for
improved machine operation and optimum efficiency.
Note that the safety, hygiene and environmental protection standards currently applicable in the country where the machine is
installed must always be applied during all phases of machine
operation. Consequently it is the user’s responsibility to ensure
that the machine is operated and used solely under the optimum
safety conditions laid down for people, animals and property.
Introduction
1.1 DESCRIPTION
The vegetable cutter with automatic feed is a machine for
professional use allowing large scale preparaion, specially
designed for cuts of vegetables such as grated carrot, celery,
sliced potatoes (gratins, pommes boulangères, chips) and carrots
in sticks of 3 or 4 mm.
1.1
The automatic feeding bin does not allow procssing long
vegetables or the preparation of French friess (refer bin with
plunger lever in option).
This machine is for professional use and must be used by personnel trained in its use and also in its cleaning and maintenance
in terms of reliability and safety.
This machine is not designed for working in an explosive atmosphere.
Installation
A
B
C
D
E
F
G
H
I
K
L
M
Speed selection (TR200 single phase)
Off push button (red)
On push button (black)
Automatic hopper
Stainless steel loader
Loader closing catch
Evacuation spout
Hopper catch
One-piece stainless steel base
Braked castors
Removable cutting unit
Plate
ATTENTION!!
Machine storage: -25°C to +50°C
Ambient temperature during operation: +4°C to +40°C
This machine is for professional use and must be used by staff trained to use, clean and maintain it, in terms or reliability and
safety.
Use the machine in adequately lit premises (See applicable technical standard for the country of use. In Europe, refer to standard
EN 12464-1)
When handling the machine, always check that the parts taken hold of are not mobile elements: risk of dropping and injury to the
lower limbs.
The machine is not designed for use in explosive atmospheres.
1
TR 200 GB 09 2011
2.1 DIMENSIONS - WEIGHT - WORK STATION (indication only)
Table-standing model : 52kg
• Vegetable cutter net weight :
Floor-standing model : 42,5kg
Table-standing model : 35,5kg
• Packaging dimensions (mm):
Floor-standing model : 800X630X1425
Table-standing model : 800X630X1160
• Gross packaged weight:
Floor-standing model : 66kg
2.2 HANDLING - SETTING UP
• The 4 braked directional castor mobile base means that the
appliance can easily be moved on a flat floor.
• When moving to the place where it will be used, it is preferable
to remove first the stainless steel loader and the automatic
hopper.
• Before refitting the various elements, apply the castor brakes
to stabilise the appliance.
• The vegetable cutter should be installed in such a way as
to allow easy access by the operator to the stainless steel
loader. When organising the work station, a trolley will be need
to be provided to receive the vegetables under the evacuation
spout.
Max. height 700mm.
• For machines connected to a three-phase supply, check that
the rotation of the tool-holder shaft is indeed in the anti-clockwise
direction. If this is not the case, the two phase wires will need to
be changed over on the socket.
• Warning to the installer:
The electronic version of the vegetable-cutter (single phase) is
fitted with a filter which sends interference in the mains supply to
earth without going via the variator. To be effective, the installation
earth should be of good quality, otherwise the interference may
go via the variator and damage it.
2.3 ELECTRICAL CONNECTION
• Motor specifications:
2.3
B Number of phases (1 single phase or 3 three phase)
C Nominal voltage in volts (value, range or commutation)
D Frequency (Hertz)
E Nominal rating (Watt)
F Nominal intensity (Amperes)
G Rating of the electric line protective fuse (Amperes)
H Indicative electrical consumption (K Watt/hour)
• The system should be protected by a residual current device
and a fuse of a rating given in column G of the specifications
(see figure 2-3).
Note: The machine can only be used on TN-type (earthing to neutral) and TT (grounded neutral) supplies.
For machines which have to be installed on the IT
(impedant or insulated neutral) supply, there is a
solution which consists of inserting a isolating transformer
and putting the machine on a et TN or TT supply locally.
• The Vegetable-cutter is powered either by a single phase or
a three phase supply depending on the model.
• For vegetable-cutters supplied with single phase power, an
easily accessible, standard 2-pole + Earth sealed wall socket
rated 10-16A will be required.
• For vegetable-cutters supplied with three phase power, an
easily accessible, standard 3-pole + Earth sealed wall socket
rated 10 A will be required.
• Check that the mains electric power supply voltage is the same
as the value shown on the specifications plate and the power
cable label.
This appliance must be earthed with a green/yellow wire
NO EARTH = NO PROTECTION = RISK OF FAILURE
Note: The earth values are determined according
to the residual current. (See NFC 15100 standard
and PROMOTELEC guide). Non-observance of
these instructions may result in the warranty being
invalidated.
To PAT test the Electrolux Range of Food Preparation Equipment,
the PCB board needs to be disconnected before any test is done.
This is due to the fact that the boards are fitted with a grounding
diode that can give incorrect result during such a test. Also on
a standard appliance a flash test of 25 amps and up to 3000v is
used but, as you would expect, to use this on equipment, which
has a printed circuit, board would be quite destructive to that
board. We would recommend the use of a PAT tester approved
for computer systems which use a lower rate of amps.
The appliance is perfectly safe and is CE certificated. There are
two ways to get overcome this problem.
· Disconnect the board as instructed and test using test for PC’s,
· Or install the mixer on a fused spur (no plug) as this takes it
away from being a portable appliance and the PAT test is then not
needed.
2.4 FIRST CLEANING
Before using for the first time, the machine should be cleaned.
For this, refer to paragraph 4.2.
Use and safety
3.1 THE SAFETY OF THE USER is assured by:
a) With the automatic hopper:
- The distance between the cutting element and the edge of
the hopper.
- The impossibility of starting the motor in the absence of the
automatic hopper, the cutting unit and the loader.
- Stoppage in less than 2 seconds on opening the automatic
hopper.
- The absence of risk from accessing the evacuation spout
linked to the design of the ejector and the discs.
- Observance of the instructions in this document for cleaning
and maintaining the appliance.
TR 200 GB 09 2011
b) With the lever ram spout:
- The impossibility of starting the motor in the absence of the
lid and the cutting unit.
- Stoppage in less than 2 seconds on opening the lever press
or cover
- The dimensions of the long-vegetable reduction hopper.
- The absence of risk from accessing the evacuation spout
linked to the design of the ejector and the discs.
- Observance of the instructions in this document for cleaning
and maintaining the appliance.
2
3.2 SELECTING THE WORKING EQUIPMENT (hoppers + discs)
3.2b
With the automatic bin
3.5a
• Cutting plates C:
3.2a
Straight cuts of 1 to 10 mm : Potatoes, beets, onions.
• Cutting plates CW: wavy cuts of 2 to 6 mm for: Potatoes,
beets.
• Curved platesCC: cutting of fragile products from 1 to 5 mm:
beets
• Plate with adjustabel thickness
Allows cutting thickness of 1 to 7 mm . Should be used separately,
without the macedoine grill.
3.2c
• Trimmer plates AS: cuts in sticks of 2 to 5 mm.
- AS 3: medium for potato straws.
- AS 4: large for potato straws.
• Grating plates J - K
3.2d
• J Use with automatic feeding bin: J3, J4, J7
Vegetables: carrots, beets, radish.
• K : Special grated raw potatoes (Knödeln).
3.2b
• Plate with adjustabel thickness
3.2b
Allows cutting thickness of 1 to 7 mm . Should be used separately,
without the macedoine grill.
3.2c
• Trimmer plates AS: cuts in sticks of 2 to 5 mm.
All the work above can be carried out with the lever-operated
hopper, but in addition long vegetables can be sliced thinly by
using the small ram spout: carrots, aubergines, celery sticks,
cucumber, chicory, fennel, leaks.
Fruits: almonds, bananas, apples.
All the work above can be carried out with the lever-operated
- AS 3: medium for potato straws.
- AS 4: large for potato straws.
• Grating plates J - K
• J Use with automatic feeding bin: J3, J4, J7
3.2d
Vegetables: carrots, beets, radish.
• K : Special grated raw potatoes (Knödeln).
The lever-operated hopper can be used for dicing and to make
chips.
Both of the two hoppers can be used with the two vegetablecutter cutting speeds, but speed II should not be used for fragile
vegetables.
The automatic hopper cannot be used to make chips and
for dicing.
Making chips and dicing should be carried out in speed I.
With the lever-ram hopper
Approximate automatic hopper throughput (kg per hour) :
Continuous input
Speed 2
• Cutting plates C:
3.2a
Straight cuts of 1 to 10 mm : Potatoes, beets, onions.
• Cutting plates CW: wavy cuts of 2 to 6 mm for: Potatoes,
beets.
• Curved platesCC: cutting of fragile products from 1 to 5 mm:
beets
3.2b
1200
Potatoes C3/C5C
1800
Grated carrots J4
400
Shredded celery AS4
700
Shredded cabbage AS4
500
3.3a-b
3.3 SETTING UP THE CUTTING EQUIPMENT
• The vegetable-cutter is supplied with the ejector fitted to the
drive shaft.
- Take off the stainless steel loader E by lifting the 2 closing
catches.
4.1a-b
Chips with C 2
To slice, slice thinly, grate and shred
• Fit the ejector on the drive shaft flat.
• Install the selected disc (slicer, shredder or grater).
to find the bayonet
- Turn the disc in a clockwise direction
opening, then continue in the same direction until the pin is
fully in. The end of the drive shaft should then be level with
the disc.
- To remove the disc, turn in an anti-clockwise direction
and
lift it using the finger grips located around its edge. If it remains
held fast, refer to § 5.3.
- Close the hopper D and lock it.
- Tighten the agitator on the end of the shaft.
- Position the loader and lock it in place.
4.1c
- Unscrew the centre agitator.
- Raise the lid catch and lift the lid as far as it will go to remove
the ejector.
The vegetable-cutter cutting unit is removable. The appliance
can only be started when it is positioned correctly.
Before starting work, always check the cutting unit,
the drive shaft, the ejector, the disc and the grill are
clean.
Handle the cutting discs with care. Use the gripping zones located on the outside of the cutting
disc to fit it or remove it
3.3a
Agitator difficult to remove: lock the plate.
3
TR 200 GB 11 06
3.4 HOPPER AND CUTTING SPEED SELECTION AND FUNCTIONS
Never insert your hand or a hard object in the feed
hopper when the machine is in operation.
• Load manually by introducing the products either one by one
or by the handful, being careful to position them properly so as
to prevent incorrect cutting. Steady “fragile” products (tomatoes,
citrus fruits, etc.) against the side.
3.4b
3.5a
1) Automatic hopper E
This is designed:
- For grating (discs J3, J4, J7),
- For thinly cutting “round” products such as potatoes,
- For grating various vegetables such as celery, cabbage,
carrots, or potatoes.
b) Small hopper with removable pestle.
• For cutting long products into slices (carrots, chicory,
cucumbers, leeks, etc.) Ø 52 mm maximum opening.
For cutting into slices, always present long products point first.
It cannot be used to make chips or for dicing.
3.4c
Speed 1 provides an average throughput but it can be used to
cut fragile products: mushrooms, tomatoes, grating cheese.
• Load manually by introducing the products into the small
hopper one by one.
•Recommendation:
- To prevent an inclined and uneven cut: arrange fine
products tail first.
- To prevent jamming: cut off the ends of the vegetables.
Speed 2 provides a very high throughput but this speed is to be
used only for grating carrots and celery and for slicing thinly or
shredding hard vegetables such as potatoes or celery.
2) Lever ram hopper
3.5b
a) Large hopper with hinged lever-ram.
A Cutting into slices B Shredding C Gating
- For large dimension products
3.4a
(160 x 80mm maximum, corresponding to 1/4 cabbage).
3.5 USING THE HOPPERS
1) Automatic hopper
3.5a
- When the ram comes out of the hopper, the motor will stop
immediately thus allowing the products to be loaded in complete
safety.
- On lowering the lever, the vegetable-cutter will start again
automatically.
The vegetable-cutter will only work if the loader is in place and
the cutting unit positioned.
The automatic hopper is designed to be supplied with a recipient
containing approximately 5-6 kg of vegetables and a maximum
of 10 kg so that it can be emptied in one go.
The centre agitator central ensures continuous delivery of the
vegetables so as to bring them to the cutting unit.
To prevent jamming, do not choose a size of carrot which is too
long and always use wet vegetables.
To slice thinly or slice.
- Using the lever-ram, accompany the products in the hopper
until fully down, pressing steadily and evenly.
- When finished, press the red STOP button.
Note: Apply the accompanying pressure on the leverram according to:
- the product to be worked (soft products = light
pressure),
- the cutting equipment selected (the grater requires more pressure
than a slicing disc).
• Using the small hopper and the pestle
- Leave the lever-ram in the lowered position and unlock the
pestle (anti-clockwise).
- Press the ON button to start it.
- Remove the pestle with one hand and load the products with
the other.
- Push the products in with the pestle.
- When finished, press the STOP button.
Do not cut frozen products: risk of jamming or damage.
Never insert the hands or any stiff implement to push
the vegetables down.
Do not cut frozen products: risk of jamming or damage.
• In the event of jamming, stop the machine, simply take off the
stainless steel loader and release the vegetable load by hand.
Recommendation: The flow of vegetables in the
automatic hopper is improved by the vegetable’s
humidity; if using “vacuum packed” vegetables the
vegetables should be washed again and drained so
as to give them the required humidity.
2) Lever ram hopper
3.5b
- Keep the pestle inside the lever ram so as to prevent the
products from rising.
- Press the ON I button.
- Raise the lever ram with one hand
Never insert the hands or any stiff implement to push
the vegetables down.
Cleaning, hygiene and storage
Before dismantling, disconnect the appliance.
4.1 BETWEEN TWO WORK SESSIONS
4.1a-b-c
1) Take off the loader, remove the agitator and the automatic
hopper.
2) Remove the cutting equipment (disc, grill, ejector, cutting
unit).
TR 200 GB 11 06
3) Wash and sterilise the equipment in hot water with a measure
of disinfectant added, rinse and dry.
4) Clean the cutting unit also and leave to drain before
refitting.
4
4.2 AFTER USE
- Clean the removable elements in hot water with detergent
added which is compatible with the materials.
- Rinse in fresh water and leave to dry.
- Do not wash the plastic elements in a dish washer.
- Make sure the cleaning products used are compatible with
the materials (plastic - stainless steel).
- Do not use abrasive detergents as this can scratch the surfaces,
or products with bleach as this can crack the plastic.
Refer to the appliance cleaning sheet which should be kept
near the machine.
4.3 PUTTING AWAY
- After cleaning, carefully put each item of equipment away in
the storage case fixed to the wall.
Fault finding
5.1 THE APPLIANCE WILL NOT START. CHECK THAT:
• The machine is plugged in correctly.
• The power supply at the power outlet is correct.
• The cutting unit is in place.
• The lid is closed properly.
• The lever ram is indeed inside the hopper.
• The loader is fitted properly.
5.2 ABNORMAL NOISE:
• Stop the appliance.
• Check that the discs, grill, ejector and cutting unit are properly
in place.
• Dismantle, clean if necessary and refit.
5.3 JAMMED DISC:
• If the noise persists and the appliance lacks power, check that
the drive belt is not worn or needs re-tensioning (see
§ 6.1).
• Check that the three-phase motor is not running on 2
phases.
5.3
- Unplug the appliance.
- Place one hand flat on the ejector to prevent it from rotating.
- With the other hand, take hold of the disc on the outside using the
finger grips and turn smartly in an anti-clockwise direction .
- Lift it up using a to-and-fro twisting movement.
5.4 QUALITY OF WORK
•
•
-
Before any operation, stop the machine.
If the products are not evacuating properly, check that:
The ejector is fitted correctly.
The products in the receiving container are not obstructing
the outlet.
- There is not an accumulation of products in the cutting unit.
• If the cutting quality is not acceptable, check:
- The direction of rotation (anti-clockwise
-
The right cutting equipment is being used (see
§ 3.2).
The condition of the cutting equipment (see
§ 6.2).
The right hopper is being used.
The presentation of the products in the hopper (see
§ 3-4)
If the incident persists, consult your supplier’s maintenance
department
seen from above).
Maintenance
6.1
Disconnect the appliance before any work on it.
6.1 MECHANISM
• The vegetable-cutter requires minimum maintenance (the
motor and mechanism bearings are greased for life).
• It is recommended that at least once a year the tension and
state of wear of the drive belt are checked.
For this, proceed as follows:
- Unplug the machine.
- Turn the appliance over.
- Remove the base plate.
• To re-tension the drive belt
- Loosen (1 turn) the 3 motor support retaining screws A (10 mm
spanner).
- Use a screwdriver as a lever between the pulley and the motor
support plate.
- Tighten the 2 screws A located in front of the motor support.
- Check the tension of the drive belt by pressing down on it
between the motor support and the large pulley, using the
thumb, to obtain a deflection of approximately 3mm.
- Tighten the screw A located behind the motor support.
- Remove the drive belt particles from inside the housing.
- Check the condition of the electric connections.
- Refit the base using the 4 feet.
6.2 MAINTENANCE OF THE CUTTING EQUIPMENT
• Slicing discs: sharpen the blades
- Remove the retaining screws,
- Use a wet grinding wheel taking care to keep to the cutting
angle.
• Graters
- The graters cannot be sharpened.
- Where the grater slots are significantly worn, change the disc.
5
6.2
• Chip grills: Setting the blade tension.
- The grill blades can be re-tensioned by firstly unscrewing the
2 screws item 1 and adjusting the tension by screwing up the
3 screws item 2. To equalise the tension over the whole length,
successively tighten the 3 screws in several goes.
TR 200 GB 11 06
6.3 ADJUSTING THE SAFETY DEVICES
4.1b
6.3
• The proper operation of the safety devices must be checked before each use. The motor should stop in less than 2 seconds.
- On opening the lid G, dimension E 10 to 20 mm,
- On raising the lever-ram, dimension F max. 45 mm from the
hopper rim.
•
-
On removing the loader and on opening.
If either of these two safety functions does not work:
Do not use the appliance.
Have it adjusted by your supplier’s maintenance department.
6.4 ELECTRICAL COMPONENTS
6.4
Refer to the wiring diagrams.
• Wire colour identification:
• Component identification:
O :
On push button
-
I
Off push button
Power circuit: black
Control circuit: red
Phases: L1 / L2 / L3
Neutral: N
Earth: B/C yellow and green.
:
S2 :
Lid safety device
S1 :
Lever-ram safety device
M :
Motor
P
Power board
:
6.5 ADDRESS FOR SERVICE REQUIREMENTS
• We advise you to contact the dealer who sold you the
machine.
Dealer’s stamp
For any information or orders for spare parts, specify
the type of machine, its serial number and the electrical
characteristics.
• The manufacturer reserves the right to modify and make
improvements to the products without giving prior warning.
Date of purchase: ……………………………
Conformity with regulations
The machine has been designed and manufactured in
conformity with:
. With European Directives.
- Machine directive 2006/42 CEE.
- CEM directive 2004/108 CEE.
- Low Voltage Directive 2006/95/EEC
- Equipment recycling directive 2002/96/EC
Directive « WEEE » 2002/96/CEE
The symbol «
» on the product indicates that this product
may not be treated as household waste. Instead it shall be
handed over to the applicable collection point for the recycling
of electrical and electronic equipment. By ensuring this product
is disposed of correctly, you will help prevent potential negative
consequences for the environment and human health, which
could otherwise be caused by inappropriate waste handling
of this product. For more detailed information about recycling
of this product, please contact the sales agent or dealer for
your product, your after-sales service, or the appropriate waste
disposal service.
Directive “Waste” 2006/12/CEE
The machine is designed so that it does not contribute, or as
little as possible, to increasing the quantity or harmfulness of the
waste and the risks of pollution.
Make sure to observe the recycling conditions.
Directive “Packaging and packaging waste”94/62/CEE
The packaging for the machine is designed so that it does not
contribute, or as little as possible to increasing the quantity or
harmfulness of the waste and the risks of pollution.
Make sure to eliminate the various parts of the packaging in
appropriate recycling centres.
- The European standards:
EN 6O 204-1-1998 machine electrical equipment.
EN 1678-1998 vegetable cutters instructions relating to safety
and hygiene.
TR 200 GB 01 09
6
Acoustic specifications:
- The acoustic pressure level measured in accordance with the
test code EN ISO 11201-EN ISO 3744 < 70 dBA.
Protection indices as per the EN 60529-1991 standard:
- Electrical controls IP55
- Machine overall IP34
Electromagnetic compatibility complies with standards:
- EN 55014-1 : Emission
- EN 55104-2 : Immunity
Integrated safety measures:
- The machine has been designed and manufactured in
compliance with the regulations and standards stated
above.
- Before using the machine, the operator must be trained to use
the machine and informed of any possible residual risks.
Food hygiene:
The machine is made from materials that conform to the following
regulations and standards:
- Directive 1935/2005/CEE: Materials and objects in contact
with foodstuffs.
- Standard EN 601-2004: cast aluminium alloy objects in contact
with foodstuffs.
The surfaces of the food processing area are smooth and easy
to clean. Use detergents that are approved for food hygiene and
observe the instructions for their use.
For additional instructions relating to cleaning, refer to the
Vegetable-cutter cleaning sheet supplied with the appliance.