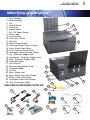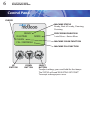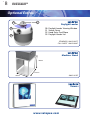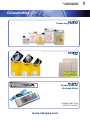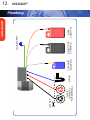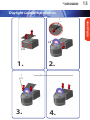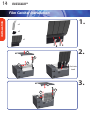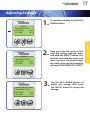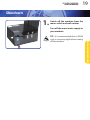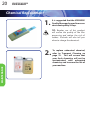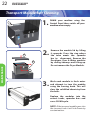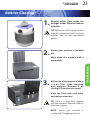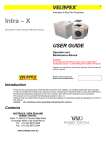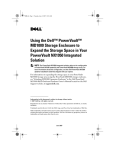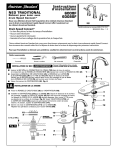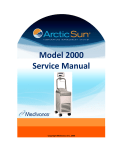
1
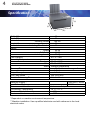
Automatic X-Ray Film Processor
USER MANUAL
Operation and
Maintenance manual
Register your machine by returning the Warranty Card
to enable full customer support.
Hi-Tech
Diagnostics
Service
www.velopex.com
C
US
MAKERS OF DENTAL, VETERINARY AND MEDICAL EQUIPMENT
Machine serial number to be
quoted on all correspondence:
I/LIT0301P MD3000 Manual English Iss.22
Issued: 03/05/13
Introduction
Thank you for purchasing your automatic film
processor from Velopex.
In order to maintain the quality of our product and
your processing it is important that you follow the
instructions contained in this user manual. This will
ensure a long life for your processor.
The processor could be dangerous if incorrectly
installed or maintained outside the instructions set
out in this manual and the warranty will be voided.
There are no operator serviceable parts inside the
machine. This equipment can only be serviced by
technically qualified engineers, trained on Velopex
machines, and is not designed to be serviced by the
end user other than as specified in this manual.
Note: Panel and Label colours and designs may vary.
Contacts
Medivance Instruments Limited
Barretts Green Road, Harlesden
London, NW10 7AP, UK
Tel: +44 (0)20 8965 2913
Fax: +44 (0)20 8963 1270
Velopex International
14 route de Montreuil le Gast
B.P.45, 35520 Melesse, France
Tel: +33 (0) 2.99.13.22.59
Fax: +33 (0) 2.99.13.22.60
Velopex International Inc.
105 East 17th Street, St Cloud
Florida, 34769, USA
Tel: +1 (407) 957 3900
Fax: +1 (407) 957 3927
Installation
Pre Installation Instructions
Plumbing
Daylight Loader Installation
Film Catcher
10,11
12
13
14
Instructions for use
Operating the Processor
Adjusting Settings
Shutdown
15,16
17,18
19
Maintenance
Chemical Replacement
Transport Cleaning
Transport Module Belt Cleaning
Exterior Cleaning
Trouble shooting
Error Messages
Problem solving
20
21
22
23
24
25-29
INSTALLATION
2
3
4
5
6,7
8
9
INSTRUCTIONS FOR USE
Safety information
Table of symbols
Specification
Identifying your machine
Control Panel
Optional Extras
Consumables
MAINTENANCE
11
1
TROUBLE SHOOTING
Contents
VELOPEX MD3000
USER MANUAL
2
VELOPEX MD3000
Instructions for use
Safety Instructions
WARNING:
1. Do not plug into the electrical mains power supply before reading this manual.
2. Use assistance when unpacking and putting the machine in place.
3. Do not move or transport machine with liquids inside.
4. A well ventilated position is mandatory.
5. Do not use in the presence of flammable anaesthetic gases.
6. Use only the Power cable supplied with your machine.
ATTENTION:
1. Ne jamais raccorder cet appareil sans au préalable avoir lu ce manuel.
2. Demandez l’assistance d’une tierce personne pour sortir la machine de son emballage et positionnez-la sur son plan de travail.
3. Ne pas déplacer ou transporter la machine avec des liquides à l’intérieur.
4. Un lieu bien aéré est obligatoire.
5. Ne pas utiliser en présence de gaz inflammables d’anesthésie.
6. Utilisez uniquement le câble d’alimentation fourni avec votre machine.
Table of Symbols
VELOPEX MD3000
Instructions for use
Symbols located on the machine
Symbol
Description
Alternating Current
Courant alternatif
Off
Éteindre
On
Allumer
Attention / Warning - Refer to Manual
Attention, se référer au manuel de l'utilisateur
Attention / Warning - Hazardous Voltage
Attention, courant haute tension
Attention / Warning - Hot Surface
Attention, surface chaude
Symbols used within manual
Tip
Attention / Warning - Refer to Manual
Attention, se référer au manuel de l'utilisateur
Touch to operate
Scroll UP Button
Scroll DOWN Button
Select Button
Heavy
Lourd
3
4
VELOPEX MD3000
Instructions for use
Specification
(H)
(D)
(W)
Width (W)
Depth (D)
Height (H)
Weight
Including Loader
Including Film Catcher
Tank Capacity
Operating Temperature
Warm-up Time
Clean cycle
Deep clean cycle
Film Feed Speed
Variable Processing Time
Electricity Supply **
Input Power **
Environmental Conditions
Environment Temperature
Maximum Relative Humidity
Maximum altitude
Empty
Full Tanks
Including Loader
Developer
Fixer
Water
60
70
100
33
66
40
55
70
0.5 - 4
cm
cm
cm
cm
cm
Kg
Kg
Kg
Litre
25 °C - 30 °C
25 °C - 30 °C
Ambient temperature
20 Minute
Average
1.2 Litre
4.5 Litre
350 x 430 mm
1.5 - 8 Minute
Indoor use Only
10 °C - 27 °C
80%
2000 m
*
200-240 V, 50 Hz
1515W
* Dependent on machine environment temperature.
** Machine installation: Use a qualified electrician and with reference to the local
electrical codes.
r
Identifying your machine
1
2
3
4
5
6
7
8
9
10
11
12
13
14
15
16
17
18
19
20
21
22
23
24
25
26
27
28
29
30
Film Collector
Warning Label
Lid
Control Panel
Film Entry
Power Socket
On / Off Power Switch
Serial Label
Air filter cover
Tube Inlet / Outlet
Film Exit
Waste Straw (Brown)
Cleaning Solution Straw (Yellow)
Fresh Water Straw (Blue)
Fixer Chemical Straw (Red)
Developer Chemical Straw (Black)
UK - Electricity Supply Cord
Continental - Electricity Supply Cord
USA - Electricity Supply Cord
Cleaning Tablets
User Manual
Warranty Registration Card
Vischeck Reader
Air filter
Mains Water Inlet
Mains Water Inlet Hose (Green)
Water Outlet Hose (Blue)
Developer Outlet Hose (Black)
Fixer Outlet
HoseViewing
(Red) Window
Daylight
Loader
17
18
19
a
ENGLISH
1
22
Automatic X-Ray Film Processor
MODEL:
MED
MEDICAL
NDT
INDUSTRIAL
USER MANUAL
Operation and
Maintenance manual
WARNING:
Do not plug into the electrical mains power supply before
reading this manual - or before filling the machine with
liquids.
Register your machine by returning the Warranty Card
to enable full customer support.
Hi-Tech
Diagnostics
Service
www.velopex.com
C
US
MAKERS OF DENTAL, VETERINARY AND MEDICAL EQUIPMENT
Machine serial number to be
quoted on all correspondence:
I/LIT0301P MD3000 Manual English Iss.16
Issued: 23/04/12
23
2
4
5
25
26
27
28
29
6
7
Mains Water Inlet
Mains Water Inlet Hose (
Water Outlet Hose (Blue)
Developer Outlet Hose (B
Fixer Outlet Hose (Red)
8
Daylight Loader
9
15
13
25
10
16
20
26
21
5
3
31 Viewer Cover
MACHINE
ACCESSORIES SUPPLIED
32 Hand Entry Port/Glove
33 Daylight Loader Lid
VELOPEX MD3000
Instructions for use
24
28
27
29
11
6
VELOPEX MD3000
Instructions for use
Control Panel
CURSER
MACHINE STATUS
Ready, Wait till ready, Cleaning,
Draining
MADE IN ENGLAND BY MEDIVANCE INSTRUMENTS LTD
READY
RUN TIME
1M30S
> CLEAN
FILL / REFRESH
PROCESSING DURATION
1min 30secs - 8mins 00sec
MACHINE CLEAN FUNCTION
MACHINE FILL FUNCTION
UP
BUTTON
DOWN
BUTTON
SELECT
BUTTON
To adjust settings, press and hold for four beeps.
The STATUS will read “ADJUSTING SET POINT.”
To accept a change press once.
MADE IN ENGLAND BY MEDIVANCE INSTRUMENTS LTD
VELOPEX MD3000
USER MANUAL
11
7
Control Panel Extended Menu
EXTENDED MENU
Use the Up & Down buttons to locate
settings and functions
MADE IN ENGLAND BY MEDIVANCE INSTRUMENTS LTD
MACHINE DRAIN FUNCTION
READY
DRAIN
DEEP CLEAN
MANUAL INITITATE
MACHINE DEEP CLEAN FUNCTION
MACHINE MANUAL INITIATE
For use in the event of beak initiation
failure
TRANSPORT ONLY
FACTORY DEFAULT
LANGUAGE - English
DEV TEMP
FIX TEMP
FILL LEVEL
27°C
27°C
1L
REPLEN RATE
VELOPEX
SCREEN CONT
MADE IN ENGLAND BY MEDIVANCE INSTRUMENTS LTD
25ml
50%
MADE IN ENGLAND BY MEDIVANCE INSTRUMENTS LTD
BACKLIGHT
ROLL FILM
USER RESET STANDBY
50%
OFF
5
TRANSPORT ONLY FUNCTION
Deactivates the machine leaving only the
film transport system
FACTORY DEFAULT
Default machine settings
LANGUAGE
Hold for 4 beeps to change language
DEVELOPER CHEMICAL TEMPERATURE
25°C - 35°C
FIXER CHEMICAL TEMPERATURE
25°C - 35°C
TANK CHEMICAL VOLUME
0.5 Litre - 4 Litre
CHEMISTRY REPLENISH RATE
25ml - 300ml per cycle.
SCREEN CONTRAST
SCREEN BACKLIGHT
Adjust standby & active backlight
ROLL FILM
Setting to process 1-4m of Roll film
USER RESET
Machine error user reset counter
STANDBY
Function allows the machine jump to
Ready mode.
118
17
18
19
20
21
22
23
24
VELOPEX MD3000
USER MANUAL
Optional Extras
UK - Electricity Supply Cord
Continental - Electricity Supply Cord
USA - Electricity Supply Cord
Cleaning Tablets
User Manual
Warranty Registration Card
Vischeck Reader
Air filter
31
30
33
Daylight Loader
30
31
32
33
32
Daylight Loader Viewing Window
Viewer Cover
Hand Entry Port/Glove
Daylight Loader Lid
STANDARD : I/MAC 6007F
FULL CHEST : I/MAC 6008F
Machine Stand
740mm
625mm
I/MAC 9105F
550mm
Viewers
www.velopex.com
Dayligh
Consumables
VELOPEX MD3000
USER MANUAL
Processing Chemical
Film
Vischeck Reader
Vischeck Strips
READER: I/MAC 7008F
STRIPS: I/FLM 7002F
www.velopex.com
11
9
11
10
VELOPEX MD3000
USER MANUAL
Pre-Installation Instructions
INSTALLATION
MINIMUM WORK TOP DIMENSIONS & ACCESS HOLE FOR DRAIN PIPES
620mm
Ø50
HOLE
A
B
C
580mm
620mm
382
mm
252
mm
122
mm
620mm
800mm
62mm
FRONT OF MACHINE
MINIMUM WORK TOP LOADING:
70KG
• Unpacking the VELOPEX
NOTE: For unpacking and lifting the machine into position it is important to have
assistance. A two person lift is reccommended.
1. Familiarise yourself with the layout of the machine by referring to the images as
you progress through the manual.
2. Lift the machine from the carton and position on counter top. Remove outer and
inner packaging. The transport modules are protected by internal packing pieces:
these must be discarded.
VELOPEX MD3000
USER MANUAL
11
• Siting of the VELOPEX
When using the machine in daylight or a darkroom, avoid sources of intense light.
Do not mount the unit under a window, fluorescent light or flood lamp.
INSTALLATION
Pre-Installation Instructions
IMPORTANT NOTE: A well ventilated position is mandatory.
• Location
Power socket
1.8m max
MED+
0.2m
TOP VIEW
Hoses
1.4m max
NDT
0.2m
TOP VIEW
IMPORTANT NOTE: Do not move or transport machine with liquids inside.
• Electrics
DRAIN
CLEANING
SOLUTION
DEVELOPER
CHEMICAL
FIXER
CHEMICAL
Plumbing
WASTE
CHEMICAL
FOR DISPOSAL
VELOPEX MD3000
USER MANUAL
cut excess
MAINS SUPPLY
INSTALLATION
11
12
VELOPEX MD3000
USER MANUAL
11
13
Daylight Loader Installation
INSTALLATION
!
!
x4
x4
A.
1.
!
DRAWING No.
Part No.
PART
No.
****
DRAWING No.
3.C.
C
C
44-007-A4
I/LIT9012
B.
2.
C.
COPYRIGHT BY MEDIVANCE INSTRUMENTS LIMITED
THIS DRAWING IS RETURNABLE ON REQUEST AND IS NOT
TO BE COMMUNICATED TO ANY THIRD PARTY NOR MUST
IT BE USED EXCEPT IN RELATION TO THE SINGLE INSTALLATION IN CONNECTION WITH WHICH IT HAS BEEN SUPPLIED
COPYRIGHT BY MEDIVANCE INSTRUMENTS LIMITED
MD3000 DAYLIGHT LOADER
MACHINE
ASSEMBLY
INSTRUCTIONSDRAWN
****
DATE
16/02/2011
SCALE
MEDIVANCE
BARRETTS G
APPROVED
LONDON
MEDIVANCE INSTRUMENTS
TITLE
4.D.
11
14
VELOPEX MD3000
USER MANUAL
INSTALLATION
Film Catcher Installation
1.
x2
x2
x1
2.
A
B
C
D
E
3.
D
A
B
slot into
tank
C
1.
B
11
15
Check that you have set up your
Plumbing and Electrics correctly,
see Page 4, 10-12. Switch on the
mains power supply.
A
MADE IN ENGLAND BY MEDIVANCE INSTRUMENTS LTD
>
EMPTY
CLEAN
FILL
DRAIN
MADE IN ENGLAND BY MEDIVANCE INSTRUMENTS LTD
>
WARMING
RUN TIME
1M30S
CLEAN
FILL
2.
3.
“WARMING”- Go to step 3.
“PURGING” & “EMPTY” Using the DOWN button scroll to
FILL in the menu. Press and hold
the SELECT button . The machine
will beep four times and when you
hear the fourth beep, the status
at the top of the display will read
“FILLING.”
TIP: To adjust fill level see Page 17.
“WARMING” - Wait for your
machine to display “READY” on
the top line of your Control Panel.
TIP: Turn the machine on 30 minutes
before you need to process to allow the
machine to warm up. Times will vary
depending on machine settings and
environmental temperatures.
INSTRUCTIONS FOR USE
Operating the Processor
VELOPEX MD3000
USER MANUAL
11
16
VELOPEX MD3000
USER MANUAL
Operating the Processor
4.
If your machine is fitted with a
Daylight Loader, ensure the Blue
Lid and the Grey Flap are closed.
Insert your hands fully into the
gloves. Insert your film and keep
your hands in the gloves until
the film has entered the machine
fully.
INSTRUCTIONS FOR USE
Feed films squarely into the film
entry slot. Touch the Film Entry
Slot to initiate processing.
5.
All films are collected in the Film
Catcher at the rear of the machine.
TIP: If fitted with a Daylight Loader,
ensure that you leave the lid open
AFTER the film has exited the machine.
This will reduce condensation inside
the Daylight Loader.
MADE IN ENGLAND BY MEDIVANCE INSTRUMENTS LTD
ADJUSTING SET POINT
FILL LEVEL
> REPLEN RATE 25ml
6.
The machine will automatically
refresh its chemistry every time a
film is entered.
To adjust the chemical refresh rate
press and hold the ‘REPLEN RATE’
function in the menu. The machine
will beep four times and when you
hear the fourth beep, the status
at the top of the display will read
“ADJUSTING SET POINT.”
Select your rate dependent on film
type and press ENTER to accept. If
unsure, speak to your dealer for
suggested replenishment rates.
MADE IN ENGLAND BY MEDIVANCE INSTRUMENTS LTD
>
READY
TRANSPORT ONLY
DEV TEMP
26°C
FIX TEMP
26°C
MADE IN ENGLAND BY MEDIVANCE INSTRUMENTS LTD
>
READY
TRANSPORT ONLY
DEV TEMP
26°C
FIX TEMP
26°C
MADE IN ENGLAND BY MEDIVANCE INSTRUMENTS LTD
>
ADJUSTING SET POINT
TRANSPORT ONLY
DEV TEMP
28°C
FIX TEMP
26°C
1.
2.
3.
17
11
To locate the setting, use the UP &
DOWN buttons.
Once you have the curser in line
with the setting required, press
and hold the SELECT button. The
machine will beep four times and
when you hear the fourth beep,
the status at the top of the display
will read “ADJUSTING SET POINT.”
Use the UP & DOWN buttons to
adjust the setting. Then press
the SELECT button to accept the
change.
INSTRUCTIONS FOR USE
Adjusting Settings
VELOPEX MD3000
USER MANUAL
11
18
VELOPEX MD3000
USER MANUAL
Adjusting Settings
INSTRUCTIONS FOR USE
4.
Press the Film Entry Slot to
recirculate the chemistry and adjust
its temperatures.
The machine does not actually cool
the chemicals. Enough time must be
allowed to let natural cooling occur.
The set temperatures will not drop
below room temperature.
To adjust fill levels you will have to
empty and refill your machine.
MADE IN ENGLAND BY MEDIVANCE INSTRUMENTS LTD
ADJUSTING SET POINT
CONTRAST
50%
50%
> BACKLIGHT
5.
To adjust the Active Backlight, hold
the enter button for four beeps.
When the status shows Adjusting Set
Point use the up and down arrows to
adjust. Press Enter to accept.
To Adjust the Standby backlight,
leave the curser on Backlight. Wait
for a few seconds for the backlight
level to change. It will either dim or
increase. Then make the adjustment
as instructed above.
MADE IN ENGLAND BY MEDIVANCE INSTRUMENTS LTD
ADJUSTING SET POINT
CONTRAST
50%
1M
> ROLL FILM
6.
To process Roll film, hold the enter
button for four beeps. When the
status shows Adjusting Set Point use
the up and down arrows to select
1-4m or OFF. Press Enter to accept.
The processing time is pre-set
and will automatically change to
accommodate the length of film
selected.
TIP : The machine will replenish it’s
chemistry at the end of the cycle. Set
adequate replenish rate before processing.
1.
11
19
Switch off the machine from the
mains switch and wall isolator.
Turn off the mains water supply to
your machine.
TIP : It is recommended that a CLEAN
cycle is run every night before turning
off the machine.
INSTRUCTIONS FOR USE
Shutdown
VELOPEX MD3000
USER MANUAL
20
VELOPEX MD3000
USER MANUAL
Cleaning Replacement
Chemical
1.
It is suggested that the VISCHECK
Quality Manager be used to ensure
consistent quality X-Rays.
TIP: Regular use of this product
will ensure the quality of the film
processing and reduce the risk of
retakes. Vischeck will also tell you
when to change the chemicals.
MAINTENANCE
2.
To replace exhausted chemical,
refer to Transport Cleaning on
page 21. This will ensure that
your fresh chemistry will not be
contaminated with exhausted
chemistry and increase the life of
your machine.
Cleaning Modules
Transport
Cleaning
1.
CLEANING
SOLUTION
21
Refer to Plumbing Layout on
page 12 & ensure that your
plumbing is correct.
Fill the Cleaning Solution bottle
with fresh water. Add one
cleaning tablet to 5 litres of
water. If you are using a waste
container ensure that it is empty.
DRAIN
5 litres water : 1 Velopex tablet
MADE IN ENGLAND BY MEDIVANCE INSTRUMENTS LTD
CLEANING
DRAIN
> CLEAN
RUN TIME
2.
1M30S
3.
Using the UP or DOWN buttons
scroll to CLEAN in the menu.
Press and hold the SELECT button
to start the cleaning cycle. The
machine will beep four times and
when you hear the fourth beep,
the status at the top of the display
will read “CLEANING.”
TIP: Depending on how regularly
your machine is used. Run a Deep
Clean, which will use 5 litres of
cleaning solution.
Once the machine has completed
its cleaning cycle the machine
status will read “EMPTY. Refill
your machine with fresh chemical,
using the Control Panel.
To Refill select “FILL” In the menu.
MAINTENANCE
FRESH
WATER
VELOPEX MD3000
USER MANUAL
22
VELOPEX MD3000
USER MANUAL
Transport Module Belt Cleaning
1.
2.
A
MAINTENANCE
B
D
DRAIN your machine using the
Control Panel then switch off your
machine when empty.
Remove the module lid by lifting
it upwards. Press the ring where
the tube meets the spreader
bar to disconnect. Remove the
Developer, Fixer & Water modules
by sliding sideways and lifting up.
Do not remove the Dryer Module.
C
3.
Wash each module in fresh water
and attempt to turn the module
using the turning knob. This will
clear the solidified chemistry from
the belts.
Replace the modules into the
correct tanks, spreader bars and
run a CLEAN cycle.
NOTE: If the incorrect module goes into
the incorrect tank it will risk chemistry
contamination.
1.
23
Remove debris from inside the
daylight loader. Wipe the interior
of loader.
TIP: The interior of the daylight loader
should be cleaned with cold sterilising
solution, wipe dry after appropriate
period.
2.
3.
Ensure your machine is switched
off.
Wipe down the machine with a
damp cloth.
At the rear of the machine, there
is a Air Filter cover attached
with magnets. Remove it by
sliding it from the rear panel.
Wash the filter with cold water
and replace when dry.
TIP: There is a spare filter supplied
with your machine. Alternate while the
other one is drying.
NOTE: Ensure your machine is
switched off. Do not replace wet.
MAINTENANCE
Exterior Cleaning
VELOPEX MD3000
USER MANUAL
24
VELOPEX MD3000
USER MANUAL
Error
Messages
Error
Messages
MADE IN ENGLAND BY MEDIVANCE INSTRUMENTS LTD
“ERROR MESSAGE”
Error Message 1 Action
Lid Open
Transprt Drive Flt
Page
ref. 2 Action
Ensure the Lid is on correctly
Remove transport modules and
clean
22
Check that your supply bottle is
not empty
12
Check that your supply bottle is
not empty
12
Dryer Sensor S/C
Dryer Sensor O/C
Dryer Over Temp
Dev Sensor S/C
Dev Sensor O/C
Dev Over Temp
Dev Level Low
Dev Levl snsr Flt
Fixer Sensor S/C
Fixer Sensor O/C
TROUBLE SHOOTING
Fixer Over Temp
Fix Level Low
Fix Levl snsr Flt
Water Level Low
Wat Levl snsr Flt
Critical Error*
MED model: Check that your
supply bottle is not empty
NDT model: Check that your
mains water supply is on
12
12
Service machine
immediately
Service machine
immediately
Service machine
immediately
Service machine
immediately
Service machine
immediately
Service machine
immediately
Service machine
immediately
Service machine
immediately
Service machine
immediately
Service machine
immediately
Service machine
immediately
Service machine
immediately
Service machine
immediately
Service machine
immediately
Service machine
immediately
Service machine
immediately
Service machine
immediately
Service machine
immediately
Service machine
immediately
*Pressing the Beak will activate a User reset. After 5 attempts the machine will be locked
and will need to be serviced. Only the film transport system will function. This will allow
films to be processed wet.
SYMPTOM
Films Do Not Enter through
Film Entry Guide.
5 Film Lost in the Machine
4
2 xx
3 xx
1 Machine does not operate
No.
If the lid is not correctly closed, the safety mechanism will prevent the
machine from operating. Check by opening and closing again.
Otherwise call for service.
Lid Open - Displayed
Check that the transport modules are correctly located in their drive
dogs and running correctly. If not, re-located.
Check the springs on the modules for correct positioning. Use the
module turning tool to rotate the belts for inspection and run a test film
through the module using this tool.
Check that all transport modules have been put through the correct
cleaning procedure.
Replace a Module
Transport Modules not in Place
Wrong Positioning of Transport Module
Spring
Dirty Transport Modules
Damaged/Torn Belt
Add a little domestic fabric softener to the washing water when
Static Electricity in the Dryer Section of the washing dryer module to avoid 'static'. IMPORTANT: Fabric softener
Machine
should be used on the Dryer Module ONLY - do NOT use it on the
Developer, Fixer or Water Modules.
Open machine lid and check engagement of transport modules.
Transport Modules not in Place
Machine is in 'standby' mode
Check by swiping finger across the Entry guide that machine is not in
Call for Service
Machine is in 'standby' mode
Blown Fuse
xx
xx
Swipe finger across the Entry guide - machine may be in 'standby'
mode.
Check Mains Power is plugged in and supply switched on. NOTE Velopex Machine will run one cycle when switched on and lid in correct
position.
ACTIONS
Power Supply
POSSIBLE CAUSE
Problem
Solving
Problem
Solving
VELOPEX MD3000
USER MANUAL
25
6
No.
POSSIBLE CAUSE
ACTIONS
Check whether films have been stored too close to X-ray source, and relocate/replace.
Check that lid has not been left off film box: i.e. process one film from a new box of
film.
Check Expiry date on film box to ensure films are not out of date. (Keep films in
cool, dry place: excessive heat can cause premature ageing of film).
Check that there has been no chemical mix-up, leading to cross-contamination.
Check that the Developer has been correctly mixed (if relevant).
Ensure that you set the chemical temperature to the settings recommended by the
supplier of the chemical and film you are using.
Close to X-ray Source
Film Box Lid open
Film Expired
Chemical Contaminations
Mixing of Developer
Temperature
Problem Solving
Check that window cover on loader has been correctly replaced and check at hand
entry ports to ensure there is a good light seal around the wrists - if not, call for
service.
Do not remove your hands out of the hand entry ports before the film has fed
completely into the machine (fog at one end only of the film indicates premature
removal of hands from daylight loader).
a
VELOPEX MD3000
USER MANUAL
Dark Film
There is Light Fog
Check that the daylight loader is firmly secured, including removal of cover tapes
from self-adhesive mounting.
Daylight Loader not Secured
Light Leaks
Check that the darkroom is light-tight, and that the safe light is sound (e.g. process a
test film with safe light off).
Darkroom not Light-Tight
When the Daylight loader is used, ensure that the machine has not been sited in
direct sunlight or in intense lighting conditions (e.g. directly under spotlights or strip
lights).
Check that the top lid is firmly in place (no lid display on).
Lid Open
Test for light fog by feeding an unexposed film through the machine. It should process as a transparent piece of film base and there
should be no shadows or blackness on it. REGULAR USE OF VISCHECK IS THE BEST TOOL FOR EARLY DIAGNOSIS OF
PROCESSING AND X-RAY PROBLEMS.
Films too Dark
SYMPTOM
TROUBLE SHOOTING
26
SYMPTOM
Sudden Change
Wrong Solutions
in Image Density
TROUBLE SHOOTING
Developer Contamination
Temperature
X-ray Unit
Replace Developer if contaminated with Fixer.
Check Developer temperature
Check X-ray unit.
Make sure the Plumbing of your machine is correct. See Plumbing
section of this manual.
Check for stray light entering machine - proceed as for fogging (see
symptom # 6).
Light Leaks
9
If found in wrong order, contamination will have occurred. Thoroughly
clean modules and tanks; re-fill with fresh chemicals.
Check transport modules are being cleaned correctly (see cleaning
instructions above).
Adjust the FILL setting on the machine Control Panel.
Wrong Position of Modules
Chemical Level too Low
Films Dirty or
Marked
Transport Modules Dirty
Water Tank Dirty
Drain the machine. Refill the Water container with fresh water. Run a
cleaning cycle with two cleaning tablets in the Water container. Drain and
Refill the Water container with fresh water.
Check films have been exposed correctly.
Check that the films are compatible with the type of intensifying screen
used with the x-ray machine.
Film Exposure
Film Compatibility
Adjust the chemical temperature settings on the machine Control Panel.
Temperature too Low
Replace with fresh (if relevant).
Developer Incorrectly Mixed
Adjust the FILL setting on the machine Control Panel.
Chemicals Contaminated
Chemical Level too Low
Clean machine, replace chemicals with fresh solutions.
Chemicals Exhausted
ACTIONS
Replace with fresh chemical (this will depend on volume of film being
processed and length of time since last chemical change).
POSSIBLE CAUSE
8
7 Films too Light
No.
Problem Solving
a
VELOPEX MD3000
USER MANUAL
27
SYMPTOM
Black Parallel Lines
13
Light Spots in Exposed Areas
White Opaque Patches on Low
Density Areas (Indicates Lack of
Fixing)
Check for dirt on intensifying screens in film cassette.
Poor screen contact.
Check water flow in wash tank.
Dirt in Cassette
Check for exhausted fixer by running a Vischeck strip.
Fixer
Water Flow
Check Fixer temperature on the Control Panel.
Temperature
Cassette Screen
0
0
Takes the form of dots, fern-like lines or lightening strikes; check for
LOW ambient humidity in processing area. Clean area with anti
static solution.
Check Intensifying screens in cassette for dirt.
Kinking the film
Static Damage
Check belts are turning properly.
Belts Jammed
Run a clean cycle.
Clean bridge-over rollers.
Clean entry slot or feed guides.
Check for Dryer Module contaminated by fixer deposits.
Fixer Deposits
Dirt
Check for contaminated or wrongly mixed Fixer.
Fixer
Check for very low wash water flow rate.
Check Control Panel for Error messages
Electrical Component
Water Flow
Look for poor air circulation or HIGH humidity in processing area.
Humidity
Check that the Fan inlet is not blocked.
Make sure Dryer is working and blowing hot air.
ACTIONS
Problem Solving
Light Areas on Film
POSSIBLE CAUSE
Dryer
xx
xx
VELOPEX MD3000
USER MANUAL
12 Dark Areas on Film
11
White Scum
Deposits on Film
10 Film not Drying
No.
TROUBLE SHOOTING
28
Immediately switch processor off and unplug from Mains
Power Supply. Contact your supplier.
The Water container must be refilled with fresh water once
a week or more often depending on the quantity of films
being processed.
a
TROUBLE SHOOTING
Abnormal Odour,
17 Overheated or Unusual
Noises
Chemicals
16 Contamination
Ensure that the machine is CLEANED and DRAINED
before changing chemicals.
Check for Error Messages on the Control Panel. Contact
your dealer if the problem persists.
Air Coming Out of the Vent is NOT
Warm
ACTIONS
Clean Modules
Run a clean cycle.
Check age and storage conditions of film.
15 Films coming Out Wet
Film Expired
Dirty Transport Modules
POSSIBLE CAUSE
See above Symptom # 6
SYMPTOM
Light fogging
14 Mottle
No.
Problem Solving
VELOPEX MD3000
USER MANUAL
29
24
Service Log:
Date
/
/
/
/
/
/
/
/
/
/
/
/
/
/
/
/
/
/
/
/
/
/
/
/
/
/
/
/
/
/
/
/
/
/
/
/
/
/
/
/
Service Description
Serviced By
Machine Installation
ETL LISTED/ENREGISTRÉ ETL
CONFORMS TO/CONFORME À
UL 61010-1
CAN/CSA-C22.2 No. 61010-1
SECOND EDITION INCLUDING AMENDMENT 1
OR A LATER VERSION OF THE SAME STANDARD
INCORPORATING THE SAME LEVEL OF TESTING
REQUIREMENTS. C No. 113778
ETL Testing Laboratories
Hi-Tech
Diagnostics
Service
www.velopex.com
C
THIS PRODUCT HAS BEEN TESTED
TO THE REQUIREMENTS OF
MAKERS OF DENTAL, VETERINARY AND MEDICAL EQUIPMENT
US