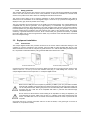
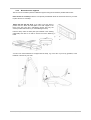
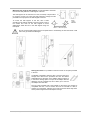
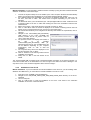
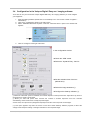
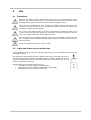
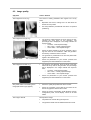
1
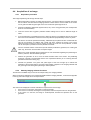
Velopex Digital USB INSTALLATION AND USER MANUAL Version 02 – 18 April 2007 0459 Medivance Instruments Ltd Barretts Green Road London NW10 7AP UK T: +44 (0) 20 8965 2913 F: +44 (0) 20 8963 1270 E: [email protected] Index 1 INTRODUCTION .....................................................................................................................3 1.1 1.2 1.3 1.4 1.5 1.6 COMPLIANCE WITH STANDARDS ...............................................................................................3 POWER SUPPLY .....................................................................................................................4 INSTALLATION PRECAUTIONS ...................................................................................................4 LIABILITY AND OPERATORS ......................................................................................................4 PACKAGING AND ENVIRONMENT ...............................................................................................5 MARKING AND LABELLING SYMBOLS ..........................................................................................5 2 CONTENTS.............................................................................................................................6 3 INSTALLATION.......................................................................................................................7 3.1 3.2 3.3 3.4 3.5 PRECAUTIONS........................................................................................................................7 EQUIPMENT INSTALLATION .......................................................................................................8 SOFTWARE INSTALLATION .....................................................................................................11 CONFIGURATION IN THE OWANDY IMAGING SOFTWARE .............................................................14 SHARING THE SENSOR AND BOX BETWEEN DIFFERENT WORKSTATIONS .......................................15 4 USE.......................................................................................................................................16 4.1 4.2 4.3 4.4 4.5 PRECAUTIONS......................................................................................................................16 LIGHTS AND BUTTON ON THE INTERFACE BOX ..........................................................................16 USE OF THE VELOPEX ‘EASY USE’ SOFTWARE ..........................................................................17 ACQUISITION OF AN IMAGE .....................................................................................................19 EXPOSURE TIME ...................................................................................................................20 5 HYGIENE AND MAINTENANCE ...........................................................................................21 5.1 5.2 5.3 HYGIENE AND DISINFECTION ..................................................................................................21 RECOMMENDED DISINFECTION PROCEDURE ............................................................................22 MAINTENANCE .....................................................................................................................22 6 TROUBLESHOOTING...........................................................................................................23 6.1 6.2 GENERAL ............................................................................................................................23 IMAGE QUALITY ....................................................................................................................24 7 SPECIFICATIONS.................................................................................................................25 8 OPTIONAL KITS AND ACCESSORIES ................................................................................26 8.1 8.2 OPTIONAL KITS.....................................................................................................................26 ACCESSORIES ......................................................................................................................26 The supplier, Medivance Instruments Ltd, reserves the right to make modifications to its products or to their specifications in order to improve the performance, quality, or ease of production. Specifications of products or accessories may be modified without prior notice. No part of this manual may be reproduced without the prior consent of Medivance Instruments Ltd Language of original document: French. Velopex Digital USB – User manual Page 2/26 1 Introduction You have just received your Velopex Digital USB digital intraoral radiology kit. We thank you for the confidence you have in us and hope that this product will give you complete satisfaction. We recommend you to read this manual thoroughly before installing the product. By following the guidelines for installation and usage described in it, you will exclude risks to your patients and your colleagues. Please keep it close to your equipment so you can refer to it at a later date. Your Velopex Digital sensor uses an Xray sensitive electronic detector (the flat part at the bottom of the sensor) that replaces the conventional film used for the acquisition of radiological intraoral images. The X rays are automatically detected by the sensor which triggers image acquisition. The acquired image is displayed almost instantaneously on the screen of the computer to which the sensor is connected. These digital images can then be manipulated, analysed, saved as files or printed. The development process of conventional Xray films is thus completely eliminated (except for use as ‘back up’ or for medicolegal issues) as well as the possible influences on image quality; such as the type, age and temperature of the chemicals, or the development time. The sensor is available in two sizes; depending on the kit you have ordered you received a size 1, a size 2 sensor or both: · The size 1 sensor allows you to acquire the majority of intraoral images (periapical and retrocoronary) both vertically and horizontally. · The size 2 sensor furthermore allows you to easily acquire horizontal “bitewing” images. The instructions and information in this manual refer to both sensor sizes, unless specifically stated. The size of the sensor is marked on the sensor itself. 1.1 Compliance with standards The Velopex Digital sensor is class IIA equipment within the meaning of the European Directive concerning CE markings, annexe IX of book Vbis of the Public Health code, supplementing Directive 93/42/CEE of the 14 th of June 1993. The Velopex Digital sensor complies with medical standard EN/IEC606011. The Velopex Digital kit complies with directive 93/42 CE (annexe VII) of decree 95292 of the Public Health code. Under certain conditions (see “1.3 Installation precautions”) it is necessary that the other components of the system that are possibly connected (computer and optional peripherals) are also compliant to standard IEC950 (EN60950) and that the installation complies with directive 93/42 CE. The Velopex Digital intraoral sensor is contained within a hermetic case, sealed in compliance with standard IPX7. The secondary electrical insulation of the sensor is determined by the materials used. There is no physical or electrical connection between the Velopex Digital kit and the Xray generator. Velopex Digital USB – User manual Page 3/26 1.2 Power supply The power to the Velopex Digital interface box is provided directly by the power supply of the USB cable. 1.3 Installation precautions Regulation requires that your computer is at least compliant with standard IEC950 (EN60950) if it is not within the patient environment. 1.3.1 Installation of the interface box outside the patient environment The Velopex Digital kit has been developed so that the box is positioned outside the patient environment when in use; meaning at a distance of at least 1,5m / 4.9ft of the patient (measured horizontally) or at more than 2,5m / 8.2ft of the ground (measured vertically) if the horizontal distance is not complied with. 1.3.2 Installation of the interface box within the patient environment If the computer or the box are situated inside the patient environment (less than 1,5m / 4.9ft from the patient), your computer must necessarily comply with standard EN/IEC606011, or your installation including the computer must have been rendered compliant with standard EN/IEC6060111. You can connect the box to your computer without additional precautions once your complete installation is compliant with standard EN/IEC6060111. If the computer is not situated in the patient environment and is not compliant with standard EN/IEC60601 1, it is necessary to apply appropriate installation precautions to make sure the box is inaccessible to the patient (when the box is installed inside the dental chair) or to place the box in nonconductive packaging. 1.4 Liability and operators Installer: the installation of the Velopex Digital kit requires computer skills relating to both equipment and software. Follow the recommendations and guidelines of the installation chapter to install the equipment and software. User: the Velopex Digital kit must be used by a dental practitioner or under their guidance by qualified personnell The Velopex Digital interface box should never be opened by the user. Only the manufacturer is authorised to open and make repairs to the sensor or box. Return the equipment to the distributor in case of malfunction and/or if the documentation you possess does not contain the necessary information for the (authorised) maintenance of the malfunctioning equipment. The manufacturer will not be liable if: · Interventions or repairs have been made by persons without the authorization of the manufacturer or distributor and are not part of accepted interventions. · The equipment is used with an installation that is not compliant with the applicable standards and decrees in particular when not compliant with the EN/IEC6060111 standard relating to the security rules for electro medical systems. Make sure the installation of the equipment is compliant with the applicable regulations. · Used in ways other than those mentioned specifically in this manual (use of the kit in normal conditions of use and in compliance with its intended purpose). Velopex Digital USB – User manual Page 4/26 1.5 Packaging and environment Transport, storage and environment: the Velopex Digital USB kit is supplied in protective packaging (protection against physical impacts and antistatic packaging). It must be stored under the following conditions: Ambient temperature: 10°C to +70°C / 14°F to 158°F Relative humidity: 10% to 100% Atmospheric pressure: 500hPa to 1060hPa Operation: in compliance with the international safety standard EN/IEC6011 (section 2), the kit has been designed for normal use under the following conditions: Ambient temperature: +10°C to +40°C / 50°F to 104°F Relative humidity: 30% to 75% Atmospheric pressure: 700hPa to 1060hPa Equipment packaging for return to distributor: should a return to the distributor be necessary, make sure to package the sensor and box kit in its original packaging after having cleaned it thoroughly. Documentation loss: all kits are shipped with its documentation. Please contact your distributor for a replacement manual if this documentation is lost. 1.6 Marking and labelling symbols These symbols are used on the product labels and inform you about the compliance with standards and the technical specifications of the component. Direct current. Sealing standard of the sensor, regulation EN/IEC 60529. Only the part of the sensor that is inserted in the mouth complies with this standard. The CE marking certifies that this product complies with European directive 93/42 CEE. Type BF equipment, EN/IEC 606011, annexes I and II. Important information: follow the instructions printed in this manual. Class II device within the meaning of standard NF EN/IEC 6060111 (reinforced or double insulation). Equipment subject to a selective collection in accordance with Directive 2002/96/EC on waste electrical and electronic equipment (WEEE) and with Decree 2005829 of the 20 th July 2005 regarding the composition of electrical and electronic equipment and the elimination of waste coming from this equipment. Velopex Digital USB – User manual Page 5/26 2 Contents Your Velopex Digital kit consists of the following elements (illustrations may vary from items supplied): A Velopex Digital interface box (compatible with Velopex Digital size 1 or 2 sensors) 1 sensor wall support 1 box wall support (with 2 screws, 2 plugs) 1 box base plate (with 4 selftapping screws, 4 transparent plastic feet, 1 strap) 1 box adaptor size 2 > size 1 A Velopex Digital sensor (size 1 or size 2) (cable of 80cm or 2,95m / 2.6ft or 9.7ft) A USB 2.0 cable (3m / 9.8ft) An introductory pack of positioners (size 1 or 2 depending on your sensor) A bag of disposable singleuse hygienic protective sleeves (for size 1 and 2 sensors) An O.S.P. installation CDROM (drivers/diagnostic tools) A sensor personnalisation CDROM A manual A packaging checklist Velopex Digital USB – User manual Page 6/26 3 Installation 3.1 Precautions The Velopex Digital kit must be handled with care, minimise the twisting, pulling and bending of the attachment cable. Do not step or roll on the cable. Do not pull on the cable itself but on the connection plug to disconnect the attachment cable. To avoid interferences in the image, do not use the system close to strong magnetic fields and avoid proximity to electrostatic emission sources. Read paragraph “1.3 Installation precautions” to ensure the installation complies with the standards. Install your imaging software before the installation of the Velopex Digital USB, its drivers and O.S.P. tools and the personalisation files. 3.1.1 Recommended minimal configuration Any computer configuration that does not comply with the minimal recommended configuration can prevent the starting or proper functioning or the Velopex Digital kit. Verify the specifications of the computer(s) before the installation. Operating system Windows XP service pack 1, Millennium or 98 second edition Computer Motherboard USB port Compliant CEIEC950 Intel 1.2GHz chipset and processor Compatible USB 1.1; USB 2.0 HighSpeed recommended Graphics card Monitor 64MB High resolution 1024x768 (15inch) RAM memory Hard disk 256MB 10GB CDROM drive Backup system 24x External/removable disk, Zip or Jaz system, CDROM/DVD… Printer Keyboard and mouse Laser, inkjet, thermal At acquisition workstation Velopex Digital kit with appropriate drivers Imaging software Xray generator with electronic timer If your computer does not possess USB 2.0 ports, these can be added as PCI cards (for desktop computers) or PCMCIA cards (for laptops). If the USB ports do not provide enough current, please use a powered hub (with its own power supply). The PCMCIA cards need to be powered by an external power supply or connected to a powered hub if they do not provide enough current. Please contact your IT specialist for further information. Velopex Digital USB – User manual Page 7/26 3.1.2 Setup guidelines The computer and the screen with which the sensor and the box are used should preferably be situated close to the chair, within the field of vision of the practitioner, to allow for immediate use. Provide visual access for the patient to be able to share the radiological information with him/her. The screen must be place so as to avoid any reflections or direct overhead illuminations that could be detrimental to the visualization of the radiological images. It must be set up (contrast and brightness) to display as many grey levels as possible in the image. The Xray generator has a great influence on the quality of the acquired images. The Velopex Digital kit is compatible with any kind of generator, be it highfrequency or conventional. The generator must be equipped with an electronic timer (allowing for very short exposure times) and must emit a dose sufficient for the acquisition of a good image (with enough grey levels). Make sure that your generator is not worn as the dose emitted will be insufficient and could influence the quality of the acquired image. The energy emitted by a generator diminishes over time; when in doubt have your generator checked by a qualified technician. Make sure he had of the generator is stable, any movement of the head will induce movement blur in the acquired image. 3.2 Equipment installation 3.2.1 Connections The Velopex Digital interface box provides connectors for the sensor and the USB cable linking it to the computer. It must be connected to the computer using the USB 2.0 cable provided with the kit. If the distance between the box and the computer is greater than the 3m / 9.8ft of USB cable provided with the kit, it is possible to add USB cables by using powered USB hubs between each cable. Connection without hub Connection with powered hub Connect the sensor cable connector to the box by aligning the red dot on the plug with the red dot on the socket of the box – do not try to force the insertion of the plug, it could damage the connector. The Velopex Digital interface box accepts size 1 or 2 Velopex Digital sensors. Make sure the USB port of the computer is preferably a USB 2.0 port. Only use USB 2.0 cables and hubs with a USB 2.0 port and make sure that the hub has its own external power supply (do not use selfpowered hubs, drawing the power from the USB cable). Each USB cable should not be longer than 3m / 9.8ft. The kit is compatible with USB 1.1 ports but with reduced image transmission speed. Do not connect or disconnect the sensor waiting for an acquisition or during an acquisition, you could damage the sensor. Make sure the box is in standby mode before disconnecting the sensor. The USB cable can be connected / disconnected without the need to power down the computer. Check that the box is correctly connected: switch it on with the button; if the green light on the box is switched on, it is powered correctly. Velopex Digital USB – User manual Page 8/26 3.2.2 Box and sensor supports The box can be mounted or placed on different supports using the accessories provided with the box. Place the box on a worktop: stick the nonslip feet provided with the kit to the back of the box if you want to place the box on a worktop. Attach the box with the strap: if you want to use the strap to position the box, attach the base plate of the wall support to the back of the box using the 4 selftapping screws (use only the screws provided with the kit or you could damage the box). Pass the strap under the base plate (as indicated in the drawing underneath) and close it on itself to ensure the Velcro fastening holds. Your box can now be attached to a support with the strap, e.g. to the arm of your Xray generator, to the headrest or armrest of your chair. Velopex Digital USB – User manual Page 9/26 Mount the box using the wall support: it is also possible to insert the box with the base plate in the wall support of the box. The wall support can be mounted on a wall, a worktop or object either by using the screws or by using the strap, passing it through the slits provided for that purpose in the wall support of the box. To mount the wall support of the box, drill 2 holes according to the outline opposite. Insert the plugs, screw in the screws and hook on the wall support to these attachments. Slide the box in the wall support using the base plate. 5mm / 1.9inch diameter 33mm / 1.3inch of space Do not mount the wall support of the box upsidedown or horizontally, the box and sensor could fall on the ground and be damaged. Storing the sensor: it is possible to store the sensor in the space provided in the box. An adapter is included to store the size 1 sensors in the box’s storage area. Remove the protective film from the double sided adhesive at the back of the adapter before inserting it in the sensor storage space. The part of the adapter with the adhesive must be inserted last, this to allow you to remove the adapter at a later date. The kit is also provided with a wall support for the sensor; this support is compatible with size 1 and 2 sensors and can be mounted to a wall, a worktop or to equipment. It allows you to store the sensor within easy reach and to protect it against eventual impacts or drops. Velopex Digital USB – User manual Page 10/26 3.3 Software installation Install the Velopex Digital ‘Easy use’ (or third party) imaging software and check its proper functioning before installing the equipment and its drivers. Refer to the software manual for the installation instructions. 3.3.1 Installation of the drivers Automatic installation for Windows 98SE and Millennium: after having connected the box to the USB port of the computer, Windows will detect automatically the new equipment and ask for the corresponding drivers. 1. Insert the O.S.P. CDROM and click on the “Next” button in the window “Add new hardware” that is displayed onscreen. 2. Check the box “Search for the best driver for your device” and click on “Next”. 3. In the new window, do not check the box “Search for location” and click on “Browse”. 4. On the CDROM, navigate to the “\drivers\WIN_98_ME\Owandy USB” directory in the navigation window that appears and click on “OK”. 5. Windows will indicate is has found the drivers for the “Velopex Digital USB”; click on “Next” to start the installation. 6. Click on “Exit” in the last window of the wizard to finalise the installation. 7. To start the installation of the O.S.P. tools please refer to paragraph “3.3.2 Installation of the O.S.P.”. The “Velopex Digital” is installed under “Universal Serial Bus controllers” in the “Device manager”. To reach this window click on the Workstation icon with the right mouse button and select “Properties”, then “Device manager”. Automatic installation for Windows 2000 and XP: insert the O.S.P. CDROM in the CDROMdrive. The interface will launch automatically and will guide you through the different installation steps. Refer to the Windows help if the CDRom does not automatically launch. 1. Select the desired language in the main screen. The tabs at the top of the page link to different pages of the Owandy website and provide more information regarding Owandy. 2. Click on “Install”, then on “Next”. 3. Select “USB” in the menu that appears. 4. Connect the USB cable to the Velopex Digital interface box and the USB 2.0 port of the computer. Windows will automatically detect your box. 5. Cancel the window “Add hardware wizard” that appears then click on “Click here” in the window of the O.S.P. installer. 6. In the new window, confirm the location of the drivers that is displayed by clicking on “Install”. This location must correspond to the directory of the drivers on the O.S.P. CDROM. The driver files are then copied to your hard disk. 7. Click on “Continue” in the message window “Equipment installation” that appears. 8. A confirmation window is displayed after the files have been copied, it confirms the drivers have been installed correctly by displaying “Velopex Digital USB: Installed”. Click on “OK” to close this window. 9. After the installation of the drivers click on “Next” in the main O.S.P. window. 10. Select “USB XRay” to start the installation of the O.S.P. tools. Refer to paragraph “3.3.2 Installation of the O.S.P.” for installation instructions. Velopex Digital USB – User manual Page 11/26 Manual installation: it is also possible to install the drivers manually by using the “New hardware detected assistant” of Windows. Follow these steps: 1. Connect the KrystalX Easy box to the USB 2.0 port of the computer. Windows will automatically detect your equipment and will display the “Found New Hardware Wizard” window. 2. If the wizard requests the authorization to connect to the Windows Update site, select “No, not this time”, then click on “Next”. This window does not appear depending on your version of Windows. 3. The wizard will inform you it has detected your “Velopex Digital USB” kit. Select “Install from a list or specific location” then click on “Next” after making sure the O.S.P. CDROM is inserted in the CDROM drive. 4. Select “Don’t search. I will choose the driver to install” and click on “Next”. 5. Click on “Have Disk” under the list that is displayed. If the window containing this list does not appear, click on “Show All Devices” then click on the “Have Disk” button. 6. The next window will allow you to navigate to the directory that contains the required files; click on “Browse”. 7. Navigate to the “\drivers\WIN_2000_XP\OWandy USB” directory on the O.S.P. CDROM; this directory contains the file “ow_usb.inf”. Click on “OK” to select this directory. 8. The previous window now displays the location of the files to be installed: “E:\drivers\WIN_2000_XP\OWandy USB” (E : representing the letter of your CDROM drive, this can be different depending on your computer configuration). Click on “OK” to start the installation. 9. The “KrystalX Easy” drivers are displayed in the list (see opposite); click on “Next”. 10. Click on “Continue” in the warning window “Device installation” that appears. 11. Finally click on “Exit” in the last window of the wizard. The “Velopex Digital USB” is installed under “Universal Serial Bus controllers” in the “Device manager”. To reach this window click on the Workstation icon with the right mouse button and select “Manage” in the dropdown menu. In the window that appears select “Device manager”. 3.3.2 Installation of the O.S.P. Manual installation: if you have followed the manual installation of the drivers or you are installing under Windows 98 or Millennium, you must start the manual installation of the O.S.P. tools: 1. Insert the O.S.P. CDROM in the CDROM drive. 2. Navigate to the “\setups\USB_XRAYS_BOX_W98_WME_W2000_WXP” directory on the O.S.P. CDROM. 3. Launch “setup.exe”. 4. Click on “USB XRay” to start the installation of the O.S.P. tools. Refer to the automatic installation of the O.S.P. mentioned above. Velopex Digital USB – User manual Page 12/26 Automatic installation for Windows 2000 and XP: the installation of the O.S.P. tools is automatically proposed after the installation of the drivers. Refer to the procedure below. Automatic installation for Windows 98SE and Millennium: insert the O.S.P. CDROM in the CDROM drive. The interface will launch automatically, click on the button and follow the installation procedure below. Refer to the Windows help if the CDRom does not automatically launch. 1. Select the desired language in the window that appears and click on “Next”. 2. In the welcome screen click on “Next”. 3. Select the target directory by clicking on “Browse” and by navigating to the desired directory. After having selected the target directory (the directory where the software will be installed) click on “Next”. 4. Click on “Install” to start the copying the files. 5. After the files have been copied, select “Velopex Digital USB” in the list that appears and click on “OK”. 6. A window will inform you of the successful installation, close it by clicking on “Exit”. 7. The last window displays the location of the O.S.P. tools; close this window by clicking on the red cross of the window (top right). 8. Close the main O.S.P. installation window if it is still displayed onscreen. 3.3.3 Personalisation files Each kit is provided with a sensor personalisation CDROM of its own; the serial number of the Velopex Digital USB sensor is written on the CDROM. You can therefore not use the same CD ROM to install several Velopex Digital USB sensors. Before installing the sensor personalisation files, make sure that: · The drivers of the Velopex Digital USB kit are installed. · The imaging software is not started. Insert the sensor personalisation CDROM, a window appears and the personalisation files are copied to the hard disk. Close the window after the files have been copied by pushing any key of the keyboard when asked for. 3.3.4 O.S.P. update If you need to update your O.S.P.: 1. Insert the O.S.P. CDROM. 2. Navigate to the “\setups\WIFI_XRAYS_BOX_W98_WME_W2000_WXP” directory on the CD ROM. 3. Launch “setup.exe”. 4. Click on “Install or Reinstall” and be guided by the instructions onscreen. Velopex Digital USB – User manual Page 13/26 3.4 Configuration in the Velopex Digital ‘Easy use’ imaging software To be able to use your kit with the Velopex Digital USB ‘Easy use’ imaging software you must configure your equipment: 1. Start the imaging software (doubleclick on the desktop icon or use the link in Start / Programs / QuickVision). 2. Click on the “Configuration” button in the main screen. 3. Select “OWANDY DSX730 & KrystalX” under the “IntraOral sensor” option in the window that appears. 4. Click on “Configure” at the right of the menu. In the configuration window: ◄ Check the “USB” model. ◄ Select the “KrystalX Easy 520” kit. ◄ Set the activation time of the box (default 5min). ◄ Select the image treatment (*). ◄ Configure the Owandy software (**). (*) When the “Film alike” option is activated, the contrast depends on the exposure time. Adjust the Xray dose on the generator to obtain a good image. (*) When you select the option “Auto contrast” the contrast is constant. Exposure errors are corrected automatically, which reveals noise in badly exposed images. In both cases, the exposure bar (blue/green/red) helps to find the correct exposure of the images. (**) This option appears only when the sensor is used from certain Owandy software programs; it allows the change of the sharpness setting or the high resolution for each acquired image. Velopex Digital USB – User manual Page 14/26 5. Click on “OK” to confirm your choice. 6. Then click on the “Save” button to validate the settings. The use of the kit is identical to the use of the Owandy XIO StandAlone software described below. 3.5 Sharing the sensor and box between different workstations Sharing the sensor and the box allows you to use one or more sensors in turn in a practice with multiple chairs. It is recommended to link the different workstations in a network to allow for the central storage and sharing of the images. A USB cable must be plugged into each workstation for fast connection of the box. Windows will automatically recognise the equipment when it is connected and it will be available immediately for image acquisition. To enable the sharing of the Velopex Digital USB kit between different workstations, it is necessary to first install the imaging software for the acquisition of the images, the drivers, O.S.P. tools and personalisation files on all the computers to which the box will have to be connected. Velopex Digital USB – User manual Page 15/26 4 Use 4.1 Precautions Make sure the sensitive surface (the flat surface) of the sensor is directed towards the Xray generator. The active surface of the sensor is marked by a frame. The back of the sensor (rounded) does not react to Xrays and does not produce an image onscreen. The kit must be manipulated with care, minimising the twisting, pulling and bending of the attachment cable. Do not step or roll on the cable. Be careful not to pull on the cable when removing the hygienic protective sheaths. Do not pull on the cable itself but on the plug to disconnect the attachment cable. Do not connect or disconnect the sensor waiting for an acquisition or during an acquisition, make sure the box is in standby mode before disconnecting the sensor. Even though the sensor is resistant to impacts, it is strongly recommended to not let it fall on the floor. If a physical impact should exceptionally happen, contact your distributor and do not try to intervene yourself. Do not ask the patient to bite on the sensor or cable. 4.2 Lights and button on the interface box During initialisation of the box, the green and yellow lights light up; once the initialisation finished, only the green light remains lit. The interface box automatically switches to standby mode after a period that can be set in the configuration window (see below the default period is 5 minutes). All lights are off when the box is in standby mode and the sensor toolbar turns red. To reactivate the box you only need to push the button on the box. The lights inform the user about the state of the box: · Green light only: sensor ready for image acquisition. · Yellow light: sensor not available (in preparation or transmitting). · Red light only: an error occurred, restart the box. Velopex Digital USB – User manual Page 16/26 4.3 Use of the Velopex Digital USB ‘Easy use’ software 4.3.1 Modes of operation The Velopex Digital USB kit can function in two ways: · Through the Twain protocol (for scanners): to use this mode select “Owandy USB Intra Oral Twain drivers” in the TWAIN acquisition option of your imaging software. Subsequently start the TWAIN acquisition; the interface is identical to that of the independent mode described below. · In independent mode: the independent software program can be started with the icon (on the Windows desktop) or by starting an Owandy software program. This memory resident software package allows the use of the sensor outside any software program. If an image is acquired without a program ready to receive it, the resident program will display the image on screen for a few seconds and save it in the “C:\Program Files\OWandy\OSP USB XRAYS BOX\standalone\Data” directory on the hard disk. A sensor icon appears in the Windows taskbar, next to the clock. The colour of the icon indicates the state of the sensor: Red: sensor inactive Yellow: sensor initialising Green: sensor ready for acquisition 4.3.2 Sensor toolbar It is possible to display the sensor toolbar by clicking with the right mouse button on the sensor icon in the taskbar. The colour of the sensor toolbar indicates the state of the sensor: Red: sensor inactive Yellow: sensor initialising Green: sensor ready for acquisition Options of the sensor toolbar: ◄ Orientation of the sensor (vertical or horizontal), doubleclick on the icon to change the orientation of the sensor. ◄ Activate/deactivate the sensor. ◄ Extension/reduction of the toolbar to hide/display the options. ◄ Configuration of the resolution: check the option to acquire images in full resolution; uncheck the option to switch to standard resolution. ◄ Iconize the toolbar in the taskbar. The resolution and operation mode can only be modified when the green light of the box is on. The box needs a few seconds to change the parameters. Velopex Digital USB – User manual Page 17/26 The box automatically switches to standby mode after a few minutes of not being used; the lights will switch off and the sensor toolbar turns red. Push the button on the box to restart the kit. Check the state of the lights on the box and the colour of the sensor toolbar before each acquisition: the green light must be switched on and the toolbar must be displayed in green. 4.3.3 Configuration menu A rightclick on the sensor icon in the taskbar or on the sensor toolbar displays the configuration menu: Intraoral sensor Displays the sensor toolbar. Start with Windows Once checked, the StandAlone program will be launched each time your computer is started. Configuration Displays the configuration menu (see “3.4 Configuration in the Velopex Digital ‘Easy use’ imaging software”). Display new images during Adjusts the display time of the image. Allows you to browse through the images waiting to be transferred. If no image is acquired this option is not displayed. Closes the resident software program. Warning: the acquisition will no longer be available until the resident program is restarted. Images pending Exit 4.3.4 Image transfer interface Options of the image transfer interface: Image display When an image is selected, it is displayed on a blue background. “Read” button Transfers the selected image to the software program. “Cancel” button Cancels the image selection and starts the toolbar for a new acquisition (only when in a software program). “Preview” button Displays the selected image fullscreen. “Delete” button Deletes the selected image. “Delete on read” option Deletes the selected image from the list after it has been transferred to a software program. Velopex Digital USB – User manual Page 18/26 4.4 Acquisition of an image 4.4.1 Acquisition procedure The image acquisition goes through several steps: 1. Before being able to acquire an image with the sensor, you need to start the computer with which the box will be used and start the imaging software. Check that the sensor toolbar or the sensor icon is green and that the green light on the box is lit and the yellow light is not lit. 2. Program the different parameters (exposure time, etc.) on the Xray generator (see “4.5 Exposure time” for more information). 3. Cover the sensor with a hygienic protective sheath making sure to cover a sufficient length of cable. 4. A set of positioners is provided with the kit to place the sensor in the different parts of the mouth; their use is recommended to ensure the sensor is positioned perpendicularly to the Xray beam. The sensor can also be positioned manually, maintained by the patient as with conventional film. This can be necessary for children with a small oral cavity. Position the sensor in the mouth, behind the tooth of which you want to acquire an image. If you do not use a positioner, a cotton roll can be helpful to position the sensor parallel to the tooth. Turn the sensitive surface of the sensor (the flat surface) towards the generator; if it is facing the other way, the sensor will not be able to acquire images. Refer to the poster provided with the positioners for more information regarding the positioning for anterior, posterior, endo and bitewing images. 5. Position the generator so as to cover the whole sensitive area of the sensor. The paralleling technique is strongly recommended and the use of positioners allows you to correctly place the generator thanks to the aiming ring. 6. Activate the generator. The green and yellow lights of the box will light up to indicate the treatment of the acquired image. Once the image treated, it appears in the imaging software and the green light of the box lights up allowing a new acquisition. 4.4.2 Owandy imaging software functions This function is available only to users of the Velopex ‘Easy use’ imaging software. When the image is displayed in the Velopex Digital QuickVision imaging software, a coloured bar appears in the top part of the image, this is the exposure bar. The white cursor displayed in this bar indicates the exposure level of the image: · If the cursor is in the green, the image is correctly exposed. · If the cursor is in the red, the image is overexposed; reduce the exposure time on the generator. · If the cursor is in the blue, the image is underexposed; increase the exposure time on the generator. Velopex Digital USB – User manual Page 19/26 4.4.3 Third party imaging software functions If you do not possess the Owandy imaging software, an exposure percentage is displayed in the acquired image: · · · 0 to 80% underexposed image, the Xray dose is too low; increase the Xray dose on the generator. 80 to 120% correctly exposed image 120 to 200% overexposed image, the Xray dose is too high; reduce the Xray dose on the generator. 4.5 Exposure time Recommended exposure times in seconds for the Owandy Xray generators: Description Owandy Altis DC Owandy Elios AC Current / Voltage 4mA / 65KV 8mA / 70KV Lower incisor / canine 0.06 – 0.10 0.02 – 0.06 Lower premolar 0.06 – 0.10 0.04 – 0.08 Lower molar 0.10 – 0.14 0.08 – 0.12 Upper incisor / canine 0.06 – 0.10 0.04 – 0.08 Upper premolar 0.08 – 0.12 0.06 – 0.10 Upper molar 0.10 – 0.14 0.08 – 0.12 Reference conditions: · Adult patient, young man or woman of average size · Distance focal spot to sensor 250mm / 9.8inch · Total (inherent) filtration equivalent to 2mm / 0.08inch Al The values indicated in the table above can vary from one generator to another. It is the responsibility of each user to calibrate his/her doses before use. If an image is over or underexposed, it can be corrected afterwards with the imaging software (contrast, brightness, etc.) to improve its visualisation. The table below allows you to note the exposure times specific to your generator: Description Adult Child Lower incisor / canine Lower premolar Lower molar Upper incisor / canine Upper premolar Upper molar Velopex Digital USB – User manual Page 20/26 5 Hygiene and maintenance 5.1 Hygiene and disinfection 5.1.1 Box The box does not require any particular maintenance, it should be cleaned using a cloth and nonabrasive detergents. 5.1.2 Sensor To avoid crosscontamination between patients during use, it is necessary to protect the sensor with hygienic singleuse protective sheaths (FDA cleared for the USA, CE marked for Europe). Some hygienic protective sheaths suited for your region are provided with each system. Before each use on a patient, the used sheath should be thrown away and the sensor disinfected applying a high level disinfection procedure (see “5.2 Recommended disinfection procedure”). A new protective sheath is applied to the sensor for each new patient. We recommend the disposal of the hygienic protective sheaths with the biologically hazardous waste of your practice. Validated protections for North America: BANTA HEALTHCARE or TIDI PRODUCTS Xray sensor sheaths, STERISHIELD PRODUCTS RS barriers. Do not pull on the cable when removing the used protective sheath. 5.1.3 Cables The cable can be cleaned with caution by using a disinfecting wipe. Hold the sensor with one hand and, with the other hand, apply a disinfecting wipe from the side of the sensor along the first 20cm / 8inch of the cable without pulling on the cable; subsequently clean the remainder of the cable in segments of 2030cm / 812inch with as little pinching of the cable as possible, the wipe should slide without applying force. 5.1.4 Positioners The positioners provided with the system should be covered by the hygienic protective sheath together with the sensor. Do not pull on the cable when removing the sensor from the positioner. They should be cleaned and disinfected according to the same procedure as for the sensor (see “5.2 Recommended disinfection procedure”). They can be sterilised, either in an autoclave (classic steam sterilizer, distilled water, 134°C / 273°F, 3bar, 4min) or using cold sterilisation (see product instructions). They withstand a maximal temperature of 145°C / 293°F. A defective positioner can be thrown away with the regular waste. Velopex Digital USB – User manual Page 21/26 5.2 Recommended disinfection procedure Remove the hygienic protective sheath (dispose of it appropriately with the contaminated waste). Vigorously wipe down the sensor to remove any visible residues. If necessary rinse with copious amounts of water. Then place the sensor in the disinfecting agent. Only immerse the sensor and the beginning of the cable in the disinfectant for 15min, never immerse the connector of the sensor or the connection box in the liquid. Then rinse thoroughly the sensor with copious amounts of fresh water. Do not put the sensor in a sterilizer or an autoclave, the high temperature and excessive high pressure will seriously damage the electronics of the sensor. Do not clean the sensor with inappropriate instruments (knife…). If the sensor is not being used immediately upon rinsing, as in the case of allowing it to airdry overnight at the end of a working day, it should be rinsed with sterile water. When the sensor is not being used and to protect it from any damage, it is recommended to store it in its protective case or to hang it in the sensor wall support. 5.2.1 Recommended disinfectants for NorthAmerica The sensor being sealed watertight and to minimize the potential for deviceassociated infections, the device shall be disinfected with an FDAcleared high level disinfection agent following the instructions of the manufacturer for use, storage, handling and warning. The following disinfectant agent has been validated with the KrystalX sensor: CIDEX OPA solution (0.55% Orthophthalaldehyde solution). The maximum soaking period is 24 hours. 5.2.2 Recommended disinfectants outside NorthAmerica The following disinfectants are compatible with the KrystalX sensor: · 2% Glutaraldehydes (maximum immersion time of 24 hours) · 2% Sodium Hypochlorite (maximum immersion time of 24 hours) · Ethyl alcohol (maximum immersion time of 24 hours) · CIDEX Even when using protective sheaths, the sensor should be disinfected each evening. Immerse the sensor in cold sterilisation fluid in accordance with the instructions of the manufacturer after having cleaned it from all residues. Never leave the sensor immersed for longer than necessary. 5.3 Maintenance 5.3.1 Computer dataprotection Your patient and image database must be backedup regularly to be able to recuperate them if needed (in case of hard disk or computer problems). Ask the advice of your IT specialist with regard to the backup system that is best suited to your computer configuration (external or removable hard disk, Zip or Jaz system, CDROM or DVD writer, etc.). Store the copies in a safe place. Velopex Digital USB – User manual Page 22/26 6 Troubleshooting If an error occurs during operation, check the different items in this troubleshooting guide. If you cannot resolve your problem please contact your distributor. 6.1 General Symptom Cause / Solution The Velopex Digital USB kit does not power up (the green light does not light up) or it does not acquire images. · Check that the active surface of the sensor is directed towards the Xray generator and is positioned correctly in the field of the Xray beam. · Check that the kit is correctly configured in the imaging software and that the drivers are correctly installed. · Check that the green light on the box is on and that the sensor toolbar is green; if this is not the case reactivate the box by pushing on the button. · Check that the USB cable is connected correctly to the box and to the computer, and that the computer is switched on. If you use a USB hub, check its connections and make sure it is powered on. · Check that the sensor is connected correctly to the box. · Check that the generator is emitting Xrays (with another sensor or with conventional film). · An error has occurred, disconnect the USB cable and wait a few seconds before reconnecting it. The red light of the box lights up. Velopex Digital USB – User manual Page 23/26 6.2 Image quality Symptom Cause / Solution The images are cut off, e.g.: The sensor is badly positioned with regard to the Xray beam. The images are too light, e.g.: · Reposition the sensor, making sure it is well within the field of the Xray beam. · Use the positioners provided with the sensor for optimal positioning. · The image is underexposed, the Xray dose is too low; increase the Xray dose on the generator. The percentage that is displayed in the image indicate the exposure level: o 0 to 80% underexposed image o 80 to 120% correctly exposed image o 120 to 200% overexposed image · Check the dose emitted by the Xray generator, due to age the dose can be insufficient. Have the generator checked by a technician when in doubt. · The generator is positioned too far from the patient with regard to the selected dose. · Check the parameters of your monitor (contrast and brightness) and avoid reflections on the screen. · The image is overexposed, the Xray dose is too high; reduce the Xray dose on the generator. The percentage that is displayed in the image indicate the exposure level: o 0 to 80% underexposed image o 80 to 120% correctly exposed image o 120 to 200% overexposed image · Check the parameters of your monitor (contrast and brightness) and avoid reflections on the screen. · Check the quality and parameters of the monitor. · Check the connection of the cable of the screen at the side of the graphics card and the monitor. · Check the screen configuration under Windows (screen configuration panel, it must display colours in at least 24bits. 211 1 Film alike mode Auto contrast mode The images are too dark, e.g.: Grey levels seem to be missing in the image (flat areas of grey appear). The image is blurred. Velopex Digital USB – User manual Reacquire the image: · The patient has moved during the exposure. · The generator head was not stabilised and has moved. Page 24/26 7 Specifications Velopex Digital USB size 1 sensor External dimensions size 1 sensor CCD matrix size 1 sensor · Sensitive area in size · · Sensitive area in pixels Pixel dimensions 38,9 x 26,5 x 7,4mm / 1.5 x 1.0 x 0.3inch 30 x 20mm (600mm 2 ) / 1.2 x 0.8inch (0.9inch 2 ) 1500 x 1000pixels 20 x 20µm Velopex Digital USB size 2 sensor External dimensions size 2 sensor CCD matrix size 2 sensor · Sensitive area in size · · Sensitive area in pixels Pixel dimensions 42,7 x 28,5 x 7,4mm / 1.7 x 1.1 x 0.3inch 34 x 24mm (816mm 2 ) / 1.3 x 0.9inch (1.3inch 2 ) 1790 x 1260pixels 19 x 19µm Technical specifications (size 1 and 2 sensors) Maximum external dimensions of connection box 18,6 x 8,4 x 2,4cm / 7.3 x 3.3 x 0.9inch Length sensor cable (in polyurethane) 80cm or 2,95m / 2.6ft or 9.7ft Grey levels 12bits (4096 grey levels) Connection USB standard: USB 2.0 HighSpeed (480Mbit/s) and USB 1.1 FullSpeed (11Mbit/s) Consumption kit 2W Input voltage connection box Input current connection box 5V (through USB connection) 0,4A Operating temperature +10°C to +40°C / 50°F to 104°F Lifespan CCD Min. 100.000 cycles Standards Sealing standard Velopex Digital USB sensor IPX 7 NF EN/CEI606011 Conformity to standards NF EN/CEI6060111 NF EN/CEI6060112 Velopex Digital USB – User manual Page 25/26 8 Optional kits and accessories 8.1 Optional kits The optional kits allow you to add a sensor or box to your kit to evolve according to your needs. Each optional kit is supplied with its accessories. Optional Velopex Digital USB interface box kit with its accessories, compatible with KrystalX size 1 and 2 sensors Contact your distributor Optional Velopex Digital USB size 1 or 2 sensor kit with its accessories Contact your distributor 8.2 Accessories Refill packs of 10 positionners: D0RT1ANGUBW D0RT1ANGUZE D0RT1ANGUZP D0RT1ANGUZPA D0RT2ANGUBW D0RT2ANGUZE D0RT2ANGUZP D0RT2ANGUZPA Size 1 bitewing Size 1 endo Size 1 posterior Size 1 periapical Size 2 bitewing Size 2 endo Size 2 posterior Size 2 periapical Hygienic singleuse disposable protection sleeves (for size 1 and 2 sensors) D0PROTECCAPXL Bag of 20 pieces Supports and adaptors: D0SUPCAP730 D0SUPKW D0ADAPTW/2V1 D0RSANGKW Sensor wall support Box wall support (with base plate & strap) Adaptor size 2 > 1 Strap (3 pieces) USB 2.0 cable C0CABUSB23 Velopex Digital USB – User manual 3m / 9.8ft cable Page 26/26