1
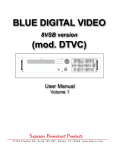
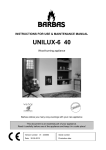
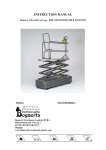
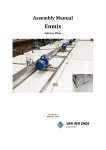
User Guide Enbar LVM Types 1U3 and 22U3 Version 20121206 Preface This user guide has been compiled for users and installers of the Enbar L.V.M. 1-U3 and 22-U3. Please read the entire user guide carefully and keep it in a safe place for future reference. In the event of loss or damage of this user guide (or a portion thereof) a new copy can be requested free of charge from the manufacturer for the entire lifespan of the system. The user guide is divided into chapters, each of which consists of sections. Each of these can, in turn, be composed of various sub-sections. The following items will be discussed in succession: General information Safety precautions (including an explanation of the symbols used) Description of the Enbar Installation and assembly Instructions for use Maintenance Repairs and malfunctions Several appendices have been included at the back of the user guide, including exploded views of the filter and the nozzle. The table of contents provides an overview of where each item can be found in the user guide. User Guide Enbar 1 U and 22U3 Page 2 of 44 Table of Contents Preface ......................................................................................................................................... 2 The table of contents provides an overview of where each item can be found in the user guide. ....... 2 Table of Contents.......................................................................................................................... 3 1. Identification ............................................................................................................................ 5 1.1 The Enbar L.V.M. U3 ......................................................................................................... 5 1.2 The machine .................................................................................................................... 5 1.3 Operators ......................................................................................................................... 6 1.4 Connection instructions ..................................................................................................... 6 1.5 Use .................................................................................................................................. 6 1.6 Unintended use ................................................................................................................ 6 1.7 Atomization environment................................................................................................... 6 1.8 Warranty .......................................................................................................................... 7 2. Description ......................................................................................................................... 8 2.1 Principle of operation ........................................................................................................ 8 2.2. Parts ..................................................................................................................................... 9 2.3 Transport and storage..................................................................................................... 12 3. Safety instructions ................................................................................................................... 13 3.1 Information about crop protection agents ........................................................................ 13 3.2 Summary of safety hazard icons ...................................................................................... 14 3.3. General safety instructions ............................................................................................. 16 3.3.1 General information ................................................................................................ 17 3.3.2 Preparing the atomizing solution .............................................................................. 18 3.3.3 Testing the installation ............................................................................................ 19 3.3.4 Switching on the machine ....................................................................................... 20 3.3.5 Using the machine .................................................................................................. 21 3.3.6 After using the machine .......................................................................................... 21 3.3.7 Maintenance and cleaning of the machine ................................................................ 22 3.4. Summary of remaining risks ........................................................................................... 23 4. Operation ............................................................................................................................... 24 4.1. Controls ........................................................................................................................ 24 4.2 Putting the Enbar into operation ...................................................................................... 25 4.3 Pre-ventilation ................................................................................................................ 25 4.4 Filling and switching on the machine ................................................................................ 26 4.5 Testing .......................................................................................................................... 27 4.5.1 Test atomization ..................................................................................................... 27 4.5.2 Test fogging + rinse cycle ....................................................................................... 27 4.5.3 Test full cycle ......................................................................................................... 27 4.6 Taking the Enbar out of operation ................................................................................... 28 4.6.1 Switching off the machine ....................................................................................... 28 4.6.2 Storing the Enbar ................................................................................................... 28 4.7 Restarting the Enbar after an emergency stop or power cut .............................................. 29 5. Maintenance ........................................................................................................................... 30 5.1. Cleaning after use .......................................................................................................... 30 5.2 Compressor maintenance ................................................................................................ 31 5.2.1 Draining condensation fluids .................................................................................... 31 5.2.2 Oil level.................................................................................................................. 31 5.2.3 Refilling and replenishing the oil .............................................................................. 31 5.2.a Air filters ................................................................................................................ 32 6. Annual overhaul ...................................................................................................................... 33 6.1 Safety instruction ............................................................................................................ 33 6.2 Fogging unit ................................................................................................................... 33 6.3 Compressor .................................................................................................................... 34 7. Malfunctions ........................................................................................................................... 35 8. Technical specifications ........................................................................................................... 37 User Guide Enbar 1 U and 22U3 Page 3 of 44 8.1 Enbar mobile .................................................................................................................. 37 8.2 Compressor .................................................................................................................... 37 8.3 Enbar unit ...................................................................................................................... 37 9. Declaration of Conformity ........................................................................................................ 38 Appendices ................................................................................................................................. 39 Composition of the nozzle ..................................................................................................... 40 Composition of the inlet filter ................................................................................................ 41 Replacing a fuse in the U3 .................................................................................................... 42 User Guide Enbar 1 U and 22U3 Page 4 of 44 1. Identification This chapter contains a number of general specifications, parameters and specifications with regard to the machine’s intended operators, operating conditions, etc. 1.1 The Enbar L.V.M. U3 Enbar L.V.M. connection Ventilator Agitator mixer Switch box Solution tank Rinse water tank Droplet size VMD Atomizing solution output Oxygen output Compressor Type Pump type Torque Electric motor specifications Maximum pressure Tank capacity Oil Type plate and CE symbol 400 V (230 V available) 230 V / 160 W / 0,71 A / 5 μF / 2650 rpm 230 V / 3.5 W / 60 rpm 230 V / control current 24 VAC 5 l optional 10 l 1l 14 μm 2.5 l / hr per nozzle +/- 90 l / min at 6 Bar N.300.50.R VE.01 18-20 N 400 V / 1.5 kW / 3.45 A / 2800 rpm 10 Bar 50 l Puska VDL 100 or Shell Corena H100 Front support or on a base plate, the CE symbol is located on the machine near the main box. Table 1: Specifications 1.2 The machine The Enbar LVM Low-Voltage Mister (or simply Enbar) is a machine that automatically disperses crop protection agents. The Enbar vaporizes the crop protection agents via an air stream, after which the vapour remains suspended in the treatment area for some time to ensure an even distribution and good permeation of the vaporized chemical solution into the crop. The benefits of the ENBAR L.V.M.: Accurate and effective application of crop protection agents The crop does not become wet Very even distribution across the entire surface Mobile Available in a 400 V and a 230 V version Requires a minimum of labour Leaves practically no residue The machine, generally speaking, is built up out of a ventilator, a nozzle, a motor, a solution tank, a frame, a compressor, and an oxygen tank. The Enbar was developed exclusively for the atomization of crop protection agents in greenhouses (fogging). The 22-U3 and 1-U3 types described in this user guide distinguish themselves from other Enbar types (U1 and U2) in the sense that this type produces its own compressed air and is mobile. According to the Low Voltage Directive, the Enbar is a Class I device. User Guide Enbar 1 U and 22U3 Page 5 of 44 1.3 Operators It is imperative that all operators using the Enbar read this user guide and inform themselves of the applicable safety precautions before putting the machine into operation. All operators must be designated as authorized operators by the company. An operator is not necessarily authorized to mix the atomizing agent or modify the settings of and/or execute maintenance and repair work on the machine, unless this person is at least eighteen years of age. Apart from this, operators must be certified to mix the atomizing solution through a valid Class III Spraying Certificate. Operators must ensure that children or persons under the age of eighteen and persons not wearing adequate protective clothing in such cases when this is required stay out of the direct vicinity of the Enbar. Pregnant women should neither operate nor remain in the direct vicinity of the Enbar. 1.4 Connection instructions Connect the Enbar to an earthed wall socket, protected with a 16A circuit breaker in combination with a 30mA earth leakage circuit breaker. The supply voltage of the mobile version of the Enbar (the 1U3 and the 22-U3) is 400 V. 1.5 Use The device may be used exclusively for the atomization of suitable crop protection agents. 1.6 Unintended use It is not permitted to use the Enbar for atomization with substances other than crop protection agents. Use of the Enbar and its solution tank as a storage unit for crop protection agents is prohibited. Never mix more atomizing solution than necessary; you should make only enough for one application only. When the Enbar has completed the atomization and post-atomization ventilation process using the relevant crop protection agent, the tank must be emptied. Collect the atomizing agent in a container and store it in an adequate storage location. The Enbar is not suitable for use as a ladder or a stepladder, or for any purpose other than atomization. 1.7 Atomization environment The consumption of food, beverages or tobacco in the direct vicinity of the Enbar is prohibited due to the presence of crop protection agents. The space where the Enbar is being used may not be entered when the machine is in operation. Make sure that there is sufficient free space on all sides of the machine to avoid any possible safety hazards. The ambient temperature must lie between 5°C and 40°C and the relative humidity between 35% and 85%. The Enbar is intended for use in a crop growing area. User Guide Enbar 1 U and 22U3 Page 6 of 44 1.8 Warranty The warranty is six months, commencing on the date of demonstrably taking the machine into commission, to which an expiration date applies of two years from the production date. In the event that a warranty claim is lodged, the relevant parts must be offered to the manufacturer for assessment. The warranty will be cancelled if any of the following conditions apply: Improper use or assembly Repeatedly ignoring the recommendations issued by the supplier and/or manufacturer Repair, maintenance or use by unauthorized parties Use of improper connections with regard to power supply or wiring Use of the machine in an unsuitable environment Deliberate damage or modifications to the machine The guarantee terms are in accordance with the Terms and Conditions of the Netherlands Metal Association (METAALUNIEVOORWAARDEN) in the version dated January 2008. User Guide Enbar 1 U and 22U3 Page 7 of 44 2. Description This chapter briefly explains the operation of the Enbar, while the location of the various parts is specified according to a number of schematic drawings. 2.1 Principle of operation The Enbar L.V.M. (Low-Volume Mister) is a machine for the treatment of a specific space with vaporized crop protection agents that enables an even distribution and good permeation of the crop protection agents into the crop. The machine injects a fluid crop protection agent into an air stream, after which the ensuing vapour is dispersed throughout the treatment area. The general principle of operation is as follows (the numbers apply to the components in paragraph 2.2). The solution tank (13) is filled with a crop protection agent. After the start sign has been given, the ventilator (12) will be switched on and the compressor (16) will ensure that the air pressure is brought to and kept at an adequate level. At the same time, the agitator mixer (6) in the solution tank will start to rotate to keep the crop protection agent dissolved and prevent it from clumping or precipitating. The ventilator will now start pre-ventilating to start up the air stream in the treatment area. Please note that the pre-ventilation time can be set. There is a nozzle (2) with inputs for liquids and air directly in front of the ventilator outlet. Once the atomizing (or fogging) program starts, the air valve will switch and the compressed air will exit the oxygen tank (10) through the nozzle via the pressure regulator (8). This will result in negative pressure in the nozzle (the Venturi effect). This negative pressure causes the crop protection agent to be sucked up via the filter (4) and the excess flow valve (3) and subsequently vaporized at the nozzle head. As the nozzle is located in the air stream of the ventilator the crop protection agent is vaporized in the air stream and dispersed throughout the treatment area. The Enbar will continue to atomize the treatment area for the duration of the set time. After this, the rinse cycle will start automatically. The water valve will switch to enable the water from the rinse water tank (11) to be vaporized. This will rinse the machine until it is clean. The rinse cycle takes approximately 3 minutes to complete. After rinsing, the post-ventilation cycle will commence (approximately 7 minutes) to ensure that any remaining droplets and moisture are dispersed. All steps and components are controlled by a PLC (Programmable Logic Controller). User Guide Enbar 1 U and 22U3 Page 8 of 44 2.2. Parts The diagram below identifies the key components by name and number. 1 12 2 11 3 4 27 5 13 6 14 26 15 8 16 9 17 10 Figure 1. Parts of the Enbar U3 1. Control unit 2. Nozzle 3. Excess flow check valve (woodpecker) 4. Filter 5. Suction tube 6. Agitator mixer 7. V-belt 8. Pressure regulator (air pressure) 9. Compressor pressure switch 10. Compressor tank 11. Rinse water tank 12. Ventilator 13. Solution tank 14. Flywheel and drive mechanism protector 15. Air filter (one on each cylinder head) 16. Compressor block 17. Oil drain plug 26. Air pressure vent 27. Junction box (with condenser, etc.) Table 2: Parts of the Enbar U3 User Guide Enbar 1 U and 22U3 Page 9 of 44 Figure 2. Parts of the Enbar U3 9. Compressor pressure switch 18. Air pressure regulation dial 19. Pressure gauge (displays air pressure) 20. Compressor ON/OFF switch 21. Ball valve between buffer tank and Enbar 22. Pressure gauge (displays pressure in buffer tank) Table 3: Parts of the Enbar U3 User Guide Enbar 1 U and 22U3 Page 10 of 44 Figure 3. Parts of the Enbar U3 7. V-belt 15. Air filter 17. Oil drain plug 23. Motor overload switch (also compressor on/off switch) 24. Oil refill opening 25. Oil level gauge (with red dot indicating maximum level) Table 4: Parts of the Enbar U3 User Guide Enbar 1 U and 22U3 Page 11 of 44 2.3 Transport and storage Before the Enbar can be moved every last remnant of the chemical solution must be removed from the solution tank. The Enbar can be moved after the wheel blocks have been removed. The Enbar should only be wheeled across flat, stable surfaces to prevent any possibility of the machine tipping over. After use, the Enbar must be stored in an area that cannot be accessed by unauthorized persons. Before storing, please ensure that the Enbar has been thoroughly rinsed and cleaned, if necessary (see paragraph 5.1). Leave enough water in the solution tank to cover the bottom to prevent the pipework and appendages from drying out. User Guide Enbar 1 U and 22U3 Page 12 of 44 3. Safety instructions This chapter contains information about how to safely use the Enbar. Please read this chapter carefully and inform anyone working in the vicinity of the Enbar of all possible safety hazards and precautions. 3.1 Information about crop protection agents The Enbar is used in combination with crop protection agents. These are deemed to be hazardous substances and are often toxic, irritants and/or hazardous to the environment. Although the crop protection agents used by the Enbar are diluted, it is still essential that appropriate safety measures are taken. Carefully read all labels for the applicable safety precautions! Ask your supplier for advice about the crop protection agents you wish to use. Always wear a full face mask and gloves when using crop protection agents, diluted as an atomizing solution or otherwise! The person mixing the atomizing solution must have a spraying licence Class III (3). For an exhaustive list of the safety precautions associated with the use of the relevant atomizing solution, please refer to the label or ask your supplier. Please keep in mind that the manufacturer of the Enbar is neither engaged in nor in any case responsible for the storage of the crop protection agents to be used. The operator of the Enbar is responsible for ensuring that adequate safety precautions are observed. The storage of the substances used does not fall within the scope of responsibility of the manufacturer. User Guide Enbar 1 U and 22U3 Page 13 of 44 3.2 Summary of safety hazard icons There are various safety icons on the Enbar and in this user guide. Please refer to the list below for the meaning of these safety and warning icons and symbols. Icon Identifying mark Definition This icon is used to designate a safety hazard associated with the use of toxic or hazardous substances. T This icon prescribes the mandatory use of personal protection equipment, such as masks or gloves. This icon designates a safety hazard associated with hot surfaces. This icon designates a safety hazard associated with electrocution. Please observe the necessary safety precautions whenever you see this icon. Face mask When using a product that has this icon, always wear a full face mask to prevent the inhalation of hazardous substances via the respiratory system or exposure to these substances via the face. Gloves When using a product that has this icon, always wear gloves to prevent the exposure to and/or spreading of hazardous substances via the hands. User Guide Enbar 1 U and 22U3 Page 14 of 44 Overalls When using a product that has this icon, always wear a protective overall or other type of protective clothing to prevent the exposure to and/or spreading of hazardous substances via the skin. User manual Always read the user manual before using a product that displays this icon. Hand-washing Always wash your hands after using a product that displays this icon. Table 5: Relevant safety icons and their meanings User Guide Enbar 1 U and 22U3 Page 15 of 44 3.3. General safety instructions Instructions with regard to the use and preparation of atomizing solutions containing crop protection agents: This machine may be used only for the atomization of suitable crop protection agents. Please inspect the machine for damage and/or incompleteness directly upon taking it into receipt. You must notify the supplier and/or manufacturer immediately of any damage and/or incompleteness. Please read the entire user guide carefully before operating the machine. Please note that a spraying licence is required for the preparation of the atomizing solution. Consult the supplier of the crop protection agent for the correct dosages. User Guide Enbar 1 U and 22U3 Page 16 of 44 3.3.1 General information Avoid physical contact with the atomizing solution. Keep pregnant women and children under 18 away from the machine. Clean up any spills immediately. Never mix more atomizing solution than needed. When using the Enbar avoid touching your eyes, mouth and nose to the greatest extent possible. Avoid contact with cylinder heads; these can be hot during and after use. Ensure that all grills and protective covers are securely mounted. Regularly replace gloves, protective clothing and full face mask filters. Ensure that everyone operating the Enbar or working in its direct vicinity is properly informed of the safety precautions. Always wash your lower arms and hands with soap and water after using crop protection agents. User Guide Enbar 1 U and 22U3 Page 17 of 44 3.3.2 Preparing the atomizing solution Wear protective clothing, gloves that fit well and a full face mask. Securely close the package after weighing off and/or measuring the crop protection agent. Securely store the package after weighing off and/or measuring the crop protection agent. The solution tank must be put back into place directly after filling it with the solution. Do not eat, drink, smoke or pick your nose. Always read the label first: other than instructions for use, labels also provide information concerning the statutory safety precautions, risk phrases (the ‘R phrases’) and safety recommendations. Always observe the R phrases on the label. Always wash your lower arms and hands with soap and water after mixing the atomizing solution. User Guide Enbar 1 U and 22U3 Page 18 of 44 3.3.3 Testing the installation Ensure that the solution tank is filled with nothing but clean water! Connect the Enbar to an earthed wall socket. Ensure that the wheel blocks are properly in place. Place the Enbar on a flat, stable surface. Ensure that the solution tank has been put into place correctly. Remove the key from the key switch after use. User Guide Enbar 1 U and 22U3 Page 19 of 44 3.3.4 Switching on the machine Make sure that nobody is present in the area to be treated. Take the necessary precautions to ensure that nobody can enter the treatment area while the Enbar is being operated. Inform all employees and other persons in the vicinity that the Enbar will be in use. Attach warning signs to the access doors of the area to be treated. Make sure that all windows and doors with outdoor access are closed to ensure that no vapour will escape. Connect the Enbar to an earthed wall socket. Follow all the instructions for connecting the machine. Ensure that the wheel blocks are properly in place. Place the Enbar on a flat, stable surface. Ensure that the solution tank has been put into place correctly. Make sure that the fans are blowing in a longitudinal direction (i.e. parallel) to the aisle. User Guide Enbar 1 U and 22U3 Page 20 of 44 3.3.5 Using the machine Make sure that nobody can enter the space where the Enbar is being used. Make sure that all windows and doors with outdoor access are closed to ensure that no vapour will escape. 3.3.6 After using the machine Thoroughly air the treated area for several hours after use. Do not enter the area until the machine has completed the postventilation cycle and the area has been properly aired. Inspect the solution tank to ensure that it is empty and, if not, empty it. Treat the fluid as chemical waste. Remove the plug from the wall socket. Store the Enbar in an area that cannot be accessed by unauthorized persons. User Guide Enbar 1 U and 22U3 Page 21 of 44 3.3.7 Maintenance and cleaning of the machine Ensure that the Enbar is completely empty of all crop protection agents before performing any maintenance or cleaning activities. Always remove the plug from the wall socket before working on the Enbar. Allow the cylinder heads to cool before cleaning them. Wear suitable protective clothing and gloves. Always wash your lower arms and hands with soap and water after using crop protection agents. User Guide Enbar 1 U and 22U3 Page 22 of 44 3.4. Summary of remaining risks All users of this machine must be aware of the safety risks associated with its operation. Although these risks have been limited to the greatest possible extent by the manufacturer, failure to follow the instructions or improper use of the machine can result in safety hazards. We have provided an overview of the remaining risks and the consequences of ignoring the instructions or improper use of the machine. Risk sheet No. 1 and 2 5. 7. Description of remaining risks The agents used, whether or not in combination with the operation of the machine (atomization, or fogging) are hazardous to the operator. As this safety hazard is an integral part of the operation of the machine it cannot be limited any further. The Enbar cannot be safely switched off once it has been put into operation. The safety hazards associated with this must be prevented by following the various safety instructions, such as meticulous inspection of the area to be treated before the fogging procedure is initiated. The solution tank must be put into place correctly to prevent any risk of leakage and/or loss of its contents. Table 6: List of remaining risks User Guide Enbar 1 U and 22U3 Page 23 of 44 4. Operation This chapter contains the instructions for the proper use of the Enbar. The numbers refer to the diagram in paragraph 2.2. 4.1. Controls Figure 4. Controls of the Enbar U3 Number 1. 30. 31. 32. 33. Name Control unit Pre-ventilation cycle settings dial Start button Key switch Emergency stop button Function Housing of the controls Setting the pre-ventilation cycle Starting the pre-ventilation cycle Testing the machine with clean water Stopping the machine while a program is running 34. Fogging cycle settings dial Setting the duration of the fogging cycle 35. Stop/reset button Stopping and resetting the controls Table 7: Designation of the controls of the Enbar U3 The compressor tank also has an ON/OFF switch (9) and an air pressure regulation knob (8). Set times cannot be changed while a program is running (after the start button has been pressed). A program or cycle can only be interrupted by pressing the stop button. Pressing the stop button (35) will cause the Enbar to abort its program or cycle. Once the machine has been stopped the duration of the relevant cycle can be modified. If the stop button is pressed during the fogging cycle, which is in principle not possible since all persons are prohibited from entering the area being treated, the time elapsed will be set to zero. We therefore do not recommend pressing this button during a cycle and to do so only immediately after you have noticed that a setting is incorrect. User Guide Enbar 1 U and 22U3 Page 24 of 44 4.2 Putting the Enbar into operation Place the Enbar on a flat, stable surface. Place and aim the Enbar lengthwise to the central aisle. o Place and aim the Enbar parallel to the central aisle. o Place and aim the Enbar in such a way that the flow of air will move over the central aisle without touching the crop. Block the wheels of the Enbar with the wheel block system. Ensure that the plants to be treated are dry. Inspect the drain cock underneath the compressor tank to make sure that it is shut. o If it is open, shut it. Shut the ball valve between the buffer tank (10) and the pressure regulator (8). Connect the Enbar to a wall socket. o Ensure that this socket is earthed. o Make sure that the wall socket is protected with a 16A circuit breaker in combination with a 30mA earth leakage circuit breaker. Open the ball valve between the buffer tank (10) and the pressure regulator (8). Wait until the pressure gauge (22) on the buffer tank reaches 8 Bar. Turn the pressure regulator dial (18) until the pressure gauge on the pressure regulator reaches 6 Bar. 4.3 Pre-ventilation The ventilator of the Enbar automatically starts the pre-ventilation cycle when the Enbar is switched on. The minimum duration of the pre-ventilation cycles is 5 minutes. This can be set using the dial (30). Close all doors and windows with outdoor access. Switch on any auxiliary ventilators in the area to be treated. Allow the auxiliary ventilators to operate for 30 minutes before the fogging cycle starts. Allow the auxiliary ventilators to operate during the fogging cycle and for 15 minutes after the fogging cycle has stopped. User Guide Enbar 1 U and 22U3 Page 25 of 44 4.4 Filling and switching on the machine Always wear gloves, protective clothing and a full face mask when preparing the atomizing solution! Please note that a spraying licence is required to prepare the atomizing solution. Prepare the atomizing solution. o Follow the instructions provided by the supplier of the crop protection agents. Carefully unscrew and remove the solution tank from underneath the Enbar. Fill the solution tank. o Use a strainer to fill the solution tank. Put the solution tank back into place. o Screw the solution tank tightly shut. Fill the rinse water tank with water. Set the desired pre-ventilation cycle using the dial (30). o The minimum duration of the pre-ventilation cycle is 5 minutes. Use the dial (34) to set the desired fogging cycle duration. o Approximately 1 litre of atomizing solution is atomized per 30 minutes. o Always extend the fogging cycle by 15 minutes to ensure that every last bit of the atomizing solution is atomized. Make sure that nobody is present in the area to be treated. Inform the staff whenever you will be using the Enbar to spray crop protection agents. Make sure that nobody can enter the area being treated. Follow the safety instructions outlined in Chapter 3. Insert the key into the key switch (32). Switch on the machine by setting the key switch (32) to ‘automatic’ (anti-clockwise) and press the start button (31). The Enbar will start the pre-ventilation cycle and continue with the rest of the program. o The fogging cycle will start directly after the pre-set pre-ventilation cycle has been completed. o The light in the start button will blink throughout the pre-ventilation cycle. Once the fogging cycle has been completed the Enbar will automatically start the rinse cycle, followed by the post-ventilation cycle. The duration of the rinse cycle is 10 minutes, o The actual rinsing procedure takes 3 minutes. o After the rinse cycle the ventilator will run for another 7 minutes. The pressure switch (9) will automatically switch off the compressor. Ensure that the area that was treated is thoroughly aired for several hours. User Guide Enbar 1 U and 22U3 Page 26 of 44 4.5 Testing Before testing, ensure that every last drop of chemical solution has been atomized and that the Enbar has been rinsed thoroughly. Use only clean, potable water for testing purposes! There are several ways to test the Enbar. If you encounter any problems please refer to Chapter 7 or contact the manufacturer. 4.5.1 Test atomization Insert the key into the key switch (32). Switch on the pressure switch (9). Open the ball valve (21) between the pressure switch (9) and the pressure regulator (8). Make sure the Enbar is connected to a power supply. Check the air pressure in the buffer tank (10) and on the pressure regulator (8). o Consult paragraph 4.2 if necessary. Turn the key clockwise. o The Enbar should now start atomizing (fogging). A spring mechanism will ensure that the key automatically returns to the neutral position. After this the machine will stop atomizing. Remove the key from the key switch (32) to prevent use by unauthorized persons. 4.5.2 Test fogging + rinse cycle Insert the key into the key switch (32). Switch the key to ‘automatic’ (anti-clockwise). Make sure the Enbar is connected to a power supply. Check the air pressure in the buffer tank (10) and on the pressure regulator (8). o Consult paragraph 4.2 if necessary. Turn the pre-ventilation dial (30) to the ‘Rinse Test’ position. Turn the dial (34) to set the fogging cycle to 1 minute. Press the ‘start’ button. o The Enbar will now start its program. o The pre-ventilation cycle will be skipped. o After atomizing for 1 minute, the Enbar will start the rinse cycle. When the Enbar has completed its program, remove the key from the key switch (32) to prevent use by unauthorized persons. 4.5.3 Test full cycle Insert the key into the key switch (32). Switch the key to ‘automatic’ (anti-clockwise). Make sure the Enbar is connected to a power supply. Check the air pressure in the buffer tank (10) and on the pressure regulator (8). o Consult paragraph 4.2 if necessary. Turn the pre-ventilation dial (30) to 5 minutes. Turn the dial (34) to set the fogging cycle to 1 minute. Press the ‘start’ button. o The Enbar will now run through its full program (pre-ventilation, fogging and rinsing). When the Enbar has completed its program, remove the key from the key switch (32) to prevent use by unauthorized persons. User Guide Enbar 1 U and 22U3 Page 27 of 44 4.6 Taking the Enbar out of operation Always wear gloves, protective clothing and a full face mask when switching off the Enbar or working on it! Always disconnect the power supply first. Close the ball valve that regulates the air supply! 4.6.1 Switching off the machine Do not enter the area until the Enbar has completed the fogging and postventilation cycles and the area has been properly aired! Set the pressure switch (9) to ‘0’ (OFF) by pressing the button (20). Switch the key switch (32) on the main box to ‘0’ and remove the key from the switch. o This is to prevent use by unauthorized persons. Remove the plug from the wall socket. Carefully unscrew and remove the solution tank (13) from the Enbar. Rinse the solution tank. o Rinse with warm tap water (40°C) until clean. o The rinse program ensures that the solution tank, suction pipe, excess flow check valve, pipework and nozzle are all rinsed with clean water. Leave a small amount of clean water to cover the bottom of the solution tank. o This will prevent the pipework from drying out. Screw the solution tank back into place. Fill the rinse tank (No. 11 in paragraph 2.2) with clean water. Drain the condensed liquid from the pressure vessel. o Put a container underneath the drain cock. Please note that the condensed liquid is sprayed from the pressure vessel under a slight pressure. o Open the drain cock. o Collect the condensed liquid. Treat the condensed liquid as chemical waste (it contains oil). o Shut the drain cock. 4.6.2 Storing the Enbar Store the Enbar where it cannot be accessed by unauthorized persons. User Guide Enbar 1 U and 22U3 Page 28 of 44 4.7 Restarting the Enbar after an emergency stop or power cut In the event of a power cut (resulting from a power failure or pressing the emergency stop button) the Enbar will not resume its program automatically. Investigate the cause of the power cut or emergency stop. Resolve the cause of the power cut. Make sure that nobody is present in the area to be treated. Press the start button. o The Enbar will now run a 5-minute pre-ventilation cycle and resume its program. User Guide Enbar 1 U and 22U3 Page 29 of 44 5. Maintenance This chapter describes the maintenance to be carried out on the Enbar. All the maintenance tasks described herein may be performed by the operators. All other maintenance tasks must be performed by a specialized maintenance professional. Always wear gloves, protective clothing and a full face mask when working with the Enbar! Always disconnect the power supply first! Close the ball valve that regulates the air supply! 5.1. Cleaning after use After the fogging cycle has been completed the solution tank, suction pipe, excess flow check valve, pipes and nozzle are all rinsed with water. Unscrew the solution tank from the unit. Rinse the solution tank. o Rinse with warm tap water (40°C) until clean. Leave a small amount of clean water to cover the bottom of the solution tank. o This will prevent the pipework and other parts from drying out. Put the solution tank back into place on the fogging unit. Fill the rinse water tank with clean water. Clean the fogging unit and the compressor. o Use a non-abrasive household cleaning agent. Inspect the Enbar for leaks and wear and tear of the tubes and cables. Inspect all guards and/or grids. Inspect all couplings, bolts and nuts. User Guide Enbar 1 U and 22U3 Page 30 of 44 5.2 Compressor maintenance 5.2.1 Draining condensation fluids Drain the pressure vessel after every use! Place a container underneath the drain cock. Open the drain cock. Collect the condensed liquid and treat it as chemical waste (it contains oil). 5.2.2 Oil level Check the compressor’s oil level. The oil level should be between the red dot on the oil level gauge and the bottom of the oil level gauge. The red dot indicates the maximum level. Refill the oil if necessary (see 5.2.3). Use only Puska Alteroil VDL 150. This can be obtained from your supplier and/or the manufacturer. 5.2.3 Refilling and replenishing the oil The oil should be replenished after every 500 operating hours or once every 6 months. Unscrew the oil filler plug (24) from the carter. Place a container underneath the oil drain plug (17). Open the oil drain plug and collect the oil. Treat the used oil as chemical waste! Clean the oil drain plug. Screw the oil drain plug back into the carter. Fill the carter with oil through the fill opening. o The maximum level is indicated by the red dot on the oil level gauge. o The minimum level is the bottom of the oil level gauge. Screw the oil filler plug (24) back into the carter. User Guide Enbar 1 U and 22U3 Page 31 of 44 5.2. Air filters After it has been used five times the Enbar’s air filters must be cleaned. Always wear gloves, protective clothing and a full face mask when cleaning the air filters! Open the air filter body (15) by unscrewing the cover (bayonet catch). Blow pressurized air through the filters. Please be careful: chemical solution particles may be released from the filters. Make sure that everyone in the vicinity is wearing personal protective equipment! Put the air filters back. If they are very dirty the air filters must be replaced. User Guide Enbar 1 U and 22U3 Page 32 of 44 6. Annual overhaul 6.1 Safety instruction Always wear gloves, protective clothing and a full face mask when working on the Enbar! Always disconnect the power supply first! Close the ball valve (21) that regulates the air supply! Never switch on the ventilator(s) if the ventilator guard is not in position! 6.2 Fogging unit Disconnect the power supply. Close the ball valve (21) that regulates the air supply. Drain condensed fluid and deaerate the pressure vessel. o Put a container underneath the drain cock. o Open the drain cock. o Leave the drain cock open until barely any air escapes from the drain cock. o Shut the drain cock. Clean the ventilator blades. o Remove the ventilator guard from the ventilator(s). o Clean the ventilator blades with soapy water. o Put the ventilator guard back into place. Clean the solution tank (6). o Wipe the tank clean with a moist cloth. o Rinse it with plenty of clean water. o Clean the tank with soapy water if necessary. Inspect the agitator mixer (5). o Switch on the Enbar via the main switch box. o Connect the plug to the wall socket. The agitator mixer should now being to rotate slowly. If the agitator mixer does not function properly contact the supplier. o Remove the plug from the wall socket. o Switch off the Enbar via the main switch box. o Put the solution tank back into place. Clean the filter in the suction line (3). o Take the suction filter apart. Use the exploded view in the appendix for reference. o Rinse the filter. Rinse with warm tap water (40°C) until clean. o Put the filter and any sealing rings (O-rings) back into place in the pipework. User Guide Enbar 1 U and 22U3 Page 33 of 44 Clean the nozzle (1). o Take the nozzle apart. Use the exploded view in the appendix for reference. o Check the nozzle for wear and tear. o Replace the nozzle with the one included in the repair kit or replace the same nozzle. Check the capacity of the nozzle (1) and the flow limiter (2). o Fill the solution tank (6) with 200 cc (= 200 ml) clean water. o Test the machine. Refer to the instructions in paragraph 4.5. o Use a watch or stopwatch to check the duration of the fogging cycle. The tank should be empty in 6 minutes. o If the tank empties too quickly the nozzle should be replaced. If this happens too slowly the flow limiter and the nozzle must be cleaned or replaced. Check the fogging unit’s rinse cycle o Refer to paragraph 4.5.2. Clean the machine. o Clean the fogging unit and the compressor. Use a non-abrasive household cleaning agent. o Inspect the Enbar for leaks and wear and tear of the tubes and cables. o Inspect all guards and/or grids. o Inspect the couplings, bolts and nuts. o Leave a small amount of clean water to cover the bottom of the solution tank. This will prevent the pipework and other parts from drying out. 6.3 Compressor Have the compressor checked every year by your service centre or supplier. This is essential to prolonging the Enbar’s service life and maintaining the operational security of the compressor. User Guide Enbar 1 U and 22U3 Page 34 of 44 7. Malfunctions Problem 1. The compressor will not start. Cause Solution No power supply Make sure that the plug is connected to the wall socket. Check to see of the power supply is functioning by briefly running the fogging cycle (see paragraph 4.5.1). Check the pressure gauge on the tank. Cut-off pressure is approximately 8.5 Bar. Turn the switch of the pressure switch (20) first to ‘O’ and then to ‘I’. Check the setting of your motor protection switch and contact your supplier. The compressor has already attained the desired pressure. The pressure switch is not on. 2. Compressor The speed at which the compressor is operating is too low. 3. The ventilator(s) are not functioning properly. The motor protection has been shut off due to overload, mismatched loads or short circuiting. Defective fuse in the power supply The pressure relief valve does not function properly. The fuse in the main box is defective. The fuse in the box on the fogging unit is defective. 4. The fogging cycle does not function properly, but the unit is blowing out air. There is no fluid; the suction pipe is clogged or has been broken off. The flow limiter is clogged. The nozzle is clogged. The nozzle gasket is leaking. The suction filter is clogged. The suction filter seal leaks. User Guide Enbar 1 U and 22U3 Check the fuse of the group to which the Enbar is connected. Contact your supplier. Remove the plug from the wall socket. Replace the fuse. If the fuse blows once more, contact your supplier. Remove the plug from the wall socket. Replace the fuse in accordance with the instructions in the appendix. If the fuse blows once more, contact your supplier. Remove the tube from the pipe. Rinse thoroughly or replace. Remove this part, including the tubes, and replace them. Carefully take the nozzle apart and clean the parts, without filing or scouring! Take the nozzle apart and replace the gasket. Take the filter apart. Rinse until clean. Take the filter apart and replace the seal. Page 35 of 44 Problem Cause Solution 5. The fogging cycle does not work, and the unit is not blowing out any air. The magnet valve is defective. Contact your supplier. The fuse in the switch box is defective. Remove the plug from the wall socket before you check the fuse. Contact your supplier. Check the setting of the stop cock for the air supply. During the fogging cycle, turn the dial until the pressure gauge of the regulation valve until it reaches 6 Bar. The stop cock for the air supply on the tank is shut. The dial of the pressure regulation valve is shut. Table 8: Possible malfunctions and solutions If you are having the Enbar repaired you must ensure that all tanks have been emptied and thoroughly rinsed. User Guide Enbar 1 U and 22U3 Page 36 of 44 8. Technical specifications 8.1 Enbar mobile Model Dimensions Weight Supply voltage Frequency Rated current L B H 22-U3 980 mm 855 mm 1285 mm 127 kg 1-U3 1090 mm 610 mm 1580 mm 112 kg 400 V 50 Hz 3.8 A Table 9: Technical specifications Enbar mobile 8.2 Compressor Type Pump type Motor Puska N300-50 VE.01 Voltage 400 V (230 V optional) Capacity 1.5 kW Power supply 3.45 A RPM 2850 / min Maximum pressure 10 Bar Tank volume 50 l Compressor oil type Puska VDL150 Type plate on the front support or base plate Table 10: Technical specifications compressor 8.3 Enbar unit Type Ventilator(s) Agitator mixer Voltage Capacity Power supply Condenser RPM Voltage Capacity RPM Solution tank volume Rinse tank volume Atomizing solution output Air output per unit Table 11: Technical specifications Enbar in general U3 230 V 160 W 0.71 A 5 μF 2650 / min 230 V 3.5 W 60 / min 5 l (10 l optional) 1l 2.5 l / hr per nozzle 90 l / min at 6 Bar CE symbol on the machine near the main box User Guide Enbar 1 U and 22U3 Page 37 of 44 9. Declaration of Conformity EC Declaration of Conformity (in accordance with Appendix IIA of the Machine Directive 2006/42/EC) We, Van der Ende Pompen B.V. Maasambacht 4 2676 CW Maasdijk The Netherlands, declare, entirely under our own responsibility, that the following machine: the Enbar LVM Models U1, U2, 1-U3 and 22-U3, to which this statement refers, is in conformity with the provisions of the following Directives: Machinery Directive (2006/42/EC) Low Voltage Directive (2006/95/EC) EMC Directive (2004/108/EC) and (in this case) in accordance with the following standards or normative documents: N/A. The Netherlands Maasdijk 17 August 2009 P.J. van der Ende User Guide Enbar 1 U and 22U3 Page 38 of 44 Appendices o o o o Exploded view nozzle Exploded view fluid filter Replacing a fuse in the U3 Time diagram User Guide Enbar 1 U and 22U3 Page 39 of 44 Composition of the nozzle* The nozzle bracket, the nozzle casing, the nozzle gasket and the male knee connectors can be ordered individually from the manufacturer. A Nozzle Repair Kit, containing a nozzle gasket, nozzle, nozzle air cap and nozzle ring can be ordered from the manufacturer. Out of the parts in this kit only the gasket can be ordered separately. The words ‘liquid’ and ‘air’ have been engraved in the nozzle casing to designate the inputs for liquids and air, respectively. The top-most bolt (to attach the nozzle bracket to the casing) is secured with green Loctite® and cannot be removed after assembly. *Legend: Nozzle beugel = Nozzle bracket Nozzle pakking = Nozzle gasket Wateraansluiting = Water input Nozzle luchtkapje = Nozzle air cap Knie inschroef koppeling = Male knee connector Lucht aansluiting = air input Nozzle huis = Nozzle casing Nozzle reparatieset = Nozzle repair kit User Guide Enbar 1 U and 22U3 Page 40 of 44 Composition of the inlet filter* *Legend: Filterhuis = Filter body Afdichtring = Sealing ring (O-ring) User Guide Enbar U1 and U2 Pagina 41 van 44 Replacing a fuse in the U3 If there is any suspicion of a fuse having been blown in the control unit of the fogging unit this must be tested or replaced immediately. Follow the instructions below. Before any maintenance work is done on the Enbar, make sure that the compressed air ball valve (21) is shut and that the machine is unplugged! Make sure that you can perform your work safely and securely. In case of doubt, consult an expert or contact the manufacturer. Open the control unit. o Unscrew each of the four corner 4 screws. Remove the cover. o This is connected to the electronic parts with cables. o Do not remove these cables! Pull back the tab of the glass fuse holder. o The U3 has three glass fuse holders, as shown in the diagram below. Test the glass fuse or replace immediately. o The glass fuse type is rated 4A (fast-acting). Clamp the glass fuse holders shut. Screw the cover back into place. Legend: Glaszekeringhouders = Glass fuse holders User Guide Enbar U1 and U2 Pagina 42 van 44 Time diagram Key Start Stop Ventilator Air valve Post-ventilation Rinsing Fogging Pre-ventilation Water valve User Guide Enbar U1 and U2 Pagina 43 van 44 The information in this user guide can be qualified as a document compiled in accordance with our best efforts and capabilities, and from which no rights can be derived. No liability is accepted for printing errors, updated technology and modifications with regard to the methods used. Neither is liability accepted for consequential damage. Van der Ende Pompen B.V. · PO Box 10, 2676 ZG, Maasdijk · Maasambacht 4, 2676 CW, Maasdijk, the Netherlands · Telephone +31(0)174 515050 · Fax +31 (0)174 514848 Rabobank 34.03.41.610 · Registered with the Chamber of Commerce in The Hague under No. 27230471 · VAT number NL8000.78.378.B01 · [email protected] · www.vanderendegroep.nl User Guide Enbar U1 and U2 Pagina 44 van 44