1
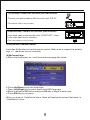
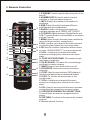
TNT-1745MPEG2
DVB-T RECEIVER
USER MANUAL
Please read and keep these instructions
Important safety instructions-please read carefully
And keeps for future reference
To reduce the risk of fire or electric shock, do not expose this product to water,
rain or moisture. To prevent the risk of electric shock, do not remove the cover or
back or this product. In case of product failure, only qualified personnel can
repair. There are no user-serviceable parts inside.
CAUTION !
Dangerous tension inside the product! Do not open. Risk of electric shock! No parts can
be repaired by the end-user. Only qualified personnel can repair and maintain this
product.
If the electric cord is damaged, it must be replaced by the manufacturer or qualified after-sales
personnel in order to avoid any danger.
The product must be installed in accordance with local laws.
Damaged batteries must be properly disposed. In order to protect the environment, please
dispose the batteries properly, in accordance with local laws (information is available at your
reseller).
Where to install the product
- Place the product on a straight, rigid and stable place. Do not place the product on a carpet.
- Do not place the product on top or another that may cause overheating (for example, a
receiver or amplifier).
- Do not place anything underneath the product (for example, CDs or magazines).
Proper ventilation
- Place the product in a sufficiently-aerated place to avoid overheating. Allow at least 10cm
spacing at the back and top of the product, and 5cm spacing on both sides to prevent
overheating.
- Do not place items such as newspapers, tablecloth, curtains, in front or the ventilating
openings.
Do not expose the product to high temperatures, moisture, water and dust.
- The apparatus shall not be exposed to dripping or splashing and that no objects filled with
liquids, such as vases, shall be placed on the apparatus
- Do not place other items close to this product that may damage it (for example, an object
containing water or lightened candles).
- No naked flame sources, such as lighted candles, should be placed on the apparatus.
Electric supply
- Please unplug the product in case of prolonged non-use.
- This product is intended to be used under temperate climate and should not be used under
tropical climate.
- If the supply cable is damaged, it must be replaced by the manufacturer or qualified aftersales personnel to avoid any danger.
- This product must be connected to an electrical supply 230V ~ 50Hz.
- The mains plug is used as the disconnect device, so the disconnect device shall remain
readily operable .
This product is compliant with directives 2006/95/EC (abrogating the directive
73/23/EEC modified by the directive 93/68/EEC) and 2004/108/EC (Abrogating
the directive 89/336EEC).
- This logo set on the product means that the recycling of this apparatus comes within the
framework of the directive 2002/96/EC of January 27, 2003 concerning the waste on electrical
and electronic equipment (WEEE).
- The presence of dangerous substances in the electrical and electronic equipments can
have potential consequences on the environment and human health in the cycle of
reprocessing this product.
- Therefore, at the end of its lifetime, this product shall not be disposed with other nonrecycled waste.
- As the end user, your role is of prime importance in the cycles of re-using, recycling, and
other forms of valorization of this electrical and electronic equipment. Local authorities and
resellers have set special procedures for the purpose of collecting and recycling this product.
- You have the obligation to use the selective waste collection systems put in place by your
local authorities.
Table of Contents
1. Introduction
1
2. Front and Rear Panel
2-5
3. Remote Controller
6
4. Basic Operations
7-11
5. System Setup
11-15
6. Detailed Operations
16
7.Troubleshooting
17-18
8.Specifications
19
1. Introduction
Welcome
Thank you for choosing this Digital Terrestrial Television Receiver. This device will
allow you to receive all free-to-air DVB-T channels broadcast in MPEG-2.
- The installation is convenient and fast, all you need is to connect the unit to your
home antenna and to the scart input of your television.
Auto Standby
In order to save energy, the electricity consumption of this product has been
reduced in both operation mode and standby mode. Furthermore, if no operation is
carried out for three consecutive hours, the unit will automatically enter standby
mode. Simply press the Standby button on the remote control to switch the unit
back to operation mode.
Main Features
- Full comply with European DVB-T standard
- Full MPEG2 ISO/IEC 13818 transport stream compliant audio/video decoding
- Bandwidth of 7/8 MHz supported
- COFDM demodulator
- Automatic/manual channel search
- Channel edit, moving and deletion
- Parental lock control
- NTSC/PAL converting automatically and manually
- Multiple-language OSD
- Supports multi-subtitle
Package Contents
Before installing the product, please check that you have in possession the
following.
~ DVB-T Receiver x1
~ Remote Control
x1
~ User Manual
x1
1
2.Front Panel and Rear Panel
Front Panel
2
1
1. REMOTE CONTROL SENSOR
2. STANDBY INDICATOR
Rear panel
1
2
3
4
1. RF LOOP THROUGH: This socket will by pass the RF signal to either your TV or another
video system.
2. RF IN : This socket connects to your external aerial.
3. USB: USB Upgrade .
4 . SCART OUT: This socket connects to your TV.
2
(1)First step: Connect the unit with your roof antenna
Connect your home antenna with the unit's input "RF IN".
(The antenna cable is not provided)
(2)Second step: Connect the unit with your television
Use a scart cable to connect the unit's “SCART OUT” output
to the scart input of your television.
(The scart cable is not provided)
(3)Prepare the remote control
Insert two AAA batteries into the remote control. Make sure to respect the polarity
sign + / - (batteries are not included).
(4)Welcome Page
a.When first time power on, it will show welcome page like below:
b.Press Up/Down key to move highlight.
c.Press Left/Right key to select region and OSD language.
d.Move highlight to OK button and press OK key to begin to auto scan.
e.Press Exit key to exit menu.
When you enter to "Installation"menu, there will display the screen like below: In
"Installation" menu;
3
Remarks:If MENU lock is "On", input password first. Default password is "0000”
Important Remarks:
(1) Analog Reception and DVB-T Reception
When you wish to watch TV using your TV tuner (analog tuner) and that your
DVB-T unit has been turned off or unplugged, the image quality can be
deteriorated according to the TV you are using. This is normal, your DVB-T unit
must be set in standby mode to allow a good quality signal.
(2)Problems receiving DVB-T channels
- First check that you have well connected your home antenna with the DVB-T
unit.
- Start a new automatic channel search as follows:
1. Press the MENU key from the remote control
2. Then select installation
3. Then select Auto search in order to run the automatic channels search.
(3) If the reception problem still occurs.
Your unit has been tested for optimal performance over all the country. In most
cases, the DVB-T reception problems are due to a weakness in your home's
antenna installation. If your installation is old, or has never been tested for DVB-T,
the signal can be too weak or flawed for the unit to work properly. It is therefore
highly recommended that you ask for a qualified technician to test the compliance
of your home antenna. This unit has been designed and is guaranteed to work
with a signal of at least 60dB.
4
Good to know - Main Functions of your Remote Control
Menu Navigation
- Use the MENU button to change the unit's configuration. You can also define your
favourite channel lists, which will be directly accessible by using the FAV button on
the remote control.
- To exit a menu or a sub-menu, press the EXIT button on the remote control to return
to the previous screen.
Audio Language Selection
- Press the AUDIO button to:
o Change the audio track to another language if this option is available on the
current DVB-T channel.
5
3. Remote Controller
1
13
2
3
4
5
6
7
14
15
16
8
9
10
17
18
11
19
12
20
21
1.STANDBY: Used to switch the set top box to on
and off.
2.NUMBER KEYS:Used to select channel
numbers or input numbers in menus.
3.INFO:Display the detailed information of
programs.
4.SUB-T:Used to switch between different
subtitles that are broadcasted.
5.AUDIO:Used to set the sound output,the
available settings are STEREO,LEFT,RIGHT.
6.TV/RADIO:Switch between Digital Radio and
DVB-T modes (Radio is not available in countries
such as France).
7.MENU:Used to open the main menu window or
return to the previously-viewed menu.
8.CH+: Used to move around the menu screens
or selecting the channels in non-menu state.
9.OK:Used to confirm a selection within a menu
or enter “QUICK SELECT” to scan program list.
10.VOL-: Used to move around the menu
screens or changing the volume in non-menu
state.
11.PAGE UP/PAGE DOWN: To browse through
the pages of channels.
12.PLAY/PAUSE: To freeze the current image,
and then to resume viewing.
13.MUTE:Used to turn the sound on or off.
14.FAVORITE:Used to access your favorite
channels.
15.TEXT:Used to open teletext OSD display if
teletext available in the broadcasted stream.
16. EXIT: To exit the viewing screen or the
current menu.
17.VOL+:Used to move around the menu
screens or changing the volume in non-menu
state.
18.CH-:Used to move around the menu screens
or selecting the channels in non-menu state.
19. RED/BLUE/GREEN/YELLOW BUTTONS:
These buttons are used to navigate teletext
pages.
20. RETURN: To return to the previously viewed
channel.
21.Button without function.
6
4.Basic Operations
4.1 Main Menu
When you press Menu key, you can enter main menu. There will display the picture
like below:
a.Press Up/Down key to select menu pages among Channel, Installation, Setup
and Tools.
b.Press OK key to enter the selected item.
4.2 Channel
a.Press Up/Down key to select items between TV Channel List and Radio Channel
List.
b.Press OK to enter the selected item.
4.2.1 TV Channel List
When you enter to"TV Channel List" menu, there will display the screen like below:
7
Press the numeric buttons on the remote control in order to: Edit, Search, Sort and
Move channels. During these operations, the system may demand the parental
password. The default password is 0000.
1) Editing Channels
Press the “1” button on the remote control to access the menu for editing channels.
a. Favourite Channels
Press the “1” button on the remote control to enter the menu of favourite channels:
You may define one or more channels as your favourites, which allows you to
access them more easily you will only need to press the FAV button on the remote
control in order to watch them. In order to select a channel to be classified as
favourite, press OK. Press OK again to cancel the selection.
You should then assign the selected channel to one of eight favourite channel
groups. In order to delete a channel from a favourite group, select the favourite
group concerned then press the “4” button on the remote control.
b. Locking Channels
This function allows you to restrict access to certain channels by requiring
password entry. After selecting a channel, choose this option by pressing the “2”
button on the remote control. A lock appears in front of the channel; press the “2”
button again to cancel the lock.
8
c. Skipping Channels
This function allows you to skip the selected channels when pressing the keys CH+
and CH-. The skipped channels remain accessible when you press their channel
number. To skip a channel, press “3” in front of the corresponding channel.
d. Deleting Channels
In order to delete a channel, press “4” in front of the corresponding channel. Once
a channel is deleted, you will need to launch a new channel installation in order to
be able to watch it again.
e. Renaming Channels
To rename a channel, press “5” in front of the corresponding channel. Move the
cursor to "Esc" to cancel the operation.
2) Searching Channels :You can search the channels according the Channels
name
A. Press “ 2 ” key on the RCU, the menu will be shown on the screen.
b.Press Up/Down/Left/Right key to move the highlight in"Find"window. Press OK
to input char.
c.Move the highlight to "OK"and press OK key to save the modification.
d.Press Exit key to cancel the operation.
3) Sorting Channels Realign the channels according sort of option.
a.Press number “ 3 ” key to sort channel.
b.It will display a dialogue to confirm. If you select"Yes" it will display "Sort"box.
c.Press Up or Right key to move the highlight and press OK to select sort type
such as Default/ Name(A-Z)/ Name(Z-A)/ FTA/ Lock.
9
4) Moving Channels : Move the channels you select to the corresponding
place
You may assign a channel to a new position, which allows you select the channel
easier by using CH+ and CH- buttons. In order to move a channel, select it and
press the “4” button on the remote control.
4.2.2. Radio Channel List
The use of the radio station list is similar to that for the television channels. Please
note that in most countries, including France/Spain/Portuguese, no radio stations
are transmitted via the DVBT network.
4.2.3 Delete All Favorites
This operation will remove all favorite channels (includes TV and radio favorite
channels) from favorite list. When you press OK key on Delete All Favorites? It will
ask you "Warning! Do you really want to delete all favorite channels?" Select
"Yes"to confirm or select "No"to cancel the operation.
4.2.4. Delete All
Use this option to delete all the channels installed. After that, you will need to
reinstall the channels.
4.2.5 Group Rename
You can rename the group.
4.3 Installation
When you enter to "Installation"menu, there will display the screen like below: In
"Installation" menu;
a.Press Up/Down key to select menu items among each item.
b.Press OK key to enter the selected item.
4.3.1 Auto Scan
When you enter to "Auto Scan"menu, (If MENU lock is "On", input password first.
Default password is "0000”).
a.Firstly please the country in system setup menu / region and time / region,such
as “France”.
b.In "Scan Mode"item, press Left/Right key to select scans all channels or just
scans free channels.
c.Moving the highlight to "Search"item and press OK key to start scanning.
d.In the "Auto Scan"menu, press Exit key to draw back from the scanning.
10
4.3.2 Channel Scan
When you enter to “Channel Scan"menu, there will display the screen like below:
a.There are two modes. You can scan channel by channel or by frequency.
b.When scan band is UHF and region is “France"the range of Ch No. is from 21 to
69. When scan band is VHF and region is “France” the range of Ch No. is from 5
to 1 0 . (It ' s according to region)
c.When you complete your modification, move highlight to "Search"item and press
OK key, then it will begin to scan.
d.Press Exit key to exit the scanning.
5. System Setup
In “System Setup"menu:
a.Press Left/Right key to select menu pages among OSD Language,TV
System,Region and Time,Timer Setting,OSD Setting and Parental Lock.
b.Press Up/Down key to select menu items among each item.
c.Press OK key to enter the selected item.
When you enter to “System Setup”menu, you will see the screen like below:
5.1. OSD Language
Choose the display language for the on-screen menus.
5.2 TV System
11
- The option Display Mode allows you to choose between PAL (for Europe
including France/Spain/Portuguese), NTSC and Automatic.
- Aspect Ratio: Depending on the format of your television, select 4:3 LB, 4:3 PS
or 16:9.
- Video Output: Select the CVBS Composite or RGB signal.
- LCN Mode: Leave this option activated to organise channels in the order
predefined by the CSA.
- Standby mode: The unit automatically enters Standby mode after 3 hours of
inactivity.
5.3 Region and Time
a.Region is used for selecting the country which you are in. You can press
Left/Right key to select each mode circularly.
b.GMT Usage: This item is use for open the usage of GMT. You can press
Left/Right keys to switch "Off / User Define / By Region”.
c.The "GMT Offset"item is valid only when the setting of "GMT Usage"is "User
Define" You can press Left/Right keys to switch GMT Offset"value, and the
range is "12:00 ~ +12:00" increase each half hour progressively.
d."Date"and "Time"items are valid only when the setting of "GMT Usage"is"Off"
You can press Left/Right keys to moving highlight and use number keys to input
directly.
e."Summer Time"items are valid only when the setting of "GMT Usage"is"By
Region" You can press Left/Right keys to switch.
f. Time display function can control whether the time will be displayed on screen or
not.
g.Press Exit key to draw back from "Time"menu.
5.4 Timer Setting
Current time information will display on the first row; if the current time is incorrect,
please modify the time information in "Time"item.
Program Timer
This option allows you to set a time at which the DVBT receiver should turn on and
display a channel on the screen.
a.Timer Mode: There are several modes for Timer to setting, include Off, Once,
Daily, Weekly, Monthly.
12
b.Wakeup Channel: press OK key to enter channel list and select channel that you
want to setting.
c.Month / Date: press Left/Right keys to select your wakeup date.
d.Day: If "Timer Mode"is"Weekly", this item is valid. You can select day such as
Monday, Tuesday, .... Sunday.
e.Time: press OK key and number keys to input your wakeup time. Once the time's
up, no matter what the system is in standby mode or in playing mode, the system
will automatically switch to the channel you want and start to play.
f. Pressing Exit key, it will ask you "Are you sure to save?" Select "Yes"to save the
timer or select "No"to cancel the operation.
Sleep Timer
a.Sleep Timer can set the system enter standby.
b.Press Left/Right key to switch the Sleep Time parameter. The option is like
below: Off / 10min /30min /60min /90min /120min. then press key OK to start
sleep time countdown.
c. After you press OK key, the "Remains"will begin to show the timer's remaining
time. This item is only used to display and can not be modified.
d. Press Exit can exit the current menu.
5.5 OSD Setting
a.Subtitle Display: You can press Left/Right key to select "Off","Standard" or
"Teletext" If the current channel has subtitle information, it will be showed up
while this function is "on" If this function is "off", there won't show up subtitle
information.
b.OSD Style: You can press Left/Right key to select OSD style.
C.Load Default OSD Setting: Press OK to load default OSD setting.
d.Press Exit key to draw back from the "OSD Setting"menu.
13
5.6 Parental Lock
You can set a password for anyone who wishes to operate in
the"Installation"menu. And you can also set the password for the lock channels.
(How to set the lock channel please refer to Lock) Here will show you how to
setting and how to revising the password.
a.In "Parental Lock"function, press OK key, there will pop a dialogue for you to
input the password. The default password is "0000" When you input the correct
password, you will see a screen like below:
b.Menu Lock determining that when user wishes to enter "Installation"menu and
Channel List / Edit whether have to input Password or not. If the setting of "Menu
Lock"is "Yes"which means user have to key in password, set "No"means unlock.
c.Channel Lock can set the channel which user wants to lock it. If you want to see
the lock channel, you can set Channel lock "OFF".
d.New Password is used for revising password; you can press OK key firstly then
input the new password in this item by using number keys directly. After you filled
in 4 digital numbers, the highlight will auto skip to Confirm Password and ask you
to input the new password again. If the password is correct, the screen will show
up a message of "change password successfully". draw back to “system
setup”menu, the revising is complete.
e.Press Exit key to draw back from the "parental Lock"menu.
Notes:
- The default password is 0000. Enter this code if the program asks for a password
and you have not set one.
- The Super Password is 0786. Use this code if you forgot your own password.
5.7 Tools
When you switch to "Tools"menu, you will see a screen like below: In "Tools"menu:
a.Press Up/Down key to select menu items among each item.
b.Press OK key to enter the selected item.
14
5.8Receiver Information
a.When you enter to "information"menu, you will see some receiver Information.
b.Press Exit key to draw back from "Tools"menu.
5.9Game
When you enter "Game"menu, you will see three Games include Tetris, Snake and
Othello.
5.10 Load Factory Default
When you press OK key In the "Load Factory Default" item:
a.After you input the correct password, there will show a warning message to
inquiry you "The operation will load default and erase all the channels that user
added, continue?"
b.If you select "Yes" option, the all revised parameters of the receiver will reset to
default value. Please carefully to using this function.
c.In step 1 and step 2, press Exit key can draw back from this item and without
saving.
15
6. Detailed Operations
AUDIO LANGUAGE
Some channels may be broadcasted into multiple languages. To change the audio
language, press the AUDIO key of the remote control.
Press the DOWN button to change the AUDIO TRACK and then press the RIGHT
button to change the current audio Mode.
SUBTITLES
Press the SUB-T button of the remote control to activate the subtitles function.
Subtitles may be available in different languages, depending on the channel.
16
7. Trouble shooting
If you experience problems with this receiver or its intallation,in the first instance
please read carefully the relevant sections of this User Manual and this
Troubleshooting section.
The unit shuts down
automatically.
The USB port does not read
multimedia files.
If no operation is performed
from the remote control for
three hours, the unit will
automatically switch to
standby mode to reduce
power consumption.
The USB port on this unit is
not designed for playing
multimedia content. It is only
used in the event of software
update requested by the
manufacturer.
17
Press the Standby button to
put the unit back into
operation.
Important Remarks:
(1) Analog Reception and DVB-T Reception
When you wish to watch TV using your TV tuner (analog tuner) and that your DVBT unit has been turned off or unplugged, the image quality can be deteriorated
according to the TV you are using. This is normal, your DVB-T unit must be set in
standby mode to allow a good quality signal.
(2)Problems receiving DVB-T channels
- First check that you have well connected your home antenna with the DVB-T
unit.
- Start a new automatic channel search as follows:
1. Press the MENU key from the remote control
2. Then select installation
3. Then select Auto search in order to run the automatic channels search.
(3) If the reception problem still occurs.
Your unit has been tested for optimal performance over all the country. In most
cases, the DVB-T reception problems are due to a weakness in your home's
antenna installation. If your installation is old, or has never been tested for DVB-T,
the signal can be too weak or flawed for the unit to work properly. It is therefore
highly recommended that you ask for a qualified technician to test the compliance
of your home antenna. This unit has been designed and is guaranteed to work
with a signal of at least 60dB.
18
8. Specification
USB
USB2.0
19
11
SAV
ADMEA / LOGISAV
ZI du clos des charmes
26 rue du clos des charmes
77090 COLLEGIEN - FRANCE