1
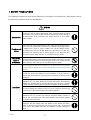
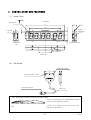
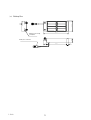
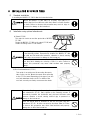
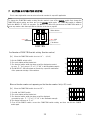
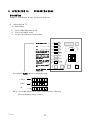
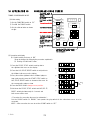
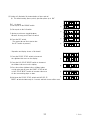
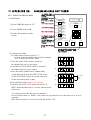
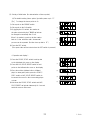
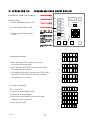
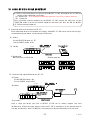
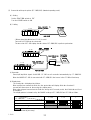
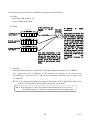
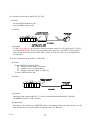
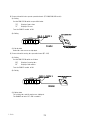
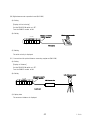
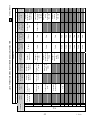
SPORTS TIMER
ST−306
INSTRUCTION MANUAL
Many thanks for purchasing SEIKO SPORTS TIMER ST-306.
Before putting your SEIKO SPORTS TIMER, MODEL ST-306, to use, please be sure to carefully
read through this manual as it has been designed to provide you with information for correct
handling, use and maintenance necessary for safe, long-lasting and trouble-free operation.
Keep this manual at hand for ready reference.
I-5039
-NOTICE(1)
This manual is the property of SEIKO and may not without the express written consent of SEIKO be
copied or reproduced in any form, in whole or in part, or used for any purpose other than that for which
it is supplied.
(2)
This manual may be subject to change without notice.
(3)
This manual has been prepared to give complete information necessary for the operation, use, handling
and maintenance of SEIKO SPORTS TIMER, MODEL ST-306.
For the purpose of our constant
technical manual improvement program, your questions, advice, suggestions and comments on the
descriptions, illustrations, procedures or any matter concerning this manual are highly appreciated.
(4)
SEIKO shall not be liable for any failures of SEIKO SPORTS TIMER, MODEL ST-306 or direct or
indirect damages resulting from such failures if such failures are caused: due to abuse, misuse, failure to
observe instructions given in the manual and neglect of other reasonable care and servicing due to be
done by the owner irrespective of such instructions, and failure due to deliberate actions or gross
negligence or accident; or caused by changes, modifications, or alterations made without prior written
consent of SEIKO or by any person other than authorized by SEIKO.
-SYMBOLS AND THEIR MEANINGSThe following conventions are used in this manual.
WARNING is used to indicate the presence of a hazard which CAN
WARNING
cause SEVERE personal injury, death, or substantial property damage if
the warning under this heading is ignored.
CAUTION is used to indicate the presence of a hazard which may
CAUTION
cause property damage if the warning under this heading is ignored.
The following pictorial symbols indicate what must not be done.
General Prohibition
Prohibition of Disassembly/Tampering
The following pictorial symbols indicate what must be done.
General instructions
I-5039
1
-TABLE OF CONTENTS-
1
SAFETY PRECAUTIONS
5
2
FEATURES
7
3
PACKING LIST
7
4
NOMENCLATURE AND FUNCTIONS
(1) Sports timer
(2) Grip switch
(3) Battery box
(4) Control panel (lefthand side panel)
(5) Storage panel (righthand side panel).
8
PREPARATIONS BEFORE OPERATION
(1) Battery
(2) Battery box connection
(3) Connection of grip switch
(4) Checkup of battery voltage
(5) Self-check operation
(6) Measurement and display range
12
INSTALLATION OF SPORTS TIMER
(1) Standard installation
(2) Installation using optional attachments
16
SETTING OF FUNCTION SWITCH
APPLICATION (1): UPCOUNTING MODE
(1) Upcounting from “0”
(2) Upcounting from a preset time
18
5
6
7
8
8
8
9
10
11
12
13
15
15
15
15
16
16
19
19
21
9
APPLICATION (2): REPETITIVE UPCOUNTING MODE
(1) Initial settings
(2) Time setting
(3) Operation and display
22
22
22
22
10
APPLICATION (3): DOWNCOUNTING MODE
(1) Initial settings
(2) Time setting
(3) Operation and display
23
23
23
23
2
I-5039
11
12
13
14
15
16
17
18
APPLICATION (4): REPETITIVE DOWNCOUNTING MODE
(1) Initial settings
(2) Time setting
(3) Operation and display
24
APPLICATION (5): MANUAL CROSSOVER COUNTING MODE
(1) Initial settings
(2) Time setting
(3) Operation and display
25
APPLICATION (6): AUTOMATIC CROSSOVER COUNTING MODE
(1) Initial settings
(2) Time setting
(3) Operation and display
26
APPLICATION (7): TIME DISPLAY MODE
27
(1) Initial settings
(2) Time setting
(3) Operation and display
27
APPLICATION (8): SCOREBOARD MODE (STANDARD)
(1) Initial settings
(2) Operation and display
28
APPLICATION (9): SCOREBOARD MODE (TENNIS)
(1) Initial settings
(2) Operation and display
(3) Setting of initial value (for determination of deuce points)
29
APPLICATION (10): SCOREBOARD MODE (SOFT TENNIS)
(1) Initial settings
(2) Operation and display
(3) Setting of initial value (for determination of deuce points)
31
APPLICATION (11): SCOREBOARD MODE (COUNT DISPLAY)
(1) Initial settings
(2) Operation and display
(3) Setting of initial value
33
I-5039
24
24
24
25
25
25
26
26
26
27
27
3
28
28
29
29
30
31
31
32
33
33
33
19
20
HOOK-UP WITH OTHER EQUIPMENT
(1) Connection with score operation unit (ST-23)
(2) Connection with signal distribution box (ST-22)
(3) Connection with sports printer (CT-1000/916) (standard operating mode)
(4) Connection with sports printer (CT-1000/916) (external synchronization mode)
(5) Connection with electronic starter (PS-107/105)
(6) Connection with ski event timing system (CT-400/300)
(7) Connection with swimming timing system (PT-7000/6000)
34
(8)
(9)
(10)
(11)
(12)
39
Connection with indoor sports operation board (ST-2000/900/800 series)
Connection with running time operation board (RT-120)
Digital anemometer operation board (WG-200)
Connection with Optical distance measuring equipment (DM-200)
Precautions on hook-up
34
34
35
36
37
37
38
39
40
40
41
OPERATIONAL PRECAUTIONS
43
(1)
(2)
(3)
(4)
43
POWER switch reclosing procedure
Blackout procedure
Procedure for restart after memory call
Buzzer
43
43
43
21
CARE AFTER USE
43
22
SPECIFICATIONS
44
23
WHAT YOU NEED TO DO BEFORE CALLING A SERVICEMAN
45
4
I-5039
1 SAFETY PRECAUTIONS
The following precautions must be strictly observed for the safety of yourself and your fellow workers and for
the protection of property from loss and damages.
WARNING
Emergencies
Immediately turn off the POWER switch if you detect abnormalities of the
sports timer, such as fuming and burning odors. These abnormal conditions
may develop into serious accidents such as fatal electric shock, and fire if
left uncorrected. Refer inspection and repair services to your SEIKO
dealer or agent.
Never put pins, wires, metal pieces or any other foreign objects into a
hole or slit in the instrument on purpose or otherwise. If a foreign object
Foreign metal is allowed into a hole or slit by mistake, turn off the POWER switch
immediately, and call your SEIKO dealer for help. Failure to follow this
pieces
instruction may lead to a risk of electric shock or fire. Inspection and
servicing should be left to the care of your SEIKO agent or dealer.
Disassembly,
repair or
modification
Tampering or unauthorized repair or modification of components may
adversely affect safety or performance of this instrument. Failure to follow
this instruction may lead to a risk of electric shock or fire. Inspection and
repair should be left to the care of your SEIKO agent or dealer.
Never leave the sports timer outdoors or in a place prone to be exposed
to water. Electric leakage may possibly lead to fatal electric shock or fire
accident
Installation
Mount the instrument firmly on a sturdy, level place in a manner that it will
not fall over under the influence of wind, vibration or shock. Failure to
observe this precaution may result in injury to personnel or damage to the
instrument.
When installing the sports timer using the stand (ST-20) or car roof rack
attachment (ST-21), firmly tighten up the fastening screws. If precariously
installed, the instrument may yield and fall under wind pressure, vibration
or shock, causing serious injury to personnel or damage to the instrument.
When the sports timer is mounted on the stand (ST-20), never use it when
the wind is blowing at a velocity of 15m/s or more. Failure to observe this
precaution may cause fatal accident and property damage.
When the sports timer is mounted on the car roof rack using the
attachment (ST-21), limit the car speed to less than 30km/h. Failure to
observe this precaution may cause fatal accident and property damage
due to fall of the instrument.
When installing the team name display unit (ST-24), be sure to engage the
round bars into the mating holes and tighten up the thumb nuts firmly.
Failure to observe this precaution may cause serious injury to personnel
due to fall of the display unit under the influence of wind, vibration or
shock.
I-5039
5
CAUTION
Handle the cable with care. Never damage or given undue stress to the
cable. Nicking the cable sheath, placing heavy objects upon the cable, or
straining the cable by undue bending is most prohibitive. Failure to observe
this precaution may lead to fatal electric shock or fire accident.
Cabling
Do not use any cable other than specified for exclusive use with the
instrument. Failure to observe this precaution may cause cable burnout or
instrument failure.
Never handle the cable connector with wet hands as such operation can
result in fatal electric shock.
Be sure to turn off the POWER switch in advance when plugging and
unplugging the cable, except in case the sports timer is connected to
CT-1000/916 for external synchronization mode operation.
STRICTLY OBSERVE THE FOLLOWING PRECAUTIONS.
FAILURE TO OBSERVE THESE PRECAUTIONS MAY LEAD TO EXPLOSION, ELECTROLYTE
LEAKAGE, AND EXOTHERMIC REACTION OF DRY CELL, CAUSING INJURIES AND
ENVIRONMENTAL POLLUTION.
Never use any power supply other than “AA” alkali dry cell (LR6) or
manganese dry cell (R6PU).
Do not use different types of dry cells together.
Handling of
dry cell
Do not use old and new dry cells together. When loading the instrument
with dry cells for the first time or when replacing spent dry cells, be sure
to use a battery of new dry cells.
When setting the dry cells into the instrument, do not mistake their plus
and negative poles for each other. Place them in the battery hatch
oriented as instructed. If the dry cells are set in the wrong directions,
instrument failure and other troubles may result.
After use, be sure to remove the dry cells from the instrument. If the dry
cells are left inside for a long period of time, electrolyte may leak to
damage the internal components of the instrument.
6
I-5039
2
FEATURES
(1) SEIKO SPORTS TIMER, MODEL ST-306, is a large-sized digital sports timer full of SEIKO’s advanced
timing functions. It has 6-digit 200mm-high display modules for clear-cut visibility, can be installed and
operated with ease. It weighs only 12.5 kg.
(2) As an upcount timer, it can be used as a timing display system for various sports events including
swimming, track races, marathon, walking race, skiing, cycling, soccer, and rugby.
(3) The MODEL ST-306 can also be used for the display of game points and deuce points in tennis.
(4) As a downcount timer, MODEL ST-306 can downcount time to show the remaining time in basketball
and other games.
(5) The following three maximum time ranges are available which can be changed over from each other to
cover a wide range of sports events:
a) 99h59m59s
b) 59m59s9
c) 59m59s99
(Note: The fractions of a second are not displayed during counting.)
(6) The MODEL ST-306 can measure lap time, split time and finish time. In addition, it can memorize and
re-display either lap or split times for a maximum of 25 athletes. (Ex.: MODEL ST-306 can memorize
and display the order of arrivals and finish times for 1st to 25th places.)
(7) The upcount function is available in two modes: one in which the time is counted up from zero, and the
other in which the time is counted up from a preset time.
(8) The downcount function has a crossover counting mode in which the time is downcounted from a preset
time to zero and in succession upcounted from zero. This mode is suitable for marathon and the like.
(9) The MODEL ST-306 has an auto repeat function in which the time is upcounted and downcounted at
fixed intervals to sound a buzzer at a preset time. Accordingly, MODEL ST-306 can be used as a
pace-clock..
(10) The MODELST-306 is battery-powered, and can be used both indoors and outdoors. (Note, however,
that it cannot be installed outdoors permanently.)
(11) The MODEL ST-306 can be used in combination with a wide variety of SEIKO sports equipment.
3 PACKING LIST
・
・
・
・
Sports timer, Model ST-306
Grip switch (stored in an exclusive compartment)
Battery box (stored in an exclusive compartment)
Manual
※Check off the above at the time of unpacking inspection
I-5039
7
4
NOMENCLATURE AND FUNCTIONS
(1)
Sports Timer
10
Front view
Mounting hole
150
(1230)
45
23
1000
φ12
Storage
compartment
330
20
200
Control box
Lefthand side
view
M8
Righthand side view
Buzzer
400
Bottom view
(2)
Grip Switch
START/STOP Switch
17
φ60
LAP/SPLlT/RESET
LAP
STLlT
RESET
Switch
Grip switch connector
Note:
START
STOP
Cable x 5m
In this manual, the lap time and split time are defined as follows:
Split time = Time required to cover a distance from the start to
a given point. (Time elapsed from the start)
Lap time = Time required to cover a given section of the
whole distance. (Interval time)
Start
8
I-5039
66.4
(3) Battery Box
147.4
Battery box mounting
pin(captive)
25.5
Battery box connector
18
I-5039
9
119.4
10
(4) Control panel (lefthand side panel)
RANGE switch
Used to set the minimum unit of
time measurement.
COUNT switch
Used to select the counting mode
(a) upcount mode, b) downcount
mode,
(b) c) crossover counting mode
(downcount through upcount)
REPEAT switch
To be turned ON when the MODEL
ST-306 is used as a cyclic timer in the
downcount or upcount mode. When
turned ON in the crossover counting
mode, the MODEL ST-306 will not
stop at the crossover point (zero).
MEMORY switch
Used to select lap or split time for
memory. Up to 25 time data sets can
be stored (only in the upcount mode).
BATT.CHECK meter
Used to check the level of electric charge
remaining in the battery. When the battery is
running short, the red lamp alone will light up
to prompt you to replace the battery.
PUSH(battery check) switch
1
1/10 1/100
RANGE
UP DOWN D→U
BATT.CHECK
PUSH
COUNT
OFF
POWER
ON
REPEAT
LAP
OFF
POWER switch
ON
SPLlT
1
5
BUZZE
0 0
OFF AUTO ON
FUNCTlON switch
Used to select a function number for a
specific application before turning on the
POWER switch
99h 24h Time
Used to set the beeping duration to 1
sec. or 5 sec. when it is on
DlSPLAY switch
Used to turn on and off the power supply to
the MODEL ST-306
MEMORY
OFF
DlSPLAY
BUZZER switch
When this switch is pressed, the BATT.
CHECK meter will be illuminated for 3
seconds
FUNCTlON
MAX TlME
FlGURE
0∼9
SET
READ
Used to select a display operating
mode: a) ON, b) OFF, c) AUTO
(externally controlled)
READ switch
BATT. lN
MAX TlME switch
Used to set the maximum time for
display.
Used to call forth a maximum of 25 data sets
stored
SET switch
FlGURE switch
When this switch is pressed, the settings are
committed to memory.
Used to shift the place at which to
enter a figure. When the FIGURE
switch is given a push, “0” will appear
in the more lefthand place of the
display. At every push of the FIGURE
switch, “0” will step rightwards.
Battery box connector
A connector used to terminate the battery
box or other power supply. (Connector:
PRC05-R3M, Tajimi)
0∼9 switch
Used to set the time or points. The
number at the place selected by the
FIGURE switch can be changed
incrementally from 0 to 9. When 9 is
reached, a push cycles the number
back to 0, from which the same
incremental process can be repeated.
Battery box compartment
Used to accommodate the
battery box.
10
I-5039
(5) Storage panel (righthand side panel)
Grip switch connector
Start signal input connector
A connector to terminate the grip switch or
other SEIKO sports timing equipment.
(Connector: PRC05-R8F, Tajimi)
A connector to terminate the
electronic starter PS-107/105.
(Connector: PRC05R2F, Tajimi)
START.lN
GRlP/EXT.
Grip switch storage compartment
A compartment to store the grip switch
I-5039
11
5 PREPARATIONS BEFORE OPERATION
(1)
Battery
Set eight “AA” alkali dry cells (LR6) or “AA” manganese dry cells (R6PU) in the battery box.
※ The dry cells are not furnished with the MODEL ST-306.
● Battery handling precautions
STRICTLY OBSERVE THE FOLLOWING PRECAUTIONS
FAILURE TO OBSERVE THESE PRECAUTIONS MAY LEAD TO EXPLOSION, ELECTROLYTE
LEAKAGE,
AND
EXOTHERMIC
REACTION
OF
DRY
CELL,
CAUSING INJURIES AND
ENVIRONMENTAL POLLUTION.
Never use any power supply other than “AA” alkali dry cell (LR6) or
manganese dry cell (R6PU).
Do not use different types of dry cells together
CAUTION
Do not use old and new dry cells together. When loading the instrument
with dry cells for the first time or when replacing spent dry cells, be
sure to use a battery of new dry cells.
When setting the dry cells into the instrument, do not mistake their
plus and negative poles for each other. Place them in the battery hatch
oriented as instructed. If the dry cells are set in the wrong directions,
instrument failure and other troubles may result.
12
I-5039
(2)Battery box connection
[Installation of battery box]
1) Pull the mounting pins in the arrow direction in advance,
① あらかじめ電池ボックス取付つまみを
and insert
the battery box into the back as illustrated to
方向へ引いた状態にし、電池ボックスを
本体の背面に沿うように入れます。
the proper
position.
電池ボックス取付つまみの先端を本体側の
NOTE:
The installation of the battery box must be done
prior to connecting the battery box connector to the
BATT.IN connector of the MODEL ST-306. This is
〔注〕必ず電池ボックスのコネクタを本体に
to prevent the battery box connector cable from
接続する前に行ってください。
being damaged by strains.
1) Top view
Terminate to ST-306 connector after
mounting the battery box in position.
Tip of the pin
Top View
I-5039
Battery box
mounting pin
2) Press the battery box mounting pins in the arrow
direction until it clicks into position. Make sure that
the battery box is fastened firmly to the MODEL
ST-306.
13
BATT.lN
Lefthand side
view
3) Finally, insert the battery box connector into the
③ 最後に、電池ボックス側のコネクタを
BATT.IN
connector
on the MODEL ST-306.
本体の BATT.lN
コネクタに差し込みます。
DISCONNECTION:
Hold and pull the
connector out as
illustrated.
CONNECTION:
Hold the connector
as illustrated, align
the groove with the
guide key, and insert
straight until clicked
into position.
Lefthand
side
[How to remove the battery box]
First diconnect the battery box connector from the BATT.IN connector of the MODEL ST-306. Give a light
pull to the battery box mounting pins to disengage the battery box from MODEL ST-306, and pull out the
battery box toward you.
(For removal, follow just the reverse of the mounting steps 1), 2) and 3).)
CAUTION: Do not pull the battery box mounting pins
excessively. They may come off from the battery box.
14
I-5039
(3) Connection of grip switch
(The procedure is the same as for the connection of battery box connector.)
Take out the grip switch from the storage compartment, and connect it to the GRIP/EXT. connector.
Righthand
side
.
CONNECTION:
Hold the connector
as illustrated, align
the groove with the
guide
key,
and
insert straight until
clicked
into
position.
DISCONNECTION:
Hold and pull the
connector out as
illustrated.
Red
(4) Checkup of battery voltage
Green
Red
Turn ON the [POWER] switch (on the control panel),
and push the BATT.CHECK box to read the battery check meter.
BATT.CHECK
*If the red lamp alone lights up, the battery must be replaced
(OK)
immediately because the MODEL ST-306 will not work properly.
(Under such condition, the display may fail to drive the display elements properly.)
BATT.CHECK
(To be replaced)
When replacing the dry cells, strictly observe the precautions instructed
CAUTION under the heading, “BATTERY HANDLING PRECAUTIONS”. Failure to
observe the precautions may lead to serious injuries and environmental
pollution
(5) Self-check operation
Check all display digits before operation as follows.
[Display sequence]
Set FUNCTION to “00”.
Black
Hold down the 0-9 switch and [SET] switch
0
simultaneously for more than 3 seconds.
1
Release the switches as soon as the self-check sequence
starts.
The self-check sequence is run for one cycle only. To
repeat the cycle, hold down the 0-9 switch and [SET]
switch simultaneously for more than 3 seconds again.
.
.
.
Black
(6)
Measurement and display range
RANGE switch setting
(minimum indicating unit)
As soon as the display is turned
black, the buzzer will sound for
about 5 seconds
Maximum display time
Remarks
1s
99h59m59s
In case MAX TIME is 99h
1/10s
59m59s9
1/100s
59m59s99
During counting, the fractions of
a second are blacked out.
NOTE: When the MODEL ST-306 is operated on an external display signal, its time display will follow
the RANGE switch setting.
I-5039
15
6
(1)
INSTALLATION OF SPORTS TIMER
Standard installation
In installing the MODEL ST-306, follow the instruction below.
Mount the MODEL ST-306 firmly on a sturdy, level place in a
WARNING manner that it will not fall over under the influence of wind, vibration
or shock. Failure to observe this precaution may result in injury to
personnel or damage to the instrument
(2)
Installation using optional attachments
(a) Stand (ST-20)
This stand is used to mount the sports timer, MODEL
ST-306.
Fasten the MODEL ST-306 to the stand (ST-20) with
screws according to the ST-20 manual.
When installing the sports timer using the stand (ST-20), firmly tighten
up the fastening screws. If precariously installed, the MODEL ST-306
may yield and fall under wind pressure, vibration or shock, causing
WARNINGserious injury to personnel or damage to the instrument.
When the sports timer is mounted on the stand (ST-20), never use it
when the wind is blowing at a velocity of 15m/s or more. Failure to
observe this precaution may cause fatal accident amd property
damage.
(b) Roof rack attachment (ST-21)
This option is an option used for mounting the sports
timer on the car roof. Mount the sports timer according
to the ST-21 manual. Depending on the type of car, the
roof rack attachment may not fit. For details of the
roof rack, consult your nearby car accessories dealer.
When installing the sports timer using the stand (ST-20) or car roof
rack attachment (ST-21), firmly tighten up the fastening screws. If
precariously installed, the instrument may yield and fall under wind
pressure, vibration or shock, causing serious injury to personnel or
WARNING damage to the instrument.
When the sports timer is mounted on the car roof rack using the
attachment (ST-21), limit the car speed to less than 30km/h. Failure
to observe this precaution may cause fatal accident and property
damage due to fall of the instrument.
16
I-5039
(c) Team name display unit(ST-24)
This is mounted on top of the sports timer,
MODEL ST-306, to display the team names
and set points. The unit has two slotted
screens, each accommodating a card board or
film showing the team name. For details,
refer to the ST-24 manual
(PROCEDURE FOR ASSEMBLING
AND INSTALLATION).
Winner display magnet mounting block
Team name display block
Team name display block
1
2
3
4
5
ST-306
When installing the team name display unit (ST-24), be sure to engage
WARNING the round bars into the mating holes and tighten up the thumb nuts
firmly. Failure to observe this precaution may cause serious injury to
personnel due to fall of the display unit under the influence of wind,
vibration or shock.
I-5039
17
7
SETTING OF FUNCTION SWITCH
This is a two-digit switch used to select a function number for a specific application.
Note:
To change the FUNCTION switch setting (function number), turn off the POWER switch first, change the
FUNCTION switch setting, and then turn on the POWER switch again. The FUNCTION switch is disabled
while the MODEL ST-306 is in operation. The MODEL ST-306 will not work when the FUNCTION switch is
set at any number other than specified as effective in the list on page 42.
Minus button
upper digit
0 0
Lower digit
Plus button
FUNCTlON
Confirmation of FUNCTION switch setting (function number)
[Ex.] When the FUNCTION switch is set at “xx”:- (x: 0-9)
1) Set the POWER switch to ON.
2) The entire display will be blacked out.
3) The function number which has been set will be displayed preceded
by code “F-” for 1 second. (“F-xx”) (“F-00” in the illustrated example)
4) The MODEL ST-306 will operate as directed by a specific combination
of the parameter settings of the switches.
①
②
③
④
Where a function number not appearing on the function number list (p. 42) is set:[Ex.] When the FUNCTION switch is set at “18”:-
①
1) Turn ON the POWER switch.
②
2) The entire display will be blacked out.
3) The function number which has been set will be displayed
③
preceded by code “F-“. (“F-xx”) (“F-18” in the illustrated example)
4) The display will freeze at “F-xx”.
5) Turn off the POWER switch, correct the FUNCTION switch setting, and then turn ON the POWER
switch again.
18
I-5039
8
APPLICATION (1):
UPCOUNTING MODE
UPCOUNTING
Display of: Running time, lap time, split time and finish time
(1)
Upcounting from "0"
(a) Initial settings
1)
2)
3)
Set the FUNCTION switch at “00”.
Turn on the POWER switch.
Set the slide switches as shown at right
1
1/10 1/100
Set the RANGE switch.
RANGE
UP DOWN D→U
UP
BATT.CHECK
OFF
OFF
Set the MEMORY switch to
LAP time or SPLIT time.
In the upcounting mode, the
buzzer
will
not
beep
irrespective of the BUZZER
switch position
The display is enabled
irrespective of the DISPLAY
switch position
Set the maximum display
time
POWER
ON
OFF
REPEAT
LAP
MEMORY
OFF
1
5
BUZZER
0 0
OFF AUTO ON
DlSPLAY
99h
24h Time
FlGURE
0∼9
1/100S
1/10S
1S
NOTE: The decimal fractions of a second (1/10s digit and 1/100s digit)
19
FUNCTlON
MAX TlME
By setting the RANGE switch, the display will show:
will not be displayed during counting..
ON
SPRIT
Set the FUNCTION
switch at “00”.
I-5039
PUSH
COUNT
SET
READ
②③⑤
①④
(b) Running time counting and display
1) Press the START/STOP switch to start the sports timer.
2) Press the LAP/SPLIT/RESET button of the grip switch,
LAP
START
SPLIT
and the sports timer display will freeze immediately. After
STOP
RESET
about 5 seconds of LAP or SPLIT time display, the sports
timer will return to the running time display mode.
Every single push of LAP/SPLIT/RESET switch will be
memorized as LAP or SPLIT time. When the LAP/SPLIT
/RESET switch is pressed while the display is in a freeze,
the LAP or SPRIT time will be committed to memory, but the time
on display will not change.
The memory has a capacity of 25-time recordings, When the LAP/SPRIT/RESET switch is pressed
more than 25 times, the data for LAP time are updated while 25 SPLIT times will remain from the
first press.
Namely, in case of SPLIT time, the data will not be updated after 25 times the data for LAP time.
Even when the SPLIT time cannot be recorded because of memory full status, it is displayed in a
5 second freeze when the LAP/SPLIT/RESET switch is pressed.
When the MEMORY switch is set to the SPLIT mode:3) Whenever the LAP/SPLIT/RESET switch is pressed,
the running time will be displayed for about 5 seconds in a freeze.
When the MEMORY switch is set to the LAP mode:3) Whenever the LAP/SPLIT/RESET switch is pressed, the
time elapsed from the previous press will be displayed for
about 5 seconds in a freeze.
4) Press the START/STOP switch to stop the time counting.
5) When the LAP/SPLIT/RESET switch is pressed, the sports timer display will be cleared to
0.(0.0,0.00), making the sports timer ready for the next heat. The memory data will be maintained
until the START/STOP switch is pressed
(c) Memory call
When the time counting is at a standstill, the memory
data can be called up by pressing the READ switch.
At every push of the READ switch, the LAP/SPLIT
number or the order of arrival (data number) and the
time will be displayed alternately as illustrated at right.
When all data have been read out, a push to the READ
switch will return you to the data number “1” again,
and you can display memory data again the same way.
To restart the sports timer for the next run after
memory call, press the LAP/SPLIT/RESET button of
the grip switch.(The sports timer will not restart unless
the LAP/SPLIT/RESET switch is pressed again.)
The sports timer will restart only from “0”.
(2) Upcounting from a preset time
READ
press
press
Start form
“0”
Reset
1
1/10 1/100
RANGE
20
UP DOWN D→U
PUSH
I-5039
BATT.CHECK
COUNT
OFF
OFF
Time
press
1S
UP
Date number
(order of
arrivals)
press
POWER
ON
REPEAT
OFF
ON
(a) Initial settings
1) Set the FUNCTION switch at
“00”.
2) Set the POWER switch to ON.
3) Set the slide switches as shown
at right
(b) Time setting
[Ex.] 13h20m00s
(When the RANGE switch is set at “1”.)
1)Give a push to the FIGURE switch, and the 10s digit
(= 10s digit of hours) will be selected.
2) Give a push to the 0-9 switch, and “1” will be entered in the 10s digit
3) Give a push to the FIGURE switch, and you will be stepped to the
next place (1s digit of hours ).
4) Press the 0-9 switch three times, and “3” will be entered in the 1s digit
①
②
③
④
5) Give a push to the FIGURE switch, and you will be stepped to
the next place (1/10s digit = 10s digit of minutes).
⑤
6) Press the 0-9 switch two times, and “2” will be entered into the 1/10s digit
⑥
7) Press the SET switch to save the time setting
⑦
(The sports timer will not start unless the SET switch is pressed.)
In case the RANGE switch is set at 1/10 or 1/100, the hours digits cannot be set.
(The maximum time rage is 59m59s, provided that the fractions of a second
cannot be set.)
(c) Operation
1) Press the START/STOP switch, and the sports timer will start counting.
2) Another push to the START/STOP switch will stop the sports timer.
9
APPLICATION (2):
I-5039
REPETITIVE UPCOUNTING MODE
Set the RANGE switch to
determine the minimum
indicating unit
21
1
1/10 1/100
RANGE
UP DOWN D→U
BATT.CHECK
PUSH
REPETITIVE UPCOUNTING (UP)
(1) Initial settings
1) Set the FUNCTION switch at “00”.
2) Set the POWER switch to ON.
3) Set the slide switches as shown
at right.
(2) Time setting
[Ex. ] 1m30s
(RANGE switch setting: 1)
1) Give a push to the FIGURE switch
①
2) Press the FIGURE switch three times further, and you
will be stepped three places rightwards to 1s digit
(= 1s digit of minutes).
3) Give a push to the 0-9 switch.
②
③
④
4) Give a push to the FIGURE switch, and you will be
stepped to the next place (10s digit of seconds).
5) Press the 0-9 switch three times.
⑤
⑥
6) Press the SET switch to save the time setting.
(The sports timer will not start unless the SET switch is pressed.)
(3) Operation and display
1) Press the LAP/SPLIT/RESET switch, and the sports timer
display will be cleared to “0”.
2) Press the START/STOP switch to start upcounting
3) The upcounting will be repeated cyclically unless the
START/STOP switch is pressed.
(When the START/STOP switch is pressed, the sports timer
will be brought to a pause.)
Every time the preset time (=1m30 sec. in this examples) is
reached, the buzzer will beep.
4) The sports timer will be initialized when the LAP/SPLIT/
RESET switch is pressed with the timer at a pause.
22
①
1 second
later
②
③
The buzzer
will sound
④
I-5039
10 APPLICATION (3):
DOWNCOUNTING MODE
DOWNCOUNTING (COUNT DOWN)
Display of: Game time
Set the RANGE switch to
determine the minimum
indicating unit
1
1/10 1/100
RANGE
(1) Initial settings
DOWN
UP DOWN D→U
BATT.CHECK
PUSH
COUNT
OFF
OFF
1) Set the FUNCTION switch at “00”.
2) Set the POWER switch to ON.
3) Set the slide switches as shown
at right
The MEMORY switch is
disabled irrespective of
its position
Set the BUZZER switch
to 1 or 5 if it is required
to activate the buzzer
POWER
ON
OFF
REPEAT
LAP
ON
SPRIT
MEMORY
OFF
1
5
BUZZER
0 0
OFF AUTO ON
DlSPLAY
The sports timer display
is enabled irrespective of
the
DISPLAY
switch
position
Set the MAX TIME switch
to
determine
the
maximum limit of time
display.
99h
24h Time
FUNCTlON
MAX TlME
FlGURE
0∼9
SET
READ
Set the FUNTON switch
at “0”
(2) Time setting
[Ex.] 20m00s0
(When the RANGE switch is set at 1/10.)
1) Give a push to the FIGURE switch.
2) Press the 0-9 switch two times.
①
3) Press the SET switch to save the setting. When
the SET switch is pressed, each of the digits to
②
the right of the digit in which numerical data is
entered last will be set to “0”.
③
*To set two digits or more, repeat the steps 1) and 2),
and press the SET switch when all the required digits have been set.
(3) Operation and display
1) Press the START/STOP switch to start downcounting.
2) Press the START/STOP switch to bring the sports timer
to a pause.
Every time the START/STOP switch is pressed,
the sports timer will start and stop downcounting alternately.
The sports timer will display time according to the RANGE
setting.
3) At once the time is counted down to “0”, the buzzer
will beep.
4) To repeat the downcounting from the same preset time,
press the LAP/SPLIT/RESET switch, and press the
START/STOP switch. The sports timer will display time
according to the RANGE setting
I-5039
23
①
1 second
later
②
③
④
The buzzer
sound
11 APPLICATION (4):
REPETITIVE DOWNCOUNTING MODE
REPETITIVE DOWNCOUNTING (DOWN)
Set the RANGE switch to
determine the minimum
indicating unit
(1) Initial settings
1) Set the FUNCTION switch at “00”.
2) Set the POWER switch to ON.
3) Set the slide switches as shown
at right
1
1/10 1/100
RANGE
UP DOWN D→U
DOWN
BATT.CHECK
PUSH
COUNT
OFF
ON
POWER
ON
OFF
REPEAT
The MEMORY switch is
disabled irrespective of
its position
Set the BUZZER switch
to 1 or 5 if it is required
to activate the buzzer
The sports timer display
is enabled irrespective of
the
DISPLAY
switch
position
Set the MAX TIME switch
to
determine
the
maximum limit of time
display.
LAP
ON
SPRIT
MEMORY
OFF
1
5
BUZZER
0 0
OFF AUTO ON
DlSPLAY
99h
24h Time
FUNCTlON
MAX TlME
FlGURE
0∼9
SET
READ
Set the FUNTON switch at
“0”
(2) Time setting
[Ex.] 4m30s
1) Give a push to the FUNCTION switch.
2) Press the FIGURE switch three times, and “0” will be
stepped three places to the right.
3) Press the 0-9 switch 4 times.
4) Give a push to the FIGURE switch, and you will be
stepped to the next digit (10s digit of seconds here).
5) Press the 0-9 switch three times.
6) Press the SET switch.
(Unless the SET switch is pressed, the sports timer
cannot be readied for downcounting.)
①
②
③
④
⑤
⑥
(3) Operation and display
1) Press the START/STOP switch, and the sports timer
will start downcounting.
2) The downcounting will be repeated cyclically unless the
START/STOP switch is pressed.
(When the START/STOP switch is pressed, the sports timer
will be brought to a pause.)
Every time “0” is reached, the buzzer will beep.
①
1 second
later
②
The buzzer
sounds
3) Pressing the LAP/SPLIT/RESET switch while the sports timer
is at a pause will initialize the sports timer.
③
24
I-5039
12 APPLICATION (5):
MANUAL CROSSOVER COUNTING MODE
DOWNCOUNTING→O (STOP)→MANUAL UPCOUNTING BY GRIP SWITCH
(1) Initial settings
1) Set the FUNCTION switch at “00”.
2) Set the POWER switch to ON.
3) Set the slide switches as shown at right
Set the RANGE switch to
determine the minimum
indicating unit
1
1/10 1/100
D→U
RANGE
UP DOWN D→U
BATT.CHECK
PUSH
COUNT
OFF
OFF
Set the MEMORY switch
to LAP time or SPLIT
time
Set the BUZZER switch
to 1 or 5 if it is required
to activate the buzzer
The sports timer display
is enabled irrespective of
the
DISPLAY
switch
position
POWER
ON
OFF
REPEAT
LAP
ON
SPRIT
MEMORY
OFF
1
5
BUZZER
0 0
OFF AUTO ON
DlSPLAY
99h
Set the MAX TIME switch
to
determine
the
maximum limit of time
display.
24h Time
FUNCTlON
MAX TlME
FlGURE
0∼9
SET
READ
Set the FUNTON switch
at “0”
(2) Time setting
[Ex.] 7m20s
(RANGE switch setting: 1)
①
1) Give a push to the FUNCTION switch.
2) Press the FIGURE switch three times further, and you
will be stepped three places rightwards to 1s digit
(= 1s digit of minutes).
3) Press the 0-9 switch seven times.
3) Give a push to the FIGURE switch, and you will be stepped
one place to the right.
5) Press the 0-9 switch two times.
6) Press the SET switch.
(The sports timer will not start unless the SET switch is pressed.)
(3) Operation and display
1) Press the START/STOP switch, and the sports timer will
start counting.
2) Countdown
Every time the START/STOP switch is pressed, the sports
timer will start and stop downcounting alternately.
3) When “0” is reached, the downcounting will be stopped, and at
the same time the buzzer will beep.
When the START/STOP switch is pressed, the sports timer
will start upcounting.
4) The sports timer will be initialized by pressing the LAP/SPLIT/
RESET switch when the sports timer is at a standstill.
②
③
④
⑤
⑥
①
1 second
later
②
③
④
I-5039
25
The buzzer
sounds
13 APPLICATION (6):
AUTOMATIC CROSSOVER COUNTING MODE
DOWNCOUNTING→ZERO (0) CROSSING ZERO WITHOUT STOP→UPCOUNTING
(1) Initial settings
Set the RANGE switch to
determine the minimum
indicating unit
1
1/10 1/100
D→U
1) Set the FUNCTION switch at “00”.
RANGE
UP DOWN D→U
ON
BATT.CHECK
PUSH
COUNT
2) Set the POWER switch to ON.
3) Set the slide switches as shown at right.
OFF
Set the MEMORY switch
to LAP time or SPLIT
time
Set the BUZZER switch
to 1 or 5 if it is required
to activate the buzzer
The sports timer display
is enabled irrespective of
the
DISPLAY
switch
position
Set the MAX TIME switch
to
determine
the
maximum limit of time
display.
POWER
ON
OFF
REPEAT
LAP
ON
SPRIT
MEMORY
OFF
1
5
BUZZER
0 0
OFF AUTO ON
DlSPLAY
99h
24h Time
FUNCTlON
MAX TlME
FlGURE
0∼9
SET
READ
Set the FUNTON switch at
“0”
(2) Time setting
[Ex.] 2m10s
(RANGE switch setting: 1)
1) Give a push to the FUNCTION switch.
2) Press the FIGURE switch three times further, and you
will be stepped three places rightwards to 1s digit
(= 1s digit of minutes).
3) Press the 0-9 switch two times.
4) Give a push to the FIGURE switch, and you will be stepped
one place to the right.
5) Give a push to the 0-9 switch.
6) Press the SET switch.
(The sports timer will not start unless the SET
switch is pressed.)
(3) Operation and display
1) Press the START/STOP switch, and the sports timer will
start counting.
2) Countdown
Every time the START/STOP switch is pressed, the sports timer
will start and stop downcounting alternately.
3) Just when the time is counted down to “0”, the buzzer will beep,
and at the same time, downcounting mode is automatically changed
over to upcounting mode.
4) The sports timer will be initialized by pressing the LAP/SPLIT/
RESET switch when the sports timer is at a standstill.
①
②
③
④
⑤
⑥
①
1 second
later
②
③
The buzzer
sounds
④
26
I-5039
14 APPLICATION (7):
TIME OF DAY DISPLAY MODE
TIME OF DAY DISPLAY MODE
(DISPLAY IN THE MILITARY
24-HOUR SYSTEM)
(1) Initial settings
Set to 1 sec.
1
1/10 1/100
RANGE
Those switches are disabled
UP DOWN D→U
Those switches are disabled
OFF
BATT.CHECK
POWER
ON
OFF
REPEAT
2) Set the POWER switch to ON.
LAP
MEMORY
1
5
Those switches are disabled
BUZZER
0 0
OFF AUTO ON
DlSPLAY
Those switches are disabled
99h
24h Time
Time
FlGURE
Set the FUNCTION switch
at “00”.
(2) Time setting
①
②
③
④
⑤
(3) Operation and display
1) Press the START/STOP switch, at the tone of “exact time”,
①
and the sports timer will start counting. as a Day Clock.
2) Countup
The upcounting will be repeated cyclically unless the
START/STOP switch is pressed.
NOTE: In the TIME of Day display mode, the LAP/SPLIT function is
disabled.By pressing the LAP/SPLIT/RESET switch when the
sports timer is at rest, its display will be cleared to zeros.
I-5039
FUNCTlON
MAX TlME
[Ex.] 10h8m00s
(RANGE switch setting: 1), to set the current time
referring to your watch.)
1) Give a push to the FUNCTION switch.
2) Give a push to the 0-9 switch.
3) Press the FIGURE switch three times further,
and you will be stepped three places rightwards to
1s digit of minutes.
4) Press the 0-9 switch eight times.
5) Press the SET switch.
(The sports timer will not start unless the SET
switch is pressed when the time is set, one to two
minutes advanced time shall be set.)
27
ON
SPRIT
Those switches are disabled
OFF
3) Set the MAX TIME to “Time”
PUSH
COUNT
1) Set the FUNCTION switch at "00".
②
0∼9
SET
READ
15 APPLICATION (8): SCOREBOARD MODE (STANDARD)
STANDARD SCOREBOARD MODE
The RENGE switch is
disabled irrespective of
its position
1
(1) Initial settings
1) Set the FUNCTION switch at “11”.
2) Set the POWER switch to ON.
3) Set the slide switches as shown at right
up to add score Down or
D-U to correct score.
1/10 1/100
RANGE
UP DOWN D→U
BATT.CHECK
OFF
POWER
ON
OFF
REPEAT
These switch are disabled
PUSH
COUNT
These switch are disabled
LAP
ON
SPRIT
MEMORY
OFF
1
5
BUZZER
These switch are disabled
1 1
OFF AUTO ON
The display is turned off
if the DISPLAY switch is
set to OFF
DlSPLAY
99h
24h Time
FUNCTlON
MAX TlME
The MAX TIME switch is
disabled irrespective of
its position
FlGURE
0∼9
SET
READ
Set the FUNCTION switch
to “11”
Every time the READ switch is pressed,
the lefthand and righthand
display
data are transposed
(2) Operation and display
1) Press the START/STOP switch, and the righthand side
score on the display will be incremented.
①
2) Press the LAP/SPLIT/RESET switch to increment the
lefthand side score on the display.
3) Every time either righthand side or lefthand player or team
②
gains a point, press the START/STOP switch or LAP/SPLIT/
RESET switch to increment the score for the corresonding
③
player or team.
The READ
switch
is
pressed.
④
4) Press the READ switch change score positions.
5) Hold down the START/STOP switch and LAP/SPLIT/RESET
switch simultaneously for 1 second, and both scores will be
⑤
reset to zeros.
< Procedure for correcting the score by subtraction >
Set the COUNT switch to “DOWN”, and operate the grip switch for the side whose score is to be
corrected.
NOTE: After correction, be sure to set the COUNT switch to “UP”.
28
I-5039
16 APPLICATION (9):
SCOREBOARD MODE (TENNIS)
TENNIS SCOREBOARD MODE
(1) Initial setting
1) Set the FUNCTION switch to “12”.
The RENGE switch is
disabled irrespective of
its position
Set the COUNT switch to
UP or DOWN
U → D serves as DOWN
mode
1/10 1/100
RANGE
UP DOWN D→U
BATT.CHECK
OFF
POWER
ON
OFF
REPEAT
These switch are disabled
PUSH
COUNT
These switch are disabled
2) Turn ON the POWER switch.
3) Set the slide switches as shown
1
LAP
ON
SPRIT
MEMORY
at right.
OFF
1
5
BUZZER
These switch are disabled
1 2
OFF AUTO ON
DlSPLAY
The display is turned off
if the DISPLAY switch is
set to OFF
The MAX TIME switch is
disabled irrespective of
its position
99h
24h Time
FUNCTlON
MAX TlME
FlGURE
0∼9
SET
READ
Set the FUNCTION switch
to “12”
Every time the READ switch is pressed,
the lefthand and righthand
display
data are transposed
(2) Operation and display
※ Default setting for deuce is “40”.
(It can be changed by following the procedure explained in
(3) “Setting of initial value” below.
1) Press the START/STOP switch to add points to
the righthand side score on the display.
①
2) Press the LAP/SPLIT/RESET switch to add points to
the lefthand side score on the display.
3) Every time either righthand side or lefthand player or
②
team gains a point, press the START/STOP switch or
LAP/SPLIT/RESET switch to increment the score for
③
the corresponding player or team.
4) Press the READ switch changes score position.
The READ
switch
is
pressed.
④
5) Hold down the START/STOP switch and LAP/SPLIT/
⑤
RESET switch simultaneously for 1 second, and
both scores will be reset.
< Procedure for correcting the score by subtraction >
Set the COUNT switch to “DOWN”, and operate the grip switch for the side whose score is to be
corrected.
NOTE: After correction, be sure to set the COUNT switch to “UP”.
I-5039
29
(3) Setting of initial value (for determination of deuce points)
※ The default setting (deuce points) just after power-up is “40”.
[Ex.] tie-break
1) Give a push to the FIGURE switch.
①
2) Give a push to the 0-9 switch.
②
3) the deuce points are toggled between
40 and 6 at every push of the 0-9 switch.
③
4) Press the SET switch.
(The sports timer will not start unless
the SET switch is pressed.)
④
< Operation and display in case of tie-break >
1) Press the START/STOP switch to increment
the righthand side score on the display.
①
2) Press the LAP/SPLIT/RESET switch to increment
the lefthand side score on the display.
②
3) Every time either righthand side or lefthand player
or team gains points, press the START/STOP switch
or LAP/SPLIT/RESET switch to increment the score
for the corresonding player or team.
③
④
4) Hold down the START/STOP switch and LAP/SPLIT/
RESET switch simultaneously for 1 second, and both scores will be reset.
30
I-5039
17 APPLICATION (10):
SCOREBOARD MODE (SOFT TENNIS)
SOFT TENNIS SCOREBOARD MODE
(1) Initial settings
1) Set the FUNCTION switch at “13”.
The RENGE switch is
disabled irrespective of
its position
Set the COUNT switch to
UP or DOWN
D-U serves as DOWN
mode.
1
1/10 1/100
RANGE
UP DOWN D→U
BATT.CHECK
These switch are disabled
OFF
POWER
ON
OFF
REPEAT
These switch are disabled
LAP
ON
SPRIT
MEMORY
2) Set the POWER switch to ON.
OFF
1
5
These switch are disabled
3) Set the slide switches as shown
at right.
PUSH
COUNT
BUZZER
1 3
OFF AUTO ON
DlSPLAY
The display is turned off
if the DISPLAY switch is
set to OFF.
99h
24h Time
FUNCTlON
MAX TlME
The MAX TIME switch is
disabled irrespective of
its position.
FlGURE
0∼9
SET
READ
Set the FUNCTION switch
to “13”.
Every time the READ switch is pressed,
the lefthand and righthand
display
data are transposed
(2) Operation and display
※ Default setting for deuce points is “3”.
(It can be changed by following the procedure explained
in (3) “Setting of initial value” below.
1) Press the START/STOP switch to increment
①
the righthand side score on the display.
2) Press the LAP/SPLIT/RESET switch to increment
the lefthand side score on the display.
②
3) Every time either righthand side or lefthand player
or team gains points, press the START/STOP switch
③
or LAP/SPLIT/RESET switch to increment the score
for the corresonding player or team.
The READ
switch
is
pressed
④
4) Press the READ switch changes score position.
5) Hold down the START/STOP switch and LAP/SPLIT/
⑤
RESET switch simultaneously for 1 second, and both scores
will be reset.
< Procedure for correcting the score by subtraction >
Set the COUNT switch to “DOWN”, and operate the grip switch for the side whose score is to be
corrected.
NOTE: After correction, be sure to set the COUNT switch to “UP”.
I-5039
31
(3) Setting of initial value (for determination of deuce points)
※The default setting (deuce points) just after power-up is “3”.
[Ex.] To change the deuce points to 9:1) Give a push to the FIGURE switch.
2) Give a push to the 0-9 switch.
①
3) By joggling the 0-9 switch, the number at
the place selected by the FIGURE switch can
②
be changed incrementally from 3 to 9.
When 9 is reached, a push cycles the number
③
back to 3, from which the same incremental
process can be repeated. (Set the deuce points to “9”.)
④
4) Press the SET switch.
(The sports timer will not start unless the SET switch is pressed.)
< Operation and display >
1) Press the START/STOP switch to add points
to the righthand side score on the display.
①
2) Press the LAP/SPLIT/RESET switch to add
points to the lefthand side score on the display.
3) Every time either righthand side or lefthand
②
player or team gains points, press the START/
STOP switch or LAP/SPLIT/RESET switch to
③
increment the score for the corresonding player
or team.
④
4) Hold down the START/STOP switch and LAP/
SPLIT/RESET switch simultaneously for 1 second,
and both scores will be reset.
32
I-5039
18 APPLICATION (11):
SCOREBOARD MODE (COUNT DISPLAY)
SCOREBOARD COUNT DISPLAY MODE
These switch are disabled
1
1/10 1/100
RANGE
These switch are disabled
(1) Initial setting
UP DOWN D→U
BATT.CHECK
PUSH
COUNT
1) Set the FUNCTION switch at “14”.
These switch are disabled
OFF
POWER
ON
OFF
REPEAT
2) Turn the POWER switch to ON.
These switch are disabled
LAP
MEMORY
OFF
3) Set the slide switches as shown
at right.
The buzzer will be
deactivated during count
display
The display is turned off
if the DISPLAY switch is
set to OFF
The MAX TIME switch is
disabled irrespective of
its position.
1
5
BUZZER
(2) Operation and display
DlSPLAY
99h
24h Time
FlGURE
1) When the START/STOP switch is given a push,
the count will be incremented.
2) When the LAP/SPLIT/RESET switch is given a push,
②
3) The display will be reset to zero when the START/STOP
switch and LAP/SPLIT/RESET switch are held down
simultaneously for 1 second.
③
(3) Setting of initial value
[Ex.] Count = 10
1) Give a push to the FIGURE switch.
①
2) Give a push to the 0-9 switch.
3) Give a push to the FIGURE switch, and you will be
②
stepped one place to the right.
③
4) Press the SET switch.
④
33
FUNCTlON
MAX TlME
①
the count will be decremented.
1 4
OFF AUTO ON
Set the FUNTION switch
at “14”
I-5039
ON
SPRIT
0∼9
SET
READ
19 HOOK-UP WITH OTHER EQUIPMENT
NOTE: When external equipment is connected to the MODEL ST-306, the display mode vs. DISPLAY
switch setting relationship is as follows:
OFF: Blacked out AUTO: Blacked out when the signal line is cut off or no data is detected
ON: Steady ON
When connecting external equipment to the MODEL ST-306, connect the cable first, set the
FUNCTION switch to meet the external equipment connected, and then turn ON the MODEL
ST-306 and external equipment.
(1) Connection with score operation unit (ST-23)
When combined with the score operation unit (option), the MODEL ST-306 can be used as a three-digit
scoreboard having a maximum scoring capacity of 999 points
(a) Setting
Set the FUNCTION switch at “10”.
Turn the POWER switch to ON.
(b) Cabling
Cable
termination to
GRIP/EXT. connector
ST-306
Score operation uit
ST-23
Cable (option)
(c) Display data
Max. 999 points vs. 999 points
<Display examples>
(0
vs.
0)
(99 vs. 100)
(10 vs.9)
(200 vs.199)
(2) Connection with signal distribution box (ST-22)
(a) Setting
Set the FUNTION switch “00”
Turn the POWER switch to ON
ST-306
(b) Cabling
Cable
termination
GRIP/EXT. connector
to
Signal distribution box
ST-22
ST-306
Cable termination to
GRIP/EXT. connector
Cable 10m (option)
(c) Operation
Using a single grip switch, two units of MODEL ST-306 can be started, stopped, and reset
smultaneously. It should be noted, however, that each ST-306 is operating on its own internal clock for
counting, and therefore, that CT-1000/916 is necessary for perfect synchronization of the two units.
34
I-5039
(3) Connection with sports printer (CT-1000/916) (standard operating mode)
(a) Setting
Set the FUNCTION switch at “20”.
Turn the POWER switch to ON.
(b) Cabling
Cable
terminated
GRIP/EXT. connector
ST-306
to
Sports printer
CT-1000/916
Cable (option)
< Where signal distribution box (ST-22) is used >
Two units of ST-306 can be connected.
The two units of ST-306 display the time data of CT-1000/916 in perfect synchronism.
ST-306
Cable
terminated
GRIP/EXT. connector
to
Signal distribution box
ST-22
Sports Printer
CT-1000/916
Cable terminated to
GRIP/EXT. connector
ST-306
Cable (option)
Cable 10m (option)
(c) Operation
Start/split/lap/finish signals for MODEL ST-306 are all controlled automatically by CT-1000/916.
When the MODEL ST-306 is connected with CT-1000/916, the buzzer in the ST-306 will not beep.
(d) Display data
The running time is displayed at all times.
When a player has reached the finish line, the sports timer will display finish time for about 5
seconds and then return to the running time display mode.
When other players have arrived the finish line during said 5-second period, their finish times will not
be displayed.
The display pattern is determined by the RANGE settings of CT-1000/916 and ST-306 as follows.
ST-306
1/100
CT-1000/916
1/10
1/100
1/10
1
Inhibited (because the display accuracy preposterously becomes higher than the
measuring accuracy.)
I-5039
35
1
(4) Connection with sports printer (CT-1000/916) (external synchronization mode)
(a) Setting
Set the FUNCTION switch at “21”.
Turn the POWER switch to ON.
(b) Cabling
ST-306
1st ST-306 synchronized
with CT1000/916
ST-306 Synchronization cable
terminated
to
GRIP/EXT.
connector
Sports Printer
CT-1000/916
Cable (option)
ST-306
2nd ST-306 synchronized
with CT1000/916
ST-306
3rd ST-306 synchronized
with CT1000/916
Even after disconnection of the
synchronization cable, three ST-306s
will show the same running time as
CT-1000/916, except that the timing
accuracy of the three ST-306s is
governed by their respective internal
clocks.
CT-1000/916
continuously.
is
running
After making sure that the first
ST-306 has been synchronized
with CT-1000/916, disconnect
the synchronization cable from
the first ST-306, and connect it
to the second ST-306. After
making sure that the second
ST-306 has been synchronized
with CT-1000/916, disconnect
the cable from the second
ST-306 and connect it to the
third ST-306. After making sure
that the third ST-306 has been
synchronized
with
CT-1000/916, disconnect the
cable.
(c) Operation
While being connected with CT-1000/916, ST-306 always displays time data from CT-1000/916.
Once synchronized with CT-1000/916, ST-306 maintains the accuracy by its internal clock.
Accordingly, two or more units of ST-306 can be synchronized conveniently using a single unit of
CT-1000/916.
NOTE: Use ST-306s with their DISPLAY switches at the position of ON. (If the DISPLAY switch is set
to AUTO, the display will be turned off when the cable is disconnected.)
NOTE: When operating ST-306 in the external synchronization mode, do not turn off
the POWER switch of ST-306 when disconnecting the synchronization cable.
36
I-5039
(5) Connection with electronic starter (PS-107/105)
(a) Setting
Set the FUNCTION switch at “00”.
Turn the POWER switch to ON.
(b) Cabling
Termination of extension
cable to START.IN connector
Electronic statar
PS-107/105
ST-306
Cable (option)
Termination of grip switch
cable to GRIP/EXT. connector
(c) Operation
ST-306 can be started by the signal sent from the electronic starter PS-107/105. When PS-107/105
is fired two times or more in succession to indicate a flying start, press the START/STOP switch to
stop counting, and press the LAP/SPLIT/RESET switch to reset the count to zero in preparation for
the next start.
(6) Connection with ski timing system (CT-400/300)
(a) Setting
Set the FUNCTION switch as follows.
“30” Display of first trial time or total time
“31” Display of first or second trial time
“32” Display of start timer (Note: CT-400 only)
Turn the POWER switch to ON.
(b) Cabling
ST-306
Cable to be terminated to
GRIP/EXT. connector
Ski timing system
CT-300/400
Cable (option)
(c) Operation
Start/Stop/finish signals for MODEL ST-306 are all controlled automatically by CT-400/300.
The RANGE switch of ST-306 is enabled.
(d) Display data
According to the setting of the FUNCTION switch, the display will show: the first trial time or total
time; first trial time or second trial time; or start timer time (CT-400 only).
I-5039
37
(7) Connection with swimming timing system (PT-7000/6000)
(a) Setting
Set the FUNCTION switch as follows:
“40” Display of running time
“41” Display of running time by way of swimming scoreboard (SB-5010)
“42” Display of running time or the lap time for the first place.
“43” Display of program No. and heat No. by way of swimming scoreboard (SB-5010).
“50-59” Display of split time by the order of arrival.
“60-69” Display of split time by lane No.
Turn the POWER switch to ON.
(b) Cabling
Where the FUNCTION switch is set at “40”, “42”, “50-59”, or “60-69”:ST-306
Cable to be terminated to
GRIP/ext. connector
Swimming Timing System
PT-7000/6000
Cable (option)
Where the FUNCTION switch is set at “41” or “43”:-
ST-306
Cable to be terminated to
GRIP/ext. connector
Swimming Timing System
PT-7000/6000
Cable (Option)
SB-5010
(c) Operation
Start/lap/finish/reset signals for MODEL ST-306 are all controlled automatically by PT-7000/6000.
(d) Display data
The running time, program No., heat No., and the split time as tagged with the order of arrival/lane
No. are displayed.
38
I-5039
(8) Connection with indoor sports operation board (ST-2000/900/800 series)
(a) Setting
Set the FUNCTION switch as specified below:
“70”
Display of game time
“71”
Display of scores
Turn the POWER switch to ON.
(b) Cabling
Time operation board
ST-306
Cable to be terminated to
GRIP/EXT. connector
Cable (option)
(c) Display data
Game time and scores are displayed.
Indoor sports operation board
ST-2000/900/800series
(9) Connection with running time operation board (RT-120)
(a) Setting
Set the FUNCTION switch as follows:
“80”
Display of running time
“81”
Display of bib number
Turn the POWER switch to ON.
(b) Cabling
ST-306
Cable to be terminated to
GRIP/EXT. connector
Cable (option)
(c) Display data
The running time and bib number are displayed.
The RANGE switch of ST-306 is enabled.
I-5039
39
Running time operation board
RT-120
(10) Digital anemometer operation board (WG-200)
(a) Setting
[Display of wind velocity]
Set the FUNCTION switch at “82”.
Turn the POWER switch to ON.
(b) Cabling
Cable to be terminated to
GRIP/EXT. connector
ST-306
Digital anemometer operation
board
WG-200
Cable (option)
(C) Cabling
The wind velocity is displayed.
(11) Connection with optical distance measuring equipment (DM-200)
(a) Setting
[Display of distance]
Set the FUNCTION switch at “83”.
Turn the POWER switch to ON.
(b) Cabling
ST-306
Optical distance measuring
equipment
DM-200
Cable to be terminated to
GRIP/EXT. connector
Signal converter box
Cable (option)
(c) Display data
The measured distance is displayed.
40
I-5039
(12) Precautions on hook-up
Be sure to turn OFF the POWER switch before connecting and
disconnecting the cable, except when operating the MODEL ST-306
connected with CT-1000/916 in the externally synchronized mode.
CAUTION
Do not use any cable other than furnished as a standard accessory or
exclusive cable for use with externally connected equipment. This is
important for the prevention of fire and equipment failure.
Do not use any cable other than furnished as a standard accessory or
exclusive cable for use with externally connected equipment. This is
important for the prevention of fire and equipment failure.
I-5039
41
42
I-5039
Lower
digit
8 place
9 place
9
7 place
7
8
6 place
4 place
6
Display of start
timer (CT-400
ONLY)
5 place
Count display
mode
Soft tennis
scoring mode
Tennis scoring
mode
3 place
10 place
Display of
program No. and
heat No.
(via SB)
Display of
running time
2 place
Display of 1st
trial time and
total time
Display of
running time,
finish time
Display of
running time or
the lap time of
1st place
CT-400/300
Connection with
swimming Timing System
(PT-7000/6000)
9 lane
8 lane
7 lane
6 lane
5 lane
4 lane
3 lane
2 lane
1 lane
10 lane
Display of scores
Display of game
time
7x
Connection with
indoor sports
operation board
ST-2000/900/800
6x
Display of split
time by lane with
PT-7000/6000
connected
5x
Display of split time
by order of arrival
PT-7000/6000
connected
1 place
Connection with
ST-23
Downcounting/
upcounting, etc
Connection with
ski timing system
Connection with
sports printer
CT-1000/916
4x
Display of
Standard scoring Synchronization of Display of 1st and
running
time (via
internal clock
2nd trial time
mode
SB)
Scoreboard
mode
Standard
operation
3x
2x
5
4
3
2
1
0
Function
1x
0x
Upper digit
LIST OF FUNCTION SWITCH SETTING AND AVAILABLE FUNCTION
Display of
distance
measured by
DM-200
Display of wind
velocity
measured by
WG-200
Display of bib
numbers and
lane numbers
sent from
RT-120
Display of
running time and
finish time sent
from RT-120
Connection with
track event timing
system
8x
Not
used
9x
Setting inhibited
20 OPERATIONAL PRECAUTIONS
(1) POWER switch reclosing procedure
To reclose the POWER switch after turning it OFF, be sure to provide a waiting period of more than 10
seconds.
(2) Blackout procedure
You are recommended to black out the display after use for the purpose of saving the display from
fading due to burn.
The blackout procedure is as follows.
1) Turn the POWER switch to OFF.
2) Turn the POWER switch to ON.
3) When the display has been totally blacked out, turn the POWER switch to OFF immediately.
If there are some segments left on display, do over again from step 1), though the user has the option
of storing the sports timer as it is because it performance will not be affected by such state.
(3) Procedure for restart after memory call
The memory can be called up after stopping or resetting the sports timer by pressing the STOP or
RESET button of the grip switch.
After memory call, press the RESET button of the grip switch to initialize the memory.
Unless the RESET button is pressed, the MODEL ST-306 will not be restarted.
(4) Buzzer
When the POWER switch is turned off, the internal buzzer may beep momentarily, but this is no
problem.
21 CARE AFTER USE
The sports timer, MODEL ST-306, is designed for outdoor use, but should not be left to take care of
itself outdoors for an extended period.
After use, wipe clean of moisture, and stow away indoors.
AFTER USE, BE SURE TO REMOVE THE DRY CELLS FROM THE
CAUTION INSTRUMENT. FAILURE TO OBSERVE THESE PRECAUTIONS MAY
LEAD TO EXPLOSION, ELECTROLYTE LEAKAGE, AND EXOTHERMIC
REACTION
OF
DRY
CELL,
CAUSING
INJURIES
AND
ENVIRONMENTAL POLLUTION.
I-5039
43
22 SPECIFICATIONS
Power supply
Battery service life under continuous duty※
Display
Timing accuracy
±0.04 sec./hr. (5℃ ~ 35℃)
Overall dimensions
1230 mm (W) × 330 mm (H) × 150 mm (D)
Mass
12.5 kg max.
Cord length, 5 m; φ60; w/START/STOP and LAP/SPLIT/RESET buttons
Grip switch
Battery box
Maximum measuring time
Measuring function
- Upcounting
(stopwatch-like
application): -
Measuring function
- Downcounting:-
“AA” dry cell x 8 pcs.
Alkali dry cell (LR6), approx. 50 hrs. (at 25 ゚ C)
Manganese dry cell (R6PU), approx. 25 hrs. (at 25 ゚ C)
Magnetic rotary bar, yellow, character height 200mm, 6 digits
Lap time or split time
Memory and memory
call
Lap or split time
“AA” dry cell x 8 pcs.
99h59m59s (59m59s99)
No limit to the count frequency within the maximum measuring time
Count or number of measurements storable: 25 max. (Count or data in excess of
26 overflows the memory.)
(REPEAT)
Automatic cyclic time counting from 0 to a preset time, and beeping of buzzer for
approx. 5 sec. after every expiration of preset time.
Preset time
99h59m59s ~ 1s
Auto
repeat
Minimum setting unit
Minimum indicating
1s
1/100s (selectable by switch; blacked out during counting operation)
unit
Start/stop
Location
Operating
Start/stop can be made any times within the preset time.
Indoors/outdoors (provided that permanent outdoor installation is prohibited.)
Although the sports timer can withstand rainwater for a short period of time, it
should not be used as a permanent outdoor installation.
When operating the sports timer outdoors under windy condition, provide proper
environment
measures to prevent toppling hazards.
Temperature
Humidity
Miscellaneous
Equipment available for connection with
ST-306
0℃ ~ 50℃ (no dew condensation)
30% ~ 80% RH (no dew condensation)
Protection against Display unit with a dust cover
dust
Printed circuit boards treated with a resist coating
Protection against
rain
Operating position
ST-23,
Protected enclosure to ensure normal operation in the rain
Fall from perpendicular line: within 15 ゚ in the x-y plane
(left/right direction), within 30 ゚ in the z-y plane
(back/forth direction)
PS-107/105,
CT-1000/916,
CT-400/300,
PT-7000/6000,
ST-2000/900/800 series, RT-120, WG-200, DM-200
※Typical value when operated continuously in the upcounting mode.
It should be noted that the battery service life varies dependent on the operating conditions, ST-306
parameter settings, ambient temperature and other environmental conditions
Our policy of constant product improvement may dictate changes to the specifications of ST-306 (incl.
accessories) above without notice.
44
I-5039
23 WHAT YOU NEED TO DO BEFORE CALLING A SERVICEMAN
SYMPTOM
PROBABLE CAUSE
Nothing appears on
Battery has run out.
the display when
the POWER switch Dry cells are set in wrong directions.
is turned ON.
Malcontact failure of grip switch
The time has not been set in DOWN
or REPEAT ON mode.
MEASURES
Check the battery and replace the dry cells
if the red lamp alone lights up.
Correct the orientation of the dry cells.
Correct the connection of the grip switch
connector.
Set the mode to DOWN, and press the
LAP/SPLIT/RESET button
ST-306 will not Failure to press the SET switch after
Press the SET switch after setting the time.
respond to the setting the initial value.
START/STOP
In the repetitive upcounting mode,
Press the START/STOP button for zero
switch
the LAP/SPLIT/RESET button was
resetting.
not pressed for zero resetting.
START/STOP button was pressed
by mistake when you should press
the LAP/SPLIT/RESET button.
Malcontact failure of extension cable
The FUNCTION switch setting is not
in agreement with the external
Nothing
is equipment
displayed
when The FUNCTION switching was set
external equipment preposterously after POWER ON.
is connected.
The DISPLAY switch is turned OFF.
External
equipment
functioning.
I-5039
is
45
Press the START/STOP button.
Correct the cable termination.
Correct the FUNCTION switch setting, and
power up the MODEL ST-306 again.
Set the FUNCTION switch first, and then
turn the POWER switch to ON.
Turn the DISPLAY switch to ON.
not Turn on the external equipment, signal
switch, etc. to send signals.