1
EGL Rich UI 7.5.1.5
User Manual
26 July 2010
EGL Rich UI 7.5.1.5
User Manual
26 July 2010
Note
Before using this information and the product it supports, read the information in “Notices,” on page 199.
This edition applies to version 7.5.1.5 of Rational Business Developer and to all subsequent releases and
modifications until otherwise indicated in new editions.
© Copyright IBM Corporation 2000, 2010.
US Government Users Restricted Rights – Use, duplication or disclosure restricted by GSA ADP Schedule Contract
with IBM Corp.
Contents
Chapter 1. Overview of EGL Rich UI. . . 1
Starting to work with EGL Rich UI .
Understanding how browsers handle
application . . . . . . . . .
Rich UI handler part. . . . . .
. . . .
a Rich UI
. . . .
. . . .
.
. 3
.
.
. 7
. 9
Chapter 2. Introduction to the EGL Rich
UI editor . . . . . . . . . . . . . . 13
Opening the EGL Rich UI editor . . . . .
Creating a Web interface in the Rich UI editor .
Using the tools on the Design surface . .
Selecting a palette . . . . . . . . .
Setting widget properties and events . . .
Running a Web application in the EGL Rich UI
editor . . . . . . . . . . . . . .
.
.
.
.
.
.
.
.
.
.
15
16
16
17
17
.
. 18
Chapter 3. Rich UI debugging . . . . . 21
Chapter 4. Rich UI programming model 23
Rich UI widgets . . . . . . . . . . . . .
Widget properties and functions . . . . . .
Widget styles . . . . . . . . . . . . .
Creating a Rich UI application with multiple
handlers . . . . . . . . . . . . . . .
Event handling in Rich UI . . . . . . . . .
Rich UI validation and formatting . . . . . . .
Rich UI date and time support . . . . . . . .
Form processing with Rich UI . . . . . . . .
Use of properties files for displayable text . . . .
RUIPropertiesLibrary stereotype . . . . . .
Browser history . . . . . . . . . . . . .
Rich UI Infobus . . . . . . . . . . . . .
Non-Infobus communication between Rich UI
handlers . . . . . . . . . . . . . . .
Rich UI drag and drop . . . . . . . . . .
Rich UI job scheduler . . . . . . . . . . .
Overview of service access . . . . . . . . .
ExternalType for JavaScript code . . . . . . .
Extending the Rich UI widget set . . . . . . .
Extending the Rich UI widget set with Dojo . .
Extending the Rich UI widget set with Silverlight
23
27
33
36
37
40
45
47
48
51
52
54
56
60
62
63
66
72
80
81
Accessing IBM i programs as Web services:
overview . . . . . . . . . . . . . . 93
Accessing IBM i programs as Web services:
keystroke details. . . . . . . . . . . . 96
Accessing a SOAP (Web) service in Rich UI. . . . 99
Creating an Interface part to access a Web service
in Rich UI . . . . . . . . . . . . . . 99
Declaring an interface to access a Web service in
Rich UI . . . . . . . . . . . . . . 100
Copying a JSON string to and from an EGL
variable . . . . . . . . . . . . . . . 101
Copying an XML string to and from an EGL
variable . . . . . . . . . . . . . . . 106
@XMLAttribute. . . . . . . . . . . . 109
@XMLElement . . . . . . . . . . . . 110
@XMLRootElement . . . . . . . . . . 110
XMLStructure . . . . . . . . . . . . 111
ServiceLib entries for Rich UI . . . . . . . . 113
bindService() . . . . . . . . . . . . 114
convertFromJSON() . . . . . . . . . . 114
convertFromURLEncoded() . . . . . . . . 115
convertToJSON() . . . . . . . . . . . 115
convertToURLEncoded() . . . . . . . . . 115
endStatefulServiceSession . . . . . . . . 115
getCurrentCallbackResponse . . . . . . . 116
getOriginalRequest . . . . . . . . . . 116
getWebServiceLocation() . . . . . . . . . 117
getRestRequestHeaders() . . . . . . . . 117
getRestServiceLocation() . . . . . . . . . 118
setHTTPBasicAuthentication() . . . . . . . 118
setProxyBasicAuthentication() . . . . . . . 119
setRestServiceLocation() . . . . . . . . . 120
setWebServiceLocation() . . . . . . . . . 120
EGL library XMLLib . . . . . . . . . . . 121
convertFromXML() . . . . . . . . . . 121
convertToXML() . . . . . . . . . . . 121
Chapter 6. EGL library RUILib . . . . 123
getTextSelectionEnabled()
getUserAgent() . . . .
setTextSelectionEnabled()
sort() . . . . . . .
.
.
.
.
.
.
.
.
.
.
.
.
.
.
.
.
.
.
.
.
.
.
.
.
.
.
.
.
.
.
.
.
.
.
.
.
123
123
124
124
Chapter 5. Accessing a service in EGL
Rich UI. . . . . . . . . . . . . . . 83
Chapter 7. Overview of EGL Rich UI
generation and deployment . . . . . 125
Accessing a REST service in Rich UI . . . . .
Creating an Interface part to access a REST
service . . . . . . . . . . . . . .
Declaring an interface to access a REST service
Coding a call statement and callback functions
for service access . . . . . . . . . .
Using a provided Interface part for a 3rd-party
REST service . . . . . . . . . . . .
Specifying parameters for service access in Rich
UI . . . . . . . . . . . . . . .
Deploying a Rich UI application to Apache Tomcat
Deploying a Rich UI application to a local
directory . . . . . . . . . . . . . . .
Deploying a Rich UI application to WebSphere
Application Server . . . . . . . . . . .
Build descriptor options used with JavaScript . .
defaultDateFormat (build descriptor option) . .
defaultServiceTimeout . . . . . . . . .
defaultSessionCookieID . . . . . . . . .
defaultTimeFormat (build descriptor option) . .
© Copyright IBM Corp. 2000, 2010
. 83
. 83
88
. 89
. 91
. 92
127
128
130
131
132
132
133
133
iii
defaultTimeStampFormat (build descriptor
option) . . . . . . . . . . . .
deploymentDescriptor . . . . . . .
.
.
. 133
. 134
Chapter 8. Setting preferences for
Rich UI . . . . . . . . . . . . . . 135
Setting preferences for Rich UI appearance . .
Setting preferences for Rich UI bidirectional text
Setting preferences for Rich UI deployment . .
. 135
138
. 139
Chapter 9. Securing a Rich UI
application . . . . . . . . . . . . 141
Overview of Rich UI security . . . . . . . .
Authentication and Authorization . . . . .
Confidentiality and Integrity . . . . . . .
Resources to secure . . . . . . . . . . .
JSF versus Rich UI applications . . . . . . .
Using Web container-managed (JEE) authentication
Defining URL patterns for Rich UI resources
Securing the HTML file by using form-based
authentication . . . . . . . . . . . .
Securing the EGL Rich UI Proxy by using basic
authentication . . . . . . . . . . . .
Removing access to the EGL Rich UI Proxy
servlet . . . . . . . . . . . . . . .
Securing EGL Web services by using basic
authentication . . . . . . . . . . . .
Using application-managed (custom) authentication
EGL single sign-on . . . . . . . . . .
Accessing user repositories . . . . . . . .
Adding a new user to a repository . . . . .
Authentication summary . . . . . . . . .
Authorization . . . . . . . . . . . . .
JEE security example . . . . . . . . . . .
Specifying security criteria in web.xml . . . .
Specifying security criteria in application.xml
for WebSphere . . . . . . . . . . . .
Enabling security by using the Administrative
Console for WebSphere . . . . . . . . .
Enabling security in the server configuration for
WebSphere . . . . . . . . . . . . .
Binding roles to users and groups in
tomcat-users.xml . . . . . . . . . . .
Running a Rich UI application with a secure proxy
WebSphere Application Server hints and tips
iv
EGL Rich UI 7.5.1.5
141
142
143
144
145
145
146
146
147
148
148
149
149
151
152
153
155
155
155
157
157
158
158
159
159
Sample login and error pages for JEE form-based
authentication . . . . . . . . . . . .
Preventing client-side security threats . . . .
Overview of SSL . . . . . . . . . . .
Using SSL with Rich UI applications . . .
SSL-related errors . . . . . . . . . .
SSL terminology . . . . . . . . . .
How SSL works . . . . . . . . . .
SSL example. . . . . . . . . . . .
Preventing SSL handshaking exceptions . .
SSL transport between WebSphere Application
Server and LDAP . . . . . . . . . .
IBM Rational AppScan . . . . . . . . .
.
.
.
.
.
.
.
.
.
160
161
162
162
163
163
164
164
168
. 169
. 169
Chapter 10. Reference to widgets . . . 171
Rich
Rich
Rich
Rich
Rich
Rich
Rich
Rich
Rich
Rich
Rich
Rich
Rich
Rich
Rich
Rich
Rich
Rich
Rich
Rich
Rich
Rich
Rich
Rich
UI
UI
UI
UI
UI
UI
UI
UI
UI
UI
UI
UI
UI
UI
UI
UI
UI
UI
UI
UI
UI
UI
UI
UI
BidiTextArea . . . . . .
BidiTextField . . . . . .
Box . . . . . . . . .
Button . . . . . . . .
Checkbox . . . . . . .
Combo. . . . . . . .
Div, FloatLeft, and FloatRight
Grid and GridTooltip . . .
Grouping . . . . . . .
HTML . . . . . . . .
Hyperlink. . . . . . .
Image . . . . . . . .
List . . . . . . . . .
ListMulti . . . . . . .
Menu . . . . . . . .
PasswordTextField . . . .
RadioGroup . . . . . .
Shadow . . . . . . .
Span . . . . . . . .
TextArea . . . . . . .
TextField . . . . . . .
TextLabel . . . . . . .
Tooltip . . . . . . . .
Tree and TreeTooltip . . .
.
.
.
.
.
.
.
.
.
.
.
.
.
.
.
.
.
.
.
.
.
.
.
.
.
.
.
.
.
.
.
.
.
.
.
.
.
.
.
.
.
.
.
.
.
.
.
.
.
.
.
.
.
.
.
.
.
.
.
.
.
.
.
.
.
.
.
.
.
.
.
.
.
.
.
.
.
.
.
.
.
.
.
.
.
.
.
.
.
.
.
.
.
.
.
.
.
.
.
.
.
.
.
.
.
.
.
.
.
.
.
.
.
.
.
.
.
.
.
.
171
172
172
173
173
173
174
174
179
179
180
180
181
182
182
188
188
189
191
192
193
193
194
195
Appendix. Notices . . . . . . . . . 199
Trademarks .
.
.
.
.
.
.
.
.
.
.
.
.
. 201
Index . . . . . . . . . . . . . . . 203
Chapter 1. Overview of EGL Rich UI
EGL Rich UI is a new technology for writing applications that will be deployed on
Web servers. The technology builds on an idea central to EGL: write simple code,
which is converted automatically to output that is useful for running a business.
The output in this case is client-side JavaScript, called client-side because the
JavaScript runs in the browser, not on the remote machine that serves the Web
page. Client-side JavaScript is important because it makes the Web page more
responsive, providing greater flexibility so that the user's experience can go beyond
receiving and submitting a page. After the user clicks a radio button, for example,
the logic might respond by changing the content of a text box. The change occurs
quickly because the JavaScript runs locally and, in most cases, redraws only one
area of the page.
An extension of client-side JavaScript is Ajax, a technology that permits the
runtime invocation of remote code and the subsequent update of a portion of a
Web page, even as the user continues working elsewhere on the page. After the
user selects a purchase order from a list box, for example, the JavaScript logic
might request transmission of order-item details from the remote Web server and
then place those details in a table displayed to the user. In this way, the application
can access content from the server but can save time by selecting, at run time,
which content is transmitted.
A developer writes Rich UI applications using EGL syntax. For advanced purposes,
however, a developer can write custom JavaScript or use JavaScript libraries
instead of relying on the default behavior provided by EGL. For example, you can
use Rich UI to access the following software:
v The Dojo Toolkit (http://dojotoolkit.org/)
v Microsoft Silverlight (http://silverlight.net/)
A Rich UI application can act as the front end for services that access databases
and do other complex processing. You can access the following kinds of services,
which are described in Overview of service access:
v SOAP Web services
v REST Web services that are provided by third parties such as Yahoo and Google
v EGL REST services, which are REST Web services for which the access code is
particularly simple
Outline of development tasks
As a Rich UI developer, you do the following tasks in the EGL Rich UI
perspective:
1. Create a Rich UI project
2. Create a kind of EGL handler part called an EGL Rich UI handler
3. Open the handler in the EGL Rich UI editor and add content to the Rich UI
handler in the following ways:
v By dragging on-screen controls called widgets onto a Web page surface. In
this situation, you can set widget properties by typing values into dialogs
that are part of the Rich UI editor.
v By coding widget details directly into the Rich UI handler.
© Copyright IBM Corp. 2000, 2010
1
v By writing the following kinds of logic directly into the Rich UI handler:
– Startup logic, which runs when the browser first receives the application
from a Web server
– Event logic, which runs in response to user actions such as a button click
When you are ready to deploy your code, you use the EGL deployment wizard
and store output in one of the following locations:
v A Web project that is configured for WebSphere® Application Server
v A Web project that is configured for Apache Tomcat
v A directory whose content is ultimately provided to a simple HTTP server such
as the Apache HTTP server. However, Rich UI does not support service access in
this case.
The EGL Rich UI Editor
You can use the EGL Rich UI editor to modify a Rich UI handler and to preview
the handler's runtime behavior. The editor includes the following views:
v The Design view is a graphical design area that shows the displayable content of
the Rich UI handler. You can drag-and-drop widgets from a palette into the
display and then customize those widgets in the Properties view.
v The Source view provides the EGL editor, where you update logic and add or
update widgets. The Design view and Source view are integrated: changes to the
Design view are reflected in the Source view; and, if possible, changes to the
Source view are reflected in the Design view.
v The Preview view is a browser, internal to the Workbench, where you can run
your logic. You can easily switch to an external browser if you prefer.
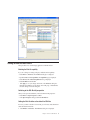
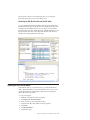
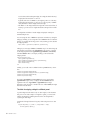
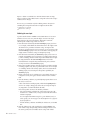
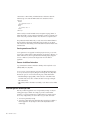
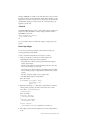
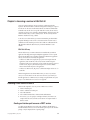
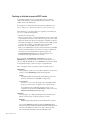
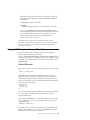
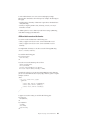
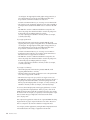
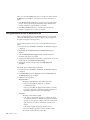
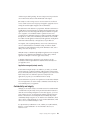
The EGL Rich UI Perspective
Here is the EGL Rich UI perspective as it appears when a Rich UI handler is open
in the Rich UI editor:
2
EGL Rich UI 7.5.1.5
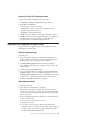
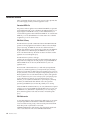
Starting to work with EGL Rich UI
This topic tells how to start developing applications with EGL Rich UI.
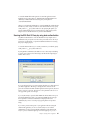
Enabling the Rich UI capability
If you are working in an existing workspace, enable the Rich UI capability:
v Click Window > Preferences. The Preferences dialog box is displayed.
v Expand General and click Capabilities. The Capabilities page is displayed.
v Click Advanced. The Advanced Capabilities dialog is displayed.
v Click EGL Rich UI and click OK.
v
Click Apply to save your changes and remain on the Preferences dialog box.
Alternatively, click OK to save the changes and exit the page; or click Cancel to
cancel the changes and exit the dialog box.
Switching to the EGL Rich UI perspective
When you first open the Workbench, switch to the EGL Rich UI perspective:
v Click Window -> Open Perspective -> Other
v At the Open Perspective dialog, double-click EGL Rich UI
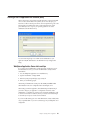
Setting the Rich UI editor as the default for EGL files
If most of your EGL work will involve Rich UI, you will want to make the Rich UI
editor the default for EGL files:
1. Click Window > Preferences. The Preferences dialog box is displayed.
Chapter 1. Overview of EGL Rich UI
3
2. Expand General and Editors and click File Associations. The File Associations
dialog is displayed.
3. In the File types section, click .egl
4. In the Associated editors section, click EGL Rich UI Editor and, at the right,
click Default
5. Click OK
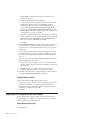
Accessing the Rich UI samples
We recommend that you use the Rich UI samples to explore the technology:
1. Click Help -> Samples. The Help dialog box is displayed.
2. Expand Samples, Technology samples.
3. Click Rich UI technical sample.
4. If your workbench does not already have the com.ibm.egl.rui project, click the
entry to it.
5. Click the entry to import the samples.
6. In the workbench Project Explorer, expand the project com.ibm.egl.rui.samples,
file EGL Source, package contents.
7. If you previously set the Rich UI editor to be the default for EGL files,
double-click contents.egl. Otherwise, right-click contents.egl and select Open
with → EGL Rich UI Editor.
8. Select the Preview tab at the bottom of the editor.
9. Follow the on-screen directions and try out the alternatives presented there.
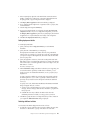
Creating your first Rich UI project
When you want to work outside of the Rich UI samples project, do as follows:
1. Click File -> New -> Project. The New Project wizard is displayed.
2. Expand EGL, click EGL Project and then Next. The New EGL Project page is
displayed.
3. Type a project name and select Rich UI Project. In most cases, complete the
task by clicking Finish, However, if you want to consider additional options,
continue here:
a. Click Next so that the EGL Project page is displayed.
b. To include the project in the directory that stores the current workspace,
select the check box for Use the default location for the project; otherwise,
specify a different directory by clearing the check box and using the Browse
mechanism.
c. An EGL service deployment descriptor lets your application access remote
services in a flexible way, so that at configuration time, an installer can
change the details of service access. The overhead of including the
descriptor is small, and we recommend that you select the check box for
Create an EGL service deployment descriptor regardless of your intent.
Click Next. The EGL Settings page is displayed.
d. The Projects tab lists all other projects in your workspace. Click the check
box beside each project that you want to add to the project's EGL build
path.
e. To put the projects in a different order or to export any of them, click the
Order and Export tab and do as follows: (i) To change the position of a
project in the build-path order, select the project and click the Up and
4
EGL Rich UI 7.5.1.5
Down buttons; (ii) to export a project, select the related check box; and (iii)
to handle all the projects at once, click the Select All or Deselect All
button.
f. Click Finish.
Reviewing general information on EGL
EGL Cafe provides is a center of information about the products that include EGL:
http://www.ibm.com/rational/eglcafe
For a concise introduction to EGL, see Enterprise Web 2.0 with EGL:
http://www.mc-store.com/5107.html
See the following topics in the EGL Programmer's Guide (aside from topics
specifically on Rich UI):
v Using EGL with the Eclipse IDE
v Introduction to EGL projects through Properties:
– In relation to Data parts, ignore references to Form Group and
ArrayDictionary
– In relation to Logic parts, ignore references to Handlers (other than Rich UI
handlers) and Programs
– Ignore Build parts other than the build descriptor and the deployment
descriptor
v Content assist
v Searching for EGL files and parts
v Setting Preferences in the EGL editor; specifically, the following topics:
– Setting Preferences for folding in the EGL editor
– Setting Preferences for organizing import statements in the EGL editor
– Setting Preferences for source styles
– Enabling and disabling code templates
v EGL debugger commands
v Setting preferences for the EGL debugger
Exclude the following subjects when reviewing the EGL Language Reference:
v File and database access; related statements such as forEach and get, and related
Exception records. When you work with Rich UI, all such access is handled by
invoked services.
v The Program-related statements transfer and call.
v User interfaces.
v Record stereotypes other than BasicRecord and ExceptionRecord.
v Details that are specific to Java or COBOL processing; in particular, details
related to J2EE, CICS®, IMS™, and z/OS® batch.
v Compatibility with VisualAge® Generator or Informix® 4GL.
v System libraries ConsoleLib, ConverseLib, DliLib, J2eeLib, JavaLib, LobLib,
PortalLib SqlLib, VgLib, and VgVar.
See the following topics in the EGL Generation Guide (aside from topics specifically
on Rich UI):
Chapter 1. Overview of EGL Rich UI
5
v Introduction to EGL generation
v Build descriptor part
Reviewing compatibility issues
Here are the major compatibility issues:
v File, database, and printer access is supported only by service access, not
directly by the Rich UI application code. However, Rich UI supports
non-structured Record parts, stereotype SQLRecord (as well as stereotypes
BasicRecord and ExceptionRecord). Not supported are the Record part properties
containerContextDependent, i4glItemsNullable, and textLiteralDefaultIsString.
v Reporting is not directly supported.
v Function overloading is not supported
v Generation of the following outputs is not supported: programs, forms, form
groups, data tables, services, or other outputs that are specific to Java or
COBOL.
v A version of the call statement is supported, but only to invoke services.
v Only the following variations of the exit statement are supported: exit for, exit
if, exit while, and exit case.
v The following statements are not supported: add, close, converse, continue,
delete, display, execute, forEach, forward, get, freeSQL, goTo, move, open,
openUI, prepare, print. replace, set, and transfer.
v The following types are supported: ANY, BIGINT, BIN (but only in the absence
of decimal places), Boolean, DataItem, DATE, DECIMAL, Delegate, Dictionary,
FLOAT, INT, NUM, NUMBER, SMALLFLOAT, SMALLINT, STRING (but only in
the absence of a size limit) , TIME, TIMESTAMP, NUM, MONEY, Service parts,
Interface parts, External types (stereotype JavaScript), arrays of supported types,
and non-structured Basic, Exception, and SQL Record parts.
v The following types are not supported: ArrayDictionary, BIN (with decimal
places), BLOB, CHAR, CLOB, DataTable, DBCHAR, HEX, INTERVAL,
MBCHAR, NUMC, STRING (with a size limit), PACF, UNICODE, structured
Record parts, and parts specific to the technologies Console UI, JSF, reports, Text
UI, and Web transactions.
v The following system libraries are not supported: ConsoleLib, ConverseLib,
DliLib, DliVar, J2eeLib, JavaLib, LobLib, PortalLib ReportLib, SqlLib, VgLib, and
VgVar.
v The following dateTimeLib functions are not supported: intervalValue() and
intervalValueWithPattern().
v The mathLib function assign() is not supported. Also, the data-type restrictions
noted earlier limit the support for the following mathLib functions: abs, max,
min, precision, and round.
v The StrLib constant nullFill is not supported.
v The following strLib functions are not supported: byteLen(), charAsInt(),
defaultMoneyForm(), defaultNumericFormat(), formatNumber(),
getNextToken(), getTokenCount(), intAsChar(), intAsUnicode(),
setBlankTerminator(), setNullTerminator(), unicodeAsInt(). Also, the data-type
restrictions noted earlier limit the support for the following mathLib functions:
getNextToken() and indexOf().
v The only supported sysLib functions are conditionAsInt(), writeStdError(), and
writeStdOut().
v The only supported sysVar variable is sysVar.systemType.
6
EGL Rich UI 7.5.1.5
v Literals of type CHAR, DBCHAR, and MBCHAR are not supported.
v The three bitwise operators (& | Xor) are not supported; nor is the in operator.
v Only the following variations of the is and not operators are supported: use of
sysVar.systemType and record-specific tests of blanks and numeric.
v Rich UI code cannot compare a variable of type ANY to a value variable:
// Not supported
if (myAny == 1)
;
end
v The details on using the EGL debugger are slightly different, as described in
Rich UI debugging.
v Throughout EGL, a property can reference a variable (theProperty =
theVariable), even if the variable is declared in code that is subsequent to the
reference. Rich UI works the same way, with the following exception: a widget
of type Widget (a generic type that is used for advanced purposes) must be
declared before the widget is referenced.
v A widget is an EGL reference variable. When declaring a widget statically
(without the new operator), remember to specify a set-value block ({}), as in the
following example:
myButton Button{};
Understanding how browsers handle a Rich UI application
This topic gives details on how browsers handle a Rich UI application at run time.
The purpose is twofold:
v To help you learn the technology faster, as is possible if you understand the
runtime effect of what you code at development time
v To make it easy for you to do advanced tasks
When a user enters a Web address into a browser, the browser transmits a request
to a Web server, which is usually on a second machine. The address identifies a
specific server and indicates what content is to be returned to the browser. For
example, if you enter the address http://www.ibm.com, an IBM® server replies with a
message that the browser uses to display the IBM home page. The question that is
of interest now is, how does the browser use the message?
The browser brings portions of the message into an internal set of data areas. The
browser then uses the values in those data areas to display on-screen controls,
which are commonly called widgets. Example widgets are buttons and text fields.
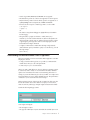
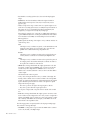
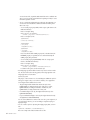
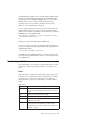
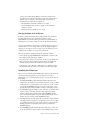
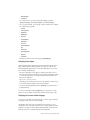
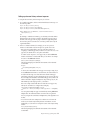
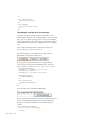
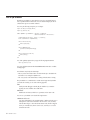
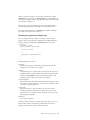
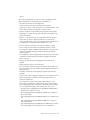
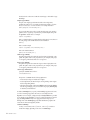
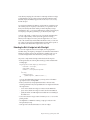
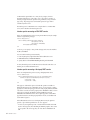
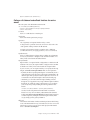
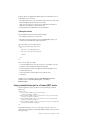
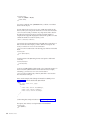
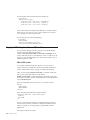
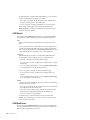
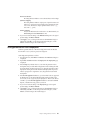
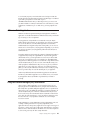
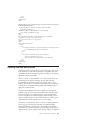
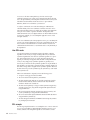
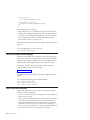
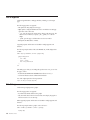
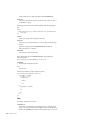
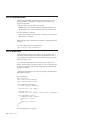
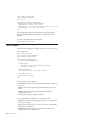
Consider the following Web-page content:
Seven widgets are displayed:
v The enclosing box is myBox
v The upper box within myBox is myBox02 and includes the text field myHelloField
Chapter 1. Overview of EGL Rich UI
7
v The lower box within myBox is myBox03 and includes the text field myInTextField,
the button myButton, and the textField myOutTextField
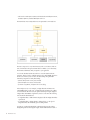
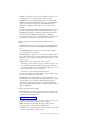
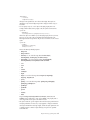
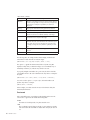
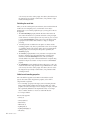
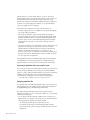
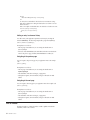
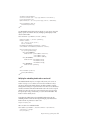
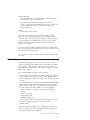
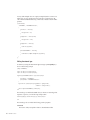
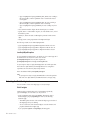
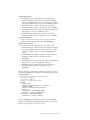
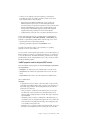
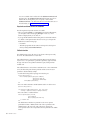
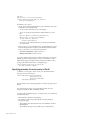
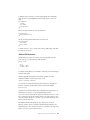
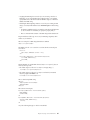
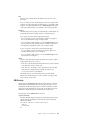
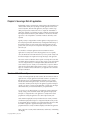
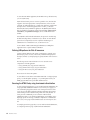
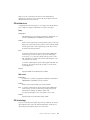
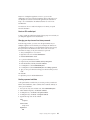
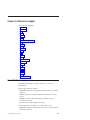
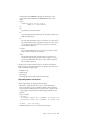
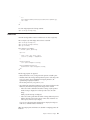
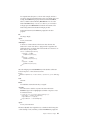
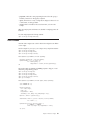
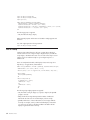
The internal data areas used by the browser are represented as an inverted tree:
The tree is composed of a root, named Document, and a set of elements, which are
units of information. The topmost element that is available to you is named Body.
The elements subordinate to Body are specific to your application.
A set of rules describes both the tree and how to access the data that the tree
represents. That set of rules is called the Document Object Model (DOM). We refer to
the tree as the DOM tree, and we refer to the relationships among the DOM
elements by using terms of family relationships:
v myBox03 and myInTextField are parent and child
v myBox and myButton are ancestor and descendant
v myInTextField, myButton, and myOutTextField are siblings
In the simplest case (as in our example), a widget reflects the information in a
single DOM element. In other cases, a widget reflects the information in a subtree
of several elements. But in all cases, the spacial relationship among the displayed
widgets reflects the DOM-tree organization, at least to some extent. The following
rules describe the default behavior:
v A widget that reflects a child element is displayed within the widget that reflects
a parent node
v A widget that reflects a sibling element is displayed below or to the right of a
widget that reflects the immediately previous sibling element
We often use a technical shorthand that communicates the main idea without
distinguishing between the displayed widgets and the DOM elements. Instead of
8
EGL Rich UI 7.5.1.5
the previous list, we might say, "A widget is contained within its parent, and a
sibling is displayed below or to the right of an earlier sibling."
The DOM tree organization does not completely describe how the widgets are
arranged. A parent element may include detail that causes the child widgets to be
arranged in one of two ways: one sibling below the next or one sibling to the right
of the next. The display also may be affected by the specifics of a given browser;
for example, by the browser-window size, which the user can update at run time
in most cases. Last, the display may be affected by settings in a cascading style
sheet.
When you develop a Web page with Rich UI, you declare widgets much as you
declare integers. However, the widgets are displayable only if your code also adds
those widgets to the DOM tree. Your code can also update the tree—adding,
changing, and removing widgets—in response to runtime events such as a user's
clicking a button. The central point is as follows: Your main task in Web-page
development is to create and update a DOM tree.
When you work in the Design tab of the Rich UI editor, some of the tasks needed
for initial DOM-tree creation are handled for you automatically during a
drag-and-drop operation. When you work in the Source tab of the Rich UI editor
or in the EGL editor, you can write code directly and even reference DOM
elements explicitly.
In general terms, you create and update a DOM tree in three steps:
1. Declare widgets of specific types—Button for buttons, TextField for text fields,
and so forth—and customize the widget properties. For example, you might set
the text of a button to "Input to Output," as in our example.
2. Add widgets to the initial DOM tree.
3. Alter the DOM tree by adding, changing, and removing widgets at those points
in your code when you want the changes to be displayable.
We say that a widget or its changes are "displayable" rather than "displayed"
because a widget in a DOM tree can be hidden from view.
At a given point in runtime processing, a widget can be the child of only one
parent.
Rich UI handler part
The main component of a Rich UI application is a Rich UI handler part, which is
an handler with the stereotype RUIHandler. The handler part places widgets on a
Web page and handles events such as a user's click of a button. The widgets and
functions in one handler part can be made available to others, as described in
Creating a Rich UI application with multiple handlers.
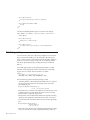
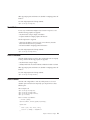
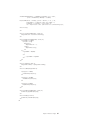
Here is an example of a Rich UI handler part:
import
import
import
import
com.ibm.egl.rui.widgets.Box;
com.ibm.egl.rui.widgets.Button;
com.ibm.egl.rui.widgets.TextField;
egl.ui.rui.Event;
handler ButtonTest01 type RUIhandler {initialUI = [ myTopBox ],
onConstructionFunction = initialization}
myHelloField TextField
Chapter 1. Overview of EGL Rich UI
9
{ readOnly = true, text = "Hello" };
myInTextField TextField{};
myButton Button{ text = "Input to Output", onClick ::= click };
myOutTextField TextField{};
myBox03 Box{ padding=8, columns = 3,
children = [ myInTextField, myButton, myOutTextField ],
backgroundColor = "CadetBlue" };
myBox02 Box{ padding=8, columns = 2, children = [myHelloField],
backgroundColor = "DarkGray"};
myTopBox Box{ padding=8, children = [ myBox02, myBox03 ],
columns = 1, backgroundColor = "Aqua" };
function initialization()
end
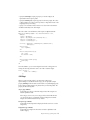
function click(e EVENT in)
myOutTextField.text = myHelloField.text + " " + myInTextField.text;
end
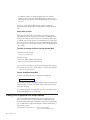
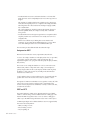
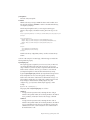
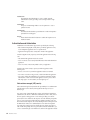
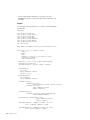
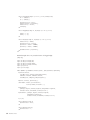
end
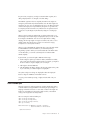
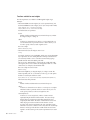
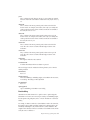
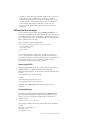
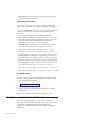
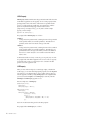
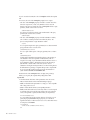
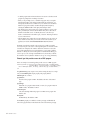
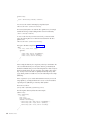
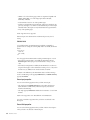
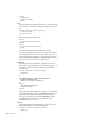
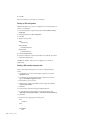
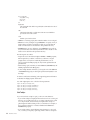
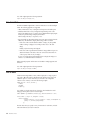
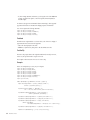
After the user types the word World in the bottom left text box and clicks the
button, the user interface is as follows:
We use the same example to explain the DOM tree; for details, see “Understanding
how browsers handle a Rich UI application.”
The Rich UI handler supports the following properties, which are optional:
v initialUI specifies which widgets are children of the initial, DOM tree document
element. If the array references a named widget multiple times, only the last
reference is used, and the others are ignored.
v onConstructionFunction specifies the on-construction function, which is a
handler function that is invoked when the handler starts running. You can reset
the value of initialUI in the on-construction function or in a function invoked
(directly or indirectly) from this function. However, once the on-construction
function ends, the value of initialUI is constant.
v cssFile specifies a cascading style sheet (a CSS file), which sets display
characteristics of an individual widget or of a category of widgets. The property
accepts a path relative to the WebContent directory. At deployment, the CSS file
is referenced in a <link> entry that is added to the HTML file.
Here is an example setting:
Handler ButtonTest Type RUIHandler
{ children = [ui], cssFile = "buttontest/coolblue.css" }
Here is an example CSS file:
.EglRuiGridTable
{ border: 3px solid black; }
.EglRuiGridHeader
10
EGL Rich UI 7.5.1.5
{ color:yellow;
background-color:red;
}
.EglRuiGridCell
{ color:black;
background-color:aqua; }
Please note that if both the cssFile property and (as described next) the
includeFile property are specified, the CSS content referenced by the cssFile
property takes precedence because, in the deployed HTML file, the <link> entry
is embedded after the content referenced by the includeFile property.
For additional details about Rich UI support for styles, see “Widget styles.”
v includeFile also specifies a file for inclusion in the deployed HTML. file. Like
the cssFile property, the includeFile property accepts a path relative to the
WebContent directory.
Here is an example setting:
Handler ButtonTest Type RUIHandler
{ children = [ui], includeFile = "buttontest/coolblue.css" }
Here are details on file types:
– A file that has an extension other than css or html is included in a <script>
element, as shown here:
<script>
<!-- file contents here -->
</script>
– A file that has extension html or css is included as is. If the file extension is
css, the style directives must be within a <style> element, as in the following
example:
<style type="text/css">
.EglRuiGridTable
{ border: 3px solid black; }
.EglRuiGridHeader
{ color:yellow;
background-color:red;
}
.EglRuiGridCell
{ color:black;
background-color:aqua; }
</style>
If file extension is html, the following statements apply:
- If you are working in a Rich UI project, the product may show a warning
message when you view a file that includes an xref attribute. For example,
here is the content of file MyIncludeFile.html, which resides in the folder
WebContent/MyFolder folder at development time:
<link REL="STYLESHEET" TYPE="text/css" href="css/dashboard.css">
In this example, a warning message indicates that the href value does not
refer to an existing file. The message arises because the development-time
editor seeks the file WebContent/MyFolder/css/dashboard.css rather than
the actual file, which is WebContent/css/dashboard.css. The point is
simply this: ensure that the value of the href tag includes a path relative to
the WebContent directory and ignore any warning message that indicates a
need for a different path.
- The inclusion of an HTML file (such that an <html> element is placed
inside the deployed HTML file) is valid, at least in some browsers. Please
note that use of the includeFile property may require that you take special
care to test your application on multiple browsers.
Chapter 1. Overview of EGL Rich UI
11
As shown, the box widgets include various properties; in particular, the children
property, which is the means by which the handler appends children and other
descendants to the widgets specified in the initialUI array.
12
EGL Rich UI 7.5.1.5
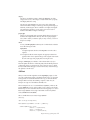
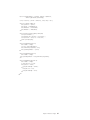
Chapter 2. Introduction to the EGL Rich UI editor
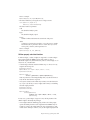
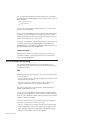
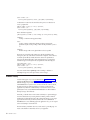
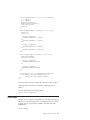
You can use the EGL Rich UI editor to modify a Rich UI handler and to preview
the handler's runtime behavior.
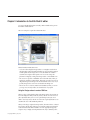
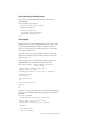
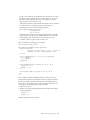
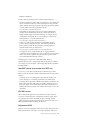
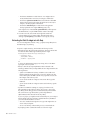
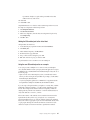
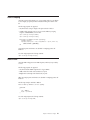
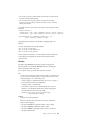
Here is an example of an open file in the Rich UI editor.
The Rich UI editor includes three views:
v As shown in the example, the Design surface is a rectangular area that shows
the displayable content of the Rich UI handler. You can drag-and-drop widgets
from the palette into the Design surface or into the Outline view and then
customize those widgets in the Properties view. You can also change the
placement of widgets by working in the Design surface or in the Outline view.
v The Source view provides an embedded version of the EGL editor, where you
update logic and add or update widgets. The Design view and Source view are
integrated: changes to the Design view are reflected in the Source view; and, if
possible, changes to the Source view are reflected in the Design view.
v The Preview view is a browser, internal to the Workbench, where you can run
your logic. You can easily switch to an external browser if you prefer.
Using the Design surface to create a DOM tree
When you drag a widget from the palette to the Design surface, the areas that can
receive the widget are called potential drop locations, and the color of those areas is
yellow by default. When you hover over a potential drop location, the area is
called a selected drop location, and the color of that area is green by default. You can
customize the colors in the Workbench preferences.
When you first drag a widget to the Design surface, the entire surface is a selected
drop location, and the effect of the drop is to declare the widget and to identify it
as the first element in the Rich UI handler's initialUI property. That property
accepts an array of widgets at development time. The array is ultimately used to
© Copyright IBM Corp. 2000, 2010
13
create a DOM tree, which is a runtime data structure described in Understanding
how browsers handle a Web application. Specifically, the elements in the Rich UI
handler's initialUI array become children of the document element, with the
order of initialUI array elements at development time equivalent to the order of
sibling DOM elements at run time.
When you drag another widget to the Design surface, you have the following
choices:
v You can place the widget adjacent to the initially placed widget. The effect on
your source code is to declare the second widget and to identify it as another
element in the initialUI array. Your placement of the new widget is either
before or after the first widget and indicates where the widget is placed in the
array.
v If the initially placed widget was a container—for example, a box—you can
place the second widget inside the first. The effect on your source code is to add
an element to the children property of the container. The effect is ultimately to
add a child element to the DOM tree; specifically, to add a child element to the
element that represents the container.
Your subsequent work continues to build the DOM tree. You can repeatedly fulfill
drag-and-drop operations, with the placement of a widget determining what array
is affected and where the widget is placed in the array. The drag-and-drop
operation is an alternative to writing a widget declaration and array assignment in
the code itself, whether in the Source tab of the Rich UI editor or in the EGL
editor.
New widget declarations are added to the source code before the declarations that
were already there; that is, the order of the statements is opposite to the order of
the drag-and-drop operations.
Using the Outline view to update the Design surface
When you are using the Design surface, the Outline view has special capabilities:
v You can drag and drop a widget from the palette to a specific position in the
Outline view and (therefore) to a specific position on the Design surface.
v Within the Outline view, you can do as follows:
– Drag and drop a widget to another position. (If you select a widget with
descendents, the widget and its descendents can be dragged to another
position.)
– Delete a widget by right-clicking the widget and clicking Delete.
– Update details about the widget by right-clicking the widget, clicking
Properties, and following the procedure described in Setting widget properties
and events.
Understanding the transparency options
The Design surface is composed of two layers. The bottom layer is the Web
browser, which displays widgets, including initial text values. The top layer is an
editing overlay, including angle brackets at each corner of each widget.
The background of the top layer can have any of the following characteristics:
transparent, a pattern of white and transparent dots, or (on Windows platforms) a
white layer with a varying level of transparency. You can set those transparency
options by setting a Workbench preference, as described in Setting preferences for
14
EGL Rich UI 7.5.1.5
Rich UI appearance. When you are working in the editor, you can change the
transparency options that are in use for the editing session.
Combining the EGL Rich UI editor and the EGL editor
You can complement the features in the Rich UI editor by opening a single file in
both the EGL Rich UI editor and the EGL editor. For example, the following screen
shot displays the file GridDemo.egl in two ways. At the top is the Design tab of
the Rich UI editor, along with a palette that lists the available Widget types. At the
bottom is the EGL editor. Your work in either editor affects the same file and is
reflected in the content displayed in the other editor.
Opening the EGL Rich UI editor
As described in Starting to work with EGL Rich UI, you can set the EGL Rich UI
editor to be the default editor for every EGL file and then, in most cases, you can
open the Rich UI editor by double-clicking an EGL file in the Project Explorer.
Here are the alternative procedures:
v To open an existing file:
1.
2.
v To
1.
2.
3.
4.
Right-click on the EGL file in the Project Explorer
Select Open with → EGL Rich UI Editor
create a new file and open it in the Rich UI editor:
Select menu item File → New → Other. A wizard is displayed.
Expand EGL
Select Rich UI Handler
Complete the wizard
Chapter 2. Introduction to the EGL Rich UI editor
15
If
v
v
v
the EGL source editor automatically opens:
Close the source editor
Right-click on the empty new file in the Project Explorer
Select Open with → EGL Rich UI Editor
Creating a Web interface in the Rich UI editor
This topic describes how to add, select, move, and delete widgets in the EGL Rich
UI editor. In each case, you work on the Design surface, which you access by
clicking on the Design tab.
To learn the implication of the actions described here, see Introduction to the EGL
Rich UI editor.
Adding a widget
Add a widget to a Rich UI handler:
1. Click a Widget type in the palette and hold the left mouse button
2. Drag the widget to the Design surface
3. Use the widget-placement guide to help identify where to drop the widget
4. At the selected drop location, release the mouse button
Selecting a widget when multiple widgets overlap
When multiple widgets overlap a given area, click the area repeatedly to cycle
through the available widgets, making each one the current one in turn. You can
move or delete the current widget as described in the next sections.
Moving a widget
Move a widget from one location to another:
1. Click a widget on the Design surface and hold the left mouse button
2. Drag the widget to the preferred location
3. Use the widget-placement guide to help identify where to drop the widget
4. At the selected drop location, release the mouse button
Deleting a widget
Delete a widget:
v Click the widget and press the Delete key; or
v Right-click the widget and, at the popup menu, select Delete.
The deletion removes the reference to the widget in the handler-specific initialUI
property or in the container-widget-specific children property, but does not
remove the widget declaration from the Rich UI handler.
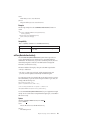
Using the tools on the Design surface
To design an EGL Rich UI application in the EGL Rich UI editor, click the Design
tab. Here is the toolbar:
16
EGL Rich UI 7.5.1.5
The tools on the Design surface provide the following functionality, as indicated by
the hover help that is displayed when you move the mouse over a given tool:
v At the left is the Show transparency controls tool, which is a toggle. Click it to
display or hide the transparency tools, which are described in Setting preferences
for Rich UI appearance.
v The second tool is the Show browser size controls tool, which is also a toggle.
Click it to display or hide the scroll bars that let you specify the browser size
within the constraints that you set in the preferences. Again, further details are
in Setting preferences for Rich UI appearance.
v The next tool is the Configure bidirectional options tool, which (if enabled) lets
you open the preference page described in Setting preferences for Rich UI
bidirectional text. See that topic for details on enabling the tool on the Design
surface.
v The fourth tool is the Configure preferences tool. Click it to access the
preferences that are described in Setting preferences for Rich UI appearance.
v Second to the right is the Refresh palette tool, which searches the Workspace for
widgets that have the @VEWidget complex property and then refreshes the palette
to reflect the outcome of that search.
v At the right is the Refresh web page tool. Click it to refresh the Web page, as
may be necessary after you change the widgets in an embedded handler. For an
introduction to embedded handlers, see Rich UI handler part.
Selecting a palette
Two palettes are available to the Rich UI editor. Each provides the same widgets as
the other, and in each case you can right-click the palette or one of its drawers to
display a menu that provides Eclipse-based options.
The default palette is tied to the Rich UI editor. You can resize the width of the
palette or dock it on the left or right.
The other palette is a view, which you can move anywhere in the perspective or
detach from the Workbench. If you want the extra flexibility provided by the
Palette view, do as follows:
1. Click Window -> Show View -> Other. The Show View dialog is displayed.
2. Expand General.
3. Click Palette and then OK.
The effect of selecting the Palette view is to close the Rich UI editor palette. If you
want to return to the Rich UI editor palette, close the Palette view.
Setting widget properties and events
You use the Properties and Events tabs when working at the Design surface of the
Rich UI editor.
To begin setting widget properties and events, do as follows:
1. Click the Design tab or (when the Design tab is active) the Outline view.
2. Right-click a widget and select Properties. The Properties view is displayed
and gives you access to both the Properties and Events tabs.
Chapter 2. Introduction to the EGL Rich UI editor
17
Setting properties
At the Properties tab, you can add a value to a widget property, and the editor
updates when you press Tab or Enter.
To remove a property value from a text box, select the value and press the Delete
key. To remove a property value from a list box, select the (none).
To handle color selection, do as follows:
1. Click the color or background Color property, if available. The Color selection
dialog is displayed
2. Three alternatives are available:
v To work in the traditional Color dialog, click the Number format radio
button and the subordinate Color button. On returning to the Color selection
dialog, you can also specify whether the numeric color values retained from
the Color dialog should be saved in RGB or hexadecimal format.
v To select from a list of named colors instead, click the Name Format radio
button and select a color.
v To specify a value of your own, click the Custom radio button option. You
can specify either an RGB format such as RGB(236,,233,216) or a
hexadecimal format such as #ece9d8.
Creating new functions and enabling events
At the Events tab, you can identify the Rich UI handler function that will run in
response to an event; or you can quickly create a new function.
In the row that lists the event of interest, do one of the following tasks:
v Double-click the second column (named Function) and click the name of an
existing handler function.
v To create a new function instead, double-click the icon in the third column to
display the New event handler dialog box. At the dialog box, specify the new
function name and click OK. By default, the function name (for example,
myButton_onClick) is the widget name followed by an underscore and the event
name.
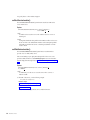
Running a Web application in the EGL Rich UI editor
To run an EGL Rich UI application in the EGL Rich UI editor, click the Preview
tab. Here is the toolbar:
The tools at the Preview tab provide the following functionality, as indicated by
the hover help that is displayed when you move the mouse over a given tool:
v At the left is the Debug tool. For details, see EGL Rich UI debugging.
v Second is the Launch external browser tool. Click it to place the output of the
Rich UI application in an external browser as well as in the Preview view. You
can select which external browser is invoked by setting a system preference:
1. Click Window -> Preferences.
2. At the Preferences dialog, expand General and click Web Browser.
18
EGL Rich UI 7.5.1.5
3. The check boxes Use Internal Web Browser and Use External Web Browser
have no effect on Rich UI. However, you can select your external browser by
selecting from the list of browsers shown at that dialog and then clicking
OK.
v The third tool is the Configure preferences tool. Click it to access the
preferences that are described in Setting preferences for Rich UI appearance.
v At the right is the Refresh Web page tool. Click it to rerun a generated Web
page from the start.
Chapter 2. Introduction to the EGL Rich UI editor
19
20
EGL Rich UI 7.5.1.5
Chapter 3. Rich UI debugging
v You can use the following EGL debugging preferences, as described in "Setting
preferences for the EGL debugger:"
– Stop at first line of a program
– Set systemType to DEBUG
– The settings in the Service Reference tab in the Default behavior mapping
window
v You do not need to create a runtime configuration to start a debugging session.
If you click the Debug icon on the toolbar of the Rich UI Preview view (not the
Debug icon on the toolbar of the workbench), a configuration is created for you.
A configuration is also created for you if you do as follows:
1. Right-click the EGL file that contains the Rich UI handler
2. Click Debug EGL Rich UI application
To launch the previously launched runtime configuration when you click the
Debug icon on the workbench toolbar, set this preference:
1. From the main menu, click Window → Preferences. The Preferences page is
displayed.
2. Expand Run/Debug and click Launching. The Launching window is
displayed.
3. Click Always launch the previously launched application.
4. To save your changes and exit the page, click OK.
v In the Debug perspective, you complete the usual set of debug activities (Step
Into, Step Over, and so on), as described in the topic "EGL debugger
commands." The Jump to Line command is not available.
v When a debug session starts, the application runs in an external browser, and
you can edit your code, set breakpoints, and inspect variables. The EGL
debugger does not support hotswapping for Rich UI, which is the processing of
changes that were made to declarations and logic statements during a
debugging session.
v To end a debugging session, click the red icon in the Debug perspective. When
the debugging session ends, you are in the Debug perspective, with your source
code open in the EGL editor.
During a debugging session, your Rich UI handler may invoke the source for
libraries (which run in a browser) and for services (which run in a simulated
server). Here are some implications:
v When you debug the library, the rules are as described earlier
v When you debug the service, the full power of EGL debugging is available to
you
v When you debug a library that is invoked from the service, the library is local to
the service, and the full power of EGL debugging is available to you
© Copyright IBM Corp. 2000, 2010
21
22
EGL Rich UI 7.5.1.5
Chapter 4. Rich UI programming model
The next topics further describe the Rich UI programming model.
Rich UI widgets
Rich UI handler parts include widgets. Each is a customized, on-screen control, but
the term widget also refers to the variable declaration that creates the control. A
widget can contain business data and can respond to events.
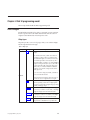
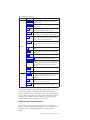
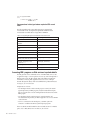
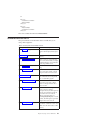
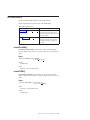
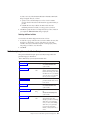
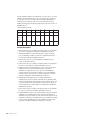
Widget types
The product provides a core set of widget types, which you use to declare widgets.
The following table lists the main types.
Table 1. Widget types
Category
Type
Box
Purpose
To define a box, which in most cases embeds other
widgets.
You can indicate how many columns are in the box. If
the number of columns is three, for example, the first
three embedded widgets are on the first row in the box,
the fourth through sixth are on the second row, and so
forth. If the number of columns is one, all the embedded
widgets are arranged vertically. In any case, the width of
a column equals the width of the largest widget in the
column, and you can indicate whether the embedded
widgets in a given column are aligned at the column's
center, right, or left.
If you want to show empty cells, include, as children of
the box, text labels that lack text.
Container
© Copyright IBM Corp. 2000, 2010
Vertical and horizontal scroll bars appear if necessary to
give the user access to widgets that are out of sight.
Div
To define a division (HTML DIV tag) on the Web page,
below the preceding content. The Div widget might be
the parent of FloatLeft and FloatRight widgets, providing
flexibility in Web-page design.
FloatLeft
To define a division (HTML DIV tag) on the Web page;
in most cases, as a child of a Div, FloatLeft, or FloatRight
widget. The widget uses the CSS element float:left.
FloatRight
To define a division (HTML DIV tag) on the Web page;
for example, as a child of a Div, FloatLeft, or FloatRight
widget. The widget uses the CSS element float:right.
Grouping
To display a widget collection in a bordered box. You
assign text that is embedded in the top of the border.
23
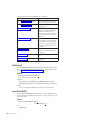
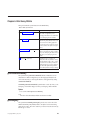
Table 1. Widget types (continued)
Category
Type
Grid
Purpose
To define an array of values in a table format. The
widget allows you to set the following details:
v Column characteristics such as width, height, and
color
v An array of records whose field values are displayed
in the corresponding grid columns, one row per
record
v Behaviors, which are fields that each accept an array of
function references. The referenced functions let you
update header-row, body-row, or cell characteristics in
response to the user's clicking a cell.
HTML
To present an HTML fragment, which may be provided
by a service. The HTML is rendered in a bounded area,
with scroll bars if necessary.
Image
To display a graphic or alternate text.
Shadow
To create a shadow effect for the widgets that are
children of a specified DIV widget.
Span
To display a string that the user cannot change. The
string can include HTML segments (such as <b>this
boldfaced code</b>).
TextLabel
To display a string that the user cannot change. The
widget is different from a span because inclusion of an
HTML segment (such as <b>this code</b>) is displayed
as is, including the angle brackets.
Tree
To define a tree of displayable nodes.
Information
24
EGL Rich UI 7.5.1.5
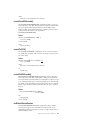
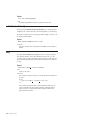
Table 1. Widget types (continued)
Category
Interactive
Type
Purpose
BidiTextArea
To define a rectangle containing one or more lines of
bidirectional text.
BidiTextField
To define a text box containing a single line of
bidirectional text.
Button
To define a button, which elicits a user click and
responds to that click by invoking a function.
Checkbox
To define a check box, which displays a true-false option
and responds to the user input by invoking a function.
Combo
To define a combo box, which presents one of several
selectable options and lets the user temporarily open a
dropdown list to select a different option.
Hyperlink
To define a Web-page link that, if clicked, displays the
page in the browser. The page display is not bounded by
a layout.
List
To define a list from which the user can select a single
entry.
Listmulti
To define a list from which the user can select multiple
entries.
Menu
To define a menu bar entry.
PasswordTextField
To define an input text field whose value is displayed as
bullets, as appropriate for accepting a password.
Hover
RadioGroup
To define a set of radio buttons, each of which responds
to a click by deselecting the other radio buttons in the
same group and (in the typical case) by invoking a
function.
TextArea
To define a rectangle containing one or more lines of
text.
TextField
To define a text box containing a single line of text.
GridTooltip
To define a special hover help; that is, one or more
widgets that are displayed when the user hovers over a
grid widget.
Tooltip
To define a hover help: one or more widgets for display
when the user hovers over a widget.
TreeTooltip
To define a special hover help: one or more widgets for
display when the user hovers over a tree widget.
Although the hover types (ToolTip, GridToolTip, and TreeToolTip) are in our list of
widgets, each tooltip type is technically a Rich UI handler (EGL handler part,
stereotype RUIHandler). In this case, the handler code provides a capability similar
to that of a Rich UI widget. However, the functions and fields that are available for
all widgets are not available for tooltips. For details on the generally available
fields and functions, see Setting widget properties and functions.
Widget declarations and package names
When you wish to declare a widget, EGL provides two ways to identify the
package in which the widget resides. Although those two ways are available when
you declare any EGL variable, special automation is available in relation to
widgets.
Chapter 4. Rich UI programming model
25
First, you can precede the name of the widget type with the name of the package.
Here is the format:
widgetName com.ibm.egl.rui.widgets.widgetTypeName;
widgetName
Name of the widget
widgetTypeName
Name of the widget type
The EGL Rich UI editor uses the preceding format for the widget-declaration
statement after you drag a widget from the palette to the Design surface. For an
overview, see Introduction to the EGL Rich UI editor.
The second way to identify the package is to include an import statement early in
the source code. Here is the format, which requires, in place of widgetTypeName,
either a wild card (*) to reference multiple types or the name of a specific type:
import com.ibm.egl.rui.widgets.widgetTypeName;
Use of a wild card in place of widgetTypeName adds unnecessary code to the
generated JavaScript output and is not recommended.
When you write source code, you can insert an import statement automatically
after you declare a widget:
1. Hold down Ctrl and Shift and press O
2. If a dialog is displayed, choose among same-named widget types; for example,
a Button can be from Dojo, Silverlight, or EGL Rich UI
Avoiding a null pointer exception
A widget is an EGL reference variable. When declaring a widget statically (without
the new operator), remember to specify a set-value block ({}), as in the following
example:
myButton Button{};
Creating additional widgets
You can create your own widgets in either of two ways:
v You can code a Rich UI widget; that is, a Rich UI handler, stereotype RUIWidget.
v You can write an EGL external type that is based on JavaScript. The ability to
use EGL external types is useful for accessing preexisting JavaScript libraries.
For details on creating widgets, see Extending the Rich UI widget set.
Using the Widget type
The EGL Widget type is used when defining a function that accepts a widget
whose specific type is not known at development time. The following (unrealistic)
example shows how such a function can use the EGL operators isa and as to make
available type-specific properties and functions; for example, the text property of
the TextField type:
import com.ibm.egl.rui.widgets.TextField;
handler MyHandlerPart type RUIhandler{onConstructionFunction = initialization}
myHelloField TextField{readOnly = true, text = "Hello"};
26
EGL Rich UI 7.5.1.5
function initialization()
myInternalFunction(myHelloField);
end
function myInternalFunction(theWidget widget in)
case
when (theWidget isa TextField)
myTextField TextField = theWidget as TextField;
myString STRING = myTextField.text + " World";
sysLib.writeStdOut(myString);
when (theWidget isa Button)
;
otherwise
;
end
end
end
The handler displays Hello world.
A variable of type Widget must be declared before the widget is referenced in a
property; in particular, before the widget is referenced in an initialUI or children
property. (That rule does not apply to variables of specific widget types such as
Button or TextField.)
A variable of type Widget is compatible with both Rich UI widgets and
external-type widgets.
Widget properties and functions
The Rich UI widgets are written in EGL. With a few exceptions, they are EGL
handler parts, stereotype RUIWidget. (The exceptions Tooltip, GridTooltip, and
TreeTooltip, all of which are stereotype RUIHandler.) You can learn the properties
and functions that are available for a widget type in any of the following ways:
v When you wish to use a declared widget, use content assist:
1. Type the widget name and a period
2. Press Ctrl-Space
v Alternatively, inspect the EGL files that contain the widget code. For details on
specific widget types, see the com.ibm.egl.rui project, EGLSource folder,
com.ibm.egl.rui.widgets package.
Always use dot syntax to access a given function or property; for example,
myWidget.myFunction() or myWidget.myProperty.
Properties available for most widgets
Widget properties are fields that are available to your code at run time. (Most
other EGL properties are available only to EGL system code and are not available
at run time.)
Style-related properties such as class and style are available for all IBM-supplied
widgets of stereotype RUIWidget. For details on styles, see “Widget styles.”
The following properties are useful for developing business applications:
v children provides access to an array of subordinate widgets, if any; for details,
see a later section.
Chapter 4. Rich UI programming model
27
v class identifies a cascading style sheet (CSS) class used when displaying the
widget.
v disabled takes a Boolean that indicates whether the widget is disabled. A
disabled widget cannot respond to events and, on most browsers, its text
appears in grey.
v id takes a string used to assign or retrieve an ID for a specific widget. You can
use the ID in a cascading style sheet (CSS) to identify the style characteristics of
that widget. Also, if you are integrating EGL with JavaScript libraries, this
property lets you assign an ID for use by the JavaScript logic.
If the widget (for example, a box) corresponds to a DOM subtree rather than to
a specific DOM element, the ID is for the topmost DOM element in the subtree.
For an introduction to the DOM, see “Understanding how browsers handle a
Rich UI application.”
v position specifies the meaning of the widget's x and y coordinates and takes one
of the following values:
static
The widget's x and y coordinates are ignored, as is the default behavior. The
displayed position changes if you first set the x and y values when the
position value is static and then change the position value.
absolute
The widget's x and y coordinates are relative to the top left of the browser
window, and those coordinates are not affected by the alignment value.
relative
The widget's x and y coordinates are relative to the top left of the parent. If
the widget's parent is the document element, the coordinates are relative to
the top left of the viewable area of the browser.
v tabIndex takes an integer that identifies the widget's placement in a tab order.
For example, a widget assigned a tabIndex value of 2 receives focus after the
user tabs away from a widget that has a tabIndex value of 1. You can use
numbers such as 10 and 20 (rather than 1 and 2) to allow for the later addition
of other widgets.
The default tab order is browser specific.
v x and y values are integers that refer to the x-y coordinate of the widget. The
meaning of that coordinate varies in accordance with the value of the position
property. As suggested in the description of the position property, the graphical
origin is either the top left of the browser window or the top left of a parent
widget. The following rules apply:
– The x value is positive to the right of the origin, negative to the left
– The y value is positive below the origin, negative above
You can place a widget outside of its parent and even outside of the viewable
area.
v zIndex takes an integer that identifies the widget's position—its nearness to the
front—in relation to other widgets at the same x and y location. A widget with a
relatively large zIndex value (for example, 4) is closer to the front than a widget
with a relatively small zIndex value (for example, 2). The zIndex value has no
effect when the value of position is static.
The following properties are especially useful for developing new Widget types
that are based on stereotype RUIWidget:
v innerHTML is a string used to assign or retrieve the HTML within a container
such as a div, floatLeft, or floatRight widget.
28
EGL Rich UI 7.5.1.5
v innerText is a string used to assign or retrieve text within a container. You can
use innerText to provide a text property that is specific to the type.
v logicalParent is used for developing Widget types that are containers. When
writing the code that adds children to the container, you set the logicalParent
property so that it refers to the appropriate parent DOM element. For an
introduction to the DOM, see Understanding how browsers handle a Rich UI
application.
For example, in relation to the child of a box, the parent property refers, not the
box, but to a DOM TD element within a DOM Table element. However, the
logicalParent property refers to the DOM Div element that represents the box
and is the parent of the DOM Table element.parent is for Widget-type
development and provides access to a parent DOM element. For an introduction
to the DOM, see Understanding how browsers handle a Rich UI application.
The following properties are for interacting with users who read Arabic or
Hebrew:
v numericSwap takes a string ("Yes" or "No") that lets you use Hindi numerals in
Arabic. To use Hindi numerals, set numericSwap and reverseTextDirection to
"Yes".
v reverseTextDirection takes a string ("Yes" or "No") that indicates whether to
reverse the text direction in the widget.
v symmetricSwap takes a string ("Yes" or "No") that indicates whether to replace
pairs of special characters to preserve the logical meaning of the presented text.
If the value is "Yes", the effect is to replace paired characters such as <, >, [, and
{ with >, <, ], and }.
v textLayout takes one of two strings: either "Visual" or "Logical":
– If the setting is "Visual" and the user types "A" and then "B" (and if "A" and
"B" are characters in a bidirectional language), the displayed characters are
"AB". The order of display is the order of input, left to right, which is also the
order in which the data is stored in local memory.
– If the setting is "Logical", the displayed characters are "BA".
In most cases, the setting "Visual" is appropriate for Arabic or Hebrew content
derived from a machine that runs z/OS or IBM i.
v widgetOrientation is for Arabic and Hebrew text. This property takes one of
two strings: either "LTR" (left-to-right) or "RTL" (right to left). When you specify
"LTR", the widgets acts as a standard non-bidirectional widget. When you
specify RTL, the widgets are mirrored; that is, scroll bars for dropdown lists
appear on the left, the text-typing orientation for input fields is right-to-left, and
the text is right-aligned.
The following properties add accessibility:
v ariaLive indicates the level of support provided for assistive technology; that is,
for screen readers that are able to notify users of updates to screen regions. The
specification for such technology is here:
http://www.w3.org/TR/wai-aria
The ariaLive value is a quoted string ("off", "polite". "assertive", or "rude"), each
of which is described in the specification's section on property: live.
v ariaRole indicates the role specified for the widget, as used for assistive
technology. For details, see the specification mentioned earlier.
The ariaRole value is a quoted string such as "button" or "listbox", each of which
is described in the specification's section on Roles.
Chapter 4. Rich UI programming model
29
Functions available for most widgets
The following functions are available for all IBM-supplied widgets of type
RUIWidget:
v The function fadeIn causes the widget to fade in (to be presented slowly), and
the function fadeOut causes the widget to fade out (to be slowly made invisible):
fadeIn (duration int in, callback EffectCallback)
fadeOut (duration int in, callback EffectCallback)
Each function takes two parameters:
duration
Number of milliseconds between the start and end of the process, whether
the widget is fading in or fading out
callback
A reference to a function that is invoked as soon as the widget fades in or
out. That function takes no parameters and has no return value. If you do
not wish to specify a function, set this argument to null.
Here is an example:
myButton.fadeOut(1000, null);
v The function focus causes the widget to receive focus:
focus()
For example, a button in focus is highlighted, and the user's pressing the ENTER
key is equivalent to the user's clicking the button. Similarly, a text field in focus
(if not read only) includes a cursor so that the user enters data by typing a
printable character without first tabbing to the field.
The user can press TAB repeatedly to cycle through the available fields. With
each keypress, the focus moves either to the next application field or to a field
on the browser; for example, to the Web address field.
Here is an example invocation of focus:
myButton.focus();
v The function morph lets you change the display of a widget over time. The
function repeatedly calls one of your functions; in this way, your code specifies
the behavior caused by the runtime invocation:
morph (duration int in, callback EffectCallback, morphFunction MorphFunction )
The function takes three parameters:
duration
Number of milliseconds between the start and end of the process.
callback
A reference to a function that is invoked as soon as the process is complete.
That function takes no parameters and has no return value. If you do not
wish to specify a function, set this second argument to null.
customMorphFunction
A reference to a custom morph function, which is a function invoked
repeatedly during the duration mentioned earlier. . The custom morph
function takes two parameters: the widget being changed and a float
assigned by the EGL runtime. The float is a fraction between 0 and 1 and
reflects the progress made toward the end of the duration. (At each
invocation of the custom morph function, the value of that float is larger.)
That fraction is based on a calculation of how many times the custom morph
function is invoked, given the duration available and the amount of time
required to run the custom logic. The custom morph function has no return
value.
30
EGL Rich UI 7.5.1.5
Here is an example:
myButton.morph(1000, null, myCustomMorphFunction);
v The function resize lets you change the size of a widget over time:
resize (width int in, height int in,
duration int, callback EffectCallback)
The function takes four parameters:
width
The desired final width, in pixels.
height
The desired final height, in pixels.
duration
Number of milliseconds between the start and end of the process.
callback
A reference to a function that is invoked as soon as the process is complete.
That function takes no parameters and has no return value. If you do not
wish to specify a function, set this argument to null.
Here is an example:
myButton.resize(100, 100, 1000, myFunction);
Children property and related functions
In “Rich UI widgets,” a subset of widgets are categorized as “container widgets.”
Those widgets include the children property, which specifies an array of
subordinate widgets. Every element in the array refers to a named widget or to an
anonymous one, as described here:
v A named widget is declared outside the children array, as is the case for every
widget in the following code:
myInTextField TextField{};
myButton Button{ text = "Input to Output", onClick ::= click };
myOutTextField TextField{};
myBox Box{ columns = 3,
children = [ myInTextField,
myButton, myOutTextField ]};
If the array references a named widget multiple times, only the last reference is
used, and the other references are ignored.
v An anonymous declaration starts with the keyword new, cannot be referenced in
any of your code, and lets you create a widget at the moment you are thinking
about the widget's placement:
myInTextField TextField{};
myTextOutField TextField{};
myBox box{columns=3,
children=[myInTextField,
new Button{ text = "Input to Output", onClick ::= click},
myOutTextField]};
In many cases, a parent widget is of type Box or Div, and the placement of the
children widgets is affected by the parent type:
v A Box widget includes the columns property, and the value of that property
specifies the default placement of each widget listed in the children array. For
example, if columns=1, the widgets listed in the array are displayed in a single
vertical column. Similarly, if columns=2, every second widget is displayed in the
Chapter 4. Rich UI programming model
31
second column, and the subsequent widget (for example, the third in the array)
is displayed in the first column of a new row.
In general, if the value of columns is n, the widget at position n+1 of the array
is displayed in the first column of a new row. If you do not specify a columns
value, the children of the Box widget extend to the right.
v The children of a Div widget extend to the right, with a horizontal scroll bar (if
necessary) to provide access to widgets that extend to the right of the viewable
area.
Div widgets that are children of another widget are displayed vertically, one
underneath the previous.
You can reassign the value of children in any function and in this way change the
Web page. (Similarly, you can reassign the value of initialUI in the on-construction
function.) For example, the following syntax is valid, assuming you have declared
the widgets specified:
myBox.children = [myInTextField, myButton02, myOutTextField];
Although you can reassign a children (or initialUI) array, do not make changes by
using dynamic array functions such appendElement or the operator ::=. Instead,
use the widget-specific functions appendChild, appendChildren, removeChild,
and removeChildren. Here is an example, assuming you have declared the
widgets specified:
Function myFirstFunction(){}
myBox.appendChild(myOtherButton);
myBox.appendChildren([myOtherTextField, myOtherButton02]);
myBox.removeChild(myOtherButton);
myBox.removeChildren();
end
Similarly, you can add or remove children from the top DOM element, as shown
here:
document.body.appendChild(myOtherButton);
document.body.appendChildren([myOtherTextField, myOtherButton02]);
document.body.removeChild(myOtherButton);
document.body.removeChildren();
The functions appendChild and removeChild each accepts a single widget;
appendChildren accepts an array of widgets; and removeChildren takes no
arguments. In the case of appendChild or appendChildren, the widget
declarations can be anonymous or named. In the case of removeChild, the widget
declarations must be named.
The effect of assigning a widget to a different parent
A specific widget can be the child of only one other widget (or of the document
body, as shown in a later example). If a widget has a parent, you can cause the
widget to be the child of a different parent. We refer to the reassignment as
re-parenting the child widget.
Consider the following declaration of myTopBox, which is the parent of two other
boxes:
myTopBox Box{padding = 8, columns = 1, backgroundColor = "Aqua",
children =[myBox02, myBox03 ]};
32
EGL Rich UI 7.5.1.5
Assume that the preceding declaration is in a Rich UI handler that makes myBox03
the only element in the initialUI array:
handler MyTest type RUIhandler{initialUI =[myBox03]}
At run time, the assignment to initialUI is handled after the declaration of
myTopBox. The effect is that myBox03 is re-parented to the document body, leaving
myTopBox with only one child, myBox02.
Your code might add myTopBox to the Web page in response to a runtime event
such as a user's button click. You can see the effect by running the following code
and clicking the button:
import
import
import
import
com.ibm.egl.rui.widgets.Box;
com.ibm.egl.rui.widgets.Button;
com.ibm.egl.rui.widgets.TextField;
egl.ui.rui.Event;
handler MyTest type RUIhandler{initialUI =[myBox03]}
myTopBox Box{padding = 8, columns = 1, backgroundColor = "Aqua",
children =[myBox02, myBox03 ]};
myBox02 Box{padding = 8, columns = 2, backgroundColor = "DarkGray",
children =[myHelloField ]};
myBox03 Box{padding = 8, columns = 3, backgroundColor = "CadetBlue",
children =[myInTextField, myButton, myOutTextField] };
myHelloField TextField{readOnly = true, text = "Hello"};
myInTextField TextField{};
myButton Button{text = "Input to Output", onClick ::= click};
myOutTextField TextField{};
function click(e EVENT in)
document.body.appendChildren([myTopBox]);
end
end
The effect of removing all children from the document body
Consider the following statement:
document.body.removeChildren();
The effect is twofold:
v Removes all children widgets from the Web page.
v Removes access to the external style sheet, if any. (Style sheets are explained in
Widget styles.)
If you wish to remove children from the document body without removing access
to the external style sheet, remove specific children, as in the following statement:
document.body.removeChild(myBox);
Widget styles
Many display characteristics of an individual widget depend on whether you
include styles. The rules are as follows: :
v You can reference a style class stored in a cascading style sheet (CSS):
– Every Rich UI application accesses the styles from the CSS file that resides in
a Rich UI system project; at this writing, the project name is com.ibm.egl.rui.
Chapter 4. Rich UI programming model
33
To access that CSS file, expand the WebContent folder and css subfolder. We
advise you to leave the file untouched because updating it is likely to cause a
maintenance problem over time.
– You can override and supplement the provided styles by maintaining your
own CSS file. You make that file available to the Rich UI handler part in
either of two ways:
- You can set the part property cssFile, which accepts a path relative to the
WebContent directory.
Here is an example setting:
Handler ButtonTest Type RUIHandler
{ children = [ui], cssFile = "buttontest/coolblue.css" }
Here is an example CSS file:
.EglRuiGridTable
{ border: 3px solid black; }
.EglRuiGridHeader
{ color:yellow;
background-color:red;
}
.EglRuiGridCell
{ color:black;
background-color:aqua; }
Please note that if both the cssFile property and (as described next) the
includeFile property are specified, the CSS content referenced by the
cssFile property takes precedence.
- You can set the part property includeFile, which also accepts a path
relative to the WebContent directory.
Here is an example setting:
Handler ButtonTest Type RUIHandler
{ children = [ui], includeFile = "buttontest/coolblue.css" }
For details on this option, see Rich UI handler part.
v Each widget type provided in Rich UI names a style class for inclusion in the
CSS. The class name has the following pattern, where WidgetTypeName is the
widget-type name such as TextArea:
EglRuiWidgetTypeName
The purpose of this convention is to let a Web designer establish the styles for
each type of widget so that you can achieve consistency across applications.
Some widgets reference additional class names:
– The grid widget includes children that reference the style classes
EglRuiGridTable, for setting the border style of the grid as a whole;
EglRuiGridHeader, for setting characteristics of header cells; and
EglRuiGridCell, for setting characteristics of body cells.
– If a textField widget is read only, the widget references the style class
EglRuiTextFieldReadOnly
– If a passwordTextField widget is read only, the widget references the style
class EglRuiPasswordTextFieldReadOnly
You can see the additional class names in the source for a given widget. Also, if
you use the Firefox browser, you can use Firebug to inspect the styling of a
displayed widget.
v You can override a style class by setting the widget property class, as shown
here:
loginBox Box { numColumns=2, class="NormalBoxStyle" };
Here is an example of the related content in the CSS file:
34
EGL Rich UI 7.5.1.5
.NormalBoxStyle
{ color:black;
background-color:aqua; }
All styles in the specified class are in effect in the widget. These styles are
inherited in every enclosed widget except when a widget overrides a style, as
noted later.
v You can specify a style (or a set of styles) in the style property. Here is an
example, which includes (in the property value) the syntax used in CSS files:
loginBox Box
{ numColumns=2,
style="background-color:lightgreen;border-style:solid;" };
All the CSS styles are available if you use the style property. However, for most
purposes you can assign values to individual style-related properties. The
following declaration is equivalent to the previous one and does not involve CSS
syntax:
loginBox Box
{ columns=2,
backgroundColor="lightgreen",
borderStyle="solid" };
Here are the EGL style-related properties:
– background
– backgroundColor
– borderStyle or one of the following subsets: borderLeftStyle,
borderRightStyle, borderTopStyle, borderBottomStyle
– borderWidth or one of the following subsets: borderLeftWidth,
borderRightWidth, borderTopWidth, borderBottomWidth
– color
–
–
–
–
–
–
–
–
–
–
–
cursor
font
fontSize
fontWeight
height
margin or one of the following subsets: marginLeft, marginRight,
marginTop, marginBottom
opacity
padding or one of the following subsets: paddingLeft, paddingRight,
paddingTop, paddingBottom
pixelHeight
pixelWidth
position
– visibility
– width
Except for background, backgroundColor, borderStyle, cursor, font, and
visibility (each of which takes a value of type STRING), each property takes a
value of type INT and uses pixel as the unit of measure.
v The styles in effect for a given widget are the sum of the styles specified in class
and style specifications. In most cases, a style applied to a widget overrides the
same styles inherited from enclosing widgets, and the last style specified in a list
of widget properties overrides an equivalent style, if any, that was specified
earlier in the list.
Chapter 4. Rich UI programming model
35
v If, in defining a widget, you use both the style property or an equivalent
property (to specify a given style) and the class property (to reference a class
that includes the same style), the value in the style property takes precedence, in
most cases.
If you do not specify styles, the default settings of the browser determine
characteristics such as the line widths, the spacing between widgets, and the text
font.
Best practice for styles
Rich UI projects are likely to be most successful if your company divides the
responsibility for two tasks—laying out the user interface, as handled by an EGL
developer, and creating the interface look and feel, as handled by a Web designer.
To make this division of labor possible, we recommend that you use external style
sheets. You can rely on a default class name such as EglRuiTextField. Alternatively,
you can assign your own class name by assigning a value to the class property for
a given widget.
The effect of removing all children from the document body
Consider the following statement:
document.body.removeChildren();
The effect is twofold:
v Removes all children widgets from the Web page
v Removes access to the external style sheet, if any
If you wish to remove children from the document body without removing access
to the external style sheet, remove specific children, as in the following statement:
document.body.removeChild(myBox);
Sources of additional information
For details on cascading style sheets, consider the following Web sites:
http://www.w3schools.com/css
At this writing, the left side of that Web site includes several links, and the choices
under the heading CSS Basic are of particular interest for Rich UI. The site search
at the right is also useful.
For a complete description of cascading style sheets, see CSS: The Definitive Guide
by Meyer (O'Reilly Media, Inc., November 2006).
Creating a Rich UI application with multiple handlers
You can use multiple Rich UI handler parts to compose a single application.
However, we do not mean to say that you embed one handler part in another.
Instead, the handler part declares variables that are each based on another handler
part. A variable based on an Rich UI handler part is called an embedded handler, as
in the following example:
embeddedHandler AnotherHandlerPart{};
36
EGL Rich UI 7.5.1.5
// declared Rich UI handler
(based on part AnotherHandlerPart)
The embedding Rich UI handler can access the global widgets and public functions
declared in an embedded Rich UI handler. In particular, the embedding handler
can add widgets to its own initialUI and children arrays. Also, you can embed a
handler that invokes services or otherwise handles business processing. A
reasonable practice is to use one handler to present the UI and to use other
handlers to oversee the backend, business processing.
You access widgets and functions with a dot syntax. In the following outline, the
Handler part AnotherHandlerPart is assumed to have declared a button named
itsButton, which is attached to the DOM tree only when that button is included in
the initialUI array of the embedding handler:
handler SimpleHandler type RUIHandler { initialUI = [ embeddedHandler.itsButton ] }
embeddedHandler AnotherHandlerPart{};
end
Similarly, you can add an embedded widget to a children array.
You can access a function or property in an embedded widget by extending the a
dot syntax. For example, the following statement retrieves the displayed text of the
embedded Button itsButton:
myString STRING = embeddedHandler.itsButton.text;
The initialUI array of the embedded handler has no effect at run time. That array
is used only when the embedded handler is the basis of a Rich UI application and
is not embedded at all.
Event handling in Rich UI
Every widget includes a set of properties for specifying which function is invoked
in response to a runtime event. The function in this case is also called an event
handler.
Events
The next table lists the available events, though widgets of specific types respond
to specific events. For example, buttons respond to onClick, but not to onChange.
Also note that two user actions involve "gaining the focus" (by tabbing to or
selecting the widget) or "losing the focus" (by tabbing to or selecting a different
widget).
Table 2. Events
Event
Meaning
onChange
onChange occurs when the user changes a widget and moves the
on-screen focus from that widget, even if the user has reversed the
change.
onClick
onClick occurs when the user clicks the widget.
onFocusGained
onFocusGained occurs when the widget gains the focus.
onFocusLost
onFocusLost occurs when the widget loses the focus. The equivalent
event in JavaScript is onBlur.
onKeyDown
onKeyDown occurs when the user presses any key. On many
browsers, the event occurs repeatedly for as long as the user is
pressing the key. Each occurrence of onKeyDown is followed by an
occurrence of onKeyPress.
Chapter 4. Rich UI programming model
37
Table 2. Events (continued)
Event
Meaning
onKeyPress
onKeyPress occurs when the user presses any key. On many browsers,
the event occurs repeatedly for as long as the user is pressing the key.
Each occurrence of onKeyPress is preceded by an occurrence of
onKeyDown.
onKeyUp
onKeyUp occurs when the user (having pressed a key) releases it.
onMouseDown
onMouseDown occurs when the user presses any mouse button.
onMouseMove
onMouseMove occurs repeatedly when the user moves the mouse
while the on-screen cursor is within the boundary of the widget.
onMouseOut
onMouseOut occurs when the user moves the mouse, just as the
on-screen cursor moves away from the widget.
onMouseOver
onMouseOver is an event that JavaScript could have named
onMouseIn. The event occurs when the user moves the mouse, just as
the on-screen cursor moves into the widget. You can use this event,
for example, to change the cursor symbol for a particular part of the
page.
onMouseUp
onMouseUp occurs when the user (having pressed a mouse button)
releases it.
onSelect
onSelect occurs when text is selected in a textArea or textField widget.
The following syntax, for example, declares a Button widget, and the function
named click is invoked when the user clicks the widget:
myButton Button { text = "Copy Input to Output", onClick ::= click };
The operator ::= appends the function named click to a dynamic array. One
implication is that, when you declare the widget, a set of event-related arrays is
immediately available to you, with each array named for an event.
If you specify multiple event handlers for a given event, the order in which the
event handlers will run is the order of elements in the array. Here is an example of
the syntax:
myButton Button { text = "Start", onClick ::= click, onClick ::= function02 };
You can also use the operator ::= in your code, to add event handlers to the
dynamic array. Here is an example:
myButton.onClick ::= function03;
In this examples, a user click causes the invocation of the functions click, then
function02, then function03.
Event record
Each event handler receives a record that provides details about the event. The
event record is of type Event and includes the following fields:
ch INT
The ASCII code for the keystroke, if any, that caused the event.
x INT
The x coordinate (in pixels) relative to the left of a given widget. For example,
if the user clicks in the exact middle of a button that is 10 by 10, the value of x
is 5.
38
EGL Rich UI 7.5.1.5
y INT
The y coordinate (in pixels) relative to the top of a given widget. For example,
if the user clicks in the exact middle of a button that is 10 by 10, the value of y
is 5.
clientX INT
The x coordinate of the mouse pointer (in pixels) relative to the left of the
browser window. For example, if two buttons, each 10 by 10, are side-by-side
at the top left of the browser window and the user clicks the exact middle of
the second, the value of x is 15.
clientY INT
The y coordinate of the mouse pointer (in pixels) relative to the top of the
browser window. For example, if two buttons, each 10 by 10, are side-by-side
at the top left of the browser window and the user clicks the exact middle of
the second, the value of y is 5.
screenX INT
The x coordinate of the mouse pointer (in pixels) relative to the left of the
screen. The value varies in accordance with the display resolution of the
workstation.
screenY INT
The y coordinate of the mouse pointer (in pixels) relative to the top of the
screen. The value varies in accordance with the display resolution of the
workstation.
widget ANY
The widget to which the event is attached.
mousebutton INT
A number that indicates which mouse button was pressed.
The record of type Event also includes the following functions, each of which is
without parameters:
allowDefault()
Not in use.
allowPropagation()
Allows event bubbling to embedding widgets, as described in the next section,
Event bubbling. This setting is in effect by default.
preventDefault()
Not in use.
stopPropagation()
Stops event bubbling, as described in Event bubbling.
Event bubbling
After Rich UI runs all the functions for a specific event in a specific widget, the
default behavior is for the same event to be processed by each embedding widget,
from the parent to the grandparent, and so on in turn. The behavior is called event
bubbling.
For example, if a button is within a box (named B) that is within a box (named A),
the onClick event is available to all three widgets; first, to the button, then to the
immediately embedding box (B), and then to the box (A) that embeds the other
widgets. Even if the button or B does not include an event handler for the onClick
event, the event is available to A.
Chapter 4. Rich UI programming model
39
You can override the default behavior by setting a function in an event handler;
specifically, the function stopPropagation, which is available from the event record,
Here is the syntax:
Function click(e Event IN){}
e.stopPropagation();
end
You may want to stop propagation for better performance or to avoid invoking
functions in a particular situation.
Even if you stop event bubbling, the response to the event in the current widget is
unaffected. For example, if the button in our example responds to an event by
running three functions (click, function02, and function03), all those functions run
in turn even if function02 invokes stopPropagation.
You can stop event bubbling in one event handler and allow it again in a later one.
For example, if function02 invokes stopPropagation and function03 invokes
allowPropagation, the event bubbles to the embedding widget. In general, the last
propagation setting causes the event to bubble or not.
Custom event types
Rich UI provides a way for you to define event types that are specific to your
organization. For details, see Extending the Rich UI widget set; in particular, the
section on the property @VEEvent.
Rich UI validation and formatting
This topic briefly describes the Model, View, and Controller (MVC) way of
organizing logic and then explores how Rich UI uses the idea of MVC to support
validation and formatting.
MVC
Modern data-processing systems separate the view from the model, and those terms
are variously defined:
v The view is the user interface, or the logic that supports the user interface, or the
business data in the user interface
v The model is a database (or other data storage), or the logic that accesses a
database, or the data that is sent to or retrieved from a database
The controller is the logic that oversees the transfer of data between the user
interface and the database-access logic.
In many cases, the acronym MVC refers to processing across multiple platforms.
For example, a Rich UI application on a Windows platform might be considered to
be the view (and to include the controller), while a service that accesses a database
might be considered to be the model.
We can also consider a division of view from model in the Rich UI application
itself. In this case, the terms have the following meaning:
v The view is a widget in the user interface. Data that is placed into that widget
must be validated before it can be used in other processing. Application data
that is intended for display by the widget must be formatted before display.
v The model is a data field that is internal to the application.
40
EGL Rich UI 7.5.1.5
A new EGL definition, the Controller, lets you tie a specific view—a specific
widget—to a specific model. The Controller also oversees validations and format
rules, as described later.
You can also define a validation form that identifies a set of display fields and the
related Controllers. If you define a validation form or a form that you code for
yourself, you can display the error messages that result from validations and
formatting. (The Controller-specific function getErrorMessage lets the form
developer access the message.)
The next sections describe the Controller and how to work with it. For details on
creating validation forms, see Form processing with Rich UI, which uses the
mechanisms described here.
The Controller in Rich UI
Consider the following declarations:
nameField TextField;
name String {inputRequired=yes,
validationPropertiesLibrary=myLibrary,
inputRequiredMsgKey="requiredMessage"};
The declaration of name has the following properties:
v inputRequired ensures the user will provide input to any widget (a view) that
is associated with that the data field (a model)
v validationPropertiesLibrary identifies the library (stereotype
RUIPropertiesLibrary) that includes declarations for use in messages and other
text. If you do not include this property, the EGL Runtime accesses default
messages. For details on customizing validation messages in Rich UI, see Use of
properties files for displayable text.
v inputRequiredMsgKey identifies a customized validation message
Here is an example declaration of a Rich UI controller:
nameController Controller
{ @MVC
{ model=name, view=nameField }
validators = [myValidationFunction01, myValidationFunction02]
};
The declaration ties a specific model—the name field—to a specific view—the
nameField widget. You control the transfer of data between the model and the
view, as follows:
v To transfer data from the view to the model, you validate the data and then
commit the validated data. In most cases, the commit step removes formatting
characters such as currency symbols.
v To transfer data from the model to the view, you publish the data. In most cases,
the publish step formats the data for display.
In our example, the controller declaration also lists a set of validators, which are
functions that you write and that validate input. Each validator is based on the
following Delegate:
Delegate
MVCValidatorFunction(input String in) returns(String?)
end
Chapter 4. Rich UI programming model
41
Input to a validator is considered to be valid if the function returns an empty
string or null, but not if the validator returns a string with content. Such a string is
considered an error message.
In most cases, you commit data only after validating it. Here is the syntax for
committing the user input from the nameField widget into the name field:
if (nameController.isValid())
nameController.commit();
end
Validating the user input
A specific controller function—isValid—is invoked either because of user action
(when the user moves focus away from the widget) or because of developer
request (when the code invokes that function). That function controls the
controller-specific validation steps, which are as follows:
1. Runs the function referenced by the retrieveViewHelper property (not shown
in our example), which identifies the function that retrieves the widget content.
The function has no parameters and returns a string. You might use this
function to convert the input in some way. However, you do not need to set the
retrieveViewHelper property in most cases. In the absence of that property, the
widget content is available as a string, for subsequent processing.
2. Runs the functions referenced by the unformatters property (not shown in our
example), which identifies an array of functions. You might use these functions
to remove formatting characters from the input. The first-listed function accepts
the string returned from the retrieveViewHelper function. Each of the
later-listed functions accepts the string returned from the previous function.
You may not need to set the unformatters property.
3. Removes the formatting characters from the user input in accordance with that
formatting properties, if any, that you specified in the source code. An example
of a formatting character is the currency symbol, which is associated with the
currency property. A second example are the separators specified by the
dateFormat property.
4. Returns control to the user if a validation error occurs related to data type; for
example, the user may have typed a character when the model is a numeric
field.
5. Runs the elementary validations, as specified by EGL properties that are set on
the model, not on the view.
A later section lists the available properties, which include inputRequired, as
shown in our example. (That property ensures the user will provide input to
any widget that is associated with that the data field.)
Here are the possible outcomes of the elementary validations:
v If any of the elementary validations fail, control returns to the user. If the
Controller is in a validation form, a message associated with the first failed
validation is displayed.
You can accept the default EGL message for a given validation; but if you
want to specify your own message, review the description in Use of properties
files for displayable text.
v If all the elementary validations are fulfilled, the validators run, as described
next.
6. Runs the validators in the order specified in the controller validators array.
Each validator accepts the input string without formatting characters such as
the currency symbol; and each validator returns a string. If the validator
42
EGL Rich UI 7.5.1.5
returns a null or blank, the EGL Runtime considers the validation to have
succeeded. However, the following statements apply if the validator returns a
different value—for example, a value retrieved from a properties file, as
described in Use of properties files for displayable text:
v The EGL Runtime considers the validation to have failed
v Control immediately returns to the user; in that case, the subsequent
validators do not run
v The returned string is available for use in a form
Changing the display of the invalid input
By default, a widget with invalid content is displayed with a style specified in a
Cascading Stylesheet (CSS) class; specifically, the initial class such as
EglRuiTextField, along with the following, secondary class: FormErrorEditor. (A
Web designer in your company is likely to set up the style sheet for best effect.)
You can assign a different set of CSS classes (or a different CSS ID) in response to
validation failure; or you can change another aspect of the displayed output. For
example, you can assign CSS classes to a label, as occurs (by default) if you use a
validating form. (For details, see Form processing with Rich UI).
Here is the procedure for changing the displayed output after validation:
v Set the controller property validStateSetter, which identifies a function for the
EGL runtime to invoke at the end of validation.
v Create the function, which has two parameters. The first is of type Widget, and
the second is of type Boolean. The first parameter receives the widget being
validated, and the second indicates whether the validation succeeded.
v In that function, assign a different or additional class (or a different CSS ID) to
the widget that has invalid content or, more likely, to the label of that widget.
Committing the validated input
When you run the controller-specific commit function, data is transferred from the
view to the model. During that process, several functions are invoked, as
determined by a set of controller properties that give you many options. Here are
the properties:
1. The retrieveViewHelper property identifies the function that retrieves the
widget content. The function has no parameters and returns a string. You might
use this function to convert the input in some way. However, you do not need
to set the retrieveViewHelper property in most cases. In the absence of that
property, the widget content is available as a string, for subsequent processing.
2. The unformatters property identifies an array of functions. You might use these
functions to remove formatting characters from the input. The first-listed
function accepts the string returned from the retrieveViewHelper function.
Each of the later-listed functions accepts the string returned from the previous
function. You may not need to set the unformatters property.
3. Formatting characters are removed from the user input in accordance with that
formatting properties, if any, that you specified in the source code. An example
of a formatting character is the currency symbol, which is associated with the
currency property. A second example are the separators specified by the
dateFormat property.
4. The commitHelper property identifies the function that assigns a value to the
model. The function has a single parameter of type STRING and has no return
Chapter 4. Rich UI programming model
43
value. You may not need to set this property. In its absence, the model receives
the string that was provided by an earlier function, if any, and that no longer
includes formatting characters.
Publishing the model data
When you run the controller-specific publish function, data is transferred from the
model to the view. During that process, several functions are invoked, as
determined by a set of controller properties that give you many options. Here are
the properties:
1. The retrieveModelHelper property identifies the function that retrieves the
data content. The function has no parameters and returns a string. You might
use this function to convert the output in some way. However, you do not need
to set the retrieveModelHelper property in most cases. In the absence of that
property, the model content is made available as a string, for subsequent
processing.
2. Formatting characters are added to the user input in accordance with the
formatting properties, if any, that you specified in the source code. An example
of a formatting character is the currency symbol, which is associated with the
currency property. A second example are the separators specified by the
dateFormat property.
3. The formatters property identifies an array of functions. You might use these
functions to format the output. The first-listed function accepts the string
returned from the retrieveModelHelper function, with any formatting
characters added in step 2. Each of the later-listed functions accepts the string
returned from the previous function. You may not need to set the formatters
property.
4. The publishHelper property identifies the function that assigns a value to the
model. The function has a single parameter of type STRING and has no return
value. You may not need to set this property. In its absence, the view receives
the string that was provided by an earlier function, if any, and that includes
formatting characters.
Validation and formatting properties
Each of the field-level properties used in Rich UI is described in Form field
properties. The current section simply lists the properties, each of which is
categorized with a single letter:
v F is for formatting. A property in this category removes formatting characters
during commit and adds formatting characters during publish. Any of these
properties can result in the display of an error message; for example, if an input
date is significantly different from the required date format, or if an integer
value is a number other than 0 or 1 but is associated with isBoolean.
v V is for input validation.
Here are all the properties:
v
v
v
v
v
v
v
44
EGL Rich UI 7.5.1.5
currency (F)
currencySymbol (F)
dateFormat (F)
fillCharacter (F)
inputRequired (V)
inputRequiredMsgKey (V)
isBoolean (F)
v
v
v
v
v
isDecimalDigit (V)
isHexDigit (V)
lowercase (F)
minimumInput (V)
minimumInputMsgKey (V)
v
v
v
v
v
v
v
numericSeparator (F)
sign (F)
timeFormat (F)
timestampFormat (F)
typeChkMsgKey (V)
uppercase (F)
validValues (V)
v validValuesMsgKey (V)
v zeroFormat (F)
The following properties are further described in Use of properties files for displayable
text:
v inputRequiredMsgKey (V)
v minimumInputMsgKey (V)
v typeChkMsgKey (V)
v validValuesMsgKey (V)
You can specify the validation and formatting properties on DataItem definitions,
on variables, and on Record fields; but they are in effect for a given Rich UI
Controller only if you specify the @MVC property when declaring the Controller.
Rich UI date and time support
Rich UI supports a subset of EGL formatting capabilities for Rich UI dates, times,
and timestamps; however, intervals are not supported.
Assigning a string to a date, time, or timestamp
Rich UI follows the EGL rules for assigning a string to a variable of type DATE,
TIME, or TIMESTAMP. In particular, the following default formats are in use:
v For date variables, strLib.defaultDateFormat
v For time variables, strLib.defaultTimeFormat
v For timestamp variables, strLib.defaultTimestampFormat
The following code assigns a string to a date field:
strLib.defaultDateFormat = "yyyy/MM/dd";
d date = "2008/04/08";
EGL is forgiving; for example, when one separator is substituted for another:
strLib.defaultDateFormat = "yyyy/MM/dd";
d date = "2008-04-08";
In a second example of forgiveness, you can omit the separators entirely:
strLib.defaultDateFormat = "yyyy/MM/dd";
myDate date = "20100412";
Chapter 4. Rich UI programming model
45
Assigning a date, time, or timestamp to a string
Here are the rules for assigning time-related variables to strings:
v To assign a date variable to a string, use strLib.formatDate.
In Rich UI, only the following formatting symbols are valid:
– yyyy for the 4-digit year
– yy for the 2-digit year
– MM for the 2-digit month
– dd for the 2-digit day
– separators such as hyphens, slashes, and blanks
You can set the build descriptor option formatDate, which provides a default for
the strLib.formatDate.
v To assign a time variable to a string, use strLib.formatTime.
In Rich UI, only the following formatting symbols are valid:
– HH for the 2-digit hour (0 to 23) in military time
– hh for the 2-digit hour (1 to 12)
– mm for the 2-digit minute in the hour
– ss for the 2-digit second in minute
– a for AM or PM
– separators such as hyphens, slashes, and blanks
You can set the build descriptor option formatTime, which provides a default
for the strLib.formatTime.
v To assign a timestamp to a string, use strLib.formatTimestamp.
In
–
–
–
–
Rich UI, only the following formatting symbols are valid:
HH for the 2-digit hour (0 to 23) in military time
hh for the 2-digit hour (1 to 12)
mm for the 2-digit minute in the hour
ss for the 2-digit second in the minute
– SSSSSS for a fractional second; specifically, a 3-digit millisecond followed by
three zeros as a result of restrictions in JavaScript
– a for AM or PM
– separators such as hyphens, slashes, and blanks
Note that the character for fractional seconds is S for strLib.formatTimestamp,
but is f in the mask used at timestamp declaration.
You can set the build descriptor option formatTimestamp, which provides a
default for the strLib.formatTimestamp.
If a date is assigned directly to a string (as shown in the previous section), the
string is formatted in accordance with the default format. For example, consider
the following code:
strLib.defaultDateFormat = "yyyy/MM/dd";
t date = "2010-04-12";
myString STRING = date;
The value of myString is "2010/04/12".
46
EGL Rich UI 7.5.1.5
Form processing with Rich UI
The Rich UI controller mechanism relates a single view—a widget—with a single a
model—a data field, as described in Rich UI validation and formatting. Rich UI also
provides a way to simulate traditional form processing, which is characteristic of
business software. For example, you may want to create an application that fulfills
the following steps:
v The application presents data to the user
v The user accepts the data or types updates; clicks a button or presses a key to
submit the data; validates the input; and commits all the validated data to some
backend code—in our case, to a service
Rich UI form processing relies on the ValidatingForm widget, which is primarily a
collection of form fields. When you declare a form field, you reference a controller
and can include the following details:
v A string field named displayName, which provides the text for an onscreen
label
v A string field named labelClass, for the CSS class used to when displaying the
label. (By default, the class name is eglRuiTextLabel)
For example, here are example entries for validating a form:
employeeForm ValidatingForm { entries = [
new FormField { displayName="Name:",
controller=nameController },
new FormField { displayName="Age:",
controller=ageController },
new FormField { displayName="Salary:", controller=salaryController }
]};
The form as a whole has the following functions:
v isValid invokes the controller-specific functions of the same name. Field
validation occurs in the order in which the form fields are listed in the entries
array. You may want to update the form-level isValid function so that it
references functions that provide cross-field validation.
v validStateSetter is the default validStateSetter function for any controllers
referenced in the form, but with an additional behavior.
If the form-level function is used (that is, if any of the controllers lack their own
validStateSetter function), every form label associated with invalid content is
displayed in accordance with the following Cascading Stylesheet (CSS) class: the
initial class such as EglRuiTextLabel, along with the following, secondary class:
FormErrorLabel.
The assumption here is that you want the same kind of display for invalid input
in any form field.
v commit lets you commit all the views to the related models with one command;
in our example, the command is employeeForm.commit. The order of the
view-specific commit invocations is the order in which the form fields are listed
in the entries array. After you invoke the form-level commit function, you can
transmit all the model data to a service.
v publish lets you publish all the models to the related views with one command;
in our example, the command is employeeForm.publish. The order of the
model-specific publish invocations is the order in which the form fields are
listed in the entries array. You can invoke the form-level publish command in
an application function that receives data returned from a service.
Chapter 4. Rich UI programming model
47
Use of properties files for displayable text
Rich UI lets you define displayable text in an external file used at run time. Here
are specific reasons for defining text in this way:
v To override the runtime messages that are available, by default, for failed input
validations or for incorrect formatting on input or output
v To assign text to widgets without hard-coding that text in the Rich UI
application
v To display text in one or another language so that your code can be used more
widely
Overriding validation or formatting messages
If you wish to override validation or formatting messages, do as follows:
v Ensure that you are using the controller mechanism described in Rich UI
validation and formatting.
v Create a Rich UI properties library—a library part that has the stereotype
RUIProperties, as described in RUIPropertiesLibrary stereotype. For an example
that follows, the library name is myLibrary, and the library includes declarations
of strings named entryForInputRequired and entryForOthers. Those variable
names are case sensitive.
v In a Rich UI handler or other code, specify the property
validationPropertiesLibrary in a part definition or variable declaration, along
with other validation and formatting properties. Here is an example declaration:
name STRING {inputRequired = yes,
lowercase = yes,
inputRequiredMsgKey = "entryForInputRequired",
typeChkMsgKey = "entryForOthers",
validationPropertiesLibrary=myLibrary };
The property validationPropertiesLibrary is used only when you are overriding
validation and formatting messages.
v Set up a properties file and include entries (name-value pairs) for which the
names match the values of MsgKey properties. In the current example, the
properties file includes the following entries:
entryForInputRequired=You must specify a value
entryForOthers=Your input is incorrect
someText=Not mentioned
The properties file is a text file. The entry names are case sensitive and are
useful only if they match a string declaration in the Rich UI properties library.
Here are the implications of the current example:
v An input-required error at run time results in display of the message "You must
specify a value," which is identified by the name entryForInputRequired.
v An input of an uppercase letter at run time also results in display of the
message "Your input is incorrect." This outcome occurs because the value of the
property typeChkMsgKey is used in response to a variety of errors; in this case,
in response to a user input (the uppercase letter) that is disallowed by the
lowercase property.
Here are the rules that explain the behavior just described:
v For a given data field, you can override the default messages associated with
each of the following properties:
– inputRequired
48
EGL Rich UI 7.5.1.5
– minimumInput
– validValues
The override relies on one of the following three "MsgKey" properties:
inputRequiredMsgKey, minimumInputMsgKey, and validValuesMsgKey.
v Also for a given data field, you can specify a single override for errors related to
any of the following properties:
– currency
– currencySymbol
– dateFormat
– fillCharacter
– isBoolean
– isDecimalDigit
– isHexDigit
–
–
–
–
–
lowercase
numericSeparator
sign
timeFormat
timestampFormat
– uppercase
– zeroFormat
That single override also relies on the property typeChkMsgKey.
Assigning text to widgets
The Rich UI mechanism for displaying text from an external file always relies on
using an Rich UI properties library, regardless of the purpose of the text. The
following statements apply whenever you use the external file for reasons other
than overriding a default message:
v The rules for EGL library access apply. For example, assume that you have a
Rich UI properties library named myLibrary and a button named myButton. Here
is one way to assign text (in our example, the string "Not mentioned") to the
button in your application:
myButton.text = myLibrary.someText;
Alternatively, you can reference myLibrary in a use statement, in which case you
do not need to reference the library name in the assignment.
v You can invoke the implicit library function getMessage to provide inserts to a
properties-file entry.
You can also use the library function getMessage to provide inserts to a string
inside your code. For details on using inserts, see RUIPropertiesLibrary stereotype.
Displaying text in one or another language
You can have several files, one for each language you wish to support. The choice
of language is based on the user's browser setting.
A displayable value comes from a properties file whose name has a root (for
example, myLibrary) and includes a locale, which is a code that identifies a human
language, For example, en is the locale that represents English, and the file name
myLibrary-en refers to a properties file that provides English text.
Chapter 4. Rich UI programming model
49
Each file name has a root name and the extension .properties. The locale is
indicated at the end of the root name, before the extension. Locales consist of one
to three identifiers, the first preceded with a hyphen and the others (if any)
preceded with an underscore. Each additional identifier after the first enables you
to indicate a more specific language; in particular, you can specify the dialect,
variety, or geographic location of a language.
The identifiers are the language code, country code, and variant code:
v Among the language codes are en for English and es for Spanish. The language
code is part of the Java specification.
v The country code indicates a country where the dialect of the language is
spoken. For example, the country code US indicates the United States, and GB
indicates Great Britain. In this way, an American English file might be named
myLibrary-en_US.properties, while a British English properties file might be
named myLibrary-en_GB.properties. The country code is part of the Java
specification.
v The variant code defines a more specific dialect or variety of the language in the
properties file. For example, you could use the variant codes A and B to
distinguish between two different varieties of Norwegian spoken in Norway.
These two files might be named myLibrary-no_NO_A.properties and
myLibrary-no_NO_B.properties. Alternately, you could define a standard type of
Norwegian as the locale no_NO and define a variant as no_NO_B. The variant
code is not part of the Java specification.
During application deployment, the HTML file that contains the EGL-generated
JavaScript references a locale-specific properties file. At runtime, the browser
requests that file from the server, and an error results if the file is unavailable.
Accessing an application that uses a specific locale
In most cases, the locale used at run time depends on the browser locale. However,
the user can request a different locale by invoking a locale-specific HTML file,
perhaps as a result of clicking a hypertext link that you provide. For example, here
is HTML that invokes the German version of MyApplication.html from
www.example.com (assuming that a German version was deployed there):
<a href="www.example.com/MyApplication-de.html">German version</a>
Deploying properties files
Store properties files in the WebContent/properties folder of your project. The root
of the property file name (for example, myLibrary) must be the name specified in
the propertiesFile property in the the Rich UI properties library.
By working with the Rich UI Deployment wizard, you prepare a Rich UI
application for installation on one or another type of Web server. You can do either
or both of the following tasks:
v You can select from the list of generally available locales; for example, en for
English. Whenever you specify a locale from the list, your selection includes the
following application components in the deployed output:
– A locale-specific properties file that you provide, if any; and
– Locale-specific runtime messages. In the Rich UI deployment wizard, the
phrase runtime messages refers to messages other than those that can be in the
properties file.
50
EGL Rich UI 7.5.1.5
v In addition to selecting from a list of generally available locales, you specify new
locales. Each new locale is available for only one purpose— to include a
locale-specific properties file that you provide. If you identify a new locale, you
also must specify one of the generally available locales for use when the new
locale is requested. That generally available locale is used for only one
purpose—to include runtime messages other than those that can be in the
properties file.
RUIPropertiesLibrary stereotype
You set up a Rich UI properties library (stereotype RUIPropertiesLibrary) if you
wish to retrieve displayable text from external files rather than hard-coding the text
in your Rich UI application. The overall mechanism is described in Use of properties
files for displayable text. You can also use an implicit function in a Rich UI properties
library to substitute values in any string.
Here is an example of a Rich UI properties library:
Library myLibrary type RUIPropertiesLibrary {propertiesFile="myFile")
entryForInputRequired STRING;
entryForOthers STRING;
someText STRING;
end
Any value assigned directly in a declaration (for example, someText String =
"Click!";) has no effect. Every runtime value comes from an external file, with
one exception: if the file does not include a particular entry (for example, if the file
does not include an entry for someText), the value at run time is the string
equivalent of the variable name (for example, "someText").
Property propertiesFile
The property propertiesFile refers to the root name of the file. The file (or files, if
multiple translations are available) must reside directly in the project's
WebContent/properties directory. Do not include any of the following details in the
root name:
v
v
v
v
Path information such as "properties/myFile"
Hyphens
Translation-specific information such "en_US"
The file extension, which is necessarily properties
The default value for propertiesFile is the name of the library; in this case,
"myLibrary".
Function getMessage
Every RUI properties library implicitly includes the function getMessage, which
lets you add inserts when selecting a message from the properties file or from a
string in your code. For example, the following message in a properties file
requires two inserts:
someText=Promote {0} in the {1} department
Here is example code that writes the string "Promote Jeff in the Sales department"
to a label:
employeeName, departmentName String;
employeeName = "Jeff";
departmentName = "Sales";
Chapter 4. Rich UI programming model
51
myLabel TextLabel {text =
myLibrary.getMessage(myLibrary.someText, [employeeName, departmentName]);
An alternative invocation has the same effect as the previous one but does not
access a properties file:
myMessage STRING = "Promote {0} in the {1} department";
myLabel TextLabel {text =
myLibrary.getMessage(myMessage, [employeeName, departmentName]);
Here is the function signature:
getMessage(baseMessage STRING in, inserts STRING[] in) returns (fullMessage STRING);
baseMessage
A string or a field in an RUI properties library.
inserts
An array of strings, with the first element providing an insert for the
placeholder {0}, the second providing an insert for the placeholder {1}, and so
on.
fullMessage
The base message with as many placeholders resolved as possible
The inserts are in ascending order, starting at 0, and the placeholders in the
message may be in any order and do not need to be in sequence. If an insert does
not match a placeholder by number, the insert is unused. If a placeholder is
unresolved, the placeholder itself is in the returned message. For example, the
returned message is "Promote Jeff in the {1} department" in the following case:
employeeName STRING = "Jeff";
myMessage STRING = "Promote {0} in the {1} department";
myLabel TextLabel {text =
myLibrary.getMessage(myMessage, [employeeName]);
You cannot use the function getMessage when overriding a validation or
formatting message. You cannot pass inserts to such a message.
Browser history
Consider what happens if you access the IBM Web site (http://www.ibm.com )
and then the IBM Rational Cafes (http://www.ibm.com/rational/cafe). Two
different Web pages are provided from remote servers, and you can click the Back
and Forward buttons in your browser to revisit each of the two sites. In contrast,
the main processing in a Rich UI application is solely in your browser. The
application may render new content and may even access the server for visual
updates, but in most cases, the Back and Forward buttons are either disabled or
direct processing to other Web sites.
In Rich UI, you decide what on-screen content to identify as a separate Web page.
You enforce that decision by accessing functions in History, which is a Rich UI
handler part provided with the product. By working with History, you can assign
pages to the browser history at run time, and the user can use the Back and
Forward buttons to access different pages in the application. Also, you can respond
to the user's attempt to close the browser.
The browser-history mechanism does not save the state of a given Web page. You
need to code the behavior that makes sense for your application.
52
EGL Rich UI 7.5.1.5
Setting up a browser history and event response
To set up the browser history and event response, do as follows:
1. In your Rich UI application, declare a Rich UI handler based on History, as in
the following outline:
import com.ibm.egl.rui.history.History;
import com.ibm.egl.rui.history.HistoryChanged;
import com.ibm.egl.rui.history.OnBeforeUnloadMessageFunction;
Handler MyApplication Type RUIHandler { onConstructionFunction=start }
myHistory History {};
end
By declaring a variable based on History, you add #empty to the Web address
displayed in the user's browser. In regard to subsequent processing, empty is
the name of the new page. The new page is added to an application-specific
browser history, but not to the browser's own history, which retains only the
original Web address.
2. In the on-construction function (for example), you can set up access to
functions—event handlers—that run in response to specific user events:
v One such event is either adding a new page to the browser history or
navigating to a different page. Later, we show how to add or move to a new
page. First, we describe how to set up the event handler.
To enable a custom response to a new-page event, invoke the addListener
function and reference an event handler that you code. Here is an example
invocation of the addListener function:
myHistory.addListener(myHistoryChanged);
The following Delegate part outlines the characteristics of the referenced
event handler:
Delegate
HistoryChanged(newPageName String in)
end
As shown, the event handler for the new-page event accepts a string. If you
invoke addListener and reference a custom function, the custom function is
invoked in the following cases: when the browser adds the initial page
named empty, and when you add a subsequent page. In each case, the user's
browser displays the Web address and includes the page name, which is the
address subset that is displayed subsequent to the pound sign (#); also, the
EGL Runtime provides that page name to your function.
Here is an example event handler that is invoked after a new-page event,
with myLabel assumed to be a widget in the user display:
function myHistoryChanged(newPageName String in)
myLabel.text = "History was changed. Current page name is "+ newPageName;
end
You can register multiple new-page event handlers by running addListener
multiple times. The referenced functions run in the order of registration.
Even if you register the same function multiple times, all the registrations are
in effect.
v A second event is the user's attempt to close the browser or browser tab.
In this case, invoke the keepUserOnPage function and reference an event
handler that you code. Here is an example invocation of the keepUserOnPage
function:
history.keepUserOnPage(stayHere);
The following Delegate part outlines the characteristics of the referenced
event handler:
Chapter 4. Rich UI programming model
53
Delegate
OnBeforeUnloadMessageFunction() returns(String)
end
As shown, the event handler for the close-browser event returns a string.
That string is displayed in a dialog box that lets the user confirm or reverse
the browser close.
Here is an example event handler that is invoked after a close-browser event:
function stayHere() returns(String)
return ("Close the application?");
end
Adding an entry to a browser history
You add an entry to the application-specific browser history by invoking the
function addToHistory. The following example adds a page named myNewPage.
myHistory.addToHistory("myNewPage");
The implication is as follows:
v The new-page event handler runs; in our example, the handler name is
myHistoryChanged
v If the user clicks the Back button, the Web address in the browser includes the
name of the previous page; and then, the Forward button is enabled, too.
Navigating to the previous page
You can navigate to the previous page in your application. Here is the example
code:
myHistory.goBack();
The implication is as follows:
v The new-page event handler runs; in our example, the handler name is
myHistoryChanged
v The Web address in the browser changes, as appropriate
v Subsequent navigation (forward and back) changes to reflect the new Web
address
Navigating to the next page
You can navigate to the next page in your application. Here is the example code:
myHistory.goForward();
The implication is as follows:
v The new-page event handler runs; in our example, the handler name is
myHistoryChanged
v The Web address in the browser changes, as appropriate
v Subsequent navigation (forward and back) changes to reflect the new Web
address
Rich UI Infobus
The Rich UI Infobus is a library that makes available a publish-and-subscribe
mechanism, which works as follows:
54
EGL Rich UI 7.5.1.5
v A handler subscribes to an event of a specified name. At the time of
subscription, the handler also references a function that will receive data when
the event occurs. The Infobus then registers the function so that it can be
invoked at the appropriate time.
For example, the following Rich UI handler part subscribes to an event named
sample.test and provides a label—a presentation area—that an embedding
handler can use:
Handler embeddedHandler Type RUIHandler {onConstructionFunction=start}
feedback TextLabel;
function start()
InfoBus.subscribe("com.mycompany.sample.test", showPublish);
end
function showPublish(eventName STRING in, data ANY in)
feedback.text = "The " + eventName + " event occurred and passed " + data;
end
end
In a more realistic case, the showPublish function might receive a record with
several fields and then transmit the data to a remote service.
v The same or a different handler in the same Rich UI application publishes the
event, specifying the event name and some event-specific data. At the time of
publication, the Infobus invokes the function that was specified at the time of
subscription, passing the event-specific data to the function.
For example, the following handler embeds the previous one, publishes the
event, and causes display of the following statement: The sample.text event
occurred and passed input data for a service:
Handler InfoBusTest Type RUIHandler
{ initialUI = [myButton, myDiv] }
myButton Button{text = "Publish the event", onClick ::= clickHandler};
myDiv Div { children = [new embeddedHandler{}.feedback] };
function clickHandler(e Event in)
InfoBus.publish("com.mycompany.sample.test", "input data for a service");
end
end
Note that the function InfoBus.publish does not include the name of the
showPublish function. Instead, the Infobus acts as a mediator, ensuring that the
appropriate function is invoked.
Infobus functions
The following Infobus functions are in use:
v Infobus.subscribe accepts two arguments: an event name and a reference to the
function that the Infobus invokes when the event is published. The event name
may include wildcard characters, as described later.
You must code the function to be invoked. That function is based on the
following Delegate part, which indicates that the function can accept whatever
type of data you provide when you publish the event:
InfoBusCallback(eventName String in, data any in)
Infobus.subscribe also returns a subscription value (type ANY), which you can
use to unsubscribe from the event.
v Infobus.unsubscribe accepts a single parameter; the value of type ANY returned
from Infobus.subscribe. This function has no return value.
Chapter 4. Rich UI programming model
55
v Infobus.publish accepts two arguments: an event name and the data that you
provide. This function has no return value.
Event names and wild cards
An event name is composed of one or more tokens—character symbols such as
sample and test (in our example). each of which is separated from the next by a dot.
You can use Infobus.subscribe to subscribe to more than one event. Two wildcard
characters are available, and you can use both in the same Infobus.subscribe
invocation:
v If an asterisk (*) is used in place of a token, the function registered by
Infobus.subscribe is invoked when your code publishes any event whose name
matches the event name regardless of the token that you specify in place of the
asterisk. For example, if Infobus.subscribe identifies the event name as
com.mycompany.update.*.new.employee, the function registered by
Infobus.subscribe is invoked in response to any of the following invocations:
InfoBus.publish("com.mycompany.update.sales.new.employee", "some data");
InfoBus.publish("com.mycompany.update.marketing.new.employee", "some data");
InfoBus.publish("com.mycompany.update.outreach.new.employee", "some data");
v If a double asterisk (**) is used in place of the last token, the function registered
by Infobus.subscribe is invoked when your code publishes any event whose
name matches the event name regardless of the series of tokens (and intervening
dots) that you specify in place of the asterisk. For example, if Infobus.subscribe
identifies the event name as com.mycompany.update.sales.**, the function registered
by Infobus.subscribe is invoked in response to any of the following invocations:
InfoBus.publish("com.mycompany.update.sales.new.employee", "some data");
InfoBus.publish("com.mycompany.update.sales.temporary.employee", "some data");
InfoBus.publish("com.mycompany.update.outreach.new.temporary.employee", "some data");
For additional details
The Infobus mechanism is based on an implementation of the OpenAjax alliance.
You may not need further details on this mechanism, but can get them as follows:
1. Go to the OpenAjax alliance Web site:
http://www.openajax.org/index.php
2. Click Wikis > Member Wiki
3. Type the following string in the Search field: OpenAjax Hub 1.0 Specification
PublishSubscribe
Rich UI does not support the specification phrases related to filter or scope.
Non-Infobus communication between Rich UI handlers
One way to organize your application is to separate the user interaction, as
expressed in one Rich UI handler, from the back-end processing of business data,
as expressed in a second Rich UI handler. This section outlines some
mechanisms—aside from the Infobus—by which one handler can communicate
with another.
56
EGL Rich UI 7.5.1.5
Pushing data from the embedding handler
In the simplest case, the embedding handler can invoke a function in the
embedded handler:
Handler EmbeddingHandler type RUIHandler
{ onConstructionFunction = onConstructionFunction }
embeddedHandler EmbeddedHandler;
function onConstructionFunction()
myString STRING = "Received from somewhere";
embeddedHandler.function01(myString);
end
end
Using delegates
Another possibility is to cause the embedded handler to invoke a function in the
embedding one. In this case, the embedding handler updates the value assigned to
a delegate in the embedded handler. A delegate is a variable that references a
function of a specific type; that is, the variable provides access to a function that
has a specific set of characteristics.
An example can help you to see the relationships. Consider the following EGL
Delegate part, which defines a function that has no parameters or return value:
delegate switchPart() end
The next example shows how to toggle between two Web pages. Here is the
embedded handler, Page2, which declares the delegate named switch:
handler Page2 type RUIHandler { onConstructionFunction = myFirstFunction,
initialUI = [content] }
content Box{children = [secondLabel, button], columns = 1};
secondLabel TextLabel{text = "page2!"};
button Button{text="switch back to first page", onClick ::= switchToFirst};
//declaration of a delegate
switch switchPart{};
function myFirstFunction()
end
function switchToFirst(e Event in)
switch();
end
end
The question is, what logic runs when switch() is invoked inside the switchToFirst?
The answer is in the embedding handler, Page1, which assigns its own function to
the delegate:
handler Page1 type RUIHandler
{ onConstructionFunction = myFirstFunction, initialUI = [page] }
page Box{ columns = 1, children = [firstLabel, button]};
firstLabel TextLabel{text = "page1!"};
button Button{text = "switch to page 2", onClick ::= switchTo2};
page2 Page2{};
function myFirstFunction()
page2.switch = switchBack;
Chapter 4. Rich UI programming model
57
end
function switchTo2(e Event in)
page.children = [page2.content];
end
function switchBack()
page.children = [firstLabel, button];
end
end
Using delegates to navigate to any of several pages
An extension of the previous example is to define a page handler (we call it
MainHandler) that controls the user's subsequent navigation to any of several Web
pages. Again, we are creating a page-by-page flow of events, as is the traditional
approach to Web applications. You can start with an approach like this, keeping in
mind that Rich UI lets you update parts of a Web page in response to a runtime
event.
In this example, the Delegate part takes a string and has no return value:
delegate SwitchToPagePart( TargetPage STRING in) end
Three Rich UI handlers are involved here. Here is the output of the first,
ButtonHandler, which shows the available options:
In reviewing the code, note that switchFunction is a delegate and that its
invocations refer to logic that resides in MainHandler, which is shown later:
handler ButtonHandler type RUIHandler{initialUI = [button1, button2, button3]}
switchFunction SwitchToPagePart;
button1 Button{text = "Go To Main Page", onClick::= toMain};
button2 Button {text = "Stay Here"};
button3 Button{text = "Go to TextField", oncLick::=toText};
function toMain(e Event in)
switchFunction("MainHandler");
end
function toText(e Event in)
switchFunction("TextFieldHandler");
end
end
Here is the output of the second handler, TextFieldHandler:
In reviewing the code, note that this Rich UI handler also declares a delegate that
is based on SwitchToPagePart and that the user can specify the Web page to
present next, even though this handler is not aware of what Web pages are
available:
handler TextFieldHandler type RUIHandler
{initialUI = [instructions, Field1, myButton]}
// a delegate
58
EGL Rich UI 7.5.1.5
switchFunction SwitchToPagePart;
instructions TextLabel {text = "Type a page name and click the button."};
Field1 Textfield{width = 200};
myButton Button{text = "Go to the specified page", onClick ::= handleEvent};
function handleEvent(e Event in)
switchFunction(Field1.text);
end
end
Last, MainHandler simply displays the text "Click to see your options," but could
display a splash screen. Here is the code, including logic that displays content
stored in other handlers:
handler MainHandler type RUIHandler{initialUI = [mainBox]}
mainBox Box{columns = 1, children = [mainLabel]};
mainLabel TextLabel{
text = "Click to see your options.",
onClick::= mainEvent};
buttonHandler ButtonHandler{switchFunction = switchTo};
textFieldHandler TextFieldHandler{switchFunction = switchTo};
function switchTo(target string in)
case (strlib.upperCase(target))
when ("TEXTFIELDHANDLER")
mainBox.children = [textFieldHandler.instructions,
textFieldHandler.Field1,
textFieldHandler.myButton];
when ("BUTTONHANDLER")
mainBox.children = [buttonHandler.button1,
buttonHandler.button2,
buttonHandler.button3];
when ("MAINHANDLER")
mainBox.children = [mainLabel];
end
end
function mainEvent (e Event in)
switchTo("ButtonHandler");
end
end
Notifying the embedding handler after a service call
The embedded handler may have no widgets at all, but may call a service. As
noted in Accessing a Service in Rich UI, service invocation in Rich UI is always
asynchronous, which means that the requester—the Rich UI handler—continues
running without waiting for a response from the service. The user can still interact
with the user interface while the Rich UI handler waits for the service to respond.
After the invocation, the service does some task and (in most cases) responds to
the requester by invoking a function that you code in the Rich UI handler. That
function is called a callback function.
From within the callback function, the embedded handler might notify the
embedding handler. Consider the following EGL Delegate part, which defines a
function that has no parameters or return value:
delegate notifyPart() end
Here's an outline of an embedded handler:
handler MyModel type RUIHandler { onConstructionFunction = myFirstFunction }
//declaration of a delegate
notify notifyPart{};
Chapter 4. Rich UI programming model
59
function myFirstFunction()
call myService.myOperation(12) returning to myCallback;
end
function myCallback(returnValue STRING)
notify();
end
end
As before, the embedding handler assigns its own function to the delegate:
handler MyHandler type RUIHandler { onConstructionFunction = myFirstFunction }
theModel MyModel;
function myFirstFunction()
theModel.notify = myNotification();
end
function myNotification()
// respond, perhaps by accessing details from the embedded handler
end
end
Rich UI drag and drop
You can write code so that a user is able to drag a widget from one location and
drop it at another. More broadly, your code can respond to the following user
events: a single mouse-down event when the user holds the position; subsequent
mouse-move events; and a single mouse-up event. You can fulfill any runtime
tasks that are represented by the drag and drop; Rich UI does not define the
behavior.
You write the drag-and-drop code by specifying three properties in a widget
declaration and by writing functions that are referenced in the corresponding
property values. For example, here is the declaration of a button:
b1 Button {
text = "Button 1", position="absolute", x=10, y=10,
onStartDrag = start, onDrag = drag, onDropOnTarget = drop};
Here are the three properties that make drag-and-drop possible:
v onStartDrag references a function that the EGL Runtime calls once, at the start
of a drag operation. The function has characteristics that are shown in the
following Delegate part:
Delegate StartDragFunction(widget Widget in,
x int in, y int in) returns (Boolean)
The function receives a reference to the widget and receives the absolute x and y
coordinates of the mouse pointer. The function returns a Boolean value that
indicates whether to continue the drag operation.
v onDrag references a function that the EGL Runtime calls repeatedly, as the drag
operation proceeds; specifically, each time the browser records a mouse-move
event. The function has characteristics that are shown in the following Delegate
part:
Delegate DragFunction(widget Widget in,
dropTarget Widget in,
x int in, y int in)
The function receives references to the widget being dragged and to the widget
(if any) over which the mouse pointer is passing. If the mouse pointer is not
60
EGL Rich UI 7.5.1.5
passing over any widget, the second argument is null. The function also receives
the absolute x and y coordinates of the mouse pointer and has no return value.
The function itself should update the position of the widget (or some other
image) in response to the mouse-move event.
v onDropOnTarget references a function that the EGL Runtime calls once, when the
user releases the mouse to end the drag operation. The function has
characteristics that are shown in the following Delegate part:
Delegate DropOnTargetFunction(widget Widget in,
dropTarget Widget in,
x int in, y int in)
The function receives references to the widget being dropped and to the widget
(if any) under the mouse pointer. If no widget is under the mouse pointer, the
second argument is null. The function also receives the absolute x and y
coordinates of the mouse pointer and has no return value.
Here is an example you can bring into your workspace:.
import com.ibm.egl.rui.widgets.TextField;
handler MyHandler type RUIHandler{initialUI =[myTextField]}
myTextField TextField{text =
"What a drag!", position = "absolute", x = 110, y = 210, width = 120,
onStartDrag = start, onDrag = drag, onDropOnTarget = drop};
dx, dy int;
function start(myWidget Widget in, x int in, y int in) returns(boolean)
dx = x - myWidget.x;
dy = y - myWidget.y;
return(true);
end
function drag(myWidget Widget in, drop Widget in, x int in, y int in)
myWidget.x = x - dx;
myWidget.y = y - dy;
end
function drop(widget Widget in, drop Widget in, x int in, y int in)
end
end
The start function calculates the difference between the location of the mouse
pointer and the top-left corner of the widget. The effect of using that calculation is
that the mouse pointer is displayed at the same place on the widget throughout
the operation. To see the effect, run the code twice, clicking the bottom-right corner
of the widget to start the drag-and-drop operation each time:
1. Run the code as shown
2. Run the code only after replacing the statements in the drag function with the
following assignments:
myWidget.x = x;
myWidget.y = y;
Additional examples are in Rich UI Shadow.
Chapter 4. Rich UI programming model
61
Rich UI job scheduler
The Rich UI job scheduler is a timer that lets you invoke a customized function
after a specified number of milliseconds. You can schedule multiple jobs and can
cancel them in response to runtime conditions.
You can try the following example in your workspace:
import com.ibm.egl.rui.widgets.Button;
import egl.javascript.Job;
handler MyHandler type RUIhandler { initialUI = [stopButton],
onConstructionFunction = initialization }
stopButton Button{text="Stop!", onclick ::= pleaseStop};
doThis Job{runFunction = myRunFunction};
function initialization()
doThis.repeat(1000);
end
function myRunFunction()
sysLib.writeStdOut(currentTime());
end
function pleaseStop(e event in)
doThis.cancel();
end
end
Use of this capability requires that you type the following import statement:
import egl.javascript.Job;
You cannot add that statement with the Ctrl-Shift-O mechanism that is available
for Widget types.
Two definitions may clarify the relationships:
v The run function is the function that is invoked when the job is scheduled. The
run function in our example is myRunFunction.
v The current function is the function that is running while the timer is running.
The job scheduler is a variable based on an EGL external type named Job. When
you declare the variable, you can set the following properties:
name
Used by the EGL debugger to identify the job scheduler. If you omit this
property, the value of name is the variable name.
runFunction
Identifies the run function, which has no parameters and no return value.
You can use a job scheduler to invoke the following functions:
schedule (int milliseconds)
Sets a timer immediately for the specified number of milliseconds and causes a
subsequent invocation of the run function. The invocation occurs, at earliest,
when the timer elapses or when the current function ends, whichever happens
last. If you omit milliseconds, the invocation occurs, at earliest, as soon as the
current function ends.
62
EGL Rich UI 7.5.1.5
repeat (int milliseconds)
Sets a timer immediately for the specified number of milliseconds and then
causes repeated invocation of the run function.
The timer is reset each time the run function starts. The rule for each
invocation of the run function, including the first, is that the invocation occurs,
at earliest, when the timer elapses or when the current function ends,
whichever happens last.
cancel()
Cancels later invocations of the job.
The invocation of a run function never interrupts the execution of another
function. For example, between the time when a job is scheduled and the time
when the invocation of the run function is possible, the user might click a button
to cause scheduling of an event handler. In that case, the invocation of the job
function waits at least until the event handler invokes its own subordinate
functions, if any, and ends.
You can create multiple variables of type JOB and in this way schedule multiple
jobs and even invoke the same run function. In all cases, only one function can run
at a given time, and it runs to completion.
If you use the same variable to reschedule a job, the previous use of that variable
is canceled.
Overview of service access
This section gives background information on remote service access, with an
emphasis on EGL Rich UI. The underlying purpose of the technologies described
here is to provide a calling mechanism, so that one unit of logic—such as your
Rich UI application—can exchange data with another unit of logic—a service that
might be half a world away.
We can distinguish between two kinds of service technologies:
v Traditional Web services fulfill a Remote Procedure Call (RPC) style. In this case,
you pass a business-specific operation name (for example, GetEmployeeData)
and a set of arguments. With this style, invoking a service is similar to invoking
a function.
v In contrast, REST services conform to the rules of Representational State Transfer
(REST). The RESTful style is based on the transfer of (at most) a single unit of
business data; for example, a set of values that includes an employee number,
title, and salary. The invoked service fulfills one of four preset operations:
– GET, for reading data; for example, to retrieve details on the specified
employee
– POST, for creating data
– PUT, for updating data
– DELETE, for deleting data
When you access a service that fully conforms with the principles of REST, you
do not need to include a business-specific operation name such as
GetEmployeeData.
A service provider indicates whether a service is deployed as a traditional Web
service or as a REST service. An important difference between the two kinds of
service technologies is their relative complexity:
Chapter 4. Rich UI programming model
63
v A traditional Web service receives and returns data that is in a format called
SOAP. which once stood for Simple Object Access Protocol. The long name was
dropped.
The complexity of a traditional Web service is related not only to the message
format, but to the required presence of a configuration file at deployment time.
That configuration file is called a Web Services Description Language (WSDL)
file, as described later.
The overall complexity has a benefit for enterprise development, allowing for
advanced capabilities related (for example) to security and to coordination
among services.
v A traditional REST service exchanges messages but does not require the added
complexity of SOAP. Access to this kind of service usually does not involve a
configuration file.
REST involves a different way of thinking about service interaction and
construction. To some extent, the EGL implementation lets you access a REST
service while thinking about the service as if it fulfilled the RPC style.
The next sections provides additional details about the technologies.
Background on REST
REST involves four main ideas: resource, representation, URI, and action.
A resource—for example, a database row with employee data—has (at a given time)
a representation—what we earlier called a "single unit of business data." A
representation might be a set of program values that specify the employee number,
title, and salary.
The resource—in our example, the database row—also has a universal resource
indicator (URI), which is a unique name such as "http://www.example.com/
gateway/employee/0020". In this case, the employee number is 0020. In general,
the URI gives a name to the resource. Also, the URI provides the main detail
needed to access a REST service.
An action indicates what is to be done with the resource. As suggested earlier, the
possible actions are few: the resource can be created, read, updated , or deleted.
The requester of a REST service identifies a resource, specifies an action, and (if the
action involves resource creation or update) provides a representation of the
resource. However, the practical use of REST does not always conform to this idea,
as noted in the next section.
REST and HTTP
The practical application of REST involves Hypertext Transfer Protocol (HTTP),
which is a set of rules that governs the runtime transmission of Web pages on the
Internet. The HTTP message that invokes a service (or retrieves a Web page) is
called a request. The HTTP message that returns a status value is called a response.
An HTTP request begins with a verb that identifies an action. As suggested earlier,
here are the verbs used by Rich UI:
v POST, for creating a resource
v GET, for reading a resource
v PUT, for updating one
64
EGL Rich UI 7.5.1.5
v DELETE, for deleting one
In HTTP, a URI may specify the resource of interest in the following ways:
v The URI can include path variables, which are variables whose values identify the
resource of interest in a direct way, without requiring that a service process the
input to determine the resource. In the following example, the employee number
is a path variable, and its value is appended to the URI:
http://www.example.com/gateway/employee/0020
Path variables are appropriate in most cases. You might use multiple path
variables, with one separated from the next by a forward slash. That use of
multiple variables suggests a hierarchical relationship. For example, the path
variables in the following URI refer to a corporate division (Consumer) and,
within that division, a corporate department (Sales):
http://www.example.com/gateway/employee/Consumer/Sales
v In relation to a GET operation, the URI can be supplemented with query
parameters, which are argument-value pairs. In the following example, the
question mark (?) precedes the query parameters, and each parameter is
separated from the next by an ampersand (&):
http://www.example.com/gateway/employee?division=Consumer&dept=Sales
In comparison to the use of path variables, the use of query parameters is
considered less ideal—less RESTful. Use of query parameters is most appropriate
when a service uses the argument-value pairs as input to logic that is in the
service and that determines the data of interest.
An HTTP request or response may include HTTP headers, which are
argument-value pairs such as Content-Length=2500. An important use of headers
is for security. A service may require or allow headers other than those specified in
the HTTP definition.
Some REST services do not conform to the REST style
In some cases, a service that uses HTTP and has no SOAP message is called a
REST service but does not fully conform to the REST style. Here are some common
variations:
v Some REST services use a POST request for tasks other than creating a new
resource. EGL lets you avoid sending a representation for a POST request.
v Some REST services require that a DELETE request include a representation (the
business data) rather than simply relying on the URI to identify the resource to
delete. EGL supports access of REST services that require a representation for a
DELETE request, but also supports access of REST services that do not have that
requirement.
EGL REST services
When an EGL Rich UI application accesses a REST service written in EGL, the
access involves an RPC style that is somewhat like a function invocation. In this
case, parameters and a return value identify the data to exchange, and path
variables and query parameters are not involved. The service access always uses a
POST request, but that detail is hidden by the EGL code.
Background on SOAP
The body of a message exchanged by a REST service contains the business content
being transferred. However, the body of a message exchanged by a Web service
Chapter 4. Rich UI programming model
65
contains text in a SOAP format, and within that text is the business data. The
SOAP message comes after the HTTP headers and is structured as follows:
<Envelope>
<Header>
<!-- SOAP header detail -->
</Header>
<Body>
<!-- Business data -->
</Body>
</Envelope>
SOAP is usually associated with Web Services Description Language (WSDL). A
WSDL file describes a service's interface requirements (operations, parameters, and
return values) and gives details needed to access the service at a specific location.
The products that include Rich UI let you easily create and use WSDL definitions.
The main benefit of the related, runtime SOAP support is that you can interact
with a Web service without being concerned about the most technical details of the
transferred data.
Service generation and Rich UI
Service generation is not supported in a Rich UI project. However, you can write
service logic in an EGL General or EGL Web project, use that logic as the basis of a
SOAP or REST service (which is generated into an EGL Web project), deploy the
service to a Web server, and access the deployed service from a Rich UI
application.
Sources of additional information
A good introduction to REST is Richardson and Ruby's book Restful Web Services
(O'Reilly Media, Inc., May 2007).
For an overview of service interaction and some of the RPC-related technologies,
see SOA for the Business Developer by Margolis and Sharpe (MC Press, May 2007).
That text also gives an overview of the following areas, which affect Rich UI:
v Extensible Markup Language (XML), which is the basis of the SOAP format
used with a Web service and is sometimes the basis for messages exchanged
with a REST service
v XML Schema, which is information—essentially, a code—that is used to validate
XML
ExternalType for JavaScript code
EGL lets your Rich UI application access non-generated JavaScript. You may be
making general logic available—for example, to provide a random number
generator—or you may be referencing a non-EGL widget—for example, to allow
use of a DoJo widget inside your code. In either case, your tasks are twofold:
1. To write non-generated JavaScript
2. To develop an EGL external type that makes the JavaScript logic available to a
Rich UI application. The JavaScript is said to be the implementation of the
external type.
66
EGL Rich UI 7.5.1.5
When you write the JavaScript, you invoke an EGL-specific function, whether
egl.defineClass, for general logic, or egl.defineWidget, for a widget definition. In
each case, the JavaScript is solely for use by EGL and is likely to be invoking other
JavaScript that is available to you.
We advise you to avoid using multiple versions of the same runtime library in a
given Rich UI application; the use of multiple versions may introduce errors.
The current topic describes the use of egl.defineClass. For details on defining a
new widget, see Extending the Rich UI widget set.
Structuring your general-use JavaScript code
If you are making general logic available —for example, a random number
generator—place your JavaScipt file in a subdirectory of the WebContent folder.
The file invokes the JavaScript function egl.defineClass. Here is the outline:
egl.defineClass(
’packageName’, ’className’,
’superclassPackageName’, superclassName,
{
"constructor": function()
{ },
"otherFunction": function(parameterList)
{ }
}
);
The italicized details are as follows:
packageName
The name of the package in which the EGL external type will reside. The
package name is case sensitive and is required.
className
An identifier that you are assigning as the JavaScript class name. The class is a
predefined collection of functions, and the name must be the name of the EGL
external type JavaScriptName property, which defaults to the name of the
external type. The class name is case sensitive and is required.
superclassPackageName
Optional. The name of the package in which the EGL external type for a super
class resides. The package name is case sensitive; and if you specify this value,
you must also specify superclassName.
superclassName
Optional. The name of a super class, which is also the name of an EGL
external type that makes the superclass available to EGL source code. The
superclass name is case sensitive; and if you specify this value, you must also
specify superclassPackageName.
parameterList
List of function parameters.
The function named "constructor" is optional and, if present, runs as soon as you
declare an EGL variable of the external type. That function cannot have any
parameters and can be in any position in the list of functions.
Chapter 4. Rich UI programming model
67
You may define multiple classes in a single JavaScript file, but the convention is to
include only one class, with the same name as the file. For example, here is the
code in file RandomNumberGenerator.js, which makes available a random number
generator:
egl.defineClass(
’randomNumber’, ’RandomNumberGenerator’,
{
"constructor" : function()
{
this.upperLimit = 100;
},
"setUpperLimit" : function(limit)
{
this.upperLimit = limit;
},
"getUpperLimit" : function()
{
return this.upperLimit;
},
"generateRandomNumber" : function()
{
return Math.floor(Math.random()*this.upperLimit);
}
}
);
Writing the external type
In relation to JavaScript, the EGL External Type stereotype is JavaScriptObject, as
shown in the following example:
package randomNumber;
import com.ibm.egl.rui.JavaScriptObject;
import com.ibm.egl.rui.JavaScriptProperty;
ExternalType RandomNumberGenerator type JavaScriptObject
{
relativePath = "randomnumber",
javaScriptName = "RandomNumberGenerator"
}
upperLimit int {@JavaScriptProperty{getMethod = "getUpperLimit",
setMethod = "setUpperLimit"}};
function generateRandomNumber() returns(int);
end
The external type can include the extends clause, to reference an external type that
represents a super class, as in the following example outline:
ExternalType MyType extends OtherType type JavaScriptObject
end
The external type also can include the following part-level properties:
relativePath
The location of the JavaScript file in relation to the WebContent folder.
68
EGL Rich UI 7.5.1.5
javaScriptName
The name of the JavaScript file.
includeFile
Identifies other CSS, JavaScript, or HTML files that are made available at run
time. The path specified in includeFile is relative to the WebContent directory;
an example is "JS/myFile.js".
The following file might be used if you were using the external type to
reference a DoJo widget, as described in Extending the Rich UI widget set with
DoJo:
<script type="text/javascript" src="http://o.aolcdn.com/dojo/1.0.0/dojo/dojo.xd.js">
</script>
<style type="text/css">
@import "http://o.aolcdn.com/dojo/1.0.0/dijit/themes/dijit.css";
@import "http://o.aolcdn.com/dojo/1.0.0/dijit/themes/tundra/tundra.css";
@import "http://o.aolcdn.com/dojo/1.0.0/dojo/resources/dojo.css"
</style>
<script>
dojo.require("dijit.form.Button");
dojo.require("dijit.form.Slider");
</script>
That file loads the Dojo widget library and Dojo CSS files and starts the Dojo
runtime.
As shown in the example of an external type, a field in that type can include the
following field-level property:
@JavaScriptProperty
This complex property is required if you wish to access, from your EGL code,
a JavaScript global field (a field of the form this.myField). If you wish to
assign a value from your EGL code, the JavaScript must define the field in the
function named "constructor". However, you can retrieve a value from the
JavaScript field regardless of where the field is defined in the JavaScript.
In general, @JavaScriptProperty identifies JavaScript functions that get and set
the JavaScript field value. You can use this property without specifying
function names if the names of the functions are built with the word get or set
followed by the variable name. For example, if the variable is UpperLimit and
the JavaScript class includes functions named getUpperLimit() and
setUpperLimit(), you only need to add the complex property, as in this
example:
UpperLimit INT { @JavaProperty{} };
The property fields in @JavaScriptProperty are as follows:
getMethod
A string (enclosed in quotation marks) containing the name of the get
method for the specified variable (do not include parentheses). The method
has no parameters, and its return value has the same type as the field.
setMethod
A string (enclosed in quotation marks) containing the name of the set
method for the specified variable (do not include parentheses). The method
has one parameter that has the same type as the field. By convention the
setMethod does not have a return value, but no error condition results if
the method returns a value.
Chapter 4. Rich UI programming model
69
If you specify only one of the two property fields, EGL assumes that the
unspecified function is not available. An error does not occur unless an
expression that causes invocation of the function that is assumed to be missing.
JavaScript field names are case sensitive, as is the field name in the external
type.
Relationship of EGL and JavaScript data types
Table 3. EGL and JavaScript data types
EGL type
JavaScript type (case-sensitive)
STRING
String
BOOLEAN
Boolean
SMALLINT, INT, FLOAT, SMALLFLOAT
Number
BIGINT, DECIMAL, MONEY, NUM
egl.JavaScript.BigDecimal (as described in a
later section)
DATE, TIME, TIMESTAMP
Date
EGL arrays are passed to JavaScript as JavaScript arrays. If an EGL type (such as
an array) is set to null, the JavaScript code receives a JavaScript null.
egl.JavaScript.BigDecimal
The supplied JavaScript class egl.javascript.BigDecimal can precisely represent
numbers with a very large number of digits. This class also has methods for
performing mathematical operations with BigDecimals.
The native numeric type in JavaScript is the Number class, which is a
floating-point representation of numbers. It is imprecise and cannot represent
many values. Rounding errors may occur when you do math with values of the
Number class.
A BigDecimal object cannot be changed once it has been created. For example, to
add two BigDecimal values, write the code as follows:
var result = bigDecimal1.add( bigDecimal2 );
The result is lost if you write the code as follows:
bigDecimal1.add( bigDecimal2 );
The egl.javascript.BigDecimal constructor takes one argument, which is a String
containing the desired value for the BigDecimal. Numbers in String form must
have at least one digit and may not contain a blank. They may have a leading sign,
may have a decimal point, and may be in exponential notation. Here are some
valid arguments:
v "0"
v "12"
v "-76"
v "12.70"
v "+0.003"
v "17."
v ".5"
v "4E+9"
70
EGL Rich UI 7.5.1.5
v "0.73e-7"
Here are JavaScript methods that use objects of egl.javascript.BigDecimal (such
objects are identified as bd, and Number objects are identified as n):
v abs() returns the absolute value of the BigDecimal
v add( bd ) returns the sum of the current object and the argument.
v compareTo( bd ) returns -1 if the current object is less than the argument, 1 if the
current object is greater than the argument, or 0 if they're equal.
v divide( bd ) returns the result of dividing the current object by the argument.
v divideInteger( bd ) returns the integer part of the result of dividing the current
object by the argument.
v equals( obj ) -- The parameter obj is any object. Returns true if the argument
(which can be any object) is a BigDecimal with the same value and scale
(number of decimal digits) as the current object. Returns false is the argument is
not a BigDecimal, or is a BigDecimal with a different value or scale.
v max( bd ) returns the current object or the argument, whichever is greater.
v min( bd ) returns the current object or the parameter, whichever is smaller.
v movePointLeft( n ) Returns a BigDecimal that is equivalent to the current object
(a Number), but with the decimal point shifted to the left by the specified
number of positions.
v movePointRight( n ) returns a BigDecimal that is equivalent to the current object
(a Number), but with the decimal point shifted to the right by the specified
number of positions.
v multiply( bd ) returns the result of multiplying the current object by the
argument.
v negate() returns the negation of the current object.
v pow( bd ) returns the result of raising the current object to the specified power.
The power must be in the range -999999999 through 999999999 and must have a
decimal part of zero.
v remainder( bd ) divides the current object by the argument and returns the
remainder.
v setScale( n, mode ) returns a BigDecimal with the given scale (number of decimal
digits). The argument n is a Number, and the optional argument mode is a
constant, as described later.
If n is larger than the current scale, the method adds trailing zeros to the
decimal part of the number. If n is smaller than the current scale, the method
removes trailing digits from the decimal part of the number, and mode indicates
how to round the remaining digits. Here are the possible values of mode:
– The default (egl.javascript.BigDecimal.prototype.ROUND_UNNECESSARY)
indicates that no rounding is necessary.
– egl.javascript.BigDecimal.prototype.ROUND_CEILING causes rounding to a
more positive number.
– egl.javascript.BigDecimal.prototype.ROUND_DOWN causes rounding toward
zero.
– egl.javascript.BigDecimal.prototype.ROUND_FLOOR causes rounding to a
more negative number.
– egl.javascript.BigDecimal.prototype.ROUND_HALF_DOWN causes rounding
to the nearest neighbor, where an equidistant value is rounded down.
Chapter 4. Rich UI programming model
71
– egl.javascript.BigDecimal.prototype.ROUND_HALF_EVEN causes rounding to
the nearest neighbor, where an equidistant value is rounded to the nearest
even neighbor.
v
v
v
v
– egl.javascript.BigDecimal.prototype.ROUND_HALF_UP causes rounding to
the nearest neighbor, where an equidistant value is rounded up.
– egl.javascript.BigDecimal.prototype.ROUND_UP causes rounding away from
zero.
scale() returns the number of digits after the decimal point, as a Number.
signum() returns -1 if the number is negative, zero if the number is zero, and 1 if
the number is positive.
subtract( bd ) returns the result of subtracting the parameter from the current
object.
toString() returns a String representation of the BigDecimal object.
The following constants are also defined by BigDecimal:
v egl.javascript.BigDecimal.prototype.ZERO is BigDecimal with the value zero.
v egl.javascript.BigDecimal.prototype.ONE is a BigDecimal with the value one.
v egl.javascript.BigDecimal.prototype.TEN is a BigDecimal with the value ten.
JavaScriptObjectException
If a non-generated JavaScript function is invoked by way of an external type and if
the function throws an error, the invocation causes an EGL
JavaScriptObjectException. Like every EGL exception, the
JavaScriptObjectException has message and messageID fields.
If a JavaScript error object is caught, the message field is set from the equivalent
field of the error object. Otherwise, the message field receives a string that is
equivalent to the value thrown by the JavaScript function.
Here is the additional field in JavaScriptObjectException:
name
If a JavaScript error object is caught, the name field is set from the equivalent
field of the error object. Otherwise, the name field receives an empty string.
Extending the Rich UI widget set
You can use EGL to create a new widget type or can use JavaScript.
Rich UI widgets
A Rich UI widget is written in EGL and is of type RUIWidget (specifically,
egl.ui.rui.RUIWidget). You often need to do only as follows:
v Specify an HTML tag name in property tagName. Alternatively, specify a
declared Widget in property targetWidget, in which case the following
statements apply:
– The HTML tag that is the basis of the referenced widget's type is the basis of
the Widget type that you are defining
– You can use the name of the referenced widget to access the functions and
properties defined for that widget's type
If you specify both tagName and targetWidget, the latter applies.
72
EGL Rich UI 7.5.1.5
v Specify the @VEWidget complex property if you want the widget to be
represented in the developer's palette.
v Specify the @EGLProperty complex property for each EGL property. The values
of EGL properties are set when a developer creates a widget that is based on the
widget type that you are writing.
v Specify an on-construction function and set a CSS class name in that function.
v Build the functionality from other widgets.
Here is the outline of an H3 definition, which requires no import statements:
Handler H3 type RUIWidget{tagName = "h3", onConstructionFunction = start,
@VEWidget{
category = "New Widgets",
template = "my.package.H3{ text=\"The Heading Text\" }",
smallIcon = "icons/h3small.gif",
largeIcon = "icons/h3large.gif" }}
text String
{ @EGLProperty { getMethod=getText, setMethod=setText },
@VEProperty{}};
function start()
class = "EglRuiH3";
end
function setText(textIn String in)
text = textIn;
this.innerText = textIn;
end
function getText() returns (String)
return (text);
end
end
Given this definition, you can create widgets that are based on the type H3. For
example, the following declaration creates a box with a nested H3 widget:
ui Box { children = [
new H3 { text = "Summary" }
]};
@VEWidget
When you write a Rich UI widget (or an external-type widget—type
egl.ui.rui.Widget—as described in another topic), you can specify the complex
property @VEWidget. The EGL editor uses the details of any @VEWidget property
in the workspace, adding entries to the palette when you refresh the palette. The
property has the following fields:
category (type STRING)
In the palette, the category in which the widget is listed. The categories are
listed in alphabetical order.
If the category does not exist, a new category will be created with the name
you specify. The category is particularly useful to distinguish same-named
widgets such as Rich UI buttons and Dojo buttons.
description (type STRING)
In the palette, the description that is displayed when the user hovers over the
widget entry.
displayName (type STRING).
In the palette, the widget name. The names are listed in alphabetical order
within a category.
Chapter 4. Rich UI programming model
73
The default value is the name of either the external type or the handler of type
RUIWidget.
template (type STRING)
The part of the widget type declaration that follows the widget name,
excluding the semicolon. In our example, the declaration includes a set-value
block, as is necessary to avoid an error. Here is an example declaration:
myH3 my.package.H3{ text="The Heading Text" };
If you want the EGL system code to specify the widget type and to include a
qualifier (such as my.package) only if necessary, start the template string with
the typeName variable. Here is an example:
template = "${typeName}{}"
Here is a related declaration, assuming that the widget type shown earlier is in
the same package as the handler that receives the declaration:
myH3 H3{};
Here is another example:
template = "${typeName}{ text=\"The Heading Text\" }"
Here is the related declaration:
myH3 H3{ text="The Heading Text" };
smallIcon (type STRING)
The path for the gif file that contains the small icon that is displayable on the
palette. The path is relative to the project directory. For example, if the project
is com.egl, the gif files listed earlier are in com.egl/icons.
largeIcon (type STRING)
The path for the gif file that contains the large icon that is displayable on the
palette. The path is relative to the project directory. For example, if the project
is com.egl, the gif files listed earlier are in com.egl/icons.
container (type @VEContainer)
Specify the container field as follows:
container{@VEContainer{}}
The presence of container has the following implications:
v At run time, the widget can include other widgets.
v At development time, the EGL developer can drag-and-drop other widgets
into the widget being defined.
v The widget must include a field named children. The field named children
must be of type Widget[] ; and you must define the property @EGLProperty
for that field, as described later.
In addition, @VEWidget lets you specify which RUIWidget properties and events
(as well as external-type properties and events) are to be displayed in the
Properties view. For example, a displayed entry for backgroundColor is provided
for any handler of type RUIWidget (or even for a widget provided by an external
type); but backgroundColor may not be appropriate for the widget you are
defining. Here are the @VEWidget property fields that filter the properties and
events that are otherwise displayed by default:
eventFilter (STRING[])
An array of event names (such as ["onClick", "OnScroll"]) to include or
exclude from display, depending on the value of eventFilterType.
74
EGL Rich UI 7.5.1.5
eventFilterType (type INT)
One of the following values (either the integer or the related constant):
1. RUILib.EXCLUDE_ALL excludes all the events defined for RUIWidget
(type egl.ui.rui.RUIWidget) and, in the case of external types, for Widget
(type egl.ui.rui.Widget). In this case, any values for eventFilter are ignored.
2. RUILib.EXCLUDE_ALL_EXCEPT excludes all the events defined for
RUIWidget and Widget except those specified in the value of eventFilter.
3. RUILib.INCLUDE_ALL includes all the events defined for RUIWidget and
Widget. In this case, values for eventFilter are ignored.
4. RUILib.INCLUDE_ALL_EXCEPT includes all the events defined for
RUIWidget and Widget except those specified in the value of eventFilter.
propertyFilter (STRING[])
An array of property names (such as ["font", "fontSize"]) to include or
exclude from display, depending on the value of propertyFilterType.
propertyFilterType (type INT)
One of the following values (either the integer or the related constant):
1. RUILib.EXCLUDE_ALL excludes all the properties defined for RUIWidget
(type egl.ui.rui.RUIWidget) and, in the case of external types, for Widget
(type egl.ui.rui.Widget). In this case, any values for propertyFilter are
ignored.
2. RUILib.EXCLUDE_ALL_EXCEPT excludes all the properties defined for
RUIWidget and Widget except those specified in the value of
propertyFilter.
3. RUILib.INCLUDE_ALL includes all the events defined for RUIWidget and
Widget. In this case, values for propertyFilter are ignored.
4. RUILib.INCLUDE_ALL_EXCEPT includes all the events defined for
RUIWidget and Widget except those specified in the value of
propertyFilter.
Here is an example of an external type for which the only displayed event types
are onScroll and onChange and for which the only displayed properties are color
and backgroundColor:
ExternalType DojoButton extends DojoBase type JavaScriptObject {
relativePath = "dojo/widgets",
javaScriptName = "DojoButton",
includeFile = "dojo/widgets/dojobutton.html",
@VEWidget{
category = "Dojo",
template = "dojo.widgets.DojoButton { text = \"Button\" }",
displayName = "Button",
smallIcon = "icons/ctool16/dijit_button_pal16.gif",
largeIcon = "",
propertyFilterType = RUILib.EXCLUDE_ALL_EXCEPT,
propertyFilter = ["color", "backgroundColor"],
eventFilterType = RUILib.EXCLUDE_ALL_EXCEPT,
eventFilterType = ["onScroll", "onChange"]
}
Changes to @VEWidget are available to the EGL editor only if you refresh the
palette. You refresh the palette by clicking the Refresh palette tool on the Design
surface, as noted in Using the tools on the Design surface.
Chapter 4. Rich UI programming model
75
@EGLProperty
@EGLProperty identifies EGL functions that get and set the EGL field value when
an EGL Rich UI application uses the property. You can use this property without
specifying function names if the names of the functions are specified with the
word get or set followed by the variable name. For example, if the variable is
UpperLimit and the Rich UI Widget type includes functions named
getUpperLimit() and setUpperLimit(), you only need to add the complex
property, as in this example:
UpperLimit INT { @EGLProperty{} };
The property fields in @EGLProperty are as follows:
getMethod
A string (enclosed in quotation marks) containing the name of the get method
for the specified variable (do not include parentheses). The method has no
parameters, and its return value has the same type as the field.
setMethod
A string (enclosed in quotation marks) containing the name of the set method
for the specified variable (do not include parentheses). The method has one
parameter that has the same type as the field. By convention the setMethod
does not have a return value, but no error condition results if the method
returns a value.
To indicate that a field is read only or write only, you can specify only one of the
two property fields. If the Rich UI application tries to read or write to a property
for which the read or write is not supported, an error occurs before the EGL
generator accesses the application code.
@VEProperty
When you write a Rich UI widget (or an external-type widget, as described in
another topic), you can ensure that widget-specific properties are in the Properties
view whenever you use the EGL editor to create a widget of the new type. You
make the properties available by setting @VEProperty for each widget field that
you want to list in the Properties view. @VEProperty is useful only when the
@VEWidget and @EGLProperty properties are set.
Here are example uses of @VEProperty::
mySimpleProperty String {
@EGLProperty{},
@VEProperty{category = "Basic"}};
myChoiceProperty String{
@EGLProperty{},
@VEProperty{category = "Advanced",
propertyType = "choice",
choices = [
@VEPropertyChoice {displayName = "3D", id = "3"},
@VEPropertyChoice {displayName = "4D", id = "4"}
]}};
Not shown are the functions that get and set the EGL properties.
The property fields in @VEProperty are as follows:
76
EGL Rich UI 7.5.1.5
category
The category in which the property is listed in the Properties view. If the
category does not exist, a new category is created with the name you specify.
The category field takes a string.
The categories in the Properties view are in reverse order of their initial
reference in the Rich UI widget or external type. The last-specified category is
listed first, and the categories that are available for all widgets are displayed
last. Similarly, the properties in a given category are in reverse order of
declaration in the Rich UI widget or external type.
propertyType
The type of value required in the property. By default, the type is the type of
the field in the widget definition. The only valid value for propertyType is
choice, which is used if you intend to specify an array of choices, as shown in
the previous example.
choices
An array of @VEPropertyChoice elements, each of which includes at least the
first of the following two fields:
displayName
A string that represents the choice in the Properties view. This value is
required.
id A string that holds the content assigned to the property in the Rich UI
application. This value is required. The type of the assigned value must be
the same as the type of the property that is receiving the value.
Changes to @VEProperty are available to a file in the EGL editor only if you
refresh the palette and the file. To refresh the palette, click the Refresh palette tool
on the Design surface, as noted in Using the tools on the Design surface. To refresh
the file, click the Refresh Web page tool on the Preview tab, as noted in Running a
Web application in the EGL editor.
@VEEvent
When you write a Rich UI widget that uses the targetWidget property (or when
you write an external-type widget, as described in another topic), you can declare
event types that are not otherwise defined. In this way, you can let the business
developer think more clearly about defining a sequence of tasks. Also, the
developer can assign an event handler at the Events view.
The next example shows use of a customized button (MyButton), which uses the
property @VEEvent. If you try out the example in your workspace, note that the
EGL developer can now use the EGL editor for the following purposes: to create a
button of type MyButton and to assign event handlers for the newly defined
events (onPreClick and onPostClick).
Here is a handler that accesses a button of type MyButton:
package pkg;
import com.ibm.egl.rui.widgets.Button;
handler MyHandler type RUIhandler {initialUI = [ someButton ]}
someButton MyButton{text = "fresh",
onPreClick ::= respondToPreClick,
onClick ::= respondToClick,
onPostClick ::= respondToPostClick};
Chapter 4. Rich UI programming model
77
function respondToPreClick(e Event in)
sysLib.writeStdout("in pre");
end
function respondToClick(e Event in)
sysLib.writeStdout("in click");
end
function respondToPostClick(e Event in)
sysLib.writeStdout("in post");
end
end
Here is the definition of MyButton:
package pkg;
import com.ibm.egl.rui.widgets.Button;
handler MyButton type RUIWidget {
targetWidget = internalButton,
@VEWidget{
category = "New EGL Widgets",
template = "pkg.myButton{ text=\"myButton\" }"}
}
text string {@EGLProperty{setMethod = setText,
getMethod = getText},
@VEProperty{}};
internalButton Button{onClick ::= respondToClick};
onPreClick EventHandler[] {@VEEvent{}};
onClick EventHandler[] {@VEEvent{}};
onPostClick EventHandler[] {@VEEvent{}};
private function setText(text String in)
internalButton.text = text;
end
private function getText() returns (String)
return ( internalButton.text );
end
private function respondToClick(e Event in)
preSize int = onPreClick.getSize();
clickSize int = onClick.getSize();
postSize int = onPostClick.getSize();
for (i int from 1 to preSize by 1)
OnPreClick[i](e);
end
for (i int from 1 to clickSize by 1)
OnClick[i](e);
end
for (i int from 1 to postSize by 1)
OnPostClick[i](e);
end
end
end
78
EGL Rich UI 7.5.1.5
Changes to @VEEvent are available to a file in the EGL editor only if you refresh
the palette and the file. To refresh the palette, click the Refresh palette tool on the
Design surface, as noted in Using the tools on the Design surface. To refresh the file,
click the Refresh Web page tool on the Preview tab, as noted in Running a Web
application in the EGL editor.
@Override
Use the @Override property if want to override a function that is available in any
widget. For example, the definition of the Box widget overrides the function
removeChild, as shown here:
function removeChildren() {@Override}
// EGL statements are here
end
For a list of functions that are available in all widgets, see Widget properties and
functions.
External type widgets
You can create an external type widget by writing custom JavaScript or by
accessing specialized JavaScript libraries.
To create a new Rich UI widget based on JavaScript, do as follows:
1. Create a JavaScript file to contain the code for the widget. Invoke
egl.defineWidget and specify the following arguments:
v The package name of the EGL external type that defines the widget; for
example, egl.rui.widgets)
v The name of the widget class (for example, Button); that class name is the
name of the external type you will create
v The package name of the EGL external type that defines the parent widget;
however, if that parent type is widget (the most elemental choice), specify
egl.ui.rui
v The name of the parent widget class (for example, Label)
v The HTML element type (for example, button)
Here is the example:
egl.defineWidget( ’egl.rui.widgets’, ’Button’,
’egl.rui.widgets’, ’Label’,
’button’, { } );
2. Within the curly brackets ( { } ), define the JavaScript functions to reflect the
following outline, separating one function from the next with a comma:
"functionName" : function(/*parameters*/)
{ //JavaScript Source }
Here is an example:
"getSelected" : function() {
return this.check.checked;
},
"setSelected" : function(value) {
this.check.checked = value;
},
"toString" : function() {
return "[CheckBox, text=\""+this.egl$$DOMElement.innerHTML+"\"]";
}
3. Each widget can specify the following functions for the JavaScript runtime to
invoke:
Chapter 4. Rich UI programming model
79
v The function constructor is invoked whenever a new widget instance is
created, and that function can be used, for example, to initialize data
v The function egl$$initializeDOMElement is invoked whenever the HTML
element is being created for the widget, and that function can be used, for
example, to set initial properties on the element
v The function childrenChanged is invoked whenever the application
developer updates the new widget's children property, if any.
Each widget also has a field called this.egl$$DOMElement, which represents
the HTML element (or top-level HTML element) created for the widget.
4. In an EGL source file, create an EGL external type that extends from
egl.ui.rui.Widget or from an existing widget. The External Type needs a
stereotype of JavaScriptObject, as described in External type for JavaScript.
Extending the Rich UI widget set with Dojo
You can write widgets that are based on Dojo, a popular JavaScript library that is
described at http://dojotoolkit.org.
We provide a sample named dojo, which includes the following four files:
v Button.egl introduces the following EGL external type, which uses the text field
from the native Rich UI Button type extended by the new widget:
ExternalType Button extends Button type JavaScriptObject
{ relativePath = "dojo",
javaScriptName = "Button",
includeFile = "dojo/dojo.html"
}
end
As shown, the implementation language is JavaScript, and use of the Button
type requires access to dojo.html.
v Button.js contains the JavaScript implementation that is referenced in the
external type definition. The JavaScript identifies the new widget and defines the
following functions:
– egl$$initializeDOMElement loads Dojo and defines code to enable event
handlers (written by the EGL developer) to respond to onClick events. The
function then replaces the DOM node with a Dojo equivalent and causes the
EGL widget to refer to the Dojo node.
– setText ensures that the new widget can write text into the Dojo-specific
DOM node.
– getText ensures that the new widget can retrieve text from the Dojo-specific
DOM node.
v dojo.html is an HTML file containing two script tags for inclusion in the
EGL-generated JavaScript. The first of the two tags accesses a version of the
Dojo library, which is being provided at a Web site hosted by America Online.
The second of the two tags indicates that a specific widget definition
(dijit.form.Button) will be retrieved from the Dojo library.
In your own projects, you might download and install Dojo into your workspace
and refer directly to the dojo.js file that is included with the Dojo distribution
you downloaded. The benefits are as follows:
– Your code is insulated from changes that a Dojo provider might make to its
version of the JavaScript file
– You can work with Dojo without needing to access an external Web site
v DojoSample.egl is EGL code that demonstrates use of the new widget.
80
EGL Rich UI 7.5.1.5
Notice that DojoSample.egl, the code written for interacting with the new widget,
is all-but identical to the code written to interact with the Rich UI button in the
buttontest sample (file OneButton.egl); the APIs are the same, for ease of use by
the EGL developer.
You can place the files Button.egl, Button.js, and dojo.html in a standalone project
and store that project in a repository so that others in your organization can use
the Dojo functionality without their needing to maintain duplicate JavaScript
implementations. Also, you can expose additional DoJo widgets to EGL developers;
for example, by coding Tree.egl and Tree.js to provide the Dojo Tree widget.
As shown in the sample, you need to be aware of an unusual requirement when
you create widgets with Dojo. When any Rich UI application is running, a
hierarchy of EGL widgets is in memory, and each widget refers to one or more
nodes of the document object model (DOM). The difference when you work with
Dojo is that you first replace native DOM elements with nodes that are specific to
Dojo and then ensure that the EGL widgets refer to those nodes.
Extending the Rich UI widget set with Silverlight
You can write widgets that are based on Silverlight, a browser plugin that is
described at http://silverlight.org. Silverlight uses an XML dialect called XAML for
defining user interfaces and uses the .Net platform for handling events. You can
access the Silverlight runtime from the browser by running JavaScript code.
We provide a sample named Silverlight, which includes the following files:
v Button.egl introduces the following EGL external type, which extends the Rich
UI Widget type:
ExternalType Button extends Widget type JavaScriptObject
{
relativePath = "silverlight",
javaScriptName = "Button",
includeFile = "silverlight/Silverlight.html"
}
text String
{ @JavaScriptProperty
{ getMethod="getText", setMethod="setText" } };
end
As shown, the implementation language is JavaScript, and use of the Button
type requires access to Silverlight.html.
v Button.js contains the JavaScript implementation that is referenced in the
external type definition. The JavaScript identifies the new widget and defines the
following functions:
– setText ensures that the new widget can write text into the DOM node
– getText ensures that the new widget can retrieve text from the DOM node
– egl$$update defines an XAML fragment and enables EGL event handling for
the onClick event
v Canvas.xaml contains an empty container for Button.js to use as a canvas when
painting a button.
v Silverlight.html is an HTML file containing a script tag for inclusion in the
EGL-generated JavaScript.
v Demo.egl is EGL code that demonstrates use of the new widget.
Chapter 4. Rich UI programming model
81
Notice that Demo.egl, the code written for interacting with the new widget, is
all-but identical to the code written to interact with the Rich UI button in the
buttontest sample (file OneButton.egl); the APIs are the same, for ease of use by
the EGL developer.
You can place the files Button.egl, Button.js, canvas.xaml and Silverlight.html in a
standalone project and store that project in a repository so that others in your
organization can use the Silverlight functionality without their needing to maintain
duplicate JavaScript implementations. Also, you can expose additional Silverlight
examples, such as an image carousel or a videoplayer.
Silverlight is a trademark of Microsoft Corporation.
82
EGL Rich UI 7.5.1.5
Chapter 5. Accessing a service in EGL Rich UI
Service invocation in Rich UI is always asynchronous, which means that the
requester—the Rich UI handler—continues running without waiting for a response
from the service. The user can still interact with the user interface while the Rich
UI handler waits for the service to respond. After the invocation, the service does
some task and, in most cases, responds to the EGL Runtime, which in turn invokes
a Rich UI function that you code: a callback function. The invocation by the EGL
Runtime is described as issuing a callback.
To invoke a service from Rich UI, you create an EGL Interface part that includes
properties indicating how the service is accessed at run time. You then create a
variable based on the Interface part and use the variable in a call statement. The
call statement includes the details necessary for the EGL Runtime to issue a
callback.
EGL Rich UI Proxy
The EGL Rich UI Proxy is runtime software that is installed with your Rich UI
application if the deployment target is WebSphere Application Server or Apache
Tomcat. The EGL Rich UI Proxy handles communication between the application
and any services that are accessed by the application:
v In relation to a Web-service request, the proxy receives the request from the
application, reads a WSDL file on the server, formats a SOAP message for
transmission to the service, and sends a service request. On receiving a response
from the service, the proxy reformats that response for use in the callback
function and sends the response to the application.
v In relation to a REST service, the process is similar but simpler, with no use of a
WSDL file.
The Rich UI application uses the EGL Rich UI Proxy to access every invoked
service, even services that are on the same server. However, if you install your
Rich UI application to an HTTP server (for example, to Apache HTTP server), the
Proxy is not available and service access is not supported.
Accessing a REST service in Rich UI
The basic tasks required to access any service in Rich UI are as follows:
1. Create an Interface part.
2. Create a variable based on that part.
3. Code a call statement
4. Code a callback function that is referenced in the call statement
5. In most cases, you also specify an onException function, which receives an
exception from the service call if the service returns an exception instead of
business content
Creating an Interface part to access a REST service
You define an EGL Interface part in a file made available to the EGL library or
Rich UI handler that invokes a service. The Interface part may be in the same EGL
package or may be imported from a separate package.
© Copyright IBM Corp. 2000, 2010
83
An EGL Interface part includes one or more function prototypes, which are
descriptions that tell how to write code to access a given service operation. A
function prototype includes the operation name, parameters (if any), and return
type (if any). The prototype does not include the operation's logic, which is
available only in the service.
The Interface part of an EGL REST service is simpler than for a non-EGL REST
service, and we describe each Interface part in turn.
Interface part for accessing an EGL REST service
Here is an example Interface part for accessing an EGL REST service; the example
includes a single function prototype:
Interface EmployeeService
Function GetEmployeeDetail(employeeCode STRING IN,
employeeSalary FLOAT OUT,
employeeStatus STRING INOUT)
returns(myEmployeeRecordPart);
end
As shown, you can specify a variety of EGL data types and can use the modifiers
IN, OUT, and INOUT.
You can create the Interface part automatically:
1. In the Project Explorer, right click the EGL file that defines the service
2. Click EGL Services > Extract EGL Interface
3. Specify details on the New EGL Interface part dialog and click Finish
In short, the Interface part for an EGL REST service reflects the same rules as an
Interface part for an EGL Web SOAP service.
Interface part for accessing a third-party REST service
Here is an example Interface part for accessing a third-party REST service:
Interface WeatherForecast
Function GetWeatherByZipCode(zipcode string in) returns(myRecordPart)
{@GetRest{uriTemplate="/GetWeatherByZipCode?zipCode={zipcode}",
requestFormat = JSON,
responseFormat = JSON}};
end
If the purpose of the Interface part is to describe the operations available in a
third-party REST service (not an EGL REST service), you must specify a complex
property for each function prototype. The name of the property indicates the HTTP
verb used to access the service: the property name is @GetREST for GET (as shown
in the previous example), @PostREST for POST, @PutREST for PUT, and
@DeleteREST for DELETE. We refer to those complex properties as the @xREST
properties because the same three property fields are in each, as described in the
section @xREST properties.
In the call statement used to access a third-party REST service, the argument
passed to a given function parameter has one of two purposes:
v In most cases, the argument provides a value that Rich UI includes in the URI.
We show this usage later, when describing the @xREST properties. Those values
are not passed to the service logic; they are values that are embedded in the
URI.
84
EGL Rich UI 7.5.1.5
v In the case of one argument (at most), the argument is a representation
processed by the service; for example, a record that contains values used to
create a database-table row. Here are details:
– If the property is @PostREST or @PutREST for a given operation, the
additional argument is present, and we call the related parameter the
representation parameter. (In practice, the argument also may be necessary if the
property is @DeleteREST; the need for such an argument depends on the
service provider.) If the @GetREST property is present, all the arguments
assigned to the function parameters are used to construct the URI.
– A callback function receives the value, if any, that is returned by the service.
In short, if the function prototype has a parameter that is not identified in the
property field uriTemplate (for @PostREST, @PutREST, or @DeleteREST), that
parameter is a representation parameter. Either of the following cases is an error:
v Specifying more than one representation parameter
v Specifying a representation parameter when @GetREST is in use
For details on the data types valid for a given parameter, see “Specifying
parameters for service access in Rich UI.”
You do not need to create an Interface part. Instead, you can use IRest, which is an
Interface part that is provided for you and that can be the basis of a variable used
to access any REST service. We describe that Interface part in the section “Using a
provided Interface part for a 3rd-party REST service.” In any case, the next section
describes the @xREST properties.
@xREST properties used for third-party REST services
Each of the @xREST complex properties has the fields uriTemplate, requestFormat,
and responseFormat:
v uriTemplate is an outline of part or all of the URI used to access the service
v requestFormat is the format for the representation of the resource sent to the
service
v responseFormat is the format for the value returned to the callback function
Here are further details:
uriTemplate
A string that (in most cases) outlines a relative URI; which is composed of the
last qualifiers in the URI that will be used to access the service. The string also
may include query parameters. The first URI qualifiers—the base URI—are
specified in one of three ways:
v When you declare a variable based on the Interface part, you can set the
base URI. In this case, the base URI is set at development time, with no
change possible at configuration time or run time. This usage is simple and
fast, but inflexible.
v Alternatively, when you declare a variable based on the Interface part, you
can identify an entry in a deployment descriptor. In this case, an initial value
for the base URI is in the deployment descriptor, and at configuration time,
a code installer can change that value.
v Regardless of how you specify an initial value for the base URI, you can run
the function serviceLib.setServiceLocation to change the value at run time.
Chapter 5. Accessing a service in EGL Rich UI
85
If you do not set the base URI, the value of uriTemplate includes the complete
URI.
In most cases, the value of the uriTemplate property has two aspects:
v The value of the uriTemplate property can include a constant value. Those
characters are present in (or after) every URI that is used to access the
function. In the previous example, the value of uriTemplate includes a query
parameter, and the constant value is as follows:
/GetWeatherByZip?zipcode=
If we change our example to include a path variable instead of the query
parameter, the constant value is as follows:
/GetWeatherByZip/
v The value of the uriTemplate property can include substitution variables,
each of which is a function-parameter name within curly braces. The
previous example includes a single substitution variable:
{zipcode}
For our original example with a query parameter, here is a relative URI and
query parameter used to access the service:
/GetWeatherByZip?zipcode=02135
If we use a path variable in place of the query parameter, here is a relative
URI:
/GetWeatherByZip/02135
A further detail is that RichUI automatically performs a URL encoding on
each substitution value that is specified in a call statement, with one
exception. For example, if your call statement indicates that the value for a
given substitution variable is "Jeff Smith", Rich UI converts the string to
"Jeff%20Smith" so that the URI is valid. However, if the value of a
substitution value begins with http, Rich UI does no URL encoding because
the call statement is specifying an argument that provides a complete URL.
If you are responsible for URL encoding, review the documentation on
system function serviceLib.convertToURLEncoded.
The default value of the uriTemplate field is an empty string so that, by
default, you can specify the complete URI by setting the base URI.
requestFormat
A value that indicates the format of the representation sent to the service:
v XML, to indicate that the format is Extensible Markup Language
v NONE, to indicate that the representation is a string (or a value compatible
with a string) and is sent as is
v JSON, to indicate that the format is JavaScript Object Notation
v FORM, to indicate that the format is form data, which is a record composed
of argument-value pairs. In the following example of the value sent to the
service, each argument is separated from the next by an ampersand (&):
division=Consumer&dept=Sales
For a given field in the Record part that is the basis of form data, you can
specify the property FormName. That property lets you work with an
argument name that is an EGL reserved word or is not valid in EGL. Here is
an example use of FormName:
record anyRecord
continue boolean {FormName="continue-content"};
end
86
EGL Rich UI 7.5.1.5
The runtime code uses the value of FormName as the name of the argument
transmitted to the service. Here is a representation that might be sent to the
service, in our example:
continue-content=yes
The default value of the property FormName is the name of the record field.
In our example, the default is continue.
You cannot override the value of FormName when you declare a record that
is based on the Record part.
If the representation is a record, the following statements apply:
v The default value of requestFormat is XML.
v JSON is also valid.
v FORM is valid, too, but only if every field in the record is of type STRING
or is of a type that is assignment-compatible with STRING. FORM is not
valid if the record references another record.
responseFormat
A value that indicates the format of the representation returned to the callback
function:
v XML, to indicate that the returned representation is in XML format
v NONE, to indicate that the returned representation is a string
v JSON, to indicate that the returned representation is in JSON format
If the return value is a string (or a value compatible with string), the default
value of responseFormat is NONE, which is the only valid format. If the return
value is a record, the default value of responseFormat is XML, and JSON is
also valid.
You can specify an @xREST property without assigning values to the property
fields. Here is an example:
Interface IEmployeeService
Function GetEmployeeDetail() returns(myRecordPart)
{@GetRest{}};
end
The lack of property fields has the following meaning:
v The complete REST service URI—such as http://www.ibm.com/myservice—must be
provided in some way, with no detail being provided in the Interface part. For
details on the three choices for specifying the base URI, see the earlier
description of uriTemplate.
v If the representation parameter (or, for @GetREST, the return value) is a string,
the EGL Runtime does no conversion. You must handle the conversion and can
use any of the following functions for that purpose:
– serviceLib.convertFromJSON
– serviceLib.convertToJSON
– XMLLib.convertFromXML
– XMLLib.convertToXML
v If the representation parameter is a record, the EGL Runtime converts the related
argument to Extensible Markup Language (XML) format.
v For @GetREST, if the return value is a record, the EGL Runtime converts that
record from XML format.
Chapter 5. Accessing a service in EGL Rich UI
87
Declaring an interface to access a REST service
To give additional details on how to access the REST service, you declare a
variable in the EGL library or Rich UI handler that invokes the service. That
variable is based on the Interface part.
For example, here is a declaration based on the Interface part WeatherForecast:
myService WeatherForcast {@RESTBinding {baseURI="http://www.ibm.com/gateway"}};
In that declaration, you can specify either of two properties, each of which gives
you a way to specify the following details:
v The initial value of the base URI.
v The session cookie ID, which is a string that identifies the session cookie provided
to the EGL Rich UI Proxy from a service. The service logic in this case is stateful,
which means that the user and logic can participate in a multistep conversation.
This setting is meaningful only if an EGL external type makes an IBM i program
or service program available as an EGL REST service. For background
information, see “Accessing IBM i programs as Web services.”
When you use stateful REST services, the connection and all the associated IBM
i resources are retained until the session on the service side is invalidated. The
service-side session is invalidated when the requesting code invokes
serviceLib.endStatefulServiceSession() or when the application server
invalidates the session, typically because of a timeout.
The two properties are @RESTBinding and @BindService. You can use
@RESTBinding to specify the base URI and session-cookie ID directly in your
code, as is simple but inflexible. You can use @BindService to specify those details
in a deployment descriptor, as allows for changes at configuration time.
Here is a description of those two properties, which are mutually exclusive:
@RESTBinding
Use this property to specify, in your code, the base URI in the code, the session
cookie ID, or both. @RESTBinding includes the following fields:
baseURI
A string that identifies the first qualifiers in the URI being used to access
the service. The default value of baseURI is an empty string.
sessionCookieID
The name of a session cookie. The default value is JSESSIONID, which is
always the session ID when your application runs on Apache Tomcat.
If your application runs on WebSphere Application Server, you can
override the value specified in sessionCookieID by setting a value for the
defaultSessionCookieID build descriptor option.
@BindService
Use this property to use a deployment-descriptor entry to identify the base
URI, the cookie-session-ID, or both. The property has one field:
bindingKey
Identifies the deployment-descriptor entry that includes the two details.
You can specify @BindService without specifying the bindingKey field, in
which case the property identifies the deployment-descriptor entry that has the
same name as the Interface part. Here is an example of that usage, which
refers to the deployment-descriptor entry named WeatherForecast:
88
EGL Rich UI 7.5.1.5
MyService WeatherForecast {@BindService{}}
Coding a call statement and callback functions for service
access
Here is the syntax of the call statement used in Rich UI:
call serviceName.operationName(argumentList)
returning to myCallbackFunction onException myExceptionHandler
{timeout = milliseconds};
serviceName
Name of a variable based on an Interface part.
operationName
Name of the Interface part function prototype.
argumentList
List of arguments, each separated from the next by a comma.
A change made to a parameter value in the service has no effect on the value
of the argument variable provided in the call statement.
For details on the restrictions placed on parameters sent to a third-party
(non-EGL) REST service, see Specifying parameters for service access in Rich UI,
myCallbackFunction
Name of a callback function or delegate that is available to the call statement.
In most cases, the function or delegate is in the same Rich UI handler or in a
library. A later section describes the callback function.
myExceptionHandler
Optional. Name of a exception handler or delegate that is available to the call
statement. In most cases, the exception handler or delegate is in the same Rich
UI handler or in a library. A later section describes the exception handler.
If you do not have your own exception handler, you can specify the following
delegate: serviceLib.serviceExceptionHandler. Here are some implications:
v By default, the effect of specifying that delegate is to automatically invoke a
system function that writes the content of the exception message field to the
standard output. In the product, the standard output is the console view. In
an external browser, the standard output is the bottom of the Web page.
v Alternatively, you can make customized exception handling consistent
throughout a set of applications. First, assign a different exception handler to
the delegate; for example, by writing a setup function in your own library
(such as in myLibrary) and by including the following statement in that
function:
serviceLib.serviceExceptionHandler = myLibrary.myExceptionHandler;
Second, invoke the setup function in Rich UI handler on-construction
functions. For every service invoked by a call statement (if the statement
includes serviceLib.serviceExceptionHandler), the EGL Runtime responds to
a runtime exception by running the customized exception handler; in this
case, by running myLibrary.myExceptionHandler.
milliseconds
The maximum valid number of milliseconds that elapse between the following
events: when the EGL Rich UI Proxy (on the Web server) invokes a service and
when the Proxy receives a response. If more time elapses, the EGL Runtime
throws a ServiceInvocationException.
Chapter 5. Accessing a service in EGL Rich UI
89
You can set a default value for milliseconds in the defaultServiceTimeout build
descriptor option. The defaultServiceTimeout build descriptor option has no
default value set, meaning that if you do not specify a value for either
defaultServiceTimeout or for milliseconds, the service call will not time out. For
more information, see “defaultServiceTimeout” on page 132.
Keystroke assistance for the call statement
The following kinds of keystroke assistance are available:
v After you type the returning to or onException keyword in the call statement,
you can request content assist by typing Ctrl-Space. In each case, a list of
functions is displayed and you can select one.
v If you type the call statement with the ending semicolon and include reference
to a callback or onException function that does not exist, you can request the
Workbench to create the missing logic:
– Press Ctrl-1
– Alternatively, right click after the semicolon and respond to the dropdown
menu by selecting Create Callback Functions
Callback function
The callback function receives the values, if any, that are in the response sent by
the service. The callback itself has no return value.
If the callback function is invoked from a third-party REST service, the function
may have zero or one parameter, If a parameter is specified, its type must match
the type of the return value specified in the Interface part, and the parameter
modifier is IN.
If the callback function is invoked from a Web SOAP service or from an EGL REST
service, the relationship of the function parameters and the service-invocation
parameters is best described by example:
v Consider the following function prototype in an Interface part:
Interface EmployeeService {}
Function GetEmployeeDetail(employeeCode STRING IN,
employeeSalary FLOAT OUT,
employeeStatus STRING INOUT)
returns(myEmployeeRecordPart);
end
v Here is an interface declaration and call statement used to invoke the service:
myInterface EmployeeService;
call myInterface.GetEmployeeDetail("A123", 25.8, "Full-time")
returning to myCallback onException myExceptionHandler;
v Here is the outline of a callback function:
Function myCallBack(salary FLOAT IN,
status STRING IN,
myRecord myEmployeeRecordPart IN)
// statements here
end
The callback function includes one parameter for each service-operation
parameter that is OUT or INOUT, and the order of those parameters in the
callback function is the same as the order in the service operation. The
service-operation return value is represented as the last parameter in the callback
function.
90
EGL Rich UI 7.5.1.5
In general, the rule for designing the callback function for a Web SOAP service or
an EGL REST service is as follows:
v The callback function has a series of parameters that are in the same order as the
OUT and INOUT parameters in the service invocation
v If the service invocation has a return value, the callback function includes an
additional, last parameter to accept the return value
v Each parameter in the callback function has the modifier IN
OnException function
The onException function has the following characteristics:
v The onException function has no return value
v The function accepts an Exception record of type AnyException, and you can
test that record to determine the specific type received
Here is the outline of an onException function:
Function myExceptionHandler(exp AnyException)
case
when (exp isa ServiceBindingException)
;
when (exp isa ServiceInvocationException)
;
otherwise
;
end
end
Errors of various kinds are possible:
v In a service binding; that is, in how the service access is specified in your code,
possibly involving a problem in the deployment descriptor
v In the communication of the Rich UI application with the EGL Rich UI Proxy
v In the EGL Rich UI Proxy
v In the communication of the EGL Rich UI Proxy with the service
v In the service
A problem in a service binding results in a ServiceBindingException. Other
problems result in a ServiceInvocationException or (less likely) a
RuntimeException.
Using a provided Interface part for a 3rd-party REST service
The following Interface part is provided for accessing a third-party (non-EGL)
REST service:
interface IRest
function invokeGet(reqURL string in) returns(string)
{@getRest {uriTemplate="{reqURL}"}};
function invokePost(reqURL string in, representation string in) returns(string)
{@postRest {uriTemplate="{reqURL}"}};
function invokePut(reqURL string in, representation string in) returns(string)
{@putRest {uriTemplate="{reqURL}"}};
function invokeDelete(reqURL string in, representation string in) returns(string)
{@deleteRest {uriTemplate="{reqURL}"}};
end
By using this Interface part as is, you avoid having to write one of your own.
However, the work required to code the call statement is different, as shown in the
following example:
Chapter 5. Accessing a service in EGL Rich UI
91
myVar IRest;
myResource String = ServiceLib.convertToJson(myRec);
call myVar.invokePost("http://www.example.com", myResource)
returning to myCallbackfunction;
The differences are as follows:
v You do not pass multiple arguments that are used as substitution values. Here
are different ways to construct the URI:
– You can pass the whole URI (as shown in the example)
– You can also specify the whole URI in the variable declaration, as shown
here:
myVar IRest {@RESTService {baseURI="http://www.example.com"};
myResource String = ServiceLib.convertToJSON(myRec);
call myVar.invokePost("", myResource)
returning to myCallbackfunction;
– You can rely on the variable declaration to provide the base URI and then
pass a relative URI
v When you invoke a service with POST, PUT, or (possibly) DELETE, you need to
ensure that the representation (a string) is in the format required by the REST
service, as shown by use of one of the following functions:
– serviceLib.convertToJSON, for JSON conversion; or
– XMLLib.convertToXML, for XML conversion.
If you need a function prototype that has a different characteristic—for example, a
DELETE operation that does not require you to pass a representation—create a
similar Interface part, but change the function prototype InvokeDelete or add a
prototype with a different name. Here is a changed prototype:
function invokeDelete(reqURL string in) returns(string)
{@deleteRest {uriTemplate="{reqURL}"}};
Specifying parameters for service access in Rich UI
An Interface (or Service) part is used for service access and includes function
prototypes such as the following one:
Function GetEmployeeDetail(employeeCode STRING IN,
employeeSalary FLOAT OUT,
employeeStatus STRING INOUT)
returns(myEmployeeRecordPart);
This topic lists the rules for specifying parameters in a function prototype used in
Rich UI.
First, if the prototype is used to access an EGL REST or SOAP service, the
prototype can include IN, OUT, and INOUT parameters.
Second, the following statements apply to a prototype used to access a third-party
(non-EGL) REST service:
v The IN modifier is required for each parameter
v If a parameter is used to help construct the URI or the query string, the
following rules apply:
– The parameter's name must match the name of the substitution variable in
the URI template
– The parameter's data type can be a primitive type or related data item
92
EGL Rich UI 7.5.1.5
– The primitive type must be STRING or one the following types, which are
assignment-compatible with STRING: FLOAT, BIN, or one of the integer
equivalents to BIN (INT, SMALLINT, or BIGINT)
v The value of a representation parameter can be a string, one of the previously
mentioned assignment-compatible types, or a non-structured Record part whose
only fields fulfill the following rules:
– The field is of type STRING or is assignment-compatible with STRING.
– The field is based on a non-structured Record part. Specifically, the field can
be based on a Record part that includes only strings (or assignmentcompatible values) or other non-structured Record parts. The nesting of
records within records can be to any level.
Accessing IBM i programs as Web services: overview
You can use EGL to expose the logic in an IBM i called program or service
program by way of an EGL external type. The EGL generator uses that external
type to create an EGL REST or SOAP service so that an application that is acting as
a service requester can access any of the following kinds of IBM i programs: rpgle,
cbl, cblle, sqlrpgle, sqlcbl, and sqlcblle.
To access an IBM i program:
1. Create an external type (type HostProgram)
2. In the Services deployment section of the EGL deployment descriptor editor,
select that external type and enter other appropriate information.
3. Deploy the resulting Web service to a JEE-compliant application server.
It is difficult to design the Record parts that will become the basis of the records
used during service invocation. However, if you use IBM Rational® Business
Developer for i for SOA Construction, you can use a wizard to create content in
two projects:
v The service project (a Web project) includes the following components, which are
used to develop the code that accesses the IBM i program:
– An external type, stereotype HostProgram, which includes function
prototypes that mirror the signatures of functions in the IBM i program of
interest
– EGL structured Record parts that are referenced by parameters and return
values in the function prototypes
– A deployment descriptor with an entry that includes the following details: a
URI for accessing the service, a reference to the external type, and a set of
connection parameters for accessing the program from IBM WebSphere
Application Server or Apache Tomcat.
– A Program Call Markup Language (PCML) file, as noted later.
v The client project (a Rich UI project) includes the following components, which
are used to develop the EGL Rich UI application that accesses the service:
– An Interface part that is like the external type placed in the service project
– A set of non-structured Record parts that are referenced by parameters and
return values in the function prototypes of the Interface part; the fields in
those Record parts are equivalent to the bottommost (leaf) fields in the
structured Record parts
– A deployment descriptor with an entry that accesses the service
Some IBM i (non-EGL) host programs are stateful:
Chapter 5. Accessing a service in EGL Rich UI
93
v A stateful program retains information between invocations so that the user and
program can participate in a multistep conversation.
v When you are providing access to a stateful host program and you set up the
deployment descriptor of the Web project that includes the external type, you
must specify that the service is a REST service, not a SOAP service. To indicate
that the host program is stateful, customize the deployment descriptor by
selecting the Stateful checkbox in the deployment descriptor editor.
v The stateful aspect of host-program access is made possible by a session cookie
that is provided by the service to the EGL Rich UI Proxy. The cookie holds an
identifier for the HTTP session. You identify the session cookie when you
declare a variable based on the Interface part, as noted in “Declaring an interface
to access a REST service.”
v The EGL Rich UI Proxy retains the session ID in between service invocations. To
release runtime resources after you invoke the service for the last time in your
application, invoke the serviceLib.endStatefulServiceSession() function.
The HTTP session detail is retained on the service-access variable. For stateful
services, the life span of the session of the requester depends on where the variable
is declared. For example, if the variable is declared in a function invocation, the
session of the requester lasts as long as the function is in scope. If the variable is
declared on a library, the session of the requester is retained until the library goes
out of scope. If you are accessing a stateful REST service, ensure that you declare
the variable in such a way that the variable does not go out of scope prematurely.
External type that provides access to an IBM i program
Here is an example of an external type that provides access to an IBM i program.
ExternalType GETREC type HostProgram {platformData=[@i5OSProgram{ programName="GETREC",
programType=NATIVE, isServiceProgram=false, libraryName="*LIBL"}]}
function GETREC(CUST CUSTa10, EOF char(1), COUNT decimal(2,0)){ hostName="GETREC"};
end
The platformData property accepts an array. In this example, the array has a single
entry for the @i5OSProgram complex property. The property fields for
@i5OSProgram are as follows:
programName
The name of the program on IBM i. The default is the name of the external
type.
programType
Either EGL (for a program written in EGL) or native (for a program written in
COBOL or RPG). The default is NATIVE.
isServiceProgram
A Boolean indicating whether the program is an IBM i service program. The
default is false.
libraryName
The IBM i library. The default is *LIBL.
The hostName property is available for a function prototype and identifies the
name of the program function. The default is the name of the function prototype.
94
EGL Rich UI 7.5.1.5
Correspondence in data type between IBM i and EGL record
fields
The Workbench converts the IBM i data types from the host source into a Program
Call Markup Language (PCML) definition. The Workbench then uses that
definition to create the external type and records.
The PCML file is retained for two reasons. First, you can update the file for use as
the input in subsequent runs of the wizard. For example, you might put together a
PCML definition that corresponds to entry points in several programs. If you use
that definition as an input file, the external type created by the wizard can reflect
all the entry points. Second, IBM technical-support representatives can use the
retained PCML file as a debugging tool, if necessary.
The following table lists the corresponding data types in IBM i structured records
and EGL structured records.
Table 4. Corresponding data types in IBM i structured records and EGL structured records
IBM i
Rules
EGL data type in the EGL
external type
char
charType = single byte
CHAR (PCML length)
charType = double byte
UNICODE (PCML length)
2 byte
signed
precision != 16, length=2
SMALLINT
2 byte
unsigned
precision = 16, length = 2
INT
4 byte
signed
precision != 32, length = 4
BIGINT
4 byte
unsigned
precision = 32, length = 4
BIGINT
8 byte
signed
length = 8
BIGINT
int
packed
DECIMAL (PCML length,
PCML precision)
zone
NUM (PCML length, PCML
precision)
float
byte
length = 4
SMALLFLOAT
length = 8
FLOAT
HEX (PCML length * 2)
You might need to update the Workbench-created EGL record fields that
correspond to IBM i types that are not supported by EGL or are not converted by
PCML. Details about PCML are available in the online information center for IBM
WebSphere Development Studio Client for iSeries®: http://
publib.boulder.ibm.com/infocenter/iadthelp/v7r0/topic/
com.ibm.etools.iseries.webtools.doc/topics/rdtcattr.html.
Some host structures do not have corresponding EGL types. Here is a COBOL
example:
Chapter 5. Accessing a service in EGL Rich UI
95
01 P1 PIC 9(5) USAGE BINARY.
01 P2.
02 P2A PIC X(5) OCCURS 1 to 10 TIMES
DEPENDING ON P1.
Correspondence in data type between equivalent EGL record
fields
The following table lists the corresponding data types in structured and
non-structured records. You might need to update the Workbench-created
non-structured record fields that are of type HEX or INTERVAL.
Table 5. Corresponding data types in structured and non-structured records
Data Type in Structured Record
Data Type in Non-Structured Record
BOOLEAN
BOOLEAN
CHAR, DBCHAR, MBCHAR, STRING,
UNICODE
STRING
HEX
HEX
DATE
DATE
TIME
TIME
TIMESTAMP
TIMESTAMP
INTERVAL
INTERVAL
DECIMAL, BIN(length), BIGINT, INT,
MONEY, NUM, SMALLINT, SMALLFLOAT
Corresponding numeric types
BIN(length, decimalPlaces) where
decimalPlaces > 0
NUM(length, decimalPlaces)
NUMC(length, decimalPlaces)
NUM(length, decimalPlaces)
PACF(length, decimalPlaces)
NUM(length, decimalPlaces)
Accessing IBM i programs as Web services: keystroke details
The EGL generator creates a SOAP Web service or EGL REST Web service so that
an application acting as a service requester can access any of the following kinds of
IBM i programs: rpgle, cbl, cblle, sqlrpgle, sqlcbl, and sqlcblle. For background
information, see Accessing IBM i programs as Web services: overview. This topic
describes the keystroke details, which can be fulfilled in the product IBM Rational
Developer for i for SOA Construction.
Prerequisites are as follows:
v Your Workspace includes a Web or General project to contain (a) the external
type that represents your IBM i program, and (b) the structured Record parts
that are used as the basis of records exchanged between the Web service and the
IBM i program.
v Your Workspace includes a Rich UI project to contain the Interface and
non-structured Record parts that your Rich UI application uses to access the IBM
i code at run time.
v You have a connection from the Workspace to your IBM i system. The
connection is available in the Remote Systems Explorer perspective.
Please note that the wizard described here does not handle creation of an Interface
part to access a Web (SOAP) service. For that case, do as follows:
96
EGL Rich UI 7.5.1.5
1. Generate the deployment descriptor, which creates the WSDL file and places it
in WebContent/WEB-INF/wsdl
2. Right-click the WSDL file, select EGL Services → Create EGL client interface,
and fulfill the steps specified in the wizard, remembering to place the Interface
part in the Rich UI project
Creating external types and structured Record parts
To create the external types and structured Record parts, do as follows:
1. In the Remote Systems Explorer perspective, right-click the entry for IBM i
program source or for an existing Program Call Markup Language (PCML)
definition.
2. Select EGL Services → Create EGL: External Type, Interface, and records
3. The first of two New EGL part dialog boxes is displayed. In the middle of the
box, select an external type to create. At the bottom of the box, click the check
boxes that indicate whether you want to create a Web (SOAP) service, a Web
(REST) service, or both. If you select Create REST Web services, you can create
an Interface part and non-structured Record parts for use by the Rich UI
application. If you do not want the Interface and Record parts, clear Create
EGL Rich UI Interface for REST Web service. Later, if you want an Interface
part for the REST service, do as follows: right click the external type, select
EGL Services → Extract EGL Interface, and fulfill the steps specified in the
displayed wizard, remembering to place the Interface part in the Rich UI
project.
4. Click Next. The second New EGL part dialog box is displayed:
a. In the Source folder field, specify the project that receives the external type
and structured Record parts. Also specify a backslash (\) and the source
folder.
b. In the Package field, specify the package name. We strongly recommend
you specify a package name; otherwise, no other project can access the parts
in the project you identified.
c. In the EGL source file name field, specify the file name.
5. In the subsequent fields, specify the details for a given external type, being
careful to specify whether the program is a service program:
a. In the ExternalType Name field, specify the name to create for the external
type itself
b. In the Host Program Name field, specify the name of the link-edited host
program
c. In the Host Program Library field, specify the library name for the
link-edited host program
d. If the program is a service program, select Service Program; otherwise, clear
that field and select the appropriate entry in the Host Program Type list
box, where you indicate whether the host program is NATIVE (written in
COBOL or RPG) or EGL (written in EGL).
e. In the Entrypoints field, select the program functions to expose as service
functions. To select all, click Select All. To clear all, click Deselect All.
f. To overwrite same-named files for the external types, select Overwrite
existing files. To protect yourself against overwriting existing files, clear the
check box.
6. Click Next.
Chapter 5. Accessing a service in EGL Rich UI
97
Creating Web (REST) services
If you are creating Web (REST) services, the New EGL REST Service dialog box is
displayed. Do as follows, taking special care to indicate whether the IBM i
program is stateful:
1. In the Source folder field (if available), specify a Web or General project, along
with the source folder that contains the deployment descriptor. The REST
service is an output that is created at deployment-descriptor generation time.
2. In the EGL deployment descriptor file name field (if available), specify the
name of the deployment descriptor.
3. In the middle box, select the entry for enableGenerate, for each service you
want to generate. If you already generated a REST service, you can save time at
generation time by specifying, in the deployment descriptor, that you do not
wish to generate the service. However, if you change any aspect of the
deployment-descriptor entry, you need to regenerate the service.
You can change the URI field, which identifies the low-level qualifier for the
address used to access the REST service. For details on the address, see Adding
Web service deployment information to the deployment descriptor.
For a given service, ensure that the last entry reflects whether the IBM i
program is stateful or not. Click on the entry to change the value.
4. To overwrite same-named REST-service entries in the deployment descriptor,
select Overwrite existing files. To protect yourself against overwriting existing
entries, clear the check box.
5. In the last section (if available), click the Add button to modify or add a
protocol used to access the IBM i program from the Web service. The Add
Protocol dialog box is displayed. Specify a protocol name, along with the
additional information specified in the EGL Generation Guide, Deployment
descriptor options for service clients. To return to the New EGL REST Service
dialog box, click Finish.
6. Click Next to continue your work in the wizard or (if possible) click Finish to
complete your work.
Creating Interface parts
If you indicated that you want to include Interface and Record parts with the REST
services, the New EGL Interface part dialog box is displayed. Do as follows:
1. In the Source folder field, specify the Rich UI project that receives the Interface
part, along with the source folder.
2. In the Package field, specify the package name. We strongly recommend you
specify a package name; otherwise, no other project can access the parts in the
project you identified.
3. In the EGL source file name field, specify the file name.
4. In the subsequent fields, specify the details for a given Interface part and the
related Record parts:
a. In the Interface Name field, specify the name to create for the Interface part
b. In the functions area, identify each IBM i function that will be represented
in the Interface part. The wizard creates a non-structured Record parts for
each parameter that is not a primitive type.
5. To overwrite existing files, select Overwrite existing files. To protect yourself
against overwriting existing files, clear the check box.
98
EGL Rich UI 7.5.1.5
Creating Web (SOAP) services
If you are creating Web (SOAP) services, the New EGL Web Service dialog box is
displayed. Do as follows:
1. In the Source folder field (if available), specify a Web or General project, along
with the source folder that contains the deployment descriptor. The Web service
is an output that is created at deployment-descriptor generation time.
2. In the EGL deployment descriptor file name field (if available), specify the
name of the deployment descriptor.
3. In the middle box, select the entry for enableGenerate, for each service you
want to generate. If you already generated a Web service, you can save time at
generation time by specifying, in the deployment descriptor, that you do not
wish to generate the service. However, if you change any aspect of the
deployment-descriptor entry, you need to regenerate the service.
4. To overwrite same-named SOAP-service entries in the deployment descriptor,
select Overwrite existing files. To protect yourself against overwriting existing
entries, clear the check box.
5. In the last section (if available), click the Add button to modify or add a
protocol used to access the IBM i program from the Web service. The Add
Protocol dialog box is displayed. Specify a protocol name, along with the
additional information specified in the EGL Generation Guide, Deployment
descriptor options for service clients. To return to the New EGL Web Service
dialog box, click Finish.
6. Click Finish to complete your work in the wizard.
Accessing a SOAP (Web) service in Rich UI
The basic tasks required to access any service in Rich UI are as follows:
1. Create an Interface part.
2. Create a variable based on that part.
3. Code a call statement
4. Code a callback function that is referenced in the call statement
5. In most cases, you also specify an onException function, which receives an
exception from the service call if the service returns an exception instead of
business content
Creating an Interface part to access a Web service in Rich UI
An EGL Interface part includes one or more function prototypes, each of which
identifies an operation available in a service. As shown in the following example, a
function prototype has an ending semicolon (;) and includes a function name,
parameter list, and (optionally) a return type:
Interface WeatherForecast
Function GetWeatherByZipCode(zipcode string in) returns(myRecordPart);
end
In relation to a Web service, the function prototypes can include parameters that
have the modifiers IN, INOUT, or OUT.
Rich UI provides a way to create an Interface part based on the WSDL file:
v Bring the WSDL file for the Web service into your EGLSource folder; for
example, into a subfolder named wsdl
Chapter 5. Accessing a service in EGL Rich UI
99
v In the Project Explorer, right click the WSDL file and, at the menu, click EGL
Services, then Create EGL Client Interface
v Following the directions of the wizard that creates the Interface part. You might
put that part into a EGLSource subdirectory named interfaces.
Rich UI writes useful comments into the file that holds the Interface part, as noted
in Declaring an interface to access a Web service in Rich UI.
Declaring an interface to access a Web service in Rich UI
To provide additional details about how to access the Web service, you can create a
variable based on the Interface part.
myService WeatherForcast {@WebBinding
{wsdlLocation="wsdl/weatherForecast",
wsdlService="wsdlforecast",
wsdlPort="wsdlport"};
In that declaration, you can specify either of two properties, each of which gives
you a way to specify details that indicate how to access the Web service:
@WebBinding and @BindService. You can use @WebBinding to specify the
WSDL-file detail directly in your code. Use @BindService to specify those details
in a deployment descriptor; this property allows for changes at configuration time.
In either case, the product tooling helps you specify details.
The two properties are mutually exclusive:
@WebBinding
Use this property to specify, in your code, the details that indicate how to
access the Web service. You do not need to create the @WebService complex
property. Rich UI writes the details in a comment, which is stored in the file
that holds the Interface part created from a WSDL file. Here are the property
fields:
wsdlLocation
A string that identifies the name and location of the WSDL file. The
location is relative to the EGLSource folder. For example, if the file is named
weatherForecast.wsdl and is in the EGLSource folder, the string is
"weatherForecast.wsdl". If the file is in EGLSource/wsdl, the string is
"wsdl/weatherForecast.wsdl".
wsdlService
A string that identifies the name of the wsdl:service element in the WSDL
file.
wsdlPort
A string that identifies the name of the wsdl:port element within the
wsdl:service element in the WSDL file.
uri
If specified, a string that overrides the URL specified in the WSDL file. If
the service is available at a location other than the one specified in the
WSDL file, such as a different version of the service used for production or
testing, you can enter that location here and use that version of the service
instead. By default, this value is null.
@BindService
Use this property to use a deployment-descriptor entry to indicate how to
access the Web service. Later, when you create a Web binding in the
100
EGL Rich UI 7.5.1.5
deployment descriptor, the product tooling provides defaults for most of the
WSDL-file details described earlier (specifically, wsdlLocation, wsdlService,
and wsdlPort).
The @BindService property has one field:
bindingKey
Identifies the deployment-descriptor entry that includes the two details.
You can specify @BindService without specifying the bindingKey field, in
which case the property identifies the deployment-descriptor entry that has the
same name as the Interface part. Here is an example of that usage, which
refers to the deployment-descriptor entry named WeatherForecast:
MyService WeatherForecast {@BindService{}}
Each SOAP service invocation uses a new HTTP session, and no session
information is retained from invocation to invocation. Your code cannot usefully
call a service that is using session variables, which retain information from
invocation to invocation.
Copying a JSON string to and from an EGL variable
This topic describes the EGL record that corresponds to a JavaScript Object
Notation (JSON) string. Other topics describe the
functions—serviceLib.convertFromJSON and serviceLib.convertToJSON—that are
used by a Rich UI developer to convert JSON data to or from a variable, as may be
necessary to access a third-party REST service. A failure in either function causes a
RuntimeException.
JSON and EGL records
You can define a record to use when accessing a JSON string such as the following
one:
{ "EmpNo":10,"LastName":"Smith" }
Within the brackets of a JSON string, each identifier-and-value pair (such as
"Empno":10) is the name and value of a JSON field. To create a record part that
matches the JSON string, ensure that each field name in the record part exactly
matches (in character and case) each corresponding field name in the JSON string,
as shown in the following example:
Record MyRecordPart
EmpNo INT;
LastName STRING;
end
You can use any primitive type other than BLOB or CLOB. An EGL record field is
also valid if based on a DataItem part that is, in turn, based on one of the
supported primitive types.
The EGL property JSONName lets you work with a JSON string in which a field
name is an EGL reserved word or is not valid in EGL. Here is a variation of the
example JSON string:
{ "Emp-No":10,"LastName":"Smith" }
The problem in this case is that you cannot create an EGL record-field name that
includes a hyphen. However, you can use the property JSONName to retain the
JSON field name in the Record part, as shown here:
Chapter 5. Accessing a service in EGL Rich UI
101
Record MyRecordPart
EmpNo INT; {JSONName = "Emp-No"}
LastName STRING;
end
(You cannot override the value of JSONName when you declare a record that is
based on the Record part.)
In many situations, the record you use to access a JSON string includes records.
However, when you are using records and invoke serviceLib.convertFromJSON or
serviceLib.convertToJSON, you reference only a single record, which is based on
the topmost (most inclusive) record part of all the record parts needed. For
example, the following JSON string might be returned from a getTime service that
calculates the number of seconds since January 1, 1970:
{"Result":{"aTimestamp":1191871152}}
A general rule is that each bracketed clause in the JSON string is equivalent to an
EGL record. In the current example, you need to define two record parts. The
record you would use in serviceLib.convertFromJSON or
serviceLib.convertToJSON is based on the following part, which has a field called
Result:
Record MyTopPart
Result MyTimestampPart;
end
Given the structure of the JSON string, the next record part has a field named
aTimestamp:
Record MyTimestampPart
aTimestamp BIGINT;
end
As shown, each JSON identifier (which precedes a colon) requires the presence of a
field in a record. If a JSON field name is an EGL reserved word (for example,
"TimeStamp"), you must access serviceLib.convertFromJSON or
serviceLib.convertToJSON by using a dictionary rather than a record. We show
this variation later in this topic.
Here is another example, which (although reformatted for readability) is from
http://json.org/, a Web site that describes JSON in detail:
{"Menu":
{ "id": "file", "value": "File", "popup":
{"Menuitem":
[
{"value": "New", "onClick": "CreateNewDoc()"},
{"value": "Open", "onClick": "OpenDoc()"},
{"value": "Close", "onClick": "CloseDoc()"}
]
}
}
}
(At this writing, that example and others are at http://json.org/example.html.)
The topmost (most inclusive) record part includes a field named Menu:
Record MyTopPart
Menu MyMenuPart;
end
102
EGL Rich UI 7.5.1.5
To build the other record parts, we consider each bracketed clause in the JSON
string. The next record part (MyMenuPart) includes fields named id, value, and
popup:
Record MyMenuPart
id STRING;
value STRING;
popup MyPopupPart;
end
The next record part includes an array named MenuItem:
Record MyPopupPart
MenuItem MyElementPart[];
end
The last record part includes fields named value and onClick:
Record MyElementPart
value STRING;
onClick STRING;
end
To further explore how to use a record when accessing a JSON string, see the Rich
UI sample geocode.records.
JSON and EGL dictionaries
An EGL dictionary contains a set of entries, each comprising both a key and a
value of any type, as in the following variable declaration:
myRef Dictionary
{
ID = 5,
lastName = "Twain",
firstName = "Mark"
};
You interact with the dictionary as described in "Dictionary part" and related topics
in the EGL help system.
The following JSON string might be returned from a getTime service that
calculates the number of seconds since January 1, 1970:
{"Result":{"aTimestamp":1191871152}}
You can decide to translate the JSON string (from the leftmost to the rightmost
bracket) to a dictionary named myTime, which is declared without detail:
myTime Dictionary;
A general rule is that each bracketed clause in the JSON string is equivalent to an
EGL dictionary. In relation to our example JSON string, the function
serviceLib.convertFromJSON treats the symbol at the left of the first colon (:) as the
key of a dictionary entry. The key is Result, which is case sensitive. Here (as in all
cases) the content to the right of a colon is the value associated with the key whose
name is at the left of the colon.
The embedded brackets indicate that the value of Result is an anonymous
dictionary. As before, the colon within those brackets distinguish between a key
(aTimestamp) and a value (1191871152). In short, you can think of the output of the
function serviceLib.convertFromJSON as follows:
Chapter 5. Accessing a service in EGL Rich UI
103
myTime Dictionary
{
Result = new Dictionary{ aTimestamp = 1191871152 }
};
You can access the content of aTimestamp by using dotted syntax:
numberOfSeconds BIGINT = myTime.Result.aTimestamp;
On occasion, dotted syntax is not valid. The Yahoo getTime service, for example,
returned the following content, including the EGL reserved word Timestamp:
{"Result":{"Timestamp":1191871152}}
To access a value whose key is an EGL reserved word, you must use bracket
syntax. The following EGL code is valid for the data returned from the Yahoo
getTime service:
numberOfSeconds BIGINT = myTime.Result["Timestamp"];
Here again is the Menu example from http://json.org/:
{"Menu":
{ "id": "file", "value": "File", "popup":
{"Menuitem":
[
{"value": "New", "onClick": "CreateNewDoc()"},
{"value": "Open", "onClick": "OpenDoc()"},
{"value": "Close", "onClick": "CloseDoc()"}
]
}
}
}
In this example, the dictionary has a single entry whose key is named Menu. The
value associated with that key is an anonymous dictionary, as indicated by the
brackets that embed the string "id" and all the strings that follow. That anonymous
dictionary includes the keys id, value, and popup, along with the values of those
keys. You may never have the kind of complexity introduced by the key called
popup, but the problem is workable. You can see the relationships in the example
JSON string.
Here is a question for you to consider: What statement is necessary to access the
string "OpenDoc()", assuming that the function serviceLib.convertFromJSON has
copied the previous JSON string to a dictionary called myMenu?
The answer is as follows:
myString STRING = myMenu.Menu.popup.MenuItem[2].onClick;
The following EGL dictionary reflects the current example:
myMenu Dictionary
{ Menu = new Dictionary
{ id = "file",
value = "File",
popup = new Dictionary
{ MenuItem = new Dictionary[]
{ new dictionary {value = "New", onClick = "CreateNewDoc()" },
new dictionary {value = "Open", onClick = "OpenDoc()" },
new dictionary {value = "Close", onClick = "CloseDoc()"}
}
}
}
};
104
EGL Rich UI 7.5.1.5
To work with the function serviceLib.convertToJSON, begin by creating a
dictionary that is structured as shown in the previous examples. The following two
rules apply:
v Each dictionary in a hierarchy of dictionaries is equivalent to a bracketed clause
in the JSON string
v Each key is assigned a primitive value, a dictionary, a record, or an array of
dictionaries or records.
To further explore how to use a dictionary record when accessing a JSON string,
see the Rich UI sample geocode.dictionaries.
JSON and both records and dictionaries
You can mix records and dictionaries in the following cases:
v When you prepare to invoke serviceLib.convertFromJSON with a record
v When you prepare to invoke serviceLib.convertToJSON with a record or
dictionary
You might include a dictionary in a record to access the following JSON string:
{"Result":{"Timestamp":1191871152}}
You can define the following part:
Record ResultRecordPart
Result Dictionary;
end
Your code can access the timestamp value as follows:
myResult ResultRecordPart;
milliseconds BIGINT;
serviceLib.convertFromJSON(resp.body, myResult);
milliseconds = myResult.Result["Timestamp"] as BIGINT;
A general rule is that, if you associate an incoming JSON clause with a dictionary,
you can access data within the clause only by using a dictionary syntax. A complex
example is as follows:
{"Menu":
{ "id": "file", "value": "File", "popup":
{"Menuitem":
[
{"value": "New", "onClick": "CreateNewDoc()"},
{"value": "Open", "onClick": "OpenDoc()"},
{"value": "Close", "onClick": "CloseDoc()"}
]
}
}
}
To prepare to access the content, you can define the following parts:
Record MyTopPart
Menu MyMenuPart;
end
Record MyMenuPart
id STRING;
value STRING;
popup Dictionary;
end
Chapter 5. Accessing a service in EGL Rich UI
105
The following EGL dictionary reflects the structure named popup:
popup Dictionary
{ MenuItem = new Dictionary[]
{ new Dictionary {value = "New", onClick = "CreateNewDoc()" },
new Dictionary {value = "Open", onClick = "OpenDoc()" },
new Dictionary {value = "Close", onClick = "CloseDoc()"}
}
}
(We show that dictionary for illustration. The substructure of a Dictionary may be
useful when you are invoking serviceLib.convertToJSON, but is not used when
you are invoking serviceLib.convertFromJSON .)
The following code accesses the string "OpenDoc()":
myTop MyTopPart;
itemString STRING;
serviceLib.convertFromJSON(resp.body, myTop);
itemString = myTop.Menu.popup.MenuItem[2].onClick;
Copying an XML string to and from an EGL variable
This topic describes the EGL record that corresponds to an Extensible Markup
Language (XML) string. Other topics describe the
functions—serviceLib.convertFromXML and serviceLib.convertToXML—that are
used by a Rich UI developer to convert XML data to or from a variable, as may be
necessary to access a third-party REST service. The last section includes sources of
additional information on XML.
XML and EGL records
You can define an EGL Record part that is the basis of a record (or array of
records) used to process an XML string. The Record part includes details that are
found in an XML Schema, which is a language for validating an XML string.
When you use the function XMLLib.convertToXML, you write the content of the
EGL record to an XML string. When you use the function
XMLLib.convertFromXML, you write the XML string into the EGL record; and if
the string does not fulfill a validation rule specified in the record, the EGL Runtime
issues an RuntimeException.
Here is an example XML string, which is shown on several lines for clarity:
<Employee>
<EmpNo>10</EmpNo>
<Name>Smith</Name>
</Employee>
Here is a Record part that matches the example XML string:
Record Employee {XMLStructure = xmlStructureKind.sequence}
EmpNo INT;
Name STRING;
end
In most cases, the Record part includes a set of field names that each match (in
character and case) the name of an element or attribute in the XML string. If the
names do not match, you use EGL properties to specify the XML element or
attribute name.
EGL support for XML has two aspects:
106
EGL Rich UI 7.5.1.5
v Assigning the XML string from a record. If you are converting a record to an
XML string, you can accept defaults when creating the string or can explicitly
specify details such as the name that the EGL Runtime assigns to an element or
attribute in the XML string.
v Validating the XML string being written to a record. If you are writing an XML
string to a record, the EGL Runtime issues a RuntimeException in the following
cases:
– An element or attribute name does not match an equivalent record-field name
(or does not match an override that you specify in a property field); or
– There is a mismatch in the structure of the XML string and the related record.
Keep in mind this twofold usage: in one case, for XML-string assignment, and in
another case, for validation.
Here is an example of an XML string that includes an attribute:
<Sample color="green"></Sample>
The attribute value for color is stored in a second record. The two Record parts
are as follows:
Record root
Sample Sample? {@XMLElement {nillable = true}};
end
Record Sample {@XMlStructure = xmlStructureKind.simpleContent}
color STRING {@XMLAttribute{}};
value STRING;
end
The EGL Runtime can read the XML shortcut (<Sample color="green"/>), but can
write only the longer form:
v The written output is as follows if root.Sample is an empty string (""):
<root><Sample color="green"></Sample></root>
v The written output is as follows if root.Sample is null and if (as mentioned
later) the property field nillable is set:
<root><Sample xsi:nil="true></Sample></root>
Here is a third example XML string:
<Employee>
<EmpNo department="Sales">10</EmpNo>
<Name>Smith</Name>
</Employee>
Here as the two Record parts:
Record Employee{XMLStructure = xmlStructureKind.sequence}
EmpNo EmpNumber;
LastName STRING;
end
Record EmpNumber {XMLStructure = xmlStructureKind.simpleContent}
department STRING {@XMLAttribute{}};
value INT;
end
Any of the following data types is valid for a Record field:
Chapter 5. Accessing a service in EGL Rich UI
107
v STRING or one of the following types, which are assignment-compatible with
STRING: FLOAT, BIN, or one of the integer equivalents to BIN (INT,
SMALLINT, or BIGINT).
v A data item that is based on one of those primitive types.
v Another non-structured Record part. The fields of that part are restricted to the
previously stated types or to another non-structured Record part. A Record part
referenced within a Record part can only include fields of the types listed here.
v Arrays of the preceding types.
Fields of type ANY are not supported.
One Record part can be referenced from another Record part at any level of
nesting.
Nullable fields
A record field related to an XML element may be nullable as indicated by a
question mark. For example, the following EmpNo field is not nullable, but the name
field is:
Record Employee
EmpNo INT;
Name STRING?;
end
Two rules apply when the EGL Runtime is reading an XML String into a record:
v If the field (for example, EmpNo) is not nullable, the EGL Runtime throws a
RuntimeException when trying to read an element that is missing or has no
value
v If the field (for example, Name) is nullable, the EGL Runtime does not throw an
exception when trying to read an element that is missing or has no value; and in
the latter case, any attributes in the valueless element are retained
For details on the different ways the EGL Runtime treats a null when writing a
record to an XML string, see the property @XMLElement (or @XMLRootElement),
property field nillable.
Record part properties
You can use the following properties when you define a Record part:
v The complex property @XMLRootElement provides naming and data-type
details about the root XML element, which is the topmost, most inclusive
element in the XML string.
v The simple property XMLStructure identifies the characteristics of a set of XML
elements.
Details on those properties are in “@RootElement” and “XMLStructure.”
You cannot override those properties when you declare a record based on the
Record part.
Record field properties
You can use the following properties when you define a field in a Record part or
when you declare a record based on the Record part:
108
EGL Rich UI 7.5.1.5
v The complex property @XMLElement provides details for a Record field that
represents an XML element. By default, that property is in effect.
v The complex property @XMLAttribute provides details for a Record field that
represents an XML attribute.
Details on those properties are in “@XMLElement” and “@XMLAttribute.”
Namespaces
Rich UI supports reading and writing XML strings that contain namespaces. You
can reference a namespace in the property @RootElement, @XMLElement, and
@XMLAttribute.
If the XML contains a default namespace, you must reference the namespace when
defining the record fields for each XML element in that namespace. Note that an
XML attribute is never in a default namespace; an attribute either has a namespace
prefix or is not in a namespace.
Additional information on XML
Many Web sites give background detail on XML and on the most popular
XML-validation format, XML Schema (XSD). Here are a few suggestions that are
present at this writing:
v W3 Schools offers XML and XSD tutorials, which you can access at the following
site, where you search for XML or XSD:
http://www.w3schools.com
v Both XML and XSD are covered in SOA for the Business Developer by Margolis
and Sharpe (MC Press, May 2007), which is available from the following site:
http://www.mc-store.com/5079.html
v A detailed overview of XML Schema is available from the World Wide Web
Consortium:
http://www.w3.org/TR/xmlschema-0/
To gain a full understanding of the alternatives available to you in EGL, review the
topics for the XML-related properties.
@XMLAttribute
The complex property @XMLAttribute is specified on a Record-part field and
identifies characteristics of an XML attribute. The property includes the following
field:
name
The name of the XML attribute. The default value is the name of the record
field.
If you are writing a record to an XML string, the value of the property field is
assigned to the attribute in the XML string. If you are reading an XML string
into a record, the EGL Runtime issues a RuntimeException if a mismatch is
found between the actual and expected attributes.
namespace
Chapter 5. Accessing a service in EGL Rich UI
109
The XML namespace associated with the XML attribute. If you are writing the
record to an XML string, the possibilities are as follows:
v If you specify a namespace, the EGL Runtime places the attribute in that
namespace, assigning a prefix to the attribute name
v If you do not specify a namespace, the attribute is not in any namespace
When reading an XML string into the record, the EGL Runtime issues
RuntimeException if a mismatch is found between the actual and expected
namespace status of the attribute.
@XMLElement
The complex property @XMLElement is specified on a record field and identifies
characteristics of an XML element. The property includes the following fields:
name
The name of the XML element. The default value is the name of the record
field.
If you are writing a record to an XML string, the value of the property field is
assigned to the element in the XML string. If you are reading an XML string
into a record, the EGL Runtime issues an RuntimeException if the name of the
topmost XML element does not match the value of the property field.
namespace
The XML namespace (if any) that is associated with the XML element. You
must specify the namespace explicitly even if it is a default namespace.
If you specify a namespace, the following statements apply:
v If you are writing a record to an XML string, a namespace prefix is assigned
automatically
v If you are reading an XML string into a record, an XMLProcessingException
occurs if the element is not in the specified namespace
If you do not specify a namespace, the following statements apply:
v If you are writing a record to an XML string, a namespace prefix is not
specified
v If you are reading an XML string into a record, an XMLProcessingException
occurs if the element is in any namespace
nillable
A Boolean value indicates whether the element to be written to an XML string
is nillable. The choice is as follows:
v If the value is false (the default), the EGL Runtime does not write an element
to the XML string when the content is null
v If the value is true, an attempt to write a null from the record to the XML
string results in an empty element that includes the attribute value
xsi:nil="true" and has no other attributes
The nullable aspect of a record field affects what occurs when the EGL
Runtime reads an XML string into a record. For details, see Copying an XML
string to and from an EGL variable.
@XMLRootElement
The complex property @XMLRootElement provides naming and data-type details
about the root XML element, which is the topmost, most inclusive element in the
XML string. The property fields are as follows:
110
EGL Rich UI 7.5.1.5
name
The name of the root XML element. The default value is the name of the
Record part.
If you are writing a record to an XML string, the value of the property field is
assigned to the topmost element in the XML string. If you are reading an XML
string into a record, the EGL Runtime issues a RuntimeException if the name
of the topmost XML element does not match the value of the property field.
namespace
The XML namespace (if any) that is associated with the root XML element. You
must specify the namespace explicitly even if it is a default namespace.
If you specify a namespace, the following statements apply:
v If you are writing a record to an XML string, a namespace is assigned. In
this case, the EGL Runtime assigns a namespace prefix
v If you are reading an XML string into a record, a RuntimeException occurs
if the element is not in the specified namespace, whether the namespace in
the XML string is specified by a prefix or by a namespace default
If you do not specify a namespace, the following statements apply:
v If you are writing a record to an XML string, a namespace prefix is not
specified, and the element is not in a namespace
v If you are reading an XML string into a record, a RuntimeException occurs
if the element is in a namespace
nillable
A Boolean value that indicates whether the element to be written to an XML
string is nillable. The choice is as follows:
v If the value is false (the default), the EGL Runtime does not write an element
to the XML string when the content is null
v If the value is true, an attempt to write a null from the record to the XML
string results in an empty element that includes the attribute value
xsi:nil="true" and has no other attributes
The nullable aspect of a record field affects what occurs when the EGL
Runtime reads an XML string into a record. For details, see Copying an XML
string to and from an EGL variable.
XMLStructure
The simple property XMLStructure identifies the potential structure of the XML
elements that are represented by fields in a Record part. In this topic, we show
examples that describe what happens when you transfer record data to an XML
string. However, the relationships also apply in the opposite direction, when the
EGL Runtime validates the transfer of an XML string to an input record.
The supported values for XMLStructure are as follows:
sequence (the default)
On output, the XML string must include every field in the Record part, in the
order in which the Record fields are listed. The following Record part and
XML string are related:
Record Employee {XMLStructure = XMLStructureKind.sequence}
EmpNo INT;
LastName STRING;
end
Chapter 5. Accessing a service in EGL Rich UI
111
<Employee>
<EmpNo>10</EmpNo>
<LastName>Smith</LastName>
</Employee>
choice
On output, the XML string must include one and only one subordinate element
that corresponds to a record field. For example, consider the following Record
part:
Record Employee{XMLStructure = XMLStructureKind.choice}
ImmigrationStatus STRING?;
YearsOfCitizenship INT?;
end
Either of the following XML strings is valid:
<Employee>
<ImmigrationStatus>A1</ImmigrationStatus>
</Employee>
<Employee>
<YearsOfCitizenship>20</YearsOfCitizenship>
</Employee>
In this case, the XML string cannot include both kinds of elements.
If a record has the XMLStructure value "choice", each field must be nullable, as
is indicated by the question marks in our example. Furthermore, the value of
one field must be non-null, and the value of only one field can be non-null.
The function XMLLib.convertToXML issues a RuntimeException if all fields in
the input record are null or if more than one field is non-null.
simpleContent
On output, the simple content transferred to an XML string is the value of a
field in a superior record (a field written as an XML element), along with a set
of attributes. For example, the following boldface Record part and XML
content are related:
Record Employee{XMLStructure = XMLStructureKind.sequence}
EmpNo EmpNumber;
LastName STRING;
end
Record EmpNumber {XMLStructure = XMLStructureKind.simpleContent}
department STRING {@XMLAttribute{}};
value INT; // any field name is acceptable here
end
<Employee>
<EmpNo department="Sales">10</EmpNo>
<LastName>Smith</LastName>
</Employee>
The subordinate record (here, EmpNumber) may include zero to many fields that
are of type STRING and that have the property @XMLAttribute. The property
indicates that a given field represents an attribute. The same subordinate
record may have a field that lacks the property @XMLAttribute; and that
non-attribute field, if any, holds the value of the related element. The
non-attribute field may have any name.
unordered
The XML string includes the specified elements in any order. The following
Record part describes either of the subsequent XML strings:
Record Employee {XMLStructure = XMLStructureKind.unordered}
EmpNo INT;
LastName STRING;
112
EGL Rich UI 7.5.1.5
end
<Employee>
<LastName>Jones</LastName>
<EmpNo>20</EmpNo>
</Employee>
<Employee>
<EmpNo>20</EmpNo>
<LastName>Jones</LastName>
</Employee>
Those values constitute the enumeration xmlStructureKind.
ServiceLib entries for Rich UI
This topic describes the serviceLib functions that are available when you are
coding a Rich UI application.
Table 6. serviceLib system functions available in Rich UI
System function and invocation
Description
result = bindService (string)
Specifies a binding name that refers to an
element in the EGL deployment descriptor
file.
convertFromJSON (json, variable)
Converts a JSON string into a record or
dictionary.
result = convertFromURLEncoded (url)
Returns a version of a Universe Resource
Locator (URL) that is decoded; for example,
the returned string has a space rather than
the following combination: %20.
result = convertToJSON (variable )
Converts a record or dictionary into a JSON
string.
result =convertToURLEncoded (input)
Returns a version of a Universe Resource
Locator (URL) that is encoded so that the
string can be used for service invocation.
endStatefulServiceSession (interface)
Releases runtime resources used to support
access of EGL REST services that provide
access to stateful IBM i programs.
result = getCurrentCallbackResponse()
Provides access to details from the HTTP
response that is received by a callback
function or onException function after a
service invocation.
result = getOriginalRequest()
Provides access to an HTTP request. If the
function is invoked a callback or
onException function, the HTTP request was
sent to the service during the specific call
that caused the service to invoke the
callback or onException function. If
serviceLib.getOriginalRequest() is invoked
elsewhere, the HTTP request was provided
during the most recent service call.
result =getRestRequestHeaders (interface)
Returns the HTTP request headers available
in an Interface variable that is used to access
a REST service. The return value is an EGL
dictionary.
Chapter 5. Accessing a service in EGL Rich UI
113
Table 6. serviceLib system functions available in Rich UI (continued)
System function and invocation
Description
result = getRestServiceLocation (interface)
Returns the base URI used to access the
REST service. The return value is a string.
result = getWebServiceLocation (variable)
Returns the URL that provides access to a
Web (SOAP) service.
setHTTPBasicAuthentication (userID,
password)
Gives the user access to a Web application
when that access is protected by JEE basic
authentication. The function lets you
provide a user ID and password, which are
automatically encrypted for inclusion in an
HTTP header.
setProxyBasicAuthentication (userID,
password)
Gives the user access to the EGL Rich UI
Proxy when that access is protected by JEE
basic authentication. The function lets you
provide a user ID and password, which are
automatically encrypted for inclusion in an
HTTP header.
setRestRequestHeaders (interface, headers)
Sets the HTTP headers that are transmitted
to a REST service. The headers are in an
EGL dictionary.
setRestServiceLocation (interface, baseURI)
Sets the base URI used to access the REST
service.
setWebServiceLocation (variable, string)
Sets the URL that provides access to a Web
(SOAP) service.
bindService()
The serviceLib.bindService() system function specifies a binding name that refers
to an element in the EGL deployment descriptor file. For more information on this
file, see Overview of EGL deployment descriptor file.
Syntax
serviceLib.bindService(bindingKey STRING in)
returns (variable Service | Interface)
bindingKey
This corresponds to the name field in an eglBinding element in the EGL
deployment descriptor file. EGL uses this element to find the requested service.
variable
A Service or Interface variable that your code uses to access the service.
convertFromJSON()
The serviceLib.convertFromJSON() system function converts a JSON string into a
record or dictionary. For details on the conversion, see Copying a JSON string to and
from an EGL variable.
Syntax
serviceLib.convertFromJSON(json STRING in,
variable VariableType out)
json
A JSON string
114
EGL Rich UI 7.5.1.5
variable
The name of a non-structured record or dictionary
convertFromURLEncoded()
The serviceLib.convertFromURLEncoded() system function returns a version of a
Universe Resource Locator (URL) that is decoded; for example, the returned string
has a space rather than the following combination: %20. You might use this
function if a REST service returned a URL and you wished to process the value of
a query parameter. This function is the complement of
ServiceLib.convertToURLEncoded().
Syntax
ServiceLib.convertFromURLEncoded(url STRING in)
returns(output STRING)
url The valid URL
output
The decoded string
convertToJSON()
The serviceLib.convertToJSON() system function converts a record or dictionary
into a JSON string. For details on the conversion, see Copying a JSON string to and
from an EGL variable.
Syntax
serviceLib.convertToJSON(variable VariableType out)
returns (json STRING)
variable
The name of a non-structured record or dictionary
json
A JSON string
convertToURLEncoded()
The ServiceLib.convertToURLEncoded() system function converts a string into a
Universe Resource Locator (URL), which identifies a Web page or represents the
resource that will be accessed by a REST service. The function is useful if you wish
to use a URL that includes spaces or other characters that are not valid in the URL.
For example, if your URL includes query parameters and the value of a parameter
includes a space, the function returns a valid URL, with a plus sign (+) in place of
the space.
Syntax
ServiceLib.convertToURLEncoded(input STRING in)
returns(url STRING)
input
The input string
url The valid URL
endStatefulServiceSession
The serviceLib.endStatefulServiceSession() system function releases runtime
resources used to support access of EGL REST services that provide access to
stateful IBM i programs. You specify the session ID (or accept a default) when you
declare the interface variable.
Chapter 5. Accessing a service in EGL Rich UI
115
For details on how EGL provides access to IBM i called programs and service
programs, see Accessing IBM i programs as Web services.
Syntax
serviceLib.endStatefulServiceSession(variable Service | Interface in)
variable
A variable used to access the service. The variable is based on a Service or
Interface part.
getCurrentCallbackResponse
The system function serviceLib.getCurrentCallbackResponse provides access to
details from the HTTP response that is received by a callback function or
onException function in a Rich UI application.
Syntax
serviceLib.getCurrentCallbackResponse()
returns (result HTTPResponse)
The invocation returns a record that is based on the Record part HTTPResponse,
which is provided for you and has the following fields:
body, type STRING?
The value returned from the service;
v In the case of a REST service, body contains the value in one of three
formats (XML, JSON, or NONE), as described in Creating an Interface part to
access a REST service. In the case of an EGL REST service, the format is JSON.
v In the case of a Web (SOAP) service, body contains the returned SOAP
message, which the EGL Rich UI proxy converted to JSON format.
headers, type Dictionary
headers contains a set of name-value pairs. Each entry key in the dictionary is
the name of an HTTP header that is returned from the service, and the related
value (a string) is the value of that header.
status, type INT
status contains the HTTP status code in the response.
Important status codes include 200 (OK) and 404 (Not Found). For a complete
list, go to the Web site of the World Wide Web Consortium
(http://www.w3.org/) and search for "HTTP status code."
statusMessage, type STRING
statusMessage contains the HTTP status message in the response.
Important status messages include OK (code 200) and Not Found (code 404).
For a complete list, go to the Web site of the World Wide Web Consortium
(http://www.w3.org/) and search for "HTTP status code."
getOriginalRequest
The serviceLib.getOriginalRequest() system function provides access to an HTTP
request. If the function is invoked in a callback or onException function, the HTTP
request was sent to the service during the specific call that caused the service to
invoke the callback or onException function. If serviceLib.getOriginalRequest() is
invoked elsewhere, the HTTP request was sent to the service during the most
recent invocation of the call statement; and in the absence of a previous call
statement, the HTTP request fields are empty.
116
EGL Rich UI 7.5.1.5
Syntax
result HTTPRequest = serviceLib.getOriginalRequest()
The invocation returns a record that is based on the Record part HTTPRequest,
which is provided for you and has the following fields:
body, type STRING?
The value sent to the service:
v In the case of a REST service, body contains the value in one of four formats
(XML, JSON, NONE, or FORM), as described in Creating an Interface part to
access a REST service. In the case of an EGL REST service, the format is JSON.
v In the case of a Web service, body contains the SOAP message in JSON
format.
headers, type Dictionary
Contains a set of name-value pairs. Each entry key in the dictionary is the
name of an HTTP header that was sent to the service, and the related value (a
string) is the value of that header.
method, type STRING
One of the HTTP verbs available to Rich UI:
v GET (for reading a resource)
v POST (for creating a resource)
v PUT (for updating one)
v DELETE (for deleting one)
queryParameters, type Dictionary
A set of name-and-value pairs that were included in the service invocation at
run time.
uri, type String
Contains the address of the resource; for example, http://www.example.com/
getTime. This string includes the values of path variables and query parameters.
getWebServiceLocation()
The serviceLib.getWebServiceLocation() system function returns the URL that
provides access to a Web (SOAP) service.
If the service binding in your deployment descriptor file for the service is not
specified as Web, EGL throws a ServiceBindingException. For more information
about the deployment descriptor file, see Overview of EGL deployment descriptor
file.
Syntax
serviceLib.getWebServiceLocation(variable Service | Interface in)
returns (url STRING)
variable
A service or interface variable that your code uses to access the service.
url The returned URL, which is similar to this example:
"http://www.ibm.com/myService"
getRestRequestHeaders()
The serviceLib.getRestRequestHeaders() system function gets the HTTP request
headers from a variable that is used to access a REST service. This function is
available only from the handlers and libraries used in Rich UI.
Chapter 5. Accessing a service in EGL Rich UI
117
Syntax
serviceLib.getRestRequestHeaders(variable Service | Interface in) returns (headers Dictionary)
variable
A variable used to access the service. The variable is based on a Service or
Interface part.
headers
A dictionary. Each entry key is the name of an HTTP header, and the related
value (a string) is the header value.
getRestServiceLocation()
The serviceLib.getRestServiceLocation() system function returns the base URI
used to access a REST service.
Syntax
serviceLib.getRestServiceLocation(variable Service | Interface in)
returns (baseURI STRING)
variable
A variable used to access the service. The variable is based on a Service or
Interface part.
baseURI
A string that identifies the first qualifiers in the URI that is associated with
variable. Subsequent qualifiers in the URI are specified in the Service or
Interface part definition on which variable is based.
setHTTPBasicAuthentication()
The serviceLib.setHTTPBasicAuthentication() system function provides simple
HTTP header authentication that uses 64–bit encryption.
HTTP Basic Authentication is a transport layer protocol that is used when invoking
a Web service over HTTP. The key-value pair in the HTTP request header consists
of the following parts:
v The key "Authorization"
v The value, a string composed of "Basic" + base64Encrypt(userid:password).
The serviceLib.setHTTPBasicAuthentication() function is available for the
following subset of EGL-generated code:
v Java programs and services
v z/OS CICS COBOL programs and services
For details about the required CICS configuration, see “Deploying a Web service
requester to CICS.”
Syntax
serviceLib.setHTTPBasicAuthentication(variable Service | Interface in,
userID STRING in,
password STRING in)
variable
A variable that your code uses to access the service. This variable is a service
or interface variable. EGL throws a ServiceBindingException if variable is not a
Web service variable.
118
EGL Rich UI 7.5.1.5
userID
The ID that you use to access the service
password
The password that you use to access the service
Example
The following example shows the setHTTPBasicAuthentication() function in
context:
try
serviceLib.setHTTPBasicAuthentication(accountServices,
userID, password);
onException(sbe ServiceBindingException)
sysLib.setError(sbe.message);
end
Compatibility
Table 7. Compatibility considerations for setHTTPBasicAuthentication()
Platform
Issue
COBOL generation
The setHTTPBasicAuthentication() function is supported only
for z/OS CICS.
setProxyBasicAuthentication()
The serviceLib.setProxyBasicAuthentication() system function gives the user
access to the EGL Rich UI Proxy when that access is protected by JEE basic
authentication. The function lets you provide a user ID and password, which are
automatically encrypted for inclusion in an HTTP header. For background
information, see EGL Rich UI security,
The function adds the following key-value pair to the HTTP request header:
v The key is authorization
v The value is a string composed of Basic and the encrypted user ID and
password, which are protected automatically with 64-bit encryption
You compromise security if you hardcode the user ID and password in your logic.
We recommend that you pass the user ID and password from a logon screen; for
example, with the following code:
userid TextField { width = 100 };
password PasswordTextField { width = 100 };
// the following statement runs in response to a button click
setProxyBasicAuthentication( userid.text, password.text );
You use serviceLib.setProxyBasicAuthentication() as part of application-managed
security. You can use the function to implement EGL single signon, as described in
EGL Rich UI security.
Syntax
serviceLib.setProxyBasicAuthentication(userID STRING in,
password STRING in)
userID
The user ID used to access the EGL Rich UI Proxy
password
The related password
Chapter 5. Accessing a service in EGL Rich UI
119
You specify the two values without encryption.
setRestServiceLocation()
The serviceLib.setServiceLocation() system function sets the base URI used to
access a REST service.
Syntax
serviceLib.setRestServiceLocation(variable Service | Interface in,
baseURI STRING in)
variable
A variable used to access the service. The variable is based on a Service or
Interface part.
baseURI
A string that identifies the first qualifiers in the URI that will be used to access
the service when a later call statement includes variable. Subsequent qualifiers
in the URI are specified in the Service or Interface part definition on which
variable is based.
setWebServiceLocation()
The serviceLib.setWebServiceLocation() system function sets the URL that
provides access to a Web (SOAP) service.
If the service binding in your deployment descriptor file for the service is not
specified as Web, EGL throws a ServiceBindingException. For more information
about the deployment descriptor file, see Overview of EGL deployment descriptor
file.
Syntax
serviceLib.setWebServiceLocation(variable Service | Interface in,
url, STRING in)
variable
A variable that your code uses to access the service. This is a service or
interface variable.
url The URL of the service, as in the following example:
"http://www.ibm.com/myService"
Related concepts
Overview of EGL deployment descriptor file
Related reference
EGL library serviceLib
The serviceLib functions get and set service variable information.
120
EGL Rich UI 7.5.1.5
EGL library XMLLib
This topic describes the XMLLib functions and variable definitions.
The following table lists the system functions in the XMLLib library.
Table 8. XMLLib system functions
System function and invocation
Description
convertFromXML (XMLstring in, variable out) Converts an XML string into a
non-structured record. For details on the
conversion, see Copying an XML string to and
from an EGL variable.
Converts a non-structured record into an
XML string. For details on the conversion,
see Copying an XML string to and from an
EGL variable.
result = convertToXML (variable in)
convertFromXML()
The XMLLib.convertFromXML() system function converts an XML string into a
record. For details on the conversion, see Copying an XML string to and from an EGL
variable.
Syntax
XMLLib.convertFromXML(xmlString STRING in,
variable Record Part out)
xmlString
An XML string.
variable
The name of a non-structured record.
convertToXML()
The XMLLib.convertToXML() system function converts a record into an XML
string. For details on the conversion, see Copying an XML string to and from an EGL
variable.
Syntax
serviceLib.convertToXML(variable Record Part out)
returns (xmlString STRING)
variable
The name of a non-structured record
xmlString
An XML string
Chapter 5. Accessing a service in EGL Rich UI
121
122
EGL Rich UI 7.5.1.5
Chapter 6. EGL library RUILib
This topic describes the system functions in the RUILib library.
Table 9. RUILib system functions
System function and invocation
Description
result = getTextSelectionEnabled ()
Indicates whether the user can select text
from a Rich UI widget that you are
developing. The function is not used when
you are developing a Rich UI handler.
result = getUserAgent ()
Provides access to the value of the HTTP
header HTTP_USER_AGENT, which is sent
by the user's browser during application
invocation. The value is useful if you need
to write code that varies by browser type or
version,
setTextSelectionEnabled(trueOrFalse in)
Sets a value that specifies whether the user
is able to select text from a Rich UI widget
that you are developing. The function is not
used when you are developing a Rich UI
handler.
sort (sortArray in, sortFunction)
Repeatedly invokes a secondary sort
function, first with array elements 1 and 2,
then with elements 2 and 3, and so on. The
invocations of the secondary sort function
continue and repeat, as necessary, until the
array reflects the requirement specified in
that secondary function, which you develop.
getTextSelectionEnabled()
The system function getTextSelectionEnabled() indicates whether the user can
select text from a Rich UI widget that you are developing. By default, the user
cannot select text, but you can change the behavior of the application by setting
setTextSelectionEnabled().
The RUILib.getTextSelectionEnabled() system function is used only when you are
developing a new Rich UI widget, not when you developing a Rich UI handler.
Syntax
result BOOLEAN = RUILib.getTextSelectionEnabled()
result
A Boolean value that indicates whether text selection is enabled.
getUserAgent()
The system function RUILib.getUserAgent() provides access to the value of the
HTTP header HTTP_USER_AGENT, which is sent by the user's browser during
application invocation. The value is useful if you need to write code that varies by
browser type or version.
© Copyright IBM Corp. 2000, 2010
123
Syntax
result STRING = RUILib.getUserAgent()
result
The HTTP_USER_AGENT value that is sent by the user's browser.
setTextSelectionEnabled()
The system function RUILib.setTextSelectionEnabled() sets a value that specifies
whether the user is able to select text in a Rich UI widget that you are developing.
The function is used when you are developing a Rich UI widget, not when you are
developing a Rich UI handler.
Syntax
RUILib.setTextSelectionEnabled(trueOrFalse BOOLEAN)
trueOrFalse
A Boolean value that causes text selection to be disabled (as is the default) or
enabled.
sort()
The system function RUILib.sort() repeatedly invokes a secondary sort function,
first with array elements 1 and 2, then with elements 2 and 3, and so on. The
invocations of the secondary sort function continue and repeat, as necessary, until
the array reflects the requirement specified in that secondary function, which you
develop.
Syntax
RUILib.sort(array ANY[] in,sortFunction SortFunction)
array
An array to be sorted.
sortFunction
The secondary sort function, which you code. The structure of that function is
as follows:
Delegate
SortFunction(ValueA ANY in, valueB ANY in) returns (INT)
end
The secondary sort function returns a value that indicates which of the two
values is greater than the other. If the first element is greater, the function
returns -1; if the two are identical, the function returns 0; if the second is
greater, the function returns 1.
124
EGL Rich UI 7.5.1.5
Chapter 7. Overview of EGL Rich UI generation and
deployment
This topic reviews the ideas behind generation and deployment and describes the
steps necessary to prepare for the deployment task.
Generating a handler or library in Rich UI
When you generate an EGL Rich UI handler or library, the output is a JavaScript
file with no embedding HTML. Two generation modes are available, as specified in
the preferences for Rich UI:
Development mode
The output has information required by the EGL debugger and the EGL Rich
UI editor.
Deployment mode
The output lacks the extra information but is smaller and more efficient.
Deployment mode is appropriate immediately before you add fully tested code
to a production environment.
The workbench automatically generates individual Rich UI handlers and libraries.
You can also generate an EGL file as follows:
1. In the Project Explorer, right click on the EGL file or on an icon that represents
a higher level of organization that includes the file: a package, folder, or project.
A dropdown menu is displayed.
2. Click Generate.
You must generate a handler part before you can use it as the basis of an
embedded handler.
Generation is guided by the presence of a build descriptor in your project. The
Workbench provides a default build descriptor, which you can customize. For
details on options and values, see “Build descriptor options used with JavaScript.”
You can generate JavaScript only in the Workbench, not in the EGL SDK.
Deploying a Rich UI application
In relation to EGL Rich UI, the word deploy refers primarily to the creation of an
HTML file that embeds previously generated JavaScript output. The Rich UI
deployment step is available only in the Workbench and precedes adding the
HTML file to a target environment such as WebSphere Application Server.
Rich UI supports the following target environments:
v WebSphere Application Server
v Apache Tomcat
v Local directory
If you target WebSphere Application Server:
v The Rich UI deployment wizard writes the generated HTML file and all
supporting files (such as graphics and properties files) to the WebContent folder
© Copyright IBM Corp. 2000, 2010
125
of a Web project. The supporting files include graphics and properties files, as
well as the EGL Rich UI Proxy. The files in the WebContent folder can be
incorporated into a WAR file for installation on a Web server.
For details on the EGL Rich UI Proxy, see “Accessing a service in EGL Rich UI.”
v The wizard also creates an Enterprise Application project, which is installable as
an Enterprise Archive (EAR) file. The EAR file acts as a container for the WAR
file.
v The HTML file is stored in a WebContent subfolder that corresponds to the
name of the package where the Rich UI handler is stored. If the package name
in the Rich UI project has multiple qualifiers (for example,
com.example.myPackage), the subfolder is a hierarchy of folders (for example,
/com/example/myPackage).
If you target Apache Tomcat:
v The Rich UI deployment wizard writes the generated HTML file and all
supporting files (such as graphics and properties files) to the WebContent folder
of a Web project. The supporting files include graphics and properties files, as
well as the EGL Rich UI Proxy. The files in the WebContent folder can be
incorporated into a WAR file for installation on a Web server.
For details on the EGL Rich UI Proxy, see “Accessing a service in Rich UI.”
v An Enterprise Archive (EAR) file is not provided for Apache Tomcat because
that Web server does not support the use of EAR files.
v The HTML file is stored in a WebContent subfolder that corresponds to the
name of the package where the Rich UI handler is stored. If the package name
in the Rich UI project has multiple qualifiers (for example,
com.example.myPackage), the subfolder is a hierarchy of folders (for example,
/com/example/myPackage).
If you target a local directory:
v The Rich UI deployment wizard writes the generated HTML file and all
supporting WebContent files to a directory.
v The likely production environment—an HTTP server such as the Apache HTTP
server—does not support EAR or WAR files.
v EGL Rich UI does not provide a proxy and does not support service access.
v The HTML file is stored in a directory subfolder that corresponds to the name of
the package where the Rich UI handler is stored. If the package name in the
Rich UI project has multiple qualifiers (for example, com.example.myPackage), the
subfolder is a hierarchy of folders (for example, /com/example/myPackage).
In each case, the Rich UI deployment wizard supports globalization, as noted in
“Use of properties files for displayable text.” When you specify a name for the
HTML file, the deployment wizard adds locale detail to the name, along with the
file extension .html. For example, if you specify myFile.htm and request an output
that uses runtime messages in English, the wizard creates the file named
myFile.htm_en_US.html.
EGL compresses the application to reduce the size of generated HTML files during
deployment and uses gzip to compress the files the server sends to the browser.
EGL uses compression only when the workbench is in Deployment mode.
You can deploy a Rich UI application by running the Rich UI Deployment wizard
in the Workbench, but cannot deploy an application in the EGL SDK.
126
EGL Rich UI 7.5.1.5
Preparing to use the Rich UI deployment wizard
To
1.
2.
3.
prepare to use the Rich UI deployment wizard, do as follows:
Click Window -> Preferences. The Preferences dialog is displayed.
Expand EGL and click Rich UI.
Set the dropdown list to the value of interest:
v Development, to include the extra information required by the EGL
debugger and the EGL Rich UI editor; or
v Deployment, to exclude that information.
4. Click OK. A message is displayed to indicate that a regeneration is required.
5. Click OK. The effect is that all the generated JavaScript in your workspace will
be available for the same purpose, whether for use in the Workbench
(Development mode) or for distribution (Deployment mode).
Deploying a Rich UI application to Apache Tomcat
This topic describes how to prepare to deploy a Rich UI application, when the
deployment target is Apache Tomcat.
Setting the deployment target
To begin the process:
1. In the Project Explorer, right click on the EGL file that contains the Rich UI
handler, or right click on a higher level of organization that includes the file:
the package, folder, or project. A dropdown menu is displayed.
2. Click Deploy Rich UI application. The first wizard dialog is displayed.
3. If you originally selected a higher level of organization such as a project, select
a Rich UI handler.
4. Select the deployment target Apache Tomcat.
5. If you wish to retain the details you will specify. select the Save deployment
configuration checkbox. If you save a deployment configuration, you can use
the Redeploy Rich UI application option later, to quickly deploy the same Rich
UI application in a way that reflects the most recently saved configuration.
6. Click Next. The Deployment Details dialog is displayed.
Setting deployment details
To set the deployment details:
1. Specify the name of the HTML file you are deploying.
The deployment wizard adds locale detail to the name, along with the file
extension .html. For example, if you specify myFile.htm and, as described later,
you request an output for the English locale, the wizard creates the file named
myFile.htm_en_US.html.
2. Specify an existing Web project that is configured for use with Apache Tomcat;
or create a new Web project.
If you are creating a new Web project, do as follows:
a. Specify the project name.
b. If you wish to select a Tomcat server that you already defined in the
Workbench, choose from a dropdown list and continue working at step 3. If
you wish to define a new Tomcat server, click the New button to display
the New Server Runtime Environment dialog.
Chapter 7. Overview of EGL Rich UI generation and deployment
127
c. Expand Apache and select the Apache Tomcat version that is used to
configure the new project.
d. Click Next. The Tomcat Server dialog is displayed.
e. To select a directory where the specified Apache Tomcat version is already
installed, specify the directory name or use the Browse mechanism.
Alternatively, to install a new version from the Apache Web site, do as
follows: (i) click Download and Install, displaying the Feature License
dialog; (ii) select I accept the terms of the licensing agreement; (iii) click
Finish, displaying the Browse for folder dialog; (iv) select a folder in which
to install the new version; and (v) click OK.
f. Specify the Java Runtime edition (JRE) to use with Apache Tomcat, either by
selecting a specific JRE or by selecting the Workbench default. To change the
Workbench default, click Installed JRE and, at the Installed JREs dialog,
select, add, or search for a different JRE and click OK.
g. Click Finish.
3. Under Globalization settings, select all the locales that you are supporting. You
can select from the list of generally available locales. In addition, you can
specify new locales. To understand the distinction, see Use of properties files for
displayable text.
To select a generally available locale, select the locale in the left box and click
the double right arrows (>>). To remove a generally available locale that was
previously chosen, select the locale in the right box and click the double left
arrows (<<)
To specify a new locale, click the New Locale button. The Create a new locale
dialog is displayed. There, do as follows:
a. Specify a locale code and description, as well as a locale for EGL runtime
messages, which are messages other than those included in a properties file
that you provide.
b. Click OK. The new entry is added to the Rich UI locale list in the
Workbench preferences. For details, see Setting preferences for Rich UI.
4. Click Next to specify the subset of workspace files that you wish to include in
your output. The Additional Artifacts dialog is displayed.
Selecting additional artifacts
Your last tasks in the Rich UI deployment wizard are as follows:
1. To select files or groups of files that are to be made available to the user, select
check boxes. To deselect files or groups of files that are not to be made
available to the user, clear check boxes. Expand or contract projects, folders,
and packages, as needed to access file entries.
2. Click Finish.
Deploying a Rich UI application to a local directory
This topic describes how to prepare to deploy a Rich UI application, when the
deployment target is a local directory, as is especially useful when you intend to
install the application on a simple HTTP server.
Setting the deployment target
To begin the process:
128
EGL Rich UI 7.5.1.5
1. In the Project Explorer, right click on the EGL file that contains the Rich UI
handler, or right click on a higher level of organization that includes the file:
the package, folder, or project. A dropdown menu is displayed.
2. Click Deploy Rich UI application. The first wizard dialog is displayed.
3. If you originally selected a higher level of organization such as a project, select
an Rich UI handler.
4. Select the deployment target Local Directory.
5. If you wish to retain the details you will specify. select the Save deployment
configuration checkbox. If you save a deployment configuration, you can use
the Redeploy Rich UI application option later, to quickly deploy the same Rich
UI application in a way that reflects the most recently saved configuration.
6. Click Next. The Deployment Details dialog is displayed.
Setting deployment details
To set the deployment details:
1. Specify a directory name in Deployment Directory or use the Browse
mechanism.
2. Specify the name of the HTML file you are deploying.
The deployment wizard adds locale detail to the name, along with the file
extension .html. For example, if you specify myFile.htm and, as described later,
you request an output for the English locale, the wizard creates the file named
myFile.htm_en_US.html.
3. Specify the application context root, which is the second qualifier used in the
Web address used to access the Rich UI application. For example, if the domain
name is www.example.com and the application context root is myApplication, the
Web address is as follows:
www.example.com/myApplication
4. Under Globalization settings, select all the locales that you are supporting. You
can select from the list of generally available locales. In addition, you can
specify new locales. To understand the distinction, see Use of properties files for
displayable text.
To select a generally available locale, select the locale in the left box and click
the double right arrows (>>). To remove a generally available locale that was
previously chosen, select the locale in the right box and click the double left
arrows (<<)
To specify a new locale, click the New Locale button. The Create a new locale
dialog is displayed. There, do as follows:
a. Specify a locale code and description, as well as a locale for EGL runtime
messages, which are messages other than those included in a properties file
that you provide.
b. Click OK. The new entry is added to the Rich UI locale list in the
Workbench preferences. For details, see Setting preferences for Rich UI.
5. Click Next to specify the subset of workspace files that you wish to include in
your output. The Additional Artifacts dialog is displayed.
Selecting additional artifacts
Your last tasks in the Rich UI deployment wizard are as follows:
1. To select files or groups of files that are to be made available to the user, select
check boxes. To deselect files or groups of files that are not to be made
Chapter 7. Overview of EGL Rich UI generation and deployment
129
available to the user, clear check boxes. Expand or contract projects, folders,
and packages, as needed to access file entries.
2. Click Finish.
Deploying a Rich UI application to WebSphere Application Server
This topic describes how to prepare to deploy a Rich UI application, when the
deployment target is WebSphere Application Server.
Setting the deployment target
To begin the process:
1. In the Project Explorer, right click on the EGL file that contains the Rich UI
handler, or right click on a higher level of organization that includes the file:
the package, folder, or project. A dropdown menu is displayed.
2. Click Deploy Rich UI application. The first wizard dialog is displayed.
3. If you originally selected a higher level of organization such as a project, select
an Rich UI handler.
4. Select the deployment target WebSphere Application Server.
5. If you wish to retain the details you will specify. select the Save deployment
configuration checkbox. If you save a deployment configuration, you can use
the Redeploy Rich UI application option later, to quickly deploy the same Rich
UI application in a way that reflects the most recently saved configuration.
6. Click Next. The Deployment Details dialog is displayed.
Setting deployment details
To set the deployment details:
1. Specify the name of the HTML file you are deploying.
The deployment wizard adds locale detail to the name, along with the file
extension .html. For example, if you specify myFile.htm and, as described later,
you request an output for the English locale, the wizard creates the file named
myFile.htm_en_US.html.
2. Specify one of the following options:
v An existing Web project that is configured for use with WebSphere
Application Server; or
v A new Web project. In this case, you specify the project name and click the
New button to display the New Server Runtime Environment dialog, where
you expand IBM and select the version of WebSphere Application Server
that is used to configure the new project. If you need to identify a previously
unspecified installation of WebSphere Application Server, click Create a new
local server and, at the next page, use the Browse mechanism to select the
directory in which WebSphere Application Server is installed.
3. Under Globalization settings, select all the locales that you are supporting. You
can select from the list of generally available locales. In addition, you can
specify new locales. To understand the distinction, see Use of properties files for
displayable text.
To select a generally available locale, select the locale in the left box and click
the double right arrows (>>). To remove a generally available locale that was
previously chosen, select the locale in the right box and click the double left
arrows (<<)
130
EGL Rich UI 7.5.1.5
To select a new locale, click the New Locale button. The Create a new locale
dialog is displayed. There, do as follows:
a. Specify a locale code and description, as well as a locale for runtime
messages other than those that can be included in a properties file that you
provide.
b. Click OK. The new entry is added to the Rich UI locale list in the
Workbench preferences. For details, see Setting preferences for Rich UI.
4. Click Next to specify the subset of workspace files that you wish to include in
your output. The Additional Artifacts dialog is displayed.
Selecting additional artifacts
Your last tasks in the Rich UI deployment wizard are as follows:
1. To select files or groups of files that are to be made available to the user, select
check boxes. To deselect files or groups of files that are not to be made
available to the user, clear check boxes. Expand or contract projects, folders,
and packages, as needed to access file entries.
2. Click Finish.
Build descriptor options used with JavaScript
This topic lists the build descriptor options used with JavaScript, which is the
generated language for EGL Rich UI.
Table 10. Build descriptor option descriptions and default values
Build descriptor option
Default value
Description
defaultDateFormat
MM/dd/yyyy
Controls the initial runtime value of
the strLib.defaultDateFormat
system variable.
defaultServiceTimeout
No default
value
Specifies the maximum valid
number of milliseconds that elapse
between the following events: when
the EGL Rich UI Proxy (on the Web
server) invokes a service and when
the Proxy receives a response.
defaultSessionCookieID
JSESSIONID
Identifies the session cookie
provided to the EGL Rich UI Proxy
from a service.
defaultTimeFormat
HH:mm:ss
Controls the initial runtime value of
the strLib.defaultTimeFormat
system variable.
defaultTimeStampFormat
An empty
string
Controls the initial runtime value of
the
strLib.defaultTimeStampFormat
system variable.
deploymentDescriptor
No default
value
Contains the name of the EGL
deployment descriptor. That
descriptor provides service-binding
detail when you are generating a
service, as well as service-binding
detail when you are generating a
logical unit (program, library,
handler, or service) that invokes a
service.
Chapter 7. Overview of EGL Rich UI generation and deployment
131
Table 10. Build descriptor option descriptions and default values (continued)
Build descriptor option
Default value
Description
eliminateSystemDependentCode
YES
Indicates whether, at generation
time, EGL ignores code that will
never run in the target system.
nextBuildDescriptor
No default
value
Identifies the next build descriptor
in the chain.
system
No default
value
Specifies the target runtime
environment of the generated code.
For Rich UI, JavaScript is specified
automatically in the Workbench.
defaultDateFormat (build descriptor option)
The defaultDateFormat build descriptor option controls the initial runtime value of
the strLib.defaultDateFormat system variable, which contains one of the masks
that can be used to create the string returned by the strLib.formatDate system
function. Other details depend on the target language:
v When you are generating a COBOL program, if you do not specify the
defaultDateFormat build descriptor option, the default value for the
strLib.defaultDateFormat system variable is set by the "Long Gregorian date
format" specified in the language-dependent options module specified for your
runtime installation. For z/OS, refer to the program directory for your runtime
product for details.
v When you are generating Java code, the defaultDateFormat build descriptor
option specifies the generated value for the vgj.default.dateFormat Java runtime
property (if you have set the genProperties build descriptor option to GLOBAL
or PROGRAM). That property then sets the initial runtime value of the
strLib.defaultDateFormat system variable.
v When you are generating JavaScript code, the default value of the
defaultDateFormat build descriptor option is MM/dd/yyyy.
For further details on system variables and functions, see the EGL Language
Reference.
defaultServiceTimeout
The defaultServiceTimeout build descriptor option specifies the maximum valid
number of milliseconds that elapse between two events:
v In the case of a Rich UI application, the events are when the EGL Rich UI Proxy
(on the Web server) invokes a service and when the Proxy receives a response
v In the case of another EGL requester, the events are when the EGL Runtime
invokes a service and when that code receives a response
If the response takes longer than the specified maximum, the EGL Runtime throws
a ServiceInvocationException.
Setting a timeout is partly a matter of trial and error:
v Take into account a variety of factors, such as local network traffic, internet
traffic, and server response time. Those factors mean that two invocations of the
same service are likely to take a different amount of time under different
conditions.
132
EGL Rich UI 7.5.1.5
v Consider the nature of your application. If your code is waiting for a credit
approval, you might set a high timeout value to avoid charging the user twice. If
your code is making a bid in an online auction bid, you might set a low timeout
value so that the user can make an additional bid quickly.
v Use timeout values that vary from one another by one or more seconds.
The option defaultServiceTimeout is available for Rich UI and EGL-generated
Java. For Rich UI, you can override the value by setting the timeout property on
the call statement that invokes the service.
The default is an infinite wait. (In EGL version 7.5.1, the default was 10,000).
defaultSessionCookieID
The defaultSessionCookieID build descriptor option identifies the session cookie
provided to the EGL Rich UI Proxy from a service. The service logic in this case is
stateful, which means that the user and logic can participate in a multistep
conversation. This setting is meaningful only if the service is an EGL external type
that makes an IBM i called program or service program available as an EGL REST
service. For background information, see Accessing IBM i programs as Web services.
The default value is JSESSIONID, which is always the session ID, regardless of any
setting in EGL, when your application runs on Apache Tomcat.
Depending on how your code is accessing the service, you can override the value
of the build descriptor option defaultSessionCookieID in one of two ways:
v When you declare a variable based on an Interface part; or
v When you configure the deployment descriptor for the requester.
For details on that choice, see Declaring an interface to access a REST service.
defaultTimeFormat (build descriptor option)
The defaultTimeFormat build descriptor option controls the initial runtime value
of the strLib.defaultTimeFormat system variable, which contains one of the masks
that can be used to create the string returned by the strLib.formatTime system
function. Other details depend on the target language:
v When you are generating a COBOL program, if you do not specify the
defaultTimeFormat build descriptor option, the default value for the
strLib.defaultTimeFormat system variable is "HH:mm:ss".
v When you are generating Java code, the defaultTimeFormat build descriptor
option specifies the generated value for the vgj.default.timeFormat Java runtime
property (if you have set the genProperties build descriptor option to GLOBAL
or PROGRAM). That property then sets the initial runtime value of the
strLib.defaultTimeFormat system variable.
v When you are generating JavaScript code, the default value of
defaultTimeFormat build descriptor option is HH:mm:ss.
For further details on system variables and functions, see the EGL Language
Reference.
defaultTimeStampFormat (build descriptor option)
The defaultTimeStampFormat build descriptor option controls the initial runtime
value of the strLib.defaultTimeStampFormat system variable, which contains one
Chapter 7. Overview of EGL Rich UI generation and deployment
133
of the masks that can be used to create the string returned by the
strLib.formatTimeStamp system function. Additional details depend on the target
language:
v When you are generating a COBOL program, if you do not specify the
defaultTimeStampFormat build descriptor option, the default value for the
strLib.defaultTimeStampFormat system variable is "yyyy-MM-dd
HH:mm:ss:SSSSSS".
v When you are generating Java code, the defaultTimeStampFormat build
descriptor option specifies the generated value for the
vgj.default.timestampFormat Java runtime property (if you have set the
genProperties build descriptor option to GLOBAL or PROGRAM). That property
then sets the initial runtime value of the strLib.defaultTimeStampFormat system
variable.
v When you are generating JavaScript code, the default value of the
defaultTimeStampFormat build descriptor option is an empty string.
For further details on system variables and functions, see the EGL Language
Reference.
deploymentDescriptor
The deploymentDescriptor build descriptor option contains the name of the EGL
deployment descriptor. That descriptor provides service-binding detail when you
are generating a service, as well as service-binding detail when you are generating
a logical unit (program, library, handler, or service) that invokes a service. The EGL
deployment descriptor is distinct from non-EGL JEE deployment descriptors.
The deploymentDescriptor option has no default value.
For an overview of services, along with keystroke details, see Overview of
service-oriented architecture (SOA) and subsequent sections in the Programmer's
Guide. For language details, see Service part.
134
EGL Rich UI 7.5.1.5
Chapter 8. Setting preferences for Rich UI
Set the initial Rich UI preferences as follows:
1. From the main menu, click Window → Preferences. The Preferences page is
displayed.
2. Expand EGL and then Rich UI. The Rich UI dialog box is displayed.
3. Select one of two values in the Generation mode list box:
Development mode
The generated output has information required by the EGL debugger and
the EGL Rich UI editor.
Deployment mode
The generated output lacks the extra information but is smaller and more
efficient. Deployment mode is appropriate immediately before you add
fully tested code to a production environment.
4. In the Locales area, specify the locales that are available in the Rich UI editor
and in the Rich UI deployment wizard. The settings are used for globalization.
The availability of a locale means that you can invoke and deploy a Rich UI
application that provides messages appropriate to the locale. For details, see
Use of properties files for displayable text.
To add a locale, do as follows:
a. Click Add. The Create a new locale dialog is displayed.
b. Specify a locale code and description.
c. Specify a locale for the EGL runtime messages, which are provided by the
EGL Runtime and are distinct from the messages included in a properties
file that you customize.
d. Click OK.
To remove a locale from the list, do as follows:
a. Double-click a locale entry
b. Click Remove
At the Rich UI dialog box, you can click into the Locale Description or Locale
Code column and change the content. Also, by clicking in the Runtime
Messages Locale column and selecting from a list, you can assign a locale for
the EGL runtime messages, even if that locale is distinct from the locale used
for the messages that you provide.
5. If you want to return the settings on the Rich UI dialaog to the original
product settings, click Restore Defaults.
6. Click Apply to save your changes and remain in the Preferences page.
Alternatively, click OK to save the changes and exit the page; or click Cancel to
cancel the changes and exit the page.
Setting preferences for Rich UI appearance
Begin to set the appearance of the Rich UI editor as follows:
1. From the main menu, click Window → Preferences. The Preferences dialog box
is displayed.
2. Expand EGL and Rich UI; and then click Appearance. The Appearance page is
displayed, with three tabs: General, Browser size, and Languages.
© Copyright IBM Corp. 2000, 2010
135
We describe each tab in turn. On completing the tabs, do as follows:
1. If you want to return the settings on the Appearance pane to the original
product settings, click Restore Defaults.
2. Click Apply to save your changes and remain on the Preferences dialog box.
Alternatively, click OK to save the changes and exit the dialog box; or click
Cancel to cancel the changes and exit the dialog box.
General tab
At the General tab, do as follows:
1. In the Editor tab section, select Design, Source, or Preview to indicate which
tab to initially use whenever you open the Rich UI editor.
2. In the Widget creation section, indicate whether the Rich UI editor must
prompt you for a variable name each time you drag a widget from the palette
to the Design surface. If you clear the checkbox, the Rich UI editor creates its
own variable name, which is the widget type name (for example, Button)
followed by a sequentially assigned integer. For example, the assigned names
might be Button1, Button2, Box1, and so forth.
3. In the Transparency section, indicate how to handle the transparency controls,
which vary how widgets are displayed in the Design tab of the Rich UI editor.
The transparency controls are particularly useful when you are working on a
Design surface with many widgets that are close together.
The Design surface is composed of two layers. The bottom layer is the Web
browser, which displays widgets, including initial text values. The top layer is
an editing overlay, including angle brackets at each corner of each widget. The
background of the top layer can have any of the following characteristics:
transparent, or a pattern of white and transparent dots, or (on Windows
platforms) a white layer with a varying level of transparency.
The transparency options provided in the Appearance pane affect the behavior
of the Rich UI editor every time you open the editor. However, when you are
working in the editor, you can change the transparency options that are in use
for the editing session. The options are as follows:
a. Select or clear the check box Show transparency controls to indicate
whether to display the transparency controls. When you start working with
Rich UI, you are likely to prefer hiding the controls, as is the default setting
for this preference.
b. Next, select one of the following transparency modes, which affect the
background of the top layer of the Design surface:
v Fully transparent means that the background is transparent.
v Dotted transparency pattern means that the background is a pattern of
white and transparent dots. The refresh rate of your monitor may cause
the pattern to shimmer.
v On Windows platforms, Variable transparency means that the
background is a white layer with a varying level of transparency. You
vary the level by changing the numeric value of a slider. The dotted
transparency pattern described earlier is roughly equivalent to the
variable transparency pattern at 38%.
c. The checkbox named Enable semi-transparency while dragging allows use
of a temporary transparency mode as you drag a widget from the palette to
the Design surface or from one location on the Design surface to another.
Selecting the checkbox means that the temporary mode is the dotted
transparency pattern. Clearing the checkbox means that your usual
136
EGL Rich UI 7.5.1.5
transparency mode remains in effect. The checkbox has no effect if your
usual transparency mode is the dotted transparency pattern.
4. In the Colors section, specify details on the following issues:
v The border of the currently selected widget
v The potential drop locations for a widget being dragged from the palette to
the Design surface or from one location on the Design surface to another
v The selected drop location, which is a potential drop location over which the
widget is hovering during a drag-and-drop operation
For the border and each location, you can click the adjacent button to display a
color dialog, where you can choose or refine a color. Also, for the border and
the selected drop location, you can select (or clear) a check box to include (or
exclude) the displayed pattern.
5. In the Performance section, select the radio button that reflects your current
need, whether for greater responsiveness or for less usage of runtime resources
such as memory. One effect of selecting Optimize to use fewer resources is
that you increase the amount of time needed to display content when you
select the Design or Preview tab.
6. In the Dependencies section, you can cause the Rich UI editor to prompt you
before adding a project to the EGL build path. The nature of project
dependencies is described in The EGL build path.
The dependency issue arises in this case because the Widget types available in
the palette may be from any project in the workspace. The prompt, if any,
occurs when you attempt to drop a widget for which the type is defined in a
project that is not already in the EGL build path.
Select the checkbox to cause a prompt, which lets you add the entry to the EGL
build path or to cancel the operation. Clear the checkbox to add the entry
automatically.
Browser size tab
In the Browser size tab, you set the browser size that is appropriate for a specific
kind of device such as a cell phone. Specifically, you set options that are in effect
whenever you open the Rich UI editor. However, when you are working in the
editor, you can change the browser-size options for the file being edited.
The options are as follows:
1. Select or clear the check box Browser size controls to indicate whether to
display the controls when a file is opened in the Rich UI editor. When you start
working with Rich UI, you are likely to prefer hiding the controls, as is the
default setting for this preference.
2. Change the numeric values of the sliders to specify the default height and
width in pixels. The default you set becomes the browser size that is provided
initially in the Rich UI editor. Similarly, change the numeric values of the
sliders to specify the minimum and maximum height and width that are valid
in any file open in the Rich UI editor. You can change the maximum and
minimum only by returning to the Appearance page.
Languages tab
In the Languages tab, you assign values that determine what messages to use
when you run Rich UI applications in the Preview tab of the Rich UI editor or in
an external browser. For details on the use of locales, see Use of properties files for
displayable text.
Chapter 8. Setting preferences for Rich UI
137
When you work in the Languages tab, you choose among locales that are listed in
the Rich UI pane, as described in Setting preferences for Rich UI. Your tasks are as
follows:
1. In the Runtime messages locale list box, select the locale for the EGL runtime
messages, which are provided by the EGL Runtime and are distinct from the
messages included in a properties file that you customize.
2. In the Rich UI handler locale list box, select the locale for the messages
included in a properties file, if any, that you customize.
Setting preferences for Rich UI bidirectional text
When you establish preferences for Rich UI bidirectional text, you provide initial
values for the bidirectional settings assigned to widgets as they are dragged from
the palette and dropped on the Design surface.
You can set these preferences only if you previously enabled bidirectional text as
follows:
1. From the main menu, click Window → Preferences. The Preferences dialog box
is displayed.
2. Expand EGL and select Bidirectional text. The Bidirectional text page is
displayed.
3. Select the Enable bidirectional support checkbox. After this check box is
selected, the other options are available.
4. To display and edit the bidirectional text fields in visual mode (the way the text
will be displayed), select Enable visual data ordering.
5. For languages that read from right to left, select Enable right-to-left
orientation.
Here are the steps for setting the Rich UI preferences:
1. From the main menu, click Window → Preferences. The Preferences dialog box
is displayed.
2. Expand EGL, Rich UI, and then Appearance; and click on Bidirectional text.
The Bidirectional text page is displayed.
3. Establish the following settings:
Widget Orientation
The setting is either LTR (left-to-right) or RTL (right to left):
v When you specify LTR, the widgets acts as a standard
non-bidirectional widget
v When you specify RTL, the widgets are mirrored; that is, scroll bars
for dropdown lists appear on the left, the text-typing orientation for
input fields is right-to-left, and the text is right-aligned
Text Layout
The setting is either Visual or Logical:
v If the setting is Visual and the user types "A" and then "B" (and if
"A" and "B" are characters in a bidirectional language), the displayed
characters are "AB". The order of display is the order of input, left to
right, which is also the order in which the data is stored in local
memory.
v If the setting is Logical, the displayed characters are "BA".
In most cases, Visual is appropriate for Arabic or Hebrew content
derived from a machine that runs z/OS or IBM i.
138
EGL Rich UI 7.5.1.5
Reverse Text direction
The setting indicates whether to reverse the text direction in the widget.
Symmetric Swapping
This setting indicates whether to replace pairs of special characters and
in this way to preserve the logical meaning of the presented text. If the
value is "Yes", the effect is to replace paired characters such as <, >, [,
and { with >, <, ], and }.
Numeric Swapping
Lets you use Hindi numerals in Arabic text. To use Hindi numerals, set
numericSwap and reverseTextDirection to Yes.
4. If you want to return the settings on the Bidirectional text pane to the original
product settings, click Restore Defaults.
5. Click Apply to save your changes and remain on the Preferences dialog box.
Alternatively, click OK to save the changes and exit the dialog box; or click
Cancel to cancel the changes and exit the dialog box.
Setting preferences for Rich UI deployment
Preferences guide the behavior of the Rich UI deployment wizard. We introduce
that wizard in Overview of Rich UI generation and deployment.
Set the deployment preferences as follows:
1. From the main menu, click Window → Preferences. The Preferences dialog box
is displayed.
2. Expand EGL and Rich UI and then click Deployment. The Deployment page
is displayed.
3. In the Prompts area, indicate what is to occur when the generation mode is
Development and you run the Rich UI deployment wizard. Selecting the check
box means that the wizard must prompt you to change the generation mode to
Deployment. Clearing the check box means that the deployment will proceed
without a prompt, and no regeneration occurs; the generation mode remains
Development.
4. In the Rich UI Application locales area, you select which locales are supported
by default when you run the Rich UI deployment wizard. For details on the
use of locales, see Use of properties files for displayable text. All the locales that are
available to you in the Rich UI Application locales area are listed in the Rich
UI pane, as described in Setting preferences for Rich UI.
5. If you want to return the settings on the Deployment page to the original
product settings, click Restore Defaults.
6. Click Apply to save your changes and remain on the Preferences dialog box.
Alternatively, click OK to save the changes and exit the dialog box; or click
Cancel to cancel the changes and exit the dialog box.
Chapter 8. Setting preferences for Rich UI
139
140
EGL Rich UI 7.5.1.5
Chapter 9. Securing a Rich UI application
Implementing security is an integral part of Web application development that you
should consider carefully when you design a Rich UI application. In the rush to
unveil new dynamic, interactive Web applications, developers sometimes forgo
adding security measures. Attackers know how to exploit the vulnerabilities of
applications. All kinds of organizations have been victimized, with results ranging
from simple embarrassment to the public distribution of sensitive data. The best
approach to avoid such problems is to eliminate weaknesses before they can be
exploited.
Typically, security is configured after a Rich UI application is deployed; however,
the security design should be determined early and integrated with the design of
the application. When you apply security early in the development cycle, the
process can be easier and you can avoid problems that might be costly if found
late in the cycle.
You should also evaluate JSF applications that are rewritten into Rich UI
applications for security issues. Even if the JSF application was not originally
secure, the introduction of the EGL Rich UI Proxy in V7.5.1 presents security risks
that must be mitigated. You might need to change the design of the application.
This section contains considerations that are specific to securing the resources that
are related to Rich UI applications. It also provides a quick overview and examples
of how to configure and use Java™ Enterprise Edition (JEE) authentication and
Secure Sockets Layer (SSL). Security is not available when you preview a Rich UI
application from the EGL Rich UI editor. Because security is a large and complex
topic, also consult the online documentation of your application server and other
security documentation.
Overview of Rich UI security
Security can be managed either by a Web container (the environment in which an
application runs) or by the application itself. A Web container is synonymous to a
JEE application server, such as IBM WebSphere Application Server or Apache
Tomcat. Web container-managed security is also known as JEE or J2EE security.
Security that is written by the developer of the application, application-managed
security, is also known as custom security. Both kinds of security have advantages
and drawbacks that you must understand before you implement them.
You can choose to use either declarative or programmatic security. In declarative
security, security policies are defined outside of the application in deployment
descriptors or configuration files so the application is security-unaware. With
programmatic security, the application code contains explicit security calls.
Web container-managed (JEE) security is declarative because security constraints
are defined in deployment descriptors or configuration files. JEE security can also
be programmatic because it includes some security-related APIs that can be called
from within an application. Application-managed (custom) security is
programmatic because security is handled completely from within the application.
Major components of security include authentication, authorization, confidentiality,
and integrity:
© Copyright IBM Corp. 2000, 2010
141
Authentication
The method by which the identity of a user is verified. Typically,
authentication occurs by providing a user id and password in a login
screen.
Authorization
The process of determining whether a user has permission to access a
particular resource
Confidentiality
Guarantees that the data that is passed between a sender and recipient is
protected from eavesdroppers.
Integrity
Ensures that the data that flows between a sender and recipient was not
modified in transit
Authentication and Authorization
Authentication and authorization support can be provided by the following:
v Web container-managed (JEE) security that is provided by application servers,
such as WebSphere Application Server or Apache Tomcat.
v Application-managed (custom) security that is written in the application.
Consider using JEE security to protect your Rich UI application in the following
cases:
v The entire Rich UI application needs to be secured.
v You do not need to access security-related information from within the Rich UI
application.
v You do not want to write security-related code in your application.
Consider using custom security to protect your Rich UI application in the
following cases:
v Access to some or all of your Rich UI application needs to be restricted.
v You want to access the user id, password, or both from within the application.
v You want to combine the authentication of your Rich UI application with the
authentication of other resources that the application uses in a process called
EGL single sign-on. For more details, see "EGL single sign-on.".
Web container-managed (JEE) security
Web container-managed security transfers the responsibility of user authentication
and authorization to the container, allowing the EGL developer to focus on
business logic.
Two common types of JEE authentication are basic and form-based. In JEE basic
authentication (also known as HTTP basic authentication), when a client, such as a
browser, requests a Web page from a server without providing a user id and
password, the server sends back a 401 response code. The client then prompts the
user for a user id and password by displaying a default login dialog to the user.
The client resends the request to the server, including the user id and password in
the HTTP header. If the user is authenticated, the server returns the requested
page. If the user id and password are invalid, the server returns a 401 response
code and the client prompts the user again. In JEE form-based authentication, you
can use a customized login screen with the look and feel of the application instead
142
EGL Rich UI 7.5.1.5
of the browser-provided login dialog. The user id and password are passed to the
server in the form data instead of in the HTTP header of the request.
JEE security uses roles to manage access to resources. Certain roles are allowed
access to certain resources. Users and groups are mapped to appropriate roles. For
example, the user bob might be mapped to the role administrator.
JEE authorization can be declarative or programmatic. Declarative authorization is
available because security information is specified in deployment descriptors. The
application servers access these deployment descriptors to determine if a specific
user is assigned to a role and decides whether a particular resource can be
accessed by that role. While JEE security also includes programmatic authorization
through the use of APIs, such as isUserInRole(), these functions are not available
from within a Rich UI application. Therefore, Rich UI applications should perform
authorization either declaratively or through custom, user-provided code.
User registries, such as Lightweight Directory Access Protocol (LDAP) directory
servers or relational databases used with JEE security, are external to the JEE
environment. A system administrator must perform administrative tasks, such as
adding a new user to the repository.
While JEE security is available through WebSphere Application Server and Apache
Tomcat, it is not available from the Workbench. You need to deploy a Rich UI
application to WebSphere or Tomcat to apply and test security.
To determine if JEE security is appropriate for your situation, review the
documentation in this chapter and the more detailed online documentation for
your application server.
Application-managed (custom) security
If Web container-managed security is not suitable for your needs, you can build
custom security into your Rich UI application. Although custom security requires
that you add security-related code to your Rich UI application, you cannot avoid it
if JEE security alone is not sufficient to express the security model of an
application. If you prefer, you can combine both forms of security.
Custom authorization can provide a more granular level of authorization than JEE
roles. You might want to use custom security to authenticate users before they can
access restricted parts of your application.
Confidentiality and Integrity
Although you can use JEE security to secure Web resources from unauthenticated
or unauthorized users, JEE security cannot prevent the data that flows between a
client and server from being intercepted or read. For these purposes, you can use
Secure Sockets Layer (SSL). SSL guarantees data integrity, ensures that messages
between a client and server are not tampered with or modified, and provides
confidentiality through encryption. SSL also includes server authentication, which
allows a client to confirm the identity of a server, and client authentication, which
allows a server to confirm the identity of a client.
It is important that you authenticate over SSL, whether you use JEE form-based,
JEE basic, or custom authentication. For more information about SSL, see
"Overview of SSL."
Chapter 9. Securing a Rich UI application
143
Resources to secure
When you determine which resources to secure, review all of the components that
have a URL mapping and that your Rich UI application accesses:
Generated HTML file
EGL generates a Rich UI application into an HTML file. HTML files are generated
into the WebContent folder (or into a subfolder in the WebContent folder) of your
deployed project. If an HTML file is secure, you must authenticate before you
access the Rich UI application that is defined in the HTML file. To secure the entire
HTML file, you can use JEE authentication. To restrict sensitive areas of the Rich
UI application, you can use custom security.
EGL Rich UI Proxy
The EGL Rich UI Proxy handles communication between the HTML file that EGL
generates for a Rich UI application and Web services Because of the Same Origin
policy for JavaScript™, the HTML file cannot invoke a Web service that has a
different origin (defined as protocol, domain, and port) than that of the HTML file.
To get to Web services on different origins, the HTML file uses a Java servlet
known as the EGL Rich UI Proxy. All Web services that are invoked in a Rich UI
application are accessed through the proxy.
The EGL Rich UI Proxy servlet is of the type
com.ibm.javart.services.RestServiceServlet and is shipped with the EGL runtime in
fda7.jar. The servlet is deployed to the same project as your generated HTML file.
While the HTML file runs in a browser, the EGL Rich UI Proxy runs on an
application server.
Because the URL of the EGL Rich UI Proxy is visible in the JavaScript that EGL
generates for your Rich UI application, you must prevent the proxy from being
used by anyone other than your Rich UI client to invoke Web services. If you leave
the proxy unsecured, it can be used to instigate JavaScript hijacking attacks. If your
Rich UI application does not use the EGL Rich UI Proxy (that is, if the application
invokes no Web services), remove access to the proxy from your deployed project.
For more information, see Removing access to the EGL Rich UI Proxy servlet.
Otherwise, you can use JEE basic authentication to prevent the proxy from being
invoked by an unauthenticated client. While this action cannot guarantee
protection against Web threats, it can reduce the possibility of one occurring.
If both the HTML file and EGL Rich UI Proxy are secure, authentication is required
only before you can access the HTML file. If the EGL Rich UI Proxy is secure and
the HTML file is not, authentication is required before you can access the proxy
(that is, before the application calls a Web service that is invoked through the
proxy).
EGL Web service
To secure EGL Web services that are generated into a Web project, you can use JEE
security through HTTP basic authentication. In HTTP basic authentication, you
access secure Web services by passing a valid user id and password in the HTTP
header. EGL provides a system function in ServiceLib,
setHTTPBasicAuthentication, which sets these values in the header. Precede each
call to a secure Web service with a call to setHTTPBasicAuthentication.
144
EGL Rich UI 7.5.1.5
To avoid security exposures, never hardcode the user id and password into the
Rich UI application. Instead, the Rich UI application should display a user-defined
login screen to prompt the user for the values to pass to
setHTTPBasicAuthentication. Once you obtain the password, you can store it in
your Rich UI handler or a library for future Web service calls. Whenever you need
a different set of credentials to pass to a Web service, you must prompt the user
again.
JSF versus Rich UI applications
Differences exist between generated and deployed JSF applications and Rich UI
applications. You should understand these ramifications because they can affect the
type of security you choose to implement.
For JSF applications, each JSF handler is associated with a Faces JSP. The JSF
handler and EGL parts it references are generated into Java. Each JSP is generated
into its own file and has its own URL, which might need to be secured from
unauthenticated users using JEE security. When securing URLs, you can choose to
include some or all of the JSPs in your JSF application. Depending on your choices,
you can keep some JSPs in your JSF application public and restrict other JSPs to
authenticated users.
For Rich UI applications, EGL generates the contents of all the Rich UI handlers in
an application into JavaScript in a single HTML file. If your Rich UI application
calls EGL Web services, you must generate those services into Java because Web
services run on an application server, not in a Web browser. The HTML file that
EGL generates for a Rich UI application is associated with a single URL that can be
secured with JEE security. If you choose to secure a URL with JEE security, users
will be prompted to authenticate before they can access any part of your Rich UI
application. If you want to make some of the areas of your Rich UI application
public, you cannot use JEE authentication. Instead, use custom security to prompt
users to log in before they can access the restricted parts of your application.
Another major difference between JSF and Rich UI applications is that the EGL
Rich UI Proxy, which Rich UI applications use to call Web services, is not needed
by JSF applications because JSF handlers are generated into Java instead of
JavaScript.
Using Web container-managed (JEE) authentication
After you deploy a Rich UI application, you can secure the resources in your
deployed project from unauthenticated users by using the Web container-based,
JEE security that is provided by WebSphere Application Server or Apache Tomcat.
After resources, such as the HTML file generated for your Rich UI application, are
secured with JEE security, users will have to authenticate before they can access
those resources. Every action that the Web container or JRE takes on behalf of the
user is done only if the user belongs to a set of roles that have permission to take
that action. The user is only requested to authenticate once even if multiple
resources are secured.
In JEE authentication, a system administrator performs administration tasks, such
as adding or deleting user data from a repository, independently of the
applications that access the repository. Application servers support various types of
repositories, or realms, such as the local OS registry, LDAP directories, and custom
directories such as relational databases and flat files. You can use these repositories
to store user ids, passwords, and other security information.
Chapter 9. Securing a Rich UI application
145
To secure the entire Rich UI application, the EGL Rich UI Proxy, and Web services,
you can use JEE security.
In JEE role-based security, access to resources is granted to roles, which are then
mapped to actual user registry entries. Security information, such as roles and
constraints, are defined declaratively, or outside of the application, in deployment
descriptors such as web.xml and application.xml. . In V7.5.1, you must use
declarative JEE security with Rich UI applications. The J2EELib system functions
that are available for programmatic security from JSF handlers (getRemoteUser(),
isUserInRole(), and getAuthenticationType()) are not available from Rich UI
handlers.
In both JEE basic and form-based authentication, the password is encoded using
the Base64 encoding scheme, a format that is easy to decode. To ensure that the
password is not compromised, use SSL in conjunction with these types of
authentication. For an introduction to SSL, see "Overview of SSL."
For more details on Web container-managed authentication, see WebSphere
Application Server or Apache Tomcat documentation.
Defining URL patterns for Rich UI resources
Security constraints define how the content of a Web project is protected. To use
JEE security to protect a resource, in the security constraints in the deployment
descriptor (web.xml) of your deployed project, specify the URLs of the resources to
secure.
The following sections contain information on how to secure the various
components of a Rich UI application:
v Securing the HTML file by using form-based authentication
v Securing the EGL Rich UI Proxy by using basic authentication
v Securing EGL Web services by using basic authentication
Those sections also refer to URL patterns.
To secure all the resources that are in the WebContent folder of a deployed project,
specify /* as the URL pattern. Specifying /* as your URL pattern secures your
HTML page, EGL Rich UI Proxy, and SOAP and REST services.
Securing the HTML file by using form-based authentication
To secure your Rich UI application, you can use JEE form-based authentication (the
most popular Web authentication method in use) for which you to supply your
own customized login page that contains a user id and password. Users cannot
access any part of the Rich UI application until they authenticate. The encoding
scheme for the password is Base64 encoding, which can be easily decoded. To
ensure password confidentiality, use SSL connections with form-based
authentication. When you use form-based authentication, error handling, such as
displaying specific error messages, is difficult to implement. If an authentication
error occurs, an error page is returned with the status code of the response set to
401.
For sample login and error pages that you can use with form-based authentication,
see "Sample login and error pages for JEE form-based authentication."
146
EGL Rich UI 7.5.1.5
To secure the HTML file that EGL generates for a Rich UI application named
RSSReader, specify a URL pattern of /RSSReader.html. If RSSReader.html is in a
subdirectory of WebContent named Secured, specify a URL pattern of
/Secured/RSSReader.html.
When you use form-based authentication to secure the HTML file, include the EGL
Rich UI Proxy in the security constraint. To secure the EGL Rich UI Proxy, specify
a URL pattern of /___proxy (three underscores). By specifying this pattern, you
prevent unauthenticated users from accessing the proxy. After logging in, users
will gain access to the EGL Rich UI Proxy as well as the HTML file.
Securing the EGL Rich UI Proxy by using basic authentication
Use JEE basic authentication to secure the EGL Rich UI Proxy. Require users to
authenticate to the proxy before it can be used to process Web service calls. If you
require users to authenticate, you prevent unauthenticated clients from accessing
the proxy for illegal purposes.
To secure the EGL Rich UI Proxy, in a security constraint in your web.xml, specify
a URL pattern of /___proxy (three underscores).
By using JEE basic authentication, the Web server uses a browser-provided dialog
to collect a user id and password. This dialog looks like the following dialog for
Mozilla® Firefox® V2.0:
If you use this login dialog, you cannot customize the dialog to look like the rest of
your Rich UI application. The dialog is redisplayed until a valid user id and
password are entered. The HTTP standard requires that when login fails, the server
returns a response code of 401. This response code is presented to the user on an
error page with a generic error message.
If you use JEE security to protect both the HTML file and EGL Rich UI Proxy, use
form-based authentication. When a user requests the HTML file, the login page
that is specified for form-based authentication is displayed. After users
authenticate, they can also access the proxy, bypassing the browser-provided
dialog.
If you want to protect sensitive parts of your application without securing the
entire Rich UI application, you can use custom security. You can combine
authentication for custom security with JEE authentication of the EGL Rich UI
Proxy in a process called EGL single sign-on. In EGL single sign-on, you use a
Chapter 9. Securing a Rich UI application
147
user-defined login screen to capture credentials that allow the end user to
authenticate to more than one resource, including the EGL Rich UI Proxy. To
prevent the user from seeing the browser-provided dialog, use EGL single sign-on.
Removing access to the EGL Rich UI Proxy servlet
If your Rich UI application does not call Web SOAP or REST services, the EGL
Rich UI Proxy will not be used. In this case, you have three options:
1. Remove the EGL Rich UI Proxy servlet from the web.xml of your deployed
project so a third party cannot access it.
2. Use JEE basic authentication to secure the proxy.
3. Leave the proxy unsecured.
Option 1 is the best option for EGL. It is simple and removes all security risks that
are related to the proxy, as described in EGL Rich UI Proxy. Option 2 is valid, but it
requires more work from the EGL developer or a security administrator. For
directions on how to use JEE basic authentication to secure the EGL Riche UI
Proxy, see JEE security example. If you choose Option 3, you leave the EGL Rich UI
Proxy vulnerable to security threats.
To remove access to the EGL Rich UI Proxy:
1. Double-click on the deployment descriptor (WebContent/WEB-INF/web.xml)
of your deployed Web project to open it with the Deployment Descriptor
Editor.
2. Click the Servlets tab.
3. In the Servlets and JSPs pane, click EGLRichUIProxy.
4. In the URL Mappings pane, select /___proxy->EGLRichUIProxy.
5. Click Remove.
6. Save your changes and exit the Deployment Descriptor Editor.
If you want to invoke Web services from your Rich UI application later, edit the
web.xml and add a servlet URL mapping into EGLRichUIProxy by using the URL
pattern /___proxy.
Securing EGL Web services by using basic authentication
You can use JEE security and basic authentication to secure EGL Web services that
are generated into an EGL Web project. If you are only securing services in your
project, specify "BASIC" as your authentication type.
To secure all EGL SOAP services in a Web project, in a security constraint in the
web.xml, specify a URL pattern of /services/*. You can replace the asterisk with a
specific name to secure a specific SOAP service. To secure a specific function in a
SOAP service, specify the service and function name, as in /services/
accountService/checkBalance.
To secure all EGL REST services in a Web project, in a security constraint in the
web.xml, specify a URL pattern of /restservices/*. You can replace the asterisk
with a specific name to secure a specific REST service. To secure a specific function
in a REST service, specify the service and function name, as in
/restservices/accountService/checkBalance.
148
EGL Rich UI 7.5.1.5
Using application-managed (custom) authentication
If you do not want to use JEE authentication to secure your HTML file, you can
incorporate custom security into your Rich UI application. You must still use JEE
security to protect the EGL Rich UI Proxy and Web services.
When you use custom security, your Rich UI application must include a
user-defined login screen. To hide the password as it is being typed, use the
PasswordTextField widget in your Rich UI handler. Your Rich UI application can
require authentication to occur either at the beginning of the application or before
accessing a restricted area. You can integrate this form of security into the rest of
the application.
The first step in defining custom security is to determine which parts of the
application should be secured (that is, which parts can be accessed only after
logging in with a valid user id and password). Even if you are not using JEE
security protect to the HTML file, use JEE security to secure the EGL Rich UI
Proxy. This is an important factor to remember when you design your Rich UI
application. A design that uses EGL single sign-on will reduce the number of times
a user will have to authenticate.
When authenticating with custom security, use SSL to ensure that the user id and
password are secure during transmission between the browser and server. For an
introduction to SSL, see Overview of SSL.
EGL single sign-on
Combining application and proxy authentication
By using EGL single sign-on, you can combine the following aspects of security
into a single step: authentication to your application (protected by custom security)
and authentication to the EGL Rich UI Proxy (protected by JEE security). You can
also include authentication to Web services.
Although the user registries that you use for authentication to the application, EGL
Rich UI Proxy, and Web services do not need to be the same, the user ID and
password used during EGL single sign-on must exist in all the relevant user
registries to prevent an authentication error.
For EGL single sign-on, the Rich UI application must define a login screen that
contains a user ID field, password field, and command button, as in the following
example:
useridLabel TextLabel { text = "User ID:", width = 80 };
useridField TextField { width = 100 };
useridBox Box { children = [ useridLabel,
useridField ], margin = 3 };
passwordLabel TextLabel { text = "Password:", width = 80 };
passwordField PasswordTextField { width = 100 };
passwordBox Box { children = [ passwordLabel,
passwordField ], margin = 3};
button Button { text = "Log in", onClick ::= authenticate };
ui Box { background = "blue",
children = [ useridBox, passwordBox, button ],
columns = 1, width = 200 };
Whenever a Web service is called, a request is sent to the EGL Rich UI Proxy.
Because the proxy is secured with JEE basic authentication, a user must log in
before accessing it. If a user has not logged in yet, a browser-provided login screen
Chapter 9. Securing a Rich UI application
149
that is similar to the example in "Using basic authentication to secure the EGL Rich
UI Proxy" will be displayed the first time a Web service is invoked.
With EGL single sign-on, when the user authenticates to the Rich UI application
using the user-defined login screen above, EGL passes those credentials (user ID
and password) to JEE security to use to authenticate to the proxy also. Therefore,
authenticating to the application is combined with authentication to the proxy in
one step. For EGL single sign-on to work, design the Rich UI application so that
the Web service for authentication to the application is invoked before any other
Web service. Doing so bypasses the browser-provided login dialog.
To implement EGL single sign-on, use the
ServiceLib.setProxyBasicAuthentication() system function to pass the user ID and
password to authenticate to the proxy. Before you call the service to log in to the
application, invoke this system function. The authenticate function for the EGL
code above might look like the following example:
function authenticate( e Event in )
ServiceLib.setProxyBasicAuthentication(useridField.text,passwordField.text );
srvc LDAPLoginService{ @bindService };
call srvc.login( useridField.text, passwordField.text )
returning to loginCallback onException loginException;
end
Adding Web service authentication
Typically, to authenticate to a secure Web service, a Rich UI application must
prompt the user for a user ID and password. However, you can pass the user ID
and password that you use for EGL single sign-on to a secure Web service. To do
so, invoke the ServiceLib.setHTTPBasicAuthentication() system function before
you call the secure Web service and pass it the user ID and password used for
EGL single sign-on.
function withdraw( e Event in )
ServiceLib.setHTTPBasicAuthentication(srvc, useridField.text,
passwordField.text );
srvc BankingService{ @bindService };
call srvc.withdraw( useridField.text, passwordField.text )
returning to withdrawCallback onException withdrawException;
end
Handling authentication errors
If you use EGL single sign-on to authenticate to your application and to the EGL
Rich UI Proxy, authentication to the proxy occurs before authentication to your
application. Because the EGL Rich UI Proxy is secured using JEE basic
authentication, the Web container, not the application, handles login failures.
Because the Web container steps in, you can no longer authenticate in a single step.
At this point, the user must authenticate to the EGL Rich UI Proxy first, and log in
to the application, Web services, or both afterward.
If users enter an invalid password for EGL Rich UI Proxy authentication on the
login screen, a browser-provided login dialog is displayed so that they can try to
authenticate again. In JEE basic authentication, the Web container prompts the
browser to display this dialog until the user logs in successfully. The application
cannot access the password that a user enters on this dialog.
150
EGL Rich UI 7.5.1.5
After users enter valid credentials for the EGL Rich UI Proxy, they must
authenticate to the application, Web services, or both. The application should direct
users to re-enter a valid user ID and password in the user-defined login screen and
to click the "Login" button again.
If an error occurs when users authenticate to a Web service that is secured with
HTTP basic authentication, control falls into the exception handler that is specified
on the call statement. Your Rich UI application must detect this error and present
appropriate instructions to the user to reauthenticate. The following example
shows the specifics of this kind of error:
Web service authentication error
Configuration
A Web service is secured using JEE basic authentication.
Problem
A valid user ID and password for the Web service are not found in the
HTTP header.
Error
A ServiceInvocationException is thrown with message ID "EGL1539E" and
message, "An exception occurred while communicating with the service.
URL: {0}" is issued where {0} is the URL of the Web service. detail1 of the
ServiceInvocationException is set to "401"; detail2 is set to "Unauthorized";
detail3 is set to "Server returned HTTP response code: 401 for URL: {0}",
"name": "egl.core.ServiceInvocationException".
Solution
Call ServiceLib.setHTTPBasicAuthentication() to set a valid user ID and
password in the HTTP header before consuming the Web service.
If both EGL Rich UI Proxy and Web service authentication are successful but an
error occurs when you try to authenticate to your application, your Rich UI
application must handle the error. When the Web service returns, control passes to
the callback or "returning to" function that is specified on your call statement.
Accessing user repositories
You can use various types of repositories, such as LDAP directories, relational
databases, and flat files with either JEE or custom security. You can use EGL
single-sign on to access different repositories to authenticate to the application,
proxy, and Web services. For single-sign on to succeed, the user id and password
that the end user enters in the login screen must exist in each of the various
repositories.
The most popular type of repository is a Lightweight Directory Access Protocol
(LDAP) directory, which is a specialized database that is optimized for read access
and that organizes its data in a tree structure. Before you access an LDAP directory
for JEE authentication, configure the application server to connect to the LDAP
directory server. For WebSphere Application Server, specify this information in the
Administrative Console; for Apache Tomcat, specify this information in the
\conf\server.xml file.
You can also use EGL code that is generated into Java and running on a server to
access an LDAP directory. To use EGL code to access an LDAP directory, define
either an EGL REST or SOAP service. The service can use EGL external types that
map to JNDI LDAP Java classes to access an LDAP directory. Here is an example
of EGL code that establishes a connection to an LDAP directory server:
Chapter 9. Securing a Rich UI application
151
// External types needed to access an LDAP directory server.
externalType ControlArray type JavaObject
{ JavaName = "Control[]", PackageName = "javax.naming.ldap" }
end
externalType InitialDirContext type JavaObject
{ JavaName = "InitialDirContext",
PackageName = "javax.naming.directory" }
function modifyAttributes( name String in,
mods ModificationItemArray in );
end
externalType InitialLdapContext extends InitialDirContext type JavaObject
{ JavaName = "InitialLdapContext",
PackageName = "javax.naming.ldap" }
constructor( environment Hashtable in, connCtls ControlArray in );
end
externalType ModificationItemArray extends Object type JavaObject
{ JavaName = "ModificationItem[]",
PackageName = "javax.naming.directory" }
end
// Instantiate a hashtable for binding criteria.
// Hashtable is already defined within EGL.
hashtable Hashtable = new Hashtable();
// Properties can be found at
// http://java.sun.com/j2se/1.4.2/docs/guide/jndi/jndi-ldap.html.
// Set JNDI environment properties.
// userid and password are passed in as strings.
hashtable.put( "java.naming.factory.initial",
"com.sun.jndi.ldap.LdapCtxFactory" );
hashtable.put( "java.naming.provider.url",
"ldap://localhost:389/o=sample" );
hashtable.put( "java.naming.security.principal",
"uid=" + userid + ",ou=people,o=sample");
hashtable.put( "java.naming.security.credentials", password );
hashtable.put( "java.naming.security.authentication", "simple" );
hashtable.put( "java.naming.referral", "follow" );
hashtable.put( "java.naming.security.protocol", null );
// Set LDAP-specific properties.
hashtable.put( "java.naming.ldap.version", "3" );
// Connect to the LDAP directory server.
ctx InitialLdapContext = new InitialLdapContext( hashtable, null );
if ( ctx != null )
// Retrieve data
...
end
For more sample EGL code, including code that retrieves and modifies data in an
LDAP directory, see "EGL LDAP Access" or "J2EE Security with EGL LDAP Access"
in the IBM Rational® Business Developer documentation (in the "Contents" under
"Samples").
Adding a new user to a repository
If your Rich UI application requires security, you have two options to give new
users permission to access the secure areas: a system or security administrator can
add a new user to the repository or the Rich UI application can contain code to
add a new user to the repository. The method that you choose depends largely on
the level of security that you need. For example, if the user must be a company
152
EGL Rich UI 7.5.1.5
employee or must possess a bank account to access a Web site, a system
administrator likely wants to tightly control access to the repository. On the other
hand, if the repository is mainly a way to keep a log of users and new users
constantly request access, it might be inconvenient or impractical to go through a
system administrator. In this case, an application might add new users to the
repository.
Note that the tighter your user registry is controlled, the tighter the security will be
of your Rich UI application and EGL Rich UI Proxy. Although securing your EGL
Rich UI Proxy with JEE security prevents unauthenticated users from accessing the
proxy, it does not prevent malicious authenticated users from using the proxy to
inflict damage. Therefore, when you require new users to go through a system
administrator, the EGL Rich UI Proxy will be more secure than if you allow the
application to add new entries to the user registry.
If you must add new users to a repository with your Rich UI application, you can
write EGL code to add the users. This code must run on an application server. You
can write the code as either a Web service or a JSF application.
If you use a Web service to write the code to add a new user, the EGL Rich UI
Proxy has to invoke the code. If the proxy is secure, a new user cannot access it.
Therefore, you can use a Web service to add a new user only if the proxy is not
protected by JEE security.
If you use JEE security to secure the proxy, you can use a JSF application to add a
new user to the repository. To link to a JSF application in a new window to update
the repository, the Rich UI handler can use a hyperlink widget that is similar to the
following example:
registerLink Hyperlink = new Hyperlink { target = "_blank",
href = "http://localhost:9080/LDAPSample/ldapLogin.faces",
text = "Click here to register" };
To close the window after authentication completes, the JSF page can invoke a
JavaScript "window.close".
Authentication summary
During the design phase of your Rich UI application, determine the type of
security that you need and integrate that security with the rest of your application.
If your entire Rich UI application needs to be secured and you do not need to
access security credentials from within the application, consider using JEE
authentication. Otherwise, you might need to implement custom security.
To secure the EGL Rich UI Proxy, use JEE security. If you use JEE form-based
authentication for your HTML file, include the URL pattern of the proxy in your
security constraint. Otherwise, use JEE basic authentication to secure the proxy. If
your application requires custom security or calls secure Web services, consider
using EGL single sign-on to eliminate the need for a user to log in more than once.
You can secure Web services using by JEE basic authentication and set a user id
and password in the HTTP header before invoking them by using the
ServiceLib.setHTTPBasicAuthentication system function.
Use SSL, described in Overview of SSL, to secure data transmitted to and from your
Rich UI application. Securing data is vital to keeping your passwords from being
compromised.
Chapter 9. Securing a Rich UI application
153
The following table summarizes the combinations of resources that you can secure
with JEE or custom authentication. For each of the eight scenarios (columns), an
"X" represents a secure resource. These scenarios assume that the HTML file is
calling Web services. Otherwise, remove access to the EGL Rich UI Proxy by
deleting its URL mapping from the deployment descriptor. The safer scenarios are
identified with an "*".
Table 11. Authentication scenario
1
HTML
file
2
3*
4
x
EGL
Rich UI
Proxy
Web
service
5*
6*
x
x
x
x
7
8*
x
x
x
x
x
x
x
Scenario descriptions
1. In this scenario, the proxy is publicly accessible. If possible, do not implement
this scenario. Secure the proxy with JEE basic authentication (scenario 3).
2. Although the HTML file is secured with either JEE or custom security, the
proxy is still publicly accessible. If possible, do not implement this scenario.
Secure the proxy with JEE authentication (scenario 5).
3. In this scenario, the proxy is secured with JEE basic authentication. This
scenario is safer than the first two.
4. In this scenario, the proxy is publicly accessible. If possible, do not implement
this scenario. Secure the proxy with JEE authentication (scenario 6).
5. If Web service does not require security, this scenario can be safe. If both the
HTML file and proxy are secured with JEE security, use form-based
authentication to require the user to log in only once. If the HTML file is
secured with custom security and the credentials to log in to the HTML file
match those used to log in to the proxy, use EGL single sign-on to combine
application authentication with JEE authentication to the proxy.
6. Although the Rich UI application does not require authentication, a
user-defined login screen is required to obtain Web service credentials, which
should never be hardcoded into the application. If the credentials that are used
to log in to the Web service match those that are used to log in to the proxy,
use EGL single sign-on to combine Web service authentication with JEE basic
authentication to the proxy.
7. In this scenario, the proxy is publicly accessible. If possible, do not implement
this scenario. Secure the proxy with JEE authentication (scenario 8).
8. If both the HTML file and proxy are secured with JEE security, use form-based
authentication. A user-defined login screen is required in the application to
authenticate to the secure Web services. Thus, the user must log in twice. If the
credentials to authenticate to the HTML file, the proxy, and Web services match,
consider securing the HTML file with custom authentication. Then use EGL
single sign-on to capture credentials for all three types of resources.
154
EGL Rich UI 7.5.1.5
Authorization
You can perform authorization through JEE security or through the application
itself. JEE security uses roles to manage access to resources. A logical security role
has permission to access certain resources. Actual users and groups who are
mapped to that logical role can access those resources. The web.xml deployment
descriptor specifies the type of access that is granted to each role. For WebSphere
Application Server, roles are bound to users and groups in the application.xml. For
Apache Tomcat, the binding occurs in a repository such as the tomcat-users.xml
file, LDAP directory, or relational database.
Although you can check authorization in a JSF application by calling the
J2EELib.isUserInRole and J2EELib.getRemoteUser EGL system functions, these
system functions are not available from a Rich UI application in V7.5.1 because the
JEE security that is used from a Rich UI application must be declarative.
If JEE authorization is not suitable for your Rich UI application, perhaps because
programmatic security is unavailable or the overhead of administering JEE security
roles is too high, authorization can be accomplished using your own application
code. One way to implement authorization is to organize user entries into groups
in a repository like an LDAP directory. You can then invoke a Web service from
your Rich UI application to retrieve an entry from the repository and check if a
user is in a group that has access a certain resource.
For details concerning authorization, see your WebSphere Application Server,
Apache Tomcat, or LDAP directory server documentation.
JEE security example
The following example shows how to use JEE basic authentication to secure an
EGL Rich UI Proxy in a Web project to which a Rich UI application has been
deployed.
For WebSphere Application Server, perform the following steps:
1. In the web.xml, specify security criteria
2. In the application.xml, specify security criteria
3. Use the Administrative Console to enable security
4. Enable security in the server configuration
For Apache Tomcat, perform the following steps:
1. In the web.xml, specify security criteria
2. In tomcat-users.xml, bind roles to users and groups
Specifying security criteria in web.xml
You can specify security criteria in the deployment descriptor of your deployed
project (web.xml) in two ways:
v By using the Security Editor.
v By editing the web.xml in the Deployment Descriptor Editor.
The Security Editor is used in this example because it provides an easy way to
specify and view security criteria.
Chapter 9. Securing a Rich UI application
155
Using the Security Editor
You can use the Security Editor to define the following things in web.xml:
v Security roles
v Security constraints
v Authentication method
From the Project Explorer in the EGL Rich UI perspective, open the Security Editor
by double-clicking on the Security Editor icon of your deployed project.
Defining security roles
In JEE role-based security, users must be assigned roles to access resources. Roles
are mapped to actual user registry entries.
v In the Create a Security Role dialog, click OK.
v In the Add Roles window, type user as the role name and click Add.
v Click Finish.
Defining security constraints
To specify the resources that are protected and the roles that have access to the
resources, define a security constraint.
1. In the Resources pane, expand the folder with your project name, Servlets,
EGLRichUIProxy, and Servlet Mappings. Under Servlet Mappings, you should
see /___proxy.
2. To secure the proxy and allow anyone in the user role to access the proxy, drag
the user role from the Security Roles pane to /___proxy in the Resources pane.
3. To see the security constraints, in the Resources pane, right click on /___proxy
(user) and click Assign Roles. In the Select Roles window, select user and click
Advanced>>>. You should see the userConstraint security constraint that is
mapped to user, which specifies how you can access the /___proxy secure
resource. The userConstraint security constraint contains the default HTTP
method access (GET, PUT, HEAD, TRACE, POST, DELETE, OPTIONS). Click
OK. To change the defaults for your security constraints, in the Security Editor,
click Security Preferences.
Selecting an authentication method
To specify an authentication method:
1.
2.
3.
4.
5.
Click Authentication.
For the authentication method, click BASIC.
To name the example, type Sample registry.
Click OK.
Save your changes and close the Security Editor.
Defining a user data constraint
A user data constraint specifies how data is protected while it is in transit between
a client and server. If you do not want to use the default user data constraint
(NONE), you must specify the user data constraint directly into the web.xml
because that information is not available from the Security Editor.
156
EGL Rich UI 7.5.1.5
You can set a user data constraint to a value of NONE, INTEGRAL, or
CONFIDENTIAL. An INTEGRAL value guarantees content integrity, preventing
tampering of messages in transit between a client and server. A CONFIDENTIAL
setting guarantees confidentiality, preventing reading of data by others during the
transfer. If you use a value of INTEGRAL or CONFIDENTIAL, requests must be
submitted over SSL.
To specify a user data constraint in the web.xml:
v From the EGL Rich UI perspective, open the deployment descriptor of your
deployed project by double-clicking on the deployment descriptor.
v Select the Security tab.
v Under Security Constraints, click userConstraint.
v To require that requests be submitted over SSL, under User Data Constraint,
select INTEGRAL or CONFIDENTIAL.
Specifying security criteria in application.xml for WebSphere
When you use WebSphere Application Server, you can specify security criteria in
the deployment descriptor of your Enterprise Application project (application.xml)
in two ways:
v By using the Security Editor
v By editing application.xml
The Security Editor is used in the following example because it provides an easy
way to specify and view security criteria.
Using the Security Editor
To bind the roles that are defined in your web.xml to actual users and groups in
your user registry, use the Security Editor. This binding information is stored in the
deployment descriptor of your Enterprise Application project (application.xml).
To open the Security Editor from the Project Explorer in the EGL Rich UI
perspective, double-click on the Security Editor icon of your deployed project.
Defining security role bindings
To define security role bindings:
1.
2.
3.
4.
5.
6.
7.
Click Role Mapping.
In the WAS Specific Role Mappings window, click user.
Click Map User.
In the Map User window, click All Authenticated Users.
Click OK.
In the WAS Specific Role Mappings window, click OK.
Save your changes and close the Security Editor.
Enabling security by using the Administrative Console for
WebSphere
To enable application and administrative security:
1. From the Servers view in the Workbench, start a WebSphere V6.1 or V7.0
server.
2. Right click on the server, click Administration → Run administrative console, .
Chapter 9. Securing a Rich UI application
157
3. When you are prompted, type a user id. Because administrative security is not
yet enabled, the user id is not really used.
4. In the Administrative Console, take the following steps:
a. Expand Security.
b. For WebSphere V6.1, select Secure administration, applications, and
infrastructure.
c. For WebSphere V7.0, select Global security.
d. From the Available realm definitions, select the type of user registry to use.
In this example, use Local operating system.
e. Click Set as current.
f. Click Configure. The configuration page for the realm opens.
g. Enter the properties. Note the Primary administrative user name, which you
must also enter in the User ID field of the server configuration that is
described in the next section. For Local operating system, type the user id
that you use to log in to your operating system.
h. Click OK to return to Secure administration, applications, and infrastructure
for WebSphere V6.1 or Global security for WebSphere V7.0.
i. Click Enable administrative security, which also selects Enable application
security.
j. Clear the Use Java 2 security to restrict access to local resources checkbox.
k. Click Apply → Save.
l. Exit the Administrative Console and stop the server. Before you start the
server again, follow the instructions in "Enable security in the server
configuration for WebSphere."
Enabling security in the server configuration for WebSphere
To enable security in the server configuration:
1. To open your WebSphere Application Server V6.1 or V7.0 server in the Servers
view, double click WebSphere Application Server V6.1 or V7.0.
2. For WebSphere V6.1, under the Server section, select SOAP as the server
connection type.
3. For WebSphere V7.0, under the Server section, click Manually provide
connection settings and select SOAP as the server connection type.
4. Under the Security section, click Security is enabled on this server. Type the
user ID and password that you set in your Administrative Console. The User
ID field should match the Primary administrative user name field in the
Configuration page of your realm in the Administrative Console. For this
example, type the password that you use to log in to your operating system.
5. Save your changes and exit the server configuration.
6. Start the server. If an authentication error occurs, ensure that the user id and
password in your server configuration match those that you used to log in to
your operating system.
Binding roles to users and groups in tomcat-users.xml
When you use Apache Tomcat V5.5 or V6.0, the user repository in a production
environment is typically an LDAP directory or relational database, but by default
is the tomcat-users.xml file. In the tomcat-users.xml file, which is located in the
<tomcat-users>
<user name="bob" password="guesswhat" roles="user"/>
</tomcat-users>
158
EGL Rich UI 7.5.1.5
Running a Rich UI application with a secure proxy
When a Web service is invoked from a Rich UI application, a request for that Web
service is sent to the EGL Rich UI Proxy. Before you can access the proxy, you
must enter a valid user id and password into a browser-specific dialog, such as the
following dialog for Mozilla Firefox V2.0. For this example, the user id and
password that you use to log in to your operating system are also used to
authenticate to the EGL Rich UI Proxy.
You can use EGL single sign-on to combine custom authentication to your
application with JEE authentication to the EGL Rich UI Proxy and bypass this
dialog.
WebSphere Application Server hints and tips
If you want to turn off administrative security but cannot start the server to run
the Administrative Console, you can turn off administrative security from the
command line:
1. Go to the WebSphere Application Server install directory.
2. Type bin\wsadmin.bat –conntype NONE
3. When the system prompt redisplays, type securityoff.
4. When you are finished, type quit.
After turning off administrative security, clear the Security is enabled on this
server checkbox in the server configuration before restarting the server.
When testing your Rich UI application, after authenticating with JEE security, if
you make a change to your application or configuration and want to retest
authentication, you might have to stop the server and exit the Workbench in order
to clear all saved values. For Windows®, before you restart, use the Task Manager
to ensure the java.exe process for the server has finished.
If you have trouble starting your server with administrative security enabled, make
sure you specified SOAP as your server connection type in your WebSphere server
configuration.
Chapter 9. Securing a Rich UI application
159
Sample login and error pages for JEE form-based authentication
In JEE form-based authentication, you can specify a customized login page and an
error page. The login page, which prompts the user to enter a user id and
password, refers to a special j_security_check servlet. Two HTTP request
parameters (form input fields) must always be in the request, one called
j_username and the other, j_password.
When the Web container receives a request for the j_security_check servlet, it
passes the request to the security mechanism of the application server to perform
the authentication. If authentication fails, the error page is displayed. Below is code
for a sample login page. Copy and save this code in login.jsp under the
WebContent folder.
<%@ page language="java" contentType="text/html; charset=ISO-8859-1"
pageEncoding="ISO-8859-1"%>
<!DOCTYPE html PUBLIC "-//W3C//DTD HTML 4.01 Transitional//EN"
"http://www.w3.org/TR/html4/loose.dtd">
<html>
<head>
<meta http-equiv="Content-Type" content="text/html; charset=ISO-8859-1">
<title>Sample Login Page for JEE Security</title>
<style type="text/css">H1 {color: navy}</style>
</head>
<body>
<table width="500" border="0">
<tbody>
<tr>
<td colspan="3" width="80%" align="center"><b><font face="Verdana"size="+2"
color="#15406a">Sample Login</font></b><hr>
</td>
</tr>
<tr>
<td colspan="3" width="560" height="65">
<form method="POST" action="j_security_check">
<div>
<table width="100%" border="1" bgcolor="#e9e9e9">
<tbody>
<tr>
<td align="right" width="169"
bgcolor="#e9e9e9"><b>
<font face="Verdana">User id:</font></b></td>
<td width="315"><input type="text" name="j_username"></td>
</tr>
<tr>
<td align="right" width="169" bgcolor="#e9e9e9">
<font face="Verdana"><b>Password:</b></font></td>
<td width="315"><input type="password" name="j_password"></td>
</tr>
<tr bgcolor="white">
<td align="right" width="169" bgcolor="white"></td>
<td width="315"><input type="submit" value="Login"></td>
</tr>
</tbody>
</table>
</div>
</form></td>
</tr>
<tr>
<td colspan="3" width="560" align="center" height="58" valign="top">
<script> document.write(Date()+".")
</script>
</td>
160
EGL Rich UI 7.5.1.5
</tr>
</tbody>
</table></body>
</html>
The following code is for a sample error page. Copy and save this code in error.jsp
under the WebContent folder.
<%@ page language="java" contentType="text/html; charset=ISO-8859-1"
pageEncoding="ISO-8859-1"%>
<!DOCTYPE html PUBLIC "-//W3C//DTD HTML 4.01 Transitional//EN"
"http://www.w3.org/TR/html4/loose.dtd">
<html>
<head>
<meta http-equiv="Content-Type" content="text/html; charset=ISO-8859-1">
<title>Sample Error Page for JEE Security</title>
<style type="text/css">H1 {color: navy}</style>
</head>
<body>
<table width="500" border="0">
<tbody>
<tr>
<td colspan="3" width="80%" align="center"><b><font face="Verdana" size="+2"
color="#15406a">Sample Login Error</font></b><hr>
</td>
</tr>
<tr>
<td colspan="3" width="560" align="center" height="58"
valign="top"><br>Authentication error.
Please check your user id and password, and try again.</td>
</tr>
</tbody>
</table></body>
</html>
Preventing client-side security threats
Unfortunately, the technologies that provide a richer interactive experience can also
make applications less secure. Rich UI applications are susceptible to the security
vulnerabilities that threaten any Web 2.0 applications including cross-site scripting,
SQL injection, and JavaScript hijacking.
When you use EGL, you are protected from some of these client-side threats. For
example, EGL prevents malicious data being sent to the client using either
JavaScript Object Notation (JSON) or XML. It also guards its usage of "eval" in
runtime code. However, it is very difficult for EGL to defend against certain types
of attacks like cross-site scripting and SQL injection without limiting the types of
applications customers can write.
You can prevent unauthenticated clients from calling the proxy and reduce the
possibility of proxy misuse by securing the EGL Rich UI Proxy with JEE security.
However, securing the proxy with JEE security does not prevent authenticated
users from using the proxy for unintended purposes. The more tightly your user
registry is controlled, the safer your proxy will be. Therefore, for security reasons, a
system administrator should control the access of your user registry.
You can keep a log of the end users who have accessed your Rich UI application if
you are using your own login screen, rather than one supplied through JEE
form-based authentication or the browser-provided login dialog from JEE basic
authentication. (In your Rich UI application, you cannot retrieve user ids from the
application server if you are using JEE security.) This log could help you determine
Chapter 9. Securing a Rich UI application
161
the guilty party if an authenticated user is illegally using your EGL Rich UI Proxy
for anything from calling Web services on other domains to instigating JavaScript
hijacking attacks. Also check the documentation of your application server to see if
it maintains logs that might be of help to you.
Overview of SSL
Secure Sockets Layer (SSL) ensures data integrity and confidentiality, and is used
extensively for securing communications. SSL is a protocol that runs above TCP/IP
and below higher-level application protocols such as HTTP and LDAP.
To initiate an HTTP-based SSL connection, the client uses a URL that starts with
HTTPS:// instead of with HTTP://. Always use an SSL-enabled port with the
HTTPS protocol.
In SSL, a server authenticates itself to the client, and the client optionally
authenticates itself to the server, insuring against imposters. By using SSL, you can
prevent the interception and tampering of messages and provide confidentiality
through encryption.
Although much of the SSL material in these topics applies to both WebSphere and
Tomcat, SSL example focuses solely on WebSphere Application Server. For
instructions on how to install and configure SSL for Tomcat, see Apache Tomcat
documentation
Using SSL with Rich UI applications
When the HTML file that EGL generates for your Rich UI application is requested,
a connection is made between the browser and the server to which your Rich UI
application (including the EGL Rich UI Proxy) was deployed. Whenever a Web
service is invoked in your Rich UI application, the EGL Rich UI Proxy creates a
new connection between its server and the one on which the Web service is
deployed. These connections are independent of one another and can use different
protocols.
Requesting an HTML file with the SSL protocol (HTTPS) results in an SSL
connection between the browser and server. If you use JEE authentication to secure
an HTML file or the EGL Rich UI Proxy, require SSL to protect the user id and
password from eavesdroppers as they are transmitted between the browser and
server. When you use JEE authentication, to require SSL for the request, set the
user data constraint in the web.xml to INTEGRAL or CONFIDENTIAL.
When you use custom authentication, you have various options to require HTTPS
for the HTML file request. For instance, you can configure your Web server to
redirect all HTTP requests to HTTPS. To redirect a specific HTML request, consider
purchasing or writing a Java redirect filter, which you can specify on the Filters tab
of your web.xml. You can use these filters to redirect certain HTTP requests to their
HTTPS equivalent.
When a Web service is invoked with the SSL protocol, the EGL Rich UI Proxy
creates a new SSL-enabled connection between its server and the one on which the
Web service is deployed. When you secure Web services with HTTP basic
authentication, require SSL to protect the user id and password during
transmission. To require SSL for the request, set the user data constraint in the
web.xml of the Web service project to INTEGRAL or CONFIDENTIAL. After you
require SSL, invoke the Web service by using the HTTPS protocol.
162
EGL Rich UI 7.5.1.5
When you invoke a secure Web service with SSL, ensure that the Rich UI
application also uses the SSL protocol to protect the user id and password in the
channel between the browser and server.
SSL-related errors
As suggested in the following examples, an occur might occur if the EGL Rich UI
Proxy or Web service requires SSL but HTTPS is not used on the request.
Proxy
Configuration
The EGL Rich UI Proxy is secured by using JEE basic authentication and
includes a CONFIDENTIAL or INTEGRAL user data constraint.
Problem
HTTP is used to request the proxy instead of HTTPS. (Because of the Same
Origin policy for JavaScript, the protocol that is used to request the HTML
file is the protocol that is used to request the proxy. The same is true for
the domain name and port number.)
Errors
A ServiceInvocationException is thrown with messageID "CRRUI3658E"
and the message, "An error occurred on proxy at ‘{0}’ while trying to
invoke service on ‘{1}’" where {0} is the URL of the proxy and {1} is the
URL of the Web service. detail1 of the ServiceInvocationException is set to
"302"; detail2 is set to "Found".
A ServiceInvocationException is thrown with messageID "EGL1546E" and
the message, "The request could not be converted to a service call. The
received request was ''."
Solution
Request the HTML file with HTTPS instead of HTTP.
Web service
Configuration
A Web service is secured by using JEE basic authentication and includes a
CONFIDENTIAL or INTEGRAL user data constraint.
Problem
HTTP is used to request the Web service instead of HTTPS.
Error
A ServiceInvocationException is thrown with messageID "CRRUI3655E"
and the message, "An error occurred while processing response object:
‘ReferenceError: urlString is not defined’". detail1 of the
ServiceInvocationException is set to "302"; detail2 is set to "Found".
Solution
Request the Web service with HTTPS instead of HTTP.
SSL terminology
A key store is a file that contains public and private keys. Public keys are stored as
signer certificates and are sent to the clients that request them. Private keys are
stored in the personal certificates and are never sent to others.
Chapter 9. Securing a Rich UI application
163
A trust store is a file that contains public keys, which are stored as signer
certificates from target servers whom you have deemed trustworthy. If the target
uses a self-signed certificate, extract the public certificate from the server key store
and add the extracted certificate into the trust store as a signer certificate.
Otherwise, add the CA root certificate to your trust store.
A certificate is sent from the server to the client during SSL authentication to
confirm the identity of the server. Certificates contain data such as the owner’s
name and email address, duration of validity, web site address, and certificate ID
of the person who certifies or signs this information. Trusted parties called
Certificate Authorities (CAs) issue digital certificates. For internal Web sites that do
not need a CA certificate, you can use WebSphere Application Server to create
self-signed certificates.
In SSL server authentication, the client prompts the server to prove its identity. The
opposite occurs in client authentication, which is also supported through SSL, but
not covered here. Client authentication is used when the server needs to send
confidential financial information to a customer but wants to verify the identity of
the recipient first.
How SSL works
SSL uses both symmetric and asymmetric encryption algorithms. Symmetric
algorithms use the same key to encrypt and decrypt data. They are faster than
asymmetric algorithms but can be insecure. Asymmetric algorithms use a pair of
keys. Data encrypted using one key can only be decrypted using the other.
Typically, one of the keys is kept private while the other is made public. Because
one key is always kept private, asymmetric algorithms are generally secure;
however, they are much slower than symmetric algorithms. To reap the benefits of
both algorithms, SSL encapsulates a symmetric key that is randomly selected each
time inside a message that is encrypted with an asymmetric algorithm. After both
the client and server possess the symmetric key, the symmetric key is used instead
of the asymmetric ones.
When server authentication is requested, SSL uses the following process:
1. To request a secure page, the client uses HTTPS.
2. The server sends the client its public key and certificate.
3. The client checks that the certificate was issued by a trusted party (usually a
trusted Certificate Authority) that the certificate is still valid, and that the
certificate is related to the contacted site.
4. The client uses the public key to encrypt a random symmetric encryption key
and sends it to the server, along with the encrypted URL required and other
encrypted HTTP data.
5. The server decrypts the symmetric encryption key using its private key and
uses the symmetric key to decrypt the URL and HTTP data.
6. The server sends back the requested HTML document and HTTP data that are
encrypted with the symmetric key.
7. The client decrypts the HTTP data and HTML document using the symmetric
key and displays the information.
SSL example
The following example illustrates how to use WebSphere V6.1 or V7.0 to create and
use your own SSL-enabled port. Before WebSphere Application Server V6.1 was
released, certificates were managed through the use of an external tool called
164
EGL Rich UI 7.5.1.5
iKeyman. As of WebSphere Application Server V6.1, you can use the
Administrative Console to manage both certificates and keys. Although you can
use WebSphere V6.0 with SSL to run Rich UI applications, the instructions for
doing so are not included here. The differences between V6.1 and V7.0 are
described below.
For instructions on how to install and configure SSL for Tomcat, see Apache
Tomcat documentation.
Create an SSL-enabled port
To create a sample SSL-enabled port, take the following steps. For more details, see
your WebSphere Application Server documentation.
Changing your key store and trust store passwords
In the following procedure, you create a new self-signed certificate in your
WebSphere Application Server default key store and import the certificate into
your default trust store. Before you use the default key and trust stores, change
their passwords from the defaults to another value to create a more secure
environment. To change your key store and trust store passwords:
1. Start your WebSphere V6.1 or V7.0 server
2. Right click on the server and click Administration.
3. Click Run administrative console.
4. Log in to the Administrative Console.
5. Expand Security and click SSL certificate and key management.
Under Related Items, click Key stores and certificates.
For WebSphere V6.1, click NodeDefaultKeyStore.
For WebSphere V7.0, click NodeDefaultKeyStore. Click Change password.
Type your new password into the Change password and Confirm password
fields.
10. Click OK.
11. Repeat this process for NodeDefaultTrustStore.
6.
7.
8.
9.
Creating a personal certificate
A self-signed certificate is useful when you are testing or when your Web site is
behind a firewall. Otherwise, obtain a certificate from a Certificate Authority. To
create a personal certificate:
1. From your list of key stores and trust stores, click NodeDefaultKeyStore.
2. Under Additional Properties, click Personal certificates.
3. For WebSphere V6.1, click Create a self-signed certificate.
4. For WebSphere V7.0, click Create → Self-signed certificate.
5. Type the following values for the certificate:
Alias
SampleCert
Common name
Sample Server
Organization
IBM
Chapter 9. Securing a Rich UI application
165
6. Click OK.
In the list of certificates, you should now see samplecert.
Creating an SSL configuration
WebSphere Application Server uses SSL configurations for SSL-based transports. To
create an SSL configuration:
1. From the left-hand pane, expand Security and click SSL certificates and key
management.
2. Under Related Items, click SSL configurations.
3. Click New.
4. Type the following values:
Name
SampleConfig
Trust store name
NodeDefaultTrustStore
Keystore name
NodeDefaultKeyStore
5. Click Get certificate aliases.
6. Ensure that samplecert is selected as the Default server certificate alias and the
Default client certificate alias.
Click OK, and click Save. In the list of SSL configurations, you should see
SampleConfig.
Creating a Web container transport chain
Create a Web container transport chain to use the SSL configuration that you
created:
1. For WebSphere V6.1, from the left-hand pane, expand Servers and click
Application servers.
2. For WebSphere V7.0, from the left-hand pane, expand Servers and Server
Types. Click WebSphere application servers.
3. Click server1 or your server name.
4. Under Container Settings, expand Web Container Settings and click Web
container transport chains.
5. Click New.
6. In the Transport chain name field, type SampleInboundSecure.
7. To select the Transport chain template, from the drop-down list, click
WebContainer-Secure(templates/chains | webcontainer-chains.xml#Chain_2).
8. Click Next.
9. In the Select a port page, type the following values:
Port
SamplePort
Host
*
Port number
9444
166
EGL Rich UI 7.5.1.5
If port 9444 is already in use, pick another port number and use that
number for the rest of the exercise.
10. Click Next.
11. Click Finish → Save.
SampleInboundSecure is now listed as a Web container transport chain. Associate
the sample SSL configuration with this transport chain:
1. Click SampleInboundSecure.
2. Click SSL inbound channel.
3. Under SSL Configuration, from the Select SSL Configuration drop-down list,
select SampleConfig .
4. Click OK → Save.
Adding the SSL-enabled port to the virtual host
Add port 9444 to the virtual host:
1. In the left-hand pane, expand Environment and click Virtual Hosts .
2. Click default_host.
3. Under Additional Properties, click Host Aliases.
4. On the Host Aliases page, click New.
5. Keep * as the host name. Change the port to 9444.
6. OK → Save. In the list of ports, you should see 9444.
Stop and restart the server. Port 9444 is now an SSL-enabled port.
Using the new SSL-enabled port to run a sample
To use your port, start a WebSphere V6.1 or V7.0 server. On your WebSphere
server, install the EAR that contains your deployed Rich UI application. To request
an HTML file such as RSSReader.html in the RSSReaderSample context, take one of
the following steps:
v Open a browser such as Internet Explorer, Safari®, or Mozilla Firefox. Enter a
URL in your browser using the newly-enabled SSL port: https://localhost:9444/
RSSReaderSample/RSSReader.html
v In your Project Explorer, right-click on an HTML file of an application that has
been published to WebSphere. Click Run As, then click Run on Server.
If you are using a self-signed certificate, you might see a "Security Alert", "Website
Certified by an Unknown Authority", or another warning, depending upon the
browser. This warning indicates that the certificate was signed by an unknown
certifying authority. Click the "View Certificate" or "Examine Certificate" button to
verify if the certificate is correct. If so, continue.
If the Common Name on the certificate does not match the domain name in the
requested URL (localhost, in this case), you might also see a "Security Error:
Domain Name Mismatch" error. To verify the certificate, click the View Certificate
button, and continue as appropriate. To prevent "man-in-the-middle" attacks, where
a rogue program intercepts all communication between a client and server, the
client must verify the server domain name that is specified in the certificate.
Chapter 9. Securing a Rich UI application
167
Preventing SSL handshaking exceptions
To prevent SSL handshaking exceptions, ensure that the certificate of a server can
be found in the trust store of a client. If the certificate is not found in the trust
store and the client is a browser, a security alert dialog is displayed. A user can use
the dialog to view the certificate and select whether to proceed.
When a Web service is invoked from a Rich UI application, the EGL Rich UI Proxy
establishes a HTTP or HTTPS connection between the proxy and Web service. This
connection is independent of the connection between the browser and proxy. If the
Web service has an HTTPS protocol, the connection between the proxy and Web
service uses SSL. Because no browser is available to display a security alert and
prompt for a response, the certificate that belongs to the server of the Web service
must be in the trust store of the server of the EGL Rich UI Proxy before the
connection is initiated. Otherwise a handshaking error occurs.
To obtain a copy of the server’s certificate when calling a third-party Web service,
enter the URL of the Web service in a browser over HTTPS. The way in which you
receive the certificate of the server varies depending on the browser. A common
way is through a "View Certificate" button, Details tab, and "Copy to File" button.
Save the certificate to a file. Use the Administrative Console to open the trust store
of your EGL Rich UI Proxy and import the saved certificate as a signer certificate.
Alternatively, you can connect to the remote SSL host and port and receive the
signer certificate during the handshake by using the "Retrieve from port" option. If
you try to use the SSL-enabled port 9444 you created in "SSL Example" to request a
Web service called from an HTML file requested on the WebSphere default SSL
port 9443, you a handshaking error occurs. To fix this problem, import the
certificate that is associated with port 9444 into the trust store that is associated
with port 9443:
1. Start the WebSphere V6.1 or V7.0 server that contains your EGL Rich UI
Proxy. The proxy is deployed to the same location as the generated HTML file
of your Rich UI application.
2. Right click the server. Click Administration → Run administrative console.
3.
4.
5.
6.
7.
Log in to the Administrative Console.
Expand Security and click SSL certificates and key management.
Under Related Items, click Key stores and certificates.
Click the appropriate trust store.
Click Signer certificates.
8. Click Retrieve from port.
9. Specify the following values:
Host
localhost
Port
9444
SSL configuration for outbound connection
NodeDefaultSSLSettings
Keystore name
SampleCert
10. Click Retrieve signer information → OK.
168
EGL Rich UI 7.5.1.5
Restart the server. You should now be able to request a Web service on port 9444
from port 9443 without receiving a handshaking error.
SSL transport between WebSphere Application Server and
LDAP
If you use an LDAP directory as your registry, WebSphere Application Server
verifies the password of a user by using the standard ldap_bind, which requires
sending the password to the LDAP directory server. A password can flow in clear
text when you use a non-SSL channel between WebSphere and the LDAP directory
server. To use SSL, create a certificate for the LDAP directory and import it into the
trust store of your server. Also enable SSL on your LDAP directory server. For
more details, see LDAP directory server and application server documentation.
IBM Rational AppScan
IBM Rational AppScan® is a Web application security assessment suite that you can
use to identify and fix common Web application vulnerabilities. Use Rational
AppScan® to scan and test the code that EGL generates for your EGL Rich UI
application to pinpoint any critical areas that are susceptible to a Web attack. For
more information on the Rational AppScan product line, see http://www306.ibm.com/software/rational/offerings/websecurity/webappsecurity.html.
Chapter 9. Securing a Rich UI application
169
170
EGL Rich UI 7.5.1.5
Chapter 10. Reference to widgets
Here are the main Widget types:
v BidiTextArea
v BidiTextField
v Box
v
v
v
v
v
v
v
Button
Checkbox
Combo
Div, FloatLeft, and FloatRight
Grid
Grouping
HTML
v Hyperlink
v Image
v
v
v
v
v
List
Listmulti
Menu
PasswordTextField
RadioGroup
v Shadow
v Span
v TextArea
v
v
v
v
TextField
TextLabel
Tooltip
Tree and TreeToolTip
Rich UI BidiTextArea
A bidiTextArea widget defines a rectangle containing one or more lines of
bidirectional text.
The following properties are supported:
v numColumns, which holds an integer that represents the number of columns in
the text area
v numRows, which holds an integer that represents the number of rows in the
text area
v readOnly, which holds a Boolean that indicates whether the text area is
protected from user input
v text, which holds a string for display in the text area
The following functions are available, none of which returns a value:
v append adds content to the content already in the text area. The only parameter
is the string to be added.
© Copyright IBM Corp. 2000, 2010
171
v setRedraw redraws the text area. The only parameter is a Boolean, which
indicates whether to redraw the area.
v select causes the widget to receive focus and, on most browsers, selects the text.
The function has no parameters.
Other supported properties and functions are described in “Widget properties and
functions.”
Use of this widget requires the following statement:
import com.ibm.egl.rui.widgets.BidiTextArea;
Rich UI BidiTextField
A bidiTextField widget defines a text box containing a single line of bidirectional
text.
The following properties are supported.
v text, which holds a string for display in the text field.
v readOnly, which holds a Boolean that indicates whether the text field is
protected from user input.
The following function is supported:
v select causes the widget to receive focus and, on most browsers, selects the text.
The function has no parameters.
Other supported properties and functions are described in “Widget properties and
functions.”
Use of this widget requires the following statement:
import com.ibm.egl.rui.widgets.BidiTextField;
Rich UI Box
A Rich UI box widget defines a box that embeds other widgets.
You can indicate how many columns are in the box. If the number of columns is
three, for example, the first three embedded widgets are on the first row in the
box, the fourth through sixth are on the second row, and so forth. If the number of
columns is one, all the embedded widgets are arranged vertically. In any case, the
width of a column equals the width of the largest widget in the column, and you
can indicate whether the embedded widgets in a given column are aligned at the
column's center, right, or left.
Vertical and horizontal scroll bars appear if necessary to give the user access to
widgets that are out of sight.
The following properties are supported:
v alignment, which holds an integer value that indicates how the content is
aligned in each column: 0 for left, 1 for center, or 2 for right
v children, which holds an array of widgets, as described in Widget properties and
functions
v columns, which holds an integer that identifies the number of columns in the
box
172
EGL Rich UI 7.5.1.5
Other supported properties and functions are described in “Widget properties and
functions.”
Use of this widget requires the following statement:
import com.ibm.egl.rui.widgets.Box;
Rich UI Button
In most cases, a Rich UI button widget invokes a function in response to a user
click. The following properties are supported:
v text, which holds a string for display on the button
v Properties described in “Widget properties and functions.”
The following function is supported:
v select causes the button to receive focus and, on most browsers, selects the
button text. The functions has no parameters.
v Functions described in “Widget properties and functions.”
Use of this widget requires the following statement:
import com.ibm.egl.rui.widgets.Button;
Rich UI Checkbox
A Rich UI checkbox displays a true-false option and responds to the user input by
invoking a function. The following properties are supported:
v text, which holds a string for display
v selected, which holds a Boolean that indicates whether the checkbox is selected
Other supported properties and functions are described in “Widget properties and
functions.”
Use of this widget requires the following statement:
import com.ibm.egl.rui.widgets.Checkbox;
Rich UI Combo
A Rich UI combo widget defines a combo box, which presents one of several
selectable options and lets the user temporarily open a dropdown list to select a
different option.
Here is example code:
import
import
import
import
com.ibm.egl.rui.widgets.Box;
com.ibm.egl.rui.widgets.Combo;
com.ibm.egl.rui.widgets.TextField;
egl.ui.rui.Event;
Handler ListExample Type RUIHandler
{ initialUI = [myBox] }
myBox Box{columns=2, children= [myCombo, myTextField]};
myCombo Combo
{
values = ["one", "two", "three", "four"],
selection = 2, onChange ::= changeFunction
};
Chapter 10. Reference to widgets
173
myTextField TextField
{text = myCombo.values[myCombo.selection]};
Function changeFunction(e Event IN)
myTextField.text = myCombo.values[myCombo.selection];
end
end
The following properties are supported:
v values, which holds an array of strings that each represent a selectable option.
v selection, which is integer that represents the position of the string in the array.
If you set the value of selection before displaying the combo box, the specified
string is displayed initially; otherwise, the first string is displayed initially.
The first string in the array is at position 1, not 0.
Other supported properties and functions are described in “Widget properties and
functions.”
Use of this widget requires the following statement:
import com.ibm.egl.rui.widgets.Combo;
Rich UI Div, FloatLeft, and FloatRight
A Rich UI div widget defines a division (HTML DIV tag) on the Web page, below
the preceding content. The widget might be the parent of floatLeft and floatRight
widgets, providing flexibility in Web-page design. A floatLeft widget uses the CSS
element float:left, and the floatRight widget uses the CSS element float:right.
At this writing, the following site offers "Floatutorial," which is a tutorial on
designing a Web page with float:left and float:right:
http://css.maxdesign.com.au
Supported EGL properties and functions are described in “Widget properties and
functions.”
Use of each widget requires the appropriate import statement:
import com.ibm.egl.rui.widgets.Div;
import com.ibm.egl.rui.widgets.FloatLeft;
import com.ibm.egl.rui.widgets.FloatRight;
Rich UI Grid and GridTooltip
A Rich UI grid widget defines an array of values in a table format. The widget
allows you to set the following details:
v An array of records whose field values are displayed in the corresponding grid
columns, one row per record
v Behaviors, which are fields that each accept an array of function references. When
a user clicks a cell, the referenced functions run in array-element order. Each
function can update cell characteristics. The result is that you can specify style
characteristics, as well as actions such as sorting by column or displaying a
tooltip. (A tooltip is a hover help, which is a box that is displayed when the user
stops the mouse and the cursor is on a particular area of the grid.)
174
EGL Rich UI 7.5.1.5
A Delegate part named CellBehavior describes the characteristics of each
function referenced by the behaviors and headerBehaviors field of a grid
widget:
Delegate
CellBehavior(grid Grid in, cell TD in, row any in,
rowNumber int in, column GridColumn in)
end
grid
The grid that is passed to the function.
cell
An internal widget that represents the grid cell. That widget is based on the
HTML TD (table data) tag.
row
The record that represents the row data. (As noted later, you assign values to
the grid by setting the grid's data property, which takes an array of records
of a type that you specify. The values for a given grid row are retrieved
from an element of that array.)
rowNumber
The row number, which ranges from 1 to the value of property totalRows,
which contains the number of rows in the grid.
column
The record that represents the column description. (As noted later, you
describe the columns by setting the grid's columns property to an array of
records of type GridColumn. The values for a given column are retrieved
from an element of that array.
Rich UI provides a number of functions that you can reference in the behavior
fields: For details, see the following files in the com.ibm.egl.rui project, EGLSource
folder, com.ibm.egl.rui.widgets package:
v
v
v
v
GridBehaviors.egl
GridSelector.egl
GridSorter.egl
GridToolTip.egl (which we mention again, later in this topic)
Supported properties and functions
The following properties are supported in the Grid widget:
v data, which is of type ANY and holds an array of records defined by the
developer. The data in a given record field is presented in the grid only if the
name of the field is matched by the name of a grid column, as specified in the
columns property. In the grid declaration, list the data property after the other
properties.
Here is an example:
stocks Stock[] = [
new Stock{Symbol = "Company1", Quote = 100, NumShares = 40, SelectQuote = false},
new Stock{Symbol = "Company2", Quote = 200, NumShares = 10, SelectQuote = false},
];
Grid myGrid {..., data = stocks as any[]};
v columns, which holds an array of records of the following type:
Chapter 10. Reference to widgets
175
Record GridColumn
displayName String;
name String;
width int;
end
displayName
The column title. If this field is not specified, the column title is the value of
the name field.
name
The default column title, as well the name of the data record field that
provides the value for the column.
width
Number of pixels in the column.
v totalRows is a read-only property that contains the number of rows in the grid.
v behaviors is an array of delegates of type CellBehavior. You specify an array of
functions that are invoked every time the user clicks any row other than the
header row. The functions are invoked in the order specified in the array.
v headerBehaviors is an array of delegates of type CellBehavior. You specify an
array of functions that are invoked every time the user clicks a header row. The
functions are invoked in the order specified in the array.
The following rules are in effect:
v Except in the case of the referenced widgets in children or initialUI properties,
Rich UI requires that you declare a value before you reference it. If a grid
property refers to an array that is outside the grid declaration (as in our
previous example of the data property), the array must be specified before the
grid declaration.
v When declaring a grid, ensure that you list the behaviors, headerBehaviors, and
column properties before the data property.
v If, when writing statements in functions, you change the value of the behaviors
or headerBehaviors property, invoke the grid-specific function layouts() to reset
the widget.
In relation to Grid (but not GridTooltip), other supported properties and functions
are described in “Widget properties and functions.”
Use of this widget requires some or all of the following statements:
import
import
import
import
import
com.ibm.egl.rui.widgets.Grid;
com.ibm.egl.rui.widgets.GridBehaviors;
com.ibm.egl.rui.widgets.GridSelector;
com.ibm.egl.rui.widgets.GridSorter;
com.ibm.egl.rui.widgets.GridToolTip;
Grid Tooltips
If you wish to include a tooltip for a grid, you have two main alternatives:
v If you wish the tooltip to be displayed whenever the cursor hovers over the grid
and not to vary according to the cell, row, or column, assign the grid as a whole
to a tooltip. For details, see Rich UI Tooltip. You might declare a tooltip as a
global widget and enable it (making it active) in some function; for example, in
the on-construction function or in a function identified in the behaviors or
headerBehaviors property.
v If you wish the tooltip to specify different tooltip information for a given cell,
row, or column, you can specify a grid tooltip, which is similar to a tooltip but
176
EGL Rich UI 7.5.1.5
always requires that you specify a grid-tooltip provider function. That function
returns a box that provides the content to display to the user.
Here is the process for creating a grid tooltip:
v Reference the following function when you assign an array for the behaviors
property: GridToolTip.setToolTips. Access to that function requires that you
include the following import statement:
import egl.rui.widgets.GridToolTip;
v Declare a grid tooltip globally, as in the following example, which references a
grid-tooltip provider (the function to invoke) and a delay (the number of
milliseconds between the start of the hover and the invocation of the provider):
gridTooltip GridTooltip { provider = tooltipText, tooltip.delay = 1000 };
v
Create a grid-tooltip provider function with the name specified in the
GridToolTip provider property (in this example, the function is tooltipText). The
grid-tooltip provider function has the parameter and return-value characteristics
outlined in the following Delegate part:
Delegate GridTooltipTextProvider(row any in, fieldName String in, td TD in) returns(Box)
end
row
The row provided to the function. You can use the input argument to access
a specific value. For example, consider the case in which the data is as
follows:
stocks Stock[] = [
new Stock{Symbol = "Company1", Quote = 100, NumShares = 40, SelectQuote = false},
new Stock{Symbol = "Company2", Quote = 200, NumShares = 10, SelectQuote = false}
];
You can determine which row is being provided by code such as in the
following example:
if (row.Quote as int == 200)
// place content in a tooltip and return the tooltip
end
fieldName
Name of the column provided to the function.
td An internal widget that represents the grid cell. That widget is based on the
HTML TD (table data) tag.
v You do not enable the grid tooltip; it is enabled as soon as you declare it.
You can have only one grid tooltip per grid.
Example
Here is an example that you can try in your workspace and that includes a tooltip
for the header row and a grid tooltip elsewhere:
import
import
import
import
import
import
import
import
import
com.ibm.egl.rui.widgets.Box;
com.ibm.egl.rui.widgets.Grid;
com.ibm.egl.rui.widgets.GridBehaviors;
com.ibm.egl.rui.widgets.GridColumn;
com.ibm.egl.rui.widgets.GridSelector;
com.ibm.egl.rui.widgets.GridTooltip;
com.ibm.egl.rui.widgets.TextArea;
com.ibm.egl.rui.widgets.Tooltip;
egl.ui.rui.Widget;
Chapter 10. Reference to widgets
177
Record Filler
F1 String;
F2 String;
F3 String;
end
handler myGrid1 type RUIhandler {initialUI = [ myBox ]}
gridSelector GridSelector { color = "lightgreen" };
filler Filler[] = [
new Filler{F1 = "R3, C1", F2 = "R3, C2", F3 = "R3C3"},
new Filler{F1 = "R4, C1", F2 = "R4, C2", F3 = "R4C3"}
];
myFirstGrid Grid{
behaviors
= [
GridBehaviors.whiteCells,
GridBehaviors.alternatingColor,
GridBehaviors.tightCells,
gridSelector.enableSelection,
gridTooltip.setTooltips
],
headerBehaviors = [
GridBehaviors.grayCells,
headerTooltips
],
columns = [
new GridColumn{name = "F1", displayName = "Column 1 Header", width=120},
new GridColumn{name = "F2", displayName = "Column 2 Header", width=120},
new GridColumn{name = "F3", width=50}
],
data = [
new Dictionary { F1 = "Row 1, Column 1", F2 = "Row 1, Column 2", F3 ="me"},
new Dictionary { F1 = "Row 2, Column 1", F2 = "Row 2, Column 2", F3 = "you"},
filler[1], filler[2]
]
};
myBox Box{ backgroundcolor = "peachpuff", padding=8,
children=[myFirstGrid], marginbottom=15};
HtooltipText String = "This is a Header tooltip";
headerTooltip Tooltip { text = HtooltipText, delay=1000 };
function headerTooltips(grid Grid in, td Widget in, row any in,
ignoreRowNumber int in, column GridColumn in)
headerTooltip.enable(td);
end
gridTooltip GridTooltip { provider = tooltipText, tooltip.delay = 1000 };
tooltipArea TextArea { width=450, height=100, paddingLeft=7, marginLeft=7 };
function tooltipText(row any in, fieldName String in, td Widget in) returns(Box)
tooltipArea.text =
"In function tooltipText (a tooltip provider):" +
" \n
fieldName is the column name (’"+fieldName+"’)." +
"\nYou can access cell content:" +
"\n
td.innerText is ’"+td.innerText+"’. \nThanks to EGL dynamic access" +
"\n
row[fieldName] is also ’"+row[fieldName] + "’.";
return (tooltipBox);
end
tooltipBox Box {columns=1, width=475, children = [ tooltipArea ]};
end
178
EGL Rich UI 7.5.1.5
Rich UI Grouping
A Rich UI grouping widget displays one or more widgets inside a box. In addition
to those widgets, you specify text that is embedded in the topmost border of the
box.
The following properties are supported:
v text, which holds a string for display in the topmost border of the box.
v contents, which represents a Div tag. You can set the children by assigning
widgets to contents.children, as shown here:
import com.ibm.egl.rui.widgets.CheckBox;
import com.ibm.egl.rui.widgets.Grouping;
handler MyOne type RUIHandler{initialUI =[myGrouping]}
myCheckbox checkbox{};
myGrouping Grouping {text = "Test", backgroundColor = "yellow", width = 100,
contents.children = [myCheckbox]};
end
Supported properties and functions are described in “Widget properties and
functions.”
Use of this widget requires the following statement:
import com.ibm.egl.rui.widgets.Grouping;
Rich UI HTML
A Rich UI HTML widget presents an HTML fragment, which may be provided by
a service.
The following properties are supported:
v text, which holds the HTML fragment and is of type STRING
v width, which is the width of the bounded area, in pixels
v height, which is the height of the bounded area, in pixels
Other supported properties and functions are described in “Widget properties and
functions.”
The following example is rendered as Rich UI:
Handler GridDemo type RUIHandler {children = [myHTML]}
myHTML HTML
{
text = "Rich UI",
height = 30, width=160
};
Use of this widget requires the following statement:
import com.ibm.egl.rui.widgets.HTML;
Chapter 10. Reference to widgets
179
Rich UI Hyperlink
A Rich UI hyperlink defines a Web-page link that, if clicked, goes to the target
page.
The following properties are supported:
v text specifies the string displayed on the page
v target specifies a string that identifies the window in which the new Web page
opens. Here are the valid values:
– "_top" opens the page in the current window, taking up the entire page. This
behavior is also in effect if you specify "_self", "_parent", or no value for
target.
– "_blank" opens the page is a different browser or browser window.
v href specifies the Web address of interest
Supported properties and functions are described in “Widget properties and
functions.”
The following example renders a link to the IBM Web site, and the displayed text
is "IBM":
Handler Hyper type RUIHandler {children = [myHyperlink]}
myHyperlink HyperLink
{
text = "IBM",
target = "_blank",
href = "http://www.ibm.com"
};
end
If the Web page to which you are linking takes up the Preview view, you can clear
the page as follows:
v Double-click the Link Preview with Editor button (the two arrows); or
v Load an EGL file that contains a different Rich UI handler.
Use of this widget requires the following statement:
import com.ibm.egl.rui.widgets.Hyperlink;
Rich UI Image
A Rich UI image widget presents a graphic.
The following properties are supported:
v src, which holds the Web address for the graphic
v text, which holds the text shown in browsers that cannot display the graphic or
when the mouse hovers over the image
Other supported properties and functions are described in “Widget properties and
functions.”
The following example renders a graphic or the word "Gears":
Handler GridDemo type RUIHandler {children = [myImage]}
myImage Image
180
EGL Rich UI 7.5.1.5
{
src =
"http://www.ibm.com/developerworks/i/spaces/feature/d-aw-s-alphaworks.jpg",
text = "Gears"
};
end
Use of this widget requires the following statement:
import com.ibm.egl.rui.widgets.Image;
Rich UI List
A Rich UI list widget defines a list from which the user can select a single entry.
Here is example code, which displays the list value in a text field:
import com.ibm.egl.rui.widgets.List;
import com.ibm.egl.rui.widgets.TextField;
import egl.ui.rui.Event;
Handler MyHandler Type RUIHandler
{ initialUI = [myList, myTextField]}
myList List
{
values = ["one", "two", "three", "four"],
selection = 2, onChange ::= changeFunction
};
myTextField TextField
{text = myList.values[myList.selection]};
Function changeFunction(e Event in)
myTextField.text = myList.values[myList.selection];
end
end
The following properties are supported:
v values, which holds an array of strings that each represent a selectable option.
v selection, which holds an integer that represents the position of the string in the
array. If you set the value of selection before displaying the list box, the
specified string is displayed in boldface.
The first string in the array is at position 1, not 0.
v size, which holds an integer that indicates how many strings to display from the
values array. The default is to display all the strings, with no scroll bar:
– If the value of size is smaller than the number of strings, only the specified
number of strings is displayed. A scroll bar provides access to the other
strings.
Initially, only the last strings are displayed.
– If the value of size is greater than the number of strings, additional spaces are
added to the bottom of the list box. The user cannot select content from one
of those spaces, which are only for display.
If you do not set the size property, Internet Explorer 6 displays the widget as a
combo box (a combination text box and list box).
Other supported properties and functions are described in “Widget properties and
functions.”
Chapter 10. Reference to widgets
181
Use of this widget requires the following statement:
import com.ibm.egl.rui.widgets.List;
Rich UI ListMulti
The Rich UI listMulti widget defines a list from which the user can select multiple
entries. The following properties are supported:
v values, which holds an array of strings that each represent a selectable option.
v selection, which holds an array of integer that represent the position of the
strings in the values array. If you set the value of selection before displaying the
list box, the specified strings are displayed in boldface.
The first string in the array is at position 1, not 0.
v size, which holds an integer that indicates how many strings to display from the
values array. The default is to display all the strings, with no scroll bar:
– If the value of size is smaller than the number of strings, only the specified
number of strings is displayed. A scroll bar provides access to the other
strings.
Initially, only the last strings are displayed.
– If the value of size is greater than the number of strings, additional spaces are
added to the bottom of the list box. The user cannot select content from one
of those spaces, which are only for display.
If you do not set the size property, Internet Explorer 6 displays the widget as a
combo box (a combination text box and list box).
Other supported properties and functions are described in “Widget properties and
functions.”
Use of this widget requires the following statement:
import com.ibm.egl.rui.widgets.ListMulti;
Rich UI Menu
A Rich UI menu widget defines a menu, which is displayed as a single, top-level
entry such as File. The menu has subordinate menu items that each can provide
additional options. To create a menu bar, you can declare a box widget that
contains a series of menus, as shown in the following example:
menuBar Box{ font = "Arial", children = [
fileMenu,
otherMenu,
helpMenu ]};
You are likely to place the menu bar in a larger box, which includes the overall
Web page. Here is partial code from a later example:
handler MyHandler type RUIhandler{initialUI =[ui], onConstructionFunction = start}
ui Box{columns = 1, margin = 12, background = "#eeeeee",
children =[ menubar,
new Box{ borderStyle = "solid", borderColor = "orange", borderTopWidth = 25,
padding = 11, children =[changeTextBox]}
]};
The basic idea is that you specify an array of menu items for each menu, and each
menu item references (at most) two functions:
182
EGL Rich UI 7.5.1.5
v The item-type function sets up relationships at run time and is invoked when the
menu item is being readied for display
v The item-action function responds to the user who selects the menu item.
However, in some cases when you declare a menu item, you do not reference
the item-action function.
For example, here is the array of items for the file menu, followed by the file menu
declaration:
fileMenuItems menuItem[] =[
new MenuItem{item = "Clear", itemType = MenuBehaviors.simpleText, itemAction = menuAction},
new MenuItem{item = "Type", itemType = MenuBehaviors.simpleText, itemAction = menuAction}];
fileMenu Menu{menubehaviors ::= MenuBehaviors.BasicMenu, title = "File",
options = fileMenuItems, onMenuOpen = closeMenu};
Supported properties and functions are described in “Widget properties and
functions.”
Use of this widget requires the following statements:
import com.ibm.egl.rui.widgets.Menu;
import com.ibm.egl.rui.widgets.MenuBehaviors;
import com.ibm.egl.rui.widgets.MenuItem;
Please note that you must declare a set of menu items before declaring the menu
in which the items are displayed. We explain menu development with this
ordering in mind.
MenuItem
The fields for type MenuItem (a Record part) reference the item-type and
item-action functions. We describe the MenuItem fields before describing the
function characteristics. Here are the fields:
id An optional value to associate the menu item with a CSS entry.
item
A value passed to the item-type function. Rich UI provides a few functions and
you can code your own; but assuming you use the existing choices, the value
of the item property is one of the following values:
v A string to display as a submenu item. Only in this case do you specify an
item-action function in the menu-item declaration.
v A widget to display as a submenu item.
v An array that is composed of (a) a submenu title and (b) an array that
references a set of subordinate submenu items. The following fragment
shows this alternative and is from a later example:
new MenuItem{item =["Special", [myTimeItem, myReadOnlyItem]],
itemType= MenuBehaviors.subMenu }];
itemType
A reference to the item-type function.
Rich UI provides three functions that allow for the options described in
relation to the item property:
v The function simpleText is appropriate if item is a string to display
v The function widgetItem is appropriate if item is widget
v The function subMenu is appropriate if item is an array of string and
subordinate submenu items
Chapter 10. Reference to widgets
183
All those functions are available in the Rich UI library MenuBehaviors.
itemAction
A reference to the item-action function. Specify this value only if the value of
the field item is a string.
The item-type function has the characteristics defined in the following Delegate
part:
Delegate
MenuItemType(newItem any in, itemAction MenuItemSelection, parentMenu Menu in)
returns (any)
end
newItem
The item you specify when declaring the menu item.
itemAction
A reference to the item-action function, as is always required in the item-type
function.
In general, a Delegate part named MenuItemSelection describes the
item-action function, as noted later.
parentMenu
The menu that contains the menu item.
Here is the Delegate part named MenuItemSelection, which describes the
item-action function:
Delegate MenuItemSelection(parentMenu Menu, item any in) end
parentMenu
The menu that contains the menu item.
item
The menu item.
The item-action function (in outline) might be as follows:
function menuAction(parentMenu Menu, item any in)
if(parentMenu == fileMenu)
case(item as string)
when("Clear")
;
otherwise
;
end
else
if(parentMenu == helpMenu)
;
else
;
end
end
end
Menu
The fields for type Menu are as follows:
menuBehaviors
A reference to a function that is invoked during creation or re-display of the
menu, so that styles and functionality are applied to the menu. The reference is
added to the menuBehaviors array by use of the append syntax (::=). You can
184
EGL Rich UI 7.5.1.5
have repeated entries (the syntax is as shown in the example), and when a
user selects a menu, the referenced functions run in array-element order. In our
example, the menuBehaviors property references the function basicMenu,
which is available in the Rich UI library MenuBehaviors. You can use the
function basicMenu directly or can use it as a basis for your own function.
A Delegate part named MenuBehavior describes the characteristics of the
function being referenced. We describe the Delegate part later.
In the menu declaration, list the behaviors property before the other
properties.
title
The string to display.
options
An array of menu items.
onMenuOpen
A reference to a function that runs when the user selects the menu. The
function has no return value and has a single parameter of type Menu and
qualifier IN. Here is an example, which ensures that the user's selection of one
menu shuts any other open menu:
function closeMenu(keepOpen Menu IN)
if(keepOpen != fileMenu)
fileMenu.hideOptions(false);
end
if(keepOpen != otherMenu)
otherMenu.hideOptions(false);
end
if(keepOpen != helpMenu)
helpMenu.hideOptions(false);
end
end
Here is the Delegate part named MenuBehavior, which describes each function
invoked in response to a menu selection at run time:
Delegate
MenuBehavior(menu Menu in, titleBar TextLabel, optionsBox Box, options MenuItem[])
end
menu
The menu.
titleBar
A text label that contains the menu title you assigned.
optionsBox
A box that contains a child for every item in the menu. The function
basicMenu assigns rules for highlighting those children in response to mouse
movements at run time:
for (index int from 1 to optionsbox.children.getSize() by 1)
widget Widget = optionsBox.children[index];
widget.onMouseOver ::= highlight;
widget.onMouseOut ::= removemenuhighlight;
end
options
An array of the menu items.
The function layouts() resets widget behaviors, as described in the following rules:
v When declaring a menu, ensure that you list the menuBehaviors property first.
Chapter 10. Reference to widgets
185
v If, when writing statements in functions, you change the value of the
menuBehaviors property, invoke the menu-specific function layouts() to reset
the widget.
Example
You can bring the following example into your workspace to see the relationships
described earlier.
package myPkg;
import
import
import
import
import
import
import
import
com.ibm.egl.rui.widgets.Box;
com.ibm.egl.rui.widgets.CheckBox;
com.ibm.egl.rui.widgets.HTML;
com.ibm.egl.rui.widgets.Menu;
com.ibm.egl.rui.widgets.MenuBehaviors;
com.ibm.egl.rui.widgets.MenuItem;
com.ibm.egl.rui.widgets.TextField;
egl.ui.rui.Event;
handler MyHandler type RUIhandler{initialUI =[ui], onConstructionFunction = start}
{}
ui Box{columns = 1, margin = 12, background = "#eeeeee",
children = [
menubar,
new Box{
borderWidth = 2, borderStyle = "solid", borderColor = "orange",
borderTopWidth = 50, padding = 11,
children =[changeTextBox]}]};
menuBar Box{font = "Arial", children =[fileMenu, otherMenu, helpMenu]};
changeTextBox TextField{text="here"};
readonlyCheck CheckBox{Text = "Read Only", onChange::= setReadOnly};
myTimeItem menuItem{
item = "Time?",
itemType = MenuBehaviors.simpleText,
itemAction = tellTime };
myReadOnlyItem MenuItem {
item = readOnlyCheck,
itemType = MenuBehaviors.widgetItem };
fileMenuItems menuItem[] =[
new MenuItem{item = "Clear",
itemType = MenuBehaviors.simpleText, itemAction = menuAction},
new MenuItem{item = "Type",
itemType = MenuBehaviors.simpleText,
itemAction = menuAction} ];
otherMenuItems menuItem[] =[
new MenuItem{item =["Special", [myTimeItem, myReadOnlyItem]],
itemType= MenuBehaviors.subMenu }];
helpItems menuItem[] =[new MenuItem{item = "About",
itemType = MenuBehaviors.simpleText,
itemAction = showHelp} ];
fileMenu Menu{menubehaviors ::= MenuBehaviors.BasicMenu, title = "File",
options = fileMenuItems, onMenuOpen = closeMenu};
helpMenu Menu{menubehaviors ::= MenuBehaviors.BasicMenu, title = "Help",
options = helpItems, onMenuOpen = closeMenu};
186
EGL Rich UI 7.5.1.5
otherMenu Menu{menubehaviors ::= MenuBehaviors.BasicMenu, title = "Other",
options = otherMenuItems, onMenuOpen = closeMenu};
helpArea HTML{onClick ::= hideHelp, position = "absolute", x = 70, y = 60,
backgroundColor = "lightyellow", width = 400, padding = 11,
borderWidth = 3, borderStyle = "solid", height = 50,
text = "Helpful detail is here. <p>Click this box to continue working.</p>"};
function start()
end
function tellTime(parentMenu Menu, item any in)
changeTextBox.text = dateTimeLib.currentTime();
end
function menuAction(parentMenu Menu, item any in)
if(parentMenu == fileMenu)
case(item as string)
when("Clear")
changeTextBox.text = "";
otherwise
changeTextBox.select();
end
else
if(parentMenu == helpMenu)
;
else
; // parentMenu == widgetMenu
end
end
end
function setReadOnly(e Event in)
changeTextBox.readOnly = !(changeTextBox.readOnly);
end
function closeMenu(keepOpen Menu in)
if(keepOpen != fileMenu)
fileMenu.hideOptions(false);
end
if(keepOpen != otherMenu)
otherMenu.hideOptions(false);
end
if(keepOpen != helpMenu)
helpMenu.hideOptions(false);
end
end
function showHelp(parentMenu Menu, item any in)
document.body.appendChild(helparea);
end
function hideHelp(e Event in)
document.body.removeChild(helparea);
end
end
Chapter 10. Reference to widgets
187
Rich UI PasswordTextField
A Rich UI passwordTextField widget defines an input text field whose value is
displayed as bullets, as appropriate for accepting a password. The following
properties are supported:
v text, which holds a string for display in the text field.
v readOnly, which holds a Boolean that indicates whether the text field is read
only. The default is false, which means that the text field can accept user input.
The following function is supported:
v select causes the widget to receive focus and, on most browsers, selects the text.
The function has no parameters.
Other supported properties and functions are described in “Widget properties and
functions.”
Use of this widget requires the following statement:
import com.ibm.egl.rui.widgets.PasswordTextField;
Rich UI RadioGroup
A Rich UI radioGroup widget (or, more simply, a radio group) displays a set of
radio buttons, which are arranged horizontally. The group elicits a user click on
any of the buttons and responds to the click by deselecting the group's previously
selected radio button, if any.
If you specify the onClick event for the radio group, the user's click invokes a
function. The same function is invoked in response to a click on any button; and in
the typical case, the function first determines which button was clicked and then
responds to the selection.
At this time in Internet Explorer, your code cannot preselect a radio button before
displaying the radio group.
Here is example code:
import egl.ui.rui.Event;
import com.ibm.egl.rui.widgets.RadioGroup;
import com.ibm.egl.rui.widgets.TextField;
Handler OneRadioButton Type RUIHandler
{ initialUI = [myTextField, myRadioGroup] }
myTextField TextField { text = "Monday?" };
myRadioGroup RadioGroup
{ groupName = "abc", options = ["Monday", "Tuesday"], onClick ::= myRadioHandler };
Function myRadioHandler(e Event in)
if (myRadioGroup.selected == "Tuesday")
myTextField.text = "Tuesday!";
else
myTextField.text = "Monday!";
end
end
end
The following properties are supported:
188
EGL Rich UI 7.5.1.5
v groupName, which takes a string representing the name of the radio group, as
needed by some browsers. This property is required.
v options, which refers to an array of strings that are displayed as the text of a set
of radio buttons, one string per button
v selected, which is a field that can be accessed at run time, as shown in the
example
Other supported properties and functions are described in “Widget properties and
functions.”
Use of this widget requires the following statement:
import com.ibm.egl.rui.widgets.RadioGroup;
Rich UI Shadow
A Rich UI shadow widget creates a shadow effect for the widgets that are children
of a Div widget.
We offer examples for you to try in your workspace. First, a simple demonstration:
import com.ibm.egl.rui.widgets.Div;
import com.ibm.egl.rui.widgets.Shadow;
import com.ibm.egl.rui.widgets.TextLabel;
handler MyHandler type RUIHandler{initialUI =[myShadow]}
myTextLabel TextLabel{text = "Text with
myShadow Shadow{x = 20, y = 20, width =
div = new Div{padding =
backgroundColor =
end
a Shadow"};
100,
5,
"salmon", children =[myTextLabel]}};
Our second example uses position and visibility properties to help give a visual
effect during a drag-and-drop operation:
import
import
import
import
import
com.ibm.egl.rui.widgets.Box;
com.ibm.egl.rui.widgets.Div;
com.ibm.egl.rui.widgets.Shadow;
com.ibm.egl.rui.widgets.TextField;
egl.ui.rui.Widget;
handler MyHandler type RUIHandler{initialUI =[myBox, shadow, myOtherBox]}
const OTHERBOXX INT = 30;
const OTHERBOXY INT = 50;
myTextField TextField{
text = "What a drag!",
width = 120,
backgroundColor = "white",
onStartDrag = start, onDrag = drag, onDropOnTarget = drop};
myBox Box { children = [ myTextField{} ]};
shadow Shadow { zIndex = 2, position = "absolute", visibility="hidden",
div = new Div { } };
myOtherBox Box {position = "absolute", zIndex = 1,
x = OTHERBOXX, y = OTHERBOXY,
width = 200, height = 200, backgroundColor = "blue"};
dx, dy int;
Chapter 10. Reference to widgets
189
function start(myWidget Widget in, x int in, y int in) returns(boolean)
dx = x - myWidget.x;
dy = y - myWidget.y;
myTextField.position = "static";
shadow.div.children = [ myTextField ];
shadow.visibility = "visible";
return(true);
end
function drag(myWidget Widget in, drop Widget in, x int in, y int in)
shadow.x = x - dx;
shadow.y = y - dy;
end
function drop(widget Widget in, drop Widget in, x int in, y int in)
shadow.visibility = "hidden";
myTextField.position = "relative";
myTextField.x = shadow.x - OTHERBOXX;
myTextField.y = shadow.y - OTHERBOXY;
myOtherBox.children = [ myTextField ];
end
end
Our third example shows a way to test the location of a dragged widget:
package pkg;
import
import
import
import
import
import
com.ibm.egl.rui.widgets.Box;
com.ibm.egl.rui.widgets.Div;
com.ibm.egl.rui.widgets.Shadow;
com.ibm.egl.rui.widgets.TextField;
egl.ui.position;
egl.ui.rui.Widget;
handler MyHandler type RUIHandler{initialUI =[shadow, , myBox, myOtherBox1, myOtherBox2]}
myTextField TextField{
text="What a drag!", width=120, backgroundColor="white",
onMouseOver::=mouseOver, onMouseOut::=mouseOut,
onStartDrag=start, onDrag=drag, onDropOnTarget=drop };
myBox Box { children=[
myTextField{} ]};
shadow Shadow { zIndex=2, position="absolute",
visibility="hidden", div=new Div { } };
myOtherBox1 Box {
padding=10, margin=10, width=200, height=200, backgroundColor="lightblue",
borderColor="black", borderWidth=2, borderStyle="solid" };
myOtherBox2 Box { padding=10, margin=10, width=200, height=200,
backgroundColor="lightyellow",
borderColor="black", borderWidth=2, borderStyle="solid" };
dx, dy int;
function mouseOver(e Event in)
myTextField.cursor = "move";
end
function mouseOut(e Event in)
myTextField.cursor = "";
end
190
EGL Rich UI 7.5.1.5
function start(myWidget Widget in, x int in, y int in) returns(boolean)
dx = x - myWidget.x;
dy = y - myWidget.y;
myTextField.position="static";
shadow.div.children=[ myTextField ];
shadow.visibility="visible";
return(true);
end
function drag(myWidget Widget in, drop Widget in, x int in, y int in)
shadow.x=x - dx;
shadow.y=y - dy;
if (inside(x, y, myOtherBox1))
myOtherBox1.backgroundColor = "lightgreen";
else
myOtherBox1.backgroundColor = "lightblue";
end
if (inside(x, y, myOtherBox2))
myOtherBox2.backgroundColor = "lightgreen";
else
myOtherBox2.backgroundColor = "lightyellow";
end
end
function drop(widget Widget in, drop Widget in, x int in, y int in)
shadow.visibility="hidden";
myTextField.position="static";
if (inside(x, y, myOtherBox1))
myOtherBox1.children=[ myTextField ];
end
if (inside(x, y, myOtherBox2))
myOtherBox2.children=[ myTextField ];
end
end
function inside(x int in, y int in, widget Widget in) returns(boolean)
return (x>=widget.x && x<=widget.pixelWidth + widget.x &&
y>=widget.y && y<=widget.pixelHeight + widget.y);
end
end
The main property of the shadow widget is div, which takes a widget of type Div.
Supported properties and functions are described in “Widget properties and
functions.”
Use of this widget requires the following statement:
import com.ibm.egl.rui.widgets.Shadow;
Rich UI Span
A Rich UI span lets you display a string that the user cannot change. The widget is
different from a text label because inclusion of an HTML segment (such as <b>this
boldfaced code</b>) causes the display of HTML-coded content such as this
boldfaced code.
Here is an example:
Chapter 10. Reference to widgets
191
import com.ibm.egl.rui.widgets.Div;
import com.ibm.egl.rui.widgets.Span;
import egl.ui.color;
handler myOne type RUIHandler{initialUI =[myDiv]}
myDiv Div{children = [mySpan01, mySpan02, mySpan03]};
mySpan01 Span{text = "mix blue ", color = "blue"};
mySpan02 Span{text = " and yellow ", backgroundColor = "black", color = "yellow"};
mySpan03 Span{text = " to see green", color = "green"};
end
The main supported property is text, which takes the string to display. Other
supported properties and functions are described in “Widget properties and
functions.”
Use of this widget requires the following statement:
import com.ibm.egl.rui.widgets.Span;
Rich UI TextArea
A Rich UI textArea widget defines a rectangle containing one or more lines of text.
Here is example code:
import com.ibm.egl.ui.rui.Event;
import com.ibm.egl.rui.widgets.RadioButton;
import com.ibm.egl.rui.widgets.TextArea
Handler OneRadioButton Type RUIHandler
{ children = [myTextArea, myRadioButton] }
myTextArea TextArea
{ text = "Monday? I’m really busy on Monday. How about Tuesday?"
numColumns = 15, numRows = 5 };
myRadioButton RadioButton
{ text = "Tuesday", selected = false, onClick ::= myRadio };
Function myRadio(e Event)
myTextField.text = "Tuesday!";
end
end
The following properties are supported:
v numColumns, which holds an integer that represents the number of columns in
the text area
v numRows, which holds an integer that represents the number of rows in the
text area
v readOnly, which holds a Boolean that indicates whether the text area is
protected from user input
v text, which holds a string for display in the text area
The following functions are available, none of which returns a value:
v append adds content to the content already in the text area. The only parameter
is the string to be added.
v select causes the widget to receive focus and, on most browsers, selects the text.
The function has no parameters.
v setRedraw redraws the text area. The only parameter is a Boolean, which
indicates whether or not to redraw the area.
192
EGL Rich UI 7.5.1.5
Supported properties and functions are described in “Widget properties and
functions.”
Use of this widget requires the following statement:
import com.ibm.egl.rui.widgets.TextArea;
Rich UI TextField
A Rich UI textField widget defines a text box containing a single line of text.
Here is example code:
import egl.ui.rui.Event;
import com.ibm.egl.rui.widgets.RadioGroup;
import com.ibm.egl.rui.widgets.TextField;
Handler OneRadioButton Type RUIHandler
{ children = [myTextField, myRadioGroup] }
myTextField TextField
{ text = "Monday?", readOnly = true };
myRadioGroup RadioGroup
{ options = ["Monday", "Tuesday"], onClick ::= myRadioHandler };
Function myRadioHandler(e Event)
if (myRadioGroup.selected == "Tuesday")
myTextField.text = "Tuesday!";
myTextField.readOnly = false;
else
myTextField.text = "Monday!";
end
end
end
The following properties are supported.
v text, which holds a string for display in the text field.
v readOnly, which holds a Boolean that indicates whether the text field is
protected from user input.
The following function is supported:
v select causes the widget to receive focus and, on most browsers, selects the text.
The function has no parameters.
Other supported properties and functions are described in “Widget properties and
functions.”
Use of this widget requires the following statement:
import com.ibm.egl.rui.widgets.TextField;
Rich UI TextLabel
A Rich UI textLabel widget displays a string that the user cannot change. The
widget is different from a span because inclusion of an HTML segment (such as
<b>this code</b>) is displayed as is, including the angle brackets.
Here is an example:
Chapter 10. Reference to widgets
193
import com.ibm.egl.rui.widgets.Div;
import com.ibm.egl.rui.widgets.TextLabel;
import egl.ui.color;
handler myOne type RUIHandler{initialUI =[myDiv]}
myDiv Div{children = [myLabel01, myLabel02, myLabel03]};
myLabel01 TextLabel{text = "mix blue ", color = "blue"};
myLabel02 TextLabel{text = " and yellow ", backgroundColor = "black", color = "yellow"};
myLabel03 TextLabel{text = " to see green", color = "green"};
end
The following property is supported:
v text, which takes the string to display
Other supported properties and functions are described in “Widget properties and
functions.”
Use of this widget requires the following statement:
import com.ibm.egl.rui.widgets.TextLabel;
Rich UI Tooltip
A Rich UI tooltip widget defines hover help: text or widgets that are displayed
when the user hovers over a widget. A tooltip is displayed only if you enable the
tooltip widget, as described in this section. You can use the same tooltip for several
widgets, and you can enable the tooltip for a given widget in response to a
runtime event.
Here is an example Rich UI handler, which displays a button and assigns hover
help that says, "To toggle the text, click the button!":
Handler Test Type RUIHandler { initialUI = [theButton], onConstructionFunction= begin }
theButton Button { text = "Start", onClick ::= click };
theToolTip Tooltip { text = "To toggle the text, click the button!", delay = 800 };
function begin()
theToolTip.enable(theButton);
end
Function click(e Event in)
if (theButton.text == "Start")
theButton.text = "Stop";
else
theButton.text = "Start";
end
end
The following tooltip widget properties are supported:
v text, which holds a string for display. If you specify a string here, the provider
property is not used.
v delay, which holds an integer that represents the number of milliseconds
between the start of the user's hover and the display of the hover help
v provider, which refers to a function that returns a box for display within the
hover help. For example, assume your Rich UI handler displays a button that
says "Start". You can create a tooltip that is enabled for the button and that
displays a hypertext link in the hover help:
194
EGL Rich UI 7.5.1.5
Here is the provider function that makes the output possible:
Function GoToWebsite(myWidget any in) returns(Box)
myLink html{text =
"You can rely on <a target = \"_blank\", href=\"http://www.ibm.com\">IBM</a>";
myBox Box{children = [mylink]};
return (myBox);
end
A Delegate part named ToolTipTextProvider describes the access characteristics
of any function that is referenced by the provider property. Specifically, the
Delegate part indicates that the provider function has one parameter type and
returns a box:
Delegate TooltipTextProvider(widget any in) returns(Box) end
The following tooltip widget function is supported:
v enable(widget in) enables the tooltip for a particular widget, as shown in our
first example.
Use of this widget requires the following statement:
import com.ibm.egl.rui.widgets.ToolTip;
Rich UI Tree and TreeTooltip
A Rich UI tree widget defines a set of tree nodes. The tree itself has two properties:
v children is a dynamic array that points to the subordinate tree nodes.
v behaviors is an array of function references. When a node is added to the tree,
the referenced functions run in array-element order, Each function can update
node characteristics. Those functions can set style characteristics and can
perform actions such as showing or hiding the node.
For each function listed in the behaviors fields of a tree widget, the parameter
list must match the following Delegate part, and the function must not return a
value:
Delegate TreeNodeBehavior(node TreeNode) end
Rich UI provides a number of functions that can be referenced in the behaviors
property. For details, see the following files in the com.ibm.egl.rui project,
EGLSource folder, com.ibm.egl.rui.widgets package:
– TreeBehaviors.egl
– TreeToolTip.egl
The following rules relate to the behaviors of either a tree or (as noted later) a tree
node:
v Except in the case of the referenced widgets in children or initialUI properties,
Rich UI requires that you declare a value before you reference it. If the
behaviors property refers to an array external to the tree or tree node
declaration (as in our example), that array must be specified before the
declaration.
v When you declare a tree or tree node, ensure that you list the behaviors
property first; in particular, before the children property.
Chapter 10. Reference to widgets
195
v If, when writing statements in functions, you change the value of the behaviors
property, invoke the tree-specific (or tree-node-specific) function layouts() to
reset the widget.
In relation to the types Tree and TreeNode (but not TreeTooltip), other supported
properties and functions are described in “Widget properties and functions.”
Use of a tree requires the following statements:
import
import
import
import
com.ibm.egl.rui.widgets.Tree;
com.ibm.egl.rui.widgets.TreeBehaviors;
com.ibm.egl.rui.widgets.TreeNode;
com.ibm.egl.rui.widgets.TreeToolTip;
TreeNode
The Rich UI tree widget includes a set of tree nodes, each of which is a widget of
type TreeNode. Here are the tree-node properties:
v text is the value displayed for the node.
v children is a dynamic array that points to the subordinate tree nodes.
TreeToolTip
The tree tooltip is equivalent to the widget described in Rich UI tooltip. However,
in this case, the provider function accepts a tree node.
The example in the next section shows use of a tree tooltip.
Example
Here is an example that you can try in your workspace:
import
import
import
import
import
import
import
import
com.ibm.egl.rui.widgets.Box;
com.ibm.egl.rui.widgets.Button;
com.ibm.egl.rui.widgets.TextArea;
com.ibm.egl.rui.widgets.TextLabel;
com.ibm.egl.rui.widgets.TreeNode;
com.ibm.egl.rui.widgets.TreeNodeBehavior;
com.ibm.egl.rui.widgets.TreeTooltip;
egl.ui.rui.Event;
handler MyTreeExample type RUIhandler {initialUI = [ myBox1 ]}
myBox1 Box{ backgroundColor = "yellow", padding=8, columns = 1,
children = [ myTextArea, myTree ] };
myTextArea TextArea {numRows = 5, numColumns = 50,
text = " This tree shows 2 children, each with 2 children."};
myTreeNodeA TreeNode{backgroundColor = "cyan",text="Child 1",
children =[myTreeNode1, myTreeNode2] };
myTreeNode1 TreeNode{backgroundColor = "lightblue",text="Gchild 1-1" };
myTreeNode2 TreeNode{backgroundColor = "lightgreen",text="Gchild 1-2" };
myTreeNodeB TreeNode{backgroundColor = "orange", text="Child 2",
children =[myTreeNode3,
new TreeNode{backgroundColor = "burlywood", text = "Gchild 2-2"}] };
myTreeNode3 TreeNode{backgroundColor = "lightpink", text="Gchild 2-1" };
myBehaviors TreeNodeBehavior[] = [ click, tooltip.setTooltips ];
196
EGL Rich UI 7.5.1.5
myTree Tree{backgroundColor = "lavender", behaviors = myBehaviors,
children =[myTreeNodeA, myTreenodeB]};
tooltip TreeTooltip { provider = showTooltip, tooltip.delay = 1000 };
function click(node TreeNode in)
node.span.cursor = "pointer";
node.onClick ::= handleNodeClick;
node.onMouseOver ::= showFeedback;
node.onMouseOut ::= hideFeedback;
end
function showTooltip(node TreeNode) returns(Box)
tooltipText TextLabel { };
tooltipResponse Box { children = [ tooltipText ] };
tooltipText.text = "Tooltip for " + node.text;
return (tooltipResponse);
end
function showFeedback(e Event in)
node TreeNode = e.widget;
color any = node.backgroundColor;
node.setAttribute("originalBG", color);
node.span.backgroundColor = "yellow";
end
function hideFeedback(e Event in)
node TreeNode = e.widget;
node.span.backgroundColor = node.getAttribute("originalBG");
end
function handleNodeClick(e Event in)
node TreeNode = e.widget;
if (node.span.color == "red")
node.span.color = "black";
node.span.fontWeight = "normal";
else
node.span.color = "red";
node.span.fontWeight = "bold";
end
end
end
Chapter 10. Reference to widgets
197
198
EGL Rich UI 7.5.1.5
Appendix. Notices
This information was developed for products and services offered in the U.S.A.
IBM may not offer the products, services, or features discussed in this document in
other countries. Consult your local IBM representative for information on the
products and services currently available in your area. Any reference to an IBM
product, program, or service is not intended to state or imply that only that IBM
product, program, or service may be used. Any functionally equivalent product,
program, or service that does not infringe any IBM intellectual property right may
be used instead. However, it is the user's responsibility to evaluate and verify the
operation of any non-IBM product, program, or service.
IBM may have patents or pending patent applications covering subject matter
described in this document. The furnishing of this document does not grant you
any license to these patents. You can send license inquiries, in writing, to:
IBM Director of Licensing
IBM Corporation
North Castle Drive
Armonk, NY 10504-1785
U.S.A.
For license inquiries regarding double-byte (DBCS) information, contact the IBM
Intellectual Property Department in your country or send inquiries, in writing, to:
Intellectual Property Licensing
Legal and Intellectual Property Law
IBM Japan, Ltd.
1623-14, Shimotsuruma, Yamato-shi
Kanagawa 242-8502 Japan
The following paragraph does not apply to the United Kingdom or any other
country where such provisions are inconsistent with local law:INTERNATIONAL
BUSINESS MACHINES CORPORATION PROVIDES THIS PUBLICATION "AS IS"
WITHOUT WARRANTY OF ANY KIND, EITHER EXPRESS OR IMPLIED,
INCLUDING, BUT NOT LIMITED TO, THE IMPLIED WARRANTIES OF
NON-INFRINGEMENT, MERCHANTABILITY OR FITNESS FOR A PARTICULAR
PURPOSE. Some states do not allow disclaimer of express or implied warranties in
certain transactions, therefore, this statement may not apply to you.
This information could include technical inaccuracies or typographical errors.
Changes are periodically made to the information herein; these changes will be
incorporated in new editions of the publication. IBM may make improvements
and/or changes in the product(s) and/or the program(s) described in this
publication at any time without notice.
Any references in this information to non-IBM Web sites are provided for
convenience only and do not in any manner serve as an endorsement of those Web
sites. The materials at those Web sites are not part of the materials for this IBM
product and use of those Web sites is at your own risk.
Licensees of this program who wish to have information about it for the purpose
of enabling: (i) the exchange of information between independently created
© Copyright IBM Corp. 2000, 2010
199
programs and other programs (including this one) and (ii) the mutual use of the
information which has been exchanged, should contact:
Intellectual Property Dept. for Rational Software
IBM Corporation
3600 Steeles Avenue East
Markham, ON Canada L3R 9Z7
Such information may be available, subject to appropriate terms and conditions,
including in some cases, payment of a fee.
The licensed program described in this document and all licensed material
available for it are provided by IBM under terms of the IBM Customer Agreement,
IBM International Program License Agreement or any equivalent agreement
between us.
Any performance data contained herein was determined in a controlled
environment. Therefore, the results obtained in other operating environments may
vary significantly. Some measurements may have been made on development-level
systems and there is no guarantee that these measurements will be the same on
generally available systems. Furthermore, some measurements may have been
estimated through extrapolation. Actual results may vary. Users of this document
should verify the applicable data for their specific environment.
Information concerning non-IBM products was obtained from the suppliers of
those products, their published announcements or other publicly available sources.
IBM has not tested those products and cannot confirm the accuracy of
performance, compatibility or any other claims related to non-IBM products.
Questions on the capabilities of non-IBM products should be addressed to the
suppliers of those products.
All statements regarding IBM's future direction or intent are subject to change or
withdrawal without notice, and represent goals and objectives only.
This information is for planning purposes only. The information herein is subject to
change before the products described become available.
This information contains examples of data and reports used in daily business
operations. To illustrate them as completely as possible, the examples include the
names of individuals, companies, brands, and products. All of these names are
fictitious and any similarity to the names and addresses used by an actual business
enterprise is entirely coincidental.
COPYRIGHT LICENSE:
This information contains sample application programs in source language, which
illustrate programming techniques on various operating platforms. You may copy,
modify, and distribute these sample programs in any form without payment to
IBM, for the purposes of developing, using, marketing or distributing application
programs conforming to the application programming interface for the operating
platform for which the sample programs are written. These examples have not
been thoroughly tested under all conditions. IBM, therefore, cannot guarantee or
imply reliability, serviceability, or function of these programs. The sample
programs are provided "AS IS", without warranty of any kind. IBM shall not be
liable for any damages arising out of your use of the sample programs.
200
EGL Rich UI 7.5.1.5
Each copy or any portion of these sample programs or any derivative work, must
include a copyright notice as follows:
© (your company name) (year). Portions of this code are derived from IBM Corp.
Sample Programs. © Copyright IBM Corp. enter the year or year, year.
If you are viewing this information softcopy, the photographs and color
illustrations may not appear.
Trademarks
IBM, the IBM logo, and ibm.com are trademarks or registered trademarks of
International Business Machines Corp., registered in many jurisdictions worldwide.
Other product and service names might be trademarks of IBM or other companies.
A current list of IBM trademarks is available on the Web at www.ibm.com/legal/
copytrade.html.
Adobe, the Adobe logo, PostScript, and the PostScript logo are either registered
trademarks or trademarks of Adobe Systems Incorporated in the United States,
and/or other countries.
Intel, Intel logo, Intel Inside, Intel Inside logo, Intel Centrino, Intel Centrino logo,
Celeron, Intel Xeon, Intel SpeedStep, Itanium, and Pentium are trademarks or
registered trademarks of Intel Corporation or its subsidiaries in the United States
and other countries.
Microsoft, Windows, Windows NT, and the Windows logo are trademarks of
Microsoft Corporation in the United States, other countries, or both.
Java and all Java-based trademarks are trademarks of Sun Microsystems, Inc. in the
United States, other countries, or both.
Linux is a registered trademark of Linus Torvalds in the United States, other
countries, or both.
UNIX is a registered trademark of The Open Group in the United States and other
countries.
Other company, product, or service names may be trademarks or service marks of
others.
Appendix. Notices
201
202
EGL Rich UI 7.5.1.5
Index
Special characters
@XMLAttribute EGL property 109
@XMLElement EGL property 110
@XMLRootElement EGL property 110
A
AJAX
defined
1
B
BidiTextArea Rich UI widget 171
BidiTextField Rich UI widget 172
bindService() EGL function 114
Box Rich UI widget 172
browser history
Rich UI handler part 52
build descriptor options
defaultDateFormat 132
defaultServiceTimeout 132
defaultSessionCookieID 133
defaultTimeFormat 133
defaultTimeStampFormat 133
deploymentDescriptor 134
JavaScript 131
Button Rich UI widget
overview 173
C
check boxes
widget description 173
Checkbox Rich UI widget 173
Combo Rich UI widget 173
convertFromJSON() EGL function 114
convertFromURLEncoded() EGL
function 115
convertFromXML() EGL function 121
convertToJSON() EGL function 115
convertToURLEncoded() EGL
function 115
convertToXML() EGL function 121
CSS Rich UI widget 33
D
date
Rich UI 45
debugging
EGL
Rich UI 21
defaultDateFormat EGL build descriptor
option 132
defaultServiceTimeout EGL build
descriptor option 132
defaultSessionCookieID EGL build
descriptor option 133
© Copyright IBM Corp. 2000, 2010
defaultTimeFormat EGL build descriptor
option 133
defaultTimeStampFormat EGL build
descriptor option 133
deployment
EGL Rich UI
Apache Tomcat 127
local directories 128
overview 125
preferences 139
WebSphere Application
Server 130
deploymentDescriptor EGL build
descriptor option 134
Div Rich UI widget 174
drag and drop Rich UI widget 60
E
editors
EGL Rich UI
creating Web interfaces 16
opening 15
overview 13
palettes 17
EGL system libraries
RUILib 123
serviceLib for Rich UI 113
XMLLib 121
endStatefulServiceSession() EGL
function 116
event handlers
Rich UI 37
extending
Rich UI widgets
overview 72
with Dojo 80
with Silverlight 81
ExternalType parts
JavaScript 66
F
FloatLeft Rich UI widget 174
FloatRight Rich UI widget 174
formats
Rich UI 40
forms
processing (Rich UI) 47
functions
EGL
bindService() 114
convertFromJSON() 114
convertFromURLEncoded() 115
convertFromXML() 121
convertToJSON() 115
convertToURLEncoded() 115
convertToXML() 121
endStatefulServiceSession() 116
getCurrentCallbackResponse() 116
functions (continued)
EGL (continued)
getOriginalRequest() 117
getRestRequestHeaders() 118
getRestServiceLocation() 118
getTextSelectionEnabled() 123
getUserAgent() 124
getWebServiceLocation() 117
setHTTPBasicAuthentication() 118
setProxyBasicAuthentication() 119
setRestServiceLocation() 120
setTextSelectionEnabled() 124
setWebServiceLocation() 120
sort() 124
G
generation
EGL
Rich UI 125
getCurrentCallbackResponse() EGL
function 116
getOriginalRequest() EGL function 117
getRestRequestHeaders() EGL
function 118
getRestServiceLocation() EGL
function 118
getTextSelectionEnabled() EGL
function 123
getUserAgent() EGL function 124
getWebServiceLocation() EGL
function 117
globalization
Rich UI 48
Grid Rich UI widget 174
GridToolTip Rich UI widget 174
Grouping Rich UI widget 179
H
handler communication
Rich UI
infobus 54
non-infobus 56
History Rich UI handler part 52
HostProgram stereotype 93
HTML Rich UI widget 179
Hyperlink Rich UI widget 180
I
IBM i
Web services
keystrokes 96
overview 93
Image Rich UI widget 180
Infobus Rich UI widget 54
Interface parts
REST service access
creating interfaces 83
203
Interface parts (continued)
REST service access (continued)
declaring interfaces 88
Web service access
creating interfaces 99
declaring interfaces 100
92
R
J
JavaScript
build descriptor options 131
ExternalType EGL parts 66
JavaScript EGL build descriptor
option 131
JavaScriptObject stereotype 66
job scheduler variable (Rich UI) 62
JSON strings
copying to EGL 101
L
language elements
EGL external mappings
JavaScript 66
layouts
Rich UI handler part 9
Library parts
stereotypes
RUIPropertiesLibrary 51
List Rich UI widget 181
ListMulti Rich UI widget 182
M
Menu Rich UI widget
182
P
palettes
Rich UI editor 17
parts
EGL
ExternalType 66
PasswordTextField Rich UI widget 188
PCML
IBM i programs as services
keystrokes 96
overview 93
preferences
Rich UI
appearance 135
deployment 139
overview 135
Program Call Markup Language (PCML)
IBM i programs as services
keystrokes 96
overview 93
properties
complex
@XMLAttribute 109
@XMLElement 110
@XMLRootElement 110
Record parts (EGL)
XMLStructure 111
204
properties files
Rich UI 48
prototypes
EGL functions
parameters
EGL Rich UI 7.5.1.5
RadioGroup Rich UI widget
overview 188
Record parts
properties
XMLStructure 111
REST services
Copying JSON strings 101
Copying XML strings 106
overview 63
Rich UI access
declaring interfaces 88
Rich UI
appearance 135
applications 145
authentication
details 142
form-based 146
overview 153
authorization
details 142
overview 155
browser history 52
confidentiality 143
criteria
application.xml for
WebSphere 157
web.xml 155
CSS 33
date 45
deployment
Apache Tomcat 127
local directories 128
overview 125
preferences 139
WebSphere Application
Server 130
drag and drop 60
editor
creating Web interfaces 16
opening 15
overview 13
palettes 17
EGL debugger 21
EGL preferences 135
errors 160
event handling 37
example 155
extending
Dojo 80
overview 72
Silverlight 81
form processing 47
formatting 40
generation 125
globalization 48
handler communication
infobus 54
handlers
multiple 36
Rich UI (continued)
handlers (continued)
overview 9
history in browser 52
IBM Rational AppScan 169
Infobus 54
JEE 155, 160
job scheduler 62
JSF 145, 149
overview 1
programming model 23
properties files 48
proxy
overview 83
removing access 148
securing 147
resources 144
security 141, 142, 143, 144, 145, 146,
147, 148, 149, 151, 152, 153, 155, 157,
158, 159, 160, 161, 162, 163, 164, 168,
169
service access
overview 83
parameters 92
SOAP access 99
SSL 162, 163, 164, 168, 169
threats 161
time 45
timer 62
Tomcat 158
URL patterns 146
users
adding 152
repositories 151
validation 40
Web services 148
WebSphere Application Server 157,
158, 159
widgets
BidiTextArea 171
BidiTextField 172
Box 172
Button 173
Checkbox 173
Combo 173
Div 174
FloatLeft 174
FloatRight 174
functions 27
Grid 174
GridToolTip 174
Grouping 179
HTML 179
Hyperlink 180
Image 180
list 23
List 181
ListMulti 182
Menu 182
PasswordTextField 188
properties 27
RadioGroup 188
reference 171
Shadow 189
Span 191
styles 33
TextArea 192
Rich UI (continued)
widgets (continued)
TextField 193
TextLabel 193
ToolTip 194
Tree 195
TreeToolTip 195
RUILib EGL system library
getTextSelectionEnabled() 123
getUserAgent() 124
overview 123
setTextSelectionEnabled() 124
sort() 124
RUIPropertiesLibrary stereotype
details 51
S
serviceLib EGL system library
bindService() 114
convertFromJSON() 114
convertFromURLEncoded() 115
convertToJSON() 115
convertToURLEncoded() 115
endStatefulServiceSession() 116
getCurrentCallbackResponse() 116
getOriginalRequest() 117
getRestRequestHeaders() 118
getRestServiceLocation() 118
getWebServiceLocation() 117
overview for Rich UI 113
setHTTPBasicAuthentication() 118
setProxyBasicAuthentication() 119
setRestServiceLocation() 120
setWebServiceLocation() 120
services
access 63
IBM i 93, 96
remote service access 63
REST
declaring interfaces 88
overview 63
Rich UI 83
SOAP
overview 63
Web access
declaring variables 100
setHTTPBasicAuthentication() EGL
function 118
setProxyBasicAuthentication() EGL
function 119
setRestServiceLocation() EGL
function 120
setTextSelectionEnabled() EGL
function 124
setWebServiceLocation() EGL
function 120
Shadow Rich UI widget 189
SOAP
Rich UI 99
SOAP services
overview 63
sort() EGL function 124
Span Rich UI widget 191
styles
Rich UI 33
T
text
globalization with Rich UI 48
TextArea Rich UI widget 192
TextField Rich UI widget 193
TextLabel Rich UI widget 193
time
Rich UI 45
timer
Rich UI 62
ToolTip Rich UI widget 194
Tree Rich UI widget 195
TreeToolTip Rich UI widget 195
V
validation
Rich UI
40
W
Web services
Rich UI
declaring interfaces
SOAP access 99
widgets
Rich UI
functions 27
list 23
properties 27
reference 171
100
X
XML
copying to and from variables 106
XMLLib EGL system library
convertFromXML() 121
convertToXML() 121
overview 121
XMLStructure EGL simple property 111
Index
205
206
EGL Rich UI 7.5.1.5
Printed in USA