1
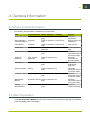
XN
How to get started
10 - 2014
XN
Contents
1. Preface - US.................................................................................................................................................................................. 3
2. Change record...............................................................................................................................................................................4
3. Introduction.....................................................................................................................................................................................5
3.1
3.2
3.3
3.4
Welcome................................................................................................................................................................................5
SoC, ROHS.......................................................................................................................................................................... 6
Statement of Conformity................................................................................................................................................ 7
System Label.......................................................................................................................................................................8
4. General Information.................................................................................................................................................................... 9
4.1 Where to find Information.............................................................................................................................................. 9
4.2 Site Preparation..................................................................................................................................................................9
4.3 User Manual...................................................................................................................................................................... 10
4.4 Safety Issues.....................................................................................................................................................................10
4.4.1 What can the system be used for...............................................................................................................11
4.4.2 Who are allowed to use the system...........................................................................................................11
4.5 Installation.......................................................................................................................................................................... 12
4.5.1 What is received................................................................................................................................................. 12
4.5.2 Unpack Equipment............................................................................................................................................ 12
4.6 Table Operation................................................................................................................................................................12
4.6.1 Power On Sequence.........................................................................................................................................12
4.6.2 Reset Safety System........................................................................................................................................ 13
4.6.3 Power Off Sequence.........................................................................................................................................13
4.6.4 Continue after Safety Break...........................................................................................................................14
4.6.5 Software Updates.............................................................................................................................................. 14
4.6.6 Maintenance......................................................................................................................................................... 14
ii
XN
1. Preface - US
How to get started
with
Kongsberg XN
Serial no:______________
PLEASE READ THIS FIRST
©Copyright 2014, Esko-Graphics Kongsberg AS, Norway
All Rights Reserved.
This copyright does not indicate that this work has been published.
This material, information and instructions for use contained herein are the property of Esko-Graphics
Kongsberg AS. There are no warranties granted or extended by this document. Furthermore, Esko-Graphics
Kongsberg AS does not warrant, guarantee or make any representations regarding the use, or the results
of the use of the system or the information contained herein. Esko-Graphics Kongsberg AS shall not be
liable for any direct, indirect, consequential or incidental damages arising out of the use or inability to use
the system or the information contained herein. The information contained herein is subject to change
without notice. Revisions may be issued from time to time to advise of such changes and/or additions.
No part of this system may be reproduced, stored in a data base or retrieval system, or
published, in any form or in any way, electronically, mechanically, by print, photoprint, microfilm
or any other means without prior written permission from Esko-Graphics Kongsberg AS.
This document supersedes all previous dated versions.
Correspondence regarding this publication should be forwarded to:
Global support
Esko-Graphics Kongsberg AS
Note: We remind you that only the Esko Staff, or persons having received appropriate training, are
allowed to handle, manipulate or do repairs on the system.
Document: D3253
32573883
Esko-Graphics Kongsberg AS
www.esko.com
P.O.Box 1016, N-3601 Kongsberg, Norway
Tel: +47 32 28 99 00 Fax: +47 32 28 85 15 / 32 28 67 63
3
1
2
XN
2. Change record
Date
By
Description
jhbe
System label chapter added
dd-mm-yy
10-10-2014
4
XN
3. Introduction
3.1 Welcome
Welcome to a long-lasting co-operation with Esko.
This How to get Started Manual is a brief introduction to the system you are about to receive.
It should stay available to Operators all time.
5
3
3
XN
3.2 SoC, ROHS
6
XN
3.3 Statement of Conformity
7
3
3
XN
3.4 System Label
A System Label as shown below is affixed to the table stand near to the Main Power Unit (sample)
8
XN
4. General Information
4.1 Where to find Information
The following documentation is available for the equipment:
Title
Target personnel Media, shipment Language
How to get started Customer
Site Preparation
Customer
Instruction Manual
User Manual
Customer
Online Help
Customer
Service Guide ARS Service
Online in shipment
(pdf).
Online in shipment
(pdf).
Online in shipment
(pdf).
Online (chm) in
shipment.
Online in shipment
(pdf).
Local and US
Local and US
Local and US
Local and US
US
Technical
Reference
Tech. support
personnel
Online in shipment US
(pdf).
Test manual
Service
Online in shipment US
(pdf).
Technical Manual
Service
Online in shipment US
(pdf).
Installation Manual Service
Online in shipment US
(pdf).
Maintenance
Manual
Customer/ Service Online in shipment US
(pdf).
Training
documentation
Online in shipment Local and US
(pdf).
Purpose
Shortform
introduction.
How to prepare for
installation.
User manual.
Context sensitive
help
Technical
information aimed
for service needs.
Technical
information for
special purpose.
How to run
HWTXP test
programs.
Technical
information aimed
for service needs.
Technical
information aimed
for service needs.
Technical
information aimed
for service needs.
A plan for
customer training.
4.2 Site Preparation
In the Site Preparation Manual, all information needed for planning and preparing the installation
of the Kongsberg system is available.
9
4
4
XN
All preparations specified in that handbook should be completed before the Service Engineer arrives
on-site to install the system.
All technical data and requirements about the equipment are available from the Site Preparation
Manual.
4.3 User Manual
In addition to the printed version, the User Manual is available as an icon on the Front End PC.
The User Manual contains all information needed about:
•
•
•
•
•
Operator Safety.
How to operate the system.
How to adjust the system properly.
System description.
Daily maintenance.
4.4 Safety Issues
Your Kongsberg system is built for high speed and productivity.
Danger zones are designed away as far as practically possible.
Still, the system represents potential hazard if operating procedures and safety precautions are not
followed.
The system is equipped with additional provisions for warning against potential hazards.
These additional provisions are:
•
•
•
•
Warning signs on moving parts.
Do not touch signs at critical areas.
Warning sign on the electrical control units.
Warnings in the User Manual.
The safety issues including a label plan are described in the User Manual topic 'Safety regulations'.
Special attention should be paid upon the following:
• Be careful when handling knife blades. Knives are extremely sharp.
• Be careful when handling heavy materials. Take care of your own health.
• Be careful not to hit parts of tools and Tool Head.
• The system is equipped with a class II laser pointer. Avoid laser beam hit your eyes.
The Main Power on/off switch on the Operator Station is for daily power on/off.
To permanently remove Mains from the equipment, remove the power cable to the equipment from
the wall outlet.
If wall outlet is not available, turn off the Mains power switch.
10
XN
Work flows and awareness of potential hazards should be periodically reviewed by the Customer's
Safety Responsible.
4.4.1 What can the system be used for
The system is designed for use within applications, materials, tools and workflow as described in
the User Manual
In the User Manual, the intended use is described in the following chapters:
• Basic Operations
• Prepare for a Job
• How to Procedures, Advanced
Any other use is considered non-intended use.
Examples of non-intended use:
• Operation by operators not meeting the requirements as described above.
• Unauthorized modifications (bridging safety devices, removing covers etc.)
• Utilizing accessories other than those specified by Esko.
Non-intended use may cause:
•
•
•
•
Health hazards and injuries.
Damage to the system.
Incorrect functionality.
Damage to work materials.
Esko is not liable for use of the system when these guidelines are not followed.
4.4.2 Who are allowed to use the system
Note: We remind you that only the Esko Staff, or persons having received appropriate training, are
allowed to handle, manipulate or do repairs on the system.
Training will be given to the customer appointed operator(s) by the Esko Service Engineer as part
of the installation.
The training covers:
•
•
•
•
•
•
Safety Regulations.
Start-up and shut-down procedures.
Online Help / User Manuals.
Set-up procedures.
Adjustment procedures.
Workflow.
11
4
4
XN
• Maintenance.
For additional training courses, contact Esko Global Support.
Un-trained personnel shall under no circumstances be allowed to operate the system!
4.5 Installation
Esko Authorized Personnel only are allowed to install the equipment.
4.5.1 What is received
The delivery is specified in a Packing List following the shipment.
4.5.2 Unpack Equipment
Esko Authorized Personnel only are allowed to unpack the equipment.
4.6 Table Operation
For detailed information on how to operate the system, be familiar with the User Manual and
complete the following sequences:
•
•
•
•
Get started.
Basic operation.
Table setup.
Tool heads and tools.
4.6.1 Power On Sequence
Follow these steps to power up the system and get ready to work:
1
Front End PC
Switch on the PC and the monitor.
2
Table Power
Switch the table on using the Main Power Switch.
12
XN
Note: After power off, wait minimum 5 sec. before the system is switched
on again.
3
XL-Guide/XL-Guide
Use the mouse, double-click the icon for XP-Guide/XL-Guide.
Check that no error message indicates faulty conditions.
4
Safety System
Reset the Safety System by pressing the Stop pushbutton.
5
Servo Power
Press the Servo On pushbutton.
The Warning Lamp on top of the Y carriage should be on without flashing.
6
Table Zero Sequence
Press Start pushbutton to complete the Table Zero Sequence.
The machine will move to the Selected Reference Point.
7
The table is now ready for operation.
4.6.2 Reset Safety System
Press Stop to Reset Safety System.
4.6.3 Power Off Sequence
Follow these steps to power down the system:
1
Servo Power
Press the Servo On pushbutton to switch Servo Off.
2
Table Power
Turn Table Power off using the Main Power Switch.
13
4
4
XN
Note: After power off, wait minimum 5 sec. before the system is switched
on again.
3
Front End PC
To switch off the PC, use the Operating System shutdown procedure..
4.6.4 Continue after Safety Break
If the Safety System is activated, all movements on the table are stopped and the Warning Lamp
starts flashing.
To continue operation, proceed as follows:
1
Ensure the table is free from obstructions and ready for operation.
2
Reset the Safety System by pressing the Stop pushbutton.
3
The Warning Lamp on top of the Y carriage should be on without flashing.
Observe that Servo Power is switched on,
4
Press Start to continue.
4.6.5 Software Updates
Follow the installation procedure on the CD cover.
The procedure is also available in the Installation Manual.
4.6.6 Maintenance
Maintenance done by the customer is limited to preventive maintenance.
This is described in the User Manual.
14
XN
Any other maintenance, repair, replacement of parts etc. must be done by Esko Authorized
Personnel only.
15
4