1
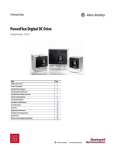
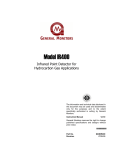
User Manual DC1100 Air Quality Monitor DYLOS CORPORATION Air Quality Monitoring Innovation U.S. Patent 8009290 Foreign Pat. Pending Table of Contents Introduction ................................................................................... 1 Important Safety Instructions .................................................... 1 For Best Performance............................................................... 2 Health Disclaimer...................................................................... 2 Operation ...................................................................................... 3 Operating Modes ...................................................................... 5 overview 5 continuous mode 5 monitor mode 6 minute history mode 7 hour history mode 8 day history mode 9 clear history mode 11 Interpreting the data .................................................................... 12 Care and Maintenance ................................................................ 13 Troubleshooting Guide ................................................................ 14 Notices ........................................................................................ 15 FCC......................................................................................... 15 FDA ......................................................................................... 15 Warranty ...................................................................................... 16 Introduction Important Safety Instructions 1. Read and keep these instructions. 2. Follow all warnings and instructions. 3. Do not attempt to open or disassemble the device. This may result in risk of shock or exposure to laser radiation. No serviceable parts are inside. 4. Do not use this device near water, such as a sink, wash basin, or bathtub. 5. Do not spill any liquids onto or into the device. 6. Do not push any objects into the openings of this device. 7. Do not use any liquid or spray cleaners on the device. Clean only with dry cloth. 8. Do not install or operate near any source of heat. 9. Operate the device only with the provided AC adaptor connected to a power outlet of the specified rating. 10. Unplug the device and return it for service if any of the following conditions occur. A. The power cord and or AC adaptor has been damaged. B. The device has had water or another liquid spilled on or into it. C. The device has been dropped or physically damaged. D. The device ceases to function properly. 1 For Best Performance 1. In addition to following all the above safety precautions, it is recommended that the DC1100 not be installed near devices which might produce a strong electromagnetic field, such as fluorescent lighting, as these may affect the count accuracy. In most cases a separation of one to several feet should be sufficient to prevent any interference. 2. It is recommended that the DC1100 not be operated in direct sunlight or other bright light source as this could affect count accuracy. 3. Install the DC1100 at a location and height in the room where you want to test the air quality. Be aware that particulate concentrations can vary dramatically from one location to another within the same house. Health Disclaimer While the DC1100 can detect levels of airborne particulates it cannot determine the health impact for any given individual. Respiratory ailments and allergic symptoms are caused by a variety of factors. The DC1100 is not meant to be used in the treatment or mitigation of any medical condition. Please consult your physician 2 Operation Getting started with the DC110 is simple. Just plug it in and turn it on. First, plug the AC adaptor provided with the unit into a 120V/60Hz wall outlet. Next, connect the AC adaptor to the DC1100 as shown in the figure. Turn the DC1100 on by pressing the ON/OFF switch and the unit will start sampling. 3 4 Operating Modes overview The DC1100 has several operating modes. The user can cycle through the various modes by pressing the MODE button. Selections within a mode, such as viewing history data, are made by pressing the SELECT button. In the various modes the DC1100 will display both the small particle concentration and large particle concentration. Small particle concentration is always displayed to the left and large particle concentration to the right. Small particles are all particles detected by the DC1100 down to its detection limit – approximately 1 micron. Large particles are all particles detected above the large particle threshold which is typically around 5 microns. The values are scaled so that these represent the concentration of particles in approximately .01 cubic foot of sampled air. Example of particles that might be present in the typical home in these ranges are: small particles: fine dust, bacteria, mold, smoke, smog, etc. large particles: coarse dust, pollens, larger bacteria, plant spores, dust mite feces, etc. continuous mode The DC1100 is simple to operate. All that needs to be done is to plug the unit in and turn it on. Once turned on the unit will automatically configure itself to run in continuous mode and display the current level of particulate pollution for both small and large particles. The data sampled will also be recorded for future analysis. In addition, a dynamic bar graph will be displayed which will give the user an immediate visual indicator of the number and size of particles being detected. 5 small particles large particles 753 38 dynamic bar graph smaller larger monitor mode In monitor mode the DC1100 will sample for one minute every hour. The LCD will display “monitor mode” and wait until the next hour break to begin sampling. When the unit starts sampling the fan will come on and the word “sampling” will flash on the second line of the LCD. At the end of the minute, the concentration of small and large particles just sampled will be displayed as shown in the figure monitor mode 178 15 small particles 6 large particles minute history mode Minute history mode allows the user to view the data recorded over the past hour on a minute by minute basis. When minute history mode is entered by pressing the MODE button while in monitor mode, the following message is displayed briefly. minute history Then the user is instructed to press the SELECT button to start viewing the history data. PRESS SELECT TO VIEW HISTORY Pressing SELECT will show a display similar to the following. The first line displays the time at which the data was recorded and the second line shows the average concentration of small and large particle over that minute. Pressing SELECT additional times will allow the user to go back through the recorded data one minute at a time. 7 1 MIN AGO 328 24 small particles large particles It may happen that instead of the particle concentration the messages “NO DATA” or “TIME BREAK” are displayed. The message “NO DATA” means that no sampling data was recorded at that period in time. The message “TIME BREAK” alerts the user that the displayed times past the time break are no longer accurate. This happens if the DC1100 is unplugged which causes the unit to lose track of time. Note: the stored data is not lost but only the time reference from the present. Turning the unit on and off does not effect the time as the internal clock keeps running. hour history mode Hour history mode allows the user to view the data recorded over the past day on an hour by hour basis. When hour history mode is entered by pressing the MODE button while in minute history mode, the following message is displayed briefly. hour history 8 Then the user is instructed to press the SELECT button to start viewing the history data. PRESS SELECT TO VIEW HISTORY As in minute history mode, pressing SELECT will allow the user to go back through the recorded data. The data represents the average of the concentration over the entire hour. The following is a typical display. 3 HOURS AGO 328 24 small particles large particles day history mode Day history mode allows the user to view the data recorded over the past month on a day by day basis. When day history mode is entered by pressing the MODE button while in hour history mode, the following message is displayed briefly. 9 day history Followed by. PRESS SELECT TO VIEW HISTORY As in the other history mode, pressing SELECT will allow the user to go back through the recorded data. The data represents the average of the concentration over the entire day. The following is a typical display. 1 DAY AGO 388 27 small particles 10 large particles clear history mode Clear history mode allows the user to clear all minute, hour, and day histories from internal memory. When clear history mode is entered by pressing the MODE button while in day history mode, the following message is displayed briefly. clear history? Followed by. PRESS SELECT TO CLEAR HISTORY If SELECT is pressed while this is displayed then the histories will be cleared and the following message briefly displayed. history cleared After the histories are cleared the DC1100 automatically switches into continuous mode. If the user opts to not clear history then he must press MODE instead of SELECT and the unit returns to continuous mode. 11 Interpreting the data The DC1100 displays the concentration of particles in the air. As stated in the overview section, the numbers represent particles in .01 cubic foot of air. Thus, if the unit displays 676 on the left and 17 on the right there are approximately 67,600 particles 1 micron or greater per cubic foot of air and, likewise, 1700 particles greater than 5 microns per cubic foot of air. (Note: if you purchased the “Pro” model then your small particle threshold is 0.5 microns and your large particle threshold is 2.5 microns.) As discussed in the Health Disclaimer we cannot say that any concentration of particles in the air is necessarily unhealthy or healthy – please contact your physician for any health related questions. The numbers will tell you how clean your air is in the measured size ranges and allow you to know if your filters or purifiers are working efficiently to remove particles. Dylos has developed a guide to rating your air relative to other residential or office environments. This chart appears also on the rear of the DC1100. Air Quality Chart – Small Count Reading 1000 + = VERY POOR 350-1000 = POOR 100-350 = FAIR 50-100 = GOOD 25-50 = VERY GOOD 0-25 = EXCELLENT The numbers above are for the standard unit only. The “Pro” model and custom calibrations will vary. It is our experience that most residences or offices can reach the VERY GOOD to EXCELLENT range. Even with good filters or air purifiers, however, the air quality can be degraded by many factors including drafts, human activity, machines, dirty carpets, etc. The Dylos DC1100 is the tool that allows you take control of your air quality and to know what works and what doesn’t work to improve it. 12 Care and Maintenance The DC1100 is essentially maintenance free. The unit may, however, require occasional cleaning if used in a dusty environment. In this case, cleaning once a month should be sufficient. Cleaning is simple - use compressed air, such as from any of the available “canned air” products, to blow into the openings in the top rear of the DC1100. It is best to perform this operation while the unit is turned on so that the fan is running and will draw out any dust blown free. Do not insert the “straw” of the duster or anything else into these openings. A few seconds should be sufficient to dislodge any dust clogging the inside. Do not attempt to open the unit as this voids the warranty and may result in exposure to laser radiation. When the DC1100 is not in use it is best to store or cover it such that it will not accumulate dust or dirt. 13 Troubleshooting Guide The unit must be turned on by pressing the ON/OFF button prior to operation. If the display does not come on after connecting the AC adaptor and pressing the ON/OFF button then contact us for support. If the unit fails to start sampling or the MODE, SELECT, or ON/OFF buttons fail to operate as described in this manual then contact us for support. If unit fails to count – that is the display consistently reads zero for both small and large particles then contact us for support. If counts seem excessively high in a particular location, but in a nearby location in the same room the counts are much less then there could be an interference problem. Certain kinds of fluorescent lighting can cause high counts if located within 1-2 feet of the DC1100. To be safe move the DC1100 several feet away from any device you suspect might be causing interference. You can obtain support for this product via our web site by emailing [email protected]. 14 Notices FCC This device complies with part 15 of the FCC Rules. Operation is subject to the following two conditions: (1) This device may not cause harmful interference, and (2) this device must accept any interference received, including interference that may cause undesired operation. FDA This device is a CLASS 1 Laser product and complies with 21 CFR 1040.10 and 1040.11. The following label appears on the rear of the device: 15 Warranty Ninety (90) Days Limited Warranty Dylos Corporation warrants this product shall be free of defects in material or workmanship for a period of 90 days following the date of purchase. If the product found to be defective, Dylos Corporation will, at its option, repair or exchange the defective product or any component of the product with a new or remanufactured product at no charge. The replacement product is covered only for the original product. When the warranty on the original product expires, the warranty on all replaced products also expires. Note: If the product is no longer available, Dylos Corporation will replace with the most similar product in its current inventory. Proof of purchase is required to obtain warranty service. You must have proof of the date of purchase in the form of a sales receipt or other document showing the product and the date that you purchased it and the authorized retailer. When it is necessary for you to ship the product to Dylos Corporation for repair or exchange, you will pay the cost of shipping to Dylos Corporation. Dylos Corporation will pay the shipping costs when returning the product to you. All warranty requirements must be met to obtain warranty service. This warranty does not cover normal wear of parts or damage resulting from any of the following: improper installation, connection to an improper voltage supply, abuse, neglect, misuse, accident, disassembly, unauthorized repair, shipping or any other cause not within the control of Dylos Corporation. REPLACEMENT AS PROVIDED UNDER THIS WARRANTY IS THE EXCLUSIVE REMEDY FOR THE CONSUMER. DYLOS CORPORATION SHALL NOT BE LIABLE FOR ANY 16 INCIDENTAL OR CONSEQUENTIAL DAMAGES FOR BREACH OF ANY EXPRESS OR IMPLIED WARRANTY ON THIS PRODUCT. EXCEPT TO THE EXTENT PROHIBITED BY APPLICABLE LAW, ANY IMPLIED WARRANTY OF MERCHANTABILITY OR FITNESS FOR A PARTICULAR PURPOSE ON THIS PRODUCT IS LIMITED IN DURATION TO THE DURATION OF THIS WARRANTY. **Some states do not allow the exclusion or limitation of incidental or consequential damages, or limitations on how long an implied warranty lasts, so the above limitations or exclusions may not apply to you. TO OBTAIN WARRANTY SERVICE Email Dylos Corporation at [email protected] stating the nature of the problem. Dylos Corporation will either respond with a solution or grant an RMA number (Return Merchandise Authorization). You may return the product via prepaid shipping along with your proof of purchase and RMA number to: Dylos Corporation 2900 Adams St #C37 Riverside, CA 92504 Copyright © 2008 Dylos Corporation All Rights Reserved 2900 Adams St #C37, Riverside, CA 92504 PH: 877-351-2730 17 18