1
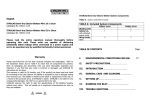
GALILEO BIOSCIENCE INSTRUCTION MANUAL ELECTROBLOTTING UNITS 91-1010-TB & 91-2020-TB WARNING THESE UNITS ARE CAPABLE OF DELIVERING POTENTIALLY LETHAL VOLTAGE WHEN CONNECTED TO A POWER SUPPLY AND ARE TO BE OPERATED ONLY BY QUALIFIED TECHNICALLY TRAINED PERSONNEL. PLEASE READ THE ENTIRE OPERATOR’S MANUAL THOROUGHLY BEFORE OPERATING THIS UNIT. Please check that the unit has been received complete and undamaged following shipment. Any Faults or losses must be notified to Galileo Bioscience™ immediately; Galileo Bioscience™ cannot accept responsibility for Goods returned without prior notification REFER TO PACKING LIST AND CHECK THAT ALL COMPONENTS AND ACCESSORIES WERE RECEIVED PACKING LISTS: 91-1010-TB 1 1 4 Description Blotting Unit with two hoses barbs for cooling Safety Lid with attached power cords Color Coded Compression Cassettes with 2 fiber pads in each cassette 91-2020-TB Description 1 Blotting Unit with two hoses barbs for cooling 1 Safety Lid with attached power cords 2 Color Coded Compression Cassettes with 2 fiber pads in each cassette Part Number Check 91-1010-TBCS Part Number 91-2020-TBCS Check SAFETY PRECAUTIONS Please, read the User Manual carefully before using the Tank Electro-Blotting Unit. This manual contains important operating and safety information. Our electrophoresis units are designed to perform flawlessly for years in the most demanding laboratories. Please take the time to read the manual to ensure that you understand the safety and operating instructions to ensure the successful use of the unit. Alterations could cause serious injury to the user or the system. Power to the unit is supplied by an external power supply. The power supply must meet safety standards for IEC 1010-1 regulations and must be ground isolated and incorporate a no load detecting circuit. ∆ Power is supplied to the gel through the lid of the system. Users should not attempt to operate this unit without the safety lid in place. Always isolate the units from their power supply before removing the safety lid. ∆ Always disconnect the unit from the power supply to avoid the risk of personal shock. Isolate the power supply from the main power source FIRST then disconnected the power cords. ∆ Running Conditions should not exceed the maximum operating voltage or current. ∆ Do not fill the units with transfer buffer above the maximum fill line. ∆ Always disconnect the unit from the power supply when you want to move the unit or add running buffer. ∆ Use this apparatus only for its intended purpose as described in this manual. Do not use this product if the power cords are damaged or if any of its surfaces are cracked. Introduction The Galileo Bioscience™ Insight™ Mini Tank Electro-Blotter is designed to rapidly transfer nucleic acid or protein fragments from up to four polyacrylamide gels at one time to nitrocellulose, nylon or PVDF membranes. The color-coded cassettes allow for easy assembly of transfer sandwich and error-free transfer. The large buffer capacity allows for high current output for the transfer of high molecular weight proteins while integral cooling permits high voltages and extended transfers. System is compatible with transfer membranes and blotting paper from all suppliers. Features Outstanding Features Ensure Trouble-Free Use Robust Acrylic Construction Stands up to Daily Usage without Breakage, Warping or Leakage Gold Plated Electrodes, Corrosion Free and Rated Safe up to 1,000 volts Safety Cover with attached Power Cords Assures Safety and Prevents Reverse Orientation of Electric Field Intelligent Design Results in Exceptional Resolution Efficient Water Cooled Base Color Coded Cassettes Obviate Accidental Sample Loss Once proteins (nucleic acids) in a sample aliquot have been separated on a slab gel, the resulting bands may be transferred to a solid support membrane. The primary reason for this type of blot is one of localization and secondarily, concentration of discrete protein bands. Although many have used alternative cross linking agents such as DATD (N,N”-dihydroxyethylene-bis Acrylamide) to allow for the accessibility of gel bound proteins, this still represents an impediment to radio enumeration due to the quenching by the gel matrix itself. The most common solid support membrane is nitrocellulose. A second type of membrane is PVDF (Polyvinylidene difloride), which is generally used when a transferred protein is to be sequenced, additionally; it has a 2x binding capacity. Also used for nucleic acid capture are Nylon membranes. In either case, the proteins are transferred from the gel to the matrix in an electric field perpendicular to the gel (initial running direction). Tris based buffers are employed in the transfer. Methanol and SDS are modifiers often used in protein transfer buffer. These components however are antithetical in their effects both in terms of movement and absorption. Methanol restricts protein movement from the gel but is often required to support the ionic nature of protein to nitrocellulose binding. SDS aids in protein elution, but can also inhibit binding of small molecular weight proteins (Mozdzanowski, J., High yield electroblotting, Electrophoresis, 1992, Vol 13., p.59-64). USING THE TANK BLOTTING UNITS A. SAFETY PRECAUTIONS ∆ READ all instructions before using the unit ∆ Always turn off power supply FIRST then disconnect the power cords. Always have electrophoresis unit disconnected from their power supply before removing the safety cover ∆ DO NOT exceed the maximum operating voltage or current (see Table ?) ∆ DO NOT operate electrophoresis units in metal trays. ∆ Acrylamide is a volatile, cumulative neurotoxin and suspected carcinogen. Wear effective protective clothing and follow recommended handling and disposal procedures. ∆ Polymerized gels contain some unpolymerized monomer. Handle with gloves only. ∆ DO NOT fill the unit with running buffer above the maximum Fill Line. ∆ DO NOT move the unit when it is running. ∆ CAUTION: During electrophoresis very low quantities of various gases are produced at the electrodes. The type of gas produced depends on the composition of the buffer employed. To disperse these gases make sure that the unit is run in a well-ventilated area. B. General Care & Cleaning WARNING !! Acrylic is not resistant to aromatic or halogenated hydrocarbons, ketones or esters. Organic solvents cause acrylic to “craze” or crack. Do not use ethanol or other organic solvents to clean your unit. Do not autoclave, bake or microwave your unit. ∆ Before using, clean and dry unit with DISTILLED WATER ONLY; dry parts with clean tissues or air dry. Use care when cleaning or drying the unit near the platinum wire. The connectors should be clean and dry before usage or storage. ∆ Do not use abrasive creams or scourers. ∆ Do not use cleaning brushes in the electrode area ∆ A thorough rinse with Distilled Water is all that is generally required to clean the unit after use. A mild detergent may also be used. Acrylic can also be exposed to a mild bleach solution (10:1). Technical Tips for Setting Up Power Supply: Blotting requires a power supply that operates at a fairly high current setting and low voltage. If the power supply used is not appropriate it may blow a fuse, shut itself off, display a no load or short load message or even have a short circuit. Blotting Buffer: The most commonly used buffer for protein blotting from polyacrylamide gels is Towbin buffer. Small amounts of buffer may be needed for equilibrating the gel and membrane prior to blotting, in addition to the buffer in the transfer tank. Buffer should be cooled to 4˚C and degassed. The buffer should be degassed prior to the addition pf SDS. TRANSFER BUFFER RECIPES* 1X Towbin Buffer 1X Tris-glycine buffer (Towbin buffer minus the methanol) is used for agarose and polyacrylamide gel electrophoresis of nucleic acids with PVDF membrane. Towbin buffer (containing 5-20% methanol) is a commonly used buffer for protein transfers to nitrocellulose membrane. This buffer can be used with or without 0.05-0.1% (w/v) SDS. 25mM Tris Base 192mM Glycine 5-20% MeOH pH 8.3 Other transfer buffers include: 48mM Tris Base 39mM Glycine 20% MeOH pH 9.2 Ref. Bjerrum and Schafer-Nielsen (1986) 10mM NaHCO3 3mM NaCO3 20% MeOH pH 9.9 Ref. Dunn (1986) * Do not pH with acid or alkali. The pH may vary slightly according to the purity of reagents and accuracy of weighing. Adding ions may cause overheating during the transfer. Filter Paper: Filter or blotting paper is used in the blotting sandwich. It is sold as pre-cut sheets, or large sheets and rolls that can be cut to the size needed. Blotting Membrane: Nitrocellulose and PVDF (Polyvinylidene difloride) can be used for proteins. Charged Nylon Membranes can be used for nucleic acids. The choice depends upon the user’s preference and sometimes the detection method to be used. Setting Up the Blot • After electrophoresis, remove the gel assembly from the unit and remove the spacers • Open the gel cassette by gently rocking a spatula between the plates, forcing separation of the plate from the gel – do not insert spatula near the notch of the glass. The gel will normally remain affixed to the bottom plate. Remove the top (notched) plate by slowly lifting it from the side with the inserted spatula and gradually increasing the angle until the plate is completely separated from the gel. If the gel should stick in an isolated spot, a stream of water from a squirt bottle can be sprayed at the spot to aid separation. • Remove the gel from the bottom plate. Tip the plate up side down, starting at one edge allow the gel to roll off into the transfer buffer. Alternatively, place the plate with the gel attached, into transfer buffer. • Pre-equilibrate the gel in cool transfer buffer for 15 minutes with gentle agitation, to remove SDS and salts. This serves to prevent the gel changing size during transfer and to reduce heating effects. If the gel is on the plate, it will become loose during this step. • Wearing gloves cut the membrane to the size of the gel and blotting paper. • Mark the membrane, to indicate the side that the samples will be on. This is important in the event that any successive probe is negative, and to indicate sample orientation. Either clipping a corner of the membrane or using a ballpoint pen can do this. • Wet the membrane according to the manufacturer’s recommendations, followed by equilibration in transfer buffer for 15 minutes. • Cut four pieces of laboratory grade blotting paper to a size 5mm larger than the gel to be blotted. Soak them in transfer buffer. • Soak fiber pads in transfer buffer. If the pads are larger than the gels you routinely use they can be trimmed down with a pair of scissors. • Building the gel sandwich is best done in a dish or shallow plastic box. Place the cassette with the black side down. • Lay a Scotch-Brite® pad on the black half of the cassette, followed by the soaked filter paper. Both should be soaking wet with transfer buffer. The tray may become filled with buffer as you build the blotting sandwich. • Add a few ml of buffer to the filter papers (2), and gently layer the gel. Beginning at one end of the gel, align the filter papers with the gel edge, and slowly lower the other end, driving out any bubbles. Use a clean glass rod wetted in transfer buffer to roll out any trapped bubbles. • Carefully align and overlay the transfer membrane onto the gel in one smooth action. Work from the center and let the ends progressively roll down. Do not attempt to re-position the membrane as some transfer may occur on contact. Again, use a clean glass rod wetted in transfer buffer to roll out any trapped bubbles. • Add another two pieces of wetted filter paper and complete the sandwich with a Scotch-Brite® pad. Blot Assembly: 1. Cassette –ve side (black) 2. Pre-wetted Scotch-Brite® Pad 3. 2 pre-wetted blotting papers 4. Gel 5. Pre-wetted gel membrane 6. 2 pre-wetted blotting papers 7. Pre-wetted Scotch-Brite® Pad 8. Cassette +ve side (red) Setting up the Tank • Cool and de-gas the appropriate volume of transfer buffer (see specifications). • Half fill the tank with transfer buffer. • Connect the cooling water supply to the tank base hose connectors. Use hose clips to secure the tubing. • Add a stir bar to the tank to maintain uniform temperature and conductivity during electrophoretic transfer • Insert the cassette into one of the tank slots with the transfer membrane on the +ve (anode/red) side. • Add transfer buffer until the top loops of the platinum wire (1010-TB) or the top of the platinumtitanium plate (2020-TB) is just covered. • Place the lid with attached power cords on the unit and refer to Table ? for operating conditions. • Run the blot. How long will it take to blot the proteins from my gel? Transfer times must be determined experimentally. There is no formula for determining transfer time. There are too many variables involved to give specific transfer conditions that will work for every protocol. Initially, choose a buffer system and perform a pilot time course experiment, transferring molecular weight markers from your gel to the membrane of your choice. It is better to start with low current or voltage settings, monitoring the temperature as the run proceeds. If the temperature is controlled and transfer is successful you can try higher settings for subsequent runs. Transfer Settings: Blotting takes place at a given migration rate for a specified time. The units are mA times hours. If you need to slow the transfer down, e.g. coincide with the setting up of a probe, simply decrease the current (mA) to match the added time you require (mA)(hr) Std setting = (mA)(hr) New setting Alternatively, one can increase the current to decrease the time. This assumes that you have determined an initial mAh value that works well for the molecules you are interested in. Table 1 91-2020-TB 91-1010-TB Transfer Buffer Towbin Buffer Bjerrum Buffer Dunn Buffer Overnight 25-40 V 40-80mA 25-40 V 40-80mA 10 V 40-80mA 1 Hour 50-100 V 200-400mA 50-100 V 200-400mA 40-80 V 200-500mA Overnight 25-40 V 80-160mA 25-40 V 80-160mA 10 V 80-160mA 1 Hour 50-60 V 200-250mA 50-60 V 200-250mA 50-60 V 200-300mA These guidelines are just a starting point; exact conditions must be determined experimentally. Factors That Will Affect the Success of Transfer: Optimal transfer conditions vary based on the characteristics of the molecule you are working with, which include: gel porosity, buffer composition and pH, transfer time, transfer field density (V/cm), molecular weight range, stirring of buffer and temperature control, choice of membrane, and the detection system chosen. Residual salts in the gel could cause the system to heat-up, so pre-equilibration of the gel with transfer buffer is important. If an acidic buffer is chosen, e.g. 0.7% acetic acid the direction of transfer will be the opposite of normal, i.e. transfer will be from anode (red) to cathode (black). Such a buffer would be suitable for IEF gels or basic protein gels (native). Cleaning & Storage After Use rinse all components in deionized water and gently dry the gold electrode (banana plug) with a soft tissue. NEVER USE ORGANIC SOLVENTS. Troubleshooting Problem: Smeared or swirled transfer and missing bands Solution: Nitrocellulose membrane: • Over transfer through the membrane • Low MW proteins are not binding well or are being washed away • SDS is preventing binding PVDF: • Membrane was dried out before it was added to the transfer sandwich • Alcohol was not used to pre-wet the membrane • Use 0.2 micron pore size nitrocellulose instead of 0.45 micron, or use PVDF with a higher binding capacity. • Use glutaraldehyde to cross link the proteins to the membrane and use Tween-20 in the wash steps • Eliminate SDS in the transfer buffer • Membrane should be completely gray and slightly translucent when added to the sandwich. If it has dried out, re-wet in methanol and equilibrate in transfer buffer. • PVDF is hydrophobic and requires a short soak in methanol prior to transfer Problem: Brown coloration of membrane or cracking of gel after transfer Solution: Electrophoretic conditions were incorrect or not ideal • • • • • • • Transferring at too high a current Membrane was not thoroughly saturated Roll a test tube or pipet over the membrane (make sure it is clean) before putting the rest of the filter paper on the sandwich. Transfer will not occur where the gel is not in contact with the membrane. Running conditions, sample preparation, percentage acrylamide, and many other variables can affect the migration and resolution of proteins. Please review your electrophoresis conditions. Always pre-wet the membrane according to the manufacturer’s instructions. White spots indicate dry areas of the membrane. Too much current Running at constant voltage can cause power fluctuations that will cause overheating. A buffer that has not been made correctly or that has too high an ionic strength can also burn a gel by overheating. A cracked and dry gel often is an indicator of overheating. Problem: Transfer efficiency is poor Solution: Power supply is inappropriate for transfer • • • • • • • Transfer performed for too short a time Transfer sandwich was assembled in the wrong order The pH of the transfer buffer is too close to the isoelectric point of the protein Too much methanol in the transfer buffer Reducing methanol can help elute proteins from the gel, but can reduce binding to nitrocellulose membranes Higher percentage acrylamide or cross linker can restrict elution of proteins. Use the lowest percentage acrylamide possible to separate your proteins. Filter paper should be saturated with transfer buffer before adding them to the sandwich References 1. Towbin, J., Staehelin, T., and Gordon, J. (1979). Electrophoresis transfer of proteins from polyacrylamide gel to nitrocellulose sheets. Procedure and some applications, Proc. Natl., Acad. Sci. USA, 76, 4350-4354. 2. Bjerrun, O. J. and Schafer-Nielsen, C. (1986). Buffer systems and transfer parameters for semi-dry electro-blotting with horizontal apparatus, in Dunn Electrophoresis 1986, 315-327, VCH, Weinheim, Germany. 3. Dunn, S.D. (1986). Effects of the modification of transfer buffer composition and the renaturation of proteins in gels on the recognition of proteins on Western Blots by monoclonal antibodies, Anal. Biochem. 157, 144-153. 4. Ausubel, F.M. et al, (1993) Current Protocols in Molecular Biology, Chapter 10. Vol.2, Green Publishing Associates Inc. and John Wiley and Sons, Inc. 5. Sambrook, J., Fritsch, E.F., Maniatis, T. (1989). Molecular Cloning. A Laboratory Manual 2nd Edition. 18.47-18.61. Cold Spring Harbor Laboratory Press, Cold Spring Harbor, New York.