1
A ~~
rJ SYSTEMS
I ~U1TJINCORPORA
============
TED
430 Sherman Avenue
Palo Alto, Calilornia 94306
415/327-0125
CLUSTER/ONE
USER MANUAL
Copyright 1979
Nestar Systems,
-
Inc.
INTRODUCTORY
This manual
is organized
I.
II .
III.
IV.
V.
VI.
VII.
VIII •
in eight
NOTE
sections:
Introduction
Set Up
Bringing Up the System
Using the System
Restrictions on Programs
Problem Isolation
Building a Library
Disk Utilities
In this preliminary edition,
Sections I. and V. and most of VII.
are omitted;
they are currently in preparation and are scheduled
for completion shortly.
Your questions
and suggestions
are welcome.
5 September
i
1979
NESTAR
SYSTEMS
CLUSTER/ONE
Table
USER
of Contents
i.
Introductory Note
ii.
Table of Contents
(in preparation)
Introduction
I.
1
Installation Instructions
II.
1
Main storage unit
A.
2
Apple II interface
B.
3
Commodore PET interface
C.
7
Radio Shack TRS-80 interface
D.
8
ClusterBus interface cables
E.
9
Bringing up the system
III. A.
11
Drone initialization procedures
B.
11
Commodore PET 2001-8, -16 and -32
12
Apple II
13
Radio Shack TRS-80
14
C. Reinitializing
the drones in case of trouble
14
Commodore PET 2001-8, -16 and -32
14
Apple II
14
Radio Shack TRS-80
What to do if there is no response to a
D.
15
Cluster/One
command.
preparation)
(in
Mounting diskettes
IV. A.
16
Summary of Commands
B.
17
Description of Cluster/One commands.
C.
18
@DIR
19
@IEEE
20
@LOAD
21
@LOSE
22
@OFF
23
@REPLACE
24
@RUN
25
@SAVE
26
Drone error messages
D.
preparation)
(in
Restrictions on programs
V.
27
Problem isolation
VI.
A.
29
Queen diagnostic facilities
B.
31
Listing of numerical error codes
C.
32
Disk organization
VII. A.
preparation)
(in
The eight inch flexible diskette
B-F
33
Protecting diskettes from erasure
VII. G.
34
The disk utilities
VIII.
35
FORMAT program
A.
38
BACKUP program
B.
41
MERGE program
C.
46
DIRMAINT program
D.
Appendix
A: Summary
September
of Changes
5, 1979
50
ii
II.A Installation instructions for Cluster/One main storage unit
Unpack the Cluster/One storage unit, following the unpacking
instructions
included in the packing carton.
Place the
Cluster/One storage unit on an appropriate surface,
leaving
sufficient space for the PET 2001-8 console to sit on the left
hand side of the storage unit. Note: the main storage unit weighs
over 90 pounds; be sure that the surface has adequate structural
support.
Ensure that the PET 2001-8 console is fully operational.
Remove
the packing material from the connector which exits from the left
hand side of the Cluster/One storage unit. Place the PET to the
left of the storage units, about 3 inches from the unit. Install
the connector onto the PET, ensuring that it is fully and
squarely installed.
It is a very tight fit, and requires some
force to apply,
and must be pressed on absolutely squarely to
seat.
Now follow the instructions in Section III.A of
"Bringing up the System".
this manual,
This completes installation and test of the main storage unit.
- 1 -
on
II.B. Installation instructions for Apple II interface CLO-1004
1. Turn off the AC
interface card.
power to
the Apple
prior
to installing the
2. Insert the interface card in a free slot
Slot 4 is convenient since it permits the
to enter and exit a nearby slot in the rear
inside the Apple,
ClusterBus cables
Note that the Apple II must have Applesoft in ROM, either
an Applesoft card in slot 0 or in the case of the Apple
Plus, on the main CPU board.
3. Apply AC power to the Apple, and enter Applesoft.
now have the It] It prompt, and enter
1n
II
You should
CALL 51712 (return)
The response
NESTAR SYSTEMS CLUSTER/ONE (TM)
indicates that the interface is correctly installed.
4. When this is completed, proceed to connect the ClusterBus
cables as described in Section II.E.
You will find it
convenient to remove
the
Apple interface cards
when
connecting the interface cables. Be sure that AC power is off
when removing or inserting these interface cards.
- 2 -
II.C.l Installation instructions for PET 2001-8 interface
CLO~l002
1. Be sure that the AC power to the PET is off when you attach or
remove the PET interface.
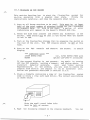
2. Plug the PET interface CLO-1002 onto the memory expansion port
on the right hand side of the PET, with the ICs facing the PET
and the wire extending to the back.
3. Plug the small connector at the end of the wire onto the
second cassette port at the rear right hand edge of the PET.
The connector is polarized so that it cannot be inserted
upside down.
(The wire should be towards the corner of the
PET.)
4. Turn on the PET. You should see the usual display.
immediately turn off power and check your work.
If
not,
5. Enter
SYS 37376 (return)
If you see the message
NESTAR SYSTEMS CLUSTER/ONE (TM)
on your screen,
the PET
installed and operational.
interface CLO-1002
is
properly
6. Proceed to Section II.C.3 for instructions on the installation
of the PET ClusterBus interface card CLO-1003.
- 3 -
II.C.2 Installation instructions for CLO-I002-2 PET
interface _RO_M
__o_nPET 2001=16 _a_nd
__-_3_2_.
--The installation of the CLO-I002-2 ROM in the Commodore PET
Models 2001-16 and -32 is quite simple; however you MUST follow
these instructions very carefully and exactly.
An error could
damage the CLO-I002-2, or your PET or both. If you feel uneasy
about proceeding, have the dealer from whom you purchased the
Cluster/One system perform these steps.
1. Turn off the PET. Remove the power cord from the AC outlet.
2. Unscrew the four screws (use a Philips,
i.e. cross point
screwdriver) which hold the top half of the PET to its black
base. The simplest way to accomplish this is to slide the PEt
forward over the edge of a table, and work from below. Do not
damage the screwheads when removing the screws.
3. Lift the top of the PET upwards slowly. As you do so, look
inside, and observe the three cable bundles which connect to
the main PET board. As you lift you may see that one (or more)
are too short to permit you to raise the cover fully and set
the-metal bar on the-le-ft -h-a-nd- os-ideof -the top into either of
the left hand side screw clearance holes. If this is the case,
simple slide the connector off the PET board.
Do not simply
yank the top of the PET open into full position, as this could
pull these connectors from the board, bending a few pins in
the process.
4.
Set the bar clipped onto the left hand inside of the PET cover
into one of the screw holes on the left.
5. Observe the row of integrated circuits just in front of the
rearmost cable connector. There are four chips plugged in the
left hand end, and three empty sockets to their right. There
is one more chip soldered to the board on the right of the
rightmost empty socket.
You are
socke~f
going to install the CLO-I002-2
the three empty soCkets.
in
the rightmost
6. Before opening the plastic package containing the CLO-I002-2,
PLACE YOUR HANDS ON THE METAL CASE OF THE PET,
in order to
discharge any high static electricity charge you may have on
your body.
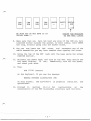
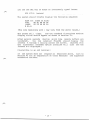
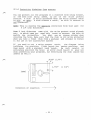
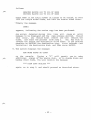
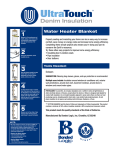
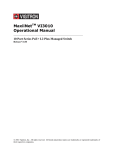
7. Now remove the CLO-I002-2 from its package, and gently insert
it into the rightmost of the three empty sockets ACCORDING TO
THIS FIGURE.
- 4 -
CBM
ROM
CBM
ROM
CBM
ROM
CBM
ROM
EMPT'
EMPT'
t
notice the position
of the HALF CIRCLE
BE SURE YOU DO NOT HAVE IT IN
UPSIDE DOWN!!!
8. Make sure that you
have not bent any pins of the ROM you have
inserted either outside the socket, or more likely, bent UNDER
the chip, without going into the socket holes.
9. You can
now lower the PET
cover,
and
reconnect any of the
cable assemblies you may have removed when opening the cover.
10. Screw the top of the PET
removed earlier.
back onto
the base using
the screws
11. Reinsert the power cord, and turn on the PET. Your should see
the usual display.
If not,
immediately turn off the power,
and check your work.
12. Type
SYS 37376
on the keyboard.
NESTAR
If you see the message
SYSTEMS
on your screen,
operational.
13. Proceed
to
installation
(return)
CLUSTER/ONE
the CLO-I002-2
(TM)
is properly
installed,
and
Section
II.C.3
for
instructions
on
the
of the PET C1usterBus interface card CLO-I003.
- 5 -
II.C.3 Installation instructions for PET ClusterBus
interface card CLO-1003--- --The PET ClusterBus interface card plugs onto the PET IEEE-488
port. This port is on the rear of the PET, and is the rightmost
connector when viewed from toe rear.
The interface card is polarized so that it cannot be inserted
upside-down or on the wrong connector. When properly inserted,
the OUT contacts are above the IEEE connector, and the IN
contacts below.
Section II.C.4 describes the
interface cables.
interconnection of
- 6 -
the ClusterBus
11.0 Installation instructions for Radio Shack TRS-80
interface CLO-I009
The TRS-80 interface may be used with Level II keyboard-only
TRS-80s, or with the Expansion Interface (with or without disks).
If you have only a keyboard unit, follow these instructions:
1. Unpack the
supply.
TRS-80
interface units
and its
powerpack DC
9V
2. Turn off all power to the TRS-80 keyboard unit, and remove the
plastic door of the rear left hand side of the keyboard unit.
3. Connect the wide 40 wire cable from the interface unit to the
connector on the printed circuit board inside the door on the
keyboard unit. Note that the RED stripe on this cable MUST BE
to the right hand side of the connector,
looking from the
front of the keyboard unit.
4. Next plug in the powerpack,
and insert the little jack into
the TRS-80 interface.
There is no switch on the interface
unit, and power can be left on the unit at all times except
when the cable to the TRS-80 is removed or attached.
5. Next, turn on the TRS-80 itself,
and initialize Level II
BASIC.
Follow the instructions in Section III.B.3,
to
initialize the TRS-80 unit, and observe the proper response:
NESTAR SYSTEMS CLUSTER/ONE (TM)
6. At this time connect the interface cables
instructions provided in Section II.C.4.
following the
If you have an Expansion Interface, follow these instructions:
1. Ensure that you have all the latest
modifications and
improvements needed for the Expansion Interface.
(The level
supported by Nestar Systems at this time
includes the
"buffered cable" mod,
and the "pig-tail" mod. We cannot
guarantee that the interface to the Expansion Interface will
continue to work for all future changes that Radio Shack
installs.)
2. Connect the Nestar Cluster/One interface to the Screen Printer
port,
which is on the left hand side of the Expansion unit
looking from the front. The RED stripe on the wire should be
to the REAR of the Expansion Interface,
with the cable
descending from the connector.
3. Otherwise all steps are
keyboard-only units.
the
-
7 -
same as
described
above
for
II.E Installation instructions for ClusterBus interface
cables
The ClusterBus cables connect the Drone stations to the main
storageunit~These
ea~lesbegin-at the-storage.unit, and connect
in a daisy-chained fashion to each Drone station in turn.
A
maximum of 15 units may be connected on one interface cable
string. (If your Cluster/One system has the ClusterBus Extender
Option CLO-I008 you will be connecting two independent strings,
which each may have a maximum of 15 Drone stations.)
All interface cables are both color coded and polarized to
simplify correct installation procedure. The general rule is that
each stations has one connection IN to it, and one connection OUT
to the next station. All cables have one end which connects to an
IN and one end which connects to an OUT. All IN connections are
labelled with GREEN dots, and all OUT connections are labelled
with RED dots.
Begin by connecting one cable from the storage unit (OUT) to the
IN connection of the first Drone station.
Power up and start the main storage unit as described in Section
III.A.
Power on and initialize the first Drone station,
as
described in Section III.B. Enter the command
@RUN "MENU"
and observe that the MENU program is loaded and runs. You can now
request the SAMPLE program (number 1) etc.
Next connect an interface cable between this Drone station and
the next station in turn. Test its operation,
and the correct
operation of the previous stations on the chain.
Proceed
seguentially in this fashion until all Drone stations are
operational. Connecting all Drone stations simultaneously is not
advised, since in case of difficulty it is not clear which unit
is the cause of the trouble due to the parallel nature of the
ClusterBus.
IMPORTANT NOTE:
Any excess cable between Drone stations should
never be coiled, but should be fan-folded and taped flat. Coiling
the excess cable can cause unnecessary bus errors and should be
avoided.
- 8 -
III.A Bringing ~
the system
This section decribes how to start the Cluster/One system
on-line operation from a powered down state.
Follow
instructions carefully, and obey the sequence shown below.
1. Turn on all
half of the
to transmit
indications
for
the
Drone stations to be used. This must be at least
total number of attached Drones-for the-ClusterBus
data. If this is not done,
a series of error
will appear on the Queen's INVALID BUS row.
2. Press the disk door latches and remove any diskettes in the
drives. They should not be left in the drives when the system
is not in use.
--3. Turn on the Cluster/One Storage Unit by pressing the switch on
the rear of the unit. The PET console should be OFF at this
time.
4. Turn on the
display
PET
console
and observe
*** COMMODORE BASIC
15359 BYTES FREE
READY
the screen.
It should
***
(or, 31743 BYTES FREE with
option CLO-100l-8 installed)
If the correct display is not present, try again by turning
off the PET console, waiting a moment, and trying again. If
incorrect
behavior persists,
call
your local Service
Representative. In the interim, you may wish to remove the
console from service and replace it by an alternate unit.
Follow the procedure described in Section II.C.2.
5. Place a diskette containing a copy of the Cluster/One system
code in Drive 1 (the left hand drive). The correct positioning
is shown below:
Note the small round index hole
must be left of center.
6. Type
the following command on the console keyboard.
- 9 -
You can
use the red DEL key to erase an incorrectly
SYS_ 47111
The system
should
typed
letter.
(return)
briefly
display
the following
sequence:
DISK ID: (name of disk)
C*PC
SR AC XR YR SP
iC6EE
00 FF F8 OE F8
R 8l,Q
(The line beginning
with
i
may vary from the above
values.)
The screen will
clear,
and the standard Cluster/One
display titles should appear as shown in Section VI.
monitor
After several seconds
(during
which time
memory buffers are
validated),
the
row
labelled
POLLING
should display
the
letters
A through 0 rolling across the screen.
(Systems with
the ClusterBus
Extender Option installed will
also
see the
letters a-o displayed.)
Cluster/One
is up and running!!
If the system does not
respond as described above,
turn to
Section VI for an explanation of error messages
and suggested
corrective actions.
- 10 -
III.B Drone initialization procedures
This section describes the procedures used to enable the
on each of the personal computer
Cluster/One interface
stations attached to the Cluster/One system.
This initialization need be done only once, when the Drone is
turned on,
and need not be repeated except in unusual
circumstances. These are described below.
l.Corilmorlore
PET 2001-8, -16 and -32.
Turn on the PET. Enter the command
SYS 37376 (return)
(for all models described above).
You should now see
NESTAR SYSTEMS CLUSTER/ONE (TM)
on your console. If you do not, either you have not correctly
installed the Cluster/One interface or have some hardware
problem
which
should
be corrected
by
your
Service
Representative.
If you receive this message,
operational.
all Cluster/One commands are now
- 11 -
2. Apple !.!.
Cluster/One commands are operational only from Apple
Applesoft ROM systems.
You must first be in Applesoft
enable the Cluster/One system.
II
to
There are several ways to accomplish this. If you have a local
minidisk system and it has been booted, type
FP (return)
to get into Applesoft BASIC. You should see the standard right
bracket prompt. From the Apple monitor, there are two ways to
get into Applesoft BASIC.
If the switch on the Applesoft ROM
card is up, type
(ctrl) B
(return)
to en·ter -Appl-e-soft, - --atnd .you----should
see
the
right
bracket
prompt. Another method, if the switch is down, is to type
C080
(return)
in Monitor mode, and you should now see
prompt. Once you have accomplished this,
methods described above, enter
the right bracket
using one of the
CALL 51712 (return)
and you should receive the message
NESTAR SYSTEMS CLUSTER/ONE (TM)
on your console. If you do not,
you have not correctly
installed the Cluster/One interface or have some hardware
problem
which
should
be corrected
by
your
Service
Representative.
If you receive this message,
operational.
all Cluster/One commands are now
- 12 -
3. Radio Shack TRS-80
Cluster/One commands are operational only from Radio Shack
first
Level II systems. To enable the Cluster/One commands,
turn on your TRS-80 in the usual fashion, responding to the
memory size command as desired.
Once in BASIC, enter
SYSTEM
(return)
You should now receive the prompt
*?
and enter
/12345
(return)
At this time, you should receive the message
NESTAR SYSTEMS CLUSTER/ONE (TM)
on your console. If you do not,
you have
installed the Cluster/One interface or have
problem
which
should
be
corrected
by
Representative.
not correctly
some hardware
Service
your
If you receive this message, all Cluster/One commands are now
operational. In addition, you will find that the keyboard has
been debounced by the Cluster/One interface firmware.
NOTES:l. ON LEVEL-II KEYBOARD ONLY UNITS
When you issue the SYSTEM command shown above the
Cluster/One system uses the top 256 bytes of memory
(below the limit, if any, set by MEMORY SIZE?) . You
should not reissue this command without first turning
your TRS-80 off, then on again during a session.
2. UNDER DISK BASIC
You MUST reissue this command every time you
DISK BASIC.
reenter
3. The SYSTEM command described above has the effect of
a NEW, that is, it erases the current program from
memory.
- 13 -
III.C Reinitializing the Drones in case of trouble
This section describes the procedures to be used in case of
difficulty at a Drone station.
Note that there is one simple
solution to any problem which will always work,
at the cost of
losing your current program-- turn off the Drone station, and
proceed according to the initialization instructions in Section
III.B.
1. Commodore PET 2001-8-,-16 or -32
There is only one time when you normally need to reinitialize
the Cluster/One
interface.
In normal operations,
all
Cluster/One commands should always be available,
unless you
have issued the
@IEEE
command, which totally resets the PET to its normal state, and
permits IEEE operations via the IEEE connector (with the
ClusterBus disconnected!!). After issuing this command, to
reenter the Cluster/One system, you must issue the SYS 37376
command, as described in Section III.B.l.
Once you have entered Applesoft,
and
initialized the
Cluster/One interface you should not need to issue the CALL
51712 command, except for the following circumstances. If you
intentionally,
or accidentally press the RESET button (on
non-Apple II Plus systems) and get to the Monitor, the proper
procedure for reentering Applesoft is to ~
--(cntrl) C
(return)
If you use
(cntrl) B
you must reenter
Section II1.B.2
the
command
CALL
51712
as
described in
3. Radio Shack TRS-80
On the TRS-80 there should be no normal sequence of events
where you must reinitialize the Cluster/One interface. If
necessary for some reason, you should first turn off, and then
on, the TRS-80, and proceed according to the procedure shown
in Section III.B.3.
Note that the Cluster/One interface must
whenever you enter DISK BASIC from TRSDO~
- 14 -
be reinitialized
III.D What
to do if there
is no response
to a Cluster/One
command
describes
the steps
to be
taken if there is no
This section
response to a Drone command after a reasonable amount of time has
elapsed.
1. First check to
see that
the Cluster/One system
is running.
This can
be observed
by looking at the
console
diagnostic
display,
which should show the usual rolling letters in the
POLLING row,
with occasional pauses for servicing Drones.
If
this is not the case, notify the System Administrator
who will
analyze the situation and restart the system.
2. If the
system appears normal,
and others
can issue commands
and are receiving the normal responses, first reset your Drone
station.
The surest method is to turn your Drone station off,
then on,
and
initialize according to the procedure shown in
Section III.B.
You may wish to perform the following attempts
first:
a) Commodore PET:
Enter
a series of 6 or more @'s from
the
keyboard.
Eventually
you
should receive a ?SYNTAX ERROR
message,
and the usual READY prompt.
You can
now reenter
the previous command,
or if the system is not operational,
continue to work on your program in your local
Drone until
the system is up again.
b) Apple II:
First try entering
a (cntrl) C, which
should
return you to Applesoft.
If this does
not work,
press
RESET,
and then (cntrl) C if you are in the Monitor.
(Do
not use cntrl-B as this will lose your current program, and
also require reinitializing
the Cluster/One
interface.)
c) Radio Shack TRS-80: First press the BREAK key. If this does
not recover and give
you a READY message,
press the RESET
button
on the left rear of the keyboard unit.
If you
now
receive the READY message,
you do not have to reinitialize
the Cluster/One
interface.
Under DISK
BASIC,
this will
re-boot the disk,
and you must reenter BASIC from TRSDOS,
and reenter the SYSTEM command as shown in Section III.B.3.
- 15 -
IV.B Summary of Commands
The following is a summary of the commands available under this
Release of the Cluster/One system. The exact syntax is described
in Section IV.C.
@DIR
displays a (possibly restricted) list of programs and
their sizes from one of the disk units on your console.
@IEEE
and
PET only:
disables the Cluster/One interface,
permits all IEEE commands. Make sure you remove the
ClusterBus interface card before proceeding!!
@LOAD
loads a program from disk into a Drone.
@LOSE
permanently
library.
@OFF
partially resets the Cluster/One interface, and permits
local tape and disk operations at a Drone station.
@REPLACE
updates
an existing
Cluster/One library.
@RUN
first LOADs, then RUNs a copy of
Cluster/One library.
@SAVE
saves a copy of a program in the Cluster/One library.
erases
a
program
copy
- 16 -
from
of
a
the
Cluster/One
program
in
a program from
the
the
IV.C Description of Cluster/One commands
This Section contains a description of each of the commands that
are available under the Cluster/One system once initialized. The
following Section describes the error messages you may receive,
and their meaning.
Many of the commands use a filename and unit number in their
syntax. In some cases they may be ommited, and the defaults are
described below. A filename is a string of 1 to 16 characters,
composed of the 64 ASCII symbols from blank to underscore (or
back arrow), with the exception of : ? and *, which are reserved.
Note that the filename must be a literal string, and not a BASIC
variable or string expression. Sample filenames are: "LESSON 1",
"HELP", "lRST LESSON".
Certain commands permit you to specify a filename
in an
abbreviated manner, by using? or * in the name. These commands
are: @DIR, @LOAD, @RUN and @LOSE. A? is used to mean anyone
character, without specifying which. For example, @LOAD "?ELP"
could load the program "HELP" if it exists. @LOAD "H??P" could
also do the same.
A trailing * is used to match any sequence of letters, from that
point on.
For example,
@LOAD "LESSON*" will load the first
program encountered in the directory which begins with the
characters LESSON, such as LESSON 1. @DIR "LESSON*",2 will list
the names of all programs on disk 2 which begin with the
characters "LESSON". The?
and * forms cannot be used in the
commands @SAVE or @REPLACE,
A unit number specifies which of the two disk units a program
resides on, and if ommited, defaults to drive 1. For example,
@LOAD "HELP" loads HELP from drive 1, as does @LOAD "HELP",l.
@LOAD "HELP",2 would load a program of the same name but from
drive 2.
- 17 -
@DIR
Directory list
The @DIR command is used to obtain a list of program names on
your console. In its simplest form you can receive the names of
all programs which are available for your Drone by entering
@DIR
for disk unit 1
or @DIR,l
for disk unit 2.
@DIR,2
A partial directory
filename, as in:
@DIR "J*",2
listing
can
be
obtained by
including a
which
lists
only
those
programs
beginning with J, on disk unit 2.
Note that @DIR "J" will list only the one program "J" (if it
exists). You may use any legal filename form, as described above,
including question marks, etc.
The directory list will display the disk identification, and any
programs available for your Drone station, along with their size.
The size is shown in decimal, and is the count of 256 byte blocks
that each program occupies. Finally, the list shows the number of
free blocks available on the referenced disk, again in units of
256 byte blocks.
The directory list may be cancelled while it is printing in the
following manners: On the PET, press STOP. On the Apple, press
(cntrl) C. On the TRS-80, press BREAK. In addition, on the PET,
you may slow down the listing by holding down the RVS key.
WARNING: During the time that you are accessing the directory,
other users cannot proceed until you are done. Be as selective as
possible in directory requests,
and complete your requests as
rapidly as feasible. Typing (cntrl) S in Apple II Plus systems
will freeze the display but will prevent other users from
accessing the disk!! Don't use it!!
- 18 -
@IEEE Permit
IEEE bus operations
~ PET ONLY
Once the Cluster/One
system has been started at a PET Drone,
the
IEEE bus
is reserved for communications
with
the Queen,
and
cannot be used for instrumentation,
etc. Because of the nature of
the syntax of PET commands, protecting against inadvertant use of
the
IEEE
bus
(which
could
interfere
with
all
ClusterBus
communications)
also
prevents use of the
local tape
cassette
drive for DATA file use.
Any attempt to OPEN a file will cause a
SYNTAX ERROR,
and not be permitted once the Cluster/One
system
has begun.
By issuing
the command
@IEEE
the PET Drone station is restored to a form where OPEN statements
are
permitted.
At this time,
you
should remove the ClusterBus
interface card
if you wish
to use the IEEE bus,
and connect
instrumentation,
printers, etc. It is possible to use DATA files
on local cassettes as well at this time.
The program residing in
the PET is not destroyed, and may be used after issuing the @IEEE
command.
Once the command has been issued,
the system will not respond to
Cluster/One
commands (except by giving ?SYNTAX ERROR).
You must
reinitialize
the system as described in Section III.B.l.
To
use the
local PET cassette
programs, see the @OFF command.
recorder
- 19 -
for loading
and saving
@LOAD LOAD a program into a Drone from the Cluster/One library
The @LOAD command is used to load anyone
program from the
Cluster/One library into a Drone station. A copy of the program
is made in the Drone's memory,
and the original copy still
resides on the disk.
Any number of stations may load the same
program if they wish to.
The @LOAD should be followed by a program name,
above, with an optional disk unit number.
as
described
For example,
@LOAD "LESSON 1"
will load the program named LESSON 1, from disk unit 1, if it
exists, and was saved from the same type of Drone as requested
from. A program saved on a PET cannot be loaded into an Apple,
etc. Programs saved on one model of the PET may be loaded into
other models, subject to memory size limits.
The system will respond with
LOADED LESSON 1
in the above case, or
NOT FOUND
if the program does not exist.
Other examples of legal LOAD commands are:
@LOAD "??MM",2
@LOAD "TEST*"
- 20 -
@LOSE Permanently remove program from Cluster/One library
The @LOSE command is used to remove, erase,
delete, scratch,
kill, unsave etc. a program in the Cluster/One library. The
syntax is identical to @LOAD, described above.
A program may be specified exactly, as in:
@LOSE "TEMP 1.3"
It is possible to use the? and * forms
command, but it is not advisable.
- 21 -
in names with the @LOSE
@OFF Partial disconnect from ClusterBus for local tape/disk
operation
Once the Cluster/One system has been initialized at a Drone
station, any attempt to load or save programs using locally
attached tape cassette units or disks (from within BASIC) are
disabled. Any such attempt will result in a SYNTAX ERROR message.
This is done because of internal peculiarities of the interaction
between the built-in tape and disk handlers, and the nature of
the ClusterBus communications.
In order to permit use of
issue the command
the local
tape or
disk operations,
@OFF
and then proceed to use the local input output devices.
Once you have, for example, loaded a program into your Drone
stations from a tape cassette and wish to save it on the
Cluster/One system,
you can simply issue the appropriate
Cluster/One command. You need not, and should not reinitialize
the Drone via a CALL, SYS or SYSTEM.
NOTE: 1. In the current release, an automatic @OFF is performed
for TRS-80 Drones, so they do not need to issue the @OFF
explicitly. This may change in future releases.
2. If you are running a TRS-80 Drone with TRSDOS BASIC, you
must issue the CMD "T" command before CLOAD or CSAVE are
operational under the Cluster/One.
3. If you have a BASIC Programmer's Toolkit (TM) installed
in a PET Drone station, and wish to access it while
connected to the Cluster/One system, first issue the
@OFF command, then the Toolkit initialization sequence
SYS 45056.
To return to the Cluster/One issue the
command SYS 37376.
- n. -
@REPLACE Replace ~ program already in
a new version
the Cluster/One library
£y
The @REPLACE command is quite similar to the @SAVE command, in
that it writes the program currently in your Drone station into
the Cluster/One library, using a specified name,
and on the
specified unit. @SAVE will not permit you to save a copy of a
program in the library using a name that is currently used by
another program. If you indeed wish to replace the program by the
same name in the library by a new version, you should use the
REPLACE command. REPLACE first attempts to write a copy of the
program from your Drone station to the disk and only when that
has been done successfully, erases the previous copy.
Thus,
during the interim period, both programs are present on the disk.
It is conceivable that there is not enough space on a disk to
permit this to happen.
In this case, and only if absolutely
required, one could LOSE the original version, and then SAVE the
new one.
This is NOT a wise thing to do, since it is possible
that even after LOSEing the original version there still is not
enough room for the new version. (It might be bigger than the old
one for instance.) Another reason for using REPLACE rather than
LOSE and SAVE is to avoid losing a copy of a program should there
be, say, a power failure just at the wrong time, i.e.
after
deleting the old version, and prior to saving a new one.
The syntax of REPLACE is identical to SAVE.
specified, and cannot contain? or *
A filename must be
For example,
@REPLACE "LESSON 1",2
will make the program currently in your Drone station the current
version of LESSON 1 on disk unit 2.
Note that you may issue @REPLACE to a filename that is not
currently on the disk, and it has the effect of @SAVE.
- 23 -
@RUN LOAD, and then RUN a program from the Cluster/One library
The @RUN command is indentical to the @LOAD command,
in its
syntax and effects, with one addition.
After a program is
successfully loaded into a Drone station,
the program is
automatically started, as if a RUN command were issued.
The program
program.
will begin
at the
first
line number
found in the
Example: @RUN "MENU"
will load,
and then begin execution of
the program MENU on disk
1.
NOTE: As a special case, the command
@RUN
by itself will load and run the first program found in the
directory on disk 1. This can be very useful in providing a means
to get to a general program which describes or directs users
automatically to several other programs on a disk, e.g. by
entering the four characters @RUN. You can arrange to have a
given program appear as the first program in a disk directory
using features of the DIRMAINT utility (Section VIII.D). The most
convenient means is to first rename the selected program AAAAA,
then sort the directory, and then rename AAAAA back to whatever
name you wish it to have. @RUN will then execute that selected
program.
@SAVE Save ~ ~
of the Drone program in the Cluster/One library
The @SAVE command is used to make a copy of the program residing
in a Drone station on one of the the disks in the Cluster/One
storage unit. The copy saved on the disk is identical to the copy
in the Drone,
and contains only the program steps of the BASIC
program, but no data variables.
The
SAVE command requires a filename,
and optional unit number,
as in:
@SAVE "TEMP 1.3"
which makes a copy of your current program under the name TEMP
1.3 on disk unit 1. Once this is done, any other Drone of the
same type as the one from which the saving has been done may load
and run a copy of the program.
You cannot SAVE a program under a name that is already in use.
See the REPLACE command description for the means of updating an
existing program.
It is possible to have programs of the same name on a disk if
they are for different Drone types. For example, it is perfectly
reasonable to have programs named "MATH 1" for PET, Apple and
TRS-80 all on the same diskette, each one identical or somewhat
different from the others.
The name specified
qualifiers.
in the
SAVE
- 25 -
command
cannot
use
?
or
*
IV.D Drone error messages
1. SYNTAX ERROR:
A command beginning with @ was ill-formed or
illegal for this Drone. You may have mistyped the command, or
specified an illegal option, such as disk unit 5.
SYNTAX ERROR will also result from attempts to use local Drone
tape cassette or disk devices without first issuing the @OFF
command.
2. PROGRAM TOO LARGE: The program specified is too large for
either the Drone or Queen memory. You may determine if it is
too large for the Drone memory by inspecting the program size
on disk using the @DIR command. The storage available on the
Queen is displayed on the console by the BUFFER TOP = message.
3. DISK ERROR:
An unrecoverable error occurred when reading or
writing to the diskette storage.
Make sure the disk is
properly installed and formatted.
Retry the operation,
possible trying an alternate disk drive.
4. NOT FOUND: The requested
specified disk unit.
program file does not reside on the
5. ALREADY THERE: You have attempted to @SAVE a program using the
name of a program already present on the disk. If you wish to
replace the existing copy, use the @REPLACE command.
6. DISK FULL: There is insufficient (contiguous) space on the
disk, or in the disk directory, to save the program you have
requested. You should use a different disk,
or remove some
programs from the current disk.
It is possible to repack
programs on a new disk using the MERGE utility program
(Section VIII.C) so that all the free space is contiguous.
7. DISK NOT READY: The specified disk unit cannot be used. Check
that a disk is installed,
and is inserted, in the correct
orientation with the door properly latched.
8. WRITE PROTECTED: You have attempted to write
program on a disk which is write protected.
or erase
a
9. INVALID FILE NAME: The characters used in a program name are
not entirely in the 64 basic ASCII characters (excluding
?
and *).
10. 2 SIDED DISK IN 1 SIDED DRIVE:
You have attempted an
operation on a disk which was formatted as double-sided, but
are using a disk drive capable of using only one disk
surface. You must use a different disk.
- 26 -
VI.A Problem
isolation:
1. Problem:
You enter SYS 47111
or ?ILLEGAL QUANTITY
Possible
cause:
Corrective
Possible
Possible
2. Problem:
cause:
Corrective
Possible
cause:
Corrective
Possible
3. Problem:
action:
2 SIDED
Possible
cause:
Corrective
incorrectly.
ROM or disk controller.
Representative.
appears
on screen.
incorectly,
damaged
or
not
Remove disk (be sure only one is present!)
and reinsert in proper orientation. Reissue
SYS command. Try alternate disk in drive to
ascertain a physical disk problem.
Hardware
action:
at all,
failure.
in bootstrap
Call Service
problem
with Drive
1.
Remove disk and place in Drive 2 (righthand
drive).
Issue
SYS 47114
which
will load
system
from
Drive
2.
Call
Service
Representative.
cause: Memory
Corrective
SYS 47111
Disk
inserted
inserted.
action:
startup
Console must be replaced, possibly by using
an available equivalent Drone. Call Service
Representative.
DISK ERROR message
Possible
Queen
and there is no response
ERROR appears.
hardware
Failure
action:
during
Enter command again.
If still not working,
turn console off, then on, and try agaln.
Console
action:
cause:
Corrective
User entered
action:
cause:
Corrective
4. Problem:
difficulty
failure
in operating
Test
memory,
Representative.
and
system
call
area.
Service
DISK message.
The disk is recorded as a two-sided
the drive can read only one side.
action:
NO SYSTEM
Use correct
system
FOUND message.
- 27 -
disk.
disk,
but
Possible cause: Attempting to bootstrap from disk which has no
copy of the Cluster/One system as its first
directory entry.
Corrective action: Use correct system disk.
5. Problem: BAD CHECKSUM message.
Possible cause: Incorrect system disk mounted, or hardware
failure in disk controller or memory system.
Corrective action: Try alternative system disk, or Drive 2. If
problem
persists,
call
Service
Representative.
6. Problem: Instead of clearing screen and beginning scan,
FILE NOT FOUND message appears.
Possible cause: Incorrect
present.
system disk used.
Program
BAD:
Q
not
Corrective action: Enter X (return) to get READY message. Use
alternate system disk, and reboot system.
7. Problem: Screen clears and displays RELOAD SYSTEM CODE message
along with registers.
Possible cause: Memory failure in program storage region.
Corrective action: Turn off console, and then back on again,
a~
restart system.
If problem persists,
call Service Representative.
- 28 -
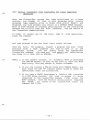
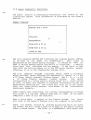
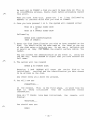
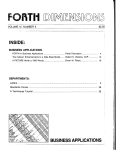
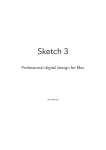
VI.B Queen diagnostic facilities
The Queen station is continually monitoring the status of the
Cluster/One system. This information is displayed on the Queen's
monitor.
Sample display:
BUFFER TOP
=
4000
POLLING:
E
RETRANSMIT:
TIME-OUT Q TO D:
TIME-OUT D TO Q:
INVALID BUS:
The line labelled BUFFER TOP indicates the highest memory address
to be used by the Queen (in hexadecimal).
This value is
determined by the Queen during startup.
It should be 4000 (or
6000 if Buffer Memory Option CLO-1001-8 is installed). A smaller
value that this indicates failing memory; if the value is less
than 2000 the failing memory is in the PET Queen console memory,
otherwise it is in the Cluster/One Storage Unit.
The line labelled POLLING indicates which drone is currently
being serviced. Drone stations are addressed by letter: A - a for
a 15 Drone (single channel) Cluster System, and A - 0, a - 0 for
a
30 Drone (double channel) Cluster system.
The letter
corresponding to a Drone station should flash for a short period
of time. If there are requests or problems encountered during the
Queen-Drone conversation, the letter will stay lit on the screen
until the Queen either rejects this Drone or the conversation
terminates normally.
Under normal idle conditions, the letters corresponding to Drones
will flash in a rolling fashion from left to right as the Queen
completes a scan of all the-statlons~---- ---When a Drone makes a request of the Cluster system, its letter
will stay on the Queen's display until the request is satisfied.
There are several invalid or problem situations which the Queen
can detect and will cause a mark to be made in the space directly
under a Drone letter. The first is a RETRANSMIT. This means that
- 29 -
a message was sent which was not received correctly. The message
is automatically sent again. This may happen because of static
electricity, auto ignition noise, electric motors, etc. These are
transient conditions and will be corrected by the automatic
retransmit. Few, ifany,retransmissi-o-ris-wlTr-occur Tn ci--no-irnaY
system.
If many retransmissions occur,
it may indicate an
electrically noisy environment. Proper shielding should correct
this.
If a transmission does not complete normally during a given
period of time, the Queen will stop all activity on the Bus and
make a mark on the TIME-OUT Q TO D or TIME-OUT D TO Q row. After
a small wait
(approximately 1/3 of a second), the Queen will
attempt to reconnect with the same Drone and restart the
conversation. This wait-restart sequence will be tried three (3)
times. If the Drone request is still not honored by this error
recovery technique, a serious problem exists. This may be faulty
cables, faulty connectors, cables improperly plugged in, or that
a cable was disconected from a Drone during the conversation.
This may also point to a hardware failure in the offending Drone.
In any case the Queen will continue to scan the other Drones. If
all Drones on the system cause this condition, it may point to a
hardware failure in the Queen.
The Bus is
A third error may be detected by the Queen.
open circuit
continually checked for shorts
and
certain
conditions. If any occur, a mark is made in the INVALID BUS row.
No data transmissions will occur until this condition is fixed.
Possible causes are:
1. More than half of the Drones are turned off (powered off units
drain the electrical capacity of the ClusterBus)
2. Improperly connected Drones
3. Bad cables, connectors, etc.
A simple diagnostic technique to help isolate the problem is:
1. Unplug all Drones from the Queen, by disconnecting the Bus at
its exit from the main storage unit.
Normal scanning
conditions should be reported on the Queen's screen. If not,
the Queen ClusterBus drivers may be faulty.
2. Reconnect Drones to the Queen, one at a time in sequence, from
the main storage unit. Observe which one causes the failure
condition to reoccur.
This procedure should quickly isolate a failing
can be removed from the Cluster to restore
operation.
- 30 -
stations which
normal system
VI.C Listing
of numerical
error codes
In almost
all
circumstances,
the numerical
error
codes used
internally by the Cluster/One
system are reported to the user in
the form of an English description of a few words. In some cases,
particularly
for the rare
or unexpected error codes a numerical
value only will be reported. This list provides a complete key to
these values.
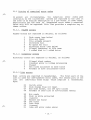
VI.C.l.
FILSYS
FILSYS
errors
1
2
3
4
5
6
7
8
VI.C.2.
are reported
errors
1
2
3
4
5
Disk
in decimal,
as follows:
Disk error (see below)
File not found
File already present
Directory full
No space for file
Directory error (see below)
Illegal character in file name
2 sided disk in 1 sided drive
Directory
Directory
VI.C.3
errors
errors
are reported
in decimal,
as follows:
Illegal block number
Internal error in bitmap processing
Unused
Two files allocated to same block
Attempt to free unallocated block
errors
Disk
errors are reported in hexadecimal.
The first part of the
list is used for odd-numbered error codes. The second part. of the
list
are
individual error flags
which comprise
a hexadecimal
byte.
03
05
07
09
Verify error
Disk change flag not reset
Bad disk format, not 256 byte blocks
Attempt to read file to non-existant
80
40
20
10
08
04
02
01
Not ready
Disk is write protected
(ignore)
Record not found
CRC error
Lost data
(ignore)
(see odd error codes above)
- 31 -
memory
VII.A
Disk organization
Cluster/One
disks
are
physically
recorded
in IBM standard
single-density
format
with
16 256 byte sectors on each
of
77
tracks per side.
The logical organization of the disks is unique
to the Cluster/One,
and the details of that organization need not
be known or understood by the user. It is not compatible with any
other file system from other manufacturers,
such as CP/M.
The disk consists logically of two parts:
the directory
which
describes the types,
sizes,
and locations of files on the disk,
and the file area,
which contains the files.
Management
of the
space
within the directory and file area is done entirely by the
Queen.
The limits on number and sizes of files depends, in part,
on that organization,
and may change with subsequent releases of
the Cluster/One operating system.
Current
limitations
are
as
follows:
single-sided
disk
Number
of files
Total number
file blocks
of
double-sided
disk
127
255
1216
2432
Each block contains 256 usable bytes.
Files are currently stored
contiguously,
so occasionaly
a file cannot be saved
although
there are enough free blocks.
Future releases may eliminate this
problem;
in the meantime the MERGE utility (Section
VIII.C) can
be used to compact the file area and produce a single
contiguous
free area.
Each file
on the disk is of a particular~,
indicated by a
single character. The following types are of particular interest:
TYPE
-S9
B
D
MEANING
A machine-language
program, such as a utility
program which runs on the Queen
An Applesoft BASIC program for the Apple II
A BASIC program for the PET
A Level II BASIC program for the TRS-SO
The various file types need not concern the Drone user, since the
Queen lets
each Drone see only those files which are appropriate
for that computer. The file type designations are only needed for
some operations done with utilities
which run on the Queen;
see
the section on Utility Programs for more information.
- 32 -
VII.G Protecting diskettes from erasure
You can protect all the programs on a diskette from being erased,
or new ones from being added, by use of the write protect
feature. A disk is write protected when the write protect notch
is cut, or open. A disk without a notch, or with it covered is
not protected.
NOTE: This is exactly the opposite convention from that used
5 1/4 inch minidisks!
for
Some 8 inch diskettes come with the write protect notch already
cut, in which case you need only cover or uncover the hole to
modify the protection.
You must use an opaque sticker when
covering the hole. Make sure that the disk is not write protected
when you take a fresh disk from a package and attempt to format
it for use on the Cluster/One system!
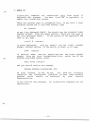
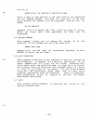
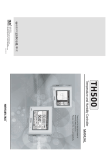
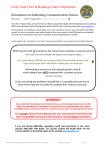
If you need to cut a write protect notch,
the diagram below
indicates its position. First layout the center position, and
then punch with a standard hand punch.
Be very careful to
accurately position the hole; an error could result in your not
only protecting your programs, but destroying the disk inside the
jacket as well!!
.0125"
~I
(1/8")
~ ~
1.750"
t
label
)
Direction of insertion
- 33 -
(1 3/4")
VIII. The disk utilities
There-·are four
system.
utili ty programs provided
wi.th.
_ the.Cluster/One
FORMAT is used to initialize new disks prior to their use in the
Cluster/One system. This must be done or else DISK ERRORs will
occur using diskettes as they come from a package.
BACKUP is used to make a complete copy of one disk to another. It
is wise to periodically make copies of diskettes and safely store
them for possible use should a diskette get physically damaged or
worn, or suffer some catastrophic loss of information. Programs
are valuable items and should be treated as such.
MERGE is used to copy all or part of one disk to another, on a
file by file basis. Disks can be combined, divided or compacted
using the MERGE program.
DIRMAINT is used to perform a variety of maintenance tasks
involving a diskette directory. It can be used to rename a
diskette, rename files, delete selected 9ro_upsof file_s,. among
-other-functlOn-s.- . -----.
-
34 -
VIlLA
FORMAT
The FORMAT
program is supplied on the system disk delivered with
the Cluster/One unit,
as are all the utility programs.
All new
disks to be used with Cluster/One
(except the spare disk supplied
by Nestar with
your
Cluster/One) must
by
initialized
by the
FORMAT program prior to their use.
FORMAT first writes
special record information on each
track of
the disk.
It then verifies that the disk is usable,
by writing
and reading data throughout the entire disk.
During this phase,
called VERIFYING,
any errors,
even transient ones, are reported
on
the
console.
A new disk should have no permanent
errors;
indeed
not even
retries should
be require~
when verifying the
disk.
If FORMAT reports errors,
try removing the disk, reinserting it,
and formatting again.
Should the condition persist (but other
disks
are formatting
correctly),
return
the disk
and get
a
replacement.
Disks with
permanent errors
are not
usable
and
indicate some manufacturing
or handling defect.
How to run FORMAT
1. Start the Cluster/One
system,
as described in Section III.
Once the system is running, press the STOP key on the console.
2. Clear
the screen
3. Place
a disk
of the console
containing
by pressing
a copy of FORMAT
SHIFT
in drive
and CLR.
1.
4. Enter
R 81,FORMAT*
on the console.
(return)
The expected
response
1S:
LOADED: FORMAT version no.
*** NESTAR DISK FORMATTER ***
PLACE DISK IN DRIVE.
ENTER DRIVE NO. WHEN READY.
(PRESS STOP TO EXIT):
Should
you receive
the message
BAD: FILE NOT FOUND
either the disk in drive 1 does not contain a copy of FORMAT,
or you have mistyped the command-.--Correct the problem and try
again.
5. You may now remove the system disk if you wish
to be formatted in either or both drives.
- 35 -
and place disks
Be sure not to FORMAT a disk you want to keep data on! This is
an irreversible process. Double check before proceeding beyond
this point.
When you have
done this,
press the
1 or 2 key (followed
RETURN) to indicate which disk you wish to FORMAT.
6. Once you have pressed
THIS
1 or 2, the system will
IS A SINGLE
respond
by
either
SIDED DISK
or
THIS
followed
IS A DOUBLE
SIDED DISK
by
ENTER DISK IDENTIFICATION
(MAX 16 CHARS):
7. Enter the disk identification you wish to have recorded on
disk.
You should write the same name on
the label on the
of the disk using a felt-tip pen.
Do not use a ballpoint
or pencil as they
can damage the plastic surface inside
jacket.
the
top
pen
the
You can correct the identification as you enter it, using
red DEL key.
Press RETURN to signal that you have entered
full name.
the
the
8. The system
will
ENTER
now respond
Y TO FORMAT
DISK:
Entering
Y (and RETURN) will cause
the entire
disk to be
initialized,
verified and the identification you have chosen
to be written on the disk.
Any other
9. You will
entry will
abort the program.
now see
FORMATTING ..•
on
the console.
disk
is
being
information.
This
is the first phase,
at which time the
initialized
with
the Cluster/One
format
Once all 77 tracks
display:
have been initialized,
VERIFYING ...
You should
next see
DONE!
- 36 -
the
console
will
on the console.
Formatting a disk takes about
two minutes for
a single sided
disk,
and about
four minutes
for a double sided disk.
All
portions
of
the disk
are checked,
and
all errors,
even
recoverable ones ("retries") are reported on the screen. A new
disk, with any errors, is suspect, and should not be used.
10. To stop FORMAT:
You may press STOP when FORMAT is requesting
Input and exit the program.
Once you have replied Y and
the
system has displayed FORMATTING ..• on the screen,
STOP will
abort;
the disk that was partially formatted must be totally
reformatted prior to use in the Cluster/One.
11. To restart FORMAT:
You may restart either by following
the
above instructions,
from step 3, or,
following the message
ABORTED, entering G (return).
- 37 -
VIII.B
BACKUP
BACKUP is used to make a full copy of one disk to another already
initialized
disk.
It should be used
periodically
to preserve
copies
of your
programs.
Should
a diskette become damaged by
handling or wear,
it may
be impossible to recover the data from
it, at which time a backup copy is invaluable. It is easy to fall
into bad habits and not perform periodic backups of disks,
since
the general behavior of floppy disks are so reliable.
But
the
first time a failure occurs,
much like
an insurance policy you
90pe never to have
to collect
on, having
a recent backup
is
lnvaluable.
1. To
run BACKUP,
first bring up the system,
and press STOP,
giving a register display.
Now clear the screen,
by pressing
SHIFT and CLR.
2. Place a disk containing a copy
of the system
code
delivered
with the Cluster/One
in drive 1. Enter the following on the
console:
R 81,BACKUP*
The console
should
(return)
now display:
LOADED: BACKUP m.n
*** DISK COpy UTILITY
WHEN DISKS ARE READY,
NUMBER (lOR 2):
(m.n is the version
***
TYPE SOURCE DISK
number)
(If you see the message BAD:
FILE NOT FOUND it indicates that
you have not
placed
the proper
disk
with
a copy
of
the
Cluster/One
system code in drive 1, or you have mistyped the
command shown above.)
3. You now may remove the
disk you want to copy
want to copy to in the
SOURCE disk drive (the
RETURN.
4. The system
follows:
will
system disk from drive 1, and place the
from in drive 1 or 2, and the disk you
other
drive.
Enter the number
of the
disk you are copying from),
and press
now display
the identification
of the disks
as
DISK 1
(or 2)
I-SIDED, ID: name of source disk
DESTINATION: DISK 2
(or 1)
I-SIDED, ID: name of destination disk
SOURCE:
The console display will indicate 2-SIDED in place
of I-SIDED
if appropriate. At this time, carefully verify that the source
and destination IDs are correct,
and that you want to totally
replace all the data on the destination drive.
- 38 -
It is possible to copy a l-sided
the system will respond with:
***
CAN'T COPY
disk to a 2-sided
disk,
but
2-SIDED TO l-SIDED
if you attempt to perform
for this purpose.)
the opposite.
(Use the MERGE
utility
5. You will now
be prompted for the name to be used for the copy
which is about to be made. You may copy the name of the source
disk to the new disk, keep the current name on the destination
disk, or enter a totally new name of your choosing.
You can keep the source
or destination
one of the following questions:
KEEP ID: source
id
KEEP ID: destination
IDs by replying
Y to
Y/N?
id
Y/N?
If you do not reply Y to one of these two prompts,
asks:
the system
ID?
and
awaits
entry of a new name
(maximum 16 characters).
6. BACKUP
should
next prompts
be copied.
TYPE
TYPE
for
the user to determine
the
destination
disk
how much of the disk
"W" TO COpy THE WHOLE DISK,
CR TO OMIT UNUSED INNER TRACKS
Normally at this point the user should enter RETURN,
in which
case BACKUP will only copy that portion of the disk that is in
use, which is faster than copying the entire disk.
7. Finally,
prompt:
the user has to enter Y in response
TYPE
before
change
to the following
"y" TO START COpy
the actual
something,
copying begins.
If you wish to
you may enter N and start again.
go back and
Entering
Y now
begins
the copying
process,
which
takes
approximately
one minute to copy a full single sided disk, and
twice that for a full double sided disk.
If you press STOP during the copying operation, it will abort.
The disk is NOT usable in this state,
and should be recopied,
or cleared using DIRMAINT.
8. The system will display
its progress
- 39 -
as it copies
the disk, as
follows:
READING BLOCKS nnn TO nnn OF mmmm
WRITING BLOCKS nnn TO nnn OF mmmm
where mmmm is the total number of blocks to be copied, at most
1232 for single sided disks, and 2464 for double sided disks.
Finally the message
DONE!
appears, indicating the entire copy has been performed.
Any errors detected during this time will cause an error
message to be displayed and the copy process aborted. Should
this occur, you should first remove and then remount the
disks, and start the process from step 2.
You may wish to
reverse the source and destination drive order. If the problem
persists on WRITING the destination copy, first reformat (and
initialize) the destination disk, and then rerun BACKUP.
9. The system displays the message:
ANY MORE DISKS TO COPY?
on the console.
Typing a l,yn will permit you to make
additional copies of the source disk, or to change disks and
backup other disks. You will receive the message
***
DISK COpy UTILITY ***
again, as in step 2, and should proceed as described above.
-
40 -
VII 1.C MERGE
MERGE is a utility which can copy
all or part of one disk
to a
second
disk,
without
disturbing
the programs
already on
the
second disk. It can be used for such maintenance functions as:
-
MERGE works
disk;
the
combination
Combining files from two disks onto one
Dividing one disk into two or more disks
Copying from double to single sided disks
Compacting the programs
on a disk to allow
shorter
access time
and the maximum possible contiguous free
space.
by copying from a SOURCE
disk
onto
a DESTINATION
SOURCE
disk is never
changed.
The disks may be any
of single and double sided media.
How to run MERGE
1. Bring up the
system
command mode and press
2. Place
Enter
and press
STOP
to enter the monitor
SHIFT and CLR to clear the screen.
a disk containing a copy
of the system
the following on the console:
R 81,MERGE*
The console
code in drive 1.
(return)
will display:
LOADED: MERGE n.m
(n.m is the version number)
*** DISK MERGE UTILITY ***
WHEN DISKS ARE READY, TYPE SOURCE DRIVE NUMBER (!OR 2)
(Underscored characters are in reverse
possible choices for your input.)
video
and
represent
3. You may now remove the system disk and insert the SOURCE
and
DESTINATION
disks.
Type a 1 or 2 to
indicate which
drive
contains
the
SOURCE
disk
(the one from
which
to copy).
Remember
that the left-hand drive
is 1,
and the right-hand
drive is 2. Type RETURN after your choice. (All input to MERGE
must be terminated with RETURN).
4. The system will now read the volume
status information; for example:
IDs on the disks
and print
SOURCE: DISK 1
I-SIDED, ID: PET USERS GROUP
DESTINATION: DISK 2
2-SIDED, ID: GAMES
You should
verify
correct.
If not,
that
press
the source
and destination IDs are
the STOP key,
and the MERGE program
- 41 -
will be aborted. At that point you are in monitor command mode
and you can return to step 2 and try again.
5. MERGE will now ask some questions to determine which files you
wish to be copied from the SOURCE disk. You may choose to copy
all of SOURCE, or you may restrict the files by specifying:
A. A starting file name.
Files before the specified
file will not be copied.
(Files are ordered as
reported by the LIST DIRECTORY command of the
DIRMAINT utility.)
B. An ending file name.
will not be copied.
Files after the specified file
C. A partial name match. Only files whose names
the specified pattern will be copied.
match
MERGE will ask you for these names with the following prompts:
ENTER STARTING FILE NAME
ENTER ENDING FILE NAME
ENTER PARTIAL NAME MATCH
You may enter or omit (by entering only RETURN) any of the
names. If you enter all three, then only files which match the
PARTIAL NAME MATCH which are not before the STARTING FILE and
are not after the ENDING FILE will be copied. If you omit the
STARTING FILE, files starting from the first one will be
considered. If you omit the ENDING FILE, then all files from
the STARTING FILE to the last file on the disk will be
considered. Finally, if you omit the PARTIAL NAME MATCH, then
all files between the STARTING FILE and the ENDING FILE will
be copied. If all three names are omitted (by typing three
RETURNs in succession), then the entire SOURCE disk will be
copied.
The names may be specified simply as an unqualified name, such
as
STARTREK
in which case the name must match exactly, but can be a file
of any type. If you wish to specify the file type, you can do
so by preceding the name with T:
where T is the single
character file type. For example:
B:STARTREK
specifies a PET BASIC file whose name is STARTREK.
For the PARTIAL NAME MATCH you will often want to specify the
name incompletely, using the same convention described in the
Section on Cluster/One commands,
namely * to terminate the
match and ? to match anyone character. For example:
-
42 -
GAME *
specifies any file,
are GAME, and
of any type,
whose first four characters
9:LESSON ?O
specifies Applesoft
etc.
BASIC files like LESSON 1.0,
LESSON 2.0,
If you want to specify only the file type and leave the name
unspecified you can do so, for example:
D:
will choose all TRS-80 BASIC programs.
There are several standard ways in which these name qualifiers
can be used; here are two examples:
1) To copy from a full double sided disk to two smaller single
sided disks:
First run MERGE and omit all three names. When the DESTINATION
disk is full,
MERGE will give an error message and indicate
which was the first file that it could not copy. Now run MERGE
again with a new DESTINATION disk, and specify that file as
the STARTING FILE NAME, with the other two names omitted.
2) To copy only files of a particular type:
Omit the STARTING and ENDING names, and specify only
part of the name for the partial name match.
6. After asking for the three names, MERGE will ask some
questions to determine how it should proceed:
the T:
more
ASK ABOUT EACH FILE? (!~)
If you specify Y, then MERGE will ask you about each file from
the SOURCE disk which satisfies the START/END/MATCH NAME
criteria, and give you an opportunity to decide whether to
copy it, skip it or copy it with a new name. If you specify N,
then files will be copied without asking about each one.
REPLACE DUPLICATES? (YjN)
SKIP DUPLICATES? (YjNTThese questions determine what is to be done if MERGE attempts
to save a file on the DESTINATION disk and finds a file with
the same name already there. If you choose neither to replace
the duplicates nor to skip them,
then MERGE will ask you
individually about each such occurance. (Not all of these
questions may be asked. If the answer to a previous question
-
43
-
makes one unnecessary, MERGE will omit it.)
7. MERGE will now search the SOURCE disk for files which match
the specified criteria, and copy them to the DESTINATION disk.
Several messages may appear:
T:XXXXXX
COPIED nn BLOCKS
indicates that the file
successfully copied.
T:XXXXXX
of type T whose name
XXXXXX was
SKIPPED
indicates that the file was
satisfy the name criteria.
T:XXXXXX
is
not
copied
because it did not
DUPLICATE SKIPPED
indicates that the file alreay exists on the DESTINATION disk
and has been skipped according to your instructions.
T:XXXXXX
REPLACE? (~~)
indicates that a duplicate has been found on the DESTINATION
disk, and you have not specified that all duplicates should be
either skipped or replaced. If you answer Y to this question,
then the existing file on the DESTINATION disk will be
replaced by the new one.
If you reply N to the REPLACE? question, or if you have asked
to be asked about each file, MERGE will ask you how to process
the file, as follows:
T:XXXXXX
SKIP/COPY/~NAME?
You can choose to skip the file by answering S, in which case
the file will not be copied. You can have the file copied with
the same name by answering C, or you can have the file copied
with a new name by answering R. If you select R, then MERGE
will prompt you for a new name with
NEW NAME?
Enter the new file name, terminated with RETURN. If you do not
give a name (by entering only RETURN), then the file will be
saved with the old name. You may not change the file type; if
you specify one it will be ignored.
8. When all of the files meeting the name criteria have been
processed, MERGE will ask you if you want to run it again:
DONE. MORE DISKS TO MERGE?
If you type Y, MERGE will be reinitialized and will start the
question sequence (step 3) from the beginning. If you type N
-
44 -
(or just RETURN),
mode.
then
you will returned to monitor command
9. If at any point you wish to abort the MERGE utility, press and
hold the STOP key. This will cause MERGE to terminate at the
end of the current file if a transfer is in progress, or
immediately if it is waiting for a typed response.
-
45
-
VIII.D DIRMAINT
DIRMAINT is a utility which allows you to perform various
maintenance tasks which involve changing the directory of a
diskette. Among the functions of DIRMAINT are:
-
Renaming selected files
Deleting selected files
Renaming the diskette
Listing the file names and types
Sorting the directory into alphabetical order
Clearing the directory (deleting all files)
DIRMAINT operates on a single disk, and makes all of the changes
directly to the disk. It is wise to have a backup of the disk if
there is any chance that the changes you make are not the ones
you intended.
How to run DIRMAINT
1. Bring up the system and press STOP to enter the monitor
command mode, and press SHIFT and CLR to clear the screen.
2. Place a diskette containing a copy of the system code in drive
1. Enter the following on the console:
R 81,DIRMAINT*
(return)
The console will display:
LOADED: DIRMAINT n.m
(n.m is the version number)
*** DIRECTORY MAINTENANCE UTILITY ***
WHEN DISK IS READY, TYPE DRIVE NUMBER
3. You may now insert the disk you wish to change in either
drive, and type a 1 or 2 to indicate which. Remember that the
left-hand drive is 1, and the right-hand drive is 2. Type
RETURN after your choice.
(All input to DIRMAINT must be
terminated with RETURN.)
4. The system will now read the volume id on
status information; for example:
the disk and
print
DISK 2
I-SIDED, ID: CLASS SA
You should verify that the
disk is
the correct one.
If not,
press the STOP key, and the DIRMAINT utility will be aborted.
At that point you are in monitor command mode and you can
return to step 2 and try again.
In general, pressing the STOP key will cause the utility to
abort. If you press it while it is awaiting input it will
abort immediately; otherwise it will abort at the end of the
-
46 -
current operation.
5. DIRMAINT will now display a menu
function:
CLEAR DIRECTORY
RENAME FILE (S)
VOLUME RENAME
and allow
SORT DIRECTORY
DELETE FILE (S)
LIST DIRECTORY
you to select
a
EXIT
?
The underscored characters are displayed in reverse video, and
represent the single character (followed by RETURN) that you
If you enter an
must type to select a particular function.
R, D, V, L, or
incorrect response (a letter other than C, S,
X) the menu will be repeated.
Some of the commands are executed immediately and return to
the menu after completion, while others require additional
information from you. The following sections describe each of
the commands in detail.
5.1 CLEAR DIRECTORY
This command requires no additional information, and causes
the entire directory, except for the volume id, to be cleared.
The effect is to cause ALL FILES TO BE DELETED. Deleted file
can NOT be recovered, so please exercise caution in the use of
this command.
5.2 SORT DIRECTORY
This command requires no additional information, and causes
the directory entries to be sorted in alphabetical order by
type and name. There is usually no compelling reason to do so;
the main consequence is simply that the directory list both on
the Queen and Drones will be in alphabetical order.
The
only operational
difference
non-sorted directory is that partial
?) may retrieve different files after
name search is performed in the order
the directory. For example, if a disk
between a
sorted and
name matches (using * or
the sort,
because the
that the names appear in
contains the files
LESSON B
LESSON A
in that order, the command @RUN "LESSON*" would run LESSON B
before sorting the directory, and LESSON A after sorting.
The is a minor performance benefit to be gained from sorting a
directory from which many files have been deleted. Deleting a
file causes its directory entry to be marked "empty", and
although that entry will be used for a new file saved, it must
be examined as part of the search for existing files. Sorting
the directory causes all such empty directory entries to be
- 47 -
purged.
On disks which contain a copy of the basic file system (called
lfFILSYSlf),that program must be the first in the directory in
order to be located by the bootstrap routine. For that reason
it will appear to be out of alphabetical order even after
sorting the directory.
After the directory has been sorted, DIRMAINT will print the
number of files sorted, and the number of empty entries that
were purged:
87 FILES SERE SORTED
4 EMPTY ENTRIES WERE MIGRATED
It then returns to the menu display.
5.3 RENAME FILE(S)
This command allows you to rename one or more files on the
disk.
It begins by asking you to give a fully or partially
specified name of the files to be renamed:
ENTER FULLY OR PARTIALLY SPECIFIED NAME
You may simply enter a file name, or a partially specified
name such as LESSON*.
If you do specify a file type then any
file matching the name will be a candidate for renaming. You
can restrict the search to files of a particular type by
giving the type character followed by a colon prior to the
name, as in
9:LESSON*
DIRMAINT will search the directory for files that match the
name you have given, and ask you for a new name for each one
it finds. For example.
9:LESSON 2A
ENTER NEW NAME
If you wish to rename the file, enter the new name. If you
wish to leave the old name, just enter RETURN.
You may not
change the type of a file, only its name.
If the name you choose already exists,
DIRMAINT will so
indicate and give you a chance to try again. As before, simply
entering RETURN will cause the old name to be retained.
After all names which match your pattern have been processed,
the menu will reappear.
5.4 ~ELETE FILE(S)
This command allows you to delete one or more files from the
disk, based on a name pattern that you specify. It will first
- 48 -
ask you to
ENTER
FULLY OR PARTIALLY
SPECIFIED
NAME
Enter a name or name pattern in the same form as was described
for the RENAME command.
The name
of each file
on the disk
which matches the pattern will be displayed,
and you will
be
asked
OK TO DELETE?
Respond
with Y to delete
have
After
all
files
displayed.
5.5 VOLUME
and N to leave it alone.
t~e file
been
processed
the menu
will
be
RENAME
This command
allows
you
to change the volume
diskette. If will prompt you for a new name with
id
of
the
ENTER NEW NAME
Respond with
the new name (16
RETURN to retain the old name.
characters
maximum)
or with
5.6 LIST DIRECTORY
This command allows you to get complete or partial listings of
the directory.
It prompts
for a partial
name match;
if you
enter
RETURN then
all files
will be listed,
otherwise only
files which match the specified name (or type) will be listed.
This differs from the directory list command (@DIR) on a Drone
in that (1) all files can be listed,
not just those program
files for
the--particular
drone
type,
and
(2) some
extra
internal information from the directory
entry is displayed.
That information
is not of concern to the user
for normal
maintenance operations.
5.7 EXIT
This command causes DIRMAINT
monitor command mode.
to terminate
- 49 -
and
return
to
the
Appendix A: Summary of Changes and Amendments
September ~
1979
Installation instructions have been
manual.
incorporated as part of this
The section on Queen Diagnostic facilities describes the BUFFER
TOP message, which is used to display the size of operational
memory.
The section on Utility Programs has been greatly expanded, to
describe two additional utilities supplied with the Cluster/One
system, namely MERGE and DIRMAINT. The directory clear function
formerly available as part of FORMAT has been removed, and is now
part of the DIRMAINT program. In the case of errors, the FORMAT
program provides additional verbal descriptions of the source of
the problem.
- 50 -