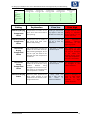
1
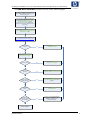
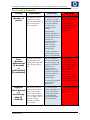
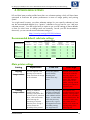
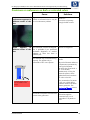
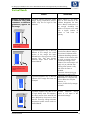
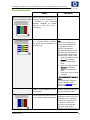
HP Designjet L25500 series Add New Substrate and Image Quality Troubleshooting procedures Version 1.0 HP Designjet L25500 printer series Add New Substrate and Image Quality Troubleshooting © Copyright 2009 Hewlett-Packard Development Company L.P. All rights are reserved. No part of the document may be photocopied, reproduced, or translated to another language without the prior written consent of the Hewlett-Packard Company. Notice The information contained in this document is subject to change without notice and should not be construed as a commitment by the Hewlett-Packard Company. Hewlett-Packard assumes no responsibility for any errors that may appear in this document nor does it make expressed or implied warranty of any kind with regard to this material, including, but not limited to, the implied warranties of merchantability and fitness for a particular purpose. The Hewlett-Packard Company shall not be liable for incidental or consequential damages in connection with, or arising out of the furnishing, performance, or use of this document and the program material that it describes. Trademarks Microsoft and Windows are U.S. registered trademarks of Microsoft Corporation. HP Designjet L25500 printer series Add New Substrate and Image Quality Troubleshooting TABLE OF CONTENTS 1. Summary ....................................................................................... 3 2. Color calibration of a printer and color profiling of a substrate ........ 5 3. Media Loading and RIP media profile .............................................. 6 Recommended Print Modes ........................................................................................ 8 Print mode parameters .............................................................................................. 9 4. Optimize media settings ............................................................... 10 Recommended default substrate settings..................................................................... 10 Main printer settings ............................................................................................... 10 Advanced printer settings ........................................................................................ 12 5. Image Quality Troubleshooting ..................................................... 14 Substrate Jams or Ink Smears ................................................................................... 14 Checking the ink quantity on the substrate .................................................................. 16 Ink smudge issues ................................................................................................... 17 Graininess or coalescence on dark or saturated colors ................................................ 18 Vertical Bands ........................................................................................................ 19 Horizontal bands.................................................................................................... 20 Color Registration ................................................................................................... 21 Sharpness ............................................................................................................. 21 Black areas look hazy or image gloss is not completely uniform .................................... 22 Stains or uneven finishing of image ........................................................................... 22 6. How to print at faster speeds........................................................ 23 7. Summary for most common substrate problems ............................ 24 Hewlett-Packard 2 HP Designjet L25500 printer series Add New Substrate and Image Quality Troubleshooting 1. SUMMARY This section describes the procedure to bring a new Substrate into operation with the printer. Obviously if the RIP media profile for the substrate is already available (see the RIP and the substrate manufacturer web pages) then the procedure can be skipped. Once the Add New Substrate procedure is completed the number of passes of the printmode can usually be changed without need for any extra action. See “HOW TO PRINT AT FASTER SPEEDS” section. Hewlett-Packard 3 HP Designjet L25500 printer series Add New Substrate and Image Quality Troubleshooting The Add New Substrate procedure consists on the following steps: Load media, it’s advisable to align printheads. See section Align printheads in “Maintenance and troubleshooting guide” Create and name a new substrate profile in RIP: 1. Choose the substrate family to start from “substrate families” table in: MEDIA LOADING AND RIP MEDIA PROFILE chapter 2. Create a copy or use the substrate family 3. Select a name for the new substrate in case you create a copy Select the initial print mode from Recommended Print Modes table in MEDIA LOADING AND RIP MEDIA PROFILE chapter Print the diagnostic plot available in: http://ip-addr/hp/device/webAccess/images/new.tif Substrate jams or ink smears? Yes Proceed to section: IMAGE QUALITY TROUBLESHOOTING Yes Proceed to section Checking the ink quantity on the substrate Yes Proceed to section: IMAGE QUALITY TROUBLESHOOTING, Ink smudge issues Yes Proceed to section: IMAGE QUALITY TROUBLESHOOTING, look for others problems Yes Proceed to section: HOW TO PRINT AT FASTER SPEEDS Yes Proceed to section Printer calibration, subsections color calibration and color profiles” in “Maintenance and troubleshooting guide” No Check ink quantity in the printed plot using the section Checking the ink quantity on the substrate. Excess of ink in plot? No Is the plot wet or does it smudge? No Are there other image quality problems? No Do you want to print faster? No Do you want to color profile and/or calibrate your substrate? No Process completed ! Hewlett-Packard 4 HP Designjet L25500 printer series Add New Substrate and Image Quality Troubleshooting 2. COLOR CALIBRATION OF A PRINTER AND COLOR PROFILING OF A SUBSTRATE Printer can be already used with the color profile you have used to follow the “Add New Substrate” procedure. However, depending on your requirements on color accuracy you may want to do the following operations: - Color-calibrate printer This operation measures the current color performance of your printer and brings it to “known”, stable point. This is useful if you need color consistency along the time—even if you change ink cartridges or printheads. The procedure is to be repeated whenever the ambient conditions change significantly or when changing any printhead. See your RIP manual for details on how to launch the calibration. - Color-profile your substrate If the color profile you are using corresponds to a substrate different than the one in your printer, then the colors may not be completely accurate. If this is a problem you can proceed to color profile your substrate using the RIP regular process. Consult your RIP documentation for more details. Hewlett-Packard 5 HP Designjet L25500 printer series Add New Substrate and Image Quality Troubleshooting 3. MEDIA LOADING AND RIP MEDIA PROFILE 1. Check if your substrate is available from your RIP web site or from your substrate vendor. If not available, you have three options: a. Check your substrate profile availability in: http://www.hp.com/go/L25500/solutions b. Create a RIP media profile departing from a “parent” RIP media profile, whose family (or printer media profile) is the same or close to that of your substrate. E.g. if you want to use a vinyl from a vendor A you could start from a “generic vinyl” RIP media profile. c. Reuse any other RIP media profile from a substrate whose family (or printer media profile) is the same or close to the family of yours. E.g. if you want to use a vinyl from a vendor A you could start from a “vinyl from vendor B” RIP media profile. The following table may help when selecting the right family or printer media profile: Substrate Family (or Printer Media Profile) Description PVC films with adhesive on one side. There can be white finished or transparent. The liner can be paper or plastic based. There are 2 main manufacturing processes: calendering and casting. Self Adhesive Vinyl Also, there are varieties such as perforated vinyl to be placed on windows. For those substrates Manual Printheads Alignment may need to be used instead of the Automatic one. Example: HP Air Release Adhesive Gloss Cast Vinyl, Avery MPI3000 (calendered), Avery MPI1005 (cast), 3M IJ-380 (cast)... Banner Usually a polyester mesh (or fabric) covered with PVC coating. There are also recyclable types to cover the same applications (green banners). Banners can be frontlit or backlit. Example: HP Durable Frontlit Scrim Banner, Ultraflex Normandy Pro, Verseidag banners... HP Photorealistic Paper based (cellulose) media with coating (gloss and matte finishing). It has a weight higher than the other billboard and offset medias (200gsm or higher). The main difference is its rigidity compared to the other billboard medias. Example: HP Photo-realistic Poster Paper Paper Solvent Hewlett-Packard Paper based (cellulose) medias with coating to allow their use in solvent printers. Also they usually have a limited water resistant performance. Example: HP Blue Back Billboard Paper, Intellicoat GPIOF140, blue back medias... 6 HP Designjet L25500 printer series Add New Substrate and Image Quality Troubleshooting Substrate Family (or Printer Media Profile) Description Paper Aqueous Paper based (cellulose) media with or without coating. The main difference with the billboards is that offset papers are not compatible with solvent printers. Weight usually around the 100gsm Mesh Usually a polyester mesh covered with PVC coating with holes. Some of these media types can have a liner and be self adhesive. Example: HP Mesh Banner with liner, Ultraflex Stripmesh... Fabric medias are usually composed of polyester fibers. Fabric Some of the fabric media types come with a liner to avoid the ink trespassing the media. Fabric materials which are very stiff (such as polyester canvases) are preferably loaded as “banner”. Example: HP Wrinkle-free Flag with liner... Film Usually a polyester film (although there are other materials like PVC, PC...) for backlit applications. They are typically translucent although there are transparent versions. Example: Intelicoat SBL-7 Polyester Backlit Film, ... 2. Load the media. If media is smaller than machine width it’s better to locate the media to the leftmost position in the spindle so it is centered in the print zone. 3. Disconnect OMAS in the RIP if substrate is transparent or dark, or if the printer recommends you to do so during the substrate load operation. 4. Launch Printheads Alignment. 5. In your RIP software, open the HP diagnostic chart, which you can obtain from the Embedded Web Server at: Hewlett-Packard 7 HP Designjet L25500 printer series Add New Substrate and Image Quality Troubleshooting http://ip-addr/hp/device/webAccess/images/new.tif where ip-addr is the IP address of your printer. Alternatively, you can find the chart on the Web under: http://www.hp.com/go/l25500/manuals/ 6. Select the number of passes recommended in the “print mode recommendation matrix” for the family (or Printer Media Profile). These are generic proposals that works with most of the substrates available. Recommended Print Modes NOTE: More specific settings for several substrates from different vendors is available in: http://www.hp.com/go/L25500/solutions 7. Print the file. Hewlett-Packard 8 HP Designjet L25500 printer series Add New Substrate and Image Quality Troubleshooting Print mode parameters Setting Explanation If too low If too high Number of passes The number of passes specifies how many times the printheads will print over the same area of substrate. The amount of ink fired per time unit is larger and ink has less time to dry on the substrate. This may create coalescence and banding. Colors are vivid, print quality is high, needs lower curing temperature and printhead health is well maintained. However, printing speed is relatively low. Because larger substrate advances are required and ink has to be placed faster on the substrate, the boundaries between passes are more visible. However, printing speed is relatively high. If number of passes < 12 the “High Ink Limit” setting is not available. Print direction: bidirectional (if checked) or unidirectional (if unchecked) Specifies if printheads can print both when moving left to right and when moving right to left. When set to bidi the amount of ink fired per time unit is larger, and therefore print quality defects such as coalescence and banding may occur, especially at the sides of the plot. However, printing speed is relatively high. This is the most suitable setting for tiling applications High Ink Limit: Normal (if unchecked), High (if checked) Hewlett-Packard Maximum quantity of ink that will be laid on paper (high ink limit option only available when number of passes is 12 or larger). The ink quantity is further reduced by the RIP color profile. TIP: Use normal ink limit for substrates such as PVC Scrim Banner Frontlit, Green Banner, Vinyl-Calendared, Vinyl-Cast, Blue back and Scrim banner. When set to unidirectional, defects such as coalescence or bands (both horizontal and vertical) tend to reduce. However, printing speed is relatively low. In general, it advisable to increase the number of passes rather than selecting unidirectional. TIP: Use High ink limit options for backlit substrates. 9 HP Designjet L25500 printer series Add New Substrate and Image Quality Troubleshooting 4. OPTIMIZE MEDIA SETTINGS HP and third party media profiles have their own substrate settings which will have been optimized to maximize the printer performance in terms of image quality and printing speed. You might need, however, use other substrate settings for your specific substrate so here are the recommended defaults for a “generic” substrate to use as start for your “add new substrate process”. Your RIP might have an option to set your RIP settings to these defaults so that you don’t have to change each one manually, consult your RIP documentation. Moreover, you can consult several substrates settings in: http://www.hp.com/go/L25500/solutions Recommended default substrate settings Main Printer settings Substrate family Banner Self-Adhesive Fabric Paper-Solvent HP Photorealistic Mesh Film Paper-Aqueous Drying Temperature Curing Temp Heating AirFlow 50 55 55 50 50 50 55 45 110 110 100 90 90 95 95 70 45 45 45 30 30 30 60 30 Automatic tracking (OMAS) Yes Yes Yes Yes Yes Yes Yes Yes Cutter enable Disabled Enabled Disabled Enabled Enabled Enabled Enabled Enabled Substrate advance compensation 0 0 0 0 0 0 0 0 Input Tension Vacuum level 15 15 15 15 15 15 15 15 5 25 20 15 40 15 20 20 Main printer settings Setting Explanation Drying temperature The heat applied in the printing zone removes water and fixes the image to the substrate. Print quality defects such as bands, bleeding and coalescence may occur. Thermal marks may be seen on the substrate; they may appear as vertical bands in some colors. The substrate may wrinkle on the platen, causing vertical banding, ink smears or substrate jams. Curing temperature Curing is needed to coalesce the latex, creating a polymeric film which acts as a protective layer, while at the same time removing the remaining co-solvents from the print. Curing is vital to ensure the durability of the printed The print may emerge not fully polymerized, so that the ink smears when rubbed with the finger. In some other cases the print may appear wet, or get a wet appearance some time after printing. You might need a The substrate may wrinkle under the curing module, causing media defects such as bubbles or liner detachment. The substrate wrinkles may also create vertical bands or ink smears at the beginning of the following plot. Hewlett-Packard If too low If too high 10 HP Designjet L25500 printer series Add New Substrate and Image Quality Troubleshooting images. higher number of passes to get the print fully dried, Heating Airflow Airflow helps removing the evaporated water from the print zone and thus allows more efficient drying conditions. Print quality defects such as banding, bleeding and coalescence may occur. Automatic tracking (OMAS) OMAS is an automatic sensing device located under the print platen that tracks the substrate movement to provide optimum advance accuracy. Disable OMAS when: The internal substrate cutter of the printer cuts transversally after every plot. disable the cutter in case: Cutter enabled Printer may not reach expected temperature in the print zone thus creating print quality defects such as banding, bleeding and coalescence. Poor text and line quality may appear. - the substrate is porous and will allow ink to trespass to the platen. Clean OMAS after using this media. - you are instructed by the front panel after substrate load or after a job, as OMAS is either dirty or it can not track this particular media. - the Take-Up Reel is used - the substrate will be cut with an external device - the leading edge of the substrate is too curly and produces media crashes Substrate Advance Compensation Your printer was calibrated at the factory to ensure that it advances the media accurately when using supported media types in normal environmental conditions. However, you may find it useful to recalibrate in certain Hewlett-Packard Dark lines appear when number of passes is 6 or below. Graininess appears when number of passes is 8 and above. White lines appear when number of passes is 6 or below. Graininess appears when number of passes is 8 and above. 11 HP Designjet L25500 printer series Add New Substrate and Image Quality Troubleshooting circumstances: Unsupported media: different media manufacturers provide media with a wide range of properties such as thickness or stiffness, which may benefit from calibration. Abnormal but stable environmental conditions: if you are printing in unusual conditions of temperature or humidity and those conditions are expected to remain stable, recalibration may be worthwhile. Input Tension Vacuum Level Tension is applied to the media through its input roll. It needs to be constant on the full width the substrate, thus substrate load is a critical operation. The substrate skews and may become increasingly wrinkled in the printing zone. The vacuum applied to the substrate at the printing zone helps to hold the substrate down on the print platen, keeping the distance to the printheads constant. The substrate can lift up off the platen and touch the printheads. This can smear the printed image, cause a substrate jam or even damage the printheads. Also, substrate advance may be irregular, resulting in horizontal bands The substrate may be permanently deformed or damaged. Media advance problems may appear in extreme cases. For sticky substrates, friction could be too high and substrate advance irregular, resulting in horizontal bands or irregular grainy patches. Advanced printer settings There are also some advanced parameters for further optimization. The next ones shouldn’t be changed unless you have reached to this point following “troubleshoot substrate issues”. Remember that you can return any time to the defaults using a “reset to defaults” feature in the RIP in case you chose wrong settings: Hewlett-Packard 12 HP Designjet L25500 printer series Add New Substrate and Image Quality Troubleshooting Advanced options Substrate family Banner Self-Adhesive Fabric Paper-Solvent HP Photorealistic Mesh Film Paper-Aqueous Warmup drying temperature offset 5 5 5 5 5 5 5 5 Warmup curing temperature offset 0 0 0 0 0 0 0 0 Cool-down drying temperature offset 0 0 0 0 0 0 0 0 Cool-down curing temperature offset 0 0 0 0 0 0 0 0 Minimum drying power 1.2 1.2 1 1 0 1 1 0 Setting Explanation If too low If too high Warm-Up Drying Temperature Offset Temperature the media at the print zone must reach before start printing. Bleeding or coalescence may appear in the first 200-300 mm of the plot A longer time to start printing is required. Vertical bands or ink smears may occur. Warm-Up Curing Temperature Offset Temperature that the media at the curing zone must reach before start printing Beginning of plot not fully dry or with oily appearance Media degradation (bubbles, adhesive detachment) at the beginning of plot Cool-Down Drying Temperature Offset Safe temperature at which the media can be under the dryer without being damaged. At the end of a job, the media is not stopped until this temperature is reached. A long time is needed to finish the print The media at the beginning of the next plot may be damaged as the media has stopped moving under a too high temperature. This case is uncommon. Cool-Down Curing Temperature Offset Safe temperature at which the media can be under the curing module without being damaged. At the end of a job, the media is not stopped until this temperature is reached. A long time is needed to finish the print The end of the plot may be damaged if the cutter is disabled. Minimum Drying Power Minimum power applied in the dryer while printing so the media does not cool too much in light inked areas A heavy inked area after a light one will have bleed or coalescence defects. Media is damaged in blank or light inked areas of the plot, especially in high number of passes. Hewlett-Packard 13 HP Designjet L25500 printer series Add New Substrate and Image Quality Troubleshooting 5. IMAGE QUALITY TROUBLESHOOTING Before continuing, please check the following items: - Ensure that all previous steps in the “Add New Substrate” procedure have been followed. Check that the media physically loaded is the same that has been specified in the Front Panel and in the RIP. Substrate Jams or Ink Smears Media Jam you have a substrate jam or an ink smear along the whole image Cause Solutions Media may have been loaded with too much skew. Make sure that you have not skipped the “Media was loaded with too much skew” warning on the media load process. Substrate shape affected by Temperature. Simultaneously do the following actions until the problem disappears: may be Drying o Set the Drying Temperature to 50°C and o Increase the vacuum level in steps of 5 mmH2O. Do not go over the following limits: Substrate family (or Printer Media Profile) Maximum vacuum level (mmH2O) Banner 20 Vinyl 35 Other families 50 o Increase Back tension in 5 steps up to 30 maximum Hewlett-Packard 14 HP Designjet L25500 printer series Add New Substrate and Image Quality Troubleshooting The initial portion of the image has been affected by the Curing process of the previous plot. Try the following solutions in order: Disable cutter. This allows better substrate control at begin of plot. If problem persists set the Extra BottomMargin: Front Panel menu >Substrate menu>Substrate Handling Options to 100mm. If this solution does not work, try again with the Extra Bottom Margin set to 200mm. This extra margin will apply only to jobs that start printing when printer is idle and when the cutter is disabled. Problem appears only in the first 200mm of the image. The initial portion of the image has been affected by a Warm-up Drying temperature too high. Decrease the Warm-Up Drying temperature in 5ºC steps until 0. o If media has excessive curling, bubbles , burnt appearance not allowing you to laminate it or hung it perfectly flat If problem is not solved with previous solution or there are durability problems. Hewlett-Packard Decrease the Curing temperature in 5 C steps until curling disappears Increase the number of passes. 15 HP Designjet L25500 printer series Add New Substrate and Image Quality Troubleshooting Checking the ink quantity on the substrate Check if the ink quantities in your profile are adequate. Too much ink quantity The patch shows one or more of the following problems: The last two or three scales of the plot look the same: Vertical bands: Solution: - Lower the ink quantity using Lower the ink quantities using your RIP, consult your RIP documentation for doing so. - User a substrate profile which uses less ink. For example: Self adhesive profiles use more ink than Paper-aqueous ones Horizontal bands: Coalescence grain: Too little ink quantity The whole plot looks washed out. Solutions: - Lower ink quantity, consult your RIP documentation for doing so - Try another profile which uses more ink. For example Self adhesive profiles use more ink than Paper-aqueous NOTE: Backlit substrates usually require to be used with the “High Ink Limit” option enabled in the RIP. Hewlett-Packard 16 HP Designjet L25500 printer series Add New Substrate and Image Quality Troubleshooting Correct ink quantity The patch has no defects and Increasing amounts of ink result on increasing color density. The last scales of the plot show a smooth increase: Ink smudge issues Ink Smudge when touched or image has an “oily” finishing Cause The Curing procedure was done at a temperature that was too low. If the “oily finishing” appears some minutes or hours after having printed the plot: Problems appear along the whole image. If the “oily finishing” appears some minutes or hours after having printed the plot: The Curing procedure was done at a temperature that was too low. Problems appear only in the first 200mm of the image. Hewlett-Packard Solutions - Increase the curing temperature in 5oC steps, as many times as needed. - If problem is not solved with previous solution (because media gets damaged or because you reach the limit in the RIP control), then increase the number of passes. - Increase the curing temperature in 5oC steps, as many times as needed. - Do not store plots with printed faces touching each other. - Use the Take-Up Reel. - Increase the Warm-Up Curing temperature in 5oC steps, as many times as needed. - If problem is not solved with previous solution (because media gets damaged or because you reach the limit in the RIP control), then increase the number of passes. 17 HP Designjet L25500 printer series Add New Substrate and Image Quality Troubleshooting Graininess or coalescence on dark or saturated colors Cause Grain or ink coalescence appears in different areas of the plot If graininess problem is more visible in dark or saturated colors it may be an ink coalescence problem Grain appears in different areas of the plot The Printheads could be misaligned. This is probable if you performed Printheads Alignment on another substrate or there has been a substrate jam. The substrate may not be advancing properly. This applies only to printmodes of 8 or more passes. - Use a higher number of passes or - Lower the ink quantity through the RIP controls. Perform PH alignment. - for printmodes of 8 or more passes: Adjust the Substrate Advance Compensation parameter by printing the Substrate Advance plot (Front Panel → Ink → Ink Quality Maintenance). In this plot locate the position of the lightest band and introduce the value in the RIP. - For printmodes of 6 passes or less it is unlikely that a Substrate Advance problem creates graininess. See h or izon t a l b a n d s section for more details Problem appears only in the first 200mm of the image. Printmodes of 8 passes and less tend to have more graininess. Hewlett-Packard Solutions If previous solutions have not reduced enough the graininess level, use a printmode of 10 passes or more. 18 HP Designjet L25500 printer series Add New Substrate and Image Quality Troubleshooting Vertical Bands Vertical straight bands of different color (and sometimes or different graininess) appear on the image Cause Solutions If problem appears along the whole image, drying temperature and/or airflow may be too high for that substrate. Reduce airflow in 15% steps, down to 30% minimum. If the problem disappears but then there is bleed, coalescence, or not enough durability this media will require to be used with a higher number of passes or with lower ink quantity Problem appears along the whole image. If problem appears only in the first 200mm of the image, the initial portion of the image has been affected by the Curing process of the previous plot. That may change substrate shape which results on Vertical Bands. Problem appears only in the first 200mm of the image. If problem appears only in the first 100mm of the image and lines are S-shaped If problem appears only after a low to high density area fill transition, the initial portion of the area fill has been affected by the previous white area fill. That may change substrate temperature profile which results on Vertical Bands. Hewlett-Packard - Disable cutter - Set the Extra Bottom Margin (Front Panel->Substrate menu>Substrate Handling Options) to 100mm. If this solution does not work, try again with the Extra Bottom Margin set to 200mm. This extra margin will apply only to jobs that start printing when printer is idle, and when the cutter is disabled. - Decrease Warm-Up Drying temperature in steps of 5oC - Decrease Cool down Curing temperature in 5 degrees step since it affects the next plot behavior, or - Set in you RIP the Top margin to 50mm. Increase Minimum drying power in 0.2 steps in RIP “advanced settings” 19 HP Designjet L25500 printer series Add New Substrate and Image Quality Troubleshooting Horizontal bands Cause There are horizontal bands or lines across the plot width If bands affect most of the colors, the printheads could be misaligned. This is probable if you performed Printheads Alignment on another substrate or there has been a substrate jam. Another cause for this problem could be a Substrate Advance problem. This applies only to printmodes of 6 passes and less. Could be a fiber attached to any of the printheads. If bands affect only some colors, the cause could be a defective printhead. Hewlett-Packard Solutions Perform Printheads Alignment - For printmodes of 6 passes or less: When unit is printing, try to reduce Horizontal Bands by changing the Substrate Advance Compensation parameter through the “on-thefly” button the Front Panel (it is the same button used to Move Substrate when printer is idle). If plot shows dark lines then increase the Substrate Advance Compensation factor. If plot shows light lines then decrease the Substrate Advance Compensation factor. When done, store the value in the RIP - For printmodes of 8 passes or more: it is unlikely that a Substrate Advance problem creates bands. See graininess section for more details Remove printheads and remove any fiber attached to them. - Step1: Print the Nozzle Health Check plot. Check if any of the printheads have a significant number of missing nozzles. If so, perform a “Clean PHs procedure” on the affected printhead. After doing so reprint your used plot to see if 20 HP Designjet L25500 printer series Add New Substrate and Image Quality Troubleshooting If bands affect mostly dark or saturated colors, or affects only area fills near the edges of the substrate, the cause could be insufficient drying of the ink If bands affect mostly black colors, the cause could be a sub-optimal generation of the color profile for K. the banding problem persists. - Step 2: If the problem persists, repeat step 1. - Step 3: If the problem persists, try performing the Manual Printheads Alignment procedure. When done, print your user plot. - Step 4: If the problem still persists, then print the Nozzle Health Check plot. Identify the printhead with more missing nozzles and replace it Use a higher number of passes Generate the color profile using “pure K” or K with little under printing of other colors. See your RIP User Manual for more details. Color Registration Color planes are shifted in any direction Cause A The printheads could be misaligned. This is probable if you performed Printheads Alignment on another substrate or there has been a substrate jam. Solutions Perform troubleshooting process of Printheads Alignment and print Printheads Alignment diagnostic plot A A Sharpness Text, lines or solid areas are rough or blurred Hewlett-Packard 21 HP Designjet L25500 printer series Add New Substrate and Image Quality Troubleshooting Cause A A The Printheads could be misaligned. This a probable if you have not done a printheads alignment for a long time or there has been a substrate jam. Solutions Perform troubleshooting process of PH alignment and print PH alignment diagnostic plot Black areas look hazy or image gloss is not completely uniform Black area fills don’t look totally black or look hazy Cause Better drying may benefit the Optical Density and appearance of black areas. Solutions - Use a higher number of passes - Lamination would level the image glossiness: laminate the printed image. Stains or uneven finishing of image Area fills show subtle stains or an uneven appearance Cause Subtle color differences may appear in some medias if storage after printing is done with objects partially covering the printout. Media coating has a defect. Hewlett-Packard Solutions Affected substrates should be stored right after printing either totally covered or totally uncovered. For covered storage right after printing, it may be advisable to avoid the prolonged contact of two printed faces. Those problems tend to disappear once the media is left uncovered for some time. Use another roll of the same media. 22 HP Designjet L25500 printer series Add New Substrate and Image Quality Troubleshooting 6. HOW TO PRINT AT FASTER SPEEDS The “Add New Substrate” procedure describes a way to setup printing which results on sellable indoor Image Quality for the majority available substrates. However, most substrates support faster printing while providing enough Image Quality for many applications. This section describes tips to speed-up printing: • Decrease the number of passes, If you do so bear in mind that: o 8 pass printing may have more graininess than 10 passes and beyond. o 4 and 6 pass printing is more sensitive to Substrate Advance problems. o 4 and 6 pass printing may provide better results if the ink quantity is reduced in the RIP. o Lower passes print modes (4-6) might need lower ink usage than higher number of passes for ink to properly get dried and durability. A generic guideline to start from is: Ink reduction percentage vs. ink quantity used in 8 passes 6 passes 30% 4 passes 50% High Ink Limit printing is available only for 12 passes or more. Decreasing passes may make it more difficult to find appropriate Curing temperature setting, or may make them more sensitive to ambient temperature and humidity conditions. Take advantage of the “concatenated plots” feature If a plot is sent while the previous one is being printed they are concatenated so that finishing time is saved. Disable the cutter In most substrates this speeds up the Finishing Print stage. Increase the Cool-Down Curing temperatures This stops image finishing procedure when the printer is still warm. Some substrates may experience a slight deformation near the end of the printed image. o o • • • Hewlett-Packard 23 HP Designjet L25500 printer series Add New Substrate and Image Quality Troubleshooting 7. SUMMARY FOR MOST COMMON SUBSTRATE PROBLEMS Here is the table of likely problems and the RIP parameters that should be changed in order they should be tried to solve the issue. There is also which could be the potential side effect which doesn’t necessary show up. Issue Durability problems, Ink smudges or with an oily finishing Substrate jam, ink smears, damaged media Horizontal and/or thin vertical bands (2mm) in highly saturated area fills Graininess or coalescence on dark or saturated colors Parameter Increase/ Decrease Potential side effect Curing temperature Increase Substrate jam, ink smears, damaged media Number of passes Increase Printing speed loss Curing temperature Decrease Durability loss (smudge) or "oily" plot finishing Vacuum change and Disable cutter Increase Substrate skew Top and/or bottom margins Increase Substrate waste Drying temperature Decrease Image quality: more coalescence and/or banding Durability loss (smudge) or "oily" plot finishing Drying temperature Increase Substrate jam, ink smears, damaged media Ink limits Decrease (depends on RIP) Color gamut loss Number of passes Increase Printing speed loss Airflow Increase 15% Run print printhead alignment Graininess, Color misregistration or lack of sharpness Black areas look hazy or image gloss is not completely uniform Perform troubleshooting process of substrate advance calibration. Modify color separations and black color generation resources Airflow Hewlett-Packard Increase 15% 24 HP Designjet L25500 printer series Add New Substrate and Image Quality Troubleshooting Hewlett-Packard Drying temperature Increase Substrate jam, ink smears, damaged media Number of passes Increase Printing speed loss Curing temperature Decrease Durability loss (smudge) or "oily" plot finishing 25