1
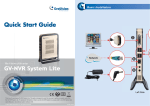
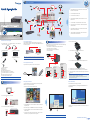
1
Basic Installation
Quick Start Guide
8
1. Using the supplied power cord, connect one end to the AC input and
the other end to the power outlet.
7
2. Connect the keyboard to the PS/2 input.
3. Connect the mouse to the PS/2 input.
1
4. Using the VGA cable supplied by the monitor manufacturer, connect
the VGA monitor.
6
5. For video lost beep, connect speakers to the Audio Line Out port.
2
The Vision of Security
3
GV-HOT SWAP DVR SYSTEM V3
4
5
6. Using the RJ-45 cable, connect one end to the Ethernet port and the
other end to Network.
7. Using the BNC video cables, connect one end to the BNC connectors
and the other end to video sources.
8. Using the supplied D-type audio cables, connect one end to audio
ports and the other end to audio sources.
RoHS
Thank you for purchasing GV-Hot Swap DVR System V3. This guide is designed to assist the new user in getting immediate
results from the GV-Hot Swap DVR System V3. For advanced information on how to use the GV-Hot Swap DVR System V3,
please refer to GV-Hot Swap DVR System V3 User's Manual and Surveillance System User's Manual on CD.
© 2008 May GeoVision Inc. All rights reserved.
DVRHV3-QG-5
Check the Accessories Supplied
2
Connecting GV-Keyboard
D-Type Audio Cable x 2 (1 x 1-8 Channels Red Cable, 1 x 9-16 Channels Red
Cable) *Not available for GV-NVRH V3
Using the USB cable supplied with the GV-Keyboard, plug one end into the
GV-Keyboard and the other end into the assigned USB port (COM6) on the back of
the GV-Hot Swap DVR V3.
5. Remove the lid of the drawer.
Install the Hard Drive
The GV-Hot Swap DVR V3 uses SATA hard drives for video and audio data storage.
To install a hard drive into the drive bay:
1. Turn off the power of the drive bay. Make sure the Power LED is off.
USB Cable
COM6
COM8
2. Turn the safety lock to the OPEN position.
3. Press the safety lock. The drawer handle pops up.
GV-Keyboard Package x 1
6. Insert the hard drive in the drawer, and slide the lid back on.
IR Remote Control Package x 1
4. Pull out the drive drawer.
COM7
GV-Keyboard
AC Power Cord x 1
RJ-11 to DB9 Cable x 1
*Not available for GV-NVRH V3
COM9
GV-Hot Swap DVR V3
Rear View
Note: If you like to plug the Keyboard into other USB ports of the GV-Hot Swap DVR V3, refer
LOCK
2
Safety Lock
3
OPEN
4
Drive Drawer
to 3.9.1 GV-Keyboard in GV-Hot Swap DVR System V3 User's Manual.
Drawer Handle
7. Turn over the drawer, and secure the hard drive with the supplied 4 screws.
Lock Key x 2
Connecting IR Remote Control
1
Front panel of SATA
backplane installed in
the 10-bay model
Plug the Receiver into any USB ports on the GV-Hot Swap DVR V3.
RESET
Front panel of SATA
backplane installed in
the 8-bay model
Front panel of SATA
backplane installed in
the 4-bay and 6-bay
models
Self-Stick Rubber Pad x 4
Recovery DVD x 1
HD1
8. Put the drawer back in the drive bay of the GV-Hot Swap DVR V3.
RESET
HD2
Nero Express CD x 1
Surveillance System Software CD x 1
Power Button
HD1
HD3
GV-Hot Swap DVR System V3 User's Manual x 1
HDD
Activity LED
Receiver
Surveillance System Installation Guide x 1
Power Button
and LED
Connect to USB
Port
HD3
GV-Hot Swap DVR V3
IR Remote Control
Power Button
and LED
HD4
Power LED
Fan LED
Important: Please keep the original carton and all packing materials for future shipping need.
3
2
Turn on the Power
10. Press the Power button. When the Power LED indicates green, the hard drive is
ready for use.
HD2
GV-Hot Swap DVR System V3 Quick Start Guide x 1
Surveillance System New Feature Guide x 1
9. Push the drawer handle back, and turn the safety lock to the LOCK position.
Note:
. Ensure to format hard drives before they can be usable. See 3.4 Formatting the
Hard Drive in GV-Hot Swap DVR System V3 User's Manual.
. To assign hot-swap drives as storage locations, see Adding the Hard Drive to
Recording Path later in this guide.
Configuring an IP Address
Back to GV-Desktop
The GV-Hot Swap DVR V3 uses Windows operating system to configure an IP
address. For this, you must exit to Windows:
Back to GV-Desktop after configuring the IP address:
1. Turn on the monitor.
Click the Windows Start button, point to Programs, click GVCombo, and click
Key Lock Utility.
1. Exit the main screen to display the GV-Desktop screen.
On
2. Turn on the AC power switch on the rear panel.
On
2. Click the Settings button, and enter the valid ID and Password to display the
Settings dialog box.
For details, refer to 3.8 Configuring an IP Address in GV-Hot Swap DVR System V3
User's Manual.
3. Turn on the main power switch on the front panel.
3. Under Desktop Type, select Windows from the drop-down list, and click OK.
Power On
4. Click the Log Off button, and enter the valid ID and Password to display the
Windows desktop.
2 4
3
5. Configure a static IP address on Windows XP platform. Check your network
administrator if you have questions about the configuration.
Note: The default ID and Password are "0000".
Continued on the reverse
4
3
Adding Hot Swap Drive to Recording Path
Main Screen
Renaming the Camera
Before recording, you need to add the formatted hard drive to the recording path.
Note: The default recording path for the hot-swap drives starts from F:\.
Click to call up I/O Control Panel
Click to call up PTZ Control Panel
Status indicators for remote applications
Date / Time / Storage Space
Camera Name
Start/stop recording
You can give a new name for each camera.
1. Click
on the main screen, point to General Setting, and select System
Configure.
1. On the GV-Desktop, click the Programs button, and select Hot Swap HDD Tool.
2. Click the Camera Record Setting tab.
2. If a hard drive is already inserted, right-click it in the MediaMan Tools window,
select Add for recording, and then select the storage group from the
drop-down list.
3. In the Camera Name field, enter a new name for the camera.
4. Click OK.
3. If a hard drive is not inserted, follow these steps:
(1) Insert a hot-swap hard drive or plug a portable hard drive to the GV-Hot Swap
DVR V3. This dialog box appears.
Choosing Recording Mode
Set up recording schedules
You can set each camera's recording mode individually for Motion Detection or
Round-the-Clock.
1. Click
on the main screen, point to General Setting, and select System
Configure.
2. Click the Camera Record Setting tab.
Access system settings
3. From the Camera Name drop-down list, select one camera.
4. In the Monitor Control section, select Rec Video, and use the drop-down list
to select Motion Detect or Round-the-Clock.
Access ViewLog
to play back video
5. Click OK.
For details on setting camera properties, refer to Adjusting Individual Camera,
Chapter 1, User's Manual on Surveillance System Software CD.
Start/stop screen rotation
(2) Select Add to recording path, and select the storage group from the
drop-down list.
Camera Record
Setting tab
4. Click OK to automatically configure the hard drive to the recording path.
Access remote applications
Logout / Exit / Minimize
5. In the MedianMan Tools window, if the hard drive is successfully added to store
data, its Status field should display “Standby”.
Select a camera for full screen mode
Status field
Select screen divisions
Select and
name a camera
Select recording
mode
6. To add another formatted hard drive for storage, repeat the above steps.
5
4
Changing Recording Resolution
The default recording resolution is 320 x 240. You can set each camera's recording
resolution individually.
on the main screen, point to A/V Setting, and select Video Source.
1. Click
2. Select the desired video resolution from the drop-down list, and click OK.
6
5
Set Up a Recording Schedule
You can program recording to turn on and off at a specific time each day.
1. Click
4. Click the Camera Record Setting tab, and use the Camera Name drop-down list
to select one camera.
Play Back Video
Playback Scroll
You can play back video recorded during a particular date and time.
on the main screen, and select Schedule Edit.
1. Click
2. Select or enter the Start and End time of the schedule.
Audio on/off
on the main screen, and select Video/Audio Log.
2. Select the camera you wish to view.
3. Select day(s).
3. Click
on the main screen, point to General Setting, and select
System Configure.
Playback Controls
3. Select a date folder from the date tree.
4. Select Rec, and use the drop-down list to select Round-the-Clock or Motion
Detect for recording mode.
4. Select a time from the Video Events list.
5. Select camera(s).
5. Click
6. Click Add Schedule.
For details, refer to Playing Back on ViewLog, Chapter 4, User's Manual on
Surveillance System Software CD.
7. Click OK.
to begin playback.
Rewind to
Beginning
Rewind
Frame-by-Frame
Reverse
For details, refer to Recording Schedule, Chapter 1, User's Manual on Surveillance
System Software CD.
4
Play
Stop
A to B
Playback
Frame-by-Frame
Forward
Speed up/
down
2
5. Click the arrow button next to Recording Quality to select the desired resolution.
Forward to Zoom in/
End
out
Frame-by-Frame/
Real Time
Playback
6. Repeat steps 4 and 5 to set up each camera.
7. Click OK.
2
4
3
3
5
4
. Zoom out:
5
7
7
6
Playing Backup Files
Open the backup folder, run EZViewLog500.exe, and then follow the
instructions in the Play Back Video section.
You can back up video files of the desired time to CD / DVD.
Insert the CD / DVD media into the drive.
2.
Click
on the main screen, and select Video/Audio Log.
3.
Click
on the functional panel.
4.
Select CD Using OS-Burning to burn files with the inbuilt software of
Windows XP.
5.
Click Add time frame.
6.
Enter the Start Time and End Time for backup.
7.
Select the desired camera(s) for backup. The number of video and audio files of
each camera is indicated respectively, e.g. “Camera 3 39+0” means the camera
3 has 39 video files and 0 audio file.
8.
Select the types of events for backup, e.g. video, audio or both together.
9.
Click OK to add the time frame. You can repeat steps 5-8 to create up to 10 time
frames.
10. Click OK to start burning.
Click the Zoom-out button, and then click on the image to zoom out.
Each click will decrease the zoom level.
5
Back Up Video Files
1.
. Zoom in: Click the Zoom-in button, and then click on the area you want to
magnify. Each click will increase the zoom level.
6
7
Using the Zoom
6
4
5
10
7
8
9
For details, refer to Backing Up Video Files, Chapter 5, User's Manual on
Surveillance System Software CD.
9F, No. 246, Sec. 1, Neihu Rd.,
Neihu District, Taipei, Taiwan
Tel: +886-2-8797-8377
Fax: +886-2-8797-8335
[email protected]
http://www.geovision.com.tw