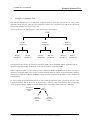
1
COMPED User Manual
Version 12
ANSYS, Inc.
Southpointe
275 Technology Drive
Canonsburg, PA 15317
[email protected]
http://www.ansys.com
(T) 724-746-3304
(F) 724-514-9494
© Copyright 2009. Century Dynamics Limited. All Rights Reserved.
Century Dynamics is a subsidiary of ANSYS, Inc.
Unauthorised use, distribution or duplication is prohibited.
ANSYS, Inc. is certified to ISO 9001:2008
Revision Information
The information in this guide applies to all ANSYS, Inc. products released on or after this date, until
superseded by a newer version of this guide. This guide replaces individual product installation guides from
previous releases.
Copyright and Trademark Information
© 2009 SAS IP, Inc. All rights reserved. Unauthorized use, distribution or duplication is prohibited.
ANSYS, ANSYS Workbench, AUTODYN, CFX, FLUENT and any and all ANSYS, Inc. brand, product,
service and feature names, logos and slogans are registered trademarks or trademarks of ANSYS, Inc. or its
subsidiaries located in the United States or other countries. ICEM CFD is a trademark used by ANSYS, Inc.
under license. All other brand, product, service and feature names or trademarks are the property of their
respective owners.
Disclaimer Notice
THIS ANSYS SOFTWARE PRODUCT AND PROGRAM DOCUMENTATION INCLUDE TRADE
SECRETS AND ARE CONFIDENTIAL AND PROPRIETARY PRODUCTS OF ANSYS, INC., ITS
SUBSIDIARIES, OR LICENSORS. The software products and documentation are furnished by ANSYS,
Inc., its subsidiaries, or affiliates under a software license agreement that contains provisions concerning nondisclosure, copying, length and nature of use, compliance with exporting laws, warranties, disclaimers,
limitations of liability, and remedies, and other provisions. The software products and documentation may be
used, disclosed, transferred, or copied only in accordance with the terms and conditions of that software
license agreement.
ANSYS, Inc. is certified to ISO 9001:2008
U.S. Government Rights
For U.S. Government users, except as specifically granted by the ANSYS, Inc. software license agreement,
the use, duplication, or disclosure by the United States Government is subject to restrictions stated in the
ANSYS, Inc. software license agreement and FAR 12.212 (for non-DOD licenses).
Third-Party Software
The products described in this document contain the following licensed software that requires reproduction of
the following notices.
Formula One is a trademark of Visual Components, Inc.
The product contains Formula One from Visual Components, Inc. Copyright 1994-1995. All rights reserved.
See the legal information in the product help files for the complete Legal Notice for ANSYS proprietary
software and third-party software. If you are unable to access the Legal Notice, please contact ANSYS, Inc.
Published in the U.S.A.
Contains proprietary and confidential information of ANSYS, Inc. and its subsidiaries and affiliates.
COMPED User Manual
Update Sheet for Version 12
April 2009
Modifications:
The following modifications have been incorporated:
Section
Page(s)
Update/Addition
Explanation
All
All
Update
Conversion to Microsoft® Word format
Contains proprietary and confidential information of ANSYS, Inc. and its subsidiaries and affiliates.
COMPED User Manual
Contents
TABLE OF CONTENTS
1.
2.
3.
Introduction ..................................................................................................................... 1-1
Example of a Structure Tree............................................................................................ 2-1
Main Menu Commands ................................................................................................... 3-1
3.1. MONITOR Command (MO) ................................................................................... 3-2
3.2. MERGE Command (ME) ........................................................................................ 3-2
3.3. EXAMINE INDEX FILES (EXI) ........................................................................... 3-3
3.4. EXAMINE BACKING FILES (EXB) .................................................................... 3-3
3.5. VIEW MASTER INDEX (V).................................................................................. 3-3
3.6. REMOVE MASTER COMPONENT wwww (RMC wwww)................................ 3-3
3.7. REMOVE STRUCTURE xxxx (RS xxxx) ............................................................. 3-4
3.8. REMOVE COMPONENT xxxx y (RC xxxx y) ..................................................... 3-5
3.9. REMOVE MASTER INDEX ROW i (RMIR i) ..................................................... 3-5
4. Index File Examination ................................................................................................... 4-1
4.1. EXAMINE MASTER INDEX (EM) ...................................................................... 4-1
4.2. EXAMINE SUB INDEX KEY x (ES x) ................................................................. 4-1
4.3. EXAMINE UNIT INFORMATION TABLE KEY x (EU x) ................................. 4-2
4.4. EXAMINE TREE KEY x LENGTH y (ET x y) ..................................................... 4-3
4.5. CHANGE MASTER INDEX (CM) ........................................................................ 4-3
4.6. CHANGE SUB INDEX KEY x (CS x)................................................................... 4-3
4.7. CHANGE UNIT INFORMATION TABLE KEY x (CU x)................................... 4-4
4.8. CHANGE TREE KEY x LENGTH y (CT x y)....................................................... 4-4
4.9. REMOVE FILE x FROM SUB INDEX KEY y (RF x y)....................................... 4-4
4.10.
END ...................................................................................................................... 4-4
5. Backing File Examination ............................................................................................... 5-1
5.1. MONITOR (M) ....................................................................................................... 5-2
5.2. EXAMINE FILE (EX m n v wwww) ....................................................................... 5-2
(EX m n v xxxx) .................................................................................................................. 5-2
(EX m n v xxxx y) ............................................................................................................... 5-2
5.3. CHANGE FILE (CH m n v wwww) ........................................................................ 5-2
(CH m n v xxxx).................................................................................................................. 5-2
(CH m n v xxxx y)............................................................................................................... 5-2
5.4. DUMP (D) ............................................................................................................... 5-3
5.5. RECREATE (R) ...................................................................................................... 5-3
5.6. END .......................................................................................................................... 5-3
6. MERGE Command ......................................................................................................... 6-1
7. DUMP and RECREATE ................................................................................................. 7-1
7.1. PROJECT File .......................................................................................................... 7-1
7.1.1. DUMP ............................................................................................................... 7-1
7.1.2. RECREATE ...................................................................................................... 7-1
7.2. ’35’ FILE .................................................................................................................. 7-2
7.2.1. DUMP ............................................................................................................... 7-2
7.2.2. RECREATE ...................................................................................................... 7-3
7.3. ’50’ FILE .................................................................................................................. 7-4
Contains proprietary and confidential information of ANSYS, Inc. and its subsidiaries and affiliates.
i
COMPED User Manual
7.3.1.
7.3.2.
Contents
DUMP ............................................................................................................... 7-4
RECREATE ...................................................................................................... 7-4
Contains proprietary and confidential information of ANSYS, Inc. and its subsidiaries and affiliates.
ii
COMPED User Manual
Introduction
COMPED
ASAS Database Editor
1.
Introduction
COMPED is the ASAS “Component Editor” program. It is a versatile and flexible ancillary program which
enables the experienced user to perform various actions on his backing files. The program is entirely interactive
and has “HELP” commands which allow the user to review the options open to him at any point.
COMPED operates on the binary files in the user disk space in the following ways:
1.
The contents of the files may be examined.
2.
In certain cases the contents may be modified.
3.
References to particular runs in a project may be deleted.
4.
Details of individual runs may be copied from one project file to another.
5.
Backing files may be converted from binary to character format and vice versa.
For some of the more advanced uses of COMPED reference to the ASAS Programmers’ Manual, which contains
full details of the binary file structure and to the index files, is strongly recommended.
This manual illustrates the workings of COMPED by reference to a specific example of a multi-level component
analysis.
Throughout the manual, user terminal input is indicated by bold lettering.
It should be noted that COMPED always operates immediately on the Index or Project file and if a command is
given to delete a reference to a run then this is not reversible. For security it is be advisable to take a copy of the
project file before using COMPED.
Contains proprietary and confidential information of ANSYS, Inc. and its subsidiaries and affiliates.
Page 1-1
COMPED User Manual
Contains proprietary and confidential information of ANSYS, Inc. and its subsidiaries and affiliates.
Introduction
Page 1-2
COMPED User Manual
2.
Example Structure Tree
Example of a Structure Tree
The example described here is a multi-level component analysis which has been carried out using several
individual ASAS analyses. There are four component creation runs, one structure run and all the components
have been recovered in one stress recovery run.
The tree generated at the end of stage 17 of the structure run is shown below.
FUSG
BLK1
(SUB3-3)
BLKS
(SUB1-1)
BLKP
(SUB1-2)
BAY1
(SUB4-6)
BAYS
(SUB2-4)
BAYP
(SUB2-5)
BLK2
(SUB3-9)
BLKS
(SUB1-7)
BLKP
(SUB1-8)
The structure, FUSG, is built up from three components, BLK1, BAY1 and BLK2. BLK1 and BLK2 both use
the master component SUB3, whilst BAY1 is the sole use of master component SUB4.
Master component SUB3 is in turn made up of two components (BLKS and BLKP) each of which is a copy of
the master component SUB1 which is solely composed of finite elements. Master component SUB4 is similarly
built from two components (BAYS and BAYP), copies of master component SUB2 which is solely composed of
finite elements.
On the tree diagram the unbracketed names are the assembled component names specified by the user in the
component topology data at each level as the structure is built up, whilst underneath are the corresponding
master component names. Finally the unique number of the component in the structure tree is indicated.
assembled
component
name
BLK1
(SUB3-9)
master
component
name
unique
component
name
Contains proprietary and confidential information of ANSYS, Inc. and its subsidiaries and affiliates.
Page 2-1
COMPED User Manual
Example Structure Tree
The file names used in this sequence of analyses are as follows.
The project file was given the name TEST, and this produces a file TEST10 in the user’s disk space. This is
often referred to as the INDEX file and contains information necessary to access all other files used in any run
which forms part of this project.
The component creation run for SUB1 had the user defined file name FIS1 and produced a binary file, FIS135,
containing details of master component SUB1.
Similarly the component creation runs for SUB2, SUB3 and SUB4 had user defined file names FIS2, FIS3 and
FIS4, producing binary files with run specific information named FIS235, FIS335 and FIS435 respectively.
The structure (or assembly) run for FUSG had the user defined file name FISC and produced FISC35. Finally
the stress recovery run on FUSG had the file name FIRE, producing FIRE35.
The details of the physical structure are not given here as this manual is concerned with describing the
relationships of the binary files and not with the structure itself.
Contains proprietary and confidential information of ANSYS, Inc. and its subsidiaries and affiliates.
Page 2-2
COMPED User Manual
Contains proprietary and confidential information of ANSYS, Inc. and its subsidiaries and affiliates.
Example Structure Tree
Page 2-3
COMPED User Manual
3.
Main Menu Commands
Main Menu Commands
COMPED is an interactive program and will normally be executed from the user’s terminal. The first prompt
which COMPED gives is
TYPE FOUR CHARACTER INDEX FILE NAME OR HELP
If HELP is input then the following list of features is given followed by the same prompt.
TYPE:
pppp
-REC
-ASD
pppp LBUF nnn FREE mmm FS NOAB
-REC LBUF nnn FREE mmm FS NOAB
-ASD LBUF nnn FREE mmm FS NOAB
WHERE
pppp IS THE PROJECT FILE NAME
-REC TO RECREATE PROJECT FILE FORM CHARACTER FORM
-ASD TO DUMP/RECREATE ASDIS 50 FILE
THESE MAY OPTIONALLY BE FOLLOWED BY:
LBUF IF THE BUFFER LENGTH IS TO BE CHANGED
nnn IS THE REVISED BUFFER LENGTH
FREE IF THE DATA AREA AREA IS TO BE INCREASED
mmm IS THE REVISED AREA (INITIALLY SET TO 10000)
FS
IF DATA AREA MONITORING IS REQUIRED
NOAB IF ABORT TRAPPING IS TO BE TURNED OFF
TYPE FOUR CHARACTER INDEX FILE NAME OR HELP
For the example given in Section 2 the project name, pppp, was TEST. The buffer length, nnn, is the size of the
file transfer buffer between the disk files and the program memory. This varies according to machine type, and
does not normally need to be defined here. In this case both LBUF and the number nnn may be omitted. The
default size of the data area, mmm, of 10000 words is usually adequate. This number is the dynamic array size
which COMPED will be allowed to use. Unless mmm needs to be greater than 10000 the command FREE and
the number mmm may both be omitted. (mmm may need to be greater than 10000 if very large records are to be
examined on the backing files.) The command FS is only required if diagnostic printing of the dynamic memory
allocation is to be investigated, which will not normally be the case.
Under normal operation the program will trap error conditions such as ‘divide by zero’ or ‘overflow’ when they
occur. After the error message the program will stop with a subroutine traceback and close down in a tidy
fashion. If the user wishes to allow the computer’s operating system to handle such conditions rather than the
program, the program’s own abort trapping can be turned off by using the command NOAB.
Contains proprietary and confidential information of ANSYS, Inc. and its subsidiaries and affiliates.
Page 3-1
COMPED User Manual
Main Menu Commands
Generally, the user only needs to supply the four character project name. If the physical file given by appending
10 to the project name, i.e. PPPP10, is not physically present in the user’s disk space COMPED issues a message
to that effect and prompts again for the project name.
If a valid project name is given, i.e. by the user typing TEST,
then COMPED will prompt
TYPE IN NEXT COMMAND, H(HELP) OR Q(QUIT)
If the user types HELP
then the following summary of commands is issued followed by a reissue of the previous prompt.
COMMANDS AVAILABLE ARE
MO
ME
(MONITOR)
(MERGE)
D
(DUMP)
EXI
EXB
(EXAMINE INDEX FILES)
(EXAMINE BACKING FILES)
V
RMC wwww
(VIEW MASTER INDEX)
(REMOVE MASTER COMPONENT wwww)
RMC wwww C (REMOVE MASTER COMPONENT wwww CONFIRM)
RS xxxx
RC xxxx y
(REMOVE STRUCTURE xxxx)
(REMOVE COMPONENT xxxx Y)
RMIR i
EN
(REMOVE MASTER INDEX ROW i)
(END)
Q
WHERE
(QUIT)
wwww IS THE MASTER COMPONENT NAME
xxxx IS THE STRUCTURE NAME
y IS THE NO. OF THE COMPONENT IN THE TREE
i IS THE MASTER INDEX ROW NUMBER
TYPE IN NEXT COMMAND, H(HELP) OR Q(QUIT)
The individual commands in the above menu are described below.
3.1. MONITOR Command (MO)
This command has no immediate effect. Any subsequent accesses to the commands in the file examination stage
will generate additional diagnostic output. This command is not usually needed by the user.
3.2. MERGE Command (ME)
This command will transfer control to the part of the program which allows COMPED to copy details of one run
from another project into the current project file. See Section 6 for further details.
Contains proprietary and confidential information of ANSYS, Inc. and its subsidiaries and affiliates.
Page 3-2
COMPED User Manual
Main Menu Commands
3.3. EXAMINE INDEX FILES (EXI)
This command transfers control to the Index File examination part of the program. See Section 4 for further
details.
3.4. EXAMINE BACKING FILES (EXB)
This command transfers control to the Backing File examination part of the program. See Section 5 for further
details.
3.5. VIEW MASTER INDEX (V)
This command displays the current master index. For the example in Section 2 the master index will be
displayed as
RUN
FILE
SUB-INDEX
UNIT-INFO
TREE
TREE
NAME
SUB1
NAME
FIS1
ADDRESS
1504
ADDRESS
2106
ADDRESS
0
LENGTH
0
SUB2
SUB3
FIS2
FIS3
2258
3012
2860
3614
0
3766
0
7
SUB4
FUSG
FIS4
FISC
3773
4534
4375
5136
4527
5288
7
76
The first column gives the individual run names (this is also the master component or structure names). The
second column identifies the corresponding physical file names used to store output produced by each run. The
sub-index and unit information table addresses for each run are given in columns 3 and 4. Finally, if there is a
tree record for the run in question, its address is given in column 5 and its length in column 6.
SUB1 and SUB2 are both lowest level master components formed solely of finite elements so they do not have
tree records. The remaining master components and the assembled structure have tree records and these are
shown. For details of the Sub-Index, Unit Information tables, and the form of the tree records, see the ASAS
Programmers’ Manual, Section 6.
The details of the addresses given by the VIEW command are required for use in the EXAMINE INDEX FILES
command, see Section 4
3.6. REMOVE MASTER COMPONENT wwww (RMC wwww)
The issue of this command will remove all reference to the named master component from the Index File. Its
principal purpose is to delete a master component which is physically incorrect, i.e. although it has been
generated correctly by ASAS with no errors it is not what the user requires.
Suppose the user wished to remove SUB1 from the master index, he would issue the command.
RMC SUB1
Contains proprietary and confidential information of ANSYS, Inc. and its subsidiaries and affiliates.
Page 3-3
COMPED User Manual
Main Menu Commands
COMPED will check that the master component is not referenced by any other run. In this case SUB3 is built
from two uses of SUB1 and SUB3 is used to build the structure FUSG, hence COMPED will issue the message
*** ERROR *** MASTER COMPONENT SUB1 REFERENCED BY FUSG
AT HIGHER LEVEL. DELETION MUST BE
CONFIRMED BY A REPLY THUS
REMOVE MASTER COMPONENT SUB1 (CONFIRM)
This prevents the user inadvertently deleting reference to a master component which is referenced from
elsewhere. If it is desired to delete the reference despite this the command must be
RMC SUB1 C
COMPED will output the message:
MASTER COMPONENT/STRUCTURE SUB1 ROW 1 HAS BEEN REMOVED
If the command
VIEW MASTER INDEX
is issued then the master index will now be displayed as
RUN
FILE
SUB-INDEX
UNIT-INFO
TREE
TREE
NAME
SUB2
NAME
FIS2
ADDRESS
2258
ADDRESS
2860
ADDRESS
0
LENGTH
0
SUB3
FIS3
3012
3614
3766
7
SUB4
FUSG
FIS4
FISC
3773
4534
4375
5136
4527
5288
7
76
Note that the row referring to SUB1 has been erased, leaving all other information unchanged.
3.7. REMOVE STRUCTURE xxxx (RS xxxx)
This command is similar to the command REMOVE MASTER COMPONENT wwww. However, as the
structure cannot be accessed by a higher level run, then there is never any need to append the word CONFIRM.
For example, if the user issues the command
RS FUSG
COMPED will respond with:
MASTER COMPONENT/STRUCTURE FUSG ROW 5 HAS BEEN REMOVED.
Contains proprietary and confidential information of ANSYS, Inc. and its subsidiaries and affiliates.
Page 3-4
COMPED User Manual
Main Menu Commands
3.8. REMOVE COMPONENT xxxx y (RC xxxx y)
This command allows the user to remove reference to the fact that a component of a structure has been
recovered.
For example the issue of the command
RC FUSG 1
will delete the reference to the component number 1, i.e. that component identified by the path FUSG-BLK1BLKS in the structure FUSG (see example in Section 2).
The principal use of this command is where the user wishes to change his selection of load cases with the
SELECT LOAD data in his stress recovery runs perhaps to add cases which were previously ignored.
3.9. REMOVE MASTER INDEX ROW i (RMIR i)
This command is similar to the commands REMOVE MASTER COMPONENT wwww or REMOVE
STRUCTURE xxxx.
For example, the command
RMIR 5
will be identical in effect to the command
RS FUSG
detailed in Section 3.7.
Contains proprietary and confidential information of ANSYS, Inc. and its subsidiaries and affiliates.
Page 3-5
COMPED User Manual
Contains proprietary and confidential information of ANSYS, Inc. and its subsidiaries and affiliates.
Main Menu Commands
Page 3-6
COMPED User Manual
4.
Index File Examination
Index File Examination
Index File Examination is commenced when the user issues the main menu command
EXI
COMPED next prompts the user with
INDEX FILE EXAMINATION
TYPE IN NEXT COMMAND, H(HELP) OR Q(QUIT)
Typing HELP
generates the following list of capabilities followed by a repeat of the prompt.
COMMANDS AVAILABLE IN INDEX FILE EXAMINATION ARE
EM
ES x
(EXAMINE MASTER INDEX)
(EXAMINE SUB INDEX KEY x)
EU x
ET x y
(EXAMINE UNIT INFO TABLE KEY x)
(EXAMINE TREE KEY x LENGTH y)
CM
(CHANGE MASTER INDEX)
CS x
CU x
(CHANGE SUB INDEX KEY x)
(CHANGE UNIT INFO TABLE KEY x)
CT x y
EN
(CHANGE TREE KEY x LENGTH y)
(END)
Q
WHERE
(QUIT)
x IS THE RELEVANT ADDRESS USING EX M
y IS THE TREE LENGTH USING EX M
TYPE IN NEXT COMMAND, H(HELP) OR Q(QUIT)
4.1. EXAMINE MASTER INDEX (EM)
This command is identical to the VIEW MASTER INDEX command in the main menu (Section 3.5).
4.2. EXAMINE SUB INDEX KEY x (ES x)
This command displays the sub-index for a run. Referring to the Example in Section 2 and the master index
displayed in Section 3.5, to examine the sub-index for SUB1 the command is:
ES 1504
where 1504 is the address (or key) given in column 3 and row 1 of the master index.
Contains proprietary and confidential information of ANSYS, Inc. and its subsidiaries and affiliates.
Page 4-1
COMPED User Manual
Index File Examination
Similarly to examine SUB2’s sub-index the command is:
ES 2258
For each request the sub-index table (see Section 6 of the ASAS Programmers’ Manual) is displayed. This
contains details of all the logical files used by the run in question, and is a more comprehensive form of the file
table output at the end of an ASAS run.
READING SUB-INDEX, ADDRESS
FILE IUNROW
1
4
1504 FILE 10 LENGTH
602 NAME ****I016 (INDFEX)
KEYB IDISP IRCONT IWCONT NRITES NREADS NLREC LLRECS MAXREC
0
0
7 11220
7
6
1
32
4200
2
3
2
4
0
0
0
0
1
2
27
24
1
2
4
3
200
1
200
6
27
23
4
6
1
1
0
832
0
2
3
0
14
0
3
0
6
0
200
1
200
14
8
0
7
3
0
0
2
320
2
2
1
6
256
12
13
4
1
0
1780
0
2
4
7
23
261
4
7
4
5
200
1
200
16
16
128
14
15
18
1
1
2132
2
2
0
5
0
36
0
5
0
0
1
200
8
200
0
18
16
15
1
2
1
303
1
1
1
2
303
17
18
1
5
1247
1
2
2
9
3
259
3684
9
3
11
0
200
1
200
12
60
1808
34
35
11
1
0
1
1
2
0
14
0
1745
0
28
0
28
0
1
0
60
0
438
37
59
12
1
1
1781
2
2
0
1
0
1
0
1
0
0
1
1
2
12
0
1
TYPE IN NEXT COMMAND
4.3. EXAMINE UNIT INFORMATION TABLE KEY x (EU x)
This command is similar to the command SUB INDEX EXAMINATION detailed above. Details of the physical
files used by a run may be obtained. Again referring to the master index in Section 3.5, the adress (or key) for
the unit information table for SUB1 is 2106.
Thus issuing the command
EU 2106
displays
ROW
1
IUNITF
35
KEYTOP
7095
MODE
0
NSFILE
11
Contains proprietary and confidential information of ANSYS, Inc. and its subsidiaries and affiliates.
NOPFIL
0
ISTGFL
0
Page 4-2
COMPED User Manual
Index File Examination
The explanation of these data is contained in the ASAS Programmers’ Manual Section 6, but basically it says
that all the saved information for SUB1 is on one physical file, number 35 (actually FIS135). This was written
on Fortran unit number 35 during the master component creation run for SUB1.
4.4. EXAMINE TREE KEY x LENGTH y (ET x y)
This command allows examination of the tree records. The address (or key) and length of a tree record can be
obtained by reference to the master index if such data are relevant to a master component or structure run. For
example, for SUB3 the key is 3766 and its length is 7.
The command ET 3766 7
produces
1 SUB3
2
BLKS SUB1
BLKP SUB1
Reference to Section 6 of the ASAS Programmers’ Manual gives details of the contents of the tree records.
4.5. CHANGE MASTER INDEX (CM)
This command allows the (integer) values stored in the master index to be modified. It is rarely necessary to do
this and would only be done under the direct guidance of the ASAS Support Team.
The command CM
causes COMPED to prompt user with
TYPE IN POSITION OF CHANGE, OLD VALUE AND NEW VALUE (RETURN TO END)
As no meaningful example is possible with the example index file none is given here.
4.6. CHANGE SUB INDEX KEY x (CS x)
This command allows information on the sub-index to be modified. Use of this command is rare and may follow
discovery of a program fault. Changes to the sub-index should only be done under the direct guidance of the
ASAS Support Team. The command may be used to modify the entry for one of the ASAS logical files, should
it be incorrect or invalid.
As an example suppose SUB1’s sub-index needed modification. From the master index displayed in Section 3.5
the sub index key is 1504, so the command
CS 1504
is issued.
COMPED prompts the user
Contains proprietary and confidential information of ANSYS, Inc. and its subsidiaries and affiliates.
Page 4-3
COMPED User Manual
Index File Examination
TYPE IN POSITION OF CHANGE, OLD VALUE AND NEW VALUE (RETURN TO END)
If it is desired to change word 37 from 1 to 0, see sub-index example output in Section 1.2 then the command
37
1
0
is issued.
4.7. CHANGE UNIT INFORMATION TABLE KEY x (CU x)
This command is similar to the CHANGE SUB INDEX command above and again will be used only rarely. If
SUB1’s unit information Table was to be modified its address is 2106 from the example in Section 3.5, so the
command to be used is
CU 2106
(Again there is no relevant example for this sample problem.)
4.8. CHANGE TREE KEY x LENGTH y (CT x y)
This command has not been implemented.
4.9. REMOVE FILE x FROM SUB INDEX KEY y (RF x y)
This command permits the deletion of a logical ASAS file from a SUB INDEX. It should be needed only rarely
and normally only after a program fault.
If the logical file 6 (IFSKEW) were to be removed from the sub index for SUB1, then the command is
RF 6 1504
to which COMPED will reply
FILE NO 6 HAS BEEN REMOVED.
4.10. END
This command returns the user to the main menu of COMPED.
Contains proprietary and confidential information of ANSYS, Inc. and its subsidiaries and affiliates.
Page 4-4
COMPED User Manual
Contains proprietary and confidential information of ANSYS, Inc. and its subsidiaries and affiliates.
Index File Examination
Page 4-5
COMPED User Manual
5.
Backing File Examination
Backing File Examination
Backing File Examination is commenced when the user issues the main menu command
EXB
COMPED next prompts the user with
BACKING FILE EXAMINATION
TYPE IN NEXT COMMAND, H(HELP) OR Q(QUIT)
Issuing the command
HELP
produces the list of capabilities followed by a repeat of the prompt.
COMMANDS AVAILABLE IN BACKING FILE EXAMINATION ARE
M
EX m n v wwww
(MONITOR)
(EXAMINE FILE m KEY n TYPE v FOR wwww)
EX m n v xxxx
(EXAMINE FILE m KEY n TYPE v FOR xxxx)
EX m n v xxxx y (EXAMINE FILE m KEY n TYPE v FOR xxxx y)
CH m n v wwww
CH m n v xxxx
CH m n v xxxx y
(CHANGE FILE m KEY n TYPE v FOR wwww)
(CHANGE FILE m KEY n TYPE v FOR xxxx)
(CHANGE FILE m KEY n TYPE v for xxxx y)
D wwww
D xxxx
(DUMP wwww)
(DUMP xxxx)
D xxxx y
R wwww
(DUMP xxxx y)
(RECREATE wwww)
R xxxx
(RECREATE xxxx)
R xxxx y
EN
(RECREATE xxxx y)
(END)
Q
WHERE
(QUIT)
m IS THE ASAS FILE NUMBER
n IS THE USER KEY
v IS THE RECORD TYPE (I R L S OR C)
wwww IS THE MASTER COMPONENT NAME
xxxx IS THE STRUCTURE NAME
y IS THE NO. OF THE COMPONENT IN THE TREE
TYPE IN NEXT COMMAND, H(HELP) OR Q(QUIT)
Contains proprietary and confidential information of ANSYS, Inc. and its subsidiaries and affiliates.
Page 5-1
COMPED User Manual
Backing File Examination
5.1. MONITOR (M)
This command will invoke the output of additional diagnostic output. This command is not usually needed by
the user.
5.2. EXAMINE FILE
(EX m n v wwww)
(EX m n v xxxx)
(EX m n v xxxx y)
This command may be used to examine the contents of any of the ASAS binary files. Details of the contents of
all ASAS files are given in Section 2 of the ASAS Programmers’ Manual. The commands must be issued to
examine any key individually. The file number (m) is the ASAS logical file number. The key number (n) is the
key to be examined on file m. The record type (v) (Integer, Real, Logical, Single Precision or Character) should
be specified as appropriate to the key requested.
For example if file No. 35 is to be examined for master component SUB1 and key 13 is integer, then the
command is
EX 35 13 I SUB1
which will produce the file contents.
For the corresponding file for the recovered component given by FUSG-BLK1-BLKS (i.e. component No. 1 in
the example of Section 2) the required command is
EX 35 13 I FUSG 1
Note that only files physically present on disc may be examined. If a key does not exist the backing file
examination is terminated following an error message and control returns to the main menu.
5.3. CHANGE FILE
(CH m n v wwww)
(CH m n v xxxx)
(CH m n v xxxx y)
This command can be used to modify any of the five types of records on the backing files. The CHANGE
command is similar to the EXAMINE command. For example, to modify key 13 of file 35 for SUB1 then the
command is
CH 35 13 I SUB1
Contains proprietary and confidential information of ANSYS, Inc. and its subsidiaries and affiliates.
Page 5-2
COMPED User Manual
Backing File Examination
COMPED then prompts with
TYPE IN POSITION OF CHANGE, OLD VALUE AND NEW VALUE (RETURN TO END)
The command will need to be used only rarely.
Once a full EXAMINE or CHANGE command has been given, the command word only is needed to examine or
change the record under consideration.
5.4. DUMP (D)
See Section 7.2.1 for a full description of this command
5.5. RECREATE (R)
See Section 7.2.2 for a full description of this command.
5.6. END
This command returns the user to the main menu of COMPED.
Contains proprietary and confidential information of ANSYS, Inc. and its subsidiaries and affiliates.
Page 5-3
COMPED User Manual
Contains proprietary and confidential information of ANSYS, Inc. and its subsidiaries and affiliates.
Backing File Examination
Page 5-4
COMPED User Manual
6.
Merge Command
MERGE Command
The MERGE command issued from the main menu allows COMPED to copy details of one run from a second
project file into the current project file. When issued, COMPED prompts for the name of the second project file
as follows:
FOURCHARACTERPROJECTFILENAMEOFSECONDPROJECTFILE(Q OR X TO TERMINATE)
If a valid second four character project name is supplied then this second project file is opened and COMPED
will prompt the user with
NAME OF STRUCTURE/MASTER COMPONENT TO BE COPIED (RETURN TO END)
For each valid master component or structure name supplied, COMPED will add a reference to the current
project file, leaving the second project file unaltered. After each successful copy the prompt is repeated.
As an example consider the project file, FRK1, which contains the following three runs and associated
information in its master index. (This can be viewed by entering COMPED, supplying FRK1 as the project
name and issuing the VIEW command, see Section 3.5).
RUN
FILE
SUB-INDEX
UNIT-INFO
TREE
TREE
NAME
PLT1
NAME
PLT1
ADDRESS
1504
ADDRESS
2106
ADDRESS
0
LENGTH
0
PLT2
PLT5
PLT2
PLT5
2258
3012
2860
3614
0
3766
0
20
PLT1 and PLT2 are both lowest level master components composed solely of finite elements and hence do not
have tree records. PLT5 is an assembled structure (actually PLT5 is PLT1 and PLT2 combined) and hence a tree
record exists.
If the user wishes to copy PLT1, PLT2 and PLT5 from the project FRK1 to the project TEST then the dialogue
is as follows
MERGE
FOURCHARACTERPROJECTFILENAMEOFSECONDPROJECTFILE(Q OR X TO TERMINATE)
TEST
NAME OF STRUCTURE/MASTER COMPONENT TO BE COPIED (RETURN TO END)
PLT1
NAME OF STRUCTURE/MASTER COMPONENT TO BE COPIED (RETURN TO END)
PLT2
NAME OF STRUCTURE/MASTER COMPONENT TO BE COPIED (RETURN TO END)
PLT5
(return)
When this has been done COMPED will then stop.
Contains proprietary and confidential information of ANSYS, Inc. and its subsidiaries and affiliates.
Page 6-1
COMPED User Manual
Merge Command
If COMPED is re-entered and the master index for project TEST is VIEWed then the following will be displayed
RUN
FILE
SUB-INDEX
UNIT-INFO
TREE
TREE
NAME
NAME
ADDRESS
ADDRESS
ADDRESS
LENGTH
SUB1
SUB2
FIS1
FIS2
1504
2258
2106
2860
0
0
0
0
SUB3
SUB4
FIS3
FIS4
3012
3773
3614
4375
3766
4527
7
7
FUSG
PLT1
FISC
PLT1
4534
10934
5136
11536
5288
0
76
0
PLT2
PLT2
11688
12290
0
0
PLT5
PLT5
12442
13044
13196
20
Note that the sub index, unit information tables and tree records for PLT1, PLT2 and PLT5 are at different
addresses in the master index for project TEST from that for project FRK1.
The principal use of the MERGE command is when a number of analyses have inadvertently been run under
different project names and it is desired to enable these to communicate with each other. For example having
now merged the project files as shown above it will be possible (assuming that the components physically
match) to build a further structure using any or all of the master components SUB1, SUB2, SUB3, SUB4, PLT1
and PLT2.
A further application, which is only possible on some machine types, is to merge two project files of the same
name but of different cycle number. This may occur if for instance two master components have both been
created with the Job status NEW. For example if the JOB commands for SUB1 and SUB2 were
JOB
NEW
PROJ
SUB1
JOB
NEW
PROJ
SUB2
Both of these runs will attempt to create physical disk files named PROJ10. On many machines the second run
will fail as PROJ10 already exists. However on other machines either ASAS or the operating system will take
evasive action.
The first PROJ10 file will be renamed by ASAS so that there are two files named
PROJ10.BAK
(for SUB1)
PROJ10
(for SUB2)
To merge the two project files the following procedure is recommended.
Rename PROJ10 to become something else, e.g. XXXX10 or XXXX10.DAT.
Rename PROJ10.BAK to become PROJ10.
Enter COMPED and give PROJ as the four character project name; then enter MERGE.
When given the prompt
Contains proprietary and confidential information of ANSYS, Inc. and its subsidiaries and affiliates.
Page 6-2
COMPED User Manual
Merge Command
FOUR CHARACTER INDEX FILE NAME OF SECOND PROJECT FILE (Q OR X TO TERMINATE)
Type
XXXX
whereupon COMPED will prompt
NAME OF STRUCTURE/MASTER COMPONENT TO BE COPIED (RETURN TO END)
now give the commands
SUB2
(return)
The project file PROJ10 should now have the run details for SUB2 from XXXX added to its existing SUB1
details. It is advised to check that this has been done satisfactorily by using the VIEW command on the master
index for PROJ before the XXXX10 file is deleted.
Note that when merging information from more than one project file the physical files used by all runs coalesced
into one project must be unique. For example if project TEST’s component SUB1 had used the same physical
file name as project FRK1’s component PLT1 then any attempt to access the necessary file would be ambiguous.
In this case FIS135 for SUB1 did not match the name used for any of PLT1, PLT2 or PLT5’s backing file
names.
Again it should be clear that attempting to merge two project files with conflicting master component or
structure names is not practical. If for example project FRK1 also had a SUB1 in it, then this could have been
transferred to project TEST. However, project TEST would now have two SUB1 entries. Any attempt to access
SUB1 is ambiguous, but as the search is from the first entry down column 1 then the first occurring SUB1 entry
would always be selected.
Clearly COMPED’s MERGE facility will not always allow the user to recover from all errors but it does provide
some flexibility in this area.
Contains proprietary and confidential information of ANSYS, Inc. and its subsidiaries and affiliates.
Page 6-3
COMPED User Manual
7.
Dump and Recreate
DUMP and RECREATE
The DUMP feature allows COMPED to output any backing file in character form. The RECREATE
feature allows COMPED to access a character file generated by a previous DUMP command and
regenerate the backing file. The dump and recreation for the project file, for the ‘35’ file and the ‘50’
file are described separately below.
7.1. PROJECT File
This Section describes the method for dumping and recreating the Project file, ie the ‘10’ file. Note,
dump and recreate cannot be used in a single run of COMPED.
7.1.1.
DUMP
At the prompt when COMPED is first started
TYPE
FOUR
CHARACTER
PROJECT
FILE
NAME,
H(HELP),
E(END)
OR
Q(QUIT)
the name of the project file is given. At the next prompt,
TYPE IN NEXT COMMAND
the user replies
DUMP
This will cause COMPED to created a file XXXXCM (where XXXX is the project file name)
containing a character representation of the project file. The message
CHARACTER FORM OF 10 FILE BEING WRITTEN TO XXXXCM
is output. The program will then stop.
7.1.2.
RECREATE
At the prompt when COMPED is first started
TYPE
FOUR
CHARACTER
PROJECT
FILE
NAME,
H(HELP),
E(END)
OR
Q(QUIT)
The user replies
-REC
Contains proprietary and confidential information of ANSYS, Inc. and its subsidiaries and affiliates.
Page 7-1
COMPED User Manual
Dump and Recreate
The user is then prompted for the name of the file containing the character form of the project file:
NAME OF FILE CONTAINING CHARACTER FORM OF PROJECT FILE
The user replies with the appropriate filename
The user is then prompted for the name of the project file to be created
4 CHARACTER NAME OF PROJECT FILE TO BE CREATED
The program will then recreate the project file and stop.
Note, if the user is recreating the 10 and 35 files, then the 10 file must be recreated first, followed by
the 35 file(s)
7.2. ’35’ FILE
Some or all of the logical binary files that have been created and saved from an ASAS run can be
dumped in character format and recreated. After the initial prompt for the project file name, enter
backing file examination by typing
EXB
At this point, the 35 file can be dumped or recreated.
Note, these commands can be used to dump and recreate logical files saved by any of the following
SAVEFILES commands
ADLD
ADMS
ADFQ
BEAM
DYPO
FATJ
FRAK
LOCO
STRE
7.2.1.
DUMP
To the dump the 35 file in character form, type
DUMP wwww
where
or
DUMP xxxx
or
DUMP xxxx y
wwww is the name of the master component
xxxx is the name of the structure
y is the component number in the structure’s tree
Contains proprietary and confidential information of ANSYS, Inc. and its subsidiaries and affiliates.
Page 7-2
COMPED User Manual
Dump and Recreate
COMPED informs the user of the logical files contained in that component/structure.
SUBINDEX CONTAINS THE FOLLOWING FILES
6
13 .................
DO YOU WISH TO DUMP ALL OR SELECTIVE FILES
REPLY ALL OR THE FILE NUMBERS REQUIRED (OR Q TO QUIT)
The user should reply either ALL or specify, on one line, all the file numbers to be dumped. COMPED
then replies:
CHARACTER FORM OF 35 FILE BEING WRITTEN TO nnnnCS
DUMPING FILE 6
DUMPING FILE 13
.....
where nnnn is the file name associated with the requested component/structure run.
7.2.2.
RECREATE
Having entered backing file examination as described above, to recreate a 35 file type
RECR wwww
or
RECR xxxx
or
RECR xxxx y
where
wwww is the name of the master component
xxxx is the name of the structure
y is the component number in the structure’s tree
COMPED asks if a new structure is to be created (all the files being read will create that structure) or if
the structure is to be updated (an existing structure has the ASAS files written into it) with the
questions:
DO YOU WANT TO INITIALISE STRUCTURE (I) OR
UPDATE EXISTING STRUCTURE (U)
where typing I will create the new structure and U will write the ASAS files into the existing structure.
COMPED requests the name of the file containing the character form of the ASAS files:
NAME OF FILE CONTAINING CHARACTER FORM OF FILES
COMPED reports each ASAS file as it is recreated:
Contains proprietary and confidential information of ANSYS, Inc. and its subsidiaries and affiliates.
Page 7-3
COMPED User Manual
Dump and Recreate
RECREATING FILE 6
RECREATING FILE 13
.....
Note, if the user is recreating the 10 and 35 files, then the 10 file must be recreated first, followed by
the 35 file(s)
7.3. ’50’ FILE
The ‘50’ file contains the structures and displacements for each run in the project. This can be dumped
in character from and later recreated in binary form as described below.
At the prompt when COMPED is first started
TYPE
FOUR
CHARACTER
PROJECT
FILE
NAME,
H(HELP),
E(END)
OR
Q(QUIT)
The user replies
-ASD
At this point, the 50 file can be dumped or recreated. The message
DUMP OR RECREATE 50 FILE (D/R)
is typed to which the user should reply D or R.
7.3.1.
DUMP
COMPED prompts the user for the name of the 50 file:
4 CHARACTER NAME OF 50 FILE
The user types, for example
ABCD
COMPED informs the user of the name of the file to which the character form is being written.
CHARACTER FORM OF 50 FILE BEING WRITTEN TO nnnnCA
where nnnn is the 4 character name typed in reply to the previous question.
The program dumps the ‘50’ file and then stops.
7.3.2.
RECREATE
COMPED prompts the user for the name of the 50 file to be created:
Contains proprietary and confidential information of ANSYS, Inc. and its subsidiaries and affiliates.
Page 7-4
COMPED User Manual
Dump and Recreate
4 CHARACTER NAME OF 50 FILE
The user types, for example
ABCD
COMPED then asks the user for the name of the file containing the character form of the 50 file:
NAME OF FILE CONTAINING CHARACTER FORM OF 50 FILE
The user types, for example
EFGHCA
The program recreates in this example ABCD50 from the data in EFGHCA. The program then stops.
Contains proprietary and confidential information of ANSYS, Inc. and its subsidiaries and affiliates.
Page 7-5