1
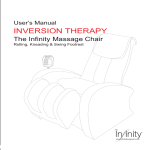
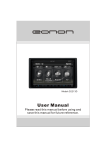
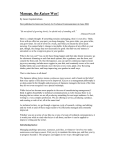
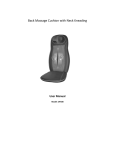
Instruction Manual OS-1000
Thank you for purchasing the OS-1000 Massage Chair.
Before using your massage chair, please read the contents of the instruction
manual to refer to it when needed.
Table of Contents
Features ................................................................... 2
Safety Instructions ................................................... 3-4
Chair Components ................................................... 5-6
Chair Installation & Moving ...................................... 7-11
Grounding Instructions ............................................ 12
Chair Specifications ................................................ 12
Operation Guide ...................................................... 13-17
Troubleshooting ...................................................... 18
Product Maintenance .............................................. 18
1
01
Features - 12 Intelligent Massage Program and Operation Function
Synchronal massage of Kneading and Tapping
Unique synchronal massage of kneading and tapping can effectively remove tiredness,
relax muscle strains and activate blood circulation, improve spirit system, enhance
whole-body enginery and help muscle recover softness and elasticity rapidly.
Kneading massage
Kneading massage with driving power force on the body points can effectively improve
skin softness and elasticity.
Tapping massage
Tapping aimed at body aperture pulse makes hard muscle soft and ease brawn around
chine.
Rolling massage
Comfortable human massage feeling come from rolling massage on every position of
body.
Four wheel massage head
Concave-convex massage gear wheel can effectively deepen massage at body’s
aperture and active aperture pulse.
Dual footrest massage cushion
To massage calf and sole for easing and eliminating ache of leg.
Air massage bags
15 special air massage bags can effectively give more comfortable massage enjoyment
for calf, feet and sole.
Backrest massage width adjustment
Provide closest massage and let you feel real enjoyment.
Massage intensity adjustment
You can enjoy most comfortable massage with different intensity adjustment.
Backrest massage angle adjustment
Freely adjust ideal massage angle from 105 degree to 168 degree and 30-90 degree of
footrest to enjoy more comfortable and close-fitting massage.
2
02
Safety Instructions
When using the massage chair, basic precaution should always be followed to
reduce the risk of electric shock, burns, fire, or injury to persons.
Read thoroughly the following details before using.
● Be sure to insert massage chair plug into the proper electrical outlet.
● Make sure the power plug is securely inserted into the proper electrical outlet to
reduce the risk of short-circuit and fire.
● Always unplug the appliance from electrical outlet immediately after using and
before cleaning.
● DO NOT use the massage chair in the places where the humidity is high.
● DO NOT use at outdoors and avoid places with direct sunlight.
● If the power is off during use, be sure to turn the power switch to the OFF position,
as well as pull the power plug out from the socket to prevent any damages at the time
when power comes back.
● Never plug/unplug the power cord plug socket with wet hands.
● Close and continuous supervision is necessary when this appliance is used by, on,
or near children, invalids or disabled persons.
● Use this appliance only for its intended use as described in user manual.
● Do not use any attachments other than those recommended by Osasi.
● Do not attempt to stand on the backrest and armrest, otherwise the chair upsets to
result an accident and injury.
● Be careful not to fall asleep during massage.
● Always keep the massage chair clean and never insert any object into gaps on and
around the massage chair.
● DO NOT remove the massage chair by pulling the power supply cord.
● Be sure to check there is not anybody (children in particular), pet or obstacle under
prior to lowering the leg rest/backrest.
● Always check whether the massage chair has been ripped before using, if you
found any abnormal rip in any area of cloth on back rest, do not use the massage
chair. Kindly contact service center immediately for repair.
● This appliance is designed for household use only.
● Please consult your doctor if you are in doubt whether you can use the massage
chair.
3
● The following persons are requested to consult a doctor prior to use in order to
reduce the risk of user feeling sick or suffering from injury
» Those who have malignant tumor
» Those who suffer from heart disease
» Those who are in pregnancy, menstruation and puerperal
» Those who are require completer rest
» Those who are under medical treatment
» Those who suffer from back disease or whose backbone is abnormal or bent
● If you experience pain was felt during use, stop using immediately. If any injury
happens, consult a doctor immediately.
● Never massage on swollen or inflamed part of body.
● This product is non-professional appliance designed to provide comfortable
massage. Do not use this product as substitute for medical treatment.
● Do not use this appliance more then 30 minutes at a time and limit the use of
massage at one point up to 5 minutes. Otherwise, over-massaging can cause
excessive heating which may result in adverse effect. Additionally, over-use may also
lead to overheating of product and short lifespan.
● DO NOT operate where aerosol (spray) products are being used or where oxygen
is being administered.
● The massage chair is not suitable to use for children age 12 years old and below.
● Never operate the appliance with the air openings blocked. Keep the air openings
free of lint, hair, and the like.
4
03
Chair Components
Double Pillow upholstery
Remote Controller
Backrest
Armrest
Seatrest
Footrest
Side Panel
Wheel
5
MASSAGE POSITION
Roller
6
04
Chair Installation
Step 1:
Ensure sufficient spaces around massage chair, please leave 24” of spaces behind
the backrest and 24” of spaces at the front of massage chair when recline backrest
and elevate leg rest. (PIC 1)
at least 24”
at least 24”
PIC 1
Step 2:
Lift the backrest, then lower the backrest into the seat brackets.
Securely lock the flat head bolts into sides of the seat.(PIC 2)
Note: Carefully unwrap the armrest to avoid scratching during installation.
A: Flat Head Bolt (on the backrest)
B: Holder (on the seat )
A
B
PIC 2
7
Attached the connecting rod and the fork of the reclining actuator with a flat head rivet,
and secure with a split pin as demonstrated in below PIC 3 & PIC 4.
A. Connecting rod(on the backrest)
B. Fork of reclining actuator (on the seat)
C. Flat head rivet
D. Split pin
A
PIC 3
PIC 4
C
B
A
D
C
B
Step 3:
Insert the wire plugs into the seat as demonstrated in PIC 5.
Note: Insert black to black and gray to gray, otherwise damage to the chair may result.
Black
Black
Grey
Grey
PIC 5
8
Step 4:
Unfold the backrest until you hear a “Click” sound. (PIC 6)
PIC 6
Step 5:
Attach the backrest pad and the pillow pad. (PIC 7)
A) Attach the backrest pad with the zipper.
B) Attach the pillow pad using the hook and look fasteners.
A
B
PIC 7
Right
Step 6:
Installing Remote Control Holder
Please tighten the screws of the Remote Control
Holders in the order of the picture shown. (PIC 8)
PIC 8
9
Step 7:
Connect the wire plugs as shown PIC 9.
PIC 9
Step 8:
Back Massage Strength-Control Pad. (PIC 10)
Back Massage Strength-Control Pad has been inserted stick onto the Backrest Cover.
If strong massage is desired, remove the Back Massage Strength-Control Pad from
the back with stickers of cover of back pad (as shown in picture). If mild massager is
desired, return the Back Massage Strength-Control Pad into the cover.
PIC 10
10
Moving the Chair
● Elevate the Calves Rest.
● Then recline the chair to approx. 45° to easily move the chair around the house
with a slight pull or push.
Note:
1. Always fully return the leg rest to its original length before moving the chair.
Otherwise, it may result injury due to the leg rest during movement.
2. Do not move the unit while a person is seated on it.
3. Place a mat on the floor and gently roll the unit over it to avoid damaging the floor.
11
05
Grounding Instructions
Fully insert the plug into an appropriate outlet.
An improper equipment-grounding conductor may result in electric shock. Contact a
qualified electrician if you are not sure that the product is properly grounded. Do not
modify the plug that is included with the massage chair. If you plug does not fit the
outlet, contact a qualified electrician to install an outlet to fit the massage chair plug.
06
Chair Specifications
Specifications
Description
Model No.
OS1000
Rated Voltage
110-120V AC
Rated Frequency
50/60Hz
Rated Power Consumption
200W Max
Timer
15 minutes
Max time rate
30 minutes
Packing size: 47” x 30.3” x 33.5”
Dimension(LxWxH)
Horizontal size: 75” x 30.3” x 30.3”
Vertical size: 49.6” x 30.3” x 49.6”
Weight
Length of The Wire
Usage Condition
Storage Condition
Net weight: 138.9 lbs
Gross weight: 178.6 lbs
Controller wire:1.3m
Power supply wire:2.2m
Temperature:10~40°C
Humidity:30~85 RH
Temperature:20~60°C
Humidity:30~85 RH
12
07
13
Operation Guide(Controller)
07
Operation Guide
Insert the power cord plug into an electrical outlet.
Turn the power switch to the “l” position for idle mode.
Four functions are available in idle mode: ON/OFF, BACK LIGHT, Recline/Raise
Backrest, Elevate/Recline Footrest. “ON/OFF, BACK LIGHT, Recline/Raise Backrest,
Elevate /Recline Footrest.”
ON/OFF
Start/Stop Control Button
Press this button to automatically recline the backrest and to automatically
elevate the footrest to a specified position. When the chair has stopped
moving, any massage function button may be pressed.
Press the ON/OFF button again to stop all massage functions and to return
the massage rollers to their original position.
PAUSE
PAUSE
Pause Control Button
Press this button to stop all massage functions and to pause the chair to
idle mode.
Press the pause button again to resume the original massage function.
RECLINE / RAISE
Backrest and Footrest Angle Adjustment Control Buttons
Press one of these buttons once to adjust the backrest and the footrest to
a comfortable position.
Press one of these buttons again to confirm the postion.
Setting Vibration
VIBRATING (SEAT)
Seat Vibration Control Button
Press this button to activate the seat vibration function.
Press the button again to stop the seat vibration function.
14
VIBRATING(CALVES)
Calves Vibration Control Button
Press this button to activate the calves vibration function.
Press the button again to stop the calves vibration function.
AUTO PROGRAM
Six pre-programmed massage sessions are activated by pressing the following
buttons: HEALTH CARE, FULL BODY RELAX, THERAPY, NECK/SHOULDER,
BACK/LUMBAR, SEAT/CALVES.
Manual Back Massage Programming
KNEADING
&TAPPING
KNEADING
TAPPING
15
KNEADING & TAPPING
Kneading & Tapping Function Start/Stop Control Button
Press this button once to activate the kneading and tapping massage
function for a full back massage.
Press the button again to stop the kneading & tapping massage function.
Press the FAST/SLOW button to adjust the speed of the massage while the
kneading and tapping function is activated.
KNEADING
Kneading Function Start/Stop Control Button
Press this button once to activate the kneading massage function for a full
back massage. Press the button again to stop the kneading massage
function.
Press the FAST/SLOW button to adjust the kneading speed while the
kneading function is activated.
TAPPING
Tapping Function Start/Stop Control Button – 3 levels of width (narrow,
medium, wide);
Press this button once to activate the tapping function for a full back
massage at medium width and speed.
Press the button again to stop the tapping massage function.
Press the WIDTH button and the SPEED button to adjust the tapping width
and speed while the tapping function is activated.
ROLLING
ROLLING
Rolling Function Start/Stop Control Button – 3 levels of width (narrow,
medium, wide)
Press this button once to activate the rolling function for a full back
massage at medium width and speed.
Press the button again to stop the rolling massage function.
Press the WIDTH button to adjust the rolling width while the rolling function
is activated.
Note: kneading, tapping, kneading & tapping , and rolling functions cannot
be combined.
FAST/SLOW
Kneading & Tapping Speed Adjustment Buttons
Press these two buttons to toggle between fast and slow for kneading &
tapping massage functions
FAST
SLOW
Setting Spot or Localized Back Massage
NARROW
MEDIUM
WIDE
UPWARD
DOWNWARD
PARTIAL
WIDTH
Width Adjustment Buttons for Tapping & Rolling Functions
When the tapping and rolling functions are activated these three buttons
adjust the width of movement to narrow, medium or wide.
UPWARD/DOWNWARD
Position Adjustment Button for Spot or Partial Massage
When the spot or partial massage functions are activated, these buttons
move the massage rollers up or down.
Release the button when the desired position is achieved.
PARTIAL
Partial Back Massage
Press this button to select a partial massage for any part of the back.
Press this button once to activate the massage rollers. The massage
rollers perform the partial massage with an 8 cm (3.1”) range of movement.
Press the button again to stop the partial massage function and to resume
the full back massage function.
16
SPOT
SPOT
Spot Back Massage
Press this button to select a spot massage for any part of the back.
Press this button once to activate the massage rollers.
Press the button again to stop the spot massage function and to resume
the full back massage function.
Note: The spot massage is not operable when the rolling function is
activated.
Setting Air Squeeze
AIR SQUEEZING
AIR SQUEEZING
STRONG
WEAK
17
AIR SQUEEZING (SEAT)
Seat Air Squeeze Control Button
Press this button to activate the seat air squeeze function.
Press the button again to stop the seat air squeeze function.
AIR SQUEEZING (CALVES)
Calves Air Squeeze Control Button
Press this button to activate the calves air squeeze function.
Press the button again to stop the calves air squeeze function.
INTENSITY (SEAT & CALVES)
Press these buttons to strong or weak the intensity of the seat and calves
air massage function
These control buttons will not function in auto massage mode.
08
Troubleshooting
This massage chair is controller by microcomputer and is susceptible to power surge
even by +10% or -15%. The massage chair will show the following strange circumstance.
Situation
The Massage Chair cannot operate
even though it has been connected
to the power supply.
During operation, the Controller is
working but not the Massage Chair.
During operation, both Controller
and the Massager Chair are not
working.
09
●
●
●
●
●
Solution
1) Check where the plug is well
connected and working well.
2) Check whether the switch on the
Massager Chair is turned to “I” position.
The Massage Chair could be overheated
after prolonged use. It will automatically
cool down to resume its normal condition.
Please turn off the power and allow the
Chair to cool off for 30 to 50 minutes.
1) In the auto timing mode, when the
timing is appropriate. Repress the
power switch.
2) Switch Off power and switch ON
again to activate the Chair.
Product Maintenance
Avoid using water and other cleaning detergent to clean.
Do not stack, pull harshly, stab or slit the surface of the massage chair.
Please press the buttons softly during operation, avoid hitting with hard object.
Please pull out the power supply plug after using.
The recommend duration of the operation is 30 minutes. It is not advisable to
exceed the suggested time.
18
www.osakimassagechair.com