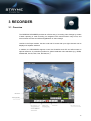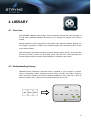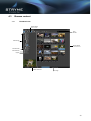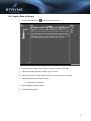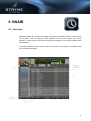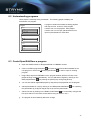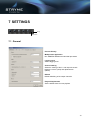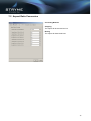
1
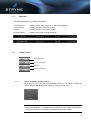
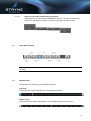
User manual
Version 1.0
Copyright and Disclaimer
Copyright © 2011 STRYME GmbH. All rights reserved.
Your rights to the software are governed by the accompanying software license agreement. The owner or authorized
user of a valid copy of GENESIX software may reproduce this publication for the purpose of learning to use such
software. No part of this publication may be reproduced or transmitted for commercial purposes, such as selling copies of
this publication or for providing paid for support services.
Information in this document is subject to change without notice and does not represent commitment on the part of
STRYME GmbH.
Note: Because STRYME frequently releases new versions and updates to its system software, applications, and Internet
sites, images shown in this manual may be slightly different from what you see on your screen.
Trademarks
The STRYME logo is a trademark of STRYME GmbH, registered in the European Union and other countries. Every effort
has been made to ensure that the information in this manual is accurate. STRYME is not responsible for printing or
clerical errors.
STRYME GmbH
Dovskygasse 5/2
1130 Vienna
Austria
tel
fax
email
web
+43 1 968 11 62
+43 1 968 11 62 – 99
[email protected]
www.stryme.com
2
CONTENTS
1
GENERAL .................................................................................................................................... 6
1.1
1.1.1
Video information .................................................................................................................. 6
1.1.2
Audio information .................................................................................................................. 7
1.1.3
Timer .................................................................................................................................... 7
1.1.4
Video Settings....................................................................................................................... 8
1.2
2
Additional functions.............................................................................................................. 10
PLAYER ..................................................................................................................................... 11
2.1
Overview ............................................................................................................................. 11
2.1.1
Status bar ............................................................................................................................12
2.1.2
Output Controls....................................................................................................................12
2.1.3
Player Main Controls............................................................................................................13
2.1.4
Navigation bar......................................................................................................................13
2.2
3
User Interface ........................................................................................................................ 6
Video playback .................................................................................................................... 14
2.2.1
Content from GENESIX Library ............................................................................................14
2.2.2
Content from Windows Explorer ...........................................................................................14
2.2.3
Using the Player’s “Open file” dialog.....................................................................................14
2.3
Multichannel playback ......................................................................................................... 14
2.4
Aspect Ratio Conversion ..................................................................................................... 15
2.5
Channel linking .................................................................................................................... 16
2.6
Scaling ................................................................................................................................ 16
RECORDER ............................................................................................................................... 17
3.1
Overview ............................................................................................................................. 17
3.2
VTR-Controls on/off ............................................................................................................. 18
3.3
Record Video....................................................................................................................... 18
3.3.1
Crash recording ...................................................................................................................18
3
3.3.2
3.4
4
5
6
Batch capturing ....................................................................................................................18
Multichannel Ingest .............................................................................................................. 18
LIBRARY .................................................................................................................................... 19
4.1
Overview ............................................................................................................................. 19
4.2
Understanding Library ......................................................................................................... 19
4.3
Browse content .................................................................................................................... 20
4.3.1
Thumbnail view ....................................................................................................................20
4.3.2
List view...............................................................................................................................21
4.4
Import files to library ............................................................................................................ 22
4.5
Edit Metadata ...................................................................................................................... 23
4.6
Playlist & Program editor ..................................................................................................... 24
4.7
Favorites folder.................................................................................................................... 24
4.8
Filter & Search..................................................................................................................... 25
4.9
Logfiles................................................................................................................................ 25
PLAYOUT ................................................................................................................................... 26
5.1
Overview ............................................................................................................................. 26
5.2
Playout toolbar .................................................................................................................... 27
5.3
Create a playlist ................................................................................................................... 27
5.3.1
Add video content ................................................................................................................27
5.3.2
Add live content ...................................................................................................................27
5.3.3
Add placeholder ...................................................................................................................27
5.3.4
Set clip actions.....................................................................................................................28
5.3.5
Set GPI events....................................................................................................................28
5.4
Instant mode........................................................................................................................ 29
5.5
Multichannel Playout............................................................................................................ 30
ONAIR ........................................................................................................................................ 31
6.1
Overview ............................................................................................................................. 31
6.2
Understanding programs ..................................................................................................... 32
6.3
Create/Open/Edit/Save a program ....................................................................................... 32
6.4
Main controls ....................................................................................................................... 33
4
7
SETTINGS .................................................................................................................................. 34
7.1
General ............................................................................................................................... 34
7.2
Aspect Ratio Conversion ..................................................................................................... 35
7.3
GPI...................................................................................................................................... 36
7.4
TCP..................................................................................................................................... 37
7.5
VTR..................................................................................................................................... 38
7.6
Keyboard Shortcuts ............................................................................................................. 39
7.7
Library ................................................................................................................................. 40
7.8
Global.................................................................................................................................. 41
5
1 GENERAL
GENESIX is the perfect workflow solution for professional broadcasting. GENESIX stands out with
impressive stability, flexibility and performance: in its modular make-up from Ingest right up to Playout,
and in its sophisticated and uniform user interface.
With functions reduced to the bare essentials the design satisfies even the most demanding users. In
practice, recurring tasks are carried out simply and efficiently.
With just the right amount of “brawn and brains“ GENESIX adds muscle to daily broadcasting.
Unique effect
Broadcasting - made easier, more efficient and cheaper!
1.1 User Interface
1.1.1
Video information
The video information provides an overview of the video-properties of the video clip.
6
1.1.2
Audio information
The audio information provides an overview of the audio-properties and allows you to
monitor the audio levels directly in the Player window. It also shows the count of audio stereo
tracks.
1.1.2.1
External audio monitor
Click the AUDIO-MONITOR button to show/hide
the separate audio monitor window that allows you
to monitor up to 8 channels.
1.1.3
Timer
The timer displays the current position of the clip. It provides count-up as well as count-down
mode.
Count-Up mode
Hours : Minutes : Seconds . Frames
Count-Down mode
The progress bar also turns into count-down mode.
7
1.1.3.1
Separate Timer window
Click the TIMER button to show/hide the
separate timer window.
1.1.3.2
Jump to exact position
Click the timecode to enter an exact
position. Confirmed by <Enter/Return> the
Player jumps to the entered position
immediately. Use <Tab> to navigate within
the timecode.
1.1.4
Video Settings
1.1.4.1
Link content
GENESIX Player allows you to link one video file with another one. Before activating
or loading the linked content you have to set up a secondary output-channel as
described in chapter 2.1.5.2
1.1.4.2
Use
1.1.4.3
Loop
the
LOOP
button
to
turn
on/off
the
loop
playback
mode.
Fade In/Out
Use the FADE IN/OUT button to activate the fade in/out function.
Set Fade In/Out
Right-click on the Fade In/Out button opens the configuration menu. Use the
markers to set time or frame-based fade in/out transitions.
8
1.1.4.4
Overlay graphics
Use the OVERLAY button to activate/deactivate overlay graphics.
Open overlay graphics
Right-Click on the OVERLAY button and select “Load overlay” to open an overlay file
or drag & drop an overlay file directly from GENESIX Library.
NOTE GENESIX supports TGA files as overlay graphics.
1.1.4.5
Opacity
Use the OPACITY button to activate/deactivate opacity for overlay graphics.
Right click on the OPACITY button enables configuration.
1.1.4.6
Position
Right click on the POSITION button enables to position the overlay graphics.
1.1.4.7
Set Mark In/Out
Set Mark
Click on the arrow beside the Mark In/Out
time display and select “Set mark...” to set
the current position as Mark In or Out.
9
Direct input
Click on the Mark In/Out time and enter the
timecode directly.
1.2 Additional functions
1.2.1.1
GPI control on/off
Use the GPI button to enable/disable GPI controls.
1.2.1.2
ShuttlePro on/off
Use the SHUTTLEPRO button to enable/disable ShuttlePro controls.
1.2.1.3
TCP on/off
Use the TCP button to enable/disable TCP controls.
1.2.1.4
Keyboard shortcuts on/off
Use the Keyboard button to enable/disable keyboard shortcuts.
1.2.1.5
Wide screen signalling (WSS) on/off
Use the WSS button to enable/disable wide screen signalling.
1.2.1.6
Frame Grabbing
For saving the current frame as a file or copy it to the clipboard click on the
GRAB FRAME button. You also can use the selected frame as preview
picture in Library.
10
2 PLAYER
2.1 Overview
The GENESIX PLAYER is an easy to use, professional application to view video footage on
a computer screen or on a video monitor. Besides an efficient operation with Jog, Shuttle or
Super Slow Motion and an individually configured work space, all relevant information is
shown on a uniform display.
Recurring tasks, such including in/out markers, adding graphic overlays, trimming video
clips, and linking channels, are carried out with the simple click of a mouse button directly in
the PLAYER.
On top of that, the PLAYER provides simultaneous up-/down- and aspect ratio conversions
with optional WSS signaling. The PLAYER supports control via ShuttlePro, GPI and TCP,
and can be started in multiple instances (subject to the number of video outputs).
11
2.1.1
Status bar
The status bar displays the following information:
2nd channel info:
Displays linked channel and up- or downscaling settings.
Linked content:
Displays the title of the linked content.
Overlay:
Displays the title of the graphic overlay.
Dropped frames:
Displays the number of dropped frames.
2.1.2
Output Controls
Primary output channel
Video format information
Aspect Ratio
Secondary output channel
2.1.2.1
Select the primary output-channel
Depending on your video card and GENESIX license you can select a number of
output channels. Set „Preview“ for output on computer screen only.
NOTE By selecting the video channel the video card initializes the channel with
settings from GENESIX configuration menu. Depending on the video card this takes
1-3 seconds. If a channel is selected it can’t be used by other modules.
12
2.1.2.2
Select the secondary output-channel (optional)
Depending on your video card and GENESIX license you can use a second output
channel for simultaneous up/down conversion or playback of linked content.
2.1.3
Player Main Controls
NOTE: Each function can be configured as keyboard and/or ShuttlePro shortcut and/or GPI
command.
2.1.4
Navigation bar
The navigation bar offers Jog (J) and Shuttle (S) mode.
Jog-mode
In Jog-mode the marker represents the current playback position.
Shuttle- mode
In Shuttle-mode the marker represents the current playback speed and direction.
13
2.2 Video playback
NOTE
Before using the Player it’s it required to select an output channel. When changing between PAL and HD the
videocard automatically re-initialises the output channel which takes 1-3 seconds, depending on your video card.
2.2.1
Content from GENESIX Library
Drag the video clip directly from the Library window and drop it in the Player window.
2.2.2
Content from Windows Explorer
Drag the video file directly from the Windows Explorer and drop it in the Player window.
2.2.3
Using the Player’s “Open file” dialog
1. Right-click the EJECT button.
2. Click “Load…”
3. Select your video-file.
2.3 Multichannel playback
Depending on the number of outputs you can start up to 4 instances of the player module in order to
playback 4 channels simultaneously.
NOTE
If you activate the “share” option in Settings – GPI menu as well as in the player you can control all instances
simultaneously (ex. start/stop playback) with a single GPI command:
14
2.4 Aspect Ratio Conversion
As described in chapter 2.1.2 it is possible to do a live conversion from 4:3 to 16:9 or 16:9 to 4:3. Just
select the correct aspect ratio from the dropdown menu for the output destination and GENESIX does
the conversion depending on the aspect ratio of the clip.
There are two different ways to do the conversion – cropping or boxing. This setting can be changed
as described in chapter 7.2. The following picture will show how the conversion is done.
The next picture shows the conversion from a 4:3 clip to a 16:9 output:
The next picture shows the conversion from a 16:9 clip to a 4:3 output:
15
2.5 Channel linking
With GENESIX it is possible to play out two clips synchronic on two channels. To setup the second
playout channel please see chapter 2.1.2.2.
After the second channel was initialized another clip can be loaded by Drag & Drop. If the first clip
starts to play the other clip at the other channel starts to play exact at the same time.
This feature is very helpful if there are two clips, one with the fill content and the other with the key
content. These clips have to start exactly at the same frame.
2.6 Scaling
With GENESIX it is possible to do an up- or downscaling from SD to HD or HD to SD on the fly.
This is done by selecting the secondary channel described in chapter 2.1.2.2.
The scaling can be performed from 576i50 to the resolution 720p50 and 1080i50, from 720p50 to
576i50 and 1080i50 or from 1080i50 to 576i50 and 720p50.
It is also possible to do an aspect ratio conversion while doing a scaling.
This feature is very helpful if you playout a HD Playlist and it is also necessary to have the same
Playlist in SD format. So there is no need to have a separate Playlist with separate files – just select
the downscaling and GENESIX does the work for you.
16
3 RECORDER
3.1 Overview
The GENESIX RECORDER provides an efficient way of recording video footage by means
of batch capturing or crash recording. Its integrated VTR controls make it easy to use, and
ensure frame accurate and efficient digitalization of video footage.
Just like in the Player module, the time code and VU meter with up to eight channels can be
displayed in separate windows.
In addition, the RECORDER supports control via ShuttlePro and GPI and offers users an
optional selection of pre-defined profiles for global broadcast video standards (e.g. RDD9,
XDCAM HD, P2 HD, HDV, D10, DVCAM, etc.).
17
3.2 VTR-Controls on/off
GENESIX Recorder supports VTR control over 422 serial cable. Use the VTR CONTROL
button to enable/disable VTR control from Recorder.
3.3 Record Video
3.3.1
Crash recording
Click the RECORD button to start recording.
3.3.2
Batch capturing
Enter the start and end time in the In/Out marker fields and then click the RECORD button.
NOTE
Before using the Recorder it’s it required to select an input channel.
3.4 Multichannel Ingest
Depending on the number of inputs and GENESIX license you can start up to 4 instances of the
recorder module in order to record 4 channels simultaneously.
NOTE
If you activate the “share” option in Settings – GPI menu as well as in the recorder you can control all instances
simultaneously (ex. Start/stop recording) with a single GPI command:
18
4 LIBRARY
4.1 Overview
With GENESIX LIBRARY video footage, audio and graphics material are easily managed on
an XML basis. GENESIX LIBRARY also allows you to manage the playlists of the Playout
module.
Besides traditional content management and editing freely defined metadata, playlists can
be managed, generated or edited via an integrated playlist editor and without direct access
to the Playout module.
With automatically generated thumbnail previews, different display options, as well as filter
and search functions, content can be located quickly. With the click of a mouse button the
favorites folder ensures the system-wide availability of frequently used content.
4.2 Understanding Library
GENESIX Library represents a specified folder or harddisk on your computer or network.
Library automatically creates thumbnail previews (JPG) and XML files (CNT) containing
video and audio information as well as individual metadata for each video clip. In order to
keep the interface clean, Library shows all these related files as one clip.
CLIP
PREVIEW
MXF
WAV
WAV
METADATA
IMPORT
XML
MXF
WAV
WAV
JPG
CNT
automatically generated by Genesix
19
4.3
Browse content
4.3.1
Thumbnail view
Display settings
Grid- / List-view
Filter
function
Video Storage
Content window
in thumbnail mode
Favorites folder
Search function
Logfiles
Thumbnail zoom level
Disc usage
20
4.3.2
List view
21
4.4 Import files to library
a. Click the IMPORT button
to open the import window.
b. Enter the frame number which should be used for preview thumbnails.
c.
Select file handling method for import. (copy or move)
d. Select source drive or folder where the clips you want to import are located
e. Select/Deselect clips you want to import
a. Optional select category
f.
Select destination folder in library
g. Click the “Import” button.
22
4.5 Edit Metadata
Double click on a clip to open the properties window.
You can set custom metadata fields in the global tab in the settings menu.
23
4.6 Playlist & Program editor
With Library you can create, edit and manage playlists and programs even if you don’t have
installed the PLAYOUT or ONAIR module on your computer. The built-in playlist editor offers
full functionality. (for further information about playlist editing, see chapter 5 and 6)
4.7 Favorites folder
Drag & Drop overlay graphics into the favourites folder in order to create a shortcut to the
original source. You can access this folder through right click on the overlay-button.
24
4.8 Filter & Search
GENESIX LIBRARY offers two methods for searching content.
Filter
The filter function on the top-right corner of the LIBRARY window filters the current folder for
the entered code.
Search
By clicking on the “Search” folder the datafield from the filter-function turns into a search
field. Using search, GENESIX LIBRARY search through all directories and delivers the
output into the search folder.
4.9 Logfiles
Within the Logfiles folder you can access all Logfiles created by GENESIX.
25
5 PLAYOUT
5.1 Overview
GENESIX PLAYOUT is a professional and sturdy playout application. In a stand-alone
operation it can easily be integrated into or controlled by existing systems.
The support of a variety of video formats, aspect ratios, live inputs and graphics within the
playlist, as well as a simultaneous up- or down-conversion on a second channel provide
maximum flexibility.
In addition, GENESIX PLAYOUT offers the instant mode that was especially designed for
live broadcasts. It plays video clips instantly upon mouse click or GPI command. Presenters
will welcome an optimized touch screen.
26
5.2 Playout toolbar
5.3 Create a playlist
Every time you open the PLAYOUT module you start with an empty playlist. If you’ve already loaded a
playlist click on the “New playlist” button in order to create a new one.
5.3.1
Add video content
Drag & drop the video clips from Library directly into the playlist.
5.3.2
Add live content
5.3.2.1
Select input channel
Select the input channel in the same dropdown menu as
output channel.
5.3.2.2
Add live item
Click on the„Live item“ button to add a placeholder for an input channel. You can set
duration time for the live item or set the action to „Loop“ for live input unless you click
the „Next“ button.
NOTE It is required to select an input channel as shown in 5.3.2.1.
5.3.3
Add placeholder
Click on „Add placeholder“ button to add a placeholder. You can edit the duration of the
placeholder by click on the duration time.
27
5.3.4
Set clip actions
With actions you can set the playback behaviour of PLAYOUT. You can set actions for the
whole playlist or individually for each clip.
Next
(default)
Play next clip after clip is finished.
Loop
The „Loop“ action loops the clip until manual input.
Stop
Playout stops after playing the clip.
5.3.5
Set GPI events
You can set GPI events for each clip.
NOTE
Before using GPI events you have enable GPI in settings as described in chapter 7.
28
5.4 Instant mode
Switch from Flow–mode (default) to Instant-mode
The instant mode plays clips on a single click - instantly
- without delay.
Add clips in Flow-mode and then switch to instant mode.
Instant mode view
29
5.5 Multichannel Playout
Depending on the number of outputs you can start up to 4 instances of the playout module in order to
playback 4 channels simultaneously.
NOTE
If you activate the “share” option in Settings – GPI menu as well as in the playout module you can control all
instances simultaneously (ex. start/stop playback) with a single GPI command:
30
6 ONAIR
6.1 Overview
GENESIX ONAIR is a flexible and reliable 24/7 playout automation solution for SD and/or
HD. Functions, such as inserting overlay graphics, GPI and TCP support, and saving
playlists in a XML format, ensure easy handling and integration into existing infrastructures
and processes.
The program-based structure offers an efficient and clear user interface for scheduling and
time controlled broadcasts.
31
6.2 Understanding programs
OnAir plays the videoclips using a timetable. The following graphics displays the
architecture of a program:
Program
Playlist
Clip
Live – Input
Placeholder
A program contains a timetable including playlists
and clips for max. 24 hours. Each program
contains one or more playlists. Each playlist
contains one or more clips, placeholders for liveinputs or placeholders for video files.
Playlist
Clip
Clip
Playlist
Clip
Clip
Clip
6.3 Create/Open/Edit/Save a program
a. Open the ONAIR module or “Programs” folder in LIBRARY module.
b. Click on the “New program” button
and enter the name and video-standard for the
new program or click on the ”Load program” button
program.
c.
in order to open an existing
Drag & Drop clips from LIBRARY into the program-window. With the first clip a new
playlist is being created automatically. You can add further Playlist by clicking on the
“New playlist” button
or by holding the [SHIFT]-Key during Drag & Drop.
d. You can also add an applicable playlist by drag & drop the playlist file into the program.
e. Add a placeholder for a clip by clicking on the “Add placeholder” button
this placeholder by a clip just drag & drop a clip over the placeholder.
f.
. For replacing
Add a Live-Item by clicking on the “Add live-item” button . It is necessary configure the
live-input-channel in the OnAir module before using as shown in 5.4.1.
g. The program is saved instantly after each change.
32
6.3.1.1
Lock playlist to a specific point in time
By entering a start time manually in the “Time” column of a playlist it’s point in time is
locked automatically (lock symbol is activated). This means that this playlist will start
on the entered time regardless of gaps. The lock can be reversed by right click on
the locker symbol and then choose “None”.
The following illustration should help you understanding the automated clip-on-clip
timing interrupted by a gap before a locked playlist.
15:00:00.00
Program
Playlist 1
Clip (00:01:00.00)
15:01:00.00
Live – Input (00:02:00.00)
15:03:00.00
Placeholder (00:03:00.00)
15:06:00.00
Playlist 2
Clip (00:01:00.00)
15:07:00.00
Clip (00:01:00.00)
15:08:00.00
15:09:59.25
GAP
Playlist 3
15:10:00.00
15:10:00.00
Clip (00:01:00.00)
15:11:00.00
Clip (00:01:00.00)
15:12:00.00
Clip (00:01:00.00)
Note: It is not possible to add content to the previous playlist (of the locked playlist) if
these content will overrun the locked point of time! In the example above the you can
fill the gap with a clip <= 00:01:59.25 duration.
6.4 Main controls
When OnAir is not active it offers player’s main controls and full flexibility of the player
module.
Like in Player you can use the Load/Eject Button to load a clip or drag & drop it from below
Playlist or Library into the preview-window.
When OnAir is active the main controls turn into playout automation actions.
33
7 SETTINGS
Settings
About/Activation
7.1 General
Process Priortiy
Multiprocess application
Run GENESIX Modules as individual processes.
Logging Level
Set the logging level
Channel naming
Select the naming of the in- and output channels
between numeric (1234) and alphanumeric
(ABCD)
Default
Default initialising of the output channels.
Playout Playlistname
Set the default name for new playlists.
34
7.2 Aspect Ratio Conversion
Converting Method:
Cropping
The output will be zoomed and cut.
Boxing
The output will have black bars.
35
7.3 GPI
NOTE: Optional GPI board is required.
Enable GPI
Activate the checkbox to enable GPI.
Shared
Activate to share GPI control between different
instances of the GENESIX modules.
Impulsed
Sends 100ms impulse instead of permanent
contact
Channel
Choose 1, 2 or 4 Channels for use. You can set
up each channel individually.
36
7.4 TCP
Enable the checkbox and enter the IP address
and port of the network adapter which is
designated for incoming TCP commands.
Use 0.0.0.0 to allow commands through all
network adapters.
Shared
Use the “Shared” option to execute the
command on designated modules
simultaneously.
37
7.5 VTR
Enable the checkbox and choose the serial port
where VTR is connected to use VTR controls in
Recorder module.
38
7.6 Keyboard Shortcuts
You can setup your keyboard shortcuts
individually in keyboard tab in the settings menu.
Click on “Create default shortcuts” to create or
reset to default shortcuts.
Function
Shortcut
Function
Shortcut
Stop/Play
Space
Save
S
Play
P
Eject
E
Stop
Q
SpeedUp
+
Record
C
SpeedDown
-
StepREW
Left
MarkIn
I
StepFWD
Right
MarkOut
O
Begin
Home
Loop on/off
L
End
End
Prev
A
FWD
F
Next
Y
REW
R
39
7.7 Library
Set the drive and directory for your video library.
The file watcher interval represents the
refreshing interval.
40
7.8 Global
Categories
Set category name and color code.
Create custom metadata fields
Name
Fieldname
Type
String
41