1
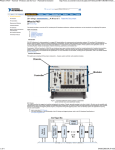
SET UP YOUR PXI-MXI™-3 SYSTEM
1. Install Your Software
Your PXI-MXI-3 kit includes a setup program for the Microsoft Windows
operating system. The setup program works the same way for
Windows 2000/NT/XP/Me/9x. Users of other operating systems can
ignore this section.
The software included for Microsoft Windows optimizes National Instruments PXI
module performance across a PCI-PCI bridge. The software does not affect PXI or
CompactPCI modules from other vendors.
Note
The setup program is an interactive application that installs the MXI-3
software and configures your system for use with the MXI-3 boards.
Follow these steps to perform the installation.
Note
You can quit the setup program at any time by choosing the Cancel option.
1.
Insert the disk labeled MXI-3 Software for Windows.
2.
Select Start»Run and type the following text (where X is the drive
letter of your floppy drive):
X:\setup.exe
3.
Press <Enter>.
4.
Click the Next button at the Welcome screen to start the installation.
You must accept the license agreement to enable installation.
5.
The setup program now copies the necessary files to your hard drive.
When the installation process is complete, you must reboot your
computer for the changes to take effect.
6.
Review the information in the README.TXT file for the most
up-to-date information on your MXI-3 board.
MXI™, National Instruments™, NI™, and ni.com™ are trademarks of National Instruments Corporation. Product and
company names mentioned herein are trademarks or trade names of their respective companies. For patents covering
National Instruments products, refer to the appropriate location: Help»Patents in your software, the patents.txt file
on your CD, or ni.com/patents.
ni.com
© 1999–2002 National Instruments Corp. All rights reserved.
September 2002
322342C-01
2a. Set Up Your PC-to-PXI/CompactPCI Chassis System
Primary System (PCI-MXI-3)
Secondary Chassis (PXI-MXI-3)
Figure 1. PC-to-PXI/CompactPCI Configuration
To install the hardware in a PC-to-PXI/CompactPCI configuration,
complete the following steps:
1.
Power off the system before installing your hardware.
2.
In the primary system (PC), install a PCI-MXI-3 in any slot.
3.
Remove the protective caps from the board and cable connectors.
Fiber optic cables are fragile. Handle the fiber optic cables included with your kit
with care. Do not crush the cables. The minimum bend radius for these cables is specified
at no less than a 6 in. OD reel; do not bend them beyond the minimum bend radius.
Caution
4.
In the secondary PXI/CompactPCI chassis, install a PXI-MXI-3 in
Slot 1.
5.
Connect the cable to the PC and chassis.
6.
Power on the secondary chassis and then the PC. When daisy-chaining
MXI-3 controllers, power on the chassis starting with the chassis
furthest from the host controller.
On some Windows systems, the OS detects the MXI-3 interface as a “PCI Standard
PCI-to-PCI Bridge,” and Windows may ask you to specify the location of a device driver
information (.inf) file. If this occurs, accept the default choices by clicking Next when
prompted.
Note
Set Up Your PXI-MXI-3 System
2
ni.com
2b. Set Up Your Multichassis System
Primary Chassis (PXI-MXI-3)
Secondary Chassis (PXI-MXI-3)
Figure 2. Multichassis (PXI/CompactPCI-to-PXI/CompactPCI) Configuration
To install the hardware in a multichassis (PXI/CompactPCI-to-PXI/
CompactPCI) configuration, follow these steps:
1.
Power off the system before installing your hardware.
2.
Remove the protective caps from the board and cable connectors.
Fiber optic cables are fragile. Handle the fiber optic cables included with your kit
with care. Do not crush the cables. The minimum bend radius for these cables is specified
at no less than a 6 in. OD reel; do not bend them beyond the minimum bend radius.
Caution
3.
In the primary PXI/CompactPCI chassis, install a PXI-MXI-3 in any
slot except Slot 1.
4.
In the secondary PXI/CompactPCI chassis, install a PXI-MXI-3 in
Slot 1.
5.
Connect the cable to the chassis.
6.
Power on the secondary chassis and then the primary chassis. When
daisy-chaining MXI-3 controllers, power on the chassis starting with
the chassis furthest from the host controller.
On some Windows systems, the OS detects the MXI-3 interface as a “PCI Standard
PCI-to-PCI Bridge,” and Windows may ask you to specify the location of a device driver
information (.inf) file. If this occurs, accept the default choices by clicking Next when
prompted.
Note
Troubleshooting Your System
What if the computer does not boot?
If the computer does not boot, try these possible solutions:
•
© National Instruments Corporation
Be sure the MXI-3 boards are properly seated and placed in the
proper slots.
3
Set Up Your PXI-MXI-3 System
•
Be sure the cable ends are fully inserted into the MXI-3 board
connectors. The MXI-3 link light should stay on continuously while
the system is powered on. If the LED flashes at any time, the link has
been lost, possibly due to a loose connection.
•
Remove all PXI devices from the chassis and reboot. (Windows XP
users should not attempt this solution, as it causes the PC to crash with
a blue screen. Refer to the following question.)
Why does my computer crash with a blue screen in Windows XP with
just the MXI-3 kit and a chassis connected?
Windows XP expects your MXI-3 kit to connect your computer to a
chassis containing PXI/CompactPCI devices. Windows XP crashes if no
such devices are present, so do not connect your Windows XP computer to
an empty chassis using MXI-3. If you remove your devices, leave at least
one PXI/CompactPCI device in the chassis while troubleshooting. (This
behavior may change in future versions of Windows XP.)
What if MXI-3 is not detected in the system?
The MXI-3 optimization software uses a pop-up box to report that the
MXI-3 was not detected. If this happens, try these possible solutions:
•
Be sure to power on the chassis in the proper sequence. When
daisy-chaining MXI-3 controllers, power on the chassis in reverse
order, starting with the chassis furthest from the host controller.
•
Be sure the cable ends are fully inserted in the MXI-3 board
connectors. The MXI-3 link light should stay on continuously while
the system is powered on. If the LED flashes at any time, the link has
been lost, possibly due to a loose connection.
What if the PXI/CompactPCI boards are not detected?
If the PXI/CompactPCI boards are not detected, try these solutions:
•
If the boards in the chassis do not appear in MAX, refresh the screen
(press <F5>). If the boards in the chassis still do not appear, check the
Device Manager. Delete any Unknown Devices with yellow question
marks next to them, and select Scan for Hardware Changes or
Refresh in the Device Manager.
•
If you can see a device in the Device Manager, but it is not working or
the driver is not detecting it, refer to the device documentation. It may
be helpful to remove working devices during troubleshooting.
Note For more information, refer to the PXI-PCI 8330 Series User Manual or the PXI
support section of the National Instruments Web site at ni.com/support/pxisupp.htm.
*322342C-01*
322342C-01
Sep02