1
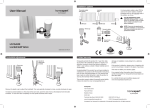
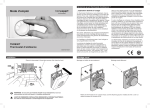
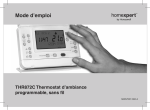
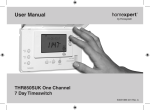
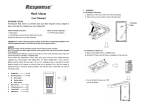
About your new cylinder thermostat
User Manual
The Honeywell THR810L is an easily installed thermostat
that controls the temperature in your hot water storage
cylinder.
Installation is quick and simple. Just connect wiring as
directed, then strap the thermostat to the hot water tank
with the supplied elastic cord. There is no need to drain
the water tank.
Features:
• Reliable bimetal Micro Switchtm technology assures
that your hot water temperature is maintained at a
comfortable level.
• Clearly marked dial is scaled to ensure accurate
temperature control.
• Secure design helps to prevent accidental changes
to temperature setting.
THR810LUK
Cylinder Thermostat
®
50051988-001 Rev. A
Installation
Wiring
1 Make sure electrical power is off.
Connect wiring system to the thermostat as
shown at left. See wiring diagram on next page
for details.
Terminal
screws
2 Use a screwdriver to remove the cover
from the thermostat as shown at left.
1 Make sure electrical power is off.
Cable
clamp
NOTE: If you are not experienced in
equipment installation, we recommend
that these procedures be done by a
professional installer.
2 Strip insulation to expose about 8 mm of
bare wire.
3 Use a screwdriver to loosen terminal screw,
insert wire into slot, then tighten screw.
4 Connect cable clamp to provide cable
strain relief.
DISCONNECT ELECTRIC POWER
BEFORE INSTALLATION: Can cause
electrical shock or equipment damage.
NOTE: All wiring must comply with IEE
regulations.
1.0 - 2.5 mm²
8 mm max.
Wiring diagram
Positioning and mounting
Measure water tank
and position thermostat
1/4 to 1/3 of height
(from the bottom).
80 mm
45 mm
• This device is intended only for use in normal domestic environments.
• All wiring must be in accordance with IEE Regulations.
• Use heat-resisting flexible cable rated at 85º C.
Thermostat
Tank
insulation
Thermostat
• A switch, having contact separation of at least 3mm in all poles, must be incorporated
in the fixed wiring as a means of disconnecting the mains supply.
Elastic cord
Cut elastic cord to
ensure tight fit, then
screw hooks into cord
and join as shown to
secure thermostat to
water tank.
• The thermostat is a Class II (double insulated) device requiring no earth connection.
• The heating system must incorporate a fuse rated at no more than 3 Amps.
Temperature control
Remove a section of
insulation as shown. Clean
cylinder surface to ensure
good surface contact.
Limited warranty
Honeywell warrants this product for 1 year from date
of purchase. We undertake to replace or repair at our
discretion, products should they become defective
within 1 year solely as a result of faulty materials and or
workmanship.
damage or installation costs arising from a defective
product.
Understandably if the product has not been installed or
maintained in accordance with Honeywell’s instructions,
has not been used appropriately or if any attempt has
been made to rectify, dismantle or alter the product in
any way the warranty will be invalidated.
This does not affect your statutory rights.
This product warranty states Honeywell’s entire liability.
It does not extend to cover consequential loss or
If the product is defective, please return it together with
a proof of purchase or receipt to the place of purchase.
If you require further information about this product,
call the homexperttm by Honeywell technical helpline on
0845 604 2893.
For a full list of terms and conditions please visit
www.homexpertbyhonyewell.com.
Honeywell
The Arnold Centre
Restricted control
Paycocke Road
Use a spade-tip screwdriver to adjust water
temperature as shown above.
Basildon, Essex
SS14 3EA
Technical Help Desk: 0845 604 2893
50051988-001 Rev. A
www.homexpertbyhoneywell.com © 2010 Honeywell International Inc
homexperttm by Honeywell is a trademark of Honeywell International Inc. All rights reserved.