Transcript
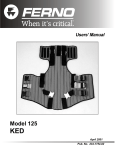
Prepare to check the brushes by first powering down and unplugging the machine. It is recommended
that you place a drop cloth around the base of the machine, since some fine black dust will come out of
the motor during this process.
Locate the 2 brush covers, they are on either side of the motor
toward the end of the motor that is away from the back display.
When removing the brush cover (unscrew them counter-clock-wise
with a standard screwdriver) you will notice an oval brass metal
plate that springs out of the hole a little bit.
Gently pull the plate (which has a spring and braided conductor
coming out of it) out until you see the square graphite post start to
come out.
Using a sharp object like a machine needle, mark the upper flat
surface of the brush with an R (for right) or an L (for left) so you can
put the brushes back in the hole they came out of and in the same
orientation (scribed letter up). Inspect the brushes for wear by
measuring their length. If the brushes are less than 3/8” – ¼” long,
measuring the graphite, they should be replaced.
With both brushes removed, use compressed air or canned air
to blow air through one hole and out the other; do this while
rotating the hand wheel and continue until the air coming out is
dust free. Note: you may want to lay down a drop cloth when
doing this step as you should expect to see a bit of black dust
come out of the motor.
Once the brush holders have been cleaned out, return the brushes
back to their respective positions, right brush in the right hole and left
brush in the left hole. New brushes can be installed without concern
for left or right; however, care should be taken to align the brushes so
the arc of the face of the brush follows the arc of the side of the
motor.
Push the brass colored plate into the hole with the cap and screw the
cap down just snugging it up. Don’t over tighten, the cap is made of
plastic not metal and can be damaged.
For more information, please refer to the Gammill User’s Manual.