1
Intel® Rapid Storage Technology
enterprise (Intel® RSTe) for
Linux OS
Software User’s Guide
June 2012
Document Number: 327602-001US
Reference Number: 454301, Revision: 1.0
INFORMATION IN THIS DOCUMENT IS PROVIDED IN CONNECTION WITH INTEL® PRODUCTS. NO LICENSE, EXPRESS OR
IMPLIED, BY ESTOPPEL OR OTHERWISE, TO ANY INTELLECTUAL PROPERTY RIGHTS IS GRANTED BY THIS DOCUMENT. EXCEPT
AS PROVIDED IN INTEL’S TERMS AND CONDITIONS OF SALE FOR SUCH PRODUCTS, INTEL ASSUMES NO LIABILITY
WHATSOEVER, AND INTEL DISCLAIMS ANY EXPRESS OR IMPLIED WARRANTY, RELATING TO SALE AND/OR USE OF INTEL
PRODUCTS INCLUDING LIABILITY OR WARRANTIES RELATING TO FITNESS FOR A PARTICULAR PURPOSE, MERCHANTABILITY,
OR INFRINGEMENT OF ANY PATENT, COPYRIGHT OR OTHER INTELLECTUAL PROPERTY RIGHT. Intel products are not intended for
use in medical, life saving, or life sustaining applications.
Intel may make changes to specifications and product descriptions at any time, without notice.
Designers must not rely on the absence or characteristics of any features or instructions marked "reserved" or "undefined." Intel
reserves these for future definition and shall have no responsibility whatsoever for conflicts or incompatibilities arising from future
changes to them.
The Intel® Matrix Storage Manager may contain design defects or errors known as errata which may cause the product to
deviate from published specifications. Current characterized errata are available on request.
Contact your local Intel sales office or your distributor to obtain the latest specifications and before placing your product order.
Intel, Intel® Matrix Storage Manager, Intel® Matrix Storage Technology, Intel® Rapid Recover Technology, and the Intel logo
are trademarks or registered trademarks of Intel Corporation or its subsidiaries in the United States and other countries.
*Other names and brands may be claimed as the property of others.
Copyright © 2012, Intel Corporation. All rights reserved.
Intel® Rapid Storage Technology enterprise (Intel® RSTe) for Linux OS
Software User’s Manual
2
June 2012
Document Number: 327602-001US
Contents
1
Introduction .....................................................................................................7
1.1
1.2
2
Intel® Matrix Storage Manager Features ............................................................ 11
2.1
2.2
2.3
2.4
2.5
2.6
2.7
2.8
3
Overview ............................................................................................ 26
User Interface ...................................................................................... 26
Version Identification ............................................................................ 26
RAID Volume Creation .......................................................................... 27
Volume Creation ............................................................................................. 32
5.1
5.2
5.3
5.4
5.5
5.6
6
Overview ............................................................................................ 25
Enabling RAID in BIOS .......................................................................... 25
Intel® Matrix Storage Manager Option ROM........................................................ 26
4.1
4.2
4.3
4.4
5
Feature Overview ................................................................................. 11
RAID 0 (Striping) ................................................................................. 11
RAID 1 (Mirroring) ................................................................................ 12
RAID 5 (Striping with Parity) .................................................................. 13
RAID 10 .............................................................................................. 14
Matrix RAID ......................................................................................... 15
Advanced Host Controller Interface ......................................................... 16
2.7.1
Native Command Queuing ........................................................ 16
2.7.2
Hot-Plug ................................................................................ 16
SAS Controller Unit ............................................................................... 17
2.8.1
SCU OEM Parameters ............................................................... 17
2.8.2
Linux libsas Sysfs Components .................................................. 18
RAID BIOS / EFI Configuration .......................................................................... 25
3.1
3.2
4
Terminology ..........................................................................................8
Reference Documents ........................................................................... 10
RAID Volume Creation .......................................................................... 32
Filesystem Creation on RAID Volume ....................................................... 33
RAID Volume Creation Examples ............................................................ 33
Adding a Spare Disk ............................................................................. 34
Creating RAID Configuration File............................................................. 34
RAID Volume Initialization / Resync ........................................................ 34
Volume Operations .......................................................................................... 35
6.1
6.2
6.3
6.4
6.5
6.6
6.7
6.8
6.9
Erasing RAID Metadata ......................................................................... 35
Volume Assemble ................................................................................. 35
Stopping the Volumes ........................................................................... 36
Reporting RAID Information ................................................................... 36
To Fail an Active Drive .......................................................................... 41
Remove a Failed Drive .......................................................................... 41
Report RAID Details from BIOS .............................................................. 41
Logging .............................................................................................. 42
Raid Level Migration ............................................................................. 43
June 2012
Document Number: 327602-001US
Intel® Rapid Storage Technology enterprise (Intel® RSTe) for Linux OS
Software User’s Manual
3
6.10
Freezing Reshape ................................................................................. 46
7
Online Capacity Expansion ............................................................................... 47
8
RAID Monitoring ............................................................................................. 48
8.1
8.2
8.3
8.4
9
Recovery of RAID Volumes ............................................................................... 53
9.1
9.2
9.3
10
SGPIO Utility ....................................................................................... 60
Ledctl Utility ........................................................................................ 61
Ledmon Service ................................................................................... 63
SAS Management Protocol Utilities .................................................................... 64
11.1
11.2
11.3
11.4
12
Removing Failed Disk(s) ........................................................................ 53
Rebuilding ........................................................................................... 54
Auto Rebuild ........................................................................................ 55
SGPIO ........................................................................................................... 60
10.1
10.2
10.3
11
mdmon ............................................................................................... 48
Monitoring Using mdadm ....................................................................... 49
Configuration File for Monitoring ............................................................. 51
Examples of monitored events in syslog................................................... 52
smp_discover ...................................................................................... 64
11.1.1 Examples ............................................................................... 64
smp_phy_control ................................................................................. 68
11.2.1 Examples ............................................................................... 68
smp_rep_manufacturer ......................................................................... 68
11.3.1 Examples ............................................................................... 68
smp_rep_general ................................................................................. 69
11.4.1 Examples ............................................................................... 69
MDRAID Sysfs Components .............................................................................. 70
Intel® Rapid Storage Technology enterprise (Intel® RSTe) for Linux OS
Software User’s Manual
4
June 2012
Document Number: 327602-001US
Figures
Figure 1. Matrix RAID ...................................................................................... 15
Figure 2. User Prompt...................................................................................... 26
Tables
Table
Table
Table
Table
Table
Table
Table
Table
1. RAID 0 Overview ................................................................................ 11
2. RAID 1 Overview ................................................................................ 12
3. RAID 5 Overview ................................................................................ 13
4. RAID 10 Overview ............................................................................... 14
5 mdadm monitor Parameters .................................................................. 49
6 Monitoring Events ................................................................................ 50
7 SGPIO Utility Options ........................................................................... 60
8 ledctl options ...................................................................................... 61
June 2012
Document Number: 327602-001US
Intel® Rapid Storage Technology enterprise (Intel® RSTe) for Linux OS
Software User’s Manual
5
Revision History
Document
Number
Revision
Number
327602
001
Description
Revision Date
June 2012
Initial Developer Release.
§
Intel® Rapid Storage Technology enterprise (Intel® RSTe) for Linux OS
Software User’s Manual
6
June 2012
Document Number: 327602-001US
Introduction
1
Introduction
The purpose of this document is to enable a user to properly set up and configure a
system using the Linux MDADM application for Intel Matrix Storage. It provides steps
for set up and configuration, as well as a brief overview on Linux MDADM features.
Note: The information in this document is only relevant on systems with a supported Intel
chipset that include a supported Intel chipset, with a supported operating system.
Supported Intel chipsets http://support.intel.com/support/chipsets/IMSM/sb/CS-020644.htm
Supported operating systems http://support.intel.com/support/chipsets/IMSM/sb/CS-020648.htm
Note: The majority of the information in this document is related to either software
configuration or hardware integration. Intel is not responsible for the software written
by third party vendors or the implementation of Intel components in the products of
third party manufacturers.
Customers should always contact the place of purchase or system/software
manufacturer with support questions about their specific hardware or software
configuration.
June 2012
Document Number: 327602-001US
Intel® Rapid Storage Technology enterprise (Intel® RSTe) for Linux OS
Software User’s Manual
7
Introduction
1.1
Terminology
Term
Description
AHCI
Advanced Host Controller Interface: an interface specification that
allows the storage driver to enable advanced Serial ATA features such
as Native Command Queuing, native hot plug, and power
management.
Continuous Update
Policy
When a recovery volume is using this policy, data on the master drive
is copied to the recovery drive automatically as long as both drives
are connected to the system.
Intel® Matrix Storage
Manager Option ROM
A code module built into the system BIOS that provides boot support
for RAID volumes as well as a user interface for configuring and
managing RAID volumes.
Master Drive
The hard drive that is the designated source drive in a recovery
volume.
Matrix RAID
Two independent RAID volumes within a single RAID array.
Member
A hard drive used within a RAID array.
Hot- Plug*
The unannounced removal and insertion of a Serial ATA hard drive
while the system is powered on.
NCQ
Native Command Queuing: a command protocol in Serial ATA that
allows multiple commands to be outstanding within a hard drive at the
same time. The commands are dynamically reordered to increase hard
drive performance.
On Request Update
Policy
When a recovery volume is using this policy, data on the master drive
is copied to the recovery drive when you request it. Only changes
since the last update process are copied.
OS
Operating System
Port0
A serial ATA port (connector) on a motherboard identified as Port0.
Port1
A serial ATA port (connector) on a motherboard identified as Port1.
Port2
A serial ATA port (connector) on a motherboard identified as Port2.
Port3
A serial ATA port (connector) on a motherboard identified as Port3.
POST
Power-On Self Test
SAS
Serial Attached SCSI
SCU
SAS Controller Unit
Intel® Rapid Storage Technology enterprise (Intel® RSTe) for Linux OS
Software User’s Manual
8
June 2012
Document Number: 327602-001US
Introduction
Term
Description
RAID
Redundant Array of Independent Drives: allows data to be distributed
across multiple hard drives to provide data redundancy or to enhance
data storage performance.
RAID 0 (striping)
The data in the RAID volume is striped across the array's members.
Striping divides data into units and distributes those units across the
members without creating data redundancy, but improving read/write
performance.
RAID 1 (mirroring)
The data in the RAID volume is mirrored across the RAID array's
members. Mirroring is the term used to describe the key feature of
RAID 1, which writes duplicate data to each member; therefore,
creating data redundancy and increasing fault tolerance.
RAID 5 (striping with
parity)
The data in the RAID volume and parity are striped across the array's
members. Parity information is written with the data in a rotating
sequence across the members of the array. This RAID level is a
preferred configuration for efficiency, fault-tolerance, and
performance.
RAID 10 (striping and
mirroring)
The RAID level where information is striped across a two disk array for
system performance. Each of the drives in the array has a mirror for
fault tolerance. RAID 10 provides the performance benefits of RAID 0
and the redundancy of RAID 1. However, it requires four hard drives.
RAID Array
A logical grouping of physical hard drives.
RAID Volume
A fixed amount of space across a RAID array that appears as a single
physical hard drive to the operating system. Each RAID volume is
created with a specific RAID level to provide data redundancy or to
enhance data storage performance.
Recovery Drive
The hard drive that is the designated target drive in a recovery
volume.
Recovery Volume
A volume utilizing Intel(R) Rapid Recover Technology.
Kilobyte
Unit mount for 1024 bytes or 210 bytes
Megabyte
Unit amount for 220 bytes
mdadm
mdadm is a Linux utility created by Neil Brown to manage software
RAID devices on Linux. It is available under the GPL license version 2
or later.
June 2012
Document Number: 327602-001US
Intel® Rapid Storage Technology enterprise (Intel® RSTe) for Linux OS
Software User’s Manual
9
Introduction
1.2
Reference Documents
Document
Document
No./Location
mdadm manpages
Linux
manpages
Ledmon manpages
Linux
manpages
SMP Utils manpages
Linux
manpages
Intel® Rapid Storage Technology enterprise (Intel® RSTe) for Linux OS
Software User’s Manual
10
June 2012
Document Number: 327602-001US
Intel® Matrix Storage Manager Features
2
Intel® Matrix Storage Manager
Features
2.1
Feature Overview
The Intel® Matrix Storage Manager software package provides high-performance
Serial ATA and Serial ATA RAID capabilities for supported operating systems.
Supported operating systems http://support.intel.com/support/chipsets/IMSM/sb/CS-020648.htm
The key features of the Intel® Matrix Storage Manager are as follows:
RAID 0
RAID 1
RAID 5
RAID 10
Matrix RAID
Intel® Rapid Recover Technology
Advanced Host Controller Interface (AHCI) support
SAS Controller Unit (SCU) support
2.2
RAID 0 (Striping)
RAID 0 uses the read/write capabilities of two or more hard drives working in parallel
to maximize the storage performance of a computer system.
Table 1 provides an overview of the advantages, the level of fault-tolerance provided,
and the typical usage of RAID 0.
Table 1. RAID 0 Overview
Hard Drives
Required:
2-6
Advantage:
Highest transfer rates
Faulttolerance:
None – if one disk fails all data will be lost
Application:
Typically used in desktops and workstations for maximum performance for
temporary data and high I/O rate. 2-drive RAID 0 available in specific mobile
configurations.
Refer to the following web site for more information on RAID 0:
http://support.intel.com/support/chipsets/iaa_raid/sb/CS-009337.htm
June 2012
Document Number: 327602-001US
Intel® Rapid Storage Technology enterprise (Intel® RSTe) for Linux OS
Software User’s Manual
11
Intel® Matrix Storage Manager Features
2.3
RAID 1 (Mirroring)
A RAID 1 array contains two hard drives where the data between the two is mirrored
in real time to provide good data reliability in the case of a single disk failure; when
one disk drive fails, all data is immediately available on the other without any impact
to the integrity of the data.
Table 2 provides an overview of the advantages, the level of fault-tolerance provided,
and the typical usage of RAID 1.
Table 2. RAID 1 Overview
Hard Drives
Required:
2
Advantage:
100% redundancy of data. One disk may fail, but data will continue to be
accessible. A rebuild to a new disk is recommended to maintain data
redundancy.
Faulttolerance:
Excellent – disk mirroring means that all data on one disk is duplicated on
another disk.
Application:
Typically used for smaller systems where capacity of one disk is sufficient
and for any application(s) requiring very high availability. Available in
specific mobile configurations.
Refer to the following web site for more information on RAID 1:
http://support.intel.com/support/chipsets/iaa_raid/sb/CS-009338.htm
Intel® Rapid Storage Technology enterprise (Intel® RSTe) for Linux OS
Software User’s Manual
12
June 2012
Document Number: 327602-001US
Intel® Matrix Storage Manager Features
2.4
RAID 5 (Striping with Parity)
A RAID 5 array contains three or more hard drives where the data and parity are
striped across all the hard drives in the array. Parity is a mathematical method for
recreating data that was lost from a single drive, which increases fault-tolerance. If
there are N disks in the RAID 5 volume, the capacity for data would be N – 1 disks.
For example, if the RAID 5 volume has 5 disks, the data capacity for this RAID volume
consists of four disks.
Linux MDRAID supports four types of parity layout. However, Intel IMSM only supports
the left-asymmetric parity layout.
Table 3 provides an overview of the advantages, the level of fault-tolerance provided,
and the typical usage of RAID 5.
Table 3. RAID 5 Overview
Hard Drives
Required:
3-6
Advantage:
Higher percentage of usable capacity and high read performance as well as
fault-tolerance.
Faulttolerance:
Excellent - parity information allows data to be rebuilt after replacing a failed
hard drive with a new drive.
Application:
Storage of large amounts of critical data. Not available in mobile
configurations.
Refer to the following web site for more information on RAID 5:
http://support.intel.com/support/chipsets/IMSM/sb/CS-020653.htm
June 2012
Document Number: 327602-001US
Intel® Rapid Storage Technology enterprise (Intel® RSTe) for Linux OS
Software User’s Manual
13
Intel® Matrix Storage Manager Features
2.5
RAID 10
A RAID 10 array uses four hard drives to create a combination of RAID levels 0 and 1.
It is a striped set whose members are each a mirrored set.
Table 4 provides an overview of the advantages, the level of fault-tolerance provided,
and the typical usage of RAID 10.
Table 4. RAID 10 Overview
Hard Drives
Required:
4
Advantage:
Combines the read performance of RAID 0 with the fault-tolerance of RAID
1.
Faulttolerance:
Excellent – disk mirroring means that all data on one disk is duplicated on
another disk.
Application:
High-performance applications requiring data protection, such as video
editing. Not available in mobile configurations.
Refer to the following web site for more information on RAID 10:
http://support.intel.com/support/chipsets/IMSM/sb/CS-020655.htm
Intel® Rapid Storage Technology enterprise (Intel® RSTe) for Linux OS
Software User’s Manual
14
June 2012
Document Number: 327602-001US
Intel® Matrix Storage Manager Features
2.6
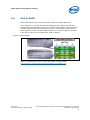
Matrix RAID
Matrix RAID allows you to create two RAID volumes on a single RAID array.
As an example, on a system with an Intel® 82801GR I/O controller hub (ICH7R),
Intel® Matrix Storage Manager allows you to create both a RAID 0 volume as well as
a RAID 5 volume across four Serial ATA hard drives. An important requirement the
Matrix RAID has is that in a Matrix RAID container, the volumes inside the container
must span the same set of member disks. Refer to Figure 1.
Figure 1. Matrix RAID
Refer to the following web site for more information on matrix RAID:
http://support.intel.com/support/chipsets/IMSM/sb/CS-020681.htm
June 2012
Document Number: 327602-001US
Intel® Rapid Storage Technology enterprise (Intel® RSTe) for Linux OS
Software User’s Manual
15
Intel® Matrix Storage Manager Features
2.7
Advanced Host Controller Interface
Advanced Host Controller Interface (AHCI) is an interface specification that allows the
storage driver to enable advanced Serial ATA features such as Native Command
Queuing and Native Hot-Plug.
Intel chipsets that support AHCI:
http://support.intel.com/support/chipsets/imst/sb/CS-012304.htm
2.7.1
Native Command Queuing
Native Command Queuing (NCQ) is a feature supported by AHCI that allows Serial
ATA hard drives to accept more than one command at a time. NCQ, when used in
conjunction with one or more hard drives that support NCQ, increases storage
performance on random workloads by allowing the drive to internally optimize the
order of commands.
Note: To take advantage of NCQ, you need the following:
2.7.2
Chipset that supports AHCI
Intel® Matrix Storage Manager
One or more Serial ATA (SATA) hard drives that support NCQ
Hot-Plug
Hot-Plug, also referred to as hot swap, is a feature supported by AHCI that allows
Serial ATA hard drives to be removed or inserted while the system is powered on and
running. As an example, Hot-Plug may be used to replace a failed hard drive that is in
an externally-accessible drive enclosure.
Note: To take advantage of Hot-Plug, you need the following:
Chipset that supports AHCI
Intel® Matrix Storage Manager
Hot-Plug capability correctly enabled in the system BIOS by the
OEM/motherboard manufacturer
Intel® Rapid Storage Technology enterprise (Intel® RSTe) for Linux OS
Software User’s Manual
16
June 2012
Document Number: 327602-001US
Intel® Matrix Storage Manager Features
2.8
SAS Controller Unit
SCU is the Intel® Serial Attached SCSI Controller Unit that is part of the C600 family
Platform Controller Hub. The Linux SCU driver (isci) has been upstreamed to the Linux
kernel since kernel version v3.0. However, the latest Linux kernel is always
recommended to get the latest bug fixes and features.
2.8.1
SCU OEM Parameters
The SCU driver requires proper OEM parameters to be loaded in order to set the
correct PHY settings. The appropriate OEM parameters shall be loaded from the
platform either from the OROM region if booting legacy or via EFI variable mechanism
if booting EFI. Below is an example of what you may see from the isci driver load. The
correct driver message displayed should be that the OEM parameter is loaded from
“platform”. This indicates the driver has found good OEM parameter from the OROM or
EFI.
isci: Intel(R) C600 SAS Controller Driver - version 1.1.0
isci 0000:03:00.0: driver configured for rev: 5 silicon
isci 0000:03:00.0: OEM parameter table found in OROM
isci 0000:03:00.0: OEM SAS parameters (version: 1.1) loaded (platform)
isci 0000:03:00.0: SCU controller 0: phy 3-0 cables: {short, short,
short, short}
scsi6 : isci
isci 0000:03:00.0: SCU controller 1: phy 3-0 cables: {short, short,
short, short}
scsi7 : isci
isci 0000:03:00.0: irq 110 for MSI/MSI-X
isci 0000:03:00.0: irq 111 for MSI/MSI-X
isci 0000:03:00.0: irq 112 for MSI/MSI-X
isci 0000:03:00.0: irq 113 for MSI/MSI-X
June 2012
Document Number: 327602-001US
Intel® Rapid Storage Technology enterprise (Intel® RSTe) for Linux OS
Software User’s Manual
17
Intel® Matrix Storage Manager Features
2.8.2
Linux libsas Sysfs Components
Linux provides driver information through sysfs, a virtual file system. The example
below provides some information on some of the libsas related components that can
be useful or informational. The sas related entries can be found in /sys/class sysfs
directory.
ls -1 /sys/class/ | grep sas
sas_device
sas_end_device
sas_expander
sas_host
sas_phy
sas_port
The sas_host directory contains all HBA attached to the computer system:
ls -l /sys/class/sas_host/
total 0
lrwxrwxrwx 1 root root 0 May 18 13:45 host6 ->
../../devices/pci0000:00/0000:00:01.0/0000:01:00.0/0000:02:08.0/0000:03:00.0/ho
st6/sas_host/host6
lrwxrwxrwx 1 root root 0 May 18 13:45 host7 ->
../../devices/pci0000:00/0000:00:01.0/0000:01:00.0/0000:02:08.0/0000:03:00.0/ho
st7/sas_host/host7
Generally the /sys/class/sas_* directories contain symbolic links. Due to those
symbolic links can be quite long, in the follow on examples they will be omitted and
only link names will be shown.
ls -1 /sys/class/sas_expander/
expander-6:0
expander-7:0
In the expander-6:0 directory, 12 disks are shown to be attached. This can be
validated by looking into sas_end_device directory where all SAS end devices are
listed.
Intel® Rapid Storage Technology enterprise (Intel® RSTe) for Linux OS
Software User’s Manual
18
June 2012
Document Number: 327602-001US
Intel® Matrix Storage Manager Features
Below shows the devices attached to expander-6:0:
ls -1 /sys/class/sas_end_device/ | grep end_device-6
end_device-6:0:10
end_device-6:0:11
end_device-6:0:12
end_device-6:0:13
end_device-6:0:14
end_device-6:0:15
end_device-6:0:24
end_device-6:0:4
end_device-6:0:5
end_device-6:0:6
end_device-6:0:7
end_device-6:0:8
end_device-6:0:9
The example above shows that the first four PHYs in the expander are missing , and
24th phy is an extra virtual phy that is used by the expander internally.
The sas_phy directory contains all phys in the system, and the sas_port contains all
ports in the system.
June 2012
Document Number: 327602-001US
Intel® Rapid Storage Technology enterprise (Intel® RSTe) for Linux OS
Software User’s Manual
19
Intel® Matrix Storage Manager Features
To see the connection between components, it is better to transverse from the
sas_host directory. What is connected to host 6 can be seen here:
ls -l /sys/class/sas_host/host6/device/
total 0
drwxr-xr-x 3 root root
0 May 18 09:27 bsg
drwxr-xr-x 4 root root
0 May 18 09:27 phy-6:0
drwxr-xr-x 4 root root
0 May 18 09:27 phy-6:1
drwxr-xr-x 4 root root
0 May 18 09:27 phy-6:2
drwxr-xr-x 4 root root
0 May 18 09:27 phy-6:3
drwxr-xr-x 5 root root
0 May 18 09:27 port-6:0
drwxr-xr-x 2 root root
0 May 18 14:37 power
drwxr-xr-x 3 root root
0 May 18 09:27 sas_host
drwxr-xr-x 3 root root
0 May 18 09:27 scsi_host
lrwxrwxrwx 1 root root
0 May 18 09:27 subsystem -> ../../../../../../../bus/scsi
-rw-r--r-- 1 root root 4096 May 18 09:27 uevent
And more:
ls -l /sys/class/sas_host/host6/device/port-6\:0/
total 0
drwxr-xr-x 45 root root
0 May 18 09:27 expander-6:0
lrwxrwxrwx 1 root root
0 May 18 14:36 phy-6:0 -> ../phy-6:0
lrwxrwxrwx 1 root root
0 May 18 14:36 phy-6:1 -> ../phy-6:1
lrwxrwxrwx 1 root root
0 May 18 14:36 phy-6:2 -> ../phy-6:2
lrwxrwxrwx 1 root root
0 May 18 14:36 phy-6:3 -> ../phy-6:3
drwxr-xr-x 2 root root
0 May 18 14:36 power
drwxr-xr-x 3 root root
0 May 18 09:27 sas_port
-rw-r--r-- 1 root root 4096 May 18 09:27 uevent
Host 6 has 4 phys that are configured as a wide port, and this wide port is a
connection between the host and the expander (expander-6:0).
Intel® Rapid Storage Technology enterprise (Intel® RSTe) for Linux OS
Software User’s Manual
20
June 2012
Document Number: 327602-001US
Intel® Matrix Storage Manager Features
Below are the contents of the expander-6:0 directory:
ls -l /sys/class/sas_host/host6/device/port-6\:0/expander-6\:0/
total 0
drwxr-xr-x 3 root root
0 May 18 09:27 bsg
drwxr-xr-x 4 root root
0 May 18 09:27 phy-6:0:0
drwxr-xr-x 4 root root
0 May 18 09:27 phy-6:0:1
drwxr-xr-x 4 root root
0 May 18 09:27 phy-6:0:10
drwxr-xr-x 4 root root
0 May 18 09:27 phy-6:0:11
drwxr-xr-x 4 root root
0 May 18 09:27 phy-6:0:12
drwxr-xr-x 4 root root
0 May 18 09:27 phy-6:0:13
drwxr-xr-x 4 root root
0 May 18 09:27 phy-6:0:14
drwxr-xr-x 4 root root
0 May 18 09:27 phy-6:0:15
drwxr-xr-x 4 root root
0 May 18 09:27 phy-6:0:16
drwxr-xr-x 4 root root
0 May 18 09:27 phy-6:0:17
drwxr-xr-x 4 root root
0 May 18 09:27 phy-6:0:18
drwxr-xr-x 4 root root
0 May 18 09:27 phy-6:0:19
drwxr-xr-x 4 root root
0 May 18 09:27 phy-6:0:2
drwxr-xr-x 4 root root
0 May 18 09:27 phy-6:0:20
drwxr-xr-x 4 root root
0 May 18 09:27 phy-6:0:21
drwxr-xr-x 4 root root
0 May 18 09:27 phy-6:0:22
drwxr-xr-x 4 root root
0 May 18 09:27 phy-6:0:23
drwxr-xr-x 4 root root
0 May 18 09:27 phy-6:0:24
drwxr-xr-x 4 root root
0 May 18 09:27 phy-6:0:3
drwxr-xr-x 4 root root
0 May 18 09:27 phy-6:0:4
drwxr-xr-x 4 root root
0 May 18 09:27 phy-6:0:5
drwxr-xr-x 4 root root
0 May 18 09:27 phy-6:0:6
drwxr-xr-x 4 root root
0 May 18 09:27 phy-6:0:7
drwxr-xr-x 4 root root
0 May 18 09:27 phy-6:0:8
June 2012
Document Number: 327602-001US
Intel® Rapid Storage Technology enterprise (Intel® RSTe) for Linux OS
Software User’s Manual
21
Intel® Matrix Storage Manager Features
drwxr-xr-x 4 root root
0 May 18 09:27 phy-6:0:9
drwxr-xr-x 5 root root
0 May 18 09:27 port-6:0:10
drwxr-xr-x 5 root root
0 May 18 09:27 port-6:0:11
drwxr-xr-x 5 root root
0 May 18 09:27 port-6:0:12
drwxr-xr-x 5 root root
0 May 18 09:27 port-6:0:13
drwxr-xr-x 5 root root
0 May 18 09:27 port-6:0:14
drwxr-xr-x 5 root root
0 May 18 09:27 port-6:0:15
drwxr-xr-x 4 root root
0 May 18 09:27 port-6:0:16
drwxr-xr-x 5 root root
0 May 18 09:27 port-6:0:24
drwxr-xr-x 5 root root
0 May 18 09:27 port-6:0:4
drwxr-xr-x 5 root root
0 May 18 09:27 port-6:0:5
drwxr-xr-x 5 root root
0 May 18 09:27 port-6:0:6
drwxr-xr-x 5 root root
0 May 18 09:27 port-6:0:7
drwxr-xr-x 5 root root
0 May 18 09:27 port-6:0:8
drwxr-xr-x 5 root root
0 May 18 09:27 port-6:0:9
drwxr-xr-x 2 root root
0 May 18 14:37 power
drwxr-xr-x 3 root root
0 May 18 09:27 sas_device
drwxr-xr-x 3 root root
0 May 18 09:27 sas_expander
-rw-r--r-- 1 root root 4096 May 18 09:27 uevent
The expander has 24 phys and 12 narrow ports. The contents of port-6:0:4 reveals
that some end devices are connected to that port/phy:
ls -l /sys/class/sas_host/host6/device/port-6\:0/expander-6\:0/port6\:0\:4
total 0
drwxr-xr-x 7 root root
lrwxrwxrwx 1 root root
0 May 18 09:27 end_device-6:0:4
0 May 18 14:51 phy-6:0:4 -> ../phy-6:0:4
drwxr-xr-x 2 root root
0 May 18 14:51 power
drwxr-xr-x 3 root root
0 May 18 09:27 sas_port
-rw-r--r-- 1 root root 4096 May 18 09:27 uevent
Intel® Rapid Storage Technology enterprise (Intel® RSTe) for Linux OS
Software User’s Manual
22
June 2012
Document Number: 327602-001US
Intel® Matrix Storage Manager Features
The Linux disk name can be found a few levels deeper:
ls -l /sys/class/sas_host/host6/device/port-6\:0/expander-6\:0/port6\:0\:4/end_device-6\:0\:4/target6\:0\:0/6\:0\:0\:0/block/
total 0
drwxr-xr-x 7 root root 0 May 18 09:27 sdb
It can also be found in a different sysfs location:
ls -l /sys/block/ | grep port-6:0:4
lrwxrwxrwx 1 root root 0 May 18 09:27 sdb ->
../devices/pci0000:00/0000:00:01.0/0000:01:00.0/0000:02:08.0/0000:03:00.0/host
6/port-6:0/expander-6:0/port-6:0:4/end_device-6:0:4/target6:0:0/6:0:0:0/block/sdb
This is an Expander Attached (EA) configuration. In a Direct Attached (DA)
configuration the contents of host6 may look like:
ls -l /sys/class/sas_host/host6/device/
total 0
drwxr-xr-x 3 root root
0 May 18 09:39 bsg
drwxr-xr-x 4 root root
0 May 18 09:17 phy-6:0
drwxr-xr-x 4 root root
0 May 18 09:17 phy-6:1
drwxr-xr-x 4 root root
0 May 18 09:17 phy-6:2
drwxr-xr-x 4 root root
0 May 18 09:17 phy-6:3
drwxr-xr-x 5 root root
0 May 18 09:06 port-6:0
drwxr-xr-x 5 root root
0 May 18 09:02 port-6:1
drwxr-xr-x 5 root root
0 May 18 09:08 port-6:2
drwxr-xr-x 5 root root
0 May 18 09:02 port-6:3
drwxr-xr-x 2 root root
0 May 18 09:39 power
drwxr-xr-x 3 root root
0 May 18 09:39 sas_host
drwxr-xr-x 3 root root
0 May 18 09:39 scsi_host
lrwxrwxrwx 1 root root
0 May 18 09:09 subsystem -> ../../../../../../../bus/scsi
-rw-r--r-- 1 root root 4096 May 18 09:09 uevent
June 2012
Document Number: 327602-001US
Intel® Rapid Storage Technology enterprise (Intel® RSTe) for Linux OS
Software User’s Manual
23
Intel® Matrix Storage Manager Features
There are 4 phys and 4 narrow ports, and this means the 4 end devices are connected
directly to the HBA. This can be shown:
ls -l /sys/class/sas_end_device/ | grep end_device-6
lrwxrwxrwx 1 root root 0 May 18 09:16 end_device-6:0 ->
../../devices/pci0000:00/0000:00:01.0/0000:01:00.0/0000:02:08.0/0000:03:00.0/ho
st6/port-6:0/end_device-6:0/sas_end_device/end_device-6:0
lrwxrwxrwx 1 root root 0 May 18 09:16 end_device-6:1 ->
../../devices/pci0000:00/0000:00:01.0/0000:01:00.0/0000:02:08.0/0000:03:00.0/ho
st6/port-6:1/end_device-6:1/sas_end_device/end_device-6:1
lrwxrwxrwx 1 root root 0 May 18 09:16 end_device-6:2 ->
../../devices/pci0000:00/0000:00:01.0/0000:01:00.0/0000:02:08.0/0000:03:00.0/ho
st6/port-6:2/end_device-6:2/sas_end_device/end_device-6:2
lrwxrwxrwx 1 root root 0 May 18 09:16 end_device-6:3 ->
../../devices/pci0000:00/0000:00:01.0/0000:01:00.0/0000:02:08.0/0000:03:00.0/ho
st6/port-6:3/end_device-6:3/sas_end_device/end_device-6:3
Or by:
ls -l /sys/block/ | grep end_device-6
lrwxrwxrwx 1 root root 0 May 18 09:09 sdb ->
../devices/pci0000:00/0000:00:01.0/0000:01:00.0/0000:02:08.0/0000:03:00.0/host
6/port-6:0/end_device-6:0/target6:0:4/6:0:4:0/block/sdb
lrwxrwxrwx 1 root root 0 May 18 09:09 sdc ->
../devices/pci0000:00/0000:00:01.0/0000:01:00.0/0000:02:08.0/0000:03:00.0/host
6/port-6:1/end_device-6:1/target6:0:1/6:0:1:0/block/sdc
lrwxrwxrwx 1 root root 0 May 18 09:09 sdd ->
../devices/pci0000:00/0000:00:01.0/0000:01:00.0/0000:02:08.0/0000:03:00.0/host
6/port-6:2/end_device-6:2/target6:0:5/6:0:5:0/block/sdd
lrwxrwxrwx 1 root root 0 May 18 09:09 sde ->
../devices/pci0000:00/0000:00:01.0/0000:01:00.0/0000:02:08.0/0000:03:00.0/host
6/port-6:3/end_device-6:3/target6:0:3/6:0:3:0/block/sde
The structure of the sysfs filesystem is quite complex and full of links pointing to links.
Full description of sysfs is outside of the scope of this manual. This chapter discussed
only very briefly some major sysfs directories related to the SCU driver.
Intel® Rapid Storage Technology enterprise (Intel® RSTe) for Linux OS
Software User’s Manual
24
June 2012
Document Number: 327602-001US
RAID BIOS / EFI Configuration
3
RAID BIOS / EFI Configuration
3.1
Overview
To install the Intel® Matrix Storage Manager, the system BIOS must include the
Intel® Matrix Storage Manager option ROM or EFI driver. The Intel® Matrix Storage
Manager option ROM / EFI driver is tied to the controller hub. For detailed
documentation please see the Intel® Rapid Storage Technology Enterprise (Intel®
RSTe) Software User’s Guide.
3.2
Enabling RAID in BIOS
To enable RAID in the system BIOS, refer to the motherboard or system
documentation or contact the motherboard or system manufacturer or place of
purchase for specific instructions.
June 2012
Document Number: 327602-001US
Intel® Rapid Storage Technology enterprise (Intel® RSTe) for Linux OS
Software User’s Manual
25
Intel® Matrix Storage Manager Option ROM
4
Intel® Matrix Storage Manager
Option ROM
4.1
Overview
The Intel® Matrix Storage Manager optional ROM is a PnP option ROM that provides a
pre-operating system user interface for RAID configurations. It also provides BIOS and
DOS disk services (Int13h).
4.2
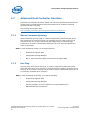
User Interface
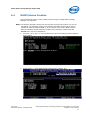
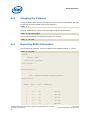
To enter the Intel® Matrix Storage Manager optional ROM user interface, press the
<Ctrl> and <i> keys simultaneously when prompted during the Power-On Self Test
(POST). Refer to Figure 2.
Figure 2. User Prompt
NOTE: The hard drive(s) and hard drive information listed for your system can differ from the
following example.
4.3
Version Identification
To identify the specific version of the Intel® Matrix Storage Manager option ROM
integrated into the system BIOS, enter the option ROM user interface. The version
number is located in the top right corner with the following format: vX.Y.W.XXXX,
where X and Y are the major and minor version numbers.
Intel® Rapid Storage Technology enterprise (Intel® RSTe) for Linux OS
Software User’s Manual
26
June 2012
Document Number: 327602-001US
Intel® Matrix Storage Manager Option ROM
4.4
RAID Volume Creation
Use the following steps to create a RAID volume using the Intel® Matrix Storage
Manager user interface:
Note: The following procedure should only be used with a newly-built system or if you are
reinstalling your operating system. The following procedure should not be used to
migrate an existing system to RAID 0. If you wish to create matrix RAID volumes
after the operating system software is loaded, they should be created using the
MDADM tool in the Linux distribution.
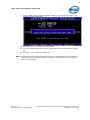
1.
Press the <Ctrl> and <i> keys simultaneously when the following window appears
during POST:
2.
Select option 1. Create RAID Volume and press the <Enter> key.
June 2012
Document Number: 327602-001US
Intel® Rapid Storage Technology enterprise (Intel® RSTe) for Linux OS
Software User’s Manual
27
Intel® Matrix Storage Manager Option ROM
3.
Type in a volume name and press the <Enter> key, or press the <Enter> key to
accept the default name.
4.
Select the RAID level by using the <> or <> keys to scroll through the
available values, then press the <Enter> key.
Intel® Rapid Storage Technology enterprise (Intel® RSTe) for Linux OS
Software User’s Manual
28
June 2012
Document Number: 327602-001US
Intel® Matrix Storage Manager Option ROM
5.
Press the <Enter> key to select the physical disks. A dialog similar to the following
will appear:
6.
Select the appropriate number of hard drives by using the <> or <> keys to
scroll through the list of available hard drives. .Press the <Space> key to select a
drive. When you have finished selecting hard drives, press the <Enter> key.
June 2012
Document Number: 327602-001US
Intel® Rapid Storage Technology enterprise (Intel® RSTe) for Linux OS
Software User’s Manual
29
Intel® Matrix Storage Manager Option ROM
7.
Unless you have selected RAID 1, select the strip size by using the <> or <>
keys to scroll through the available values, then press the <Enter> key.
8.
Select the volume capacity and press the <Enter> key. The default value indicates
the maximum volume capacity using the selected disks. If less than the maximum
volume capacity is chosen, creation of a second volume is needed to utilize the
remaining space (i.e. a matrix RAID configuration).
Intel® Rapid Storage Technology enterprise (Intel® RSTe) for Linux OS
Software User’s Manual
30
June 2012
Document Number: 327602-001US
Intel® Matrix Storage Manager Option ROM
9.
At the Create Volume prompt, press the <Enter> key to create the volume. The
following prompt will appear:
10. Press the <Y> key to confirm volume creation.
11. To exit the option ROM user interface, select option 5. Exit and press the <Enter>
key.
12. Press the <Y> key again to confirm exit.
Note: To change any of the information before the volume creation has been confirmed, you
must exit the Create Volume process and restart it. Press the <Esc> key to exit the
Create Volume process.
June 2012
Document Number: 327602-001US
Intel® Rapid Storage Technology enterprise (Intel® RSTe) for Linux OS
Software User’s Manual
31
Volume Creation
5
Volume Creation
RAID volumes can be created using the mdadm command line utility. Mdadm supports
the Intel Matrix Storage Manager (IMSM) meta data format when specified with the
IMSM meta data option.
5.1
RAID Volume Creation
Warning: Creating a RAID volume will permanently delete any existing data on the selected
hard drives. Back up all important data before beginning these steps.
Below is an example to create a RAID5 volume with 6 disks:
1. First a container of Intel IMSM metadata must be created.
mdadm -C /dev/md0 /dev/sd[b-g] –n 6 –e imsm
Continue creating array? y
mdadm: container /dev/md0 prepared.
The command creates a RAID container with Intel® Matrix Storage Manager
metadata format. The device node for the container will be /dev/md0. In this
example disks sdb, sdc, sdd, sde, sdf, and sdg are used for this RAID set, and the
total number of disks is 6. The wildcard expression /dev/sd[b-g] can be used to
specify the range of disks. Although individual disks can be used to list out all the
disks. i.e. /dev/sdb /dev/sdc /dev/sdd /dev/sde /dev/sdf /dev/sdg
2.
Next a RAID 5 volume is created.
mdadm -C /dev/md/Volume0 /dev/md0 –n 6 –l 5
The command creates a RAID 5 volume /dev/md/Volume0 within the /dev/md0
container.
The following command parameters may also be used in conjunction to give finer
control for the creation of the RAID volume.
-n : Number of active RAID devices to be used in the volume.
-x : Specifies the number of spare devices in the initial array.
-c : Specifies the chunk (stripe) size in Kilobytes. The default is 512KiB.
-l : Specifies the RAID level. The options are 0, 1, 5, 10.
-z : Specifies the size (in Kilobytes) of space dedicated on each disk to the RAID
volume. This must be a multiple of the chunk size. For example:
mdadm –C /dev/md/Volume0 /dev/md0 –n 3 –l 5 –z $((100*1024*1024))
The command above creates a RAID volume inside the /dev/md0 container with
100GB of disk space used on each disk member.
Intel® Rapid Storage Technology enterprise (Intel® RSTe) for Linux OS
Software User’s Manual
32
June 2012
Document Number: 327602-001US
Volume Creation
5.2
Filesystem Creation on RAID Volume
After the RAID volume has been created, a filesystem can be created in order to allow
the mounting of the RAID volume.
mkfs.ext4 /dev/md/Volume0
Once the filesystem has been created, it can be mounted:
mount /dev/md/Volume0 /mnt/myraidvolume
5.3
RAID Volume Creation Examples
To create a RAID 0 volume, use the following example:
mdadm –C /dev/md/Volume0 /dev/md0 –n 2 –l 0
To create a RAID 1 volume, use the following example:
mdadm –C /dev/md/Volume0 /dev/md0 –n 2 –l 1
To create a RAID 5 volume, use the following example:
mdadm –C /dev/md/Volume0 /dev/md0 –n 3 –l 5
To create a RAID 10 volume, use the following example:
mdadm –C /dev/md/Volume0 /dev/md0 –n 4 –l 10
Note: To create multiple RAID volumes in the same container, they MUST span equal
number of disks. For example, in order to have a RAID 0 volume and a RAID 5 volume
in the same container, four disks must be used for both volumes.
June 2012
Document Number: 327602-001US
Intel® Rapid Storage Technology enterprise (Intel® RSTe) for Linux OS
Software User’s Manual
33
Volume Creation
5.4
Adding a Spare Disk
Adding a spare disk allows immediate reconstruction of the RAID volume when a
device failure is detected. Mdraid will mark the failed device as “bad” and start
reconstruction with the first available spare disk. The spare disk can also be used to
grow the RAID volume. The spare disks sit idle during normal operations. When using
mdadm with IMSM meta data, the spare disk added to a container is dedicated to that
specific container. The following command adds a spare disk to the designated
container.
mdadm -a /dev/md0 /dev/sde
5.5
Creating RAID Configuration File
A configuration file can be created to record the existing RAID volumes. The
information can be extracted from the existing RAID setup. The configuration file is
typically stored at the default location of /etc/mdadm.conf. This allows a consistent
assemble of the appropriate RAID volumes.
mdadm -E –s –-config=mdadm.conf > /etc/mdadm.conf
5.6
RAID Volume Initialization / Resync
Immediately after a RAID volume has been created, initialization (or resync)
commences if the RAID level is 1, 10, or 5. During this time, any data stored on RAID
level 5 volumes are not guaranteed to be safe if failure occurs. If a disk failure
happens during the initialization time, recovery will not be possible. This scenario is
also true during RAID volume rebuilds.
Intel® Rapid Storage Technology enterprise (Intel® RSTe) for Linux OS
Software User’s Manual
34
June 2012
Document Number: 327602-001US
Volume Operations
6
Volume Operations
mdadm provides various options to assemble, monitor, examine, or stop RAID
volumes.
6.1
Erasing RAID Metadata
Having incorrect and bad RAID metadata can cause RAID volumes to be assembled
incorrectly. The metadata can be erased with the following command to make sure the
disk is clean. This operation does not attempt to wipe existing user data.
mdadm --zero-superblock /dev/sdb
Multiple disks can be specified to clear the superblock at the same time.
6.2
Volume Assemble
RAID volumes can be created via OROM user interface or mdadm. Inactive RAID
volumes that are created can be activated using the assemble option with mdadm.
The following command scans for the mdadm configuration file at /etc/mdadm.conf in
order to assemble the RAID volumes. If the configuration file is not found, it scans all
available disks for RAID member disks and assembles all the RAID volumes:
mdadm –A –s
To manually assemble and activate RAID volumes without the configuration file, the
following example can be used:
mdadm –A /dev/md0 –e imsm /dev/sda /dev/sdb /dev/sdc /dev/sdd
mdadm –I /dev/md0
The first command assembles the container with the name /dev/md0 using the
provided list of disks. The second command assembles and activates appropriate
volumes with the device nodes.
June 2012
Document Number: 327602-001US
Intel® Rapid Storage Technology enterprise (Intel® RSTe) for Linux OS
Software User’s Manual
35
Volume Operations
6.3
Stopping the Volumes
To stop all active RAID volumes, the following command can be used. Mdadm will scan
for and stop all running RAID volumes and containers.
mdadm –S –s
However, RAID volume names can be specified to stop the volume directly.
mdadm –S /dev/md/Volume0
And to stop a container, the following command can be used.
mdadm –S /dev/md0
6.4
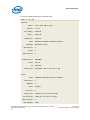
Reporting RAID Information
Use the following command, to print out details about a RAID container or volume:
mdadm –D /dev/md0
/dev/md0:
Version : imsm
Raid Level : container
Total Devices : 5
Working Devices : 5
UUID : b559b502:b199f86f:ee9fbd40:cd10e91d
Member Arrays :
Number
Major
Minor
RaidDevice
0
8
32
-
/dev/sdc
1
8
48
-
/dev/sdd
2
8
80
-
/dev/sdf
3
8
96
-
/dev/sdg
4
8
16
-
/dev/sdb
Intel® Rapid Storage Technology enterprise (Intel® RSTe) for Linux OS
Software User’s Manual
36
June 2012
Document Number: 327602-001US
Volume Operations
To display details about a RAID volume:
mdadm –D /dev/md/Volume0
/dev/md/Volume0:
Container : /dev/md0, member 0
Raid Level : raid5
Array Size : 39999488 (38.15 GiB 40.96 GB)
Used Dev Size : 9999872 (9.54 GiB 10.24 GB)
Raid Devices : 5
Total Devices : 5
Update Time : Thu Jun 17 07:40:23 2010
State : clean
Active Devices : 5
Working Devices : 5
Failed Devices : 0
Spare Devices : 0
Layout : left-asymmetric
Chunk Size : 128K
UUID : 084d2b20:09897744:36757c5b:77e0e945
Number
Major
Minor
4
8
96
0
active sync
/dev/sdg
3
8
48
1
active sync
/dev/sdd
2
8
32
2
active sync
/dev/sdc
1
8
16
3
active sync
/dev/sdb
0
8
80
4
active sync
/dev/sdf
June 2012
Document Number: 327602-001US
RaidDevice State
Intel® Rapid Storage Technology enterprise (Intel® RSTe) for Linux OS
Software User’s Manual
37
Volume Operations
To print out RAID details about a member disk:
mdadm –E /dev/sdb
/dev/sdb:
Magic : Intel Raid ISM Cfg Sig.
Version : 1.2.04
Orig Family : e0935e91
Family : a830104b
Generation : 00000037
UUID : b559b502:b199f86f:ee9fbd40:cd10e91d
Checksum : 3ba66395 correct
MPB Sectors : 2
Disks : 5
RAID Devices : 1
Disk02 Serial : 9QMCLMDM
State : active
Id : 00000000
Usable Size : 976768654 (465.76 GiB 500.11 GB)
[vol0]:
UUID : 084d2b20:09897744:36757c5b:77e0e945
RAID Level : 5
Members : 5
Slots : [UUUUU]
This Slot : 3
Array Size : 79998976 (38.15 GiB 40.96 GB)
Per Dev Size : 19999744 (9.54 GiB 10.24 GB)
Sector Offset : 0
Num Stripes : 19531
Intel® Rapid Storage Technology enterprise (Intel® RSTe) for Linux OS
Software User’s Manual
38
June 2012
Document Number: 327602-001US
Volume Operations
Chunk Size : 128 KiB
Reserved : 0
Migrate State : idle
Map State : normal
Dirty State : clean
Disk00 Serial : 9QMCLYES
State : active
Id : 00000000
Usable Size : 976768654 (465.76 GiB 500.11 GB)
Disk01 Serial : 9QMCLYB9
State : active
Id : 00000000
Usable Size : 976768654 (465.76 GiB 500.11 GB)
Disk03 Serial : 9QMCM7XY
State : active
Id : 00000000
Usable Size : 976768654 (465.76 GiB 500.11 GB)
Disk04 Serial : 9QMCF38Z
State : active
Id : 00000000
Usable Size : 976768654 (465.76 GiB 500.11 GB)
June 2012
Document Number: 327602-001US
Intel® Rapid Storage Technology enterprise (Intel® RSTe) for Linux OS
Software User’s Manual
39
Volume Operations
To get the most current status on all RAID volumes, the file /proc/mdstat can be
examined. This file is a special file that is updated continuously to show the status of
all the containers, and RAID volumes. In the example below, the status shows that
currently available RAID supports are level 4, 5, and 6. md126 is the active RAID
volume with RAID level 5 and 128k stripe size. The RAID volume contains 5 disks that
are all in normal (UP) status. md127 is the IMSM container for the RAID volume.
cat /proc/mdstat
Personalities : [raid6] [raid5] [raid4]
md127 : active raid5 sdg[4] sdd[3] sdc[2] sdb[1] sdf[0]
39999488 blocks super external:/md0/0 level 5, 128k chunk,
algorithm 0 [5/5] [UUUUU]
md0 : inactive sdb[4](S) sdg[3](S) sdf[2](S) sdd[1](S) sdc[0](S)
11285 blocks super external:imsm
unused devices: <none>
Note: When creating containers and volumes, one will notice that in /proc/mdstat the
device names will not match up. For example, when /dev/md/Volume0 is created,
md127 will be shown in /proc/mdstat and other detail output as well. The
/dev/md/Volume0 is created as an alias of /dev/md127 device node. Looking in the
/dev/md directory, one will notice that /dev/md/Volume0 is a soft link to /dev/md127.
Intel® Rapid Storage Technology enterprise (Intel® RSTe) for Linux OS
Software User’s Manual
40
June 2012
Document Number: 327602-001US
Volume Operations
6.5
To Fail an Active Drive
In order to mark an active drive as a failed drive (or set as faulty) manually, the
following command can to be issued:
mdadm –f /dev/md/Volume0 /dev/sdb
6.6
Remove a Failed Drive
To remove a failed drive, the following command needs to be executed. This only
works on a container based RAID volume.
mdadm –r /dev/md0 /dev/sdb
6.7
Report RAID Details from BIOS
To see what Intel® RAID support is provided by the BIOS issue the command:
mdadm -–detail-platform
Platform : Intel(R) Matrix Storage Manager
Version : 8.9.0.1023
RAID Levels : raid0 raid1 raid10 raid5
Chunk Sizes : 4k 8k 16k 32k 64k 128k
Max Disks : 6
Max Volumes : 2
I/O Controller : /sys/devices/pci0000:00/0000:00:1f.2
Port0 : /dev/sda (3MT0585Z)
Port1 : - non-disk device (ATAPI DVD D
DH16D4S) -
Port2 : /dev/sdb (WD-WCANK2850263)
Port3 : /dev/sdc (3MT005ML)
Port4 : /dev/sdd (WD-WCANK2850441)
Port5 : /dev/sde (WD-WCANK2852905)
Port6 : - no device attached –
June 2012
Document Number: 327602-001US
Intel® Rapid Storage Technology enterprise (Intel® RSTe) for Linux OS
Software User’s Manual
41
Volume Operations
6.8
Logging
Various messages coming from MDRAID subsystem in the kernel are logged. Typically
the messages are stored in the log file /var/log/messages in popular Linux
distributions with other kernel status, warning, and error outputs. Below is an example
snippet of what the log may look like:
Jun 17 06:20:04 testbox kernel: raid5: allocated 5334kB for md126
Jun 17 06:20:04 testbox kernel: 0: w=1 pa=0 pr=5 m=1 a=0 r=5 op1=0 op2=0
Jun 17 06:20:04 testbox kernel: 1: w=2 pa=0 pr=5 m=1 a=0 r=5 op1=0 op2=0
Jun 17 06:20:04 testbox kernel: 2: w=3 pa=0 pr=5 m=1 a=0 r=5 op1=0 op2=0
Jun 17 06:20:04 testbox kernel: 3: w=4 pa=0 pr=5 m=1 a=0 r=5 op1=0 op2=0
Jun 17 06:20:04 testbox kernel: 4: w=5 pa=0 pr=5 m=1 a=0 r=5 op1=0 op2=0
Jun 17 06:20:04 testbox kernel: raid5: raid level 5 set md126 active with 5 out of 5
devices, algorithm 0
Jun 17 06:20:04 testbox kernel: RAID5 conf printout:
Jun 17 06:20:04 testbox kernel: --- rd:5 wd:5
Jun 17 06:20:04 testbox kernel: disk 0, o:1, dev:sdg
Jun 17 06:20:04 testbox kernel: disk 1, o:1, dev:sdd
Jun 17 06:20:04 testbox kernel: disk 2, o:1, dev:sdc
Jun 17 06:20:04 testbox kernel: disk 3, o:1, dev:sdb
Jun 17 06:20:04 testbox kernel: disk 4, o:1, dev:sdf
Jun 17 06:20:04 testbox kernel: md127: detected capacity change from 0 to
40959475712
Jun 17 06:20:04 testbox kernel: md127: unknown partition table
Jun 17 06:20:04 testbox kernel: md: md127 switched to read-write mode.
Intel® Rapid Storage Technology enterprise (Intel® RSTe) for Linux OS
Software User’s Manual
42
June 2012
Document Number: 327602-001US
Volume Operations
6.9
Raid Level Migration
The RAID level migration feature allows changing of the RAID volume level without
loss of data stored on the volume. It does not require re-installation of the operating
system. All applications and data remain intact.
The following table shows the available migration support with Intel© IMSM metadata.
You must have the number of drives necessary for the level you’re converting to as
spare drives.
Migration capabilities with IMSM
Destination
Source level
RAID 0
RAID 1
RAID 10
RAID 5
RAID 0
N/A
No
Yes
Yes
RAID 1
Yes
N/A
No
*Yes
RAID 10
Yes
No
N/A
*Yes
RAID 5
No
No
No
N/A
*Migrations from RAID 1 to RAID 5 or from RAID 10 to RAID 5 must be done in two
steps. A conversion to RAID 0 first is necessary before converting to RAID 5. During
the second step (migration from RAID 0 to RAID 5) the addition of spare drive(s) may
be needed. There is an example of migration from RAID 1 to RAID 5 below:
1) A RAID 1 is shown below:
cat /proc/mdstat
Personalities : [raid1] [raid0] [raid6] [raid5] [raid4]
md127 : active raid1 sdb[1] sda[0]
102400 blocks super external:/md0/0 [2/2] [UU]
md0 : inactive sdb[1](S) sda[0](S)
2210 blocks super external:imsm
unused devices: <none>
June 2012
Document Number: 327602-001US
Intel® Rapid Storage Technology enterprise (Intel® RSTe) for Linux OS
Software User’s Manual
43
Volume Operations
2) First step is to migrate from RAID 1 to RAID 0
mdadm –G /dev/md127 –l 0
cat /proc/mdstat
Personalities : [raid1] [raid0] [raid6] [raid5] [raid4]
md127 : active raid0 sdb[1]
102400 blocks super external:/md0/0 64k chunks
md0 : inactive sdb[1](S) sda[0](S)
2210 blocks super external:imsm
unused devices: <none>
3) Use Online Capacity Expansion to go from 1-disk RAID 0 to 2-disk RAID 0:
# mdadm -G /dev/md0 -n 2
# cat /proc/mdstat
Personalities : [raid1] [raid0] [raid6] [raid5] [raid4]
md127 : active raid0 sda[2] sdb[1]
204800 blocks super external:/md0/0 64k chunks
md0 : inactive sdb[1](S) sda[0](S)
2210 blocks super external:imsm
unused devices: <none>
4) Adding a spare disk to the container:
mdadm -a /dev/md0 /dev/sdc
cat /proc/mdstat
Personalities : [raid1] [raid0] [raid6] [raid5] [raid4]
md127 : active raid0 sda[2] sdb[1]
204800 blocks super external:/md0/0 64k chunks
md0 : inactive sdc[2](S) sdb[1](S) sda[0](S)
3315 blocks super external:imsm
unused devices: <none>
Intel® Rapid Storage Technology enterprise (Intel® RSTe) for Linux OS
Software User’s Manual
44
June 2012
Document Number: 327602-001US
Volume Operations
5) Migrating from RAID 0 to RAID 5:
mdadm -G /dev/md127 -l 5 --layout=left-asymmetric
cat /proc/mdstat
Personalities : [raid1] [raid0] [raid6] [raid5] [raid4]
md127 : active raid5 sdc[3] sda[2] sdb[1]
204800 blocks super external:/md0/0 level 5, 64k chunk,
algorithm 0 [3/3] [UUU]
md0 : inactive sdc[2](S) sdb[1](S) sda[0](S)
3315 blocks super external:imsm
unused devices: <none>
***NOTE: IMSM metadata supports only the left-asymmetric layout of RAID
5. The default layout is left-symmetric, so during migrations the layout for
IMSM metadata has to be specified explicitly.
June 2012
Document Number: 327602-001US
Intel® Rapid Storage Technology enterprise (Intel® RSTe) for Linux OS
Software User’s Manual
45
Volume Operations
6.10
Freezing Reshape
If a RAID volume is in the process of reshape, the reshape process should be frozen
during the initramfs booting phase and resumed when the system is fully up. Starting
with mdadm 3.2.5 these features are supported. Distributions from the Operating
System Vendors should have taken cared of this in their init script setup utilities, but
details are described below for customers that are building their own distribution.
The parameters --freeze-reshape is used to pause the reshape operation during
system start up initramfs phase. For example:
mdadm –As --freeze-reshape
When reshape is frozen, the status provided by /proc/mdstat will denote the state
with a hypen such as “super external:-md127/0” instead of “super
external:/md127/0”:
Personalities : [raid5]
md127 : active raid5 sda[2] sdb[1] sdc[0]
10485760 blocks super external:-md0/0 level 5, 128k chunk,
algorithm 0 [3/3] [UUU]
[>....................] reshape =
finish=501934.9min speed=0K/sec
2.2% (116736/5242880)
md0 : inactive sda[2](S) sdb[1](S) sdc[0](S)
9459 blocks super external:imsm
unused devices: <none>
Once the system is up, the following example with the parameter --continue can be
used to resume the reshape process:
mdadm –G /dev/md0 --continue
or with a volume:
mdadm –G /dev/md/Volume0 --continue
Intel® Rapid Storage Technology enterprise (Intel® RSTe) for Linux OS
Software User’s Manual
46
June 2012
Document Number: 327602-001US
Online Capacity Expansion
7
Online Capacity Expansion
The Online Capacity Expansion (OLCE) feature allows the capacity expansion of the
RAID volumes. With the “online” feature, the operation can be performed while a
filesystem is mounted on top of the RAID volume. This allows avoiding having down
time from taking the RAID volume offline for service or loss of data.
The size of a RAID volume can be increased by adding additional disks to the RAID
container or (only if it is the last volume in the container) by expanding it on existing
unused disk space available to the RAID volume. In the first case if two volumes exist
in the same container, OLCE is performed automatically on both volumes (one by one)
because of the requirement that all volumes must span the same set of disks for
IMSM.
The following commands can be issued to grow the RAID volume. The first assumes
that it is the last volume in the container and we have additional room to grow, and
the second assumes that an additional disk has been added to the IMSM container.
1) If there is additional room in the last volume of the container, the volume can
be grown to the maximum available capacity. This feature is only available
starting with mdadm v3.2.5:
mdadm –G /dev/md/Volume0 –-size=max
2) The example below adds a single disk to the RAID container and then grows the
volume(s). Because IMSM volumes inside a container must span the same
number of disks, all volumes are expanded. A backup file that MDRAID will store
the backup superblock is specified. This file must not reside on any of the active
RAID volumes that are being worked on.
mdadm –a /dev/md0 /dev/sde
mdadm –G /dev/md0 –n 4 --backup-file=/tmp/backup
June 2012
Document Number: 327602-001US
Intel® Rapid Storage Technology enterprise (Intel® RSTe) for Linux OS
Software User’s Manual
47
RAID Monitoring
8
RAID Monitoring
There are two components within the mdadm tools to monitor events for the RAID
volumes. Mdadm can be used to monitor general RAID events, and mdmon provides
the ability to monitor “metadata event” occurrences such as disk failures, clean-todirty transitions, and etc for external metadata based RAID volumes. The kernel
provides the ability to report such actions to the userspace via sysfs, and mdmon
takes action accordingly with the monitoring capability. The mdmon polls the sysfs
looking for changes in the entries array_state, sync_action, and per disk state
attribute files.
8.1
mdmon
The mdadm monitor, mdmon, is automatically started when MDRAID volumes are
activated by mdadm through creation or assemble. However, the daemon can be
started manually:
mdmon /dev/md0
The --all parameter can be used in place of the container name to star monitors for all
active containers.
Mdmon must be started in the initramfs in order to support an external metadata
RAID array as the root filesystem. Mdmon needs to be restarted in the new
namespace once the final root filesystem has been mounted.
mdmon --takeover --all
Intel® Rapid Storage Technology enterprise (Intel® RSTe) for Linux OS
Software User’s Manual
48
June 2012
Document Number: 327602-001US
RAID Monitoring
8.2
Monitoring Using mdadm
Mdadm monitoring can be started with the following command line:
mdadm --monitor –-scan --daemonise –-syslog
The command above runs mdadm as a daemon to monitor all md devices. All events
will be reported to syslog. The user can monitor the syslog and filter for specific
mdadm events generated.
There are additional command line parameters that can be passed to mdmon at
startup.
Table 5 mdadm monitor Parameters
Long form
Short form
Description
--mail
-m
Provide mail address to email alerts or failures to.
--program or
--alert
-p
Provide program to run when an event is detected.
--delay
-d
Seconds of delay between polling state. Default is
60s.
--config
-c
Specify a different config file.
--scan
-s
Find mail-address/program settings in config file.
--oneshot
-1
Check for degraded arrays and then exit.
--test
-t
Generate a TestMessage event against each array at
startup.
--syslog
-y
Cause all events to be reported through ’syslog’. The
messages have facility of ’daemon’ and varying
priorities.
--increment
-r
Give a percentage increment. mdadm will generate
RebuildNN events with the given percentage
increment.
--daemonise
-f
Run as background daemon if monitoring.
--pid-file
-i
Write the pid of the daemon process to specified file.
--no-sharing
N/A
This inhibits the functionality for moving spares
between arrays.
June 2012
Document Number: 327602-001US
Intel® Rapid Storage Technology enterprise (Intel® RSTe) for Linux OS
Software User’s Manual
49
RAID Monitoring
The following table presents all the events that are reported by mdadm monitor:
Table 6 Monitoring Events
Event Name
Description
DeviceDisappeared
An MD array previously configured no longer exists.
RebuildStarted
An MD array started reconstruction.
RebuildNN
NN is a 2 digit number that indicates rebuild has passed that
many percent of the total. For example, Rebuild50 will trigger
an event when 50% of rebuild has completed.
RebuildFinished
An MD array has completed rebuild.
Fail1
An active component of an array has been marked faulty.
FailSpare1
A spare device that was being rebuilt to replace a faulty device
has failed.
SpareActive
A spare device that was being rebuilt to replace a fault device
is rebuilt and active.
NewArrary
A new MD array has been detected in /proc/mdstat.
DegradedArray1
A newly discovered array appears to be degraded.
MoveSpare
A spare drive has been moved from one array in a spare group
to another array to replace a failed disk. Both arrays are
labeled with the same spare group.
SparesMissing1
The spare device(s) does not exist in comparison to the config
file when the MD array is first discovered.
TestMessage1
Discovered new array while --test flag was used.
1: The events indicated cause email to be sent.
Intel® Rapid Storage Technology enterprise (Intel® RSTe) for Linux OS
Software User’s Manual
50
June 2012
Document Number: 327602-001US
RAID Monitoring
8.3
Configuration File for Monitoring
Mdadm will check the mdadm.conf config file to extract the appropriate entries for
monitoring. The following entries we can set to pass to mdmon:
MAILADDR: This config entry allows an E-mail address to be used for alerts. Only one
email address should be used.
MAILFROM: This config entry sets the email address to appear from the alert emails.
The default from would be the “root” user with no domain. This entry
overrides the default.
PROGRAM:
This config entry sets the program to run when mdmon detects
potentially interesting events on any of the arrays it is monitoring. There
can be only one PROGRAM line in the config file.
June 2012
Document Number: 327602-001US
Intel® Rapid Storage Technology enterprise (Intel® RSTe) for Linux OS
Software User’s Manual
51
RAID Monitoring
8.4
Examples of monitored events in syslog
In this example we have a RAID5 volume:
Personalities : [raid5]
md127 : active raid5 sdd[2] sdc[1] sdb[0]
204800 blocks super external:/md0/0 level 5, 128k chunk, algorithm
0 [3/3] [UUU]
md0 : inactive sdd[2](S) sdc[1](S) sdb[0](S)
3315 blocks super external:imsm
unused devices: <none>
In order to monitor all RAID containers a mdadm daemon can be started using the
following command:
mdadm --monitor --scan --daemonise --syslog
All events now will be written to syslog. After a mdadm daemon has been started the
following messages can be found in /var/log/messages or the corresponding syslog file
the distribution has designated:
May 15 09:58:40 myhost mdadm[9863]: NewArray event detected on md device
/dev/md127
May 15 09:58:40 myhost mdadm[9863]: NewArray event detected on md device
/dev/md0
When a spare disk has been added:
May 15 09:59:07 myhost mdadm[9863]: SpareActive event detected on md
device /dev/md127, component device /dev/sde
When an OLCE command is finished:
May 15 09:59:16 myhost mdadm[9863]: RebuildFinished event detected on md
device /dev/md127
When a disk fails:
May 15 10:01:04 myhost mdadm[9863]: Fail event detected on md device
/dev/md127, component device /dev/sdb
When a rebuild finishes:
May 15 10:02:22 myhost mdadm[9863]: RebuildFinished event detected on md
device /dev/md127
May 15 10:02:22 myhost mdadm[9863]: SpareActive event detected on md
device /dev/md127
When all MD devices are stopped:
May 15 10:03:27 myhost mdadm[9863]: DeviceDisappeared event detected on
md device /dev/md127
May 15 10:03:27 myhost mdadm[9863]: DeviceDisappeared event detected on
md device /dev/md0
Intel® Rapid Storage Technology enterprise (Intel® RSTe) for Linux OS
Software User’s Manual
52
June 2012
Document Number: 327602-001US
Recovery of RAID Volumes
9
Recovery of RAID Volumes
Recovery is one of the most important aspects of using RAID. It allows rebuilding of
RAID volumes on a system when disk failure occurs without the loss of any data.
Recovery is only possible in the case of following RAID levels: 1, 5, and 10. General
recovery is possible if no more than one disk fails. However in the case of RAID 10,
recovery may be possible even if two out of four disks fail if the two failed disks are
members of two different RAID 1S. If both disks of one of the RAID 1 fails, recovery is
not possible.
9.1
Removing Failed Disk(s)
Below is the output of /proc/mdstat with an active RAID5 volume with IMSM metadata
where md127 is the IMSM container and md126 is the RAID 5 volume. The RAID 5
volume contains disks /dev/sdb, /dev/sdc, /dev/sdd, /dev/sde, /dev/sdf.
Personalities : [raid6] [raid5] [raid4]
md127 : active (read-only) raid5 sde[4] sdd[3] sdc[2] sdb[1] sdf[0]
39999488 blocks super external:/md0/0 level 5, 512k chunk,
algorithm 0 [5/5] [UUUUU]
md0 : inactive sdb[4](S) sdf[3](S) sde[2](S) sdc[1](S) sdd[0](S)
11285 blocks super external:imsm
unused devices: <none>
When a disk fails, in this instance /dev/sde, the following is displayed in /proc/mdstat:
Personalities : [raid6] [raid5] [raid4]
md127 : active raid5 sdf[4] sdb[3] sdc[2] sdd[1]
39999488 blocks super external:/md0/0 level 5, 512k chunk,
algorithm 0 [5/4] [_UUUU]
md0 : inactive sdf[4](S) sde[3](S) sdd[2](S) sdc[1](S) sdb[0](S)
1045 blocks super external:imsm
unused devices: <none>
The failed disk can be removed from the RAID volume by the following command:
mdadm /dev/md/Volume0 --fail detached --remove detached
or from the container by the following command:
mdadm --remove /dev/md0 /dev/sde
June 2012
Document Number: 327602-001US
Intel® Rapid Storage Technology enterprise (Intel® RSTe) for Linux OS
Software User’s Manual
53
Recovery of RAID Volumes
9.2
Rebuilding
At this point, this RAID volume is running in degraded mode. However, it is still
operational. If there are spares disks available in the container, rebuild of the RAID
volume would automatically commence. A spare can also be manually added to start
the rebuild process:
mdadm –add /dev/md0 /dev/sdg
Personalities : [raid6] [raid5] [raid4]
md127 : active raid5 sdg[5] sdf[4] sdb[3] sdc[2] sdd[1]
39999488 blocks super external:/md0/0 level 5, 512k chunk,
algorithm 0 [5/4] [_UUUU]
[==>..................] recovery = 11.5% (1154588/9999872)
finish=2.6min speed=54980K/sec
md0 : inactive sdg[5](S) sdf[4](S) sde[3](S) sdd[2](S) sdc[1](S)
sdb[0](S)
1254 blocks super external:imsm
unused devices: <none>
Intel® Rapid Storage Technology enterprise (Intel® RSTe) for Linux OS
Software User’s Manual
54
June 2012
Document Number: 327602-001US
Recovery of RAID Volumes
9.3
Auto Rebuild
Auto-rebuild allows a RAID volume to be automatically rebuilt when a disk fails. There
are 3 different scenarios this can happen:
1.
2.
3.
There is a rebuild capable RAID volume with no spare disk in the
container. If one of the disks in the volume fails it enters degraded mode.
When a spare disk is added manually to the container, rebuild starts
automatically (as referenced in section 9.2 Rebuilding).
There is a rebuild capable RAID volume with at least one spare disk in the
container. If one of the disks in the volume fails, the spare disk is
automatically pulled in, and the rebuild starts.
There are two containers . One container has a spare disk and the other
one does not. If mdadm is running in monitor mode, and the appropriate
policy is configured in the mdadm.conf file, a spare disk will be moved
automatically from one container to the other if there’s a RAID volume
failure that requires a spare disk for rebuild.
For scenario number three, an example is presented below:
1. Create container ”md1” with 3 disks:
mdadm –C /dev/md1 –e imsm –n3 /dev/sda /dev/sdb /dev/sdc
2. Create RAID1 volume “Volume1” in container”md1”, disk /dev/sdc remains a
spare disk:
mdadm –C /dev/md/Volume1 –l1 –n2 /dev/sda /dev/sdb
3. Create container “md2” with 2 disks:
mdadm –C /dev/md2 –e imsm –n2 /dev/sdd /dev/sde
June 2012
Document Number: 327602-001US
Intel® Rapid Storage Technology enterprise (Intel® RSTe) for Linux OS
Software User’s Manual
55
Recovery of RAID Volumes
4. Create RAID1 volume “Volume2” in container ”md2”, with no spare disks:
mdadm –C /dev/md/Volume2 –l1 –n2 /dev/sdd /dev/sde
Personalities : [raid5] [raid1] [raid0]
md126: active raid1 sde[1] sdd[0]
1048576 blocks super external:/md2/0 [2/2] [UU]
md2 : inactive sde[1](S) sdd[0](S)
2210 blocks super external:imsm
md127: active raid1 sdb[1] sda[0]
1048576 blocks super external:/md1/0 [2/2] [UU]
md1 : inactive sdc[2](S) sdb[1](S) sda[0](S)
3315 blocks super external:imsm
unused devices: <none>
Intel® Rapid Storage Technology enterprise (Intel® RSTe) for Linux OS
Software User’s Manual
56
June 2012
Document Number: 327602-001US
Recovery of RAID Volumes
5. Save configuration file:
mdadm –Ebs > /etc/mdadm.conf
6. Add the policy with the same domain and the same action for all disks to the
configuration file, which allows the spare to move from one container to another
for rebuild:
echo "POLICY domain=DOMAIN path=* metadata=imsm action=spare-sameslot" >> /etc/mdadm.conf
The configuration file in /etc/mdadm.conf may look like below:
ARRAY metadata=imsm UUID=67563d6a:3d253ad0:6e649d99:01794f88 spares=1
ARRAY /dev/md/Volume2 container=67563d6a:3d253ad0:6e649d99:01794f88
member=0 UUID=76e507f1:fadb9a42:da46d784:2e2166e8
ARRAY metadata=imsm UUID=267445e7:458c89eb:bd5176ce:c37281b7
ARRAY /dev/md/Volume1 container=267445e7:458c89eb:bd5176ce:c37281b7
member=0 UUID=25025077:fba9cfab:e4ad212d:3e5fce11
POLICY domain=DOMAIN path=* metadata=imsms action=spare-same-slot
7. Make sure mdadm is in monitor mode:
mdadm --monitor --scan –daemonise
June 2012
Document Number: 327602-001US
Intel® Rapid Storage Technology enterprise (Intel® RSTe) for Linux OS
Software User’s Manual
57
Recovery of RAID Volumes
8. Fail one of the disks in volume “Volume2”, the volume without a spare:
mdadm --fail /dev/md/Volume2 /dev/sdd
The spare disk /dev/sdc should automatically moves from the container “md1” to the
container “md2” and the rebuild of “Volume2” starts automatically:
Personalities : [raid5] [raid1] [raid0]
md126: active raid1 sdc[2] sde[1]
1048576 blocks super external:/md2/0 [2/1] [_U]
[========>............]
finish=0.0min
recovery = 41.2% (432896/1048576)
speed=144298K/sec
md2 : inactive sdc[2](S) sde[1](S) sdd[0](S)
5363 blocks super external:imsm
md127: active raid1 sdb[1] sda[0]
1048576 blocks super external:/md1/0 [2/2] [UU]
md1 : inactive sdb[1](S) sda[0](S)
2210 blocks super external:imsm
unused devices: <none>
Intel® Rapid Storage Technology enterprise (Intel® RSTe) for Linux OS
Software User’s Manual
58
June 2012
Document Number: 327602-001US
Recovery of RAID Volumes
When the rebuild has completed:
Personalities : [raid5] [raid1] [raid0]
md126: active raid1 sdc[2] sde[1]
1048576 blocks super external:/md2/0 [2/2] [UU]
md2 : inactive sdc[2](S) sde[1](S) sdd[0](S)
5363 blocks super external:imsm
md127: active raid1 sdb[1] sda[0]
1048576 blocks super external:/md1/0 [2/2] [UU]
md1 : inactive sdb[1](S) sda[0](S)
2210 blocks super external:imsm
unused devices: <none>
June 2012
Document Number: 327602-001US
Intel® Rapid Storage Technology enterprise (Intel® RSTe) for Linux OS
Software User’s Manual
59
SGPIO
10
SGPIO
Serial General Purpose Input/Output (SGPIO) is a four signal bus used between a
storage controller and a backplane. The official name designated to SGPIO is
SFF-8485 by the Small Form Factor (SFF) Committee. SGPIO provides the capability
of blinking LEDs on disk arrays and storage backplanes to indicate statuses.
10.1
SGPIO Utility
Linux uses the utility SGPIO to control the LEDs on a hard disk drive bay enclosure.
The following table describes the options the SGPIO utility provides:
Table 7 SGPIO Utility Options
-h, --help
Displays the help text
-V, --version
Displays the utility version and AHCI SGPIO specification version
-d, --disk
Disk name of LED location. i.e. sda, sdb, sdc. Can be comma delimited
list
-p, --port
SATA port number of LED location. Can be used when a disk name is
no longer valid. i.e. 0, 1, 2, 4. Can be comma delimited list
-s, --status
The LED status to set to: locate, fault, rebuild, off
-f, --freq
The frequency of the LED blinking in Hz between 1 and 10.
For example, the following command sets sda, sdb, and sdc LEDs to fault with a
frequency of 3Hz Flash rate:
sgpio –d sda,sdb,sdc –s fault –f 3
Intel® Rapid Storage Technology enterprise (Intel® RSTe) for Linux OS
Software User’s Manual
60
June 2012
Document Number: 327602-001US
SGPIO
10.2
Ledctl Utility
The LEDs can also be manipulated via the ledctl utility. The ledctl utility has been
verified to work with Intel® storage controllers such as the AHCI and SCU.
Below are some examples on using the ledctl utility:
To locate a single block device:
ledctl locate=/dev/sda
To locate a RAID device
ledctl locate=/dev/md127
To set a rebuild pattern for 4 block devices in a RAID:
ledctl rebuild={/sys/block/sd[a-d]}
To turn off status and failure LED for a given device:
ledctl off=/dev/sda,/dev/sdb
The ledctl utility has the command format of:
ledctl [OPTIONS] pattern_name=list_of_devices
The table below shows all the options:
Table 8 ledctl options
Parameter
Usage
-c or --config=
Specify path to a configuration file or override the global or default
config file. (Although the utility currently does not use a config
file).
-l or --log=
Sets the path to a user specified log file. If this option is specified
the global log file /var/log/ledctl.log is not used.
-h or --help=
Prints out help text and exits.
--quiet
Suppress messages to stdout and stderr, but does not prevent log
to file.
-v or –version
Prints out version and license information and exits.
June 2012
Document Number: 327602-001US
Intel® Rapid Storage Technology enterprise (Intel® RSTe) for Linux OS
Software User’s Manual
61
SGPIO
The table below shows all the “patterns” that can be specified:
Pattern Name
Usage
locate
Turns locate LED on for given device(s) or associated empty
slot(s).
locate_off
Turns locate LEDs off.
normal
Turns status, failure, and locate LEDs off.
off
Turns status and failure LEDs off.
ica or degraded
Display “in a critical array” pattern.
rebuild or
rebuild_p
Display “rebuild” pattern.
ifa or
failed_array
Display “in a failed array” pattern.
hotspare
Display “hotspare” pattern.
pfa
Display “predicted failure analysis” pattern.
failure or
disk_failed
Display “failure” pattern.
Intel® Rapid Storage Technology enterprise (Intel® RSTe) for Linux OS
Software User’s Manual
62
June 2012
Document Number: 327602-001US
SGPIO
10.3
Ledmon Service
Ledmon is a daemon service that monitors the state of MDRAID devices or a block
device. The service monitors all RAID volumes. There is no method to specify
individual volumes to monitor. Like ledctl, ledmon has only been verified with Intel®
storage controllers.
Ledmon can be run with the following options listed below:
Option
Usage
-c or --configpath=
Sets the configuration file path. This overrides any other
configuration files. (Although the utility currently does not use a
config file).
-l or --log-path
Sets the path to a log file. This overrides /var/log/ledmon.log.
-t or --interval=
Sets the time interval in seconds between scans of the sysfs. A
minimum of 5 seconds is set.
--quiet, --error, --warning, --info,
--debug, --all
Specifies verbosity level of the log - 'quiet' means no logging at
all, and 'all' means to log everything. The levels are given in
order. If user specifies more than one verbose option the last
option comes into effect.
-h or --help
Prints help text and exits.
-v or --version
Prints version and license information, then exits.
June 2012
Document Number: 327602-001US
Intel® Rapid Storage Technology enterprise (Intel® RSTe) for Linux OS
Software User’s Manual
63
SAS Management Protocol Utilities
11
SAS Management Protocol
Utilities
smp_utils is a set of command line utilities that are used to invoke SAS Management
Protocol (SMP) functions to monitor and manage SAS expanders. More information
about smp_utils, package contents and usage examples can be found at:
http://sg.danny.cz/sg/smp_utils.html
Below are some helpful commands that are described together with usage examples.
11.1
smp_discover
smp_discover utility sends the SMP DISCOVER Request to a SMP Target. It may be
used to check what devices are attached to the HBA or an expander.
11.1.1
Examples
Finding an HBA:
ls -l /dev/bsg/sas_host*
crw-rw---- 1 root root 253, 1 May 16 16:32 /dev/bsg/sas_host6
crw-rw---- 1 root root 253, 2 May 16 16:32 /dev/bsg/sas_host7
In this example 2 SAS Hosts were found. Numbers in sas_host* will change for
instance when unloading and loading driver module.
Intel® Rapid Storage Technology enterprise (Intel® RSTe) for Linux OS
Software User’s Manual
64
June 2012
Document Number: 327602-001US
SAS Management Protocol Utilities
To see what is connected to the sas_host6:
smp_discover /dev/bsg/sas_host6
Discover response:
phy identifier: 0
attached device type: expander device
negotiated logical link rate: phy enabled; 3 Gbps
attached initiator: ssp=0 stp=0 smp=1 sata_host=0
attached sata port selector: 0
attached target: ssp=0 stp=0 smp=1 sata_device=0
SAS address: 0x5001e6734b8d2000
attached SAS address: 0x50000d166a80e87f
attached phy identifier: 0
programmed minimum physical link rate: not programmable
hardware minimum physical link rate: not programmable
programmed maximum physical link rate: not programmable
hardware maximum physical link rate: not programmable
phy change count: 0
virtual phy: 0
partial pathway timeout value: 0 us
routing attribute: direct
June 2012
Document Number: 327602-001US
Intel® Rapid Storage Technology enterprise (Intel® RSTe) for Linux OS
Software User’s Manual
65
SAS Management Protocol Utilities
To probe the PHYs attached to the host controller:
smp_discover -m /dev/bsg/sas_host6
Device <5001e6734b8d2000>, expander:
phy
0:D:attached:[50000d166a80e87f:00 exp i(SMP) t(SMP)]
3 Gbps
phy
1:D:attached:[50000d166a80e87f:00 exp i(SMP) t(SMP)]
3 Gbps
phy
2:D:attached:[50000d166a80e87f:00 exp i(SMP) t(SMP)]
3 Gbps
phy
3:D:attached:[50000d166a80e87f:00 exp i(SMP) t(SMP)]
3 Gbps
In this example sas_host6 is connected to an expander device with all 4 phys. Such
configuration creates a wide port.
To see what expander is connected to sas_host6, a simple check in sysfs can be
performed:
ls
/sys/class/bsg/sas_host6/device/port-6:0/
expander-6:0
phy-6:0
phy-6:1
phy-6:2
phy-6:3
Intel® Rapid Storage Technology enterprise (Intel® RSTe) for Linux OS
Software User’s Manual
66
power
sas_port
uevent
June 2012
Document Number: 327602-001US
SAS Management Protocol Utilities
To see what is connected to the expander-6:0:
smp_discover -m /dev/bsg/expander-6\:0
Device <50000d166a80e87f>, expander:
phy
0:T:attached:[0000000000000000:00]
phy
1:T:attached:[0000000000000000:00]
phy
2:T:attached:[0000000000000000:00]
phy
3:T:attached:[0000000000000000:00]
phy
4:T:attached:[5000c50017ae9815:00
t(SSP)]
3 Gbps
phy
5:T:attached:[5000c5000051fe39:00
t(SSP)]
3 Gbps
phy
6:T:attached:[5000c50005f437a9:00
t(SSP)]
3 Gbps
phy
7:T:attached:[5000c50005f4373d:00
t(SSP)]
3 Gbps
phy
8:T:attached:[5000c50001cd61d1:00
t(SSP)]
3 Gbps
phy
9:T:attached:[5000c50023c799a1:00
t(SSP)]
3 Gbps
phy
10:T:attached:[5000c50001ab182d:00
t(SSP)]
3 Gbps
phy
11:T:attached:[5000c50005fba135:00
t(SSP)]
3 Gbps
phy
12:T:attached:[5000c5000490c705:00
t(SSP)]
3 Gbps
phy
13:T:attached:[5000c5000051fca9:00
t(SSP)]
3 Gbps
phy
14:T:attached:[5000c500076a4ab5:00
t(SSP)]
3 Gbps
phy
15:T:attached:[5000c50005fd6cb1:00
t(SSP)]
3 Gbps
phy
16:S:attached:[5001e6734b8d2000:02
i(SSP+STP+SMP)]
3 Gbps
phy
17:S:attached:[5001e6734b8d2000:03
i(SSP+STP+SMP)]
3 Gbps
phy
18:S:attached:[5001e6734b8d2000:00
i(SSP+STP+SMP)]
3 Gbps
phy
19:S:attached:[5001e6734b8d2000:01
i(SSP+STP+SMP)]
3 Gbps
phy
20:T:attached:[0000000000000000:00]
phy
21:T:attached:[0000000000000000:00]
phy
22:T:attached:[0000000000000000:00]
phy
23:T:attached:[0000000000000000:00]
phy
24:D:attached:[50000d166a80e87e:24
V i(SSP) t(SSP)]
3 Gbps
In this example to the expander 12 SAS disks are connected (phy4-15). Phys 16-19
are occupied by wide port (connection to HBA) and Phy24 is a virtual phy.
More information about this utility can be found in the smp_discover(8) man page.
June 2012
Document Number: 327602-001US
Intel® Rapid Storage Technology enterprise (Intel® RSTe) for Linux OS
Software User’s Manual
67
SAS Management Protocol Utilities
11.2
smp_phy_control
smp_phy_control utility sends the PHY CONTROL request to a SMP Target. Using this
utility administrator can for instance disable the phy.
11.2.1
Examples
To disable phy:
smp_phy_control --phy=4 --op=di /dev/bsg/expander-6\:0
To enable it again:
smp_phy_control --phy=4 --op=lr /dev/bsg/expander-6\:0
More information about this utility can be found in the smp_phy_control(8) man page.
11.3
smp_rep_manufacturer
smp_rep_manufacturer utility sends the REPORT MANUFACTURER INFORMATION
request to a SMP Target.
11.3.1
Examples
smp_rep_manufacturer -vvvv /dev/bsg/expander-6\:0
smp_initiator_open: interface not recognized
Report manufacturer information request: 40 01 00 00 00 00 00 00
send_req_sgv4: fd=3,
subvalue=0
send_req_sgv4: driver_status=0, transport_status=0
device_status=0, duration=0, info=0
din_resid=0, dout_resid=0
Report manufacturer response:
Expander change count: 0
SAS-1.1 format: 0
vendor identification: PMCSIERA
product identification: SXP 36x3G
product revision level: REVA
More information about this utility can be found in the smp_rep_manufacturer(8) man
page.
Intel® Rapid Storage Technology enterprise (Intel® RSTe) for Linux OS
Software User’s Manual
68
June 2012
Document Number: 327602-001US
SAS Management Protocol Utilities
11.4
smp_rep_general
smp_rep_general utility sends the REPORT GENERAL request to a SMP Target.
11.4.1
Examples
mp_rep_general -vvvv /dev/bsg/expander-6\:0
Report general request: 40 00 00 00 00 00 00 00
send_req_sgv4: fd=3,
subvalue=0
send_req_sgv4: driver_status=0, transport_status=0
device_status=0, duration=0, info=0
din_resid=0, dout_resid=0
Report general response:
expander change count: 547
expander route indexes: 1024
long response: 0
number of phys: 25
table to table supported: 0
zone configuring: 0
self configuring: 0
STP continue AWT: 0
open reject retry supported: 0
configures others: 0
configuring: 0
externally configurable route table: 0
enclosure logical identifier <empty>
More information about this utility can be found in the smp_rep_general(8) man page.
June 2012
Document Number: 327602-001US
Intel® Rapid Storage Technology enterprise (Intel® RSTe) for Linux OS
Software User’s Manual
69
MDRAID Sysfs Components
12
MDRAID Sysfs Components
Just like the isci driver and libsas, the MDRAID subsystem also has sysfs components
that provides information or can be used to tweak behavior and performance. All
MDRAID devices present in the system are shown in:
/sys/block/
Example:
ls -l /sys/block/md*
lrwxrwxrwx 1 root root 0 May 17 13:26 /sys/block/md126 ->
../devices/virtual/block/md126
lrwxrwxrwx 1 root root 0 May 17 13:26 /sys/block/md127 ->
../devices/virtual/block/md127
Mapping between a device number and its name can be found:
ls -l /dev/md/
total 0
lrwxrwxrwx 1 root root 8 May 17 13:26 imsm0 -> ../md127
lrwxrwxrwx 1 root root 8 May 17 13:26 raid1 -> ../md126
md127 is imsm0 and md126 is raid1.
Intel® Rapid Storage Technology enterprise (Intel® RSTe) for Linux OS
Software User’s Manual
70
June 2012
Document Number: 327602-001US
MDRAID Sysfs Components
Md devices in /sys/block are symbolic links pointing to the /sys/devices/virtual/block.
All MD Devices are in the ‘md’ subdirectory in /sys/devices/virtual/block/mdXYZ
directory. In the md directory the following contents can be found:
ls -l /sys/devices/virtual/block/md127/md
total 0
-rw-r--r-- 1 root root 4096 May 18 13:18 array_size
-rw-r--r-- 1 root root 4096 May 17 13:26 array_state
drwxr-xr-x 2 root root
0 May 18 13:18 bitmap
-rw-r--r-- 1 root root 4096 May 18 13:18 chunk_size
-rw-r--r-- 1 root root 4096 May 18 13:18 component_size
drwxr-xr-x 2 root root
0 May 17 13:26 dev-sdb
drwxr-xr-x 2 root root
0 May 17 13:26 dev-sdc
-rw-r--r-- 1 root root 4096 May 18 13:18 layout
-rw-r--r-- 1 root root 4096 May 17 13:26 level
-rw-r--r-- 1 root root 4096 May 18 13:18 max_read_errors
-rw-r--r-- 1 root root 4096 May 17 13:26 metadata_version
--w------- 1 root root 4096 May 17 13:26 new_dev
-rw-r--r-- 1 root root 4096 May 17 13:26 raid_disks
-rw-r--r-- 1 root root 4096 May 18 13:18 reshape_position
-rw-r--r-- 1 root root 4096 May 18 13:18 resync_start
-rw-r--r-- 1 root root 4096 May 18 13:18 safe_mode_delay
Since the MD device is a container, the metadata_version file will show:
cat /sys/devices/virtual/block/md127/md/metadata_version
external:imsm
The directory contains subdirectories dev-sdb and dev-sdc specifying the disks that
the container is assembled from.
June 2012
Document Number: 327602-001US
Intel® Rapid Storage Technology enterprise (Intel® RSTe) for Linux OS
Software User’s Manual
71
MDRAID Sysfs Components
The MD Volume contents look like below:
ls -l /sys/devices/virtual/block/md126/md/
total 0
-rw-r--r-- 1 root root 4096 May 17 13:26 array_size
-rw-r--r-- 1 root root 4096 May 17 13:26 array_state
drwxr-xr-x 2 root root
0 May 18 13:10 bitmap
--w------- 1 root root 4096 May 18 13:10 bitmap_set_bits
-rw-r--r-- 1 root root 4096 May 17 13:26 chunk_size
-rw-r--r-- 1 root root 4096 May 17 13:26 component_size
-r--r--r-- 1 root root 4096 May 17 13:26 degraded
drwxr-xr-x 2 root root
0 May 17 13:26 dev-sdb
drwxr-xr-x 2 root root
0 May 17 13:26 dev-sdc
-rw-r--r-- 1 root root 4096 May 17 13:26 layout
-rw-r--r-- 1 root root 4096 May 17 13:26 level
-rw-r--r-- 1 root root 4096 May 18 13:10 max_read_errors
-rw-r--r-- 1 root root 4096 May 17 13:26 metadata_version
-r--r--r-- 1 root root 4096 May 18 13:10 mismatch_cnt
--w------- 1 root root 4096 May 17 13:26 new_dev
-rw-r--r-- 1 root root 4096 May 17 13:26 raid_disks
lrwxrwxrwx 1 root root
0 May 17 13:26 rd0 -> dev-sdb
lrwxrwxrwx 1 root root
0 May 17 13:26 rd1 -> dev-sdc
-rw-r--r-- 1 root root 4096 May 18 13:10 reshape_position
-rw-r--r-- 1 root root 4096 May 17 13:26 resync_start
-rw-r--r-- 1 root root 4096 May 17 13:26 safe_mode_delay
-rw-r--r-- 1 root root 4096 May 18 13:10 suspend_hi
-rw-r--r-- 1 root root 4096 May 18 13:10 suspend_lo
-rw-r--r-- 1 root root 4096 May 17 13:26 sync_action
-r--r--r-- 1 root root 4096 May 17 13:26 sync_completed
Intel® Rapid Storage Technology enterprise (Intel® RSTe) for Linux OS
Software User’s Manual
72
June 2012
Document Number: 327602-001US
MDRAID Sysfs Components
-rw-r--r-- 1 root root 4096 May 18 13:10 sync_force_parallel
-rw-r--r-- 1 root root 4096 May 18 13:10 sync_max
-rw-r--r-- 1 root root 4096 May 18 13:10 sync_min
-r--r--r-- 1 root root 4096 May 17 13:26 sync_speed
-rw-r--r-- 1 root root 4096 May 18 13:10 sync_speed_max
-rw-r--r-- 1 root root 4096 May 18 13:10 sync_speed_min
June 2012
Document Number: 327602-001US
Intel® Rapid Storage Technology enterprise (Intel® RSTe) for Linux OS
Software User’s Manual
73
MDRAID Sysfs Components
Several new files are present, and they are related to the RAID Volume properties.
Base information can be read from files:
Array size
cat /sys/devices/virtual/block/md126/md/array_size
1048576
Array state
cat /sys/devices/virtual/block/md126/md/array_state
clean
Raid level
cat /sys/devices/virtual/block/md126/md/level
raid1
Strip size
cat /sys/devices/virtual/block/md126/md/chunk_size
65536
Metadata
cat /sys/devices/virtual/block/md126/md/metadata_version
external:/md127/0
And this is what is shown in mdstat for the example RAID information:
cat /proc/mdstat
Personalities : [raid1]
md127 : active raid1 sdc[1] sdb[0]
1048576 blocks super external:/md127/0 [2/2] [UU]
md0 : inactive sdc[1](S) sdb[0](S)
2210 blocks super external:imsm
unused devices: <none>
Intel® Rapid Storage Technology enterprise (Intel® RSTe) for Linux OS
Software User’s Manual
74
June 2012
Document Number: 327602-001US