1
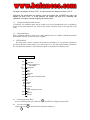
My Weigh
IBalance 201
ELECTRONIC BALANCE
INSTRUCTION MANUAL
Low Batteries & Faulty AC Adaptors are the #1 cause of scale malfunction and
inaccuracy!
We test all of our scale returns from consumers. Fully 60% of consumer
returns are simply dead or low batteries. This sounds silly but it's true! A scale will perform
slowly, or read inaccurately when it has low batteries. Please replace the batteries often (and
only use good quality batteries). We include good quality batteries with all of our scales but
batteries can run low in storage. A Faulty AC adaptor can cause your scale to act unstable
with numbers "jumping" all around. Please test your scale with a good set of batteries
(instead of the AC adaptor) to determine if perhaps the AC adaptor is faulty.
Quick IMPROVED Calibration Guide:
The iBalance is calibrated with the included 200g weight.
iBalance:
To calibrate the
1)Press and hold the ON/TARE key with no load on the platform, until “CAL” shows on the
display, then immediately release the key. This accesses the “CAL” menu. The Display
will show -200- (NOTE: don’t hold onto the ON/TARE key for too long or it will access the
setup menu instead)
2) Press and release the ON/TARE key again, The display will show “CAL”. In a few
seconds , it will display “CAL A”,
3) Place the 200g weight on the center of the platform . Press and release the ON/TARE
key again, the display will show “CAL”. In a few seconds, the display will show “CAL S”.
4)Remove the weight from the platform, press and release the ON/TARE key again, the display will
show “CAL”. In a few seconds, the display will show 0.00, indicating that calibration is complete.
Normal weighing can now be done.
Table of contents
1. Introduction
2. Description
3. Features
4. Unpacking
5. Installation
5. Environment
5.2 Power options
5.3 Battery installation
5.4 AC Adapter
6. Operation
6.1 Turning the balance on and off
6.2 checking calibration
6.3 Weighing
6.4 Taring
6.5 Printing
7. Using menus to configure the balance
7.1 Calibration menu
7.2 Calibration Menu Protection
7.3 Calibration masses
8. Setup menu
8.1 Accessing the setup menu
8.2 Accessing the submenus in the Setup
8.3 Reset to Factory Settings
8.4 Unit Selection
8.5 Taels
8.6 Averaging Level
8.7 Stability Range
8.8 Auto―Zero
8.9 Parts Counting Error Level
8.10 Auto―off
8.11 End
9. Care and Maintenance
10. Troubleshooting
11. Error Codes
12. Service Information
13. Specifications
INTRODUCTION
This manual covers installation, operation and troubleshooting for the iBalance 201. To ensure
proper operation of the balance , please read this manual completely .
1.
2. DESCRIPTION
The iBalance 201 portable advanced balance is a precision weighing instrument, designed to provide
years of service with virtually no maintenance .The Portable Advanced housing is constructed of a
material which is impact resistant contains a one piece solid-state precision electronics PC
board and a five digit LCD display which is 0.5 inches in height All Portable Advanced balances
are initially factory set to measure in grams and can be set to measure in other units of measure as
desired. Each balance operates through a series of menus which enable precise calibration and the
selection of various parameters which enhance operation. Power is supplied through an AC adapter or
batteries.
3. This Portable Advanced balance contains two display menus which enable you to calibrate and
configure the balance for specific operating requirements.
· CALIBRATION Menu–Allows the balance to be calibrated by using standard weights.
· SETUP Menu–allows the balance to be set for environmental conditions and customized for specific
weighing functions.
When the balance is first turned on, it can be used to weigh in 7 standard modes, parts counting
and tare items without setting the advanced menus. Refer to the individual menus in this manual for
detailed descriptions and procedures for programming (it is usually not necessary for most
applications).
4.
UNPACKING
All iBalances are supplied with a weighing platform, AC power adapter, instruction manual, and
warranty card.
INSTALLATION
Environment
Excessive air currents, corrosives, vibration, temperature changes or humidity variations, can affect
the iBalance’s performance.
5.
5.1 DO NOT use the iBalance:
· Near open windows or doors causing drafts or rapid temperature changes.
· Near air conditioning or heat vents.
· Near vibrating, rotating or reciprocating equipment.
· On any non-level work surface SCALE MUST BE LEVEL!
· Near corrosive vapors (example : nitric acid ).
5.2 Power Options
The iBalance can be operated using AA alkaline batteries (not included ), or from an AC
electrical outlet using the AC adapter supplied.
5.3 Battery Installation NOTE: Be careful during battery installation to not accidentally overload the
scale and DON’T PRESS ON THE TRAY AT ANY TIME OR FATAL OVERLOAD CAN
OCCUR.
Turn the iBalance upside down
Press the tabs on the battery cover inward and lift the cover off.
Remove the battery holder.
Install the AA alkaline batteries in the battery holder, orienting the Plus (+) and minus (-) ends as
indicated on the holder.
Replace the battery cover.
5.4 AC Adapter
Plug the jack from the adapter into the receptacle located on the right side of the balance. Plug
the adapter into a 110v (or 220v) AC outlet. Be sure the plug is connected firmly into the back of the
iBalance.
6 OPERATION
6.1 Turning the Balance On and Off
Will no load on the platform, press ON/TARE. All segments of the display will turn on, then the
software version will be displayed (SR 14).
NOTE: Try to allow 30 seconds for the iBalance to temperature stabilize before using. If the balance is
moved to a different temperature environment, allow additional time to stabilize.
To turn the balance off, press OFF/MODE
and hold until OFF is displayed, then release it.
6.2 Checking Calibration
Before using the balance, its calibration should be checked. The balance has been calibrated before
shipment, however, calibration is influenced by factors such as:
Variations in the earth gravitational field at different latitudes of the world.
Rough handling.
Changes in angle (even the slightest slant) or other environmental changes
Height above sea level.
To check the iBalance’s calibration, place a known mass on the center of the platform and read
the displayed weight.
If the displayed weight differs from the known mass by more than acceptable limits, refer to the
Calibration Guide and the Specifications in this manual.
6.3 Weighing
Press ON/TARE to set the display to zero.
Place the object to be weighed on the platform.
Wait until the unit indicator appears before reading the displayed weight. When the unit indicator
appears, the reading is stable.
6.4 Taring
When weighing samples that must be held in a container, taring
enables the balance to subtract the weight of the container and display only the net weight of the
sample.
Press ON/Tare with no load on the platform to set the display to zero.
Place the empty container on the platform.. It’s weight will be displayed.
Press ON/Tare . 0.0 (0.000) will be displayed and the container’s weight will be stored in the
balance’s memory.
Add the sample to the container and read its net weight on the display.
When the container and its contents are removed, the container weight will be displayed as a
negative number.
The tared weight will remain in memory until ON/Tare is pressed again or the iBalance is turned
off.
6.5 Parts Counting (optional)
Parts Counting must be enabled in the Setup menu before using
This procedure. The iBalance will count parts based on the weight of a reference sample:
5,10,20,30,40 or 50 parts. For optimum results, the parts should be uniform in weight.
Repeatedly press OFF/Mode until pc CON is displayed.
Place a container on the platform, then press On/Tare . the display will show pcADD 5 which is the
preset reference quantity. “5” shows the quantity of the reference sample.
To change the reference quantity, repeatedly press Off/Mode until the desired quantity is
displayed.
Parts Counting Factory Settings
NOTE: If you need to exit or restart parts counting at any
time, press and
Parts Counting Mode ………….. Enabled
hold On/Tare until pc CON is displayed, then immediately
Err ………………………….. 0FF
release (if you hold onto the ON/Tare key for too long the
scale will go into Calibration or Setup mode). Return to step 2 to
restart, or press ON/Tare or other weighing functions.
Add the displayed number of parts to the container, then press ON/Tare. The display will show the
current number of parts (ie 5).
NOTE : If PCE rr is displayed, the sample is too small to provide accurate results within the selected
parts counting error level (PCE rr of the Setup menu).
Add parts to the container as desired and read the quantity on the display. The small “PC” indicator
will show on the left side of the display.
NOTE : The programmed quantity/weight (ie 5) will remain in memory until it is changed or the
iBalance is turned off..
To switch between viewing the quantity and weight of the parts,
press OFF/Mode.
USING MENUS TO CONFIGURE THE iBALANCE
The following illustration identifies the items in each menu and
The factory default settings are shown in bold type.
7
Yes No
Unit selection
g,oz,ozt,dwt,lb,t,.(custom) ,PC
DFLT/USR
A
Averaging level
0,1,2
Stability
.5d,1d,2d,5d
Auto zero
OFF,.5d,1d,3d
Custom unit conversion faction
Mantissa
1.0000
Exponent
E0,E1,E2,E3
E-3,E-2,E-1
LSE
.1d,.2d,.5d,1d
2d,5d,10d
Parts counting error level
OFF,1,2.5,5
Auto off
OFF,60,120,180
ON
To access a menu, press and hold TAR
until desired menu appears, then release it .
E
Use these buttons to step through menus and select submenus :
next
select
OFF
ON
selection MOD
displayed item TAR
E
E
7.0
Calibration:
The iBalance is calibrated with the included 200g weight.
iBalance:
To calibrate the
1)Press and hold the ON/TARE key with no load on the platform, until “CAL” shows on the
display, then immediately release the key. This accesses the “CAL” menu. The Display
will show -200- (NOTE: don’t hold onto the ON/TARE key for too long or it will access the setup menu
instead)
2) Press and release the ON/TARE key again, The display will show “CAL”. In a few
seconds , it will display “CAL A”,
3) Place the 200g weight on the center of the platform . Press and release the ON/TARE
key again, the display will show “CAL”. In a few seconds, the display will show “CAL S”.
4)Remove the weight from the platform, press and release the ON/TARE key again, the
display will show “CAL”. In a few seconds, the display will show 0.00, indicating that
calibration is complete. Normal weighing can now be done
7.1 (optional) Calibration Menu Lockout
If equipped, the Calibration menu may be locked out to prevent unauthorized access to calibration.
Please see the online manual if your scale has this option (a lockout switch on the right side of the
scale)
7.2 Calibration Masses
Before beginning calibration, make sure a 200g calibration mass is available. Calibration should be
performed as necessary to ensure accurate weighing .
SETUP MENU
The Setup menu is used to customize the operation of the balance for your specific requirements.
It contains submenus which enable you to turn features on or off, and program balance parameters.
The next illustration describes which submenus appear on the Setup menu and their order.
8.
Yes No
Unit selection
g,oz,ozt,dwt,lb,t,.(custom) ,PC
DFLT/USR
A
Averaging level
0,1,2
Stability
.5d,1d,2d,5d
Auto zero
OFF,.5d,1d,3d
Custom unit conversion faction
Mantissa
1.0000
Exponent
E0,E1,E2,E3
E-3,E-2,E-1
LSE
.1d,.2d,.5d,1d
2d,5d,10d
Parts counting error level
OFF,1,2.5,5
Auto off
OFF,60,120,180
8.1 Accessing the Setup Menu
To access the Setup menu, press and hold
8.2
ON
TAR
E
until SETUP is Displayed, then release.
To access a submenu
OFF :
Repeatedly press MOD
until the desired submenu is displayed.
E
ON
TAR
E
Press
to select the displayed submenu.
NOTE : You must use END to store any changes you make to the Setup menu. Otherwise your
changes will be lost.
The following sections describe
each item on the Setup menu in detail.
Reset to Factory Settings
This submenu enables you to
reset all Setup menu selections to
the original factory setting outlined
in the adjacent table.
To reset to factory settings :
Access the Reset submenu.
ON to enter RESET.
Press TAR
8.3
E
OFF
MOD
E
SETUP MENU
FACTORY SETTING
Unit Selection
Averaging level
Stability
Auto Zero
5
Conversion
Mantissa
1.0000
Exponent
0
LSD
1
PC Error Level
OFF
Auto Off
OFF
Press
to change the
setting from YES to NO.
Selecting YES resets the Setup menu
to the original factory setting.
Press ON/Tare to accept the displayed setting.
Unit Selection
The Unit Selection submenu permits you to specify which weighing units and operating modes
will be enabled for use during operation. The adjacent table lists the units and modes available on the
iBalance.
Access the
Sel submenu.
ON
TAR
Press E the display will show
the grams unit indicator (g) along
with the current status (ON/OFF).
Press OFF/Mode to change the status.
Press ON/Tare to accept the displayed
status, the display will now show the
next unit indicator along with it’s current
status (ie On oz).
Set each unit or mode ON or
OFF as in steps 3 and 4 (it’s your choice).
8.4
Taels (Optional)
If taels are enabled, you will
be required to choose one of three different taels : Hong Kong,
Singapore, or Taiwan.
When the display shows
TAEL1, press OFF to change to another tael if desired.
8.5
MOD
E
ON
Press TAR
E
displayed tael.
to accept the
Unit Selection (Cont . )
Proceed through all of the weighing units in the same manner, setting each one as desired.
Custom Units (Optional – only on certain models)
Averaging Level
Averaging level compensates for
vibration or excessive air currents. During operation, the iBalance continually takes weight readings
from the weighing cell. Successive readings are then digitally processed to achieve a stabilized
display. Use this submenu to specify how much processing you need to obtain stable results.
NOTE : Averaging level does not affect
iBalance accuracy.
Select one of three averaging levels using the adjacent table as a guide.
To view or change the averaging level :
Access the AL submenu.
ON
Press TAR to display the
E
current setting.
OFF
Press MOD to change the
E
setting.
ON
TAR
Press
to accept the
E
displayed setting, when released,
AL will be displayed again.
8.6
Stability Range
The stability range specifies
how much a displayed weight may
change while the stability indicator
(unit indicator ) remains ON. When displayed weight changes beyond the allowable range, the
stability indicator turns OFF indicating an unstable condition. The iBalance permits you to select one
of four
stability ranges (in divisions) as shown in the table.
NOTE :
To view or change the stability range :
Access the Stb submenu to display the current setting.
Press ON/Tare to display the current setting.
Press OFF/Mode to change the setting.
Press ON/Tare to accept the displayed setting, when released, Stb will show on the display again.
8.7
Auto-Zero
Auto-Zero minimizes the effects of temperature changes and shift on the zero reading. By
defining a threshold level in divisions, the balance maintains the zero display until the threshold is
exceeded. This submenu permits you to select one of three threshold levels, or turn the feature OFF.
Auto-Zero only functions when the display reads zero.
To view or change the auto-zero setting :
Access the Auto 0 submenu.
Press ON/Tare to display the current setting.
Press OFF/Mode to change the setting.
Press ON/Tare to accept the displayed setting, when released, auto 0 will be displayed again.
8.8
Parts Counting Error Level
The parts counting error level is based on the resolution (readability) of the iBalance and the
sample weight. You can choose between OFF (no parts counting error will be reported), 1pct, 2.5pct or
5pct. Please choose depending on the weight or variations of your samples (less variation, less weight
select a lower number or keep the PC Error turned off).
To view, change or disable the parts counting error level :
Access the PCErr submenu.
8.9
Press ON/Tare to display the current setting.
Press OFF/Mode to change the setting.
Press ON/Tare to accept the displayed setting, when released, PCErr will be displayed again.
Auto Off
Auto Off permits the selection of either OFF, 60 seconds, 120 seconds or 180 seconds. When this
function is selected, the iBalance will turn off if it is idle for the selected period of time (OFF, 60 , 120
or 180 seconds). This feature is especially useful when the balance is operated from internal batteries.
To view, change or disable the auto off feature :
Access the A.OFF submenu.
Press ON/Tare to display the current setting.
Press OFF/Mode to change the setting.
Press ON/Tare to accept the displayed setting.
Now A.OFF will show on the display again.
8.10
END
You must use End to exit the Setup menu. NOTE: Changes you made in the Setup menu are only
stored in memory if you use End.
To exit the Setup menu and store your settings, press ON/Tare when END is displayed. After 3
seconds, the iBalance will returned to normal weighing operation.
8.11
CARE AND MAINTENANCE
To keep the iBalance operating properly, the housing and platform should be kept clean and free
from foreign material. If necessary, a cloth dampened with a mild detergent may be used. Keep the
calibration mass in a safe dry place to prevent rust or tarnish.
Unplug the AC Adapter when not in use. For long-term storage, remove the batteries.
9.
10. TROUBLESHOOTING
SYMPTOM
No Display
(nothing on
display)
PROBABLE CAUSE
the
LO BAT Indicator
Incorrect Weight
Reading
Calibration Procedure does not work
Unable to display
Weight in a particular weighing unit
Unable to access C.
UNIT in Setup menu
to enter Conversion
Factor
Balance won’t store
Selections made in
Setup menu
Power Adapter
connected..
Batteries are dead.
not
REMEDY
Firmly Connect power
Adapter.
Replace batteries
Batteries are weak
Balance was not rezeroed before weighing or
Balance has not been
properly calibrated.
Incorrect weights being
Used
Weighing unit not
Enabled in Setup menu.
Replace batteries
Press ON TARE with
no weight on the
platform, then weigh
item. Or recalibrate.
Use
correct
200g
weight.
Use Unit Selection submenu to set desired units
ON (see Setup menu).
Custom Units (·) not
Enabled in Setup menu,
or not set to USR.
Use Unit Selection submenu to set Custom
Units (·) to USR.
END selection was not
used to exit Setup menu.
You MUST use END to
Exit Setup menu and
save selections.
11. Error Codes
The following list describes the various error which can appear on
the display and the suggested remedy.
Display Description
Err 0 With the platform on, this indicates the platform is too light, make it heavier properly. If this
error still occurs, the sensor or the circuit board may be destroyed. The balance must be sent to the
manufacturer to be serviced.
Err 1 Sample being weighed exceeds the capacity of the iBalance. If error occurs when the sample
is within the iBalance capacity, the iBalance may be incorrectly calibrated.
Err 2 This indicates there is no platform or the platform is too light when turning the balance on.
Please put the platform on before turning on the balance and if necessary try recalibrating the scale
Err 3 This indicates there has been weight on the platform when turning on the balance. Remove
the weight from the platform before turning on the balance. If necessary try recalibrating the scale.
Err 4 Value is too large to display ; exceeds 99999 counts . Possibly caused by an invalid custom
unit conversion factor.
12. SERVICE INFORMATION
If the Troubleshooting section does not resolve or describe your problem, you will need to contact
My Weigh Tech Support at www.myweigh.com.
8.
SPECIFICATION
Capacity x
Readability
200×0.01
Grams(g)
Ounces(oz)
7.054×0.001
Ounces troy
6.430×0.001
(oz t)
Pennyweight
128.60×0.01
(dwt)
*Carats(ct)
1000×0.05
Pounds(lb)
0.4409×0.0001
HK taels
5.3430×0.001
Singpore taels
5.2910×0.001
Grains (gr)
3086×0.1*
Parts counting
Standard
Custom unit
Standard
Repeatability
0.01
(std.dev)(g)
Linearity
±0.01
Tare range
To capacity by
subtraction
Over range capacity
Capacity 9d
Stabilization time(sec)
3
Sensitivity drift(%/ )
±0.003
Zero point drift(g/ )
±0.01
Operation temperature
Power requirements
15 30
AC adaptor (supplied
with balance);110 or
220V AC,50/60Hz
Or AA batteries
Platform size(mm)
Dia.126
Dimension
176×55×196
(W×H×D)(mm)
Net weight
0.9
(kg)
Shipping weight (kg)
1.5