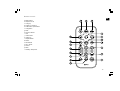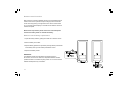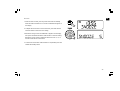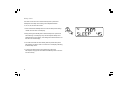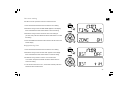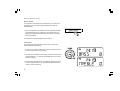
1
WR-5
GB
Rersion 2
“Made for iPod” means that an electronic accessory has been designed to connect specifically to iPod, and has been certified by the developer to
meet Apple performance standards. Apple is not responsible for the operation of this device or its compliance with safety and regulatory standards.
Please note that the use of this accessory with iPod may affect wireless performance.
iPod, iPod classic, iPod nano, iPod shuffle, and iPod touch are trademarks of Apple inc., registered in the U.S. and other countries.
1
Table of contents
GB
Important safety instructions ............................................... 3-4
Introduction .............................................................................. 5
Controls .............................................................................. 6-10
Remote control functions ..................................................... 11
Using the radio for the first time ........................................... 12
Operating your radio – AM/FM ...................................... 13-14
Setting up the tuning step increment .................................. 15
Display modes – FM ............................................................ 16
FM Stereo (auto) / mono ...................................................... 17
Presetting stations / Recalling a preset station
in AM/FM modes ................................................................... 18
iPod docking .................................................................... 19-22
Setting the time format / date format ............................. 23-24
Setting the clock time ..................................................... 25-26
Setting the alarm clock ................................................... 27-28
When the alarm sounds / Cancelling alarms /
Snooze .............................................................................. 29-30
Sleep timer ............................................................................ 31
Time zone setting / Daylight saving time ........................... 32
Display & Audio setup .................................................... 33-37
Specifications ........................................................................ 38
2
Important Safety Instructions
1. Read and understand all safety and operating instructions before the
radio is operated.
2. Retain instruction: The safety and operating instructions should be
retained for future reference.
3. Heed warnings. All warnings on the appliance and operating
instructions should be followed.
4. Follow all operations and use instructions.
5. Water and moisture: The appliance should not be used near water.
Do not use near a bathtub, washbowl, laundry tub, kitchen sink,
wet basement, swimming pool, etc.
6. Unplug the radio from the AC power outlet before cleaning. Use only a
damp cloth for cleaning the exterior of the radio.
7. Do not place the radio on an unstable cart, stand, bracket or table.
The radio may fall, causing serious personal injury and damage to
the radio.
8. Ventilation: This radio should be situated so that its location or
position does not interfere with its proper ventilation. For example,
the radio should not be used on a bed, sofa, rug or other soft
surfaces that may block the ventilation openings. It should not be
placed in a built-in situation like a cabinet that may reduce air flow
through the ventilation openings.
3
9. Power sources; The radio should be operated only from the type of
power source indicated on the marking label. If you are not sure of
the type of power supply to your home, consult your radio dealer or
power company.
10. Mains adaptor: The mains adaptor should be positioned so it is not
walked on, pinched, or items placed on top of it. Pay particular
attention to wires at plugs, convenience receptacles, and the point
where they exit from the unit. Unplug the mains adaptor by gripping
the adaptor, not the wire. Operate the radio using only the current
type of power source indicated. If you are not sure of the type of
power source supply to your home, consult your dealer or local
power company.
11. Do not overload wall outlets or extension cords. This can result in a
risk of fire or electrical shock. Never insert objects of any kind into
the radio through opening. The objects may touch dangerous
voltage points or short out parts. This could cause a fire or
electrical shock.
12. If the radio is left unattended and unused for long periods of time,
unplug it from the wall outlet. This will prevent damage caused by
lightning or power line surges.
13. If the radio is left unattended and unused for a long period of time,
remove the batteries. The batteries may leak and damage furniture
or your radio. (US version only)
GB
14. Do not attempt to service the receiver yourself. Removing the
cover may expose you to dangerous voltage, and will void
the warranty. Refer all servicing to authorized
service personnel.
15. Never push objects of any kind into this radio through opening as
they may touch dangerous voltage points or short-out parts that
could result in a fire or electric shock. Never spill liquid of any
kind into the product.
16. Apparatus shall not be exposed to dripping or splashing and no
objects filled with liquids, shall be placed on the apparatus.
17. For outdoors use, to avoid electric shock, use battery only
during a raining day or the weather is wet.
18. The power plug should be close to the radio, and easy to be
approached that during the emergency, to disconnect the
power from the radio, just unplug the power plug from the
AC power slot.
4
Introduction
The Sangean WR-5 AM/FM-RDS/iPod Dock Wooden Table-top
Receiver provides the following range of features:
Radio for AM and FM (with RDS) broadcasts.
12 radio station presets (6 for AM, 6 for FM).
Large LCD display with adjustable backlight.
Two alarm timers with snooze feature to wake you to either buzzer,
radio alarm, or iPod.
Adjustable sleep timer which can be set to turn the clock radio off
after between 15 and 120 minutes.
A 3.5mm stereo Auxiliary Input socket for playing audio from
MP3 players, iPod devices or other audio equipment.
iPod cradle plays and charges iPods.
Equipped with tone control (bass/treble) and
loudness compensation.
Passive reflex tube and 3D expandable surround design speakers to
enhance the sound performance.
Remote control allows you to access all features of WR-5 and
operate iPod more easily.
5
Controls
GB
1. Speakers
2. LCD display
3. Remote control sensor
6
Controls
4.
5.
6.
7.
7
FM telescopic antenna
AM external antenna terminal
Ground terminal
Back-up battery compartment
(only available for US version only)
8.
9.
10.
11.
AC in
Headphone jack
Line out socket
Aux in socket
Controls
GB
12.
13.
14.
15.
16.
17.
18.
19.
20.
iPod Universal Dock adjuster
iPod Dock connector
Info / menu button
Preset 3 / Repeat button
Tuning control
Seek / Select button
Standby / Sleep timer
Preset 6 / Fast Forward
Preset 2 / Folder Up
21.
22.
23.
24.
25.
26.
27.
28.
29.
Snooze / dimmer
Preset 5 / Play / pause
Preset 4 / Back Forward
Source
Preset 1 / Folder Down
Tone button
Volume control
Alarm 1
Alarm 2
8
Display icons
A. Battery capacity indicator
B. PM indicator
C. Time display
D. Sleep timer icon
E. Alarm 1 icon
F. Alarm 2 icon
G. Frequency / information for station display
H. RDS icon
9
Remote control
GB
a. Back forward
b. Repeat one / all
c. Tuning up
d. Folder up / preset up
e. Folder down / preset down
f. Tuning down
g. Mute
h. Snooze / dimmer
i. Tone
j. Volume down
k. Volume up
l. Repeat random
m. Select
n. Fast forward
o. Play / pause
p. Source
q. Menu
r. Standby / Sleep timer
10
Remote control functions
Many functions of the WR-5 tabletop receiver can be operated using the
remote control. Some operations require a longer press of the button.
In this case simply keep your finger held on the remote control button
for 2-3 seconds until the display on the radio shows that the command
has been accepted.
Before the first operation: please remove the small transparent
foil from the battery holder to activate the battery.
Remote control battery replacement
1. Open the battery holder by pulling the holder out in direction shown.
2. Remove battery from holder.
3. Replace battery (CR2025 or equivalent) ensuring that the positive side
of the battery faces you with holder positioned as shown.
4. Replace the battery holder.
IMPORTANT:
The batteries should not be exposed to excessive heat such
as sunshine, fire or the like. After use, disposable batteries should if
possible be taken to a suitable recycling center. On no account should
batteries be disposed of by incineration.
11
Using the radio for the first time
GB
Using the AC power adaptor
The AC power adaptor required for this unit should be 12 volts AC
at 1.6A.
Insert the adaptor plug into the AC socket on the rear of the radio.
Plug the adaptor into a standard mains socket outlet.
Getting started with external accessories
You may use an optional AM Radio Antenna as external antenna if
satisfactory reception cannot be obtained. Connect the optional AM
radio antenna to the AM external antenna terminal and ground
terminal located on the rear panel. See figure 5, 6.
The AC adaptor should be disconnected from the main supply when not
in use.
Backup battery operation (for US version only)
1. Remove the battery cover on the bottom of the unit.
2. Insert two UM-4 (AAA size) batteries into the spaces in
the compartment.
3. Take care to ensure all batteries are inserted with correct polarity as
shown inside the compartment. Replace the battery cover.
4. When the low battery capacity indicator shows on the display please
replace the batteries immediately.
5. When the radio is used as clock radio or as an alarm, please always
keep the batteries inserted.
12
Operating your radio – Search tuning AM/FM
1. Press the Standby button to switch on your radio.
2. Press the Source button as needed until the AM or FM band
is selected.
3. Press and release the Seek / Select button to carry out an auto-tune.
Your radio will scan up the AM/FM band from the currently displayed
frequency and will stop scanning automatically when it finds a station
of sufficient strength.
2
4. After a few seconds the display will update. The display will show the
frequency of the signal found.
5. To find other station, press and release the Seek / Select button
as before.
6. When the end of the waveband is reached your radio will
recommence tuning from the opposite end of the waveband.
7. Use the Volume control to adjust the sound level as required.
8. To switch off your radio press the Standby button.
13
7
Manual tuning – AM/FM
GB
1. Press the Standby button to switch on your radio.
2. Press and release the Source button to select AM or FM radio mode.
3. Rotate the Tuning control to tune to a station. The FM frequency will
change in steps of 100kHz/50kHz and AM frequency will change in
steps of 10kHz/9kHz.
2
4. When the end of the waveband is reached your radio will
recommence tuning from the opposite end of the waveband.
5. Use the Volume control to adjust the sound level as required.
3
5
14
Setting up the tuning step increment
1. Press and hold the Info/menu button to enter the menu setting.
2. Rotate the Tuning control until FM 50/100MHz or AM 9/10kHz
appears on the display, and press and release the Seek / Select
button to enter the step increment setting.
3. Rotate the Tuning control to select either 100kHz/200kHz
(US version) or 50kHz/100kHz (European version) for FM radio,
and 9kHz/10kHz for AM radio. Then press and release the
Seek / Select button to confirm the setting.
4. Press and release the Info/menu button and the LCD will revert to the
normal display.
15
1,4
2,3
Display modes – FM
GB
Your radio has a range of display options for FM radio mode.
1. Repeatedly press and release the Info/menu button to view the RDS
information of the station you are listening to.
Displays the name of the station being listened to.
Station name
1
a.
Program type
Displays the type of station being listened to such
as Pop, Classic, News, etc.
Radio text
Displays radio text messages such as new
items etc.
Stereo / Mono
Displays the radio broadcasting is in Stereo or
Mono mode.
Year / Day
Displays the year and day of the week according to
the date setting of your radio.
Date / Day
Displays the date and day of the week according to
the date setting of your radio.
Frequency
Displays the frequency of the FM for the station
listened to.
b.
c.
d.
e.
f.
g.
16
FM stereo (auto) / mono
If the FM radio station being listened to has a weak signal some hiss
may be audible. It is possible to reduce this hiss by forcing the radio to
play the station in mono rather than stereo.
1. Press the Source button as needed to select the FM radio mode
display and tune to the required FM station as previously described.
2. Press and hold the Info/menu button to enter the menu setting.
3. Rotate the Tuning control until the FM Stereo / mono setting shows
on the display. If the setting is Auto press the Seek / Select button
to switch to Mono mode to reduce the hiss.
2
4. To return to Auto (stereo) mode press and release the Seek / Select
button to alter the setting, so that the radio will switch back to
Auto mode.
3
17
Presetting stations in AM/FM mode
GB
There are 6 preset stations each for AM and FM radio. They are used in
the same way for each waveband.
1. Press the Standby button to switch on your radio.
2. Press the Source button to select the desired waveband. Tune to the
required radio station as previously described.
3. Press and hold the required Preset button (1 to 6) until the display
shows “P3” for example after the frequency. The station will be
stored using the preset number. Repeat this procedure for the
remaining presets as you wish.
4. Preset stations which have already been stored may be overwritten
by following the above procedure if required.
2
3
Recalling a preset in AM/FM mode
1. Press the Standby button to switch on your radio.
2. Select the required waveband by pressing the Source button.
3. Momentarily press the required Preset button to cause your radio to
tune to one of the stations stored in the preset memory.
Note:
the remote control can only recall preset stations.
Presetting stations can’t be operated by remote control.
18
iPod docking
Your radio has an iPod docking facility which allows you to play digital
audio files and soundtracks held on your iPod directly.
Your radio uses the iPod Universal Dock adjustor developed for use
with iPods. Recent models of iPod are supplied with Universal Dock
Adapter inserts which ensure correct alignment of the iPod with the
electrical connector.
Important:
The radio does not support iPod 3rd generation (build 2003-2004).
To avoid possible damage to your iPod, do not use your iPod with
the product without the correct adapter fitted to the radio.
Docking you iPod by dock adjuster
This unit comes with the iPod dock adjuster. iPod adaptors are
not supplied.
1. Press and turn the iPod dock adjuster dial to move slide door
backward until end.
2. Carefully place your iPod onto the cradle.
3. Turn the iPod dock adjuster dial to move slide door forwards until
holding your iPod.
19
Charging your iPod
GB
1. Place the iPod onto the Universal Dock Adjuster into the iPod
docking compartment. Press the STANDBY button to switch on
your radio.
2. Press SOURCE button until “iPod” shows on the display. Your radio
is able to recharge your iPod’s internal battery when the source is
Aux In, iPod or Standby mode. Your iPod won’t be charged under
AM and FM mode.
2
20
Navigating your iPod
To navigate your iPod menus to make selections or to change settings,
you should use your iPod controls. The radio controls can be used for
Menu / Select, Previous / Next, Fast Rewind / Fast Forward and
Play / Pause functions.
Playing an audio file / repeat playing files on
your iPod
1. When you have found the required item, use the Tuning/Seek/Select
control on the radio to start the iPod playing.
1. Use the Menu button to navigate to higher level menus on your iPod.
2. Adjust the volume to the required setting using the Volume control on
your radio.
2. Rotate the Tuning control as required to move up or down a menu
screen on your iPod.
3. To pause playback press the Play/Pause button. To resume playback
press the Play/Pause button again.
3. Press the Seek / Select button to choose the highlighted on screen
menu item. If this item is a lower level menu item, you may then
navigate further using the Tuning/Seek/Select control.
4. iPods do not have a Stop button (they use the Pause function).
To play an alternative selection, use the iPod menus to make the
selection using the Play/Pause button to stop playing the current
item if needed.
5. If it was previously playing, your iPod will switch on and continue
playing from where it was previously stopped.
6. To select the various repeating modes, press and release the Repeat
button (Preset 3) to repeat one/all/folder or repeat random.
21
Search function
Your WR-5 works with the following models of iPod:
1. Press and release either the Fast-Forward or Back-forward button to
start playing the next or previous track.
2. While the iPod is playing, press and hold the Fast-Forward or
Back-forward buttons to move through the current file or track,
and then release the button when the desired point in the file or track
is reached.
22
GB
Clock and Alarms
Setting the time format
The clock display used in stand-by mode and on the playing mode
screens can be set to 12 or 24 hour format. The selected format is
then also used when setting the alarms.
1. Press and hold the Info/menu button to enter the menu setting.
2. Rotate the Tuning control until CLOCK 12H/24H appears on
the display, then press and release the Seek / Select button to enter
the setting and the setting of time format begins to flash.
3. Rotate the Tuning control to select either 12 or 24 hour format.
Press and release the Seek / Select button to confirm your choice of
clock format. The display will then revert to the previous menu.
4. Press and release the Info/menu button and the LCD will revert to the
normal display.
If the 12 hour clock format is chosen, the radio will then use the12 hour
clock for the setting of alarms with a PM indicator.
23
1,4
2,3
Setting the date format
GB
1. Press and hold the Info/menu button to access the menu setting.
2. Rotate the Tuning control until date format ex. “Jan-xx-2010” shows
on the display. Press and release the Seek / Select button to enter
the date format setting.
3. Rotate the Tuning control to select the required date format.
Press and release the Seek / Select button to confirm your choice of
date format. The display will then revert to the previous menu.
4. Press and release the Info/menu button and the LCD will revert to
normal display.
24
Setting the clock time manually
1. Press the Standby button to switch on your radio.
2. Press and hold the Info/menu button.
3. Rotate the Tuning control until a clock symbol appears on the left
side display, then press and release the Seek / Select button to
enter the setting. Rotate the Tuning control until MANUAL appears
on the display, then press and release the Seek / Select button to
select the setting.
2,8
4. Rotate the Tuning control until CLOCK appears on the display.
Press and release the Seek / Select button to enter the setting.
5. The hour setting on the display will begin flashing. Rotate the Tuning
control to select the desired hour, and press and release the
Seek / Select button to confirm the setting. Then rotate the Tuning
control to select the desired minute, and press and release the
Seek / Select button to confirm the setting.
6. Rotate the Tuning control until DATE appears on the display.
Press and release the Seek / Select button to enter the setting.
7. The year setting will begin to flash. Rotate the Tuning control to
select the desired year, and press and release the Seek / Select
button to confirm the setting. Then rotate the Tuning control to select
the desired month, and press and release the Seek / Select button
to confirm the setting. Then rotate the Tuning control to select the
desired date. Press and release the Seek / Select button to confirm
the setting and the radio will beep once.
8. Press and release the Info/menu button to leave the current setting,
and the radio will revert to normal display.
25
3-7
Setting the clock time using RDS CT
1. When tuning to a station transmitting RDS data, press and hold the
Info/menu button.
GB
1,4
2. Rotate the Tuning control until a clock symbol appears on
the display. Press and release the Seek / Select button to enter
the setting.
3. Rotate the Tuning control until RDS CT appears on the display.
Press and release the Seek / Select button to confirm the setting.
The clock time of the radio will set up automatically according to the
RDS data received. When the action is completed, the RDS icon will
appear on the LCD display indicating the radio time is RDS
clock time. The radio cock time will be valid for 5 days each time the
radio time is synchronized with RDS CT.
2,3
4. Press and release the Info/menu button and the LCD will revert to the
normal display.
26
Setting the alarm clock
Your WR-5 has two alarms which can each be set to wake you to
AM/FM radio, buzzer alarm or iPod. The alarms may be set while the
unit is in standby mode or while playing.
1. Before setting an alarm ensure that the clock time is set. Press and
hold the Alarm 1 button to enter the alarm 1 setting.
2. The hour setting of alarm 1 will begin to flash. Rotate the Tuning
control to select the required alarm hour, and press and release the
Seek / Select button to confirm the setting. Rotate the Tuning control
to select the required alarm minute, and press and release the
Seek / Select button to confirm the setting.
3. Then the display will show the frequency options for the alarm.
The alarm options are as follows:
ONCE – the alarm will sound once
DAILY – the alarm will sound everyday
WEEKDAY – the alarm will sound only on weekdays
WEEKEND – the alarm will sound only at weekends
Press and release the Seek / Select button to confirm the setting.
27
2-6
GB
4. Rotate the Tuning control to choose the required alarm type,
and then press and release the Seek / Select button to confirm
the setting. The alarm can be set to buzzer, iPod, FM or AM.
When radio mode is selected, the radio frequency and the preset
number on the display will begin to flash. Rotate the Tuning control
to adjust the required radio frequency or the required preset
number for the radio alarm, then press and release the
Seek / Select button to confirm the setting.
Note:
If the alarm type selected is iPod but your iPod is not docked when the
alarm is sounding, the buzzer alarm will be used instead.
5. Rotate the Tuning control to choose the required sound level for
the alarm. Press and release the Seek / Select button to confirm
the setting.
6. The alarm has now been set. Press and release the Seek / Select
button again, and the radio will revert to normal display.
Active alarms are shown using alarm indicator on the display.
28
When the alarm sounds
To cancel a sounding alarm, press and hold the Alarm 1 or Alarm 2
button until the alarm indicator on the display disappears.
When the buzzer alarm activates, the alarm will start softly and
gradually increase in level. It will sound for 1 minute and silence for
1 minute in repetition for 60 minutes unless cancelled. The radio will
sound non-stop at the selected time for up to 60 minutes for other
alarm types.
Disabling / cancelling alarms
To disable an active alarm, either press and release the Standby button,
or press and hold the according alarm button to cancel the alarm.
29
Snooze
1. When the alarm sounds, press any button other than the Standby
button will silence the alarm for 5 minutes. “SNOOZE’ will appear on
the display.
GB
2
2. To adjust the silence time for the snooze timer, press and hold the
Info/menu button to enter the menu setting.
3. Rotate the Tuning control until “SNOOZE 5” appears on the display,
then press and release the Seek / Select button to enter the setting.
Rotate the Tuning control to adjust the silence time from 5, 10, 15
and 20 minutes for the snooze timer.
3
4. To cancel the snooze timer while the alarm is suspended, press and
release the Standby button.
30
Sleep timer
Your radio can be set to turn off automatically after a preset time
has elapsed. The Sleep Timer setting can be adjusted between
15, 30, 45, 60, 90 and 120 minutes.
1. Press and hold the Standby button to enter the Sleep Timer setting.
“SLEEP XX” will show on the display.
1-2,4
2. Keep pressing the Standby button and the Sleep Timer options will
start switching on the display. Stop until the required Sleep Timer
setting appears on the display. The setting will be saved and the LCD
will return to normal display.
3. Your radio will switch off automatically after the preset Sleep Timer
has elapsed. The Sleep Timer icon will show on the display indicating
an active Sleep Timer.
4. To cancel the Sleep Timer function before the preset time
has elapsed, simply press and release the Standby button to turn the
unit off manually.
31
Time zone setting
GB
Your WR-5 can set up the time zone for its radio clock time.
1. Press and hold the Info/menu button to enter the menu setting.
2. Rotate the Tuning control until TIME ZONE appears on the display.
Press and release the Seek / Select button to enter the setting.
1,4
3. Rotate the Tuning control to choose the Time zone setting for
your area, then press and release the Seek / Select button to confirm
the setting.
4. Press and release the Info/menu button and the LCD will revert to the
normal display.
2,3
Daylight Saving Time
1. Press and hold the Info/menu button to enter the menu setting.
2. Rotate the Tuning control until “DST OFF” appears on the display.
Press and release the Seek / Select button to enter the setting.
1,4
3. Rotate the Tuning control to choose +1H to set the clock
1 hour faster, and press and release the Seek / Select button to
confirm the setting.
4. To set the clock back from D.S.T., choose OFF and then press and
release the Seek / Select button.
2-4
32
Display & Audio setup
Dimmer control
The brightness of the display may be adjusted. If you use the unit in
the bedroom, you may prefer a higher brightness level than the
standard setting.
1. Press and release the Snooze/Dimmer button repeatedly to adjust
the brightness level of the LCD display. The backlight level will
change with 8 different illumination levels so that you can see the
effect of the change.
2. Stop when the desired backlight level is selected.
Tone control
You can adjust the bass and treble of the sound of your WR-5 to
enhance the tone while listening.
1. First ensure your radio is switched on. Press and release the Tone
control to enter the tone control setting.
2. The bass value will appear on the display. Rotate the Volume control
to adjust between -5~+5, and press and release the Tone control to
confirm the setting.
3. Then the treble value will appear on the display. Rotate the Volume
control to adjust between -5~+5, and press and release the Tone
control to confirm the setting.
33
1-3
Loudness
GB
You can get compensation on lower and higher frequency for your WR-5
by adjusting the Loudness function.
1. Press and hold the Info/menu button to enter the menu setting.
2. Rotate the Tuning control until LOUD ON/OFF appears on
the display. Press and release the Seek / Select button to enter
the setting.
3. Rotate the Tuning control to choose ON to turn on the
Loudness function, then press and release the Seek / Select button
to confirm the setting.
1
2-4
4. To turn off the Loudness function, select OFF and press and release
the Seek / Select button to confirm the setting.
34
3D surround sound expander
Your WR-5 allows you to get more spaciousness in the sound
performance with the 3D surround expander function.
1. Press and hold the Info/menu button to enter the menu setting.
2. Rotate the Tuning control until 3D ON/OFF appears on the display.
Press and release the Seek / Select button to enter the setting.
1
3. Rotate the Tuning control to choose ON to turn on the 3D surround
expander function, then press and release the Seek / Select button
to confirm the setting.
4. To turn off the 3D expander function, select OFF and press and
release the Seek / Select button to confirm the setting.
35
2-4
Auxiliary input socket
GB
A 3.5mm stereo Auxiliary Input socket is provided on the rear of your
radio to permit an audio signal to be fed into the unit from an external
audio device such as iPod, MP3 or CD player.
1. Repeatedly press and release the SOURCE button until AUX IN
is displayed.
2. Connect an external audio source (for example, iPod, MP3 or
CD player) to the Auxiliary Input socket.
3. Adjust the volume setting on your iPod, MP3 or CD player to ensure
an adequate signal level from the player, and then use the Volume
control on the radio as needed for comfortable listening.
3
Headphone socket
A 3.5mm stereo Headphone Socket is provided on the rear of your radio
for use with headphones. Inserting a plug automatically mutes the
internal loudspeaker.
IMPORTANT:
Excessive sound pressure from earphones and headphones can cause
hearing loss.
Line out socket
The radio can be used as a separate tuner by connecting the input to
Hi-Fi system, or using this input to make recording in stereo from
audio program.
36
Software version
The software display cannot be altered and is just for your reference.
1. Press and hold the Info/menu button to enter the menu setting.
2. Rotate the Tuning control until VER 1.XX appears on the display to
view the software version of your radio.
1
2
Note:
Most of the remote control operation of WR-5 is the same with operation
on the radio, except some functions like the following:
1. Mute function: press the mute button on the remote control, and the
receiver will be muted and MUTE will appear on the display.
To disable the mute function, press the mute button again.
2. Repeat function: press the button while the radio is playing your
iPod to choose from repeating one file, repeating all files or turning off
repeat function. Press the button to choose random repeat mode.
37
Specifications
Circuit Features
Power Requirements
Mains AC 12V~/1.6A
Loudspeaker 2.25” 6 ohm x 2 full range
GB
Output Power: 5W+5W
Frequency Range
FM: 87.5 – 108 MHz
AM: 520 – 1710 kHz (US version)
522 – 1629 kHz (European version)
Back-up Battery
2 x 1.5V Size “AAA” / UM-4 / LR3
Headphone socket 3.5mm dia stereo
Auxiliary socket 3.5mm dia stereo
Line out socket 3.5mm dia stereo
Aerial System: FM telescopic antenna
If at any time in the future you should need to dispose of this product please note that: Waste electrical products should not be
disposed of with household waste. Please recycle where facilities exist. Check with your Local Authority or retailer for recycling
advice. (Waste Electrical and Electronic Equipment Directive)
38