Transcript
360Q SERIES SAFETY INSTRUCTIONS AND OPERATING PROCEDURESAVE THESE INSTRUCTIONS!
A. Lamp Installation
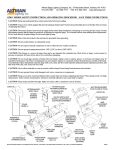
Loosen the captive knurled brass screw and remove socket cap from rear of unit. Insert lamp fully into socket. Be sure lamp is properly seated by holding the socket
cap in both hands and pressing down on both sides of the lamp base with your
thumbs.
CAUTION: Do not touch glass portion of lamp with your hands. Agents such as
sodium, grease, or oil from your fingers may be transferred to the glass wall. These
contaminants can cause the lamp to rupture or can greatly reduce the performance
and life of the lamp. If accidentally soiled, immediately clean the lamp with a soft,
clean, lint-free cloth soaked in methylated spirits (denatured alcohol), and then
polish with a dry, soft, clean, lint-free cloth.
B. Beam Adjustment and Lamp Centering
The beam may be altered in appearance utilizing the three flat head machine screws in conjunction with the round
head machine screw. The “hot spot” may be increased (peak field) or decreased (flat field) by moving the socket
plate towards the front or rear of the fixture respectively. This is accomplished by loosening the round head
machine screw a few turns, then by alternately adjusting the three flat head screws, the field can be adjusted to the
desired look. The lamp should also be centered during this procedure, again using the three flat head screws to “fine
tune” the field until the hot spot is centered in the beam. Once the desired field has been achieved, tighten the round
head machine screw to lock the socket mounting plate into position, then tighten the two nuts on the round head
screw onto the socket cap to prevent the screw from vibrating loose.
CAUTION: Always insure that the lamp in centered when using an iris. A lamp imaged onto an iris will cause
premature iris failure.
C. Focusing
A hard or soft edge beam pattern is accomplished by loosening the lens adjusting knob then sliding the lens holder
in or out until desired focus is attained. Tighten the lens adjusting knob to lock the lens holder into position.
D. Beam Shaping
The four shutters are used to shape the beam pattern. By moving these shutters in and out or side to side, a wide
variety of shapes and angles are made possible. Remember, the left-hand shutter as you stand at the rear of the
fixture will shape the right-hand side of the beam, and the top shutter affects the bottom of the beam, and so on.
CAUTION: When using an iris, always close down the shutters as close to the edge of the iris as possible. This will
minimize the detrimental heating effect of the lamp upon the iris.
E. Lens Cleaning
To gain access to the lenses for cleaning, or other purposes, remove the lens adjusting knob and slide the lens holder
out of the unit. Remove the lens retaining ring and carefully remove the front lens. If necessary, remove the lens
spacer and remove the rear lens. Reverse this process to install the lens holder back into unit.
NOTE: Be sure to note the position and orientation of the lenses before removing them to assure correct reassembly
and optical correctness of the fixture.
Clean the lenses with a mild soap and water or a commercial glass cleaning solution and a soft, clean, lint-free cloth.
Insure that the cleaning process does not leave film on the lens, since the heat from the beam will bond onto the
surface.
57 Alexander Street, Yonkers, NY 10701
Tel: 914.476.7987, 212.569.7777; 800.4.ALTMAN Fax:914.963.7304
Visit our website at www.altmanltg.com © 2008 Altman Stage lighting Company, Inc.