1
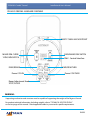
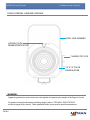
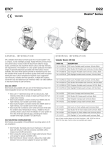
INSTALLATION & USER’S MANUAL
20151019 Pegasus Installation Manual
Corporate Offices:
57 Alexander Street
Yonkers, NY 10701
(914)-476-7987
www.altmanlighting.com
The material in this manual is for information purposes only and is subject to change without notice. Altman Lighting assumes no responsibility for any errors or omissions which may appear in this
manual. For comments and suggestions regarding corrections and/or updates to this manual, please
visit the Altman Lighting web site at www.altmanlighting.com or contact your nearest Altman Lighting
Regional Manager.
El contenido de este manual es solamente para información y está sujeto a cambios sin previo aviso.
Altman Lighting con no asume responsabilidad por errores o omisiones que puedan aparecer. Cualquier comentario, sugerencia o corrección con respecto a este manual, favor de dirijirlo a la oficina de
Altman Lighting más cercana.
Der Inhalt dieses Handbuches ist nur für Informationszwecke gedacht, Aenderungen sind vorbehalten.
Altman Lighting uebernimmt keine Verantwortung für Fehler oder Irrtuemer, die in diesem Handbuch
auftreten. FürBemerkungen und Verbesserungsvorschlaege oder Vorschlaege in Bezug auf Korrekturen
und/oder Aktualisierungen in diesem Handbuch, moechten wir Sie bitten, Kontakt mit der naechsten
Altman Lighting Niederlassung aufzunehmen.
Le matériel décrit dans ce manuel est pour information seulement et est sujet à changements sans
préavis. La compagnie Altman Lighting n’assume aucune responsibilité sur toute erreur ou ommission
inscrite dans ce manuel. Pour tous commentaires ou suggestions concernant des corrections et/ou les
mises à jour de ce manuel, veuillez s’il vous plait contacter le bureau de Altman Lighting le plus proche.
Note: Information contained in this document may not be duplicated in full or in part by any person
without prior written approval of Altman Lighting Its sole purpose is to provide the user with conceptual
information on the equipment mentioned. The use of this document for all other purposes is specifically
prohibited.
Document Number:49-0240
Version as of: 20151019
Pegasus Luminaire Installation & User’s Manual
©2015 Altman Stage Lighting Co. Inc., All rights reserved.
PEGASUS 6” and 8” Fresnel
Installation & User’s Manual
IMPORTANT INFORMATION
When using electrical equipment, basic safety precautions should always be followed including the following:
a. READ AND FOLLOW ALL SAFETY INSTRUCTIONS.
b. Do not use outdoors.
c. Do not mount near gas or electric heaters.
d. Equipment should be mounted in locations and at heights where it will not readily be subjected to
tampering by unauthorized personnel.
e. The use of accessory equipment not recommended by the manufacturer may cause an unsafe condition.
f. Do not use this equipment for other than intended use.
g. Refer service to qualified personnel.
SAVE THESE INSTRUCTIONS.
WARNING: You must have access to a main circuit breaker or other power disconnect device before installing
any wiring. Be sure that power is disconnected by removing fuses or turning the main circuit breaker off before
installation. Installing the device with power on may expose you to dangerous voltages and damage the device. A qualified electrician must perform this installation.
WARNING: Refer to National Electrical Code® and local codes for cable specifications. Failure to use proper
cable can result in damage to equipment or danger to personnel.
WARNING: This equipment is intended for installation in accordance with the National Electric Code® and
local regulations. It is also intended for installation in indoor applications only. Before any electrical work is
performed, disconnect power at the circuit breaker or remove the fuse to avoid shock or damage to the control. It is recommended that a qualified electrician perform this installation.
WARNING: This Lighting Fixture IS NOT for residential installation or use.
THIS PRODUCT MUST BE INSTALLED IN ACCORDANCE WITH THE APPLICABLE INSTALLATION CODE BY
A PERSON FAMILIAR WITH THE CONSTRUCTION AND OPERATION OF THE PRODUCT AND THE HAZARDS INVOLVED.
CE PRODUIT DOIT ÊTRE INSTALLÉ SELON LE CODE D'INSTALLATION PERTINENT, PAR UNE PERSONNE
QUI CONNAÎT BIEN LE PRODUIT ET SON FONCTIONNEMENT AINSI QUE LES RISQUES INHÉRENTS.
PAGE 1
PEGASUS 6” and 8” Fresnel
Installation & User’s Manual
FCC NOTICE
This equipment has been tested and found to comply with the limits for a Class A digital device, pursuant to part
15 of the FCC Rules. These limits are designed to provide reasonable protection against harmful interference
when the equipment is operated in a commercial environment. This equipment generates, uses, and can radiate radio frequency energy and, if not installed and used in accordance with the instruction manual, may cause
harmful interference to radio communications.
Operation of this equipment in a residential area is likely to cause harmful interference in which case the user
will be required to correct the interference at his own expense.
DMX 512 ADDITIONAL RESOURCES
For more information on installing DMX512 control systems, the following publication is available for purchase from the United States Institute for Theatre Technology (USITT), “Recommended Practice for DMX512:
A Guide for Users and Installers, 2nd edition” (ISBN: 9780955703522). PLASA Contact Information:
Plasa Standards
630 Ninth Ave, Suite 609
New York, NY. 10036
www.plasa.org
ALTMAN LIGHTING STANDARD WARRANTY
Altman Lighting, Inc., a subsidiary of Altman Stage Lighting Company, Inc., herein referred to as Altman, warrants each new product (except for spare parts or products Altman does not manufacture) for a period of TWO
(2) years from date of shipment to correct by repair or replacement any part defect due to faulty material or
workmanship. Under these same terms, products with an LED light source shall be warranted for a period of
THREE (3) years. The customer must receive a Return Material Authorization (RMA) number prior to return.
Return shipments must be visibly marked with the RMA number; the product must be returned (shipping
prepaid) to the factory at:
Altman Lighting Inc.
57 Alexander Street
Yonkers, NY 10701
www.altmanlighting.com
The return must be within THIRTY (30) days of receiving the RMA from Altman. Altman warrants for NINETY
(90) days any spare part it manufactures. On spare parts or products Altman does not manufacture, such as
lamps, sockets, lenses, roundels, electronics, ignitors, ballasts, etc.; Altman will grant the same warranty given
Altman by its vendors.
Altman assumes no responsibility for damage or faulty performance caused by misuse, improper installation,
careless handling or where repairs have been attempted by others.
This warranty is in lieu of all warranties or guarantees expressed or implied and no representative or person is
authorized to assume Altman any other liability with the sale of Altman’s products.
PAGE 2
PEGASUS 6” and 8” Fresnel
Installation & User’s Manual
TABLE OF CONTENTS
Important Information
1
FCC Notice , DMX Resources, Altman Standard Warranty
2
Table of Contents - this page
3
About this Manual
4
Product Descriptions - Part Number Ordering
4
Accessories
4
Luminaire Overview
5/6
Installation and Setup
7/8
Set up for Dimming system use
8
Set up for DMX Control
9
Luminaire Controls
10
Operation and Programming
11/12
Display Information
13
Cleaning and Care
14
Trouble Shooting
15
Technical Specifications
16
PAGE 3
PEGASUS 6” and 8” Fresnel
Installation & User’s Manual
ABOUT THIS MANUAL
This document provides installation and operation instructions for the following products: Pegasus 6” and
8” Fresnels, (refer to “Product Descriptions” for individual product models). Please read all instructions before
installing or using this product. Retain this manual for future reference. Additional product information and
descriptions may be downloaded at www.altmanlighting.com
PRODUCT DESCRIPTIONS
Altman Pegasus Fresnels are 6” and 8” white output LED Fresnel Family that are both Mains Dimmable and
DMX controlled all in one luminaire. Pegasus replicates the soft light output that is expected from a theatrical
or Studio Fresnel. Under 150 Watts the 6” Pegasus Fresnel far surpasses the output of its 500 watt incandescent
counterpart, where the 8” Pegasus Fresnel meets the output of its 750 watt incandescent counterpart.
Under Mains Dim Control these fresnels can plug directly into your theatrical phase cut dimmers whether they
are forward or reverse phase, and have been specially designed to replicate the smooth dimming curve of their
incandescent counter part. A 120 /230 switch on the back of unit allows you to set the dimming curve for both
120 volt and 230 volt dimming systems.
If your lighting system consists of constant power and DMX data then Pegasus is also right choice for you.
With the flip of a switch Pegasus converts from Mains Dimmable to a DMX / RDM controlled unit.
Pegasus is available in a number of different color temperatures from 2,700k, 3000k, 4000k, and 5000k. Pegasus boasts a very high CRI, >90, and can be used with standard theatrical gel as well as theatrical Gels that have
been formulated for LED’s.
Typical Part numbering scheme:
Model
Description
PEG6-**-***
PEG8-**-***
** (CCT)
6” Pegasus Fresnel
8” Pegasus Fresnel
2K, 3K, 4K, & 5K (Nb. 2K = 2700 Kelvin)
***(Body Color)
B=Black, W=White, S = Silver, C=Custom
Part Numbering Example: PEG6-2K-B (Pegasus 6” Fresnel - 2,700 Kelvin - Black Body color)
Accessories
510 (Included)
6-CF (Included)
SC-36-BK (Included)
6-BD-4
PCL-PBG-12* (Included Standard)
PCL-2P&G-12-5-*
Description
Malleable Iron Pipe Clamp
Black Color Frame, 7.5” x 7.5”
36” Black Safety Cable w. Spring Clip
4-Way Barn Door
5’ 20A PowerCON With Edison Connector
5’ 20A PowerCon with Stage Pin Connector
PCL-TLG-12-5-*
PCL-BARE-12-5-*
5’ 20A PowerCon with L5-20P Twist Lock Connector
5’ 20A PowerCon with Bare End Lead
*=W for White Cable, Black Cable is Standard and no suffix is required
PAGE 4
PEGASUS 6” and 8” Fresnel
Installation & User’s Manual
PEGASUS FRESNEL LUMINAIRE OVERVIEW
SAFETY CABLE ANCHOR POINT
MAINS DIM CURVE
120V/240V SWITCH
DMX/RDM IN
Power CON IN
DMX/MAINS DIM SWITCH
DMX - Control Interface
DMX/RDM THRU
Power CON THRU
Beam Adjustment Knob
SPOT/FLOOD
WARNING:
Supporting mechanism and structure must be capable of supporting the weight of the Pegasus Fresnel.
For product technical information (including weight), refer to "TECHNICAL SPECIFICATIONS"
on the last page of this manual. Check applicable codes in your area for specific requirements.
PAGE 5
PEGASUS 6” and 8” Fresnel
Installation & User’s Manual
PEGASUS FRESNEL LUMINAIRE OVERVIEW
STEEL YOKE ASSEMBLY
LOCKING COLOR
FRAME RETENTION CLIP
T-HANDLE TILT LOCK
7.5” X 7.5” COLOR
FRAME HOLDER
WARNING:
Supporting mechanism and structure must be capable of supporting the weight of the Pegasus Fresnel.
For product technical information (including weight), refer to "TECHNICAL SPECIFICATIONS"
on the last page of this manual. Check applicable codes in your area for specific requirements.
PAGE 6
PEGASUS 6” and 8” Fresnel
Installation & User’s Manual
INSTALLATION AND SET UP
POWER CONNECTION - DMX CONTROL MODE: The PEGASUS Luminaire should be connected to either a
constant circuit or relay device when in DMX mode. Note: Altman Lighitng recommends that all Non-Dim
circuits powering solid state luminaires are routinely powerded down to both conserve energy and maximize
luminare performance.
POWER CONNECTION - MAINS DIM CONTROL MODE: When PEGAUS is set to Mains Dim Mode the luminaire should be connected to a Phase cut dimmer either forward or reverse phase. Typical Phase Cut dimmers
include SCR’s (Silicon Controlled Rectifiers), IGBT’s (Insullated Gate Bipolar Transistors), and TRIAC dimmers).
The Pegaus Luminaire operates on 100 to 240 volts AC (+/- 10%, auto-ranging). Depending on supply voltage,
each luminaire can draw up to 125 Watts. The maximum through current should not exceed 20 Amps*.
WARNING! The maximum allowable input current is 20 Amps (and the maximum power supply limit of 125
Watts). Do not overload circuits! Luminaires must be supplied by a branch circuit protected by a maximum 20
Amp circuit protector. Doit être alimenté par un circuit de dérivation protégé par un maximum de 20 ampères
circuit protecteur. Do not overload circuits!
IMPORTANT AC POWER CONNECTION NOTES:
a. Must be supplied by a branch either dimming or constant circuit protected by a maximum 20 Amp circuit
protector.
Doit être alimenté par un circuit de dérivation protégé par un maximum de 20 ampères circuit protecteur.
b. When using the daisy-chain connection method, ONLY connect PEGASUS Luminaires to AC Output Connection of PEGASUS Luminaires. DO NOT CONNECT OTHER TYPES OF LUMINAIRES OR DEVICES!
c. Use only use approved cable types.
d. Do not overload circuits!
f. The MAXIMUM allowable number of PEGASUS Luminaires which can be 'daisychained'
CONNECTING POWER
Connecting Power
Units can be powered in one of two ways:
• Direct connection to a AC power source using a supplied AC input cable.
• Daisy chain connection using a interconnect AC cable.
Field wiring of PEGASUS Luminaire is straight forward. A total of 3 wires/conductors
need to be brought to the unit. The following wiring scheme is required: Please consult:
http://www.neutrik.com/en/video/powercon/powercon-20-a/nac3fca
For additional powerCON blue and grey wiring and assembly information.
Wire Color
Brown (230V) Black (120V)
Blue (230V) White (120V)
Green/Yellow (230V) Green (120V)
Purpose
Main/(L)ine (120 to 240 VAC)
(N)eutral
Ground / Earth
PAGE 7
PEGASUS 6” and 8” Fresnel
Installation & User’s Manual
CONNECTING PEGASUS TO A DIMMING SYSTEM
Power Feed from
Phase Cut Dimming system
(forward or reverse phase)
Power daisy chain
to next luminaire
via powerCON thru
connection. DO
NOT CONNECT
MORE THAN
FOUR (4) UNITS
TO A DIMMER.
SPECIAL NOTE: PEGASUS must be set to MAINS CONTROL (switch on the back of the luminare) to be controlled via a phase cut dimming system. Please select the dimming system dim curve for local voltage to either
115VAC or 220VAC If switching between DMX CONTROL and MAINS CONTROL. Please remove power from
Luminiare and Wait 10 Seconds before switching the luminaire to MAINS CONTROL.
When PEGAUS is set to Mains Dim Mode the luminaire should be connected to a Phase cut dimmer either forward or reverse phase. Typical Phase Cut dimmers include: SCR’s (Silicon Controlled Rectifiers), IGBT’s (Insullated Gate Bipolar Transistors), and TRIAC dimmers).
NOTE MAINS DIM CONTROL MODE: DO NOT CONNECT MORE THAN FOUR (4) PEGASUS
FRESNELS TO THE SAME DIMMER. CONNECTING MORE THAT FOUR UNITS ON THE SAME DIMMER WILL RESULT UNDESIRED LOW END DIMMER REPONSES.
The Pegaus Luminaire operates on 100 to 240 volts AC (+/- 10%, auto-ranging). Depending on supply voltage,
each luminaire can draw up to 125 Watts. The maximum through current should not exceed 20 Amps*.
WARNING: DO NOT Daisey chain both MAINS DIMMABLE Luminaires with Luminaires that require CONSTANT POWER. When Pegaus is connected to a dimming system ONLY Pegasus Luminaires should be daisey
chained together. Failing to follow these guidelines will result in unwanted dimming performance and potentail
damage to the luminares.
WARNING! To prevent injury or death, you must have access to a main circuit breaker or other power disconnect device before installing any wiring. Be sure that power is disconnected by removing fuses or turning the
main circuit breaker off before installation. Installing the device with power on may expose you to dangerous
voltages and damage the device. A qualified electrician must perform this installation.
Note: The PEGASUS Luminaire is intended for installation in accordance with the National Electric Code and
local regulations. To assure full compliance with local codes and regulations, check with your local electrical
inspector before installation. The PEGASUS Luminaire is not intended for residential use or installation.
PAGE 8
PEGASUS 6” and 8” Fresnel
Installation & User’s Manual
LUMINAIRE WIRING DMX
Connector Wiring -DMX/RDM
DMX 512 XLR and RJ45 Connections
DMX 512 Signal
XLR Pin
RJ45 Pin
Common (Drain)
1
7
DMX 512 Minus (-)
2
2
DMX 512 Plus (+)
3
1
Note: Remaining pins on each connector are not used
DMX NETWORK CONNECTIVITY
Basic DMX512 installation consists of connecting multiple Pegasus Luminaires together (up to 32 Total devices
per DMX string) in “daisy-chain” fashion. A cable runs from the control console (or DMX512 control source) to the
DMX INPUT connection on the first Pegasus Luminaire. From the DMX OUTPUT of this Pegasus Luminaire another cable runs to the DMX IN connector on the next Pegasus Luminaire (or DMX512 device to be controlled).
Special Note: at the end of each DMX Daisy chain, it is highly recommended that DMX TERMINATION is turn ON
on the last Pegasus Luminaire in the chain. The Display will show (I---I) when DMX TERMINATION is turned on.
The “Hundreds” decimal point will blink slowly when DMX TERMINATION is active. SEE PAGE 10 of this Manual
for information on DMX Termination set up.
NOTE: When valid DMX is present the “Ones” decimal point will remain illuminated.
NOTE: When DMX TERMINATION is active the “Hundreds” decimal point will blink slowly.
For more information on installing DMX512 control systems, the following publication is available for purchase
from the United States Institute for Theatre Technology (USITT), “Recommended Practice for DMX512: A Guide
for Users and Installers, 2nd edition” (ISBN: 9780955703522). USITT Contact Information: www.usitt.org
CONNECTING PEGASUS TO A DMX NETWORK
DMX512 (from Console or
Control device)
Power Feed from
Constant Power Circuit
DMX512 (out from first luminaire to second luminaire) NOTE
DMX DAISY CHAIN RULES
Power daisy chain
to next luminaire via powerCON thru connection.
DO NOT EXCEED Power feed
ratings.
SPECIAL NOTE: PEGASUS must be set to DMX CONTROL (switch on the back of the luminare) to be controlled
via a DMX 512 system. Please select the Luminaire dim curve for local voltage to either 115VAC or 220VAC.
If switching between MAINS CONTROL and DMX CONTROL. Please remove power from Luminiare and wait
10 Seconds before switching the luminaire to DMX CONTROL.
PAGE 9
PEGASUS 6” and 8” Fresnel
Installation & User’s Manual
LUMINAIRE CONTROLS - INFO DISPLAY SEQUENCE
Once in DMX CONTROL, the Pegasus Fresnel luminaire’s three digit control system provides set up and local
control for accessing all of the luminaires menu options and settings.
Upon Power-up, the three digit display will sequence:
1.
2.
3.
4.
5.
6.
7.
8.
Firmware Version: (vXX) where XX = Verson number Displays for 2 seconds,
Absence of DMX: (oFF, HLd, PrE, FuL) [ Default: oFF ] Displays for 2 seconds,
Preset Level(L01 ~ L99) [ Default: L99 ] Displays for 2 seconds,
Locked State (Loc, unL) [ Default: unL] Displays for 2 seconds,
Control / ReceiveState (Con , rEC) [ Default: rEC)] Displays for 2 seconds,
Pxx Set: Personality (dimming curve)
601 = Linear, 602 = Incandescent fade 1, 603 = Incandescent fade 2
DMX Termination: (I--I or -----) I--I = Termination on 120ohm resistor active for DMX end of line
termination; ---- = DMX Termination OFF [Default: ----]
999 = Termination OFF, 998 = Termination ON
DMX address: (001 ~512)– This is the DMX channel number. [ Default: 001] Displays for 4 seconds ;
NOTE: When valid DMX is present the “Ones” decimal point will remain illuminated.
When Luminaire has DMX termination ON the “Hundreds” Decimal point will blink.
To initiate Info Display sequence, do the following button sequence: Wait a few seconds until the display goes
blank,
1.
press and hold the [ TENS ] button,
2.
press and hold the [ HUNDREDS ] button,
3.
release the [ TENS ] button,
4.
release the [ HUNDREDS ] button.
Pressing any button in any mode activates display if it is blank, and shows appropriate display for the Operating mode.
001
HUNDREDS
PAGE 10
TENS
ONES
PEGASUS 6” and 8” Fresnel
Installation & User’s Manual
LUMINAIRE CONTROLS -OPERATING MODES
There are two (2) main Operating modes:
1. DMX mode (rEC):
The Pegasus Luminaire’s dimming level is set via a DMX controller. This controller controls the luminaire
via DMX 512a. This address can be from 001 - 512. To programming a different DMX address:
1. Depress the Hundreds, Tens, and Ones, selection switches to the desired DMX address
number (001 to 512).
2. The display goes blank* and comes back again, confirming the new DMX address, displays it
for 4 seconds, then display goes blank*.
[ Default DMX address 001]
NOTE: When valid DMX is present the “Ones” decimal point will remain illuminated.
2. Standalone mode:
When in Standalone mode, the Pegasus Luminaire does not require a DMX control signal.
To enter Standalone mode (or exit back to DMX (rEC) mode):
Wait a few seconds until the display goes blank*, then do the following button sequence:
1.
press and hold the [ ONES ] button,
2.
press and hold the [ TENS] button,
3.
release the [ ONES ] button,
4.
release the [ TENS ] button. When in Standalone mode the unit will ignore DMX input,
once in Standalone mode the ONES and TENS indicator will remain lit.
5.
Unit Preset level is set (0 to 100%) using [TENS] and [ONES] buttons : (00 to 99) (L00=0%),
(L99=100% full).
6.
IMPORTANT NOTE: Unit must be in Control State (below) inorder for above output to take
effect.
A. Control / Receive State:
Note: Only one unit per DMX string should be set to Control State to avoid data conflict.
When in Standalone Mode the Pegasus can also enter into a Control State. The Luminaire will transmit its
Preset level on DMX channel 1, so that it acts like a console to control the other units that are connected
via DMX cable. If unit is in DMX mode, Control State will do nothing.
When in Receive State (rEC), Unit only receives DMX, and if set to DMX channel 1, it will imitate the other
unit that is set to Control State, if connected.
To Toggle between Control and Receive state, do the following button sequence:
Wait a few seconds until the display goes blank,
1.
press and hold the [HUNDREDS ] button,
2.
press and hold the [ONES ] button,
3.
release the [HUNDREDS ] button,
4.
release the [ONES ] button;
Once in Con State the ONES, TENS, & HUNDREDS Indicator will remain Lit.
Display will blink and show Con (or rEC) for 4 seconds and then go to current mode display.
[Default is Receive State]
PAGE 11
PEGASUS 6” and 8” Fresnel
Installation & User’s Manual
OPERATION AND PROGRAMMING -DMX CONTROL MODE
Absence of DMX:
When connected to a DMX network, if there is a loss of signal the following settings will effect the behavior
of the Pegaus Luminaire upon signal loss. This mode can be programmed by entering a number greater
than 900. There are four (4) different options upon the loss of signal.
SETTING
901
902
903
904
DISPLAY [RDM]
oFF [00]
HLd [01]
PrE [02]
FuL [03]
DESCRIPTION
off (dimmed to 0%) [Default]
hold last look (retains last DMX level)
preset (Standalone Preset level
full on (100%)
NOTE: upon loss of valid DMX setting 904 will initiate an instant change in the light output from the DMX setting to FULL ON (100%)
When this is done, after 2 sec, the display will change the [ HUNDREDS ] digit to [P],
asking for confirmation of personality change. This is confirmed with a press of [ ONES ] button. Pressing any
other button reverts back to 90X series display so that modification can be made.
Once confirmation is made:
Display blinks and shows new Absence of DMX setting
(oFF, HLd, PrE, FuL) for 4 sec, then goes to current mode display.
Locked State:
When in Locked State, Buttons will have no effect until they are unlocked. To Lock (or unlock) the buttons, do
the following button sequence:
Wait a few seconds until the display goes blank,
1.
press and hold the [ ONES ] button,
2.
press and hold the [ HUNDREDS ] button,
3.
release the [ ONES ] button,
4.
release the [ HUNDREDS ] button.
Display will blink and show Loc (or unL) for 4 sec and then go to current mode display.
[ Default is unlocked]
*Display Notes:
Display goes completely blank after 4 seconds, except :
1. If in DMX Mode and DMX signal is detected;
then: [ONES] decimal point will stay lit
2. If in Standalone Mode, and Receive State;
then: [TENS] and [ONES] decimal point will stay lit;
3. If in Standalone Mode, and Control State;
then: [HUNDREDS], [TENS] and [ONES] decimal
point will stay lit.
PAGE 12
TENS
Decimal Point
HUNDREDS
Decimal Point
ONES
Decimal Point
PEGASUS 6” and 8” Fresnel
Installation & User’s Manual
OPERATION AND PROGRAMMING - DIMMING CURVE AND DMX TERMINATION
DIMMING CURVE:
Pegasus will replicate one of three programmed dimming curves replicating linear and incandescent dimming.
SETTING
601
602
604
DISPLAY [RDM]
P01 [0]
P02 [1]
P03 [2]
DESCRIPTION
Linear
Incandescent Fade 1
Incandescent Fade 2 (fast Bottom)
SETTING DIM CURVE:
1. Wait for Display to go blank (decimal points may still be active depending upon termination and
DMX presence.
2. Using the programming buttons set the desired DIMMING CURVE setting
3. Wait 2 seconds, the display will then will change the [ HUNDREDS ] digit to a [P],
asking for confirmation of personality change.
4. Depress the [ ONES ] button to confirm personality change Pressing any other button reverts
back to 90X series display so that modification can be made.
5. Depress the [ONES] button a second time to return out of programming mode.
DMX TERMINATION:
Pegasus is supplied with a programmable DMX terminator built into the luminaire. In a DMX system it
is recommended that the luminare that is at the end of the DMX Daisey-chain is terminated using a 120
OHM resistor.
SETTING
998
999
DISPLAY [RDM]
I---I [0]
---- [1]
DESCRIPTION
Termination ON
Termination OFF
SETTING DMX TERMINATION:
1. Wait for Display to go blank (decimal points may still be active depending upon termination and
DMX presence.
2. Using the programming buttons set the desired DMX TERMINATION setting
3. Wait 2 seconds, the display will then will change the [ HUNDREDS ] digit to a [P],
asking for confirmation of personality change.
4. Depress the [ ONES ] button to confirm personality change Pressing any other button reverts
back to 90X series display so that modification can be made.
5. Depress the [ONES] button a second time to return out of programming mode.
PAGE 13
PEGASUS 6” and 8” Fresnel
Installation & User’s Manual
CLEANING AND CARE
WARNING! All cleaning should be performed with power completely removed from the luminaire. Never
remove protective covers when luminaire is powered. Wear appropriate protective eye wear and gloves
when cleaning the fixture. All service and maintenance, other than described herein, should be performed
by a qualified technician or Authorized Service Center.
1. Special Cleaning and Care Instructions
Being a solid-state fixture, and unlike most fixtures, the Pegaus Luminaire requires very little routine maintenance by the user. This section covers portions of the luminaire that can be removed for cleaning.
The Pegaus Luminaire requires special care when it comes to cleaning the front lens assembly. Additional
care needs to be taken with the plastic components because they are much easier to scratch or damage
than glass.
The following is a list of cleaning materials required to care for your Pegasus Luminaire:
• Lint free lens tissue
• Lint or powder free gloves
• Reagent grade isopropyl alcohol*
• A mild soap solution.
WARNING! Under no circumstances should ammonia-based cleaners, acetone, or other harsh solvents be
used on or near the Pegaus Luminaires . These types of cleaners or solvents can permanently damage the
optics or housings of the fixture. If you have any questions regarding the use or care of your Pegaus LED
Luminaire, please contact Altman Lighting technical support or your local Authorized Dealer.
2. Front Lens Cleaning
To clean the front lens and reflector:
Step 1. Unplug luminaire and allow to cool completely.
Step 2. Apply a small amount of reagent grade isopropyl alcohol to lint-free lens tissue.
Step 3. Wipe all debris, dirt, fingerprints, etc. from lens
Step 4. Using a second lint-free lens tissue, wipe off any alcohol residue.
3. Service and Maintenance
For all other service and maintenance issues, please contact your local Altman Lighting offices or an
Authorized Service Center.
PAGE 14
PEGASUS 6” and 8” Fresnel
Installation & User’s Manual
TROUBLE SHOOTING
WARNING! Any service and maintenance (including troubleshooting), other than described herein should be
performed by an Authorized Altman Lighting Dealer or Service Center.
Description
No Light Output
No Power at Luminaire
Symptom
Fixture will not produce
Light output but has power. Display is illuminated or
internal LED is illuminated.
Luminaire does not power
up.
Possible Cause / Remedy
Unit Setting is at 0% Local control
Unit Setting is at 0% DMX control
Set Level above 0% or adjust to a higher intensity.
Circuit is not energized, Verify circuit power and circuit breaker has been turned on.
Not Plugged in, ensure viable power source and unit is
plugged in. Verify power cabling is wired correctly (see
page 9 for details)
Not detecting DMX data, Disconnect and reconnect DMX input cable.
Unit is set in Stand Alone mode. DMX Connection not
wired properly see page 9 for details. DMX address is
different than that of the DMX controller. DMX CONTROL switch is in MAINS CONTROL
Luminaire is in the incorrect DIM CURVE Setting for connected voltage. Use 115 VAC setting for 100-120 and
220 VAC setting for 220 - 240
DMX Data Control
Fixture will not respond to
DMX Commands.
LOW light output
Fixture is powered but low
light output.
Local Programming
Unit will not allow programming changes
See page 11 - 13 for step by step on setting up DMX
and stand alone control.
Luminaire not responding to DMX
control
Unit either goes to full
intensity or zero and does
not respond to control
Remove power from the Luminaire - Wait 10 seconds reapply power. DMX control board will then boot and
allow for control.
Luminaire not responding to DMX
control
Unit either goes to full
intensity or zero and does
not respond to control
Remove power from the Luminare. Depress the “TENS”
button and reapply power. Wait 3 Seconds and release
the “TENS” button. Control board will reboot and reset
all factory defaults.
PAGE 15
PEGASUS 6” and 8” Fresnel
Installation & User’s Manual
TECHNICAL SPECIFICATIONS.
Source:
120 Watt Fixed White LED emitter
Light :
Output Pegasus 6: >9,300 Lumens; LED color temperature dependent
Output Pegasus 8: >11,620 Lumens; LED color temperature dependent
Materials:
Corrosion-resistant materials and hardware
Light Engine:
Available in 2700K, 3000K, 4000K, 5000K White
Power Consumption:
Pegasus 6: 140 Watts at 120 VAC
Pegasus 8: 140 Watts at 120 VAC
425.5
BTU’s/HR:
Lumens/Watt:
CRI:
Input Voltage:
Pegasus 6: 76.0 LED dependent
Pegasus 8: 90.0 LED dependent
>90
100-240 VAC 50/60hZ
1.16A @ 120 VAC
0.58A @240 VAC
Power Factor:
>.92 full load
Current Inrush:
15Apk Max 1/2 cycle @230VAC.
Quiescent Load:
12 watts @ 120VAC (only under DMX control) 0.1A
Cooling:
Active Silent Cooling (<19dBa) @.5M
Ambient Temperature:
0 to 40 Degrees C (32 to 104 Degrees F)
Beam Angle:
Pegasus 6: Spot (10 Degrees) to Flood (70 Degrees)
Pegasus 8: Spot (10 Degrees) to Flood (50 Degrees)
Weight:
Pegasus 6: 11.5 Pounds with C- Clamp
Pegasus 8: 14.2 Pounds with C-Clamp
Finish:
Black, White, or Silver. Custom colors available
Rating:
ETL,cETL, CE ALL PENDING.
PAGE 16
PEGASUS 6” and 8” Fresnel
Installation & User’s Manual
NOTES:
PAGE 17
Document Number:49-0240
Version as of: 20151019
PEGASUS Luminaire Installation & User’s Manual
©2015 Altman Stage Lighting Co. Inc., All rights reserved.
INSTALLATION & USER’S MANUAL
Corporate Offices:
57 Alexander Street
Yonkers, NY 10701
(914)-476-7987
www.altmanlighting.com