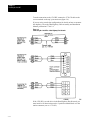
1
AllenBradley
1785-KE Data
Highway Plus
Communication
Interface
Module
(Cat. No. 1785-KE)
User Manual
Table of Contents
Using This Manual . . . . . . . . . . . . . . . . . . . . . . . . . . . . . . .
2
Chapter Objectives . . . . . . . . . . . . . . . . . . . . . . . . . . . . . . . . . . .
Purpose of This Manual . . . . . . . . . . . . . . . . . . . . . . . . . . . . . . .
Who Should Read This Manual . . . . . . . . . . . . . . . . . . . . . . . . . .
Series B Enhancements . . . . . . . . . . . . . . . . . . . . . . . . . . . . . . .
Frequently Used Terms . . . . . . . . . . . . . . . . . . . . . . . . . . . . . . .
Precautionary Notes . . . . . . . . . . . . . . . . . . . . . . . . . . . . . . . . . .
Related Products . . . . . . . . . . . . . . . . . . . . . . . . . . . . . . . . . . . .
Related publications . . . . . . . . . . . . . . . . . . . . . . . . . . . . . . . . . .
2
2
2
3
3
4
4
5
Overview of the 1785KE and Data Highway Plus . . . . . . . .
1
Chapter Objectives . . . . . . . . . . . . . . . . . . . . . . . . . . . . . . . . . . .
What is the 1785KE Module? . . . . . . . . . . . . . . . . . . . . . . . . . . .
What is Data Highway Plus? . . . . . . . . . . . . . . . . . . . . . . . . . . . .
The Physical Link Layer . . . . . . . . . . . . . . . . . . . . . . . . . . . . . . .
Delivery Order of Commands . . . . . . . . . . . . . . . . . . . . . . . . . . .
Applications . . . . . . . . . . . . . . . . . . . . . . . . . . . . . . . . . . . . . . . .
1
1
2
3
7
8
Installing the 1785KE . . . . . . . . . . . . . . . . . . . . . . . . . . . .
1
Chapter Objectives . . . . . . . . . . . . . . . . . . . . . . . . . . . . . . . . . . .
Setting the Communication Option Switches . . . . . . . . . . . . . . . . .
Switch Assembly SW1: RS232C Link Features . . . . . . . . . . . . .
Switch Assembly SW2: Data Highway Plus Node Address . . . . . .
Switch Assembly SW3: Communication Rates and
Local/Remote Option . . . . . . . . . . . . . . . . . . . . . . . . . . . . . . .
Switch Assembly SW4 . . . . . . . . . . . . . . . . . . . . . . . . . . . . . .
Mounting the 1785KE Module . . . . . . . . . . . . . . . . . . . . . . . . . .
Making Connections to the 1785KE . . . . . . . . . . . . . . . . . . . . . .
Powering Up the 1785KE Module . . . . . . . . . . . . . . . . . . . . . . . .
1
1
3
5
8
9
10
11
13
Connecting Your RS232C Device to the 1785KE . . . . . . .
1
Chapter Objectives . . . . . . . . . . . . . . . . . . . . . . . . . . . . . . . . . . .
The RS232C PORT Connector . . . . . . . . . . . . . . . . . . . . . . . . .
Electrical Characteristics of the RS232C Port . . . . . . . . . . . . . . .
Character Transmission . . . . . . . . . . . . . . . . . . . . . . . . . . . . . . .
Cabling for Your RS232C Device . . . . . . . . . . . . . . . . . . . . . . . .
Direct Connection to a Computer . . . . . . . . . . . . . . . . . . . . . . . . .
Connection to Another Communication Module . . . . . . . . . . . . . . .
Connection to a Modem . . . . . . . . . . . . . . . . . . . . . . . . . . . . . . .
Choosing a Modem for PointtoPoint/FullDuplex Applications . . . .
Using the 1785KE in an AutoAnswer Application . . . . . . . . . . . . .
1
1
2
2
3
5
6
8
9
11
ii
Table of Contents
Choosing a Modem for Multidrop/HalfDuplex Applications . . . . . . .
12
Communicating Through the 1785KE Module . . . . . . . . . .
1
Chapter Objectives . . . . . . . . . . . . . . . . . . . . . . . . . . . . . . . . . . .
Application 1: Connecting a Computer to Data Highway Plus . . . . .
Computer to PLC5 . . . . . . . . . . . . . . . . . . . . . . . . . . . . . . . .
PLC2 Normal Unprotected Write . . . . . . . . . . . . . . . . . . . . . . .
PLC2 Normal Unprotected Read . . . . . . . . . . . . . . . . . . . . . .
PLC3 Normal Unprotected Write (Word Range Write) . . . . . . . .
PLC3 Normal Unprotected Read (Word Range Read) . . . . . . .
Application 2:
Communicating Between Two Data Highway Plus Networks . . .
PLC5 Write Commands . . . . . . . . . . . . . . . . . . . . . . . . . . . . .
PLC5 Read Commands . . . . . . . . . . . . . . . . . . . . . . . . . . . . .
Program Verification . . . . . . . . . . . . . . . . . . . . . . . . . . . . . . . . . .
Application 3: Multidrop Applications With the 1785_KE Series B . .
Example 1: Master to Slave Communication . . . . . . . . . . . . . . . . .
Example 2: Slave to Master Communication . . . . . . . . . . . . . . . . .
PLC2 Unprotected Write . . . . . . . . . . . . . . . . . . . . . . . . . . . .
PLC2 Unprotected Read . . . . . . . . . . . . . . . . . . . . . . . . . . . .
Program Verification . . . . . . . . . . . . . . . . . . . . . . . . . . . . . . . . . .
Example 3: Slave to Slave Communication . . . . . . . . . . . . . . . . . .
PLC2 Unprotected Write . . . . . . . . . . . . . . . . . . . . . . . . . . . .
Read Command . . . . . . . . . . . . . . . . . . . . . . . . . . . . . . . . . . .
Program Verification . . . . . . . . . . . . . . . . . . . . . . . . . . . . . . . . . .
Polling More Than One PLC5 on a Data Highway Plus . . . . . . .
Using the Multidrop Expansion Digit . . . . . . . . . . . . . . . . . . . . .
1
1
2
3
4
5
6
7
8
9
10
11
13
16
16
17
18
18
19
20
21
21
22
1785KE Diagnostic Tools . . . . . . . . . . . . . . . . . . . . . . . . .
1
Chapter Objectives . . . . . . . . . . . . . . . . . . . . . . . . . . . . . . . . . . .
Using the LED Indicators . . . . . . . . . . . . . . . . . . . . . . . . . . . . . .
The 1785KE Diagnostic Counters . . . . . . . . . . . . . . . . . . . . . . . .
What is a Diagnostic Counter? . . . . . . . . . . . . . . . . . . . . . . . .
How to Read Diagnostic Counters . . . . . . . . . . . . . . . . . . . . . .
1785KE Data Highway Plus Diagnostic Counters . . . . . . . . . . .
1
1
3
3
3
4
Specifications . . . . . . . . . . . . . . . . . . . . . . . . . . . . . . . . . .
1
Definitions of RS232C Handshaking Signals . . . . . . . . . .
1
Table of Contents
iii
Using a Series A 1785KE Module . . . . . . . . . . . . . . . . . . .
1
Appendix Objectives . . . . . . . . . . . . . . . . . . . . . . . . . . . . . . . . . .
Replacing a Series A Module with a Series B Module . . . . . . . . . .
Setting the Communication Option Switch . . . . . . . . . . . . . . . . . .
Switch Assembly SW1: RS232C Link Features . . . . . . . . . . .
Switch Assembly SW2: For Future Use . . . . . . . . . . . . . . . . . .
Switch Assemblies SW3 and SW: Node Number . . . . . . . . . . .
Switch Assembly SW5: Network Link Communication Rate . . . .
Switch Assembly SW6:
RS232C Communication Rate and Diagnostic Commands .
Mounting the 1785KE Module . . . . . . . . . . . . . . . . . . . . . . . . . .
Making Connections to the Series A 1785KE . . . . . . . . . . . . . . . .
1
1
2
3
4
5
6
Interprocessor Addressing . . . . . . . . . . . . . . . . . . . . . . . .
1
Appendix Addressing . . . . . . . . . . . . . . . . . . . . . . . . . . . . . . . . .
How to Address a PLC5 From a PLC2 . . . . . . . . . . . . . . . . . . . .
Addressing a PLC5 From a PLC3 . . . . . . . . . . . . . . . . . . . . . . .
Communicating From a Computer to a PLC5 . . . . . . . . . . . . . . . .
1
1
4
5
6
7
8
Chapter 1
Using This Manual
Chapter Objectives
After reading this chapter, you should know:
if this manual contains the information you need
where to locate information in this manual
where to locate information on related products
Purpose of This Manual
This manual describes the 1785-KE Data Highway Plus RS-232-C
Interface Module. It gives you procedures for:
installing the 1785-KE
troubleshooting your 1785-KE
For more information on programming and troubleshooting Data Highway
Plus and Data Highway interface modules, refer to the Data Highway/Data
Highway Plus Protocol and Command Set Reference Manual (publication
1770-6.5.16).
Who Should Read This
Manual
You should read this manual before attempting to install or use the
1785-KE. We assume that you are already familiar with:
RS-232-C standards and practices
your RS-232-C device or modem
Allen-Bradley Programmable Logic Controllers (PLCs)
Chapter 1
Using This Manual
Series B Enhancements
This manual describes both Series A and Series B versions of the 1785-KE
module. Table 1.A lists the Series B enhancements to the module. These
features were not available on the Series A version of the module. Where
we describe these features later in the manual, we note that they are only
available on the Series B version of the module. You can see the catalog
number and the series level of the module on the name plate on the side of
the module.
Table 1.A
Series B Enhancements
Feature
Benefit
Remote Addressing Capability
(Full Duplex Operation)
Enhanced communications capability
for applications involving point to point
modem links.
Remote Addressing Capability
(Half Duplex Operation)
Enhanced communications capability
for applications involving multidrop
modem links.
The Series B version of the 1785-K module uses different communication
option switches and has a different front cover and Data Highway Plus
connectors than the Series A version. Information on setting the Series A
is included in Appendix C for reference.
Frequently Used Terms
In this manual, we use the following terms:
This Term:
Means:
Data Highway Plus
formerly Peer Communications Link
(PCL)
link
a Data Highway or Data Highway Plus
network
local node
node on local link
remote node
node on remote link
1–3
Chapter 1
Using This Manual
Precautionary Notes
In this manual, you will see:
WARNINGS to tell you where you may be injured if you do not follow
procedures properly
CAUTIONS to tell where equipment may be damaged if you do not
follow procedures properly
Important notes that stress information that is critical to your
understanding and use of the product
Related Products
1–4
The 1785-KE Data Highway Plus RS-232-C Interface Module is part of
the Data Highway Plus product family. Related products include:
Product
Catalog Number:
Data Highway or Data Highway Plus/ Asynchronous
(RS232C or RS422A) Interface Module
1770KF2
Data Highway Plus to Data Highway 1785KA Interface
Module
1785KA
Data Highway Plus PLC2 Family Communication
Adapter Module
1785KA3
PLC3 I/O Scanner Communication Adapter Module
1775S5,SR5
Industrial Terminal System
1784T50
PLC5 Family Programmable Controllers
Series 1785
Chapter 1
Using This Manual
Related publications
For more information on the 1785-KE and the Data Highway Plus
network, refer to the following documents:
Publication:
Publication Number:
Data Highway Plus Overview Product Data
17852.6
Data Highway/Data Highway Plus Protocol and
Command Set User's Manual
17706.5.16
Data Highway Cable Assembly and Installation Manual
17706.2.1
The publications in the table above are available from Allen-Bradley.
Contact your local Allen-Bradley sales office for more information.
1–5
Chapter 2
Overview of the 1785KE and
Data Highway Plus
Chapter Objectives
In this chapter, we give you an overview of the 1785-KE module and how
it interfaces with a Data Highway Plus network.
What is the 1785KE
Module?
The 1785-KE module is a communication interface that links an intelligent
RS-232-C (asynchronous) device to an Allen-Bradley Data Highway Plus
network. The 1785-KE gives you a choice of full duplex (unpolled) or
half duplex (polled) protocol on its asynchronous link.
Figure 2.1 shows the 1785-KE module’s hardware features:
diagnostic indicators
connector for the Data Highway Plus
connector for the T50 Industrial Terminal
connector for an RS-232-C device
Chapter 2
Overview of the 1785KE and
Data Highway Plus
Figure 2.1
1785KE Communication Interface Module
What is Data Highway Plus?
Data Highway Plus is a local area network (LAN) that allows peer-to-peer
communication among up to 64 nodes. You use Data Highway Plus when
you want to connect a small number of nodes on a common link.
Data Highway Plus provides easy re-configuration and expansion if you
want to add more nodes later.
Typically, you would use Data Highway Plus to connect PLC-5s that need
to communicate with each other frequently. For example, you would use
Data Highway Plus to connect a small group of PLC-5s (approximately 10
nodes or less) involved in a single integrated process. Larger links, or those
in looser configurations, could use a Data Highway as a common backbone
network.
Communication on a Data Highway Plus involves:
a physical link layer
software layers
2–2
Chapter 2
Overview of the 1785KE and
Data Highway Plus
The Physical Link Layer
The physical link layer is a set of cables and interface modules that work
together to provide a channel for communication between the various
points, called nodes, on the physical link.
A Data Highway Plus node consists of an interface to Data Highway Plus,
usually a module. (The PLC-5 processor has a Data Highway Plus
connection built in, so it does not need a separate interface module.)
The Data Highway Plus cables consist of a trunkline that can be up to
10,000 feet long and droplines that can be up to 100 feet each.
You can use your Data Highway Plus to connect such nodes as:
RS-232-C devices attached to a 1785-KE or a 1770-KF2
Data Highway modules attached (via their RS-232-C port) to a 1785-KE
or a 1770-KF2
a PLC-3 or PLC-3/10 attached to a 1775-S5,-SR5
a PLC-2 family device attached to a 1785-KA3
PLC-5s (direct connection)
a T50 industrial terminal
a 1785-KA (connected to a Data Highway network)
Figure 2.2 illustrates a typical Data Highway Plus network.
2–3
Chapter 2
Overview of the 1785KE and
Data Highway Plus
Figure 2.2
A Typical Data Highway Plus Configuration
Important: A computer connected to a 1785-KE module cannot access a
node on a Data Highway through a 1785-KA module. Also, nodes on Data
Highway cannot access a computer connected to a 1785-KE on Data
Highway Plus.
The Software Layers
Both Data Highway Plus and the 1785-KE’s RS-232 asynchronous link
require two layers of software to enable communication to take place. The
layers are defined as follows:
Application layer -- controls and executes the actual tasks, or
commands, specified in the communication between nodes.
Data link layer -- controls the flow of communication over the physical
link by establishing, maintaining, and releasing the communication
channel between nodes.
2–4
Chapter 2
Overview of the 1785KE and
Data Highway Plus
The 1785-KE module automatically takes care of the data link layers on
the Data Highway Plus network.
This means that your application programs at the PLCs and computers do
not need to bother with inter-node protocol, handshaking, or control of the
Data Highway Plus link.
You must program these layers, however, for the asynchronous link
between your 1785-KE and its RS-232-C device. This programming
allows your computer to communicate with the Data Highway Plus
network, through the asynchronous link.
For more information on the commands, protocols, and diagnostics used
on your Data Highway Plus network, refer to the Data Highway/Data
Highway Plus Protocol and Command Set User’s Manual (publication
1770-6.5.16). This manual contains the information you need to program
the software layers for your computer and troubleshoot your network.
The Data Highway Plus Protocol
The Data Highway Plus link has a communication rate of 57,600 bits per
second. The Data Highway Plus implements peer-to-peer communication
with a token passing scheme to rotate link mastership among its stations.
Since this method does not require polling, it is time efficient. The Data
Highway Plus uses factory set timeouts to rebuild the token pass network if
a token is lost because of a defective station. This timeout is not adjustable.
The RS232C Asynchronous Link Protocols
The 1785-KE’s RS-232 asynchronous link has a selectable communication
rate from 110 bits per second to 19,200 bits per second. It uses a selectable
protocol of half-duplex (master-slave, polled) or full-duplex (peer-to-peer,
unpolled).
You can select the half-duplex protocol for a multidrop or point-to-point
communication link. You can select the full-duplex protocol only for a
point-to-point communication link.
2–5
Chapter 2
Overview of the 1785KE and
Data Highway Plus
FullDuplex Protocol
The full-duplex protocol conforms closely to ANSI X3.28, combining
features of subcategories D1 (data transparency) and F1 (two-way
simultaneous transmission with embedded responses).
You can use full-duplex protocol for a point-to-point link that allows
two-way simultaneous transmission. It is relatively difficult to implement
because it requires you to use interrupts and multi-tasking programming
techniques. It is intended for high performance applications where you
need to get the highest possible throughput from the available
communication medium.
HalfDuplex Protocol
Half-duplex protocol serves as an alternate to full-duplex protocol.
Half-duplex protocol is similar to full-duplex in most respects. Two major
differences are:
Half-duplex protocol provides for polling of slave stations.
Half-duplex protocol does not allow embedded responses.
Half-duplex protocol is used for a link between one master and one or
more slaves. You must use modems for this type of link (unless there is
only one slave). The 1785-KE module has slave mode capability only. You
must provide the master function through a computer, or the 1771-KGM
module.
Half-duplex protocol provides a lower effective utilization of resources
compared to full-duplex, but it is easier to implement. You should use
half-duplex protocol if:
you are using multidrop modems to connect multiple slave stations to a
single master computer.
you are using moderns that have only half-duplex capability.
you are willing to sacrifice data throughput in exchange for ease of
implementation.
2–6
Chapter 2
Overview of the 1785KE and
Data Highway Plus
Delivery Order of Commands
If any node on a Data Highway Plus network initiates multiple commands
(for example, the initiating node sets multiple bits at any time), the order
in which those commands get executed at the remote node cannot be
guaranteed. The initiating node, the network, and the receiving node
execute commands based on network conditions, including but not limited
to:
nodes buffering commands
retries due to noise on the network
If your application requires that commands be delivered in a specific order,
your logic must control the initiation of one command at a time on the
network and verify delivery before initiating additional commands. This
verification is completed by:
a done bit or an error bit in a PLC
a reply message in a computer
A done bit or a successful reply should cause the next command to be
initiated. If an error bit or a reply with non-zero status is returned, you
must decide the appropriate action based on your application.
2–7
Chapter 2
Overview of the 1785KE and
Data Highway Plus
Applications
Three typical applications of the 1785-KE are discussed in this manual:
connecting a computer or other intelligent device to Data Highway Plus
via an RS-232-C point-to-point link (local mode, full- or half-duplex
protocol option).
connecting two Data Highway Plus networks together over a
point-to-point modem link (remote mode, full-duplex protocol option).
connecting a Data Highway Plus node (such as a PLC-5) as a slave on a
multidrop link with a modem (remote mode, half-duplex slave protocol
option).
These are discussed in more detail later in Chapter 5, “Communicating
through the 1785-KE Module”. A short discussion of each application
follows:
Figure 2.3 shows an example of using a 1785-KE to attach a computer or
other intelligent RS-232-C device to Data Highway Plus. You attach the
computer to Data Highway Plus using a point-to-point RS-232-C link.
Figure 2.3 shows the following three options using:
a short (50 feet or less) RS-232-C link
the AB-longline RS-232-C option
a point-to-point modem link
Refer to Chapter 4 for more information on these RS-232-C options.
Figure 2.3
PointtoLinks to a Data Highway Plus Network
2–8
Chapter 2
Overview of the 1785KE and
Data Highway Plus
You can use either full-duplex or half-duplex for the RS-232-C link.
Figure 2.4 shows an example of using a 1785-KE (series B) to connect two
Data Highway Plus networks over a point-to-point modem link. You must
set the 1785-KE for full-duplex protocol in this application.
Figure 2.4
Communication Between Two Remote Data Highway Plus Networks
2–9
Chapter 2
Overview of the 1785KE and
Data Highway Plus
Figure 2.5 shows an example of using the 1785-KE (series B) to connect a
Data Highway Plus node (such as a PLC-5) to a multidrop network. The
PLC-5 acts as a slave on the multidrop link. You must set the 1785-KE for
half-duplex protocol and use modems.
Figure 2.5
Multidrop Networking Using the 1785KE (Series B)
2–10
Chapter 3
Installing the 1785KE
Chapter Objectives
This chapter explains how to install the 1785-KE module. There are four
parts to installation:
setting the communication option switches
mounting the module
connecting the module to the Data Highway Plus link
powering up your module
Refer to Chapter 4 for information on how to connect your RS-232-C
device to the 1785-KE module.
Read the first two chapters of this manual carefully before attempting to
install the 1785-KE.
Important: The Series B version of the 1785-KE module uses different
communication option switches, has a different front cover, and has
different Data Highway Plus connectors than the Series A version. This
chapter describes the Series B version. Information on setting the Series A
communication option switches and making connections to the Series A is
included in Appendix C for reference.
Setting the Communication
Option Switches
The 1785-KE module has 4 switch assemblies (figure 3.1) that enables you
to select various communication options. The switch assemblies and their
corresponding options are:
Select this
Switch Assembly:
For this
Communication Option:
SW1
RS232C link features
SW2
Node number
SW3
Data Highway Plus and RS232C link communication rates
-Local/remote option
SW4
Reserved
Chapter 3
Installing the 1785KE
Figure 3.1
Location of the Switch Assemblies on the 1785KE Module
Important: The 1785-KE Series B uses the convention DOWN
(ON) = Binary 0, and UP (OFF) = Binary 1.
3–2
Chapter 3
Installing the 1785KE
Switch Assembly SW1:
RS232C Link Features
Figure 3.2 shows the 1785-KE (Series B) set for:
full duplex
BCC error checking
even parity
embedded responses enabled
detect and ignore duplicate messages
ignore handshaking
execute diagnostic commands
Figure 3.2
The Switches on Switch Assembly SW1
The following table shows you how to set switches 1, 2, and 3 for the
module options you require.
If You Want to
Select Protocol
as:
With
Error
Check
as:
With
Parity
as:
With
Embedded
Responses:
Set these
SW1 Switches:
1
2
3
full duplex
BCC
none
no
UP
(OFF)
UP
(OFF)
UP
(OFF)
full duplex
BCC
even
no
DWN
(ON)
UP
(OFF)
UP
(OFF)
full duplex
BCC
none
yes
UP
(OFF)
DWN
(ON)
UP
(OFF)
full duplex
BCC
even
yes
DWN
(ON)
DWN
(ON)
UP
(OFF)
full duplex
BCC
none
no
UP
(OFF)
UP
(OFF)
DWN
(ON)
half duplex
BCC
even
no
DWN
(OFF)
UP
(ON)
DWN
(ON)
full duplex
CRC
none
yes
UP
(OFF)
DWN
(ON)
DWN
(ON)
half duplex
CRC
none
no
DWN
(ON)
DWN
(ON)
DWN
(ON)
3–3
Chapter 3
Installing the 1785KE
Switch 4 determines whether or not the RS-232-C port of the 1785-KE
module can detect duplicate messages transmitted to it.
If You Want the Module to:
Set Switch 4:
detect and ignore duplicate messages
DOWN (ON)
accept all messages regardless of
duplication
UP (OFF)
Switch 5 determines whether the RS-232-C port on the 1785-KE module
uses and recognizes the following handshaking signals.
data set ready (DSR)
request to send (RTS)
clear to send (CTS)
data carrier detect (DCD)
data terminal ready (DTR)
If You Want the Port to:
Set Switch 5:
use handshaking signals
DOWN (ON)
ignore handshaking signals
UP (OFF)
Important: If you select half-duplex, the 1785-KE uses handshaking
signals even if switch 5 is set UP.
To set diagnostic commands, you use switch 6 on SW-1. Use the table
below to set switch 6.
If you want your module to:
3–4
Set switch 6:
execute diagnostic commands
DOWN (ON)
pass through diagnostic commands
UP (OFF)
Chapter 3
Installing the 1785KE
Switch Assembly SW2:
Data Highway Plus Node
Address
Switch assembly SW-2 is for setting the Data Highway Plus node address
of the 1785-KE (figure 3.3).
Figure 3.3
Setting Switch Assembly SW2
As seen in the figure, SW-2 represents 3 octal digits; Octal Digit 0, Digit 1,
and Digit 2.
Octal Digit 0
Octal Digit 0 (Switches 1 and 2) should be set to 0 (DWN DWN).
Octal Digits 1 and 2 (Data Highway Plus Node Address)
Octal Digits 1 and 2 are used to set a Data Highway Plus node address for
the 1785-KE module. The node address is an encoded 2 digit octal number
that identifies the 1785-KE module as a unique node on Data Highway
Plus. Valid Data Highway Plus addresses for the 1785-KE module are
00 to 77 octal.
Octal Digit 1 (switches 3, 4, 5) is used to set the most significant octal digit
(0-7) of the Data Highway Plus node address.
Octal Digit 2 (switches 6, 7, 8) is used to set the least significant octal digit
(0-7) of the Data Highway Plus node address.
3–5
Chapter 3
Installing the 1785KE
Figure 3.4 shows you how to set the Data Highway Plus node address with
switch assembly SW-2.
Figure 3.4
Setting the Data Highway Plus Node Address with Switch
Assembly SW2
Octal Digit 1 (most significant )
To set
Octal Digit
1 to:
Octal Digit 2 (least significant)
Set switches 3 5
To set
Octal Digit
2 to:
No.3
No.4
No.5
0
DWN
(ON)
DWN
(ON)
DWN
(ON)
1
DWN
(ON)
DWN
(ON)
2
DWN
(ON)
3
Set switches 6 8
No.6
No.7
No.8
0
DWN
(ON)
DWN
(ON)
DWN
(ON)
UP
(OFF)
1
DWN
(ON)
DWN
(ON)
UP
(OFF)
UP
(OFF)
DWN
(ON)
2
DWN
(ON)
UP
(OFF)
DWN
(ON)
DWN
(ON)
UP
(OFF)
UP
(OFF)
3
DWN
(ON)
UP
(OFF)
UP
(OFF)
4
UP
(OFF)
DWN
(ON)
DWN
(ON)
4
UP
(OFF)
DWN
(ON)
DWN
(ON)
5
UP
(OFF)
DWN
(ON)
UP
(OFF)
5
UP
(OFF)
DWN
(ON)
UP
(OFF)
6
UP
(OFF)
UP
(OFF)
DWN
(ON)
6
UP
(OFF)
UP
(OFF)
DWN
(ON)
7
UP
(OFF)
UP
(OFF)
UP
(OFF)
7
UP
(OFF)
UP
(OFF)
UP
(OFF)
Important: The 1785-KE Series B uses the convention DWN (ON)
= Binary 0, and UP (OFF) = Binary 1.
3–6
Chapter 3
Installing the 1785KE
Figure 3.5 shows you how to set the node number 37 using Octal Digits 1
and 2 as follows:
Figure 3.5
Setting the Data Highway Plus Node Address 37
Octal Digit 0 (Most Significant Digit)
To set Octal
Digit 1 to:
3
Set switches 3 5
No.3
No.4
No.5
DWN
(ON)
UP
(OFF)
UP
(OFF)
Octal Digit 2 (Least Significant Digit)
To set Octal
Digit 2 to:
7
Set switches 6 8
No.6
No.7
No.8
UP
(OFF)
UP
(OFF)
UP
(OFF)
Important: The 1785-KE Series B uses the convention DOWN (ON)
= Binary 0, and UP (OFF) = Binary 1.
3–7
Chapter 3
Installing the 1785KE
Switch Assembly SW3:
Communication Rates and
Local/Remote Option
Switch assembly SW-3 is for:
setting the communication rate for the Data Highway Plus network and
the RS-232-C link
setting the module for local or remote operation
Figure 3.6
Setting Switch Assembly SW3
You use switches 1 and 2 to set the Data Highway Plus communication
rate. Both switches must be DOWN for 57.6 Kbit communication rate.
You use switches 3, 4, and 5 to set the communication rate for the
RS-232-C link between your device and the 1785-KE (figure 3.6). Use the
following table to set these switches.
To Set this Rate
in Bits Per
Second:
3–8
Set These Switches:
3
4
5
110
UP (OFF)
UP (OFF)
UP (OFF)
300
DWN (ON)
UP (OFF)
UP (OFF)
600
UP (OFF)
DWN (ON)
UP (OFF)
1200
DWN (ON)
DWN (ON)
UP (OFF)
2400
UP (OFF)
UP (OFF)
DWN (ON)
4800
DWN (ON)
UP (OFF)
DWN (ON)
9600
UP (OFF)
DWN (ON)
DWN (ON)
19200
DWN (ON)
DWN (ON)
DWN (ON)
Chapter 3
Installing the 1785KE
You use switch 6 of SW-3 to set local/remote operation. Use the table
below as a guide to setting this switch:
If You are Using the 1785KE
to Connect:
Set Switch 6 to:
computer or other intelligent RS232C
device to a Data Highway Plus network
local mode DOWN (ON)
Data Highway Plus node (such as a PLC5)
as a slave on a multidrop link, using a
modem (fig. 2.5)
remote mode UP (OFF)
two Data Highway Plus networks over a
pointtopoint modem link (fig. 2.4)
remote mode UP (OFF)
Communications to a 1785-KE Series A is the same as that to a 1785-KE
in local mode (i.e., when the 1785-KE Series B is in local mode, it
functions the same as a 1785-KE Series A). As a result:
Important: If you are replacing a 1785-KE Series A with a 1785-KE
Series B and desire Series A compatible operation, set the Local/Remote
option switch to Local.
See Chapter 5 for more information on selecting this option.
Switch Assembly SW4
Switch assembly SW-4 is reserved for future use. Set the switches in the
UP position (figure 3.7).
Figure 3.7
Switch Assembly SW4
3–9
Chapter 3
Installing the 1785KE
Mounting the 1785KE
Module
The 1785-KE module mounts in an Allen-Bradley Bulletin 1771 I/O rack.
If you are using a dropline/trunkline configuration, you must mount the
1785-KE module within 100 cable feet of the Data Highway Plus
trunkline. When you are connecting the module directly to an RS-232-C
device, you must mount the 1785-KE module within 50 cable feet of that
device.
If the RS-232-C device is another Allen-Bradley communication module,
you can mount the 1785-KE module up to 7,000 cable feet away from it by
using the longline connection (discussed in Chapter 4). If you are using a
modem link to connect the 1785-KE module to the RS-232-C device, then
the module and the device may be as far apart as the modem link will
allow.
To install a 1785-KE module in an Allen-Bradley Bulletin 1771 I/O rack,
follow these steps:
1.
Perform an orderly power down of the I/O rack and its controlling
PLC processor.
WARNING: Remove system power before removing or
installing your module in the 1771 I/O chassis. Failure to
observe this warning could result in:
damage to module circuitry
undesired operation and possible injury to personnel
3–10
2.
Set the keying bands on the I/O rack slot. The 1785-KE is keyed to
guard against installation in the wrong slot in your rack. Prior to
installing your module in the rack, you may insert optional keying
bands (provided with your 17711/0 rack) on the backplane. If you
elect to use keying bands, two are required. Insert the first between
keying positions 6 and 8. Insert the second between keying positions
12 and 14.
3.
Slide the 1785-KE module into one of the slots in the I/O rack. Snap
down the latch on the top of the module slot to secure the module in
the I/O rack.
Chapter 3
Installing the 1785KE
Making Connections to
the 1785KE
The 1785-KE module has 3 connectors on its front edge (figure 3.8).
Figure 3.8
The Connectors on the 1785KE
3–11
Chapter 3
Installing the 1785KE
To make connections to the 1785-KE, connect the 1770-CD cable to the
screw terminals on the top 3-pin connector (figure 3.9).
If you are using a trunk drop configuration, for details on how to construct
the dropline, refer to the Data Highway Cable Assembly and Installation
Manual, publication 1770-6.2.1.
Figure 3.9
Connecting the 1785KE to a Data Highway Plus Network
If the 1785-KE is an end device in the Data Highway Plus Network, you
must install a 150 ohm resistor on the 3-position terminal block or in the
station connector (cat. no. 1770-SC).
3–12
Chapter 3
Installing the 1785KE
Powering Up the 1785KE
Module
When you have successfully:
set the switch assemblies on the 1785-KE to the setting suited to your
application
mounted your 1785-KE module in a 1771 I/O rack following the
procedure earlier in this chapter
connected your module to the Data Highway Plus
connected your RS-232-C device to your 1785-KE
(refer to Chapter 4)
you are ready to power up your 1785-KE module.
To power up your module, perform an orderly power up of the 1/0 rack and
system PLC.
At power-up, the 1785-KE module runs tests to check the integrity of its
internal memory, timers and firmware. Any failure causes the red ERR
indicator (on the front panel) to flash.
Important: The test cycle during power up takes approximately 10
seconds. This delay is normal operation for the module.
For troubleshooting information, refer to the Data Highway/Data Highway
Plus Protocol and Command Set Reference Manual (publication
1770-6.5.16).
3–13
Chapter 4
Connecting Your RS232C
Device to the 1785KE
Chapter Objectives
In this chapter we give you guidelines for connecting your RS-232-C
device to the 1785-KE.
For definitions of handshaking signals, refer to Appendix B.
The RS232C PORT
Connector
You connect your RS-232-C device to the RS-232-C PORT connector
(figure 4.1) on your 1785-KE module. The RS-232-C PORT connector, a
female 15-pin D-shell, does not conform strictly to the RS-232-C standard,
which specifies a 25-pin male connector. However, you can use an
RS-232-C adapter cable (cat. no. 1770-CG or 1770-CP) to interface
between this connector and a standard 25-pin connector.
Figure 4.1
The RS232C PORT Connector on the 1785KE
Chapter 4
Connecting Your RS232C
Device to the 1785KE
Electrical Characteristics
of the RS232C Port
Input and output levels on the RS-232 port conform to the RS-232-C
standard. The transmitter has increased capability to drive an isolated line
that is up to 7,000 feet long. The length of this line determines the
maximum communication rate on the RS-232-C link:
Line Length in Feet:
Maximum Communication Rate in
Bits Per Second:
Up to 2,000
19,200
2,000 to 4,000
9,600
4,000 to 6,000
4,800
6,000 to 7,000
2,400
The receiver can sense the signals generated by a similar transmitter, and it
is electrically isolated from all other circuitry on the module. It consists of
an opto-isolater circuit with an input and return line at the RS-232-C port.
All other signals on the RS-232-C port are driven and received by standard
RS-232-C interface circuits, which have maximum drive capability of 50
feet.
Character Transmission
The 1785-KE module sends data serially over the RS-232-C interface, one
8-bit byte at a time. The transmission format conforms to ANSI X3.16,
CCITT V.4, and ISO 1177, with the exception that the parity bit is retained
while the data length is extended to eight bits.
The transmission format may be summarized as:
start bit
data bit 0
data bit 1
data bit 2
data bit 3
data bit 4
data bit 5
data bit 6
data bit 7
even parity bit (optional)
one stop bit
4–2
Chapter 4
Connecting Your RS232C
Device to the 1785KE
Cabling for Your RS232C
Device
Cabling for the RS-232-C port of the 1785-KE module will vary,
depending on your application. In general, the pinouts for this cabling are
as follows:
Signal:
Mnemonic:
chassis/shield drain
Standard RS232
25pin Connector:
1785KE 15pin
Connector:
1
1
transmitted data
TXD
2
2
received data
RXD
3
3
request to send
RTS
4
4
clear to send
CTS
5
5
data set ready
DSR
6
6
signal ground
GND
7
7
data carrier detect
DCD
8
8
data terminal ready
DTR
20
11
transmitted data return TXDRET (longline
only)
14
received data return
13
RXDRET (longline
only)
For definitions of each signal, refer to Appendix B.
When communication option switch 5 of switch assembly SW-1
(handshaking enable/disable) is set DOWN, the RS-232-C port of the
1785-KE module can transmit or receive all of the above signals (refer to
Chapter 3 for switch setting information). If this switch is UP, then the
RS-232-C port uses only TXD, RXD, and GND (TXDRET and RXDRET
for longlines).
Important: If you select half-duplex, the 1785-KE uses handshaking
signals even if switch 5 is set UP.
4–3
Chapter 4
Connecting Your RS232C
Device to the 1785KE
If you are connecting a 1785-KE module to a device not manufactured by
Allen-Bradley, then you must mount the module within 50 cable feet of
that device. For such applications, the module’s GND must be connected to
the GND of the modem or computer. RXDRET must be jumpered to GND
at the module. TXDRET should be left open. Note that this type of
connection does not provide electrical isolation between the module and
the connected device.
The following sections provide guidelines for cabling your 1785-KE to:
a computer
another Allen-Bradley communication module
a modem
4–4
Chapter 4
Connecting Your RS232C
Device to the 1785KE
Direct Connection to a
Computer
To connect the module directly to a computer, you can use a data terminal
interface cable (cat. no. 1770-CG). This cable plugs into the RS-232-C
PORT connector on the module and the RS-232-C compatible connector
on the computer. Connect the cable shield at one end only.
The 1770-CG cable is 16.5 feet long. If you need a longer cable or a
male/female adapter cable, you can construct your own according to the
wiring diagram in Figure 4.2. Make sure that the cable length does not
exceed 50 feet.
Figure 4.2
Wiring Diagram - RS232C PORT Connector to Computer
This type of connection includes the DTR signal to allow each end to
detect the loss of the other end’s ability to communicate. If your computer
does not provide the DTR signal, jumper pins 6 and 8 at the module to pin
11.
4–5
Chapter 4
Connecting Your RS232C
Device to the 1785KE
Connection to Another
Communication Module
You can connect the 1785-KE to another Data Highway interface module
with a longline cable. This cable can be up to 7,000 feet long. However,
remember that the cable length can limit the communication rate (refer to
the section earlier in this chapter entitled Electrical Characteristics of the
RS-232-C Port).
For information on how to construct a longline cable for connection to a:
1771-KG module, refer to figure 4.3
1773-KA or 1775-KA module, refer to figure 4.4
To construct the cable, use a male connector at each end. Use Belden 8723
or equivalent cable (available from Allen-Bradley under cat. no. 1778-CR).
Connect the cable shield at one end only.
4–6
Chapter 4
Connecting Your RS232C
Device to the 1785KE
Figure 4.3
Connection to a 1771KG Module
Figure 4.4
Connection to a 1773KA or 1775KA Module
4–7
Chapter 4
Connecting Your RS232C
Device to the 1785KE
Connection to a Modem
To connect the module to a modem, you can use the modem interface cable
(cat. no. 1770-CP). This cable plugs into the RS-232-C PORT connector
on the module and the RS-232-C compatible connector on the modem.
Connect the cable shield at one end only.
The 1770-CP cable is 16.5 feet long. If you need a longer cable or a
male/female adapter cable, you can construct your own according to the
wiring diagram in Figure 4.5. Be sure that the cable length does not exceed
the RS-232-C limit of 50 feet.
Figure 4.5
Wiring Diagram RS232C PORT Connector to a Modem
4–8
Chapter 4
Connecting Your RS232C
Device to the 1785KE
Choosing a Modem for
PointtoPoint/FullDuplex
Applications
This section provides guidelines for selecting the modems you use with the
1785-KE in point-to-point applications using full-duplex protocol.
The modem you use to interface to an Allen-Bradley RS-232-C
communication module (using full-duplex protocol) must be capable of:
supporting the standard RS-232-C handshaking described in
Appendix B
supporting the baud rate of your module
operating on a full-duplex link
interfacing to an asynchronous device
operating in a “transparent” mode (data is passed over the link without
being modified)
Note: If handshaking is enabled (via the SW-1 switch selection discussed
in Chapter 3), and the DCD signal is lost for more than approximately
10 seconds, the 1785-KE follows the handshaking sequence described in
the section “Using the 1785-KE in an Auto-Answer Application” later in
this chapter. If your modem does not support this sequence, you can either
disable handshaking, or with handshaking enabled, jumper DTR to DSR at
the module to insure the module will recover after DCD is restored.
The 1785-KE can communicate via modems over either a:
dedicated link (such as a leased phone line)
dial-up link
4–9
Chapter 4
Connecting Your RS232C
Device to the 1785KE
The types of dial-up network modems that you can use are:
Manual: These are typically acoustically coupled modems. The
connection is established when human operators (at both ends) insert the
telephone handsets into couplers to complete the connection.
DTE-controlled answer: These unattended moderns are directly
connected to the phone lines. The module, serving as the data terminal
equipment (DTE), controls the modem through the DTR, DSR, and
DCD signals. The module incorporates timeouts and tests to properly
operate these types of modems. See the section “Using the 1785-KE in
an Auto-Answer Application” below for details.
Auto-answer: These modems have self contained timeouts and tests, and
can answer and hangup the phone automatically.
The module has no means of controlling an auto-dial modem, but it can be
used in conjunction with a separate auto-dialer.
4–10
Chapter 4
Connecting Your RS232C
Device to the 1785KE
Using the 1785KE in an
AutoAnswer Application
The 1785-KE module continually asserts DTR when it is waiting for a
call. Under this condition, a modem attached to the 1785-KE module will
answer a call and assert DSR as soon as it detects ringing. The 1785-KE
module does not monitor the RING indicator signal in the RS-232-C
interface. Once it detects DSR, the module starts a timer (approximately
10 seconds) and waits for the DCD signal. When the module detects DCD,
communication can start.
If the module does not detect DCD within the timeout, the module turns
DTR off. This causes the modem to hang up and break the connection.
When the hang-up is complete, the modem turns off DSR. This causes the
module to reassert the DTR line and wait for another call. This feature
protects access to the phone if someone calling a wrong number reaches
the module.
After detecting DCD, the module continues to monitor the DCD line. If
DCD goes off, the module restarts the timeout. If DCD is not restored
within the timeout, the module initiates the hangup sequence. This feature
allows the remote station to re-dial in the event that the connection is lost
through a fault in the phone network.
This handshaking is necessary to guarantee access to the phone line. If you
defeat this handshaking protocol by improper selection of your modem
options or by jumpers at the connectors, the modem may still answer a call,
but, if the connection is lost, the modem will not hang up. It will then be
impossible for the remote station to re-establish the connection because it
will get a busy signal.
You can connect the module to standard American dialup modems and
some European modems.
Other European standards specify that the DTR signal will make the
modem answer the phone, whether it is ringing or not. This causes the
phone to always be “busy”. Since the 1785-KE module asserts the DTR
signal while waiting for a call, you cannot use the 1785-KE with such
modems.
4–11
Chapter 4
Connecting Your RS232C
Device to the 1785KE
Choosing a Modem for
Multidrop/HalfDuplex
Applications
This section provides guidelines for selecting the modems you use with the
1785-KE in multidrop applications using half-duplex protocol.
The multidrop link may either be a two-circuit system (master sends and
slaves receive on one circuit, slaves send and master receives on the other),
or a one-circuit system (master and slaves send and receive on the same
circuit).
The half-duplex protocol is a polled protocol that only allows one node to
transmit at a time. Because of this, the modems must operate in switched
carrier mode (they only switch their carriers on when they transmit data).
The RS-232-C handshaking lines are used to control the switching of the
carrier for a message transmission as follows (figure 4.6):
Request to Send (RTS) -- sent from the Allen-Bradley module to the
modem to indicate the module has a message to send and wants a carrier
to be established.
Clear to Send (CTS) -- sent from the modem to the Allen-Bradley
module to indicate that the carrier is established and that the module can
send its message.
Data Carrier Detect (DCD) -- sent from the modem to the Allen-Bradley
module to indicate that a carrier has been detected and that a message is
on the way. The module uses this signal to enable its receiver.
4–12
Chapter 4
Connecting Your RS232C
Device to the 1785KE
Figure 4.6
A Typical Packet Transmission Using RTS, CTS, and DCD
4–13
Chapter 4
Connecting Your RS232C
Device to the 1785KE
The modem you use to interface to an Allen-Bradley RS-232-C
communication module (using half-duplex protocol) must be capable of:
supporting standard RS-232-C handshaking described in this section and
in Appendix B
supporting the baud rate of your module
operating on a multidrop link
operating in switched carrier mode under handshake control
interfacing to an asynchronous device
operating in a “transparent” mode (data is passed over the link without
being modified)
minimal RTS/CTS delay time, for optimum performance. This time is
typically determined by the time it takes the modem to turn the carrier
on.
4–14
Chapter 5
Communicating Through the
1785KE Module
Chapter Objectives
In this chapter, we discuss three typical applications of the 1785-KE
module:
connecting an intelligent RS-232-C device, such as a computer, to Data
Highway Plus through a point-to-point RS-232-C link (local mode, fullor half-duplex protocol)
connecting two Data Highway Plus networks together over a
point-to-point modern link (remote mode, full-duplex protocol)
connecting a Data Highway Plus node (such as a PLC-5) as a slave on a
multidrop link through a modem (remote mode, half-duplex slave
protocol)
Application 1: Connecting
a Computer to Data Highway
Plus
When you connect a computer or other intelligent RS-232-C device to
Data Highway Plus (figure 5.1), you select the local mode option and
either full- or half-duplex protocol. Refer to Chapter 3 for more
information on setting the 1785-KE option switches.
Figure 5.1
Connecting a Computer to Data Highway Plus
Chapter 5
Communicating Through the
1785KE Module
The computer is attached to the Data Highway Plus via the RS-232-C
connection to the 1785-KE. In this configuration, the computer assumes
the address of the 1785-KE on the Data Highway Plus, i.e., the computer
and 1785-KE are addressed as a single node on the Data Highway Plus. As
a result, messages sent from other nodes on the Data Highway Plus to the
computer will use the address of the 1785-KE as the destination address.
Messages sent from the computer to other nodes on the Data Highway Plus
will use the address of the 1785-KE as the source node address.
The following example will use the system of figure 5.1 to illustrate
commands initiated by the computer to PLC-5 051. The full duplex
protocol is used in the examples.
You may wish to refer to Appendix D, “Interprocessor Addressing”, for
further background information on communicating from a computer to a
PLC-5.
Computer to PLC5
In this example, we show the computer sending the following commands
to the PLC-5:
PLC-2 read and write commands
PLC-3 read and write commands
We display the command formats that are sent over the RS-232-C link as
they would appear on a line monitor placed between the computer and its
1785-KE Data Highway Plus module (all line monitor printouts are shown
in hex). Full-duplex protocol is used.
In this example:
computer (1785-KE) node address 040 (octal) = 020 (hex)
PLC-5 node address: 051 (octal) = 029 (hex)
Important: If the computer sends a PLC-2 type command to the PLC-5,
then the PLC-5 must create a PLC-2 compatibility file number 32
[computer node address 040 (octal) = 032 (decimal)]. This file must look
like a PLC-2 data table to the computer.
If the computer sends a PLC-3 type command with a four-level extended
address to the PLC-5, the command will be able to access any file in the
PLC-5 data table.
5–2
Chapter 5
Communicating Through the
1785KE Module
For information on creating an RS-232-C asynchronous link driver for
your computer, refer to the Data Highway/Data Highway Plus Protocol and
Command Set Reference Manual (publication 1770-6.5.16).
PLC2 Normal Unprotected Write
This example writes 4 words (8 bytes) of data to the PLC-5’s PLC-2
compatibility file (file 32), word locations 20 through 23. The following
paragraphs show line monitor examples for this command:
1. Computer sends command to the 1785-KE:
DLE
STX
DST
SRC
CMD
STS
TNS
TNS
ADR
ADR
------------DATA-------------
DLE
ETX
BCC
10
02
29
20
08
00
44
01
28
00
22 11 44 33 66 55 88 77
10
03
DE
2. 1785-KE responds to computer:
DLE
ACK
10
06
3. 1785-KE sends command to the PLC-5:
The 1785-KE sends the command onto Data Highway Plus and the PLC-5 node at address 51 (octal).
4. PLC-5 sends the reply to the 1785-KE:
The PLC-5 receives the command, executes the command, formats a reply, and sends the reply back to the
1785-KE.
5. 1785-KE sends the PLC-5 reply back to the computer:
DLE
STX
DST
SRC
CMD
STS
TNS
TNS
DLE
ETX
BCC
10
02
20
29
48
00
44
01
10
03
2A
6. Computer responds to the 1785-KE.
DLE
ACK
10
06
5–3
Chapter 5
Communicating Through the
1785KE Module
PLC2 Normal Unprotected Read
This example reads the 4 words (8 bytes) of data that you sent with the
PLC-2 Normal Unprotected Write command in the previous example. The
following paragraphs show line monitor examples for this command:
1. Computer sends command to the 1785-KE:
DLE
STX
DST
SRC
CMD
STS
TNS
TNS
ADR
ADR
SIZE
DLE
ETX
BCC
10
02
29
20
01
00
45
01
28
00
08
10
03
40
2. 1785-KE responds to computer:
DLE
ACK
10
06
3. 1785-KE sends command to the PLC-5:
The 1785-KE sends the command onto Data Highway Plus and the PLC-5 node at address 51 (octal).
4. PLC-5 sends the reply to the 1785-KE:
The PLC-5 receives the command, executes the command, formats a reply, and sends the reply back to the 1785-KE.
5. 1785-KE sends the PLC-5 reply back to the computer:
DLE
STX
DST
SRC
CMD
STS
TNS
TNS--------------DATA-------------
10
02
20
29
41
00
45
01
6. Computer responds to the 1785-KE.
DLE
ACK
10
06
5–4
22
11
DLE
44 33 66 55 88
ETX
77 10
BCC
03
CC
Chapter 5
Communicating Through the
1785KE Module
PLC3 Normal Unprotected Write (Word Range Write)
This example writes 4 words (8 bytes) of data to the PLC-5 address 51
(octal) integer file 10, word locations 15 through 18. When you send a
PLC-3 command to a PLC-5, the command can only have a four-level
address. In this example, the address is in logical binary form. The
following paragraphs show line monitor examples for this command:
1. Computer sends command to the 1785-KE:
DLE STX DST SRC CMD STS TNS TNS FNC PO
PO
TT
TT
|------------ADDRESS------------| |-------------DATA-------------| DLE ETX BCC
10
00
04
00
0F
02
29
20
0F
00
46
01
00
00
00
0A
0F
00
22 11 44 33 66 55 88 77 10
03
D1
2. 1785-KE responds to computer:
DLE
ACK
10
06
3. 1785-KE sends command to the PLC-5:
The 1785-KE sends the command onto Data Highway Plus and the PLC-5 node at address 51 (octal).
4. PLC-5 sends the reply to the 1785-KE:
The PLC-5 receives the command, executes the command, formats a reply, and sends the reply back to the 1785-KE.
5. 1785-KE sends the PLC-5 reply back to the computer:
DLE
STX
DST
SRC
CMD
STS
TNS
TNS
DLE
ETX
BCC
10
02
20
29
4F
00
46
01
10
03
21
6. Computer responds to the 1785-KE.
DLE
ACK
10
D6
5–5
Chapter 5
Communicating Through the
1785KE Module
PLC3 Normal Unprotected Read (Word Range Read)
This example reads the 4 words (8 bytes) of data that you sent with the
PLC-3 Word Range Write command in the previous example. When you
send a PLC-3 command to a PLC-5, the command can only have a
four-level address. In this example, the address is in logical ASCII form.
The following paragraphs show line monitor examples for this command:
1. Computer sends command to the 1785-KE:
----------------------ADDRESS---------------------DLE STX DST SRC CMDSTS TNS TNS FNC PO
PO
TT
TT
NL
$
N
1
0
:
1
5
NL
SIZE
DLE ETX BCC
10
00
04
00
00
24
4E
31
30
3A
31
35
00
08
10
02
29
20
0F
00
47
01
01
00
03
E0
2. 1785-KE responds to computer:
DLE
ACK
10
06
3. 1785-KE sends command to the PLC-5:
The 1785-KE sends the command onto Data Highway Plus and the PLC-5 node at address 51 (octal).
4. PLC-5 sends the reply to the 1785-KE:
The PLC-5 receives the command, executes the command, formats a reply, and sends the reply back to the 1785-KE.
5. 1785-KE sends the PLC-5 reply back to the computer:
DLE
STX
DST
SRC
CMD
STS
TNS
TNS------------DATA-----------
10
02
20
29
4F
00
47
01 22 11 44 33 66 55 88 77 10
6. Computer responds to the 1785-KE.
OLE
ACK
10
06
5–6
DLE
ETX
BCC
03
BC
Chapter 5
Communicating Through the
1785KE Module
Application 2:
Communicating Between Two
Data Highway Plus Networks
Figure 5.2 shows application involving communication between two Data
Highway Plus networks through a full-duplex link between two Series B
1785-KE modules.
Figure 5.2
Connecting Two Data Highway Plus Networks
5–7
Chapter 5
Communicating Through the
1785KE Module
When using a 1785-KE in this application, it should be set for Remote
mode by setting the Remote/Local option switch (refer to Chapter 3).
When in Remote mode, the Series B 1785-KE module allows any PLC on
one of the Data Highway Plus networks to talk to any PLC on the other
Data Highway Plus network. This is made possible because the Series B
module supports the Data Highway Plus remote addressing capability.
With remote addressing, the local 1785-KE (node address 013 on Data
Highway Plus #1) can be addressed separately from the final destination
PLC-5 (node address 012 on Data Highway #2). There are no additional
restrictions on what the addresses can be when using the Series B 1785-KE
to connect two Data Highway Plus networks.
In the following examples, we send PLC-5 read and write commands from
a PLC-5 on Data Highway Plus #1 (node address 010) to a PLC-5 on Data
Highway Plus #2 (node address 012).
PLC5 Write Commands
This example message instruction writes eight words from the local PLC-5
(node 010) integer file 7, word locations 0 through 7, to the remote PLC-5
(node 012) integer file 7, word locations 0 to 7.
Program a message (MSG) instruction with the parameters shown below.
Also, you must set up the message instruction for continuous mode by
toggling bit N 10:20/11 to ON.
MESSAGE INSTRUCTION DATA MONITOR FOR CONTROL BLOCK N10:20
Read/Write:
PLC5 Data Table Address:
Size in Elements:
Local/Remote:
Remote Station:
Link ID
Remote Link Type:
Local Node Address:
Processor Type:
Destination Data Table Address:
WRITE
N7:0
8
REMOTE
012
00
DATA HIGHWAY
13
PLC5
N7:0
ignore if timedout:
to be retried:
awaiting execution:
continuous:
error:
message done:
message transmitting:
message enabled:
0 TO
0 NR
0 EW
1 CO
0 ER
0 DN
1 ST
1 EN
control bit addr: N10:20/11
ERROR CODE: 0
Press a key for desired function, or <ESC> or <RETURN> to exit monitor.
[
RUN
no forces
decimal data
decimal addr
PLC5
SIZE IN
TOGGLE
ELEMNTS
BIT
F3
F9
5–8
Addr 10
Chapter 5
Communicating Through the
1785KE Module
PLC5 Read Commands
This example message instruction reads the eight words that were written
to the remote PLC-5 (node 012) in the last example. The instruction stores
these words in the integer file 7, word locations 10 through 17, of the local
PLC-5 (node 010).
Program a message (MSG) instruction with the parameters shown below.
Also, you must set up the message instruction for continuous mode by
toggling bit N 10:0/11 to ON.
MESSAGE INSTRUCTION DATA MONITOR FOR CONTROL BLOCK N10:0
Read/Write:
PLC5 Data Table Address:
Size in Elements:
Local/Remote:
Remote Station:
Link ID
Remote Link Type:
Local Node Address:
Processor Type:
Destination Data Table Address:
READ
N7:0
8
REMOTE
012
00
DATA HIGHWAY
13
PLC5
N7:0
ignore if timedout:
to be retried:
awaiting execution:
continuous:
error:
message done:
message transmitting:
message enabled:
0 TO
0 NR
0 EW
1 CO
0 ER
0 DN
1 ST
1 EN
control bit addr: N10:0/8
ERROR CODE: 0
Press a key for desired function, or <ESC> or <RETURN> to exit monitor.
[
RUN
no forces
decimal data
decimal addr
PLC5
SIZE IN
TOGGLE
ELEMNTS
BIT
F3
F9
Addr 10
5–9
Chapter 5
Communicating Through the
1785KE Module
Program Verification
To verify that the example programs above are executing properly, follow
these steps:
1.
Look at the local PLC-5 (node 10 octal) file contents of integer file 7
by typing:
<DISPLAY MONITOR> N7:0
2.
Change any value in word locations 0 through 7 in this file.
3.
The values appearing in word locations 10 through 17 should be the
same as the values in word locations 0 through 7.
Important: These PLC-5 to PLC-5 examples are for testing only.
Toggling the continuous bit to ON generates high network traffic which, in
most cases, is not necessary.
5–10
Chapter 5
Communicating Through the
1785KE Module
Application 3: Multidrop
Applications With the
1785_KE Series B
This section focuses on examples that use a 1771-KGM PLC-2 master
which interfaces over an RS-232-C multidrop to PLC-5s used as slaves.
If you are writing your own master driver or need more information on
Allen-Bradley half-duplex protocol, refer to the Data Highway/Data
Highway Plus Protocol and Command Set Reference Manual (publication
1770-6.5.16).
The examples in this section discuss message transfers as they occur with a
PLC-5 using a 1785-KE Series B.
The 1785-KE acts as a slave on the multidrop and listens for messages
addressed to a PLC-5 on its Data Highway Plus link. Thus, the master can
send a message addressed directly to a PLC-5 and the 1785-KE will hear
the message and pass it through. Therefore, you can use the same network
addressing for PLC5/1785-KE slave nodes as for PLC-2/1771-KG slave
nodes.
Figure 5.3 below will be used for the examples of this section. Note that a
PLC-2/1771-KG (#012) is shown as a slave in the figure to illustrate the
fact that the 1785-KE Series B allows both PLC-5’s and PLC-2’s to be
addressed identically on the multidrop.
Figure 5.3
Using the 1785KE Series B on a Multidrop
5–11
Chapter 5
Communicating Through the
1785KE Module
Note: When using the 1785-KE in this application, you must set each
slave 1785-KE to Remote Mode by correctly setting the Local/Remote
Option switch (see Chapter 3 for details).
You may wish to refer to Appendix D “Interprocessor Addressing” for
more background information on addressing PLC-5’s from PLC-2’s.
Setting the 1785-KE’s Node Address
When used in a RS-232 multidrop application, the 1785-KE has each of
the following:
a Data Highway Plus address on the Data Highway Plus link
a slave node address on the master-slave multidrop network
A single 1785-KE node address, used on both links, is selected by setting
the appropriate switches on Switch Assembly SW-2 (see Chapter 3 for
details on setting option switches).
The valid range of slave addresses on the multidrop network is 001-376
octal (010-077 and 110-376 octal when a 1771-KGM is used as the
master). The valid range of addresses on Data Highway Plus is 00-77 octal.
Figure 5.4 below shows Switch Assembly SW-2
Figure 5.4
5–12
Chapter 5
Communicating Through the
1785KE Module
Note from the figure that three octal digits are available: Octal Digit 0,
Octal Digit 1, and Octal Digit 2.
Use Octal Digits 1 and 2 to set the 1785-KE’s Data Highway Plus address
from 00-77. These digits also set the lower two digits of the 1785-KE’s
address on the multidrop network.
Octal Digit 0 is an multidrop address expansion digit. It sets the most
significant (highest) digit of the 1785-KE multidrop address. If your
multidrop network only requires addresses 000-077 octal, you can set this
digit to 00 (switch position DOWN DOWN). If you need to use addresses
higher than 000-077 you will need to set this digit to 1 2 or 3. See Using
the Multidrop Address Expansion Digit later in this chapter for more
information on setting this digit.
Example 1: Master to Slave
Communication
In this example, we send a message from the master (1771-KGM/PLC-2)
at multidrop address 014 (octal), through the 1785-KE at address 021
(octal), to the PLC-5 with Data Highway Plus address 011 (octal).
The master sends the message to the PLC-5 address 011 (octal). The
1785-KE recognizes the address as one of the addresses on the Data
Highway Plus link and passes the message through to address 011. The
PLC-5 executes the command, processes a reply to the master, and returns
the reply to the 1785-KE. Later, when the master polls for address 011, the
1785-KE returns the response from address 011.
In this communication, the 1785-KE is transparent to the master. The
master is polling and sending messages only to the PLC-5 at address 011.
The following example shows the PLC-2 program to send a command
from the PLC-2/1771-KGM master at address 014 (octal), through the
1785-KE, to the PLC-5 at Data Highway Plus address 011 (octal).
Important: Since the PLC-5 is communicating with a PLC-2, the PLC-5
must have a file set up to look like a PLC-2 data table. The PLC-5 file
must be the decimal equivalent of the PLC-2/1771-KGM node address.
Since the PLC-2/1771-KGM is at address 014 (octal), the PLC-5 must
create file 012 (0148 = 01210 )to communicate with the PLC-2.
5–13
Chapter 5
Communicating Through the
1785KE Module
PLC-2 Program Example
Rungs 8 through 11 are timer values to write to and then read from the
PLC-5.
5–14
Chapter 5
Communicating Through the
1785KE Module
The following table summarizes the purpose of each rung in the example.
For more information on 1771-KGM master programming, refer to the
1771-KGM User’s Manual (publication 1771-6.5.39).
Rung:
What It Does:
1
communication one header rung the timeout preset code (the third GET
statement) may need to be increased depending on your RS232C link
characteristics.
2
configuration rung defines the nodes to be polled by the 1771KGM. The
1771KGM's address (014) must be included in the polling range. Note that the
PLC5's addresses are used in the polling range. (The 1785KE's are
transparent to the 1771KGM and are not included in the polling range).
3
command rung normal PLC2 Unprotected Write to PLC5 node 011 (octal).
The values in the timer accumulators 040 through 043 (octal) will be written into
PLC5 file 12 (decimal) element locations 8 through 11 (decimal).
4
command rung normal PLC2 Unprotected Read to PLC5 node 11 (octal).
The values from the timer accumulators that were written to the PLC5 file 012
(decimal) element locations 8 through 11 (decimal) will be read into word
locations 044 through 047 (octal) in the PLC2.
5
communication zone delimiter rung
6
This rung continuously cycles the command start bit for the normal Unprotected
Write command.
7
This rung continuously cycles the command start bit for the normal Unprotected
Read command.
8
timer 040 (octal)
9
timer 041 (octal)
10
timer 042 (octal)
11
timer 043 (octal)
12
This rung displays the four timer accumulator values that are written to the
PLC.5.
13
This rung displays the four timer accumulator values that are read from the
PLC5.
To verify that the PLC-2 test program is executing properly, check the
timer accumulator values in rungs 11 and 12. You should see the timer
values in word locations 040 through 043 (octal) appear in word locations
044 through 047 (octal).
5–15
Chapter 5
Communicating Through the
1785KE Module
Example 2: Slave to Master
Communication
In this example, we send a message from the PLC-5 with Data Highway
Plus address 011 (octal), through the 1785-KE at address 021 (octal), to the
master (1771-KGM/PLC-2) at multidrop address 014 (octal).
In this case, the PLC-5 sends the command to:
local destination: address 021
remote destination: address 014
The command remains in the 1785-KE (address 021) buffer until the
master polls address 011. The 1785-KE recognizes address 011 as a PLC-5
on its Data Highway Plus link and sends the command to the master. When
the master finishes processing the reply, it sends it to the PLC-5 through
the 1785-KE. The 1785-KE is transparent to the master.
The following examples show the T50 message instructions necessary to
send PLC-2 Unprotected Read and Unprotected Write commands from the
PLC-5 (address 011 octal) to the master (address 014 octal) through the
1785-KE.
PLC2 Unprotected Write
This example writes eight words from integer file 7, word locations 0
through 7, to the PLC-2/1771-KGM master node (014 octal), data table
words 050 through 057 (octal).
Program a message (MSG) instruction with the parameters shown below.
Also, you must set up the message instruction for continuous mode by
toggling N30:0/11 to ON.
MESSAGE INSTRUCTION DATA MONITOR FOR CONTROL BLOCK N30:0
Read/Write:
PLC5 Data Table Address:
Size in Elements:
Local/Remote:
Remote Station:
Link ID
Remote Link Type:
Local Node Address:
Processor Type:
Destination Data Table Address:
WRITE
N7:0
8
REMOTE
014
00
DATA HIGHWAY
21
PLC2
050
ignore if timedout:
to be retried:
awaiting execution:
continuous:
error:
message done:
message transmitting:
message enabled:
0 TO
0 NR
0 EW
1 CO
0 ER
0 DN
1 ST
1 EN
control bit addr: N30:0/8
ERROR CODE: 0
Press a key for desired function, or <ESC> or <RETURN> to exit monitor.
[
RUN
no forces
decimal data
decimal addr
PLC5
SIZE IN
TOGGLE
ELEMNTS
BIT
F3
F9
5–16
Addr 11
Chapter 5
Communicating Through the
1785KE Module
PLC2 Unprotected Read
This example reads the eight words that were written to the PLC-2 data
table with the last example. This example stores the data in integer file 7,
word locations 10 to 17.
Program a message (MSG) instruction with the parameters shown below.
Also, you must set up the message instruction for continuous mode by
toggling bit N30:20/11 to ON.
MESSAGE INSTRUCTION DATA MONITOR FOR CONTROL BLOCK N30:20
Read/Write:
PLC5 Data Table Address:
Size in Elements:
Local/Remote:
Remote Station:
Link ID
Remote Link Type:
Local Node Address:
Processor Type:
Destination Data Table Address:
READ
N7:10
8
REMOTE
014
00
DATA HIGHWAY
21
PLC2
050
ignore if timedout:
to be retried:
awaiting execution:
continuous:
error:
message done:
message transmitting:
message enabled:
0 TO
0 NR
0 EW
1 CO
0 ER
0 DN
1 ST
1 EN
control bit addr: N30:20/11
ERROR CODE: 0
Press a key for desired function, or <ESC> or <RETURN> to exit monitor.
[
RUN
no forces
decimal data
decimal addr
PLC5
SIZE IN
TOGGLE
ELEMNTS
BIT
F3
F9
Addr 11
5–17
Chapter 5
Communicating Through the
1785KE Module
Program Verification
To verify that the example programs above are executing properly, follow
these steps:
1.
Look at the PLC-5 file contents of integer file 7 by typing:
<DISPLAY MONITOR> N7:0
2.
Change any value in word locations 0 through 7 in this file.
3.
These values in word locations 10 through 17 should be the same as
the values in word locations 0 through 7.
Important: These PLC-5 slave to PLC-2 master example is for testing
only. Toggling the continuous bit to ON generates high network traffic
which, in most cases, is not necessary.
Example 3: Slave to Slave
Communication
In this example, we send a message from the PLC-5 with Data Highway
Plus address 013 (octal), to the PLC-5 at Data Highway Plus address 011
(octal).
In this case, the PLC-5 sends the command to:
local destination: address 023
remote destination: address 011
The command remains in the 1785-KE (address 023) buffer until the
master polls address 013. The 1785-KE recognizes address 013 as an
address on the Data Highway Plus link and sends the command to the
master. The master sees that the destination address (011) is not its own
address and immediately retransmits the message onto the multidrop link.
The 1785-KE at address 021 recognizes address 011 and passes the
command through to the PLC-5 at that address. The PLC-5 at address 011
then executes the command, generates a reply, and sends it to the 1785-KE
at address 021. The 1785-KE buffers the message and awaits a poll for
address 011 from the master. The master then forwards the reply to the
PLC-5 at address 013.
Both 1785-KE modules are transparent to the master.
5–18
Chapter 5
Communicating Through the
1785KE Module
The following examples show the T50 message instructions necessary to
send PLC-5 Read and Write commands from the PLC-5 (address 013
octal) to the PLC-5 (address 011 octal) through the 1785-KE modules.
PLC2 Unprotected Write
This example writes eight words from the local PLC-5 (address 013 octal)
integer file 7, word locations 0 through 7, to the remote PLC-5 (address
011 octal) integer file 7 word locations 0 through 7.
Program a message (MSG) instruction with the parameters shown below.
Also, you must set up the message instruction for continuous mode be
toggling bit N30:0/11 to ON.
MESSAGE INSTRUCTION DATA MONITOR FOR CONTROL BLOCK N10:20
Read/Write:
PLC5 Data Table Address:
Size in Elements:
Local/Remote:
Remote Station:
Link ID
Remote Link Type:
Local Node Address:
Processor Type:
Destination Data Table Address:
WRITE
N7:0
8
REMOTE
011
00
DATA HIGHWAY
23
PLC2
N7:0
ignore if timedout:
to be retried:
awaiting execution:
continuous:
error:
message done:
message transmitting:
message enabled:
0 TO
0 NR
0 EW
1 CO
0 ER
0 DN
1 ST
1 EN
control bit addr: N10:20/11
ERROR CODE: 0
Press a key for desired function, or <ESC> or <RETURN> to exit monitor.
[
RUN
no forces
decimal data
decimal addr
PLC5
SIZE IN
TOGGLE
ELEMNTS
BIT
F3
F9
Addr 11
5–19
Chapter 5
Communicating Through the
1785KE Module
Read Command
This example reads the eight words that were written to the remote PLC-5
(address 011 octal) in the last example. The instruction stores the data in
the local PLC-5 (address 013 octal) integer file 7, word locations 10
through 17.
Program a message (MSG) instruction with the parameters shown below.
Also, you must set up the message instruction for continuous mode by
toggling bit N30:20/11 to ON.
MESSAGE INSTRUCTION DATA MONITOR FOR CONTROL BLOCK N10:20
Read/Write:
PLC5 Data Table Address:
Size in Elements:
Local/Remote:
Remote Station:
Link ID
Remote Link Type:
Local Node Address:
Processor Type:
Destination Data Table Address:
WRITE
N7:0
8
REMOTE
011
00
DATA HIGHWAY
23
PLC5
N7:0
ignore if timedout:
to be retried:
awaiting execution:
continuous:
error:
message done:
message transmitting:
message enabled:
0 TO
0 NR
0 EW
1 CO
0 ER
0 DN
1 ST
1 EN
control bit addr: N10:20/11
ERROR CODE: 0
Press a key for desired function, or <ESC> or <RETURN> to exit monitor.
[
RUN
no forces
decimal data
decimal addr
PLC5
SIZE IN
TOGGLE
ELEMNTS
BIT
F3
F9
5–20
Addr 11
Chapter 5
Communicating Through the
1785KE Module
Program Verification
To verify that the example programs above are executing properly, follow
these steps:
1.
Look at the PLC-5 (node 51 octal) file contents of integer file 7 by
typing:
<DISPLAY MONITOR> N7:0
2.
Change any value in word locations 0 through 7 in this file.
3.
These values in word locations 10 through 17 should be the same as
the values in word locations 0 through 7.
Important: These PLC5 to PLC5 examples are for testing only. Toggling
the continuous bit to ON generates high network traffic which, in most
cases, is not necessary.
Polling More Than One PLC5 on a Data Highway Plus
Since the 1785-KE Series B is transparent to the master, remote PLC-5’s
can be polled as individual slaves whether there is one or multiple PLC-5’s
attached to a given 1785-KE. As a result, PLC-5’s on a remote DH + can
be polled as though they were individual slave stations. Figure 5.5
illustrates this application.
Figure 5.5
5–21
Chapter 5
Communicating Through the
1785KE Module
Using the Multidrop Expansion Digit
As mentioned earlier, the valid range of slave addresses on the multidrop
network is 001-376 octal (010-077 and 110-376 octal when a 1771-KGM
is used as the master). The valid range of addresses on Data Highway Plus
is 00-77 octal.
Figure 5.6
Switch Assembly SW2
Octal Digit 0
Multidrop Address Expansion Digit
To set Octal
Digit 1 to:
Set switches 1 - 2
No.1
No.2
0
DWN (ON)
DWN (ON)
1
DWN (ON)
UP (OFF)
2
UP (OFF)
DWN (ON)
3
UP (OFF)
UP (OFF)
Important: The 1785-KE Series B uses the convention DOWN (ON)
= Binary 0, and UP (OFF) = Binary 1.
Note from the figure that three octal digits are available: Octal Digit 0,
Octal Digit 1, and Octal Digit 2.
5–22
Chapter 5
Communicating Through the
1785KE Module
Use Octal Digits 1 and 2 to set the 1785-KE’s Data Highway Plus address
from 00-77. These digits also set the lower two digits of the 1785-KE’s
address on the multidrop network.
Octal Digit 0 is a multidrop address expansion digit. It sets the most
significant (highest) digit of the 1785-KE multidrop address. If you need to
use multidrop addresses higher than 000-077, you will need to set this digit
to 1, 2, or 3.
Figure 5.7 below shows an example of using this digit.
Figure 5.7
5–23
Chapter 5
Communicating Through the
1785KE Module
As you can see from the figure, the value of Digit 0 determines both the
address of the 1785-KE on the multidrop. This allows you to expand the
total number of 1785-KE and PLC-5 addresses on the multidrop beyond
the 00-77 (octal) limitation of DH+.
The figure shows that all of the 1785-KE’s have address 21 octal on their
respective DH+ networks. The PLC’s have addresses of 11 and 12 on their
DH+ networks. By setting Digit 0, you change the address as seen by
nodes on the multidrop as follows:
5–24
Value of Octal
Digit 0
Address on DH +
Address on Multidrop
0
1785KE: 21
PLC5:11
PLC5:12
1785KE: 021
PLC5: 011
PLC5: 012
1
1785KE: 21
PLC5: 11
PLC5: 12
1785KE: 121
PLC5:111
PLC5:112
2
1785KE: 21
PLC5:11
PLC5:12
1785KE: 221
PLC5: 211
PLC5: 212
3
1785KE: 21
PLC5: 11
PLC5: 12
1785KE: 321
PLC5: 311
PLC5:312
Chapter 6
1785KE Diagnostic Tools
Chapter Objectives
In this chapter, we provide:
descriptions of the LED indicators on the front panel of the 1785-KE
a list of 1785-KE diagnostic counters and a description of what they
contain
For information on error codes and and the diagnostic indicators of other
Data Highway Plus and Data Highway modules, refer to the Data
Highway/Data Highway Plus Protocol and Command Set Reference
Manual (publication 1770-6.5.16).
Using the LED Indicators
There are 5 LED indicators on the front panel of the 1785-KE module
(figure 6.1). These indicators can help you in diagnosing problems with the
module’s installation and operation.
Figure 6.1
The LED Indicators
Chapter 6
1785KE Diagnostic Tools
The following table contains the meaning of each LED on the front panel
of the 1785-KE.
This LED:
Lights:
XMTG
when the 1785KE module is passing the token. transmitting a
command, or transmitting a reply message on Data Highway Plus.
RCVG
when the module is receiving a command or reply message from
another node on Data Highway Plus.
RDY
when the module has a message stored in its transmit buffer and
it is waiting to acquire the token so it can transmit
ACTV
stays lit when the cable between the COMPUTER (RS232C)
connector and the interfacing RS232C device is properly
connected. This light will appear to flicker whenever characters
are being transmitted across the RS232C link. If this light goes
off, check the cable and connectors for possible problems.
Note: This ACTV LED is hardware (not software) driven.
ERROR
At power up, this light flashes if the power up tests (integrity
checks of internal memory, timers, and firmware) fail.
After power up:
G this light flashes for approximately half a second every time the
module transmits or receives a DLE NAK protocol sequence on
the RS232C link. If this light flickers frequently or stays on, the
RS232C link might need better isolation or noise immunity.
G flashes at approximately 1 Hz when a duplicate node (two
nodes with the same node number) is detected on the Data
Highway Plus link
G comes on and stays lit when an internal hardware fault is
detected
If the RCVG LED remains lit and the XMIT LED appears to flicker, then
the module is passing the token or sending messages.
6–2
Chapter 6
1785KE Diagnostic Tools
The 1785KE Diagnostic
Counters
The following sections tell you:
what a diagnostic counter is
how to read diagnostic counters
what types of information the 1785-KE counters contain
What is a Diagnostic Counter?
A diagnostic counter records an event of interest for debugging the module
and for longer term reliability analysis.
The diagnostic counters occupy a block of the module’s internal scratch
RAM. Most are single byte counters that wrap around to zero when they
overflow.
These counters provide a useful tool for diagnosing problems.
How to Read Diagnostic Counters
To read diagnostic counters, you must issue a Diagnostic Read command.
This command can only be sent from a device:
connected to a Data Highway Plus module that supports an
asynchronous port
that can format the diagnostic commands
Therefore, a PLC user program is unable to initiate a Diagnostic Read
command.
Important: The location of the diagnostic counters in a Data Highway
Plus module varies:
from module to module
between revision levels of the same type module
You must first request the location of these counters by transmitting a
Diagnostic Status command to the module. Based on the address returned,
you can use the number of the counters which follow as an offset to
calculate:
the location of a particular counter
how many counter values you want returned
6–3
Chapter 6
1785KE Diagnostic Tools
You can then use this information to format a Diagnostic Read command.
The reply from the Diagnostic Read command will contain the data stored
in the counters.
For more information on the Diagnostic Status and Diagnostic Read
commands, refer to the Data Highway/Data Highway Plus Protocol and
Command Set Reference Manual (publication 1770-6.5.16).
1785KE Data Highway Plus Diagnostic Counters
The 1785-KE stores 29 diagnostic counters in a total of 35 bytes. The
following table contains a list of 1785-KE Data Highway Plus diagnostic
counter bytes and what they contain.
Counter Byte:
6–4
What the Counter Contains:
0
received ACK with bad CRC
1
timeout expired with no ACK received
2
transmit retries exhausted
3
NAK/illegal protocol operation received
4
NAK/bad LSAP received
5
NAK/no memory received
6
received ACK/NAK too short
7
received ACK/NAK too long
8
something other than an ACK/NAK received
9
token pass timeout
10
token pass retries exhausted
11
claim token sequence entered
12
token claimed
13
bad CRC in received frame
14
NAK/ illegal protocol operation sent
15
NAK/bad LSAP sent
16
NAK/no memory sent
17
received frame too small
18
received frame too long
19
received a retransmission of a frame
20
received frame aborted (line noise)
21, 22
message successfully sent (low byte first)
23, 24
message successfully received (low byte first)
25, 26
command successfully sent (low byte first)
27, 28
reply successfully received (low byte first)
29, 30
command successfully received (low byte first)
31, 32
reply successfully sent (low byte first)
33
reply could not be sent
34
number of active nodes
Chapter 6
1785KE Diagnostic Tools
Counter Byte:
What the Counter Contains:
35
count of messages attempted
36, 37
count of messages sent and ACKed
38, 39
count of ACKs received
40, 41
count of ACKs passed from RX to TX
42
count of NAKs received
43
count of NAKs passed from RX to TX
44
count of timeouts waiting for a response
45
count of ENQ's sent
46
count of messages that could not be sent
47
count of replies that could not be forwarded
48
count of messages received
49, 50
count of ACKs sent
51, 52
count of NAKs sent
53
count of ENQs received
54
count of retransmissions received and ACKed
55
count of STX (or SOH) received
56
count of messages ignored
57
count of messages aborted by DLE ENQ
58
count of messages aborted by control code other than ENQ
59
count of ACKs but no memory for next message
60
count of NAKs sent because of no memory
61
count of broadcasts received
62
count of broadcasts received successfully
63
count of messages not for this station
64
count of EOTs sent
65
count of calls received
66
count of times before phone hung up
67
count of times DCD lost
68
count of hangups due to DCD timeout
6–5
Appendix A
Specifications
Communication Rates
Data Highway Plus: 57,600 bits per second
RS-232-C Port: Switch selectable from 110 to 19200 bits/sec
Functions
Interface a programmable RS-232-C compatible device with an
Allen-Bradley Data Highway Plus network
Location
1771 I/O Rack
Communicating Ports
Data Highway Plus: 3-screw terminal block
1784-T50 Terminal: 9-pin male EIA D-shell connector
Asynchronous (RS-232-C): 15-pin female EIA D-shell connector
Cabling
Asynchronous RS-232-C: Data Terminal Interface Cable (cat. no.
1770-CG or equivalent) or Modem Interface Cable (cat. no. 1770-CP or
equivalent)
Data Highway Plus: User-supplied Data Highway Plus dropline cable
(Belden 9463)
Power Requirements
1.2A @ 5VDC
Ambient Temperature Rating
32°F to 140°F (0°C to 60°C) operational
-40°F to 185°F (-40°C to 85°C) storage Ambient Humidity Rating
Ambient Humidity Rating
5% to 95% noncondensing
Appendix B
Definitions of RS232C
Handshaking Signals
The table below gives definitions for each signal:
Signal:
What it Does:
TXD
transmitted
data
carries serialized data. It is an output from the module.
RXD received
data
is serialized data input to the module. RXD and RXDRET are isolated
from the rest of the circuitry on the modules.
RTS request to
send
is a request from the module to the modem to prepare to transmit.
RTS is always ON with full-duplex protocol. It typically turns the data
carrier on. With half-duplex protocol, RTS is turned ON when the
module has a message to transmit. Otherwise, RTS is OFF.
CTS clear to
send
is a signal from the modem to the module that indicates the carrier is
stable and the modem is ready to transmit. The module will not
transmit until CTS is on. If CTS is turned off during transmission, the
module will stop transmitting until CTS is restored.
DTR data
terminal ready
is a signal from the 1785-KE module to the modem to indicate that the
module is operational and ready for communication. The module will
continually assert DTR (except during an auto-answer application
such as the one discussed in Chapter 4.)
In auto answer applications, DTR is a signal from the module to the
modem to connect to the phone line (i.e., "pick up the phone"). The
module will assert DTR all the time except during the phone hangup
sequence. Modems built to American standards will not respond to
DTR until the phone rings. Some European modems will always pick
up the phone, whether it is ringing or not. The 1785-KE module will
not work with these types of European modems.
DSR data set
ready
is a signal from the modem to the 1785-KE module to indicate that the
modem is operational and ready for communication. If the 1785-KE
module is in half-duplex mode, or in full-duplex mode with
handshaking enabled (via the SW-1 switch selection discussed in
Chapter 3), the 1785-KE requires the DSR signal to communicate.
The module will not transmit or receive unless DSR is on. This signal
is typically continually asserted by the modem (except during an
auto-answer application such as the one discussed in Chapter 4.
If the modem does not properly control DSR, or if no modem is used,
DSR must be jumpered to a high signal at the module's RS-232-C
connector. Since DTR is held high by the module, DSR can be
jumpered to DTR.
In auto-answer applications, DSR is a signal from the modem to the
module that the phone is off-hook. (It is the modems answer to DTR).
Appendix B
Definitions of RS232C
Handshaking Signals
Signal:
What it Does:
DCD data
carrier detect
is a signal from the modem to the module to indicate that the carrier
from another modem is being sensed on the link. If the 1785KE
module is in halfduplex mode, or in fullduplex mode with
handshaking enabled (via the SW1 switch selection discussed in
Chapter 3). the 1785KE requires the DCD signal to communicate.
modem does not properly control DCd, or if a modem is not being
used, DCD can be jumpered to DTR at the module.
In autoanswer applications, DCD should not be asserted unless the
phone is offhook.
B–2
TXDRET
transmifted
data return
is the return signal for TXD. It is connected to module logic ground
through a resistor. It does not conform to RS-232-C specifications.
RXDRET
received data
return
is the return signal for RXD. It is connected to the isolated receiver
and is isolated from all other circuitry on the module. It does not
conform to RS232C specifications.
Appendix C
Using a Series A 1785KE Module
Appendix Objectives
The Series A version of the 1785-KE has the following differences from
Series B:
limited communication applications
different option switches
different front cover and connectors
The following sections describe the differences for each of these areas.
Replacing a Series A Module
with a Series B Module
The Series A module operates like a Series B module in local mode.
If you are replacing a Series A 1785-KE with a Series B and want the
operation to be compatible with your Series A module, set the
Local/Remote switch on the Series B module to Local. Refer to Chapter 3
for more information.
Appendix C
Using a Series A 1785KE Module
Setting the Communication
Option Switch
The Series A module has 6 switch assemblies (figure C.1 that enable you
to select various communication options. The switch assemblies and their
corresponding options are:
Select this switch assembly:
For this communication option:
SW1
RS232C link features
SW2
not used (switches must be OFF)
SW3, SW4
node number
SW5
network link communication rate
SW6
RS232C link communication rate and parity
Figure C.1
Location of the Assemblies on the Series A 1785KE Module
C–2
Appendix C
Using a Series A 1785KE Module
Switch Assembly SW1:
RS232C Link Features
Figure C.2 shows you the five switches in Switch Assembly SW-1:
Figure C.2
The Switches on Switch Assembly SW1
The following table shows you how to set switches 1, 2, and 5 for the
module options you require.
If you want to
select protocol
as:
With error check
as:
with parity as:
full duplex
BCC
none
full duplex
BCC
full duplex
With embedded
responses:
Set these SW1 switches:
1
2
5
no
OFF
OFF
OFF
even
no
ON
OFF
OFF
BCC
none
yes
OFF
ON
ON
full duplex
BCC
even
yes
ON
ON
OFF
half duplex
BCC
none
no
OFF
OFF
OFF
half duplex
BCC
even
no
ON
OFF
OFF
full duplex
CRC
none
yes
OFF
ON
ON
half duplex
CRC
none
no
ON
ON
ON
C–3
Appendix C
Using a Series A 1785KE Module
Switch 3 determines whether or not the RS-232-C port of the Series A
module can delete duplicate messages transmitted to it.
If you want the module to:
Set switch 3:
detect and ignore duplicate messages
ON
accept all messages regardless of
duplication
OFF
Switch 4 determines whether the RS-232-C port on the Series A module
uses and recognizes the following handshaking signals:
data set ready (DSR)
requests to send (RTS)
clear to send (CTS)
data carrier detect (DCD)
data terminal ready (DTR)
If you want the port to:
Set switch 4:
use handshaking signals
ON
ignore handshaking signals
OFF
Switch Assembly SW2:
For Future Use
Switch assembly SW-2 is for future use.
You must set both switches on switch assembly SW-2 to OFF (figure C.3)
Figure C.3
Setting Switch Assembly SW2
C–4
Appendix C
Using a Series A 1785KE Module
Switch Assemblies SW3 and SW:
Node Number
Switch assemblies SW-3 and SW-4 are for setting the node number of the
1785-KE module. The node number is an encoded 2-digit octal number
that identifies the Series A module as a unique node on Data Highway
Plus. Valid node numbers for the Series A module are 00 to 77 octal.
Figure C.4 shows you how to set the node number using switch assemblies
SW-3 and SW-4. Use the switches in assembly
SW-3 to set the first (left-most) digit
SW-4 to set the second (right-most) digit.
Figure C.4
Setting Switch Assemblies SW3 and SW4
For example, to set the node address to 37 octal, you would set switch
assemblies SW-3 and SW-4 as shown below.
To set
assembly:
To this
number:
Set these switches:
1
2
3
SW3
3
OFF
ON
ON
SW4
7
ON
ON
ON
C–5
Appendix C
Using a Series A 1785KE Module
Switch Assembly SW5:
Network Link Communication Rate
Switch assembly SW-5 lets you select the communication rate for the Data
Highway Plus port on the Series A module. Figure C.5 shows the switches
on SW-5.
Figure C.5
The Switches on Switch Assembly SW5
Important: You must set both switches ON for SW-5. This is the setting
for a communication rate of 57,600 bits per second on the Data Highway
Plus.
Switch Assembly SW6:
RS232C Communication Rate and Diagnostic Commands
You use switch assembly SW-6 to select the communication rate and
diagnostic commands for the RS-232-C port on the Series A module.
Figure C.6 shows the switches on switch assembly SW-6.
Figure C.6
The Switches on Switch Assembly SW6
C–6
Appendix C
Using a Series A 1785KE Module
To set the communication rate, you use switches 1, 2, and 3 on SW-6. Use
the table below to set these switches:
To set this rate in
bits per second:
Set these switches:
1
2
3
110
OFF
OFF
OFF
300
ON
OFF
OFF
600
OFF
ON
OFF
1200
ON
ON
OFF
2400
OFF
OFF
ON
4800
ON
OFF
ON
9600
OFF
ON
ON
19200
ON
ON
ON
To set diagnostic commands, you use switch 4 on SW-6. Use the table
below to set switch 4.
Mounting the 1785KE
Module
If you want your module to:
Set switch 4:
execute diagnostic commands
ON
pass through diagnostic commands
OFF
The 1785-KE module mounts in an Allen-Bradley Bulletin 1771 I/O rack.
If you are using a dropline/trunkline configuration, you must mount the
1785-KE module within 100 cable feet of the Data Highway Plus
trunkline. When you are connecting the module directly to an RS-232-C
device, you must mount the 1785-KE module within 50 cable feet of that
device.
If the RS-232-C device is another Allen-Bradley communication module,
you can mount the 1785-KE module up to 7,000 cable feet away from it by
using the longline connection (discussed in Chapter 4.) If you are using a
modem link to connect the 1785-KE module to the RS-232-C device, then
the module and the device may be as far apart as the modem link will
allow.
C–7
Appendix C
Using a Series A 1785KE Module
Making Connections to the
Series A 1785KE
C–8
The 1785-KE module has 3 connectors on its front edge (figure C.7).
Figure C.7
The Connectors on the Series A 1785KE
Appendix C
Using a Series A 1785KE Module
You use the top connector, labeled PEER COMM INTFC, to connect the
Series A 1785-KE to Data Highway Plus. Plug the 15-pin connector of
your Data Highway Plus dropline into this connector. (For details on how
to construct the dropline, refer to the Data Highway Cable Assembly and
Installation Manual, publication 1770-6.2.1.)
You can use the center connector, labeled PEER COMM INTFC, to
connect your 1784-T50 terminal to Data Highway Plus. You must use a
cable with the pinouts shown in figure C.8.
Figure C.8
Pinouts for Connecting the 1784T50 to the Series A 1785KE
You use the bottom connector, labeled RS-232-C PORT, to connect an
intelligent RS-232-C compatible device to the 1785-KE Series A module.
Refer to Chapter 4 for guidelines on how to connect RS-232-C devices to
the 1785-KE.
C–9
Appendix D
Interprocessor Addressing
Appendix Addressing
This Appendix discusses the following:
How to address a PLC-5 from a PLC-2
How to address a PLC-5 from a PLC-3
Communicating from a computer to a PLC-5
How to Address a PLC5
From a PLC2
The PLC-2 does not understand the file structure of the PLC-5. When a
PLC-2 sends a message to a PLC-5, the data is either read from or written
to a default file in the PLC-5. This default file is the file number that
corresponds to the decimal equivalent of the PLC-2’s octal node address.
For example, a PLC-2 with a node address of 012 (octal) will read data
from and write data to file number 10 (012 octal = 10 decimal) in each of
the PLC-5s on Data Highway Plus.
The file type of this file is not pre-defined, but the file must look like a
PLC-2 data table to the PLC-2.
The following table shows the octal addresses, their decimal equivalents,
and the PLC-5 reserved files. The first 9 files (0 – 8) are reserved for the
data type listed.
Appendix D
Interprocessor Addressing
Octal:
000
Decimal Equivalent:
0
001
PLC5 Reserved
File/File Type:
output file
input file
002
2
status file
003
3
bit file
004
4
timer file
005
5
counter file
006
6
control file
007
7
integer file
010
8
floating point
011 to 376
9 to 255 (a PLC5 may
have a file number up to
999)
user defined files
Make sure that:
if you use a communications module with a node address of 000 to 010
(octal) to communicate with a PLC-5 using PLC-2 commands, the
module must be able to properly communicate to the corresponding file
type listed in the previous table.
the file in the PLC-5 is created and is large enough to handle the
command.
you specify the address of the destination PLC-5 the same way that you
would specify the address of another PLC-2.
D–2
Appendix D
Interprocessor Addressing
The PLC-5’s address is specified in the command rung of the PLC-2’s
command code specifications:
AAA – beginning word addresses (in octal) of the remote node processor
for read/write operation.
BBB – beginning word address (in octal) of the local node processor for
read/write operation.
CCC – ending word address (in octal) of the local node processor for
read/write operation.
D–3
Appendix D
Interprocessor Addressing
Addressing a PLC5
From a PLC3
When sending a command to a PLC-5 from a PLC-3, use the following
guidelines to program the message instruction.
The PLC-3 has six levels of addressing while the PLC-5 has only four
levels. Therefore, if a PLC-5 received a full PLC-3 six-level address, it
would return an error code. The following table summarizes the addressing
levels of the PLC-3 and PLC-5.
Address Level
PLC-3 Family:
PLC5 Family:
1
Major Section
(3 = data table)
Major Section
(0 = data table)
2
Context
File Number
(must be 1 - 15)
3
Section
Element
4
File
SubElement
5
Structure
6
Word
To communicate from the PLC-3 to the PLC-5, you must enter the PLC-5
address in the following format:
$ E [Major Section].[File #]. [Element].[Sub-Element]
A command of this format can be accepted by the PLC-5 because the
address has only 4 levels.
D–4
Appendix D
Interprocessor Addressing
Make sure that:
the PLC-5 file you will communicate with is created and large enough
to handle the command
you specify the PLC-5 address in a message instruction as shown above.
If you were to enter a PLC-5 address in normal PLC-3 address format
($N1:0), the 1775-KA would format a six level address. If the PLC-5
receives a six-level address, it will be unable to read it and will return an
error.
The following example shows a PLC-3 message instruction with a PLC-5
address:
Communicating From a
Computer to a PLC5
A computer can communicate with a PLC-5 on Data Highway Plus using
the 1785-KE module. The table below gives a summary of PLC-5 data
table areas based on the type of commands your computer sends.
The extent to which your computer can access PLC-5 data table areas
depends on the addressing capabilities of the computer’s software. Refer to
the Data Highway/Data Highway Plus Protocol and Command Set
Reference Manual (publication 1770-6.5.16) for information necessary to
create a Data Highway of Data Highway Plus software driver for your
computer.
D–5
Appendix D
Interprocessor Addressing
If your computer
executes:
the basic Command Set
(CMD=01, CMD=08)
Then your computer access data from:
a single file in the PLC5 data table. This file
automatically defaults to the file number that is
the decimal equivalent of the octal node address
of the computer's interface module. For
example, if the computer the computer's octal
node address is 20, the computer would read
from and write to PLC5 file 16 (20 octal = 16
decimal).
You can change the default file to any file in a
PLC5 by issuing a Modify PLC2
Compatibility File command.
PLC5 Commands or
PLC3 Word Range Read
or Write ( CMDOF and
D–6
all files in the PLC5 data table.
The computer must have the capability to format
the appropriate packet in logical ASCII or logical
binary format.
AllenBradley, a Rockwell Automation Business, has been helping its customers improve pro
ductivity and quality for more than 90 years. We design, manufacture and support a broad range
of automation products worldwide. They include logic processors, power and motion control
devices, operator interfaces, sensors and a variety of software. Rockwell is one of the worlds
leading technology companies.
Worldwide representation.
Argentina • Australia • Austria • Bahrain • Belgium • Brazil • Bulgaria • Canada • Chile • China, PRC • Colombia • Costa Rica • Croatia • Cyprus • Czech Republic •
Denmark • Ecuador • Egypt • El Salvador • Finland • France • Germany • Greece • Guatemala • Honduras • Hong Kong • Hungary • Iceland • India • Indonesia •
Ireland • Israel • Italy • Jamaica • Japan • Jordan • Korea • Kuwait • Lebanon • Malaysia • Mexico • Netherlands • New Zealand • Norway • Pakistan • Peru •
Philippines • Poland • Portugal • Puerto Rico • Qatar • Romania • RussiaCIS • Saudi Arabia • Singapore • Slovakia • Slovenia • South Africa, Republic • Spain •
Sweden • Switzerland • Taiwan • Thailand • Turkey • United Arab Emirates • United Kingdom • United States • Uruguay • Venezuela • Yugoslavia
AllenBradley Headquarters, 1201 South Second Street, Milwaukee, WI 53204 USA, Tel: (1) 414 3822000 Fax: (1) 414 3824444
Publication 1785-6.5.2 - May 1989
Supersedes Publication 1785-6.5.2 - February 1989
PN 404611004
Copyright 1989 AllenBradley Company, Inc. Printed in USA
Publication 1785-6.5.2 - May 1989
Supersedes Publication 1785-6.5.2 - February 1989