1
DIGITAL
CAMERA
)¢)C)
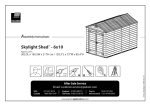
User's Manual
PictureControls
Nikon's unique Picture Control system makes it possible to share image processing
settings, including sharpening, contrast, saturation, and hue, among compatible
devices and software.
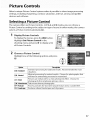
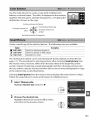
Selecting a Picture Control
The camera offers six Picture Controls. In R S,A, and M modes, you can choose a
Picture Control according to the subject or type of scene (in other modes, the camera
selects a Picture Control automatically).
Display
Picture
Controls.
To display the menus, press the MENUbutton.
Highlight Set Picture Control in the
shooting menu and press I_ to display a list
of Picture Controls.
MENU
button
2
Choose
Highlight
a Picture
Control.
one of the following
options
and press
@.
_-=!:_i-()_Dti°on
='T=':_::_''_-_
r_SD Standard
[]NL Neutral
[]Vl
Vivid
T_::::::
Description
Standard processing
situations.
Minimal
processing
for balanced
for natural
will later be extensively
Pictures are enhanced
photographs
Recommended
for most
results. Choose for photographs
that
processed or retouched.
for a vivid, photoprint
that emphasize
BMC Monochrome Take monochrome
results.
primary
effect.
Choose for
colors.
photographs.
BPT Portrait
Process portraits
for skin with natural texture
r_LS Landscape
Produces vibrant
landscapes
and a rounded
feel.
and cityscapes.
87
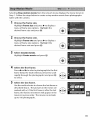
Modifying
Picture
Controls
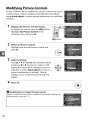
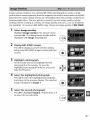
Picture Controls can be modified
to suit the scene or the user's
creative intent. Choose a balanced combination of settings
using Quick adjust, or make manual adjustments to individual
settings.
Display
the Picture
Control
menu.
To display the menus, press the MENUbutton.
Highlight Set Picture Control in the
shooting menu and press I_.
MENU
button
2
Select
a Picture
Highlight
press I_.
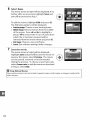
3
4
[]
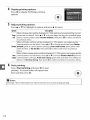
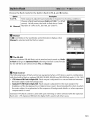
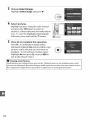
Adjust settings.
Press • or • to highlight the desired setting
and press • or I_ to choose a value (_ 89).
Repeat this step until all settings have been
adjusted, or select Quick adjust to choose a
preset combination of settings. Default
settings can be restored by pressing the
button.
Press _).
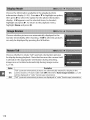
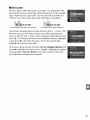
Modifications
Picture Controls
indicated
88
Control.
the desired Picture Control and
to Original
Picture Controls
that have been modified
by an asterisk ("*").
from
default settings are
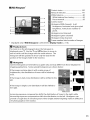
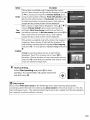
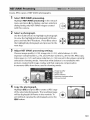
Choose from options
Quickadjust
-2 and +2 to reduce or exaggerate
Control
the sharpness
of outlines.
according
0 (no sharpening)
the effect
adjustments).
For example, choosing positive values for Vivid makes pictures
Not available with Neutral or Monochrome
Picture Controls.
Sharpening automatically
-_==
between
of the selected Picture Control (note that this resets all manual
more vivid.
Select A to adjust sharpening
to the type of scene, or choose from values between
and 9 (the higher the value, the greater the sharpening).
Select A to adjust contrast automatically
according to the type of scene, or
choose from values between -3 and +3 (choose lower values to prevent
_,="
_' Contrast
highlights in portrait
_=_
higher values to preserve
subjects).
Not available
D-Lighting
is activated
Control
==
_ Saturation
the vividness
according
when Active D-Lighting
of colors. Select A to adjust
lower values reduce saturation
values (to a minimum
of-3)
-3 and +3
to make reds more purple,
positive
the effect of color filters on monochrome
yellow, orange,
Choose the tint used in monochrome
white),
automatically
values (up to +3) to
greens more blue, and blues more purple.
from Off (the default setting),
_= effects
_. Toning
saturation
and higher values increase it).
blues more green, and greens more yellow,
Simulate
(_ 64) is on; reset if Active
after value is changed.
make reds more orange,
_ Filter
out" in direct sunlight,
detail in misty landscapes and other low-contrast
to the type of scene, or choose from values between
Choose negative
_' Hue
subjects from being "washed
Sepia, Cyanotype
(blue-tinted
photographs.
Choose
red, and green (_ 90).
photographs
monochrome),
from B&W (black-andRed, Yellow, Green,
Blue Green, Blue, Purple Blue, Red Purple (_ 90).
"A" (Auto)
Results for auto contrast
the frame.
and saturation
vary with exposure
and the position
of the subject in
89
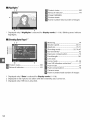
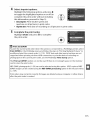
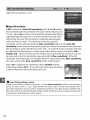
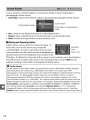
[]
The Picture Control
Pressing the _ button
showing
Grid
in Step 3 displays a Picture Control grid
the contrast and saturation
for the selected Picture
Control
in relation to the other Picture Controls (only contrast is displayed
when Monochrome
is selected). Release the _ button to return to
the Picture Control
menu.
The icons for Picture Controls that use auto contrast
are displayed in green in the Picture Control
parallel to the axes of the grid.
[]
Previous Settings
The line under the value display in the Picture Control
indicates
the previous value for the setting.
when adjusting
[]
and saturation
grid, and lines appear
The following
menu
settings.
Filter Effects (Monochrome
The options
setting
Use this as a reference
in this menu simulate
Only)
the effect of color filters on monochrome
photographs.
filter effects are available:
Note that the effects achieved with Filter effects are more pronounced than those
produced by physical glass filters.
[] Toning (Monochrome Only)
Pressing • when Toning is selected displays saturation options.
Press• or • to adjust saturation. Saturation control is not available
when B&W (black-and-white) is selected.
9O
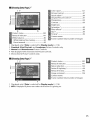
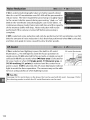
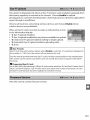
More onPlayback
Full.Frame Pla,
To play photographs
back, press the F_I button.
The most recent photograph will be displayed in
the monitor.
F_qbutton
__Us°e =°:U:'_=_View additional
Press • to view photographs
photographs
View photo
information
View thumbnails
Description
photographs
//_
i(__
._j
,_1
_
_
in order recorded,
•
to view
in reverse order.
Press A or V to view information
about current
photograph
(_ 92).
ql_
See page 97 for more information
on the thumbnail
See page 99 for more information
on playback
display.
Zoom in on
photograph
Confirmation
dialog will be displayed.
delete photo.
Delete images
Change protect
status
O-Irl
AE-[
G,-O
To protect image, or to remove protection
zoom.
Press _ again to
from protected
image, press o-. (Ik_)button (_ 100).
Return to
shooting
mode
Display menus
Monitor will turn off. Photographs
immediately.
MENU
copy or play stopmotion movie
See page 117 for more information.
Create retouched
Create retouched
@
can be taken
current
copy of current
photograph
(_
140). If
picture is marked with _ icon to show that it is a
stop-motion
(_ 153).
movie, pressing
_) starts movie
playback
91
Photo
Information
Photo information is superimposed on images displayed in full-frame playback.
Press • or • to cycle through photo information as shown below. Note that
shooting data, RGB histograms, and highlights are only displayed if corresponding
option is selected for Display mode (_ 118).
File information
Overview data
RGB histogram
Shooting data 3
Highlights
Shooting data 2
Shooting data I
II FileInformation
1
2
Protect status ...............................................1O0
Retouch indicator
Frame number/total
.......................................141
number
of images
File name .........................................................51
Image quality .................................................50
Image size ........................................................52
Time of recording
.........................................18
Date of recording ..........................................18
8
92
7
Folder name ..................................................138
II R6BHistogrom_
Protect status ...............................................1O0
Retouch indicator .......................................141
White balance .................................................80
White balance fine-tuning
......................82
Preset manual ..............................................
83
_
Camera name
Histogram (RGB channel).
In all
histograms,
horizontal
axis gives pixel
brightness,
vertical axis number
of
pixels.
Histogram
(red channel)
Histogram
(green channel)
Histogram
(blue channel)
Frame number/total
Displayed
only if RGB histogram
is selected for Display
number
of images
mode (_ 118).
[] Playback Zoom
To zoom in on the photograph when the histogram is
displayed, press % Usethe _ and ql_ buttons to zoom in
and out and scroll the image with the multi selector. The
histogram will be updated to show only the data for the
3ortion of the image visible in the monitor.
[]
Histograms
Camera histograms are intended as a guide only and may differ from those displayed
tmaging applications.
Some sample histograms are shown below:
If the image contains
brightnesses,
eve n.
in
objects with a wide range of
the distribution
of tones will be relatively
If the image is dark, tone distribution
left.
will be shifted
If the image is bright, tone distribution
to the
will be shifted to
the right.
Increasing
exposure
decreasing
exposure
compensation
compensation
shifts the distribution
shifts the distribution
3rovide a rough idea of overall exposure
see photographs
when bright
of tones to the right, while
to the left. Histograms
ambient
lighting
can
makes it difficult
to
in the monitor.
93
Protect status ...............................................1O0
Retouch indicator
.......................................141
Image highlights
_
Camera name
Frame number/total
4
*
Displayed
number
of images
5
only if Highlights
is selected for Display mode (_
118). Blinking
areas indicate
highlights.
ll ShootingData Page 17
1
2
Metering
...........................................................
74
Shutter speed ..........................................
69, 71
Aperture
....................................................
70, 71
Shooting
mode ................................25, 30, 67
ISO sensitivity
2...............................................
Exposure compensation
62
.............................76
Focal length ..................................................161
Lens data
Focus mode ..............................................
41,48
I0
II
Lens VR (vibration
reduction)
3.................17
Protect status ...............................................1O0
Flash mode ......................................................
59
Retouch indicator
Flash compensation
.......................................141
.....................................78
Camera name
Frame number/total
94
1 Displayed
only if Data is selected for Display mode
2 Displayed
in red if photo
3 Displayed
only ifVR lens is attached.
number
(_ 118).
was taken with ISO sensitivity
auto control on.
of images
IIShooting Data Page 21
1
2
Color space ...................................................
121
Picture Control ...............................................
87
Quick adjust 2..................................................
89
Original Picture Control 3............................
87
Sharpening ......................................................
89
Contrast ............................................................
89
Brightness
[Saturation 4......................................................
89
Filter effects s ..................................................
89
12
13
Protect status ................................................100
Retouch indicator .......................................141
White balance ................................................80
_
White balance fine-tuning ......................82
Preset manual .............................................83
1 Displayed
Hue 4...................................................................
89
Toning 5.............................................................
89
Camera name
Frame number/total number of images
only if Data is selected for Display mode (_
2 Standard, Vivid, Portrait,
3 Neutral and Monochrome
118),
and Landscape Picture Controls only.
Picture Controls.
4 Not displayed
with monochrome
5 Monochrome
Picture Controls
Picture Controls.
only.
U ShootingData Page3 7
1
2
Protect status ...............................................100
Retouch indicator
Noise reduction
.......................................141
..........................................122
Active D-Lighting
2........................................64
Retouch history ...........................................140
Image comment
_
.........................................128
Camera name
Frame number/total
7
1 Displayed
number
of images
8
only if Data is selected for Display
2 AUTOis displayed
mode (_ 118).
if photo was taken with Active D-Lighting
on.
95
II OverviewData
1
2
3
Histogram
showing
the distribution
of
tones in the image (_ 93).
ISO sensitivity*.
15
14
..............................................62
Focal length ..................................................161
Image comment
indicator
.......................128
Flash mode ......................................................59
lO
8
9
Frame number/total
number
of images
Protect status ...............................................1O0
_
Retouch indicator
.......................................141
.....................................78
Exposure compensation
Metering
Shooting
Shutter
Camera name
Displayed
Flash compensation
Aperture
in red if photo was taken with ISO sensitivity
............................76
..........................................................
74
mode ................................25, 30, 67
speed ..........................................69, 71
....................................................70, 71
auto control
on.
File name .........................................................
51
Image quality
.................................................50
Image size ........................................................52
Time of recording
25
.........................................18
Date of recording ..........................................18
Folder name ..................................................138
White balance ................................................80
22
21
20
19
White balance fine-tuning
.....................82
Preset manual .............................................83
Picture Control ...............................................87
Active D-Lighting
* AUTOis displayed
_. ......................................64
Color space ....................................................121
if photo was taken with Active D-Lighting
on.
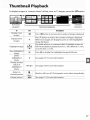
To display images in "contact sheets" of four,nine, or 72 images, press the ql_ button.
Full-frame
playback
i
I
Thumbnail Piayback
Use
Description
Display more
images
Press ql_ button
_-button
Display fewer
images
to increase the number
to reduce the number
When four images are displayed,
images
full-frame
playback,
or protection
Viewhighlighted
image
of images displayed.
of images displayed.
press to view highlighted
image full frame.
Use multi selector or command
Highlight
Calendar
playback
@
dial to highlight
images for
playback zoom (_ 99), deletion
(_ 101),
(_ 100).
Press _) to display the highlighted
image full frame.
Delete
highlighted
See page 101 for more information.
photo
Change protect
status of
highlighted
AE-L
om (AF-L)
See page 100 for more information.
photo
shooting
Return mode
to
Display
menus
Monitor
MENU
will turn off. Photographs
can be taken immediately.
See page 117 for more information.
97
To view images taken on a selected date, press the e_ button
when 72 images are
displayed.
Full-frame
playback
I
I
Thumbnailplayback
Calendar
playback
Thumbnaillist
Press the e=_ button to toggle between the date list
and the list of thumbnails for the selected date. Use
the multi selector to highlight dates in the date list
or to highlight pictures in the thumbnail list.
Date list
The operations can be performed
the thumbnail list:
=:U_I°'-°'To-_U_-
°_Use T-
Toggle between date
list and thumbnail
list
e,l_
Exit to thumbnail
playback/Zoom
in on
highlighted
depend on whether
_
photo
the cursor is in the date list or
Description
Press 91_ butt°n in date list t° place curs°r in thumbnail
list. Press again to return to date list.
° Date list: Exit to 72-frame playback.
• Thumbnaillist: Press and hold _ button
highlighted
to zoom in on
picture.
Highlight
dates/
_
• Date list:Highlight
Highlight
images
_
° Thumbnaillist: Highlight
date.
picture.
Toggle full frame
playback
_)
• Date list:View first picture taken on selected
• Thumbnaillist: View highlighted
picture.
date.
Delete highlighted
photo(s)
._
• Date list:Delete all pictures taken on selected date.
• Thumbnail list: Delete highlighted
picture (_ 101).
Change protect
status of highlighted
o-, (_-0
AE-L
See page 100 for more information.
Return to shooting
[_
Monitor
mode
_
immediately.
photo
Display menus
98
MENU
will turn off. Photographs
See page 1 17 for more information.
can be taken
Press the _ button to zoom in on the image displayed
in full-frame
image currently highlighted
in thumbnail or calendar
operations can be performed while zoom is in effect:
playback.
_-_UUFFTo
-:77U'F'F'I
-°_--JJse "=_
Description
_-to
zoom in to maximum
approximately
Zoom in or out
9 / 9[]
playback or on the
The following
(medium
of
25 x (large images), 19 x
images) or 13x (small
images). Press e,l_ to zoom out. While
photo is zoomed in, use multi selector
to view areas of image not visible in
monitor.
View other
Keep multi selector pressed to scroll rapidly to other
areas of frame.
areas of image
Navigation
window
ratio is altered; area currently
'ellow border.
_+
Faces (up to 1O) detected
is displayed
visible in monitor
by
during zoom
are indicated by white borders in
navigation window.
Press _ and •
Select faces
when zoom
is indicated
or
• to view other faces.
View other
images
_----_
Rotate command
_
current
Cancel zoom
_)
Change protect
status
o-,I (_I:[)
shooting
Return mode
to
Display menus
in other images at
zoom ratio.
Cancel zoom and return to full-frame
playback.
See page 1O0 for more information.
Monitor
MENU
dial to view same location
will turn off. Photographs
can be taken immediately.
See page 117 for more information.
99
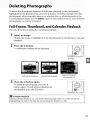
In full-frame, zoom, thumbnail, and calendar playback, the o-n button can be used to
protect photographs from accidental deletion. Protected files can not be deleted
using the _ button or the Delete option in the playback menu. Note that protected
images will be deleted when the memory card is formatted (_ 21).
To protect a photograph:
Select
an image.
Display the image in full-frame playback or playback zoom or highlight
thumbnail list in thumbnail or calendar playback.
Full-frame playback
2
Thumbnail playback
Press the o-n (_:_) button.
The photograph will be marked with a []
icon. To remove protection from the
photograph so that it can be deleted, display
the photograph or highlight it in the
thumbnail list and then press the o-n (_:_)
button.
1O0
Calendar playback
it in the
To delete the photograph displayed in full-frame playback or the photograph
highlighted
in the thumbnail list, press the _ button. To delete multiple selected
photographs, all photographs taken on a selected date, or all photographs in the
current playback folder, use the Delete option
photographs can not be recovered.
Full-Frame,
Thumbnail,
and Calendar
Press the _ button to delete the current
Select
Playback
photograph.
an image.
Display the image or highlight
playback.
2
in the playback menu. Once deleted,
it in the thumbnail
list in thumbnail
or calendar
Press the _ button.
A confirmation dialog will be displayed.
_ button
Full-frame
playback
3
Press the -_ button
Thumbnailplayback
again.
To delete the photograph, press the
button again. To exit without deleting
photograph, press the F_I button.
[]
Calendar
the
Playback
During calendar
highlighting
Calendar playback
(thumbnail list)
playback, you can delete all photographs
taken on a selected date by
the date in the date list and pressing the _ button
(_ 98).
101
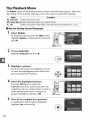
The Playback
Menu
The Delete option in the playback menu contains the following options. Note that
depending on the number of images, some time may be required for deletion.
_=°-_
Description
_'_-_
Delete selected pictures.
Select date I Delete all pictures taken on a selected date.
ALL All
Delete all pictures in the folder currently selected for playback (_ 117).
II Selected:Deleting SelectedPhotographs
Select
Delete.
To display the menus, press the MENUbutton.
Highlight Delete in the playback menu and
press I_.
MENU
button
2
Choose Selected.
Highlight Selected and press I_.
3
4
Highlight
a picture.
Use the multi selector to highlight a picture
(to view the highlighted
picture full screen,
press and hold the _ button).
Select the highlighted
picture.
Press the ql_ button to select the
highlighted
picture. Selected pictures are
marked by a _ icon. Repeat steps 3 and 4 to
select additional pictures; to deselect a
picture, highlight it and press ql_.
5
Press _) to complete
the operation.
A confirmation
dialog will be displayed;
highlight Yes and press _).
102
q[] button
II SelectDate: Deleting PhotographsTakenon a SelectedDate
1
Choose
Select
Date.
In the delete menu, highlight
and press I_.
2
Select date
Highlight a date.
Press• or • to highlight a date.
To view the pictures taken on the
highlighted date, press ql_. Use the multi
selector to scroll through the pictures, or
press _ to view the current picture full
screen. Press ql_ to return to the date list.
q[] button
3
4
Select the highlighted
date.
Press I_ to select all pictures taken on the
highlighted date. Selected dates are marked
with a [] icon. Repeat steps 2 and 3 to select
additional dates; to deselect a date,
highlight it and press I_.
Press _) to complete
the operation.
A confirmation
dialog will be displayed;
highlight Yes and press _).
103
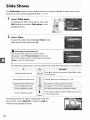
The Slide show option in the playback menu is used to display a slide show of the
pictures in the current playback folder (_ 117).
Select
Slide
show.
To display the slide show menu, press the
MENUbutton and select Slide show in the
playback menu.
MENUbutton
2
Select
Start.
To start the slide show, highlight
slide show menu and press _).
[]
Choosing
Start in the
a Frame Interval
To choose how long each picture will be
displayed,
select Frame interval
and choose
from the options shown at right before selecting
Start to start the slide show.
The following
operations
can be performed
while the slide show is in progress:
_=_:Z"Z"Z"Z"Z"Z"Z"Z"ITo=:_T:'_"Z"Z"Z"Z"Z"Z"Z"Z
°_-IJse=_
Skip back/skip
Description
Press • to return to previous
((4'_(o*);,1_)}
to next frame.
ahead
frame, • to skip
YA_
View additional
photo
info
ll_
(OK))%)
Change photo info displayed
(_ 92).
_Vf
Pause/resume
slide show
menu
MENU
Exit to playback
mode
Fcq
Exit to shooting
mode
The dialog shown at right
show ends. Select Restart
return
104
_)
Exit to playback
to the
playback
I
....
W
Pause show. Press again to resume.
See page 117 for more information.
End show and return to playback
I Press shutter-release
to shooting
is displayed
when the
to restart or Exit to
menu.
mode.
button
mode.
halfway
to return
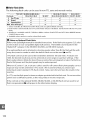
Connections
This section describes how to use the supplied
camera to a computer.
Before Connecting
UC-E4 USB cable to connect the
the Camera
Before connecting the camera, install the software on the supplied Software Suite
CD. To ensure that data transfer is not interrupted, be sure the camera EN-ELga
battery is fully charged. If in doubt, charge the battery before use or use an EH-Sa AC
adapter and EP-5 power connector (available separately).
II SuppliedSoftware
Nikon Transfer is used to copy photographs from the camera to the computer, where
they can be viewed using ViewNX (Nikon Transfer can also be used to back up
photographs and embed information in photographs as they are transferred, while
ViewNX can be used to sort photographs, convert images to different file formats,
edit NEF/RAW photographs,
and adjust NEF/RAW and JPEG images).
II SupportedOperatingSystems
The supplied software can be used with computers running the following operating
systems:
• Windows:Windows Vista Service Pack 1 (32-bit Home Basic/Home Premium/
Business/Enterprise/Ultimate)
and Windows XP Service Pack 3 (Home Edition/
Professional).
Macintosh:Mac OS X (version 10.3.9, 10.4.11, 10.5.6)
•
See the websites listed on page xvi for the latest information
systems.
[]
Connecting
operating
Cables
Be sure the camera is offwhen
connecting
force or attempt to insert the connectors
connector is not in use.
[_
on supported
or disconnecting
at an angle.
interface
cables. Do not use
Close the connector
cover when the
During Transfer
Do not turn the camera off or disconnect
the USB cable while transfer
is in progress.
105
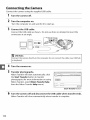
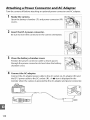
Connecting
the Camera
Connect the camera using the supplied
1
Turn the camera
2
Turn the computer
Turn the computer
3
Connect
USB cable.
off.
on.
on and wait for it to start up.
the USB cable.
Connect the USB cable as shown.
connectors at an angle.
Do not use force or attempt
to insert the
USB Hubs
Connect the camera directly to the computer; do not connect the cable via a USBhub
or keyboard.
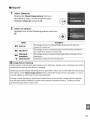
4
Turn the camera
5
Transfer
on.
photographs.
Nikon Transfer will start automatically;
the Start Transfer button to transfer
_z,.:,,_-
:
:
,
click
photographs
(for more information on using
Nikon Transfer, select Nikon Transfer help
from the Nikon Transfer Help menu).
Start Transfer button
6
Turn the camera off and disconnect
the USB cable when transfer
Nikon Transfer will close automatically when transfer is complete.
106
ends.
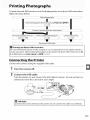
To print selected JPEG pictures on a PictBridge
follow the steps below.
printer via a direct USB connection,
Take photographs
I
IISeiect_hotogra_hs_or_rinting.singPr,ntse
II
Connect
camera
i-
to printer
(see below)
_2.
!
Print_hotogra_hsoneata
IIPrintm.lti_lephotogra_hs
II Create
index_rints
time, t08)
II
_oj
II
_3j
Disconnect USB cable
[]
Printing
Via Direct USB Connection
Be sure the EN-ELga battery is fully charged or use an optional EH-Sa AC adapter and EP-5
power connector.
When taking photographs
to be printed via direct USB connection in P,S,
A, and M modes,
set Color space to sRGB (_ 121).
Connecting
the Printer
Connect
using
the
camera
the
1
Turn the camera off.
2
Connect
supplied
USB cable.
the USB cable.
Turn the printer on and connect the USB cable as shown.
attempt to insert the connectors at an angle.
Do not use force or
_I_ USB Hubs
Connect the camera directly to the printer;
do not connect
the cable via a USB hub.
107
3
Turn the camera
on.
A welcome screen will be displayed
playback display.
Printing
Pictures
in the monitor,
followed
One at a Time
Select a picture.
Press • or I_ to view additional pictures, or press
• or • to view photo information (_ 92). Press
the _ button to zoom in on the current frame
(_ 99; press F_I to exit zoom). To view six
pictures at a time, press the ql_ button. Use the
multi selector to highlight pictures, or press _ to
display the highlighted
picture full frame.
2
3
Display printing options.
Press_) to display PictBridge printing options.
Adjust
printing
Press •
or •
options.
to highlight
an option
and press I_ to select.
Option
Description
Menu of page sizes will be displayed
(options
not
supported
by current printer are not listed). Press • or
Pagesize • to choose page size (to print at default page size for
current
printer,
select Printer default),
select and return to previous
No. of
copies
108
Menu shown at right will be displayed.
choose number
then press _) to
menu.
of copies (maximum
to select and return to previous
menu.
Press • or •
to
99), then press _)
by a PictBridge
Option
Description
This option
is available
only if supported
by current
)rinten Menu shown at right will be displayed.
or • to choose print style from Printer default
Press •
(print
Border using current printer settings), Print with border
)hoto
with white
(print
border), or No border, then press _)
to select and return to previous
supported
by current
printer
menu.
Menu shown at right will be displayed.
choose Printer default
(print
Only options
will be displayed.
Press •
using current
or •
to
printer
Time settings), Print time stamp (print time and date of
stamp recording on photo), or No time stamp, then press _) to
select and return to previous
supported
by current printer
This option
cropping.
is available
menu. Only options
will be displayed.
only with printers that support
Menu shown at right will be displayed.
exit without cropping picture,
and press _). To crop picture,
highlight
highlight
To
No cropping
Crop and press
I_.
Cropping
If Crop is selected, dialog shown at right will be
displayed. Press _ to increase size of crop, ell] to
decrease. Choose position of crop using multi selector
and press _). Note that print quality may drop if small
crops are printed
4
[_
at large sizes.
Start printing.
Select Start printing and press _) to start
printing. To cancel before all copies have been
printed, press _).
Date Imprint
If you select Print time stamp in the PictBridge menu when printing photographs
containing date information recorded using Date imprint in the setup menu (_ 136), the
date will appear twice.
The imprinted
are cropped
without
or printed
date may however
be cropped
out if the photographs
a border.
109
Printing
Display
Multiple
the PictBridge
Pictures
menu.
Press the MENUbutton in the PictBridge
playback display (see Step 3 on page 108).
MENU
button
2
Choose an option.
Highlight one of the following options and
press I_.
• Print select: Select pictures for printing.
• Selectdate: Printone copyofall the pictures
taken on a selected date.
• Print(DPOF):Print an existing print order created with the Print set (DPOF)
option in the playback menu (_ 114). The current print order will be
displayed in Step 3.
To create an index print of all JPEG pictures on the memory card, select Index
print. See page 113 for more information.
110
3
Select pictures or choose a date.
If you chosePrint select or Print (DPOF) in
Step2, use the multi selector to scroll through
the pictures on the memory card. To display
the current picture full screen, press and
hold the _ button. To select the current
picture for printing, press the ql_ button and
press A The picture will be marked with a
icon and the number of prints will be set
to 1. Keeping the ql_ button pressed, press
• or • to specify the number of prints (up
to 99; to deselect the picture, press • when
the number of prints is 1). Continue until all
the desired pictures have been selected.
[I_ Selecting
Photographs
NEF (RAW) photographs
selected for printing.
q[] + • V: Choose
number
ofcopies
for Printing
(_ 50) can not be
JPEG copies of NEF (RAW)
images can be created using the NEF {RAW)
processing
(_ 149).
option
in the retouch
menu
Ifyou choseSelect date in Step2, press • or •
to highlight a date and press I_ to toggle the
highlighted date on or off. To view the
pictures taken on the selected date, press
ql_ Use the multi selector to scroll through
the pictures, or press and hold _ to view the
current picture full screen.
button:Viewphotofullscreen
q[] button:View
photos
forselected
date
N button: View
highlighted
photo
furlscreen
111
4
5
Display printing
options.
Press _) to display PictBridge
options.
Adjust printing
Press •
or •
printing
options.
to highlight
an option
_°Ol_ti-°o_n
-
and press I_ to select.
Description
'_TI_=I°'_T°'°'°'°'°'°
....
Menu of page sizes will be displayed (_ 108; options not supported
by current
Page )rinterarenotlisted).
Press•orVtochoosepagesize(toprintatdefaultpage
size size for current printer, select Printer default), then press oo_)to select and return
to previous
menu.
Menu of border options will be displayed (_ 109; options not supported by
current printer are not listed). Press • or • to choose print style from Printer
Border default (print at current printer settings), Print with border (print photo with
white border), or No border, then press _) to select and return to previous
menu.
Menu of time stamp options
Time current
printer
are not listed).
will be displayed
Press •
(_
109; options
or • to choose Printer
not supported
default
by
(print at
stamp current printer settings), Print time stamp (print time and date of recording on
_hoto), or No time stamp, then press _) to select and return to previous menu.
6
Start printing.
Select Start printing
and press _) to start
printing. To cancel before all copies have
been printed, press _).
[] Errors
See page 183 for information on what to do if an error occurs during printing.
112
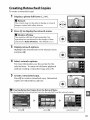
Creating
Index
Prints
To create an index print of all JPEG pictures on the memory card, select Index print
in Step 2 of"Printing
Multiple Pictures" (_ 110). Note that if the memory card
contains more than 256 pictures, only the first 256 images will be printed.
Select
Index
print.
Selecting Index print in the PictBridge menu
(_ 110) displays the images on the memory card
as shown at right.
2
3
Display printing options.
Press_) to display PictBridge printing options.
Adjust
printing
options.
Choose page size, border, and time stamp options as described on page 112 (a
warning will be displayed if the selected page size is too small).
4
Start printing.
Select Start printing and press _) to start
printing. To cancel before all copies have been
printed, press _).
113
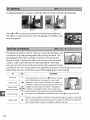
Creating
a DPOF Print Order:
Print Set
The Print set (DPOF) option in the playback menu is used to create digital "print
orders" for PictBridge-compatible
printers and devices that support DPOF. Selecting
Print set (DPOF) from the playback menu displays the menu shown in Step 1.
Choose Select/set.
Highlight Select/set and press I_.
[]
Creating
a New Print Order
To remove all previously selected pictures from
the print order, highlight Deselect all? and
press _).
2
Select
pictures.
Use the multi selector to scroll through the
pictures on the memory card. To display the
current picture in full screen, press and hold
the _ button. To select the current picture
for printing, press the q_ button and press
• . The picture will be marked with a _ icon
and the number of prints will be set to 1.
Keeping the q_ button pressed, press • or
• to specify the number of prints (up to 99;
to deselect the picture, press • when the
number of prints is 1). Continue until all the
desired pictures have been selected.
q[] + • V: Choose
numberofcopies
button:Viewphotofullscreen
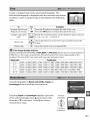
3
114
Display imprint options.
Press_) to display data imprint options.
4
Select imprint
options.
Highlight
the following
to toggle
the highlighted
complete
this
•
the print
information,
options
order
without
proceed
on or off (to
including
to Step 5).
Data imprint: Print shutter
aperture
and press I_
option
on all pictures
speed
in print
and
order.
Imprint date: Print date of recording
5
[I_
on all pictures in print order.
Complete the print order.
Highlight Done and press _) to complete
the print order.
Print Set (DPOF)
To print the current
print order when the camera is connected
Print (DPOF) in the PictBridge
modify
and print the current
supported
photographs
when printing
menu and follow
Pictures" to
options
are not
is not enough
space on the memory
(_ 50) can not be selected using this option.
if images are deleted
on
Time stamp option.
(RAW) images can be created using the NEF {RAW) processing
(_ 149).
Print orders may not print correctly
after the print order is created.
printer, select
to print the date of recording
print order, use the PictBridge
The Print set (DPOF) option can not be used if there
card to store the print order.
NEF (RAW) photographs
Multiple
order (_ 110). DPOF date and data imprint
via direct USB connection;
in the current
to a PictBridge
the steps in "Printing
option
JPEG copies of NEF
in the retouch
using a computer
or other
menu
device
115
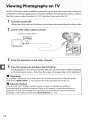
An EG-DIO0 video cable (available separately) can be used to connect the camera to
a television or VCR for playback or recording. Before connecting the camera, confirm
that the camera video standard (_ 127) matches that used in the TV.
I
Turn the camera off.
Always turn the camera off before connecting or disconnecting the video cable.
2
Connect the video cable as shown.
Connect to video device
Connect
3
Tune the television
4
Turn the camera
to cclmeFCl
to the video channel.
on and press the []
button.
During playback, the camera monitor will turn off and images will be displayed
on the television screen. Note that the edges of images may not be displayed.
[]
Video Mode
If no image is displayed, check that camera is correctly connected and that the option
selected for Video mode (_ 127) matches the video standard used in the TV.
[]
Television
Playback
Use of an EH-Sa AC adapter
recommended
for extended
and EP-5 power connector
(available
playback. When an AC adapter
separately)
is connected,
playback will end automatically
if no operations are performed for about
regardless of the options selected for Auto off timers (_ 130).
116
is
television
30 minutes,
Menu Guide
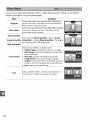
Th e Playba ck M en U: Managinglmages
To display the playback menu, press MENU
and select the I_I (playback menu) tab.
MENU
button
The playback
c°_'
menu contains the following
Option
options:
Option
r
Image review
Rotate tall
Choose a folder for playback:
Option
Current
All
Description
Only photos in the folder currently selected for Active folder in the setup menu are
displayed during playback. This option is selected automatically when a photo is
taken. Ifa memory card is inserted and this option selected before photos have
been taken, a message stating that the folder contains no images will be displayed
during playback. Select All to begin playback.
Pictures in all folders will be visible during playback.
@
117
Choose the information available in the playback photo
information display (_ 92). Press • or • to highlight an option,
then press I_ to select the option for the photo information
display. A [] appears next to selected items; to deselect,
highlight and press I_. To return to the playback menu,
highlight Done and press _).
Choose whether pictures are automatically displayed in the
monitor immediately after shooting. If Off is selected, pictures
can only be displayed by pressing the 1_1button.
Choose whether
to rotate "tall" (portrait-orientation)
pictures
for display during playback. Note that because the camera itself
is already in the appropriate orientation during shooting,
images are not rotated automatically during image review
(_ 118).
_-!Optie-n-_
Description
......................
"Tall" (portrait-orientation) pictures are automatically rotated for display in the
On camera monitor. Pictures taken with Off selected for Auto image rotation (_ 128)
Off
118
"Tall" (portrait-orientation)
pictures are displayed in "wide" (landscape) orientation.
To display
the shooting
menu,
press MENUand
select
the I_1 (shooting
menu)
tab.
MENUbutton
The shooting
menu contains the following
options:
Option
Option
Reset shooting options
Colorspace
Set Picture Control
Noisereduction
Image quality
Releasemode
Image size
Focusmode
White balance
AF-areamode
ISOsensitivitysettings
Single point
Dynamic
Auto
_°, _, _, ._., _i, P,S,A,
M
100
off
off
ActiveD-Lighting
Select Yes to reset shooting
[]
Reset Shooting
64
area
44
Auto-area
AF-assist
On
Metering
Matrix
74
TTL
123
Built-in flash
122
menu settings.
Options
Selecting Yes for Reset shooting options also restores Picture Control
default values (_ 88) and resets the following:
Option
settings to their
-: - T- -6i)iio-n_!!!!! !!!!:l- --beiauii---/q_Flash mode
Au,0_
*
Focus point not displayed if[ ==] Auto-area
is selected for AF-area mode.
_
' '_" _
IP_
/,-,-,-.
Auto frontcurtain
Auto
slowsync
sync 59
Front curtain
sync
Exposure compensation
Off
76
Flash compensation
Off
78
119
Adjust ISO sensitivity
Ilbto
(_ 62).
150Sensitivity
If Off is chosen for Auto ISO sensitivity in P,S,A,and M modes,
ISO sensitivity will remain fixed at the value selected by the user
(_ 62). When On is chosen, ISO sensitivity will automatically be
adjusted if optimal exposure can not be achieved at the value
selected by the user (ISO sensitivity is adjusted appropriately
when the flash is used). The maximum value for auto ISO
sensitivity can be selected using the Max. sensitivity option in the Auto ISO
sensitivity menu (choose lower values to prevent noise; the minimum value for auto
ISO sensitivity is automatically
set to ISO I00). In modes Pand A, sensitivity will only
be adjusted if underexposure would result at the shutter speed selected for Min.
shutter spd. Slower shutter speeds will be used only if optimum exposure can not
be achieved at the ISO sensitivity value selected for Max. sensitivity. If the ISO
sensitivity selected by the user is higher than the value selected for Max. sensitivity,
the value selected for Max. sensitivity will be used instead.
When On is selected, the viewfinder
shows ISO-AUTO
and the
information display ISO-L These indictors blink when sensitivity
is altered from the value selected by the user.
[]
Auto ISO Sensitivity
Control
Noise is more likely at higher sensitivities.
menu to reduce noise (_
auto ISO sensitivity
122).
Use the Noise reduction
Note that ISO sensitivity
control is used in combination
option
when
with slow sync flash modes (available with
the built-in flash and SB-900, SB-800, SB-600, and SB-400 flash units), possibly
camera from selecting slow shutter speeds.
120
in the shooting
may be raised automatically
preventing
the
The color space determines the gamut of colors available for
color reproduction.
Choose sRGB for photographs that will be
printed or used "as is"with no further modification.
Adobe RGB
has a wider color gamut and is recommended for images that
will be extensively processed or retouched after leaving the
camera.
[]
Color Space
Color spaces define the correspondence
represent
between
colors and the numeric
them in a digital image file. The sRGB color space is widely
RGB color space is typically
used in publishing
and commercial
recommended
when taking photographs
that will be printed
viewed in applications that do not support color management,
that will be printed
kiosk printing
with ExifPrint, the direct printing
or other
commercial
3rinted using these options,
JPEG photographs
print services.
option
printing,
sRGB is
without modification
or
or when taking photographs
on some household
Adobe RGB photographs
DCF will select the correct color space automatically.
applications
or
and
If the application
or device does not support DCF, select the appropriate
color space manually.
information,
see the documentation
provided with the application
or device.
[]
printers,
can also be
but colors will not be as vivid.
taken in the Adobe RGB color space are DCF compliant;
3rinters that support
values that
used, while the Adobe
For more
Nikon Software
ViewNX
(supplied)
color space when
and Capture
opening
NX 2 (available
photographs
separately)
automatically
select the correct
created with this camera.
121
If On is selected, photographs taken at shutter speeds slower
than 8 s or at ISO sensitivities over ISO 400 will be processed to
reduce noise. The time required for processing is roughly equal
to the current shutter speed; during processing, "uoo'' nr" will
blink in the viewfinder and photographs can not be taken. In
continuous release mode, frame rates will slow and the capacity
of the memory buffer will drop. Noise reduction will not be
performed if the camera is turned off before processing is
complete.
If Off is selected, noise reduction will only be performed at ISO sensitivities over ISO
800; the amount of noise reduction is less than that performed when On is selected,
and does not apply to noise caused by slow shutter speeds.
If On is selected and lighting is poor, the built-in AF-assist
illuminator (_ 43) will light to assist the focus operation in
single-servo AF (AF-Sselected for focus mode, or single-servo AF
selected in AF-Afocus mode) when [m] Auto-area is selected for
AF-area mode or when [-3 Single point, [.0.]Dynamic area, or
[3D]3D-tracking (11 points) is selected and the center focus
point is used. If Off is selected, the AF-assist illuminator will not
AF-assistilluminator
light to assist the focus operation. The camera may not be able
to focus using autofocus when lighting is poor.
[]
See Also
See page 161 for restrictions
the shooting
122
modes in which
on the lenses that can be used with AF assist. See page 176 for
the AF-assist illuminator
can be used.
Choose the flash mode for the built-in
TTLf_
TTL
MS Manual
[]
flash in E S,A, and M modes.
Flash output is adjusted automatically in response to shooting conditions.
Choose a flash level between Full and 1/32 (1/32of full
power). At full power, the built-in flash has a Guide
Number of 13/43 (m/ft., ISO 100, 20°C/68 °F).
Manual
A _ icon blinks in the viewfinder and information
Manual is selected and the flash is raised.
[]
display when
The SB-400
When an optional
SB-400 flash unit is attached
and turned
on, Built-
in flash changes to Optional flash, allowing the flash control
for the SB-400 to be selected from TTL and Manual.
[]
mode
Flash Control
The following types of flash control are supported when a CPU lens is used in combination
with the built-in flash or optional SB-900, SB-800, SB-600, and SB-400 flash units (_ 58, 162).
• i-ff[
Balanced Fill-Flashfor DigitalSLR:Flash output
is adjusted
for a natural
balance between
the main subject and the background.
• Standardi-ff[ Fill-Flashfor Digital SLR:Flash output is adjusted for the main subject; the
brightness of the background is not taken into account. Recommended
for shots in which
the main subject is emphasized
compensation
at the expense
of background
details, or when exposure
is used.
Standard i-TTLflash control is used with spot metering or when selected with the optional
flash unit. i-TTL balanced fill-flash for digital SLRis used in all other cases.
123
To display the setup menu, press MENUand select the y (setup menu) tab.
MENU
button
The setup menu contains the following
options:
Option
Default
DustOff ref photo
LCDbrightness
0
On
Info displayformat
129
Auto off timers
Normal
130
Self-timer delay
Remoteon duration
10 s
.5 mi n.
131
131
On
131
Beep
Graphic;
Viewfinderoptions
Off
Backgroundcolor:
Green
Auto infodisplay
On
Off
Filenumbersequence
Buttons
Cleanimage sensor
Off
Startup &
shutdown
Mirrorlock-up1
Videomode2
Nomemorycard?
Timezone and date2
Daylight
savingtime
124
Off
Eye-Fiupload3
Image comment
Firmwareversion
Auto image rotation
On
1 Not available when battery
2 Default varies with country
is low.
of purchase.
when compatible
Eye-Fi memory
card is inserted
132
133
Self-timer
134
AE/AF lock
135
Off
135
Release locked
136
Off
--
136
138
Enable
139
--
139
Date imprint
Activefolder
Language2
3 Only available
_-_
--
(_ 139).
Select Yes to reset setup menu all settings except Video mode, Time zone and
date, Language, and Active folder to the defaults listed on page 124.
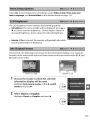
The LCD brightness
•
menu contains
the following
options:
I.Cl)brightness:The menu at right will be displayed; press • or
• to choose monitor brightness. Choose higher values for
increased brightness, lower values for reduced brightness.
• Autodim: If On is selected, the monitor
shooting information
is displayed.
will gradually
dim while
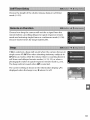
Choose from the following two formats for the information display (_ 6). Separate
formats can be selected for auto and scene modes on the one hand and for P,S,A,and
M modes on the other.
Classic (_ 126)
Graphic (_ 6)
Choose the modes in which the selected
information display will be used.
Highlight Auto/scene modes or P,S, A, and M
modes and press I_.
2
Select Classic or Graphic.
Highlight Classicor Graphic and press I_.
125
3
Select
a background
color.
Highlight a background color and press _).
Choose from blue, black, or orange (Classic) or
green, black, or brown (Graphic).
The "Classic" display is shown below.
Camera rotated 90 oto shoot
Camera in normal orientation
in tall (portrait)
orientation
1
25
26
24
23
-5
-22
16 171819
20
-8
-7
-6
21
2-
10 9 11
Shooting mode
_° auto/
L_ auto (flash off) ..............25
Scene modes ......................
30
R S,A, and I_1modes ...........67
Focus mode ............................. 41
Release mode ......................... 53
ISO sensitivity
White
........................ 62
balance ........................ 80
Image size ............................... 52
Help icon ...............................
183
Flash mode .............................
59
Image quality
......................... 50
m
"Beep" indicator
Number
remaining
indicator
Manual
flash indicator
Flash compensation .............78
3D-tracking
Active D-Lighting ..................64
Focus point .............................. 46
Aperture
Metering ..................................
74
Eye-Fi connection
indicator ............................. 139
Exposure indicator
Battery indicator
........... 45
....... 136
Auto ISO sensitivity
indicator ............................. 120
Exposure compensation ......76
AF-area mode ........................
44
Flash compensation
for optional
....... 123
indicator
flash units ... 164
(f-number)
......70, 71
................ 71
Exposure compensation
indicator ............................... 77
.................... 25
Electronic
Shutter
126
............................ 26
Date imprint
Picture Control ...................... 87
Auto-area AF indicator ......... 45
indicator
.................. 131
of exposures
rangefinder
....... 132
speed ................... 69, 71
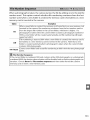
This option can be set separately for auto and scene modes and for R S,A, and M
modes. If On is selected, the information display will appear after the shutter-release
button is pressed halfway; if image review (_ 118) is off, it will also be displayed
immediately after shooting. Choose On if you find yourself frequently referring to
the information display during shooting. If Off is selected, the information display
can only be viewed by pressing the [] button.
When connecting the camera to a television or VCR, be sure the camera video mode
matches the device video standard (NTSC or PAL).
Change time zones, set the camera clock, choose the date display order, and turn
daylight saving time on or off.
==!: _i-()_i_ti°on
='T="::::_
Time zone
Date and time
.........
Description
...................................... :°'=
Choose a time zone. The camera clock is automatically
new time zone.
set to the time in the
Set the camera clock (_ 18).
Date format
Choose the order in which
Daylight
saving time
Turn daylight saving time on or off. The camera clock will automatically
advanced or set back one hour. The default setting is Off.
Choose a language
available:
-_
Option
Dk Dansk
De Deutsch
the day, month, and year are displayed.
for camera menus and messages. The following
options
be
are
.....
D_ip-iioii_: oo
Danish
It
Italiano
German
NI
Nederlands
En English
Es Espa_ol
Fi Suomi
English
No Norsk
Spanish
PI
Polski
Finnish
Pt
Portugu_s
Fr Fran_ais
French
Ru PyccK._
Italian
Dutch
Sv Svenska
Traditional
Chinese
Norwegian
Polish
Portuguese
Russian
Swedish
Simplified
Chinese
[]
Et;_
Japanese
Korean
127
Add a comment to new photographs as they are taken. Comments can be viewed as
metadata in ViewNX (supplied) or Capture NX 2 (available separately; _ 167). The
comment is also visible on the third shooting data page in the photo information
display (_ 95).
• Done:Save changes and return to the setup menu.
• Input comment:Input a comment as described on page 138. Comments can be up to
36 characters long.
• Attachcomment:Select this option to attach the comment to all
subsequent photographs.
Attach comment can be turned
on and off by highlighting
it and pressing I_.
Photographs taken while On is selected contain information on camera orientation,
allowing them to be rotated automatically during playback or when viewed in
ViewNX or Capture NX 2 (available separately; _ 167). The following orientations are
recorded:
D
Landscape (wide) orientation
Camera rotated 90° clockwise
Camera rotated 90°
counterclockwise
Camera orientation is not recorded when Off is selected. Choose this option
panning or taking photographs with the lens pointing up or down.
when
[I_ Auto Image Rotation
In continuous
photographs
[]
release mode (_ 53), the orientation
is changed
during
shooting.
Rotate Tall
To automatically
rotate "tall" (portrait-orientation)
select On for the Rotate
128
recorded for the first shot applies to all
in the same burst, even if camera orientation
tall option
in the playback
photographs
menu (_
for display during
118).
playback,
Acquire reference data for the Image Dust Off option in Capture NX 2 (available
separately; for more information, see the Capture NX 2 manual).
Dust off ref photo is available only when a CPU lens is mounted on the camera. A
lens with a focal length of at least 50 mm is recommended.
When using a zoom lens,
zoom all the way in.
Choose a start option.
Highlight one of the following options and press
_). To exit without acquiring image dust off
data, press MENU.
Start:The message shown at right will be
displayed and "rEF" will appear in the
viewfinder.
Cleansensor,thenstart: Select this option to clean
the image sensor before starting. The
message shown at right will be displayed
"rEF" will appear in the viewfinder when
cleaning is complete.
[_
Image Sensor Cleaning
Dust off reference
be used with
data recorded
photographs
Clean sensor, then
existing
2
and
before image sensor cleaning
taken after image sensor cleaning
start only if the dust off reference
is performed
is performed.
can not
Select
data will not be used with
photographs.
Frame a featureless
white object in the viewfinder.
With the lens about ten centimeters (four inches) from a well-lit, featureless
white object, frame the object so that it fills the viewfinder
shutter-release button halfway.
In autofocus mode, focus will automatically
mode, set focus to infinity manually.
and then press the
be set to infinity;
in manual focus
129
3
Acquire
dust off reference
data.
Press the shutter-release button the rest of the way down to acquire Image Dust
Off reference data. The monitor turns off when the shutter-release button is
pressed. Note that noise reduction
increasing recording times.
will be performed
if the subject is poorly lit,
If the reference object is too bright or too dark,
the camera may be unable to acquire Image Dust
Off reference data and the message shown at
right will be displayed. Choose another
reference object and repeat the process from
step 1.
Image Dust Off Reference
The same reference
Data
data can be used for photographs
taken with different lenses or at different apertures.
Reference images can not be viewed using computer
imaging
software.
A grid pattern
reference images are viewed
This option
determines
is displayed
when
on the camera.
how long the monitor
remains on if no operations
are
performed during menu display and playback (Playback/menus),
while
photographs are displayed in the monitor after shooting (Image review), and how
long the exposure meters, viewfinder, and information display remain on when no
operations are performed (Auto meter-off).
Choose shorter auto-off delays to
reduce the drain on the battery.
SHORT
Short
NORM
Normal
LONG
Long
_
Custom
[]
Auto off Timers
The exposure
optional
130
4s
4s
4s
8s
20 s
20 s
1 min.
Make separate adjustments to the Playback/menus,
Image review, and Auto
meter-off
timers. When settings are complete, highlight Done and press _.
meters will not turn off automatically
EH-5a AC adapter
automatically
8s
12s
when the camera is powered
and EP-5 power connector.
when the camera is connected
The viewfinder
to a computer
or printer
by an
will not turn off
via USB.
Choose the length of the shutter release delay in self-timer
mode (_ 55).
Choose how long the camera will wait for a signal from the
remote before cancelling delayed or quick-response remote
mode and restoring single-frame or continuous mode (_ 56).
Choose shorter times for longer battery life.
If On is selected, a beep will sound when the camera focuses in
single-servo AF (AF-S or when shooting stationary subjects in
AF-A focus mode), while the release timer is counting down in
self-timer and delayed remote modes (_ 53, 55), or when a
photograph is taken in quick-response remote mode (_ 55).
The beep will not sound when Off is selected.
The current setting is shown in the information display: J_is
displayed when the beep is on, (_ when it is off.
131
Display a framing grid in the viewfinder or choose whether the exposure indicator
the viewfinder can be used as a focusing aid in manual focus mode.
in
II Viewfinder Grid
Choose On to display on-demand grid lines in the viewfinder
reference when composing photographs.
for
II Rangefinder
Choose On to use the exposure
indicator
to determine
whether
the camera is
correctly focused in manual focus mode (_ 42_ note that this function is not available
in shooting mode M, when the exposure indicator instead shows whether the subject
is correctly exposed).
_
Camera in focus.
_
ocus point
is slightly
behind
subject.
Focus point is slightlyin
Focus point is well
front of subject.
behind
subject.
Camera can not
Focus point is well in
determine
front of subject.
[]
Using the Electronic
The electronic
desired
rangefinder
132
Rangefinder
requires a lens with a maximum
results may not be achieved
focus using autofocus
correct
focus.
(_ 42).
in situations
in which
aperture
of f/5.6 or faster. The
the camera would
be unable to
When
a photograph
number
used.
number
used when
memory
card
is taken,
This option
the camera
controls
a new folder
is inserted
names
whether
is created,
the file by adding
file numbering
the
memory
one to the last file
continues
card
from
is formatted,
the last
or a new
in the camera.
=-_O°ptio°n
_'7-':
Description
When a new folder is created, the memory
card formatted,
or a new memory
card
inserted in the camera, file numbering
continues from the last number used or
from the largest file number in the current folder, whichever is higher. Ifa
On
photograph
is taken when the current
folder contains
9999, a new folder will be created automatically
a photograph
numbered
and file numbering
will begin
again from 0001.
formatted, or a new memory
folder is created automatically
Off
contains
999 photographs.
Creates a new folder and resets file numbering
taken.
RESET
Reset
File Number
If the current
to 0001 with the next photograph
Sequence
folder is numbered
999 and contains either 999 photographs
numbered
9999, the shutter-release
be taken.
Choose Reset for File number
memory
card is inserted in the camera. Note that a new
ifa photograph
is taken when the current folder
button
card or insert a new memory
will be disabled and no further
sequence
and then either format
or a photograph
photographs
can
the current
card.
133
Choose
the
roles played
by the _/Fn
and AE-L/AF-L buttons.
II Q/Fn Button
Choose
the
role played
by the
Fn (_)
button.
Fn(_) button
Option
Self-timer
Release mode*
0UAL Image quality/
size*
180
WB
rd
8#
to toggle
Press the Fn(_) button
and rotate the command
self-timer
mode on and off (_ 57).
dial to select the
release mode (_ 53).
Press the Fn(_) button and rotate the command
quality and size (_ 50).
dial to select image
and rotate the command
dial to select ISO
and rotate the command
dial to select white
ISO
Press the Fn (_) button
sensitivity*
sensitivity
White
Press the Fn (_) button
balance*
balance (P,S,A, and M modes only; _ 80).
Active
D-Lighting*
Press the Fn(_) button and rotate the command
D-Lighting option (_ 64).
dial to select an Active
Set framing
Press the Fn(_) button
dial to display or hide
grid*
a framing
* The item currently
mode
134
Description
Press the Fn(_) button
(_ 62).
selected for _/Fn
is shown by an Fn icon).
and rotate the command
grid in the viewfinder
button
(_
is shown
132).
by a white-on-black
icon (Release
IIAE-L/AF-L
Choose the role played by the AE-L/AF-Lbutton.
AE-L/AF-L
button
Description
Focus and exposure lock while the AE-L/AF-L
button is pressed.
Exposure locks while the AE4./AF-L
button is pressed.
Focus locks while the AE4./AF-L
button is pressed.
Exposure locks when the AE-L/AF-L
button is pressed, and remains locked
!_@ AE lock (hold) until the button is pressed a second time or the exposure meters turn
off.
The AE-L/AF-L
button initiates autofocus. The shutter-release button can
AF-ON
not be used to focus.
I_
!_
Option
AE/AF lock
AE Iockonly
AF lock only
IIAE Lock
At the default setting of Off, exposure only locks when the AE-L/
AF-Lbutton is pressed. If On is selected, exposure will also lock
when the shutter-release button is pressed halfway.
135
If Release locked is selected, the shutter-release button is only enabled when a
memory card is inserted in the camera. Selecting Enable release allows the shutter
to be released when no memory card is inserted, although no pictures will be
recorded (they will however be displayed in the monitor in demo mode).
Choose the date information
imprinted
on photographs
_-=!:_ITIT_
0pti°on
°'T_=::::::::_
Off
Description
The time and date do not appear on photographs.
DATE
Date
The date or date and time are imprinted on
DATE®
Date and time
photographs taken while this option is in effect.
Date counter
New photos are imprinted with a time stamp showing the number of
days between the date of shooting and a selected date (_ 137).
At settings other than Off, the selected option
icon in the information display.
[]
is indicated
by a
Date Imprint
The date is recorded
information
in the order selected in the Time zone and date menu (_ 127). Date
is not imprinted
added to or removed
taken with date imprint
Imprint
on photographs
from existing
pictures.
taken in NEF (RAW) format
To print the date of recording
off, select Time stamp in the PictBridge
menu (_
date in the Print set (DPOF) menu to print the date of recording
the current DPOF print order (_
136
as they are taken.
11_5).
and can not be
on photographs
109, 112), or select
on all pictures
in
II DateCounter
Pictures taken while this option is in effect are imprinted with
the number of days remaining until a future date or the number
days elapsed since a past date. Use it to track the growth of a
child or count down the days until a birthday or wedding.
Future date (two days remaining)
Past date (two days elapsed)
Up to three separate dates can be stored in slots 1,2, and 3. The
first time you use the date counter, you will be prompted to
select a date for slot 1; enter a date using the multi selector and
press _). To change the date or store additional dates, highlight
a slot, press I_, and enter the date. To use the stored date,
highlight the slot and press _).
To choose a date counter format, highlight Display options and
press I_ to display the menu shown at right. Highlight an option
and press _). Highlight Done in the date counter menu and
press _) when settings are complete.
137
Create, rename, or delete folders, or choose the folder in which subsequent
photographs will be stored.
• Selectfolder:Choose the folder in which subsequent photographs will be stored.
Current folder
D3000 (default
folder)
Other folders (in alphabetical
order)
• New: Create a new folder and name it as described below.
• Rename:Select a folder from the list and rename it as described
•
Delete:Delete all empty folders on the memory
below.
card.
II Naming and RenamingFolders
Folder names can be up to five characters long. To
move the cursor in the name area, rotate the
command dial. To enter a new letter at the current
cursor position,
use the multi selector to highlight
the
Keyboard
area
-Name area
desired character in the keyboard area and press the
button. To delete the character at the current cursor position, press the # button.
Press _) to save changes and return to the shooting menu, or press MENUto exit
without creating a new folder or changing the folder name.
[I_ Folder Names
On the memory card, folder names are preceded by a three-digit folder number assigned
automatically by the camera (e.g., 100D3000). Eachfolder can contain up to 999
photographs. During shooting, pictures are stored in the highest-numbered folder with the
selected name. Ira photograph is taken when the current folder is full or contains a
photograph numbered 9999, the camera will create a new folder by adding one to the
current folder number (e.g., 101D3000). The camera treats folders with the same name but
different folder numbers as the same folder. For example, if the folder NIKONis selected for
Active folder, photographs in all folders named NIKON (IOONIKON,101NIKON, 102NIKON,
etc.) will be visible when Current is selected for Playback folder (_ 117). Renaming
changesall folders with the same name but leavesthe folder numbers intact. Selecting
Delete deletes empty numbered folders but leavesother folders with the same name intact.
138
Thisoptionisdisplayed
onlywhenanEye-Fi
memory
card(available
separately
from
third-party
suppliers)
isinsertedinthecamera.
Choose
Enableto upload
photographs
toapreselected
destination.
Notethatpictures
willnotbeuploaded
if
signalstrengthisinsufficient.
Observe
alllocallawsconcerning
wireless
devices
andchoose
Disablewhere
wireless
devices
areprohibited.
WhenanEye-Fi
cardisinserted,
itsstatusisindicated
byanicon
intheinformation
display:
• _: Eye-Fi
uploaddisabled.
• _: Eye-Fi
uploadenabled
butnopictures
available
forupload.
• _ (static):
Eye-Fi
uploadenabled;
waitingto beginupload.
• _ (animated):
Eye-Fi
uploadenabled;
uploading
data.
• _: Error.
[I_
Eye-Fi Cards
Eye-Fi cards may emit wireless signals when Disable
the monitor
(_
See the manual
is selected.
Ifa warning
provided
with the Eye-Fi card, and direct any inquiries
Supported
other Eye-Fi
Eye-Fi Cards
As of April 2009, the following
2 GB Eye-Fi cards can be used: Eye-Fi Card, Eye-Fi Home, Eye-Fi
Share, and Eye-Fi Explore. Eye-Fi cards are for use only in the country
the Eye-Fi card firmware has been updated to the latest version.
View the current
in
to the manufacturer.
The camera can be used to turn Eye-Fi cards on and off, but may not support
functions.
[]
is displayed
183), turn the camera off and remove the card.
camera firmware
of purchase.
Be sure
version.
139
To display
the retouch
menu,
press MENUand
select
the _
(retouch
menu)
tab.
MENUbutton
The retouch menu is used to create trimmed or retouched copies of the photographs
on the memory card, and is only available when a memory card containing
photographs is inserted in the camera.
_=!==.o,
_,_
_,i,_o_,-O-i;_i0=n-,
_=_,_,,_,,_,,_,,_,,_,,_,,_,,_,,_,,_,,u,
_=o =,_!_,_oT_
_,_,_oi_ii_n -
_o_
_E] D-Lighting
142
I_
image overlay1
147
4_> Red-eye correction
142
_
NEF (RAW) processing
149
Trim
143
F_.._:.Quick retouch
150
Monochrome
143
E_
Color outline
150
C) Filter effects
144
_i
Miniature
150
Ell
_°
_%_ Color balance
L_
145
Small picture
1 Can only be selected by pressing MENUbutton
2 Available
only if_)
original
is displayed.
[]
Retouching
button
_o_:moiion movi_ _..............................................
151
m-_D Before and after 2
and selecting
is pressed in full-frame
playback
154
F_ tab.
when a retouched
image or
Copies
Up to ten effects can in most cases be applied
the exception
effect
of Image
in succession to a single image, although
overlay each option can only be applied
edits may result in loss of detail).
Options
that can not be applied
with
once (note that multiple
to the current
image are
grayed out and unavailable.
[]
Image Quality
Except in the case of copies created with Trim, Small picture, Image overlay, NEF (RAW)
processing, and Stop-motion
movie, copies created from JPEG images are the same size
and quality
as the original, while
fine-quality
JPEG images.
cropped
140
out or illegible
copies created from NEF (RAW) photos are saved as large
Time stamps added with Date Imprint
depending
on the retouch options
used.
(_
136) may however
be
Creating
Retouched
To create a retouched
Copies
copy:
Display a photo full frame (_ 91).
[]
Retouch
The camera may not be able to display
images created with other devices.
2
or retouch
Press _) to display the retouch menu.
[]
Monitor
off Delay
The monitor will turn off automatically
if no
operations are performed for the length of time
selected for Auto off timers. The default is 12 s.
3
Display
retouch
options.
Highlight the desired item in the retouch menu
and press _).
4
Select
retouch
options.
For more information, see the section for the
selected item. To return to full-frame playback
without creating a retouched copy, press I_1.
5
[]
Create a retouched
copy.
Press _) to create a retouched copy. Retouched
copies are indicated by a Fallicon.
Creating
Retouched
The photographs
Copies from the Retouch
to be retouched
Highlight an option and
press I_.
Menu
can also be selected from the retouch
Highlight
a picture and
press o_.
menu.
Create retouched
copy of
selectedpicture.
141
D-Lighting
brightens
shadows, making
Before
it ideal for dark or backlit photographs.
After
Press • or • to choose the amount of correction performed.
The effect can be previewed in the edit display. Press _) to copy
the photograph.
This option is used to correct "red-eye" caused by the flash, and
is available only with photographs taken using the flash. The
photograph selected for red-eye correction is previewed as
shown at right. Confirm the effects of red-eye correction and
create a copy as described in the following table. Note that
red-eye correction may not always produce the expected results
and may in very rare circumstances be applied to portions of the image that are not
affected by red-eye; check the preview thoroughly
before proceeding.
_=_UU_"ITo-'77UZ"Z"-'u_us-°
e': - .................................................................
D-em]l_ii-o_n
-"_....................................................................
Zoom in
_
Press_ button to zoom in, 91_button to zoom
out. While photo is zoomed in, use multi
Zoom out
91_ selector to view areas of image not visible in
__
monitor. Keep multi selector pressed to scroll
View other
" - ,_ rapidly to other areas of frame. Navigation
areas of image il_.,(oK):,_l__,/
window is displayed when zoom buttons or
-multi selector is pressed; area currently visible
--
142
Cancel zoom
_)
in monitor is indicated by yellow border. Press_) to cancel zoom.
Create copy
_)
If the camera detects red-eye in the selected photograph, a copy will
be created that has been processed to reduce its effects. No copy will
be created if the camera is unable to detect red-eye.
Create a cropped copy of the selected photograph.
The
selected photograph
is displayed with the selected crop shown
in yellow; create a cropped copy as described in the following
table.
1"O
Description
Increase size of crop
button
to increase the size of the crop.
Reduce size of crop
Press the ql_ button
Change crop aspect
ratio
Rotate the command
Move crop
Create copy
Trim: Image Quality
to reduce the size of the crop.
dial to switch between
aspect ratios of
to move the crop to another
area of the
3:2,4:3,5:4,1:1,and16:9.
Use multi selector
image.
Save the current
crop as a separate file.
and Size
Copies created from NEF (RAW) or NEF (RAW) + JPEG basic photos have an image quality of
JPEG fine (_ 50); copies created from JPEG photos have the same image quality as the
original.
The size of the copy varies with crop size and aspect ratio.
Copy photographs
in Black-and-white,
Sepia, or
Cyanotype (blue and white monochrome).
Selecting Sepia or Cyanotype displays a preview
of the selected image; press • to increase color
saturation, • to decrease. Press _) to create a
monochrome
Increase
saturation
copy.
Decrease
saturation
143
Choose
below,
from
the following
press Q to copy
filter
the
effects.
After
_-_z_i_i-(J_i)ti°o°n
°'T-'_
....
filter
effects
Description
Creates the effect of a skylight
Skylight
adjusting
photograph.
filter, making
the
picture less blue. The effect can be previewed
the monitor as shown at right.
in
Creates a copy with warm tone filter effects, giving
Warm filter
the copy a "warm" red cast. The effect can be
areviewed in the monitor.
Red intensifier
Green intensifier
Intensify reds (Red intensifier), greens (Green
intensifier), or blues (Blue intensifier).
Press •
increase the effect, •
to
to decrease.
Blue intensifier
Add starburst
effects to light sources.
Numberof points:Choose from four, six, or eight.
Filter amount: Choose the brightness
sou rces affected.
Cross screen
of the light
Filter angle: Choose the angle of the points.
Lengthof points:Choose the length of points.
Confirm: Preview the effects of the filter as shown
at right.
Press _ to preview
Save:Create a retouched
Soft
144
Add a soft filter effect.
the copy full frame.
copy.
Use the multi selector
choose from 1 (high), 2 (normal),
or 3 (low).
to
as described
Use the multi selector to create a copy with modified color
balance as shown below. The effect is displayed in the monitor
together with red, green, and blue histograms (_ 93) giving the
distribution
of tones in the copy.
Increase amount
Increase amount
of
blue
of green
_/_-
Create retouched copy
__//
Increase amount of
_j
Increase amount
amber
of magenta
Create a small copy of the selected
picture.
The following
sizes are available:
The small picture option can be used during full-frame playback as described on
page 141. The procedure for selecting pictures after choosing Small picture from
the retouch menu, however, differs from that described at the beginning of this
section: instead of selecting a single photograph and then choosing a picture size,
the user selects a picture size first and then selects one or more photographs to copy
at the selected size as described below.
Selecting Small picture from the retouch menu displays the menu shown in Step 1.
Follow the steps below to create small copies of multiple pictures.
Select Choose size.
Highlight Choose size and press I_.
2
Choose
the desired
size.
Highlight desired size and press _) to select
and return to the previous menu.
145
3
Choose Select image.
Highlight Select image and press I_.
4
Select pictures.
Highlight pictures using the multi selector
and press the ql_ button to select or
deselect. Selected pictures are marked by an
icon. To view the highlighted
photograph
full frame, press and hold the _ button.
S
Press _) to complete
q[] button
the operation.
Press _). A confirmation
dialog will be
displayed; highlight Yes and press _) to copy
pictures at the selected size and return to
playback. To exit without creating copies,
highlight No and press _), or press MENUto
exit to the retouch menu.
[]
Viewing
Small Pictures
Small pictures are indicated
pictures are displayed.
the original,
146
by a gray border.
Playback zoom is not available
when small
Note that because small copies do not have the same aspect ratio as
the edges of the copy will be cropped
out on its longest
dimension.
Image overlay combines two existing NEF (RAW) photographs to create a single
picture that is saved separately from the originals; the results, which make use of RAW
data from the camera image sensor, are noticeably better than overlays created in an
imaging application.
The new picture is saved at current image quality and size
settings; before creating an overlay, set image quality and size (_ 50, 52; all options
are available). To create an NEF (RAW) copy, choose an image quality of NEF {RAW).
Select Image overlay.
Highlight Image overlay in the retouch menu
and press I_. The dialog shown at right will be
displayed, with Image 1 highlighted.
2
Display
NEF (RAW) images.
Press _) to display a picture selection dialog
listing only NEF (RAW) images created with this
camera.
3
Highlight
a photograph.
Use the multi selector to highlight the first
photograph in the overlay. To view the
highlighted photograph full frame, press and
hold the _ button.
4
Select
the highlighted
photograph.
Press _) to select the highlighted
photograph
and return to the preview display. The selected
image will appear as Image 1.
5
Select the second photograph.
Press I_ to highlight Image 2. Repeat Steps 2-4
to select the second photo.
147
6
Set gain.
Highlight Image I or Image 2 and optimize
exposure for the overlay by pressing • or • to
set gain for the selected image to values
between 0.1 and 2.0. Repeat for the second
image. The default value is 1.0; selecting 0.5 cuts
gain in half, while selecting 2.0 doubles gain. The
effects of gain are visible in the Preview column.
7
8
9
Highlight the Preview column.
Press• or I_ to highlight the Preview column.
Preview the overlay.
Press • or • to highlight Overlay and press _)
(to save the overlay without displaying a
preview, highlight Save and press _)). To return
to Step 6 and select new photos or adjust gain,
press ql_.
Save the overlay.
Press _) while the preview is displayed to save
the overlay. After an overlay is created, the
resulting image will be displayed full-frame in
the monitor.
+
[I_ Image Overlay
The overlay
has the same photo
info (including
date of recording,
metering,
shutter speed,
aperture, shooting mode, exposure compensation,
focal length, and image orientation)
values for white balance and Picture Control as the photograph
selected for Image 1.
148
and
Create JPEG copies of NEF (RAW) photographs.
Select NEF (RAW) processing.
Highlight NEF (RAW) processing in the retouch
menu and press I_ to display a picture selection
dialog listing only NEF (RAW) images created
with this camera.
2
3
Select a photograph.
Use the multi selector to highlight a photograph
(to view the highlighted
photograph full frame,
press and hold the _ button). Press _) to select
the highlighted
photograph and proceed to the
next step.
Adjust NEF (RAW) processing
settings.
Choose image quality (_ 50), image size (_ 52), white balance (_ 80),
exposure compensation
(_ 76), and a Picture Control (_ 87) for the JPEG copy.
Color space (_ 121 ) and noise reduction (_ 122) are set to the values currently
selected in shooting mode. Note that white balance is not available with
pictures created with image overlay and that exposure compensation
increments differ from those used in shooting mode.
,e size
White balance
Exposure compensation
4
Copy the photograph.
Highlight EXE and press _) to create a JPEG copy
of the selected photograph.
The resulting image
will be displayed full-frame in the monitor. To
exit without copying the photograph, press the
MENUbutton.
149
Create copies with enhanced saturation and contrast.
D-Lighting is applied as required to brighten dark or backlit
subjects.
Press •
or •
to choose the amount of enhancement.
can be previewed
photograph.
in the edit display.
The effect
Press _) to copy the
Create an outline copy of a photographs to use as a base for
painting. The effect can be previewed in the edit display. Press
_) to copy the photograph.
Before
After
Create a copy that appears to be a photo of a diorama.
from a high vantage point.
Works best with photos taken
Description _]_-_-_-_-_-_-_-_-_-_-_-_-_-_-_-_-_-_-_-_-_
i
If photo is displayed in wide orientation, press
• or • to position frame showing area of copy
that will be in focus.
Choose area
in focus
Area in focus
If photo is displayed in tall orientation (_ 128),
press • or • to position frame showing area of
copy that will be in focus.
Preview
copy
Cancel
Create copy
150
Preview copy.
Exit to full-frame
Create copy.
playback
without
creating
copy.
Selecting Stop-motion movie from the retouch menu displays the menu shown in
Step 1. Follow the steps below to create a stop-motion
movie from photographs
taken with the camera.
Choose
the frame
size.
Highlight Frame size and press I1_to display a
menu of frame size options. Highlight the
desired frame size and press _).
2
Choose
the frame
rate.
Highlight Frame rate and press I1_to display a
menu of frame rate options. Highlight the
desired frame rate and press _).
3
Select Create
Highlight
4
Select
movie.
Create movie and press _).
the first
frame.
Press • and I1_to select a photograph for the first
frame (keep the multi selector pressed to scroll
rapidly through the photographs) and press _)
to select.
5
Select
the last frame.
Use the multi selector to choose the last frame as
described Step 4. The pictures in the movie are
marked with €; if the first frame is after the last
frame, the frames in between will appear in the
movie in reverse order. The movie can include
up to 100 photographs.
151
6
Select Save.
The menu shown at right will be displayed; if no
further edits are necessary, highlight Save and
press _) to proceed to Step 7.
To edit the movie, highlight Edit and press _).
The following options will be displayed:
• Startingimage:Choose a new starting frame.
• Middleimage: Remove frames from the middle
of the movie. Press • and I_ to highlight a
photo, ql_ to remove the _" icon. Pictures from
which the _" has been removed will be
removed from the movie when you press _).
• Endimage: Choose a new end frame.
• Cancel:Exit without making further changes.
7
Save the movie.
The menu shown at right will be displayed;
highlight Save and press _) to save the movie. To
preview the movie, select Preview. The movie
can be paused, rewound, or fast-forwarded
during the preview. To choose a new frame rate,
select Frame rate; to edit the movie as described
in Step 6, select Edit.
_I_ Stop-Motion
Movies
Stop-motion
movies can not include cropped
other devices.
152
copies, small copies, or images created with
II Viewing Stop-Motion Movies
To view
movie
stop-motion
option
existing
•
and
stop-motion
movies
I_ to highlight
playback.
while
movies,
in the playback
a movie
The following
playback
To
Start/pause/
resume
Rewind/
advance
Return to fullframe playback
select
the
menu
will
(_
Stop-motion
117).
be displayed;
A list of
press
and press _) to begin
operations
can be performed
is in progress:
Press
_)
Description
Press _) to start, pause, or resume playback.
automatically
if no operations are performed
minutes while
Playback ends
for about three
movie is paused.
Press • or • to rewind or fast forward. While playback is pa used,
/4_(o_)_'1_))ress • or • to rewind or advance one frame.
_ A \_
I_I/l< _, >/) Press l_q or •
to exit to full-frame
playback.
153
Compare retouched copies to the original photographs.
This option is only available
if the _) button is pressed to display the retouch menu when a copy or original is
played back full frame.
Select a picture.
Select a retouched copy (shown by a Fallicon) or a
photograph that has been retouched in fullframe playback and press _).
2
Select
Before
and after.
Highlight Before and after in the retouch menu
and press _).
3
Compare
the copy
with
the original.
Options used to create
copy
The source image is displayed on the left, the
retouched copy on the right, with the options
used to create the copy listed at the top of the
display. Press • or I_ to switch between the
source image and the retouched copy. To view
the highlighted picture full frame, press and hold
the _ button. If the copy was created from two
Source Retouched
images using Image overlay, press • or • to
image
copy
view the other source image. If multiple copies
exist for the current source image, press • or • to view the other copies. To
exit to playback mode, press the 1-_ button, or press _) to return to playback
with the highlighted
image displayed.
@
Before-and-After
Comparisons
The source image will not be displayed
since been deleted
154
or that was protected
if the copy was created from a photograph
when the copy was made (_
100).
that has
To display the recent settings menu, press MENUand select the _ (recent settings) tab.
MENU
button
The recent settings menu lists the twenty most recently used
settings. Press • or • to highlight an option and press I_ to
select.
[]
Removing
Items from
the Recent Settings
Menu
To remove an item from the recent settings menu, highlight
confirmation
dialog will be displayed;
it and press the _ button.
press _ again to delete the selected
A
item.
155
156
TechnicalNotes
Compatible
CPU Lenses
Autofocus is available with AF-S and AF-I CPU lenses only; autofocus is not supported
with other autofocus (AF) lenses. IX NIKKOR lenses can not be used. The features
available with compatible CPU lenses are listed below:
AI-P NIKKOR
1 Use AF-S or AF-I lenses to get the most from your camera. Vibration
lenses.
2 Spot metering
meters
selected
focus point (_
or an aperture
other
systems may not function
than the maximum
6 With maximum
effective aperture of f/5.6 or faster.
7 When AF 80-200mm
f/2.8, AF 35-70mm
f/2.8, AF 28-85mm
lenses are zoomed
all the way in at the minimum
displayed when the image on the matte
image in viewfinder
is in focus.
8 With
[]
maximum
Identifying
aperture
(VR) supported
with VR
74).
3 Can not be used with shifting or tilting.
4 The camera's exposure metering and flash control
lens is shifted and/or tilted
5 AF-S or AF-I lens required.
Reduction
aperture
f/3.5-4.5
focus distance,
screen in the viewfinder
as expected
when
(New), or AF 28-85mm
the in-focus
the
is used.
indicator
is not in focus.
f/3.5-4.5
may be
Focus manually
until
of f/5.6 or faster.
AF-S and AF-I Lenses
AF-S lenses have names beginning
with
AF-S,
AF-I lenses names beginning
with AF-I.
157
[]
Identifying
CPU and Type G and D Lenses
CPU lenses can be identified
on the lens barrel.
by the presence
of CPU contacts, type G and D lenses by a letter
Type G lenses are not equipped
CPU con tacts
CPU lens
with a lens aperture
Aperture
Type G lens
Type D lens
[] Lensf-number
The f-number given in lens names is the maximum aperture of the lens.
158
ring.
ring
Compatible
Non-CPU Lenses
Non-CPU lenses may only be used when the camera is in mode M. Selecting another
mode disables the shutter release. Aperture must be adjusted manually via the lens
aperture ring and the camera metering system, i-TTL flash control, and other features
requiring a CPU lens can not be used. Some non-CPU lenses can not be used; see
"Incompatible
Accessories and Non-CPU Lenses" below.
PN-11)
1 With
maximum
aperture
of f/5.6 or faster.
2 Exposure indicator can not be used.
3 Can be used at shutter speeds slower than flash sync speed by one step or more.
4 Can not be used with
shifting
or tilting.
S With maximum
effective aperture of f/5.6 or faster.
6 Attach in vertical orientation
(can be used in horizontal
_I_ Incompatible
Accessories and Non-CPU
orientation
once attached).
Lenses
The following accessories and non-CPU lenses can NOTbe used with the D3000:
• TC-16AS AF teleconverter
• Non-AI lenses
• Lenses that require the AU-1 focusing
1200mm f/11)
unit (400mm
f/4.5, 600mm
f/5.6, 800mm
f/8,
• Fisheye (6mm f/5.6, 7.Smm f/5.6, 8mm f/8, OP 10mm f/5.6)
• 2.1cm f/4
• Extension Ring K2
• 180-600mm
f/8 ED (serial numbers
• 360-1200mm
174041-174180)
f/11 ED (serial numbers
174031-174127)
• 200-600mm
f/9.5 (serial numbers 280001-300490)
• AF lenses for the F3AF (AF 80mm f/2.8, AF 200mm
• PC 28mm f/4 (serial number
f/3.5 ED, AF Teleconverter
TC-16)
180900 or earlier)
• PC 35mm f/2.8 (serial numbers
851001-906200)
• PC 35mm f/3.5 (old type)
• Reflex 1000mm f/6.3 (old type)
• Reflex 1000mm f/11 (serial numbers
142361-143000)
• Reflex 2000mm
200111-200310)
f/11 (serial numbers
159
_I_ The Built-in
The built-in
Flash
flash can be used with lenses with focal lengths of 18-300
some cases the flash may be unable to entirely
ram, although
in
light the subject at some ranges or focal
lengths due to shadows cast by the lens, while lenses that block the subject's view of the redeye reduction lamp may interfere with red-eye reduction. Remove lens hoods to prevent
shadows.
The flash has a minimum
range of 60 cm and can not be used in the macro range
of macro zoom lenses. The flash may be unable to light the entire subject with the following
lenses
at ranges
less than
_-_'i
those
AF-S DX NIKKOR 10-24mm
AF-S DX 12-24mm
below:
AF-S 17-35mm
f/3.5-
AF-S DX 18-70mm
f/3.5-5.6G
AF-S DX 18-135mm
4.5D ED
f/3.5_.5G
ED
f/3.5-5.6G
f/3.5-5.6G
AF-S DX VR 18- 200mm
EDVR
ED
f/3.5-5.6G
AF-S DX NIKKOR 18- 200mm
ED
f/3.5-
5.6G EDVR II
f/2.8D
AF-S NIKKOR 24-70mm
AF-S VR 24-I 20mm
AF-S 28-70mm
ED VR
f/2.8G ED
AF-S DX NIKKOR 18-105mm
AF 20-35mm
ED
f/2.8D ED
AF-S DX 17-55mm
AF 18-35mm
f/3.5_.5G
f/4G ED
AF-S DX NIKKOR 16-85mm
f/2.8G ED
f/3.5-5.6G
ED
f/2.8D ED
AF-S VR 200-400mm
f/4G ED
PC-E NIKKOR 24mm
f/KS ED _
When
given
Lens
not shifted
Zoom position
24 mm
Minimum range
2.5 m/8 ft. 2in.
20 mm
3.0 m/9 ft. lOin.
24 mm
1.0 m/3 ft.
3in.
24 mm
2.0 m/6 ft.
7in.
28 mm
1.0 m/3 ft.
3in.
28 mm
1.5 m/4 ft. 11 in.
35mm
1.0m/3ft.
3in.
24mm
1.0m/3ft.
3in.
18 mm
1.0 m/3 ft.
3 in.
18mm
2.5 m/8
ft.
2in.
24mm
1.0 m/3 ft.
3in.
18mm
1.0 m/3 ft.
3in.
24 mm
1.0 m/3 ft.
3in.
24 mm
1.0 m/3 ft.
3in.
24 mm
2.5 m/8
ft.
2in.
28 mm
1.0 m/3 ft.
3in.
35 mm
1.5 m/4 ft. 11 in.
50 mm
1.0 m/3 ft.
3in.
24 mm
1.0 m/3 ft.
3in.
35 mm
1.5 m/4 ft. 11 in.
Under
24 mm
250 mm
2.5 m/8
ft.
2in.
350 mm
2.0 m/6 ft.
7in.
24 mm
3.0 m/9 ft. loin.
or tilted,
When used with the AF-S NIKKOR 14-24mm
f/2.8G ED, the flash will be unable to light the
entire subject at all ranges.
_1_ Dark Edges in the Viewfinder
You may notice darkening of the edges of the image in the viewfinder
has no effect on photographs.
160
with some lenses. This
_I_ AF-Assist Illumination
AF-assist illumination
is not available with the following
lenses:
• AF-S NIKKOR 14-24mm f/2.8G ED
• AF-S 80-200mm
• AF-S VR 70-200
m m f/2.8G ED
• AF-S NIKKOR 70-200mm
f/2.8D ED
• AF-S VR 200 mm f/2G ED
f/2.8G ED VR II
• AF-S VR 200-400mm
f/4G ED
At ranges under 1 m (3 ft. 3 in.), the following
lenses may block the AF-assist illuminator
and
interfere with autofocus when lighting is poor:
• AF-S 17-35mm f/2.8D ED
• AF-S NIKKOR 24-70mm
f/2.8G ED
• AF-S DX 17-55mm f/2.8G ED
• AF-S DX NIKKOR 18-105 mm f'3.5-5.6G
• AF-S DX VR 18-200mm
f/3.5-5.6G
• AF-S DX NIKKOR 18-200mm
[]
Calculating
• AF-S VR 24-120
• AF-S 28-70mm
EDVR
ED
mm f/3.5-5.6G
f/2.8D ED
ED
• AF-S VR Micro 105 mm f/2.8G ED
f/3.5-5.6G
ED VR II
Picture Angle
The size of the area exposed
by the D3000, in contrast,
camera is approximately
by a 35 mm camera is 36 x 24 mm. The size of the area exposed
is 23.6 x 15.8 mm, meaning
that the picture angle of a 35mm
1.5 times that of the D3000. The approximate
for the D3000 in 35 mm format
can be calculated
by multiplying
focal length of lenses
the focal length of the lens
by a bout 1.5.
Picture size (35ram format)
f
f
Lens
Picture diagonal
Picture angle [35mm format)
Picture angle (D3000)
161
The camera supports the Nikon Creative Lighting System (CLS) and can be used with
CLS-compatible flash units. Optional flash units can be attached directly to the
camera accessory shoe as described below. The accessory shoe is equipped with a
safety lock for flash units with a locking pin, such as the SB-900, SB-800, SB-600, and
SB-400.
1
Remove the accessory shoe cover.
2
Mount
the flash
unit
on the accessory
shoe.
See the manual provided with the flash unit for details.
The built-in flash will not fire when an optional flash unit is
attached.
[]
The AS-15 Sync Terminal
When the AS-15 sync terminal
accessory
[_
Adapter
adapter
shoe, flash accessories
Use Only Nikon
(available
can be connected
separately)
is mounted
on the camera
via a sync cable.
Flash Accessories
Use only Nikon flash units. Negative
voltages or voltages over 250 V applied
to the accessory
shoe could not only prevent normal operation, but damage the sync circuitry of the camera
or flash. Before using a Nikon flash unit not listed in this section, contact a Nikon-authorized
service representative
for more information.
The Nikon Creative
Lighting
System
(CLS)
Nikon's advanced Creative Lighting System (CLS) offers improved communication
between the camera and compatible flash units for improved flash photography.
162
ll CL$-CompatibleFlashUnits
The camera can be used with the following CLS-compatible
• TheSB-900,SB-800,SB-600,SB-400,andSB-R200:
I
Ifa color filter
is attached
to the SB-900 when
flash units:
AUTOor _ (flash) is selected
for white
balance,
the
camera will automatically
detect the filter and adjust white balance appropriately.
2 Controlled
remotely using optional SB-900, SB-800 flash unit or SU-800 wireless Speedlight
commander.
3 m/ft., 20 °C (68 °F), SB-900, SB-800 and SB-600 at 35 mm zoom head position;
illumination.
SB-900 with
standard
TheSU-800wireless speedlight commander:When mounted on a CLS-compatible
camera, the SU-800 can be used as a commander for remote SB-900, SB-800,
SB-600, or SB-R200 flash units. The SU-800 itself is not equipped
with a flash.
The following features are available with the above flash units:
I Only available
when SU-800 is used to control
other
flash units.
2 CPU lens required.
3 Standard i-TTL flash for digital
4 Standard i-TTL flash for digital
5 Selected with flash unit.
SLR is used with
SLR is used with
6 Auto aperture (AA) is used regardless
7 Can be selected with camera.
[]
Guide
spot metering
spot metering.
of mode selected
or when
selected
with
flash unit.
with flash unit.
Number
To calculate the range of the flash at full power, divide the Guide Number by the aperture.
For example, at ISO I00 the SB-800 has a Guide Number of 38 m or 125 ft. (35 mm zoom head
position);
its range at an aperture
125+5.6=approximately
the Guide Number
of f/5.6 is 38+5.6
or about 6.8 meters (or in feet,
23 ft. 7 in.). For each twofold
increase in ISO sensitivity,
by the square root of two (approximately
multiply
1.4).
163
II Other FlashUnits
The following
flash
I Select mode
units
P,S,A, or M, lower
2 Flash mode is automatically
flash).
3 Autofocus
can be used in non-TTL
is available
built-in
auto
flash, and use optional
set to TTL and shutter-release
with AF-S VR Micro-Nikkor
and
manual
flash unit only.
is disabled.
105mm
modes.
Set flash unit to A (non-TTL
auto
f/2.8G IF-ED and AF-S Micro NIKKOR 60 mm
f/2.8G ED lenses only.
4 Available when camera is used to select flash mode.
Notes on Optional
Flash Units
Refer to the Speedlight
manual
for detailed
to the section on CLS-compatible
"digital
SLR" category
If an optional
instructions.
digital SLR cameras.
flash unit is attached
modes other than _, the flash will fire with
the built-in
flash can not be used (i
between
and 4).
100 and 1600. At values over
results may not be achieved at some ranges or aperture
flash-ready indicator blinks for about three seconds after a photograph
fired at full power and the photograph
may be underexposed.
When an SC-series 17, 28, or 29 sync cable is used for off-camera
settings.
If the
is taken, the flash has
flash photography,
correct
may not be achieved in i-TTL mode. We recommend that you choose spot
to select standard i-TTL flash control. Take a test shot and view the results in the
In i-TTL, use the flash panel or bounce
panels such as diffusion
If the controls
_
adapter
provided
panels, as this may produce
on the optional
flash compensation,
164
in the
in shooting
i-TTL flash control can be used at ISO sensitivities
exposure
metering
monitor.
CLS, refer
in the SB-8ODX, SB-28DX, and SB-5ODX manuals.
every shot, even in modes in which
1600, the desired
If the flash unit supports
The D3000 is not included
with the flash unit. Do not use other
incorrect
exposure.
SB-900, SB-800, SB-600, or SU-800 flash unit are used to set
will appear
in the information
display.
[I_
Notes on Optional
Flash Units (Continued)
The SB-900, SB-800, SB-600, and SB-400 provide
SB-600, and SU-800 provide
AF-assist illumination
red-eye reduction,
• SB-900: AF-assist illumination
is available for all focus
points; with17-135
mm AF lenses, however, autofocusis
not available with the focus points shown in gray.
• SB-8OO,
SB-6OOandSU-8OO:With24-105
mm AF lenses, AF-
assist illumination
is not available with the focus points
shown in gray.
With other flash units, the camera AF-assist illuminator
is
used for AF-assist illumination
and red-eye
while the SB-900, SB-800,
with the following
restrictions:
c
:
o c
3 8
_
17-I05mm
I
c
:
: u c
_ c
"
24-34 mm
'_
'
s
.;
I06-135mm
'_
_D
i}
{}
CD
(]
35-I05mm
reduction.
165
At the time
...............
of writing,
the following
accessories
were
available
for the
°. RechargeableLi-ionBattery EN_
available from local retailers and Nikon service representatives.
be recharged using an MH-23 quick charger. EN-EL9 batteries
Power
D3000.
The EN-ELga can
can also be used.
• QuickChargerMH-23(LJ 14): The MH-23 can be used to recharge
EN-EL9 batteries.
EN-ELga and
• Power ConnectorEP-5,ACAdapterEH-Sa:These accessories can be used to power the
camera for extended periods (EH-5 AC adapters can also be used). The EP-5 is
required to connect the camera to the EH-Sa or EH-5; see page 168 for details.
Videocable VideoCableEG-DIO0:Use the EG-D1 O0 to connect
• Nikon filters can be divided
the camera to a TV.
into three types: screw-on,
slip-in, and rear-
interchange.
Use Nikon filters; filters manufactured
by other
interfere with autofocus or the electronic rangefinden
The D3000 can not be used with
Filters
linear polarizing
polarizing filter instead.
• The NC and L37C filters are recommended
filters.
for protecting
makers may
Use the C-PL circular
the lens.
To prevent ghosting, use of a filter is not recommended
when the subject is
framed against a bright light, or when a bright light source is in the frame.
• Center-weighted
metering is recommended
with filters with exposure factors
(filter factors) over 1 x (Y44, Y48, Y52,056, R60, XO, Xl, C-PL, ND2S, ND4, ND4S,
ND8, ND8S, ND400, A2, A12, B2, B8, B12). See the filter manual
• DK-20CEyepieceCorrectionLenses:Lenses are available
with diopters
O,+0.5, +1, +2, and +3 m 1 when the camera diopter
neutral
position
(-1 m 1). Use eyepiece correction
adjustment
for details.
of -5, -4, -3, -2,
control is in the
lenses only if the desired
focus can not be achieved with the built in diopter adjustment
control (-1.7 to
+0.5 m 1). Test eyepiece correction lenses before purchase to ensure that the
desired focus can be achieved
eyepiece correction
Viewflnder
eyepiece
accessories
The rubber eyecup can not be used with
lenses,
Magnifier DG-2:The DG-2 magnifies
the scene displayed
in the center of the
viewfinder.
Use for close-up photography,
copying, telephoto lenses, and other
tasks that require added precision. Eyepiece adapter required (available
separately).
• EyepieceAdapterDK-22:The DK-22 is used when attaching
the DG-2 magnifier.
• Right-AngleViewingAttachment DR-6:The DR-6 attaches at a right angle to the
viewfinder eyepiece, allowing the image in the viewfinder to be viewed at right
ang les to the lens (for example,
from directly
above when the camera is
horizontal).
Optional
- NikonSpeedlightsSB-900,SB-800,SB-600,andSB-400
flashunits • NikonWirelessRemoteSpeedlightSB-R200
(_-_162)
• WirelessSpeedlightCommanderSU-800
166
_='°'=::_'_'=: CaptureNX2:A complete photo editing package.
Software Note:Usethe latest versions of Nikon software. Most Nikon software offers an auto
update feature when the computer is connected to the Internet. Seethe websites
listed on page xvi for the latest information on supported operating systems.
°:=::=-°-°:7°BoayCapBF:iAiTBe 5oay cap keep_rr
or,viewfi nder sc reen, and Iow-pa ss filte r
Bodycap free of dust when a lens is not in place.
_=::7_7T7 Wireless
Remote
ControlML-L3(_ 55): Use asa remote shutter releasefor self-portraits
or to prevent blur caused by camera shake. The ML-L3 uses a 3 V CR2025battery.
controls
Remote
Pressing the battery-chamber latch to the right (_1_),insert a fingernail into the gap
and open the battery chamber ((2)).Ensure that the battery is inserted in the
correct orientation ((4)).
Approved
Memory
Cards
The following SD memory cards have been tested and approved for use in the D3000.
All cards of the designated make and capacity can be used, regardless of speed.
*
If card will be used with
± SDHC compliant.
supports SDHC.
card reader or other
device, check that the device
If card will be used with card reader or other
supports
2GB cards.
device, check that the device
_'_
Other cards have not been tested. For more details on the above cards, please
contact the manufacturer.
167
Attaching
a Power Connector and AC Adapter
Turn the camera off before attaching
1
3
4
and AC adapter.
(0_) and power connector
(<(2_)
Insert the EP-5 power connector.
Be sure to insert the connector in the correct orientation.
Close the battery-chamber
Position the power connector
cover.
cable so that it passes
through the power connector
chamber cover.
slot and close the battery-
Connect
the AC adapter.
Connect the AC adapter power cable to the AC socket on AC adapter (_3_)and
the EP-5 power cable to the DC socket (_r4_).A _
icon is displayed in the
monitor
168
power connector
Ready the camera.
Open the battery-chamber
covers.
2
an optional
when the camera is powered
by the AC adapter and power connector.
Storage
When the camera will not be used for an extended period, remove the battery and
store it in a cool, dry area with the terminal cover in place. To prevent mold or
mildew, store the camera in a dry, well-ventilated
area. Do not store your camera
with naphtha or camphor moth balls or in locations that:
• are poorly ventilated or subject to humidities of over 60%
• are next to equipment that produces strong electromagnetic
fields, such as
televisions or radios
• are exposed to temperatures
above 50 °C (122 °F) or below -10 °C (14 °F)
Cleaning
Camera
using the camera at the beach or seaside, wipe off sand or salt with a cloth lightly
dampened in distilled water and dry thoroughly.
Important: Dust or otherforeign
matter inside the camera may cause damage not covered under warranty.
__us_
ana°°iin_
wi_ a _iowerl i_.............
Lens,
mirror,and using an aerosol blower, keep the can vertical to prevent the discharge of liquid. To
viewfinder remove fingerprints and other stains, apply a small amount of lens cleaner to a soft
cloth and clean with care.
Remove dust and lint with a blower.
Monitor
When removing
fingerprints
wipe the surface lightly with a soft cloth or chamois leather.
as this could result in damage or malfunction.
Do not use alcohol,
_I_ Servicing
thinner,
or other
volatile
and other stains,
Do not apply pressure,
chemicals.
the Camera and Accessories
The camera is a precision
camera be inspected
device and requires
by the original
regular servicing.
Nikon recommends
retailer or Nikon service representative
that the
once every one
to two years, and that it be serviced once every three to five years (note that fees apply to
these services).
Frequent
inspection
camera is used professionally.
lenses or optional Speedlights,
serviced.
and servicing
are particularly
recommended
if the
Any accessories regularly used with the camera, such as
should be included when the camera is inspected or
169
The Low-Pass Filter
The image sensor that acts as the camera's picture element is fitted with a low-pass
filter to prevent moir6. If you suspect that dirt or dust on the filter is appearing in
photographs, you can clean the filter using the Clean image sensor option in the
setup menu. The filter can be cleaned at any time using the Clean now option, or
cleaning can be performed automatically when the camera is turned on or off.
II "CleanNow"
Place the camera
base down.
Image sensor cleaning is most effective when
the camera is placed base down as shown at
right.
2
Display
the Clean
image
sensor
menu.
Press the MENUbutton to display the menus.
Highlight Clean image sensor in the setup
menu (_ 124) and press I_.
MENU
button
3
Select Clean now.
Highlight Clean now and press _).
The message shown at right will be displayed
while cleaning is in progress.
170
II "CleanAt"
Select
Clean
at.
Display the Clean image sensor menu as
described in Step 2 on the previous page.
Highlight Clean at and press I_.
2
Selectan
Highlight
option.
one of the following
options
and press
@.
Option
Description
The image sensor is automatically
camera is turned on.
_)ON Startup
cleaned each time the
_OFF Shutdown
The image sensor is automatically
cleaned during
each time the camera is turned off.
Startup &
_°°_ shutdown
The image sensor is cleaned automatically
shutdown.
@
Cleaning
off
Automatic
shutdown
at startup and at
image sensor cleaning off.
_I_ Image Sensor Cleaning
Using camera controls interrupts image sensor cleaning.
3erformed at startup if the flash is charging.
Image sensor cleaning
may not be
Cleaning is performed by vibrating the low-pass filter. If dust can not be fully removed using
the options in the Clean image sensor menu, clean the image sensor manually (_ 172) or
consult a Nikon-authorized
If image sensor cleaning
may be temporarily
3erformed
service representative.
is performed
disabled
to protect
several times in succession,
the camera's internal
image sensor cleaning
circuitry.
Cleaning
can be
again after a short wait.
171
IN Manual Cleaning
If foreign matter can not be removed from the low-pass filter using the Clean image
sensor option in the setup menu (_ 170), the filter can be cleaned manually as
described below. Note, however, that the filter is extremely delicate and easily
damaged. Nikon recommends that the filter be cleaned only by Nikon-authorized
service personnel.
Charge the battery
or connect an AC adapter.
A reliable power source is required when inspecting
or cleaning the low-pass
filter. Turn the camera off and insert a fully-charged EN-EL9a battery or connect
an optional EP-5 power connector and EH-Sa AC adapter.
2
3
Remove the lens.
Turn the camera off and remove the lens.
Select Mirror lock-up.
Turn the camera on and press the MENU
button to display the menus. Highlight
Mirror lock-up in the setup menu and press
I_ (note that this option is not available at
battery
4
levels of _
or below).
MENU
button
Press _).
The message shown at right will be displayed in the
monitor. To restore normal operation without inspecting
the low-pass filter, turn the camera off.
5
Raise the mirror.
Press the shutter-release button all the way down. The
mirror will be raised and the shutter curtain will open,
revealing the low-pass filter.
6
Examine
the low-pass
filter.
Holding the camera so that light falls on the low-pass filter,
examine the filter for dust or lint. If no foreign objects are
present, proceed to Step 8.
172
%
7
Clean
the filter.
Remove any dust and lint from the filter with a blower. Do
not use a blower-brush, as the bristles could damage the
filter. Dirt that can not be removed with a blower can only
be removed by Nikon-authorized
service personnel.
Under no circumstances should you touch or wipe the
filter.
8
Turn the camera
off.
The mirror will return to the down position and the shutter curtain will close.
Replace the lens or body cap.
[]
Use a Reliable
Power
The shutter curtain
Source
is delicate and easily damaged.
is raised, the curtain will close automatically.
following
precautions:
If the camera powers offwhile
To prevent
• Do not turn the camera off or remove or disconnect
raised.
damage to the curtain,
the mirror
observe
the
the power source while the mirror is
• If the battery runs low while the mirror is raised, a beep will sound and the self-timer lamp
will blink to warn that the shutter curtain will close and the mirror will be lowered after
about two minutes.
[I_ Foreign Matter
End cleaning
or inspection
immediately.
on the Low-Pass Filter
Nikon takes every possible
precaution
to prevent
with the low-pass filter during production
be used with interchangeable
foreign
and shipping.
lenses, and foreign
matter
matter
from coming
into contact
The D3000, however, is designed
may enter the camera when
to
lenses
are removed or exchanged.
Once inside the camera, this foreign matter may adhere to the
low-pass filter, where it may appear in photographs
taken under certain conditions.
To
arotect the camera when no lens is in place, be sure to replace the body cap provided
the camera, being careful to first remove all dust and other foreign
adhering
to the body cap. Avoid exchanging
Should foreign
with
that may be
lenses in dusty environments.
matter find its way onto the low-pass filter, clean the filter as described
above, or have the filter cleaned
affected
matter
by authorized
by the presence of foreign
(available separately;
imaging applications.
_
matter
Nikon service personnel.
on the filter can be retouched
167) or the clean image options
available
Photographs
using Capture
NX 2
in some third-party
173
Donot drop:The product
Keepdry: This product
may malfunction
is not waterproof,
to high levels of humidity.
if subjected
and may malfunction
if immersed
Rusting of the internal mechanism
Avoidsuddenchangesin temperature: Sudden changes
when entering
to strong shocks or vibration.
or leaving a heated building
in water or exposed
can cause irreparable damage.
in temperature,
such as those that occur
on a cold day, can cause condensation
device. To prevent condensation,
place the device in a carrying
exposing it to sudden changes in temperature.
inside the
case or plastic bag before
Keepaway from strong magneticfields: Do not use or store this device in the vicinity of equipment
that generates strong electromagnetic
radiation or magnetic fields. Strong static charges or
the magnetic
monitor,
fields produced
damage
by equipment
such as radio transmitters
data stored on the memory
Donot leavethe lenspointed at the sun:Do not leave the lens pointed
source for an extended
period.
could interfere with the
card, or affect the product's
internal circuitry.
at the sun or other strong
Intense light may cause the image sensor to deteriorate
light
or
produce a white blur effect in photographs.
Turnthe productoff beforeremovingor disconnectingthe powersource:Do not unplug the product
remove the battery
Forcibly cutting
product
carrying
while the product
is on or while images are being recorded
power in these circumstances
or
or deleted.
could result in loss of data or in damage to
memory or internal circuitry. To prevent an accidental interruption of power, avoid
the product from one location to another while the AC adapter is connected.
Cleaning:When cleaning the camera body, use a blower
wipe gently
with a soft, dry cloth.
sand or salt using a cloth lightly
dampened
The lens and mirror are easily damaged.
When using an aerosol
fingerprints
to gently
remove dust and lint, then
After using the camera at the beach or seaside, wipe offany
in pure water and then dry the camera thoroughly.
Dust and lint should be gently removed
blower, keep the can vertical
to prevent discharge
and other stains from the lens, apply a small amount
with a blower.
of liquid.
To remove
of lens cleaner to a soft cloth
and wipe the lens carefully.
See "The Low-Pass Filter" (_
170, 172) for information
Lenscontacts:Keep the lens contacts
clean.
Donot touchthe shutter curtain:The shutter
no circumstances
curtain is extremely
should you exert pressure on the curtain,
subject it to powerful
the curtain.
Storage:To prevent
on cleaning the low-pass filter.
air currents
from a blower.
mold or mildew,
thin and easily damaged.
poke it with cleaning
These actions could scratch, deform,
store the camera in a dry, well-ventilated
Under
tools, or
or tear
area. If the
product will not be used for an extended period, remove the battery to prevent leakage and
store the camera in a plastic bag containing a desiccant. Do not, however, store the camera
case in a plastic bag, as this may cause the material
gradually
174
loses its capacity
to absorb
moisture
to deteriorate.
Note that desiccant
and should be replaced
at regular intervals.
To prevent
mold or mildew, take the camera out of storage at least once a month.
camera on and release the shutter a few times before putting
Store the battery
in a cool, dry place.
Replace the terminal
Turn the
it away.
cover before putting
the battery
away.
Notesonthemonitor:
The monitor may contain a few pixels that are always lit or that do not light.
This is common to all TFT LCDmonitors and does not indicate a malfunction. Images recorded
with the product are unaffected.
Images in the monitor
may be difficult
Do not apply pressure to the monitor,
on the monitor
can be removed
soft cloth or chamois
leather.
to see in a bright
as this could cause damage
with a blower.
or malfunction.
Stains can be removed
Should the monitor
from broken glass and to prevent
light.
by wiping
Dust or lint
lightly with a
break, care should be taken to avoid injury
liquid crystal from the monitor
touching
the skin or entering
the eyes and mouth.
Moir& Moir_ is an interference pattern created by the interaction
of an image containing a
regular, repeating grid, such as the pattern of weave in cloth or windows in a building, with the
camera image sensor grid.
to the subject, zooming
camera.
If you notice moir_ in your photographs,
in and out, or changing
the angle between
try changing
the distance
the subject and the
Batteries:Dirt on the battery terminals can prevent the camera from functioning and should be
removed with a soft, dry cloth before use.
Batteries may leak or explode if improperly handled. Observe the following precautions when
handling batteries:
Turn the product off before replacing the battery.
The battery may become hot when used for extended periods. Observe due caution when
handling the battery.
Useonly batteries approved for use in this equipment.
Do not expose the battery to flame or excessive heat.
After removing the battery from the camera, be sure to replace the terminal cover.
Charge the battery before use. When taking photographs on important occasions, ready a
spare EN-EL9abattery and keep it fully charged. Depending on your location, it may be
difficult to purchase replacement batteries on short notice.
On cold days, the capacity of batteries tends to decrease. Be sure the battery is fully charged
before taking photographs outside in cold weather. Keep a spare battery in a warm place and
exchange the two as necessary. Once warmed, a cold battery may recover some of its charge.
Continuing to charge the battery after it is fully charged can impair battery performance.
Used batteries are a valuable resource. Pleaserecycle used batteries in accord with local
regulations.
175
The following table lists the settings that can be adjusted in each mode. Defaults can
be restored with Reset shooting options (_ 119).
-_°_ °°= l_="_-°°
i/
i/
i/
i/
i/
i/
111111--
i/
1 Reset when mode dial is rotated to new setting.
176
_°_T°_°T_ _ooop-
........
_-_ _........
_-_ _
........
_-_ _
i/
i/
i/
'_° --="
The following
table shows the approximate
a 4 GB Lexar Media Professional
settings.
number of pictures that can be stored on
133x card at different
image quality and size
No. of images1
Buffercapacity2
NEF (RAW)+
JPEG basic 3
L
9.8 MB
227
6
NEF (RAW)
-L
8.6 MB
4.7 MB
235
541
6
100
JPEG fine
M
2.7 MB
951
100
S
1.3 MB
2000
100
L
2.4 MB
1000
100
M
1.4 MB
1800
100
S
0.7 MB
3900
100
L
1.3 MB
2000
100
M
0.7 MB
3400
100
S
0.4 M B
6900
100
JPEG normal
JPEG basic
1 All figures are approximate.
File size varies with
2 Maximum
number of exposures
800 (_ 62) or if Noise reduction
3 Image
size applies
scene recorded.
that can be stored in memory
(_ 122) or Active D-Lighting
to JPEG images only.
buffer. Drops at ISO sensitivities
(_ 64) is on.
Size of NEF (RAW) images can not be changed.
over ISO
File size is the
total for NEF (RAW) and JPEG images.
177
The exposure
program
for programmed
auto
is shown
in the following
graph:
F (lens focal length) <_55 mm
--55mm
<F<_ 135mm
_135mm<F
F1
F1,4
F2
@F2.8
/ ////////
_ F4
r_ F8
F11
F16
F22
F32
////////
////////
////////////
////////////
////////////
///////////./.
/
30"15"
8"
4"
2"
1"
2
4
8
15
30
68
125 250 500100020004000
Shutter speed
The maximum and minimum values for EV vary with ISO sensitivity; the above graph
assumes an ISO sensitivity of ISO 100 equivalent. When matrix metering is used,
values over 161/3 EV are reduced to 161/3 EV.
178
If the camera fails to function
before consulting
as expected,
check the list of common
problems
below
your retailer or Nikon representative.
Display
Viewfinderisout of focus: Adjust viewfinder
focus or use optional
eyepiece
correction
lenses
(_ 23, 166).
Viewfinderis dark: Insert a fully-charged
battery
Displaysturn offwithout warning: Choose longer
(_
15, 25).
delays for Auto off timers (_ 130).
Information displaydoesnot appear in monitor:Shutter-release
button is pressed halfway. If
information display does not appear when you remove your finger from shutter-release
button,
confirm
that On is selected for Auto info display (_ 127) and that battery
is charged.
Cameradoesnot respondto controls:See "A Note on Electronically-Controlled
Cameras;' below.
Viewfinderdisplayisunresponsiveanddim: The response times and brightness
with temperature.
of this display vary
[]
A Note on Electronically-Controlled
In extremely
rare instances,
unusual
Cameras
characters
may
appear in the monitor and the camera may stop
functioning.
In most cases, this phenomenon
is
caused by a strong external
static charge.
_
Reset switch
Turn the
camera off, remove and replace the battery, taking
care to avoid burns, and turn the camera on again, or, if
you are using an AC adapter (available
disconnect and reconnect the adapter
camera on again.
If the problem
separately),
and turn the
persists, turn the camera off, open the connector
aress the reset switch (this also resets the camera clock). Note that disconnecting
cover and
the power
source or pressing the reset switch may result in loss of any data not recorded to the memory
card at the time the problem occurred. Data already recorded to the card will not be
affected. In the event of continued malfunction,
contact your retailer or Nikon-authorized
service representative.
179
Shooting
(All Modes)
Cameratakes time to turn on: Delete files or folders.
Shutter-releasedisabled:
• Memory card is locked, full, or not inserted
• Built-in flash is charging (_ 29).
(_ 20, 22, 26).
• Camera is not in focus (_ 28).
• CPU lens with aperture ring attached but aperture not locked at highest
• Non-CPU lens is attached but camera is not in mode M (_ 159).
Final photois larger than areashownin viewfinder:Viewfinder
is approximately
horizontal
f-number
(_
157).
and vertical frame coverage
95%.
Photos are out of focus:
• AF-S or AF-I lens is not attached:
use AF-S or AF-I lens or focus manually.
• Camera unable to focus using autofocus:
use manual
• Camera is in manual focus mode: focus manually
focus or focus lock (_ 46, 48).
(_ 48).
Focusdoesnot lockwhen shutter-releasebutton is pressedhalfway: Use AE-I./AF-Lbutton
when AI=-Cfocus mode is selected or when photographing
moving
subjects
to lock focus
in AI=-Amode.
Cannot selectfocus point:
• [m] Auto-area
selected for AF-area mode: choose another
• Press shutter-release
button
Cannot selectAF-areamode: Manual
halfway to turn monitor
mode (_ 44).
off or activate exposure
meters (_ 26).
focus selected (_ 42).
Cameraisslowto recordphotos:Turn noise reduction
off (_
122).
Randomly-spacedbright pixels("noise") appear in photos:
• Choose lower ISO sensitivity
• Shutter
or turn noise reduction
speed is slower than 8 s: use noise reduction
AF-assistilluminator doesnot light:
• Camera is in _i or _ mode (_ 30): select another
on (_
122).
(_ 122).
mode.
• AF-assist lamp does not light for continuous-servo
autofocus.
Choose AF-S.In single-point,
dynamic-area,
or 3D-tracking AF, select center focus point (_ 46).
• Off selected for AF-assist (_ 122).
• l lluminator
has turned off automatically,
wait for lamp to cool down.
180
llluminator
may become
hot with continued
use;
Nophototaken when remotecontrolshutter-releasebutton is pressed:
•
•
Replace battery in remote control (_ 167).
Choose remote control mode (_ 53, 55).
•
Flash is charging
(_ 29).
• Time selected for Remote
•
Bright light
is interfering
on duration
has passed: reselect remote
Smudgesappear in photographs:Clean front and rear lens elements.
image sensor cleaning
control
mode (_ 131).
with remote.
(_
If problem
persists, perform
170).
Menu item can not be selected:Some options
are not available
in all modes.
Shooting (P, S, A, M)
Shutter-releasedisabled:
•
Non-CPU lens is attached:
•
Mode dial rotated
new shutter
rotate camera mode dial to M (_
to Safter shutter speed of"bulb"
159).
or "time"
selected in mode M: choose
speed (_ 69).
Fullrange of shutterspeedsnotavailable: Flash in use (_ 60).
Colorsareunnatural:
• Adjust white
• Adjust
balance to match light source (_ 80).
Set Picture Control
settings
(_ 87).
Cannot measurewhite halance:Su bje ct is to o d a
...................................................................
Image cannot be selectedassourcefor presetwhite balance:Image was not created with D3000 (_ 86).
Effectsof PictureControldiffer from image to image:A (auto) is selected for sharpening,
saturation.
For consistent
results over a series of photos,
choose another
Cannot adjustcontrastfor selectedPictureControl:Active D-Lighting
before adjusting
contrast
setting
contrast,
or
(_ 89).
is on. Turn Active D-Lighting
off
(_ 64).
Metering can not be changed:Autoexposure
lock is in effect (_ 75).
Exposurecompensation can not
0nly oneshottaken eachtime shutter-releasebutton is pressedin continuousshootingmode: Lower built-in
flash (_ 54).
Reddishareasappearin photosor textures areuneven:Reddish areas and uneven textures may appear
in long time-exposures.
Turn noise reduction on when shooting at shutter speeds of "bulb" or
"time"
(_ 122).
181
Playback
Flashingareas,shootingdata,or graphsappear onimages:Press •
displayed,
or change settings for Display
or •
to choose photo
information
mode (_ 92, 118).
NEF(RAW)image is not playedback:Photo was taken at image quality
of NEF+JPEG basic (_ S1).
Somepicturesarenot displayedduringplayback:Select All for Playback
folder.
automatically
selected after photograph
is taken (_
Note that Current is
117).
"Tall" (portrait) orientation photosare displayedin "wide" (landscape)orientation:
• Select On for Rotate tall (_ 118).
•
Photo was taken with Off selected for Auto image rotation
• Camera orientation
was changed
while
release mode or camera was pointed
•
Photo is displayed
shutter-release
up or down
in image review (_
(_
button
when photo
128).
was pressed in continuous
was taken (_ 54).
118).
Cannot delete picture:
•
Picture is protected:
• Memory
remove protection
(_ 100).
card is locked (_ 22).
Cannot retouchpicture:Photo can not be further
edited with this camera (_ 140).
Cannot changeprintorder:
• Memory
card is full: delete pictures
• Memory
card is locked (_ 22).
(_ 26, 101).
Cannot selectphotofor printing: Photo is in NEF (RAW) format. Create JPEG copy using NEF (RAW)
processing or transfer to computer and print using supplied software or Capture NX 2 (_ 105,
149).
Pkture is not displayedon TV: Choose correct video mode (_ 127).
Cannot transfer photos to computer:OS not compatible
reader to copy photos
to computer
(_
with camera or transfer
software.
NEF(RAW)photosnot displayedin Capture NX2: Update to latest version (_
167).
Image DustOffoption in CaptureNX2 doesnot have desiredeffect: Image sensor cleaning
position
of dust on the low-pass filter.
Use card
105).
Dust off reference
data recorded
changes
the
before image sensor
cleaning is performed can not be used with photographs
taken after image sensor cleaning is
performed.
Dust off reference data recorded after image sensor cleaning is performed can not
be used with photographs
taken before image sensor cleaning
is performed
(_ 129).
Miscellaneous
Date of recordingisnot correct:Set camera clock (_
182
19, 127).
Menu itemcan not be selected:Some options
are not available
or when no memory
13, 20, 140).
card is inserted (_
at certain
combinations
of settings
This section lists the indicators and error messages that appear in the viewfinder
monitor.
[]
Warning
and
Icons
A flashing _ in the monitor
can be displayed
or _] in the viewfinder
in the monitor
indicates
that a warning
or error message
by pressing the ? (ql_) button.
:!
_g
to minimum
aperture
1_
158
_ach
Lensnot attached
'._
I
non-IX NIKKOR lens.
..............
Shutter releasedisabled.
I
'i.........
159
-14,15
This battery cannot be used.
Ch__o
ed battery
Initialization error.Turn
_nd
Battery levelis low.
_mera
L.ompleleoperationanu
I
(EN-EL9a).
166
replace
5 25
I.......
offand
turn
_
....
,_ _
replace
L. _ _- .....
battery, and
recharge or
-
battery.
_
that card is correctly
I_
/ /J
_
zu
_tected.)..
Slide
Use approved
card.
167
_ersists,
card may be
_uthorized
21
service
representative.
Th'__iles
or insert
new memory
I__
card.
Insert new memory
_ireless
_ted
_smission,
33,
101
card.
20
signal after
139
for Eye-Fi upload.
turn the
camera off and remove the card.
183
Monitor
_mera
......
_-
L.arotsTuu
_
off and insert new
|
• Reduce quality or size.
Delete photographs.
"
-
50
33,
"
101
__
20
__
_ng
autofocus.
Change
__
28,
42, 48
_0
• Use commercial
Subjectistoo bright•
_o
_
sensitivity
ND filter
62
speed
69
In mode:
_
$1ncrease shutter
__
70
_g
Subjectistoo dark•
_o
rlSO sensitivity
62
In mode:
SLower shutter
speed
69
__
70
NoBulb in Smode
_
select manual
exposure
69 71
•
--
/
_er
--
_just
Flashisin TTLmode•Choose_ IE)llnKs)
........
_n
anoznersezzmgoruseau, u _or
lens.
__
_tached:
_stance
_sary,
_ws
_rmware
184
in.
settings and try
useCPU lens.
_
optional
'
flash unit
_n_rtur_
fl_£h
flash
---
___
t._/
__
_hipct
_ject_ure,
_0
Flasherror
..Check photo
_uthorized
sensitivity.
flash is in
58
61,
62, 70
--
is very short.
increase focus
from appearing in
for optional
service
--
_!_:ii_:_u_!__iu_ii_
_i_i_o_]i!
C¸
Monitor
::
_:!_
Solution
._rr._r.
i,ress.snutterrelease frequently
I_Ut_onagain.
consult
Nikon-authorized
service
--
representative.
--
Start-up error.Contact a
Nikon-authorized service
representative.
_lce
_utoexposure error.L.ontac_ _
a Nikon-authorizedservice
Foldercontainsnoimages. _dor
contains no images.
selecta different
__
'
117
Filedoesnot containimage _d
data.
_
_ain
.....
_,
or modif)ed
usinga
....
of camera, or file is
select Continue
(if
Insert paper of correct
Checupaper.
Checkink supply.
141
NEF (RAW)images
_.necuprinter.
Outofink.
* See printer
20
-......................
i_
--_
--_
manual for more information.
185
iii
ii _
!
i
i
i i_
i
_
i
i
i
II Nikon D3000 Digital Camera
Image size(pixe!s)
• 3,872 x 2,592 (L)
Fiie_fo°r°matT7
°_°_
• 1,936 x 1,296 (S)
• NEF(RAW)
• 2,896 x 1,944 (M)
• JPEG:JPEG-Baseline compliant with fine (approx.
1 : 8), or basic (approx. 1 : 16) compression
• NEF(RAW)+JPEG:Single photograph
JPEG formats
recorded
1 : 4), normal (approx.
in both NEF (RAW) and
qctureControlSystem Can be selected from Standard, Neutral, Vivid, Monochrome,
Landscape; selected Picture Control can be modified
Media
SD (Secure Digital)
memory
cards, SDHC-compliant
_Fi°ie
-]_y_s
i em-'_'_'_':'_'_'_T
Format),
Portrait,
Exif 2.21 (Exchangeable
__F
iDigit ai Print 0 _ er ..........
Image File Format for Digital Still
Cameras), PictBridge
Viewfinder
_i;_Oin_g_e_,!
Eye-level pentamirror
single-lens reflex viewfinder
.........
i Approx. 95% horizontal and 95% vertical
_Ma°gnJfica_tJon_!!!!!!!!!!!!!!!7_Approx.
0.8 x (50 mm f/1.4 lens at infinity, -1.0 m 1)
[yepeint
18 mm (-1.0 m 1)
Diepteradjustment
-1.7-+0.5
Focusingscreen
Type B BriteView Clear Matte Mark V screen with focus frame (framing
grid can be displayed)
Reflexmirror
Lensaperture
186
Quick
m 1
return
Instant
return, electronically
controlled
Compatible lenses
AF-SorAF-I:All functions supported.
TypeGor D AFNIKKORwithout built-inautofocusmotor: All functions
autofocus
supported.
OtherAFNIKKOR:All functions
matrix metering
supported
• AI-P NIKKOR:All functions
•
except autofocus
and 3D color
II. Lenses for F3AF not supported.
TypeDPCNIKKOR:All functions
shooting modes.
matrix metering
except
IX NIKKOR lenses not supported.
supported
supported
except autofocus
except autofocus
and some
and 3D color
II.
Non-CPU:Autofocusnotsupported.
Can be used in exposure
but exposure meter does not function.
Electronic rangefinder
f/5.6 or faster.
can be used if lens has a maximum
Electronically-controlled
vertical-travel
focal-plane
1/4ooo- 30 s in steps of 1/3 EV, bulb, time (requires
remote control)
mode M,
aperture
of
shutter
optional
ML-L3 wireless
Flashsyncspeed
X=1/200 s; synchronizes
Frameadvancerate
Up to 3 fps (manual focus, mode M or S,shutter speed 1/2s0s or faster, and
Self-timer
other settings at default values)
Can be selected from 2, 5, 10, and 20 s duration
(quick-response
Mete[i,g method
with shutter at 1/200s or slower
remote)
} • Matrix: 3D color matrix metering
II (type G and D lenses); color matrix
metering II (other
CPU of
lenses)
• Center-weighted:
Weight
75% given to 8-mm circle in center of frame
• Spot: Meters 3.5-mm circle (about 2.5% of frame) centered on selected
focus point
Range(ISO100, f/1.4
• Matrix or center-weightedmetering: 0-20
lens,20 °C/68°F)
•
Spotmetering: 2-20 EV
Exposuremeter
coupling
EV
CPU
Mode- _-_°- .....
auto (flash off)); scene modes (_ portrait;
l_i landscape;
._. child; _ sports; _ close up; [] night portrait;
programmed
auto with flexible program
aperture-priority
a uto (A); manual (M)
Exposurecompensation -5 - +5 EV in increments
(P); shutter-priority
auto (S);
of 1/3 EV
[xpo°s°ure°Jock°_::_:
_°:°_ __°_
7
............................................
ISOsensitivity
ISO 100 - 1600 in steps of 1 EV; can also be set to approx.
(Recommended
ExposureIndex)
1600 (ISO 3200 equivalent);
ActiveD-Lighting
Can be selected from
auto ISO sensitivity
1 EV above ISO
control available
On or Off
187
Autofocus
Nikon Multi-CAM 1000 autofocus sensor module with TTL phase
detection,
11 focus points (including one cross-type sensor), and AFassist illuminator
(range approx. 0.5-3
Detectionrange
-1 -+19
Lenssento
• Autofocus(AF):Single-servo
m/1 ft. 8 in.-9
ft. 10 in.)
EV(ISO 100,20 °C/68 °F)
AF-S/AF-C selection
AF (AF-S);continuous-servo
(AF-A);predictive
AF (AF-C);auto
focus tracking
activated
automatically
according to subject status
• Manual focus(MF): Electronic rangefinder
can be used
Focuspoint
Can be selected from
11 focus points
AF-areamode
Single point, dynamic
area, auto-area,
Focuslock
Focus can be locked by pressing shutter-release
3D-tracking
(11 points)
button
halfway
(single-
servo AF) or by pressing AE-L/AF-Lbutton
Built,in flash
AUTO _
,-., _, .,_.,_, _i: Auto flash with auto pop-up
P,S,A,M: Manual
pop-up
with button
Approx.
Flashcontrol
• TTL:i-TTL balanced fill-flash and standard i-TTL flash for digital SLR
using 420-pixel RGB sensor are available with built-in flash and SB-900,
....
12/39, 13/43 with manual
release
GuideHumber
flash (m/ft,
ISO 100, 20 °C/68 °F)
SB-800, SB-600, or SB-400 (i-TTL balanced fill-flash
matrix or center-weighted
metering is selected)
Autoaperture: Available
........
with SB-9OO/SB-800 and CPU lens
with SB-900 and SB-800
• _0T0
.-., z,
. .,_.,_: Auto, auto with red-eye reduction, off; fill-flash
eye reduction available with optional flash units
• _i: Auto slow sync, auto slow sync with red-eye reduction,
sync and slow sync with red-eye
flash units
reduction
_i, 4: Fill-flash and red-eye reduction
units
• P,A: Fill-flash,
rear-curtain
red-eye reduction,
• S,M: Fill-flash,
Flashcompensation
when
• Non-TTLauto:Supported flash units include SB-9OO, SB-8OO, SB-8ODX,
SB-28DX, SB-28, SB-27, and SB-22S
• Distance-prioritymanual: Available
Flashtoo(
is available
red-eye
rear-curtain
-3 - +1 EV in increments
available
available
and redoff; slow
with optional
with optional
flash
with slow sync, slow sync, slow sync with
reduction
sync, red-eye
reduction
of 1/3 EV
Flash,readyindicator Lights when built-in flash or optional flash unit such as SB-900, SB-800,
SB-600, SB-400, SB-80DX, SB-28DX, or SB-50DX is fully charged; blinks for
3 s after flash is fired at full output
Accessoryshoe
ISO 518 hot-shoe
with sync and data contacts
and safety lock
HikonCreativeLighting Advanced Wireless Lighting supported with SB-900, SB-800, or SU-800 as
System(CLS)
commander;
Flash Color Information Communication
supported with
built-in
Syncterminal
188
flash and all CLS-compatible
AS-15 sync terminal
adapter
(available
flash units
separately)
Monitor
Playback
3-in., approx.
230k-dot
TFT LCD with brightness
Full-frame and thumbnail
playback zoom, playback
slide show, histogram
image comment
adjustment
(4, 9, or 72 images or calendar) playback with
of stop-motion
movies created with D3000,
display, highlights,
auto image rotation,
and
(up to 36 characters)
USB
Hi-Speed USB
Videooutput
Can be selected from
NTSC and PAL
Supportedlanguages Chinese (Simplified and Traditional), Danish, Dutch, English, Finnish,
French, German, Italian, Japanese, Korean, Norwegian, Polish,
Portuguese,
Russian, Spanish, Swedish
Battery
One rechargeable
Li-ion EN-EL9a battery
ACadapter
EH-Sa AC adapter;
requires EP-5 power connector
Tripodsocket
1/4 in. (ISO 1222)
Dimensions
(WxHxD)
Approx.
126 x 97 x 64 mm (5.0 x 3.8 x 2.5 in.)
Weight
Approx.
485 g (1 lb. 1.1 oz.) without
battery,
(available
memory
separately)
card, or body cap
Temperature
0-40 °C (+32-104 °F)
Humidity
Lessthan 85% (no condensation)
Unless otherwise stated, all figures are for a camera with a fully-charged battery operating at
an ambient temperature of 20 °C (68 °F).
• Nikon reserves the right to change the specifications of the hardware and software
described in this manual at any time and without prior notice. Nikon will not be held liable
for damages that may result from any mistakes that this manual may contain.
189
Ratedinput
Ratedoutput
AC 100-240 V (50/60 Hz)
DC 8.4 V/900 mA
Supported batteries
Nikon EN-EL9a or EN-EL9 rechargeable
(EN-ELg) when battery
Operating temperature 0-40 °C (+32-104 °F)
190
Li-ion battery
is fully discharged
(WxHxD)
Approx.
82.5 x 28 x 65 mm (3.2 x 1.1 x 2.6 in.)
length of cord
Approx.
1800 mm (5 ft. 11 in.)
Weight
Approx.
80 g (2.8 oz.), excluding
power cable
mount
Supportedcameras
Nikon digital SLR cameras (DX format)
Focallength
1855
Maximum aperture
f/3.5-5.6
mm
Construction
11 elements
in 8 groups (including
Pictureangle
76°-28°50
,
1 aspherical
element)
Focallength scale(ram) 18, 24, 35, 45, 55
Distanceinformation
Output
Zoomcontrol
Zoom adjusted
Focusing
Autofocus
with Silent Wave Motor;
Vibrationreduction
Lensshift
method
Closestfocusdistance
028 m (11 in) from focal plane mark (_ 49) at all zoom settings
Di°ai_hragm-'::__::_ _°sev
to camera
by rotating
en: biaded _
separate zoom ring
manual
using voice coil motors
_
22 at 18 mm;f/56
m with rounded°_
Aperture range
f/35
36at
Metering
Maximum
Attachmentsize
52 mm (P=O 75 mm)
bayonet
mount to end of lens)
Weight
Approx
265 g (9 3 oz)
Lenshood
HB45 (available
focus
(VCMs)
es and°fuiiy automatic
aperture
55 mm
aperture
separately;
attaches
as shown below)
I
Nikon reserves the right to change
in this manual
the specifications
at any time and without
prior notice
that may result from any mistakes that this manual
of the hardware
and software
described
Nikon will not be held liable for damages
may contain
191
|| Supported Standards
•
DCFVersion
2.0: The Design Rule for Camera File Systems (DCF) is a standard widely
used in the digital camera industry to ensure compatibility
among different makes
of camera.
•
DPOF:Digital Print Order Format (DPOF) is an industry-wide
standard that allows
pictures to be printed from print orders stored on the memory card.
• Exifversion2.21: The D3000 supports Exif (Exchangeable Image File Format for
Digital Still Cameras) version 2.21, a standard in which information stored with
photographs is used for optimal color reproduction when the images are output
on Exif-compliant printers.
• PictBridge:A standard developed through cooperation with the digital camera and
printer industries, allowing photographs to be output directly to a printer without
first transferring them to a computer.
TrademarkInformation
Macintosh, Mac OS, and QuickTime are registered
Windows and Windows Vista are either registered
Corporation
in the United States and/or
Card Association.
192
PictBridge
mentioned
in this manual
trademarks
or registered
trademarks
trademarks,
other countries.
of Apple Inc. Microsoft,
or trademarks of Microsoft
The SD logo is a trademark
and the SDHC logo are trademarks.
or the other
trademarks
documentation
provided
of their respective
holders.
of the SD
All other trade names
with your Nikon
product
are
Battery Life
The number of shots that can be taken with fully-charged
batteries varies with the
condition of the battery, temperature, and how the camera is used. Sample figures
for EN-EL9a (1080 mAh) batteries are given below.
• Single-framereleasemode(CIPAstandard1):Approximately
550 shots
• Continuousreleasemode(Nikonstandard2): Approximately
2000 shots
1 Measured at 23 °C/73.4 °F (+2 °C/3.6 °F) with an ADS DX NIKKOR 18-55mm
f/3.5-5.6G VR lens under the following test conditions: lens cycled from infinity
to minimum range and one photograph taken at default settings once every
30 s; after photograph is taken, monitor is turned on for 4 s; tester waits for
exposure meters to turn off after monitor is turned off; flash fired at full power
once every other shot.
2 Measured at 20 °C/68 °F with an ADS DX NIKKOR 18-55mm f/3.5-5.6G VR lens
under the following test conditions: vibration reduction off, continuous release
mode, focus mode set to AF-C,image quality set to JPEG basic, image size set to
M (medium), white balance set to AUTO,
ISO sensitivity set to ISO 100, shutter
speed 1/250s, focus cycled from infinity to minimum range three times after
shutter-release button has been pressed halfway for 3 s; six shots are then taken
in succession and monitor turned on for 4 s and then turned off; cycle repeated
once exposure meters have turned off.
The following can reduce battery life:
• Using the monitor for extended periods
• Keeping the shutter-release button pressed halfway
• Repeated autofocusoperations
• Taking NEF (RAW) photographs
• Slow shutter speeds
• Using VR (vibration reduction) mode with VR lenses
To ensure that you get the most from rechargeable Nikon EN-ELga batteries:
• Keep the battery contacts clean. Soiled contacts can reduce battery performance.
• Use batteries immediately after charging. Batteries will lose their charge if left
unused.
193
Index
Symbols
_.° (Auto mode) ................................25
(Auto (flash off) mode) ........... 25
(Portrait) .......................................
30
(Landscape) .................................30
O. (Child) ............................................
31
(Sports) ..........................................
31
(Close up) .....................................31
[] (Night portrait) ...........................31
P (Programmed auto) ....................68
S (Shutter-priority
auto) ...............69
A (Aperture-priority
auto) ............70
M (Manual) ........................................71
GUIDE(Guide) ....................................
35
(flexible program) ......................68
WB(White balance) ........................80
PRE (Preset manual) ......................83
[]
(Single frame) ............................53
(Continuous) ..............................53
(Self-timer) ...................53, 55, 131
2s (Delayed remote) ............53, 55
(Quick-response remote) .. 53, 55
[-] (Single point) ............................45
[.0.](Dynamic area) .........................45
[m] (Auto-area) .................................
45
[3I)] (3D-tracking (11 points) ) ..... 45
[_ (Matrix) .........................................
74
_l (Center-weighted)
....................74
[] (Spot) .............................................
74
(Flash compensation) ............78
[] (Exposure compensation) ...... 76
[] (Information) button ..................6
,B' (Information edit) button .........7
_q (Help) .............................................
11
• (focus indicator) ...........28, 46, 49
(flash-ready indicator) ..............29
•i_('Beep" indicator) .....................131
Numerics
3D color matrix metering
AF-area mode .........................44, 122
AF-assist .............................
28, 43, 161
A-M switch .................................16, 48
Amber ........................................
82, 145
Aperture .....................................67, 70
Aperture-priority
auto ..................70
Attaching the lens ..........................16
Auto (White balance) ....................80
Auto dim ..........................................
125
Auto image rotation ....................128
Auto info display ..........................127
Auto ISO sensitivity .....................120
Auto meter-off .......................26, 130
Auto off timers ..............................
130
Auto-area (AF-area mode) ..........45
Autofocus ...................................
41-47
Auto-servo AF ..................................
42
Available Settings ........................176
II .........74
A
AC adapter ............................166, 168
Accessories .....................................
166
Active D-Lighting ..................64, 134
Active folder ...................................
138
Adobe RGB .....................................
121
AE lock ..............................................
135
AE-I.............................................
75, 135
CPU contacts ..................................
158
CPU lens ....................................
17, 157
Creative Lighting System ..........162
Cross screen (Filter effects) .......144
Cyanotype .......................................
143
D
Date and time .........................18, 127
Date counter ........................136, 137
Date format .............................
18, 127
Date imprint ...................................
136
Daylight saving time ............18, 127
DCF version 2.0 ...................121,192
Delayed remote (Release mode) ....
53, 55
Delete ........................................
33, 101
Delete all images ..........................102
Delete current image ...........33, 101
Delete selected images ..............102
Digital Print Order Format ........ 107,
110,114,192
B
Diopter adjustment
166
Battery ..................................14, 15, 25
Beep ..................................................
131
Before and after ............................154
Black-and-white ............................143
Direct sunlight (White balance) 80
Display mode .................................
118
D-Lighting .......................................
142
DPOF ....................107, II0, I14, 192
Blue ............................................
82, 145
Blue intensifier (Filter effects) .. 144
Dust Off ref photo ........................129
Dynamic area ...................................
45
Body cap ..............................2, 16, 167
Border (PictBridge) ............ 109, 112
Built-in flash ...................................
123
Bulb .....................................................
72
E
Burst ....................................................
54
Buttons .............................................
134
C
Calendar ............................................
98
Calendar playback .........................98
Center-weighted
............................74
3D-tracking ......................................
45
3D-tracking (11 points) (AF-area
mode) ...............................................
45
420-pixel RGB sensor ....................74
194
AE-L/AF-L ........................................
135
AE-UAF-Lbutton .........................47, 75
AF ..................................................
41-47
Charging a battery .........................14
Clean image sensor .....................170
Clock ..........................................
18, 127
Clock battery ....................................
19
Cloudy (White balance) ...............80
CLS.....................................................
162
Color balance .................................
145
Color outline ..................................
1 S0
Color space ...........................119, 121
Color temperature .........................81
Compatible lens ............................157
Computer ........................................
10S
Continuous (Release mode) ....... 53
Continuous-servo
AF ....................42
control ...... 23,
Exif version 2.21 ..................121,192
Exposure
Exposure
Exposure
Exposure
..............................67, 75, 76
compensation ..............76
indicator .........................71
lock ..................................75
Exposu re meters ....................26, 130
Exposure mode ...............................67
Exposure program .......................178
Eye-Fi upload .................................
139
F
File information
..............................92
File number sequence ................133
Filter effects .............................89, 144
Fine-Tuning White Balance .........82
Firmware version ..........................139
Flash .............................
29, 58, 59, 162
Flash (White balance) ...................80
Flash compensation ......................78
Flash control ...................................
123
Flash mode .......................................
sg
Flash range .......................................
61
Flash ready indicator ............29, 164
Flash sync speed ..........................187
Flexible program .............................
68
Fluorescent (White balance) .......80
Fn button .........................................
134
f-number ..................................
70, 158
Focal length ...................................161
Focal length scale ...........................
16
Focal plane mark .............................
49
Focus ...........................................
41-49
Focus indicator ...................28, 46, 49
Focus lock ..........................................
46
Focus mode .......................................
41
Focus point ...................27, 41,46, 49
Focus tracking ..................................
45
Focusing screen ............................186
Focusing the viewfinder ...............23
Focus-mode switch .................16, 48
Format .................................................
21
Format memory card .....................21
Frame interval (Slide show)__.. 104
Front-curtain sync ...........................
60
Full-frame playback ........................
91
P
Landscape (Set Picture Control) 87
Language .................................18, 127
Large ...................................................
52
Large (Image size) ..........................52
LCD ....................................................
125
Page size (PictBridge) ........108, 112
Photo info ................................
92, 118
PictBridge ..............................
107, 192
Picture angle ..................................161
Picture Controls .......................87, 88
LCD brightness ..............................
125
Lens .....................................16, 17, 157
Playback .....................................32, 91
Playback folder .............................117
Lens
Lens
Lens
Lens
Long time-exposure with remote
control ..............................................
72
Playback information ...........92, 118
Playback menu ..............................
117
Playback zoom ................................g9
Portrait (Set Picture Control)...... 87
Preset manual (White balance) 80,
83
M
Press the shutter-release
cap .............................................
16
focus ring ................................16
mount ...........................2, 16, 49
VR switch .................................16
Magenta ...................................
82, 145
Manual .........................................
48, 71
Manual focus ...................................48
Matrix .................................................
74
Max. sensitivity .............................120
Maximum aperture .......................49
Medium .............................................
52
G
Green .........................................
82, 145
Green intensifier (Filter effects) ......
144
Guide menu ......................................
35
H
Help ......................................................
11
Hi (Sensitivity) ...........................
62, 63
Highlights ................................
94, 118
Histogram
................................
93, 118
I
Image
Image
Image
Image
L
comment ...........................128
overlay ................................147
quality ...................................
50
review .................................118
Image size ..........................................
52
Incandescent (White balance)...80
Index print ......................................
113
Info display format ......................125
In-focus indicator ..............28, 46, 49
Information .........................6, 92, 125
Medium
Memory
Memory
(Image size) ....................52
buffer ..........................
28, 54
card .................20, 167, 177
Memory card capacity ................177
Metering ............................................
74
Min. shutter spd ...........................120
Miniature effect ............................150
Minimum aperture ..................17, 67
Mirror ............................................
2, 172
Mirror lock-up ................................
172
Monitor .....................................
gl, 125
Monochrome .................................
143
Monochrome
87
Mounting
(Set Picture Control)
index ..............................16
N
NEF ......................................................
50
NEF (RAW) .......................50, 105, 149
NEF (RAW) processing ................149
Neutral (Set Picture Control) ...... 87
Nikon Transfer ......................105, 106
halfway ......................................
28, 29
Print (DPOF) ...................................
110
Print select ......................................
110
Print set (DPOF) ............................114
Printing ............................................
107
Programmed auto .........................68
Protecting photographs ............100
Q
Quick retouch ................................
150
Quick-response remote (Release
mode) ...............................................
53
Rangefinder ...................................
132
Rear lens cap ....................................16
Rear-curtain sync ...........................60
Recent settings .............................155
Red intensifier (Filter effects)_. 144
Red-eye correction ......................142
Red-eye reduction .........................60
Release mode ..................................53
Remote Control ..............55, 72, 167
Remote on duration ....................131
Removing the lens from the
camera .............................................
17
Reset setup options ....................125
Reset shooting options ..............119
Retouch menu ...............................140
RGB .............................................
93, 121
i-TTL balanced fill-flash for digital
SLR...................................................
123
No memory card? ........................136
Noise reduction ............................122
Non-CPU lens ................................
159
Number of shots ...........................
193
J
0
S
JPEG .....................................................
50
JPEG basic ..........................................
50
Optional flash ................................
123
Overview data .................................96
Self-timer
ISO sensitivity .........................62, 120
i-TTL ..................................................
123
JPEG fine .............................................
50
JPEG normal ......................................
50
button
all the way down ..........................29
Press the shutter-release button
RGB Histogram ................................93
Rotate tall ........................................
118
..........................53, 55, 131
Self-timer delay .............................131
Sensitivity ................................
62, 120
Sepia .................................................
143
195
Set framing grid ............................134
Set Picture Control .........................88
W
Setup menu ....................................
124
Shade (White balance) .................80
Warm filter (Filter effects) ..........144
WB ........................................................
80
White balance ..................................80
Shooting data ...........................94, 95
Shooting menu .............................119
Shutter-priority
auto .....................69
Shutter-release button... 29, 46, 75
Single frame (Release mode)..... 53
Single point (AF-area mode)_._. 45
Single-servo AF ...............................
42
Size ......................................................
52
Skylig ht (Filter effects) ................144
Slide show .......................................
104
Slow sync ..........................................
60
Small ...................................................
52
Small (Image size) ..........................52
Small picture ..................................
145
Soft (Filter effects) ........................144
Speedlight ......................................
162
Spot .....................................................
74
sRGB ..................................................
121
Standard (Set Picture Control)... 87
Standard i-TTL fill-flash for digital
SLR...................................................
123
Start printing (PictBridge) 109, 112
Stop-motion
movie ........... 151, 153
T
Television ........................................
116
Thumbnail playback .....................97
Time ....................................................
72
Time stamp (PictBridge) .. 109, 112
Time zone ................................18, 127
Time zone and date ..............18, 127
Timer ...................................................
55
Toning .........................................
89, 90
Trim ...................................................
143
Type D lens .....................................
157
TypeG lens .....................................
157
U
USB ..........................................
106,107
USBcable ..............................106,107
UTC ......................................................
18
V
Vibration Reduction ......................17
Video mode ....................................
127
Viewfinder ...........................5, 23, 186
Viewfinder eyepiece ......................SS
Viewfinder eyepiece cap .............SS
Viewfinder options ......................132
ViewNX .............................................
10S
Vivid (Set Picture Control) ........... 87
196
Nikon
No reproduction
in any form of this manual, in whole or in part (except for brief
quotation in critical articles or reviews), may be made without written authorization
from NIKON CORPORATION.
((
NIKONCORPORATION
Fuji Bldg., 2-3 Marunouchi 3-chome,
Chiyoda-ku,Tokyo
© 2009 Nikon
100-8331,
Japan
Corporation
Printed
in Hong
Kong
SB9G01(11)
6MB07111-01