1
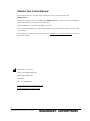
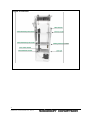
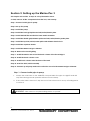
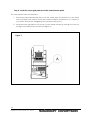
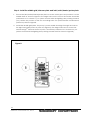
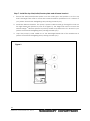
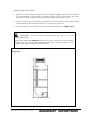
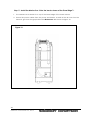
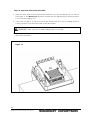
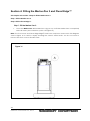
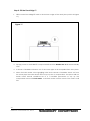
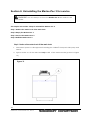
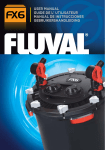
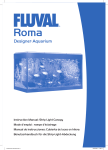
Marine-Pac 3 User Manual Marine-Pac 3 User Manual These instructions set out the steps required to set up and maintain your Marine-Pac 3. Read this manual before installing the Marine-Pac 3 to ensure correct installation and maintenance procedures are followed. ©2014 Saltwater Conversion. All rights reserved. The written and graphic product descriptions in this manual are correct at the time of printing. This manual is updated as required. Visit the Saltwater-Conversion website to access the latest version. Saltwater Conversion Unit 16, 595 Willoughby Rd Willoughby NSW 2067 Australia Tel: +61 448833089 www.saltwater-conversion.com.au [email protected] 2 Marine-Pac 3 user manual V1.0, 15.6.14 Table of contents Section 1: Marine-Pac 3 at a glance ......................................................................... 4 Section 2: Getting started............................................................................................ 6 Introduction to nano reefing .............................................................................. 6 What is in the box?.............................................................................................. 7 Other equipment you will need to supply ........................................................ 8 Section 3: Setting up the Marine-Pac 3 ...................................................................... 9 Section 4: Filling the Marine-Pac 3 and Fluval Edge™ ........................................... 26 Section 5: Maintenance and care ........................................................................... 28 Section 6: Uninstalling the Marine-Pac 3 for service ............................................... 29 Section 7: Troubleshooting ........................................................................................ 31 Disclaimer of liability, and warranty information .................................................... 33 3 Marine-Pac 3 user manual V1.0, 15.6.14 Section 1: Marine-Pac 3 at a glance Figure 1: Side view 4 Marine-Pac 3 user manual V1.0, 15.6.14 Figure 2: Front view 5 Marine-Pac 3 user manual V1.0, 15.6.14 Section 2: Getting started WARNING: Before use, please read all operating instructions and our liability disclaimer on page 31. The Marine-Pac 3 provides you with the platform you need to turn the Fluval Edge™ aquarium into a stunning saltwater nano reef. The attractive compact design fits into any contemporary home and is suitable for cultivating advanced corals, delicate reef fish, anemones and other invertebrates. It allows you to bring a micro-habitat of the Great Barrier Reef into your own home or office. Your Marine-Pac 3 set-up kit includes a best-in-class reef lighting system and Mame© Design Protein skimmer – everything needed to convert the Fluval Edge™ into a compact state-ofthe-art reef aquarium. The Marine-Pac 3 is an all in one module that fits into the back of the stunning Fluval Edge aquarium and converts it into a high performance Nano reef tank. The Fluval Edge stands unrivalled in its amazing styling and design. It is the only tank available that presents the viewer with a cube of water visible from every side. The Marine-Pac 3 enhances the aesthetics and performance of the Fluval Edge by hiding all of the equipment out of sight. The Marine-Pac 3 has been designed to automatically start and recover from power outages without priming or manual intervention. Introduction to nano reefing Small reefs, or ‘nano reefs’ as they have become known, are becoming increasingly popular with aquarium hobbyists. They allow you to enjoy a unique connection to the reef in even the most urban and inland environments. Some of the key advantages are: less space used less power smaller water changes less bulky gear less cost to stock less cost to maintain. A nano reef also presents is own unique set of challenges that the hobbyist should be aware of before establishing a new tank. As the owner of a nano reef, you are ultimately responsible for the lives and wellbeing of many delicate organisms. Before you start your nano reef, it is your responsibility to learn how to care for these creatures correctly. 6 Marine-Pac 3 user manual V1.0, 15.6.14 If you are new to the hobby please consider investing in at least one of the following books to assist you in selecting suitable livestock and corals and finding information on running your new nano reef: Nano-Reef Handbook: The Ultimate Guide to Reef Systems Under 15 Gallons—Chris R. Brightwell The Simple Guide to Mini-Reef Aquariums—Jeffrey Kurtz. What is in the box? 1. Marine-Pac 3 2. Inlet/outlet assembly 3. Inlet/outlet hose 4. Mame DesignTM protein skimmer 5. Mame DesignTM waste collection vessel 6. 50W reef light 7. LED driver 8. LED power supply 9. 3 x inlet/outlet/heater/probe bracket 10. Middle grid/skimmer bracket 11. Lower grid 12. Skimmer bracket 13. Universal power supply for light 7 Marine-Pac 3 user manual V1.0, 15.6.14 Other equipment you will need to supply Heater A heater maintains the correct water temperature for your reef. Most standard-sized heaters will fit correctly into the mounting bracket in the Marine-Pac 3. Use a fully submersible heater. The mounting bracket will accommodate heaters up to 26mm/1.02” diameter. Most standard heaters are 23mm/0.9” in diameter. EHEIM™ Compact 600 © This is a quality pump, available worldwide. Purchase locally with the appropriate power plugs and voltage for your region. Air pump A small air pump is required to drive the Mame DesignTM skimmer. Purchase this locally with the appropriate power pugs and voltage for your region. 8 Marine-Pac 3 user manual V1.0, 15.6.14 Section 3: Setting up the Marine-Pac 3 This chapter sets out the 15 steps to set up the Marine-Pac 3. To start, remove all the components from the box, and unwrap. Step 1: Connect outlet pipe to pump Step 2: Set up the pump Step 3: Install the pump Step 4: Install the lower grid plate and inlet/outlet/heater plate Step 5: Install desired filter media into lower media chamber Step 6: Install the middle grid/skimmer plate and inlet/outlet/heater/probe plate Step 7: Install the top inlet/outlet/heater plate and skimmer bracket etc. Step 8: Install the aquarium heater Step 9: Install the Mame Design™ skimmer Step 10: Remove the stock lighting Step 11: Install the Marine-Pac 3 into the back column of the Fluval Edge™ Step 12: Install the back column cover Step 13: Install back column onto the base of the tank Step 14: Insert the inlet/outlet assembly Step 15: Connect up air pump and waste collection vessel to the Mame DesignTM skimmer. Step 1: Connect outlet pipe to pump. 1. Attach the outlet tube to the EHEIM™ Compact 600©. The pipe is a tight fit and will stay fitted during normal operation without a hose clamp. 2. If the outlet tube is hard to fit, dip the end of the return hose in a cup of boiling water to soften it. WARNING: Take care not to splash boiling water on yourself. 9 Marine-Pac 3 user manual V1.0, 15.6.14 Step 2: Set up the pump. 1. Unbox the EHEIM™ Compact 600©. Insert the included suction cups into the bottom 4 openings on the motor body and pump housing as shown in Figure 5. 2. Set the flow rate on the EHEIM™ Compact 600© to maximum flow by adjusting the slider to the + position as shown in Figure 5. Figure 5 10 Marine-Pac 3 user manual V1.0, 15.6.14 Step 3: Install the pump. 1. Wet each of the suction cups on the EHEIM™ Compact 600© and install the pump into the Marine-Pac 3 as shown in Figure 6. The EHEIM™ Compact 600© must be pushed to the very bottom of the Marine-Pac 3. 2. If your hands do not easily fit into the Marine-Pac 3, install the pump at the top of the Marine-Pac 3 and slide it down into position by pushing it with a long object like a ruler. 3. It is important that the pump is installed on the right hand side (when viewed with the lighting arm pointing towards you) as shown in Figure 6. Figure 6 11 Marine-Pac 3 user manual V1.0, 15.6.14 Step 4: Install the lower grid plate and inlet/outlet/heater plate. This step requires care and patience. 1. Thread the Inlet/outlet/heater plate over the outlet pipe and position it on the lower shelf. The large hole used to mount the heater should be positioned so it is closest to you (when viewed with the lighting arm pointing towards you) 2. Install the lower grid plate. The pump’s power cable should go through the hole on the right hand side (shown in point A in Figure 7.) Figure 7 12 Marine-Pac 3 user manual V1.0, 15.6.14 Step 5: Install desired filter media into lower media chamber. Filter media will assist in removing waste and keeping the water pure and of the high quality needed by most corals and marine life. It will help remove phosphates and hence the nuisance algae that often occur in the early stages of your tank’s development as it is still establishing itself. It will also help support the nitrogen cycle in your tank. To assist in maintaining water quality, filter media can be added to the Marine-Pac 3. Up to two bags of 100mg filter media can be used at a time. 1. Place the media bags side by side on the lower grid plate, point A in Figure 7. The following filter products are recommended: 1. Seachem Purigen Use 100mg sealed mesh bag (typically requires changing every 4 months in the 46l/12g FluvalEdge™) Purigen® controls ammonia, nitrites and nitrates by removing nitrogenous organic waste. It ‘polishes’ the water for good clarity. Purigen® will assist in keeping the high water quality required by some advanced corals. Purigen® darkens progressively as it exhausts. 2. Seachem Sea GelTM Use 100mg sealed mesh bag (typically requires changing every 4 months in the 46l/12g FluvalEdge™) SeaGel™ is a blend of MatrixCarbon™ and PhosGuard™. MatrixCarbon™ is an ultracapacity carbon used for the removal of organic and colour impurities. PhosGuard™ is a powerful remover of phosphate, silicate, toxic metals, and acids. 13 Marine-Pac 3 user manual V1.0, 15.6.14 3. Seachem PhosGaurdTM Use 100mg sealed mesh bag (typically requires changing every 4 months in the 46l/12g FluvalEdge™) PhosGuard™ rapidly removes phosphate and silicate from the water. The general consensus is to limit phosphate (as PO43-) to lower than 0.05 parts per million (ppm) for reef aquariums. This can be achieved in a variety of ways, but using media such as PhosGaurd™ to adsorb phosphate may be necessary for some aquarists. This product is highly recommended for new tanks as it will help control nuisance algae that often occurs in the early stages of your tank’s development as it is still establishing itself. Note: Some people prefer to use granular ferric oxide media (GFO) for phosphate removal. If you prefer to use GFO you will need to purchase a sealable mesh filter media bag and fill it with a GFO filter media. 4. Live rock rubble Live rock rubble acts as a biological filter that hosts both the aerobic and anaerobic nitrifying bacteria required for the nitrogen cycle that processes waste in the tank. You can source live rock rubble from your local aquarium store. Fill a small sealable mesh filter media bag with live rock rubble for use in the Marine-Pac 3 14 Marine-Pac 3 user manual V1.0, 15.6.14 Step 6: Install the middle grid/skimmer plate and inlet/outlet/heater/probe plate. 1. Thread the inlet/outlet/heater/probe plate over the outlet pipe and position it on the middle shelf as shown in Figure 8. The large hole used to mount the heater should be positioned so it is closest to you (when viewed with the lighting arm pointing towards you). Notice the position of the two mounting holes for optional water measurement probes in point B in Figure 8. 2. Install the middle grid plate. The pump’s power cable should go through the hole on the right hand side (shown in point A in Figure 8). The large hole used to mount the Mame DesignTM skimmer shown in point C should be positioned so it is closest to you (when viewed with the lighting arm pointing towards shelf as shown in Figure 8). Figure 8 15 Marine-Pac 3 user manual V1.0, 15.6.14 Step 7: Install the top inlet/outlet/heater plate and skimmer bracket. 1. Thread the inlet/outlet/heater plate over the outlet pipe and position it on the top shelf. The large hole used to mount the heater should be positioned so it is closest to you (when viewed with the lighting arm pointing towards you). 2. Install the skimmer bracket. The pump’s power cable should go through the hole on the right hand side (shown in point A in Figure 9). The large hole used to mount the Mame Design TM skimmer (shown in point B) should be positioned so it is closest to you (when viewed with the lighting arm pointing towards you). 3. Loop the pump’s power cable out of the back right-hand side of the Marine-Pac 3 (when viewed with the lighting arm pointing towards you). Figure 9 16 Marine-Pac 3 user manual V1.0, 15.6.14 Step 8: Install your heater. 1. Because of the closed top design of the Fluval Edge, a slightly lower water temperate is recommended as it will assist in retaining oxygen in the water. Follow the setup instruction of your heaters manufacturer and set the temperature to 23°C. 2. Insert the heater into the heater mounting hole on the left hand side (when viewed with the lighting arm pointing towards you), as shown in Figure 10. 3. Loop the heater power cable over the back left hand side of the Marine-Pac 3. WARNING: The manufacturer recommends that you use a fully submersible heater. Please note where the minimum water line is on your heater. If the low water line is above the top of Inlet/outlet/heater/probe plate, install the heater at the middle Inlet/outlet/heater/probe plate instead. Figure 10 17 Marine-Pac 3 user manual V1.0, 15.6.14 Step 9: Install the Mame Design™ skimmer. 1. Place the included silicon ring around the Mame Design™ skimmer 145mm from the bottom edge of the glass skimmer body as shown in Figure 11. 2. Slide the Mame Design™ skimmer into the skimmer bracket. The skimmer’s air intake and outlet should face away from you (when viewed with the lighting arm pointing towards you). Attach the two included lengths of airline tubing to the Mame Design™ skimmer. Figure 11 18 Marine-Pac 3 user manual V1.0, 15.6.14 Step 10: Remove the stock lighting. 1. Remove the original lighting arm, lift the arm up and use a small Phillips head screwdriver to remove the 4 recessed Phillips head screws (2 each side). 2. Once the screws have been removed, the 2 halves of the stock lighting arm can be separated and removed. Unscrew the cable clamp holding down the stock lighting cable in the back column. 19 Marine-Pac 3 user manual V1.0, 15.6.14 Step 11: Install the Marine-Pac 3 into the back column of the Fluval Edge™. 1. The Marine-Pac 3 should sit on top of the lower ledge of the back column. 2. Ensure the power cables from the pump and heater, as well as the air hose from the skimmer, go down the gap behind the Marine-Pac 3 as shown in Figure 12. Figure 12 20 Marine-Pac 3 user manual V1.0, 15.6.14 Step 12: Install the back column cover. 1. Lay the Marine-Pac 3 flat and install the back cover of the rear column as shown in Figure 13. Figure 13 21 Marine-Pac 3 user manual V1.0, 15.6.14 Step 13: Install back column onto the base of the tank. 1. With the plastic base of the Fluval EdgeTM and the glass tank aired setup, lift the back column with the Marine-Pac 3 inside it into position as shown in Figure 14. Figure 14 2. Group the cables and airline hose together so they all exit though the hole out of the back of the column of the Fluval Edge™ (see point A in Figure 15.) 22 Marine-Pac 3 user manual V1.0, 15.6.14 Figure 15 23 Marine-Pac 3 user manual V1.0, 15.6.14 Step 14: Insert the inlet/outlet assembly 1. Insert the inlet pipe and the inlet/outlet assembly into the remaining hole on the left hand side of the Marine-Pac 3 (when viewed with the lighting arm pointing towards you, as shown in Figure 16.) 2. If the tube is hard to fit, dip the end of the return hose in a cup of boiling water to soften it and fit it over the hose barb on the inlet/outlet. WARNING: Take care not to splash boiling water on yourself. 3. Attach the inlet/outlet assembly to the neck of the tank using the hook on the side of inlet/outlet assembly. Figure 16 24 Marine-Pac 3 user manual V1.0, 15.6.14 Step 15: Connect up air pump and waste collection vessel to the Mame DesignTM skimmer. 1. The airline hose connected to the waste outlet of the Mame Design TM skimmer should be connected to the Mame DesignTM waste collection vessel included with the Mame DesignTM skimmer. 2. Install the included airline clamp over the remaining airline hose to adjust the flow of air. 3. Connect the airline hose to the skimmer. 25 Marine-Pac 3 user manual V1.0, 15.6.14 Section 4: Filling the Marine-Pac 3 and Fluval Edge™ This chapter sets out the 2 steps to fill the Marine-Pac 3. Step 1: Fill the Marine-Pac 3. Step 2: Fill the Fluval Edge™. Step 1: Fill the Marine-Pac 3. 1. Once the Marine-Pac 3 is installed use a jug or cup to fill the Marine-Pac 3 completely with salt water (See water line, point A in Figure 16.) Note: The front cover and Fluval Edge Edge™ tank have only been removed in this diagram view in Figure 16 to assist in clearly showing the correct water levels. You do not need to remove the front cover or Fluval™ tank. Figure 16 26 Marine-Pac 3 user manual V1.0, 15.6.14 Step 2: Fill the Fluval Edge™. 1. Fill the main Fluval Edge™ tank to the bottom edge of the neck (See point B in Figure 17.) Figure 17 2. Do not fill past this point. 3. Supply power to the EHEIM™ Compact 600 © and the Marine-Pac 3 will automatically start. 4. A stream of bubbles will come out of the return pipe as air is expelled from the system. 5. When the inlet makes a loud gurgling noise and a stream of bubbles shoots out from the return pipe the water levels need a top-up due to evaporation. The siphon will not break under normal conditions but it is a sensible precaution to top up the evaporated water with fresh water. Add fresh water until the neck of the tank is half full. 27 Marine-Pac 3 user manual V1.0, 15.6.14 Section 5: Maintenance and care Daily Top up water levels with fresh water to replace evaporation and maintain salinity levels. Monthly The intake grill and outlet nozzle assembly and siphon tubes should be cleaned every month to prevent build-up that could cause blockages. Remove the inlet/outlet and use the included pipe cleaner to clean inside the airline tube and other internal surfaces. Soak in vinegar to loosen any organic build up. Rinse off any remaining vinegar carefully with water before reinstalling. Every 4–6 months (3 times a year) The Marine-Pac 3 should be removed completely from the Fluval Edge TM back column and thoroughly cleaned. (See section 5.) Water changes Step 1. Disconnect all power to the tank’s equipment. Step 2. Siphon out as much water as required from the Fluval Edge™ tank for your water change (typically 30% ) Step 3. Follow the instruction in: Filling the Marine-Pac 3 and Fluval Edge™ on page 19. Important notes If the intake grill manages to become completely blocked on all sides, the contents of the sump will overflow. The intake grill is carefully designed with holes on all sides and placed in the tank in such a way that it is very difficult to block completely. Avoid putting very large snails or other invertebrates into the Fluval Edge™ tank as they may be capable of blocking the inlet/outlet assembly. If the water level and evaporation effects are left uncorrected for a long time it is possible that it could eventually drop below the siphon tube in the Marine-Pac 3. While this event is very unlikely, if this does occur the remaining water in the MarinePac 3 will be pumped back into the tank and overflow. The Marine-Pac 3 starts jetting large amounts of bubbles into the tank and making a loud gurgling noise if the water level has dropped too low. Simply top up the water as soon as you next get a chance.. It will normally take many weeks of gurgling, bubbles and neglect before any chance of serious overflow. 28 Marine-Pac 3 user manual V1.0, 15.6.14 Section 6: Uninstalling the Marine-Pac 3 for service WARNING: Do not attempt to move the Marine-Pac 3 tank while it is still full of water. This chapter sets out the 4 steps to uninstall the Marine-Pac 3. Step 1: Reduce the water level of the main tank. Step 2: Empty the Marine-Pac 3 Step 3: Service the Marine-Pac 3 Step 4: Refill the Marine-Pac 3 Step1: Reduce the water level of the main tank. 1. Disconnect power to all equipment including the EHEIM™ Compact 600© pump and heater. 2. Syphon water out of the main tank only until ¾ of the water remains (point A in Figure 19.) Figure 19 29 Marine-Pac 3 user manual V1.0, 15.6.14 Step 2: Empty the Marine-Pac 3. 1. With the water level in the Fluval Edge™ tank reduced, apply power only to the EHEIM™ Compact 600© pump and wait for 40 seconds for the water from the MarinePac 3 to be pumped into the Fluval Edge™ tank. 2. Once the water stops coming out of the inlet/outlet assembly, disconnect the EHEIM™ Compact 600© from the power. 3. The Marine-Pac 3 is now mostly empty of water and easily removed. Step 3: Service the Marine-Pac 3. 1. Disassemble the pump and wash the interior surfaces in vinegar. Clean intake grill. 2. Use a tube cleaning brush to thoroughly clean all the pipes. If you do not have a tube cleaning brush one can be purchased from most pet stores or online through eBay. 3. Replace or clean any filter media. 4. Wipe down heater 5. Rinse filter grid plates in vinegar 6. Remove the inlet/outlet. Soak in vinegar to loosen any organic build up. 7. Use pipe cleaner to clean air hose and interior surfaces of build-up. Rinse off any remaining vinegar carefully with water before reinstalling. Step 4: Refill the Marine-Pac 3. 1. Follow the steps in Section 4: Filling the Marine-Pac 3 and Fluval Edge™ to reinstall the Marine-Pac 3. Do not attempt to fill it and then install it. 2. Remove air bubbles from the top glass by brushing them into the neck with a magnetic glass cleaner. 30 Marine-Pac 3 user manual V1.0, 15.6.14 Section 7: Troubleshooting The following table will enable a user to diagnose basic problems and implement a solution that may enable the device to resume operation. Symptom checklist Symptom Check for the following: A mist of bubbles comes out of the return outlet Check water levels. Loud gurgling noise Check water levels. No water coming from outlet Uninstall Marine-Pac 3 and check EHEIM™ Compact 600© impeller for obstructions. (See Section 5: Uninstalling the Marine-Pac 3 for service.) A tiny amount of water overflows out of the Marine-Pac each time the power is turned off. The small outlet section running up the side of the inlet/outlet assembly is blocked, carefully clean inlet/outlet assembly with the included pipe cleaner and vinegar. Syphon does not start automatically Check EHEIM™ Compact 600© intake grill for obstructions. Check the airline tube is firmly seated on the side of the inlet nozzle. Check that water levels have been set up correctly. Clean inlet/outlet assembly (See page 30: Maintenance and care, for the Marine-Pac 3) Check that the pump flow rate is set to maximum (see: Section 3: Setting up your Marine-Pac 3, Step 2) The water level in the neck is to low Ideally, when running the water level should be around halfway up the neck of the Fluval™ edge tank. It is possible to adjust water levels in the display tank and Marine-Pac 3 by adjusting the position of the EHEIM™ Compact 600© in the Marine-Pac 3. This can he achieved without removing the Marine-Pac by gently pulling on the power cable 31 Marine-Pac 3 user manual V1.0, 15.6.14 of the EHEIM™ Compact 600© to move it higher up in the Marine-Pac 3. Make a small adjustment and wait 30 seconds for the water levels to change before adjusting any further. 32 Marine-Pac 3 user manual V1.0, 15.6.14 Disclaimer of liability, and warranty information IMPORTANT: Fluval Edge™, FluvalTM and Hagen are in no way associated with Saltwater Conversion. FLUVAL™ is a trademark registered by Rolf C. Hagen (USA) Corp. in Mansfield, MA, 02048, 1 Year Warranty What is covered This warranty covers any defects in materials or workmanship with the product, with the exceptions stated below. How long coverage lasts This warranty runs for 12 months. The warranty starts from date of shipping. What is not covered This warranty does not cover associated damage to the aquarium, any equipment or its inhabitants, or damage to property. As with all aquarium products, the risk of leaking or overflowing is very real. This product should only be used in a location where, if in the event of leaking or flooding, appropriate drainage and waterproof surfaces exist to mitigate all potential damage. Appropriate care should be taken to ensure that, in the event of an overflow, there is no risk of electrical equipment contacting the water. Accidental water damage to the lighting system is not covered under warranty however in the event of accidental damage spare parts and repairs will be made available to the owner. Warranty shipping costs The customer shall be responsible for shipping costs associated with returning this product to Saltwater Conversion for warranty should it be required. How to get Service Contact Saltwater Conversion at [email protected] A service representative will be in touch and let you know the necessary action to correct problems covered by this warranty. In the event your product is faulty during the warranty period, please contact us and we will offer a replacement or parts for the faulty item. How State Law applies This warranty gives you specific legal rights, and you may also have other rights, which vary from state to state. IMPORTANT: Disclaimer and Accepted Risks Please read carefully. As with all aquarium products, the risk of leaking or overflowing as a result of 33 Marine-Pac 3 user manual V1.0, 15.6.14 equipment failure or tank breakage is very real. This risk is increased further when using systems featuring a sump and return pump like the Marine-Pac 3 or any other filter product. This product should only be used in a location where, if in the event of leaking or flooding, appropriate drainage and waterproof surfaces exist to mitigate any potential damage – or in a situation where the customer understands and accepts the risk that folding may occur in the event of a fault. Appropriate care should be taken to ensure that, in the event of flooding, there is no risk of electrical equipment contacting the water. The extent of the warranty provides for replacement of parts supplied by Saltwater Conversion only and assumes no liability for any and all associated damages including but not limited to damage to property to the tank and its inhabitants, flooding, water damage etc. By using this product you accept the risks associated with it. Otherwise please return the product at the time of purchase for a full refund (excluding return shipping changes). Contact Saltwater Conversion for any operating, fault or maintenance queries. 34 Marine-Pac 3 user manual V1.0, 15.6.14