1
While standing inside the trampoline frame, lift
the straight frame section and ensure the spacing of the U shaped sections are correct; adjust
if necessary.
Insert a straight section into the two U
shaped sections. Fasten the sections together
with the large bolts and nuts provided. Do not
over tighten.
Repeat with the last straight section.
Figure 6-C: Attaching last straight frame section onto U shaped
frame sections
Step 7: Attaching the final legs
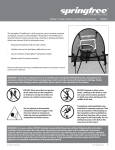
Figure 7-A: Inserting legs onto straight sections
The legs along the sides of the trampoline can
now be fully attached. Rotate each leg to align
with the sockets on the straight frame section.
Lift the U shaped frame sections to insert the
leg into the leg socket on the straight section
(Figure 7-A).
Repeat on all remaining legs. Next, fasten
the legs to the frame with the small bolts and
nuts provided. Do not over-tighten. If the
holes do not line up, check that the leg is the
right way round or lift the leg slightly. The nut
should be towards the mat center; the bolt
head should be towards the outside.
Note: The frame will
not be rigid until the
mat is installed.
Figure 7-B: Fully assembled frame
Springfree™ Trampoline
www.springfreetrampoline.com
13