1
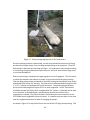
attaching!a!section!of!2”!pipe!to!the!top!of!the!existing!pipe!using!a!coupler.!!The!
coupler!contained!all!female!threads!and!was!screwed!to!the!top!of!the!existing!pipe!
(which!was!already!male!threaded).!!The!extension!pipe!was!then!threaded!into!the!top!
of!the!coupler.!
!
In!cases!where!a!new!pole!is!needed,!a!hole!needs!to!be!excavated!at!least!2!ft!deep!and!
filled!with!fast!drying!concrete!(e.g.,!Sakrete!(50!lb)),!in!which!a!10Yft,!2Yin!galvanized!
steel!pole!can!be!placed.!
!
At!one!site,!our!solar!panels!needed!to!be!mounted!against!a!bridge.!!To!do!this,!
masonry!wedge!anchor!bolts!were!set!in!the!face!of!the!bridge!by!drilling!a!1Y½”!deep!
hole,!the!same!diameter!as!the!bolts!to!be!used,!and!hammering!to!wedge!the!ends!of!
the!bolt!into!the!holes.!!Four!bolts!were!used!to!mount!two!U!brackets,!spaced!vertically!
such!that!2Yinch!galvanized!pipe!could!be!slid!through!them.!!A!horizontal!bolt!in!the!U!
brace!was!tightened!to!hold!the!galvanized!pipe!in!place.!
!
All!solar!panels!were!positioned!to!face!south!and!to!match!the!tilt!of!the!solar!panels!
already!deployed!at!the!sites!by!USGS.!!
!
4.1.5!Wiring!
!
Before!inserting!the!bilge!pump!into!the!PVC!housing,!the!existing!power!and!ground!
wires!on!the!pump!need!to!be!extended!to!the!sensor!enclosure.!!After!trenching,!16Y!
gage!wire!can!be!run!from!the!pump!to!the!enclosure!and!then!cut,!leaving!some!
excess.!!This!wire!can!then!be!then!spliced!to!the!pump!wires!by!stripping!the!end!of!
each!wire!and!connecting!them!using!a!wire!nut.!Since!water!may!reach!this!spliced!
connection,!it!should!be!sealed;!this!can!be!done!by!wrapping!the!wire!nut!with!
electrical!tape,!covering!with!heat!shrink!(a!material!that!shrinks!and!makes!a!tight!seal!
when!heated),!and!wrapping!once!more!in!electrical!tape!to!ensure!the!ends!of!the!
heatY!shrinkYwrapping!are!sealed.!!Since!the!pumps!have!a!finite!lifetime,!it!is!advisable!
to!make!a!splice!in!the!wires!somewhere!near!an!easy!access!connection!in!the!PVC.!
!
The!overall!wiring!diagram!utilized!in!the!enclosure!is!shown!and!discussed!in!Section!!
2.6.!!As!mentioned!in!that!section,!16Ygage!wire!was!used!to!connect!all!components.!!
Red!wire!was!used!as!power!(positive),!black!was!used!as!ground!(negative),!and!blue!
was!used!as!excitation!channel!or!data!transmission!wire.!
!
In!terms!of!wiring!order,!this!is!somewhat!arbitrary,!but!we!found!that!the!following!
order!worked!well!for!our!setYup:!(1)!connections!between!the!relays!and!datalogger;!
(2)!connection!of!the!bilge!pump!and!SUNA!to!the!relays;!(3)!connection!of!the!YSI!and!
other!SUNA!wires!to!the!datalogger;!and!(4)!connection!of!the!Raven!to!the!datalogger.!
!
The!SunSaver!solar!controllers!should!be!connected!last.!!Per!the!SunSaver!manual,!the!
36! !
!