1
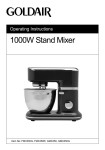
Operating Instructions
Slow Cooker – 2.5L
Model: FSL100
General care and safety guide
Thank you for choosing a GOLDAIR Electric Slow Cooker. This GOLDAIR
appliance has been designed and manufactured to high standards of
engineering and with proper use and care, as described in this leaflet, will
give you years of useful service. Please read these instructions carefully.
ALWAYS
✔ Always ensure hands are dry before handling
the plug or the Slow Cooker.
✔ Always operate the Slow Cooker on a secure,
dry, level surface.
✔ Always allow adequate air space above and
on all sides for air circulation. Do not allow the
Slow Cooker to touch curtains, wall coverings,
clothing, dishtowels or other flammable
materials during use. Do not use under
cupboards or curtains.
✔ Caution is required on surfaces where heat
may cause a problem – an insulated heat pad is
recommended.
✔ Always be sure to unplug from the socket
when not in use and before cleaning.
✔ Always allow the Slow Cooker to cool before
cleaning and storing.
✔ Carry out regular checks of the supply cord to
ensure no damage is evident.
✔ Return the Slow Cooker after a malfunction,
or if it has been damaged in any manner to an
authorised electrical service technician for
examination, repair or adjustment as special
purpose tools are required.
✔ Take care not to scratch the special coating
of the cooking plate. Use a wooden or heat
resistant plastic spatula.
This appliance is intended for household use
only or in similar applications such as:
•
Staff kitchen areas in shops, offices and
other working environments;
•
Farm houses
•
By clients in hotels, motels and other
residential type environments;
•
Bed and breakfast type environments.
TECHNICAL SPECIFICATION
Model No:
FSL100
Power Supply:
220-240VAC 50Hz
Power:
180W
NEVER
✘ Never touch hot surfaces.
✘ Never use this appliance outdoors.
✘ Never use this appliance for any purpose
other than its intended use. This appliance is for
household use only.
✘ Never operate this Electric Slow Cooker on
an inclined plane.
✘ Never move this Electric Slow Cooker while it
is switched on.
✘ This appliance is not intended for use by
persons (including children) with reduced
physical, sensory or mental capabilities or lack
of experience and knowledge, unless they are
supervised or have been given instruction
concerning the use of the Slow Cooker by a
person responsible for their safety.
✘ Close supervision is necessary when the
appliance is near children.
✘ Never leave the appliance unattended when
in use.
✘ Never place this appliance on or near a hot
gas or electric burner or where it could touch a
heated oven or microwave oven.
✘ Never immerse any part of the Slow Cooker,
or cord set and plug in water or any other liquid
to protect against electrical hazards.
✘ Never use harsh, abrasive or caustic cleaners
to clean this appliance.
✘ Never operate the appliance with a damaged
cord or plug, after it malfunctions, or if it has
been damaged in any manner. If the supply
cord is damaged, it must be replaced by the
manufacturer, its service agent or similarly
qualified persons in order to avoid a hazard.
✘ The Slow Cooker is not intended to be
operated by means of an external timer or
separate remote-control system.
CAUTION:
THE SLOW COOKER GENERATES
HEAT AND STEAM DURING USE.
PROPER PRECAUTIONS MUST BE
TAKEN TO PREVENT THE RISK OF
BURNS, SCALDS, FIRES OR OTHER
DAMAGE TO PERSONS.
Components
Lid handle
Glass Lid
Handle
Handle
Inner pot
Control
panel
FEATURES
•
Removable ceramic crock to make serving
meals and cleaning easy.
•
Tempered safety glass lid for easy viewing
without losing heat and to retain heat and
moisture during cooking.
•
3 Heat Settings with LOW, HIGH and
AUTO options.
•
Large capacity oval ceramic bowl for large
cuts of meat and family sized meals.
•
Cool touch handles and knob to allow for
easy manoeuvring to the table for serving.
SAFETY DURING USE
•
•
•
•
•
•
•
CAUTION:
RAPID TEMPERATURE CHANGES MAY
CAUSE THE CERAMIC BOWL TO
CRACK EG PLACING HOT BOWL INTO
COLD WATER OR ONTO COLD
SURFACE SUCH AS MARBLE OR
GRANITE BENCH
•
•
•
Use oven gloves when handling the pot or
removing the lid after or during use.
Keep out of reach from children.
Allow the lid to cool before immersing in
water.
Do not immerse the Slow Cooker housing in
water or any other liquid.
Do not leave the base unit switched ON
without the ceramic bowl in place.
The metal inner lining of the Slow Cooker
will remain hot when it is turned ON, and
immediately after cooking. DO NOT TOUCH.
Ensure that the plug and electrical
connections remain dry at all times.
NOTE: Do not fill the ceramic crock to the
rim as the liquid will overflow during cooking.
Do not place the ceramic crock directly on a
heat source or in the oven.
It is normal for the outside of the Slow
Cooker to heat up during long periods of
cooking.
Guide to slow cooking
•
•
•
•
•
•
•
•
•
•
Slow cooking occurs at temperatures below
boiling point, liquids do not boil quickly at
this temperature. There is little steam or
evaporation, food will not stick and virtually
no stirring is required. Slow cooking helps
retain both flavours and nutrients.
The Slow Cooker can operate on LOW all
day and night if required.
When on the HIGH heat setting it will cook
similarly to a covered pot on a stove, foods
will cook in approximately half the time of
that set on LOW.
When cooking on the HIGH heat setting,
additional liquid may be required.
Vegetables such as carrots, potatoes and
turnips require longer cooking than many
meats. Place them on the bottom of the
ceramic bowl and cover with liquid.
If adding fresh milk or yoghurt, this should
be done during the last 2 hours of cooking.
Evaporated milk may be added at the start
of cooking.
Rice, noodles and pasta are not
recommended for long cooking periods.
Cook them separately and then add to the
cooker during the last 30 minutes.
During cooking, ensure liquid ingredients
are warmed before adding.
If cooking frozen food, add some warm
liquid before putting in the ceramic crock. If
the bowl is hot do not add cold food.
USING THE CONTROL PANEL
•
The Slow Cooker is equipped with 3 heat
settings – LOW, HIGH, AUTO
•
Once your Slow Cooker is plugged into the
power supply, switch the control dial to the
HIGH temperature setting. The red display
light will activate to show your Slow Cooker
is turned on.
•
Switch the control dial to the OFF position
before removing the plug from the mains
power supply.
HIGH
•
Suitable for cooking most foods.
•
Liquid will take 3.5-4 hours to boil (varies
between Summer and Winter).
•
Food should be ready after 5-6 hours
however times vary depending on
ingredients
LOW
•
Suitable for keeping food warm
•
Use to keep food warm if you wish to eat
some time after food is ready
AUTO
•
Suitable for cooking food that needs low
power for a longer cooking time.
•
Must be used in conjunction with HIGH
function.
•
Initially set control knob to HIGH until liquid
boils, then switch to AUTO until end of
cooking process.
•
AUTO adjusts power automatically.
•
NOTE – liquid will not boil if you use AUTO
from start of cooking
Using your Slow Cooker
•
•
•
•
•
•
•
For hygiene reasons we recommend that you
wash the removable ceramic crock in hot
soapy water, rinse and dry before use.
NOTE: When you first use your Slow Cooker,
you may notice a slight odour due to the
burning off of manufacturing residues. This
will disappear after the first use.
Ensure that you place your Slow Cooker on a
clear, flat work surface near a suitable mains
power socket.
Plug the cord into the mains power socket.
Add the ingredients of your choice.
Attach the lid. The lid should not be removed
during use. Frequent lifting of the lid during
use can delay the cooking time.
PREHEAT unit on HIGH for around 20
minutes, with inner pot in it.
•
•
•
•
•
Carefully remove inner pot and place it on a
heatproof surface. CAUTION: inner pot will
be hot after preheating.
Add ingredients to inner pot – refer to Tips
pages later in this user manual.
Set the temperature to either LOW or HIGH.
Replace inner pot into unit.
CAUTION: The LOW setting should be
used to keep food warm ONLY after
completely cooking the recipe according
to the instructions. The food must be hot
enough to prevent bacterial growth before
using the LOW setting. Do not use the
LOW setting to reheat any food, especially
if it has been refrigerated or frozen.
Care and cleaning
•
•
•
Before cleaning your Slow Cooker always
allow the unit to thoroughly cool down.
Clean the ceramic bowl in hot soapy water,
rinse and dry thoroughly.
Before cleaning the metal inner lining of the
base unit, disconnect from the mains power
supply.
•
Clean the base unit with a cloth dampened
by water only. Do not immerse the appliance
or its cord in water or any other liquid. Do not
use polish or detergents as these may
damage the finish of the outer casing.
SUPPORT AND TECHNICAL ADVICE
Goldair – New Zealand
Monday – Friday 8am-5pm
Phone +64 (0)9 917 4000
Phone 0800 232 633
[email protected]
Goldair – Australia
Monday – Friday 8am-5pm
Phone +61 (0)3 9336 4423
Phone 1300 465 324
[email protected]
Tips for Cooking in Slow Cookers
This document is intended to provide general
tips and guidelines for cooking in slow cookers also known as crockpots. These tips are not
specific to any particular brand or model of slow
cooker.
As with many appliances, practise and a
preparedness to experiment are among your
most helpful tools!
One hour on HIGH is roughly equivalent to two
hours on LOW.
Ceramic slow cooker bowls can crack if exposed
to sudden temperature changes. When
removing the bowl from your slow cooker, do not
place the bowl straight on to a cold bench; place
it on a folded tea towel or cloth. If you have had
the bowl in the refrigerator, do not place it
directly into the slow cooker from the fridge.
WHAT TO LOOK FOR IN A SLOW COOKER
FOOD SAFETY TIPS
A removable liner/cooking bowl - much easier
to clean than a non-removable one.
A non-stick liner/cooking bowl means less
elbow-grease will be required when you are
cleaning up.
NOTE: bowl will be easier to clean if you do not
leave food in it after cooking. The residual heat
in the bowl can cause food to bake on/stick if it
is left for too long.
GENERAL TIPS
Line your cooking bowl with a cooking bag for a
super-easy clean up. Or spray with a little
cooking oil.
It’s advised to cook on HIGH for the first hour to
ensure
that
food
reaches
minimum
temperatures to be safe.
Many recommend that you do not place frozen
foods in a slow cooker. Defrost before cooking.
If you are going to refrigerate food after cooking
in a slow cooker, you must remove it from the
liner/cooking pan and place it in a suitable food
storage
container.
Your
slow
cooker
liner/cooking bowl will not cool down quickly
enough and food will remain in the unsafe
temperature zone for too long and harmful
bacteria may grow.
CONVERTING TRADITIONAL OVEN TIMES TO SLOW COOKER TIMES
This is an approximate guide only. Please be familiar with your slow cooker before you leave it
unmonitored.
TRADITIONAL OVEN TIME
TIME ON LOW
TIME ON HIGH
15-30 minutes
4-6 hours
1-2 hours
30-60 minutes
6-8 hours
2-4 hours
1-3 hours
8-12 hours
4-7 hours
Tips for Cooking in Slow Cookers
COOKING TIPS
Do not fill your slow cooker more than two thirds
full. If you over fill the slow cooker, foods will not
cook properly. If the slow cooker does not have
enough food and liquid in it, food will over cook.
Foods that are immersed in liquid cook faster
and will be more moist.
Fatty foods tend to cook faster so it is wise to
remove poultry skin, excess meat fat etc. If not
removed, the fats dissolve in the cooking liquid
and can give the cooked food a texture that is
unpleasant to eat.
If you wish to thicken cooking liquid, turn the unit
to HIGH for the last half hour of cooking and
also remove the lid for this time.
Cheaper cuts of meat are better in the slow
cooker as they have less fat. However most
meats need about 8 hours of cooking on LOW;
this gives a more tender result.
Layer your ingredients so that the ones that
require more cooking are in the BOTTOM of the
slow cooker.
DO NOT lift the lid to check the food. Each time
you lift the lid, heat escapes and this can add
many minutes to your overall cooking time … as
much as 15-20 minutes per lift lid.
Resist the urge to stir unless your recipe advises
to do so. It is generally not necessary to stir
when using a slow cooker.
Minced meats are best if first browned in a
frypan on the stove top, before placing in slow
cooker.
Large pieces of meat can also be browned
before placing in slow cooker. This isn’t
absolutely necessary but browning does add
flavour and colour.
Seafood does not take long to cook and should
be added towards the end of your cooking
time … about one hour. Overcooked seafood
has a rubbery texture.
Sauteing vegetables before cooking in the slow
cooker also adds more flavour.
Soft vegetables like mushrooms, courgettes,
tomatoes etc do not take long to cook. Add them
about 45 minutes before end of cooking.
Dairy products are best added about 15-30
minutes from end of cooking, unless you are
using a recipe that has other instructions. Dairy
products tend to break down in slow cookers
and adding them at the end of cooking will help
prevent this.
Some items like cayenne pepper and tabasco
sauce can become bitter if cooked for too long.
Add these towards the end of cooking time, and
use quite small amounts.
Spices tend to lose flavour if cooked for too long
with the other ingredients so add towards end of
cooking time … during the last hour.
Herbs are best when you use whole leaves and
use about half the amount you would use for a
conventional recipe. If using ground herbs, add
them in the last hour of cooking.
If you are using a recipe that was not developed
for slow cooker use, you will need less liquid.
This is because liquids to not evaporate in the
same way that they do for other methods of
cooking. Reduce liquid by a third to a half …
unless you are cooking rice or making soup, in
which case use your recipe as is.
Dusting meat in flour before placing in slow
cooker will give you a thicker sauce.
If you are cooking at high altitudes, you need to
allow about 30 extra minutes for each hour
specified in the recipe. Legumes take about
twice as long to cook at high altitudes.
Trim excess fat off meat. Fat retains heat better
than water does so fattier foods like meat cook
faster than less fatty foods eg vegetables. If you
are cooking meat and vegetables together in
your slow cooker, try placing veges on the
bottom and sides and meat on top.
You may prefer to preheat liquids before adding
them to the inner pot.
Two year warranty
Thank you for purchasing this Goldair product. Your product is warranted against faults and manufacture
when used in normal domestic use for a period of two years. In non-domestic use Goldair limits the
voluntary warranty to three months.
Goldair undertake to repair or replace this product at no charge if found to be defective due to a
manufacturing fault during the warranty period.
This warranty excludes damage caused by misuse, neglect, shipping accident, incorrect installation, or
work carried out by anyone other than a qualified electrical service technician.
PLEASE KEEP YOUR RECEIPT AS THIS WILL HELP VERIFY YOUR WARRANTY.
The benefits given to you by this warranty are in addition to other rights and remedies available to you
under law in relation to the goods or services to which this warranty relates.
In Australia, our goods come with guarantees that cannot be excluded under the Australian Consumer
Law. You are entitled to a replacement or refund for a major failure and compensation for any other
reasonably foreseeable loss or damage. You are also entitled to have the goods repaired or replaced if the
goods fail to be of acceptable quality and the failure does not amount to a major failure.
In New Zealand this warranty is additional to the conditions and guarantees of the Consumers Guarantee
Act (1993).
Goldair – New Zealand
CDB Goldair
PO Box 100-707
N.S.M.C
Auckland
Phone +64 (0)9 917 4000
Phone 0800 232 633
www.goldair.co.nz
Goldair – Australia
CDB Goldair Australia Pty
PO Box 574
South Morang
Victoria, 3752
Phone +61 (0)3 9336 4423
Phone 1300 GOLDAIR (1300 465 324)
www.goldair.com.au
IMPORTANT: Please complete and retain this warranty card
Name ……………………………………………… Purchased from …………………………………
Address …………………………………………… Date of purchase …………………………………
………………………………………………………. Name of product …………………………………
Suburb …………………………………………… Model no ……………………………………………
Attach a copy of the purchase receipt to this warranty card
Due to continual design improvements, the product illustrated in this User Manual may differ slightly from the actual product.